离线安装ollama到服务器
搜了很多教程不满意,弄了半天才弄好,这里记录下,方便以后的人用,那个在线下载太慢,怕不是得下载到明年。
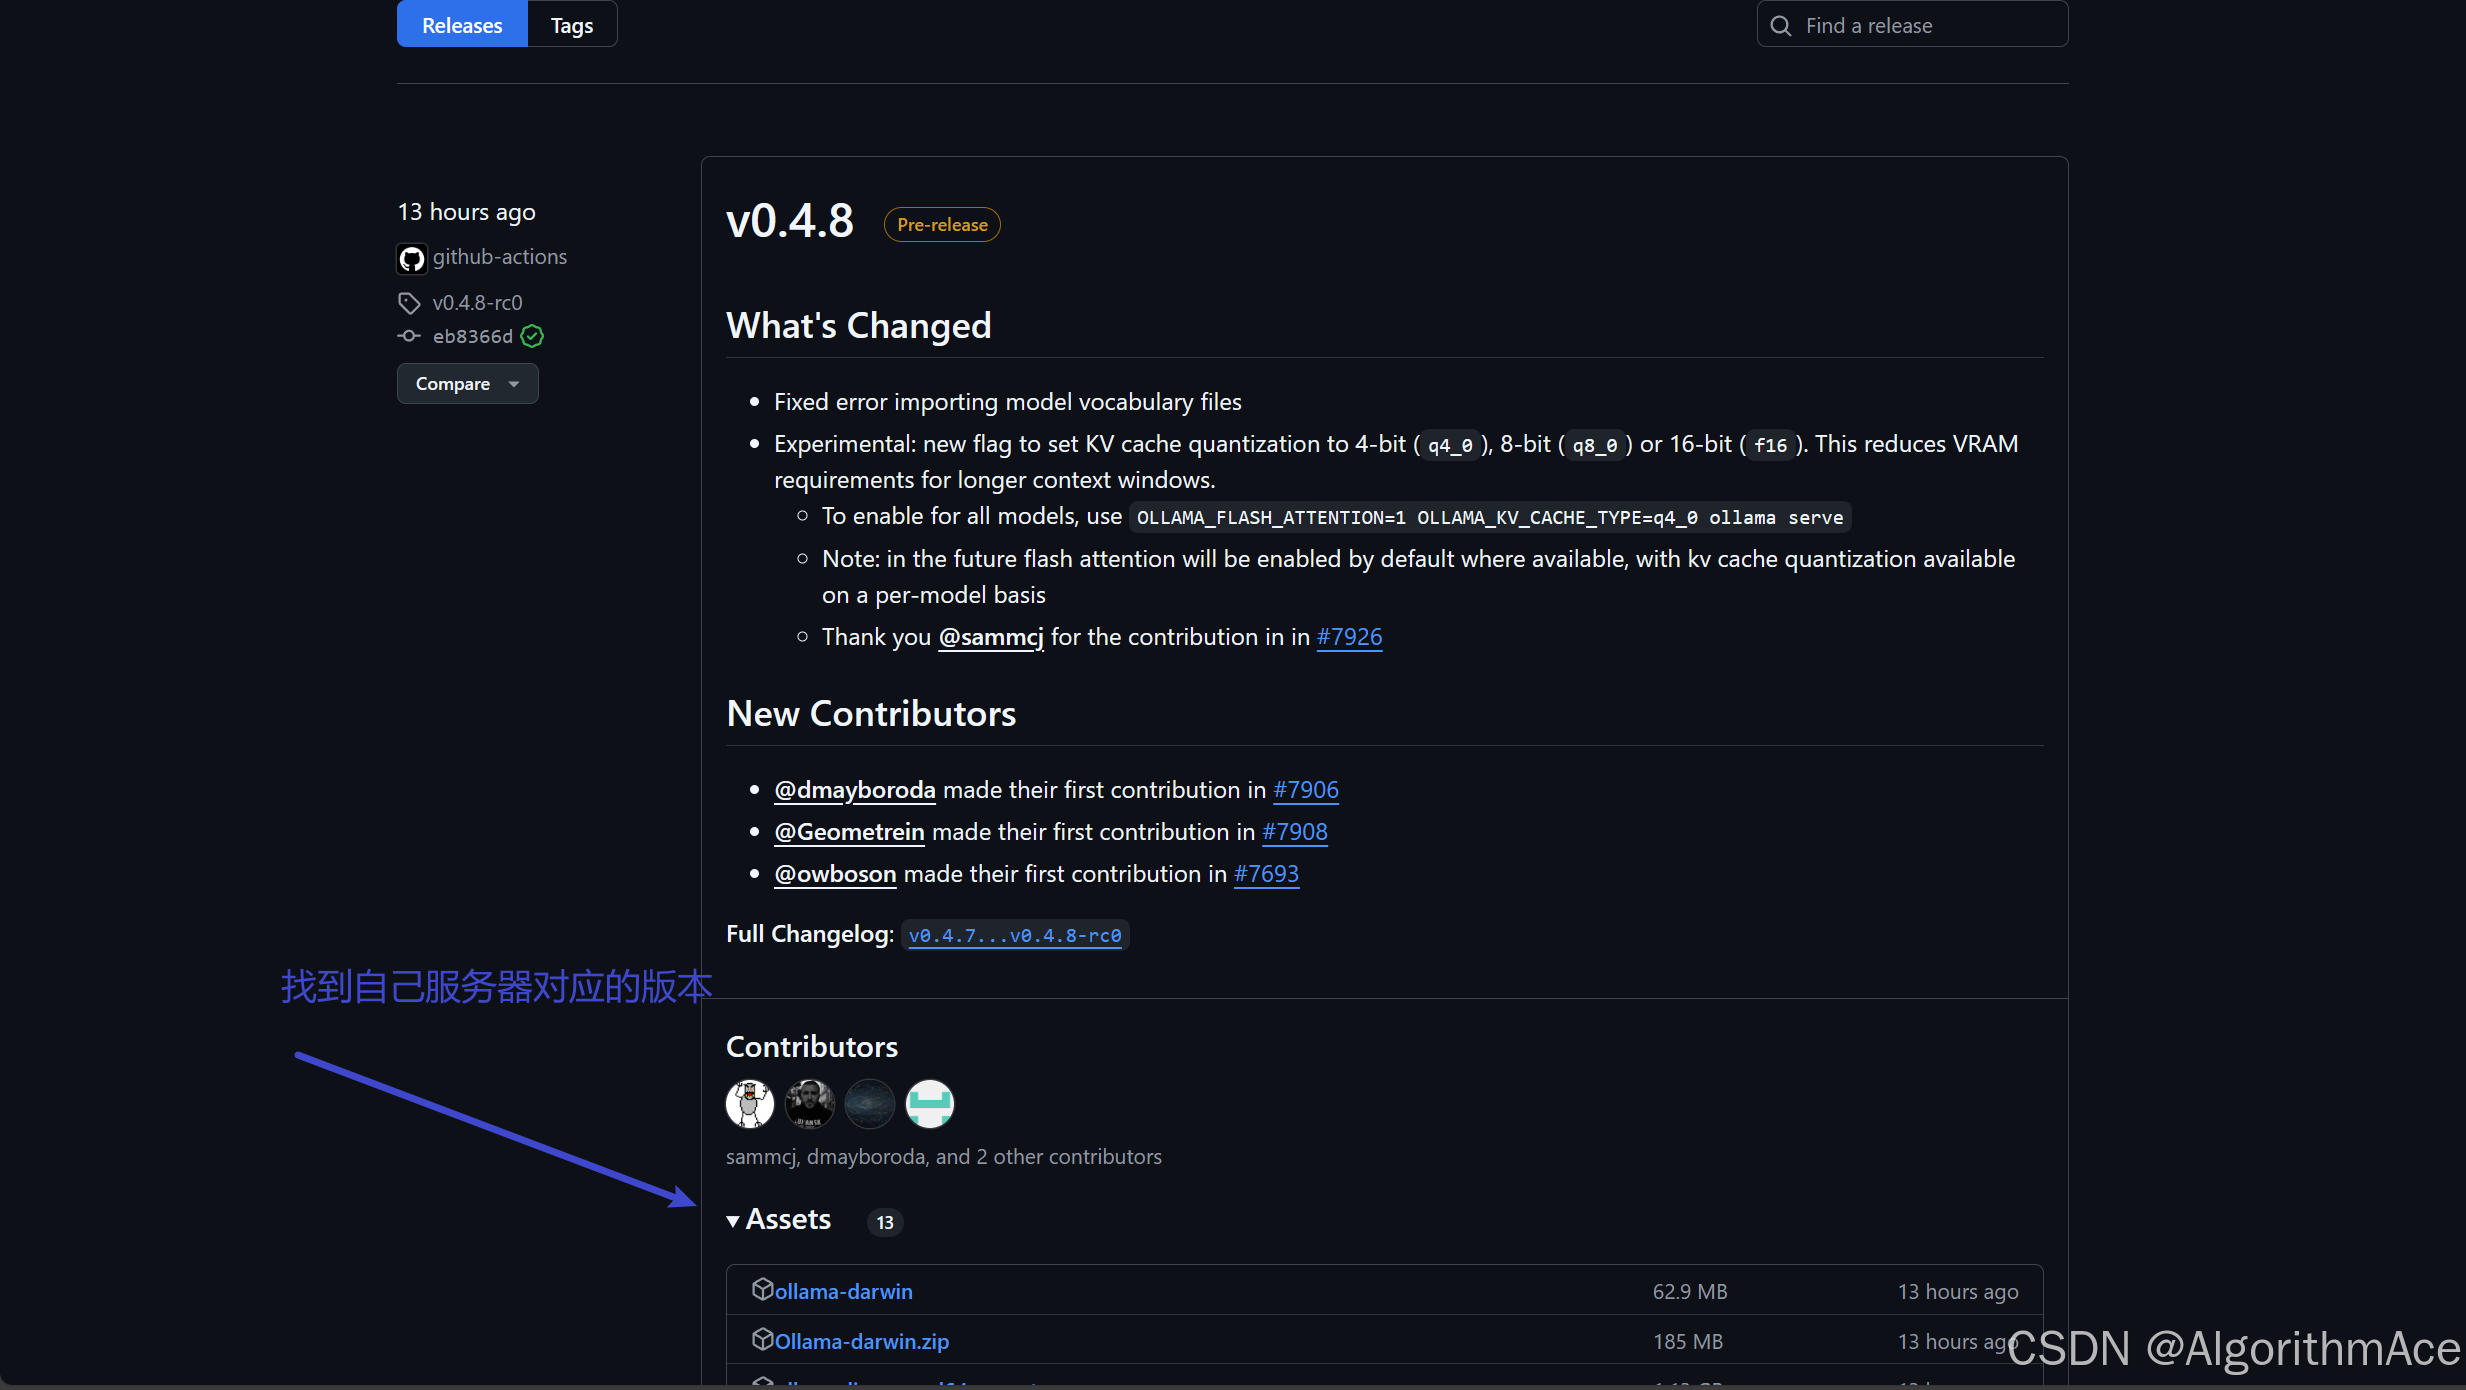
一.从官网下在liunx版的tgz安装包
Releases · ollama/ollama (github.com)
查看自己的服务器信息(参考 https://www.cnblogs.com/Casflawed/p/18525187)
- x86_64 CPU选择下载ollama-linux-amd64;aarch64|arm64 CPU选择下载ollama-linux-arm64
#查看Linux版本号
cat /proc/version
#查看cpu架构
lscpu
二.利用rz命令上传至服务器端
不知道怎么用看 如何利用Xshell上传文件到服务器-CSDN博客
三.下载官网的安装程序 https://ollama.com/install.sh 起名为insatll.sh
双击打开,我这里用vscode打开

这是官方的
#!/bin/sh
# This script installs Ollama on Linux.
# It detects the current operating system architecture and installs the appropriate version of Ollama.set -eured="$( (/usr/bin/tput bold || :; /usr/bin/tput setaf 1 || :) 2>&-)"
plain="$( (/usr/bin/tput sgr0 || :) 2>&-)"status() { echo ">>> $*" >&2; }
error() { echo "${red}ERROR:${plain} $*"; exit 1; }
warning() { echo "${red}WARNING:${plain} $*"; }TEMP_DIR=$(mktemp -d)
cleanup() { rm -rf $TEMP_DIR; }
trap cleanup EXITavailable() { command -v $1 >/dev/null; }
require() {local MISSING=''for TOOL in $*; doif ! available $TOOL; thenMISSING="$MISSING $TOOL"fidoneecho $MISSING
}[ "$(uname -s)" = "Linux" ] || error 'This script is intended to run on Linux only.'ARCH=$(uname -m)
case "$ARCH" inx86_64) ARCH="amd64" ;;aarch64|arm64) ARCH="arm64" ;;*) error "Unsupported architecture: $ARCH" ;;
esacIS_WSL2=falseKERN=$(uname -r)
case "$KERN" in*icrosoft*WSL2 | *icrosoft*wsl2) IS_WSL2=true;;*icrosoft) error "Microsoft WSL1 is not currently supported. Please use WSL2 with 'wsl --set-version <distro> 2'" ;;*) ;;
esacVER_PARAM="${OLLAMA_VERSION:+?version=$OLLAMA_VERSION}"SUDO=
if [ "$(id -u)" -ne 0 ]; then# Running as root, no need for sudoif ! available sudo; thenerror "This script requires superuser permissions. Please re-run as root."fiSUDO="sudo"
fiNEEDS=$(require curl awk grep sed tee xargs)
if [ -n "$NEEDS" ]; thenstatus "ERROR: The following tools are required but missing:"for NEED in $NEEDS; doecho "  - $NEED"doneexit 1
fifor BINDIR in /usr/local/bin /usr/bin /bin; doecho $PATH | grep -q $BINDIR && break || continue
done
OLLAMA_INSTALL_DIR=$(dirname ${BINDIR})status "Installing ollama to $OLLAMA_INSTALL_DIR"
$SUDO install -o0 -g0 -m755 -d $BINDIR
$SUDO install -o0 -g0 -m755 -d "$OLLAMA_INSTALL_DIR"
if curl -I --silent --fail --location "https://ollama.com/download/ollama-linux-${ARCH}.tgz${VER_PARAM}" >/dev/null ; thenstatus "Downloading Linux ${ARCH} bundle"curl --fail --show-error --location --progress-bar \"https://ollama.com/download/ollama-linux-${ARCH}.tgz${VER_PARAM}" | \$SUDO tar -xzf - -C "$OLLAMA_INSTALL_DIR"BUNDLE=1if [ "$OLLAMA_INSTALL_DIR/bin/ollama" != "$BINDIR/ollama" ] ; thenstatus "Making ollama accessible in the PATH in $BINDIR"$SUDO ln -sf "$OLLAMA_INSTALL_DIR/ollama" "$BINDIR/ollama"fi
elsestatus "Downloading Linux ${ARCH} CLI"curl --fail --show-error --location --progress-bar -o "$TEMP_DIR/ollama"\"https://ollama.com/download/ollama-linux-${ARCH}${VER_PARAM}"$SUDO install -o0 -g0 -m755 $TEMP_DIR/ollama $OLLAMA_INSTALL_DIR/ollamaBUNDLE=0if [ "$OLLAMA_INSTALL_DIR/ollama" != "$BINDIR/ollama" ] ; thenstatus "Making ollama accessible in the PATH in $BINDIR"$SUDO ln -sf "$OLLAMA_INSTALL_DIR/ollama" "$BINDIR/ollama"fi
fi# Check for NVIDIA JetPack systems with additional downloads
if [ -f /etc/nv_tegra_release ] ; thenif grep R36 /etc/nv_tegra_release > /dev/null ; thenstatus "Downloading JetPack 6 components"curl --fail --show-error --location --progress-bar \"https://ollama.com/download/ollama-linux-${ARCH}-jetpack6.tgz${VER_PARAM}" | \$SUDO tar -xzf - -C "$OLLAMA_INSTALL_DIR"elif grep R35 /etc/nv_tegra_release > /dev/null ; thenstatus "Downloading JetPack 5 components"curl --fail --show-error --location --progress-bar \"https://ollama.com/download/ollama-linux-${ARCH}-jetpack5.tgz${VER_PARAM}" | \$SUDO tar -xzf - -C "$OLLAMA_INSTALL_DIR"elsewarning "Unsupported JetPack version detected.  GPU may not be supported"fi
fiinstall_success() {status 'The Ollama API is now available at 127.0.0.1:11434.'status 'Install complete. Run "ollama" from the command line.'
}
trap install_success EXIT# Everything from this point onwards is optional.configure_systemd() {if ! id ollama >/dev/null 2>&1; thenstatus "Creating ollama user..."$SUDO useradd -r -s /bin/false -U -m -d /usr/share/ollama ollamafiif getent group render >/dev/null 2>&1; thenstatus "Adding ollama user to render group..."$SUDO usermod -a -G render ollamafiif getent group video >/dev/null 2>&1; thenstatus "Adding ollama user to video group..."$SUDO usermod -a -G video ollamafistatus "Adding current user to ollama group..."$SUDO usermod -a -G ollama $(whoami)status "Creating ollama systemd service..."cat <<EOF | $SUDO tee /etc/systemd/system/ollama.service >/dev/null
[Unit]
Description=Ollama Service
After=network-online.target[Service]
ExecStart=$BINDIR/ollama serve
User=ollama
Group=ollama
Restart=always
RestartSec=3
Environment="PATH=$PATH"[Install]
WantedBy=default.target
EOFSYSTEMCTL_RUNNING="$(systemctl is-system-running || true)"case $SYSTEMCTL_RUNNING inrunning|degraded)status "Enabling and starting ollama service..."$SUDO systemctl daemon-reload$SUDO systemctl enable ollamastart_service() { $SUDO systemctl restart ollama; }trap start_service EXIT;;*)warning "systemd is not running"if [ "$IS_WSL2" = true ]; thenwarning "see https://learn.microsoft.com/en-us/windows/wsl/systemd#how-to-enable-systemd to enable it"fi;;esac
}if available systemctl; thenconfigure_systemd
fi# WSL2 only supports GPUs via nvidia passthrough
# so check for nvidia-smi to determine if GPU is available
if [ "$IS_WSL2" = true ]; thenif available nvidia-smi && [ -n "$(nvidia-smi | grep -o "CUDA Version: [0-9]*\.[0-9]*")" ]; thenstatus "Nvidia GPU detected."fiinstall_successexit 0
fi# Don't attempt to install drivers on Jetson systems
if [ -f /etc/nv_tegra_release ] ; thenstatus "NVIDIA JetPack ready."install_successexit 0
fi# Install GPU dependencies on Linux
if ! available lspci && ! available lshw; thenwarning "Unable to detect NVIDIA/AMD GPU. Install lspci or lshw to automatically detect and install GPU dependencies."exit 0
ficheck_gpu() {# Look for devices based on vendor ID for NVIDIA and AMDcase $1 inlspci)case $2 innvidia) available lspci && lspci -d '10de:' | grep -q 'NVIDIA' || return 1 ;;amdgpu) available lspci && lspci -d '1002:' | grep -q 'AMD' || return 1 ;;esac ;;lshw)case $2 innvidia) available lshw && $SUDO lshw -c display -numeric -disable network | grep -q 'vendor: .* \[10DE\]' || return 1 ;;amdgpu) available lshw && $SUDO lshw -c display -numeric -disable network | grep -q 'vendor: .* \[1002\]' || return 1 ;;esac ;;nvidia-smi) available nvidia-smi || return 1 ;;esac
}if check_gpu nvidia-smi; thenstatus "NVIDIA GPU installed."exit 0
fiif ! check_gpu lspci nvidia && ! check_gpu lshw nvidia && ! check_gpu lspci amdgpu && ! check_gpu lshw amdgpu; theninstall_successwarning "No NVIDIA/AMD GPU detected. Ollama will run in CPU-only mode."exit 0
fiif check_gpu lspci amdgpu || check_gpu lshw amdgpu; thenif [ $BUNDLE -ne 0 ]; thenstatus "Downloading Linux ROCm ${ARCH} bundle"curl --fail --show-error --location --progress-bar \"https://ollama.com/download/ollama-linux-${ARCH}-rocm.tgz${VER_PARAM}" | \$SUDO tar -xzf - -C "$OLLAMA_INSTALL_DIR"install_successstatus "AMD GPU ready."exit 0fi# Look for pre-existing ROCm v6 before downloading the dependenciesfor search in "${HIP_PATH:-''}" "${ROCM_PATH:-''}" "/opt/rocm" "/usr/lib64"; doif [ -n "${search}" ] && [ -e "${search}/libhipblas.so.2" -o -e "${search}/lib/libhipblas.so.2" ]; thenstatus "Compatible AMD GPU ROCm library detected at ${search}"install_successexit 0fidonestatus "Downloading AMD GPU dependencies..."$SUDO rm -rf /usr/share/ollama/lib$SUDO chmod o+x /usr/share/ollama$SUDO install -o ollama -g ollama -m 755 -d /usr/share/ollama/lib/rocmcurl --fail --show-error --location --progress-bar "https://ollama.com/download/ollama-linux-amd64-rocm.tgz${VER_PARAM}" \| $SUDO tar zx --owner ollama --group ollama -C /usr/share/ollama/lib/rocm .install_successstatus "AMD GPU ready."exit 0
fiCUDA_REPO_ERR_MSG="NVIDIA GPU detected, but your OS and Architecture are not supported by NVIDIA.  Please install the CUDA driver manually https://docs.nvidia.com/cuda/cuda-installation-guide-linux/"
# ref: https://docs.nvidia.com/cuda/cuda-installation-guide-linux/index.html#rhel-7-centos-7
# ref: https://docs.nvidia.com/cuda/cuda-installation-guide-linux/index.html#rhel-8-rocky-8
# ref: https://docs.nvidia.com/cuda/cuda-installation-guide-linux/index.html#rhel-9-rocky-9
# ref: https://docs.nvidia.com/cuda/cuda-installation-guide-linux/index.html#fedora
install_cuda_driver_yum() {status 'Installing NVIDIA repository...'case $PACKAGE_MANAGER inyum)$SUDO $PACKAGE_MANAGER -y install yum-utilsif curl -I --silent --fail --location "https://developer.download.nvidia.com/compute/cuda/repos/$1$2/$(uname -m | sed -e 's/aarch64/sbsa/')/cuda-$1$2.repo" >/dev/null ; then$SUDO $PACKAGE_MANAGER-config-manager --add-repo https://developer.download.nvidia.com/compute/cuda/repos/$1$2/$(uname -m | sed -e 's/aarch64/sbsa/')/cuda-$1$2.repoelseerror $CUDA_REPO_ERR_MSGfi;;dnf)if curl -I --silent --fail --location "https://developer.download.nvidia.com/compute/cuda/repos/$1$2/$(uname -m | sed -e 's/aarch64/sbsa/')/cuda-$1$2.repo" >/dev/null ; then$SUDO $PACKAGE_MANAGER config-manager --add-repo https://developer.download.nvidia.com/compute/cuda/repos/$1$2/$(uname -m | sed -e 's/aarch64/sbsa/')/cuda-$1$2.repoelseerror $CUDA_REPO_ERR_MSGfi;;esaccase $1 inrhel)status 'Installing EPEL repository...'# EPEL is required for third-party dependencies such as dkms and libvdpau$SUDO $PACKAGE_MANAGER -y install https://dl.fedoraproject.org/pub/epel/epel-release-latest-$2.noarch.rpm || true;;esacstatus 'Installing CUDA driver...'if [ "$1" = 'centos' ] || [ "$1$2" = 'rhel7' ]; then$SUDO $PACKAGE_MANAGER -y install nvidia-driver-latest-dkmsfi$SUDO $PACKAGE_MANAGER -y install cuda-drivers
}# ref: https://docs.nvidia.com/cuda/cuda-installation-guide-linux/index.html#ubuntu
# ref: https://docs.nvidia.com/cuda/cuda-installation-guide-linux/index.html#debian
install_cuda_driver_apt() {status 'Installing NVIDIA repository...'if curl -I --silent --fail --location "https://developer.download.nvidia.com/compute/cuda/repos/$1$2/$(uname -m | sed -e 's/aarch64/sbsa/')/cuda-keyring_1.1-1_all.deb" >/dev/null ; thencurl -fsSL -o $TEMP_DIR/cuda-keyring.deb https://developer.download.nvidia.com/compute/cuda/repos/$1$2/$(uname -m | sed -e 's/aarch64/sbsa/')/cuda-keyring_1.1-1_all.debelseerror $CUDA_REPO_ERR_MSGficase $1 indebian)status 'Enabling contrib sources...'$SUDO sed 's/main/contrib/' < /etc/apt/sources.list | $SUDO tee /etc/apt/sources.list.d/contrib.list > /dev/nullif [ -f "/etc/apt/sources.list.d/debian.sources" ]; then$SUDO sed 's/main/contrib/' < /etc/apt/sources.list.d/debian.sources | $SUDO tee /etc/apt/sources.list.d/contrib.sources > /dev/nullfi;;esacstatus 'Installing CUDA driver...'$SUDO dpkg -i $TEMP_DIR/cuda-keyring.deb$SUDO apt-get update[ -n "$SUDO" ] && SUDO_E="$SUDO -E" || SUDO_E=DEBIAN_FRONTEND=noninteractive $SUDO_E apt-get -y install cuda-drivers -q
}if [ ! -f "/etc/os-release" ]; thenerror "Unknown distribution. Skipping CUDA installation."
fi. /etc/os-releaseOS_NAME=$ID
OS_VERSION=$VERSION_IDPACKAGE_MANAGER=
for PACKAGE_MANAGER in dnf yum apt-get; doif available $PACKAGE_MANAGER; thenbreakfi
doneif [ -z "$PACKAGE_MANAGER" ]; thenerror "Unknown package manager. Skipping CUDA installation."
fiif ! check_gpu nvidia-smi || [ -z "$(nvidia-smi | grep -o "CUDA Version: [0-9]*\.[0-9]*")" ]; thencase $OS_NAME incentos|rhel) install_cuda_driver_yum 'rhel' $(echo $OS_VERSION | cut -d '.' -f 1) ;;rocky) install_cuda_driver_yum 'rhel' $(echo $OS_VERSION | cut -c1) ;;fedora) [ $OS_VERSION -lt '39' ] && install_cuda_driver_yum $OS_NAME $OS_VERSION || install_cuda_driver_yum $OS_NAME '39';;amzn) install_cuda_driver_yum 'fedora' '37' ;;debian) install_cuda_driver_apt $OS_NAME $OS_VERSION ;;ubuntu) install_cuda_driver_apt $OS_NAME $(echo $OS_VERSION | sed 's/\.//') ;;*) exit ;;esac
fiif ! lsmod | grep -q nvidia || ! lsmod | grep -q nvidia_uvm; thenKERNEL_RELEASE="$(uname -r)"case $OS_NAME inrocky) $SUDO $PACKAGE_MANAGER -y install kernel-devel kernel-headers ;;centos|rhel|amzn) $SUDO $PACKAGE_MANAGER -y install kernel-devel-$KERNEL_RELEASE kernel-headers-$KERNEL_RELEASE ;;fedora) $SUDO $PACKAGE_MANAGER -y install kernel-devel-$KERNEL_RELEASE ;;debian|ubuntu) $SUDO apt-get -y install linux-headers-$KERNEL_RELEASE ;;*) exit ;;esacNVIDIA_CUDA_VERSION=$($SUDO dkms status | awk -F: '/added/ { print $1 }')if [ -n "$NVIDIA_CUDA_VERSION" ]; then$SUDO dkms install $NVIDIA_CUDA_VERSIONfiif lsmod | grep -q nouveau; thenstatus 'Reboot to complete NVIDIA CUDA driver install.'exit 0fi$SUDO modprobe nvidia$SUDO modprobe nvidia_uvm
fi# make sure the NVIDIA modules are loaded on boot with nvidia-persistenced
if available nvidia-persistenced; then$SUDO touch /etc/modules-load.d/nvidia.confMODULES="nvidia nvidia-uvm"for MODULE in $MODULES; doif ! grep -qxF "$MODULE" /etc/modules-load.d/nvidia.conf; thenecho "$MODULE" | $SUDO tee -a /etc/modules-load.d/nvidia.conf > /dev/nullfidone
fistatus "NVIDIA GPU ready."
install_success
然后找到这个代码片段
if curl -I --silent --fail --location "https://ollama.com/download/ollama-linux-${ARCH}.tgz${VER_PARAM}" >/dev/null ; thenstatus "Downloading Linux ${ARCH} bundle"curl --fail --show-error --location --progress-bar \"https://ollama.com/download/ollama-linux-${ARCH}.tgz${VER_PARAM}" | \$SUDO tar -xzf - -C "$OLLAMA_INSTALL_DIR"BUNDLE=1if [ "$OLLAMA_INSTALL_DIR/bin/ollama" != "$BINDIR/ollama" ] ; thenstatus "Making ollama accessible in the PATH in $BINDIR"$SUDO ln -sf "$OLLAMA_INSTALL_DIR/ollama" "$BINDIR/ollama"fi
elsestatus "Downloading Linux ${ARCH} CLI"curl --fail --show-error --location --progress-bar -o "$TEMP_DIR/ollama"\"https://ollama.com/download/ollama-linux-${ARCH}${VER_PARAM}"$SUDO install -o0 -g0 -m755 $TEMP_DIR/ollama $OLLAMA_INSTALL_DIR/ollamaBUNDLE=0if [ "$OLLAMA_INSTALL_DIR/ollama" != "$BINDIR/ollama" ] ; thenstatus "Making ollama accessible in the PATH in $BINDIR"$SUDO ln -sf "$OLLAMA_INSTALL_DIR/ollama" "$BINDIR/ollama"fi
fi
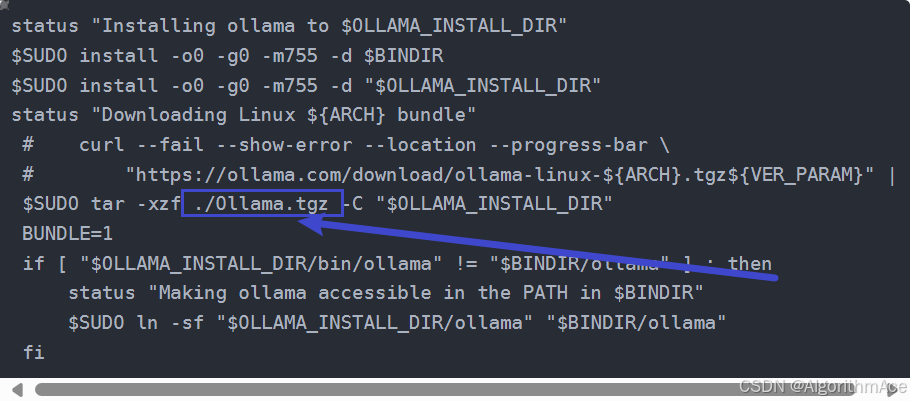
可以看到这里的路径是官网的,我们要搞成自己的
status "Installing ollama to $OLLAMA_INSTALL_DIR"
$SUDO install -o0 -g0 -m755 -d $BINDIR
$SUDO install -o0 -g0 -m755 -d "$OLLAMA_INSTALL_DIR"
status "Downloading Linux ${ARCH} bundle"#    curl --fail --show-error --location --progress-bar \#        "https://ollama.com/download/ollama-linux-${ARCH}.tgz${VER_PARAM}" | \$SUDO tar -xzf ./Ollama.tgz -C "$OLLAMA_INSTALL_DIR"BUNDLE=1if [ "$OLLAMA_INSTALL_DIR/bin/ollama" != "$BINDIR/ollama" ] ; thenstatus "Making ollama accessible in the PATH in $BINDIR"$SUDO ln -sf "$OLLAMA_INSTALL_DIR/ollama" "$BINDIR/ollama"fi
注意文件名,改成自己的,这个例子中是/home/Ollama.tgz, 依据实际情况来改(参考自https://blog.csdn.net/weixin_43278082/article/details/142357712)
把该文件用rz指令上传至服务器。
四.安装
1.解决报错
报错:
install.sh: line 4: $'\r': command not found
: invalid option 5: set: -
set: usage: set [-abefhkmnptuvxBCHP] [-o option-name] [--] [arg ...]
原因:
出现这个错误是因为你的脚本文件在Windows环境下被编辑或保存过,导致它包含了Windows风格的换行符(CRLF),而Linux系统下的脚本通常使用UNIX风格的换行符(LF)。此外,set: invalid option 5的错误提示表明脚本中可能存在语法错误。
解决:使用dos2unix工具将脚本文件的换行符从CRLF转换为LF
使用该命令下载必要的包
sudo yum install dos2unix转换
dos2unix install.sh然后在install.sh文件目录下执行
sh install.sh等待安装即可
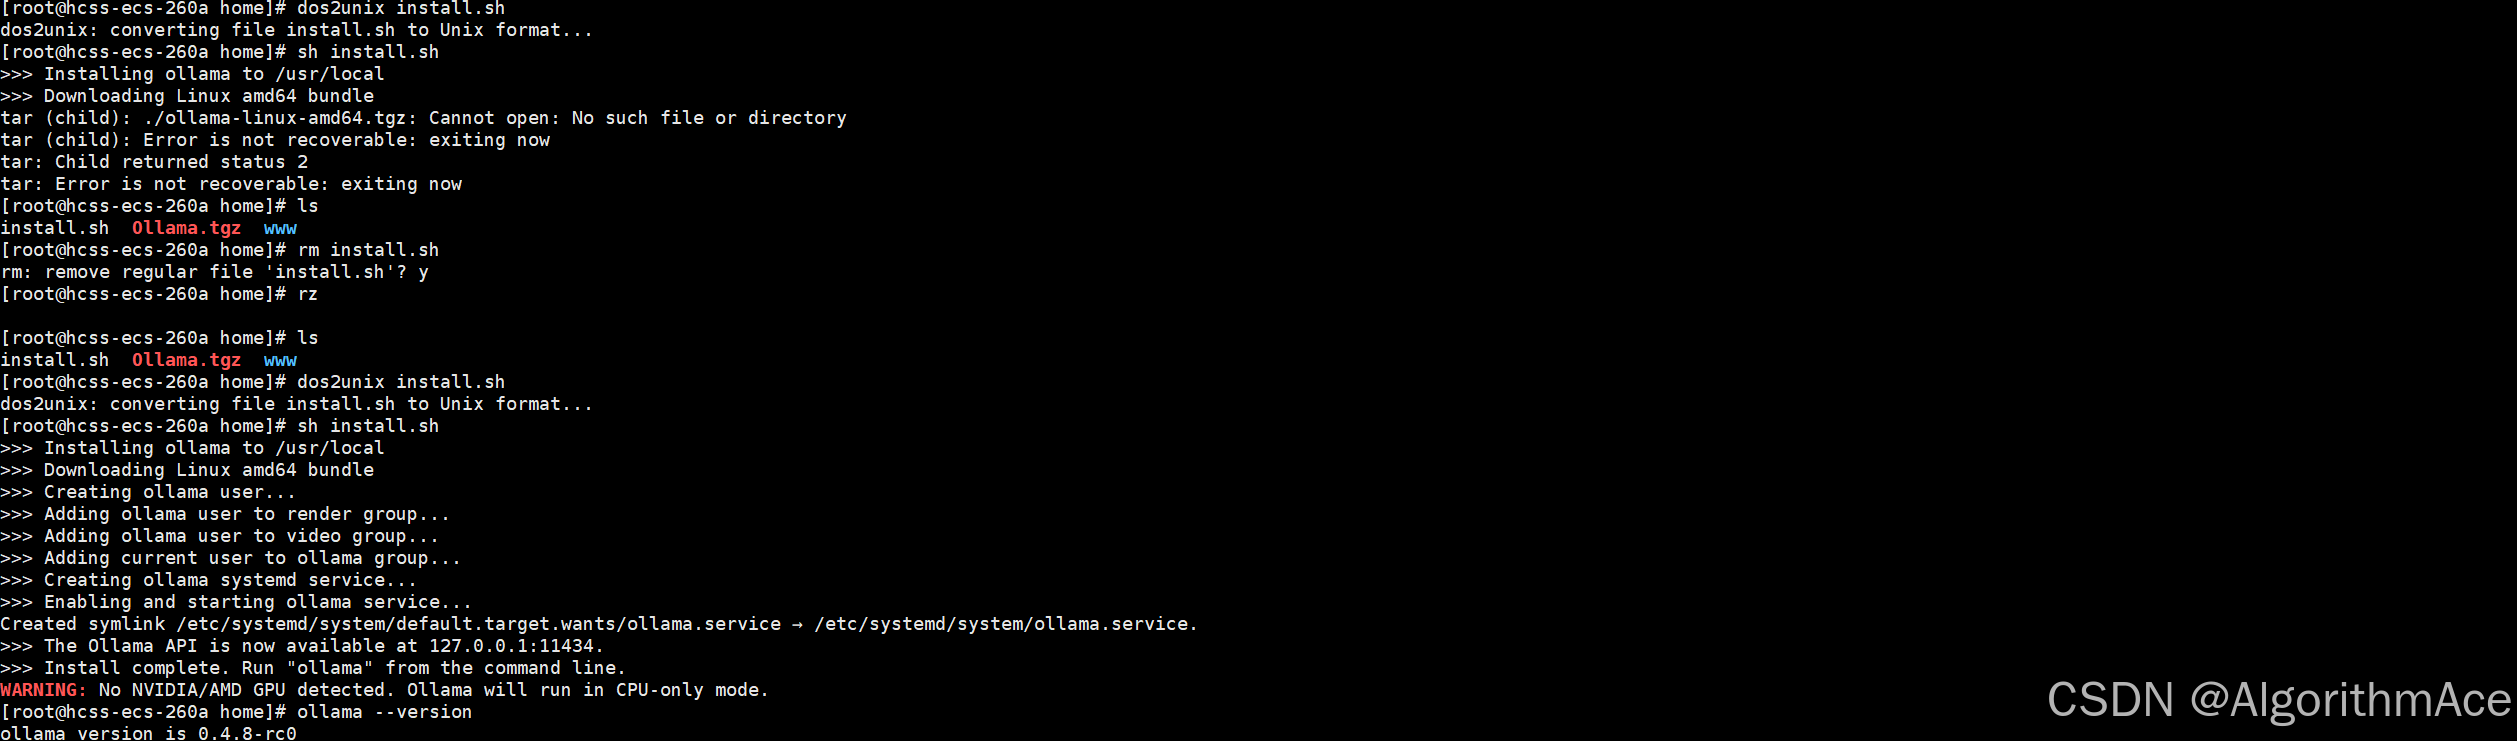
最终安装成功
相关文章:
离线安装ollama到服务器
搜了很多教程不满意,弄了半天才弄好,这里记录下,方便以后的人用,那个在线下载太慢,怕不是得下载到明年。 一.从官网下在liunx版的tgz安装包 Releases ollama/ollama (github.com) 查看自己的服务器信息(参考 https:/…...

自动化点亮LED灯之程序编写
程序编写: #!/bin/shecho none > /sys/class/leds/led1/triggerecho none > /sys/class/leds/led2/triggerecho none > /sys/class/leds/led3/triggerecho 0 > /sys/class/leds/led1/brightnessecho 0 > /sys/class/leds/led2/brightnessecho 0 >…...

linux 系列服务器 高并发下ulimit优化文档
系统输入 ulimit -a 结果如下 解除或提高 Linux 系统的最大进程数 在高并发场景中,合理设置 Linux 系统的最大进程数对于提升服务器性能至关重要。以下是具体步骤: 临时修改 ulimit 设置 可以通过 ulimit 命令临时调整当前会话的最大进程数。 查看当前…...

人工智能入门数学基础:统计推断详解
人工智能入门数学基础:统计推断详解 目录 前言 1. 统计推断的基本概念 1.1 参数估计 1.2 假设检验 2. 统计推断的应用示例 2.1 参数估计示例:样本均值和置信区间 2.2 假设检验示例:t检验 3. 统计推断在人工智能中的应用场景 总结 前言…...

Spark区分应用程序 Application、作业Job、阶段Stage、任务Task
目录 一、Spark核心概念 1、应用程序Application 2、作业Job 3、阶段Stage 4、任务Task 二、示例 一、Spark核心概念 在Apache Spark中,有几个核心概念用于描述应用程序的执行流程和组件,包括应用程序 Application、作业Job、阶段Stage、任务Task…...

【Liunx篇】基础开发工具 - yum
文章目录 🌵一.Liunx下安装软件的方案🐾1.源代码安装🐾2.rpm包安装🐾3.包管理器进行安装 🌵二.软件包管理器-yum🌵三.yum的具体操作🐾1.查看软件包🐾2.安装软件包🐾3.卸载…...

docker学习笔记(五)--docker-compose
文章目录 常用命令docker-compose是什么yml配置指令详解versionservicesimagebuildcommandportsvolumesdepends_on docker-compose.yml文件编写 常用命令 命令说明docker-compose up启动所有docker-compose服务,通常加上-d选项,让其运行在后台docker-co…...
电子商务人工智能指南 4/6 - 内容理解
介绍 81% 的零售业高管表示, AI 至少在其组织中发挥了中等至完全的作用。然而,78% 的受访零售业高管表示,很难跟上不断发展的 AI 格局。 近年来,电子商务团队加快了适应新客户偏好和创造卓越数字购物体验的需求。采用 AI 不再是一…...

Hadoop3集群实战:从零开始的搭建之旅
目录 一、概念 1.1 Hadoop是什么 1.2 历史 1.3 三大发行版本(了解) 1.4 优势 1.5 组成💗 1.6 HDFS架构 1.7 YARN架构 1.8 MapReduce概述 1.9 HDFS\YARN\MapReduce关系 二、环境准备 2.1 准备模版虚拟机 2.2 安装必要软件 2.3 安…...

Kotlin设计模式之桥接模式
桥接模式用于将抽象部分与实现部分分离,使它们可以独立变化。Kotlin中可以通过接口和抽象类来实现桥接模式。以下是桥接模式的实现方法: 一. 基本桥接模式 在这种模式中,定义一个抽象部分和一个实现部分,通过组合将它们连接起来…...

详解组合模式
引言 有一种情况,当一组对象具有“整体—部分”关系时,如果我们处理其中一个对象或对象组合(区别对待),就可能会出现牵一发而动全身的情况,造成代码复杂。这个时候,组合模式就是一种可以用一致的…...

【系统架构设计师论文】云上自动化运维及其应用
随着云计算技术的迅猛发展,企业对云资源的需求日益增长。为了应对这一挑战,云上自动化运维(CloudOps)应运而生,它结合了DevOps理念和技术,通过自动化工具和流程来提高云环境的管理效率和服务质量。本文将探讨云上自动化运维的主要衡量指标,并详细介绍一个实际项目中如何…...

交换排序----快速排序
快速排序 快速排序是一种高效的排序算法,它采用分治法策略,将数组分为较小和较大的两个子数组,然后递归排序两个子数组。 快速排序是Hoare于1962年提出的一种二叉树结构的交换排序方法,其基本思想为:任取待排序元素序…...

ES 与 MySQL 在较大数据量下查询性能对比
在进行数据查询性能测试的过程中,我的同事幺加明对 ES(Elasticsearch)和 MySQL 进行了相对较大数据量的测试,并整理了相关结果。在得到其授权的情况下,我将此对比案例分享给大家,在此再次向幺加明表示感谢。…...

C# 新语法中的字符串内插$和{}符号用法详解
自C#6.0开始提供一个新的语法糖,即"$" 符号,配合“{}”使用,它的作用除了是对String.format的简化,还可设置其格式模板,实现了对字符串的拼接优化。 语法格式: $"string {变量表达式}” 语…...

Nacos源码学习-本地环境搭建
本文主要记录如何在本地搭建Nacos调试环境来进一步学习其源码,如果你也刚好刷到这篇文章,希望对你有所帮助。 1、本地环境准备 Maven: 3.5.4 Java: 1.8 开发工具:idea 版本控制工具: git 2、下载源码 官方仓库地址 :https://git…...

windows 好工具
Windows文件夹目录大小分析工具WizTree...
计算机运行时提示错误弹窗“由于找不到 quazip.dll,无法继续执行代码。”是什么原因?“quazip.dll文件缺失”要怎么解决?
计算机运行时错误解析:解决“quazip.dll缺失”问题指南 在软件开发和日常计算机使用中,我们经常会遇到各种运行时错误。今天,我们将深入探讨一个常见的错误提示:“由于找不到quazip.dll,无法继续执行代码。”这一弹窗…...

创造未来:The Sandbox 创作者训练营如何赋能全球创造者
创作者训练营让创造者有能力打造下一代数字体验。通过促进合作和提供尖端工具,The Sandbox 计划确保今天的元宇宙是由一个个创造者共同打造。 2024 年 5 月,The Sandbox 推出了「创作者训练营」系列,旨在重新定义数字创作。「创作者训练营」系…...

R语言对简·奥斯汀作品中人物对话的情感分析
项目背景 客户是一家文学研究机构,他们希望通过对简奥斯汀作品中人物对话的情感分析,深入了解作品中人物的情感变化和故事情节的发展。因此,他们委托你进行一项情感分析项目,利用“janeaustenr”包中的数据集来构建情感分析模型。…...

从COCO到Cityscapes:实例分割指标mAP和mIOU在不同数据集上的表现差异与陷阱
从COCO到Cityscapes:实例分割指标mAP和mIOU在不同数据集上的表现差异与陷阱 当你在COCO数据集上训练的Mask R-CNN模型取得了0.85的mAP,满怀信心地将其部署到自动驾驶项目的Cityscapes数据集上时,却发现mIOU从预期的0.75骤降到0.52——这种&qu…...

终极Gmail桌面体验:告别浏览器标签混乱,拥抱高效邮件管理
终极Gmail桌面体验:告别浏览器标签混乱,拥抱高效邮件管理 【免费下载链接】gmail-desktop :postbox: Gmail desktop app for macOS, Windows & Linux (formerly Gmail Desktop) 项目地址: https://gitcode.com/gh_mirrors/gm/gmail-desktop 厌…...

前端工程化19:微前端架构实战,大型中台项目拆分落地方案
前端工程化19:微前端架构实战,大型中台项目拆分落地方案 文章目录 前端工程化19:微前端架构实战,大型中台项目拆分落地方案 前言 一、微前端核心概念 1. 什么是微前端 2. 核心优势 3. 企业主流使用场景 二、主流微前端方案选型对比 三、整体项目架构划分 四、实战搭建 Qian…...

AI Agent Harness Engineering 与组织结构重塑:未来公司将变成什么样
AI Agent Harness Engineering 与组织结构重塑:未来公司将变成什么样 摘要/引言 你有没有在深夜刷到过这样的“科技黑话式”创业视频?创始人拍着桌子喊:“我们公司90%的活都是AI干的!产品上线从3个月缩短到3天!利润率翻了10倍!”旁边的工位要么是空的,要么坐着手忙脚乱…...

KMS_VL_ALL_AIO:一站式智能激活工具,彻底解决Windows与Office激活难题
KMS_VL_ALL_AIO:一站式智能激活工具,彻底解决Windows与Office激活难题 【免费下载链接】KMS_VL_ALL_AIO Smart Activation Script 项目地址: https://gitcode.com/gh_mirrors/km/KMS_VL_ALL_AIO KMS_VL_ALL_AIO是一款开源的智能激活脚本ÿ…...

告别本地调试:手把手教你将Flink Java应用打包成JAR并提交到YARN集群
从IDE到YARN集群:Flink Java应用全流程部署实战指南 当你在IntelliJ IDEA中完成了Flink流处理程序的调试,看着本地控制台输出的结果一切正常时,接下来的挑战才刚刚开始——如何将这个精心编写的程序部署到真实的分布式环境中运行?…...
,搞懂设备插上后到底经历了什么)
别再只盯着USB3.0速度了!深入链路训练状态机(LTSSM),搞懂设备插上后到底经历了什么
USB3.0链路训练状态机:从插入到识别的技术全景解析 当我们将一个USB3.0设备插入电脑时,那个短暂的"识别"过程背后,隐藏着一套精密的数字握手协议。这个看似简单的动作,实际上触发了物理层到协议层的多阶段协同工作&…...
)
告别Qt默认英文!3分钟搞定QMessageBox按钮中文显示(附完整代码示例)
3分钟实现QMessageBox按钮中文显示的实战指南 刚接触Qt开发的程序员经常会遇到一个尴尬问题——精心设计的界面突然弹出英文按钮的对话框。这种"半中半英"的体验在交付给国内客户时尤为明显。今天我们就来解决这个看似简单却困扰很多开发者的问题,无需复杂…...

初创公司利用taotoken token plan在ai原型开发期控制成本
🚀 告别海外账号与网络限制!稳定直连全球优质大模型,限时半价接入中。 👉 点击领取海量免费额度 初创公司利用 Taotoken Token Plan 在 AI 原型开发期控制成本 对于一家处于产品原型快速迭代阶段的 AI 初创公司而言,技…...

播客内容找不到源头?Perplexity深度索引机制解析,7类冷门播客源自动唤醒术
更多请点击: https://codechina.net 第一章:播客内容找不到源头?Perplexity深度索引机制解析,7类冷门播客源自动唤醒术 Perplexity 的播客内容发现能力并非依赖传统 RSS 聚合或平台 API 抓取,而是通过其自研的深度索引…...