第五节:GLM-4v-9b模型model加载源码解读(模型相关参数方法解读)
文章目录
- 前言
- 一、GLM-4v-9b模型model加载源码解读
- 1、GLM-4v-9b模型model加载主函数源码
- 2、GLM-4v-9b模型model加载源码源码解读
- 3、GLM-4v-9b自定义模型类源码解读
- 二、基于GLM-4v-9b模型获取模型输入参数等内容源码解读(from_pretrained-->huggingface)
- 1、from_pretrained函数参数解读(huggingface)
- 2、config文件路径获取(huggingface)
- 3、adapter_config文件路径获取与加载(huggingface)
- 4、config文件方法获取
- 1、config源码
- 2、from_pretrained函数kwargs参数传递
- 3、config内容获取
- config加工源码调用
- AutoConfig.from_pretrained函数源码内容
- AutoConfig.from_pretrained的PretrainedConfig.get_config_dict函数源码解读
- config的类class加载源码解读
- 4、小节总结
前言
清华智普的GLM-4v-9b模型,作为优化的多模态大模型,特别适用于国内应用场景,解决了国外模型本地化不足的问题。本专栏提供环境安装、数据处理、视觉与语言模型源码理解,并基于Hugging Face重构GLM模型搭建教程,帮助理解、修改和应用GLM墨西哥,指导搭建多模态大模型,帮助读者自由搭建与修改大模型。本节给出GLM-4-9B模型加载相关参数获取方法源码解读内容。
第一节:GLM-4v-9B大模型安装、推理与训练详细教程
第二节:GLM-4v-9B数据加载源码解读
第三节:GLM-4v-9B数据加载之huggingface数据加载方法教程(通用大模型数据加载实列)
第四节:GLM-4v-9b模型的tokenizer源码解读
第五节:GLM-4v-9b模型model加载源码解读(模型相关参数方法解读)
第六节:GLM-4v-9b模型加载源码解读(模型加载方法解读)
第七节:GLM-4v-9b模型的视觉模型源码解读
第八节:GLM-4v-9b模型的大语言模型源码解读(ChatGLMForConditionalGeneration)
第九节:通过Debug解析ChatGLMForConditionalGeneration的数据流,理解GLM-4v-9b模型架构
第十节:通过Debug解析ChatGLMModel的数据流,理解视觉与语言模型结合架构
第十一节:利用huggingface重构GLM-4v-9B模型数据处理代码Demo
第十二节:利用huggingface重构GLM-4v-9B训练模型代码Demo
第十一、十二节是在理解GLM-4v-9B模型后,使用huggignface重新构建/搭建GLM-4v-9B模型,使读者能自由构建多模态大模型!
本节给出GLM-4v-9b模型model加载,而加载使用huggingface方法,是十分简单,然而huggingface源码确为麻烦。为此,本节以glm的model加载示例重点解读huggingface加载model源码。该小节主要解释,模型加载前准备工作,特别需要知道使用下面代码可以完成自定义模型加载:
"auto_map": {"AutoConfig": "configuration_chatglm.ChatGLMConfig","AutoModel": "modeling_chatglm.ChatGLMForConditionalGeneration","AutoModelForCausalLM": "modeling_chatglm.ChatGLMForConditionalGeneration","AutoModelForSeq2SeqLM": "modeling_chatglm.ChatGLMForConditionalGeneration","AutoModelForSequenceClassification": "modeling_chatglm.ChatGLMForSequenceClassification"},
一、GLM-4v-9b模型model加载源码解读
我们解读下model加载流程吧,实际这个部分与huggingface相关,我们先给出与huggingface加载相关源码
1、GLM-4v-9b模型model加载主函数源码
来源:finetune_demo/finetune_vision.py-->load_tokenizer_and_model函数
我给出GLM-4v-9b模型加载函数,其主要是调用huggingface内容,我给出主函数加载源码如下:
def load_tokenizer_and_model(model_dir: str,peft_config: Optional[PeftConfig] = None,
):tokenizer = AutoTokenizer.from_pretrained(model_dir, trust_remote_code=True)if peft_config is not None:model = AutoModelForCausalLM.from_pretrained(model_dir,trust_remote_code=True,empty_init=False,use_cache=False,torch_dtype=torch.bfloat16,  # Must use BFloat 16# cache_dir = '/extend_disk/disk3/tj/GLM-4V-9B/GLM-4-main/THUDM/cache_dir')model = get_peft_model(model, peft_config)model.print_trainable_parameters()else:model = AutoModelForCausalLM.from_pretrained(model_dir,trust_remote_code=True,empty_init=False,use_cache=False,torch_dtype=torch.bfloat16)return tokenizer, model
2、GLM-4v-9b模型model加载源码源码解读
来源:finetune_demo/finetune_vision.py-->load_tokenizer_and_model函数
实际模型使用huggingface的AutoModelForCausalLM.from_pretrained来构建,而get_peft_model是高效微调使用函数,也就是模型加载也是比较简单,其主要还是huggingface内容源码解读,我将后面重点解读,而GLM-4v-9b源码如下:
if peft_config is not None:model = AutoModelForCausalLM.from_pretrained(model_dir,trust_remote_code=True,empty_init=False,use_cache=False,torch_dtype=torch.bfloat16  # Must use BFloat 16)model = get_peft_model(model, peft_config)model.print_trainable_parameters()
else:model = AutoModelForCausalLM.from_pretrained(model_dir,trust_remote_code=True,empty_init=False,use_cache=False,torch_dtype=torch.bfloat16)
3、GLM-4v-9b自定义模型类源码解读
在权重文件中有个config.json文件,这也是huggingface最重要配置文件。该文件有个参数auto_map"字典,里面包含了很多方法,和之前tokenizer加载自定义方法有点类似。auto_map有AutoModel等内容,用来加载模型,列如"AutoModel": "modeling_chatglm.ChatGLMForConditionalGeneration"就是在modeling_chatglm.py文件中加载 ChatGLMForConditionalGeneration类。我给出json这个文件内容如下。
"auto_map": {"AutoConfig": "configuration_chatglm.ChatGLMConfig","AutoModel": "modeling_chatglm.ChatGLMForConditionalGeneration","AutoModelForCausalLM": "modeling_chatglm.ChatGLMForConditionalGeneration","AutoModelForSeq2SeqLM": "modeling_chatglm.ChatGLMForConditionalGeneration","AutoModelForSequenceClassification": "modeling_chatglm.ChatGLMForSequenceClassification"},
我也给出GLM-4v-9b自定义ChatGLMForConditionalGeneration类部分内容,如下:
class ChatGLMForConditionalGeneration(ChatGLMPreTrainedModel):def __init__(self, config: ChatGLMConfig, empty_init=True, device=None):super().__init__(config)self.max_sequence_length = config.max_lengthself.transformer = ChatGLMModel(config, empty_init=empty_init, device=device)self.config = configdef _update_model_kwargs_for_generation(self,outputs: ModelOutput,model_kwargs: Dict[str, Any],is_encoder_decoder: bool = False,) -> Dict[str, Any]:# update past_key_valuescache_name, cache = self._extract_past_from_model_output(outputs)model_kwargs[cache_name] = cache# update attention maskif "attention_mask" in model_kwargs:attention_mask = model_kwargs["attention_mask"]model_kwargs["attention_mask"] = torch.cat([attention_mask, attention_mask.new_ones((attention_mask.shape[0], 1))], dim=-1)# update position idsif "position_ids" in model_kwargs:position_ids = model_kwargs["position_ids"]new_position_id = position_ids[..., -1:].clone()new_position_id += 1model_kwargs["position_ids"] = torch.cat([position_ids, new_position_id], dim=-1)model_kwargs["is_first_forward"] = Falsereturn model_kwargs
二、基于GLM-4v-9b模型获取模型输入参数等内容源码解读(from_pretrained–>huggingface)
来源:transforms/models/auto/auto_factory.py-->class _BaseAutoModelClass-->from_pretrained函数
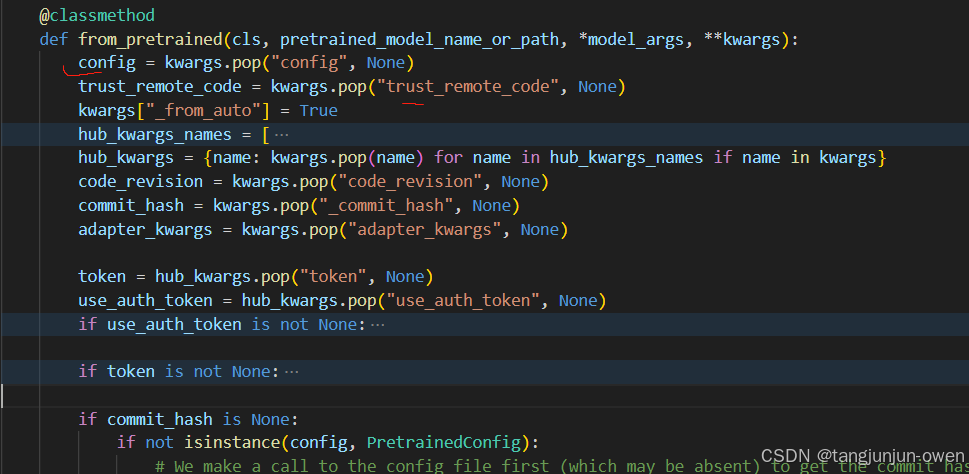
1、from_pretrained函数参数解读(huggingface)
这里我需要说明from_pretrained(cls, pretrained_model_name_or_path, *model_args, **kwargs)参数,特别是kwargs可以直接提供对应参数,如config文件,而from_pretrained内部如下图:
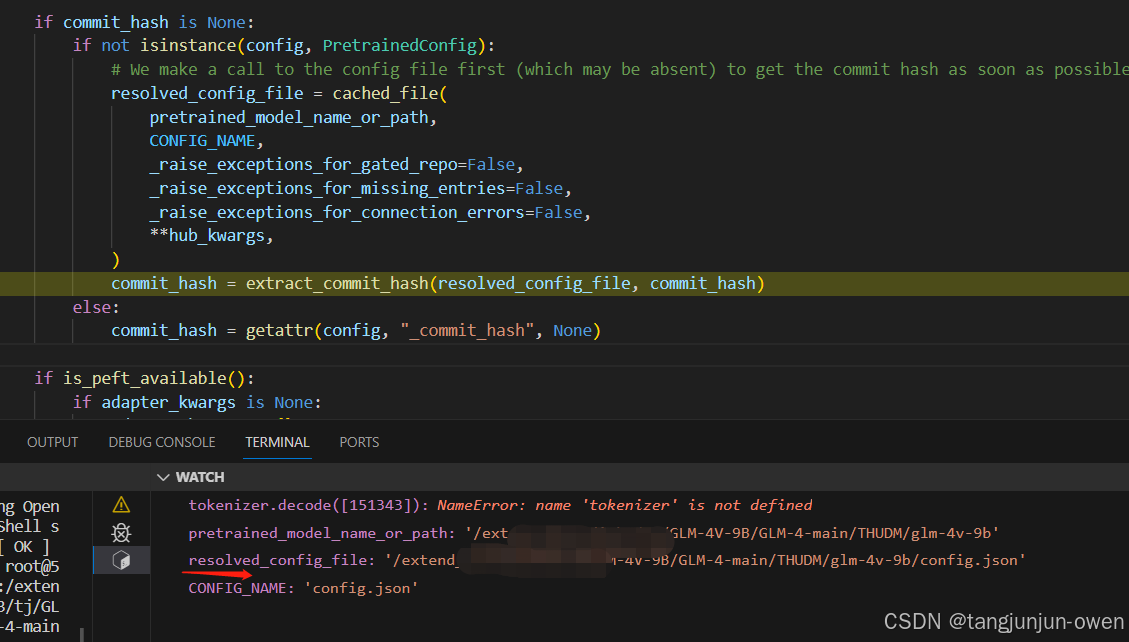
2、config文件路径获取(huggingface)
通过以下代码就可以获取config文件路径,给了resolved_config_file变量
if commit_hash is None:if not isinstance(config, PretrainedConfig):# We make a call to the config file first (which may be absent) to get the commit hash as soon as possibleresolved_config_file = cached_file(pretrained_model_name_or_path,CONFIG_NAME,_raise_exceptions_for_gated_repo=False,_raise_exceptions_for_missing_entries=False,_raise_exceptions_for_connection_errors=False,**hub_kwargs,)commit_hash = extract_commit_hash(resolved_config_file, commit_hash)else:commit_hash = getattr(config, "_commit_hash", None)如图显示如下:
3、adapter_config文件路径获取与加载(huggingface)
这个代码是类似lora方法获得内容加载,首先是加载adapter_config.josn文件,该文件也是在pretrained_model_name_or_path路径中存在,使用find_adapter_config_file函数来获取adapter_config.json路径,其源码如下:
if is_peft_available():if adapter_kwargs is None:adapter_kwargs = {}if token is not None:adapter_kwargs["token"] = tokenmaybe_adapter_path = find_adapter_config_file(pretrained_model_name_or_path, _commit_hash=commit_hash, **adapter_kwargs)if maybe_adapter_path is not None:with open(maybe_adapter_path, "r", encoding="utf-8") as f:adapter_config = json.load(f)adapter_kwargs["_adapter_model_path"] = pretrained_model_name_or_pathpretrained_model_name_or_path = adapter_config["base_model_name_or_path"]
如果存在adapter_config.json路径就执行with open(maybe_adapter_path, "r", encoding="utf-8") as f 获得其参数。
4、config文件方法获取
1、config源码
我们给出整体源码代码,如下:
if not isinstance(config, PretrainedConfig):kwargs_orig = copy.deepcopy(kwargs)# ensure not to pollute the config object with torch_dtype="auto" - since it's# meaningless in the context of the config object - torch.dtype values are acceptableif kwargs.get("torch_dtype", None) == "auto":_ = kwargs.pop("torch_dtype")# to not overwrite the quantization_config if config has a quantization_configif kwargs.get("quantization_config", None) is not None:_ = kwargs.pop("quantization_config")config, kwargs = AutoConfig.from_pretrained(pretrained_model_name_or_path,return_unused_kwargs=True,trust_remote_code=trust_remote_code,code_revision=code_revision,_commit_hash=commit_hash,**hub_kwargs,**kwargs,)# if torch_dtype=auto was passed here, ensure to pass it onif kwargs_orig.get("torch_dtype", None) == "auto":kwargs["torch_dtype"] = "auto"if kwargs_orig.get("quantization_config", None) is not None:kwargs["quantization_config"] = kwargs_orig["quantization_config"]
kwargs存在quantization_config与torch_dtype会直接剔除,共下面函数调用。
2、from_pretrained函数kwargs参数传递
仅接着,from_pretrained函数的参数kwargs将传递,如下代码:
kwargs_orig = copy.deepcopy(kwargs)
3、config内容获取
config加工源码调用
获得config函数,使用以下源码,如下:
config, kwargs = AutoConfig.from_pretrained(pretrained_model_name_or_path, # 模型路径return_unused_kwargs=True,trust_remote_code=trust_remote_code,code_revision=code_revision,_commit_hash=commit_hash,**hub_kwargs,**kwargs,)AutoConfig.from_pretrained函数源码内容
来源:transforms/models/auto/configuration_auto.py-->class AutoConfig-->from_pretrained函数
我们继续解读AutoConfig.from_pretrained函数所有源码,如下:
@classmethod
@replace_list_option_in_docstrings()
def from_pretrained(cls, pretrained_model_name_or_path, **kwargs):r"""..."""use_auth_token = kwargs.pop("use_auth_token", None)if use_auth_token is not None:warnings.warn("The `use_auth_token` argument is deprecated and will be removed in v5 of Transformers. Please use `token` instead.",FutureWarning,)if kwargs.get("token", None) is not None:raise ValueError("`token` and `use_auth_token` are both specified. Please set only the argument `token`.")kwargs["token"] = use_auth_tokenkwargs["_from_auto"] = Truekwargs["name_or_path"] = pretrained_model_name_or_pathtrust_remote_code = kwargs.pop("trust_remote_code", None)code_revision = kwargs.pop("code_revision", None)config_dict, unused_kwargs = PretrainedConfig.get_config_dict(pretrained_model_name_or_path, **kwargs)has_remote_code = "auto_map" in config_dict and "AutoConfig" in config_dict["auto_map"]has_local_code = "model_type" in config_dict and config_dict["model_type"] in CONFIG_MAPPINGtrust_remote_code = resolve_trust_remote_code(trust_remote_code, pretrained_model_name_or_path, has_local_code, has_remote_code)if has_remote_code and trust_remote_code:class_ref = config_dict["auto_map"]["AutoConfig"]config_class = get_class_from_dynamic_module(class_ref, pretrained_model_name_or_path, code_revision=code_revision, **kwargs)if os.path.isdir(pretrained_model_name_or_path):config_class.register_for_auto_class()return config_class.from_pretrained(pretrained_model_name_or_path, **kwargs)elif "model_type" in config_dict:try:config_class = CONFIG_MAPPING[config_dict["model_type"]]except KeyError:raise ValueError(f"The checkpoint you are trying to load has model type `{config_dict['model_type']}` ""but Transformers does not recognize this architecture. This could be because of an ""issue with the checkpoint, or because your version of Transformers is out of date.")return config_class.from_dict(config_dict, **unused_kwargs)else:# Fallback: use pattern matching on the string.# We go from longer names to shorter names to catch roberta before bert (for instance)for pattern in sorted(CONFIG_MAPPING.keys(), key=len, reverse=True):if pattern in str(pretrained_model_name_or_path):return CONFIG_MAPPING[pattern].from_dict(config_dict, **unused_kwargs)raise ValueError(f"Unrecognized model in {pretrained_model_name_or_path}. "f"Should have a `model_type` key in its {CONFIG_NAME}, or contain one of the following strings "f"in its name: {', '.join(CONFIG_MAPPING.keys())}")
AutoConfig.from_pretrained的PretrainedConfig.get_config_dict函数源码解读
简单说就是读取路径config文件内容,重要代码如下:
config_dict, unused_kwargs = PretrainedConfig.get_config_dict(pretrained_model_name_or_path, **kwargs)
传递路径pretrained_model_name_or_path变量中,通过PretrainedConfig.get_config_dict函数可以直接获得config.json文件内容与其它unused_kwargs 内容,而unused_kwargs就是kwargs内容。如下图所示:
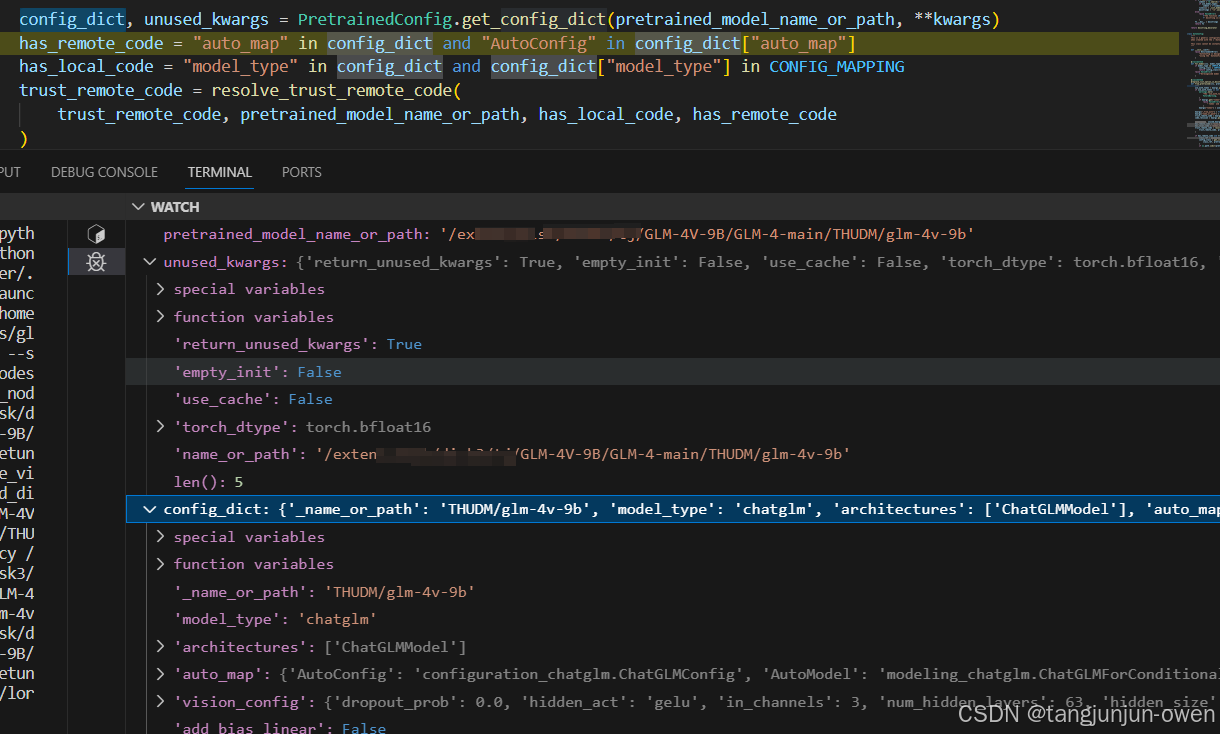
而unused_kwargs来源kwargs,但有些参数被剔除了pop,如下图所示:

config的类class加载源码解读
这里就很关键了,我们需要加载config对应class方法了,当然你可以自己继承huggingface构建一个自己想处理的config方法class,也可以调用已有的。我们来看下源代码如下:
if has_remote_code and trust_remote_code:class_ref = config_dict["auto_map"]["AutoConfig"]config_class = get_class_from_dynamic_module(class_ref, pretrained_model_name_or_path, code_revision=code_revision, **kwargs)if os.path.isdir(pretrained_model_name_or_path):config_class.register_for_auto_class()return config_class.from_pretrained(pretrained_model_name_or_path, **kwargs)
elif "model_type" in config_dict:try:config_class = CONFIG_MAPPING[config_dict["model_type"]]except KeyError:raise ValueError(f"The checkpoint you are trying to load has model type `{config_dict['model_type']}` ""but Transformers does not recognize this architecture. This could be because of an ""issue with the checkpoint, or because your version of Transformers is out of date.")return config_class.from_dict(config_dict, **unused_kwargs)
else:# Fallback: use pattern matching on the string.# We go from longer names to shorter names to catch roberta before bert (for instance)for pattern in sorted(CONFIG_MAPPING.keys(), key=len, reverse=True):if pattern in str(pretrained_model_name_or_path):return CONFIG_MAPPING[pattern].from_dict(config_dict, **unused_kwargs)
①、如果config存在auto_map字典的AutoConfig内容
config.json的auto_map如下所示内容:
"auto_map": {"AutoConfig": "configuration_chatglm.ChatGLMConfig","AutoModel": "modeling_chatglm.ChatGLMForConditionalGeneration","AutoModelForCausalLM": "modeling_chatglm.ChatGLMForConditionalGeneration","AutoModelForSeq2SeqLM": "modeling_chatglm.ChatGLMForConditionalGeneration","AutoModelForSequenceClassification": "modeling_chatglm.ChatGLMForSequenceClassification"},
此时使用下面加载config
if has_remote_code and trust_remote_code:class_ref = config_dict["auto_map"]["AutoConfig"] #configuration_chatglm.ChatGLMConfigconfig_class = get_class_from_dynamic_module(class_ref, pretrained_model_name_or_path, code_revision=code_revision, **kwargs)
然后会进入get_class_from_dynamic_module方法来加载class,我下面说给函数主要源码来解读,首先module_file, class_name = class_reference.split(".")将class_ref的configuration_chatglm.ChatGLMConfig字符分成文件和类名, module_file=configuration_chatglm, class_name=ChatGLMConfig。然后在通过以下代码来调用:
# And lastly we get the class inside our newly created module
final_module = get_cached_module_file(repo_id, # 文件路径module_file + ".py", # configuration_chatglm.pycache_dir=cache_dir,force_download=force_download,resume_download=resume_download,proxies=proxies,token=token,revision=code_revision,local_files_only=local_files_only,repo_type=repo_type,
)
将final_module变成路径transformers_modules/glm-4v-9b/configuration_chatglm.py
最后在经过get_class_in_module方法来获得config的类class,其代码如下:
return get_class_in_module(class_name, final_module, force_reload=force_download)
将其结果返回到config_class 中,这样就得到了config的方法了。
就是config, kwargs = AutoConfig.from_pretrained(*)的返回config内容了,该内容实际是继承PretrainedConfig类,该方法就是configuration_chatglm.py的文件了,该文件如下:
from transformers import PretrainedConfigclass ChatGLMConfig(PretrainedConfig):model_type = "chatglm"def __init__(self,num_layers=28,padded_vocab_size=65024,hidden_size=4096,ffn_hidden_size=13696,kv_channels=128,num_attention_heads=32,seq_length=2048,hidden_dropout=0.0,classifier_dropout=None,attention_dropout=0.0,layernorm_epsilon=1e-5,rmsnorm=True,apply_residual_connection_post_layernorm=False,post_layer_norm=True,add_bias_linear=False,add_qkv_bias=False,bias_dropout_fusion=True,multi_query_attention=False,multi_query_group_num=1,rope_ratio=1,apply_query_key_layer_scaling=True,attention_softmax_in_fp32=True,fp32_residual_connection=False,pre_seq_len=None,prefix_projection=False,boi_token_id=None,eoi_token_id=None,**kwargs):self.num_layers = num_layersself.vocab_size = padded_vocab_sizeself.padded_vocab_size = padded_vocab_sizeself.hidden_size = hidden_sizeself.ffn_hidden_size = ffn_hidden_sizeself.kv_channels = kv_channelsself.num_attention_heads = num_attention_headsself.seq_length = seq_lengthself.hidden_dropout = hidden_dropoutself.classifier_dropout = classifier_dropoutself.attention_dropout = attention_dropoutself.layernorm_epsilon = layernorm_epsilonself.rmsnorm = rmsnormself.apply_residual_connection_post_layernorm = apply_residual_connection_post_layernormself.post_layer_norm = post_layer_normself.add_bias_linear = add_bias_linearself.add_qkv_bias = add_qkv_biasself.bias_dropout_fusion = bias_dropout_fusionself.multi_query_attention = multi_query_attentionself.multi_query_group_num = multi_query_group_numself.rope_ratio = rope_ratioself.apply_query_key_layer_scaling = apply_query_key_layer_scalingself.attention_softmax_in_fp32 = attention_softmax_in_fp32self.fp32_residual_connection = fp32_residual_connectionself.pre_seq_len = pre_seq_lenself.prefix_projection = prefix_projectionself.boi_token_id = boi_token_idself.eoi_token_id = eoi_token_idsuper().__init__(**kwargs)4、小节总结
config.json文件内容设置auto_map来实现huggingface调用我们自己构建的ChatGLMConfig类,而"AutoConfig": “configuration_chatglm.ChatGLMConfig”,的configuration_chatglm为文件py名称,ChatGLMConfig为类别名称。同时,进一步说明auto_map内容 "auto_map": { "AutoConfig": "configuration_chatglm.ChatGLMConfig", "AutoModel": "modeling_chatglm.ChatGLMForConditionalGeneration", "AutoModelForCausalLM": "modeling_chatglm.ChatGLMForConditionalGeneration", "AutoModelForSeq2SeqLM": "modeling_chatglm.ChatGLMForConditionalGeneration", "AutoModelForSequenceClassification": "modeling_chatglm.ChatGLMForSequenceClassification" },其它方法都可以通过这个方法来调用对应的方法。
相关文章:
第五节:GLM-4v-9b模型model加载源码解读(模型相关参数方法解读)
文章目录 前言一、GLM-4v-9b模型model加载源码解读1、GLM-4v-9b模型model加载主函数源码2、GLM-4v-9b模型model加载源码源码解读3、GLM-4v-9b自定义模型类源码解读 二、基于GLM-4v-9b模型获取模型输入参数等内容源码解读(from_pretrained-->huggingface)1、from_pretrained函…...

面试经验分享 | 北京渗透测试岗位
更多大厂面试经验的视频经验分享看主页 目录: 所面试的公司:安全大厂 所在城市:北京 面试职位:渗透测试工程师 面试方式:腾讯会议线上面试线下面试 面试过程: 面试官的问题: 1、说一下XSS有哪…...

unity Toggle制作滑动开关
先上效果图 重点是这个Graphic要清空,不然显示不能直接切换,会消失 using DG.Tweening; using UnityEngine; using UnityEngine.UI;public class SwitchToggle : MonoBehaviour {public RectTransform handleRect;public float duration 0.5f;private Vector2 handlePos;To…...

全面解析 Kubernetes 流量负载均衡:iptables 与 IPVS 模式
目录 Kubernetes 中 Service 的流量负载均衡模式 1. iptables 模式 工作原理 数据路径 优点 缺点 适用场景 2. IPVS 模式 工作原理 数据路径 优点 缺点 适用场景 两种模式的对比 如何切换模式 启用 IPVS 模式 验证模式 总结 Kubernetes 中 Service 的流量负载…...

【unity】【游戏开发】Unity项目一运行就蓝屏报Watch Dog Timeout
【背景】 由于是蓝屏所以没法截屏,总之今天遇到了一开Unity,过一阵就蓝屏的情况,报Watch Dog Timeout。 【分析】 通过任务管理器查看,发现Unity占用率100%,再观察Unity内部,每次右下角出现一个Global I…...

【macos java反编译工具Java Decompiler】
mac上能用的反编译工具 https://java-decompiler.github.io/...

宠物用品电子商务系统|Java|SSM|VUE| 前后端分离
【技术栈】 1⃣️:架构: B/S、MVC 2⃣️:系统环境:Windowsh/Mac 3⃣️:开发环境:IDEA、JDK1.8、Maven、Mysql5.7 4⃣️:技术栈:Java、Mysql、SSM、Mybatis-Plus、VUE、jquery,html 5⃣️数据库可…...

脑肿瘤检测数据集,对9900张原始图片进行YOLO,COCO,VOC格式的标注
脑肿瘤检测数据集,对9900张原始图片进行YOLO,COCO,VOC格式的标注 数据集分割 训练组 70% 6930图片 有效集 20% 1980图片 测试集 10% 990图片 预处理 静态裁剪: 24-82&…...

Adversarial Machine Learning(对抗机器学习)
之前把机器学习(Machine Learning)的安全问题简单记录了一下,这里有深入研究了一些具体的概念,这里记录一下方便以后查阅。 Adversarial Machine Learning(对抗机器学习) Adversarial Examples 相关内容Eva…...

每日十题八股-2024年12月23日
1.MySQL如何避免重复插入数据? 2.CHAR 和 VARCHAR有什么区别? 3.Text数据类型可以无限大吗? 4.说一下外键约束 5.MySQL的关键字in和exist 6.mysql中的一些基本函数,你知道哪些? 7.SQL查询语句的执行顺序是怎么样的&…...

Android Studio新建项目在源码中编译
新建空白项目 用AS新建默认空项目,代码目录如下: MyApplication$ tree -L 4 . ├── Android.bp // bp编译脚本 ├── Android.mk.bak // mk编译脚本 ├── app // 下面目录结构是AS新建工程目录 │ ├── build.gradle │ ├── pro…...

ubuntu使用ffmpeg+ZLMediaKit搭建rtsp推流环境
最方便的方式,ubuntu上安装vlc播放器,通过vlc来推流,在网上有很多教程。这里采用ffmpegZLMediaKit 必备条件: 1、安装ffmpeg 2、安装ZLMediaKit 一、安装ffmpeg sudo apt update sudo apt install ffmpeg 二、安装ZLMediaKit…...

vue中的css深度选择器v-deep 配合!important
当 <style> 标签有 scoped 属性时,它的 CSS 只作用于当前组件中的元素,父组件的样式将不会渗透到子组件。 如果你希望 scoped 样式中的一个选择器能够作用得“更深”,例如影响子组件,你可以使用深度选择器。 ::v-deep { } 举…...

Python读写JSON文件
import jsondef writeJSONFile(self):with open(g_updateFilePath, "w" encodingutf-8) as fiel:json.dump(dictData, fiel, indent4, ensure_asciiFalse)fiel.close()def readJsonToDict(file):with open(file, r, encodingutf-8) as f: # 确保文件以 UTF-8 编码打…...

重温设计模式--外观模式
文章目录 外观模式(Facade Pattern)概述定义 外观模式UML图作用 外观模式的结构C 代码示例1C代码示例2总结 外观模式(Facade Pattern)概述 定义 外观模式是一种结构型设计模式,它为子系统中的一组接口提供了一个统一…...

云原生服务网格Istio实战
基础介绍 1、Istio的定义 Istio 是一个开源服务网格,它透明地分层到现有的分布式应用程序上。 Istio 强大的特性提供了一种统一和更有效的方式来保护、连接和监视服务。 Istio 是实现负载平衡、服务到服务身份验证和监视的路径——只需要很少或不需要更改服务代码…...

linux蓝牙模块和手机配对
在 Linux 系统下,将蓝牙模块与手机配对和连接通常涉及以下几个步骤。以下是详细的步骤和命令,帮助你实现蓝牙模块与手机的配对和连接。 1. 确认蓝牙服务已启动 首先,确保蓝牙服务已在 Linux 系统上运行。 systemctl status bluetooth如果服…...

dockerfile文档编写(1):基础命令
目录 Modelscope-agentARGFROMWORKDIRCOPYRUNENVCMD run_loopy Modelscope-agent ARG BASE_IMAGEregistry.cn-beijing.aliyuncs.com/modelscope-repo/modelscope:ubuntu22.04-cuda12.1.0-py310-torch2.1.2-tf2.14.0-1.12.0FROM $BASE_IMAGEWORKDIR /home/workspaceCOPY . /hom…...

在 Go 中利用 ffmpeg 进行视频和音频处理
在 Go 中利用 ffmpeg 进行视频和音频处理 ffmpegutil 包概述主要功能介绍1. 视频格式转换2. 提取音频3. 获取视频信息4. 创建视频缩略图5. 提取随机帧无线程版本:多线程版本: 总结 ffmpeg 是一款功能强大的多媒体处理工具,支持视频和音频的编…...

【机器学习】探索机器学习与人工智能:驱动未来创新的关键技术
探索机器学习与人工智能:驱动未来创新的关键技术 前言:人工智能的核心技术深度学习:自然语言处理(NLP):计算机视觉: 机器学习与人工智能的驱动创新医疗健康领域金融行业智能制造与工业互联网智慧…...

关于power bi计算列使用 符号“>“出现报错的问题
解决办法很简单那就是转变逻辑,配合NOT或者"-"之类的方法,使用符号"<"。问题重新:在筛选器中对计算列使用了">"号,视觉对象报错。将">"修改为"<",发现…...

如何快速上手IAMDinosaur:打造专属AI游戏助手的终极指南
如何快速上手IAMDinosaur:打造专属AI游戏助手的终极指南 【免费下载链接】IAMDinosaur 🦄 An Artificial Inteligence to teach Googles Dinosaur to jump cactus 项目地址: https://gitcode.com/gh_mirrors/ia/IAMDinosaur IAMDinosaur是一款令人…...

腕带硬件选型方案
一、核心处理器选型 二、心率与血氧检测模块选型 2.1 选型方案:JFC103 2.1.1 发光源 1. 绿色 功能:心率测量与脉搏波形(心律波形) 采集。 原因:绿光穿透表皮后,被血液吸收的程度会随心脏搏动而周期性变化。相比红光,绿光在皮肤浅层对血流灌注变化的敏感度最高,信噪比…...

网盘下载限速终结者:8大平台直链解析终极指南
网盘下载限速终结者:8大平台直链解析终极指南 【免费下载链接】Online-disk-direct-link-download-assistant 一个基于 JavaScript 的网盘文件下载地址获取工具。基于【网盘直链下载助手】修改 ,支持 百度网盘 / 阿里云盘 / 中国移动云盘 / 天翼云盘 / 迅…...

OpenClaw学习总结_IV_认证与安全_4:Multi-Account Patterns详解
OpenClaw IV. 认证与安全(4)Multi-Account Patterns本篇目标:把“一个人/一个团队同时拥有多个账号(或多个 Bot / 多个 Workspace / 多个 Provider credentials)”时,OpenClaw 侧应该怎么建模、怎么隔离、怎…...

如何快速安装Jasminum插件:中文文献管理终极解决方案
如何快速安装Jasminum插件:中文文献管理终极解决方案 【免费下载链接】jasminum A Zotero add-on to retrive CNKI meta data. 一个简单的Zotero 插件,用于识别中文元数据 项目地址: https://gitcode.com/gh_mirrors/ja/jasminum 还在为中文文献管…...

Vue3生命周期钩子详解:从创建到销毁的全过程
Vue3 生命周期 Vue3 的生命周期钩子函数与 Vue2 有所不同,主要通过 Composition API 的方式使用。以下是 Vue3 的主要生命周期钩子及其用途: beforeCreate 在实例初始化之后、数据观测和事件配置之前被调用。此时组件的选项还未被处理,data 和…...
恫)
大卫小东(Sheldon)恫
Issue 概述 先来看看提交这个 Issue 的作者是为什么想到这个点子的,以及他初步的核心设计概念。?? 本 PR 实现了 Apache Gravitino 与 SeaTunnel 的集成,将其作为非关系型连接器的外部元数据服务。通过 Gravitino 的 REST API 自动获取表结构和元数据&…...

2026年心脑血管疾病专科风云榜:谁是健康守护者?
随着现代生活节奏的加快和生活方式的变化,心脑血管疾病的发病率逐年上升。根据《中国心血管健康与疾病报告2025》显示,我国40岁以上人群中心脑血管疾病患者已超过3亿人。面对这一严峻形势,如何找到值得信赖的心脑血管疾病专科医院,…...

肺部音频数据集:从咳嗽检测到呼吸音分类的全面解析
1. 肺部音频数据集的价值与应用场景 当你听到咳嗽声时,能分辨出是普通感冒还是更严重的肺部疾病吗?这个问题正是肺部音频数据集要解决的核心问题。这类数据集通过收集大量咳嗽、呼吸等声音样本,为AI模型提供训练素材,最终实现自动…...