Autoware Universe 安装记录
前提: ubuntu20.04,英伟达显卡。
ROS2-Galactic安装
wget http://fishros.com/install -O fishros && . fishros


选择galactic(ROS2)版本,桌面版
ROS2-dev-tools安装
sudo apt install python3-testresources
sudo apt update && sudo apt install -y
build-essential
cmake
git
python3-colcon-common-extensions
python3-flake8
python3-pip
python3-pytest-cov
python3-rosdep
python3-setuptools
python3-vcstool
wget
python3 -m pip install -U
flake8-blind-except
flake8-builtins
flake8-class-newline
flake8-comprehensions
flake8-deprecated
flake8-docstrings
flake8-import-order
flake8-quotes
pytest-repeat
pytest-rerunfailures
pytest
setuptools
rmw-implementation安装
sudo apt-get -y update
sudo apt-get -y install git
mkdir autoware_universe
cd autoware_universe/
git clone https://github.com/autowarefoundation/autoware.git -b galactic
./setup-dev-env.sh
cd autoware_universe/
source amd64.env
#For details: https://docs.ros.org/en/galactic/How-To-Guides/Working-with-multiple-RMW-implementations.html
sudo apt update
rmw_implementation_dashed= ( e v a l s e d − e " s / / − / g " < < < " (eval sed -e "s/_/-/g" <<< " (evalsed−e"s//−/g"<<<"{rmw_implementation}")
sudo apt install ros- r o s d i s t r o − {rosdistro}- rosdistro−{rmw_implementation_dashed}
#(Optional) You set the default RMW implementation in the ~/.bashrc file.
echo ‘’ >> ~/.bashrc && echo “export RMW_IMPLEMENTATION=${rmw_implementation}” >> ~/.bashrc
pacmod安装
#wget -O /tmp/amd64.env https://raw.githubusercontent.com/autowarefoundation/autoware/galactic/amd64.env && source /tmp/amd64.env
cd autoware_universe/
source amd64.env
#Taken from https://github.com/astuff/pacmod3#installation
sudo apt install apt-transport-https
sudo sh -c 'echo "deb [trusted=yes] https://s3.amazonaws.com/autonomoustuff-repo/ ( l s b r e l e a s e − s c ) m a i n " > / e t c / a p t / s o u r c e s . l i s t . d / a u t o n o m o u s t u f f − p u b l i c . l i s t ′ s u d o a p t u p d a t e s u d o a p t i n s t a l l r o s − (lsb_release -sc) main" > /etc/apt/sources.list.d/autonomoustuff-public.list' sudo apt update sudo apt install ros- (lsbrelease−sc)main">/etc/apt/sources.list.d/autonomoustuff−public.list′sudoaptupdatesudoaptinstallros−{rosdistro}-pacmod3
autoware universe dependencies安装
sudo apt install geographiclib-tools
sudo geographiclib-get-geoids egm2008-1
安装pre-commit
clang_format_version=14.0.6
pip3 install pre-commit clang-format==${clang_format_version}
#Install Golang (Add Go PPA for shfmt)
sudo add-apt-repository ppa:longsleep/golang-backports
sudo apt install golang
CUDA安装
wget -O /tmp/amd64.env https://raw.githubusercontent.com/autowarefoundation/autoware/galactic/amd64.env && source /tmp/amd64.env
cd autoware_universe/
source amd64.env
Modified from:
https://developer.nvidia.com/cuda-11-4-4-download-archive?target_os=Linux&target_arch=x86_64&Distribution=Ubuntu&target_version=20.04&target_type=deb_network
wget https://developer.download.nvidia.com/compute/cuda/repos/ubuntu2004/x86_64/cuda-ubuntu2004.pin
sudo mv cuda-ubuntu2004.pin /etc/apt/preferences.d/cuda-repository-pin-600
sudo apt-key adv --fetch-keys https://developer.download.nvidia.com/compute/cuda/repos/ubuntu2004/x86_64/3bf863cc.pub
sudo add-apt-repository “deb https://developer.download.nvidia.com/compute/cuda/repos/ubuntu2004/x86_64/ /”
sudo apt-get update
cuda_version_dashed= ( e v a l s e d − e " s / [ . ] / − / g " < < < " (eval sed -e "s/[.]/-/g" <<< " (evalsed−e"s/[.]/−/g"<<<"{cuda_version}")
sudo apt install cuda-${cuda_version_dashed} --no-install-recommends
一个指令一个指令输入
cuDNN and TensorRT安装
wget -O /tmp/amd64.env https://raw.githubusercontent.com/autowarefoundation/autoware/galactic/amd64.env && source /tmp/amd64.env
cd autoware_universe/
source amd64.env
#Taken from: https://docs.nvidia.com/deeplearning/tensorrt/install-guide/index.html#installing
sudo apt-get install libcudnn8= c u d n n v e r s i o n l i b c u d n n 8 − d e v = {cudnn_version} libcudnn8-dev= cudnnversionlibcudnn8−dev={cudnn_version}
sudo apt-mark hold libcudnn8 libcudnn8-dev
sudo apt-get install libnvinfer8= t e n s o r r t v e r s i o n l i b n v o n n x p a r s e r s 8 = {tensorrt_version} libnvonnxparsers8= tensorrtversionlibnvonnxparsers8={tensorrt_version} libnvparsers8= t e n s o r r t v e r s i o n l i b n v i n f e r − p l u g i n 8 = {tensorrt_version} libnvinfer-plugin8= tensorrtversionlibnvinfer−plugin8={tensorrt_version} libnvinfer-dev= t e n s o r r t v e r s i o n l i b n v o n n x p a r s e r s − d e v = {tensorrt_version} libnvonnxparsers-dev= tensorrtversionlibnvonnxparsers−dev={tensorrt_version} libnvparsers-dev= t e n s o r r t v e r s i o n l i b n v i n f e r − p l u g i n − d e v = {tensorrt_version} libnvinfer-plugin-dev= tensorrtversionlibnvinfer−plugin−dev={tensorrt_version}
sudo apt-mark hold libnvinfer8 libnvonnxparsers8 libnvparsers8 libnvinfer-plugin8 libnvinfer-dev libnvonnxparsers-dev libnvparsers-dev libnvinfer-plugin-dev
Autoware.Universe源码下载
vcs import src < autoware.repos
sudo mkdir -p /etc/ros/rosdep/sources.list.d/
sudo curl -o /etc/ros/rosdep/sources.list.d/20-default.list https://mirrors.tuna.tsinghua.edu.cn/github-raw/ros/rosdistro/master/rosdep/sources.list.d/20-default.list
export ROSDISTRO_INDEX_URL=https://mirrors.tuna.tsinghua.edu.cn/rosdistro/index-v4.yaml
rosdep update --include-eol-distros
echo ‘export ROSDISTRO_INDEX_URL=https://mirrors.tuna.tsinghua.edu.cn/rosdistro/index-v4.yaml’ >> ~/.bashrc
source /opt/ros/galactic/setup.bash
rosdep install -y --from-paths src --ignore-src --rosdistro $ROS_DISTRO
编译空间
colcon build --symlink-install --cmake-args -DCMAKE_BUILD_TYPE=Release
只编译指定包
colcon build --symlink-install --cmake-args -DCMAKE_BUILD_TYPE=Release --packages-select 包名
忽略指定包
colcon build --symlink-install --cmake-args -DCMAKE_BUILD_TYPE=Release --packages-ignore 包名
遇到编译错误继续编译其他模块
colcon build --symlink-install --cmake-args -DCMAKE_BUILD_TYPE=Release --continue-on-error
启动程序(相关资源已经下载完毕)
https://autowarefoundation.github.io/autoware-documentation/galactic/tutorials/ad-hoc-simulation/rosbag-replay-simulation/
bag包启动
source ~/autoware/install/setup.bash
ros2 launch autoware_launch logging_simulator.launch.xml map_path:=$HOME/autoware_map/sample-map-rosbag vehicle_model:=sample_vehicle sensor_model:=sample_sensor_kit
source ~/autoware/install/setup.bash
ros2 bag play ~/autoware_map/sample-rosbag/sample.db3 -r 0.2 -s sqlite3

相关文章:
Autoware Universe 安装记录
前提: ubuntu20.04,英伟达显卡。 ROS2-Galactic安装 wget http://fishros.com/install -O fishros && . fishros 选择galactic(ROS2)版本,桌面版 ROS2-dev-tools安装 sudo apt install python3-testresources sudo apt update …...

每天40分玩转Django:Django部署概述
一、Django部署概述 在开发阶段,我们通常使用Django内置的轻量级开发服务器runserver。但在生产环境中,为了应对大量并发请求,需要使用高性能的WSGI服务器,如Gunicorn、uWSGI等。同时还要配置Nginx等Web服务器作为反向代理,实现负载均衡、静态文件处理等。下面是Django部署的整…...

使用VS Code开发ThinkPHP项目
【图书介绍】《ThinkPHP 8高效构建Web应用》-CSDN博客 《ThinkPHP 8高效构建Web应用 夏磊 编程与应用开发丛书 清华大学出版社》【摘要 书评 试读】- 京东图书 ThinkPHP 8开发环境安装-CSDN博客 安装ThinkPHP项目的IDE 常用的集成开发环境(IDE)包括P…...
基于深度可分离卷积的MNIST手势识别
基于深度可分离膨胀卷积的MNIST手写体识别 Github链接 项目背景: MNIST手写体数据集是深度学习领域中一个经典的入门数据集,包含了从0到9的手写数字图像,用于评估不同模型在图像分类任务上的性能。在本项目中,我们通过设计一种基…...

Linux服务器pm2 运行chatgpt-on-wechat,搭建微信群ai机器人
安装 1.拉取项目 项目地址: chatgpt-on-wechat 2.安装依赖 pip3 install -r requirements.txt pip3 install -r requirements-optional.txt3、获取API信息 当前免费的有百度的文心一言,讯飞的个人认证提供500万token的额度。 控制台-讯飞开放平台 添加链接描述…...

Word批量更改题注
文章目录 批量更改批量去除空格 在写文章的时候,往往对图片题注有着统一的编码要求,例如以【图 1- xx】。一般会点击【引用】->【插入题注】来插入题注,并且在引用的时候,点击【引用】->【交叉引用】,并且在交叉…...

Springboot配置嵌入式服务器
一.如何定制和修改Servlet容器的相关配置 修改和server有关的配置(ServerProperties); server.port8081 server.context‐path/tx server.tomcat.uri‐encodingUTF‐8 在yml配置文件的写法: server:port: 8081servlet:context-pa…...
正交三角函数全面阐述
目录 1. 正交性定义 2. 正交三角函数 常见的正交三角函数 3. 正交三角函数的特性 4. 正交三角函数在傅里叶分析中的应用 5. 正交三角函数的应用领域 6. 总结 正交三角函数是指在特定条件下,三角函数之间的内积为零。更具体地说,在数学分析、信号处…...

《Vue3 四》Vue 的组件化
组件化:将一个页面拆分成一个个小的功能模块,每个功能模块完成自己部分的独立的功能。任何应用都可以被抽象成一棵组件树。 Vue 中的根组件: Vue.createApp() 中传入对象的本质上就是一个组件,称之为根组件(APP 组件…...
)
linux中,mysql数据库分片(分库分表)
1.mysql分库分表:解决单个mysql存储上限问题1.实现方法:存储层面:利用分布式存储解决方案分库分表:拆分库和表到其它服务器2.常用设计思路:垂直分库(库里面的表分开)水平分表(表里面的数据分开)分库:数据库分为多个,每个数据库里面都有表,数据均匀存储分库分表:在分的每库里面,…...

springboot503基于Sringboot+Vue个人驾校预约管理系统(论文+源码)_kaic
摘 要 传统办法管理信息首先需要花费的时间比较多,其次数据出错率比较高,而且对错误的数据进行更改也比较困难,最后,检索数据费事费力。因此,在计算机上安装个人驾校预约管理系统软件来发挥其高效地信息处理的作用&am…...
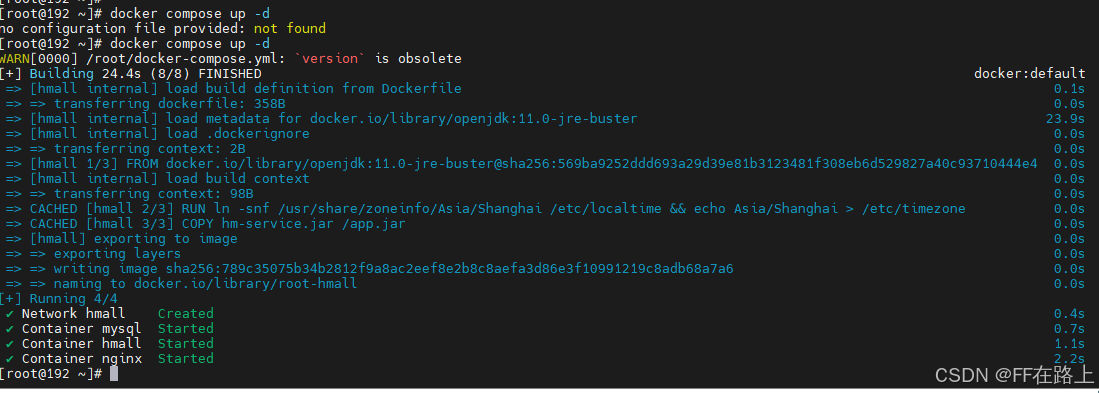
Docker应用-项目部署及DockerCompose
文章目录 Docker应用-项目部署1. 项目部署-后端1.1 修改配置1.2 项目打包1.3 编写Dockerfile1.4 创建镜像1.5 创建并运行容器1.6 测试 2. 项目部署-前端2.1 html前端静态目录2.2 nginx.config编写2.3 部署宿主机服务器2.4 创建容器并挂载2.5 测试 3. DockerCompose3.1 基本语法…...

从0入门自主空中机器人-2-1【无人机硬件框架】
关于本课程: 本次课程是一套面向对自主空中机器人感兴趣的学生、爱好者、相关从业人员的免费课程,包含了从硬件组装、机载电脑环境设置、代码部署、实机实验等全套详细流程,带你从0开始,组装属于自己的自主无人机,并让…...

Kafka高性能设计
高性能设计概述 Kafka高性能是多方面协同的结果,包括集群架构、分布式存储、ISR数据同步及高效利用磁盘和操作系统特性等。主要体现在消息分区、顺序读写、页缓存、零拷贝、消息压缩和分批发送六个方面。 消息分区 存储不受单台服务器限制,能处理更多数据…...

Redis字符串底层结构对数值型的支持常用数据结构和使用场景
字符串底层结构 SDS (Simple Dynamic Strings) 是 Redis 中用于实现字符串类型的一种数据结构。SDS 的设计目标是提供高效、灵活的字符串操作,同时避免传统 C 字符串的一些缺点。 struct sdshdr {int len; // 已使用的长度int free; // 未使用的长度char bu…...

uniapp 微信小程序 数据空白展示组件
效果图 html <template><view class"nodata"><view class""><image class"nodataimg":src"$publicfun.locaAndHttp()?localUrl:$publicfun.httpUrlImg(httUrl)"mode"aspectFit"></image>&l…...

在vscode的ESP-IDF中使用自定义组件
以hello-world为例,演示步骤和注意事项 1、新建ESP-IDF项目 选择模板 从hello-world模板创建 2、打开项目 3、编译结果没错 正在执行任务: /home/azhu/.espressif/python_env/idf5.1_py3.10_env/bin/python /home/azhu/esp/v5.1/esp-idf/tools/idf_size.py /home…...

目标检测,语义分割标注工具--labelimg labelme
1 labelimg labelimg可以用来标注目标检测的数据集, 提供多种格式的输出, 如Pascal Voc, YOLO等。 1.1 安装 pip install labelimg1.2 使用 命令行直接输入labelimg即可打开软件主界面进行操作。 使用非常简单, 不做过细的介绍࿰…...

发明专利与实用新型专利申请过程及自助与代办方式对比
申请专利(发明专利、实用新型专利、外观设计专利)有两种方式:1、自己直接向国家知识产权局申请。2、通过专利代办处申请。以下是对这两种专利类型(发明专利、实用新型专利)申请过程及两种申请方式的详细介绍和对比,参考…...

Datawhale AI冬令营(第二期)动手学AI Agent task2--学Prompt工程,优化Agent效果
目录 如何写好Prompt? 工具包神器1:Prompt框架——CO-STAR 框架 工具包神器2:Prompt结构优化 工具包神器3:引入案例 案例:构建虚拟女友小冰 1. 按照 CO-STAR框架 梳理目标 2. 撰写Prompt 3. 制作对话生成应用&…...

如何让Windows高效识别苹果设备?极简驱动安装工具3分钟解决连接难题
如何让Windows高效识别苹果设备?极简驱动安装工具3分钟解决连接难题 【免费下载链接】Apple-Mobile-Drivers-Installer Powershell script to easily install Apple USB and Mobile Device Ethernet (USB Tethering) drivers on Windows! 项目地址: https://gitco…...

销售易发布AI原生CRM NeoAgent 2.0,引领行业迈入AI CRM 2.0时代
3月27日,在2026腾讯云城市峰会首站上海站,腾讯旗下CRM销售易重磅发布新一代营销服全场景AI原生CRM——NeoAgent 2.0。这不仅是产品迭代,更是销售易基于全新架构打造的智能体产品矩阵,标志着CRM开始从“管理工具”向“企业数字员工…...

Python实战:利用SymPy与SciPy高效破解复杂非线性方程组
1. 为什么需要SymPy和SciPy解非线性方程组? 遇到工程计算或科研问题时,我们常需要解像这样的方程组:xy10且yz34。这种包含平方项、三角函数或指数函数的方程,传统手工计算不仅耗时还容易出错。我去年做机器人运动学分析时…...

2026上海紧固件专业展观察:12.9级螺栓为何成为高端制造核心紧固方案?
2026第十六届上海紧固件专业展(Fastener Expo Shanghai 2026)将于6月24日至26日在上海国家会展中心举办。作为紧固件行业的重要展示窗口,本届展会将集中呈现高强度紧固件的发展趋势,其中12.9级螺栓已成为当前制造业升级的重要标志…...

Qwen3-14B企业知识图谱构建:从私有文档抽取实体关系实践
Qwen3-14B企业知识图谱构建:从私有文档抽取实体关系实践 1. 企业知识图谱构建概述 在当今企业数字化转型浪潮中,知识图谱作为结构化知识表示的重要方式,正成为企业知识管理的核心基础设施。传统知识图谱构建需要大量人工标注和规则设计&…...
)
手把手教你用SAM2和LoRA:基于CVPR25新思路的开放词汇分割实战(附代码)
手把手教你用SAM2和LoRA:基于CVPR25新思路的开放词汇分割实战(附代码) 开放词汇语义分割(Open-Vocabulary Semantic Segmentation)正成为计算机视觉领域的热点方向。传统语义分割模型受限于预定义的封闭类别ÿ…...

应用篇,在Silverlight中使用Virtual Earth地图服务
ilverlight应用中使用地图服务是否能够得心应手呢? 答案是肯定的,我们操作Earth服务只需执行简单的服务调用,就可完成坐地日行八万里的壮举了,而这一切是由VIEWs组件封装了Javascript脚本来完成的,通过对Virtual Eart…...

GLM-4.1V-9B-Base基础教程:Web界面支持的图片格式/大小/分辨率清单
GLM-4.1V-9B-Base基础教程:Web界面支持的图片格式/大小/分辨率清单 1. 模型简介 GLM-4.1V-9B-Base是智谱开源的视觉多模态理解模型,专门用于处理图像内容识别、场景描述、目标问答和中文视觉理解任务。这个模型已经完成了Web化封装,可以直接…...
)
静息态fMRI分析避坑指南:DPARSFA预处理中那些容易踩的‘雷’(附解决方案)
静息态fMRI分析实战避坑手册:DPARSFA预处理中的7个致命陷阱与修复方案 当你熬夜跑完DPARSFA预处理流程,满心期待地点开结果图时——突然发现ReHo图像像被泼了墨水,fALFF数值全部溢出,或是软件弹出一串看不懂的报错代码。这种崩溃…...
)
别再手动点啦!用Android无障碍服务+讯飞语音,5分钟实现App语音操控(保姆级教程)
用Android无障碍服务打造语音操控神器:5分钟实现"可见即可说" 你是否厌倦了在手机上反复点击屏幕的操作?想象一下,只需对着手机说出"打开微信"、"点击朋友圈"、"返回主页",设备就能自动完…...