docker+ffmpeg+nginx+rtmp 拉取摄像机视频
1、构造程序容器镜像
app.py
import subprocess
import json
import time
import multiprocessing
import socketdef check_rtmp_server(host, port, timeout=5):try:with socket.create_connection((host, port), timeout):print(f"RTMP server at {host}:{port} is available.")return Trueexcept Exception as e:print(f"RTMP server at {host}:{port} is unavailable: {e}")return Falsedef push_rtsp_to_nginx(rtsp_url, rtmp_url, transport_protocol="tcp"):host, port = "127.0.0.1", 1935  # RTMP 服务器地址和端口while True:if not check_rtmp_server(host, port):print("RTMP server not ready. Retrying in 5 seconds...")time.sleep(5)continueprint("RTMP server is ready. Waiting 5 seconds before starting the stream...")time.sleep(5)  # 等待 RTMP 服务器完全准备好ffmpeg_command = ["ffmpeg","-loglevel", "quiet","-rtsp_transport", transport_protocol,"-i", rtsp_url,"-flags", "low_delay","-fflags", "nobuffer","-bufsize", "5000k","-c:v", "copy","-c:a", "copy","-an", "-f", "flv",rtmp_url]try:print(f"Attempting to push stream from {rtsp_url} to {rtmp_url} using {transport_protocol}")process = subprocess.Popen(ffmpeg_command, stdout=subprocess.PIPE, stderr=subprocess.PIPE)for line in process.stderr:print(line.decode('utf-8').strip())process.wait()print(f"FFmpeg process exited with code {process.returncode}")except Exception as e:print(f"Error occurred: {e}")finally:if process:process.terminate()print("FFmpeg process terminated.")print("Retrying in 5 seconds...")time.sleep(5)def monitor_streams(config_path):with open(config_path, 'r') as f:config = json.load(f)processes = []for camera in config['cameras']:transport_protocol = camera.get('transport', 'tcp')p = multiprocessing.Process(target=push_rtsp_to_nginx,args=(camera['input'], camera['output'], transport_protocol))p.start()processes.append(p)try:while True:time.sleep(10)except KeyboardInterrupt:print("Stopping streams...")for p in processes:p.terminate()p.join()if __name__ == "__main__":config_path = "config.json"monitor_streams(config_path)
config.json
{"cameras": [{"id": 1,"input": "rtsp://admin:xxx@10.91.49.251:554/video1","output": "rtmp://127.0.0.1:8080/stream_1/stream_1","transport": "tcp"},{"id": 2,"input": "rtsp://admin:xxx@10.91.49.23:554/video1","output": "rtmp://127.0.0.1:8080/stream_2/stream_2","transport": "tcp"}]
}
nginx.conf
worker_processes auto;  # 可以根据服务器性能调整工作进程数
rtmp_auto_push on;
rtmp_auto_push_reconnect 1s;  # 配置重连间隔,确保流同步快速恢复# 事件配置
events {worker_connections  2048;  # 提高单个进程的最大连接数multi_accept on;use epoll;  # 如果是 Linux 系统,启用 epoll 提高性能
}http {include       mime.types;default_type  application/octet-stream;sendfile        on;tcp_nopush      on;  # 启用 TCP_NODELAY,减少网络包碎片tcp_nodelay     on;keepalive_timeout  65;  # 保持连接时间,可以根据需要调整server {listen 80;server_name localhost;location / {root   html;index  index.html index.htm;}# 提供 HLS 播放服务location /hls/ {types {application/vnd.apple.mpegurl m3u8;video/mp2t ts;}root /tmp;  # 对应 hls_path 根目录add_header Cache-Control no-cache;add_header Access-Control-Allow-Origin *;  # 允许跨域请求(如果需要)}location /stream_1/ {types {application/vnd.apple.mpegurl m3u8;video/mp2t ts;}root /tmp;  # 对应 hls_path 根目录add_header Cache-Control no-cache;add_header Access-Control-Allow-Origin *;  # 允许跨域请求(如果需要)}location /stream_2/ {types {application/vnd.apple.mpegurl m3u8;video/mp2t ts;}root /tmp;  # 对应 hls_path 根目录add_header Cache-Control no-cache;add_header Access-Control-Allow-Origin *;  # 允许跨域请求(如果需要)}location /stream_3/ {types {application/vnd.apple.mpegurl m3u8;video/mp2t ts;}root /tmp;  # 对应 hls_path 根目录add_header Cache-Control no-cache;add_header Access-Control-Allow-Origin *;  # 允许跨域请求(如果需要)}location /stream_4/ {types {application/vnd.apple.mpegurl m3u8;video/mp2t ts;}root /tmp;  # 对应 hls_path 根目录add_header Cache-Control no-cache;add_header Access-Control-Allow-Origin *;  # 允许跨域请求(如果需要)}location /stream_5/ {types {application/vnd.apple.mpegurl m3u8;video/mp2t ts;}root /tmp;  # 对应 hls_path 根目录add_header Cache-Control no-cache;add_header Access-Control-Allow-Origin *;  # 允许跨域请求(如果需要)}# 启用统计页面location /stat {rtmp_stat all;       # 显示所有流的统计信息rtmp_stat_stylesheet stat.xsl;  # 加载 XSL 样式}# 提供 `stat.xsl` 文件的静态路径location /stat.xsl {root /usr/local/nginx/html;  # 你可以根据需要修改路径}error_page 500 502 503 504 /50x.html;location = /50x.html {root html;}}
}# RTMP 配置块,放在 http 配置之外
rtmp {server {listen 1935;  # RTMP 推流端口chunk_size 4096;  # 增加 chunk 大小application hls {live on;record off;hls on;hls_path /tmp/hls;hls_fragment 3s;}}server {listen 8080;  # 另外一个 RTMP 推流端口chunk_size 4096;  # 增加 chunk 大小application stream_1 {live on;record off;hls on;hls_path /tmp/stream_1;hls_fragment 3s;}application stream_2 {live on;record off;hls on;hls_path /tmp/stream_2;hls_fragment 3s;}application stream_3 {live on;record off;hls on;hls_path /tmp/stream_3;hls_fragment 3s;}application stream_4 {live on;record off;hls on;hls_path /tmp/stream_4;hls_fragment 3s;}application stream_5 {live on;record off;hls on;hls_path /tmp/stream_5;hls_fragment 3s;}}
}
entrypoint.sh
#!/bin/bash
# 启动 nginx 和其他服务
/usr/local/nginx/sbin/nginx
python3 /app/app.py
dockerfile
FROM ubuntu:20.04# 设置非交互模式避免构建时的交互提示
ENV DEBIAN_FRONTEND=noninteractive# 更新源并安装依赖
RUN apt-get update && apt-get install -y \curl \unzip \build-essential \libpcre3-dev \zlib1g-dev \libssl-dev \python3-pip \ffmpeg && \apt-get clean && \rm -rf /var/lib/apt/lists/*# 创建工作目录并复制应用程序
WORKDIR /tmp# 复制本地的 NGINX 和 RTMP 模块压缩包到容器内
COPY nginx-1.27.3.tar.gz /tmp/nginx-1.27.3.tar.gz
COPY nginx-rtmp.zip /tmp/nginx-rtmp.zip# 解压并安装 NGINX 和 RTMP 模块
RUN tar zxvf nginx-1.27.3.tar.gz && \unzip nginx-rtmp.zip && \cd nginx-1.27.3 && \./configure --with-http_ssl_module --add-module=../nginx-rtmp-module-master && \make && make install && \cd .. && rm -rf nginx-1.27.3 nginx-1.27.3.tar.gz nginx-rtmp.zip nginx-rtmp-module-master# 安装 Python 库
RUN pip3 install --no-cache-dir ffmpeg-python# 设置入口脚本
COPY entrypoint.sh /entrypoint.sh
RUN chmod +x /entrypoint.sh# 创建工作目录并复制应用程序
WORKDIR /app
COPY app.py /app/app.py
COPY config.json /app/config.json# 复制 NGINX 配置文件
COPY nginx.conf /usr/local/nginx/conf/nginx.conf# 复制stat文件
COPY stat.xsl /usr/local/nginx/html/stat.xsl#设置stat.xsl文件权限
RUN chmod 644 /usr/local/nginx/html/stat.xsl# 开放端口
EXPOSE 1935 8080 80# 启动脚本,运行 NGINX 和推流服务
CMD ["/entrypoint.sh"]
另外还需要nginx和nginx-rtmp的包自行下载
构建容器
docker build -t nginx-ffmpeg-server .
2、运行
docker run -d -p 80:80 -p 1935:1935 -p 8080:8080 --name rtmp nginx-ffmpeg-server
另一种方法测试
app.py
import av
import json
import requests
import multiprocessing
import time
import xml.etree.ElementTree as ETdef fetch_rtmp_stats(url):"""从 RTMP 统计页面获取统计数据 (XML 格式)"""try:response = requests.get(url, timeout=5)if response.status_code == 200:return ET.fromstring(response.text)else:print(f"[ERROR] Failed to fetch stats. HTTP {response.status_code}")return Noneexcept Exception as e:print(f"[ERROR] Could not fetch RTMP stats: {e}")return Nonedef push_rtsp_to_rtmp(rtsp_url, rtmp_url, transport_protocol="tcp"):"""从 RTSP 拉流并直接推送到 RTMP(无需重新编码)。"""try:print(f"[INFO] Starting stream: {rtsp_url} -> {rtmp_url}")input_container = av.open(rtsp_url,options={"rtsp_transport": transport_protocol, "timeout": "5000000"})output_container = av.open(rtmp_url, mode="w", format="flv")video_stream = Noneaudio_stream = Nonefor stream in input_container.streams:if stream.type == "video" and not video_stream:video_stream = output_container.add_stream(template=stream)elif stream.type == "audio" and not audio_stream:audio_stream = output_container.add_stream(template=stream)for packet in input_container.demux(video_stream, audio_stream):if packet.dts is None:continuepacket.stream = video_stream if packet.stream.type == "video" else audio_streamoutput_container.mux(packet)except Exception as e:print(f"[ERROR] Failed to push stream: {rtsp_url} -> {rtmp_url}: {e}")raise  # 重新抛出异常,通知调用方进程失败finally:if 'input_container' in locals():input_container.close()if 'output_container' in locals():output_container.close()print(f"[INFO] Stopped pushing stream: {rtsp_url} -> {rtmp_url}")def check_stream_status(stats_url, stream_name, retries=3, check_interval=5):"""检查指定流的状态,最多尝试 `retries` 次,返回流是否正常"""failure_count = 0for _ in range(retries):stats = fetch_rtmp_stats(stats_url)if stats is None:print("[WARNING] Could not fetch RTMP stats. Retrying...")failure_count += 1else:# 查找当前流状态stream_nodes = stats.findall(f".//stream[name='{stream_name}']")is_active = stream_nodes and all(node.find("active") is not None for node in stream_nodes)if is_active:print(f"[INFO] Stream {stream_name} is active.")return True  # 流正常else:print(f"[WARNING] Stream {stream_name} is inactive.")failure_count += 1time.sleep(check_interval)  # 等待几秒后再次尝试# 如果检查了所有次数后都失败了,才认为流异常if failure_count == retries:print(f"[ERROR] Stream {stream_name} is inactive after {retries} checks.")return False  # 流不正常return True  # 如果至少有一次成功,则认为流正常def monitor_streams(config_path, stats_url, check_interval=60):"""定期从 /stat 页面获取流状态,如果流异常则尝试恢复已有推流进程,不成功则重新启动新推流进程。"""with open(config_path, "r") as f:config = json.load(f)processes = {}# 初始化:先启动所有流的推流进程for camera in config.get("cameras", []):stream_name = camera["stream"]rtsp_url = camera["input"]rtmp_url = camera["output"]transport_protocol = camera.get("transport", "tcp")print(f"[INFO] Starting initial stream for {stream_name}...")new_proc = multiprocessing.Process(target=push_rtsp_to_rtmp, args=(rtsp_url, rtmp_url, transport_protocol))new_proc.start()processes[stream_name] = new_proc# 定期检查流状态while True:for camera in config.get("cameras", []):stream_name = camera["stream"]rtsp_url = camera["input"]rtmp_url = camera["output"]transport_protocol = camera.get("transport", "tcp")# 检查流状态,如果流异常,则进行处理print(f"[INFO] Checking status of stream {stream_name}...")if not check_stream_status(stats_url, stream_name):print(f"[WARNING] Stream {stream_name} is inactive. Attempting recovery...")# 如果进程存在并且存活,尝试恢复推流if stream_name in processes:proc = processes[stream_name]if proc.is_alive():print(f"[INFO] Attempting to recover existing process for stream {stream_name}.")try:# 尝试恢复推流并再次检查流状态proc.join(timeout=1)  # 检查现有进程的状态except Exception as e:print(f"[ERROR] Existing process for stream {stream_name} failed: {e}")proc.terminate()  # 终止失败的进程proc.join()print(f"[INFO] Terminated failed process for stream {stream_name}.")proc = None# 再检查两次流状态,如果流仍然异常,则重新启动新进程recovery_attempts = 2for _ in range(recovery_attempts):if check_stream_status(stats_url, stream_name):print(f"[INFO] Stream {stream_name} has recovered.")breakprint(f"[WARNING] Stream {stream_name} is still inactive after recovery attempt.")time.sleep(5)# 如果仍然失败,则重新启动进程if not check_stream_status(stats_url, stream_name):print(f"[ERROR] Stream {stream_name} could not be recovered. Restarting...")proc = Noneelse:print(f"[INFO] Existing process for stream {stream_name} is not alive. Restarting.")proc = Noneelse:proc = None# 如果没有存活的进程或进程不可用,启动新的推流进程if proc is None:print(f"[INFO] Starting a new process for stream {stream_name}.")new_proc = multiprocessing.Process(target=push_rtsp_to_rtmp, args=(rtsp_url, rtmp_url, transport_protocol))new_proc.start()processes[stream_name] = new_procelse:print(f"[INFO] Stream {stream_name} is healthy. No action needed.")time.sleep(check_interval)if __name__ == "__main__":CONFIG_PATH = "config.json"STATS_URL = "http://127.0.0.1/stat"monitor_streams(CONFIG_PATH, STATS_URL)
config.json
{"cameras": [{"id": 1,"stream": "stream_1","input": "rtsp://admin:xxx@10.91.49.251:554/video1?rtsp_transport=tcp","output": "rtmp://127.0.0.1:8080/stream_1/stream_1","transport": "tcp"},{"id": 2,"stream": "stream_2","input": "rtsp://admin:xxx@10.91.49.23:554/video1?rtsp_transport=tcp","output": "rtmp://127.0.0.1:8080/stream_2/stream_2","transport": "tcp"}]}
entrypoint.sh
#!/bin/bash
# 启动 NGINX
/usr/local/nginx/sbin/nginx# 启动 Python 推流服务
python3 /app/app.py
nginx.conf
worker_processes auto;  # 可以根据服务器性能调整工作进程数
rtmp_auto_push on;
rtmp_auto_push_reconnect 1s;  # 配置重连间隔,确保流同步快速恢复# 事件配置
events {worker_connections  2048;  # 提高单个进程的最大连接数multi_accept on;use epoll;  # 如果是 Linux 系统,启用 epoll 提高性能
}http {include       mime.types;default_type  application/octet-stream;sendfile        on;tcp_nopush      on;  # 启用 TCP_NODELAY,减少网络包碎片tcp_nodelay     on;keepalive_timeout  65;  # 保持连接时间,可以根据需要调整server {listen 80;server_name localhost;location / {root   html;index  index.html index.htm;}# 提供 HLS 播放服务location /hls/ {types {application/vnd.apple.mpegurl m3u8;video/mp2t ts;}root /tmp;  # 对应 hls_path 根目录add_header Cache-Control no-cache;add_header Access-Control-Allow-Origin *;  # 允许跨域请求(如果需要)}location /stream_1/ {types {application/vnd.apple.mpegurl m3u8;video/mp2t ts;}root /tmp;  # 对应 hls_path 根目录add_header Cache-Control no-cache;add_header Access-Control-Allow-Origin *;  # 允许跨域请求(如果需要)}location /stream_2/ {types {application/vnd.apple.mpegurl m3u8;video/mp2t ts;}root /tmp;  # 对应 hls_path 根目录add_header Cache-Control no-cache;add_header Access-Control-Allow-Origin *;  # 允许跨域请求(如果需要)}location /stream_3/ {types {application/vnd.apple.mpegurl m3u8;video/mp2t ts;}root /tmp;  # 对应 hls_path 根目录add_header Cache-Control no-cache;add_header Access-Control-Allow-Origin *;  # 允许跨域请求(如果需要)}location /stream_4/ {types {application/vnd.apple.mpegurl m3u8;video/mp2t ts;}root /tmp;  # 对应 hls_path 根目录add_header Cache-Control no-cache;add_header Access-Control-Allow-Origin *;  # 允许跨域请求(如果需要)}location /stream_5/ {types {application/vnd.apple.mpegurl m3u8;video/mp2t ts;}root /tmp;  # 对应 hls_path 根目录add_header Cache-Control no-cache;add_header Access-Control-Allow-Origin *;  # 允许跨域请求(如果需要)}# 启用统计页面location /stat {rtmp_stat all;       # 显示所有流的统计信息rtmp_stat_stylesheet stat.xsl;  # 加载 XSL 样式}# 提供 `stat.xsl` 文件的静态路径location /stat.xsl {root /usr/local/nginx/html;  # 你可以根据需要修改路径}error_page 500 502 503 504 /50x.html;location = /50x.html {root html;}}
}# RTMP 配置块,放在 http 配置之外
rtmp {server {listen 1935;  # RTMP 推流端口chunk_size 4096;  # 增加 chunk 大小application hls {live on;record off;hls on;hls_path /tmp/hls;hls_fragment 3s;}}server {listen 8080;  # 另外一个 RTMP 推流端口chunk_size 4096;  # 增加 chunk 大小application stream_1 {live on;record off;hls on;hls_path /tmp/stream_1;hls_fragment 3s;}application stream_2 {live on;record off;hls on;hls_path /tmp/stream_2;hls_fragment 3s;}application stream_3 {live on;record off;hls on;hls_path /tmp/stream_3;hls_fragment 3s;}application stream_4 {live on;record off;hls on;hls_path /tmp/stream_4;hls_fragment 3s;}application stream_5 {live on;record off;hls on;hls_path /tmp/stream_5;hls_fragment 3s;}}
}
dockerfile
FROM ubuntu:20.04# 设置非交互模式,避免构建时的交互提示
ENV DEBIAN_FRONTEND=noninteractive# 更新源并安装依赖
RUN apt-get update && apt-get install -y \curl \unzip \build-essential \libpcre3-dev \zlib1g-dev \libssl-dev \python3-pip \python3-dev \pkg-config \libavformat-dev \libavcodec-dev \libavdevice-dev \libavutil-dev \libswscale-dev \libswresample-dev \libopencv-dev && \apt-get clean && \rm -rf /var/lib/apt/lists/*# 创建工作目录并复制 NGINX 和 RTMP 模块压缩包到容器内
WORKDIR /tmp
COPY nginx-1.27.3.tar.gz /tmp/nginx-1.27.3.tar.gz
COPY nginx-rtmp.zip /tmp/nginx-rtmp.zip# 解压并安装 NGINX 和 RTMP 模块
RUN tar zxvf nginx-1.27.3.tar.gz && \unzip nginx-rtmp.zip && \cd nginx-1.27.3 && \./configure --with-http_ssl_module --add-module=../nginx-rtmp-module-master && \make && make install && \cd .. && rm -rf nginx-1.27.3 nginx-1.27.3.tar.gz nginx-rtmp.zip nginx-rtmp-module-master# 安装 Python 库
RUN pip3 install --no-cache-dir \opencv-python-headless \av \requests \numpy# 设置入口脚本
COPY entrypoint.sh /entrypoint.sh
RUN chmod +x /entrypoint.sh# 创建工作目录并复制应用程序
WORKDIR /app
COPY app.py /app/app.py
COPY config.json /app/config.json# 复制 NGINX 配置文件
COPY nginx.conf /usr/local/nginx/conf/nginx.conf# 复制 stat 文件
COPY stat.xsl /usr/local/nginx/html/stat.xsl# 设置 stat.xsl 文件权限
RUN chmod 644 /usr/local/nginx/html/stat.xsl# 开放端口
EXPOSE 1935 8080 80# 启动脚本,运行 NGINX 和推流服务
CMD ["/entrypoint.sh"]
相关文章:
docker+ffmpeg+nginx+rtmp 拉取摄像机视频
1、构造程序容器镜像 app.py import subprocess import json import time import multiprocessing import socketdef check_rtmp_server(host, port, timeout5):try:with socket.create_connection((host, port), timeout):print(f"RTMP server at {host}:{port} is avai…...
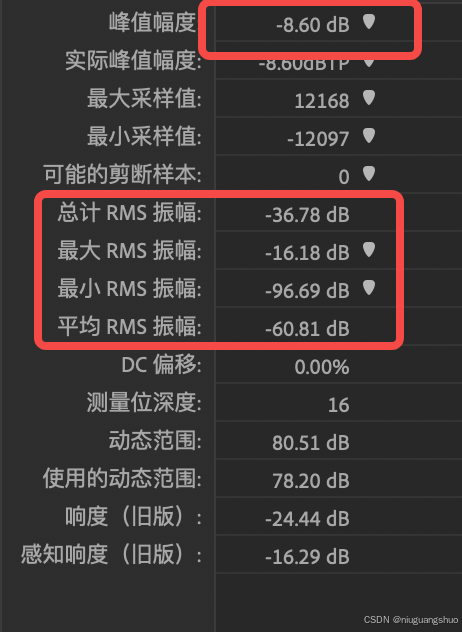
不同音频振幅dBFS计算方法
1. 振幅的基本概念 振幅是描述音频信号强度的一个重要参数。它通常表示为信号的幅度值,幅度越大,声音听起来就越响。为了更好地理解和处理音频信号,通常会将振幅转换为分贝(dB)单位。分贝是一个对数单位,能…...
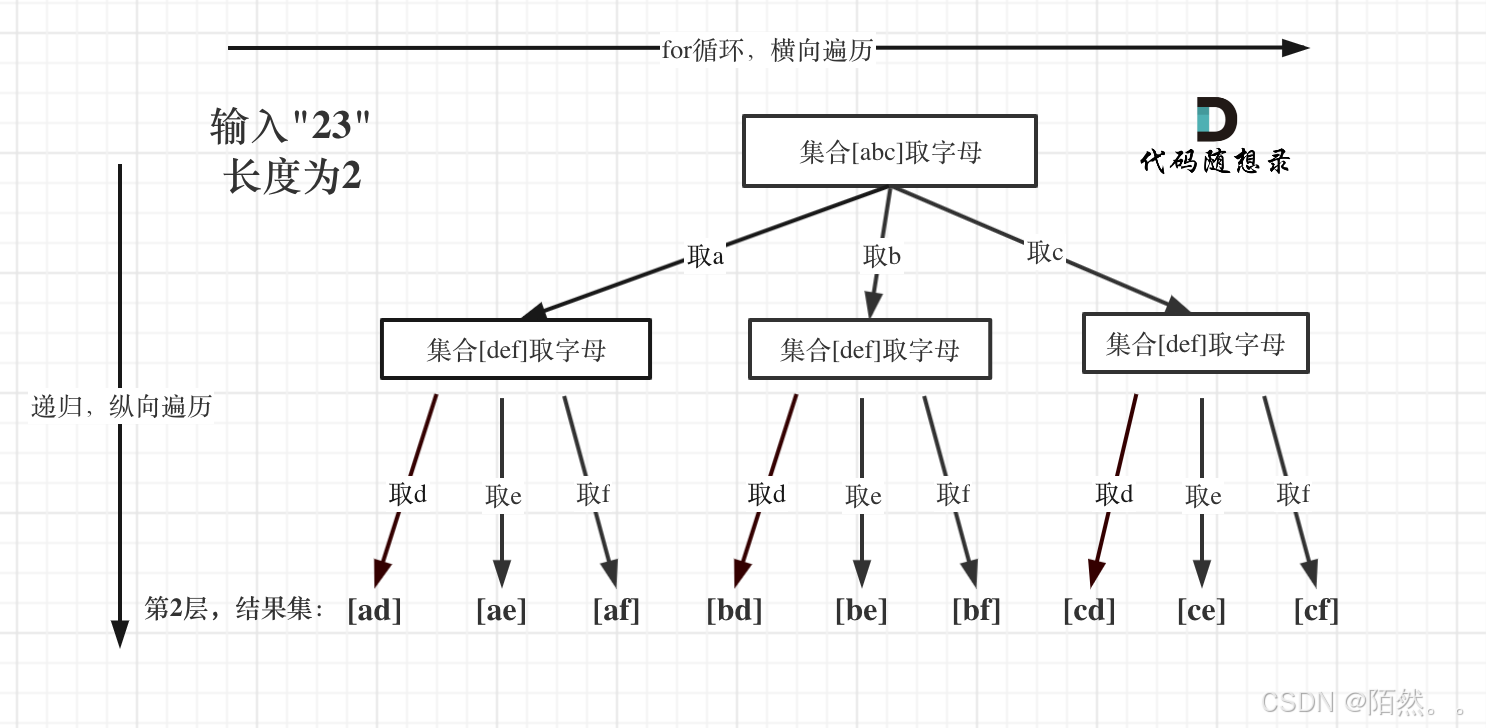
【17. 电话号码的字母组合 中等】
题目: 给定一个仅包含数字 2-9 的字符串,返回所有它能表示的字母组合。答案可以按 任意顺序 返回。 给出数字到字母的映射如下(与电话按键相同)。注意 1 不对应任何字母。 示例 1: 输入:digits “23”…...
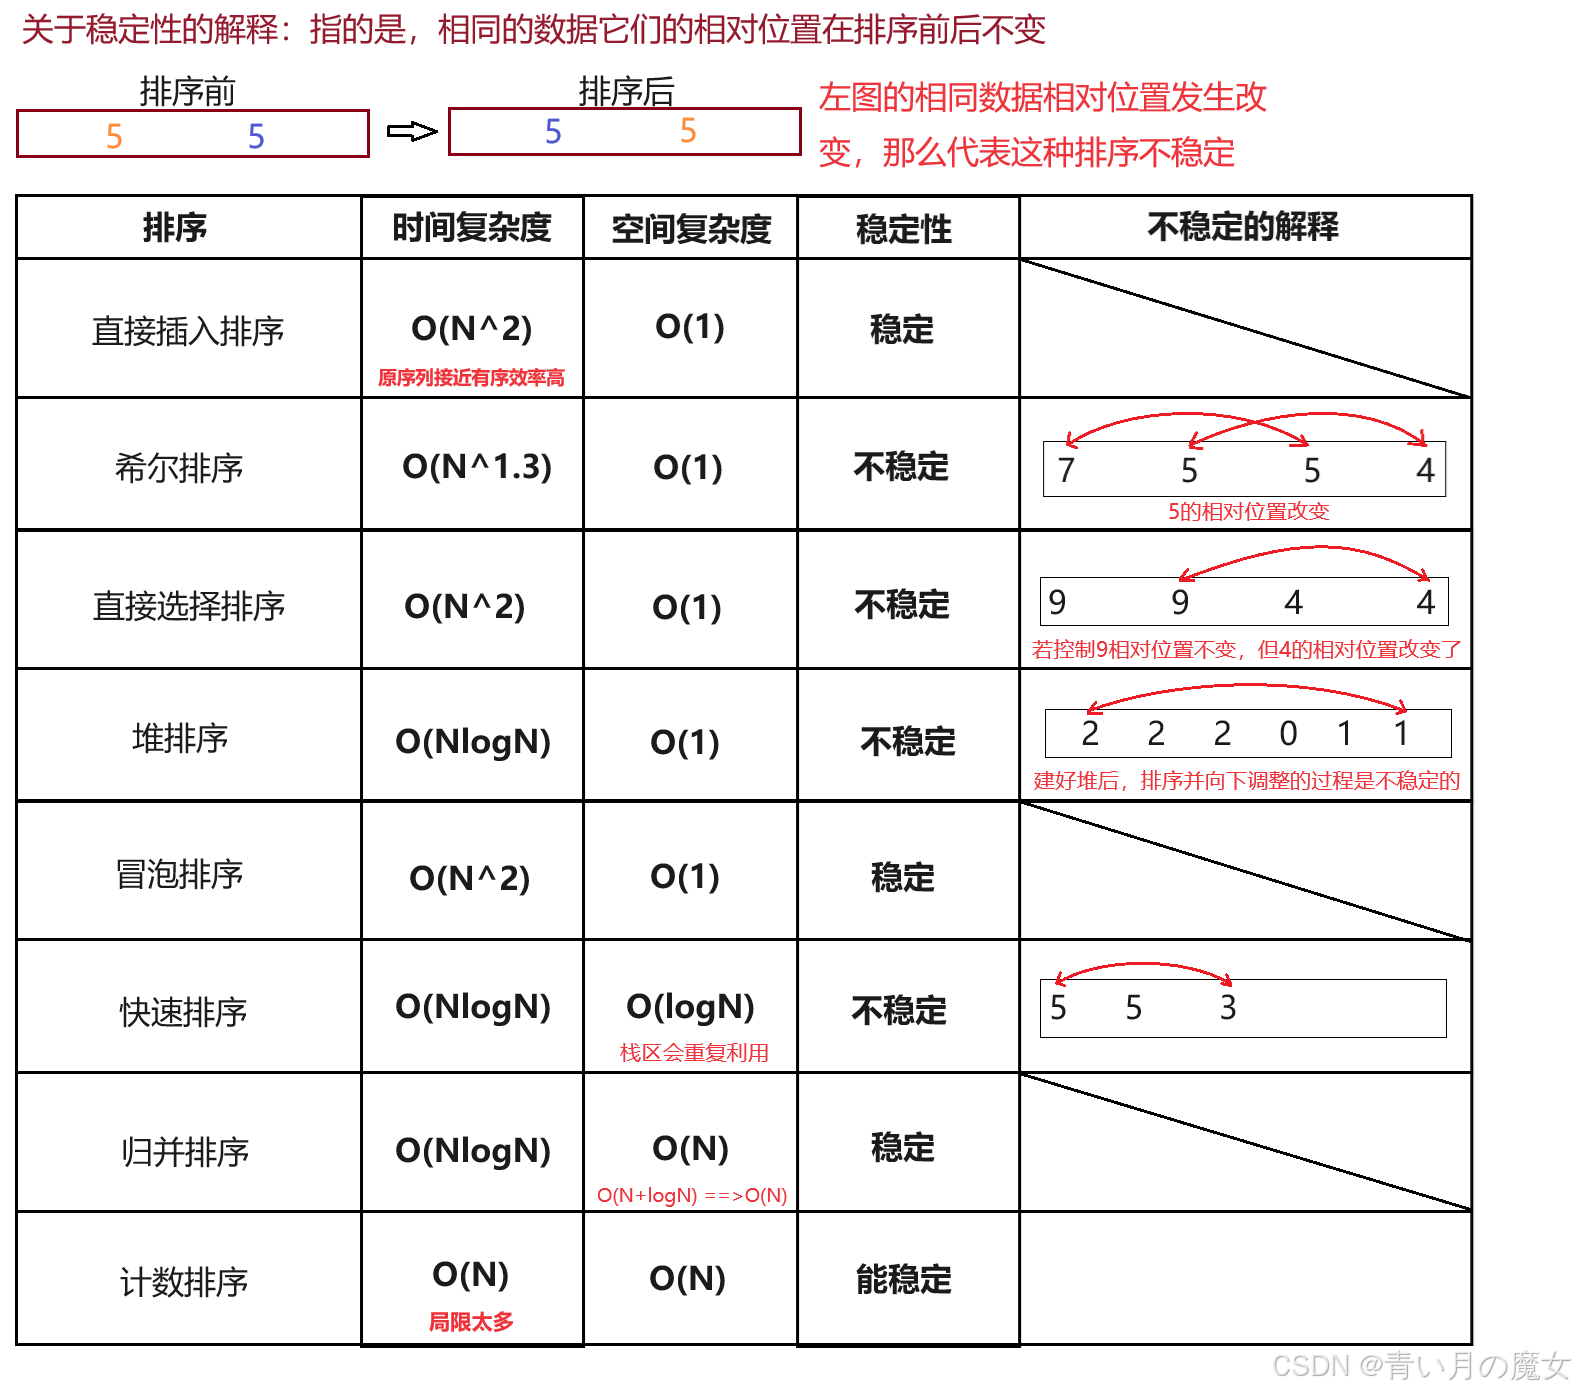
数据结构初阶---排序
一、排序相关概念与运用 1.排序相关概念 排序:所谓排序,就是使一串记录,按照其中的某个或某些关键字的大小,递增或递减的排列起来的操作。 稳定性:假定在待排序的记录序列中,存在多个具有相同的关键字的…...
【从0-1实现一个前端脚手架】
目录 介绍为什么需要脚手架?一个脚手架应该具备哪些功能? 脚手架实现初始化项目相关依赖实现脚手架 发布 介绍 为什么需要脚手架? 脚手架本质就是一个工具,作用是能够让使用者专注于写代码,它可以让我们只用一个命令…...

AI文章管理系统(自动生成图文分发到分站)
最近帮一个网上的朋友做了一套AI文章生成系统。他的需求是这样: 1、做一个服务端转接百度文心一言的生成文章的API接口。 2、服务端能注册用户,用户在服务端注册充值后可以获取一个令牌,这个令牌填写到客户端,客户端就可以根据客…...

【Leetcode 每日一题】3270. 求出数字答案
问题背景 给你三个 正 整数 n u m 1 num_1 num1, n u m 2 num_2 num2 和 n u m 3 num_3 num3。 数字 n u m 1 num_1 num1, n u m 2 num_2 num2 和 n u m 3 num_3 num3 的数字答案 k e y key key 是一个四位数,定义如下&…...
基于单片机的无线气象仪系统设计(论文+源码)
1系统方案设计 如图2.1所示为无线气象仪系统设计框架。系统设计采用STM32单片机作为主控制器,结合DHT11温湿度传感器、光敏传感器、BMP180气压传感器、PR-3000-FS-N01风速传感器实现气象环境的温度、湿度、光照、气压、风速等环境数据的检测,并通过OLED1…...

【数据库】Mysql精简回顾复习
一、概念 数据库(DB):数据存储的仓库数据库管理系统(DBMS):操纵和管理数据库的大型软件SQL:操作关系型数据库的编程语言,是一套标准关系型数据库(RDBMS)&…...

深入理解 HTTP 的 GET、POST 方法与 Request 和 Response
HTTP 协议是构建 Web 应用的基石,GET 和 POST 是其中最常用的请求方法。无论是前端开发、后端开发,还是接口测试,对它们的深入理解都显得尤为重要。在本文中,我们将介绍 GET 和 POST 方法,以及 Request 和 Response 的…...

MySQL 中联合索引相比单索引性能提升在哪?
首先我们要清楚所以也是要占用磁盘空间的,随着表中数据量越来越多,索引的空间也是随之提升的,因而单表不建议定义过多的索引,所以使用联合索引可以在一定程度上可以减少索引的空间占用其次,使用联合索引的情况下&#…...
第34天:安全开发-JavaEE应用反射机制攻击链类对象成员变量方法构造方法
时间轴: Java反射相关类图解: 反射: 1、什么是 Java 反射 参考: https://xz.aliyun.com/t/9117 Java 提供了一套反射 API ,该 API 由 Class 类与 java.lang.reflect 类库组成。 该类库包含了 Field 、 Me…...

C++笔记之数据单位与C语言变量类型和范围
C++笔记之数据单位与C语言变量类型和范围 code review! 文章目录 C++笔记之数据单位与C语言变量类型和范围一、数据单位1. 数据单位表:按单位的递增顺序排列2. 关于换算关系的说明3. 一般用法及注意事项4. 扩展内容5. 理解和使用建议二、C 语言变量类型和范围基本数据类型标准…...

算法-拆分数位后四位数字的最小和
力扣题目2160. 拆分数位后四位数字的最小和 - 力扣(LeetCode) 给你一个四位 正 整数 num 。请你使用 num 中的 数位 ,将 num 拆成两个新的整数 new1 和 new2 。new1 和 new2 中可以有 前导 0 ,且 num 中 所有 数位都必须使用。 …...

Python 管理 GitHub Secrets 和 Workflows
在现代软件开发中,自动化配置管理变得越来越重要。本文将介绍如何使用 Python 脚本来管理 GitHub 仓库的 Secrets 和 Workflows,这对于需要频繁更新配置或管理多个仓库的团队来说尤为有用。我们将分三个部分进行讨论:设置 GitHub 权限、创建 GitHub Secret 和创建 GitHub Wo…...

指令的修饰符
指令的修饰符 参考文献: Vue的快速上手 Vue指令上 Vue指令下 Vue指令的综合案例 文章目录 指令的修饰符指令修饰符 结语 博客主页: He guolin-CSDN博客 关注我一起学习,一起进步,一起探索编程的无限可能吧!让我们一起努力&…...

C# 正则表达式完全指南
C# 正则表达式完全指南 C#通过 System.Text.RegularExpressions 命名空间提供强大的正则表达式支持。本指南将详细介绍C#中正则表达式的使用方法、性能优化和最佳实践。 1. 基础知识 1.1 命名空间导入 using System.Text.RegularExpressions;1.2 基本使用 public class Re…...

【笔记整理】记录参加骁龙AIPC开发者技术沙龙的笔记
AIoT 首先了解了一个概念叫AIoT,我的理解就是AI IoT 5G,通过AI的发展使得边缘计算、数据整合和处理变得快捷方便,不仅限于传统的云端数据处理,在边缘的IoT设备上也可以进行智能化打造,通过5G的通信能力扩展可以实现…...

论文解析 | 基于语言模型的自主代理调查
论文 《A Survey on Large Language Model-based Autonomous Agents》 对基于大型语言模型(LLM)的自主智能体(Autonomous Agents)进行了全面调查。随着大型语言模型(如 GPT 系列、BERT、T5 等)的快速发展&a…...

面试加分项:Android Framework AMS 全面概述和知识要点
第一章:AMS 的架构与组件 1.1 AMS 整体架构 在 Android 系统的庞大体系中,AMS(Activity Manager Service)就如同一个中枢神经系统,是整个系统的核心服务之一,对应用的性能和用户体验有着直接且关键的影响 。它的整体架构由 Client 端和 Service 端两大部分组成,这两端相…...

ZjDroid命令大全:从DEX内存dump到Lua脚本注入的完整教程
ZjDroid命令大全:从DEX内存dump到Lua脚本注入的完整教程 【免费下载链接】ZjDroid Android app dynamic reverse tool based on Xposed framework. 项目地址: https://gitcode.com/gh_mirrors/zj/ZjDroid ZjDroid是一款基于Xposed框架的Android应用动态逆向分…...

Buzz音频转录完全指南:3大核心功能+5个实战场景,快速掌握本地语音转文字技术
Buzz音频转录完全指南:3大核心功能5个实战场景,快速掌握本地语音转文字技术 【免费下载链接】buzz Buzz transcribes and translates audio offline on your personal computer. Powered by OpenAIs Whisper. 项目地址: https://gitcode.com/GitHub_Tr…...

ARM PMU外部接口与性能监控寄存器详解
1. ARM性能监控寄存器外部接口深度解析性能监控单元(PMU)是现代处理器架构中用于硬件性能分析的核心模块,它通过一组可编程计数器实时捕获处理器微架构层面的各类事件。在ARMv8/v9架构中,PMU不仅可以通过系统寄存器访问,还提供了标准化的外部…...

echarts中heatmap鼠标滚动禁用缩放,向下滚动
配置如下效果如下...

PCB虚焊/走线断裂/焊盘脱落工程师易漏判
PCB 故障中,30% 并非元件损坏,而是 PCB 本身的隐性故障—— 虚焊、走线断裂、焊盘脱落、过孔开路。这类故障外观隐蔽、时好时坏、排查难度大,很多工程师反复更换元件仍无法解决,最终误判为 “板报废”。一、PCB 隐性故障核心成因…...

电子商务设计师软考备战:特别篇 - 综合模拟与备考策略
1. 考试形式与内容结构1.1 考试基本信息考试科目与时间基础知识考试:上午9:00-11:30(150分钟)应用技术考试:下午2:00-4:30(150分钟)题型与分值分布上午考试(基础知识): -…...

2026年一键生成论文工具对比实测:5款神器从选题到格式全流程护航
写论文的焦虑,是每个科研人和学生都心照不宣的“隐形压力”。选题无从下手,文献检索耗时费力,逻辑框架反复推翻,格式排版让人抓狂,查重降重更是像在和系统玩“猫鼠游戏”。2026年的AI工具早已不是过去那种“打字机”&a…...

基于MAX78000的离线鸟类声音识别:边缘AI从数据到部署全流程解析
1. 项目概述:当边缘AI“听懂”鸟鸣在野外生态监测或自家后院观鸟时,你是否有过这样的经历:听到一阵清脆或婉转的鸟鸣,却完全不知道是哪位“歌唱家”在表演?传统的鸟类识别依赖专家经验和图鉴比对,不仅门槛高…...

16个分片+2副本:pg_shard的master_create_worker_shards最佳实践
16个分片2副本:pg_shard的master_create_worker_shards最佳实践 【免费下载链接】pg_shard ATTENTION: pg_shard is superseded by Citus, its more powerful replacement 项目地址: https://gitcode.com/gh_mirrors/pg/pg_shard pg_shard作为PostgreSQL的分…...

PrivacyGuard实战:基于实证差分隐私的机器学习模型隐私审计框架
1. 项目概述与核心价值在过去的几年里,我亲眼见证了机器学习模型从实验室走向银行、医疗、社交网络等各个敏感领域的全过程。模型性能的每一次飞跃都令人兴奋,但随之而来的隐私泄露事件也一次次为我们敲响警钟。一个在医疗数据上训练出的诊断模型&#x…...