Vue3+codemirror6实现公式(规则)编辑器
实现截图
实现/带实现功能
- 插入标签
- 插入公式
- 提示补全
- 公式验证
- 公式计算
需要的依赖
"@codemirror/autocomplete": "^6.18.4","@codemirror/lang-javascript": "^6.2.2","@codemirror/state": "^6.5.2","@codemirror/view": "^6.36.2","codemirror": "^6.0.1",
初始化编辑器
// index.ts
export const useCodemirror = () => {const code = ref("");const view = shallowRef<EditorView>();const editorRef = ref<InstanceType<typeof HTMLDivElement>>();const extensions = [placeholderTag, //插入tagplaceholderFn, //插入函数baseTheme, //基础样式EditorView.lineWrapping, //换行basicSetup, //基础配置javascript(), //js语言支持autocompletion({ override: [myCompletions] }), //补全提示];/*** @description 初始化编辑器*/const init = () => {if (editorRef.value) {view.value = new EditorView({parent: editorRef.value,state: EditorState.create({doc: code.value,extensions: extensions,}),});setTimeout(() => {view.value?.focus();}, 0);}};/*** @description 销毁编辑器*/const destroyed = () => {view.value?.destroy();view.value = undefined;};/*** @description 插入文本并设置光标位置*/const insertText = (text: string, type: "fn" | "tag" = "tag") => {if (view.value) {let content = type === "tag" ? `[[${text}]]` : `{{${text}}}()`;const selection = view.value.state.selection;if (!selection.main.empty) {// 如果选中文本,则替换选中文本const from = selection.main.from;const to = selection.main.to;const anchor =type === "tag" ? from + content.length : from + content.length - 1;const transaction = view.value!.state.update({changes: { from, to, insert: content }, // 在当前光标位置插入标签selection: {anchor,}, // 指定新光标位置});view.value.dispatch(transaction);} else {// 如果没有选中文本,则插入标签const pos = selection.main.head;const anchor =type === "tag" ? pos + content.length : pos + content.length - 1;const transaction = view.value.state.update({changes: { from: pos, to: pos, insert: content }, // 在当前光标位置插入标签selection: {anchor: anchor,}, // 指定新光标位置});view.value.dispatch(transaction);}setTimeout(() => {view.value?.focus();}, 0);}};return {code,view,editorRef,init,destroyed,insertText,};
};
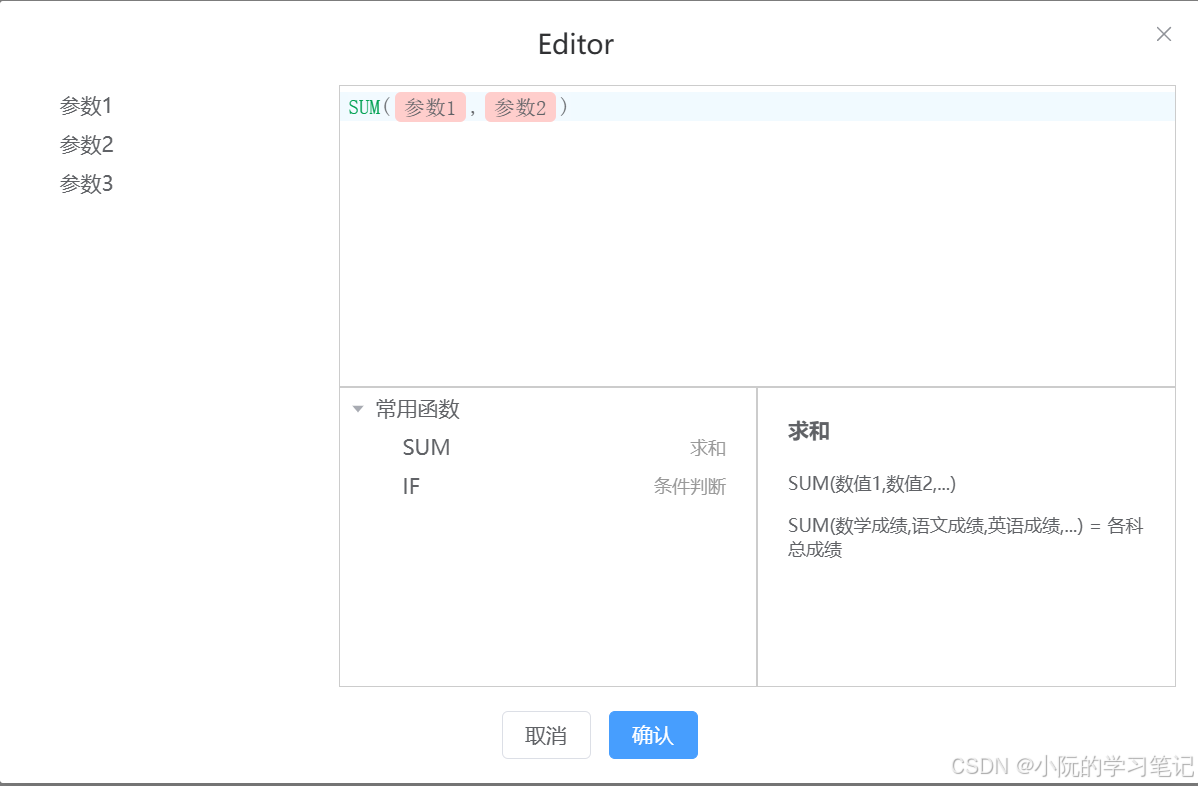
<template><MyDialogv-model="state.visible"title="Editor":width="800"center:close-on-click-modal="false":destroy-on-close="true"@close="close"><div class="editor-container"><TreeComclass="editor-tree":data="state.paramsData"@node-click="insertTag"></TreeCom><div class="editor-content"><div class="editor-main" ref="editorRef"></div><div class="fn"><div class="fn-list"><TreeCom:default-expand-all="true":data="state.fnData"@node-click="insertFn"@mouseenter="hoverFn"></TreeCom></div><div class="fn-desc"><DescCom v-bind="state.info"></DescCom></div></div></div></div><template #footer><div><el-button @click="close">取消</el-button><el-button type="primary" @click="submit">确认</el-button></div></template></MyDialog>
</template><script lang="ts">
export default { name: "Editor" };
</script>
<script lang="ts" setup>
import { nextTick, reactive } from "vue";
import TreeCom from "./components/tree.vue";
import DescCom from "./components/desc.vue";
import { useCodemirror, functionDescription } from ".";
import { Tree } from "@/types/common";const state = reactive({visible: false,paramsData: [{label: "参数1",id: "1",},{label: "参数2",id: "2",},{label: "参数3",id: "3",},],fnData: [{label: "常用函数",id: "1",children: [{label: "SUM",desc: "求和",id: "1-1",},{label: "IF",desc: "条件判断",id: "1-2",},],},],info: {},
});const { code, view, editorRef, init, destroyed, insertText } = useCodemirror();
/*** @description 插入标签*/
const insertTag = (data: Tree) => {if (!data.children) {insertText(`${data.id}.${data.label}`);}
};
/*** @description 插入函数*/
const insertFn = (data: Tree) => {if (!data.children) {insertText(`${data.label}`, "fn");}
};
/*** @description 鼠标悬停展示函数描述*/
const hoverFn = (data: Tree) => {const info = functionDescription(data.label);if (info) {state.info = info;}
};
/*** @description 获取数据*/
const submit = () => {const data = view.value?.state.doc;console.log(data);
};
const open = () => {state.visible = true;nextTick(() => {init();});
};
const close = () => {destroyed();state.visible = false;
};defineExpose({open,
});
</script><style lang="scss" scoped>
.editor-container {position: relative;.editor-tree {width: 200px;position: absolute;left: 0;top: 0;height: 100%;}.editor-content {margin-left: 210px;display: flex;flex-direction: column;.editor-main {border: 1px solid #ccc;height: 200px;}.fn {display: flex;height: 200px;> div {flex: 1;border: 1px solid #ccc;}}}
}
:deep(.cm-focused) {outline: none;
}
:deep(.cm-gutters) {display: none;
}
</style>
插入标签的实现
根据官网例子以及部分大佬思路改编
- 插入标签使用
[[${id}.${label}]]
/*** @description 插入文本并设置光标位置*/const insertText = (text: string, type: "fn" | "tag" = "tag") => {if (view.value) {let content = type === "tag" ? `[[${text}]]` : `{{${text}}}()`;const selection = view.value.state.selection;if (!selection.main.empty) {// 如果选中文本,则替换选中文本const from = selection.main.from;const to = selection.main.to;const anchor =type === "tag" ? from + content.length : from + content.length - 1;const transaction = view.value!.state.update({changes: { from, to, insert: content }, // 在当前光标位置插入标签selection: {anchor,}, // 指定新光标位置});view.value.dispatch(transaction);} else {// 如果没有选中文本,则插入标签const pos = selection.main.head;const anchor =type === "tag" ? pos + content.length : pos + content.length - 1;const transaction = view.value.state.update({changes: { from: pos, to: pos, insert: content }, // 在当前光标位置插入标签selection: {anchor: anchor,}, // 指定新光标位置});view.value.dispatch(transaction);}setTimeout(() => {view.value?.focus();}, 0);}};
- 然后去匹配
[[]]中的内容,取出来用span包裹
/*** @description 插入tag*/
const placeholderTagMatcher = new MatchDecorator({regexp: /\[\[(.+?)\]\]/g,decoration: (match) => {return Decoration.replace({ widget: new PlaceholderTag(match[1]) });},
});
// 定义一个 PlaceholderTag 类,继承自 WidgetType
class PlaceholderTag extends WidgetType {// 定义一个字符串类型的 id 属性,默认值为空字符串id: string = "";// 定义一个字符串类型的 text 属性,默认值为空字符串text: string = "";// 构造函数,接收一个字符串类型的 text 参数constructor(text: string) {// 调用父类的构造函数super();// 被替换的数据处理if (text) {const [id, ...texts] = text.split(".");if (id && texts.length) {this.text = texts.join(".");this.id = id;console.log(this.text, "id:", this.id);}}}eq(other: PlaceholderTag) {return this.text == other.text;}// 此处是我们的渲染方法toDOM() {let elt = document.createElement("span");if (!this.text) return elt;elt.className = "cm-tag";elt.textContent = this.text;return elt;}ignoreEvent() {return true;}
}
// 导出一个名为placeholders的常量,它是一个ViewPlugin实例,通过fromClass方法创建
const placeholderTag = ViewPlugin.fromClass(// 定义一个匿名类,该类继承自ViewPlugin的基类class {// 定义一个属性placeholders,用于存储装饰集placeholders: DecorationSet;// 构造函数,接收一个EditorView实例作为参数constructor(view: EditorView) {// 调用placeholderMatcher.createDeco方法,根据传入的view创建装饰集,并赋值给placeholders属性this.placeholders = placeholderTagMatcher.createDeco(view);}// update方法,用于在视图更新时更新装饰集update(update: ViewUpdate) {// 调用placeholderMatcher.updateDeco方法,根据传入的update和当前的placeholders更新装饰集,并重新赋值给placeholders属性this.placeholders = placeholderTagMatcher.updateDeco(update,this.placeholders);}},// 配置对象,用于定义插件的行为{// decorations属性,返回当前实例的placeholders属性,用于提供装饰集decorations: (v) => v.placeholders,// provide属性,返回一个函数,该函数返回一个EditorView.atomicRanges的提供者provide: (plugin) =>EditorView.atomicRanges.of((view) => {// 从view中获取当前插件的placeholders属性,如果不存在则返回Decoration.nonereturn view.plugin(plugin)?.placeholders || Decoration.none;}),}
);
- 设置样式
const baseTheme = EditorView.baseTheme({".cm-tag": {paddingLeft: "6px",paddingRight: "6px",paddingTop: "3px",paddingBottom: "3px",marginLeft: "3px",marginRight: "3px",backgroundColor: "#ffcdcc",borderRadius: "4px",},".cm-fn": {color: "#01a252",},
});
- 使用插件

插入公式的实现
同理,我只是把[[]]换成了{{}},然后样式也修改了
注意:我们插入标签和公式的时候要指定光标位置,不然会出现问题,使用起来也不方便
提示补全的实现
也是根据官网例子改编,注意要先下载依赖@codemirror/autocomplete
/*** @description 补全提示*/
const completions = [{label: "SUM",apply: insetCompletion,},{label: "IF",apply: insetCompletion,},
];
/*** @description 补全提示* @param {CompletionContext} context* @return {*}*/
function myCompletions(context: CompletionContext) {// 匹配到以s或su或sum或i或if开头的单词let before = context.matchBefore(/[s](?:u(?:m)?)?|[i](?:f)?/gi);if (!context.explicit && !before) return null;return {from: before ? before.from : context.pos,options: completions,};
}
/*** @description 插入补全* @param {EditorView} view* @param {Completion} completion* @param {number} from* @param {number} to*/
function insetCompletion(view: EditorView,completion: Completion,from: number,to: number
) {const content = `{{${completion.label}}}()`;const anchor = from + content.length - 1;const transaction = view.state.update({changes: { from, to, insert: content }, // 在当前光标位置插入标签selection: {anchor: anchor,}, // 指定新光标位置});view.dispatch(transaction);
}
使用插件

仓库地址
在线预览
相关文章:
Vue3+codemirror6实现公式(规则)编辑器
实现截图 实现/带实现功能 插入标签 插入公式 提示补全 公式验证 公式计算 需要的依赖 "codemirror/autocomplete": "^6.18.4","codemirror/lang-javascript": "^6.2.2","codemirror/state": "^6.5.2","cod…...

Lua中文语言编程源码-第十一节,其它小改动汉化过程
__tostring 汉化过程 liolib.c metameth[] {"__转换为字符串", f_tostring}, lauxlib.c luaL_callmeta(L, idx, "__转换为字符串") lua.c luaL_callmeta(L, 1, "__转换为字符串") __len 汉化过程 ltm.c luaT_eventname[] ltablib.c c…...

Safari常用快捷键
一、书签边栏 1、显示或隐藏书签边栏:Control-Command-1 2、选择下一个书签或文件夹:向上头键或向下头键 3、打开所选书签:空格键 4、打开所选文件夹:空格键或右箭头键 5、关闭所选文件夹:空格键或左箭头键 6、更…...

Git登录并解决 CAPTCHA
修改公司域账户密码之后,导致今天pull代码时显示:remote error: CAPTCHA required 本文将介绍如何解决 Git 中的常见错误“fatal: Authentication failed for git”。该问题通常出现在尝试访问远程 Git 仓库时,表示身份验证失败。以下是几种常…...

Websocket从原理到实战
引言 WebSocket 是一种在单个 TCP 连接上进行全双工通信的网络协议,它使得客户端和服务器之间能够进行实时、双向的通信,既然是通信协议一定要从发展历史到协议内容到应用场景最后到实战全方位了解 发展历史 WebSocket 最初是为了解决 HTTP 协议在实时…...

Ubuntu 下 nginx-1.24.0 源码分析 - ngx_get_options函数
声明 就在 main函数所在的 nginx.c 中: static ngx_int_t ngx_get_options(int argc, char *const *argv); 实现 static ngx_int_t ngx_get_options(int argc, char *const *argv) {u_char *p;ngx_int_t i;for (i 1; i < argc; i) {p (u_char *) argv[i]…...

判断您的Mac当前使用的是Zsh还是Bash:echo $SHELL、echo $0
要判断您的Mac当前使用的是Zsh还是Bash,可以使用以下方法: 查看默认Shell: 打开“终端”应用程序,然后输入以下命令: echo $SHELL这将显示当前默认使用的Shell。例如,如果输出是/bin/zsh,则说明您使用的是Z…...

Centos执行yum命令报错
错误描述 错误:为仓库 ‘appstream’ 下载元数据失败 : Cannot prepare internal mirrorlist: Curl error (6): Couldn’t resolve host name for http://mirrorlist.centos.org/?release8&archx86_64&repoAppStream&infrastock [Could not resolve h…...
--- 如何使用redis实现订单超时实时关闭功能)
订单超时设计(1)--- 如何使用redis实现订单超时实时关闭功能
如何使用redis实现订单超时实时关闭功能 准备工作实现步骤解释注意事项(重点) 使用Redis实现订单超时实时关闭功能,可以利用Redis的延时队列(使用Sorted Set实现)和过期键(使用TTL和Keyspace Notifications…...

485网关数据收发测试
目录 1.UDP SERVER数据收发测试 使用产品: || ZQWL-GW1600NM 产品||【智嵌物联】智能网关型串口服务器 1.UDP SERVER数据收发测试 A(TX)连接RX B(RX)连接TX 打开1个网络调试助手,模拟用户的UDP客户端设…...

RabbitMQ快速上手及入门
概念 概念: publisher:生产者,也就是发送消息的一方 consumer:消费者,也就是消费消息的一方 queue:队列,存储消息。生产者投递的消息会暂存在消息队列中,等待消费者处理 exchang…...

4种架构的定义和关联
文章目录 **1. 各架构的定义****业务架构(Business Architecture)****应用架构(Application Architecture)****数据架构(Data Architecture)****技术架构(Technology Architecture)*…...

109,【1】攻防世界 web 题目名称-文件包含
进入靶场 直接显示源代码 提示我们通过get方式传递名为filename的参数,同时给出了文件名check.php filenamecheck.php 显示使用了正确的用法,错误的方法 filename./check.php 还是一样的回显 傻了,题目名称是文件包含,需要用到…...

leetcode90 子集II
1. 题意 给一个可能含有重复元素的数组,求这个数组的所有子集。 2. 题解 跟leetcode 72 子集的差别在于,我们需要将重复的元素给去掉。那如何去重呢,实际上我们可以先排序将重复的元素给放在一起。然后在回溯后,找到下一个不与…...

DeepSeek模型构建与训练
在完成数据预处理之后,下一步就是构建和训练深度学习模型。DeepSeek提供了简洁而强大的API,使得模型构建和训练变得非常直观。无论是简单的全连接网络,还是复杂的卷积神经网络(CNN)或循环神经网络(RNN),DeepSeek都能轻松应对。本文将带你一步步构建一个深度学习模型,并…...

PyTorch torch.unbind、torch.split 和 torch.chunk函数介绍
pytorch中 torch.unbind、torch.split 和 torch.chunk等函数可用于张量的拆分操作。 1. torch.unbind 功能说明: torch.unbind 沿指定的维度将张量“解包”为多个张量,返回一个元组。解包后被操作的那个维度会消失,每个输出张量的维度数会比…...

【愚公系列】《循序渐进Vue.js 3.x前端开发实践》061-Vue Router的动态路由
标题详情作者简介愚公搬代码头衔华为云特约编辑,华为云云享专家,华为开发者专家,华为产品云测专家,CSDN博客专家,CSDN商业化专家,阿里云专家博主,阿里云签约作者,腾讯云优秀博主&…...

杭州某小厂面试
问的都是基础知识,主要是三个部分:计网,数据库,java。计网答得挺好,数据答得一般,Java答得一坨。 目录 1.TCP/IP协议的5层模型 2.3次握手和4次挥手 3.操作系统中的进程和线程的区别 4.lunix top 命令看…...

C基础寒假练习(8)
一、终端输入10个学生成绩,使用冒泡排序对学生成绩从低到高排序 #include <stdio.h> int main(int argc, const char *argv[]) {int arr[10]; // 定义一个长度为10的整型数组,用于存储学生成绩int len sizeof(arr) / sizeof(arr[0]); // 计算数组…...
)
设计模式 ->模板方法模式(Template Method Pattern)
模板方法模式 模板方法模式是一种行为设计模式,它在一个方法中定义一个操作的算法骨架,而将一些步骤延迟到子类中实现。它允许子类在不改变算法结构的情况下重新定义算法中的某些步骤 特点 算法骨架: 在基类中定义算法的框架延迟实现&…...

嵌入式开发中的模拟信号处理:ADC、DAC与PWM核心原理与CircuitPython实战
1. 项目概述:从数字世界到物理世界的桥梁在嵌入式开发的世界里,我们写的代码最终是要和物理世界打交道的。物理世界是连续的、模拟的——光线强弱、温度高低、声音大小,这些都不是简单的“开”或“关”,而是平滑变化的连续量。而我…...

GPT-Image-2 老是生成失败?完整排查和修复指南,5 个真根因逐个击破
GPT-Image-2 老是生成失败?完整排查和修复指南,5 个真根因逐个击破GPT-Image-2 的处理时间比文字模型长很多——高质量 1024px 需要 145-280 秒。大多数所谓的"生成失败"其实不是模型问题,而是网络链路(CDN、反代、SDK&…...

CC2530开发避坑指南:IAR for 8051 10.10.1新建工程到流水灯调试的完整流程
CC2530开发实战:IAR for 8051 10.10.1工程搭建与调试全解析 第一次接触CC2530和IAR开发环境时,我盯着满屏的编译错误和无法识别的仿真器,深刻理解了什么叫"从入门到放弃"。这种经历在嵌入式开发领域太常见了——特别是当你面对的是…...

ARM异常处理机制与ESR寄存器详解
1. ARM异常处理机制概述在ARMv8/v9架构中,异常处理是处理器响应硬件或软件事件的核心机制。当发生异常时,处理器会暂停当前程序执行,跳转到预定义的异常向量表入口,同时将异常相关信息记录在异常综合征寄存器(ESR)中。异常可能由多…...

基于Circuit Playground Express与MakeCode的阿基米德螺旋桨智能小船制作
1. 项目概述:当古老智慧遇见现代创客阿基米德螺旋,这个诞生于两千多年前的巧妙发明,最初被用来从低处向高处提水。它的核心原理简单而强大:一个旋转的螺旋面,能将流体或颗粒物沿着轴向“推”动。今天,我们不…...

5G NR物理层实战:从帧结构参数到TB块生成的完整计算解析
1. 5G NR物理层基础:为什么需要计算TB块? 在5G通信系统中,物理层就像快递公司的打包部门,负责把用户数据(比如你刷的视频内容)装进标准化的"包裹"里传输。这个"包裹"的专业名称就是传输…...

书匠策AI官网www.shujiangce.com|别再硬扛了!这个AI把写期刊论文变成了“填空题“
微信公众号搜一搜「书匠策AI」,三分钟治好你的论文拖延症! 各位还在深夜对着Word文档发呆的同学们,今天我不讲道理,只讲工具。 你们有没有想过一个问题:为什么写期刊论文这件事,让90%的人觉得痛苦…...

信息量模型避坑指南:搞懂这3个关键点,你的地质灾害评价结果才靠谱
信息量模型避坑指南:搞懂这3个关键点,你的地质灾害评价结果才靠谱 在地质灾害易发性评价领域,信息量模型因其计算简单、结果直观而广受欢迎。然而,许多GIS从业者和科研人员在应用该模型时,常常陷入"流程正确但结果…...

Taotoken官方折扣与活动价接入实践带来的成本节省感受
🚀 告别海外账号与网络限制!稳定直连全球优质大模型,限时半价接入中。 👉 点击领取海量免费额度 Taotoken官方折扣与活动价接入实践带来的成本节省感受 1. 背景与决策起点 作为个人开发者或小团队,在构建基于大模型的…...

构建插件化搜索聚合服务:从架构设计到Go语言实现
1. 项目概述与核心价值最近在折腾一个个人项目,需要实现一个轻量级的在线搜索聚合功能。我的需求很简单:不想在代码里写死一堆搜索引擎的API调用,也不想每次加个新搜索源就改一遍逻辑。就在我到处翻找有没有现成的轮子时,一个叫st…...