线程同步(互斥锁与条件变量)
文章目录
- 1、为什么要用互斥锁
- 2、互斥锁怎么用
- 3、为什么要用条件变量
- 4、互斥锁和条件变量如何配合使用
- 5、互斥锁和条件变量的常见用法
参考资料:https://blog.csdn.net/m0_53539646/article/details/115509348
1、为什么要用互斥锁
为了使各线程能够有序地访问公共资源。例如:有一个全局变量g_count,有三个线程thread_fun_1、thread_fun_2、thread_fun_3,三个线程都要对g_count写操作。在不加锁的情况下,当thread_fun_1正在写数据时thread_fun_2和thread_fun_3也可能会进行写操作,这就会导致程序不符合我们的预期结果。而加锁的目的就是保证各线程能够按顺序访问公共资源,就好比我们排队WC一样,一个人解决完下个人才能解决。不多说,直接看下面的例子:
#include <stdio.h>
#include <unistd.h>
#include <stdlib.h>
#include <string.h>
#include <pthread.h>static int g_count = 0; //共享数据static void *thread_fun_1(void *data)
{for(int i=0; i<10000; i++){g_count++;}printf("%s g_count: %d\n", __func__, g_count);
}static void *thread_fun_2(void *data)
{for(int i=0; i<10000; i++){g_count++;}printf("%s g_count: %d\n", __func__, g_count);
}static void *thread_fun_3(void *data)
{for(int i=0; i<10000; i++){g_count++;}printf("%s g_count: %d\n", __func__, g_count);
}int main(int argc, char const *argv[])
{pthread_t pid[3]; //创建3个线程pthread_create(&pid[0], NULL, thread_fun_1, NULL);pthread_create(&pid[1], NULL, thread_fun_2, NULL);pthread_create(&pid[2], NULL, thread_fun_3, NULL);//等待三个线程结束pthread_join(pid[0], NULL);pthread_join(pid[1], NULL);pthread_join(pid[2], NULL);return 0;
}
运行结果:
user@root:/mnt/hgfs/UbuntuRK3568/04_ThreadLockTest$ gcc threadtest1.c -pthread
user@root:/mnt/hgfs/UbuntuRK3568/04_ThreadLockTest$ ./a.out
thread_fun_1 g_count: 10000
thread_fun_2 g_count: 20000
thread_fun_3 g_count: 30000
user@root:/mnt/hgfs/UbuntuRK3568/04_ThreadLockTest$ ./a.out
thread_fun_1 g_count: 10000
thread_fun_2 g_count: 20437
thread_fun_3 g_count: 28812
user@root:/mnt/hgfs/UbuntuRK3568/04_ThreadLockTest$
例程解析:
上面的例程创建了3个线程,每个线程都对全局变量g_count加10000次,然后打印g_count的值。从运行结果很容易看出,同样的程序两次运行的结果不一致,这就是线程无序访问公共资源的原因。
2、互斥锁怎么用
说完为什么要用互斥锁,接下来就该说下怎么用了,步骤如下:
// 1、包含pthread.h头文件
#include <pthread.h>// 2、互斥锁的声明
static pthread_mutex_t g_mutex_lock//3、互斥锁的初始化
pthread_mutex_init(&g_mutex_lock, NULL);// 4、锁定互斥锁
pthread_mutex_lock(&g_mutex_lock);// 5、执行对共享资源的操作// 6、解锁互斥锁
pthread_mutex_unlock(&g_mutex_lock);// 7、销毁互斥锁
pthread_mutex_destroy(&g_mutex_lock);
接着上面的例子,写一个带互斥锁的程序:
#include <stdio.h>
#include <unistd.h>
#include <stdlib.h>
#include <string.h>
#include <pthread.h>static int g_count = 0; //共享数据
static pthread_mutex_t g_mutex_lock;static void *thread_fun_1(void *data)
{pthread_mutex_lock(&g_mutex_lock); //上锁for(int i=0; i<10000; i++){g_count++;}printf("%s g_count: %d\n", __func__, g_count);pthread_mutex_unlock(&g_mutex_lock); //解锁
}static void *thread_fun_2(void *data)
{pthread_mutex_lock(&g_mutex_lock); //上锁for(int i=0; i<10000; i++){g_count++;}printf("%s g_count: %d\n", __func__, g_count);pthread_mutex_unlock(&g_mutex_lock); //解锁
}static void *thread_fun_3(void *data)
{pthread_mutex_lock(&g_mutex_lock); //上锁for(int i=0; i<10000; i++){g_count++;}printf("%s g_count: %d\n", __func__, g_count);pthread_mutex_unlock(&g_mutex_lock); //解锁
}int main(int argc, char const *argv[])
{int ret;pthread_t pid[3];ret = pthread_mutex_init(&g_mutex_lock, NULL);if (ret != 0) {printf("mutex init failed\n");return -1;}pthread_create(&pid[0], NULL, thread_fun_1, NULL);pthread_create(&pid[1], NULL, thread_fun_2, NULL);pthread_create(&pid[2], NULL, thread_fun_3, NULL);pthread_join(pid[0], NULL);pthread_join(pid[1], NULL);pthread_join(pid[2], NULL);pthread_mutex_destroy(&g_mutex_lock);
}
运行结果:
user@root:/mnt/hgfs/UbuntuRK3568/04_ThreadLockTest$ gcc threadtest2.c -pthread
user@root:/mnt/hgfs/UbuntuRK3568/04_ThreadLockTest$ ./a.out
thread_fun_1 g_count: 10000
thread_fun_2 g_count: 20000
thread_fun_3 g_count: 30000
user@root:/mnt/hgfs/UbuntuRK3568/04_ThreadLockTest$ ./a.out
thread_fun_1 g_count: 10000
thread_fun_2 g_count: 20000
thread_fun_3 g_count: 30000
user@root:/mnt/hgfs/UbuntuRK3568/04_ThreadLockTest$ ./a.out
thread_fun_1 g_count: 10000
thread_fun_2 g_count: 20000
thread_fun_3 g_count: 30000
user@root:/mnt/hgfs/UbuntuRK3568/04_ThreadLockTest$
从上面的结果可以看到,程序多次运行,执行结果都是一样的
3、为什么要用条件变量
相信大家到这里会有一个疑问,既然互斥锁都能保证程序有序访问了,为什么还要使用条件变量呢?我们看下面的例子:下面代码创建了thread_fun_1和thread_fun_2两个线程,thread_fun_2中对g_count全局变量加100次,thread_fun_1中判断全局变量的值大于0才执行。按照我们的理解,两个线程都能正常运行退出才对,但实际运行结果并不是这样。
#include <stdio.h>
#include <unistd.h>
#include <stdlib.h>
#include <string.h>
#include <pthread.h>static int g_count = 0; //共享数据
static pthread_mutex_t g_mutex_lock;static void *thread_fun_1(void *data)
{pthread_mutex_lock(&g_mutex_lock); //上锁printf("%s g_count: %d\n", __func__, g_count);while(0 < g_count){//do somethingprintf("%s run ok,g_count: %d\n", __func__, g_count);pthread_mutex_unlock(&g_mutex_lock); //解锁break;}
}static void *thread_fun_2(void *data)
{pthread_mutex_lock(&g_mutex_lock); //上锁for(int i=0; i<100; i++){g_count++;}printf("%s g_count: %d\n", __func__, g_count);pthread_mutex_unlock(&g_mutex_lock); //解锁}int main(int argc, char const *argv[])
{int ret;pthread_t pid[3];ret = pthread_mutex_init(&g_mutex_lock, NULL);if (ret != 0) {printf("mutex init failed\n");return -1;}pthread_create(&pid[0], NULL, thread_fun_1, NULL);pthread_create(&pid[1], NULL, thread_fun_2, NULL);pthread_join(pid[0], NULL);pthread_join(pid[1], NULL);pthread_mutex_destroy(&g_mutex_lock);
}
运行结果:可以看到线程thread_fun_1打印了一串日之后就没有其他打印了,程序像是阻塞了一样。其实这里是进入了死锁,g_count一开始初始化为0:当 thread_fun_1进入临界区时,其他线程不能进入临界区,意味着 Bthread_fun_2没有机会去修改 g_count, g_count的值一直为 0,不满足Athread_fun_1继续执行的条件(g_count> 0),Athread_fun_1只能一直等待。 又因为使用了互斥锁:当 thread_fun_1进入临界区时,其他线程不能进入临界区,意味着 thread_fun_2没有机会去修改 g_count, g_count 的值一直为 0,不满足thread_fun_1继续执行的条件(g_count > 0)。最终结果:thread_fun_1只能一直等待,thread_fun_2不能执行,导致整个程序不能正常运行。这时候就需要使用条件变量了。
user@root:/mnt/hgfs/UbuntuRK3568/04_ThreadLockTest$ gcc threadtest3.c -pthread
user@root:/mnt/hgfs/UbuntuRK3568/04_ThreadLockTest$ ./a.out
thread_fun_1 g_count: 0
4、互斥锁和条件变量如何配合使用
使用步骤:
// 1、包含pthread.h头文件
#include <pthread.h>// 2、条件变量声明
pthread_cond_t g_cond ; //3、条件初始化
pthread_cond_init(&g_cond, NULL) ;// 4、/* 令一个线程A等待在条件变量上 */
pthread_cond_wait(&g_cond, &g_mutex_lock) ;// 5、线程B执行对共享资源的操作// 6、线程B通知等待在条件变量上的线程A,线程通知函数有2个,pthread_cond_broadcast是通知所有线程
//    pthread_cond_signal是至少通知一个线程,一般使用pthread_cond_broadcast函数
pthread_cond_broadcast(&g_cond) ;
pthread_cond_signal(&g_cond);// 7、销毁条件变量
pthread_cond_destroy( &g_cond ) ;
我们通过条件变量解决上面的问题:
#include <stdio.h>
#include <unistd.h>
#include <stdlib.h>
#include <string.h>
#include <pthread.h>static int g_count = 0; //共享数据
static pthread_mutex_t g_mutex_lock;//互斥锁
pthread_cond_t g_cond ; //条件变量static void *thread_fun_1(void *data)
{pthread_mutex_lock(&g_mutex_lock); //上锁printf("%s g_count: %d\n", __func__, g_count);pthread_cond_wait(&g_cond, &g_mutex_lock) ;while(0 < g_count){//do somethingprintf("%s run ok,g_count: %d\n", __func__, g_count);pthread_mutex_unlock(&g_mutex_lock); //解锁break;}
}static void *thread_fun_2(void *data)
{pthread_mutex_lock(&g_mutex_lock); //上锁for(int i=0; i<100; i++){g_count++;pthread_cond_broadcast(&g_cond) ;}printf("%s g_count: %d\n", __func__, g_count);pthread_mutex_unlock(&g_mutex_lock); //解锁}int main(int argc, char const *argv[])
{int ret;pthread_t pid[3];pthread_cond_init(&g_cond, NULL) ;ret = pthread_mutex_init(&g_mutex_lock, NULL);if (ret != 0) {printf("mutex init failed\n");return -1;}pthread_create(&pid[0], NULL, thread_fun_1, NULL);pthread_create(&pid[1], NULL, thread_fun_2, NULL);pthread_join(pid[0], NULL);pthread_join(pid[1], NULL);pthread_cond_destroy( &g_cond ) ;pthread_mutex_destroy(&g_mutex_lock);
}
运行结果:
user@root:/mnt/hgfs/UbuntuRK3568/04_ThreadLockTest$ gcc threadtest4.c -pthread
user@root:/mnt/hgfs/UbuntuRK3568/04_ThreadLockTest$ ./a.out
thread_fun_1 g_count: 0
thread_fun_2 g_count: 100
thread_fun_1 run ok,g_count: 100
user@root:/mnt/hgfs/UbuntuRK3568/04_ThreadLockTest$
5、互斥锁和条件变量的常见用法
一般做项目的时候如果我们希望多个线程使用同一资源,我们一般会将这部分资源打包成一个结构体,通过结构体定义一个全局变量供各线程使用。所以,互斥锁和条件变量一般也是和结构体一起用的,如下面的例子,加锁、解锁还有初始化跟上面的举的例子一样,放在结构体表示对该结构体的数据进行加锁。
typedef struct
{int a;char buf[32];/* ... */pthread_mutex_t mutex_test;pthread_cond_t cond_test;
} test;
就写这么多吧,如果哪里有问题欢迎大家指正。
相关文章:
)
线程同步(互斥锁与条件变量)
文章目录 1、为什么要用互斥锁2、互斥锁怎么用3、为什么要用条件变量4、互斥锁和条件变量如何配合使用5、互斥锁和条件变量的常见用法 参考资料:https://blog.csdn.net/m0_53539646/article/details/115509348 1、为什么要用互斥锁 为了使各线程能够有序地访问公共…...

Ubuntu指令学习(个人记录、偶尔更新)
Ubuntu指令学习 0、一点常用指令列表一、Ubuntu下复制与移动,cp/mv二、Ubuntu下echo 与 重定向>,>>三、Ubuntu下chmod,用户权限四、Ubuntu下的tar打包,gzip压缩五、Ubuntu(22.04)下系统语言为中文,切换主目录文件名为英文。六、Ubun…...
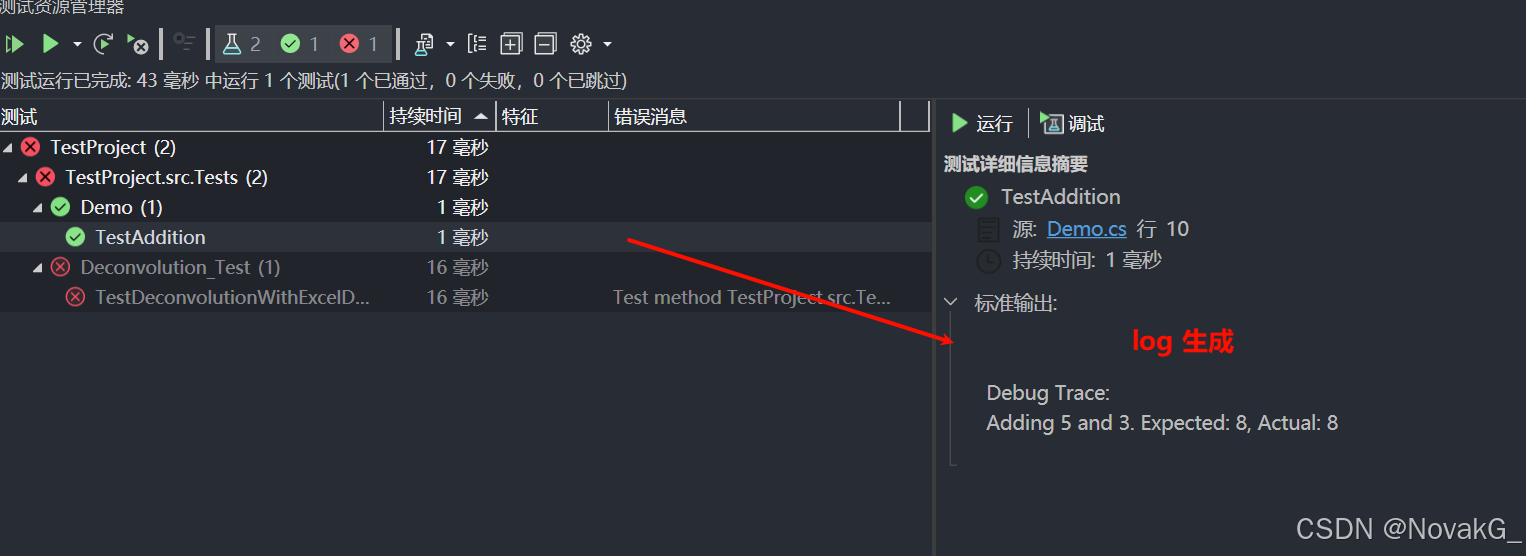
Visual Studio 进行单元测试【入门】
摘要:在软件开发中,单元测试是一种重要的实践,通过验证代码的正确性,帮助开发者提高代码质量。本文将介绍如何在VisualStudio中进行单元测试,包括创建测试项目、编写测试代码、运行测试以及查看结果。 1. 什么是单元测…...

【经验分享】Linux 系统安装后内核参数优化
在 Linux 系统安装后,进行内核优化有助于提升系统的性能、稳定性和安全性。以下是一些常见的内核优化操作: 修改/etc/sysctl.conf 文件 执行sysctl -p使配置生效。 kernel.shmmax 135185569792 kernel.shmall 4294967296 fs.aio-max-nr 3145728 fs.fi…...

linux统计文件夹下有多少个.rst文件行数小于4行
您可以使用 find 命令结合 wc 命令来统计文件夹下 .rst 文件行数小于 4 行的文件数量。以下是一个具体的命令示例: find /path/to/directory -name "*.rst" -type f -exec wc -l {} | awk $1 < 4 | wc -l解释: find /path/to/directory …...

使用开源项目xxl-cache构建多级缓存
xxl-cache简介 官网地址:https://www.xuxueli.com/xxl-cache/ 概述 XXL-CACHE 是一个 多级缓存框架,高效组合本地缓存和分布式缓存(RedisCaffeine),支持“多级缓存、一致性保障、TTL、Category隔离、防穿透”等能力;拥有“高性…...
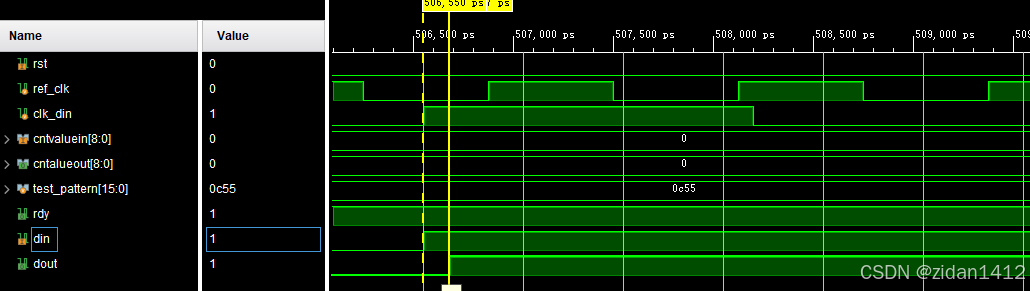
LVDS接口总结--(5)IDELAY3仿真
仿真参考资料如下: https://zhuanlan.zhihu.com/p/386057087 timescale 1 ns/1 ps module tb_idelay3_ctrl();parameter REF_CLK 2.5 ; // 400MHzparameter DIN_CLK 3.3 ; // 300MHzreg ref_clk ;reg …...
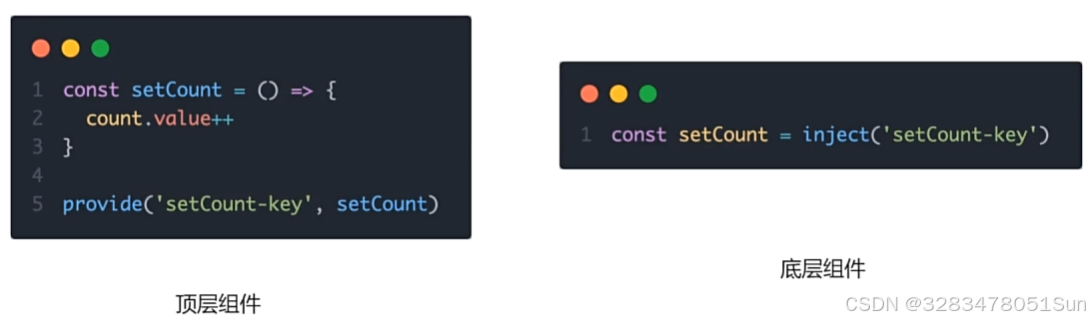
Vue3(1)
一.create-vue // new Vue() 创建一个应用实例 > createApp() // createRouter() createStore() // 将创建实例进行了封装,保证每个实例的独立封闭性import { createApp } from vue import App from ./App.vue// mount 设置挂载点 #app (id为app的盒子) createA…...
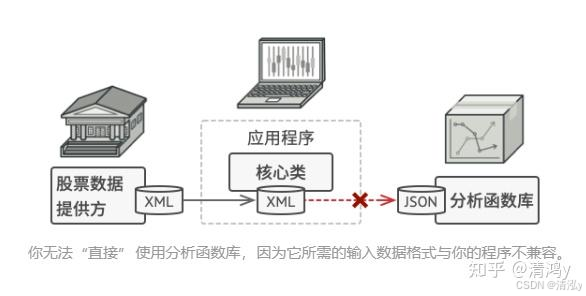
玩转适配器模式
文章目录 解决方案现实的举例适用场景实现方式适配器模式优缺点优点:缺点:适配器模式可比上一篇的工厂模式好理解多了,工厂模式要具有抽象的思维。这个适配器模式,正如字面意思,就是要去适配某一件物品。 假如你正在开发一款股票市场监测程序, 它会从不同来源下载 XML 格…...
2.11寒假作业
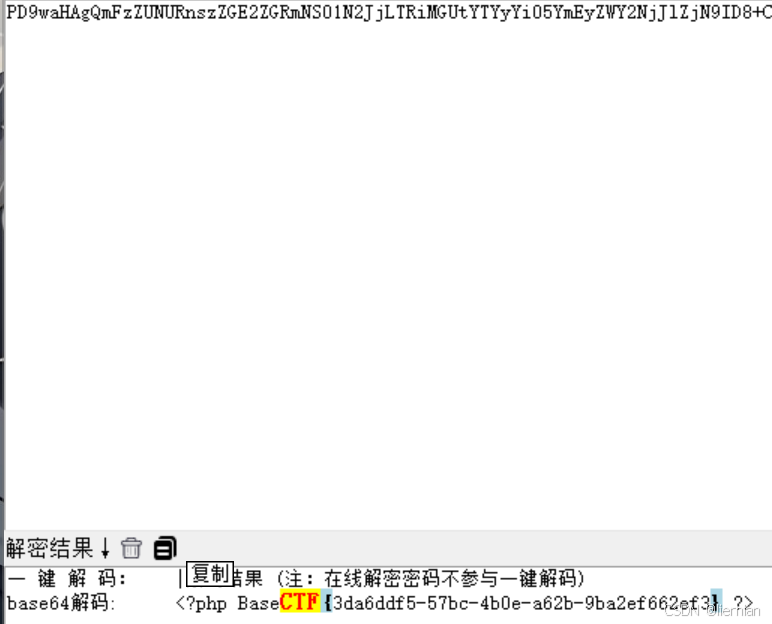
web:[SWPUCTF 2022 新生赛]js_sign 打开环境是这样的,随便输入进行看看 提示错误,看源码其中的js代码 这个代码很容易理解,要让输入的内容等于对应的字符串,显然直接复制粘贴是错的 这串字符看起来像是base64加密&…...

untiy 冰面与地面,物理材质的影响
效果 WeChat_20250211165601...

视频编解码标准中的 Profile 和 Level
视频编解码标准中的 Profile 和 Level 在视频编码标准(如 H.264/AVC、HEVC/H.265、H.266/VVC、AV1)中,Profile(配置文件) 和 Level(级别) 是两个重要的概念,它们用于定义编码器和解码器支持的特性、功能以及视频质量与编码效率之间的权衡。 Profile(配置文件) Pro…...

通用的将jar制作成docker镜像sh脚本
通用的将jar制作成docker镜像sh脚本 为了在将 JAR 制作成 Docker 镜像的过程中创建日志目录,可以对之前的脚本进行扩展。以下是改进后的脚本,会在镜像构建时在容器内创建日志目录,并将日志文件挂载到该目录下。 在生成的 Dockerfile 中添加…...

AUTOGPT:基于GPT模型开发的实验性开源应用程序; 目标设定与分解 ;;自主思考与决策 ;;信息交互与执行
目录 AUTOGPT是一款基于GPT模型开发的实验性开源应用程序目标设定与分解自主思考与决策信息交互与执行AUTOGPT是一款基于GPT模型开发的实验性开源应用程序 目标设定与分解 自主思考与决策 信息交互与执行 AUTOGPT是一款基于GPT模型开发的实验性开源应用程序,它能让大语言模…...

异步线程中使用RestTemplate注入空指针解决
在某种情况下,调用第三方或者jar文件中封装的httpClient时,上层调用采用异步线程调用,导致底层的RestTemplate注入为空,无法正常调用,需要强制将spring的上下文绑定到异步线程中。 强制传递 Spring 上下文到异步线程 …...
2024BaseCTF_week4_web上
继续!冲冲冲 目录 圣钥之战1.0 nodejs 原型 原型链 原型链污染 回到题目 flag直接读取不就行了? 圣钥之战1.0 from flask import Flask,request import jsonapp Flask(__name__)def merge(src, dst):for k, v in src.items():if hasattr(dst, __geti…...

说一下 jvm 有哪些垃圾回收器?
JVM 垃圾回收器对比表 垃圾回收器类型工作方式回收方式停顿时间适用场景优点缺点常见问题常见配置Serial GC串行单线程,STW年轻代:复制算法 老年代:标记-整理长小内存、单核CPU,如桌面应用或嵌入式设备简单高效,适用于…...

react国际化配置react-i18next详解
react PC端项目构建TS,react18.2.0antdviteaxiosreduxsassts 完整版代码下载: https://download.csdn.net/download/randy521520/88922625 react PC端项目构建,react18.2.0antdviteaxiosreduxsass完整版代码下载: https://downloa…...

Java并发编程——上下文切换、死锁、资源限制
文章目录 1.1上下文切换(1)上下文切换的概念(2)多线程一定比单线程快吗?(3)测量上下文切换如何减少上下文切换 1.2 死锁(1)死锁的定义(2)死锁产生…...
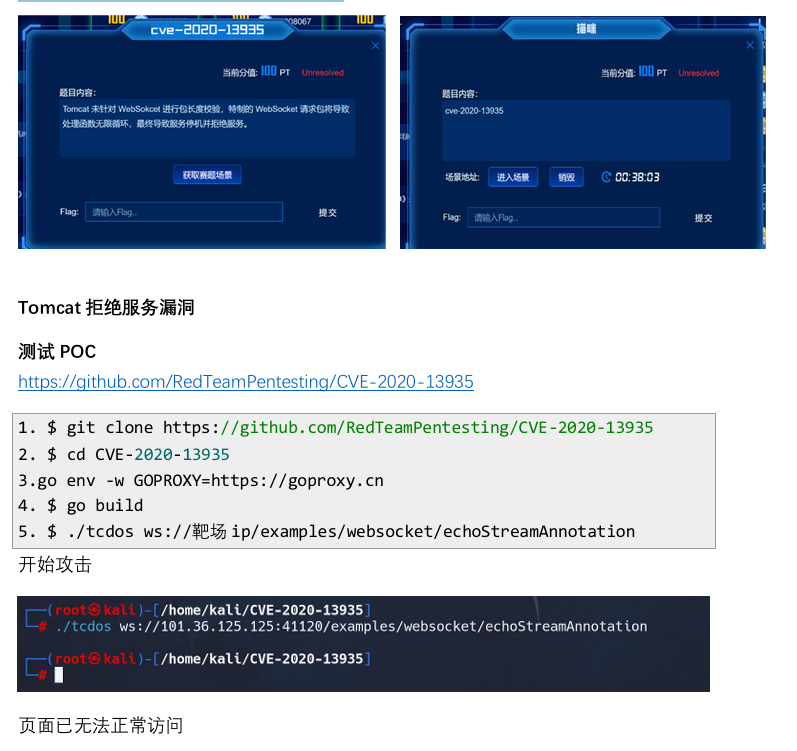
MS08067练武场--WP
免责声明:本文仅用于学习和研究目的,不鼓励或支持任何非法活动。所有技术内容仅供个人技术提升使用,未经授权不得用于攻击、侵犯或破坏他人系统。我们不对因使用本文内容而引起的任何法律责任或损失承担责任。 注:此文章为快速通关…...

从AI绘画到虚拟主播:拆解AIGC在创意行业的6种落地场景
从AI绘画到虚拟主播:AIGC在创意行业的6大实战场景解析 当Midjourney生成的插画登上《经济学人》封面,当虚拟主播24小时不间断带货,创意行业正经历一场由AIGC驱动的生产力革命。本文将深入拆解6个最具商业价值的落地场景,通过真实…...

EagleEye效果实测:在JetPack 6.0 + Orin AGX上实现15ms推理的边缘部署方案
EagleEye效果实测:在JetPack 6.0 Orin AGX上实现15ms推理的边缘部署方案 如果你正在为边缘设备寻找一个又快又准的目标检测方案,那么今天的内容可能会让你眼前一亮。我们刚刚在NVIDIA Jetson Orin AGX上,基于最新的JetPack 6.0系统…...

AI人脸隐私卫士效果展示:看它如何精准识别并模糊多人合照
AI人脸隐私卫士效果展示:看它如何精准识别并模糊多人合照 1. 效果展示:从家庭合影到百人合照 1.1 家庭聚会照片处理 想象一下这样的场景:你刚刚参加完一场热闹的家庭聚会,手机里存满了欢乐的合影。这些照片中,有近景…...

跨设备电子书同步终极指南:Koodo Reader 2.3.1完整教程
跨设备电子书同步终极指南:Koodo Reader 2.3.1完整教程 【免费下载链接】koodo-reader A modern ebook manager and reader with sync and backup capacities for Windows, macOS, Linux and Web 项目地址: https://gitcode.com/GitHub_Trending/koo/koodo-reader…...

终极指南:如何快速配置HsMod插件提升炉石传说游戏体验
终极指南:如何快速配置HsMod插件提升炉石传说游戏体验 【免费下载链接】HsMod Hearthstone Modify Based on BepInEx 项目地址: https://gitcode.com/GitHub_Trending/hs/HsMod HsMod是一个基于BepInEx框架开发的炉石传说游戏插件,专为希望提升游…...

AI净界-RMBG-1.4企业落地:制造业产品手册高清图自动透明化处理
AI净界-RMBG-1.4企业落地:制造业产品手册高清图自动透明化处理 1. 引言:从“手动抠图”到“一键透明”的制造业痛点 在制造业,产品手册、宣传图册、官网详情页是展示企业实力的重要窗口。一张清晰、专业、背景干净的产品图,往往…...

日程管理革命:OpenClaw解析Qwen3.5-9B生成的待办清单并同步日历
日程管理革命:OpenClaw解析Qwen3.5-9B生成的待办清单并同步日历 1. 为什么需要智能日程管理 每天早上打开电脑,我的第一件事就是对着记事本手忙脚乱地整理当天的待办事项。这种原始的工作方式持续了三年,直到我发现会议时间冲突、任务遗漏成…...

Onekey:5分钟上手!Steam游戏清单下载终极指南
Onekey:5分钟上手!Steam游戏清单下载终极指南 【免费下载链接】Onekey Onekey Steam Depot Manifest Downloader 项目地址: https://gitcode.com/gh_mirrors/one/Onekey 想要轻松获取Steam游戏的完整文件清单吗?Onekey作为专业的Steam…...

macOS专属方案:OpenClaw+nanobot镜像的5个效率技巧
macOS专属方案:OpenClawnanobot镜像的5个效率技巧 1. 为什么选择OpenClawnanobot组合 作为一个长期使用macOS的开发者,我一直在寻找能够提升日常工作效率的自动化工具。直到遇到OpenClaw和nanobot这个组合,才真正找到了适合个人使用的智能助…...

新手零压力入门:借助快马ai互动教程轻松搞定node.js安装与环境搭建
最近在学前端开发,发现很多教程都提到要安装Node.js。作为一个纯小白,第一次看到"环境变量"、"包管理器"这些词简直一头雾水。好在发现了InsCode(快马)平台,它把复杂的安装过程变成了可以边学边做的互动教程,…...