OpenGL入门教程之 变换
引言
这是一个闪耀的时刻,因为我们即将能生产出令人惊叹的3D效果!
变换
向量和矩阵变换包括太多内容,但由于学过线性代数和GAMES101,因此不在此做过多阐述。仅阐述包括代码的GLM内容。
GLM的使用
(1)GLM的配置
GLM是OpenGL Mathematics的缩写,它是一个只有头文件的库,也就是说我们只需包含对应的头文件就行了,不用链接和编译。GLM可以在它们的网站上下载。把头文件的根目录复制到你的includes文件夹,然后你就可以使用这个库了。
我们需要的GLM的大多数功能都可以从下面这3个头文件中找到:
#include <glm/glm.hpp>
#include <glm/gtc/matrix_transform.hpp>
#include <glm/gtc/type_ptr.hpp>
(2)GLM中类型的使用
例子1:定义向量(1,0,0),并使其位移(1,1,0)。注意需要把他定义为一个glm::vec4类型的值,并且其次坐标设定为1.0。
// 使用glm::vec4定义一个四维向量(齐次坐标为1.0)glm::vec4 vec(1.0f, 0.0f, 0.0f, 1.0f);// 使用glm::mat4定义一个4x4的矩阵// glm::mat4如果不初始化则数据会是未知的,所以用以下方式初始化为单位矩阵glm::mat4 trans = glm::mat4(1.0f);// 使用glm::translate(变换矩阵,位移向量)// glm::translate返回变换矩阵添加位移效果后得到的矩阵trans = glm::translate(trans, glm::vec3(1.0f, 1.0f, 0.0f));// 使用 变换矩阵✖四维向量= 变换后的向量vec = trans * vec;std::cout << vec.x << vec.y << vec.z << std::endl;
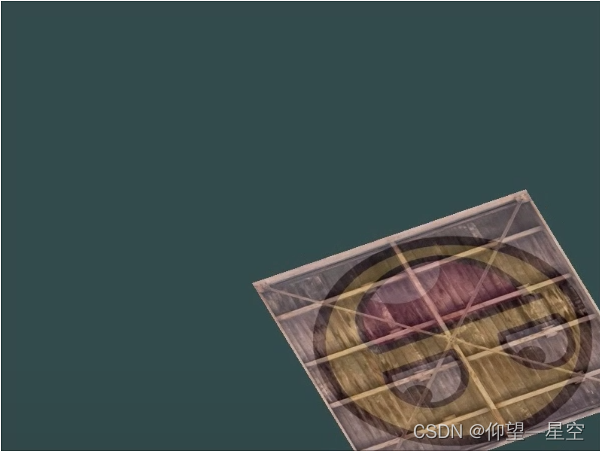
例子2:我们来旋转和缩放之前教程中的那个箱子。首先我们把箱子逆时针旋转90度。然后缩放0.5倍,使它变成原来的一半大。我们来创建变换矩阵:
glm::mat4 trans;trans = glm::rotate(trans, 90.0f, glm::vec3(0.0, 0, 1.0));trans = glm::scale(trans, glm::vec3(0.5, 0.5, 0.5));
针对变换顺序的讨论:
绝大多数情况下,我们约定的变换顺序是先缩放,再旋转,最后平移。这样变换顺序的依据是,比如我们Blender里面建模了一个可乐罐,我们要将它从自己的局部坐标转换到世界坐标,比如我们希望它:位移到桌子上、倾斜45°、x和y轴均匀缩放至0.5倍。我们可以试想,如果先将可乐瓶倾斜45°再缩放的话,原本针对x轴和y轴的缩放应将可乐瓶的半径和高进行缩放至一半,但是现在可乐瓶倾斜了,导致缩放不是针对可乐瓶的半径和高了(即可乐瓶的半径不在x轴上,高不在y轴上),由此我们得出结论:缩放要在旋转之前进行,因为我们潜意识里的缩放就是针对模型未旋转时体态的缩放。还有一个很重要的事情是,我们推导旋转矩阵是基于旋转中心在原点时,因此我们使用旋转矩阵务必要保证旋转中心在原点,试想我们从Blender中建模的对象,其所在局部坐标一定旋转中心是在原点的,但是当我们对他进行平移之后,它的几何中心就不在原点了。因此我们的旋转应该是针对物体最初的位置进行的,所以我们得到结论:旋转需要在位移之前。综上所述,我们就明白了,需要先缩放、再旋转、最后位移。
设变换矩阵初始为M0单位矩阵,设我们需要变换的坐标为 ve4,设我们需要对ve4做的一系列顺序变换为(S1,S2,S3),设这一系列变换对应的变换矩阵为(M1,M2,M3)。则我们应该做的是:M3✖M2✖M1✖ve4,这样我们则对ve4按顺序执行了变换。那么如果我们要使用一个变换矩阵M包含所有的变换怎么办呢?
由于矩阵乘法满足结合律,即A✖B✖C=(A✖B)✖C=A✖(B✖C)。因此M3✖M2✖M1✖ve4=(M3✖M2✖M1)✖ve4,M=(M3✖M2✖M1)。我们要先计M3再乘M2再乘M1,即可得到M变换矩阵。而对于平移旋转缩放而言,优先级为平移<旋转<缩放,所以应算平移矩阵、再旋转、再计算缩放。如此就可以解释上文中对图形先缩放再旋转的变化顺序,也可以解释代码中先对变化矩阵进行了旋转,再对变换矩阵进行了缩放。

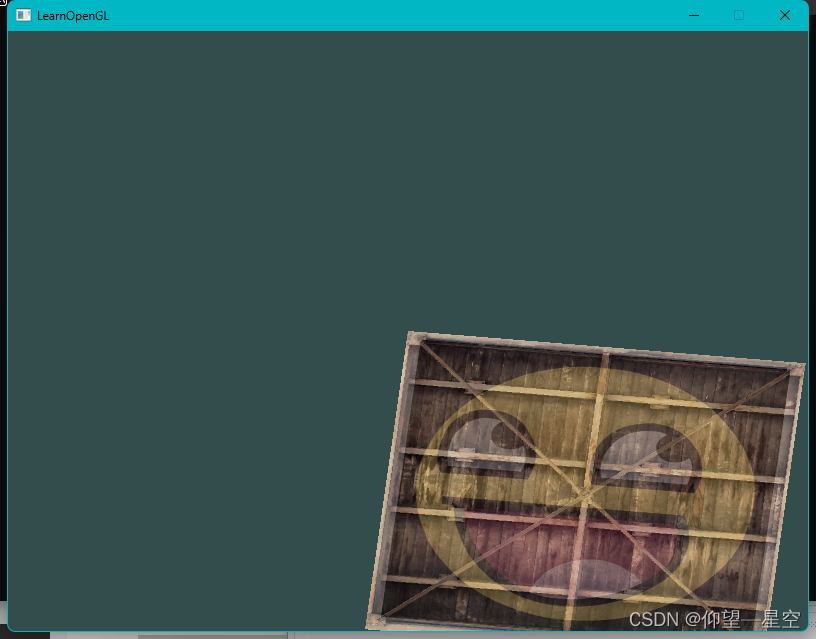
如果在后续程序中你的笑脸旋转了,但是不是正确你预料之中的角度,那么可能是下图的问题。如果你不对你程序中的glm::mat4对象初始化,可能你就看不到你的笑脸了。 顶点着色器:
// 声明OpenGL版本
#version 330 core
// 定义包含位置值的输入变量
layout  (location = 0) in vec3 position;	// 顶点位置
layout (location = 1) in vec3 color;	// 顶点颜色
layout (location = 2) in vec3 textCoord;	// 顶点的纹理坐标
// 定义输出变量(到片段着色器)
out vec3 ourColor;	//	顶点颜色
out vec2 TexCoord;	//	顶点的纹理坐标uniform mat4 transform;	// 	变换矩阵void main()
{// 使用变换矩阵左乘顶点位置得到变换后位置并赋值gl_Position = transform * vec4(position, 1.0f);// 将顶点颜色输出给片段着色器ourColor = color;// 顶点的纹理坐标(由于图片是反的,所以纹理坐标的y值“取反”)TexCoord = vec2(texCoord.x , 1.0 - texCoord.y);
}

我们现在需要把变换矩阵传递给着色器:
#version 330 core
in vec3 ourColor;
in vec2 TexCoord;out vec4 color;uniform float mixValue;// Texture samplers
uniform sampler2D ourTexture1;
uniform sampler2D ourTexture2;void main()
{// Linearly interpolate between both textures (second texture is only slightly combined)color = mix(texture(ourTexture1, TexCoord), texture(ourTexture2, TexCoord), mixValue);
}
GLuint transformLoc = glGetUniformLocation(ourShader.Program,"transform");
glUniformMatrix4v(transformLoc, 1, GL_FALSE, glm::value_ptr(trans));
最终效果:
完整代码:
#include <iostream>// GLEW
#define GLEW_STATIC
#include <GL/glew.h>// GLFW
#include <GLFW/glfw3.h>// Other Libs
#include <SOIL.H>// Other includes
#include "Shader.h"#include <glm/glm.hpp>
#include <glm/gtc/matrix_transform.hpp>
#include <glm/gtc/type_ptr.hpp>// Function prototypes
void key_callback(GLFWwindow* window, int key, int scancode, int action, int mode);// Window dimensions
const GLuint WIDTH = 800, HEIGHT = 600;GLfloat mixValue = 0.2f;// The MAIN function, from here we start the application and run the game loop
int main()
{glm::mat4 trans = glm::mat4(1.0f);trans = glm::rotate(trans,glm::radians(90.0f), glm::vec3(0.0, 0, 1.0));trans = glm::scale(trans, glm::vec3(0.5, 0.5, 0.5));// Init GLFWglfwInit();// Set all the required options for GLFWglfwWindowHint(GLFW_CONTEXT_VERSION_MAJOR, 3);glfwWindowHint(GLFW_CONTEXT_VERSION_MINOR, 3);glfwWindowHint(GLFW_OPENGL_PROFILE, GLFW_OPENGL_CORE_PROFILE);glfwWindowHint(GLFW_RESIZABLE, GL_FALSE);// Create a GLFWwindow object that we can use for GLFW's functionsGLFWwindow* window = glfwCreateWindow(WIDTH, HEIGHT, "LearnOpenGL", nullptr, nullptr);glfwMakeContextCurrent(window);// Set the required callback functionsglfwSetKeyCallback(window, key_callback);// Set this to true so GLEW knows to use a modern approach to retrieving function pointers and extensionsglewExperimental = GL_TRUE;// Initialize GLEW to setup the OpenGL Function pointersglewInit();// Define the viewport dimensionsglViewport(0, 0, WIDTH, HEIGHT);// Build and compile our shader programShader ourShader("C:\\Users\\32156\\source\\repos\\LearnOpenGL\\Shader\\vertexShader.txt", "C:\\Users\\32156\\source\\repos\\LearnOpenGL\\Shader\\fragmentShader.txt");// Set up vertex data (and buffer(s)) and attribute pointersGLfloat vertices[] = {// Positions          // Colors           // Texture Coords0.5f,  0.5f, 0.0f,   1.0f, 0.0f, 0.0f,   1.0f, 1.0f, // Top Right0.5f, -0.5f, 0.0f,   0.0f, 1.0f, 0.0f,   1.0f, 0.0f, // Bottom Right-0.5f, -0.5f, 0.0f,   0.0f, 0.0f, 1.0f,   0.0f, 0.0f, // Bottom Left-0.5f,  0.5f, 0.0f,   1.0f, 1.0f, 0.0f,   0.0f, 1.0f  // Top Left };GLuint indices[] = {  // Note that we start from 0!0, 1, 3, // First Triangle1, 2, 3  // Second Triangle};GLuint VBO, VAO, EBO;glGenVertexArrays(1, &VAO);glGenBuffers(1, &VBO);glGenBuffers(1, &EBO);glBindVertexArray(VAO);glBindBuffer(GL_ARRAY_BUFFER, VBO);glBufferData(GL_ARRAY_BUFFER, sizeof(vertices), vertices, GL_STATIC_DRAW);glBindBuffer(GL_ELEMENT_ARRAY_BUFFER, EBO);glBufferData(GL_ELEMENT_ARRAY_BUFFER, sizeof(indices), indices, GL_STATIC_DRAW);// Position attributeglVertexAttribPointer(0, 3, GL_FLOAT, GL_FALSE, 8 * sizeof(GLfloat), (GLvoid*)0);glEnableVertexAttribArray(0);// Color attributeglVertexAttribPointer(1, 3, GL_FLOAT, GL_FALSE, 8 * sizeof(GLfloat), (GLvoid*)(3 * sizeof(GLfloat)));glEnableVertexAttribArray(1);// TexCoord attributeglVertexAttribPointer(2, 2, GL_FLOAT, GL_FALSE, 8 * sizeof(GLfloat), (GLvoid*)(6 * sizeof(GLfloat)));glEnableVertexAttribArray(2);glBindVertexArray(0); // Unbind VAO// Load and create a texture GLuint texture1;GLuint texture2;// ====================// Texture 1// ====================glGenTextures(1, &texture1);glBindTexture(GL_TEXTURE_2D, texture1); // All upcoming GL_TEXTURE_2D operations now have effect on our texture object// Set our texture parametersglTexParameteri(GL_TEXTURE_2D, GL_TEXTURE_WRAP_S, GL_CLAMP_TO_EDGE);	// Set texture wrapping to GL_REPEATglTexParameteri(GL_TEXTURE_2D, GL_TEXTURE_WRAP_T, GL_CLAMP_TO_EDGE);// Set texture filteringglTexParameteri(GL_TEXTURE_2D, GL_TEXTURE_MIN_FILTER, GL_NEAREST);glTexParameteri(GL_TEXTURE_2D, GL_TEXTURE_MAG_FILTER, GL_NEAREST);// Load, create texture and generate mipmapsint width, height;unsigned char* image = SOIL_load_image("C:\\Users\\32156\\source\\repos\\LearnOpenGL\\Resource\\container.jpg", &width, &height, 0, SOIL_LOAD_RGB);glTexImage2D(GL_TEXTURE_2D, 0, GL_RGB, width, height, 0, GL_RGB, GL_UNSIGNED_BYTE, image);glGenerateMipmap(GL_TEXTURE_2D);SOIL_free_image_data(image);glBindTexture(GL_TEXTURE_2D, 0); // Unbind texture when done, so we won't accidentily mess up our texture.// ===================// Texture 2// ===================glGenTextures(1, &texture2);glBindTexture(GL_TEXTURE_2D, texture2);// Set our texture parametersglTexParameteri(GL_TEXTURE_2D, GL_TEXTURE_WRAP_S, GL_CLAMP_TO_BORDER);glTexParameteri(GL_TEXTURE_2D, GL_TEXTURE_WRAP_T, GL_CLAMP_TO_BORDER);float borderColor[] = { 1.0f, 1.0f , 0.0f, 1.0f };glTexParameterfv(GL_TEXTURE_2D, GL_TEXTURE_BORDER_COLOR, borderColor);// Set texture filteringglTexParameteri(GL_TEXTURE_2D, GL_TEXTURE_MIN_FILTER, GL_LINEAR);glTexParameteri(GL_TEXTURE_2D, GL_TEXTURE_MAG_FILTER, GL_LINEAR);// Load, create texture and generate mipmapsimage = SOIL_load_image("C:\\Users\\32156\\source\\repos\\LearnOpenGL\\Resource\\awesomeface.png", &width, &height, 0, SOIL_LOAD_RGB);glTexImage2D(GL_TEXTURE_2D, 0, GL_RGB, width, height, 0, GL_RGB, GL_UNSIGNED_BYTE, image);glGenerateMipmap(GL_TEXTURE_2D);SOIL_free_image_data(image);glBindTexture(GL_TEXTURE_2D, 0);// Game loopwhile (!glfwWindowShouldClose(window)){// Check if any events have been activiated (key pressed, mouse moved etc.) and call corresponding response functionsglfwPollEvents();// Render// Clear the colorbufferglClearColor(0.2f, 0.3f, 0.3f, 1.0f);glClear(GL_COLOR_BUFFER_BIT);// Activate shaderourShader.Use();// Bind Textures using texture unitsglActiveTexture(GL_TEXTURE0);glBindTexture(GL_TEXTURE_2D, texture1);glUniform1i(glGetUniformLocation(ourShader.Program, "ourTexture1"), 0);glActiveTexture(GL_TEXTURE1);glBindTexture(GL_TEXTURE_2D, texture2);glUniform1i(glGetUniformLocation(ourShader.Program, "ourTexture2"), 1);GLuint transformLoc = glGetUniformLocation(ourShader.Program, "transform");glUniformMatrix4fv(transformLoc, 1, GL_FALSE, glm::value_ptr(trans));// 设置混合参数glUniform1f(glGetUniformLocation(ourShader.Program,"mixValue"),mixValue);// Draw containerglBindVertexArray(VAO);glDrawElements(GL_TRIANGLES, 6, GL_UNSIGNED_INT, 0);glBindVertexArray(0);// Swap the screen buffersglfwSwapBuffers(window);}// Properly de-allocate all resources once they've outlived their purposeglDeleteVertexArrays(1, &VAO);glDeleteBuffers(1, &VBO);glDeleteBuffers(1, &EBO);// Terminate GLFW, clearing any resources allocated by GLFW.glfwTerminate();return 0;
}// Is called whenever a key is pressed/released via GLFW
void key_callback(GLFWwindow* window, int key, int scancode, int action, int mode)
{if (key == GLFW_KEY_ESCAPE && action == GLFW_PRESS)glfwSetWindowShouldClose(window, GL_TRUE);if (key == GLFW_KEY_UP && action == GLFW_PRESS){mixValue += 0.1f;if (mixValue >= 1.0f)mixValue = 1.0f;}if (key == GLFW_KEY_DOWN && action == GLFW_PRESS){mixValue -= 0.1f;if (mixValue <= 0.0f)mixValue = 0.0f;}
}
(3)随时间旋转的笑脸
我们可以定义一个无限数量的变换,把它们组合为仅仅一个矩阵,如果愿意的话我们还可以重复使用它。在着色器中使用矩阵可以省去重新定义顶点数据的功夫,它也能够节省处理时间,因为我们没有一直重新发送我们的数据(这是个非常慢的过程)。
上文中的旋转还是很呆,因为是一个不会动的旋转后笑脸。所以我们现在打算让他动起来,即旋转角度会根据时间变换生成变换矩阵即可。
效果:
代码如下:
glm::mat4 trans;
trans = glm::translate(trans, glm::vec3(0.5f, -0.5f, 0.0f));
trans = glm::rotate(trans,(GLfloat)glfwGetTime() * 50.0f, glm::vec3(0.0f, 0.0f, 1.0f));
完整代码:
#include <iostream>// GLEW
#define GLEW_STATIC
#include <GL/glew.h>// GLFW
#include <GLFW/glfw3.h>// Other Libs
#include <SOIL.H>// Other includes
#include "Shader.h"#include <glm/glm.hpp>
#include <glm/gtc/matrix_transform.hpp>
#include <glm/gtc/type_ptr.hpp>// Function prototypes
void key_callback(GLFWwindow* window, int key, int scancode, int action, int mode);// Window dimensions
const GLuint WIDTH = 800, HEIGHT = 600;GLfloat mixValue = 0.2f;// The MAIN function, from here we start the application and run the game loop
int main()
{// Init GLFWglfwInit();// Set all the required options for GLFWglfwWindowHint(GLFW_CONTEXT_VERSION_MAJOR, 3);glfwWindowHint(GLFW_CONTEXT_VERSION_MINOR, 3);glfwWindowHint(GLFW_OPENGL_PROFILE, GLFW_OPENGL_CORE_PROFILE);glfwWindowHint(GLFW_RESIZABLE, GL_FALSE);// Create a GLFWwindow object that we can use for GLFW's functionsGLFWwindow* window = glfwCreateWindow(WIDTH, HEIGHT, "LearnOpenGL", nullptr, nullptr);glfwMakeContextCurrent(window);// Set the required callback functionsglfwSetKeyCallback(window, key_callback);// Set this to true so GLEW knows to use a modern approach to retrieving function pointers and extensionsglewExperimental = GL_TRUE;// Initialize GLEW to setup the OpenGL Function pointersglewInit();// Define the viewport dimensionsglViewport(0, 0, WIDTH, HEIGHT);// Build and compile our shader programShader ourShader("C:\\Users\\32156\\source\\repos\\LearnOpenGL\\Shader\\vertexShader.txt", "C:\\Users\\32156\\source\\repos\\LearnOpenGL\\Shader\\fragmentShader.txt");// Set up vertex data (and buffer(s)) and attribute pointersGLfloat vertices[] = {// Positions          // Colors           // Texture Coords0.5f,  0.5f, 0.0f,   1.0f, 0.0f, 0.0f,   1.0f, 1.0f, // Top Right0.5f, -0.5f, 0.0f,   0.0f, 1.0f, 0.0f,   1.0f, 0.0f, // Bottom Right-0.5f, -0.5f, 0.0f,   0.0f, 0.0f, 1.0f,   0.0f, 0.0f, // Bottom Left-0.5f,  0.5f, 0.0f,   1.0f, 1.0f, 0.0f,   0.0f, 1.0f  // Top Left };GLuint indices[] = {  // Note that we start from 0!0, 1, 3, // First Triangle1, 2, 3  // Second Triangle};GLuint VBO, VAO, EBO;glGenVertexArrays(1, &VAO);glGenBuffers(1, &VBO);glGenBuffers(1, &EBO);glBindVertexArray(VAO);glBindBuffer(GL_ARRAY_BUFFER, VBO);glBufferData(GL_ARRAY_BUFFER, sizeof(vertices), vertices, GL_STATIC_DRAW);glBindBuffer(GL_ELEMENT_ARRAY_BUFFER, EBO);glBufferData(GL_ELEMENT_ARRAY_BUFFER, sizeof(indices), indices, GL_STATIC_DRAW);// Position attributeglVertexAttribPointer(0, 3, GL_FLOAT, GL_FALSE, 8 * sizeof(GLfloat), (GLvoid*)0);glEnableVertexAttribArray(0);// Color attributeglVertexAttribPointer(1, 3, GL_FLOAT, GL_FALSE, 8 * sizeof(GLfloat), (GLvoid*)(3 * sizeof(GLfloat)));glEnableVertexAttribArray(1);// TexCoord attributeglVertexAttribPointer(2, 2, GL_FLOAT, GL_FALSE, 8 * sizeof(GLfloat), (GLvoid*)(6 * sizeof(GLfloat)));glEnableVertexAttribArray(2);glBindVertexArray(0); // Unbind VAO// Load and create a texture GLuint texture1;GLuint texture2;// ====================// Texture 1// ====================glGenTextures(1, &texture1);glBindTexture(GL_TEXTURE_2D, texture1); // All upcoming GL_TEXTURE_2D operations now have effect on our texture object// Set our texture parametersglTexParameteri(GL_TEXTURE_2D, GL_TEXTURE_WRAP_S, GL_CLAMP_TO_EDGE);	// Set texture wrapping to GL_REPEATglTexParameteri(GL_TEXTURE_2D, GL_TEXTURE_WRAP_T, GL_CLAMP_TO_EDGE);// Set texture filteringglTexParameteri(GL_TEXTURE_2D, GL_TEXTURE_MIN_FILTER, GL_NEAREST);glTexParameteri(GL_TEXTURE_2D, GL_TEXTURE_MAG_FILTER, GL_NEAREST);// Load, create texture and generate mipmapsint width, height;unsigned char* image = SOIL_load_image("C:\\Users\\32156\\source\\repos\\LearnOpenGL\\Resource\\container.jpg", &width, &height, 0, SOIL_LOAD_RGB);glTexImage2D(GL_TEXTURE_2D, 0, GL_RGB, width, height, 0, GL_RGB, GL_UNSIGNED_BYTE, image);glGenerateMipmap(GL_TEXTURE_2D);SOIL_free_image_data(image);glBindTexture(GL_TEXTURE_2D, 0); // Unbind texture when done, so we won't accidentily mess up our texture.// ===================// Texture 2// ===================glGenTextures(1, &texture2);glBindTexture(GL_TEXTURE_2D, texture2);// Set our texture parametersglTexParameteri(GL_TEXTURE_2D, GL_TEXTURE_WRAP_S, GL_CLAMP_TO_BORDER);glTexParameteri(GL_TEXTURE_2D, GL_TEXTURE_WRAP_T, GL_CLAMP_TO_BORDER);float borderColor[] = { 1.0f, 1.0f , 0.0f, 1.0f };glTexParameterfv(GL_TEXTURE_2D, GL_TEXTURE_BORDER_COLOR, borderColor);// Set texture filteringglTexParameteri(GL_TEXTURE_2D, GL_TEXTURE_MIN_FILTER, GL_LINEAR);glTexParameteri(GL_TEXTURE_2D, GL_TEXTURE_MAG_FILTER, GL_LINEAR);// Load, create texture and generate mipmapsimage = SOIL_load_image("C:\\Users\\32156\\source\\repos\\LearnOpenGL\\Resource\\awesomeface.png", &width, &height, 0, SOIL_LOAD_RGB);glTexImage2D(GL_TEXTURE_2D, 0, GL_RGB, width, height, 0, GL_RGB, GL_UNSIGNED_BYTE, image);glGenerateMipmap(GL_TEXTURE_2D);SOIL_free_image_data(image);glBindTexture(GL_TEXTURE_2D, 0);// Game loopwhile (!glfwWindowShouldClose(window)){// Check if any events have been activiated (key pressed, mouse moved etc.) and call corresponding response functionsglfwPollEvents();// Render// Clear the colorbufferglClearColor(0.2f, 0.3f, 0.3f, 1.0f);glClear(GL_COLOR_BUFFER_BIT);// Activate shaderourShader.Use();glm::mat4 trans = glm::mat4(1.0f);trans = glm::rotate(trans, glm::radians((GLfloat)glfwGetTime()*50.0f), glm::vec3(0.0, 0, 1.0));trans = glm::scale(trans, glm::vec3(0.5, 0.5, 0.5));// Bind Textures using texture unitsglActiveTexture(GL_TEXTURE0);glBindTexture(GL_TEXTURE_2D, texture1);glUniform1i(glGetUniformLocation(ourShader.Program, "ourTexture1"), 0);glActiveTexture(GL_TEXTURE1);glBindTexture(GL_TEXTURE_2D, texture2);glUniform1i(glGetUniformLocation(ourShader.Program, "ourTexture2"), 1);GLuint transformLoc = glGetUniformLocation(ourShader.Program, "transform");glUniformMatrix4fv(transformLoc, 1, GL_FALSE, glm::value_ptr(trans));// 设置混合参数glUniform1f(glGetUniformLocation(ourShader.Program,"mixValue"),mixValue);// Draw containerglBindVertexArray(VAO);glDrawElements(GL_TRIANGLES, 6, GL_UNSIGNED_INT, 0);glBindVertexArray(0);// Swap the screen buffersglfwSwapBuffers(window);}// Properly de-allocate all resources once they've outlived their purposeglDeleteVertexArrays(1, &VAO);glDeleteBuffers(1, &VBO);glDeleteBuffers(1, &EBO);// Terminate GLFW, clearing any resources allocated by GLFW.glfwTerminate();return 0;
}// Is called whenever a key is pressed/released via GLFW
void key_callback(GLFWwindow* window, int key, int scancode, int action, int mode)
{if (key == GLFW_KEY_ESCAPE && action == GLFW_PRESS)glfwSetWindowShouldClose(window, GL_TRUE);if (key == GLFW_KEY_UP && action == GLFW_PRESS){mixValue += 0.1f;if (mixValue >= 1.0f)mixValue = 1.0f;}if (key == GLFW_KEY_DOWN && action == GLFW_PRESS){mixValue -= 0.1f;if (mixValue <= 0.0f)mixValue = 0.0f;}
}
变换的练习
练习一
使用应用在箱子上的最后一个变换,尝试将其改变为先旋转,后位移。看看发生了什么,试着想想为什么会发生这样的事情。
诸如我们上文所说,旋转矩阵的运算是针对旋转中心在原点的,代码中先将矩阵旋转再位移,相当于对矩阵先位移再旋转。这时会发现笑脸绕着窗口中心原点不停的逆时针旋转。这是由于旋转中心的不同导致的差距。当先进行移动后,笑脸的几何中心就不在原点了,原本打算让它绕着几何中心旋转变成了绕着原点(非几何中心)旋转。
结果:
源代码:
#include <iostream>// GLEW
#define GLEW_STATIC
#include <GL/glew.h>// GLFW
#include <GLFW/glfw3.h>// Other Libs
#include <SOIL.H>// Other includes
#include "Shader.h"#include <glm/glm.hpp>
#include <glm/gtc/matrix_transform.hpp>
#include <glm/gtc/type_ptr.hpp>// Function prototypes
void key_callback(GLFWwindow* window, int key, int scancode, int action, int mode);// Window dimensions
const GLuint WIDTH = 800, HEIGHT = 600;GLfloat mixValue = 0.2f;// The MAIN function, from here we start the application and run the game loop
int main()
{// Init GLFWglfwInit();// Set all the required options for GLFWglfwWindowHint(GLFW_CONTEXT_VERSION_MAJOR, 3);glfwWindowHint(GLFW_CONTEXT_VERSION_MINOR, 3);glfwWindowHint(GLFW_OPENGL_PROFILE, GLFW_OPENGL_CORE_PROFILE);glfwWindowHint(GLFW_RESIZABLE, GL_FALSE);// Create a GLFWwindow object that we can use for GLFW's functionsGLFWwindow* window = glfwCreateWindow(WIDTH, HEIGHT, "LearnOpenGL", nullptr, nullptr);glfwMakeContextCurrent(window);// Set the required callback functionsglfwSetKeyCallback(window, key_callback);// Set this to true so GLEW knows to use a modern approach to retrieving function pointers and extensionsglewExperimental = GL_TRUE;// Initialize GLEW to setup the OpenGL Function pointersglewInit();// Define the viewport dimensionsglViewport(0, 0, WIDTH, HEIGHT);// Build and compile our shader programShader ourShader("C:\\Users\\32156\\source\\repos\\LearnOpenGL\\Shader\\vertexShader.txt", "C:\\Users\\32156\\source\\repos\\LearnOpenGL\\Shader\\fragmentShader.txt");// Set up vertex data (and buffer(s)) and attribute pointersGLfloat vertices[] = {// Positions          // Colors           // Texture Coords0.5f,  0.5f, 0.0f,   1.0f, 0.0f, 0.0f,   1.0f, 1.0f, // Top Right0.5f, -0.5f, 0.0f,   0.0f, 1.0f, 0.0f,   1.0f, 0.0f, // Bottom Right-0.5f, -0.5f, 0.0f,   0.0f, 0.0f, 1.0f,   0.0f, 0.0f, // Bottom Left-0.5f,  0.5f, 0.0f,   1.0f, 1.0f, 0.0f,   0.0f, 1.0f  // Top Left };GLuint indices[] = {  // Note that we start from 0!0, 1, 3, // First Triangle1, 2, 3  // Second Triangle};GLuint VBO, VAO, EBO;glGenVertexArrays(1, &VAO);glGenBuffers(1, &VBO);glGenBuffers(1, &EBO);glBindVertexArray(VAO);glBindBuffer(GL_ARRAY_BUFFER, VBO);glBufferData(GL_ARRAY_BUFFER, sizeof(vertices), vertices, GL_STATIC_DRAW);glBindBuffer(GL_ELEMENT_ARRAY_BUFFER, EBO);glBufferData(GL_ELEMENT_ARRAY_BUFFER, sizeof(indices), indices, GL_STATIC_DRAW);// Position attributeglVertexAttribPointer(0, 3, GL_FLOAT, GL_FALSE, 8 * sizeof(GLfloat), (GLvoid*)0);glEnableVertexAttribArray(0);// Color attributeglVertexAttribPointer(1, 3, GL_FLOAT, GL_FALSE, 8 * sizeof(GLfloat), (GLvoid*)(3 * sizeof(GLfloat)));glEnableVertexAttribArray(1);// TexCoord attributeglVertexAttribPointer(2, 2, GL_FLOAT, GL_FALSE, 8 * sizeof(GLfloat), (GLvoid*)(6 * sizeof(GLfloat)));glEnableVertexAttribArray(2);glBindVertexArray(0); // Unbind VAO// Load and create a texture GLuint texture1;GLuint texture2;// ====================// Texture 1// ====================glGenTextures(1, &texture1);glBindTexture(GL_TEXTURE_2D, texture1); // All upcoming GL_TEXTURE_2D operations now have effect on our texture object// Set our texture parametersglTexParameteri(GL_TEXTURE_2D, GL_TEXTURE_WRAP_S, GL_CLAMP_TO_EDGE);	// Set texture wrapping to GL_REPEATglTexParameteri(GL_TEXTURE_2D, GL_TEXTURE_WRAP_T, GL_CLAMP_TO_EDGE);// Set texture filteringglTexParameteri(GL_TEXTURE_2D, GL_TEXTURE_MIN_FILTER, GL_NEAREST);glTexParameteri(GL_TEXTURE_2D, GL_TEXTURE_MAG_FILTER, GL_NEAREST);// Load, create texture and generate mipmapsint width, height;unsigned char* image = SOIL_load_image("C:\\Users\\32156\\source\\repos\\LearnOpenGL\\Resource\\container.jpg", &width, &height, 0, SOIL_LOAD_RGB);glTexImage2D(GL_TEXTURE_2D, 0, GL_RGB, width, height, 0, GL_RGB, GL_UNSIGNED_BYTE, image);glGenerateMipmap(GL_TEXTURE_2D);SOIL_free_image_data(image);glBindTexture(GL_TEXTURE_2D, 0); // Unbind texture when done, so we won't accidentily mess up our texture.// ===================// Texture 2// ===================glGenTextures(1, &texture2);glBindTexture(GL_TEXTURE_2D, texture2);// Set our texture parametersglTexParameteri(GL_TEXTURE_2D, GL_TEXTURE_WRAP_S, GL_CLAMP_TO_BORDER);glTexParameteri(GL_TEXTURE_2D, GL_TEXTURE_WRAP_T, GL_CLAMP_TO_BORDER);float borderColor[] = { 1.0f, 1.0f , 0.0f, 1.0f };glTexParameterfv(GL_TEXTURE_2D, GL_TEXTURE_BORDER_COLOR, borderColor);// Set texture filteringglTexParameteri(GL_TEXTURE_2D, GL_TEXTURE_MIN_FILTER, GL_LINEAR);glTexParameteri(GL_TEXTURE_2D, GL_TEXTURE_MAG_FILTER, GL_LINEAR);// Load, create texture and generate mipmapsimage = SOIL_load_image("C:\\Users\\32156\\source\\repos\\LearnOpenGL\\Resource\\awesomeface.png", &width, &height, 0, SOIL_LOAD_RGB);glTexImage2D(GL_TEXTURE_2D, 0, GL_RGB, width, height, 0, GL_RGB, GL_UNSIGNED_BYTE, image);glGenerateMipmap(GL_TEXTURE_2D);SOIL_free_image_data(image);glBindTexture(GL_TEXTURE_2D, 0);// Game loopwhile (!glfwWindowShouldClose(window)){// Check if any events have been activiated (key pressed, mouse moved etc.) and call corresponding response functionsglfwPollEvents();// Render// Clear the colorbufferglClearColor(0.2f, 0.3f, 0.3f, 1.0f);glClear(GL_COLOR_BUFFER_BIT);// Activate shaderourShader.Use();glm::mat4 trans = glm::mat4(1.0f);trans = glm::rotate(trans, (GLfloat)glfwGetTime() * 2.0f, glm::vec3(0.0f, 0.0f, 1.0f));trans = glm::translate(trans, glm::vec3(0.5f, -0.5f, 0.0f));// Bind Textures using texture unitsglActiveTexture(GL_TEXTURE0);glBindTexture(GL_TEXTURE_2D, texture1);glUniform1i(glGetUniformLocation(ourShader.Program, "ourTexture1"), 0);glActiveTexture(GL_TEXTURE1);glBindTexture(GL_TEXTURE_2D, texture2);glUniform1i(glGetUniformLocation(ourShader.Program, "ourTexture2"), 1);GLuint transformLoc = glGetUniformLocation(ourShader.Program, "transform");glUniformMatrix4fv(transformLoc, 1, GL_FALSE, glm::value_ptr(trans));// 设置混合参数glUniform1f(glGetUniformLocation(ourShader.Program,"mixValue"),mixValue);// Draw containerglBindVertexArray(VAO);glDrawElements(GL_TRIANGLES, 6, GL_UNSIGNED_INT, 0);glBindVertexArray(0);// Swap the screen buffersglfwSwapBuffers(window);}// Properly de-allocate all resources once they've outlived their purposeglDeleteVertexArrays(1, &VAO);glDeleteBuffers(1, &VBO);glDeleteBuffers(1, &EBO);// Terminate GLFW, clearing any resources allocated by GLFW.glfwTerminate();return 0;
}// Is called whenever a key is pressed/released via GLFW
void key_callback(GLFWwindow* window, int key, int scancode, int action, int mode)
{if (key == GLFW_KEY_ESCAPE && action == GLFW_PRESS)glfwSetWindowShouldClose(window, GL_TRUE);if (key == GLFW_KEY_UP && action == GLFW_PRESS){mixValue += 0.1f;if (mixValue >= 1.0f)mixValue = 1.0f;}if (key == GLFW_KEY_DOWN && action == GLFW_PRESS){mixValue -= 0.1f;if (mixValue <= 0.0f)mixValue = 0.0f;}
}
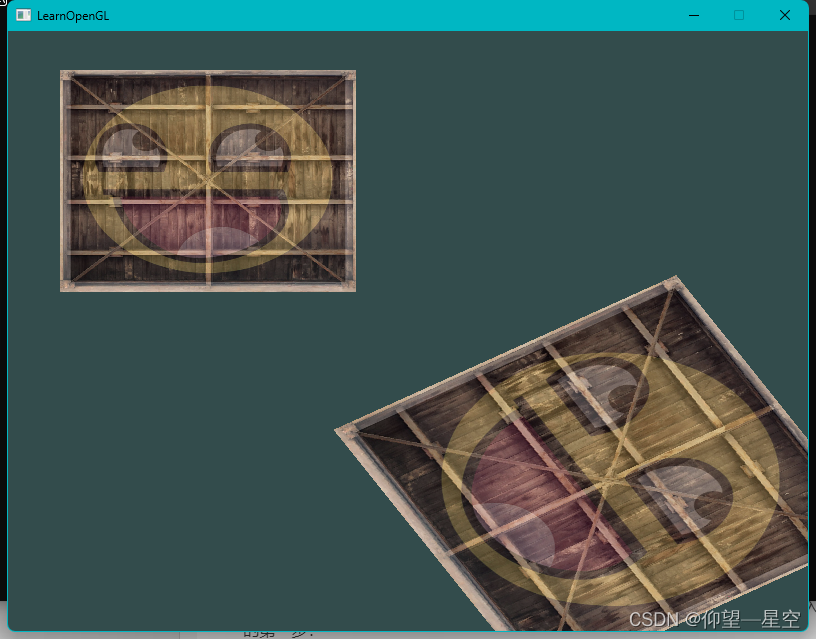
练习二
尝试再次调用glDrawElements画出第二个箱子,只使用变换将其摆放在不同的位置。让这个箱子被摆放在窗口的左上角,并且会不断的缩放(而不是旋转)。sin函数在这里会很有用,不过注意使用sin函数时应用负值会导致物体被翻转。
最终效果:
其实还是很简单的,直接上核心代码:
while (!glfwWindowShouldClose(window)){// Check if any events have been activiated (key pressed, mouse moved etc.) and call corresponding response functionsglfwPollEvents();// Render// Clear the colorbufferglClearColor(0.2f, 0.3f, 0.3f, 1.0f);glClear(GL_COLOR_BUFFER_BIT);// Activate shaderourShader.Use();// 计算右下角笑脸的变换矩阵glm::mat4 trans = glm::mat4(1.0f);trans = glm::translate(trans, glm::vec3(0.5f, -0.5f, 0.0f));trans = glm::rotate(trans, (GLfloat)glfwGetTime() * 2.0f, glm::vec3(0.0f, 0.0f, 1.0f));GLuint transformLoc = glGetUniformLocation(ourShader.Program, "transform");glUniformMatrix4fv(transformLoc, 1, GL_FALSE, glm::value_ptr(trans));// Bind Textures using texture unitsglActiveTexture(GL_TEXTURE0);glBindTexture(GL_TEXTURE_2D, texture1);glUniform1i(glGetUniformLocation(ourShader.Program, "ourTexture1"), 0);glActiveTexture(GL_TEXTURE1);glBindTexture(GL_TEXTURE_2D, texture2);glUniform1i(glGetUniformLocation(ourShader.Program, "ourTexture2"), 1);// 设置混合参数glUniform1f(glGetUniformLocation(ourShader.Program,"mixValue"),mixValue);// Draw containerglBindVertexArray(VAO);glDrawElements(GL_TRIANGLES, 6, GL_UNSIGNED_INT, 0);// 计算左上角笑脸的变换矩阵trans = glm::mat4(1.0f);trans = glm::translate(trans, glm::vec3(-0.5f, 0.5f, 0.0f));// 利用sin/2+0.5,将时间 0到正无穷 转换为 0到1GLfloat scaleValue = sin((GLfloat)glfwGetTime()) / 2 + 0.5;trans = glm::scale(trans, glm::vec3(scaleValue,scaleValue,scaleValue));glUniformMatrix4fv(transformLoc, 1, GL_FALSE, glm::value_ptr(trans));glDrawElements(GL_TRIANGLES, 6, GL_UNSIGNED_INT, 0);glBindVertexArray(0);// Swap the screen buffersglfwSwapBuffers(window);}
相关文章:
OpenGL入门教程之 变换
引言 这是一个闪耀的时刻,因为我们即将能生产出令人惊叹的3D效果! 变换 向量和矩阵变换包括太多内容,但由于学过线性代数和GAMES101,因此不在此做过多阐述。仅阐述包括代码的GLM内容。 GLM的使用 (1)GLM…...

ASPICE详细介绍-4.车载项目为什么要符合ASPICE标准?
目录 车载项目为什么要符合ASPICE标准?ASPICE与功能安全的关系、区别?各大车厂对软件体系的要求 车载项目为什么要符合ASPICE标准? ASPICE(Automotive Software Process Improvement and Capability Determination)最…...
一文彻底理解Java 17中的新特性密封类
密封类的作用 在面向对象语言中,我们可以通过继承(extend)来实现类的能力复用、扩展与增强。但有的时候,有些能力我们不希望被继承了去做一些不可预知的扩展。所以,我们需要对继承关系有一些限制的控制手段。而密封类…...
【Git 入门教程】第四节、Git冲突:如何解决版本控制的矛盾
Git是目前最流行的版本控制系统之一,它为团队协作开发提供了方便和高效的方式。然而,在多人同时修改同一个文件时,可能会出现代码冲突(conflict),导致代码无法正确合并。那么,如何解决Git冲突呢…...

c++验证用户输入合法性的示例代码
c验证用户输入合法性的示例代码 本文介绍c验证用户输入合法性,用于检测限定用户输入值。包括:1、限定用户输入为整数(正负整数);2、限定用户输入为正整数;3、限定用户输入为正数(可以含有小数&…...

ctfshow web入门phpcve web311-315
1.web311 通过抓包发现php版本时为PHP/7.1.33dev 漏洞cve2019-11043 远程代码执行漏洞 利用条件: nginx配置了fastcgi_split_path_info 受影响系统: PHP 5.6-7.x,Nginx>0.7.31 下载工具进行利用 需要安装go环境 yum install golang -y …...

gpt.4.0-gpt 国内版
gpt 使用 GPT(Generative Pre-trained Transformer)是一种预训练的语言模型,可用于多种自然语言处理任务,如情感分析、文本分类、文本生成等。下面是使用GPT的一些步骤和建议: 确定任务和数据集:首先&…...
放弃手动测试,快来了解JMeter压测神器的安装和使用吧~~
目录:导读 引言 jmeter的安装 JMeter是干什么的 JMeter都可以做那些测试 JMeter的使用和组件介绍 下面我们进行XML格式的实战练习 jmeter与postman的区别 JSON的插件 另附视频教程资源 引言 你是否曾经为手动测试而苦恼?是不是觉得手动测试太费…...
SQL函数
文章目录 一、SQL 函数二、SQL COUNT() 函数三、SQL FIRST() 函数四、SQL LAST() 函数五、SQL MAX() 函数总结 一、SQL 函数 SQL 拥有很多可用于计数和计算的内建函数。 SQL Aggregate 函数 SQL Aggregate 函数计算从列中取得的值,返回一个单一的值。 有用的 Aggre…...

苦熬10年,国产操作系统“归零”,新操作系统上新,跟Excel很像
苦熬10余年,国产操作系统自主研发 说到国内自主研发的操作系统,经验最丰富的品牌,当然是麒麟OS. 从诞生到发展,历经10多年的努力,麒麟os逐渐成为了国内自主研发操作系统领域中的一颗耀眼的明珠。麒麟OS不仅推出了许多…...

什么是shell脚本和简单shell脚本练习
文章目录 什么是shell脚本和简单shell脚本练习什么是shell脚本为什么要学习shell脚本第一个脚本编写与执行编写第一个脚本 简单的shell脚本练习简单案例交互式脚本:变量内容由用户决定随日期变化:利用date建立文件数值运算:简单的加减乘除数值…...

MySQL MyBatis
MySQL从表中随机查一条数据 SELECT * FROM address ORDER BY RAND() LIMIT 1MySQL查询表是否存在 select count(*) from information_schema.TABLES where table_name #{tableName}插入数据插入随机的uuid <insert id"insertComment" parameterType"com.…...
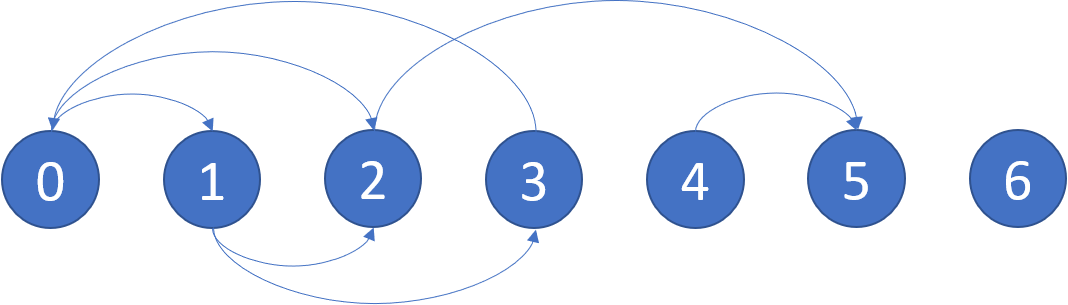
Leetcode力扣秋招刷题路-0802
从0开始的秋招刷题路,记录下所刷每道题的题解,帮助自己回顾总结 802. 找到最终的安全状态 有一个有 n 个节点的有向图,节点按 0 到 n - 1 编号。图由一个 索引从 0 开始 的 2D 整数数组 graph表示, graph[i]是与节点 i 相邻的节…...

编程中最难的就是命名?这几招教你快速上手
作者:陈立(勤仁) 你可不能像给狗狗取名字那样给类、方法、变量命名。仅仅因为它很可爱或者听上去不错。 在写代码的时候,你要经常想着,那个最终维护你代码的人可能将是一个有暴力倾向的疯子,并且他还知道你住在哪里。 01 为什么…...
NUXT规范及常见问题
props中不要使用Web环境才有的对象,服务端渲染的时候会失败 使用<Nuxt/>组件代替<router-view/>,使用<NuxtLink/>代替<router-link/>static目录下的资源是静态资源,不应该通过import或../static/img/logo.png等方式…...
2023年Q1天猫空调品牌销量排行榜
如今,空调的普及水平较高,空调行业进入存量换新为主的发展阶段。 根据鲸参谋数据分析平台的相关数据显示,2023年Q1在天猫平台上,空调的销量将近100万件,销售额将近30亿,同时,空调产品的产品均价…...

如何在比特币系统内创造人工生命
信息来源:coingeek.com 自2015年以来,关于比特币能否进行复杂计算以及比特币是否“图灵完备”的争论一直在持续。不幸的是,现在存在着一种流传甚广的谬论,有人说比特币并非图灵完备的,它不能像以太坊区块链那样进行复杂…...

除了Figma,再给你介绍10款好用的协同设计软件
组织结构越来越复杂,团队中的每个人都有独特的技能、经验和专业知识。我们怎样才能让团队更好地合作?在这种情况下,协同设计应运而生。 UI的未来是协同设计!如果你想把握未来的设计趋势,不妨从使用高效的协同设计软件…...

信息安全复习五:数据加密标准(DES)
一、本章梗概 1.主要内容:分组密码、分组密码用到的关键技术和结构、对称密钥密码典型算法DES 2.思考问题: ①按照明文被处理的形式,DES属于标准的分组密码 ②根据密钥的使用数量,DES属于标准的对称密码 3.内容回顾: …...
Java ---包装类
(一)包装类概念 官方说法: Java是面向对象的语言,但是为了便于开发者的使用,Java中却沿用了C语言的基本数据类型,在进行基本的数据计算时,开发者可以直接使用基础类。但是当需要和Java其他对象…...

ArcGIS点符号压盖标注看不清?试试‘合并图层+制图表达’这个组合拳
ArcGIS点符号压盖标注看不清?试试‘合并图层制图表达’这个组合拳 在GIS制图工作中,点位数据密集区域的标注压盖问题堪称"地图美学杀手"。想象一下这样的场景:某村庄同时存在水文站、水位站和雨量站三个监测点,由于地理…...

零 Python 依赖!用 JavaCV + ONNX Runtime 把 YOLO 塞进生产环境
上周五快下班的时候,运维老张突然冲进办公室,手里还拎着半杯凉透的枸杞茶。 “兄弟,客户那边又炸了!”他把杯子往桌上一墩,“那个 PCB 缺陷检测系统,Python 推理服务又崩了。这周第三次了,人家产…...

别再死磕论文了!用PyTorch复现StyleGAN,从代码层面理解风格混合与解耦
从零构建StyleGAN:用PyTorch代码揭示风格混合的奥秘 当你在浏览社交媒体时,是否曾被那些由AI生成的逼真虚拟人脸所震撼?这些图像背后往往隐藏着一个强大的生成对抗网络——StyleGAN。与传统的GAN不同,StyleGAN能够精确控制生成图像…...

线下技术沙龙:AI Coding深度实践LLM应用分享
活动简介 我们正在经历一场软件开发 范式的变革。从Copilot的智能补全,到Cursor的对话式编程,再到Agent自主完成复杂任务——代码的编写方式,正在被重新定义。 但这场变革的核心,不是工具本身,而是使用工具的人。 本…...

终极指南:5分钟实现直播实时操作可视化
终极指南:5分钟实现直播实时操作可视化 【免费下载链接】input-overlay Show keyboard, gamepad and mouse input on stream 项目地址: https://gitcode.com/gh_mirrors/in/input-overlay 你是否曾在直播游戏时,观众好奇地问:"你…...

Noisereduce的PyTorch实现:将降噪算法集成到神经网络中的完整教程
Noisereduce的PyTorch实现:将降噪算法集成到神经网络中的完整教程 【免费下载链接】noisereduce Noise reduction in python using spectral gating (speech, bioacoustics, audio, time-domain signals) 项目地址: https://gitcode.com/gh_mirrors/no/noisereduc…...

API 监控告警系统
LogMonitor - API监控告警系统 基于Python的智能API监控系统,集成Splunk日志分析和钉钉告警,支持多种API类型的实时监控和趋势分析。 代码地址 https://github.com/junbingliu007/log_monitor 功能特性 多API类型监控:支持多种API类型智…...

RT-Thread Studio开发RA2L1:从环境搭建到GPIO输入输出实战
1. 项目概述与核心价值最近在捣鼓瑞萨电子的RA2L1 MCU开发板,想基于RT-Thread Studio这个国产IDE快速上手。我发现很多朋友拿到一块新板子,第一步“点亮LED”或者“读取按键”这个看似简单的操作,往往就卡在了环境搭建上。网上的资料要么过于…...
)
用STM32F103C8T6驱动总线舵机:手把手教你实现机械臂逆运动学(附完整代码)
STM32F103C8T6驱动总线舵机实现机械臂逆运动学全流程解析 第一次尝试用STM32控制机械臂时,看着六个关节不知如何协调运动,直到理解了逆运动学原理才豁然开朗。本文将带你从零实现一个基于STM32F103C8T6的四自由度机械臂控制系统,重点解决如何…...

企业级应用如何利用 TaoToken 构建高可用的大模型服务网关
🚀 告别海外账号与网络限制!稳定直连全球优质大模型,限时半价接入中。 👉 点击领取海量免费额度 企业级应用如何利用 TaoToken 构建高可用的大模型服务网关 应用场景类,探讨在中大型企业应用中,为内部多个…...