Python+Yolov5舰船侦测识别
程序示例精选
Python+Yolov5舰船侦测识别
如需安装运行环境或远程调试,见文章底部个人QQ名片,由专业技术人员远程协助!
前言
这篇博客针对<<Python+Yolov5舰船侦测识别>>编写代码,代码整洁,规则,易读。 学习与应用推荐首选。
文章目录
一、所需工具软件
二、使用步骤
1. 引入库
2. 代码实现
3. 运行结果
三、在线协助
一、所需工具软件
1. Python,Pycharm
2. Yolov5
二、使用步骤
1.引入库
import argparse
import time
from pathlib import Pathimport cv2
import torch
import torch.backends.cudnn as cudnn
from numpy import randomfrom models.experimental import attempt_load
from utils.datasets import LoadStreams, LoadImages
from utils.general import check_img_size, check_requirements, check_imshow, non_max_suppression, apply_classifier, \scale_coords, xyxy2xywh, strip_optimizer, set_logging, increment_path
from utils.plots import plot_one_box
from utils.torch_utils import select_device, load_classifier, time_synchronized
2. 代码实现
代码如下:
def detect(save_img=False):source, weights, view_img, save_txt, imgsz = opt.source, opt.weights, opt.view_img, opt.save_txt, opt.img_sizewebcam = source.isnumeric() or source.endswith('.txt') or source.lower().startswith(('rtsp://', 'rtmp://', 'http://'))# Directoriessave_dir = Path(increment_path(Path(opt.project) / opt.name, exist_ok=opt.exist_ok)) # increment run(save_dir / 'labels' if save_txt else save_dir).mkdir(parents=True, exist_ok=True) # make dir# Initializeset_logging()device = select_device(opt.device)half = device.type != 'cpu' # half precision only supported on CUDA# Load modelmodel = attempt_load(weights, map_location=device) # load FP32 modelstride = int(model.stride.max()) # model strideimgsz = check_img_size(imgsz, s=stride) # check img_sizeif half:model.half() # to FP16# Second-stage classifierclassify = Falseif classify:modelc = load_classifier(name='resnet101', n=2) # initializemodelc.load_state_dict(torch.load('weights/resnet101.pt', map_location=device)['model']).to(device).eval()# Set Dataloadervid_path, vid_writer = None, Noneif webcam:view_img = check_imshow()cudnn.benchmark = True # set True to speed up constant image size inferencedataset = LoadStreams(source, img_size=imgsz, stride=stride)else:save_img = Truedataset = LoadImages(source, img_size=imgsz, stride=stride)# Get names and colorsnames = model.module.names if hasattr(model, 'module') else model.namescolors = [[random.randint(0, 255) for _ in range(3)] for _ in names]# Run inferenceif device.type != 'cpu':model(torch.zeros(1, 3, imgsz, imgsz).to(device).type_as(next(model.parameters()))) # run oncet0 = time.time()# Apply NMSpred = non_max_suppression(pred, opt.conf_thres, opt.iou_thres, classes=opt.classes, agnostic=opt.agnostic_nms)t2 = time_synchronized()# Apply Classifierif classify:pred = apply_classifier(pred, modelc, img, im0s)# Process detectionsfor i, det in enumerate(pred): # detections per imageif webcam: # batch_size >= 1p, s, im0, frame = path[i], '%g: ' % i, im0s[i].copy(), dataset.countelse:p, s, im0, frame = path, '', im0s, getattr(dataset, 'frame', 0)p = Path(p) # to Pathsave_path = str(save_dir / p.name) # img.jpgtxt_path = str(save_dir / 'labels' / p.stem) + ('' if dataset.mode == 'image' else f'_{frame}') # img.txts += '%gx%g ' % img.shape[2:] # print stringgn = torch.tensor(im0.shape)[[1, 0, 1, 0]] # normalization gain whwhif len(det):# Rescale boxes from img_size to im0 sizedet[:, :4] = scale_coords(img.shape[2:], det[:, :4], im0.shape).round()# Print resultsfor c in det[:, -1].unique():n = (det[:, -1] == c).sum() # detections per classs += f"{n} {names[int(c)]}{'s' * (n > 1)}, " # add to string# Write resultsfor *xyxy, conf, cls in reversed(det):if save_txt: # Write to filexywh = (xyxy2xywh(torch.tensor(xyxy).view(1, 4)) / gn).view(-1).tolist() # normalized xywhline = (cls, *xywh, conf) if opt.save_conf else (cls, *xywh) # label formatwith open(txt_path + '.txt', 'a') as f:f.write(('%g ' * len(line)).rstrip() % line + '\n')if save_img or view_img: # Add bbox to imagelabel = f'{names[int(cls)]} {conf:.2f}'plot_one_box(xyxy, im0, label=label, color=colors[int(cls)], line_thickness=3)# Print time (inference + NMS)print(f'{s}Done. ({t2 - t1:.3f}s)')# Stream resultsif view_img:cv2.imshow(str(p), im0)cv2.waitKey(1) # 1 millisecond# Save results (image with detections)if save_img:if dataset.mode == 'image':cv2.imwrite(save_path, im0)else: # 'video'if vid_path != save_path: # new videovid_path = save_pathif isinstance(vid_writer, cv2.VideoWriter):vid_writer.release() # release previous video writerfourcc = 'mp4v' # output video codecfps = vid_cap.get(cv2.CAP_PROP_FPS)w = int(vid_cap.get(cv2.CAP_PROP_FRAME_WIDTH))h = int(vid_cap.get(cv2.CAP_PROP_FRAME_HEIGHT))vid_writer = cv2.VideoWriter(save_path, cv2.VideoWriter_fourcc(*fourcc), fps, (w, h))vid_writer.write(im0)if save_txt or save_img:s = f"\n{len(list(save_dir.glob('labels/*.txt')))} labels saved to {save_dir / 'labels'}" if save_txt else ''print(f"Results saved to {save_dir}{s}")print(f'Done. ({time.time() - t0:.3f}s)')if __name__ == '__main__':parser = argparse.ArgumentParser()parser.add_argument('--weights', nargs='+', type=str, default='yolov5_crack_wall_epoach150_batchsize5.pt', help='model.pt path(s)')parser.add_argument('--source', type=str, default='data/images', help='source') # file/folder, 0 for webcamparser.add_argument('--img-size', type=int, default=640, help='inference size (pixels)')parser.add_argument('--conf-thres', type=float, default=0.4, help='object confidence threshold')parser.add_argument('--iou-thres', type=float, default=0.45, help='IOU threshold for NMS')parser.add_argument('--device', default='', help='cuda device, i.e. 0 or 0,1,2,3 or cpu')parser.add_argument('--view-img', action='store_true', help='display results')parser.add_argument('--save-txt', action='store_true', help='save results to *.txt')parser.add_argument('--save-conf', action='store_true', help='save confidences in --save-txt labels')parser.add_argument('--classes', nargs='+', type=int, help='filter by class: --class 0, or --class 0 2 3')parser.add_argument('--agnostic-nms', action='store_true', help='class-agnostic NMS')parser.add_argument('--augment', action='store_true', help='augmented inference')parser.add_argument('--update', action='store_true', help='update all models')parser.add_argument('--project', default='runs/detect', help='save results to project/name')parser.add_argument('--name', default='exp', help='save results to project/name')parser.add_argument('--exist-ok', action='store_true', help='existing project/name ok, do not increment')opt = parser.parse_args()print(opt)check_requirements()with torch.no_grad():if opt.update: # update all models (to fix SourceChangeWarning)for opt.weights in ['yolov5s.pt', 'yolov5m.pt', 'yolov5l.pt', 'yolov5x.pt']:detect()strip_optimizer(opt.weights)else:detect()
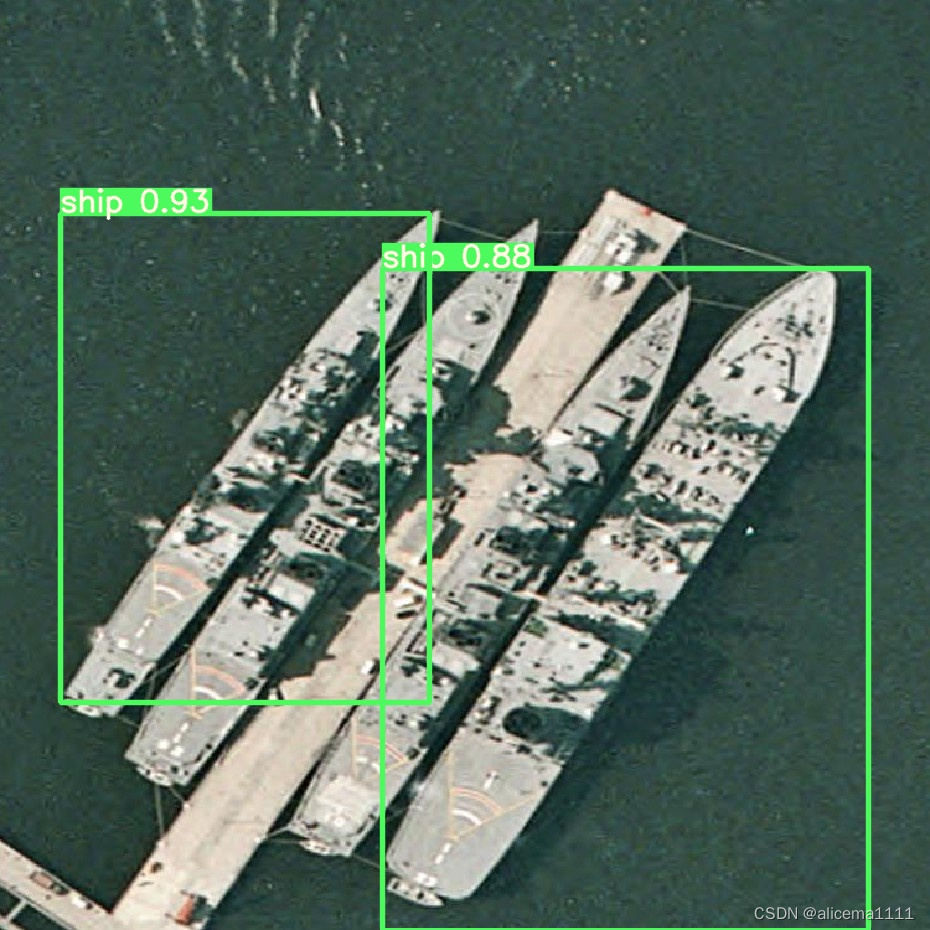
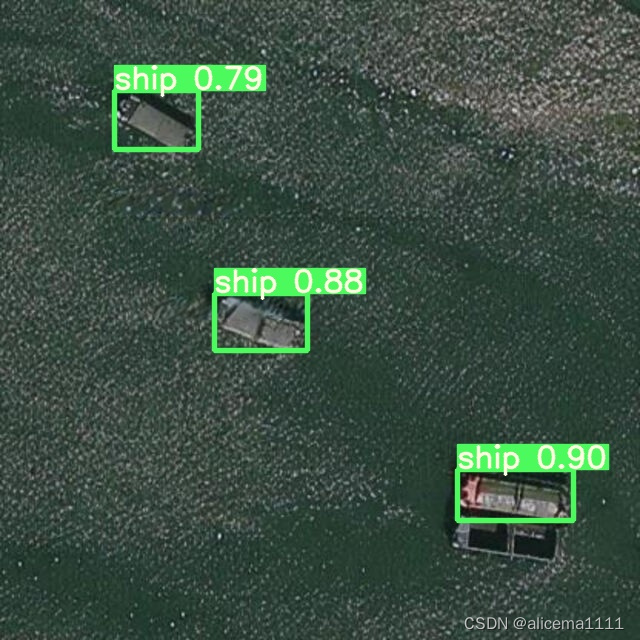
3. 运行结果

三、在线协助:
如需安装运行环境或远程调试,见文章底部个人 QQ 名片,由专业技术人员远程协助!
1)远程安装运行环境,代码调试
2)Qt, C++, Python入门指导
3)界面美化
4)软件制作
博主推荐文章:python人脸识别统计人数qt窗体-CSDN博客
博主推荐文章:Python Yolov5火焰烟雾识别源码分享-CSDN博客
Python OpenCV识别行人入口进出人数统计_python识别人数-CSDN博客
个人博客主页:alicema1111的博客_CSDN博客-Python,C++,网页领域博主
博主所有文章点这里:alicema1111的博客_CSDN博客-Python,C++,网页领域博主
相关文章:
Python+Yolov5舰船侦测识别
程序示例精选 PythonYolov5舰船侦测识别 如需安装运行环境或远程调试,见文章底部个人QQ名片,由专业技术人员远程协助! 前言 这篇博客针对<<PythonYolov5舰船侦测识别>>编写代码,代码整洁,规则,…...

Qt5.9学习笔记-事件(五) 事件调试和排查
⭐️我叫忆_恒心,一名喜欢书写博客的在读研究生👨🎓。 如果觉得本文能帮到您,麻烦点个赞👍呗! 近期会不断在专栏里进行更新讲解博客~~~ 有什么问题的小伙伴 欢迎留言提问欧,喜欢的小伙伴给个三…...

【实用工具】SpringBoot实现接口签名验证
需求场景 由于项目需要开发第三方接口给多个供应商,为保证Api接口的安全性,遂采用Api接口签名验证。 Api接口签名验证主要防御措施为以下几个: 请求发起时间得在限制范围内请求的用户是否真实存在是否存在重复请求请求参数是否被篡改 项目…...

DDR基础
欢迎关注我的博客网站nr-linux.com,图片清晰度和,排版会更好些,文章优先更新至博客站。 DDR全称Double Data Rate Synchronous Dynamic Random Access Memory,是当代处理器必不可少的存储器件之一。本文关于DDR介绍的核心点如下&…...

理解find命令
find命令使用通配符,而不是正则表达式 对于如下两个命令 find ./ -name *txt 和 find ./ -name \*txt 这两个命令之间的区别在于 shell 对通配符字符 * 的解释和展开方式不同。 find ./ -name *txt:在这个命令中,shell 在将命令传递给 fin…...

OpenCV教程——调整图像亮度与对比度,绘制形状和文字
调整图像亮度与对比度 1.图像变换 图像变换通常有两种方式: 像素变换:点操作邻域操作:区域 调整图像亮度和对比度属于像素变换(点操作)。 2.调整图像亮度与对比度 可以通过以下公式调整图像的亮度和对比度&#…...

Python模块篇:函数/类/变量和常量/注释/导入和使用
大家好,我是辣条哥!本期应邀写了一些Python模块相关内容~ Python模块是一种组织Python代码的方式,它将相关的代码放在一个文件中,以便于重用和维护。Python模块可以包含函数、类、变量和常量等,可以被其他Python程序导…...
Java反射和动态代理
反射 反射允许对封装类的成员变量、成员方法和构造方法的信息进行编程访问 成员变量:修饰符、名字、类型、get/set值 构造方法:修饰符、名字、形参、创建对象 成员方法:修饰符、名字、形参、返回值、抛出的异常、获取注解、运行方法 获取…...
Python实现)
[NOIP2004 提高组] 津津的储蓄计划(思路+代码详解)Python实现
题目描述 津津的零花钱一直都是自己管理。每个月的月初妈妈给津津300 元钱,津津会预算这个月的花销,并且总能做到实际花销和预算的相同。 为了让津津学习如何储蓄,妈妈提出,津津可以随时把整百的钱存在她那里,到了年…...
分布式搜索引擎es 面试突击
es elastocsearch 倒排索引是在数据查询之前建立,在查询的时候可以直接通过关键词定位到文档内容。用空间换时间 分布式架构原理说一下? es底层是基于lucene来的 大概就是一个用于全文检索的jar包 用es来做分布式的搜索引擎 可以承载一秒钟几千的…...

社会心理学的六个经典实验
社会心理学的六个经典实验 社会心理学(Social Psychology)是一门研究我们周围情境的力量的科学,尤其关注我们是如何看待他人,如何影响他人的。更确切地说,社会心理学是一门就人们如何看待他人,如何影响他人…...

Java 单例模式详解
单例模式(Singleton Pattern)是一种常见的设计模式,它可以确保某个类只有一个实例,并提供对该实例的全局访问点。本文将详细介绍 Java 中所有单例模式实现,包括懒汉式、饿汉式、枚举式、双重检查锁定式、静态内部类式等…...

AI读心重磅突破登Nature!大脑信号1秒被看穿,还能预测未来画面
最近,来自洛桑联邦理工学院的研究团队提出了一种全新的方法,可以用AI从大脑信号中提取视频画面。论文已登Nature,却遭网友疯狂「打假」。 现在,AI不仅会读脑,还会预测下一个画面了! 利用AI,一个…...
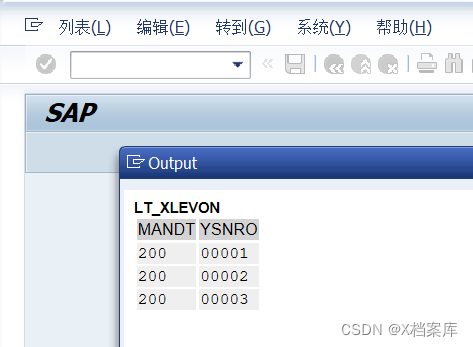
【SAP Abap】X-DOC:SNRO - ABAP流水号应用
【SAP Abap】X-DOC:SNRO - ABAP流水号应用 1、定义表(字段域)2、定义流水号3、使用流水号4、测试程序 1、定义表(字段域) 2、定义流水号 Tcode: SNRO/SNUM, 根据以上创建的字段域 YDSNRO,创建对…...
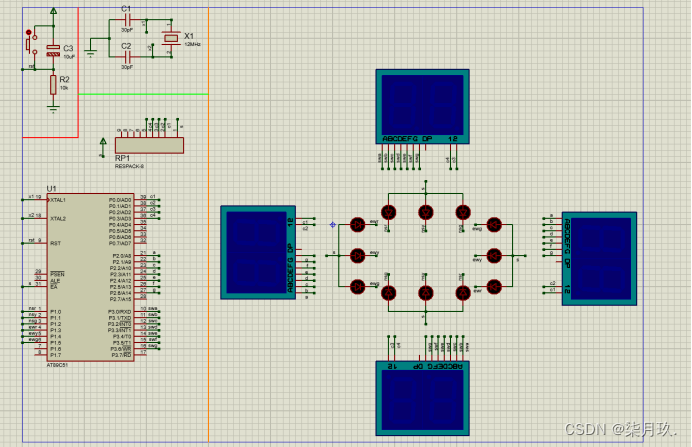
基于AT89C51单片机的交通灯设计与仿真
点击链接获取Keil源码与Project Backups仿真图: https://download.csdn.net/download/qq_64505944/87763760?spm1001.2014.3001.5503 源码获取 主要内容: 设计一个能够控制十二盏交通信号灯的模拟系统,:利用单片机的定时器定时,令十字路口…...
Using filesort)
MySQL系列三(定位慢SQL、SQL优化与索引优化)Using filesort
文章目录 1. 慢SQL1.1 定位慢SQL(慢查询日志)1.2 慢SQL优化整体思路 2. 索引优化3. SQL语句优化回表Using filesort 1. 慢SQL 1.1 定位慢SQL(慢查询日志) 在mysql 配置文件中 (my.conf),进行下面配置&…...

免费使用GPT-4.0?【AI聊天 | GPT4教学】 —— 微软 New Bing GPT4 申请与使用保姆级教程
目录 认识 New Bing 2. 注册并登录 Microsoft 账号 3. 如何免科学上网使用 New Bing? 4. 加入 WaitList 候补名单 5. 使用 New Bing! 6. 使用 Skype 免科学上网访问 New Bing! 7. 在 Chrome 浏览器中使用 New Bing! 8. 总…...

渲染对电脑伤害大吗_如何减少渲染伤机?
虽然说摄影穷三代,但想要自己的本地配置跟上自己的创作速度,高昂的硬件配置支出也可以让自己穷一段时间。CG制作过程中,渲染是必不可少的一步,而且这一步也是很吃“机器”的,那很多人也会担心,如果经常用自…...

非线性最小二乘
非线性最小二乘 目录 文章目录 非线性最小二乘目录 [toc]1 非线性最小二乘估计3 非线性最小二乘的实现 1 非线性最小二乘估计 在经典最小二乘法估计中,假定被解释变量的条件期望是关于参数的线性函数,例如 E ( y ∣ x ) a b x E(y|x) abx E(y∣x)a…...

23.5.7总结(学习通项目思路)
项目: 1.登录修改:删除数据库中的状态,通过使用 ConcurrentHashMap来作为是否在线的判断,通过设定一个退出的按钮,发消息给服务端主动移除对应的值。 2.注册:增加了手机号的填写,正则判断&…...

Stitches API完全指南:从基础配置到自定义扩展
Stitches API完全指南:从基础配置到自定义扩展 【免费下载链接】stitches HTML5 Sprite Sheet Generator 项目地址: https://gitcode.com/gh_mirrors/sti/stitches Stitches是一款强大的HTML5 Sprite Sheet Generator,它提供了直观的API接口&…...

Taurus多执行器对比实战:JMeter/Gatling/Locust统一压测方案
1. 为什么选Taurus做多执行器对比——不是为了炫技,而是为了少踩坑在性能测试领域,我见过太多团队卡在“选型”这一步:刚招来一个会写JMeter脚本的工程师,项目突然要压测WebSocket接口,发现JMeter原生支持弱、插件维护…...

2605.VGGT-Omega 论文解读: 3D重建的Scaling Law, Register Attention效率革命 | Oxford+Meta CVPR26 Oral
VGGT-Omega: Scaling Feed-Forward 3D Reconstruction Jianyuan Wang, Minghao Chen, Shangzhan Zhang, Nikita Karaev, Johannes Schonberger, et al. Visual Geometry Group, Oxford Meta AI | CVPR 2026 Oral | arXiv 2605.15195 Paper | Project Page 一句话总结 VGGT-Om…...

CausalVLR基准测试报告:在IU X-Ray和MIMIC-CXR数据集上的性能分析
CausalVLR基准测试报告:在IU X-Ray和MIMIC-CXR数据集上的性能分析 【免费下载链接】CausalVLR CausalVLR: A Toolbox and Benchmark for Vision-Language Causal Reasoning (多模态因果推理开源框架) 项目地址: https://gitcode.com/gh_mirrors/ca/CausalVLR …...

利用FTDI芯片MPSSE模式构建Arduino兼容开发环境
1. 项目概述:当FTDI芯片遇上Arduino生态如果你手头有一些闲置的FTDI USB转串口模块,比如常见的FT232R、FT2232H,或者像我一样,从某个旧设备上拆下来一块FT2232C的老古董,除了用来给单片机烧录程序或者做串口调试&#…...
)
别再纠结了!给激光焊接新手讲透单模和多模激光到底怎么选(附M²因子解读)
激光焊接设备选型指南:单模与多模激光的实战抉择 当你第一次站在激光焊接设备采购的十字路口,面对"单模"和"多模"这两个专业术语时,那种迷茫感我深有体会。五年前,我作为产线技术负责人,需要为汽车…...

观察Taotoken在多模型聚合调用下的路由与失败重试效果
🚀 告别海外账号与网络限制!稳定直连全球优质大模型,限时半价接入中。 👉 点击领取海量免费额度 观察Taotoken在多模型聚合调用下的路由与失败重试效果 在构建依赖大模型能力的应用时,服务的稳定性是开发者关注的核心…...

使用Taotoken CLI工具一键配置多开发环境下的统一模型接入点
🚀 告别海外账号与网络限制!稳定直连全球优质大模型,限时半价接入中。 👉 点击领取海量免费额度 使用Taotoken CLI工具一键配置多开发环境下的统一模型接入点 在团队协作或管理多个AI应用项目时,一个常见的痛点是每个…...

终极虚拟显示器解决方案:ParsecVDisplay完整使用指南
终极虚拟显示器解决方案:ParsecVDisplay完整使用指南 【免费下载链接】parsec-vdd ✨ Perfect virtual display for game streaming 项目地址: https://gitcode.com/gh_mirrors/pa/parsec-vdd ParsecVDisplay是一个基于Parsec虚拟显示驱动(VDD)的独立应用程序…...

Unity动态植被系统:实时天气与自然现象耦合方案
1. 这不是“贴图堆砌”,而是一套可交互的自然系统你有没有试过在Unity里拖进几棵树、铺点草地,结果运行起来——风一吹,所有树叶像被钉在空中一样纹丝不动;下雨时,雨滴垂直砸进地面,连个水花都没有…...