Pytest自动化测试框架一些常见的插件
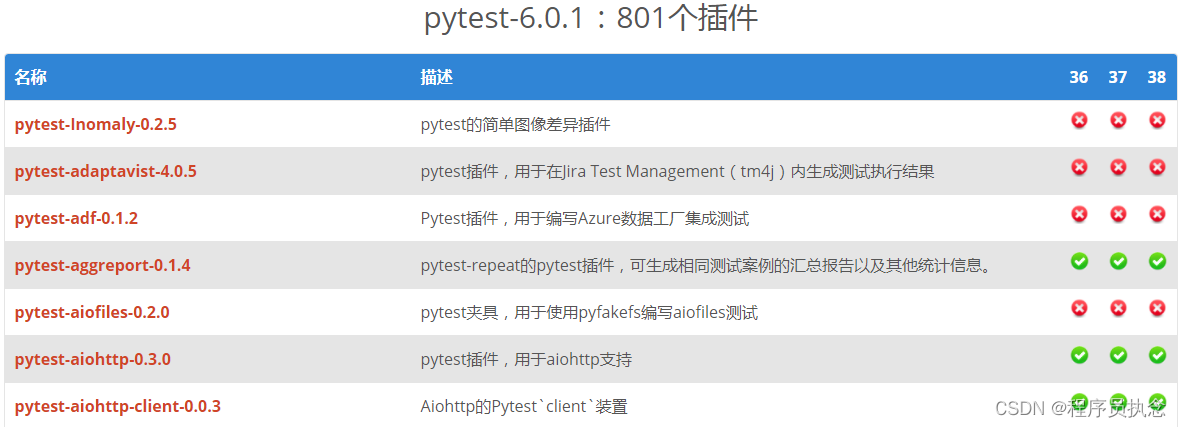
Pytest拥有丰富的插件架构,超过800个以上的外部插件和活跃的社区,在PyPI项目中以“ pytest- *”为标识。
本篇将列举github标星超过两百的一些插件进行实战演示。
插件库地址:http://plugincompat.herokuapp.com/
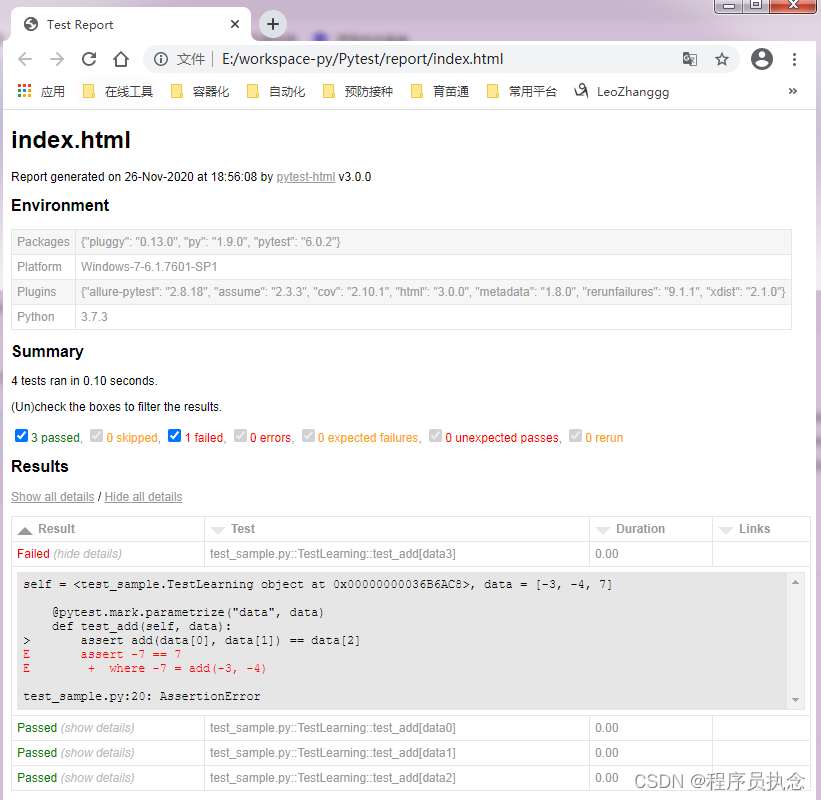
1、pytest-html:用于生成HTML报告
一次完整的测试,测试报告是必不可少的,但是pytest自身的测试结果过于简单,而pytest-html正好可以给你提供一份清晰报告。
安装:
pip install -U pytest-html
用例:
# test_sample.py
import pytest
# import time
# 被测功能
def add(x, y):
# time.sleep(1)
return x + y
# 测试类
class TestLearning:
data = [
[3, 4, 7],
[-3, 4, 1],
[3, -4, -1],
[-3, -4, 7],
]
@pytest.mark.parametrize("data", data)
def test_add(self, data):
assert add(data[0], data[1]) == data[2]
运行:
E:\workspace-py\Pytest>pytest test_sample.py --html=report/index.html
========================================================================== test session starts ==========================================================================
platform win32 -- Python 3.7.3, pytest-6.0.2, py-1.9.0, pluggy-0.13.0
rootdir: E:\workspace-py\Pytest
plugins: allure-pytest-2.8.18, cov-2.10.1, html-3.0.0, rerunfailures-9.1.1, xdist-2.1.0
collected 4 items
test_sample.py ...F [100%]
=============================================================================== FAILURES ================================================================================
_____________________________________________________________________ TestLearning.test_add[data3] ______________________________________________________________________
self = <test_sample.TestLearning object at 0x00000000036B6AC8>, data = [-3, -4, 7]
@pytest.mark.parametrize("data", data)
def test_add(self, data):
> assert add(data[0], data[1]) == data[2]
E assert -7 == 7
E + where -7 = add(-3, -4)
test_sample.py:20: AssertionError
------------------------------------------------- generated html file: file://E:\workspace-py\Pytest\report\index.html --------------------------------------------------
======================================================================== short test summary info ========================================================================
FAILED test_sample.py::TestLearning::test_add[data3] - assert -7 == 7
====================================================================== 1 failed, 3 passed in 0.14s ======================================================================
运行完,会生产一个html文件 和 css样式文件夹assets,用浏览器打开html即可查看清晰的测试结果。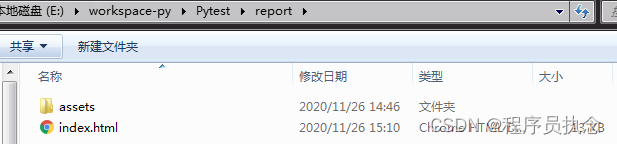
后面我将会更新更加清晰美观的测试报告插件: allure-python
2、pytest-cov:用于生成覆盖率报告
在做单元测试时,代码覆盖率常常被拿来作为衡量测试好坏的指标,甚至,用代码覆盖率来考核测试任务完成情况。
安装:
pip install -U pytest-cov
运行:
E:\workspace-py\Pytest>pytest --cov=.
========================================================================== test session starts ==========================================================================
platform win32 -- Python 3.7.3, pytest-6.0.2, py-1.9.0, pluggy-0.13.0
rootdir: E:\workspace-py\Pytest
plugins: allure-pytest-2.8.18, cov-2.10.1, html-3.0.0, rerunfailures-9.1.1, xdist-2.1.0
collected 4 items
test_sample.py .... [100%]
----------- coverage: platform win32, python 3.7.3-final-0 -----------
Name Stmts Miss Cover
------------------------------------
conftest.py 5 3 40%
test_sample.py 7 0 100%
------------------------------------
TOTAL 12 3 75%
=========================================================================== 4 passed in 0.06s ===========================================================================
3、pytest-xdist:实现多线程、多平台执行
通过将测试发送到多个CPU来加速运行,可以使用-n NUMCPUS指定具体CPU数量,或者使用-n auto自动识别CPU数量并全部使用。
安装:
pip install -U pytest-xdist
用例:
# test_sample.py
import pytest
import time
# 被测功能
def add(x, y):
time.sleep(3)
return x + y
# 测试类
class TestAdd:
def test_first(self):
assert add(3, 4) == 7
def test_second(self):
assert add(-3, 4) == 1
def test_three(self):
assert add(3, -4) == -1
def test_four(self):
assert add(-3, -4) == 7
E:\workspace-py\Pytest>pytest test_sample.py
========================================================================== test session starts ==========================================================================
platform win32 -- Python 3.7.3, pytest-6.0.2, py-1.9.0, pluggy-0.13.0
rootdir: E:\workspace-py\Pytest
plugins: allure-pytest-2.8.18, cov-2.10.1, html-3.0.0, rerunfailures-9.1.1, xdist-2.1.0
collected 4 items
test_sample.py .... [100%]
========================================================================== 4 passed in 12.05s ===========================================================================
E:\workspace-py\Pytest>pytest test_sample.py -n auto
========================================================================== test session starts ==========================================================================
platform win32 -- Python 3.7.3, pytest-6.0.2, py-1.9.0, pluggy-0.13.0
rootdir: E:\workspace-py\Pytest
plugins: allure-pytest-2.8.18, assume-2.3.3, cov-2.10.1, forked-1.3.0, html-3.0.0, rerunfailures-9.1.1, xdist-2.1.0
gw0 [4] / gw1 [4] / gw2 [4] / gw3 [4]
.... [100%]
=========================================================================== 4 passed in 5.35s ===========================================================================
E:\workspace-py\Pytest>pytest test_sample.py -n 2
========================================================================== test session starts ==========================================================================
platform win32 -- Python 3.7.3, pytest-6.0.2, py-1.9.0, pluggy-0.13.0
rootdir: E:\workspace-py\Pytest
plugins: allure-pytest-2.8.18, assume-2.3.3, cov-2.10.1, forked-1.3.0, html-3.0.0, rerunfailures-9.1.1, xdist-2.1.0
gw0 [4] / gw1 [4]
.... [100%]
=========================================================================== 4 passed in 7.65s ===========================================================================
上述分别进行了未开多并发、开启4个cpu、开启2个cpu,从运行耗时结果来看,很明显多并发可以大大缩减你的测试用例运行耗时。
4、pytest-rerunfailures:实现重新运行失败用例
我们在测试时可能会出现一些间接性故障,比如接口测试遇到网络波动,web测试遇到个别插件刷新不及时等,这时重新运行则可以帮忙我们消除这些故障。
安装:
pip install -U pytest-rerunfailures
运行:
E:\workspace-py\Pytest>pytest test_sample.py --reruns 3
========================================================================== test session starts ==========================================================================
platform win32 -- Python 3.7.3, pytest-6.0.2, py-1.9.0, pluggy-0.13.0
rootdir: E:\workspace-py\Pytest
plugins: allure-pytest-2.8.18, cov-2.10.1, html-3.0.0, rerunfailures-9.1.1, xdist-2.1.0
collected 4 items
test_sample.py ...R [100%]R
[100%]R [100%]F [100%]
=============================================================================== FAILURES ================================================================================
___________________________________________________________________________ TestAdd.test_four ___________________________________________________________________________
self = <test_sample.TestAdd object at 0x00000000045FBF98>
def test_four(self):
> assert add(-3, -4) == 7
E assert -7 == 7
E + where -7 = add(-3, -4)
test_sample.py:22: AssertionError
======================================================================== short test summary info ========================================================================
FAILED test_sample.py::TestAdd::test_four - assert -7 == 7
================================================================= 1 failed, 3 passed, 3 rerun in 0.20s ==================================================================
如果你想设定重试间隔,可以使用 --rerun-delay 参数指定延迟时长(单位秒);
如果你想重新运行指定错误,可以使用 --only-rerun 参数指定正则表达式匹配,并且可以使用多次来匹配多个。
pytest --reruns 5 --reruns-delay 1 --only-rerun AssertionError --only-rerun ValueError
如果你只想标记单个测试失败时自动重新运行,可以添加 pytest.mark.flaky() 并指定重试次数以及延迟间隔。
@pytest.mark.flaky(reruns=5, reruns_delay=2)
def test_example():
import random
assert random.choice([True, False])
5、pytest-randomly:实现随机排序测试
测试中的随机性非常越大越容易发现测试本身中隐藏的缺陷,并为你的系统提供更多的覆盖范围。
安装:
pip install -U pytest-randomly
运行:
E:\workspace-py\Pytest>pytest test_sample.py
========================================================================== test session starts ==========================================================================
platform win32 -- Python 3.7.3, pytest-6.0.2, py-1.9.0, pluggy-0.13.0
Using --randomly-seed=3687888105
rootdir: E:\workspace-py\Pytest
plugins: allure-pytest-2.8.18, cov-2.10.1, html-3.0.0, randomly-3.5.0, rerunfailures-9.1.1, xdist-2.1.0
collected 4 items
test_sample.py F... [100%]
=============================================================================== FAILURES ================================================================================
___________________________________________________________________________ TestAdd.test_four ___________________________________________________________________________
self = <test_sample.TestAdd object at 0x000000000567AD68>
def test_four(self):
> assert add(-3, -4) == 7
E assert -7 == 7
E + where -7 = add(-3, -4)
test_sample.py:22: AssertionError
======================================================================== short test summary info ========================================================================
FAILED test_sample.py::TestAdd::test_four - assert -7 == 7
====================================================================== 1 failed, 3 passed in 0.13s ======================================================================
E:\workspace-py\Pytest>pytest test_sample.py
========================================================================== test session starts ==========================================================================
platform win32 -- Python 3.7.3, pytest-6.0.2, py-1.9.0, pluggy-0.13.0
Using --randomly-seed=3064422675
rootdir: E:\workspace-py\Pytest
plugins: allure-pytest-2.8.18, assume-2.3.3, cov-2.10.1, forked-1.3.0, html-3.0.0, randomly-3.5.0, rerunfailures-9.1.1, xdist-2.1.0
collected 4 items
test_sample.py ...F [100%]
=============================================================================== FAILURES ================================================================================
___________________________________________________________________________ TestAdd.test_four ___________________________________________________________________________
self = <test_sample.TestAdd object at 0x00000000145EA940>
def test_four(self):
> assert add(-3, -4) == 7
E assert -7 == 7
E + where -7 = add(-3, -4)
test_sample.py:22: AssertionError
======================================================================== short test summary info ========================================================================
FAILED test_sample.py::TestAdd::test_four - assert -7 == 7
====================================================================== 1 failed, 3 passed in 0.12s ======================================================================
这功能默认情况下处于启用状态,但可以通过标志禁用(假如你并不需要这个模块,建议就不要安装)。
pytest -p no:randomly
如果你想指定随机顺序,可以通过 --randomly-send 参数来指定,也可以使用 last 值来指定沿用上次的运行顺序。
pytest --randomly-seed=4321
pytest --randomly-seed=last
6、其他活跃的插件
还有一些其他功能性比较活跃的、一些专门为个别框架所定制的、以及为了兼容其他测试框架,这里暂不做演示,我就简单的做个列举:
pytest-django:用于测试Django应用程序(Python Web框架)。
pytest-flask:用于测试Flask应用程序(Python Web框架)。
pytest-splinter:兼容Splinter Web自动化测试工具。
pytest-selenium:兼容Selenium Web自动化测试工具。
pytest-testinfra:测试由Salt,Ansible,Puppet, Chef等管理工具配置的服务器的实际状态。
pytest-mock:提供一个mock固件,创建虚拟的对象来实现测试中个别依赖点。
pytest-factoryboy:结合factoryboy工具用于生成各式各样的数据。
pytest-qt:提供为PyQt5和PySide2应用程序编写测试。
pytest-asyncio:用于使用pytest测试异步代码。
pytest-bdd:实现了Gherkin语言的子集,以实现自动化项目需求测试并促进行为驱动的开发。
pytest-watch:为pytest提供一套快捷CLI工具。
pytest-testmon:可以自动选择并重新执行仅受最近更改影响的测试。
pytest-assume:用于每个测试允许多次失败。
pytest-ordering:用于测试用例的排序功能。
pytest-sugar:可立即显示失败和错误并显示进度条。
pytest-dev/pytest-repeat:可以重复(可指定次数)执行单个或多个测试。
相关文章:
Pytest自动化测试框架一些常见的插件
Pytest拥有丰富的插件架构,超过800个以上的外部插件和活跃的社区,在PyPI项目中以“ pytest- *”为标识。 本篇将列举github标星超过两百的一些插件进行实战演示。 插件库地址:http://plugincompat.herokuapp.com/ 1、pytest-htmlÿ…...

【力扣】刷题+剑指offer第二版
文章目录 题目收藏不含重复字符的最长子串最长公共子串 剑指 Offer剑指 Offer 05. 替换空格剑指 Offer 03. 数组中重复的数字剑指 Offer 04. 二维数组中的查找剑指 Offer 09. 用两个栈实现队列剑指 Offer 07. 重建二叉树剑指 Offer 06. 从尾到头打印链表剑指 Offer 11. 旋转数组…...
QueryStorm Crack
QueryStorm Crack 应用程序现在可以指定“minRuntimeVersion”。 添加了用于节流和API密钥管理的HTTP请求基础结构(请求/尝试/重试循环)。 改进了许可提示的处理(避免在多个单元格中评估许可功能时出现多个提示)。 已添加“IDialogServiceExt”接口,该接口允许应用程…...

网络安全与隐私保护:挑战与应对策略
一、引言 在互联网时代,个人隐私保护已经成为一项全球性的难题。尤其是在“裸奔”时代下,人们越来越难以避免个人隐私泄露的风险。网络安全与隐私保护已经成为了人们关注的焦点。保护网络隐私已经成为了每个人最基本的权利和义务。 二、网络安全与隐私…...
不同应用场景瑞芯微RK3568主板方案定制
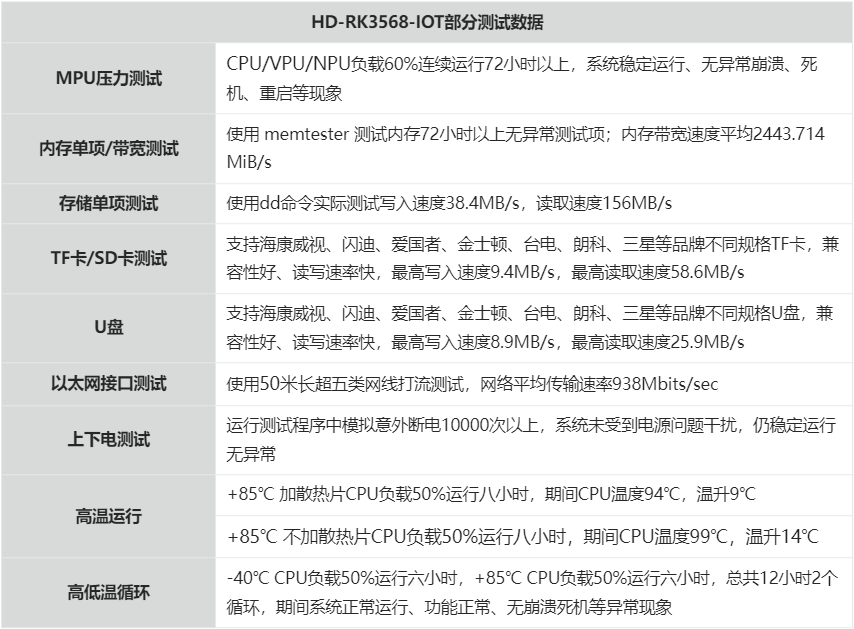
随着物联网和智能设备的迅猛发展,瑞芯微RK3568主板方案作为一种高性能的系统System-on-a-chip(SoC),已经成为嵌入式系统、智能家居设备和工业自动化设备等应用场景的首选方案。定制瑞芯微RK3568主板方案可以满足不同应用场景的需求…...
公司数字化转型,如何选择高效的知识管理工具?
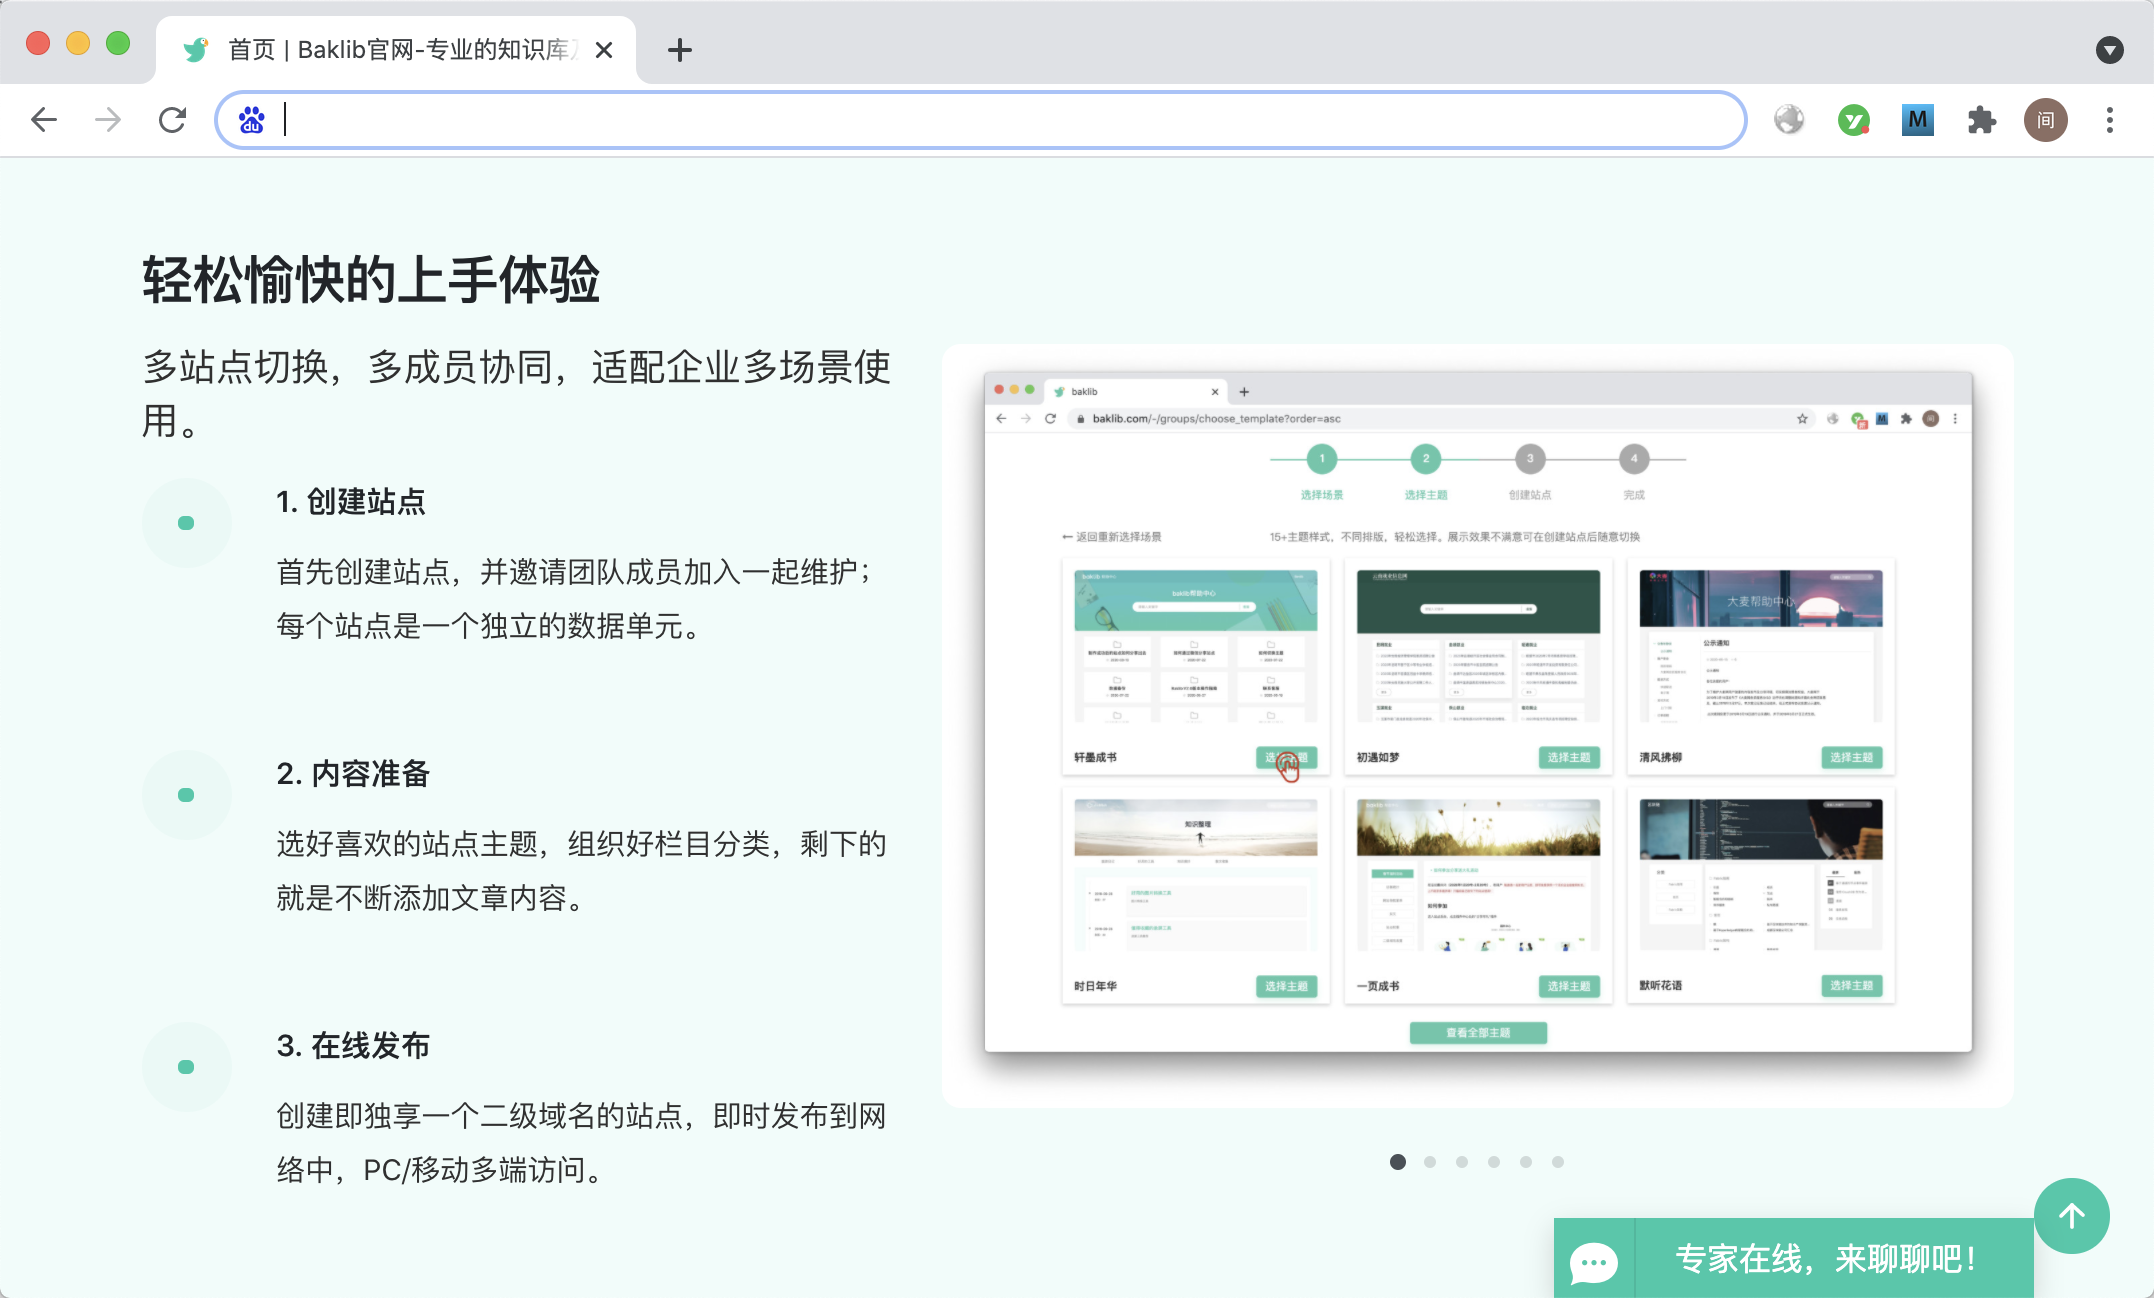
随着企业数字化转型的加速,知识管理工具的重要性也日益凸显。好的知识管理工具可以帮助企业提高工作效率、降低成本、提高创新能力和竞争力。但是,市场上的知识管理工具繁多,如何选择高效的知识管理工具成为了企业面临的一大难题。本文将从以…...
-多选)
银行从业法律法规(初级)-多选
目录 前言一、巴塞尔相关1-1 第一版巴塞尔1-2 第二版巴塞尔1-3 第三版巴塞尔 二、银行2-0 银行相关2-1 中国人民银行2-2 国家开发银行2-3 政策性银行2-4 银保监会2-5 银监会 三、合规&风险3-1合规3-2 风险3-3 资产负债管理 四、货币&财政4-1 货币4-2 利率 五、存款贷款…...
Maven 依赖管理 学习
目录 Maven 依赖管理 可传递性依赖发现 依赖范围 依赖管理 Maven 自动化部署 问题描述 解决方案 修改项目的 pom.xml Maven Release 插件 Maven Web 应用 创建 Web 应用 构建 Web 应用 部署 Web 应用 Maven 依赖管理 Maven 一个核心的特性就是依赖管理。当我们处…...

分享105个NET源码ASP源码,总有一款适合您
分享105个NET源码,总有一款适合您 源码下载链接:https://pan.baidu.com/s/1zFMIHX6juXdR2CaHMEr5mQ?pwdf5hz 提取码:f5hz 下面是文件的名字,我放了一些图片,文章里不是所有的图主要是放不下...,大家下载后…...
Web缓存利用分析(三)
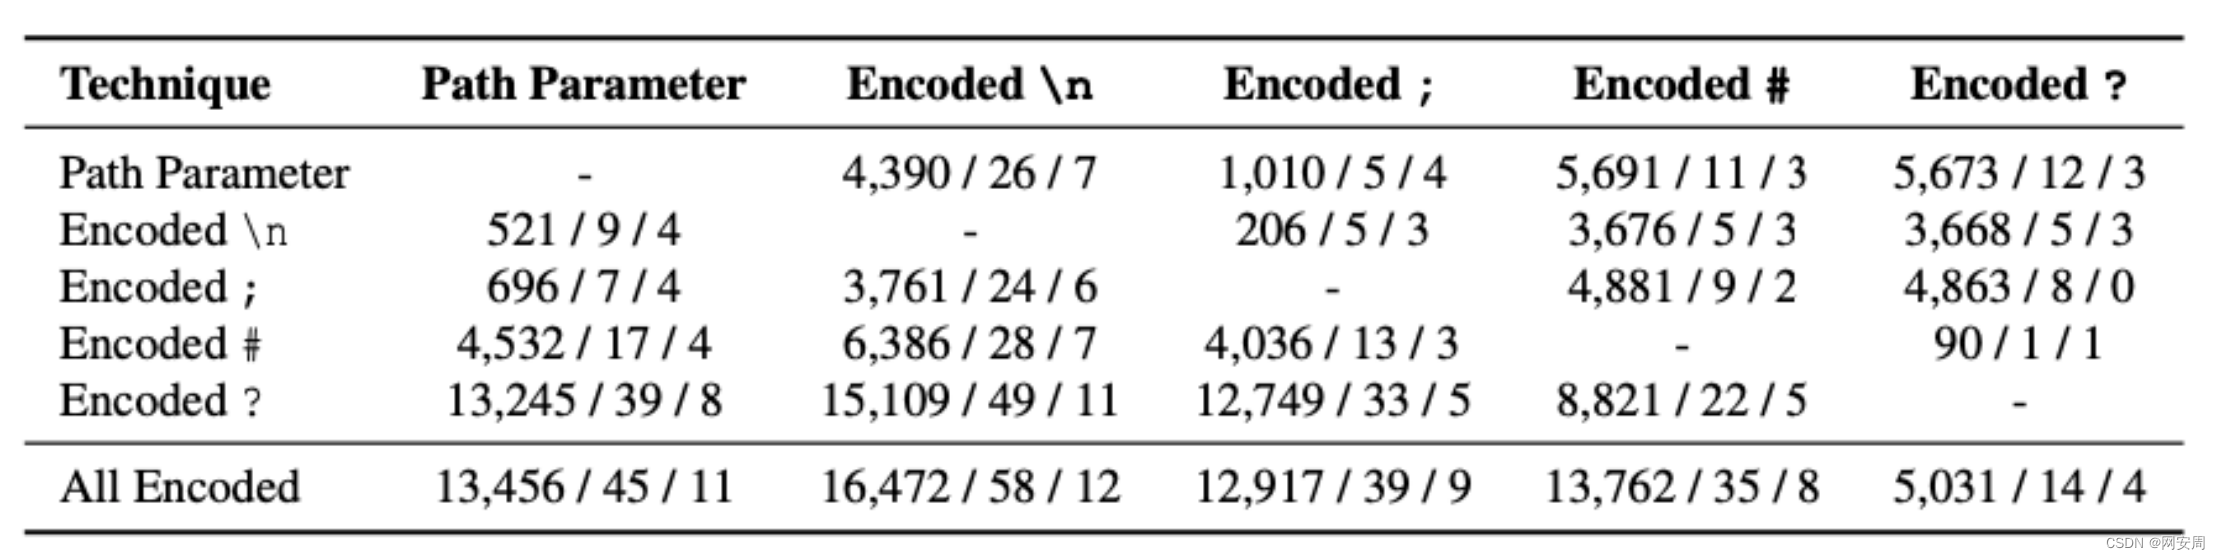
导语:前一篇文章介绍了Server Cache Poisoning在实际应用场景下,产生DOS攻击的利用方式。本篇文章则介绍Web Cache Deception在真实场景下的应用方式和测试情况。 前言 前一篇文章介绍了Server Cache Poisoning在实际应用场景下,产生DOS攻击…...

Git合并冲突的根本原因和解决方法
假如您现在正在参与一个团队项目,并取得了实质性的进展。然而,当你准备提交代码的时候,发现团队中的某个人也更改了同一个文件,并且先你一步提交了——您现在遇到了代码冲突问题。而且需要花时间去解决自己的更改与别人的更改之间…...
从C语言到C++⑨(第三章_CC++内存管理)详解new和delete+面试题笔试题
目录 1. C语言动态内存管理 1.1 C/C内存分布 1.2 C语言中动态内存管理的方式 2. C动态内存管理方式 2.1 new/delete操作内置类型 2.2 初始化new数组的问题 2.3 new 和 delete 操作自定义类型 3. operator new与operator delete函数详解 3.1 operator new与operator de…...
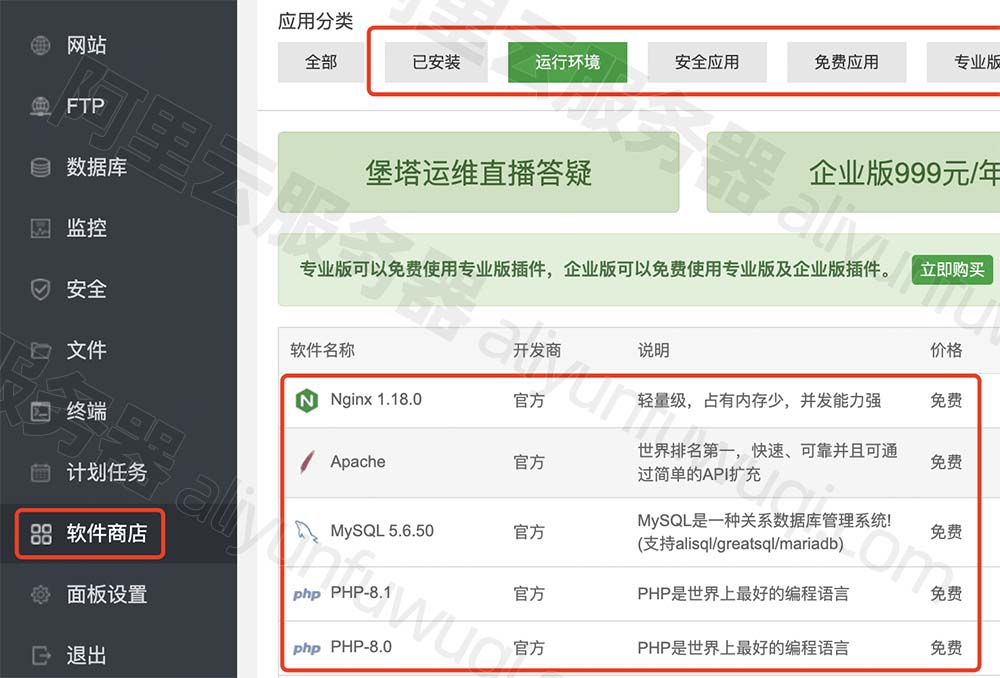
阿里云服务器安装宝塔Linux面板教程图解
使用阿里云服务器安装宝塔面板教程,阿里云服务器网以CentOS操作系统为例,安装宝塔Linux面板,先远程连接到云服务器,然后执行宝塔面板安装命令,系统会自动安装宝塔面板,安装完成后会返回面板地址、账号和密码…...

ORA-01555 ORA-22924 快照过旧问题处理
ORA-01555 ORA-22924 快照过旧问题处理 问题描述 使用数据泵导出数据,或在业务功能查询某个表时,可能出现 ORA-01555 ORA-22924 快照过旧的错误: ORA-01555: snapshot too old: rollback segment number with name "" too small…...
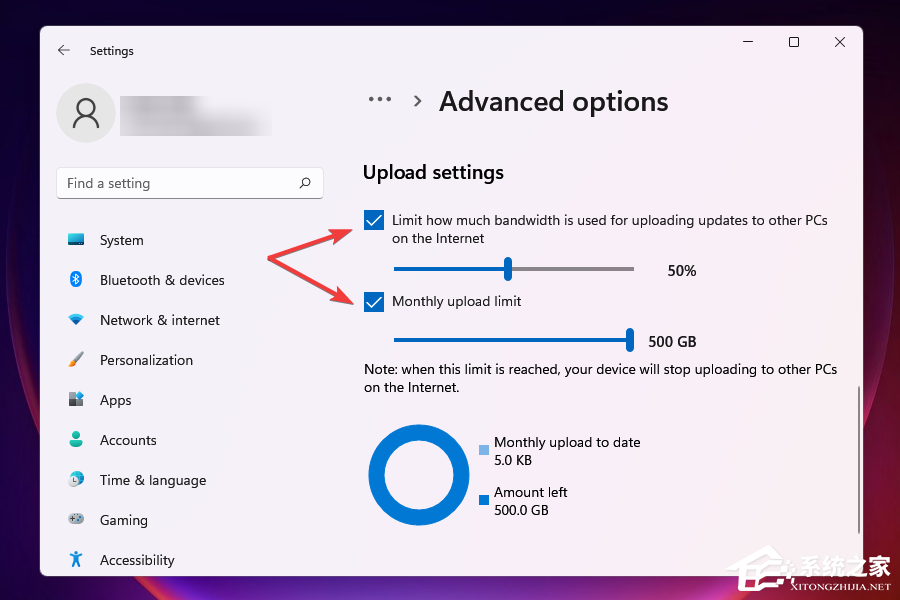
Win11系统更新后网络速度变的很慢怎么办?
Win11系统更新后网络速度变的很慢怎么办?有用户将自己的电脑系统升级到了Win11之后,出现了一些问题。电脑在使用中出现了网络速度变慢的情况。而且其它的设备在连接网络后速度是正常的,那么这个问题要怎么解决?来看看以下的方法分…...
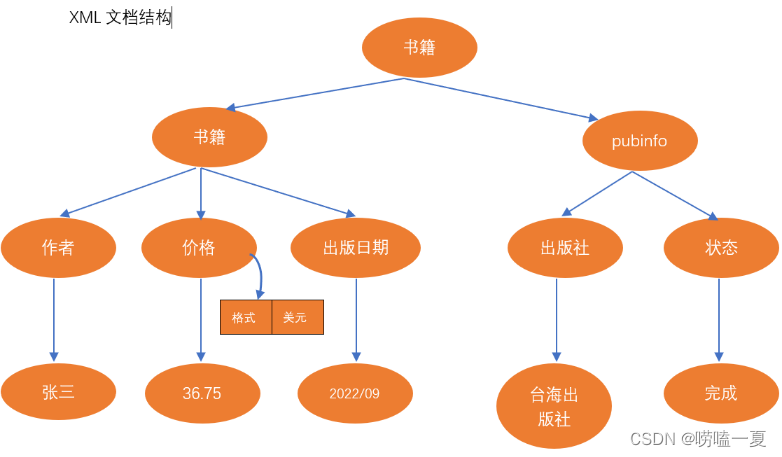
了解 XML结构(一)
文章目录 1 XML定义2 了解XML结构3 XML节点类型4 加载读取XML5 小结 1 XML定义 XML是一种可扩展标记语言(Extensible Markup Language, XML),可以用来标记数据,定义数据类型,是一种允许用户对自己的标记语言进行定义的源语言。 …...

Vue简单语法记录
指令 v-show:展示和隐藏 如图片的展示和隐藏 (底层是其实已经创建了 加了个css属性,display none)v-if:创建和删除 创建和删除,删除就真的没了v-for: 遍历指令 v-for"item in list&…...

matplotlib的安装和使用教程:中文字体及语言参数设置
matplotlib是一个常用的数据可视化库,广泛应用于科学研究、工程设计、金融分析等领域。由于其强大的功能和易用性,matplotlib已经成为了广大科研工作者和数据分析师的必备工具之一。本文将重点介绍matplotlib的安装和允许中文及几种字体的方法。 一、mat…...

mysql深分页
第一种:主键自增id情况: 未改: select * from wx_product_category_info where category_name_cn#{categoryNameCn} and category_type#{categoryType} order by id asclimit #{pageNum}, #{pageSize};在普通的limit条件下,如果…...

【JavaScript由浅入深】常用的正则表达式
【JavaScript由浅入深】常用的正则表达式 文章目录 【JavaScript由浅入深】常用的正则表达式写在前面一、认识正则表达式1.1 正则表达式的概念 二、正则表达式的使用2.1 使用构造函数创建正则表达式2.2 使用字面量创建正则表达式2.3 补充 三、正则表达式常见规则3.1 字符类3.2 …...
)
从测速到配置:一套完整的cFosSpeed网络加速保姆级教程(适用于小白)
从零开始掌握cFosSpeed:网络加速全流程实战指南对于经常进行在线游戏、视频会议或大文件传输的用户来说,网络延迟和带宽利用率低下往往是影响体验的关键痛点。cFosSpeed作为一款专业的网络流量优化工具,能够显著改善这些问题,但许…...

Unity安卓打包实战指南:从环境配置到APK生成全链路排错
1. 这不是“入门教程”,而是一份写给真实开发现场的生存指南你打开Unity,新建一个3D项目,拖进一个Cube,点击Play——它动了。你松了口气,觉得“Unity好像也没那么难”。但当你把APK打包发给测试同事,对方回…...

CANN-昇腾NPU-RAG推理-检索增强生成怎么部署
RAG(Retrieval-Augmented Generation)是 LLM 知识库的组合:先检索相关文档,再让 LLM 基于文档回答。昇腾NPU 上部署 RAG 需要两个组件:Embedding 模型(做向量检索)和 LLM(做生成&am…...
)
ThinkPad开机报错0183/0253?别慌,手把手教你搞定EFI变量错误(附BIOS重置教程)
ThinkPad开机报错0183/0253?EFI变量错误全面解决方案当你按下ThinkPad的电源键,期待熟悉的开机画面时,屏幕上却突然跳出一串神秘代码——"0183: Bad CRC of Security Settings in EFI Variable"或"0253: EFI Variable Block D…...

AI圈内火热的Agent、MCP、Skill、CLI是啥?用装修房子讲透,看完秒懂
本文用装修房子的比喻,详细解释了AI领域的四个核心概念:Agent如同会自主规划任务的私人助理;MCP是AI与外部工具数据的统一接口,类似USB-C;Skill是指导AI按标准操作执行的手册;CLI则是不依赖图形界面的命令行…...

告别鼠标点击,微博图片批量下载的轻松方案
告别鼠标点击,微博图片批量下载的轻松方案 【免费下载链接】weiboPicDownloader Download weibo images without logging-in 项目地址: https://gitcode.com/gh_mirrors/we/weiboPicDownloader 还记得那个周末的下午吗?你喜欢的博主发布了九宫格美…...

BetterNCM安装器终极指南:5分钟解锁网易云音乐无限潜能
BetterNCM安装器终极指南:5分钟解锁网易云音乐无限潜能 【免费下载链接】BetterNCM-Installer 一键安装 Better 系软件 项目地址: https://gitcode.com/gh_mirrors/be/BetterNCM-Installer 你是否觉得网易云音乐PC版功能有限,界面单调?…...

框架组件识别:从版本号到利用链的渗透实战指南
1. 这不是“扫个版本号”那么简单:框架组件识别在真实渗透中的战略定位 很多人看到“框架组件识别”,第一反应是跑个whatweb、wappalyzer,截图发报告里写一句“识别到Spring Boot 2.6.3”,就算交差了。我干这行十多年,…...

网盘直链下载助手:九大主流平台高速下载终极指南
网盘直链下载助手:九大主流平台高速下载终极指南 【免费下载链接】Online-disk-direct-link-download-assistant 一个基于 JavaScript 的网盘文件下载地址获取工具。基于【网盘直链下载助手】修改 ,支持 百度网盘 / 阿里云盘 / 中国移动云盘 / 天翼云盘 …...
)
独家首发|DeepSeek官方未公开的IP检查API接口文档(含沙箱环境调用密钥获取路径)
更多请点击: https://kaifayun.com 第一章:DeepSeek知识产权检查 DeepSeek系列大模型(如DeepSeek-V2、DeepSeek-Coder、DeepSeek-MoE)由深度求索(DeepSeek)公司自主研发,其权重、训练代码、推…...