SpringBoot08:Shiro
什么是Shiro?
一个Java的安全(权限)框架,可以完成认证、授权、加密、会话管理、Web集成、缓存等
下载地址:Apache Shiro | Simple. Java. Security.

快速启动
先在官网找到入门案例:shiro/samples/quickstart at main · apache/shiro · GitHub
步骤:
1、新建一个 Maven 工程,删除其 src 目录,将其作为父工程
2、在父工程中新建一个 Maven 模块
3、在maven模块中,复制依赖
<dependencies><dependency><groupId>org.apache.shiro</groupId><artifactId>shiro-core</artifactId><version>1.4.2</version></dependency><dependency><groupId>org.slf4j</groupId><artifactId>jcl-over-slf4j</artifactId><version>1.7.24</version></dependency><dependency><groupId>org.slf4j</groupId><artifactId>slf4j-log4j12</artifactId><version>1.7.21</version></dependency><dependency><groupId>log4j</groupId><artifactId>log4j</artifactId><version>1.2.17</version></dependency></dependencies>4、复制 log4j.properties
log4j.rootLogger=INFO, stdoutlog4j.appender.stdout=org.apache.log4j.ConsoleAppender
log4j.appender.stdout.layout=org.apache.log4j.PatternLayout
log4j.appender.stdout.layout.ConversionPattern=%d %p [%c] - %m %n# General Apache libraries
log4j.logger.org.apache=WARN# Spring
log4j.logger.org.springframework=WARN# Default Shiro logging
log4j.logger.org.apache.shiro=INFO# Disable verbose logging
log4j.logger.org.apache.shiro.util.ThreadContext=WARN
log4j.logger.org.apache.shiro.cache.ehcache.EhCache=WARN
5、复制 shiro.ini(要先在 IDEA中添加 ini 插件)
[users]
# user 'root' with password 'secret' and the 'admin' role
root = secret, admin
# user 'guest' with the password 'guest' and the 'guest' role
guest = guest, guest
# user 'presidentskroob' with password '12345' ("That's the same combination on
# my luggage!!!" ;)), and role 'president'
presidentskroob = 12345, president
# user 'darkhelmet' with password 'ludicrousspeed' and roles 'darklord' and 'schwartz'
darkhelmet = ludicrousspeed, darklord, schwartz
# user 'lonestarr' with password 'vespa' and roles 'goodguy' and 'schwartz'
lonestarr = vespa, goodguy, schwartz# -----------------------------------------------------------------------------
# Roles with assigned permissions
#
# Each line conforms to the format defined in the
# org.apache.shiro.realm.text.TextConfigurationRealm#setRoleDefinitions JavaDoc
# -----------------------------------------------------------------------------
[roles]
# 'admin' role has all permissions, indicated by the wildcard '*'
admin = *
# The 'schwartz' role can do anything (*) with any lightsaber:
schwartz = lightsaber:*
# The 'goodguy' role is allowed to 'drive' (action) the winnebago (type) with
# license plate 'eagle5' (instance specific id)
goodguy = winnebago:drive:eagle5
6、复制 Quickstart
import org.apache.shiro.SecurityUtils;
import org.apache.shiro.authc.*;
import org.apache.shiro.config.IniSecurityManagerFactory;
import org.apache.shiro.mgt.DefaultSecurityManager;
import org.apache.shiro.realm.text.IniRealm;
import org.apache.shiro.session.Session;
import org.apache.shiro.subject.Subject;
import org.apache.shiro.util.Factory;
import org.slf4j.Logger;
import org.slf4j.LoggerFactory;/*** @ClassName Quickstart* @Description TODO* @Author GuoSheng* @Date 2021/4/20  17:28* @Version 1.0**/
public class Quickstart {private static final transient Logger log = LoggerFactory.getLogger(Quickstart.class);public static void main(String[] args) {// The easiest way to create a Shiro SecurityManager with configured// realms, users, roles and permissions is to use the simple INI config.// We'll do that by using a factory that can ingest a .ini file and// return a SecurityManager instance:// Use the shiro.ini file at the root of the classpath// (file: and url: prefixes load from files and urls respectively):DefaultSecurityManager defaultSecurityManager=new DefaultSecurityManager();IniRealm iniRealm=new IniRealm("classpath:shiro.ini");defaultSecurityManager.setRealm(iniRealm);// for this simple example quickstart, make the SecurityManager// accessible as a JVM singleton.  Most applications wouldn't do this// and instead rely on their container configuration or web.xml for// webapps.  That is outside the scope of this simple quickstart, so// we'll just do the bare minimum so you can continue to get a feel// for things.SecurityUtils.setSecurityManager(defaultSecurityManager);// Now that a simple Shiro environment is set up, let's see what you can do:// get the currently executing user:Subject currentUser = SecurityUtils.getSubject();// Do some stuff with a Session (no need for a web or EJB container!!!)Session session = currentUser.getSession();session.setAttribute("someKey", "aValue");String value = (String) session.getAttribute("someKey");if (value.equals("aValue")) {log.info("Retrieved the correct value! [" + value + "]");}// let's login the current user so we can check against roles and permissions:if (!currentUser.isAuthenticated()) {UsernamePasswordToken token = new UsernamePasswordToken("lonestarr", "vespa");token.setRememberMe(true);try {currentUser.login(token);} catch (UnknownAccountException uae) {log.info("There is no user with username of " + token.getPrincipal());} catch (IncorrectCredentialsException ice) {log.info("Password for account " + token.getPrincipal() + " was incorrect!");} catch (LockedAccountException lae) {log.info("The account for username " + token.getPrincipal() + " is locked.  " +"Please contact your administrator to unlock it.");}// ... catch more exceptions here (maybe custom ones specific to your application?catch (AuthenticationException ae) {//unexpected condition?  error?}}//say who they are://print their identifying principal (in this case, a username):log.info("User [" + currentUser.getPrincipal() + "] logged in successfully.");//test a role:if (currentUser.hasRole("schwartz")) {log.info("May the Schwartz be with you!");} else {log.info("Hello, mere mortal.");}//test a typed permission (not instance-level)if (currentUser.isPermitted("lightsaber:wield")) {log.info("You may use a lightsaber ring.  Use it wisely.");} else {log.info("Sorry, lightsaber rings are for schwartz masters only.");}//a (very powerful) Instance Level permission:if (currentUser.isPermitted("winnebago:drive:eagle5")) {log.info("You are permitted to 'drive' the winnebago with license plate (id) 'eagle5'.  " +"Here are the keys - have fun!");} else {log.info("Sorry, you aren't allowed to drive the 'eagle5' winnebago!");}//all done - log out!currentUser.logout();System.exit(0);}
}
7、运行结果

Shiro的Subject分析
Quickstart 中的一些方法:
1、获取当前用户
Subject currentUser = SecurityUtils.getSubject();2、通过当前用户拿到 Session
Session session = currentUser.getSession();3、用session存值取值
session.setAttribute("someKey", "aValue");String value = (String) session.getAttribute("someKey");4、判断是否被认证
currentUser.isAuthenticated()5、执行登录操作
currentUser.login(token);6、打印其标识主体
currentUser.getPrincipal()7、判断当前用户是否有某个角色
currentUser.hasRole("schwartz")8、注销
currentUser.logout();SpringBoot整合Shiro环境搭建
步骤:
1、导入shiro的整合依赖
<!--shiro整合spring--><dependency><groupId>org.apache.shiro</groupId><artifactId>shiro-spring</artifactId><version>1.4.1</version></dependency>2、在config包下,编写Shiro的配置类
①自定义 Realm 类
public class UserRealm extends AuthorizingRealm {//授权@Overrideprotected AuthorizationInfo doGetAuthorizationInfo(PrincipalCollection principalCollection) {System.out.println("执行了shiro的授权方法");return null;}//认证@Overrideprotected AuthenticationInfo doGetAuthenticationInfo(AuthenticationToken authenticationToken) throws AuthenticationException {System.out.println("执行了shiro的认证方法");return null;}
}
②自定义 ShiroConfig
public class ShiroConfig {//ShiroFilterFactoryBean@Beanpublic ShiroFilterFactoryBean getShiroFilterFactoryBean(@Autowired DefaultWebSecurityManager defaultWebSecurityManager){ShiroFilterFactoryBean bean = new ShiroFilterFactoryBean();//设置安全管理器bean.setSecurityManager(defaultWebSecurityManager);return bean;}//DefaultWebSecurityManager@Beanpublic DefaultWebSecurityManager getDefaultWebSecurityManager(@Autowired UserRealm userRealm){DefaultWebSecurityManager securityManager = new DefaultWebSecurityManager();//关联 UserRealmsecurityManager.setRealm(userRealm);return securityManager;}//创建Realm对象,需要自定义类@Beanpublic UserRealm userRealm(){return new UserRealm();}
}
Shiro实现登录拦截
功能:必须认证了才能访问add和update页面,没有认证直接跳到登录页面
步骤:
1、编写前端页面
①编写首页
<h1>首页</h1>②编写测试页
(登录首页的时候,通过controller跳到测试页,测试页包含可以跳到add和update页面的超链接)
<h1>测试页</h1>
<p th:text="${msg}"></p><a th:href="@{/user/add}">add</a><a th:href="@{/user/update}">update</a>
③add页面
<h1>add</h1>
增加一个用户
④update页面
<h1>update</h1>
修改一个用户
⑤登录页
<h1>登录</h1>
<form action="toLogin">用户名:<input type="text" name="username"> <br>密码: <input type="password" name="password"> <br><button type="submit">提交</button>
</form>
2、编写Controller
@Controller
public class MyController {@RequestMapping({"/","/index","/index.html"})public String toIndex(Model model){model.addAttribute("msg","hello,Shiro");return "test";}@RequestMapping("/user/add")public String add(){return "user/add";}@RequestMapping("/user/update")public String update(){return "user/update";}@RequestMapping("/toLogin")public String toLogin(){return "login";}
}
3、shiro配置登录拦截
@Configuration
public class ShiroConfig {//ShiroFilterFactoryBean@Beanpublic ShiroFilterFactoryBean getShiroFilterFactoryBean(@Autowired DefaultWebSecurityManager defaultWebSecurityManager){ShiroFilterFactoryBean bean = new ShiroFilterFactoryBean();//设置安全管理器bean.setSecurityManager(defaultWebSecurityManager);//添加shiro的内置过滤器/*anon:无需认证就可以访问authc:必须认证了才能访问user:必须拥有 记住我 功能才能访问perms:拥有某个权限才能访问role:拥有某个角色才能访问*/Map<String, String> filterMap = new LinkedHashMap<>();filterMap.put("/user/add", "authc");filterMap.put("/user/update", "authc");bean.setFilterChainDefinitionMap(filterMap);//设置登录的请求bean.setLoginUrl("/toLogin");return bean;}//DefaultWebSecurityManager@Beanpublic DefaultWebSecurityManager getDefaultWebSecurityManager(@Autowired UserRealm userRealm){DefaultWebSecurityManager securityManager = new DefaultWebSecurityManager();//关联 UserRealmsecurityManager.setRealm(userRealm);return securityManager;}//创建Realm对象,需要自定义类@Beanpublic UserRealm userRealm(){return new UserRealm();}
}

Shiro实现用户认证
步骤:
1、在 UserRealm中,编写认证方法
//认证@Overrideprotected AuthenticationInfo doGetAuthenticationInfo(AuthenticationToken token) throws AuthenticationException {System.out.println("执行了shiro的认证方法");//用户名、密码(要从数据库中获取)String name = "root";String password = "123456";UsernamePasswordToken userToken = (UsernamePasswordToken)token;if(!userToken.getUsername().equals(name)){ //如果userToken中的username和数据库中取出来的name不一样return null; //抛出异常 UnknownAccountException}//密码认证,shiro做return new SimpleAuthenticationInfo("",password,"");}2、在controller中封装用户数据
@RequestMapping("/login")public String login(String username, String password, Model model){//获取当前用户Subject subject = SecurityUtils.getSubject();//封装用户的登录数据UsernamePasswordToken token = new UsernamePasswordToken(username, password);try{subject.login(token); //执行登录方法,如果没有异常说明就ok了return "index";}catch (UnknownAccountException e){ //用户名不存在model.addAttribute("msg","用户名错误");return "login";}catch (IncorrectCredentialsException e){ //密码不存在model.addAttribute("msg","密码错误");return "login";}}步骤解析:


Shiro整合MyBatis
步骤:
1、导入依赖
<dependency><groupId>mysql</groupId><artifactId>mysql-connector-java</artifactId><version>8.0.26</version></dependency><dependency><groupId>com.alibaba</groupId><artifactId>druid</artifactId><version>1.1.18</version></dependency><dependency><groupId>log4j</groupId><artifactId>log4j</artifactId><version>1.2.17</version></dependency><dependency><groupId>org.mybatis.spring.boot</groupId><artifactId>mybatis-spring-boot-starter</artifactId><version>2.2.0</version></dependency><dependency><groupId>org.projectlombok</groupId><artifactId>lombok</artifactId><version>1.18.24</version></dependency>2、编写application.yaml和application.properties配置文件
①application.yaml
spring:datasource:username: rootpassword: 123456url: jdbc:mysql://localhost:3306/mybatis?useUnicode=true&characterEncoding=utf-8&serverTimezone=UTCdriver-class-name: com.mysql.cj.jdbc.Drivertype: com.alibaba.druid.pool.DruidDataSource#Spring Boot 默认是不注入这些属性值的,需要自己绑定#druid 数据源专有配置initialSize: 5minIdle: 5maxActive: 20maxWait: 60000timeBetweenEvictionRunsMillis: 60000minEvictableIdleTimeMillis: 300000validationQuery: SELECT 1 FROM DUALtestWhileIdle: truetestOnBorrow: falsetestOnReturn: falsepoolPreparedStatements: true#配置监控统计拦截的filters,stat:监控统计、log4j:日志记录、wall:防御sql注入#如果允许时报错 java.lang.ClassNotFoundException: org.apache.log4j.Priority#则导入 log4j 依赖即可,Maven 地址:https://mvnrepository.com/artifact/log4j/log4jfilters: stat,wall,log4jmaxPoolPreparedStatementPerConnectionSize: 20useGlobalDataSourceStat: trueconnectionProperties: druid.stat.mergeSql=true;druid.stat.slowSqlMillis=500②application.properties
mybatis.type-aliases-package=com.pojo
mybatis.mapper-locations=classpath:mapper/*.xml
3、编写实体类
@Data
@AllArgsConstructor
@NoArgsConstructor
public class User implements Serializable {private int id;private String name;private String pwd;
}
4、编写mapper层
①UserMapper接口
@Repository
@Mapper
public interface UserMapper {//根据用户名查用户信息public User queryUserByName(String name);
}
②UserMapper.xml
<?xml version="1.0" encoding="UTF-8" ?>
<!DOCTYPE mapperPUBLIC "-//mybatis.org//DTD Mapper 3.0//EN""https://mybatis.org/dtd/mybatis-3-mapper.dtd">
<mapper namespace="com.mapper.UserMapper"><select id="queryUserByName" parameterType="String" resultType="User">select * from mybatis.user where name = #{name};</select>
</mapper>
5、编写service层
①UserService接口
public interface UserService{public User queryUserByName(String name);
}
②UserServiceImpl
@Service
public class UserServiceImpl implements UserService{@AutowiredUserMapper userMapper;@Overridepublic User queryUserByName(String name) {return userMapper.queryUserByName(name);}
}
6、把之前在UserRealm中直接写的name和password,改成从数据库中查出来的
public class UserRealm extends AuthorizingRealm {@AutowiredUserServiceImpl userService;//授权@Overrideprotected AuthorizationInfo doGetAuthorizationInfo(PrincipalCollection principalCollection) {System.out.println("执行了shiro的授权方法");return null;}//认证@Overrideprotected AuthenticationInfo doGetAuthenticationInfo(AuthenticationToken token) throws AuthenticationException {System.out.println("执行了shiro的认证方法");UsernamePasswordToken userToken = (UsernamePasswordToken)token;//连接真实的数据库User user = userService.queryUserByName(userToken.getUsername());//如果user为空,说明用户不存在if(user == null){return null; //抛异常 UnknownAccountException}//密码认证,shiro做return new SimpleAuthenticationInfo("",user.getPwd(),"");}
}
Shiro请求授权实现
1、在ShiroConfig中设置访问哪些路径,需要哪些权限,并配置未授权页面
filterMap.put("/user/add","perms[user:add]"); //拥有 user:add 权限才能访问/user/addfilterMap.put("/user/update","perms[user:update]"); bean.setUnauthorizedUrl("/noauth");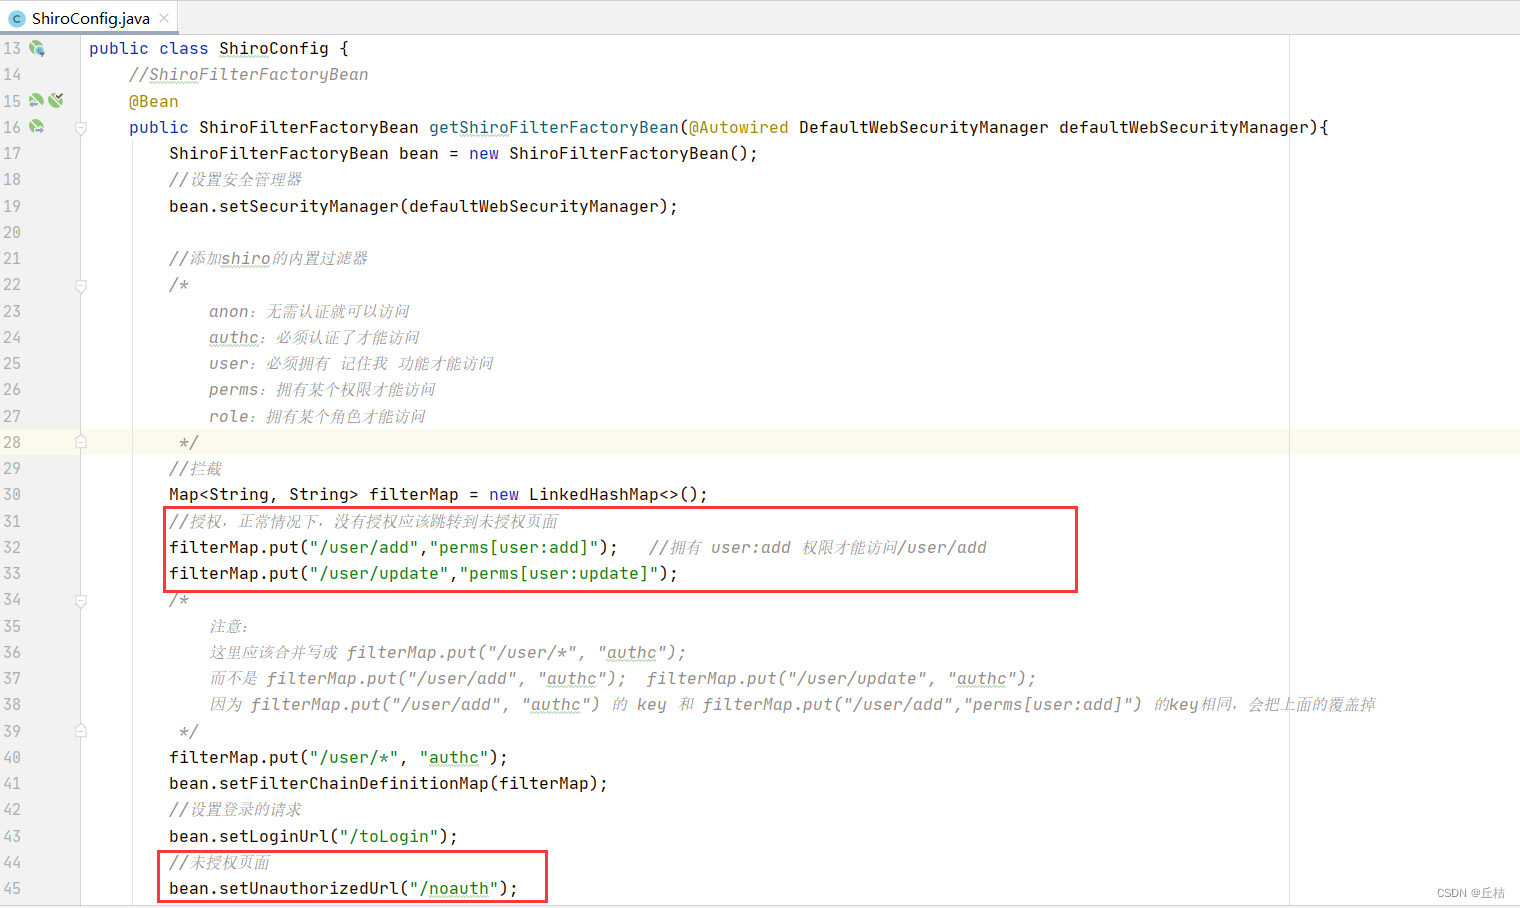
2、在UserRealm中给当前用户授权,其中权限是从数据库中查出来的
@Overrideprotected AuthorizationInfo doGetAuthorizationInfo(PrincipalCollection principalCollection) {System.out.println("执行了shiro的授权方法");SimpleAuthorizationInfo info = new SimpleAuthorizationInfo();//拿到当前登录的这个对象Subject subject = SecurityUtils.getSubject();User currentUser = (User)subject.getPrincipal(); //拿到user对象info.addStringPermission(currentUser.getPerms());return info;}
3、在controller中设置未授权url处理
@RequestMapping("/noauth")@ResponseBodypublic String unauthorized(){return "未经授权,无法访问此页面";}Shiro整合Thymeleaf
1、导入依赖
<!--shiro-thymeleaf整合--><dependency><groupId>com.github.theborakompanioni</groupId><artifactId>thymeleaf-extras-shiro</artifactId><version>2.0.0</version></dependency>2、在shiroConfig中整合thymeleaf
//ShiroDialect:用来整合 shiro thymeleaf@Beanpublic ShiroDialect getShiroDialect(){return new ShiroDialect();}3、更改前端页面
①在test页面编写一个登录连接
<p><a th:href="@{/toLogin}">登录</a>
</p>

②在首页设置add和update链接,拥有对应权限才可以访问
shiro命名空间:
xmlns:shiro="http://www.thymeleaf.org/thymeleaf-extras-shiro"链接:
<div shiro:hasPermission="user:add"><a th:href="@{/user/add}">add</a>
</div><div shiro:hasPermission="user:update"><a th:href="@{/user/update}">update</a>
</div>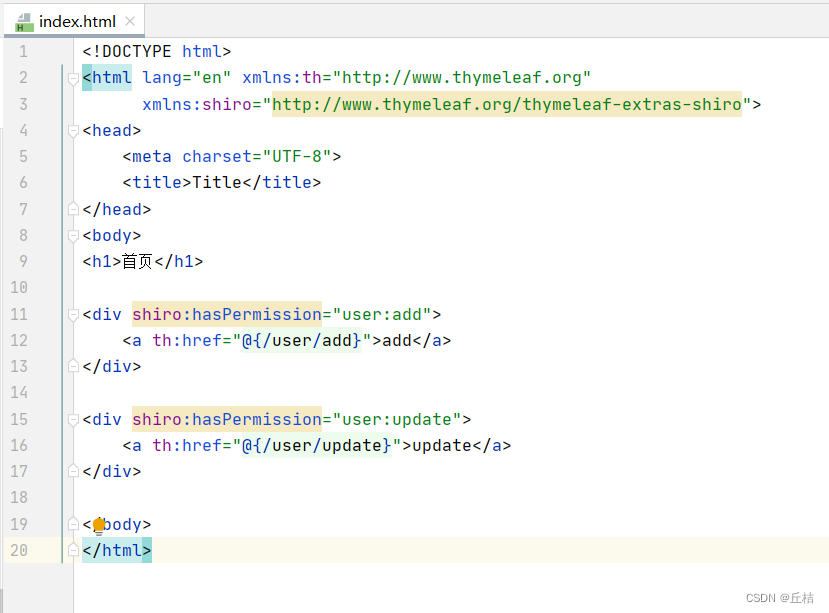
相关文章:
SpringBoot08:Shiro
什么是Shiro? 一个Java的安全(权限)框架,可以完成认证、授权、加密、会话管理、Web集成、缓存等 下载地址:Apache Shiro | Simple. Java. Security. 快速启动 先在官网找到入门案例:shiro/samples/quick…...

进击中的 Zebec 生态,Web2 与 Web3 世界的连接器
虽然从意识形态上看,Web2世界与Web3世界存在着不同的逻辑,但我们同样看到,随着加密资产领域的发展,其正在作为优质投资品,被以Paypal、高盛等主流机构重视与接受。当然,除了作为投资者品外,近年…...
SpringCloud保姆级搭建教程五---Redis
首先,这个和微服务没有直接的关系,只是在代码开发当中要使用的一个工具而已,为了提高这个系统的性能,加快查询效率等方面而使用它1、首先,要先安装redis到电脑上,这里依然是在windows上演示,之后…...
存储类别、链接与内存管理(一)
1、一些必要的基础概念 (1)对象 从硬件的角度,被存储的每个值都被占用了一定的物理内存,C语言把这样的一块内存称为对象对象可以存储一个或多个值一个对象可能并未存储实际的值,也可能存储一个或多个值,但…...
JS设计模式
文章目录1 什么是设计模式?2 发布-订阅模式2.1 DOM事件2.2 基于Broadcast Channel实现跨页面通信2.3 基于localStorage实现跨页面通信2.4 使用 Vue 的 EventBus 进行跨组件通信2.4 使用 React 的 EventEmitter 进行跨组件通信3 装饰器模式3.1 React 高阶组件 HOC3.2…...
四、常用样式讲解二
文章目录一、常用样式讲解二1.1 元素隐藏1.2 二级菜单1.3 相对定位和绝对定位1.4 定位的特殊情况1.5 表格1.6 表格的css属性1.7 表格中新增的标签一、常用样式讲解二 1.1 元素隐藏 如何让一个元素隐藏 1、不定义颜色 占用空间 2、display: none 不占用空间 3、visibility: hi…...

KDHX-8700无线高压核相相序表
一、产品简介 KDHX-8700无线高压核相相序表(以下简称“仪器”)用于测定三相线相序、检测环网或双电源电力网闭环点断路器两侧电源是否同相。在闭环两电源之前一定要进行核相操作,否则可能发生短路。仪器适用于380V~35kV交流输电线…...
【C++提高笔记】泛型编程与STL技术
文章目录模板的概念函数模板函数模板语法函数模板注意事项函数模板案例普通函数与函数模板的调用规则模板的局限性类模板类模板语法类模板与函数模板区别类模板中成员函数创建时机类模板对象做函数参数类模板与继承类模板成员函数类外实现类模板分文件编写类模板与友元类模板案…...

实用机器学习-学习笔记
文章目录9.1模型调参9.1.1思考与总结9.1.2 基线baseline9.1.3SGD ADAM9.1.4 训练代价9.1.5 AUTOML9.1.6 要多次调参管理9.1.7复现实验的困难9.1模型调参 9.1.1思考与总结 1了解了baseline和调参基本原则 2了解了adams和sgd的优劣 3了解了训练树和神经网络的基本代价 4了解了a…...

2023-02-15 学习记录--React-邂逅Redux(二)
React-邂逅Redux(二) “天道酬勤,与君共勉”——承接React-邂逅Redux(一),让我们一起继续探索Redux的奥秘吧~☺️ 一、前言 React-邂逅Redux(一)让我们对Redux有了初步认识ÿ…...

Framework——【MessageQueue】消息队列
定义 队列是 Apache RocketMQ 中消息存储和传输的实际容器,也是 Apache RocketMQ 消息的最小存储单元。 Apache RocketMQ 的所有主题都是由多个队列组成,以此实现队列数量的水平拆分和队列内部的流式存储。 队列的主要作用如下: 存储顺序性…...
SpringBoot依赖原理分析及配置文件
💟💟前言 友友们大家好,我是你们的小王同学😗😗 今天给大家打来的是 SpringBoot依赖原理分析及配置文件 希望能给大家带来有用的知识 觉得小王写的不错的话麻烦动动小手 点赞👍 收藏⭐ 评论📄…...

智慧机场,或将成为航空领域数字孪生技术得完美应用
在《智慧民航建设路线图》文件中,民航局明确指出,智慧机场是实现智慧民航的四个核心抓手之一。这一战略性举措旨在推进数字化技术与航空产业的深度融合,为旅客提供更加智能化、便捷化、安全化的出行服务,进一步提升我国民航发展的…...

SQL64 对顾客ID和日期排序
描述有Orders表cust_idorder_numorder_dateandyaaaa2021-01-01 00:00:00andybbbb2021-01-01 12:00:00bobcccc2021-01-10 12:00:00dickdddd2021-01-11 00:00:00【问题】编写 SQL 语句,从 Orders 表中检索顾客 ID(cust_id)和订单号(…...
MybatisPlus使用聚合函数
前言 今天遇到了一个求总数返回的情况,我一想这不是用sum就完事了吗。 但是仔细想想,MybatisPlus好像没有直接使用sum的api。 虽然没有直接提供,但是办法还是有的,下面就分享下如何实现的: 首先如果使用sql是这么写…...

工程管理系统源码企业工程管理系统简介
一、立项管理 1、招标立项申请 功能点:招标类项目立项申请入口,用户可以保存为草稿,提交。 2、非招标立项申请 功能点:非招标立项申请入口、用户可以保存为草稿、提交。 3、采购立项列表 功能点:对草稿进行编辑&#x…...

《计算机视觉和图像处理简介 - 中英双语版》:使用 OpenCV对图像进行空间滤波
文章大纲 Linear Filtering 线性滤波器Filtering Noise 过滤噪声Gaussian Blur 高斯滤波Image Sharpening 图像锐化Edges 边缘滤波Median 中值滤波Threshold Function Parameters 阈值函数参数References本文大概需要40分钟 Spatial Operations in Image Processing 图像处理中…...

FreeRTOS软件定时器 | FreeRTOS十三
目录 说明: 一、定时器简介 1.1、定时器 1.2、软件定时器 1.3、硬件定时器 1.4、FreeRTOS软件定时器 1.5、软件定时器服务任务作用 1.6、软件定时器的命令队列 1.7、软件定时器相关配置 1.8、单次定时器和周期定时器 1.9、软件定时器结构体 二、软件定时…...
电脑文件被误删?360文件恢复工具,免费的文件恢复软件
电脑里面保存着各种文件,因为误操作我们把还需要用的文件给删除了。很多人都想要使用不收费的文件恢复软件来进行恢复操作,但是又不清楚有哪些文件可以帮到我们。接下来就给大家介绍,一款真正免费的数据 恢复app,一起来看看&#…...

pg_cron优化案例--terminate pg_cron launcher可自动拉起
场景 在PostgreSQL中我们可以使用pg_cron来实现数据库定时任务 我有一个select 1的定时任务,每分钟触发一次 testdb# select * from cron.job ;jobid | schedule | command | nodename | nodeport | database | username | active | jobname -------…...

ChromaControl:如何用智能技术终结RGB设备控制混乱局面
ChromaControl:如何用智能技术终结RGB设备控制混乱局面 【免费下载链接】ChromaControl 3rd party device lighting support for Razer Synapse. 项目地址: https://gitcode.com/gh_mirrors/ch/ChromaControl 想象一下这样的场景:你的桌面上摆放着…...

从单片机寄存器到多线程标志:volatile关键字的5个硬核使用场景详解
从单片机寄存器到多线程标志:volatile关键字的5个硬核使用场景详解 在嵌入式系统和并发编程的世界里,volatile关键字就像一位沉默的守护者,确保编译器不会自作聪明地优化掉那些看似冗余但实际上至关重要的代码。对于习惯了高层抽象语言的开发…...

颠覆性网络拓扑可视化:基于Vue+SVG的一站式轻量级解决方案
颠覆性网络拓扑可视化:基于VueSVG的一站式轻量级解决方案 【免费下载链接】easy-topo vuesvgelement-ui 快捷画出网络拓扑图 项目地址: https://gitcode.com/gh_mirrors/ea/easy-topo 在复杂的网络架构设计和运维管理中,网络工程师和开发人员经常…...

百度网盘Mac破解终极方案:解锁SVIP高速下载体验
百度网盘Mac破解终极方案:解锁SVIP高速下载体验 【免费下载链接】BaiduNetdiskPlugin-macOS For macOS.百度网盘 破解SVIP、下载速度限制~ 项目地址: https://gitcode.com/gh_mirrors/ba/BaiduNetdiskPlugin-macOS 作为Mac用户,你是否曾因百度网盘…...

MATLAB仿真实战:手把手绘制LFM信号的模糊函数,看懂“斜刀刃”形状的由来
MATLAB仿真实战:手把手绘制LFM信号的模糊函数,看懂“斜刀刃”形状的由来 雷达信号处理中,模糊函数是理解信号分辨特性的关键工具。对于初学者而言,仅通过数学公式往往难以直观把握其物理意义。本文将通过MATLAB实战,从…...

SSD硬件加密性能无损?十年调查揭示五大认知误区与实战指南
1. 项目概述:一次关于SSD认知误区的深度调查最近在整理资料时,翻到了一篇2014年来自EE Times的旧文,内容是关于存储网络行业协会(SNIA)发起的一项固态硬盘(SSD)用户调查。虽然时间过去近十年&am…...

给手机直尺界面添加logo
我已经说完了...

Carla 启动卡在75%并报“Fatal error”:从崩溃日志到资源缺失的排查实录
1. 当Carla卡在75%:从崩溃现象到问题定位 那天我正在Windows环境下调试Carla仿真平台,编译过程一切顺利,但执行make launch命令后,进度条就像被施了定身咒——永远停在了75%的位置。紧接着弹出的"Fatal error"对话框让我…...

pdf2pptx:三分钟实现LaTeX幻灯片到PowerPoint的无缝转换
pdf2pptx:三分钟实现LaTeX幻灯片到PowerPoint的无缝转换 【免费下载链接】pdf2pptx Convert your (Beamer) PDF slides to (Powerpoint) PPTX 项目地址: https://gitcode.com/gh_mirrors/pd/pdf2pptx 还在为学术演示的格式兼容问题烦恼吗?你是否需…...

node.js、node、nvm、npm、npx的关系
1、node.js Node.js:一个基于Chrome V8引擎的JavaScript运行环境。Node.js是一个开源的、跨平台的JavaScript运行环境,用于在服务器端运行JavaScript代码。它使得开发人员可以使用JavaScript来编写服务器端应用程序,从而简化了开发过程&#…...