Pytest学习笔记
Pytest学习笔记
1、介绍
1.1、单元测试
单元测试是指在软件开发当中,针对软件的最小单位(函数,方法)进行正确性的检查测试
1.2、单元测试框架
- 测试发现:从多个py文件里面去找到我们测试用例
- 测试执行:按照一定的顺序和规则去执行。并生成结果
- 测试判断:通过断言判断预期结果和实际结果的差异
- 测试报告:统计测试进度,耗时,通过率,生成测试报告
1.3、自动化测试框架
针对一个项目开发的一个代码框架,这个框架封装了很多的基础模块,报告模块等等
1.4、Pytest
pytest可以和selenium,requests,appium结合实现web自动化,接口自动化,app自动化
pytest可以实现测试用例的跳过以及reruns失败用例重试
pytest可以和allure生成非常美观的测试报告
pytest可以和Jenkins持续集成
pytest有很多非常强大的插件,并且这些插件能够实现很多的实用的操作
- pytest pytest-xdist 测试用例分布式执行,多CPU分发
- pytest-ordering 用于改变测试用例的执行顺序(从上到下)
- pytest-rerunfailures 用例失败后重跑 pytest-html (生成html格式的自动化测试报告)
- allure-pytest 用于生成美观的测试报告
2、快速入门
2.1、Pytest约定
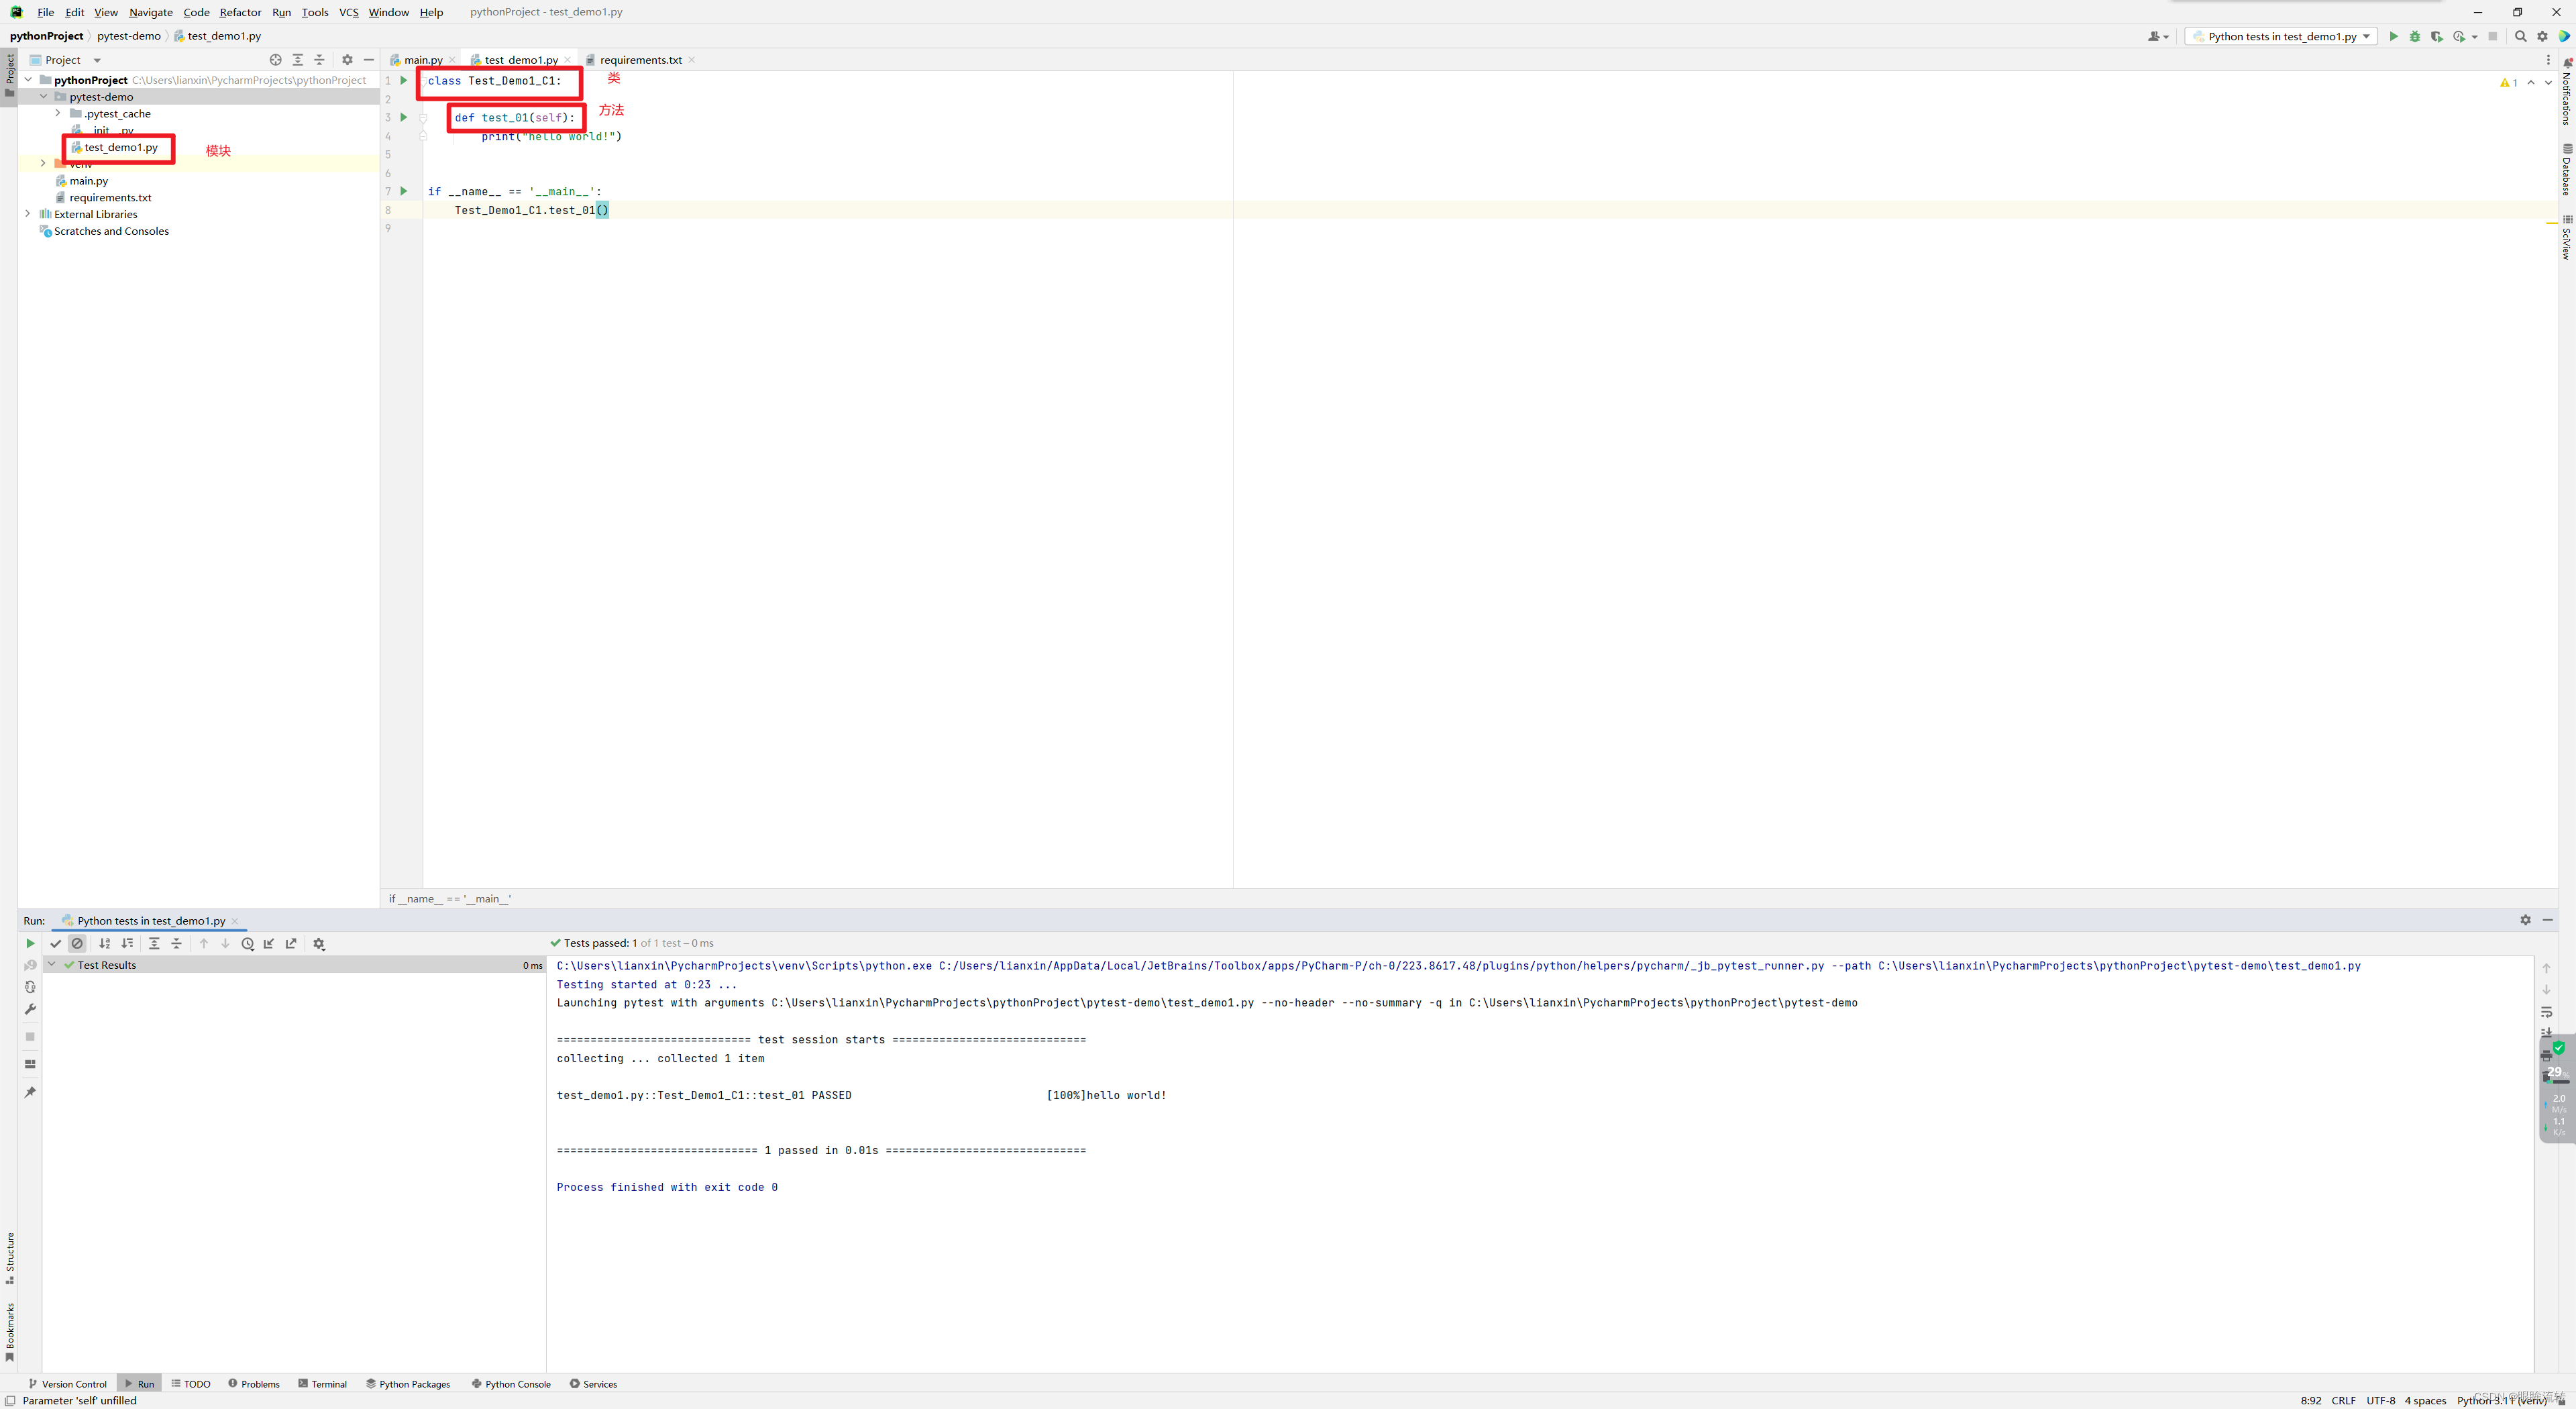
模块名必须以test_开头或者_test结尾
测试类必须以Test开头,并且不能有init方法
测试方法必须以test开头
pytest
pytest-xdist
pytest-ordering
pytest-rerunfailures
pytest-html
allure-pytest
requests
2.2、安装依赖
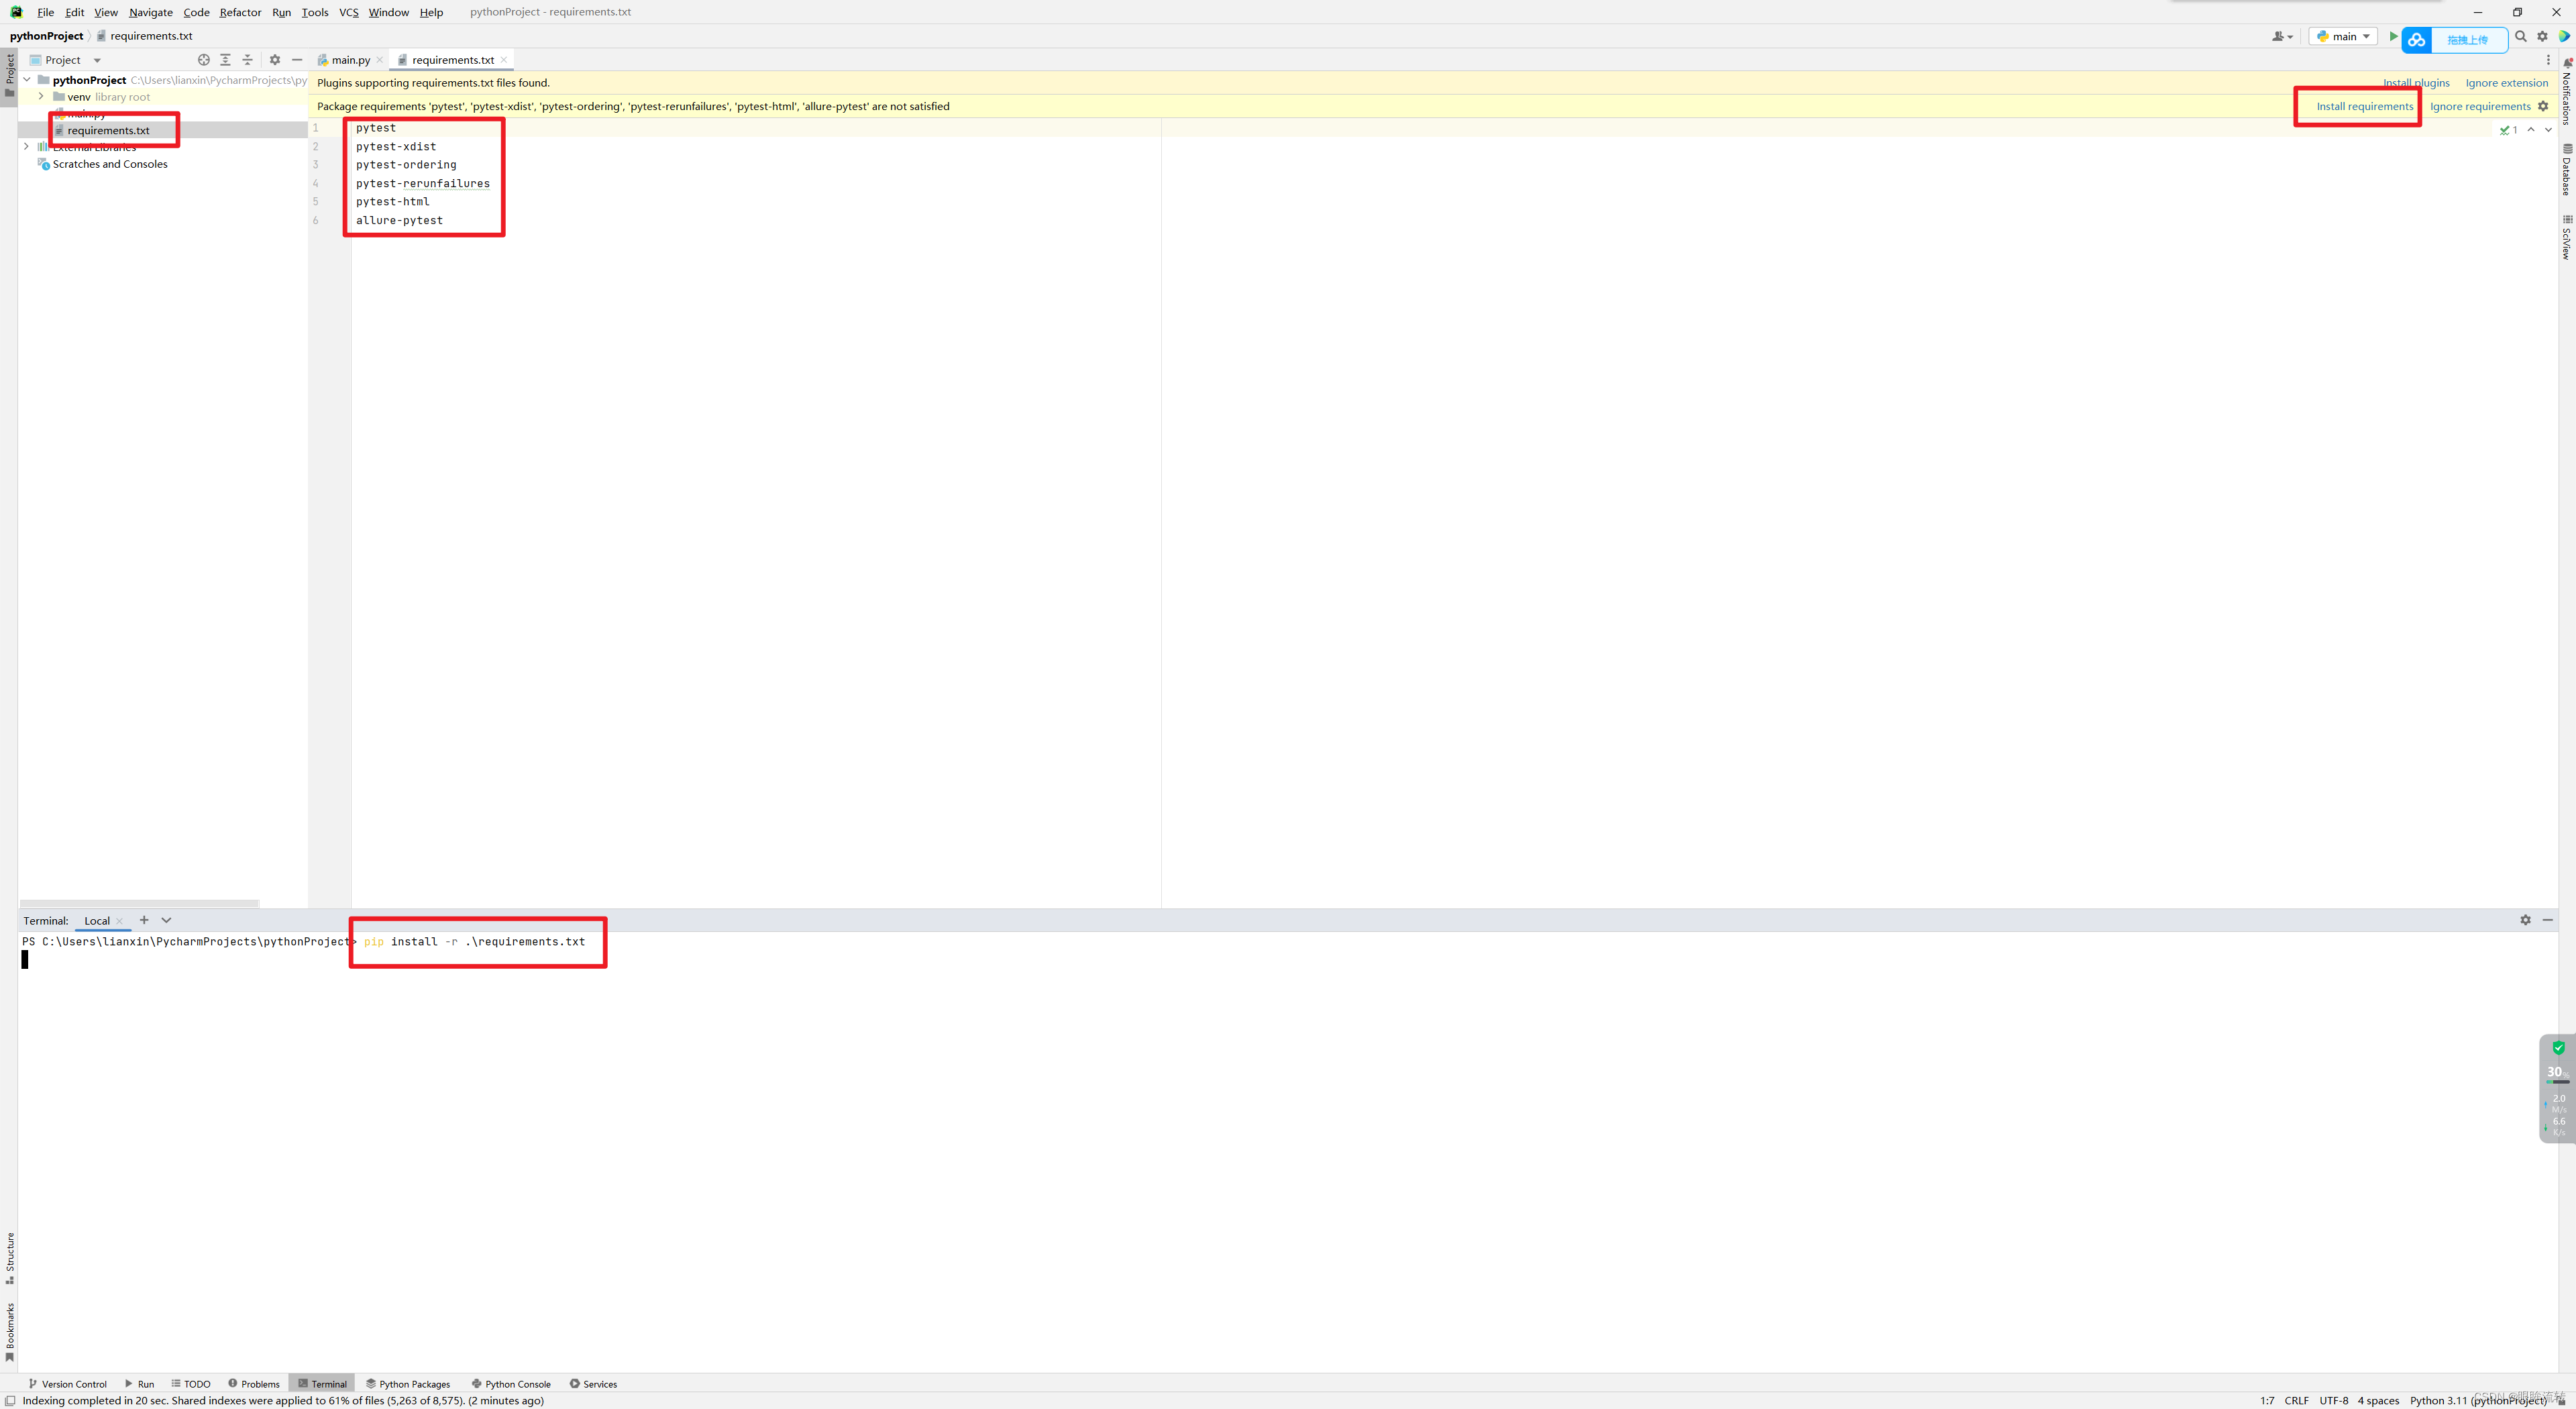
安装插件时可以通过将要安装的插件卸载requirements.txt中进行快速进行安装
2.3、运行方式
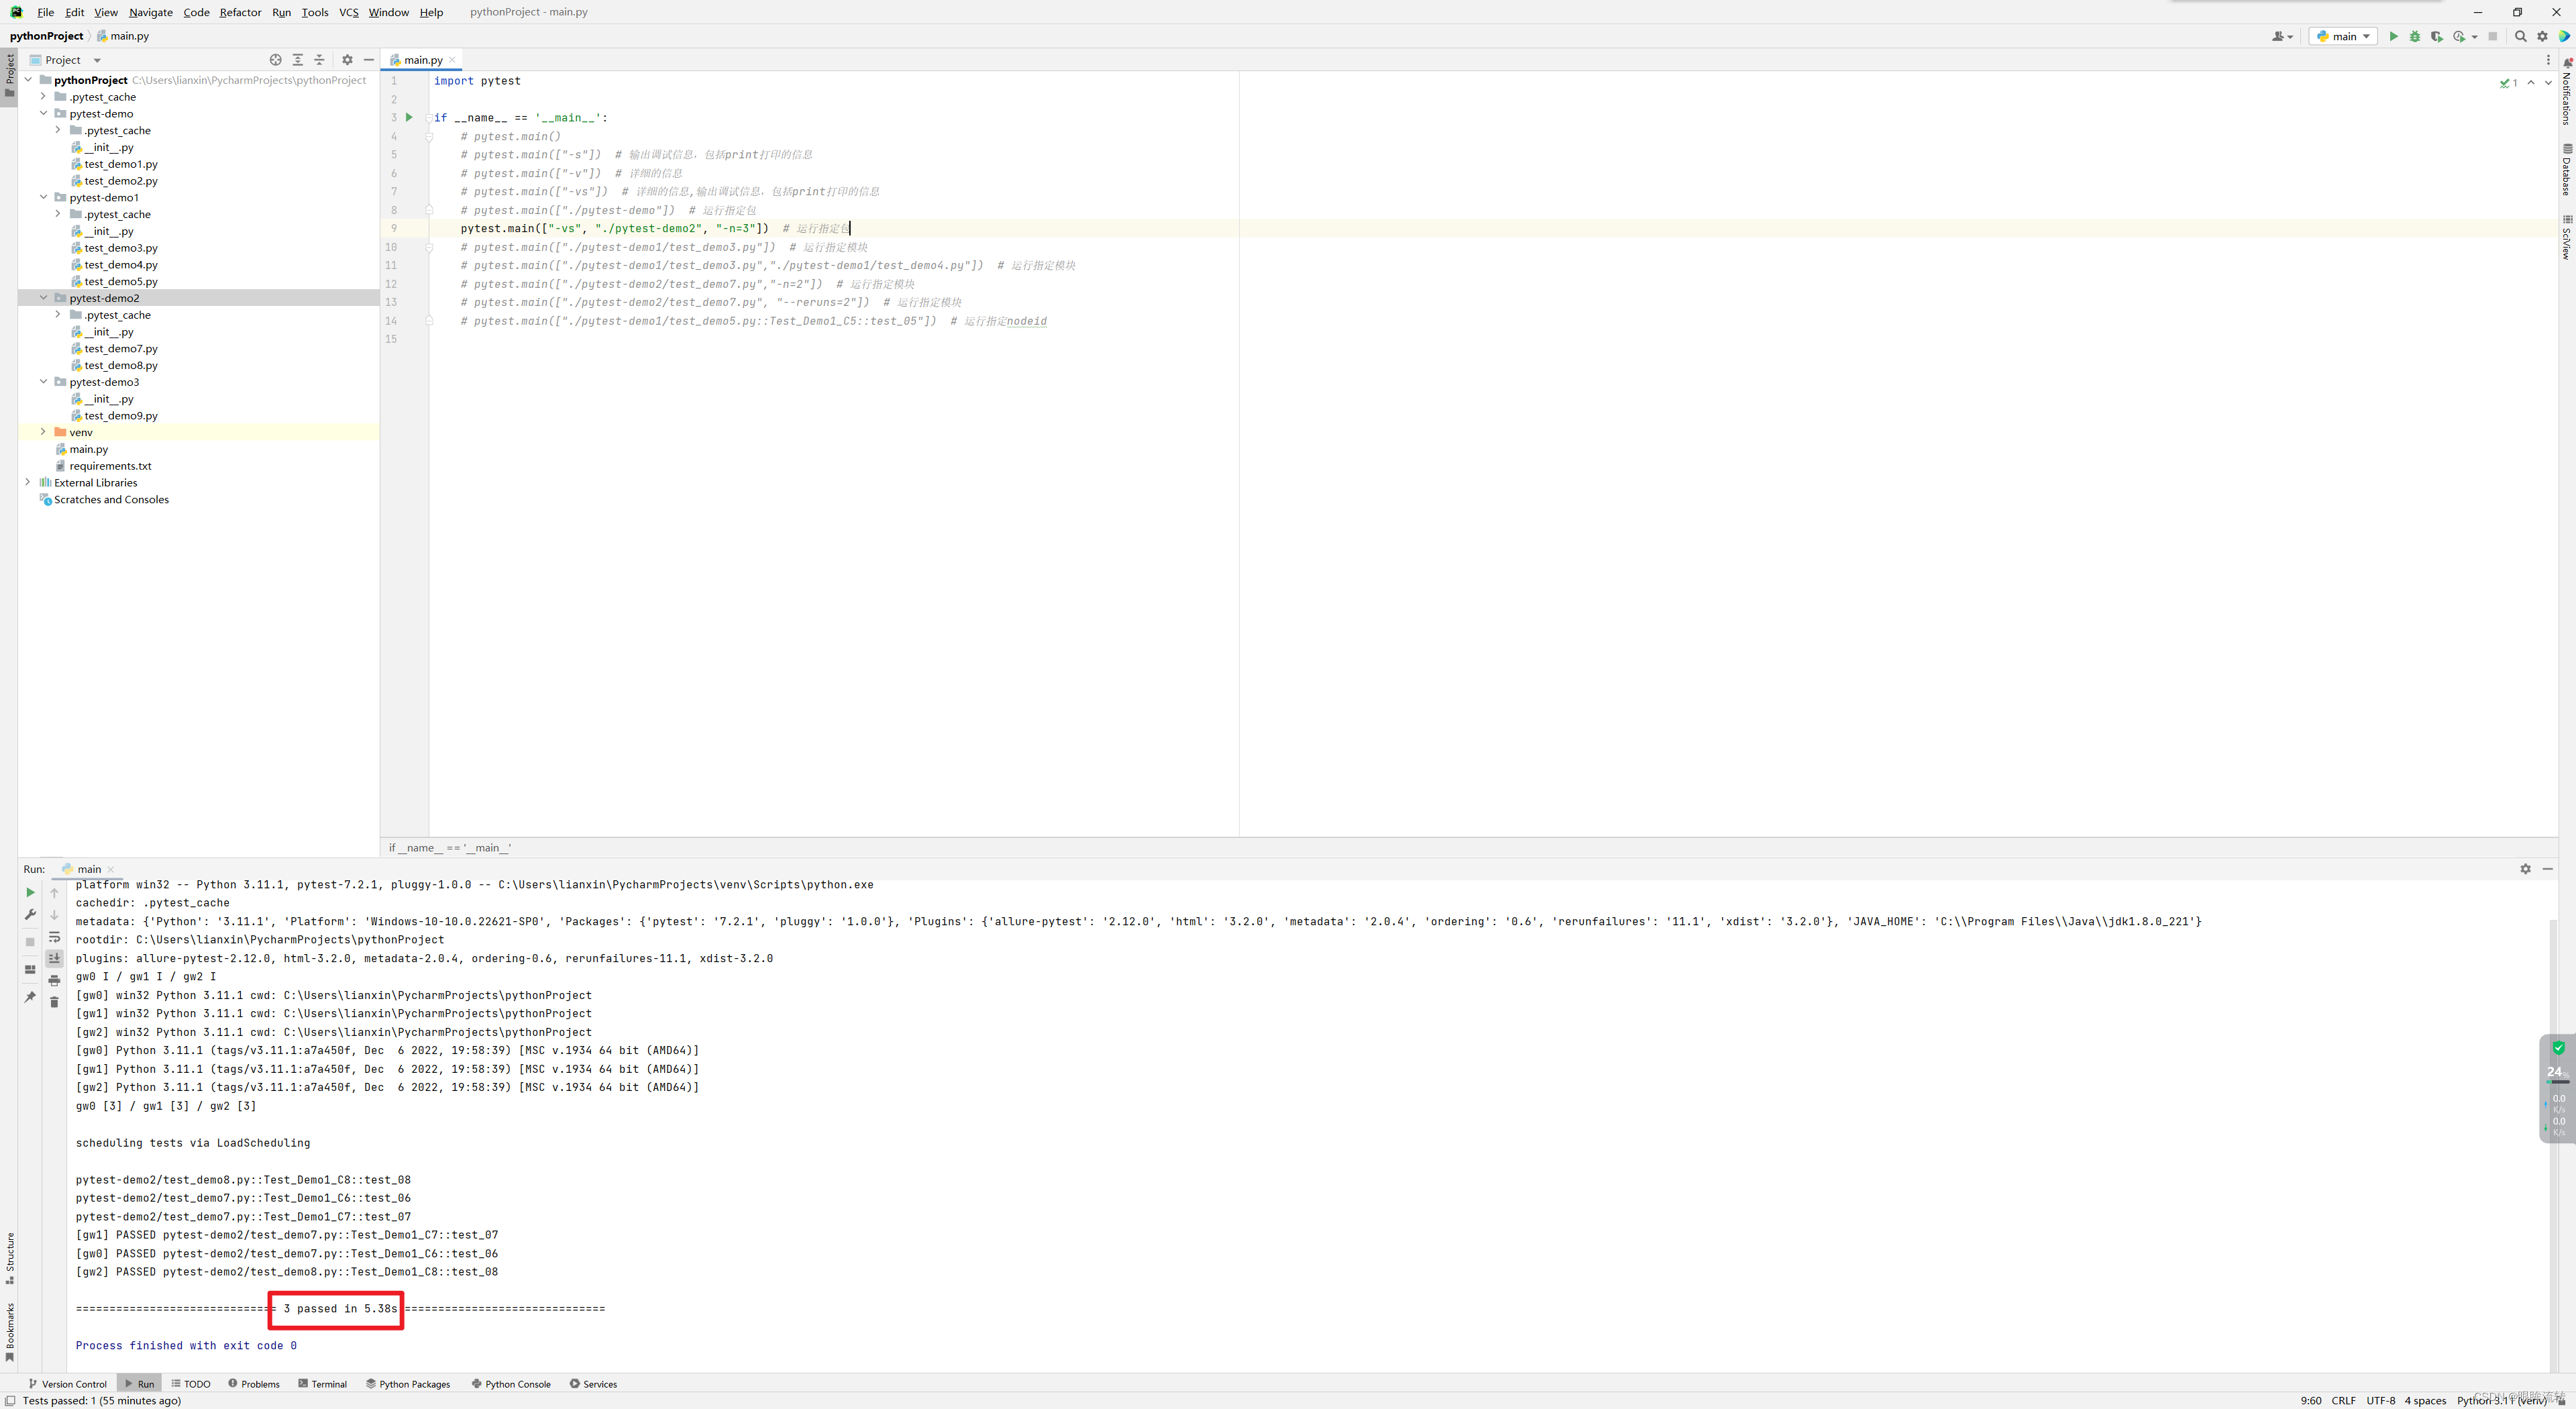
main.py
import pytestif __name__ == '__main__':# pytest.main()
test_demo1.py
class Test_Demo1_C1:def test_01(self):print("hello world!")
test_demo2.py
class Test_Demo1_C2:def test_02(self):print("hello world!2")
test_demo3.py
class Test_Demo1_C3:def test_03(self):print("hello world!3")
test_demo4.py
class Test_Demo1_C4:def test_04(self):print("hello world!4")
test_demo5.py
class Test_Demo1_C4:def test_05(self):print("hello world!5")
test_demo7.py
import timeclass Test_Demo1_C6:def test_06(self):time.sleep(5)print("hello world!6")class Test_Demo1_C7:def test_07(self):time.sleep(5)print("hello world!7")
test_demo8.py
import timeclass Test_Demo1_C8:def test_08(self):time.sleep(5)print("hello world!8")
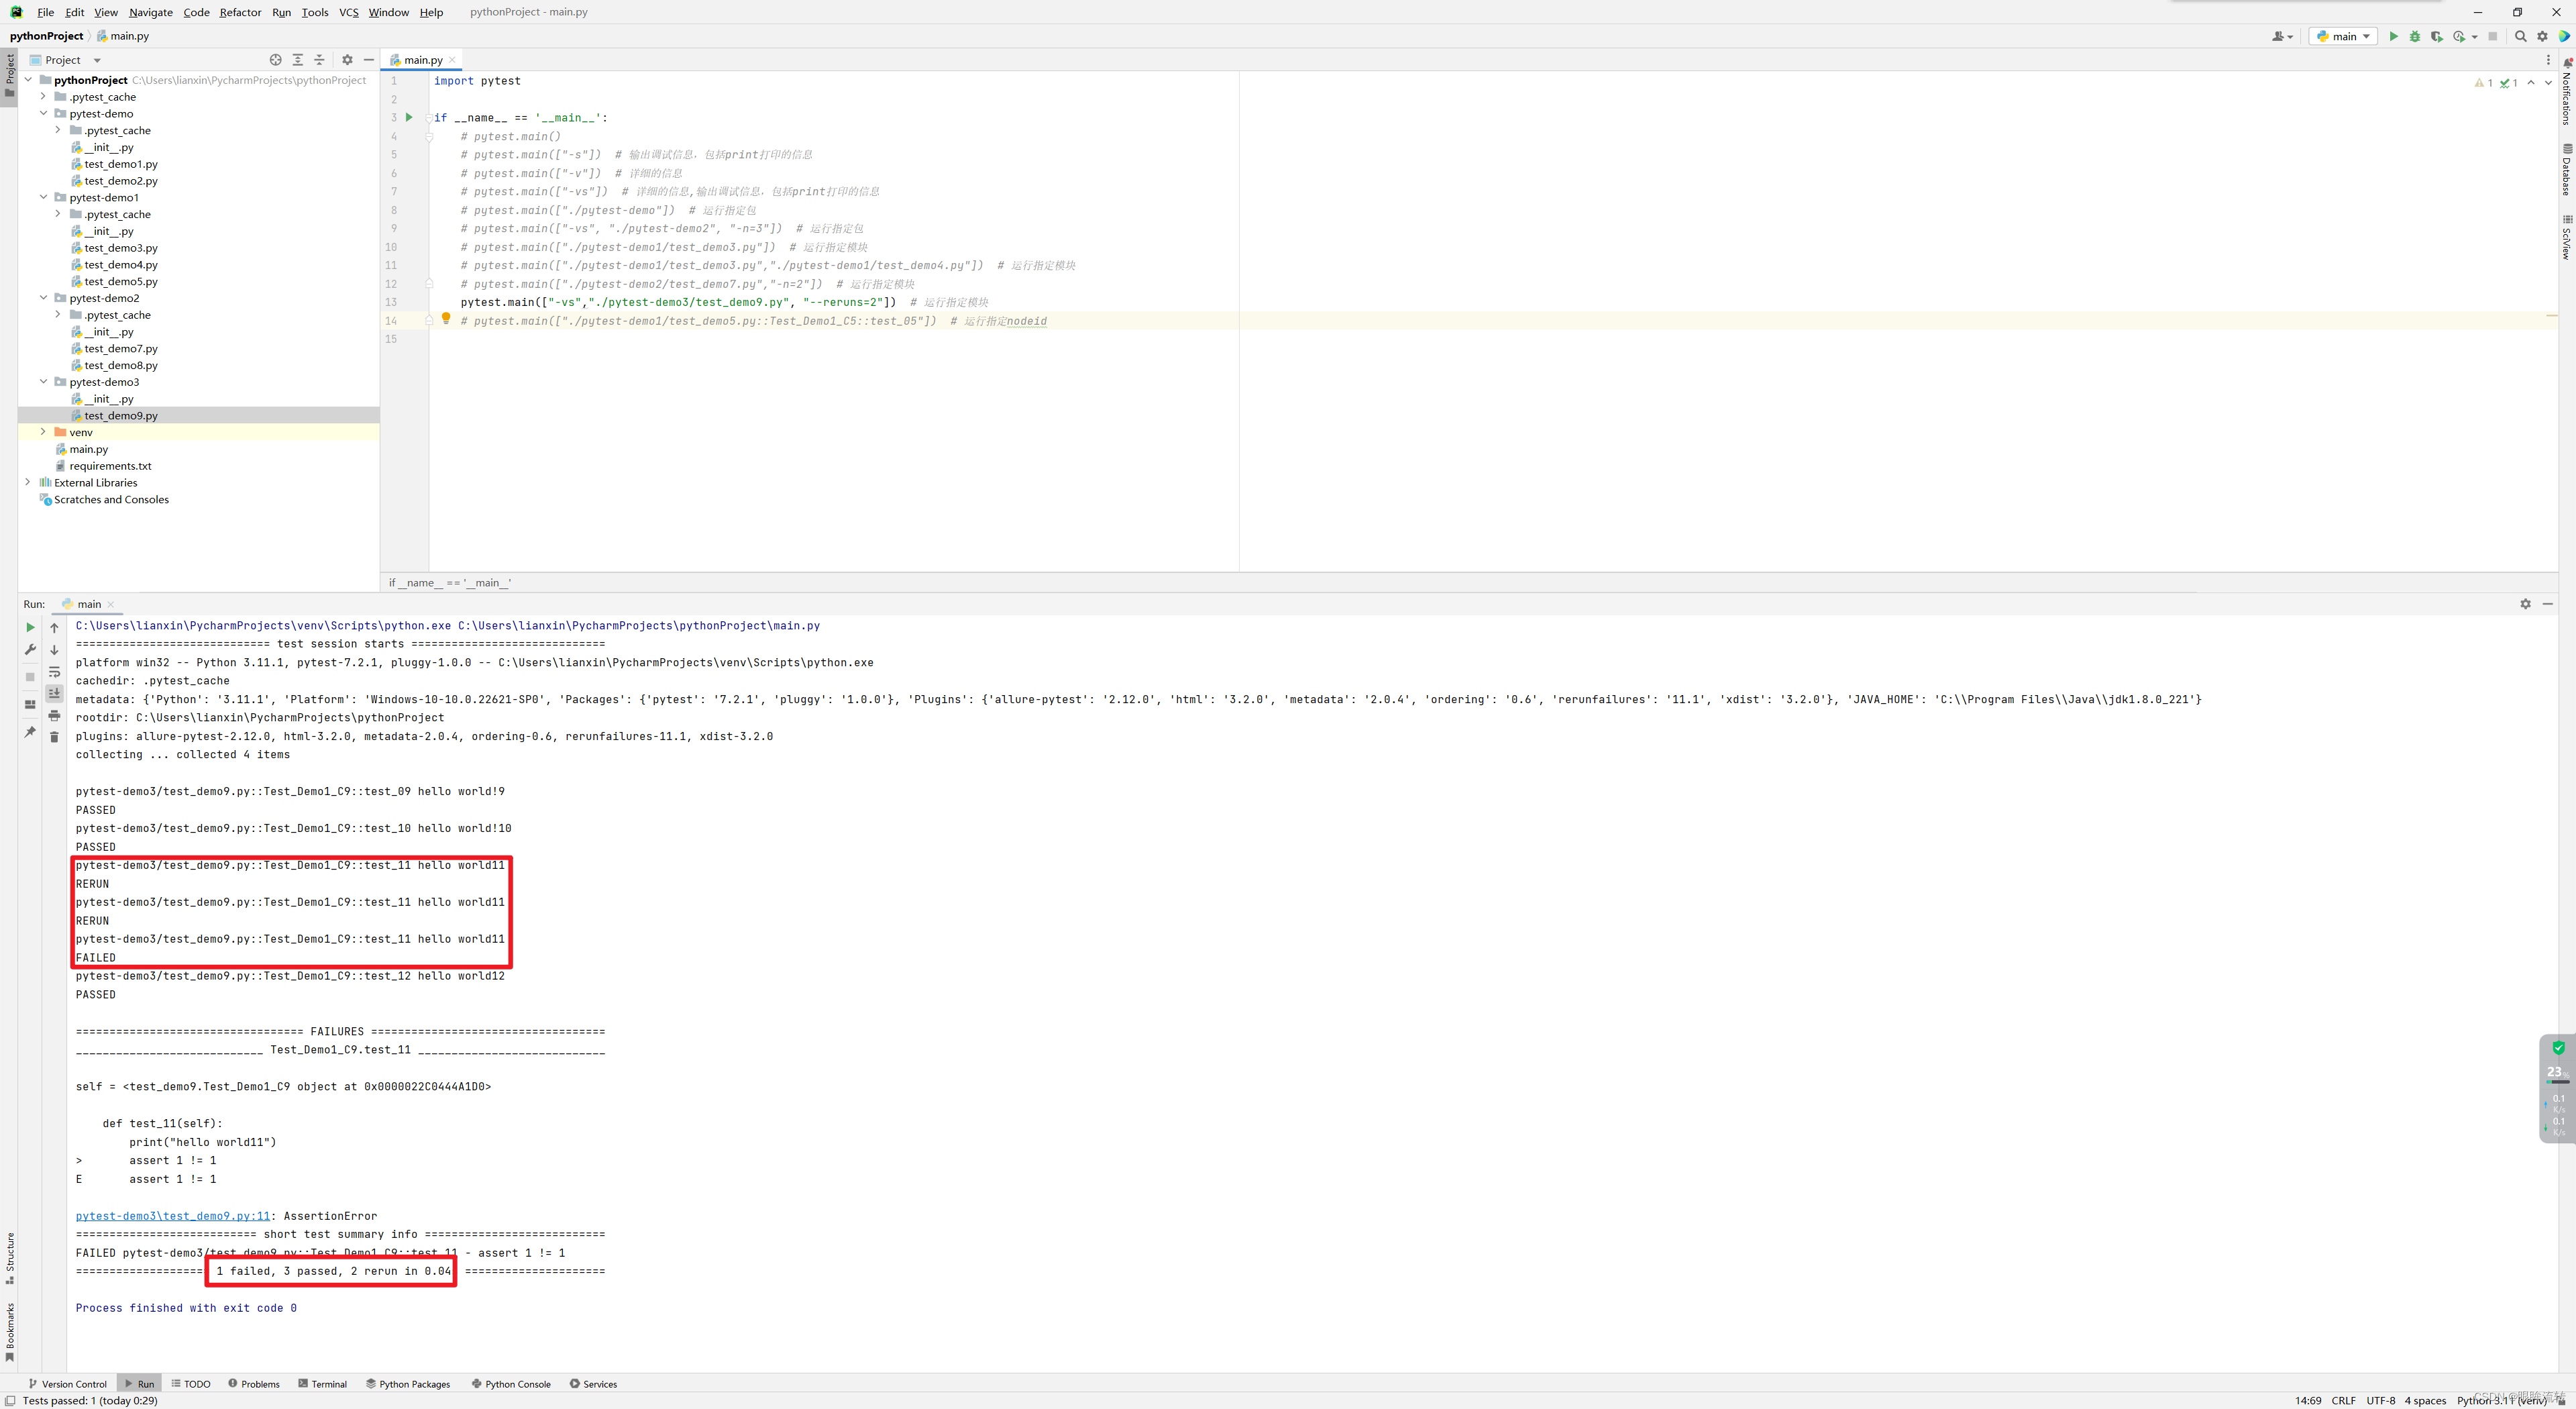
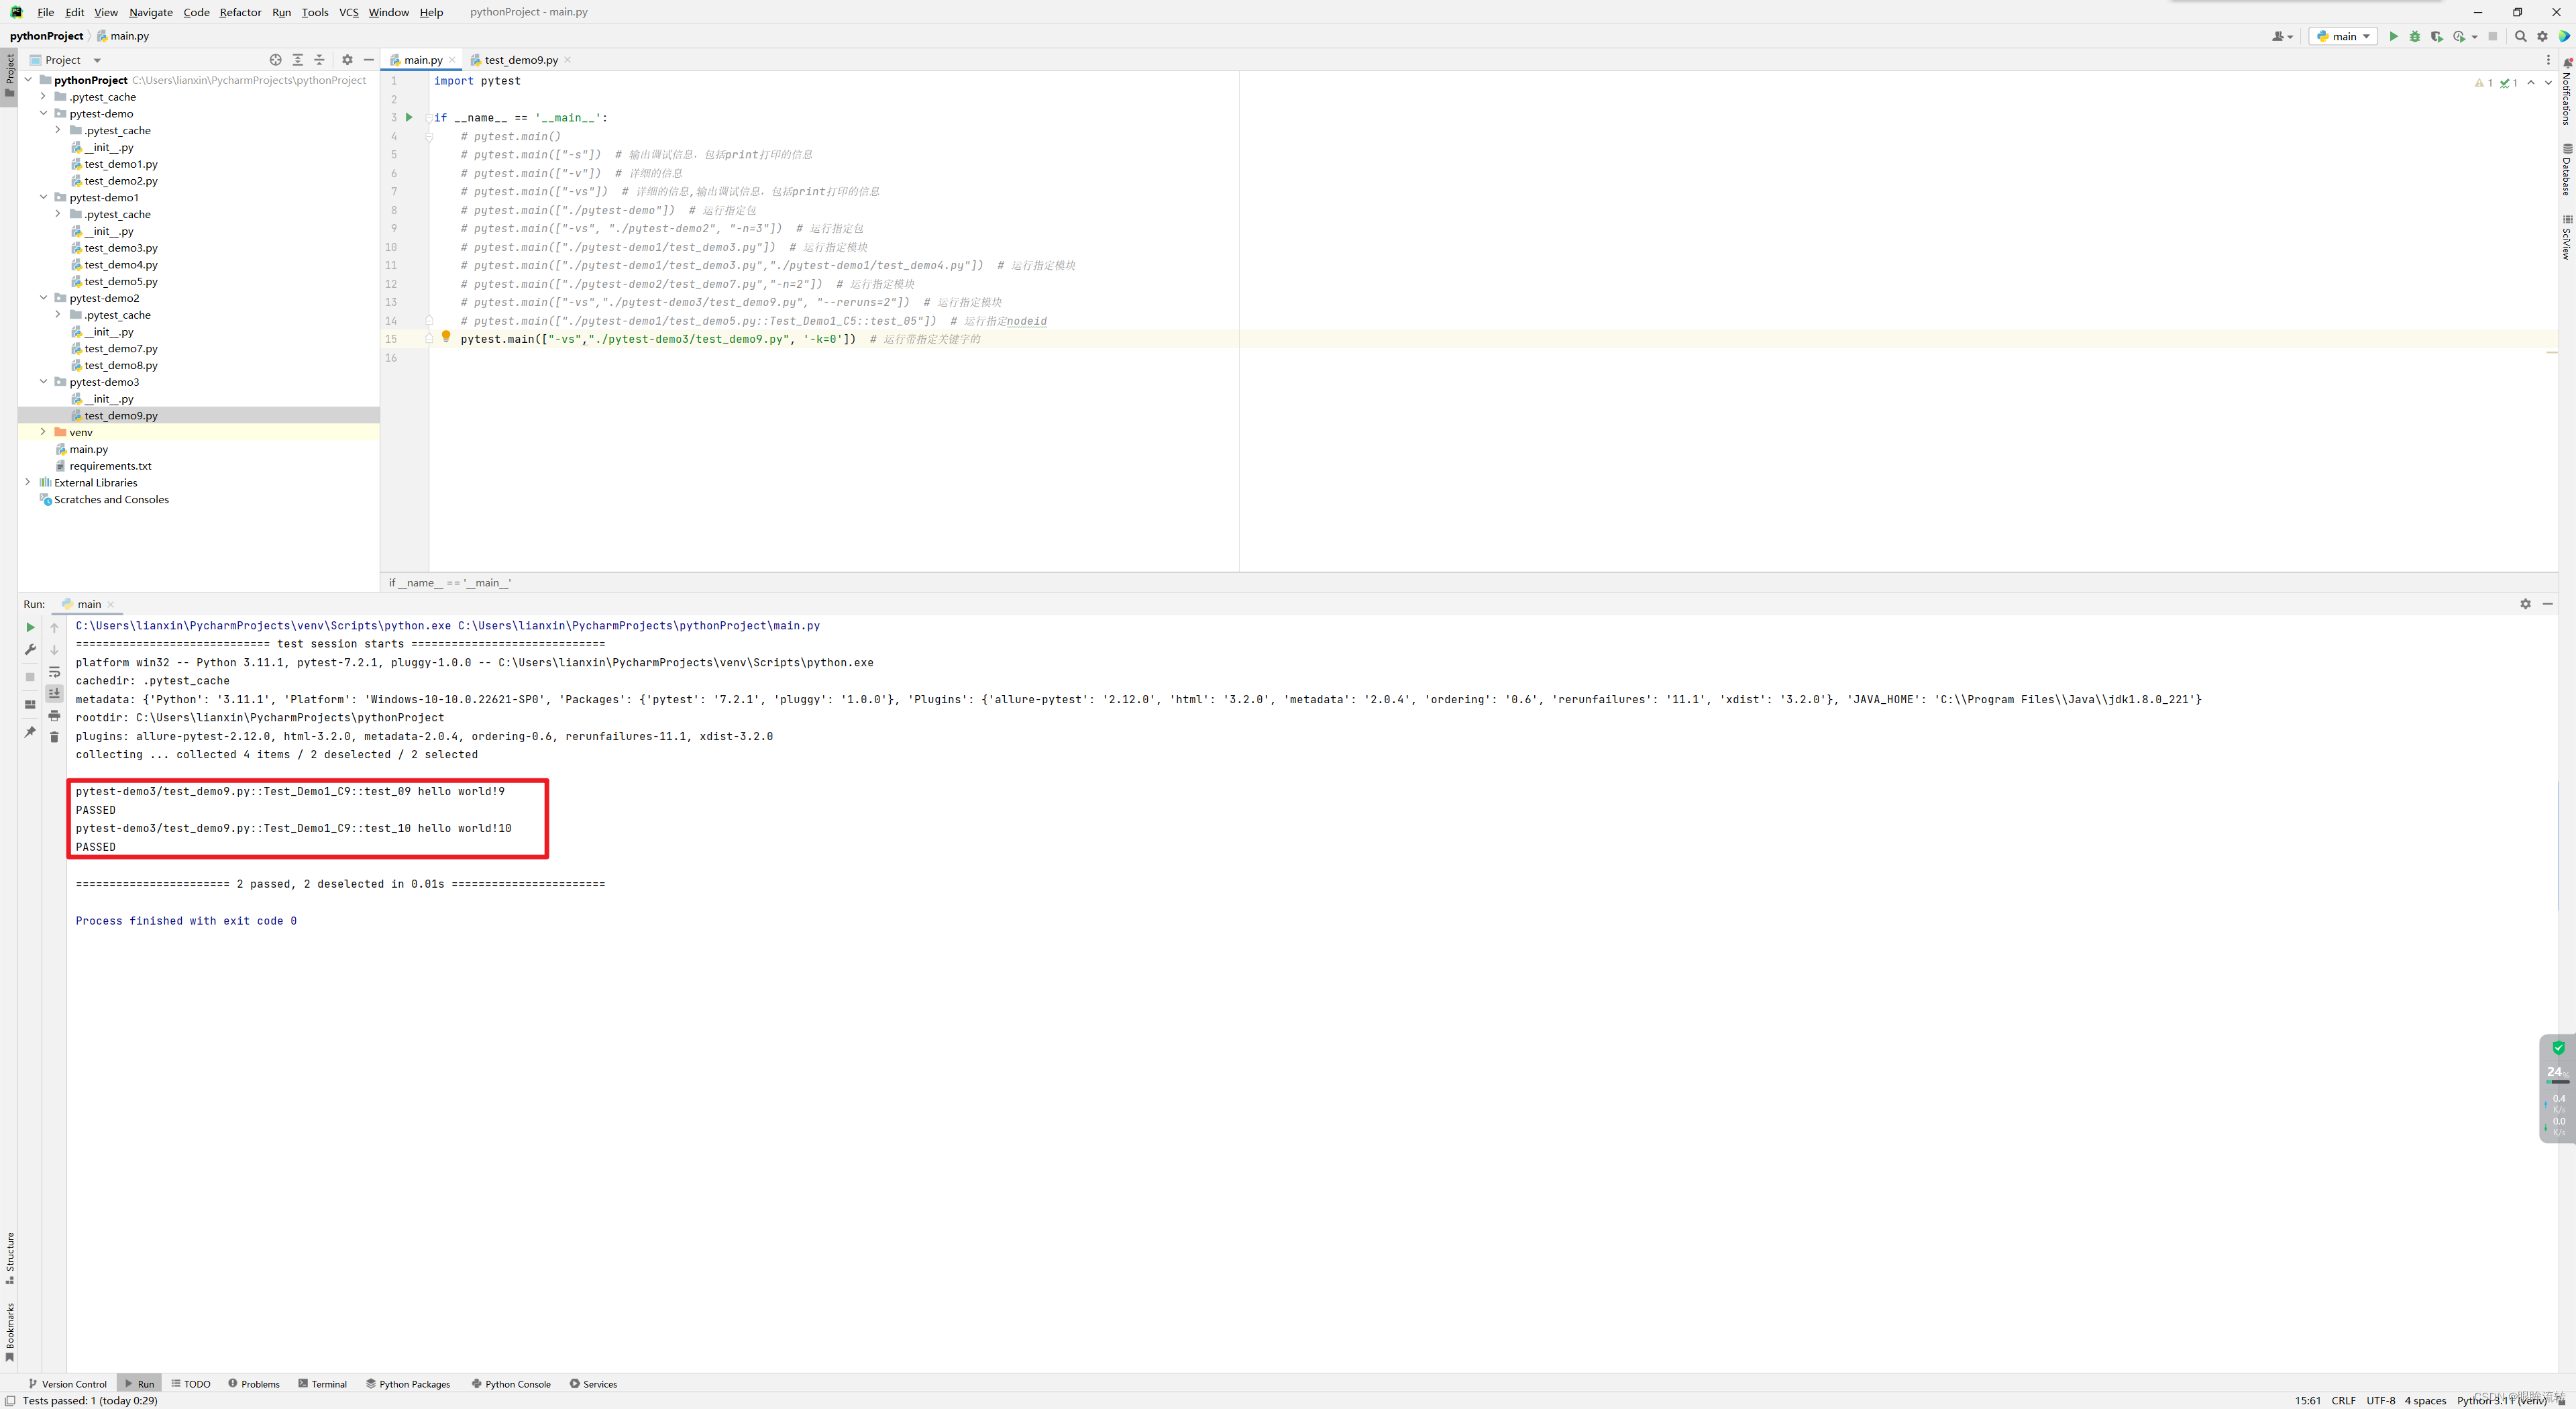
test_demo9.py
class Test_Demo1_C9:def test_09(self):print("hello world!9")def test_10(self):print("hello world!10")def test_11(self):print("hello world11")assert 1 != 1def test_12(self):print("hello world12")
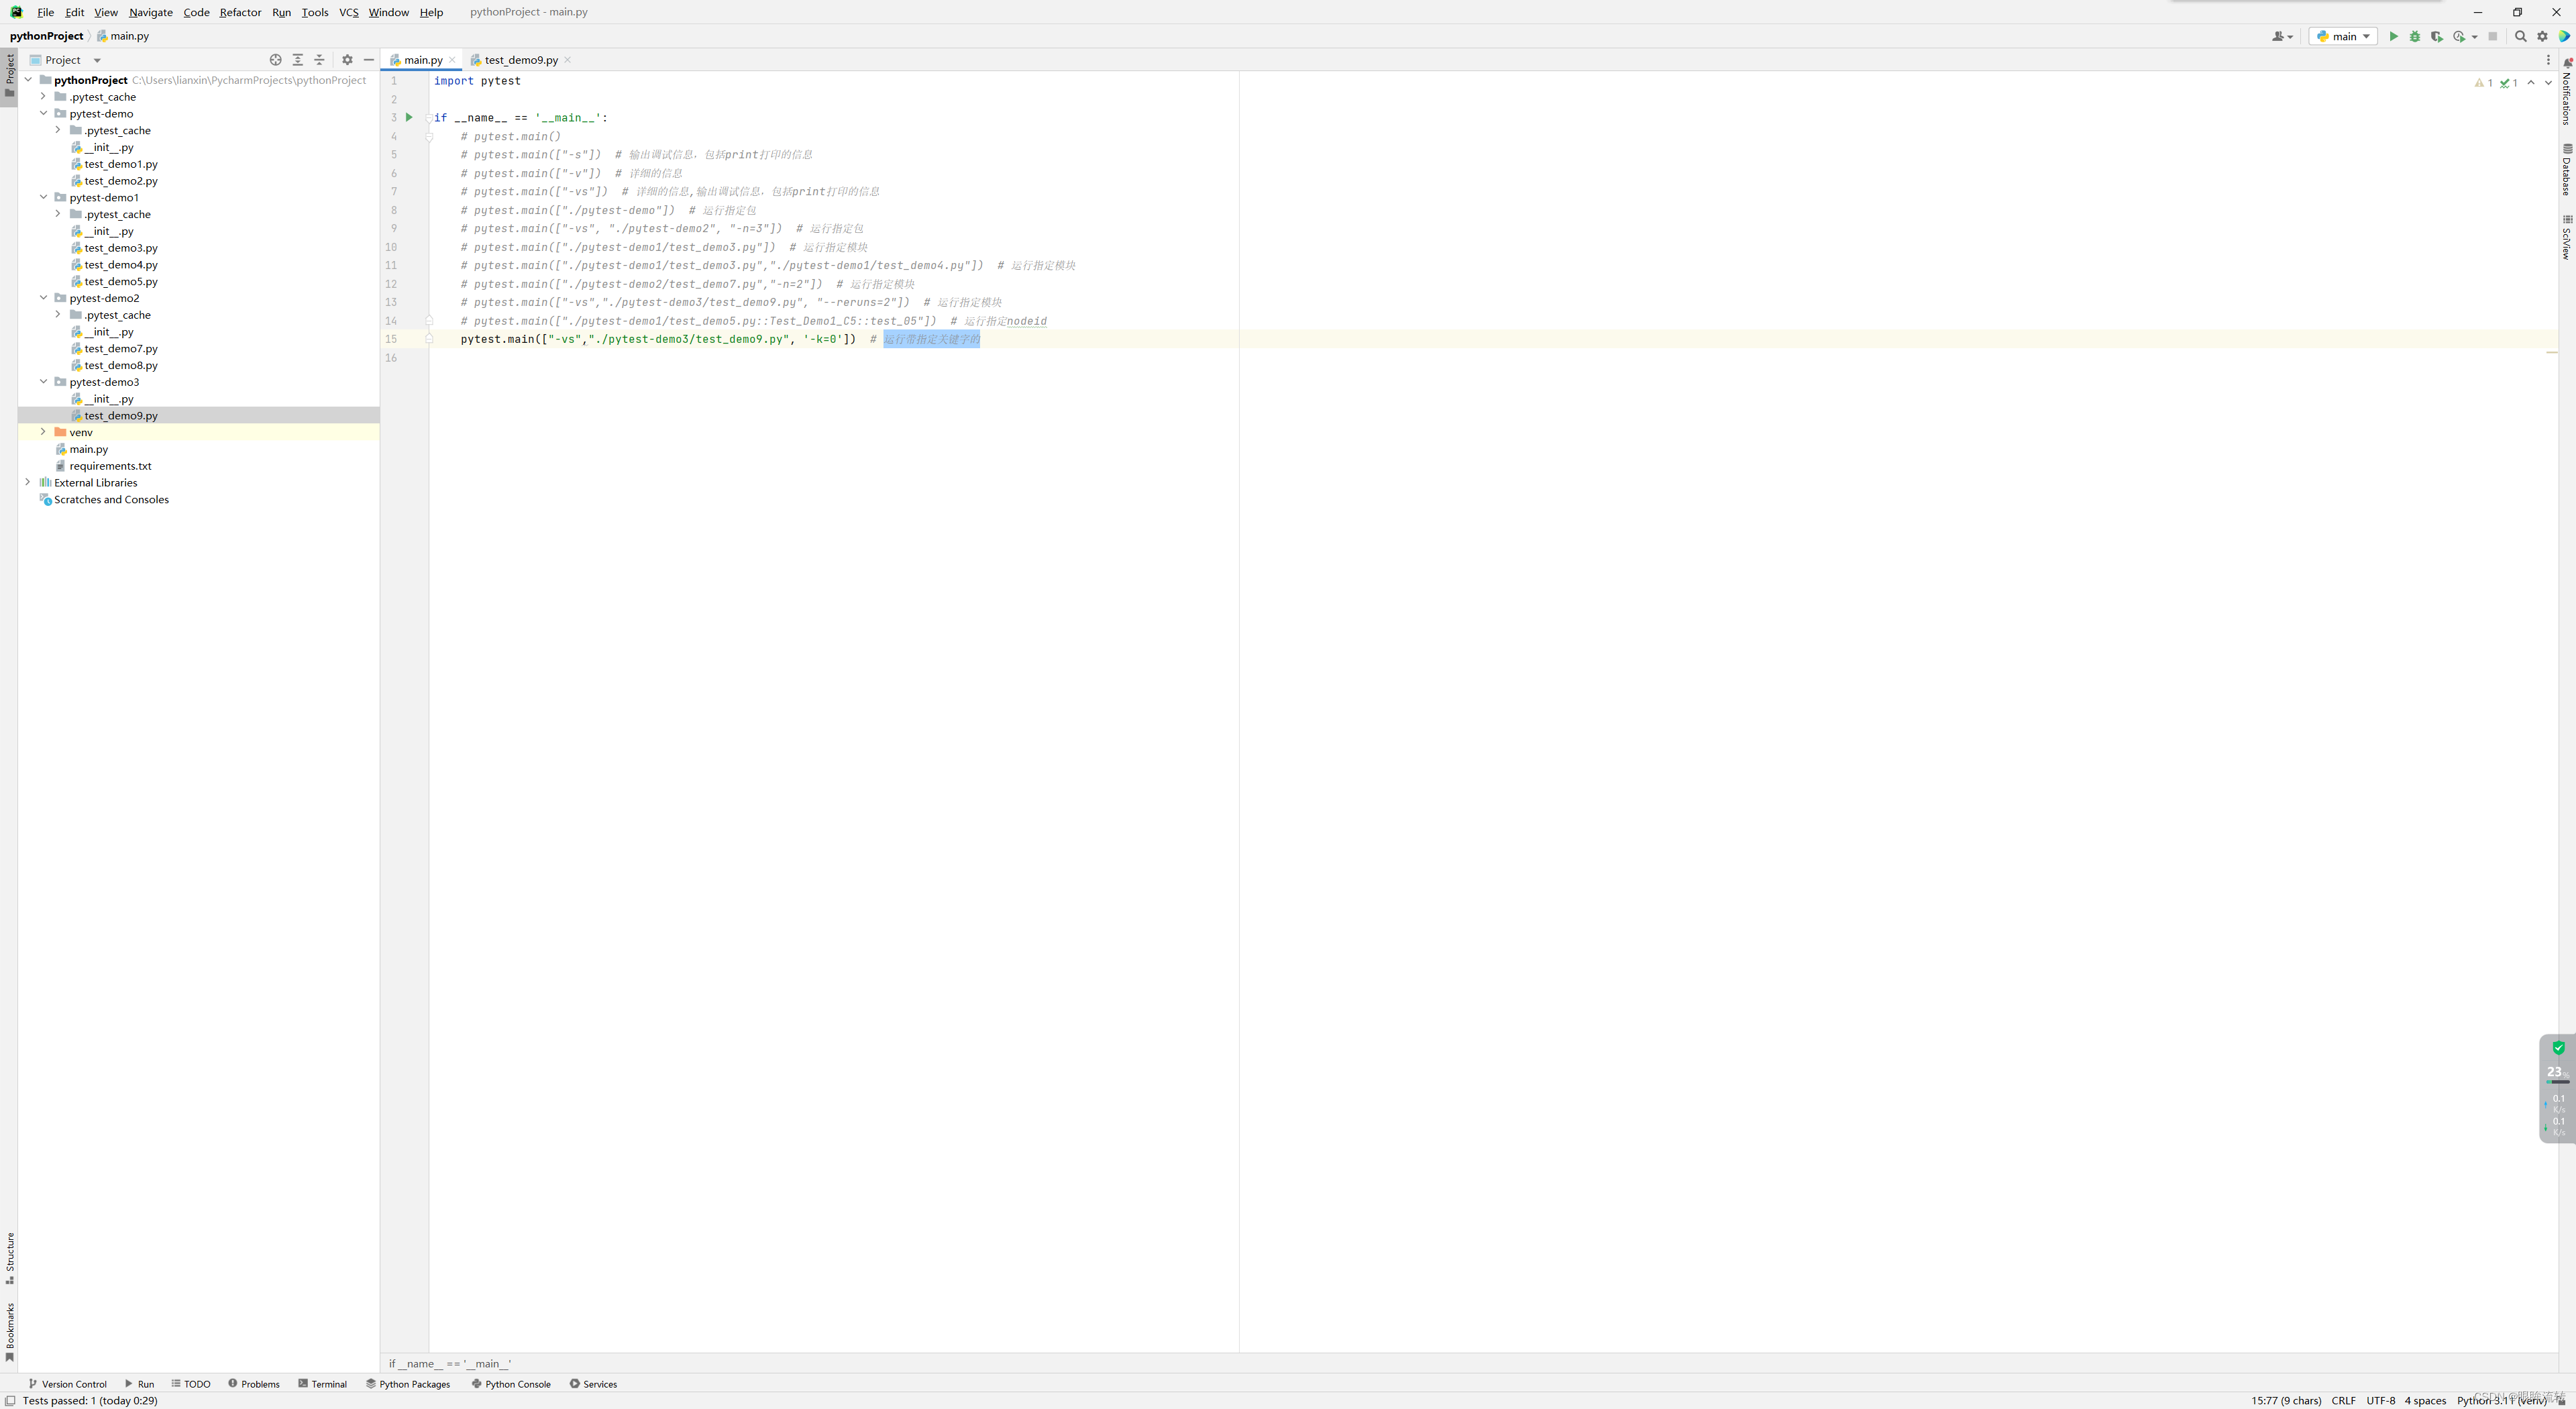
1、主函数模式
运行所有
import pytestif __name__ == '__main__':pytest.main()
指定包运行
import pytestif __name__ == '__main__':pytest.main(["./pytest-demo"]) # 运行指定包
指定模块运行
import pytestif __name__ == '__main__':pytest.main(["./pytest-demo1/test_demo3.py"]) # 运行指定模块pytest.main(["./pytest-demo1/test_demo3.py","./pytest-demo1/test_demo4.py"])
指定nodeid运行
import pytestif __name__ == '__main__':pytest.main(["./pytest-demo1/test_demo5.py::Test_Demo1_C5::test_05"]) # 运行指定nodeid
2、命令行模式
运行所有
pytest
指定包运行
pytest ./pytest-demo
指定模块运行
pytest ./pytest-demo/test_demo3.py
pytest ./pytest-demo/test_demo3.py ./pytest-demo1/test_demo4.py
指定nodeid运行
pytest ./pytest-demo1/test_demo5.py::Test_Demo1_C5::test_05
3、配置文件模式
读取pytest.ini全局配置文件运行
pytest.ini(需要时ANSI编码或者GBK)
[pytest]
# 命令行参数,用空格进行分隔
addopts = -vs# 测试用例的路径 ./为pytest.ini当前目录下的同级文件夹
testpaths =./pytest_demo# 模块名的规则,配置测试搜索的模块文件名称
python_files = test_*.py
# 类名的规则,配置测试搜索的测试类名
python_classes = Test*
# 方法名的规则,配置测试搜索的测试函数名
python_functions = test
4、参数详解
-s:输出调试信息,包括print打印的信息
-v:详细的信息
-vs:详细的信息,输出调试信息,包括print打印的信息
-n:多线程(在命令行中-n参数分割符为空格,主函数中-n参数分隔符为=)
–reruns:失败重试(在命令行中–reruns参数分割符为空格,主函数中–reruns参数分隔符为=)
-k:运行带指定关键字的
2.4、执行顺序
默认执行顺序:从上到下,依次执行
可以使用@pytest.mark.run(order=x)改变执行顺序,数字越小越先执行
test_demo13.py
import pytestclass Test_Demo1_C13:@pytest.mark.run(order=1)def test_013(self):print("hello world!13")@pytest.mark.run(order=4)def test_14(self):print("hello world!14")@pytest.mark.run(order=2)def test_15(self):print("hello world15")@pytest.mark.run(order=3)def test_16(self):print("hello world16")
2.5、冒烟测试
1、单组
test_demo14.py
import pytestclass Test_Demo1_C14:@pytest.mark.smokedef test_017(self):print("hello world!17")@pytest.mark.xumengdef test_18(self):print("hello world!18")def test_19(self):print("hello world19")def test_20(self):print("hello world20")test_demo15.py
import pytestclass Test_Demo1_C15:@pytest.mark.smokedef test_017(self):print("hello world!17")@pytest.mark.xumengdef test_18(self):print("hello world!18")def test_19(self):print("hello world19")def test_20(self):print("hello world20")pytest.ini
[pytest]
# 命令行参数,用空格进行分隔
addopts = -vs -m="smoke"# 测试用例的路径 ./为pytest.ini当前目录下的同级文件夹
testpaths =./pytest-demo5# 模块名的规则,配置测试搜索的模块文件名称
python_files = test_*.py
# 类名的规则,配置测试搜索的测试类名
python_classes = Test*
# 方法名的规则,配置测试搜索的测试函数名
python_functions = test# 冒烟测试
markers =smoke:冒烟测试
2、多组
[pytest]
# 命令行参数,用空格进行分隔
addopts = -vs -m="smoke or xumeng"# 测试用例的路径 ./为pytest.ini当前目录下的同级文件夹
testpaths =./pytest-demo5# 模块名的规则,配置测试搜索的模块文件名称
python_files = test_*.py
# 类名的规则,配置测试搜索的测试类名
python_classes = Test*
# 方法名的规则,配置测试搜索的测试函数名
python_functions = test# 冒烟测试
markers =smoke:冒烟测试xumeng:测试
2.6、跳过用例
1、无条件跳过
test_demo16.py
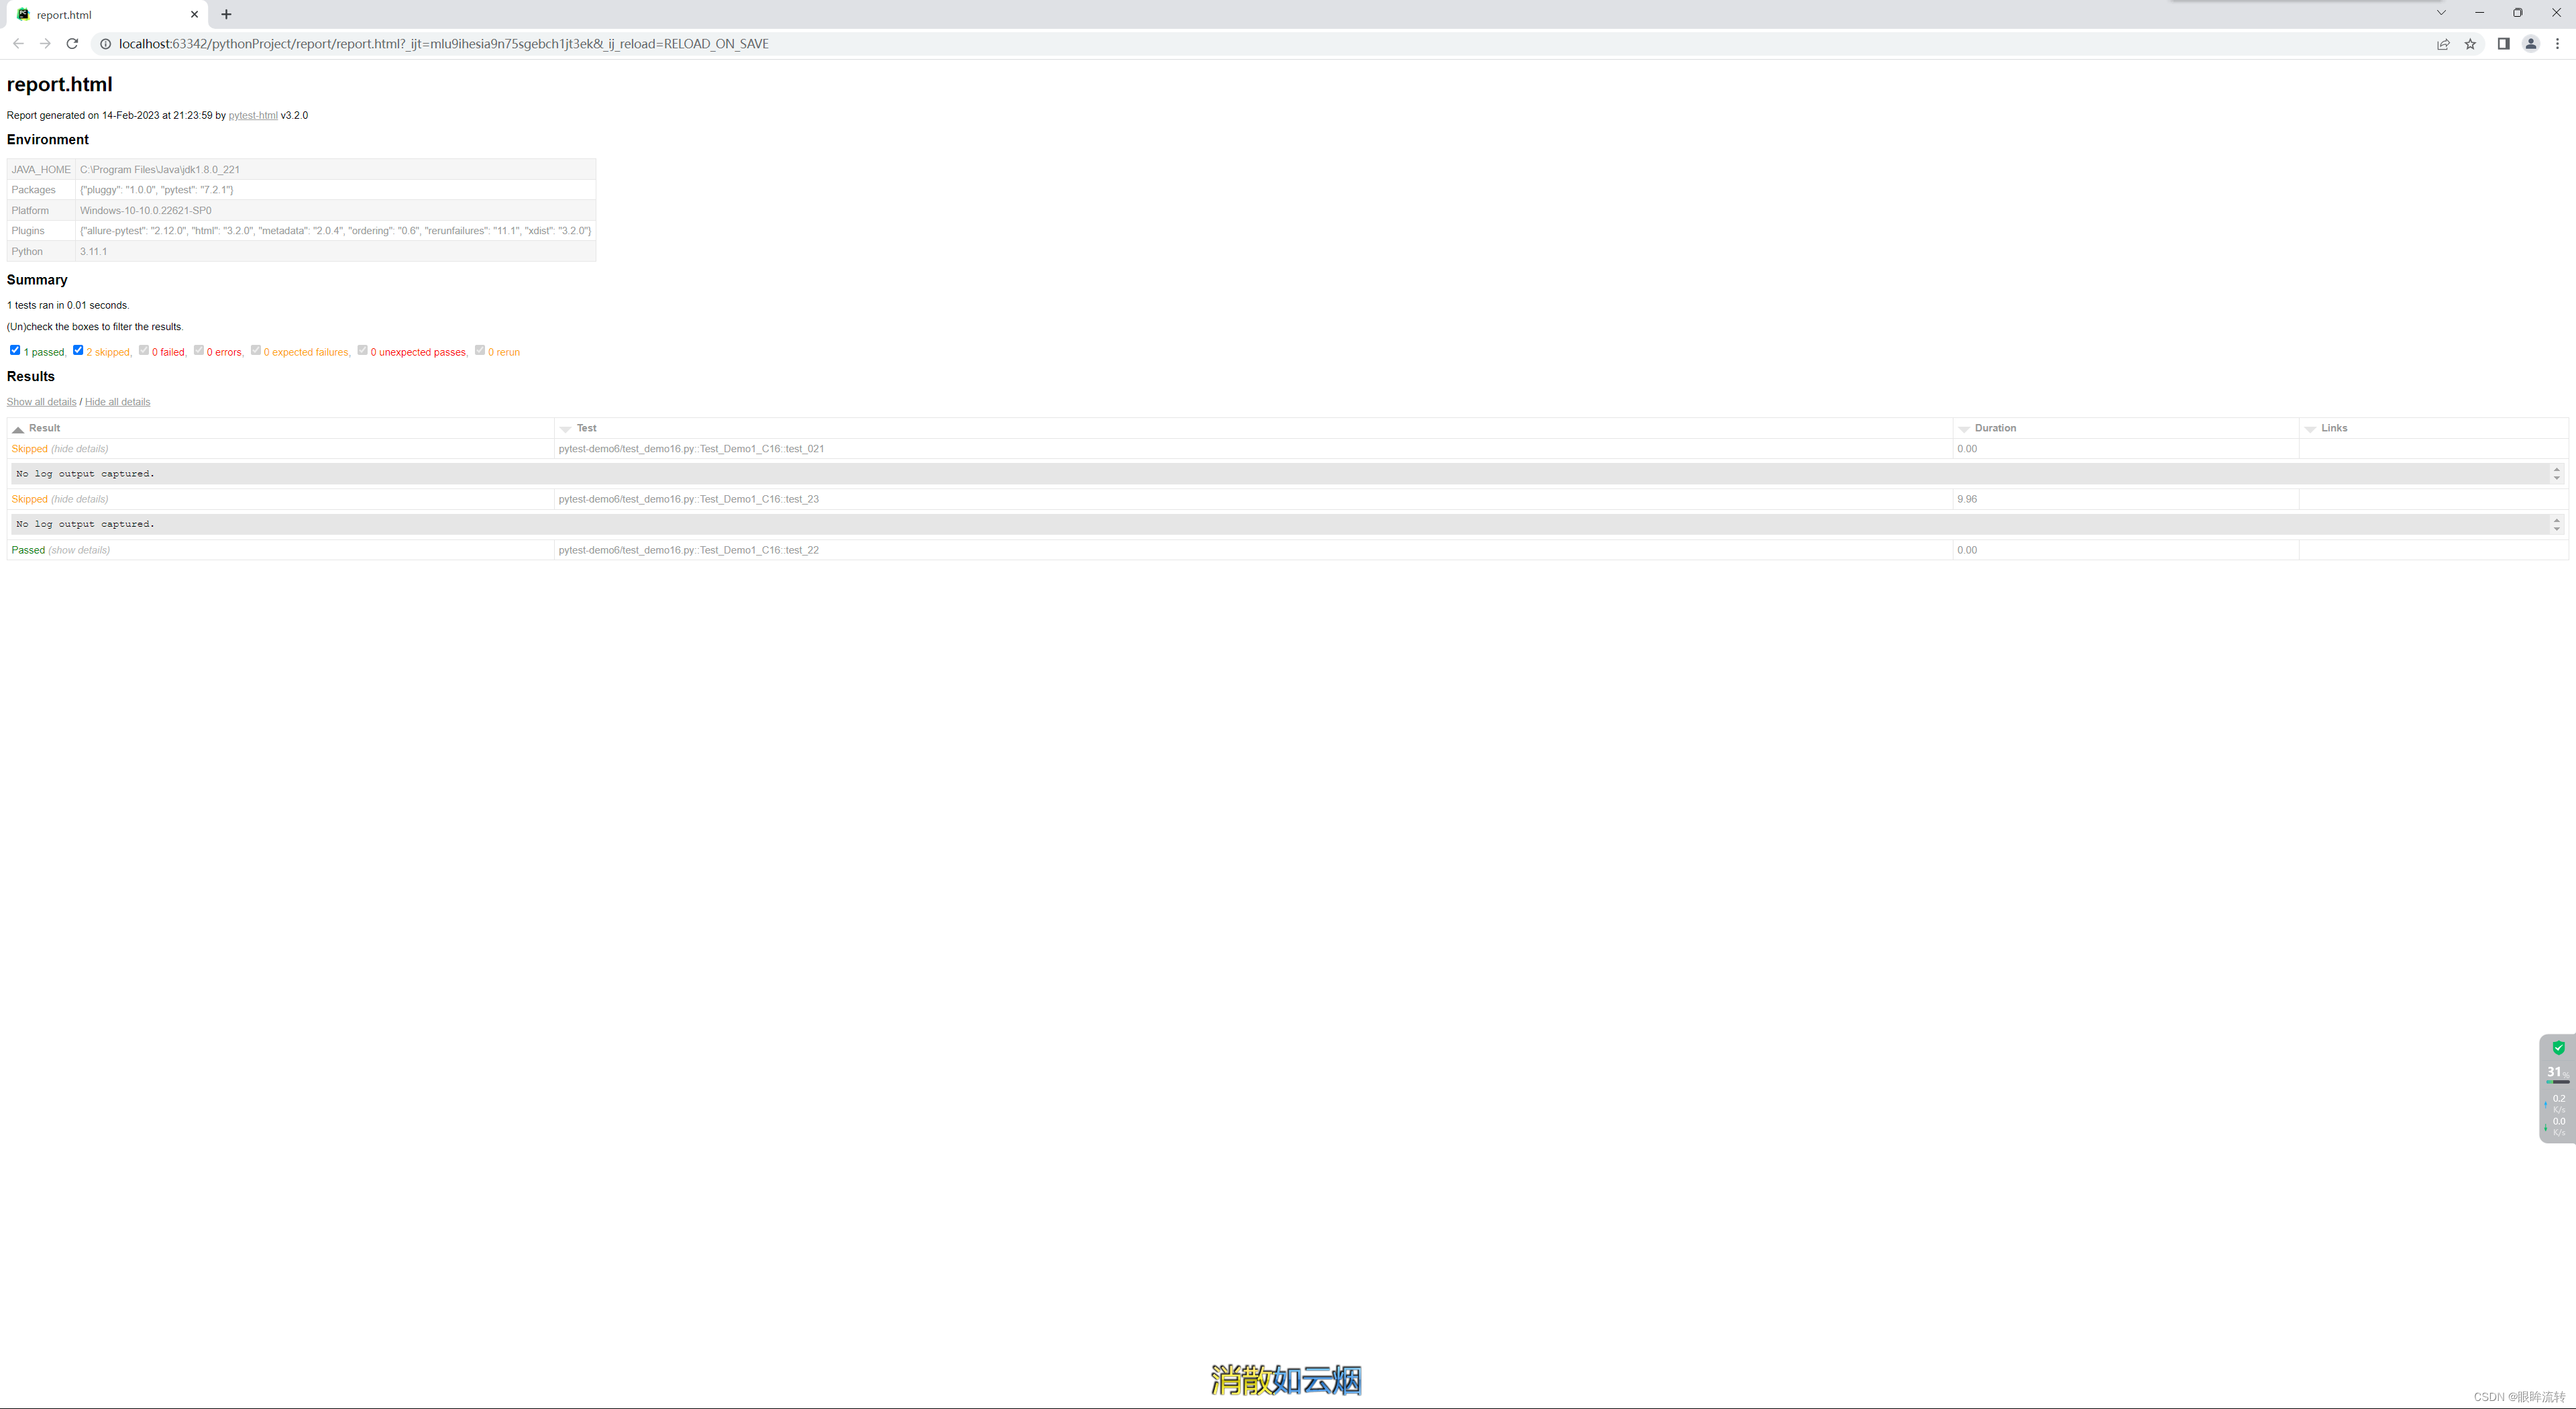
import pytestclass Test_Demo1_C16:age = 18@pytest.mark.skip(reason="任性")def test_021(self):print("hello world!21")def test_22(self):print("hello world!22")def test_23(self):print("hello world23")
pytest.ini
[pytest]
# 命令行参数,用空格进行分隔
addopts = -vs# 测试用例的路径 ./为pytest.ini当前目录下的同级文件夹
testpaths =./pytest-demo6# 模块名的规则,配置测试搜索的模块文件名称
python_files = test_*.py
# 类名的规则,配置测试搜索的测试类名
python_classes = Test*
# 方法名的规则,配置测试搜索的测试函数名
python_functions = test
2、有条件跳过
test_demo16.py
import pytestclass Test_Demo1_C16:age = 18@pytest.mark.skip(reason="任性")def test_021(self):print("hello world!21")@pytest.mark.skipif(age != 18, reason="任性")def test_22(self):print("hello world!22")@pytest.mark.skipif(age == 18, reason="任性")def test_23(self):print("hello world23")
pytest.ini
[pytest]
# 命令行参数,用空格进行分隔
addopts = -vs# 测试用例的路径 ./为pytest.ini当前目录下的同级文件夹
testpaths =./pytest-demo6# 模块名的规则,配置测试搜索的模块文件名称
python_files = test_*.py
# 类名的规则,配置测试搜索的测试类名
python_classes = Test*
# 方法名的规则,配置测试搜索的测试函数名
python_functions = test
2.7、生成报告
[pytest]
# 命令行参数,用空格进行分隔
addopts = -vs --html ./report/report.html# 测试用例的路径 ./为pytest.ini当前目录下的同级文件夹
testpaths =./pytest-demo6# 模块名的规则,配置测试搜索的模块文件名称
python_files = test_*.py
# 类名的规则,配置测试搜索的测试类名
python_classes = Test*
# 方法名的规则,配置测试搜索的测试函数名
python_functions = test
3、前后置处理(固件,夹具)
3.1、基本用法
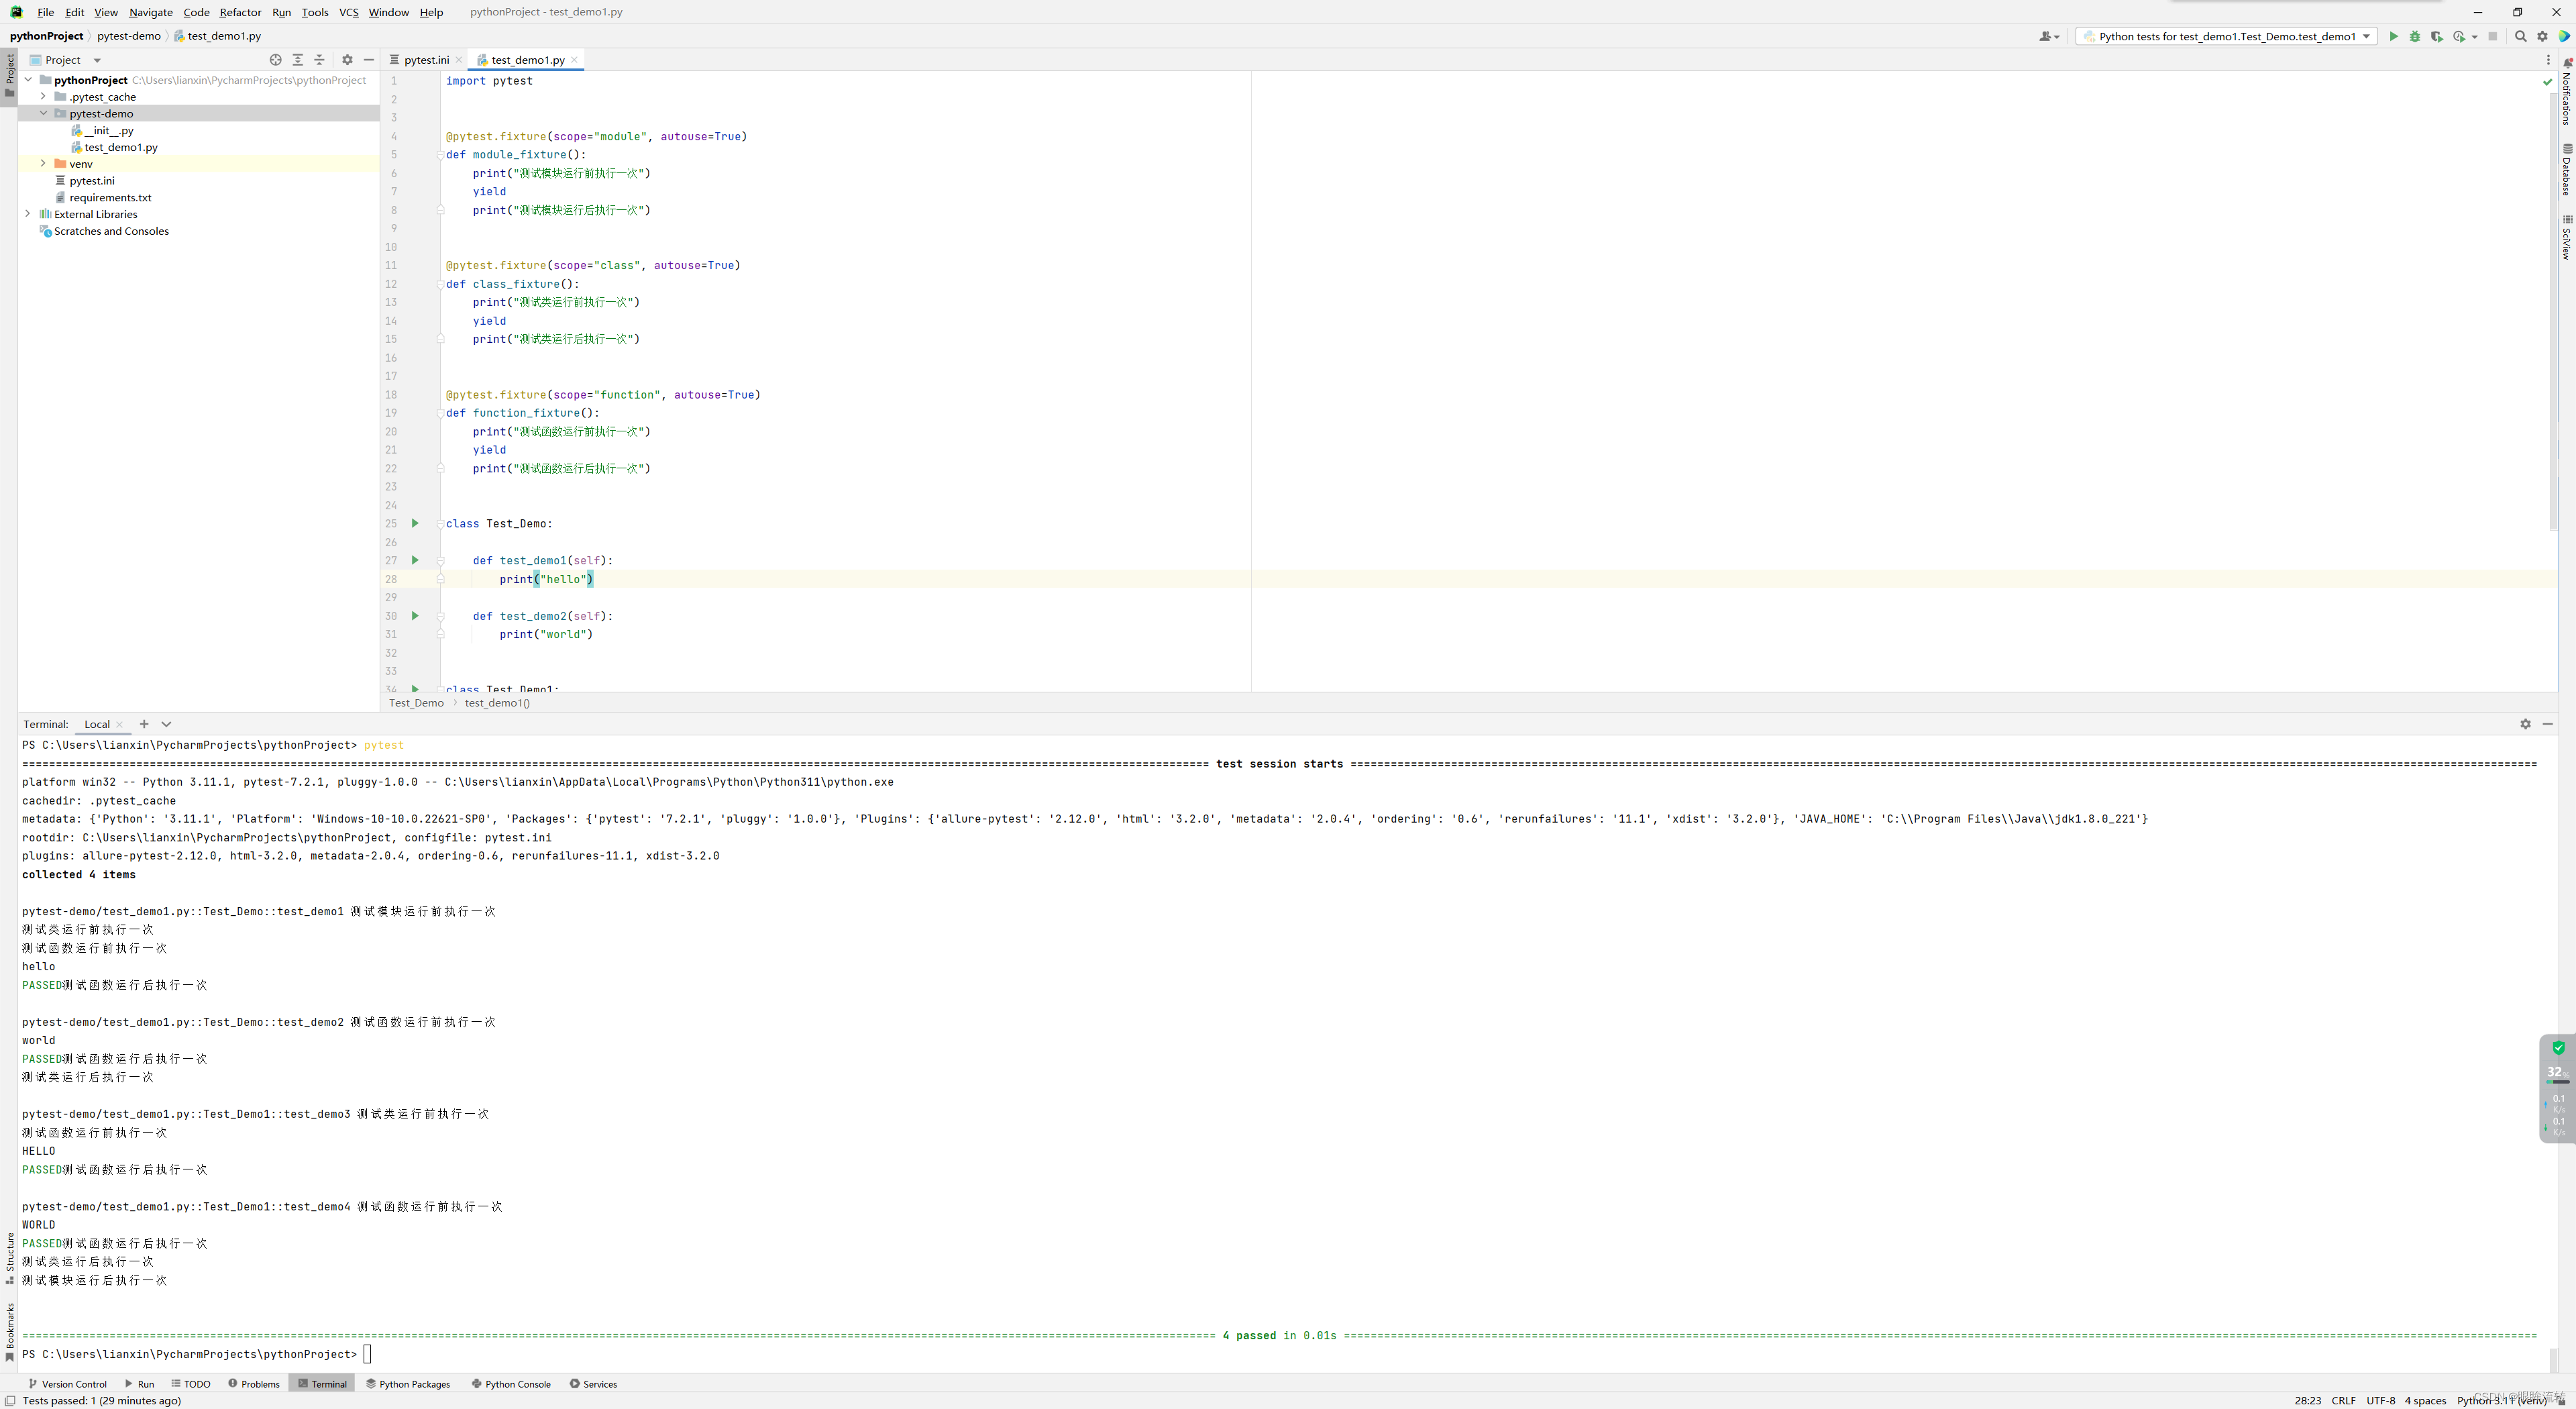
def setup_module(self):print("测试模块运行前执行一次")def teardown_module(self):print("测试模块运行后执行一次")class Test_Demo:def setup_class(self):print("测试类运行前执行一次")def setup_method(self):print("测试函数运行前执行一次")def test_demo1(self):print("hello ")def test_demo2(self):print("world ")def teardown_method(self):print("测试函数运行后执行一次")def teardown_class(self):print("测试类运行后执行一次")class Test_Demo1:def setup_class(self):print("测试类运行前执行一次1")def setup_method(self):print("测试函数运行前执行一次1")def test_demo1(self):print("hello ")def test_demo2(self):print("world ")def teardown_method(self):print("测试函数运行后执行一次1")def teardown_class(self):print("测试类运行后执行一次1")

3.2、装饰器
@pytest.fixture(scope=“”,params=“”,autouse=Boolean,ids=“”,name=“”)
1、基础使用(scope、autouse)
scope也支持session
import pytest@pytest.fixture(scope="module", autouse=True)
def module_fixture():print("测试模块运行前执行一次")yieldprint("测试模块运行后执行一次")@pytest.fixture(scope="class", autouse=True)
def class_fixture():print("测试类运行前执行一次")yieldprint("测试类运行后执行一次")@pytest.fixture(scope="function", autouse=True)
def function_fixture():print("测试函数运行前执行一次")yieldprint("测试函数运行后执行一次")class Test_Demo:def test_demo1(self):print("hello")def test_demo2(self):print("world")class Test_Demo1:def test_demo3(self):print("HELLO")def test_demo4(self):print("WORLD")
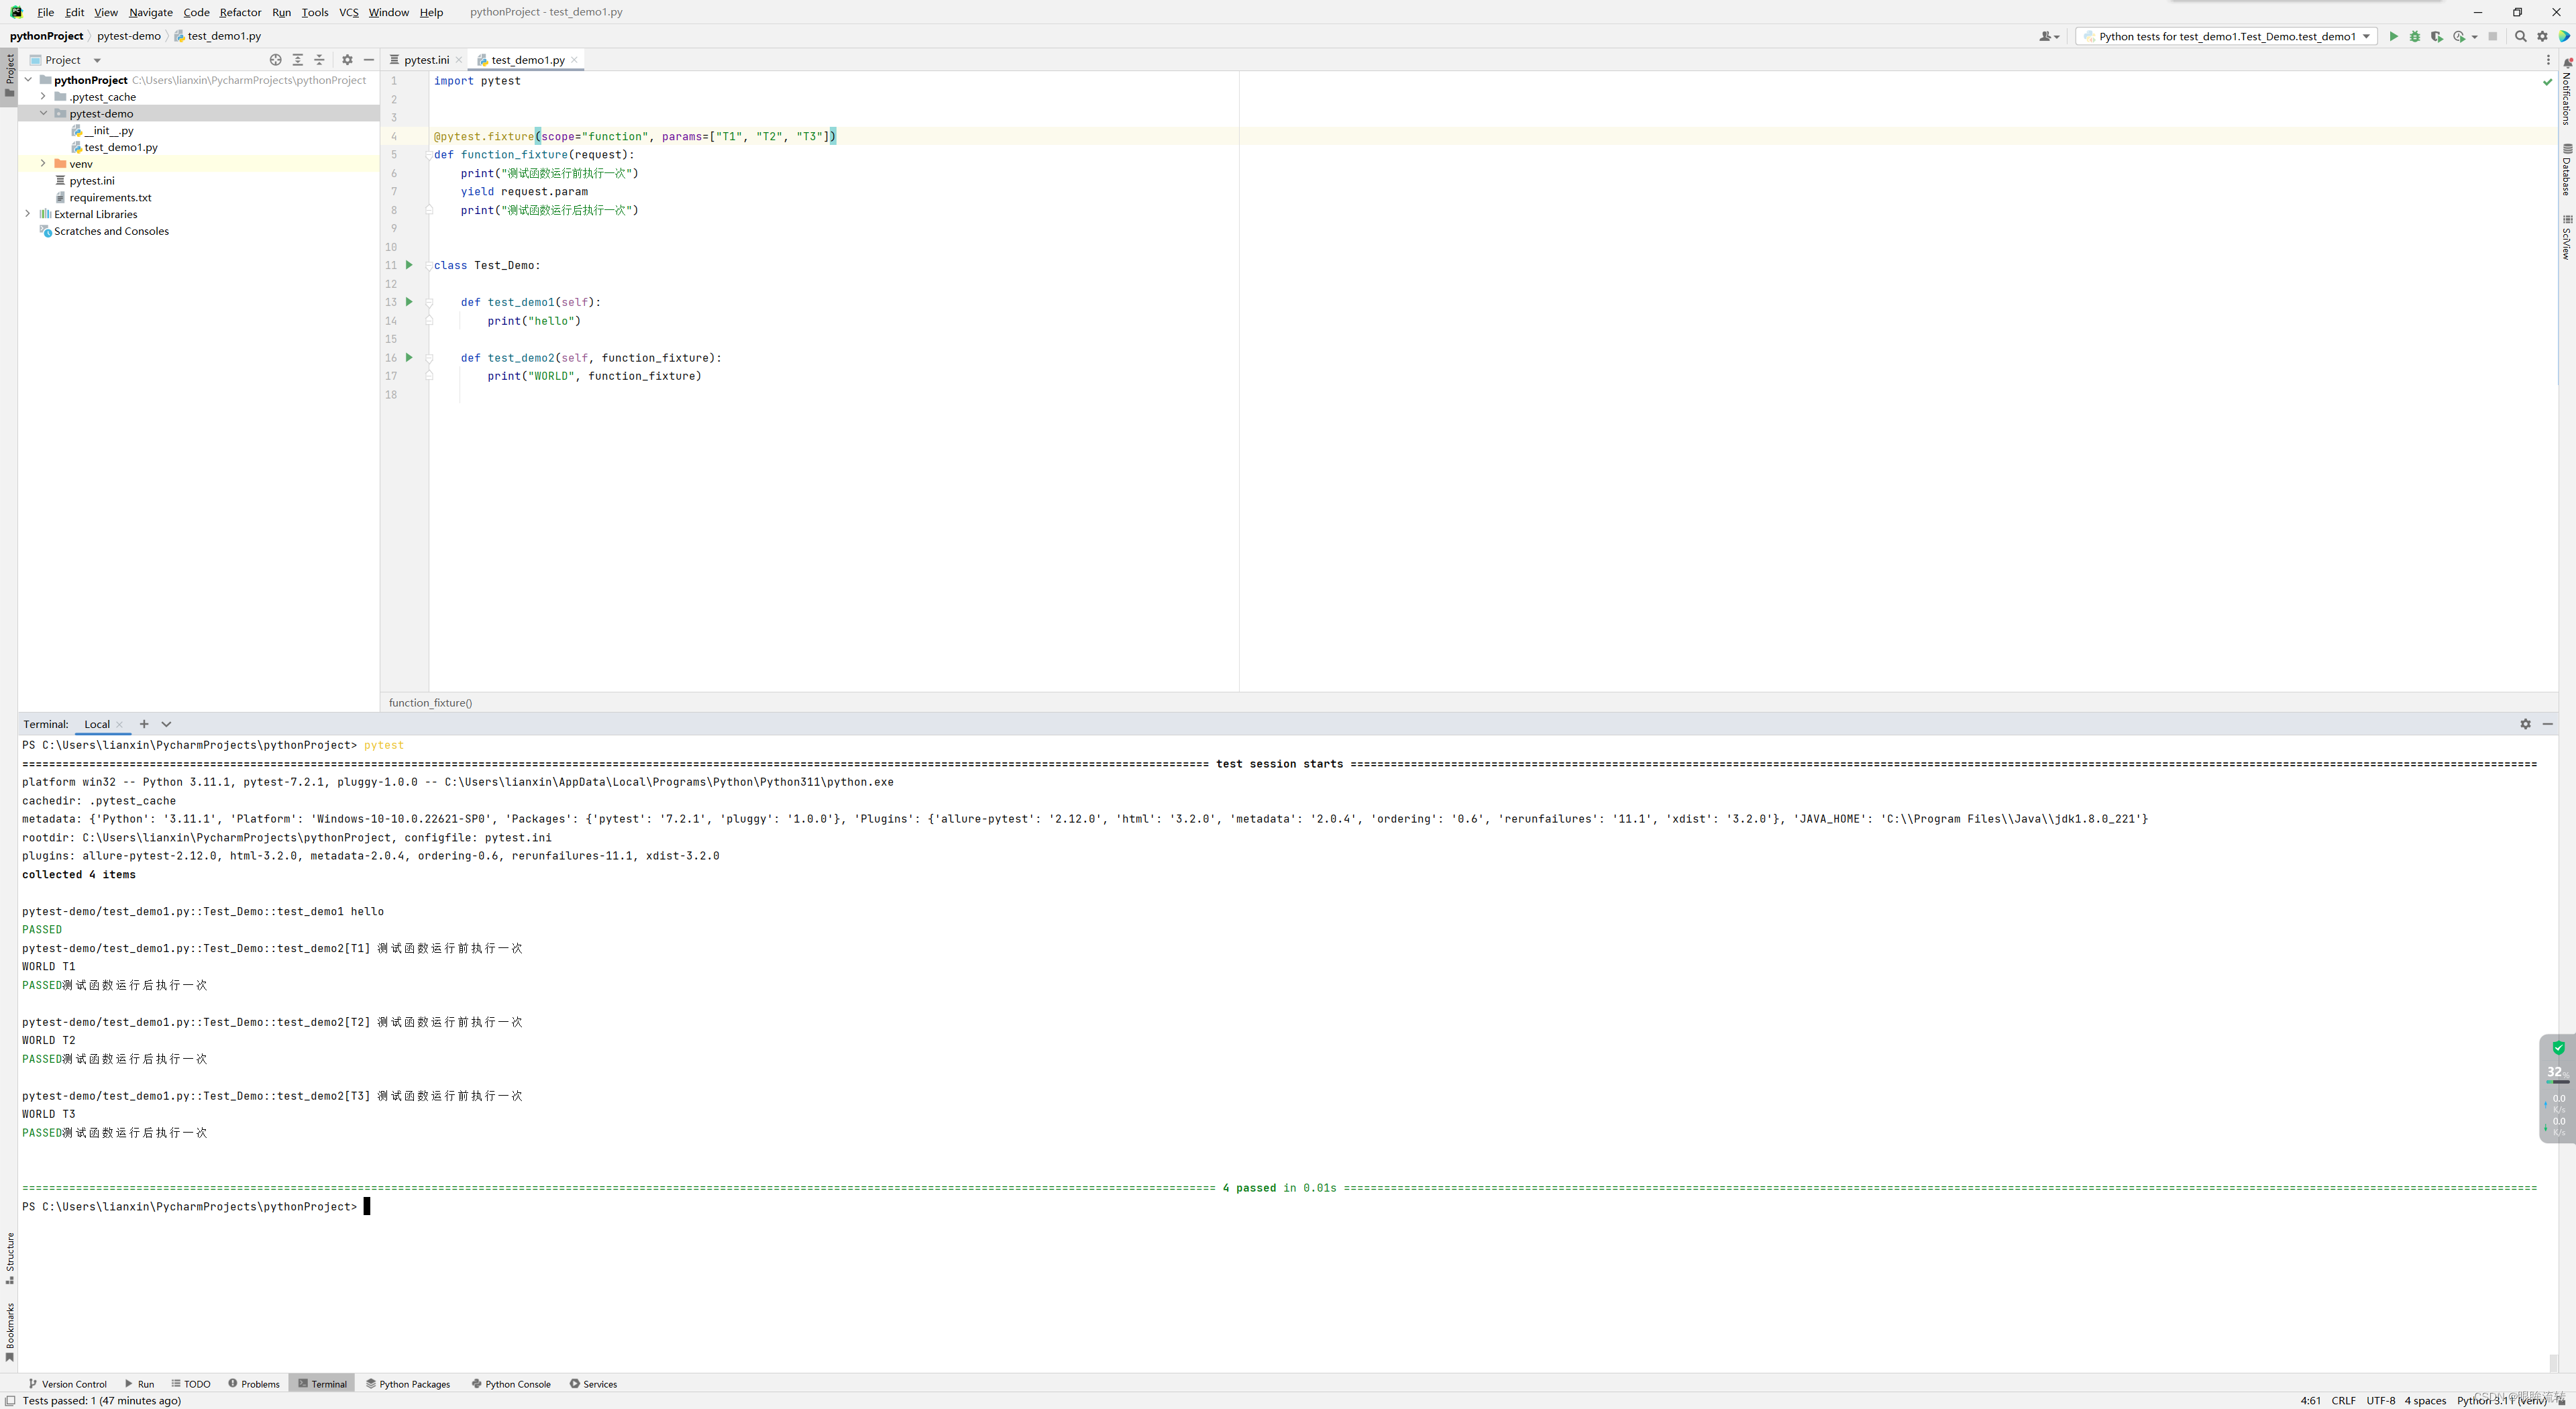
2、参数化(params、ids)
import pytest@pytest.fixture(scope="function", params=["T1", "T2", "T3"])
def function_fixture(request):print("测试函数运行前执行一次")yield request.paramprint("测试函数运行后执行一次")class Test_Demo:def test_demo1(self):print("hello")def test_demo2(self, function_fixture):print("WORLD", function_fixture)
import pytest@pytest.fixture(scope="function", params=["T1", "T2", "T3"], ids=["t1", "t2", "t3"])
def function_fixture(request):print("测试函数运行前执行一次")yield request.paramprint("测试函数运行后执行一次")class Test_Demo:def test_demo1(self):print("hello")def test_demo2(self, function_fixture):print("WORLD", function_fixture)

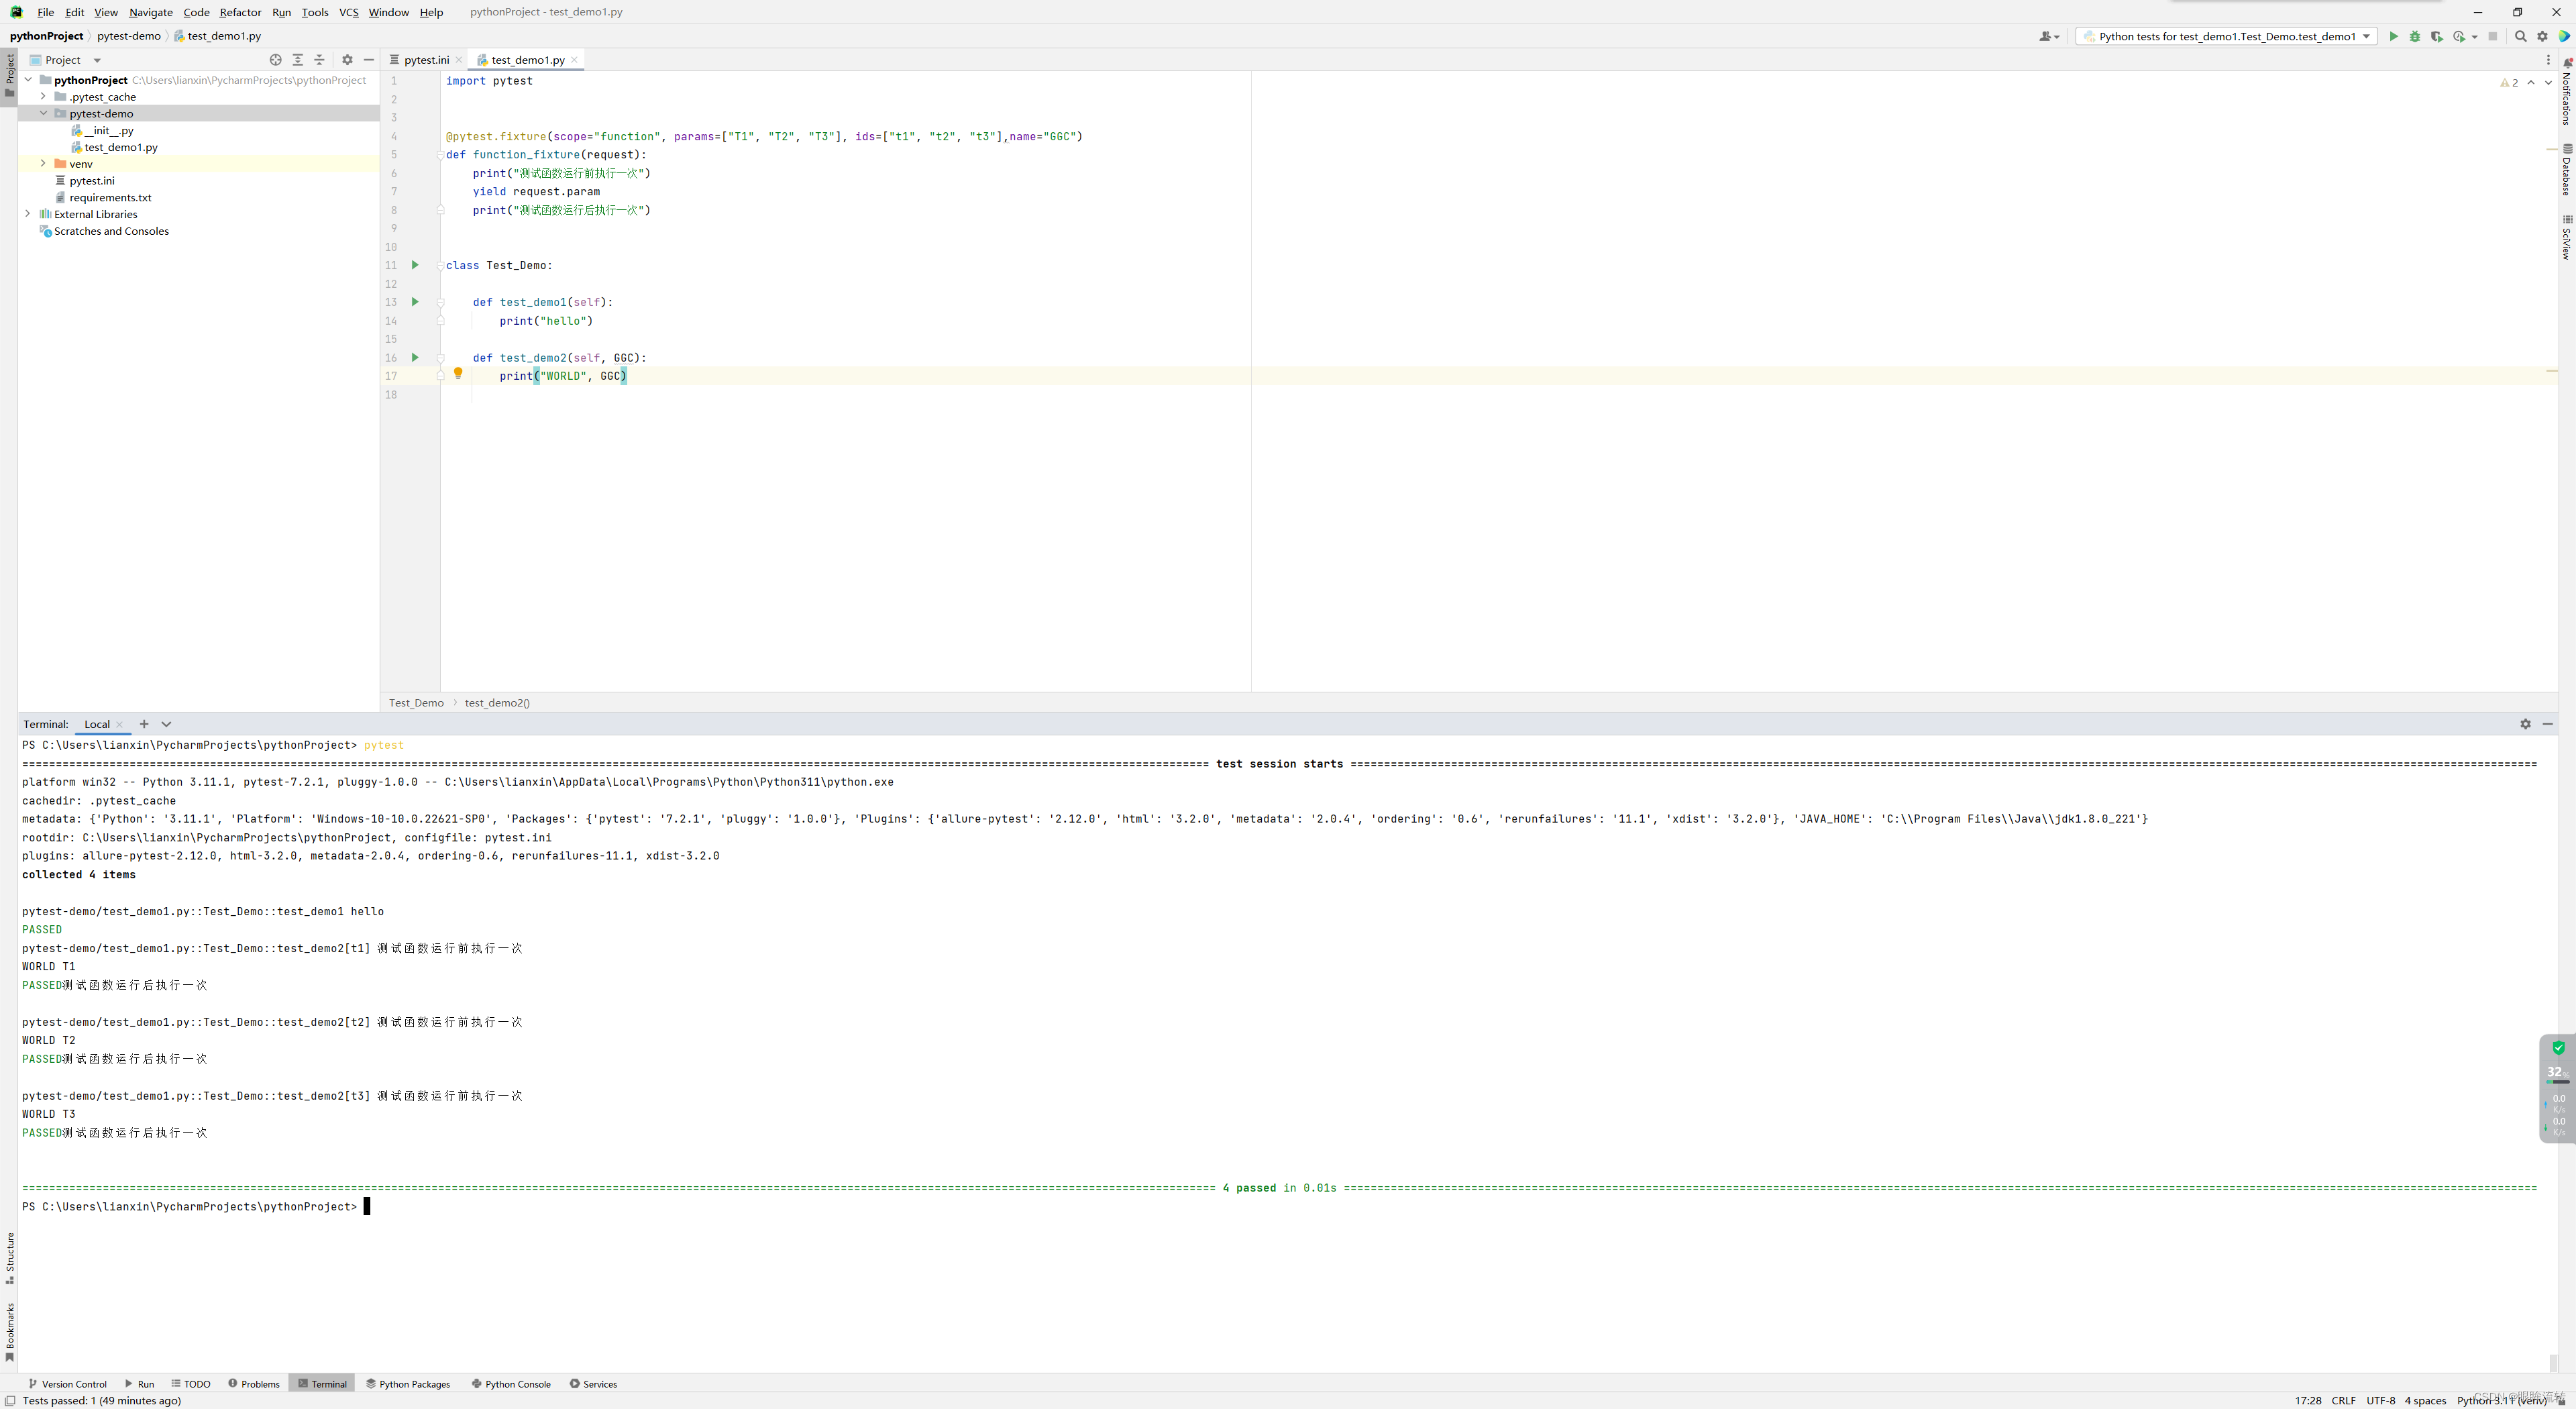
3、别名
import pytest@pytest.fixture(scope="function", params=["T1", "T2", "T3"], ids=["t1", "t2", "t3"],name="GGC")
def function_fixture(request):print("测试函数运行前执行一次")yield request.paramprint("测试函数运行后执行一次")class Test_Demo:def test_demo1(self):print("hello")def test_demo2(self, GGC):print("WORLD", GGC)
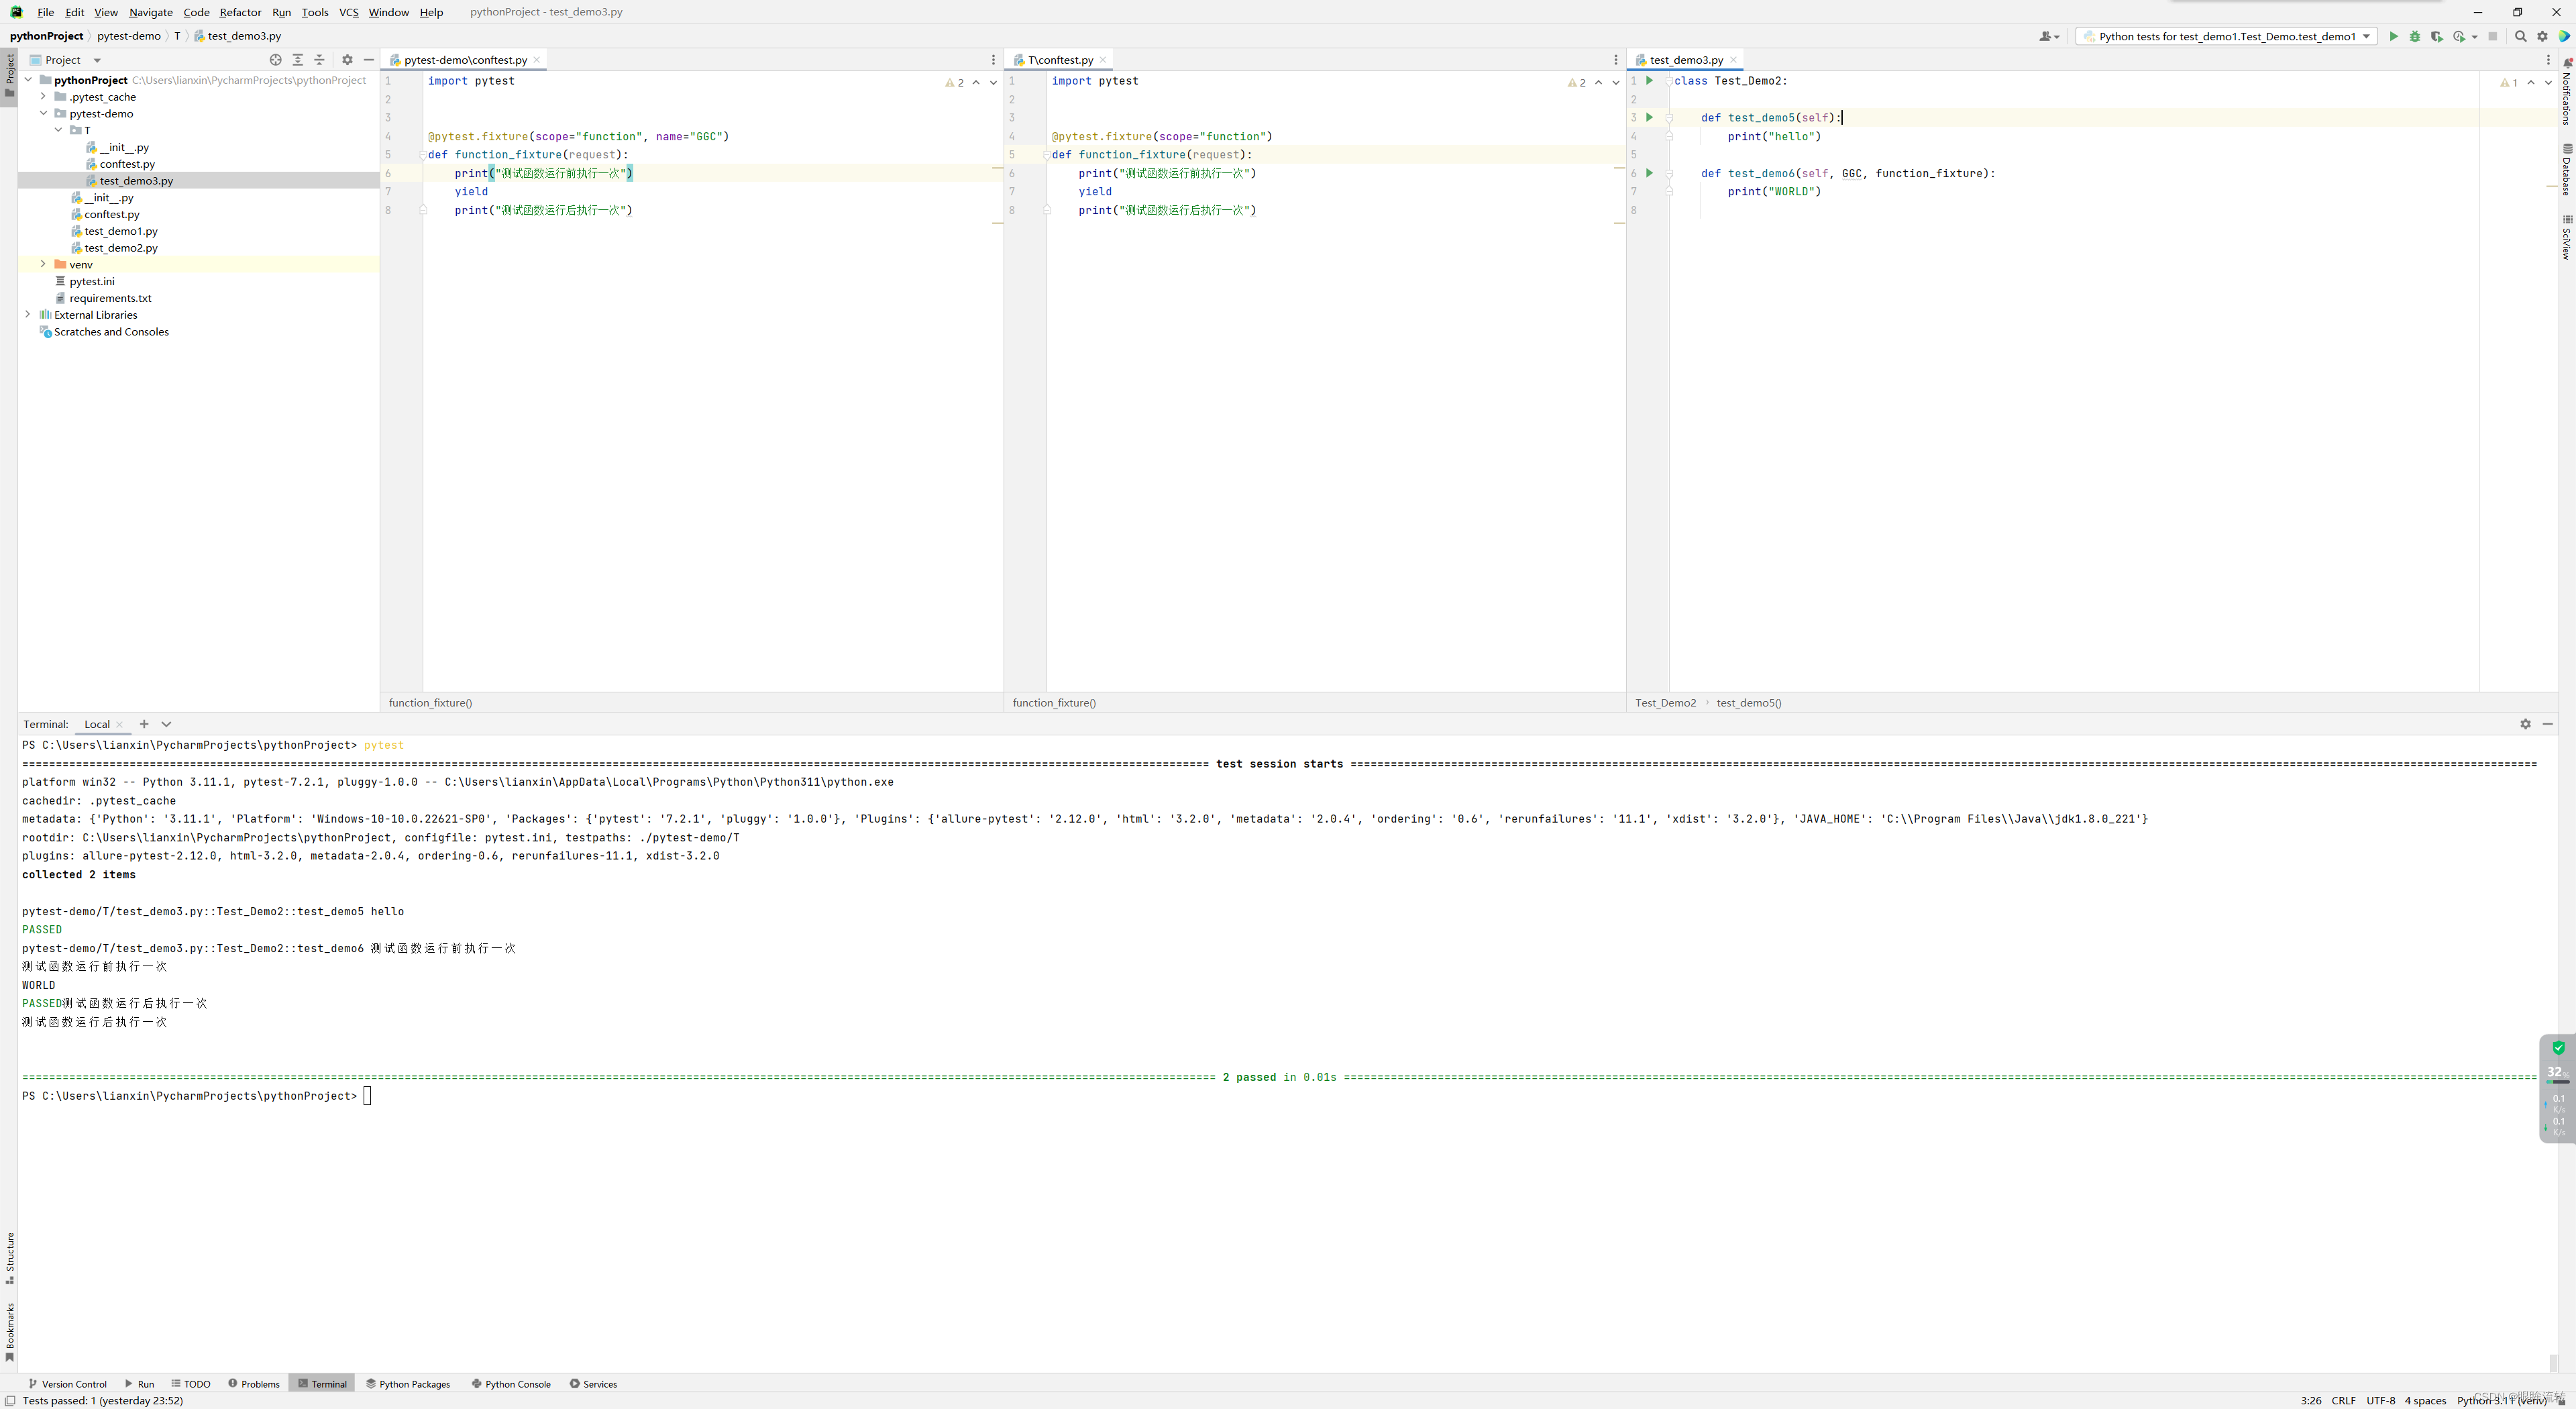
4、conftest.py
conftest.py文件是单独存放的一个夹具配置文件,名称是不能更改
可以在不同的py文件中使用同一个fixture函数
原则上conftest.py需要和运行的用例放到同一层,但是其实可以访问上层的conftest.py
conftest.py的fixture函数使用时也是有先后顺序的
4、接口测试
支持HTTP连接保持和连接池
支持使用cookie保持会话
支持文件上传
支持自动确定响应内容的编码
支持国际化的 URL 和 POST 数据自动编码
4.1、request
1、get
requests.get(url, params=None, **kwargs)
url:接口地址
params:传参(通过url之后以?传参,多个参数之间用&分隔)
**kwargs:可变长度的字典
import pytest
import requestsclass TestDemo1:access_token = ""# 获取tokendef test_1(self):data = {"grant_type": "client_credential","appid": "wx4a3a215280b8f14a","secret": "2609941fb2b5d8aaea637a1d430cab222"}response = requests.get("https://api.weixin.qq.com/cgi-bin/token", data)print(response.json())TestDemo1.access_token = response.json()["access_token"]print(TestDemo1.access_token)
2、post
requests.post(url, data=None, json=None, **kwargs)
url:接口地址
data:表单
json:json数据
files:文件上传
import osimport pytest
import requestsclass TestDemo1:access_token = ""# 获取tokendef test_1(self):data = {"grant_type": "client_credential","appid": "wx4a3a215280b8f14a","secret": "2609941fbb5d8aaea637a1d430cab222"}response = requests.get("https://api.weixin.qq.com/cgi-bin/token", data)print(response.json())TestDemo1.access_token = response.json()["access_token"]print(TestDemo1.access_token)# 创建标签@pytest.mark.skipdef test_2(self):json = {"tag": {"name": "xumeng"}}response = requests.post("https://api.weixin.qq.com/cgi-bin/tags/create?access_token=" + TestDemo1.access_token,json=json)print(response.json())# 获取所有标签def test_3(self):json = {"tag": {"name": "xumeng"}}response = requests.post("https://api.weixin.qq.com/cgi-bin/tags/get?access_token=" + TestDemo1.access_token,json=json)print(response.json())# 上传文件def test_4(self):# print(os.getcwd())files = {"media": open("./Luoyang.jpg", "rb")  # 路径起点为项目根目录}response = requests.post("https://api.weixin.qq.com/cgi-bin/media/uploadimg?access_token=" + TestDemo1.access_token,files=files)print(response.json())
3、put
requests.put(url, data=None, **kwargs)
url:接口地址
data:表单
4、delete
requests.delete(url, **kwargs)
url:接口地址
5、request
requests.request(method, url, **kwargs)
method:请求方式
url:请求路径
**kwargs:
- params:get请求传参
- data:post请求传参
- headers:请求头
- cookies:cookie
- files:文件
- auth:授权
- timeout=None
- allow_redirects=True
- proxies:代理
- hooks=None
- stream=None
- verify:SSL证书检验
- cert=None
- json:post请求传参
4.2、response
res.text:返回字符串的响应数据
res.content:返回字节响应数据bytes
res.json():返回字典格式的响应数据
res.status_code:返回状态码
res.reason:返回状态信息
res.cookies:返回cookie信息
res.encoding:返回编码格式
res.headers:返回响应头
res.request.url:返回请求路径
res.request.headers:返回请求头
res.request.body:返回请求数据
res.request.method:返回请求方式
4.3、cookie
4.4、session
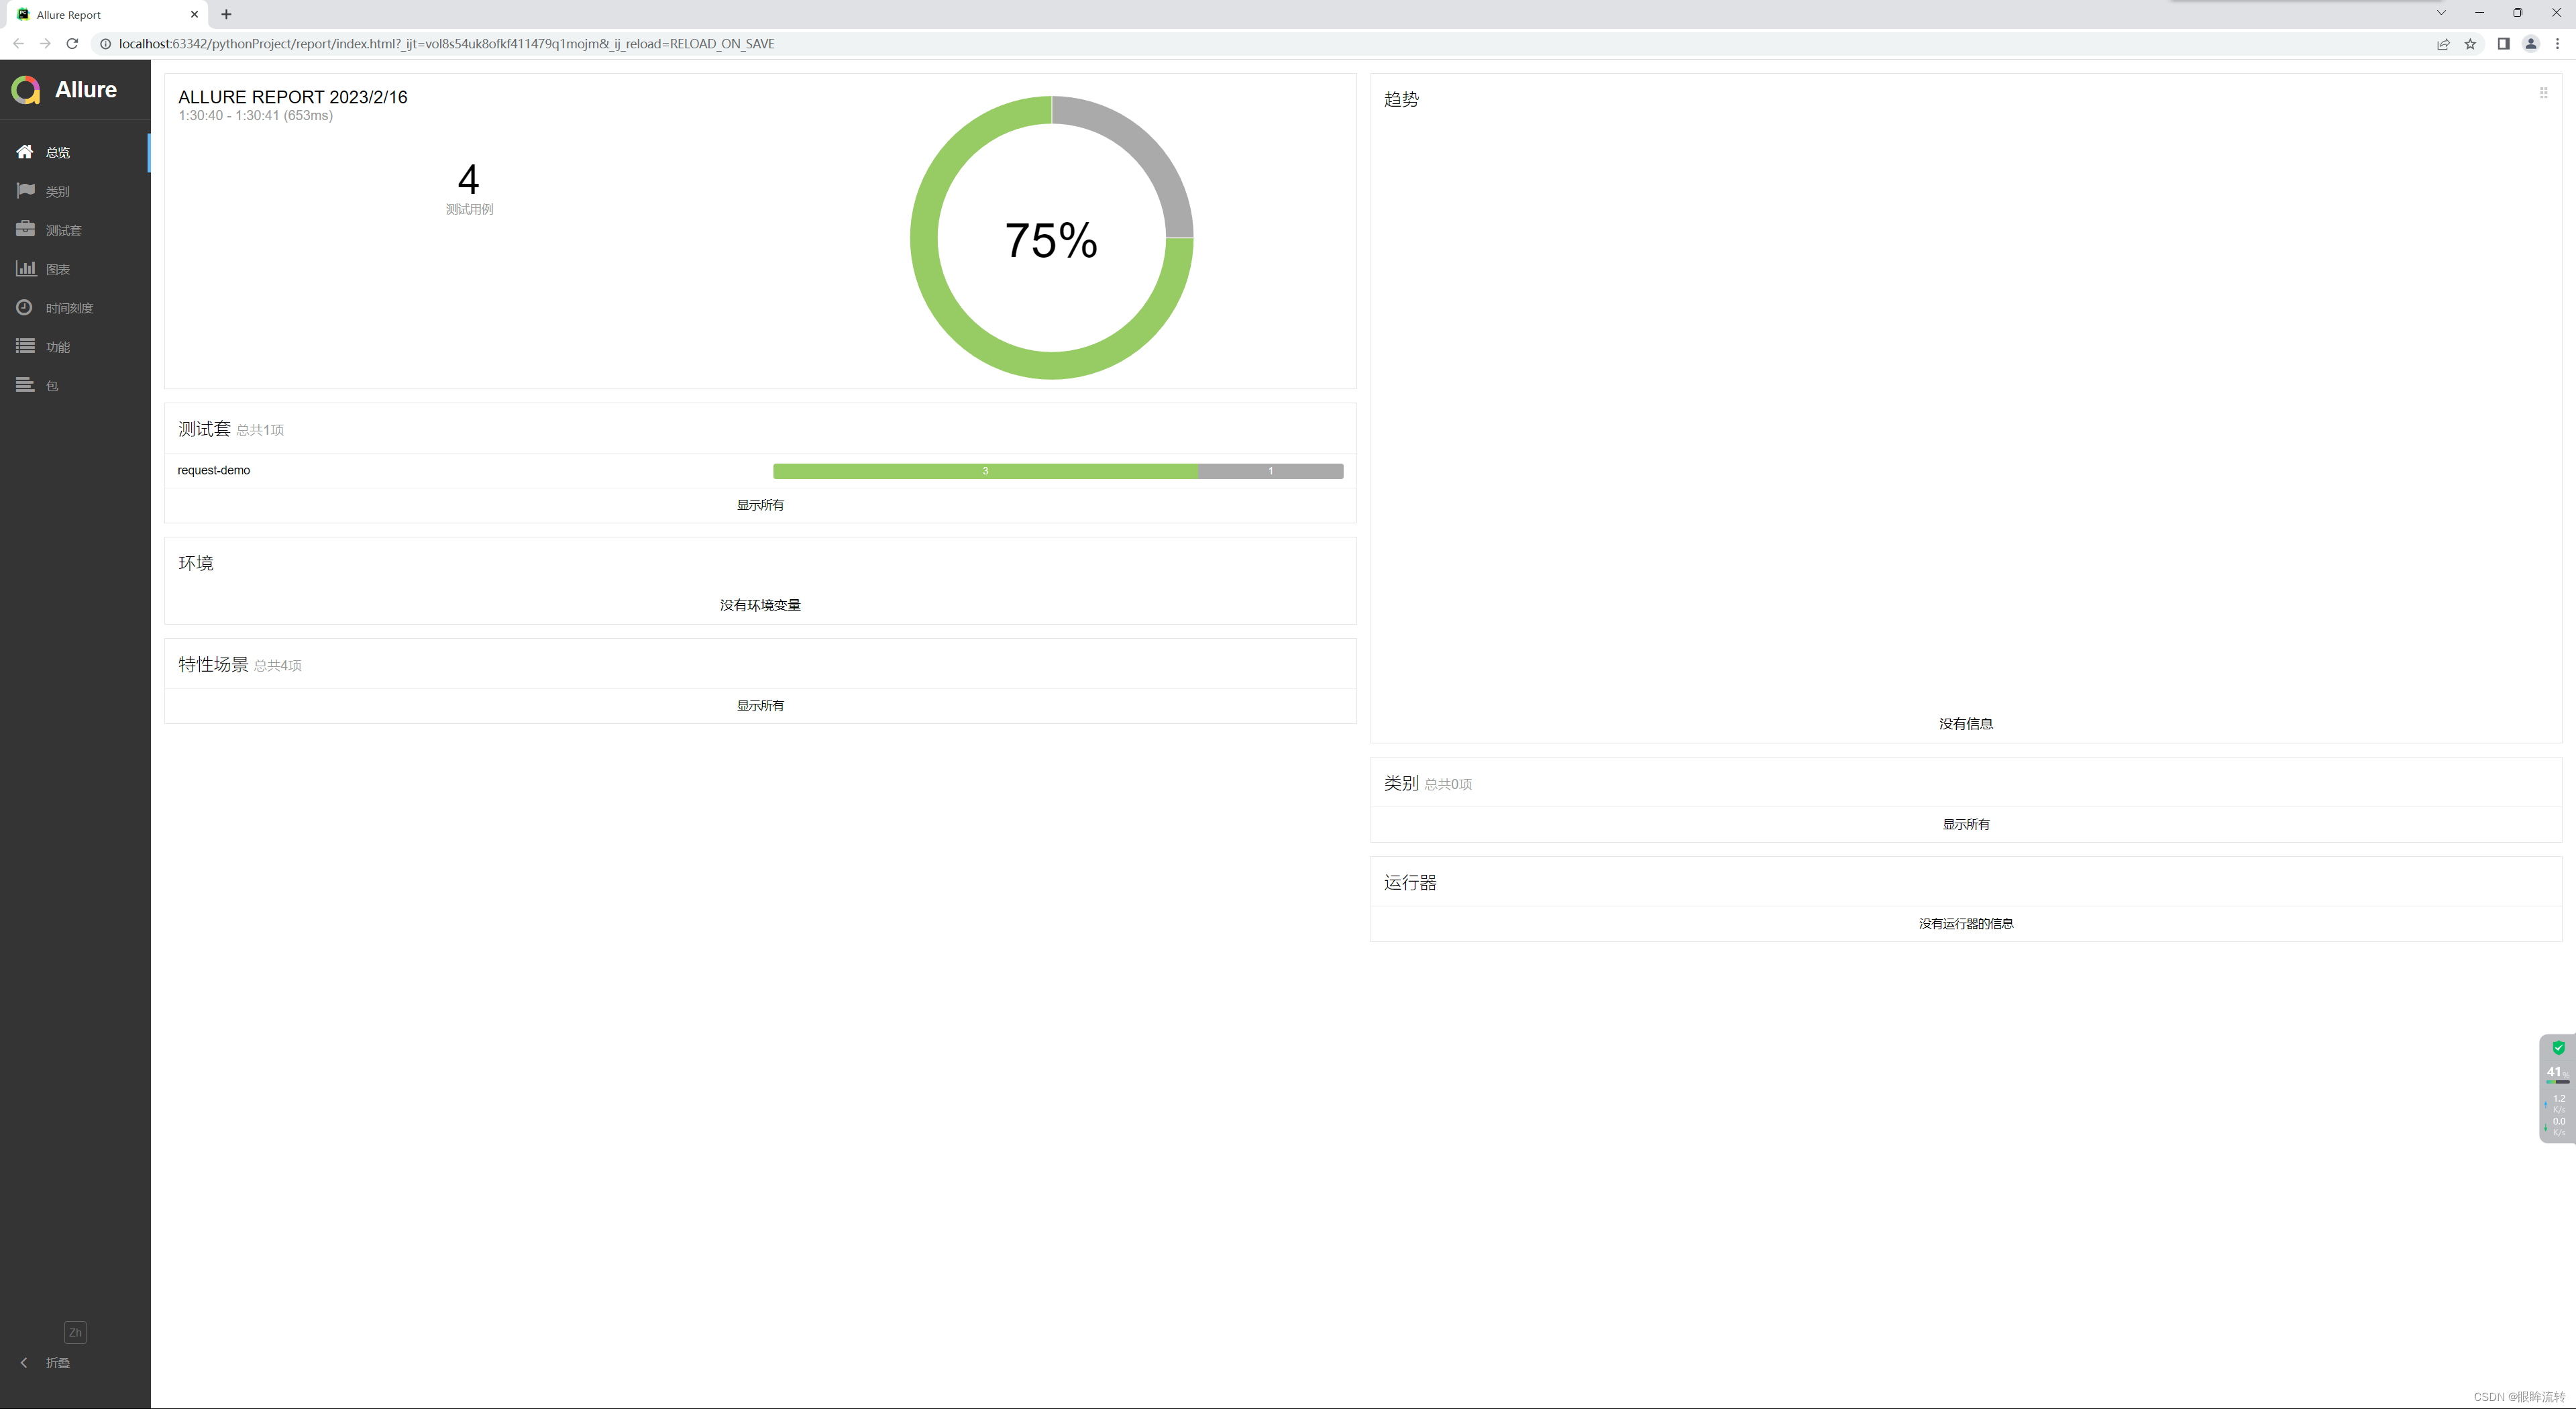
5、allure
生成pytest测试报告
下载地址:https://github.com/allure-framework/allure2/releases
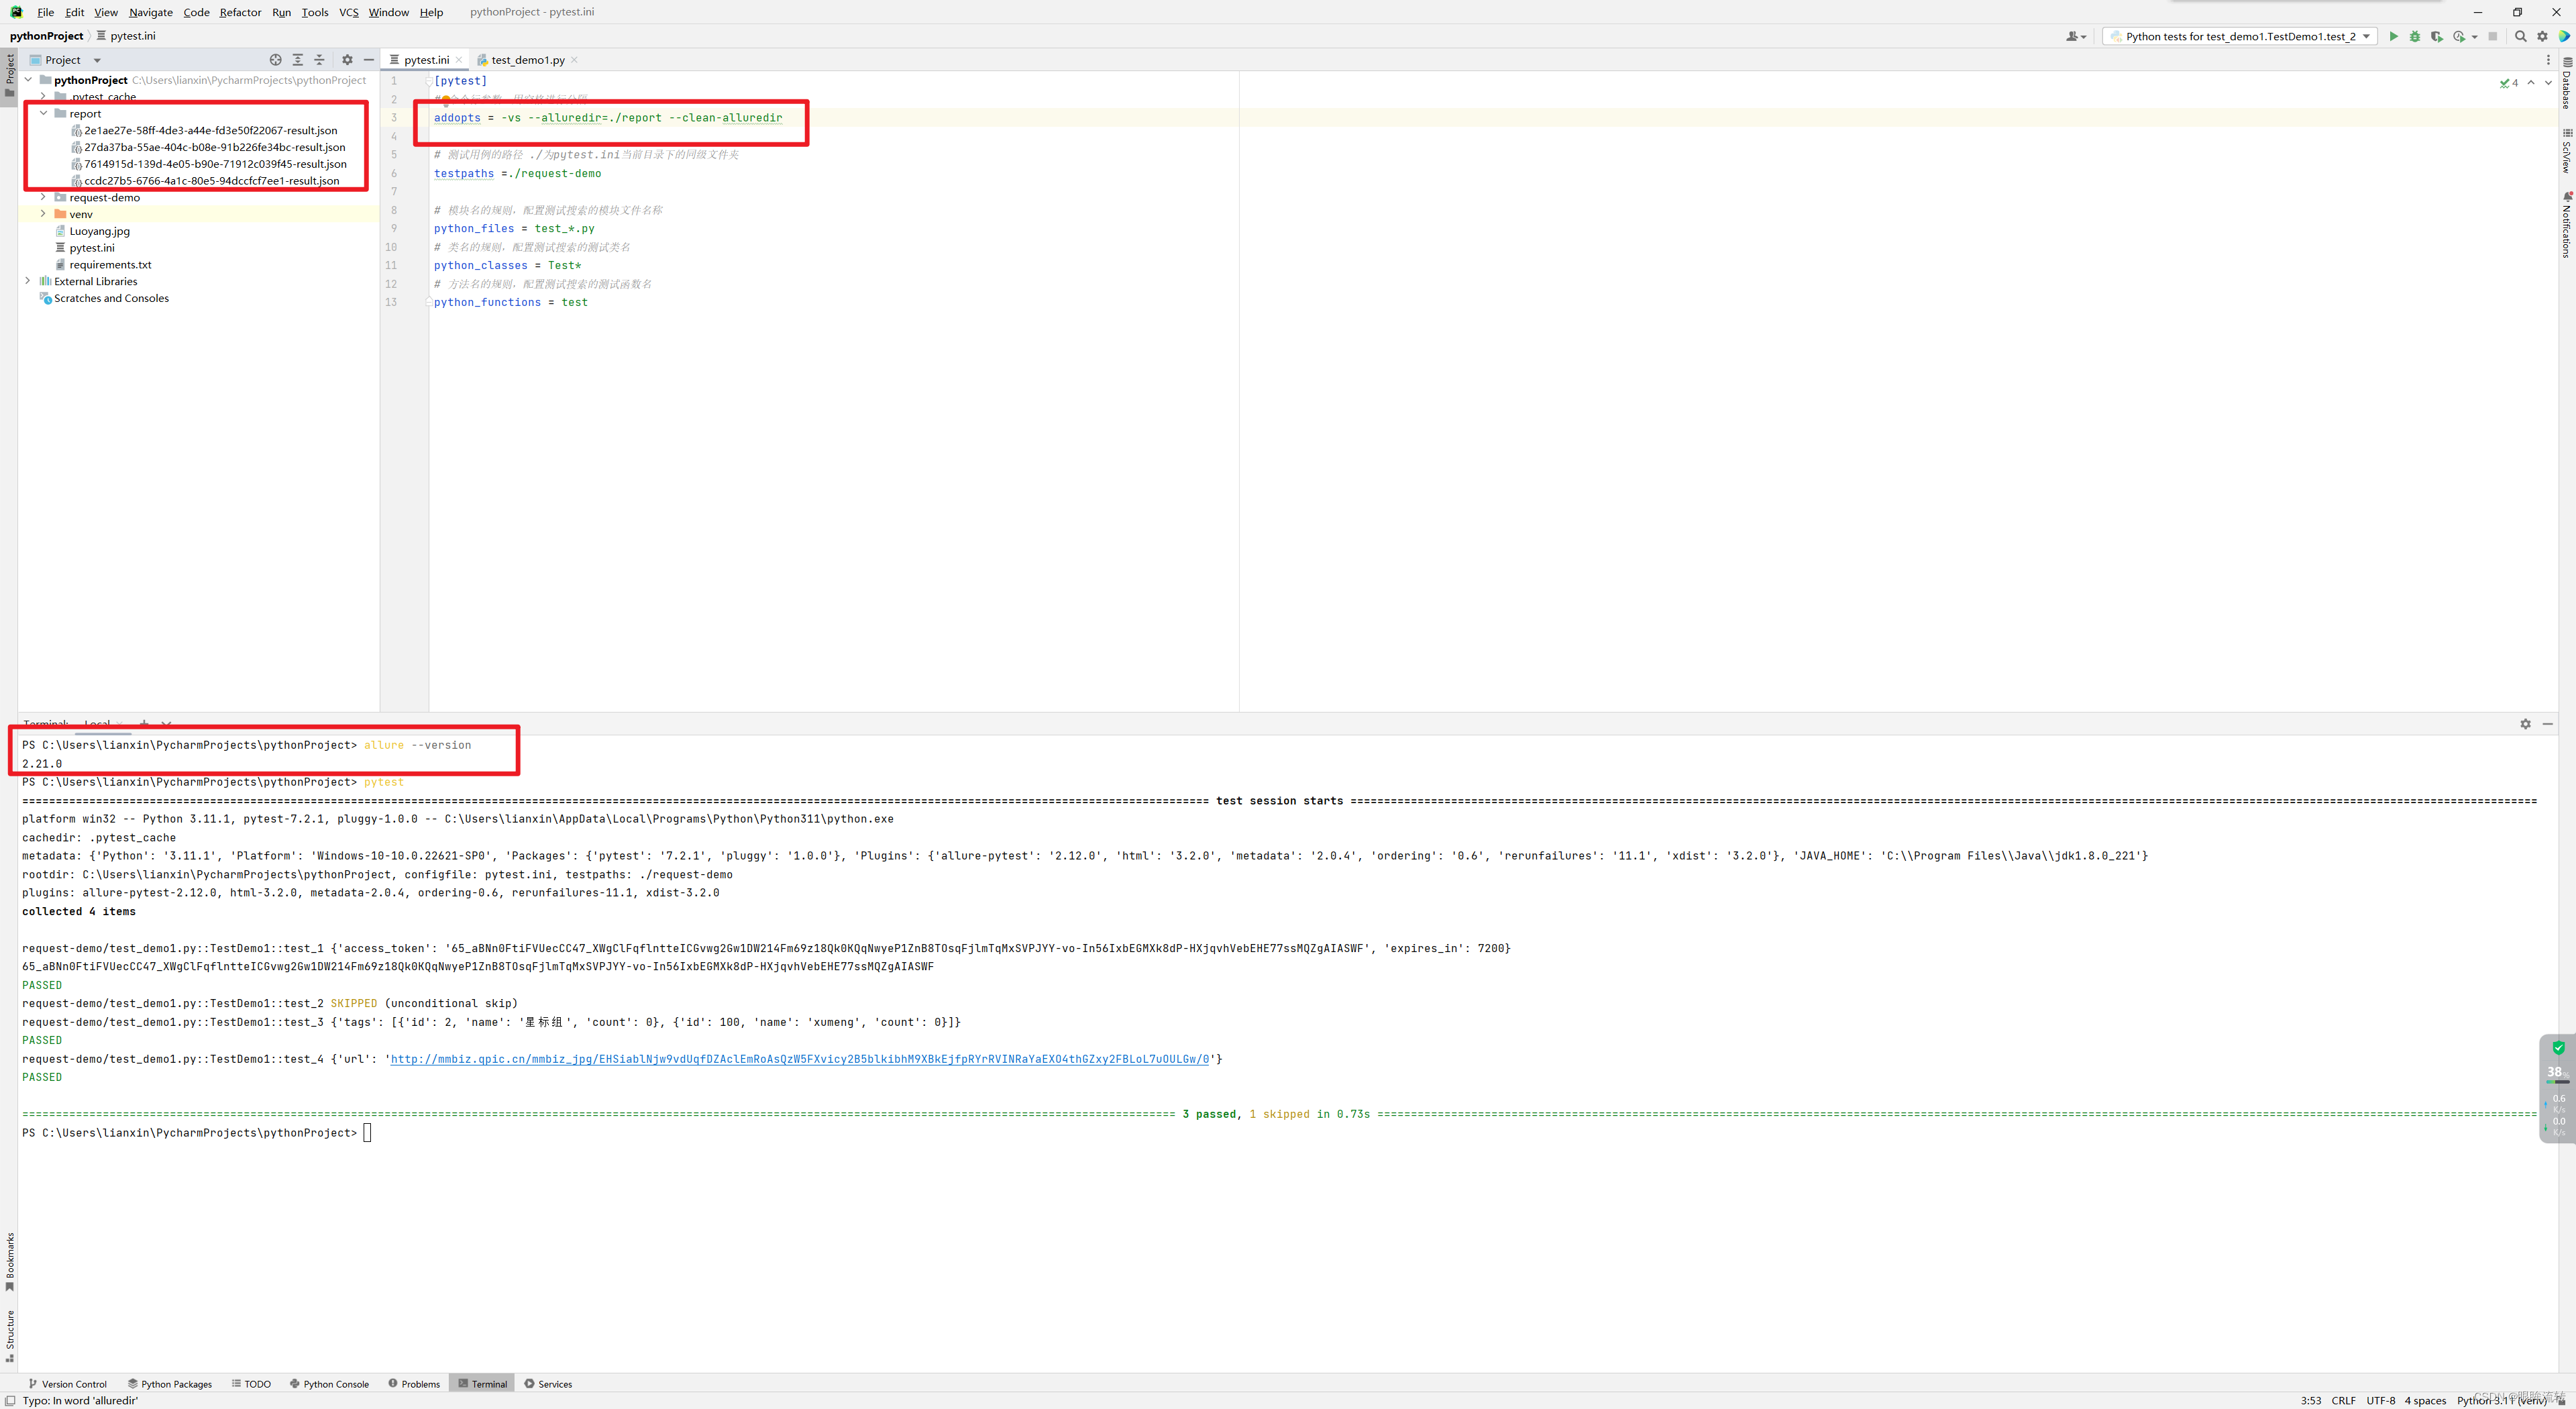
验证是否成功allure --version
5.1、临时报告
[pytest]
# 命令行参数,用空格进行分隔
addopts = -vs --alluredir=./report --clean-alluredir# 测试用例的路径 ./为pytest.ini当前目录下的同级文件夹
testpaths =./request-demo# 模块名的规则,配置测试搜索的模块文件名称
python_files = test_*.py
# 类名的规则,配置测试搜索的测试类名
python_classes = Test*
# 方法名的规则,配置测试搜索的测试函数名
python_functions = test
5.2、正式报告
import os
import timeimport pytestif __name__ == '__main__':pytest.main()time.sleep(3)os.system("allure generate ./temp -o ./report --clean")
6、数据驱动
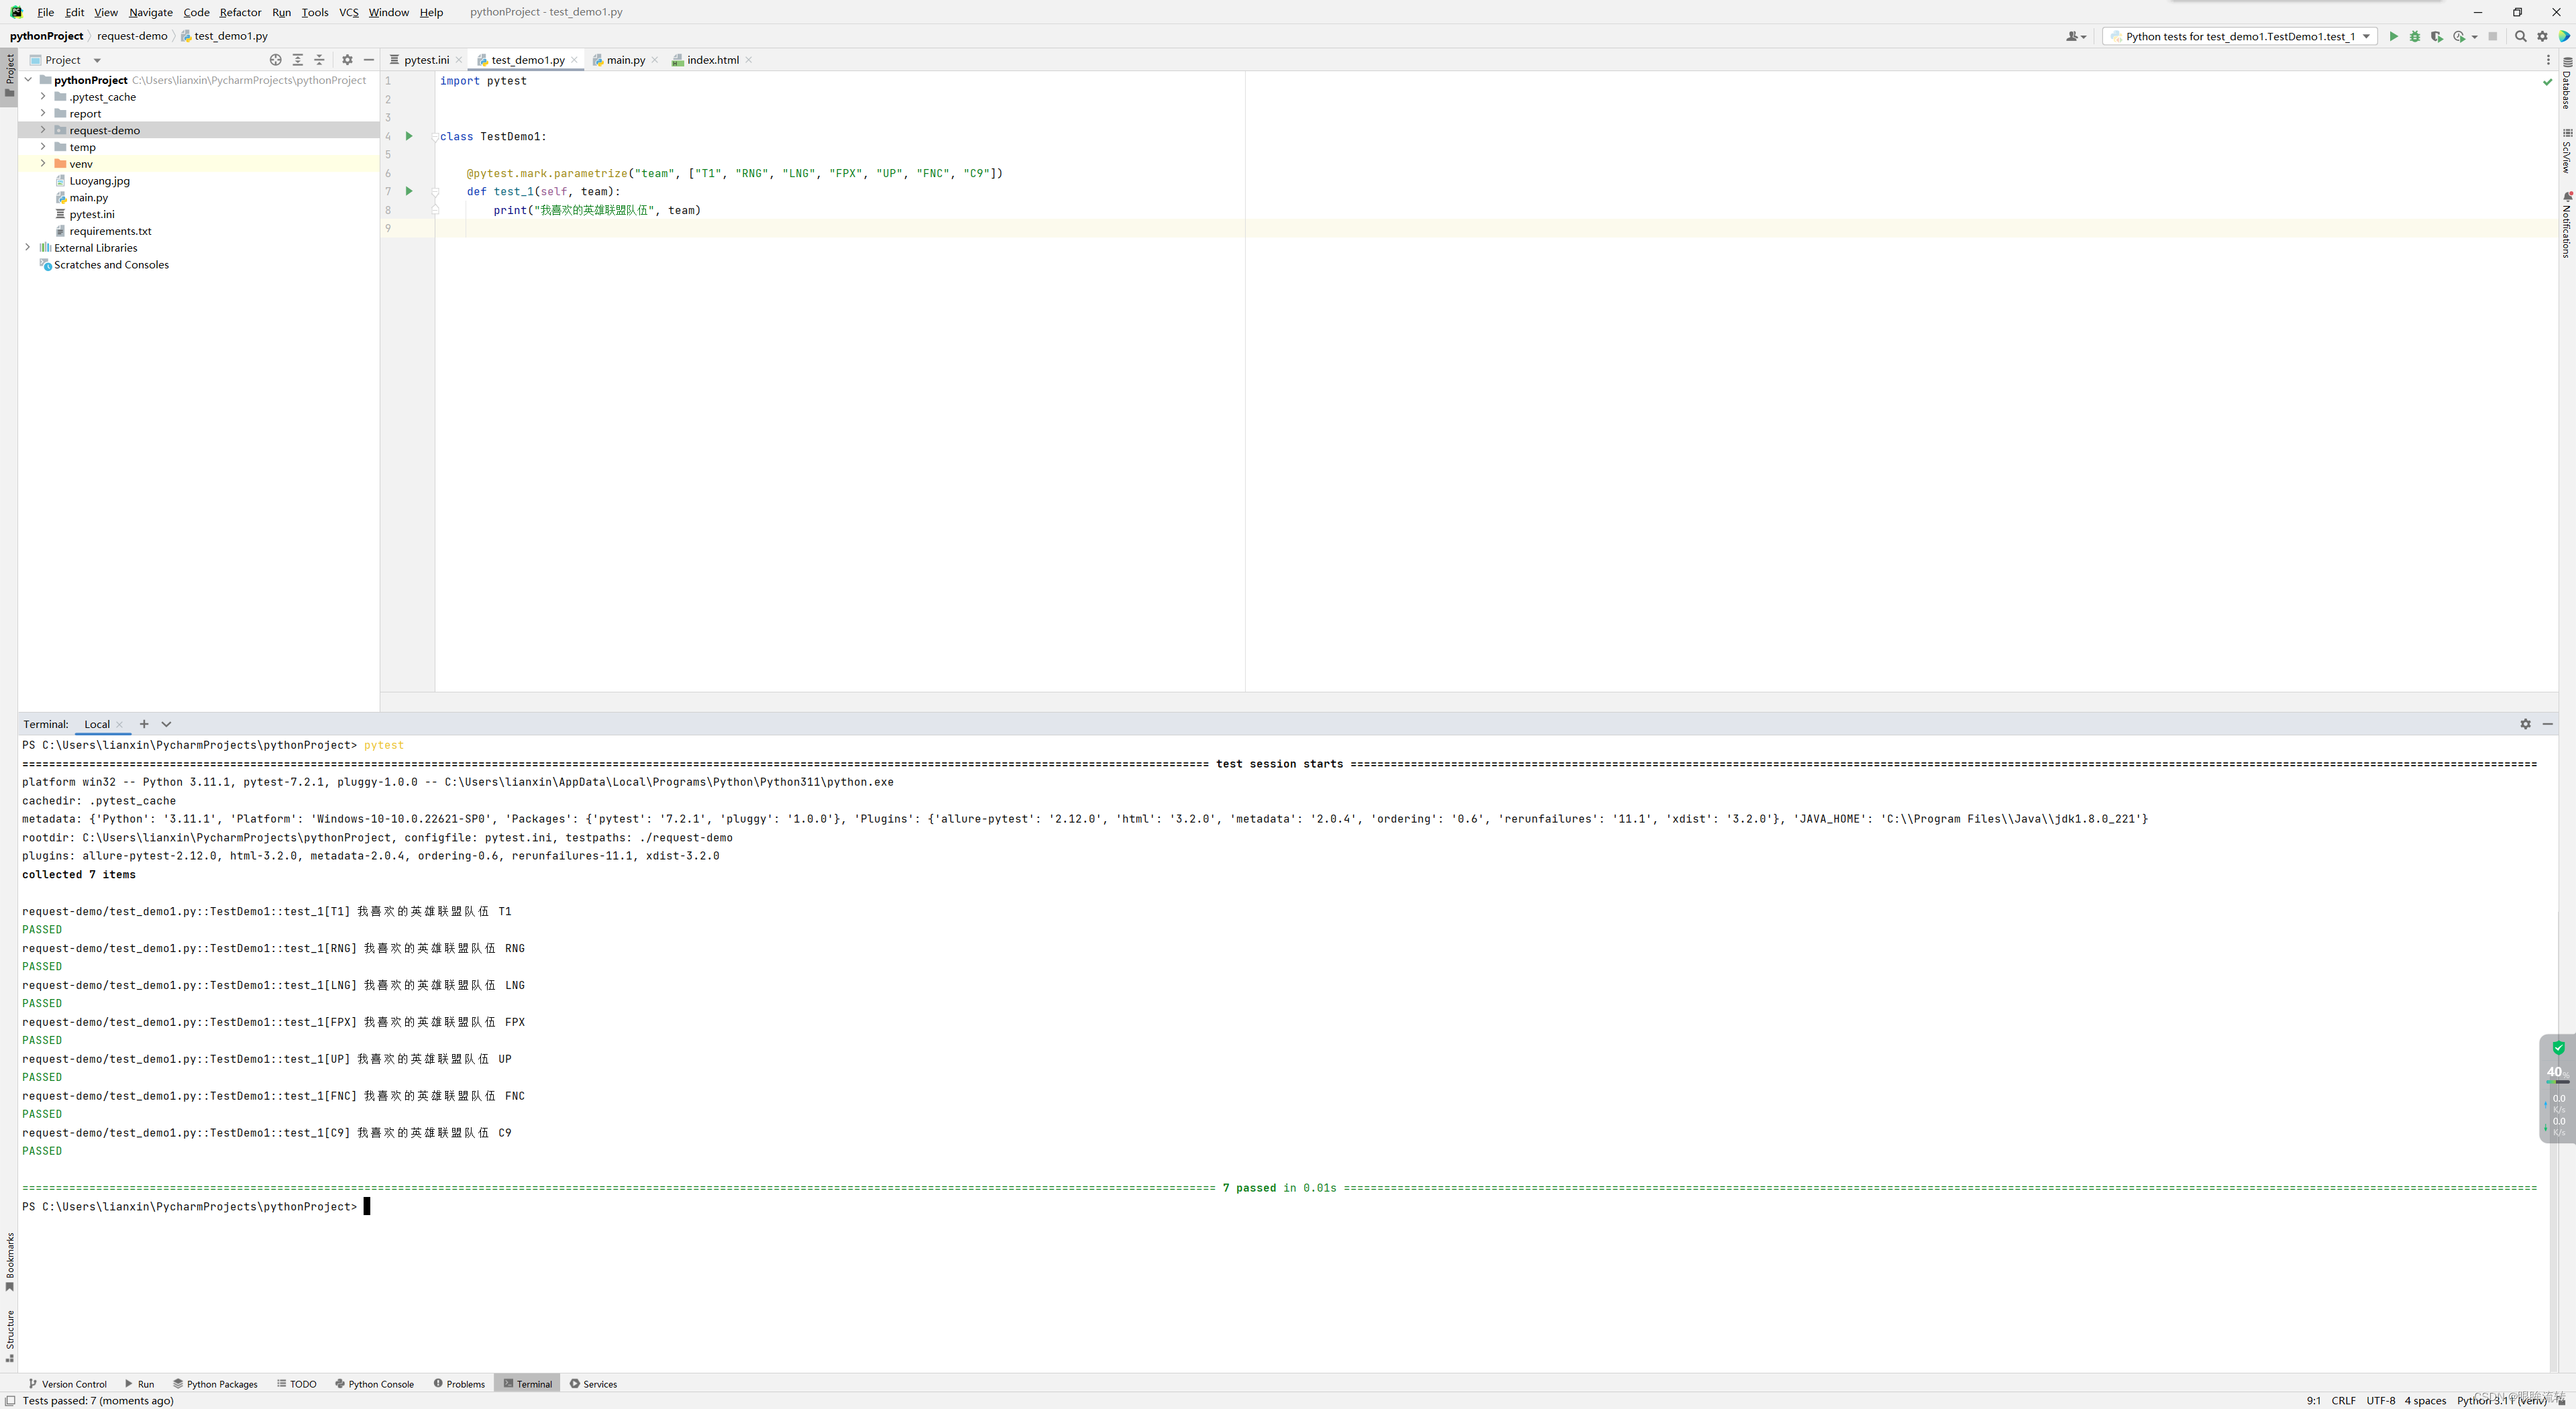
6.1、基础使用
import pytestclass TestDemo1:@pytest.mark.parametrize("team", ["T1", "RNG", "LNG", "FPX", "UP", "FNC", "C9"])def test_1(self, team):print("我喜欢的英雄联盟队伍", team)
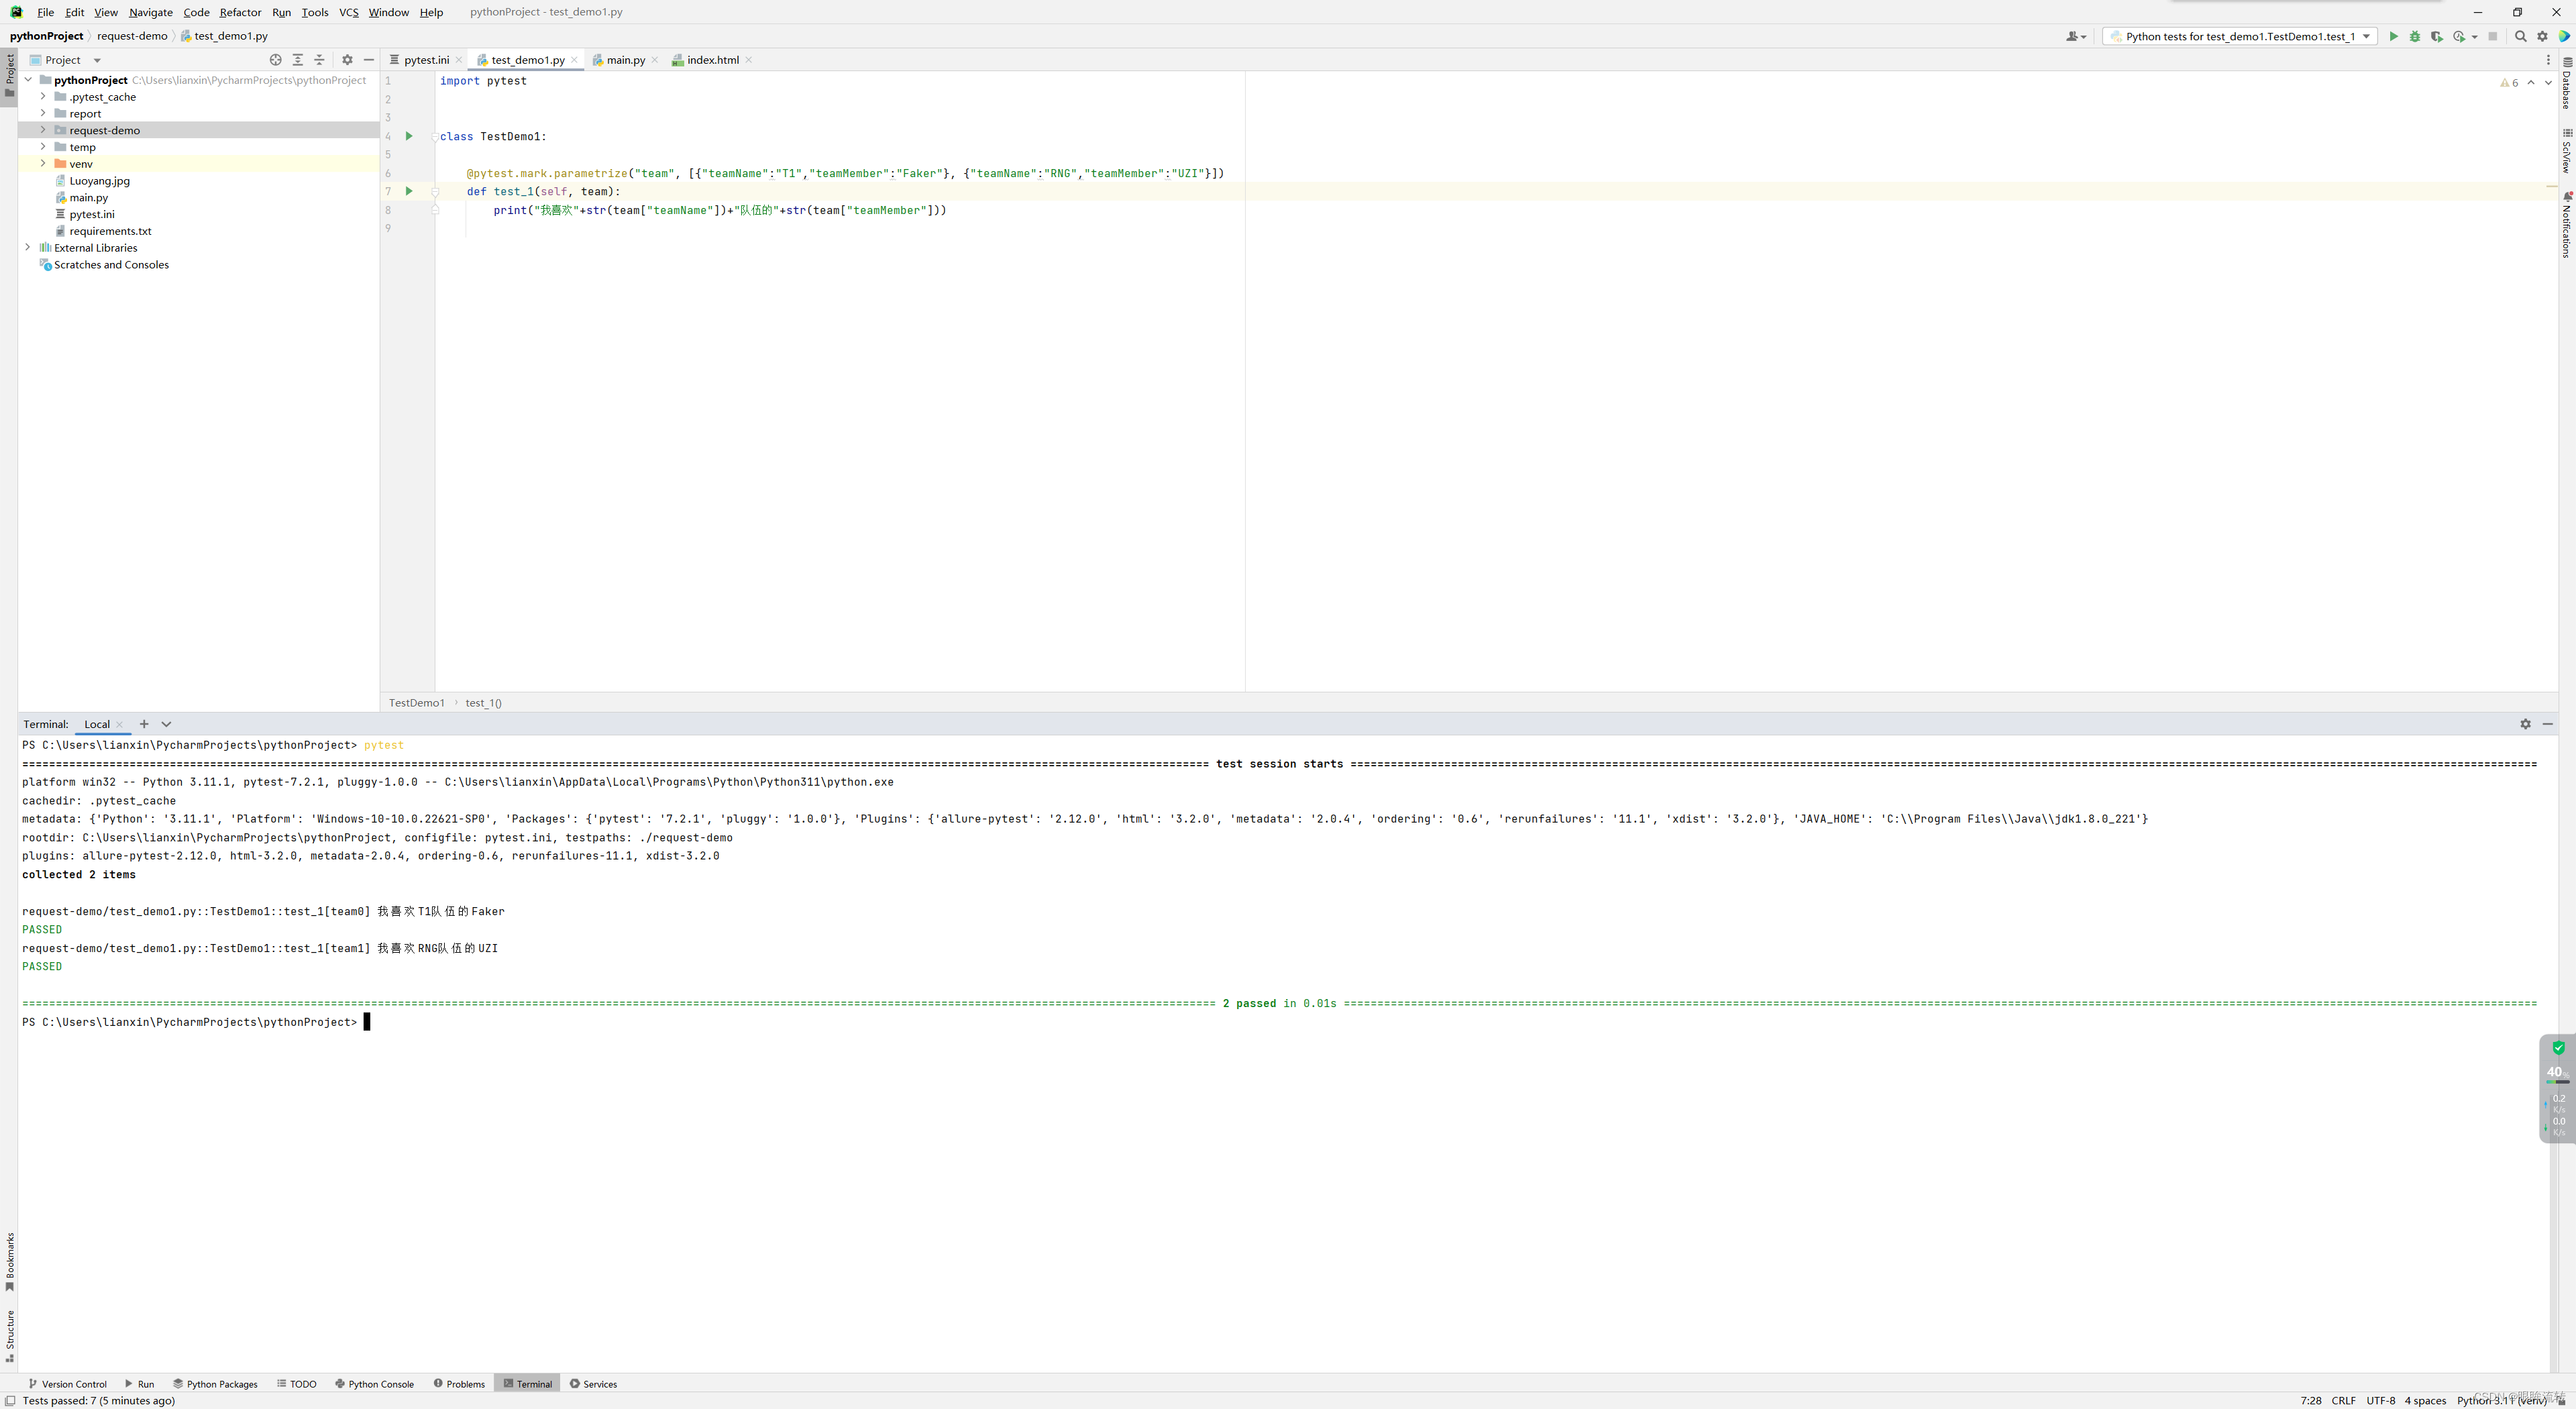
import pytestclass TestDemo1:@pytest.mark.parametrize("team", [{"teamName":"T1","teamMember":"Faker"}, {"teamName":"RNG","teamMember":"UZI"}])def test_1(self, team):print("我喜欢"+str(team["teamName"])+"队伍的"+str(team["teamMember"]))
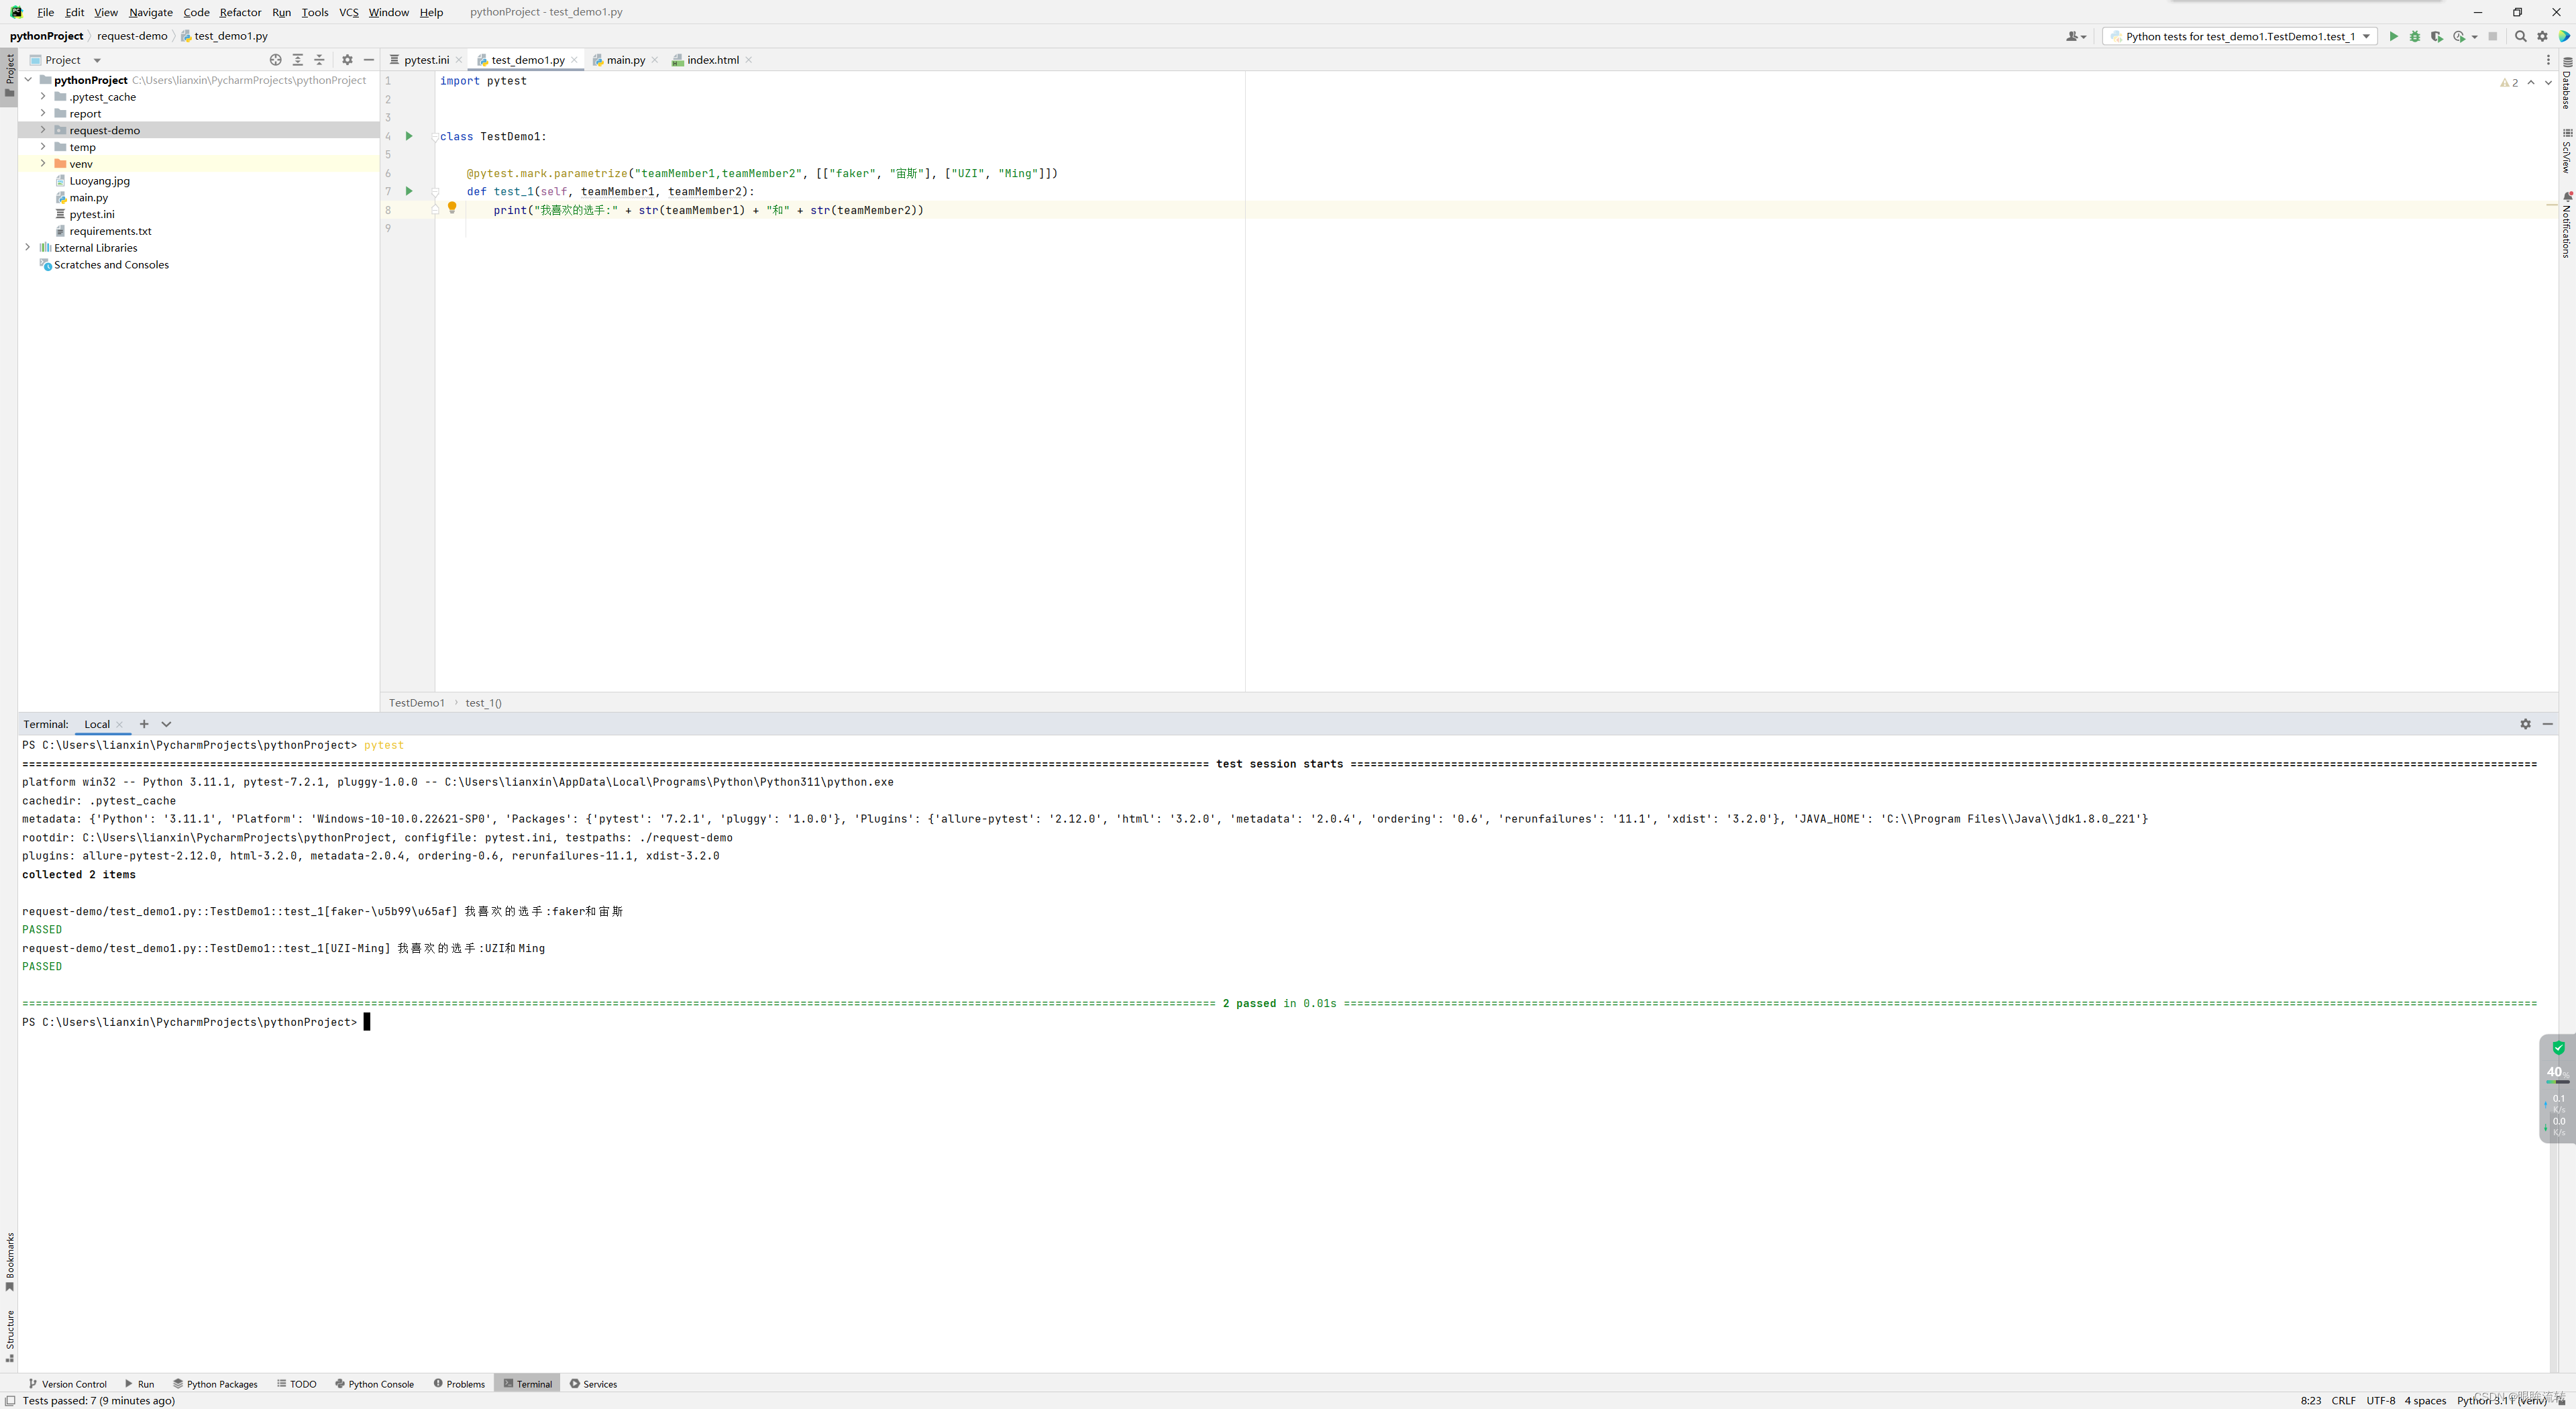
import pytestclass TestDemo1:@pytest.mark.parametrize("teamMember1,teamMember2", [["faker", "宙斯"], ["UZI", "Ming"]])def test_1(self, teamMember1, teamMember2):print("我喜欢的选手:" + str(teamMember1) + "和" + str(teamMember2))
6.2、yaml
yaml详解:https://blog.csdn.net/gyfghh/article/details/119465409
1、yaml读取
yaml
-name: zhangsanage: 20money: 123.5hobbies: baskball,football,volleyballbooks:- book1- book2- book3lotteries: [lottery1,lottery2,lottery3]bankcards: {ICBC: 123456789,ABC: 987654321}pet:name: huahuaage: 2
-name: lisiage: 20money: 123.5hobbies: baskball,football,volleyballbooks:- book1- book2- book3lotteries: [lottery1,lottery2,lottery3]bankcards: {ICBC: 123456789,ABC: 987654321}pet:name: huahuaage: 2
安装依赖
pip install pyyaml
load_yaml.py
import yamldef load_yaml(path):with open(path, mode="r", encoding="utf-8") as file:return yaml.load(stream=file, Loader=yaml.FullLoader)
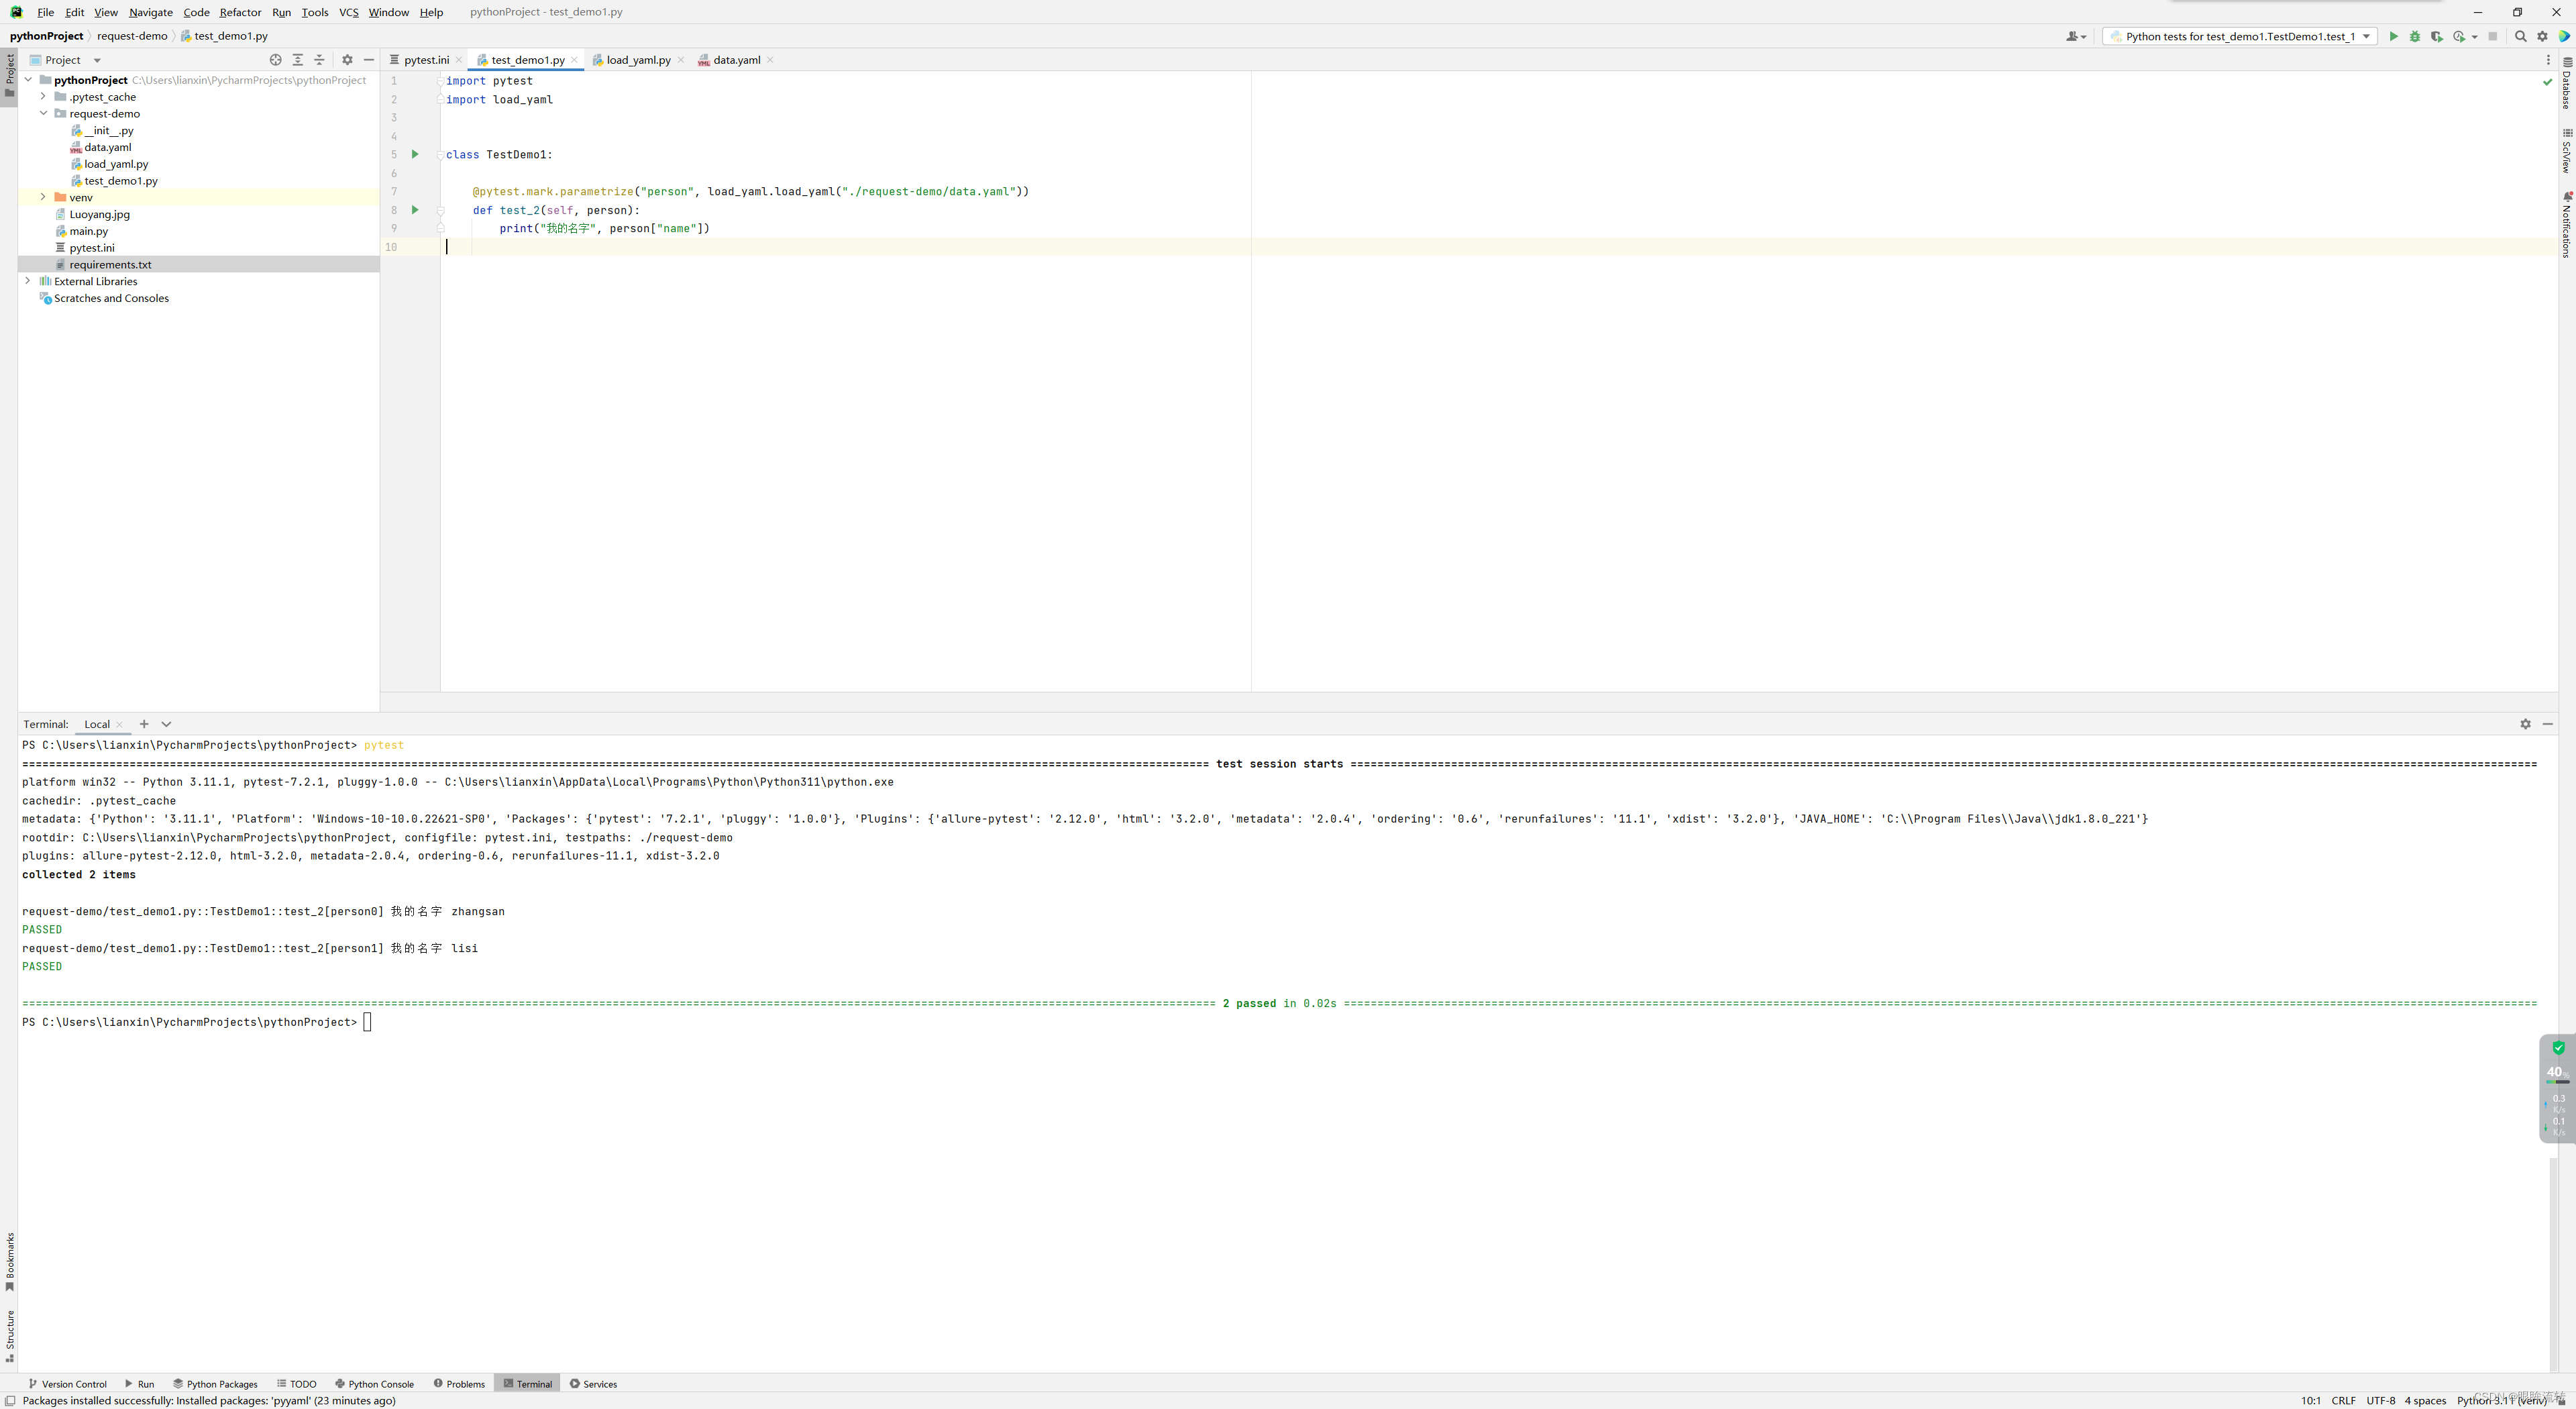
test_demo1.py
import load_yamlclass TestDemo1:def test_1(self):print(load_yaml.load_yaml("./request-demo/data.yaml"))
6.3、yaml配合parametrize
-name: zhangsanage: 20money: 123.5hobbies: baskball,football,volleyballbooks:- book1- book2- book3lotteries: [lottery1,lottery2,lottery3]bankcards: {ICBC: 123456789,ABC: 987654321}pet:name: huahuaage: 2
-name: lisiage: 20money: 123.5hobbies: baskball,football,volleyballbooks:- book1- book2- book3lotteries: [lottery1,lottery2,lottery3]bankcards: {ICBC: 123456789,ABC: 987654321}pet:name: huahuaage: 2
import pytest
import load_yamlclass TestDemo1:@pytest.mark.parametrize("person", load_yaml.load_yaml("./request-demo/data.yaml"))def test_2(self, person):print("我的名字", person["name"])
相关文章:
Pytest学习笔记
Pytest学习笔记 1、介绍 1.1、单元测试 单元测试是指在软件开发当中,针对软件的最小单位(函数,方法)进行正确性的检查测试 1.2、单元测试框架 测试发现:从多个py文件里面去找到我们测试用例测试执行:按…...
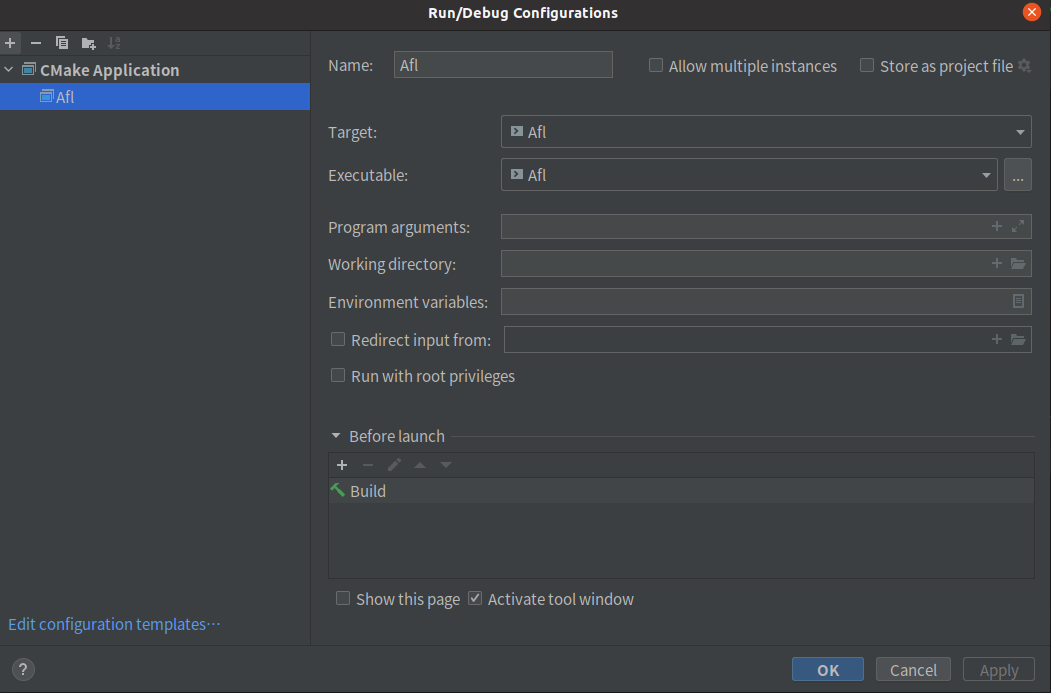
Fuzz概述
文章目录AFL一些概念插桩与覆盖率边和块覆盖率afl自实现劫持汇编器clang内置覆盖率反馈与引导变异遗传算法fork server机制AFL调试准备AFL一些概念 插桩与覆盖率 边和块 首先,要明白边和块的定义 正方形的就是块,箭头表示边,边表示程序执行…...
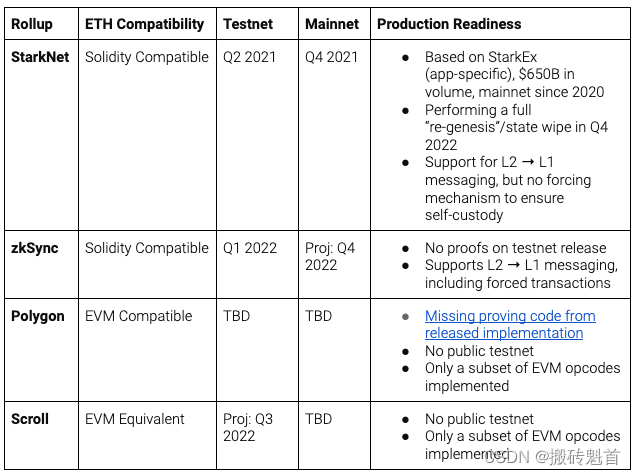
区块链知识系列 - 系统学习EVM(四)-zkEVM
区块链知识系列 - 系统学习EVM(一) 区块链知识系列 - 系统学习EVM(二) 区块链知识系列 - 系统学习EVM(三) 今天我们来聊聊 zkEVM、EVM 兼容性 和 Rollup 是什么? 1. 什么是 Rollup rollup顾名思义,就是把一堆交易卷(rollup)起来…...

Leetcode.2341 数组能形成多少数对
题目链接 Leetcode.2341 数组能形成多少数对 Rating : 1185 题目描述 给你一个下标从 0 开始的整数数组 nums。在一步操作中,你可以执行以下步骤: 从 nums选出 两个 相等的 整数从 nums中移除这两个整数,形成一个 数对 请你在 nums上多次执…...

C++复习笔记10
1. list是可以在常数范围内在任意位置进行插入和删除的序列式容器,并且该容器可以前后双向迭代。 2. list的底层是双向链表结构,双向链表中每个元素存储在互不相关的独立节点中,在节点中通过指针指向其前一个元素和后一个元素。 3. list与for…...
leaflet 纯CSS的marker标记,不用图片来表示(072)
第072个 点击查看专栏目录 本示例的目的是介绍演示如何在vue+leaflet中使用纯CSS来打造marker的标记。这里用到的是L.divIcon来引用CSS来构造新icon,然后在marker的属性中引用。 这里必须要注意的是css需要是全局性质的,不能被scoped转义为其他随机的css。 直接复制下面的 v…...
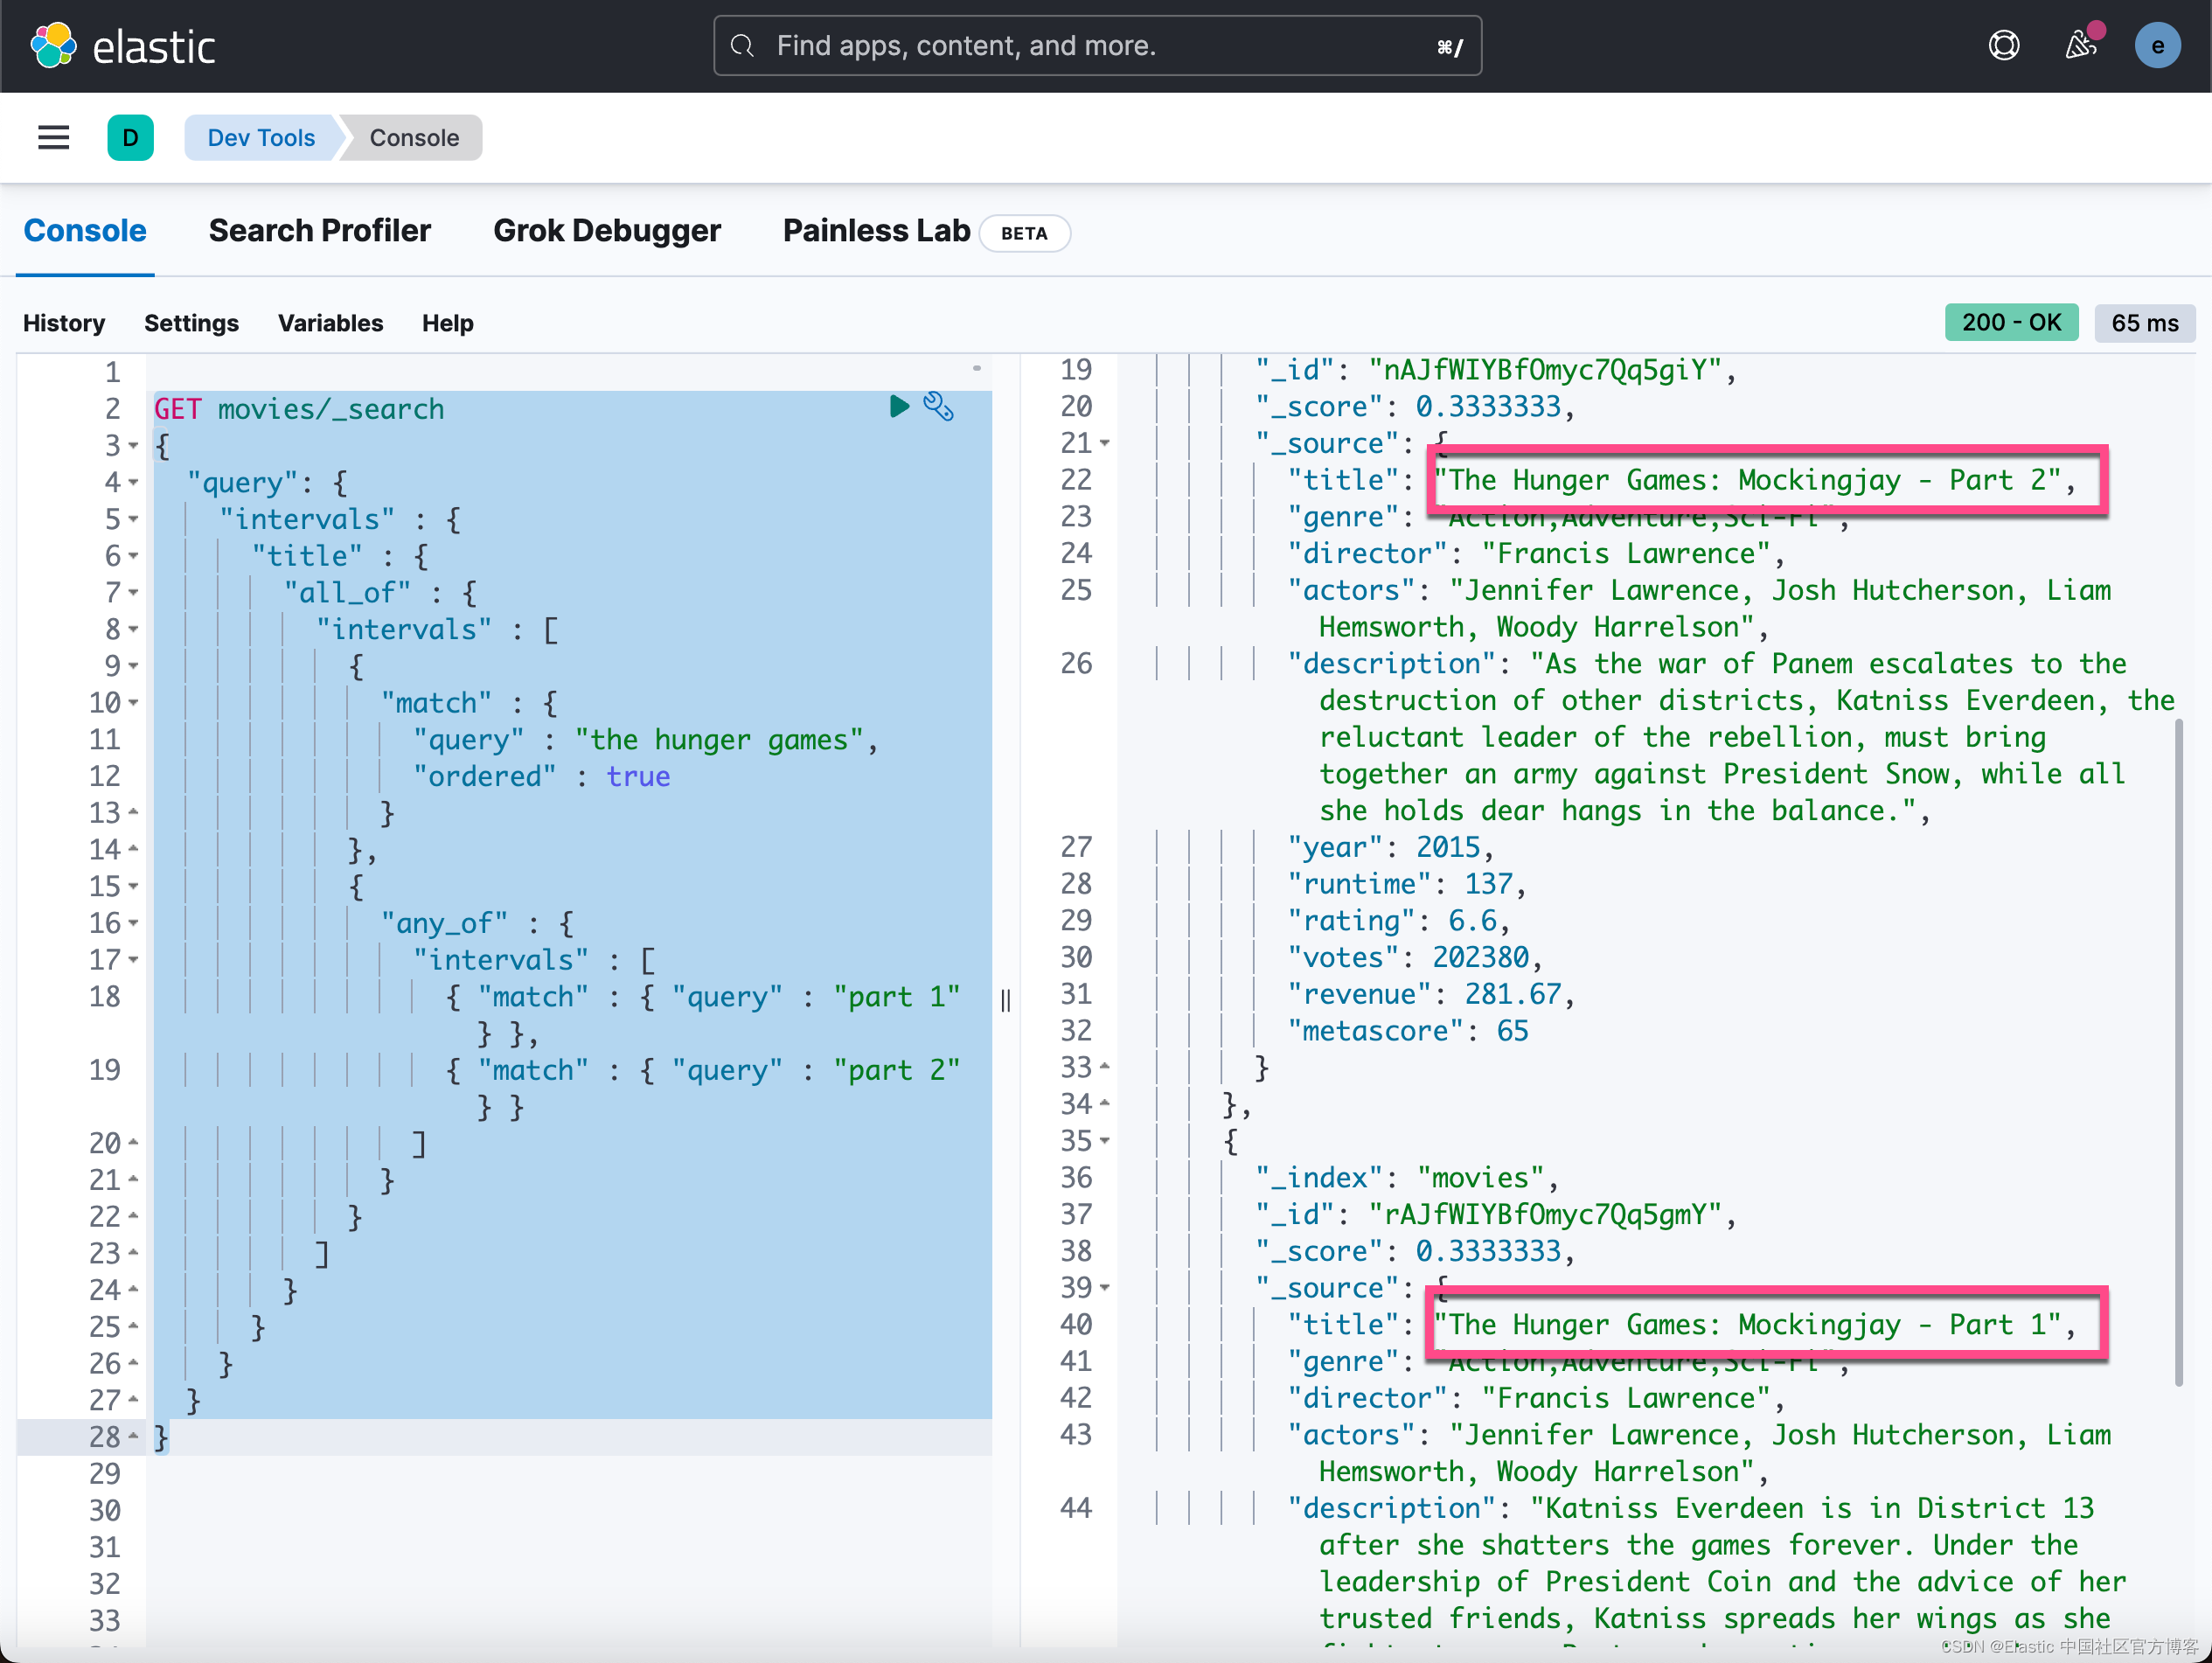
Elasticsearch:使用 intervals query - 根据匹配项的顺序和接近度返回文档
Intervals query 根据匹配项的顺序和接近度返回文档。Intervals 查询使用匹配规则,由一小组定义构成。 然后将这些规则应用于指定字段中的术语。 这些定义产生跨越文本正文中的术语的最小间隔序列。 这些间隔可以通过父源进一步组合和过滤。 上述描述有点费解。我…...
无法决定博客主题的人必看!如何选择类型和推荐的 5 种选择
是否有人不能迈出第一步,因为博客的类型还没有决定?有些人在出发时应该行动,而不是思考,但让我们冷静下来,仔细想想。博客的难度因流派而异,这在很大程度上决定了随后的发展。因此,在选择博客流…...

数字化转型的成功模版,珠宝龙头曼卡龙做对了什么?
2月11日,曼卡龙(300945.SZ)发布2022年业绩快报,报告期内,公司实现营业收入16.11亿元,同比增长28.63%。来源:曼卡龙2022年度业绩快报曼卡龙能在2022年实现营收增长尤为不易。2022年受疫情影响&am…...

转换矩阵、平移矩阵、旋转矩阵关系以及python实现旋转矩阵、四元数、欧拉角之间转换
文章目录1. 转换矩阵、平移矩阵、旋转矩阵之间的关系2. 缩放变换、平移变换和旋转变换2. python实现旋转矩阵、四元数、欧拉角互相转化由于在平时总是或多或少的遇到平移旋转的问题,每次都是现查资料,然后查了忘,忘了继续查,这次弄…...
中国地图航线图(echarjs)
1、以上为效果图 需要jq、echarjs、china.json三个文件支持。以上 2、具体代码 DOM部分 <!-- 服务范围 GO--> <div class"m-maps"><div id"main" style"width:1400px;height: 800px; margin: 0 auto;"> </div> <!-…...
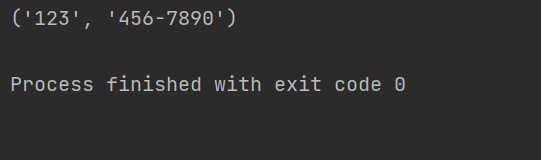
Python正则表达式中group与groups的用法详解
本文主要介绍了Python正则表达式中group与groups的用法详解,文中通过示例代码介绍的非常详细,对大家的学习或者工作具有一定的参考学习价值,需要的朋友们下面随着小编来一起学习学习吧目录在Python中,正则表达式的group和groups方…...

c++练习题7
1.下列运算符中优先级最高的是 A)> B) C) && D)! 2.以下关于运算符优先级的描述中,正确的是 。 A)!(逻辑非&#x…...

MySQL学习
目录1、数据库定义基本语句(1)数据库操作(2)数据表操作2.数据库操作SQL语句(1)插入数据(2)更新语句(3)删除数据3.数据库查询语句(1)基…...

C语言(强制类型转换)
一.类型转换原则 1.升级:当类型转换出现在表达式时,无论时unsigned还是signed的char和short都会被自动转换成int,如有必要会被转换成unsigned int(如果short与int的大小相同,unsigned short就比int大。这种情况下,uns…...

搭建hadoop高可用集群(二)
搭建hadoop高可用集群(一)配置hadoophadoop-env.shworkerscore-site.xmlhdfs-site.xmlmapred-site.xmlyarn-site.xml/etc/profile拷贝集群首次启动1、先启动zk集群(自动化脚本)2、在hadoop151,hadoop152,hadoop153启动JournalNode…...

CentOS升级内核-- CentOS9 Stream/CentOS8 Stream/CentOS7
官方文档在此 升级原因 当我们安装一些软件(对,我说的就是Kubernetes),可能需要新内核的支持,而CentOS又比较保守,不太升级,所以需要我们手工升级. # 看下目前是什么版本内核 uname -a# 安装公钥 rpm --import https://www.elrepo.org/RPM-GPG-KEY-elrepo.org# 添加仓库,如果…...

【基础篇】一文掌握css的盒子模型(margin、padding)
1、CSS 盒子模型(Box Model) 所有HTML元素可以看作盒子,在CSS中,"box model"这一术语是用来设计和布局时使用。CSS盒模型本质上是一个盒子,封装周围的HTML元素,它包括:边距,边框,填充,和实际内容。盒模型允许我们在其它元素和周围元素边框之间的空间放置元素…...
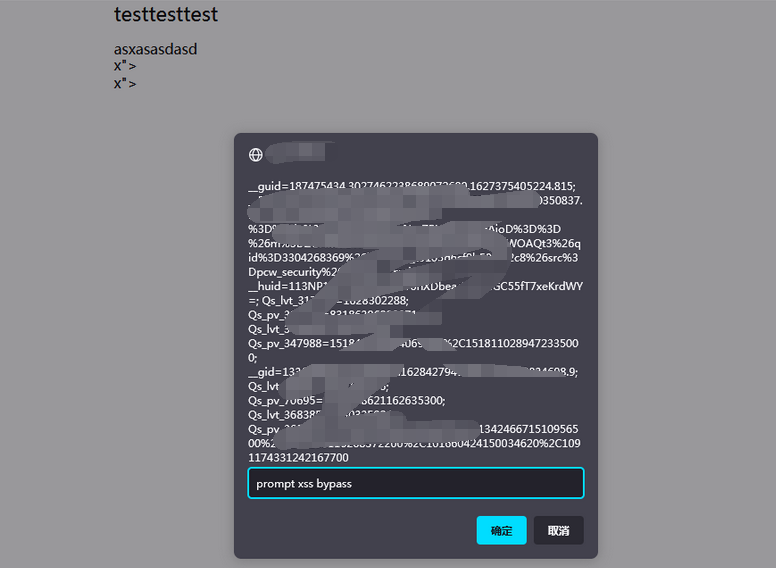
重生之我是赏金猎人-漏洞挖掘(十一)-某SRC储存XSS多次BypassWAF挖掘
0x01:利用编辑器的超链接组件导致存储XSS 鄙人太菜了,没啥高质量的洞呀,随便水一篇文章吧。 在月黑风高的夜晚,某骇客喊我起床挖洞,偷瞄了一下发现平台正好出活动了,想着小牛试刀吧 首先信息收集了一下&a…...

Wails简介
https://wails.io/zh-Hans/docs/introduction 简介 Wails 是一个可让您使用 Go 和 Web 技术编写桌面应用的项目。 将它看作为 Go 的快并且轻量的 Electron 替代品。 您可以使用 Go 的灵活性和强大功能,结合丰富的现代前端,轻松的构建应用程序。 功能…...

Windows平台Android开发环境自动化部署:ADB与Fastboot驱动智能安装工具技术解析
Windows平台Android开发环境自动化部署:ADB与Fastboot驱动智能安装工具技术解析 【免费下载链接】Latest-adb-fastboot-installer-for-windows A Simple Android Driver installer tool for windows (Always installs the latest version) 项目地址: https://gitc…...
:高级分块策略——Parent-Child 与 Contextual Retrieval)
RAG 系列(十二):高级分块策略——Parent-Child 与 Contextual Retrieval
分块的两难困境 RAG 系统里有一个经典矛盾: Chunk 太小:向量匹配精准,但返回给 LLM 的内容是片段,缺乏上下文,无法完整回答问题 Chunk 太大:内容完整,但语义太分散,embedding 质量下降,检索命中率降低 这不是调参能解决的问题,而是 Naive 分块的结构性缺陷。 小块适…...

3分钟掌握:如何用WeChatMsg永久保存你的数字记忆?
3分钟掌握:如何用WeChatMsg永久保存你的数字记忆? 【免费下载链接】WeChatMsg 提取微信聊天记录,将其导出成HTML、Word、CSV文档永久保存,对聊天记录进行分析生成年度聊天报告 项目地址: https://gitcode.com/GitHub_Trending/w…...

ABAQUS多孔介质渗流分析保姆级教程:从渗透系数设置到Soil分析步详解
ABAQUS多孔介质渗流分析实战指南:从零搭建渗流模型 第一次打开ABAQUS进行多孔介质分析时,面对密密麻麻的参数选项,大多数工程师都会感到无从下手。渗流分析作为岩土工程、生物力学等领域的基础仿真需求,其核心难点不在于理论复杂度…...

告别复杂配置!5分钟在Vue/React项目中集成讯飞语音听写WebSocket API
5分钟实现Vue/React与讯飞语音听写的优雅集成方案 在智能语音交互逐渐成为标配的今天,前端开发者经常面临将语音识别能力快速集成到现代Web应用中的需求。讯飞语音听写WebSocket API凭借其流式传输、低延迟的特性,成为众多项目的首选方案。但官方示例往往…...

Claude Code用户如何配置Taotoken解决密钥与额度问题
🚀 告别海外账号与网络限制!稳定直连全球优质大模型,限时半价接入中。 👉 点击领取海量免费额度 Claude Code用户如何配置Taotoken解决密钥与额度问题 对于使用Claude Code进行编程辅助的开发者来说,直接使用原厂服务…...

抖音批量下载神器:免费开源工具让你3分钟搞定海量视频收藏
抖音批量下载神器:免费开源工具让你3分钟搞定海量视频收藏 【免费下载链接】douyin-downloader A practical Douyin downloader for both single-item and profile batch downloads, with progress display, retries, SQLite deduplication, and browser fallback s…...

Maya路径动画参数详解:从‘连接到运动路径’到‘世界上方向类型’,彻底搞懂每个选项
Maya路径动画参数深度解析:从基础操作到高级控制 在三维动画制作中,路径动画是一种让对象沿着预定轨迹运动的强大工具。与关键帧动画相比,路径动画特别适合需要精确控制运动轨迹的场景,比如飞行的无人机、行驶的汽车或者摄像机运动…...

为AI Agent构建文件交付通道:OpenClaw File Links Tool部署与集成指南
1. 项目概述:为AI Agent构建专属文件交付通道如果你正在开发或使用AI Agent,比如AutoGPT、Claude Desktop的MCP工具,或者任何需要执行文件操作(如数据分析、文档生成、网页抓取)的自动化程序,那么一个核心痛…...

FunClip终极指南:3步掌握AI智能视频剪辑的完整秘诀
FunClip终极指南:3步掌握AI智能视频剪辑的完整秘诀 【免费下载链接】FunClip Open-source, accurate and easy-to-use video speech recognition & clipping tool, LLM based AI clipping intergrated. 项目地址: https://gitcode.com/GitHub_Trending/fu/Fun…...