flutter开发实战-flutter二维码条形码扫一扫功能实现
flutter开发实战-flutter二维码条形码扫一扫功能实现
flutter开发实战-flutter二维码扫一扫功能实现,要使用到摄像头的原生的功能,使用的是插件:scan
效果图如下

一、扫一扫插件scan
# 扫一扫scan: ^1.6.0
1.1 iOS权限设置
<key>NSCameraUsageDescription</key>
<string>Your Description</string><key>io.flutter.embedded_views_preview</key>
<string>YES</string>
1.2 android权限设置
<uses-permission android:name="android.permission.CAMERA" /><application><meta-dataandroid:name="flutterEmbedding"android:value="2" />
</application>
1.3 使用ScanView的widget
ScanController controller = ScanController();
String qrcode = 'Unknown';Container(width: 250, // custom wrap sizeheight: 250,child: ScanView(controller: controller,
// custom scan area, if set to 1.0, will scan full areascanAreaScale: .7,scanLineColor: Colors.green.shade400,onCapture: (data) {// do something},),
),
扫一扫Widget使用ScanController来做响应的控制
暂停/恢复camera
controller.pause();
controller.resume();
识别图片的二维码结果
String result = await Scan.parse(imagePath);
闪光灯切换
controller.toggleTorchMode();
二、代码实现
实现自定义扫码的appBar
class QrScanAppBar extends StatefulWidget {const QrScanAppBar({Key? key,required this.toolbarHeight,this.elevation,this.backgroundColor,this.leadingWidget,this.trailingWidget,this.centerWidget,this.brightness,this.padding, this.barPadding,}) : super(key: key);final double toolbarHeight;final double? elevation;final Color? backgroundColor;final Widget? leadingWidget;final Widget? trailingWidget;final Widget? centerWidget;final Brightness? brightness;final EdgeInsetsGeometry? padding;final EdgeInsetsGeometry? barPadding;State<QrScanAppBar> createState() => _QrScanAppBarState();
}class _QrScanAppBarState extends State<QrScanAppBar> {Widget build(BuildContext context) {final SystemUiOverlayStyle overlayStyle =widget.brightness == Brightness.dark? SystemUiOverlayStyle.light: SystemUiOverlayStyle.dark;Widget leadingWidget = (widget.leadingWidget ?? Container());Widget centerWidget = (widget.centerWidget ?? Container());Widget trailingWidget = (widget.trailingWidget ?? Container());return AnnotatedRegion<SystemUiOverlayStyle>(//套AnnotatedRegion是为了增加状态栏控制value: overlayStyle,child: Material(//套Material是为了增加elevationelevation: widget.elevation ?? 0,color: Colors.transparent,child: Container(padding: widget.padding,height: widget.toolbarHeight + ScreenUtil().statusBarHeight,decoration: BoxDecoration(color: widget.backgroundColor,),child: Column(mainAxisAlignment: MainAxisAlignment.center,crossAxisAlignment: CrossAxisAlignment.center,children: [Container(height: ScreenUtil().statusBarHeight,),Expanded(child: Container(padding: widget.barPadding,height: widget.toolbarHeight,alignment: Alignment.center,child: Row(mainAxisAlignment: MainAxisAlignment.center,crossAxisAlignment: CrossAxisAlignment.center,children: [Container(height: widget.toolbarHeight,child: leadingWidget,),Expanded(child: Container(alignment: Alignment.center,height: widget.toolbarHeight,child: centerWidget,),),Container(height: widget.toolbarHeight,child: trailingWidget,),],),),)],),),),);}
}
实现扫一扫界面
class QrScanPage extends StatefulWidget {const QrScanPage({Key? key, this.arguments}) : super(key: key);final Object? arguments;State<QrScanPage> createState() => _QrScanPageState();
}class _QrScanPageState extends State<QrScanPage> {ScanController scanController = ScanController();String qrcode = 'Unknown';bool torchOn = false;void initState() {// TODO: implement initStatesuper.initState();}void dispose() {// TODO: implement disposescanController.pause();super.dispose();}void changedTorchMode() {scanController.toggleTorchMode();if (torchOn == true) {torchOn = false;} else {torchOn = true;}setState(() {});}void refreshScan() {scanController.resume();}// controller.resume();// controller.pause();// String result = await Scan.parse(imagePath);Widget build(BuildContext context) {return Scaffold(body: Stack(children: [buildQrScanView(context),Positioned(child: buildAppBar(context),),],),);}Widget buildQrScanView(BuildContext context) {double width = MediaQuery.of(context).size.width;double height = MediaQuery.of(context).size.height;double scanW = width * 0.75;double scanMY = (height - scanW) / 2.0 + scanW + 15.0;return Container(alignment: Alignment.center,child: Stack(alignment: Alignment.center,children: [ScanView(controller: scanController,// custom scan area, if set to 1.0, will scan full areascanAreaScale: 0.75,scanLineColor: Colors.green.shade400,onCapture: (data) {// do somethingLoggerManager().debug("onCapture:${data}");openQrScanWebPage(data);},),Positioned(top: scanMY,child: buildOption(context, scanMY),),],),);}Widget buildAppBar(BuildContext context) {return QrScanAppBar(toolbarHeight: 44.0,backgroundColor: Colors.transparent,padding: EdgeInsets.symmetric(horizontal: 10.0),barPadding: EdgeInsets.symmetric(vertical: 4.0),leadingWidget: Container(alignment: Alignment.center,child: QrscanButton(bgColor: ColorUtil.hexColor(0xA9A9A9),bgHighlightedColor: ColorUtil.hexColor(0xf0f0f0),borderColor: Colors.transparent,onPressed: () {navigatorBack();},borderRadius: 18.0,height: 36.0,width: 36.0,child: ImageHelper.wrapAssetAtImages("icons/ic_scan_navback.png",width: 36.0,height: 36.0,fit: BoxFit.fill,),),),centerWidget: Text(S.of(context).qrScan,textAlign: TextAlign.center,softWrap: true,style: TextStyle(fontSize: 17,color: ColorUtil.hexColor(0xffffff),fontWeight: FontWeight.w600,fontStyle: FontStyle.normal,decoration: TextDecoration.none,),),trailingWidget: Container(width: 32.0,height: 32.0,),);}Widget buildOption(BuildContext context, double originY) {return Container(height: ScreenUtil().screenHeight - originY,width: ScreenUtil().screenWidth,child: Column(mainAxisAlignment: MainAxisAlignment.center,crossAxisAlignment: CrossAxisAlignment.center,children: [Container(width: 300.0,child: Text(S.of(context).qrScanBottomTip,textAlign: TextAlign.center,softWrap: true,style: TextStyle(fontSize: 15,fontWeight: FontWeight.w500,fontStyle: FontStyle.normal,color: Colors.white,decoration: TextDecoration.none,),),),SizedBox(height: 25.0,),buildButtons(context),Expanded(child: Container(),),],),);}Widget buildButtons(BuildContext context) {return Row(mainAxisAlignment: MainAxisAlignment.center,crossAxisAlignment: CrossAxisAlignment.center,children: [Padding(padding: EdgeInsets.symmetric(horizontal: 20.0),child: QrscanButton(bgColor: ColorUtil.hexColor(0x35fb99),bgHighlightedColor: Colors.green.shade400,onPressed: () {changedTorchMode();},width: 100.0,height: 50.0,borderRadius: 25.0,child: Text((torchOn? S.of(context).qrScanTorchOff: S.of(context).qrScanTorchOn),textAlign: TextAlign.center,softWrap: true,style: TextStyle(fontSize: 14,color: ColorUtil.hexColor(0xffffff),fontWeight: FontWeight.w600,fontStyle: FontStyle.normal,decoration: TextDecoration.none,),),),),Padding(padding: EdgeInsets.symmetric(horizontal: 20.0),child: QrscanButton(bgColor: ColorUtil.hexColor(0x35fb99),bgHighlightedColor: Colors.green.shade400,onPressed: () {refreshScan();},width: 100.0,height: 50.0,borderRadius: 25.0,child: Text(S.of(context).qrScanRefresh,textAlign: TextAlign.center,softWrap: true,style: TextStyle(fontSize: 14,color: ColorUtil.hexColor(0xffffff),fontWeight: FontWeight.w600,fontStyle: FontStyle.normal,decoration: TextDecoration.none,),),),),],);}void navigatorBack() {NavigatorPageRouter.pop();}void openQrScanWebPage(String data) {Map<String, dynamic> args = {};args["url"] = data;/// true保留跳转的当前栈 false 不保留NavigatorPageRouter.pushReplacementNamed(RouterName.web,arguments: args,);}
}
三、小结
flutter开发实战-flutter二维码扫一扫功能实现,要使用到摄像头的原生的功能,使用的是插件:scan,实现自定义Appbar。
学习记录,每天不停进步。
相关文章:
flutter开发实战-flutter二维码条形码扫一扫功能实现
flutter开发实战-flutter二维码条形码扫一扫功能实现 flutter开发实战-flutter二维码扫一扫功能实现,要使用到摄像头的原生的功能,使用的是插件:scan 效果图如下 一、扫一扫插件scan # 扫一扫scan: ^1.6.01.1 iOS权限设置 <key>NSCa…...

一篇文章了解Redis分布式锁
Redis分布式锁 什么是分布式锁? redis分布式锁是一种基于redis实现的锁机制,它用于在多并发分布式环境下控制并发访问共享资源。在多个应用程序或是进程访问共享资源时,分布式锁可以确保只有一个进程可以访问该资源,不会发生…...

记录第一次组装电脑遇到的坑
京东装机大师配置清单如下: 主板cpu安装 本次安装拆了两次主板 原因1.主板侧面有个金属板需要从内部安装 2.cpu风扇有个板需要装在主板底下 显卡比较大个要最后装,要不然可能要拆好几次 装系统时候 u盘启动认不出来,他妈的是因为机箱上的usb…...

右键pdf文件没有打印
问题描述 右键点pdf文件,弹出的菜单找不到打印选项。网上找了很多办法,然并卵啊。还是得靠自己慢慢摸索。 原因分析 新安装的win11系统,pdf文件默认可以用windows自带的edge浏览器打开。但是edge浏览器没有能力提供右键打印功能。 解决办法…...

什么是CDN?CDN的原理和作用是什么?
一:什么是CDN CDN全称Content Delivery Network,即内容分发网络。 CDN是Content Delivery Network(内容分发网络)的缩写,是一种利用分布式节点技术,在全球部署服务器,即时地将网站、应用、视频…...
链路传播(Propagate)机制及使用场景
服务间链路追踪传播机制是指在微服务架构中,通过记录和跟踪服务之间的请求和响应信息,来实现对服务间链路的追踪和监控。这种机制可以帮助开发人员快速定位服务间出现的问题,并进行优化和调整。 具体来说,服务间链路追踪传播机制…...

pytorch技巧总结1:学习率调整方法
pytorch技巧总结1:学习率调整方法 前言 这个系列,我会把一些我觉得有用、有趣的关于pytorch的小技巧进行总结,希望可以帮助到有需要的朋友。 免责申明 本人水平有限,若有误写、漏写,请大家温柔的批评指正。 目录…...
谈谈VPN是什么、类型、使用场景、工作原理
作者:Insist-- 个人主页:insist--个人主页 作者会持续更新网络知识和python基础知识,期待你的关注 前言 本文将讲解VPN是什么、以及它的类型、使用场景、工作原理。 目录 一、VPN是什么? 二、VPN的类型 1、站点对站点VPN 2、…...

windows 下载安装Redis,并配置开机自启动
windows 下载安装Redis,并配置开机自启动 1. 下载 地址:https://github.com/tporadowski/redis/releases Redis 支持 32 位和 64 位。这个需要根据你系统平台的实际情况选择,这里我们下载 Redis-x64-xxx.zip压缩包,之后解压 打…...
2. CSS3的新特性
2.1CSS3的现状 ●新增的CSS3特性有兼容性问题, ie9才支持 ●移动端支持优于PC端 ●不断改进中 ●应用相对广泛 ●现阶段主要学习: 新增选择器和盒子模型以及其他特性 CSS3给我们新增了选择器,可以更加便捷,更加自由的选择目标元素: 1.属性选择器 2.结构伪类选择器…...

从零开始训练神经网络
用Keras实现一个简单神经网络 Keras: Keras是由纯python编写的基于theano/tensorflow的深度学习框架。 Keras是一个高层神经网络API,支持快速实验,能够把你的idea迅速转换为结果,如果有如下需 求,可以优先选择Keras&a…...
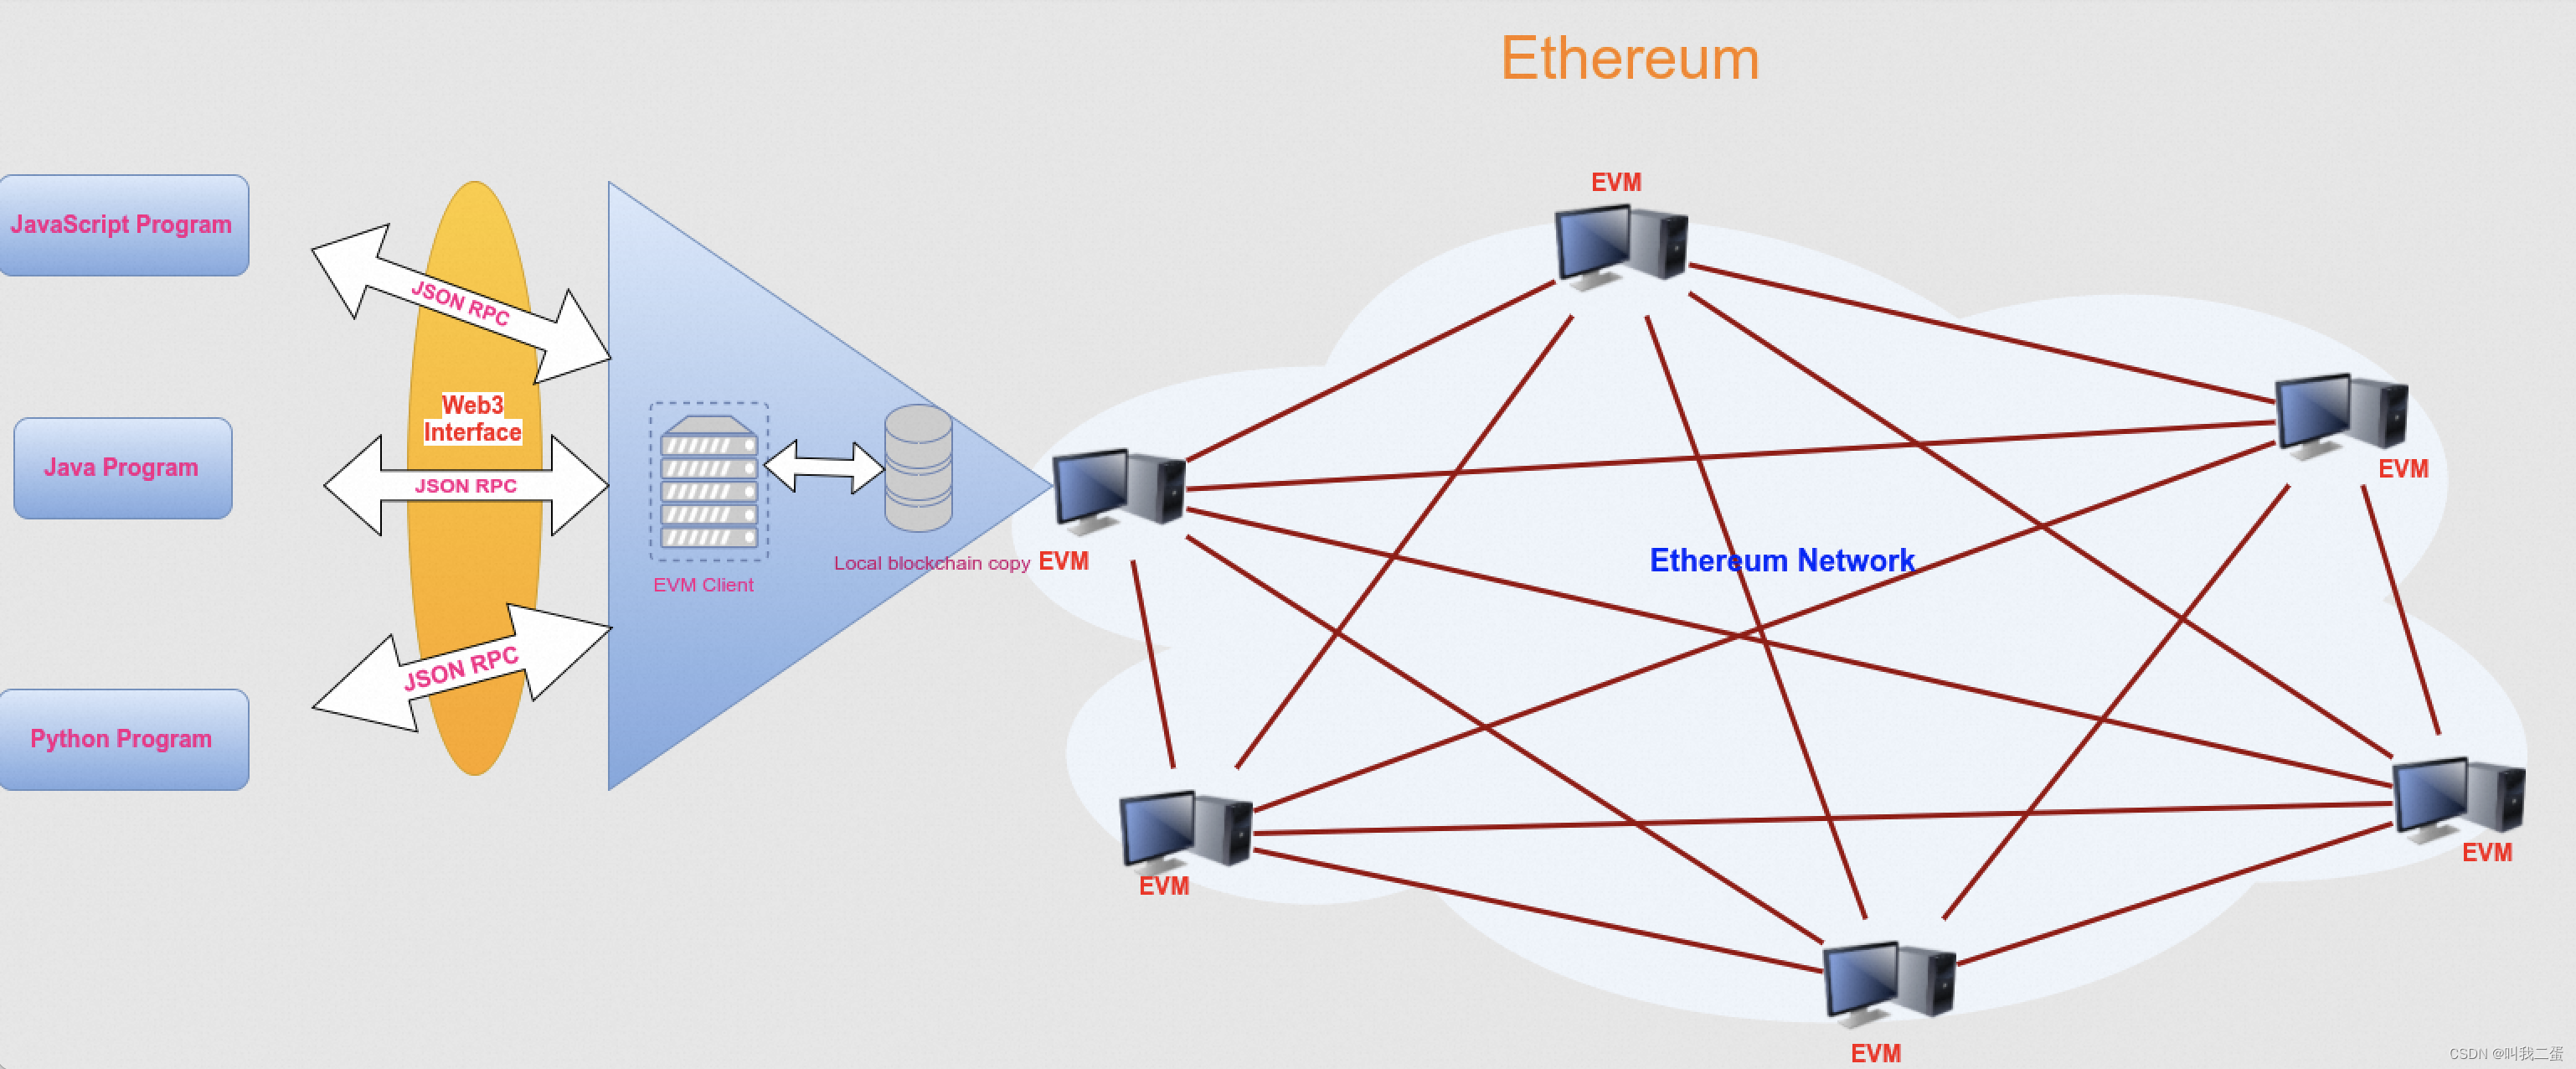
连接区块链节点的 JavaScript 库 web3.js
文章目录 前言web3.js 介绍web3.js安装web3.js库模块介绍连接区块链节点向区块链网络发送数据查询区块链网络数据 前言 通过前面的文章我们可以知道基于区块链开发一个DApp,而DApp结合了智能合约和用户界面(客户端),那客户端是如…...

js:scroll平滑滚动页面或元素到顶部或底部的方案汇总
目录 1、CSS的scroll-behavior2、Element.scrollTop3、Element.scroll()/Window.scroll()4、Element.scrollBy()/Window.scrollBy()5、Element.scrollTo()/Window.scrollTo()6、Element.scrollIntoView()7、自定义兼容性方案8、参考文章 准备知识: scrollWidth: 是…...

【Docker】Docker的部署含服务和应用、多租环境、Linux内核的详细介绍
前言 Docker 是一个开源的应用容器引擎,让开发者可以打包他们的应用以及依赖包到一个可移植的容器中,然后发布到任何流行的Linux或Windows操作系统的机器上,也可以实现虚拟化,容器是完全使用沙箱机制,相互之间不会有任何接口。 📕作者简介:热…...
C国演义 [第五章]
第五章 子集题目理解步骤树形结构递归函数递归结束的条件单层逻辑 代码 子集II题目理解步骤树形结构递归函数递归结束的条件单层逻辑 代码 子集 力扣链接 给你一个整数数组 nums ,数组中的元素 互不相同 。返回该数组所有可能的子集(幂集)。…...
Proxy-Reflect使用详解
1 监听对象的操作 2 Proxy类基本使用 3 Proxy常见捕获器 4 Reflect介绍和作用 5 Reflect的基本使用 6 Reflect的receiver Proxy-监听对象属性的操作(ES5) 通过es5的defineProperty来给对象中的某个参数添加修改和获取时的响应式。 单独设置defineProperty是只能一次设置一…...

【Linux后端服务器开发】Shell外壳——命令行解释器
目录 一、Shell外壳概述 二、描述Shell外壳原理的生动例子 三、C语言模拟实现Shell外壳 一、Shell外壳概述 在狭义上 , 我们称Linux操作系统的内核为 Linux 在广义上 , Linux发行版 Linux内核 外壳程序 就比如市面上现在的redhat, centos, ubuntu等等我们耳熟能详的Linux发…...
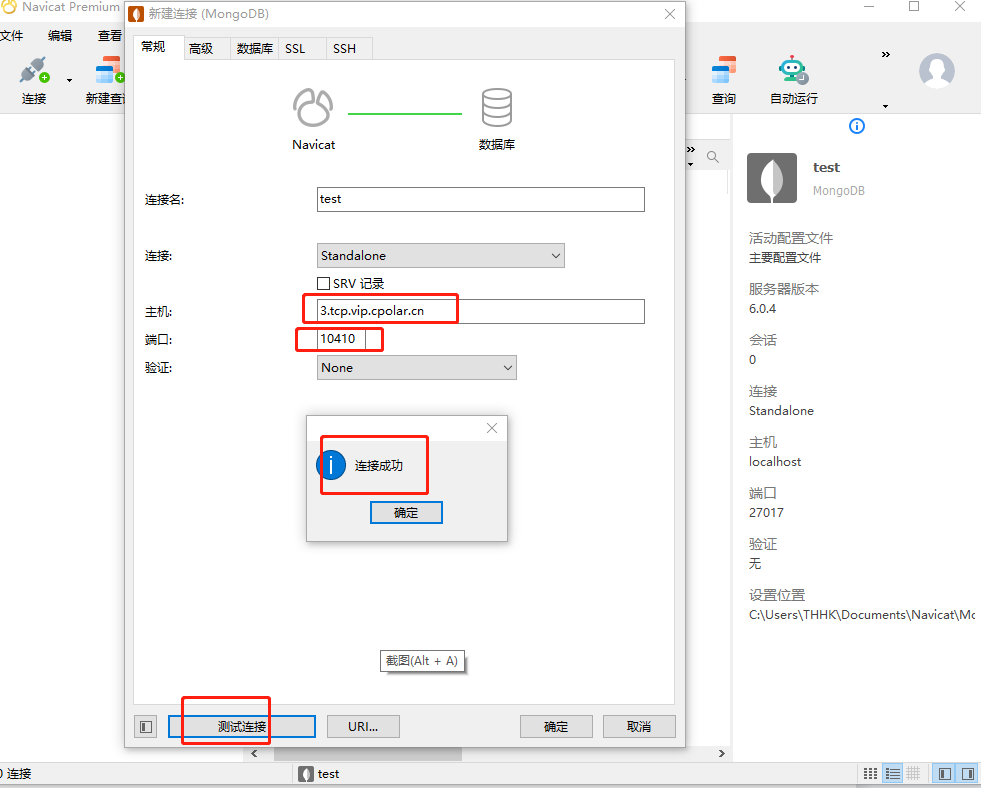
【无公网IP】在外Windows远程连接MongoDB数据库
文章目录 前言1. 安装数据库2. 内网穿透2.1 安装cpolar内网穿透2.2 创建隧道映射2.3 测试随机公网地址远程连接 3. 配置固定TCP端口地址3.1 保留一个固定的公网TCP端口地址3.2 配置固定公网TCP端口地址3.3 测试固定地址公网远程访问 转载自cpolar极点云文章:公网远程…...

mac python3 安装virtualenv
第一步,执行安装virtualenv pip3 install virtualenv 注意:如果出现WARNING: The script virtualenv is installed in ‘/home/local/bin’ which is not on PATH. Consider adding this directory to PATH or, if you prefer to suppress this warning,…...
网络安全(自学笔记)
如果你真的想通过自学的方式入门web安全的话,那建议你看看下面这个学习路线图,具体到每个知识点学多久,怎么学,自学时间共计半年左右,亲测有效(文末有惊喜): 1、Web安全相关概念&am…...

如何用Python处理杭州交通数据集?从roadnet.json到flow.json的完整解析指南
杭州交通数据实战:用Python解析roadnet.json与flow.json的进阶技巧 第一次接触杭州交通数据集时,我被roadnet.json里密密麻麻的交叉点坐标和flow.json中流动的车辆轨迹震撼到了——这哪是数据文件,分明是一座数字孪生城市的血管与血液。作为算…...

每天20分钟值不值?淘宝任务自动化的取舍之道
每天20分钟值不值?淘宝任务自动化的取舍之道 【免费下载链接】taojinbi 淘宝淘金币自动执行脚本,包含蚂蚁森林收取能量,芭芭农场全任务,解放你的双手 项目地址: https://gitcode.com/gh_mirrors/ta/taojinbi 在数字生活时代…...

RuoYi项目部署避坑大全:从宝塔面板配置到前端OpenSSL报错,一次讲清所有常见问题
RuoYi项目部署避坑指南:从错误现象到根治方案 1. 部署前的环境准备与常见陷阱 部署RuoYi这类前后端分离项目时,环境配置往往是第一个拦路虎。不少开发者习惯直接跳到代码部署环节,却忽略了基础环境的兼容性问题。我们先来看看那些容易被忽视的…...

终极指南:Heynote版本更新与数据迁移全攻略
终极指南:Heynote版本更新与数据迁移全攻略 【免费下载链接】heynote A dedicated scratchpad for developers 项目地址: https://gitcode.com/gh_mirrors/he/heynote Heynote作为开发者专用的即时记事本工具,定期更新能带来更稳定的性能和更丰富…...

5分钟掌握WaveTools:让你的《鸣潮》游戏体验提升200%
5分钟掌握WaveTools:让你的《鸣潮》游戏体验提升200% 【免费下载链接】WaveTools 🧰鸣潮工具箱 项目地址: https://gitcode.com/gh_mirrors/wa/WaveTools 还在为《鸣潮》的卡顿和掉帧烦恼吗?无论你是刚入坑的新手还是追求极致体验的资…...

Python 数据统计分析全攻略:从基础到实战,一文掌握常用方法
在数据分析、机器学习、业务报表开发等场景中,数据统计分析是核心基础环节。Python 凭借丰富的第三方库,成为数据统计分析的首选工具。本文将系统梳理 Python 中数据统计分析的常用方法、核心库、实战代码,从基础统计量到高级分析,…...

VSCode里玩转Qt Designer:手把手教你可视化设计PyQt5界面并自动生成Python代码
VSCode高效开发PyQt5:可视化设计与自动化代码生成实战 在Python GUI开发领域,PyQt5凭借其强大的功能和跨平台特性成为众多开发者的首选。然而,传统的手写界面布局代码不仅耗时耗力,还难以实时预览效果。本文将带你探索如何在VSCod…...

MIKE21不同下垫面添加随时空变化净雨过程线
近期很多文章都是关于市政管网方向的,今天小编换个口味,对MIKE21中添加降雨边界文件有了一种新的制作形式。其实这种方法涉及到MIKE SHE一个小工具,不过确实很实用,就让小编给大家介绍下吧。第一步 下垫面转DFS2熟悉MIKE21的同学们…...

明略科技公布上市后首次年报:营收14亿 经调整净利4204万
雷递网 雷建平 3月26日明略科技(股份代码:2718)今日发布截至2025年12月31日财报,财报显示,明略科技2025年营收14.26亿,较上年同期的13.81亿增长3.2%。明略科技2025年来自数据智能服务收入为12.6亿元&#x…...

OpenClaw+GLM-4.7-Flash智能邮件分类:自动识别优先级与回复草稿
OpenClawGLM-4.7-Flash智能邮件分类:自动识别优先级与回复草稿 1. 为什么我需要智能邮件助手 每天早晨打开邮箱时,我的收件箱总是堆满未读邮件——客户咨询、会议邀请、系统通知、订阅推送混杂在一起。手动分类需要花费20-30分钟,而最让我头…...