Spring MVC 是什么?
一、什么是 Spring MVC?
Spring Web MVC is the original web framework built on the Servlet API and has beenincluded in the Spring Framework from the very beginning. The formal name, “Spring WebMVC,” comes from the name of its source module ( spring-webmvc ), but it is more commonly known as “Spring MVC”.引用来自: https://docs.spring.io/springframework/docs/current/reference/html/web.html#spring-web
Spring Web MVC 是基于 Servlet API 构建的原始 Web 框架,从一开始就包含在 Spring 框架中。它的正式名称“Spring Web MVC” 来自其源模块的名称 (Spring-webmvc) ,但它通常被称为 “Spring MVC”。
1.1 MVC 定义
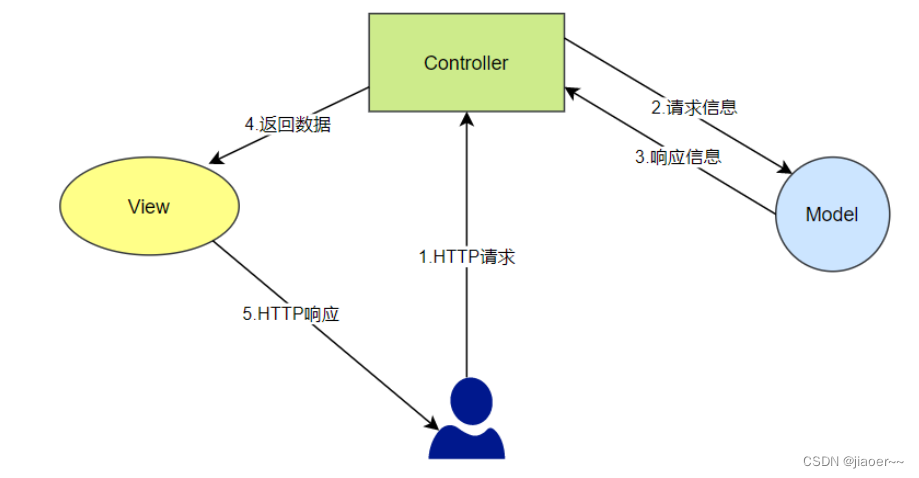
- Model(模型)是应用程序中用于处理应用程序数据逻辑的部分。通常模型对象负责在数据库中存取数据。
- View(视图)是应用程序中处理数据显示的部分。通常视图是依据模型数据创建的。
- Controller(控制器)是应用程序中处理用户交互的部分。通常控制器负责从视图读取数据,控制用户输入,并向模型发送数据。
1.2 MVC 和 Spring MVC 的关系
二、为什么要学 Spring MVC?

三、怎么学 Spring MVC?
1. 连接的功能 :将用户(浏览器)和 Java 程序连接起来,也就是访问一个地址能够调用到我们的 Spring 程序。2. 获取参数的功能 :用户访问的时候会带一些参数,在程序中要想办法获取到参数。3. 输出数据的功能 :执行了业务逻辑之后,要把程序执行的结果返回给用户。对于 Spring MVC 来说,掌握了以上 3 个功能就相当于掌握了 Spring MVC 。
3.1 Spring MVC 创建和连接
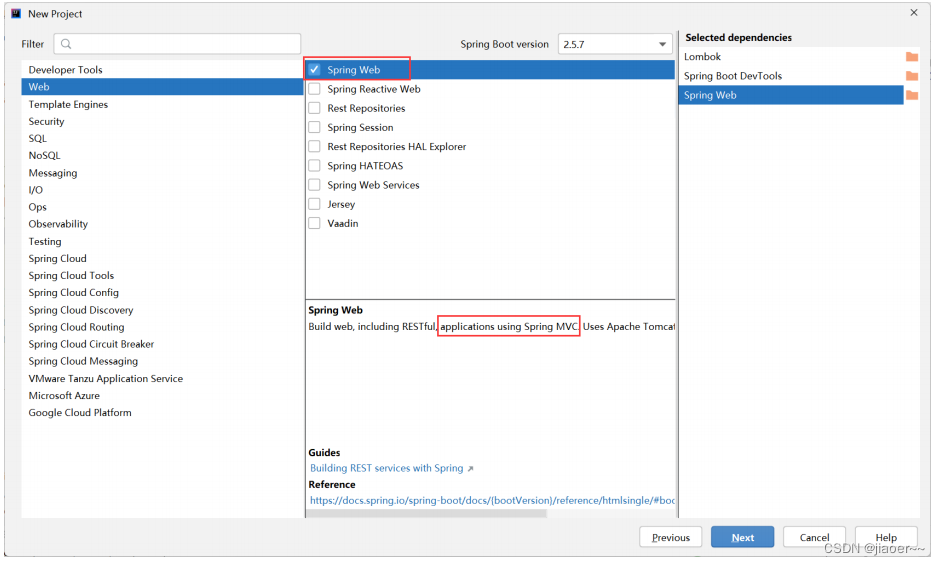
3.1.1 创建 Spring MVC 项目
接下来,创建一个 UserController 类,实现用户到 Spring 程序的互联互通,具体实现代码如下:
import org.springframework.stereotype.Controller;
import org.springframework.web.bind.annotation.RequestMapping;
import org.springframework.web.bind.annotation.ResponseBody;
@Controller // 让 spring 框架启动时,加载
@ResponseBody // 返回一个 text/html 信息
@RequestMapping("/user") // 路由器规则注册
public class UserController {
// 路由器规则注册
@RequestMapping("/hi")
public String sayHi(){
return "<h1>Hi,Spring MVC.</h1>";}
}3.1.2 @RequestMapping 注解介绍
import com.example.demo.model.Person;
import org.springframework.stereotype.Controller;
import org.springframework.web.bind.annotation.RequestMapping;
@Controller
@RequestMapping("/p")
public class PersonController {
@RequestMapping("/index")
public Object index(Person person){
// 获取参数
System.out.println(person.getName() +":"+
person.getPassword());
// 执行业务...
return "/index.html";}
}import org.springframework.stereotype.Controller;
import org.springframework.web.bind.annotation.RequestMapping;
import org.springframework.web.bind.annotation.ResponseBody;
@Controller
@ResponseBody // 定义返回的数据格式为非视图(text/html)
public class UserController {
@RequestMapping("/hi")
public String sayHi(){
return "<h1>Hi,Spring MVC.</h1>";}
}3.1.3 @RequestMapping 是 post 还是 get 请求?

如何接收 post 请求?
import org.springframework.stereotype.Controller;
import org.springframework.web.bind.annotation.RequestMapping;
import org.springframework.web.bind.annotation.RequestMethod;
import org.springframework.web.bind.annotation.ResponseBody;
@Controller
@ResponseBody // 定义返回的数据格式为非视图(text/html)
public class UserController {
@RequestMapping(value = "/hi",method= RequestMethod.POST)
public String sayHi(){
return "<h1>Hi,Spring MVC.</h1>";}
}
3.1.4 @GetMapping 和 PostMapping
// 写法1
@RequestMapping("/index")
// 写法2
@RequestMapping(value = "/index",method = RequestMethod.GET)
// 写法3
@GetMapping("/index")// 写法1
@RequestMapping(value = "/index",method = RequestMethod.POST)
// 写法2
@PostMapping("/index")3.2 获取参数
3.2.1 传递单个参数
@RequestMapping("/m1")
public Object method_1(String name){
System.out.println("参数 name:"+name);
return "/index.html";
}
程序的执行结果:

3.2.2 传递对象
import lombok.Data;
@Data
public class Person {
private int id;
private String name;
private String password;
}
传递对象代码实现:
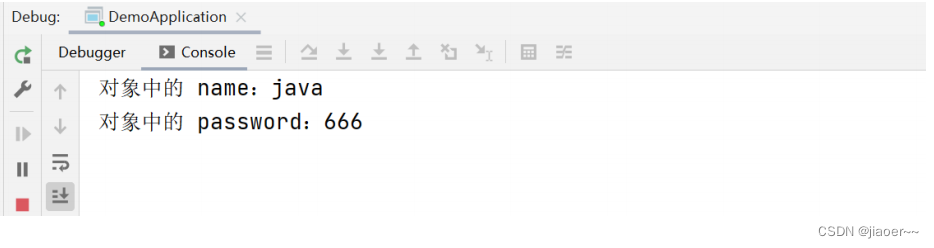
@RequestMapping("/m2")
public Object method_2(Person p){
System.out.println("对象中的 name:"+p.getName());
System.out.println("对象中的 password:"+p.getPassword());
return "/index.html";
}
最终执行结果:
3.2.3 表单参数传递/传递多个参数(非对象)
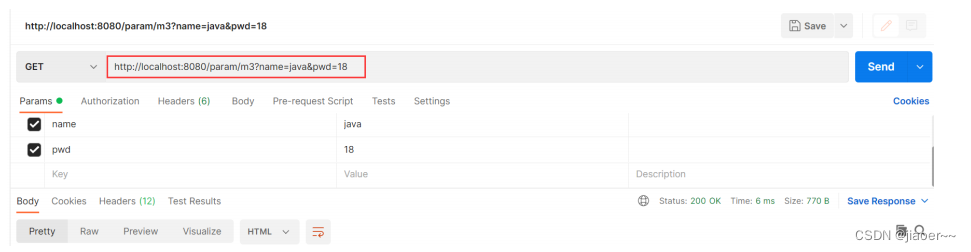
@RequestMapping("/m3")
public Object method_3(String name, String pwd) {
System.out.println("name 参数:" + name);
System.out.println("pwd 参数:" + pwd);
return "/index.html";
}
前台访问地址:
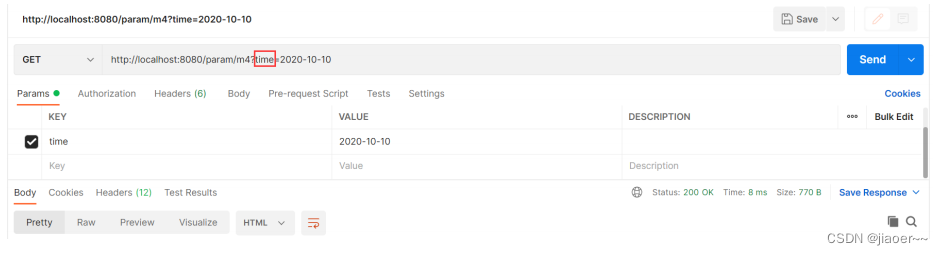
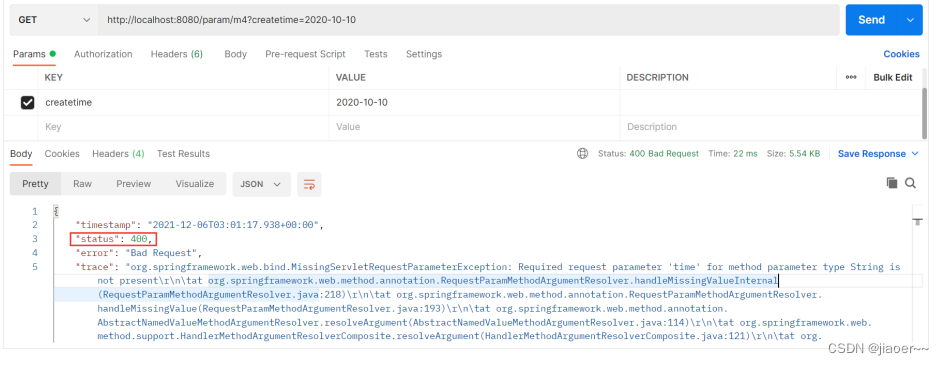
3.2.4 后端参数重命名(后端参数映射)
@RequestMapping("/m4")
public Object method_4(@RequestParam("time") String createtime) {
System.out.println("时间:" + createtime);
return "/index.html";
}
3.2.5 设置参数必传@RequestParam
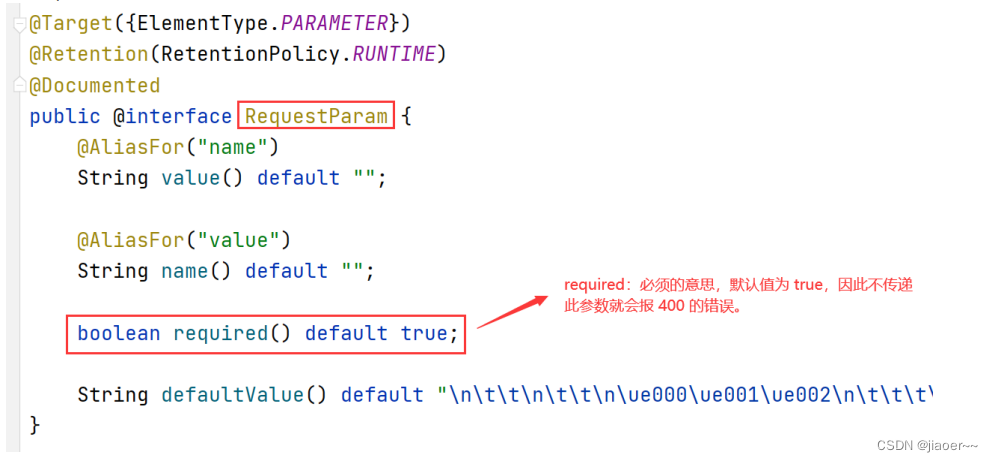
非必传参数设置
@RequestMapping("/m4")
public Object method_4(@RequestParam(value = "time", required = false) String
createtime) {
System.out.println("时间:" + createtime);
return "/index.html";
}
3.2.6 @RequestBody 接收JSON对象

后端接收代码:
@RequestMapping(value = "/m5", method = RequestMethod.POST)
public Object method_5(@RequestBody Person person) {
System.out.println("Person:" + person);
return "redirect:/index.html";
}
尝试去除掉 @RequestBody 试试。
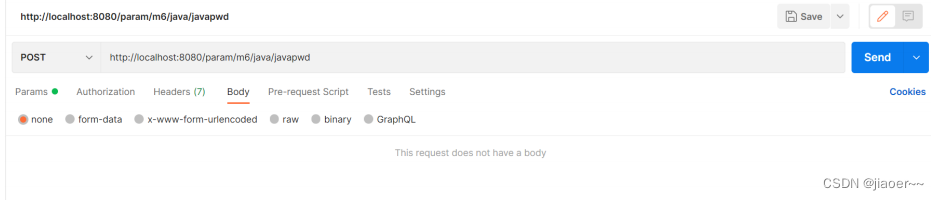
3.2.7 获取URL中参数@PathVariable
@PostMapping("/m6/{name}/{password}")
public Object method_6(@PathVariable String name, @PathVariable String password)
{
System.out.println("name:" + name);
System.out.println("password:" + password);
return "redirect:/index.html";
}
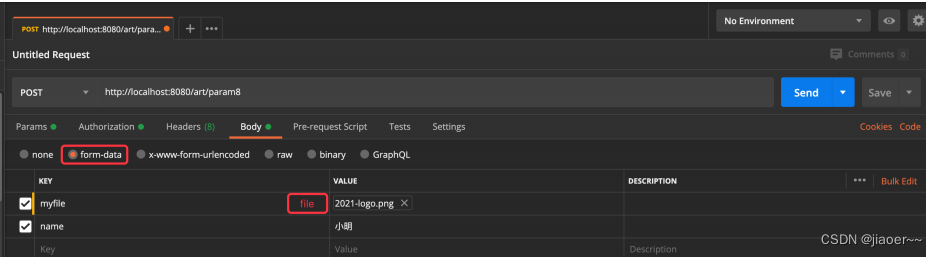
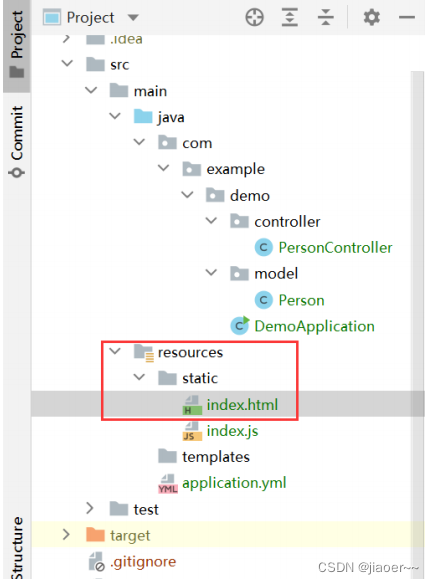
3.2.8 上传文件@RequestPart
@RequestMapping("/param9")
public String param9(String name, @RequestPart("myfile") MultipartFile file)
throws IOException {
// 获取文件后缀名
String fileName =
file.getOriginalFilename().substring(file.getOriginalFilename().lastIndexOf(".")
);
// 文件保存地址
String filePath =
ClassUtils.getDefaultClassLoader().getResource("static").getPath() +
"/" + UUID.randomUUID() + fileName;
// 保存文件
file.transferTo(new File(filePath));
return filePath + " 上传成功.";
}
获取项目目录的几种方式:
ResourceUtils.getFile(ResourceUtils.CLASSPATH_URL_PREFIX).getPath();
new ClassPathResource("").getFile().getAbsolutePath();
ClassUtils.getDefaultClassLoader().getResource("").getPath();
ResourceUtils.getFile("classpath:static/").getPath();
3.2.9 获取Cookie/Session/header
获取 Request 和 Response 对象
@RequestMapping("/param10")
public String param10(HttpServletResponse response, HttpServletRequest request)
{
String name = request.getParameter("name");
// 获取所有 cookie 信息
Cookie[] cookies = request.getCookies();
return name + " 你好.";
}
传统获取 header/cookie
@RequestMapping("/param10")
@ResponseBody
public String param10(HttpServletResponse response, HttpServletRequest request)
{
String name = request.getParameter("name");
// 获取所有 cookie 信息
Cookie[] cookies = request.getCookies();
String userAgent = request.getHeader("User-Agent");
return name + ":"+userAgent;
}
简洁的获取 Cookie—@CookieValue
@RequestMapping("/cookie")
@ResponseBody
public String cookie(@CookieValue("bite") String bite) {
return "cookie:" + bite;
}
简洁获取 Header—@RequestHeader
@RequestMapping("/header")
@ResponseBody
public String header(@RequestHeader("User-Agent") String userAgent) {
return "userAgent:"+userAgent;
}
Session 存储和获取
@RequestMapping("/setsess")
@ResponseBody
public String setsess(HttpServletRequest request) {
// 获取 HttpSession 对象,参数设置为 true 表示如果没有 session 对象就创建一个
session
HttpSession session = request.getSession(true);
if(session!=null){
session.setAttribute("username","java");
}
return "session 存储成功";
}
读取 Session 可以使用 HttpServletRequest,如下代码所示:
@RequestMapping("/sess")
@ResponseBody
public String sess(HttpServletRequest request) {
// 如果 session 不存在,不会自动创建
HttpSession session = request.getSession(false);
String username = "暂无";
if(session!=null && session.getAttribute("username")!=null){
username = (String) session.getAttribute("username");
}
return "username:"+username;
}
获取 Session 更简洁的方式:
@RequestMapping("/sess2")
@ResponseBody
public String sess2(@SessionAttribute(value = "username",required = false)
String username) {
return "username:"+username;
}
3.3 返回数据
3.3.1 返回静态页面
<!doctype html>
<html lang="en">
<head>
<meta charset="UTF-8">
<meta name="viewport"
content="width=device-width, user-scalable=no, initial-scale=1.0,
maximum-scale=1.0, minimum-scale=1.0">
<meta http-equiv="X-UA-Compatible" content="ie=edge">
<title>hello,spring mvc</title>
<script src="index.js"></script>
</head>
<body>
<h1>Hello,Spring MVC.</h1>
</body>
</html>
创建控制器 controller:
import com.example.demo.model.Person;
import org.springframework.stereotype.Controller;
import org.springframework.web.bind.annotation.RequestMapping;
@Controller
@RequestMapping("/p")
public class PersonController {
@RequestMapping("/index")
public Object index(){
// 执行业务...
// 返回view -> index.html
return "/index.html";}
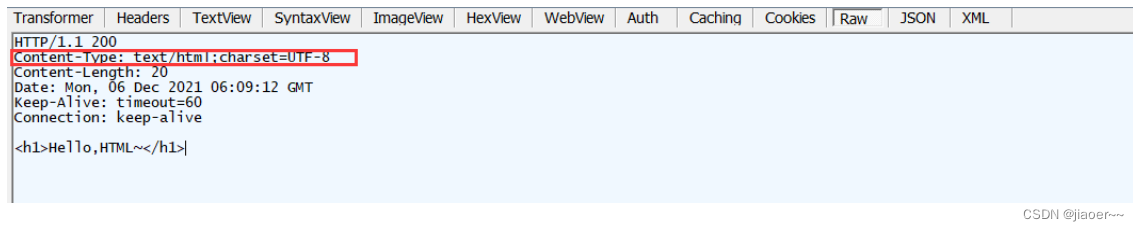
}3.3.2 返回 text/html
@RequestMapping("/m7")
@ResponseBody
public String method_7() {
return "<h1>Hello,HTML~</h1>";
}
<!doctype html>
<html lang="en">
<head>
<meta charset="UTF-8">
<meta name="viewport"
content="width=device-width, user-scalable=no, initial-scale=1.0,
maximum-scale=1.0, minimum-scale=1.0">
<meta http-equiv="X-UA-Compatible" content="ie=edge">
<title>计算器示例</title>
</head>
<body>
<form action="http://localhost:8080/calc/sum">
<h1>计算器</h1>
数字1:<input name="num1" type="text"><br>
数字2:<input name="num2" type="text"><br>
<input type="submit" value=" 点击相加 ">
</form>
</body>
</html>import org.springframework.stereotype.Controller;
import org.springframework.web.bind.annotation.RequestMapping;
import org.springframework.web.bind.annotation.ResponseBody;
@ResponseBody
@Controller
@RequestMapping("/calc")
public class CalcController {
@RequestMapping("/sum")
public String sum(Integer num1,Integer num2){
return String.format("<h1>计算的结果是:%d</h1><a
href='javascript:history.go(-1);'>返回</a>",num1+num2);}
}3.3.3 返回 JSON 对象
@RequestMapping("/m8")
@ResponseBody
public HashMap<String, String> method_8() {
HashMap<String, String> map = new HashMap<>();
map.put("Java", "Java Value");
map.put("MySQL", "MySQL Value");
map.put("Redis", "Redis Value");
return map;
}

@RequestMapping(value = "/login")
@ResponseBody
public HashMap<String,Object> login(String username, String password){
HashMap<String,Object> res = new HashMap<>();
int succ = 200;
if(username!=null && password!=null &&
username.equals("admin") && password.equals("admin")){
res.put("msg","登录成功");
}else{
res.put("msg","登录失败");
}
res.put("succ",succ);
return res;
}
前端代码:
<!doctype html>
<html lang="en">
<head>
<meta charset="UTF-8">
<meta name="viewport"
content="width=device-width, user-scalable=no, initial-scale=1.0,
maximum-scale=1.0, minimum-scale=1.0">
<meta http-equiv="X-UA-Compatible" content="ie=edge">
<script src="js/jquery-1.9.1.min.js"></script>
<title>Document</title>
<script>
function mysub() {
var username = jQuery("#username").val();
var password = jQuery("#password").val();
jQuery.getJSON("/user/login",
{
"username":username,
"password":password
},
function (result) {
if(result.succ==200){
alert("返回结果:"+result.msg);
}else{
alert("操作失败,请重试。");
}
});
}
</script>
</head>
<body>
<div style="text-align: center;">
<h1>登录</h1>
用户:<input id="username">
<br>
密码:<input id="password" type="password">
<br>
<input type="button" value=" 提交 " onclick="mysub()" style="margin-top:
20px;margin-left: 50px;">
</div>
</body>
</html>
3.3.4 请求转发或请求重定向
forward VS redirect
- forward 是请求转发;
- redirect:请求重定向。
// 请求重定向
@RequestMapping("/index")
public String index(){
return "redirect:/index.html";
}
// 请求转发
@RequestMapping("/index2")
public String index2(){
return "forward:/index.html";
}
举例说明 forward 和 redirect
forward 和 redirect 具体区别如下:
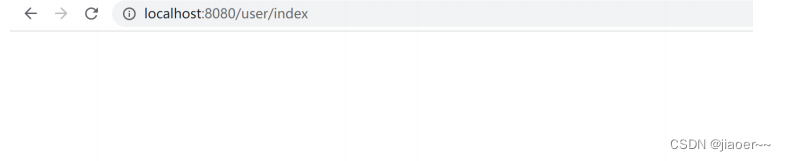
请求转发 forward 导致问题演示
@Controller
@RequestMapping("/user")
public class UserController {
@RequestMapping(value = "/index")
public String sayHi(){
return "forward:/index.html";}
}
程序的执行结果如下:
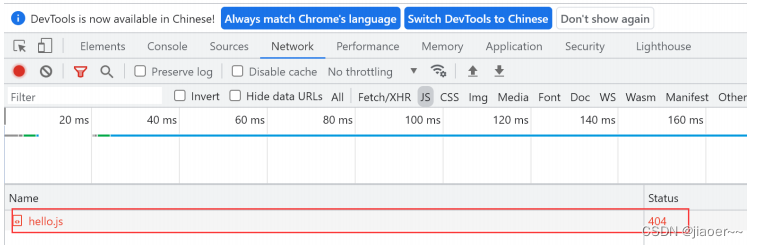
尝试将转发 foward 换成重定向 redirect,如下代码所示:
import org.springframework.stereotype.Controller;
import org.springframework.web.bind.annotation.RequestMapping;
import org.springframework.web.bind.annotation.RequestMethod;
import org.springframework.web.bind.annotation.ResponseBody;
@Controller
@RequestMapping("/user")
public class UserController {
@RequestMapping(value = "/index")
public String sayHi(){
return "redirect:/index.html";}
}
页面就可以正常获取到外部资源 js 了。
3.3.5 @ResponseBody 说明
- @ResponseBody 返回的值如果是字符会转换成 text/html,如果返回的是对象会转换成 application/json 返回给前端。
- @ResponseBody 可以用来修饰方法或者是修饰类,修饰类表示类中的所有方法都会返回 html 或者json,而不是视图。
3.3.6 组合注解:@RestController
3.3.7 查看更多注解
官方 API : https://docs.spring.io/spring-framework/docs/current/reference/html/web.html#mvcann-requestmapping
相关文章:
Spring MVC 是什么?
一、什么是 Spring MVC? 官方对于 Spring MVC 的描述是这样的: Spring Web MVC is the original web framework built on the Servlet API and has been included in the Spring Framework from the very beginning. The formal name, “Spring Web …...
Rust操作MySQL
查询 本部分是对 「Rust入门系列」Rust 中使用 MySQL[1]的学习与记录 经常使用的时间处理库: chrono 流式查询使用: query_iter 输出到Vec使用: query 映射到结构体使用: query_map 获取单条数据使用: query_first 命名…...

JAVA面试总结-Redis篇章(二)——缓存击穿
JAVA面试总结-Redis篇章(二) 缓存击穿解决方案一:互斥锁解决方案二:逻辑过期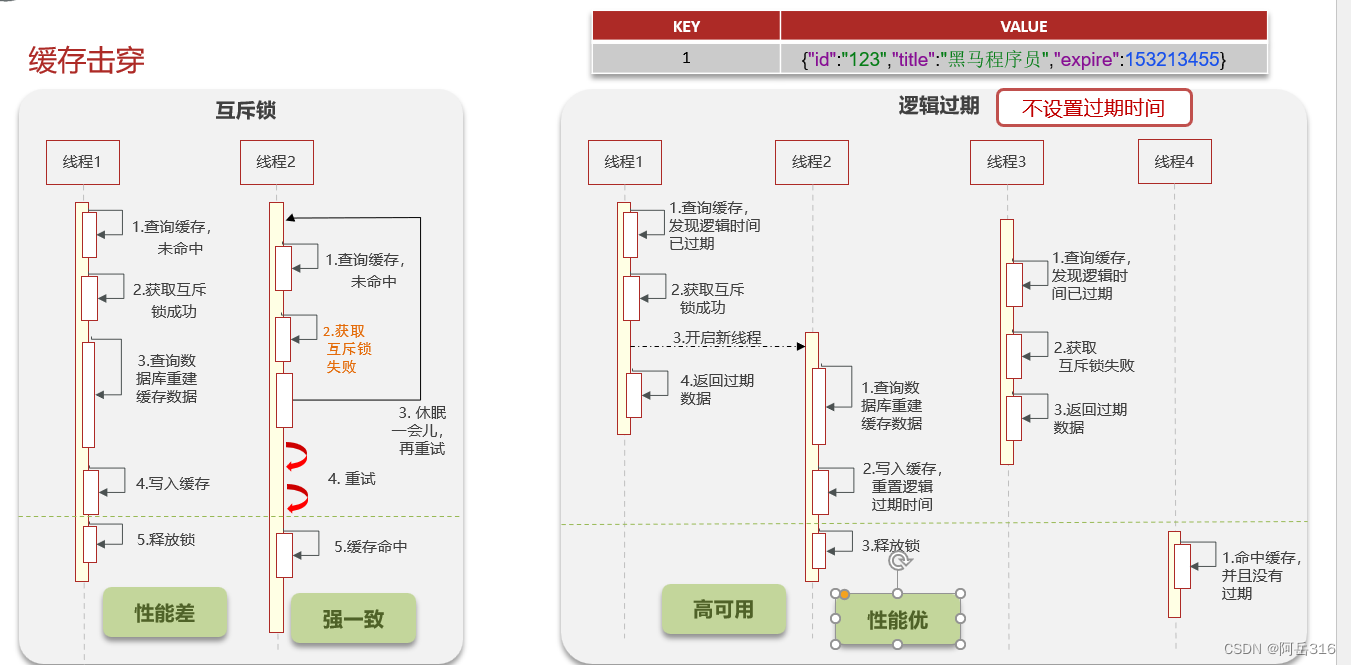 缓存击穿 解决方案一:互斥锁 解决方案二&…...

Spring相关知识点
概述 分层的轻量级的全栈开源框架 展示层SprigMVC 持久层 Spring JDBCTemplate 业务层事务管理 注: 轻量级:API简单 全栈:各层都有相应解决方案 在Spring的体系结构中,由上而下,逐层依赖 Spring相当于是一个粘合剂&…...
)
Nginx专题--反向代理(未完成)
反向代理 正向代理:如果把局域网外的 Internet 想象成一个巨大的资源库,则局域网中的客户端要访问 Internet,则需要通过代理服务器来访问,这种代理服务就称为正向代理。 反向代理:其实客户端对代理是无感知的&…...
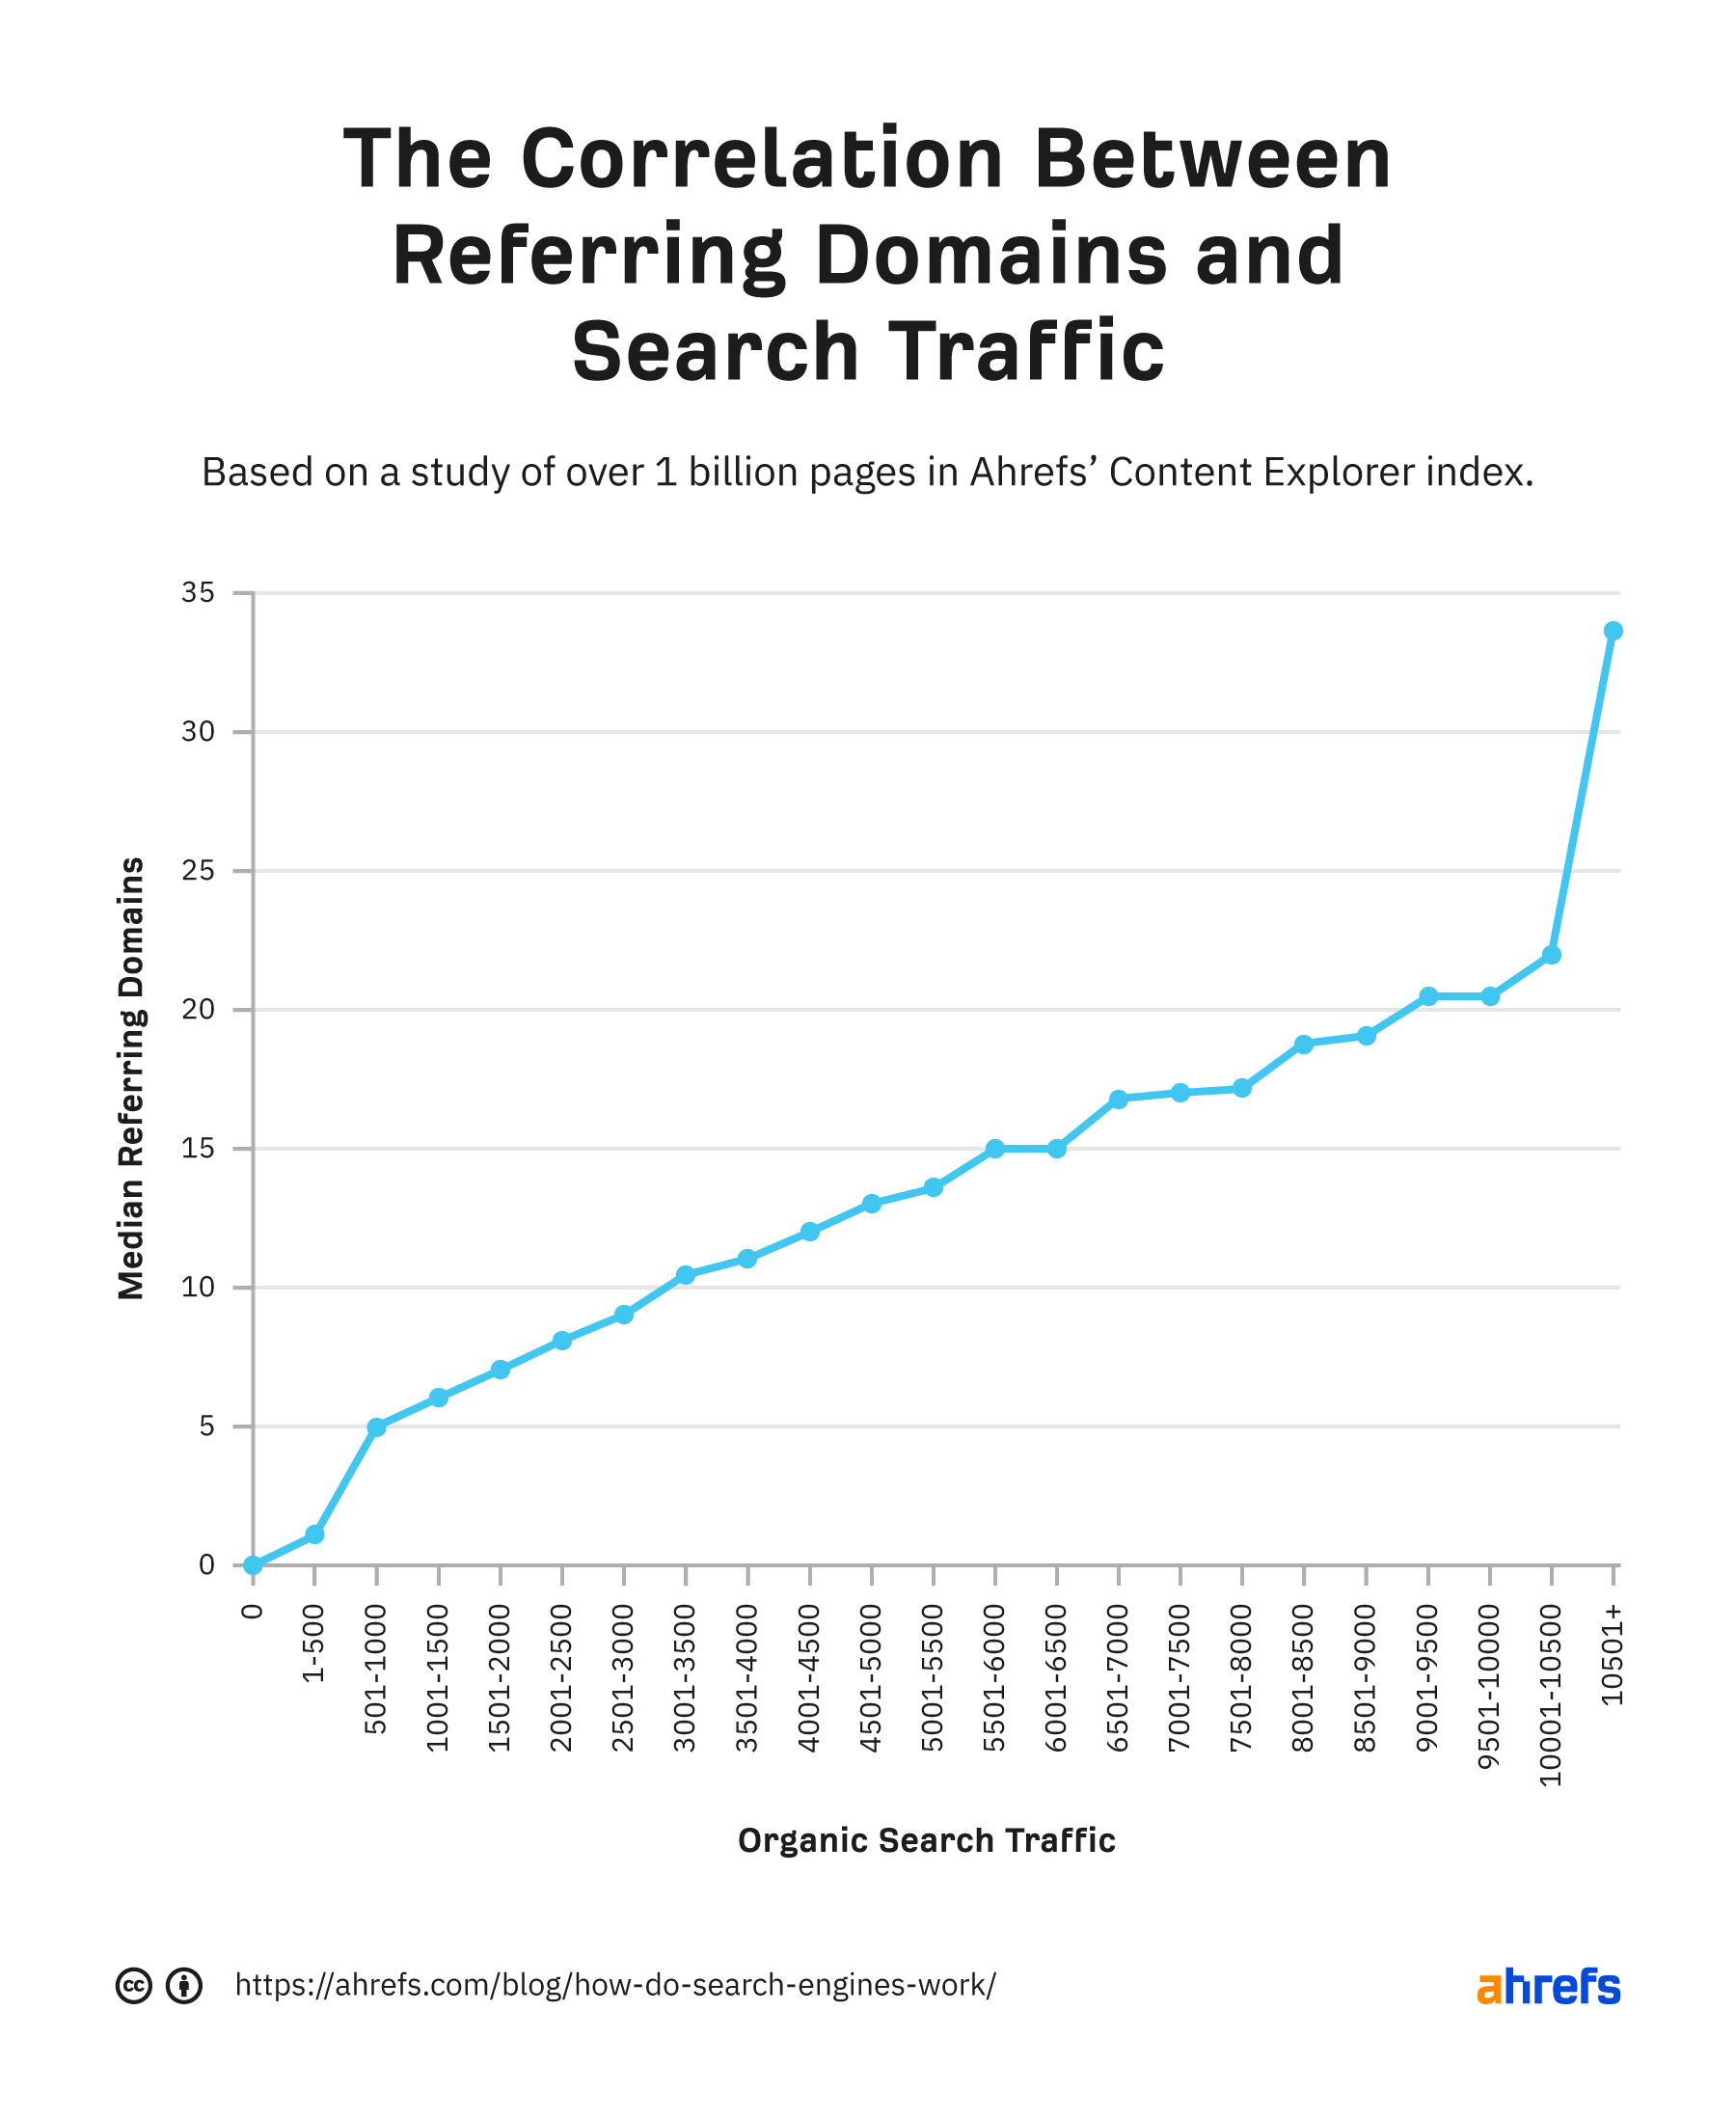
什么是搜索引擎?2023 年搜索引擎如何运作?
目录 什么是搜索引擎?搜索引擎的原理什么是搜索引擎爬取?什么是搜索引擎索引?什么是搜索引擎检索?什么是搜索引擎排序? 搜索引擎的目的是什么?搜索引擎如何赚钱?搜索引擎如何建立索引?网页抓取文本处理建…...
Spring系列一:spring的安装与使用
文章目录 💞 官方资料🍊Spring5下载🍊文档介绍 💞Spring5🍊内容介绍🍊重要概念 💞快速入门🍊Spring操作演示🍊类加载路径🍊Debug配置🍊Spring容器…...
Ubuntu--科研工具系列
翻译系列 pot-desktop github链接: https://github.com/pot-app/pot-desktop 下载deb Releases pot-app/pot-desktop GitHub 安装过程 在下载好的deb目录下打开终端(自动安装依赖) sudo apt install "XXX.deb" (后面可以直接托文件到终端&#…...
【压测指南|压力测试核心性能指标及行业标准】
文章目录 压力测试核心性能指标及行业标准指标1:响应时间指标2:吞吐量(TPS)指标3:失败率总结: 压力测试核心性能指标及行业标准 在做压力测试时,新手测试人员常常在看报告时倍感压力:这么多性能…...

spark-submit --files
一、原理 spark-submit --files通常用来加载外部资源文件,在driver和executor进程中进行访问 –files和–jars基本相同 二、使用步骤 2.1 添加文件 spark-submit --files file_paths 其中file_paths可为多种方式:file: | hdfs:// | http:// | ftp:// |…...

应该选云服务器还是物理服务器
应该选云服务器还是物理服务器 一、为什么需要云服务器或独立服务器取代共享主机 在最早之前,大多数的网站都是共享主机开始的,这里也包含了云虚拟机。这一类的站点还有其他站点都会共同托管在同一台服务器上。但是这种共享机只适用于小的网站ÿ…...
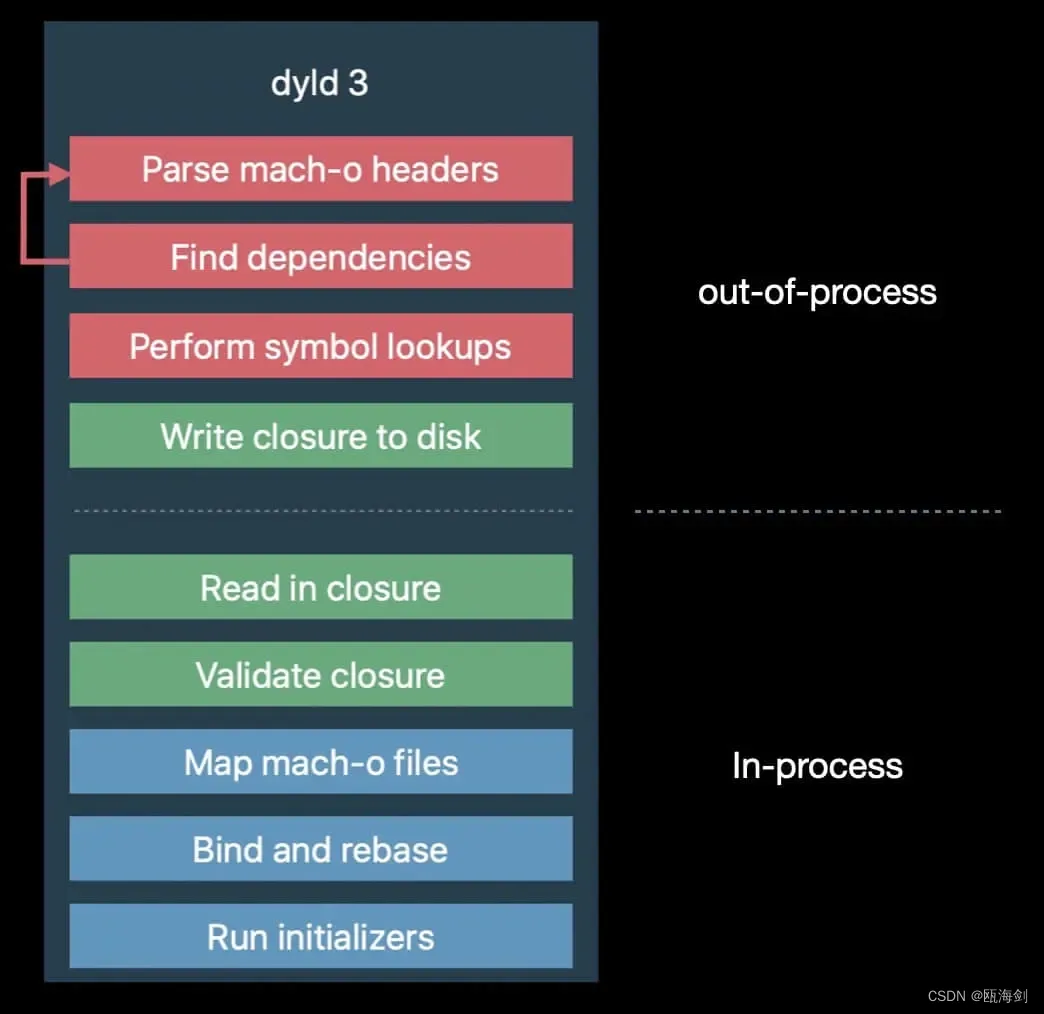
【iOS】动态链接器dyld
参考:认识 dyld :动态链接器 dyld简介 dyld(Dynamic Linker)是 macOS 和 iOS 系统中的动态链接器,它是负责在运行时加载和链接动态共享库(dylib)或可执行文件的组件。在 macOS 系统中…...

RocketMQ集成Springboot --Chapter1
RocketMQ集成Springboot 三种消息发送方式 生产者 引入依赖 <!--⽗⼯程--><parent><groupId>org.springframework.boot</groupId><artifactId>spring-boot-starter-parent</artifactId><version>2.3.2.RELEASE</version><…...
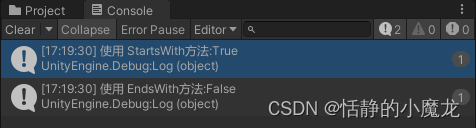
【Unity3D日常开发】Unity3D中比较string字符串的常用方法
推荐阅读 CSDN主页GitHub开源地址Unity3D插件分享简书地址我的个人博客 大家好,我是佛系工程师☆恬静的小魔龙☆,不定时更新Unity开发技巧,觉得有用记得一键三连哦。 一、前言 字符串string的比较有很多方法,比如: …...
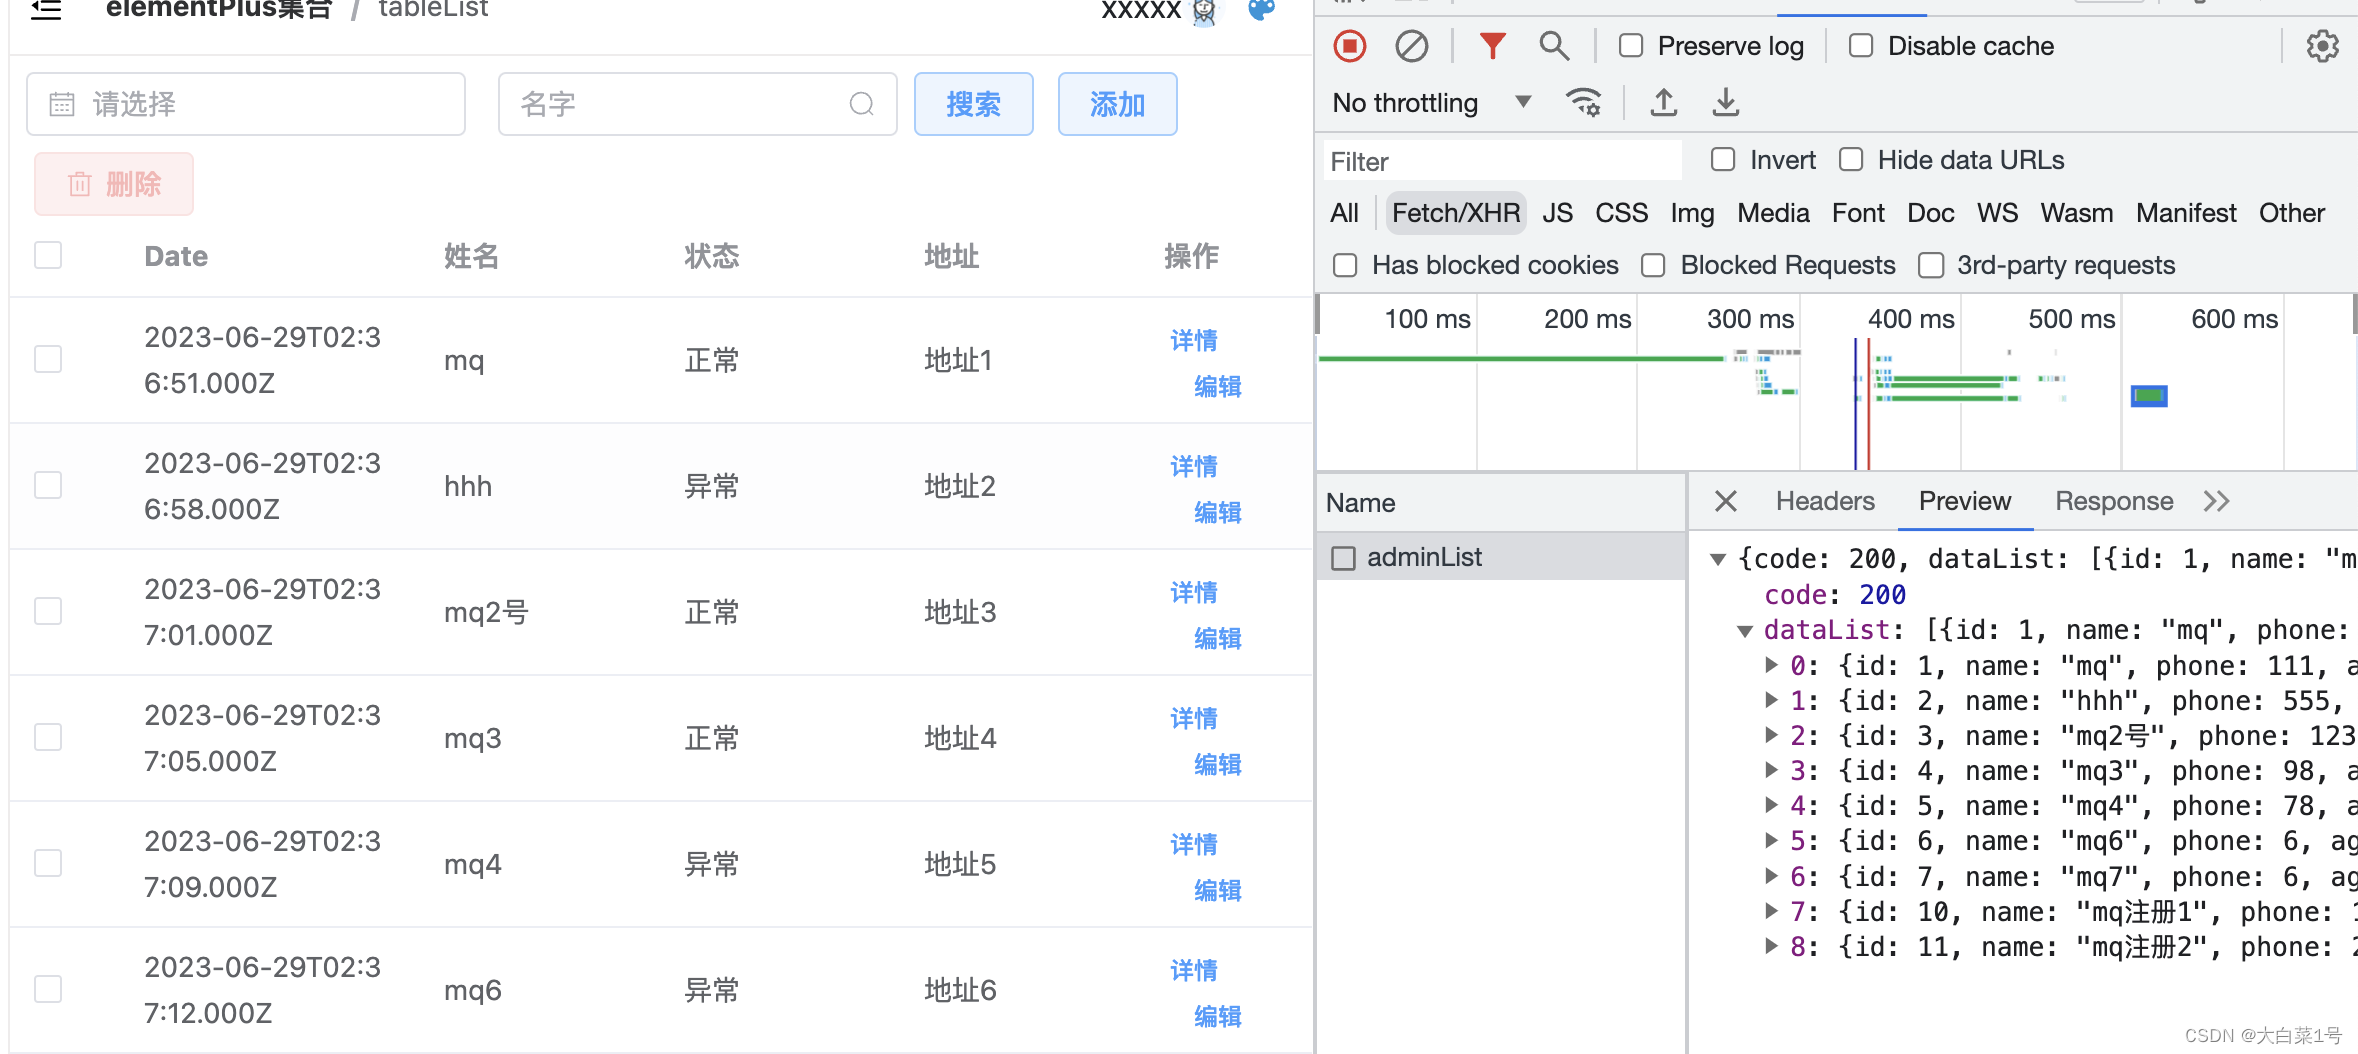
vue3+ts+element-plus 之使用node.js对接mysql进行表格数据展示
vue3tselement-plus axiosnode.jsmysql开发管理系统之表格展示 ✏️ 1. 新建一个node项目* 初始化node* 安装可能用到的依赖* 配置文件目录* 添加路由router1. 添加router.js文件,添加一个test目录2. 修改app.js ,引入router📒 3. 启动并在浏览器打开 * …...
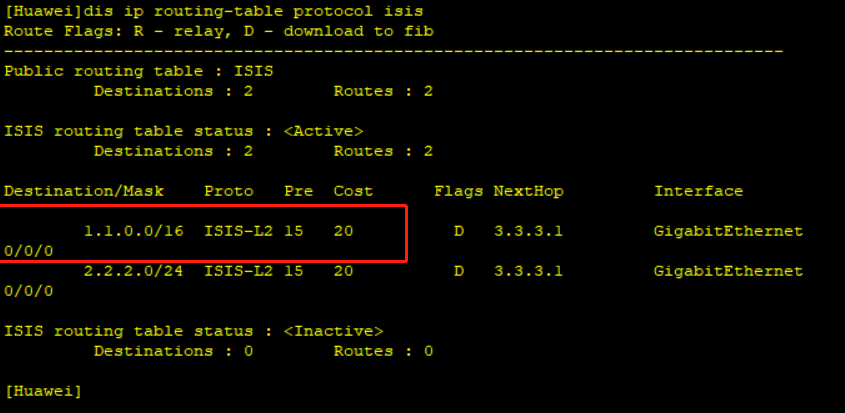
华为eNSP:isis配置跨区域路由
一、拓扑图 二、路由器的配置 1、配置接口IP AR1: <Huawei>system-view [Huawei]int g0/0/0 [Huawei-GigabitEthernet0/0/0]ip add 1.1.1.1 24 [Huawei-GigabitEthernet0/0/0]q AR2: [Huawei]int g0/0/0 [Huawei-GigabitEthernet0/0/0]ip add 1.1.1.2 24 [Huawe…...

IUPAC和SMILES的相互转换
这种方法只能解决非常简单的转换,更难的SMILES之间应该是无法直接转换,我可能很多人都使用神经网络解决 ,暂时还没仔细看,后面再仔细看吧... 简单的转换: import urllib.error import urllib.parse import urllib.re…...

逻辑回归概述
逻辑回归介绍 1. 逻辑回归的应用场景 逻辑回归(Logistic Regression)是机器学习中的 一种分类模型 ,逻辑回归是一种分类算法,虽然名字中带有回归。由于算法的简单和高效,在实际中应用非常广泛 广告点击率是否为垃圾邮件是否患病信用卡账单是否会违约 逻辑回归就是解决二…...
React 框架下自己写一个braft编辑器,然后将编辑器内容展示在网页端
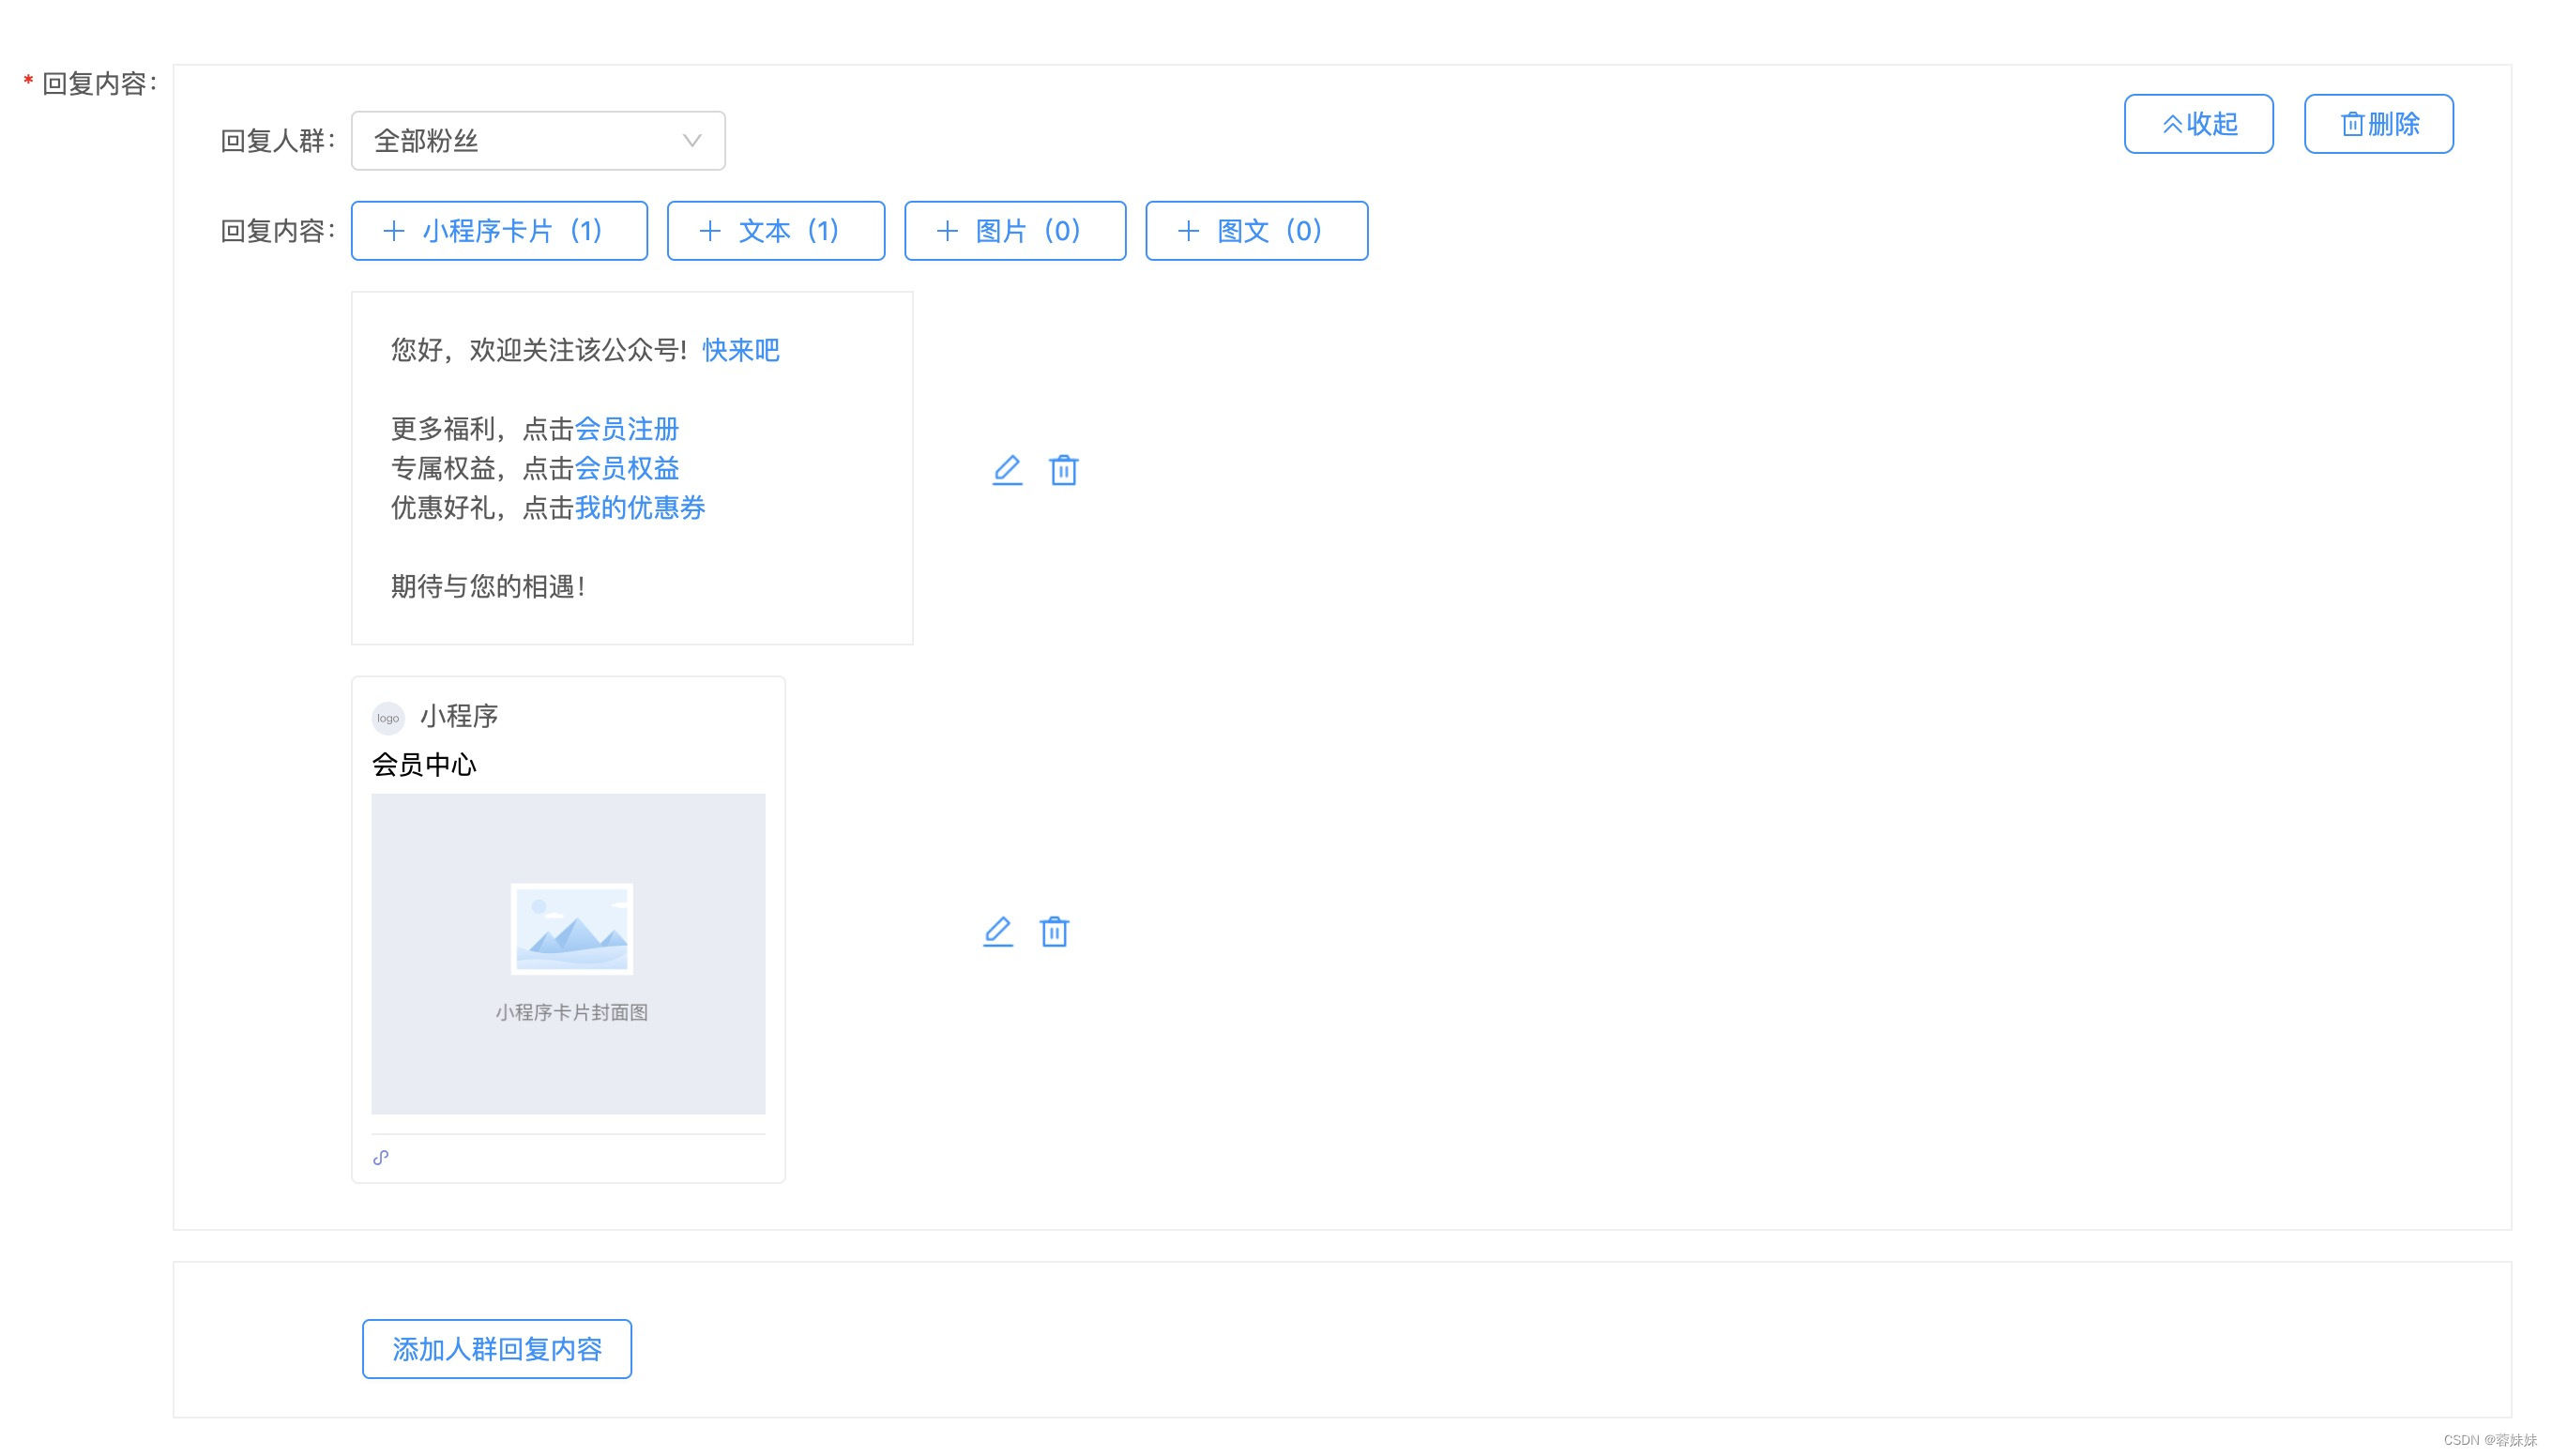
1.首先自己写一个编辑器 输入文字; 支持选择表情; 可添加小程序链接;可添加网页链接;并且可以编辑删除;效果如下 2.输入完毕后,点击文本输入框保存,将便携式内容回显, 渲染时…...
基于DNN深度学习网络的OFDM+QPSK信号检测算法matlab仿真
目录 1.算法运行效果图预览 2.算法运行软件版本 3.部分核心程序 4.算法理论概述 5.算法完整程序工程 1.算法运行效果图预览 2.算法运行软件版本 matlab2022a 3.部分核心程序 ............................................................................. Transmitt…...

告别手动记录!用CAPL脚本的file系列函数自动生成CANoe测试报告
告别手动记录!用CAPL脚本的file系列函数自动生成CANoe测试报告 在汽车电子测试领域,工程师们每天都要面对海量的测试数据——从总线负载率到错误帧统计,从信号值波动到时间戳记录。传统的手动截图、复制粘贴方式不仅效率低下,还容…...

从YOLO到A*:手把手教你用PyTorch和OpenCV搭建一个简易的自动驾驶避障仿真器
从YOLO到A*:用PyTorch和OpenCV构建自动驾驶避障仿真器 想象一下,你正坐在一辆自动驾驶汽车里,车辆能够自动识别前方的行人、车辆和障碍物,并规划出安全的行驶路径。这种看似科幻的场景,如今正逐渐成为现实。本文将带你…...

突破平台限制:基于Go+Qt5的喜马拉雅音频下载解决方案
突破平台限制:基于GoQt5的喜马拉雅音频下载解决方案 【免费下载链接】xmly-downloader-qt5 喜马拉雅FM专辑下载器. 支持VIP与付费专辑. 使用GoQt5编写(Not Qt Binding). 项目地址: https://gitcode.com/gh_mirrors/xm/xmly-downloader-qt5 喜马拉雅FM作为国内…...

STM32智能安全头盔设计与工业安全应用
1. 项目概述这个智能安全头盔项目源于我在工业安全领域多年的观察和实践。传统头盔只能提供基础的物理防护,而现代工作环境中的危险因素远不止于此。去年参与某建筑工地事故调查时,我发现如果当时工人佩戴的头盔能够实时监测环境气体浓度和人体状态&…...

KRM库:Arduino嵌入式运动控制的安全映射与非阻塞调度
1. KRM库概述:面向嵌入式运动控制的Arduino实用工具集KRM(Koval Robotics & Motion)是一个专为Arduino平台设计的轻量级底层工具库,其核心定位并非通用算法封装,而是聚焦于机器人与机电控制系统开发中高频、重复、…...

3步解锁:让老旧电脑流畅运行Windows 11的终极精简方案
3步解锁:让老旧电脑流畅运行Windows 11的终极精简方案 【免费下载链接】tiny11builder Scripts to build a trimmed-down Windows 11 image. 项目地址: https://gitcode.com/GitHub_Trending/ti/tiny11builder 在数字时代,系统性能直接影响工作效…...

3步学会BilibiliDown:零基础掌握B站视频下载的终极指南
3步学会BilibiliDown:零基础掌握B站视频下载的终极指南 【免费下载链接】BilibiliDown (GUI-多平台支持) B站 哔哩哔哩 视频下载器。支持稍后再看、收藏夹、UP主视频批量下载|Bilibili Video Downloader 😳 项目地址: https://gitcode.com/gh_mirrors/…...

MogFace人脸检测工具保姆级教程:Streamlit状态管理实现连续检测流程
MogFace人脸检测工具保姆级教程:Streamlit状态管理实现连续检测流程 1. 项目简介与核心价值 你是不是遇到过这样的场景?团队合影需要快速统计人数,或者从一张复杂的照片里找出所有人脸的位置。传统方法要么精度不够,要么操作复杂…...

Engram:解锁AI潜能,系统优化新高度!
Engram是一种基于LLM的智能体研究者架构,旨在解决系统优化中AI的两个关键局限:进化邻域偏差和连贯性上限。通过将长时程探索与单一上下文窗口解耦,Engram组织一系列智能体迭代设计、测试和分析机制。每次运行结束时,智能体将代码快…...

SD 协议
1、SD 协议科普 SD 协议的全称是 Secure Digital (SD) Interface Protocol,它是由 SD 协会(SDA,Secure Digital Association) 制定的一套标准。 eMMC、SD、SDIO 的关系: SD 卡的协议最初是基于 MMC(MultiM…...