详解rocketMq通信模块升级构想

本文从开发者的角度深入解析了基于netty的通信模块, 并通过简易扩展实现微服务化通信工具雏形, 适合于想要了解netty通信框架的使用案例, 想了解中间件通信模块设计, 以及微服务通信底层架构的同学。希望此文能给大家带来通信模块架构灵感。

概述
网络通信是很常见的需求,
对于传统web网页工具短连接场景,浏览器和服务器交互,常见为浏览器通过http协议请求Tomcat服务器;
对于长连接场景, 比如即时通讯,或中间件等实时性要求高的场景,一般采用tcp协议的长连接进行全双工实时通信;
对于java开发者来说,使用原生socket进行tcp开发,效率是比较低的,稳定性可靠性等也不好保障,一般选择网络通信框架netty加快开发效率。
对于上层应用来说,netty的标准使用方式依然比较繁琐,未能很好的适配一些业务使用场景,比如rocketMq根据netty包装了一层业务框架:通信模块remoting。
该模块可用性高,稳定性好,易扩展,经过了中间件产品长期高并发的质量验证, 值得信任,并广泛用于其他点对点(指定ip)通信场景,如dleger(raft的java实现)。
有相关通信需求的同学也都可以参考该通信模块,相信有很多的灵感,或直接使用该通信模块,带来开发效率的提升。
本文从一个普通java开发者的视角,去解析该通信模块
如何用 - 常见使用方式
实现原理 - 数据流转链路
设计关键点 - 为什么要如此设计
模块升级 - 实现简易的微服务化通信工具
本文代码版本:
<parent><groupId>org.apache.rocketmq</groupId><artifactId>rocketmq-remoting</artifactId><version>5.0.1-PREVIEW-SNAPSHOT</version>
</parent>
如何用
编写简单易懂的测试demo,实现server client的交互流程。
简单示例 协议code 为写死 0 1 5 9,输入测试信息,输出使用sysout。
▐ 启动server 注册服务监听
import com.alibaba.fastjson.JSON;
import io.netty.channel.ChannelHandlerContext;
import org.apache.rocketmq.remoting.RemotingServer;
import org.apache.rocketmq.remoting.netty.NettyRemotingServer;
import org.apache.rocketmq.remoting.netty.NettyRequestProcessor;
import org.apache.rocketmq.remoting.netty.NettyServerConfig;
import org.apache.rocketmq.remoting.protocol.RemotingCommand;
import java.util.concurrent.ArrayBlockingQueue;
import java.util.concurrent.ExecutorService;
import java.util.concurrent.ThreadPoolExecutor;
import java.util.concurrent.TimeUnit;
public class Server {public static void main(String[] args) throws Exception {NettyServerConfig nettyServerConfig = new NettyServerConfig();// 配置端口nettyServerConfig.setListenPort(8888);// 配置线程数 netty workGroup 线程池 处理io等低耗时nettyServerConfig.setServerSelectorThreads(2);// 配置线程数 netty eventGroup 线程池 处理自定义hander/长耗时等nettyServerConfig.setServerWorkerThreads(8);NettyRemotingServer remotingServer = new NettyRemotingServer(nettyServerConfig, null);// 支持共用或独立的业务处理线程池ExecutorService poolA = new ThreadPoolExecutor(4, 4, 0, TimeUnit.SECONDS, new ArrayBlockingQueue<>(1024));ExecutorService poolB = new ThreadPoolExecutor(4, 4, 0, TimeUnit.SECONDS, new ArrayBlockingQueue<>(1024));// 业务处理器NettyRequestProcessor processA = new NettyRequestProcessor() {@Overridepublic RemotingCommand processRequest(ChannelHandlerContext ctx, RemotingCommand request) throws Exception {System.out.println("received from client, remark:" + request.getRemark() + ", coe:" + request.getCode());RemotingCommand response = RemotingCommand.createResponseCommand(0, "server");switch (request.getCode()) {case 0:response.setBody(new String("hello sync 0").getBytes());case 1:response.setBody(new String("hello sync 1").getBytes());default:break;}return response;}@Overridepublic boolean rejectRequest() {return false;}};// 业务处理器NettyRequestProcessor processB = new NettyRequestProcessor(){@Overridepublic RemotingCommand processRequest(ChannelHandlerContext ctx, RemotingCommand request) throws Exception {System.out.println("received from client, remark:" + request.getRemark() + ", coe:" + request.getCode());RemotingCommand response = RemotingCommand.createResponseCommand(0, "server");switch (request.getCode()) {case 9:response.setBody(new String("hello sync 9").getBytes());default:break;}return response;}@Overridepublic boolean rejectRequest() {return false;}};// 注册 协议 - 对应的处理器, 类似web url 路由到对应的classremotingServer.registerProcessor(0, processA, poolA);remotingServer.registerProcessor(1, processA, poolA);remotingServer.registerProcessor(9, processB, poolB);remotingServer.start();System.out.println("start ok " + JSON.toJSONString(nettyServerConfig));System.in.read();}
}
▐ 启动client 发起调用
import io.netty.channel.ChannelHandlerContext;
import org.apache.rocketmq.remoting.InvokeCallback;
import org.apache.rocketmq.remoting.netty.NettyClientConfig;
import org.apache.rocketmq.remoting.netty.NettyRemotingClient;
import org.apache.rocketmq.remoting.netty.NettyRequestProcessor;
import org.apache.rocketmq.remoting.netty.ResponseFuture;
import org.apache.rocketmq.remoting.protocol.RemotingCommand;
import java.util.concurrent.ArrayBlockingQueue;
import java.util.concurrent.ExecutorService;
import java.util.concurrent.ThreadPoolExecutor;
import java.util.concurrent.TimeUnit;
public class Client {public static void main(String[] args) throws Exception {NettyClientConfig nettyServerConfig = new NettyClientConfig();// 配置线程数 netty eventGroup 线程池 处理自定义hander/耗时长等nettyServerConfig.setClientWorkerThreads(8);NettyRemotingClient remotingClient = new NettyRemotingClient(nettyServerConfig, null);// 支持共用或独立的业务处理线程池ExecutorService poolA = new ThreadPoolExecutor(4, 4, 0, TimeUnit.SECONDS, new ArrayBlockingQueue<>(1024));// 监听服务端发过来的请求remotingClient.registerProcessor(5, new NettyRequestProcessor() {@Overridepublic RemotingCommand processRequest(ChannelHandlerContext ctx, RemotingCommand request) throws Exception {System.out.println("receive from server : " + request.getCode());return null;}@Overridepublic boolean rejectRequest() {return false;}}, poolA);remotingClient.start();// 主动发起远程调用 {// 同步调用RemotingCommand request = RemotingCommand.createRequestCommand(0, null);request.setRemark("sync");RemotingCommand response = remotingClient.invokeSync("127.0.0.1:8888", request, 30 * 1000L);System.out.println("call sync ok remark:" + response.getRemark() + " body:" + new String(response.getBody()));}{// 异步调用RemotingCommand request = RemotingCommand.createRequestCommand(1, null);request.setRemark("async");remotingClient.invokeAsync("127.0.0.1:8888", request, 30 * 1000L, new InvokeCallback() {@Overridepublic void operationComplete(ResponseFuture responseFuture) {RemotingCommand response = responseFuture.getResponseCommand();System.out.println("call async ok remark:" + response.getRemark() + " body:" + new String(response.getBody()));}});}{// 单向调用RemotingCommand request = RemotingCommand.createRequestCommand(9, null);request.setRemark("oneway");remotingClient.invokeOneway("127.0.0.1:8888", request, 30 * 1000L);System.out.println("call oneway ok ");}System.in.read();}
}该点对点调用,是需要手动指定目标服务器的ip和端口的,不同于hsf拥有注册中心进行协调撮合提供目标ip。
▐ 日志输出
Connected to the target VM, address: '127.0.0.1:57381', transport: 'socket'
start ok {"listenPort":8888,"serverAsyncSemaphoreValue":64,"serverCallbackExecutorThreads":0,"serverChannelMaxIdleTimeSeconds":120,"serverOnewaySemaphoreValue":256,"serverPooledByteBufAllocatorEnable":true,"serverSelectorThreads":2,"serverSocketRcvBufSize":65535,"serverSocketSndBufSize":65535,"serverWorkerThreads":8,"useEpollNativeSelector":false}
received from client, remark:sync, coe:0
received from client, remark:async, coe:1
received from client, remark:oneway, coe:9
Connected to the target VM, address: '127.0.0.1:57385', transport: 'socket'
call sync ok remark:server body:hello sync 1
call oneway ok
call async ok remark:server body:hello sync 1
实现原理
关于netty如何封装java基础nio socket不做展开。
这里分析通信模块是如何封装netty,扩展调用协议规范的部分,重点描述其中关键的设计要点。
▐ server 启动 监听请求
作为服务端,需绑定端口,监听请求,这里采用标准netty服务端模式。
remotingServer.start();
@Overridepublic void start() {...ServerBootstrap childHandler =this.serverBootstrap.group(this.eventLoopGroupBoss, this.eventLoopGroupSelector).channel(useEpoll() ? EpollServerSocketChannel.class : NioServerSocketChannel.class).option(ChannelOption.SO_BACKLOG, 1024).option(ChannelOption.SO_REUSEADDR, true).option(ChannelOption.SO_KEEPALIVE, false).childOption(ChannelOption.TCP_NODELAY, true).childOption(ChannelOption.SO_SNDBUF, nettyServerConfig.getServerSocketSndBufSize()).childOption(ChannelOption.SO_RCVBUF, nettyServerConfig.getServerSocketRcvBufSize()).localAddress(new InetSocketAddress(this.nettyServerConfig.getListenPort())).childHandler(new ChannelInitializer<SocketChannel>() {@Overridepublic void initChannel(SocketChannel ch) throws Exception {
ch.pipeline()
.addLast(defaultEventExecutorGroup, HANDSHAKE_HANDLER_NAME, handshakeHandler)
.addLast(defaultEventExecutorGroup,encoder,new NettyDecoder(),new IdleStateHandler(0, 0, nettyServerConfig.getServerChannelMaxIdleTimeSeconds()),connectionManageHandler,serverHandler
);}});...ChannelFuture sync = this.serverBootstrap.bind().sync();InetSocketAddress addr = (InetSocketAddress) sync.channel().localAddress();...}
关注涉及几个线程池的地方:
bossGroup -> eventLoopGroupBoss 固定线程数1
workerGroup -> eventLoopGroupSelector 若linux采用epoll实现 否则使用nio实现, 线程数可配置
eventGroup -> defaultEventExecutorGroup 普通实现的 handler 工作线程池, 线程数可配置
另外就是传统艺能:心跳, 解码器 NettyEncoder,编码器 NettyDecoder,连接管理器 connectionManageHandler,和最终的业务处理器 serverHandler
▐ server 注册业务处理器
业务线程池配置
请求协议code关联业务处理器
// 支持共用或独立的业务处理线程池ExecutorService poolA = new ThreadPoolExecutor(4, 4, 0, TimeUnit.SECONDS, new ArrayBlockingQueue<>(1024));ExecutorService poolB = new ThreadPoolExecutor(4, 4, 0, TimeUnit.SECONDS, new ArrayBlockingQueue<>(1024));// 业务处理器NettyRequestProcessor processA = new NettyRequestProcessor() {@Overridepublic RemotingCommand processRequest(ChannelHandlerContext ctx, RemotingCommand request) throws Exception {System.out.println("received from client, remark:" + request.getRemark() + ", coe:" + request.getCode());RemotingCommand response = RemotingCommand.createResponseCommand(0, "server");switch (request.getCode()) {case 0:response.setBody(new String("hello sync 0").getBytes());case 1:response.setBody(new String("hello sync 1").getBytes());default:break;}return response;}@Overridepublic boolean rejectRequest() {return false;}};// 业务处理器NettyRequestProcessor processB = new NettyRequestProcessor(){@Overridepublic RemotingCommand processRequest(ChannelHandlerContext ctx, RemotingCommand request) throws Exception {System.out.println("received from client, remark:" + request.getRemark() + ", coe:" + request.getCode());RemotingCommand response = RemotingCommand.createResponseCommand(0, "server");switch (request.getCode()) {case 9:response.setBody(new String("hello sync 9").getBytes());default:break;}return response;}@Overridepublic boolean rejectRequest() {return false;}};// 注册 协议 - 对应的处理器, 类似web url 路由到对应的classremotingServer.registerProcessor(0, processA, poolA);remotingServer.registerProcessor(1, processA, poolA);remotingServer.registerProcessor(9, processB, poolB);不同业务独立线程池的必要性
在复杂业务场景中,比如商品管理链路,订单交易链路,将所有的请求堆积在一个线程池中,快请求和慢请求公用一个赛道,无法避免资源分配不均问题
通信模块设计为可手动配置每个业务的处理线程池
注册路由和线程池关系
@Overridepublic void registerProcessor(int requestCode, NettyRequestProcessor processor, ExecutorService executor) {ExecutorService executorThis = executor;if (null == executor) {executorThis = this.publicExecutor;}Pair<NettyRequestProcessor, ExecutorService> pair = new Pair<NettyRequestProcessor, ExecutorService>(processor, executorThis);this.processorTable.put(requestCode, pair);}建立 code - processor - pool 的三者映射关系,在后续收到请求后,可查找注册关系进行路由唤起processor
▐ client 启动 发起请求
NettyRemotingClient remotingClient = new NettyRemotingClient(nettyServerConfig, null);remotingClient.start();// 主动发起远程调用{// 同步调用RemotingCommand request = RemotingCommand.createRequestCommand(0, null);request.setRemark("sync");RemotingCommand response = remotingClient.invokeSync("127.0.0.1:8888", request, 30 * 1000L);System.out.println("call sync ok remark:" + response.getRemark() + " body:" + new String(response.getBody()));}{// 异步调用RemotingCommand request = RemotingCommand.createRequestCommand(1, null);request.setRemark("async");remotingClient.invokeAsync("127.0.0.1:8888", request, 30 * 1000L, new InvokeCallback() {@Overridepublic void operationComplete(ResponseFuture responseFuture) {RemotingCommand response = responseFuture.getResponseCommand();System.out.println("call async ok remark:" + response.getRemark() + " body:" + new String(response.getBody()));}});}{// 单向调用RemotingCommand request = RemotingCommand.createRequestCommand(9, null);request.setRemark("oneway");remotingClient.invokeOneway("127.0.0.1:8888", request, 30 * 1000L);System.out.println("call oneway ok ");}启动客户端client后,即处于长连接状态,双向通信及时性有保障
三种调用模式
作为通信组件,需要适配多种调用场景,同步异步调用已是基本操作,oneway用于不关心是否返回的场景。
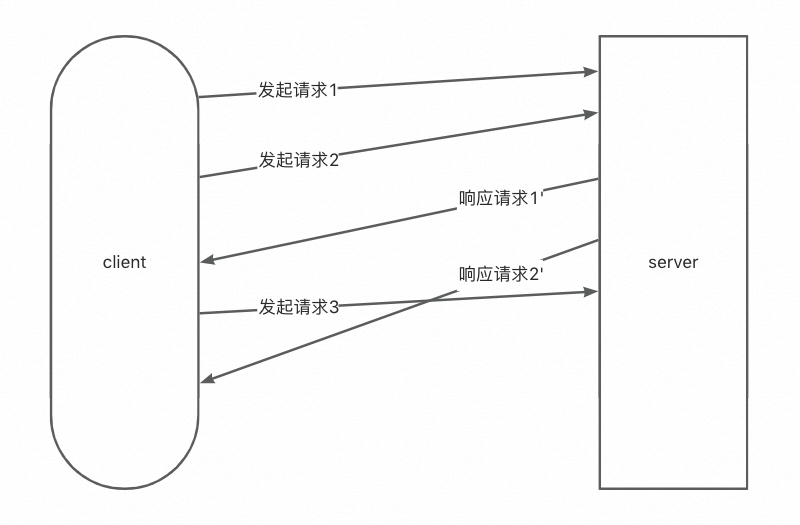
试想一下,在全双工双向异步通信的背景下,如何能像http一样实现同步调用,发出一个请求,收到一个请求后怎么跟前面发出的请求关联起来,又如何实现异步等待转为同步响应。
同步调用
发起请求
public RemotingCommand invokeSyncImpl(final Channel channel, final RemotingCommand request, final long timeoutMillis)throws InterruptedException, RemotingSendRequestException, RemotingTimeoutException {// 唯一idfinal int opaque = request.getOpaque(); ...final ResponseFuture responseFuture = new ResponseFuture(channel, opaque, timeoutMillis, null, null);// 把当前请求记录到待响应table中this.responseTable.put(opaque, responseFuture);final SocketAddress addr = channel.remoteAddress();channel.writeAndFlush(request).addListener(new ChannelFutureListener() {@Overridepublic void operationComplete(ChannelFuture f) throws Exception {if (f.isSuccess()) {//标记为写入成功responseFuture.setSendRequestOK(true);return;} else {responseFuture.setSendRequestOK(false);}// 写入异常结果 并唤起wait的线程responseTable.remove(opaque);responseFuture.setCause(f.cause());responseFuture.putResponse(null);public void putResponse(final RemotingCommand responseCommand) {this.responseCommand = responseCommand;this.countDownLatch.countDown();}log.warn("send a request command to channel <" + addr + "> failed.");}});// 同步等待结果RemotingCommand responseCommand = responseFuture.waitResponse(timeoutMillis);public RemotingCommand waitResponse(final long timeoutMillis) throws InterruptedException {this.countDownLatch.await(timeoutMillis, TimeUnit.MILLISECONDS);return this.responseCommand;}...}关键设计点:每一个请求request,都分配了一个 client唯一自增的id (request.getOpaque(); requestId.getAndIncrement())。
把id和上下文存储到请求待响应table中:发送请求后(写入channel),线程等待结果响应 responseFuture.waitResponse,利用countDownLatch等待结果。
异步调用
发起请求
public void invokeAsyncImpl(final Channel channel, final RemotingCommand request, final long timeoutMillis,final InvokeCallback invokeCallback)// 唯一idfinal int opaque = request.getOpaque();... final ResponseFuture responseFuture = new ResponseFuture(channel, opaque, timeoutMillis - costTime, invokeCallback, once);// 把当前请求记录到待响应table中this.responseTable.put(opaque, responseFuture);...channel.writeAndFlush(request).addListener(new ChannelFutureListener() {@Overridepublic void operationComplete(ChannelFuture f) throws Exception {if (f.isSuccess()) {//标记为写入成功responseFuture.setSendRequestOK(true);return;}requestFail(opaque);log.warn("send a request command to channel <{}> failed.", RemotingHelper.parseChannelRemoteAddr(channel));}}); ...}关键设计点:每一个请求request,都分配了一个 client唯一自增的id (request.getOpaque(); requestId.getAndIncrement())。
把id和上下文存储到请求待响应table中:发送请求后,将callback传递给responseFuture,等待callback被调用。
单向调用oneway
发起请求
public void invokeOnewayImpl(final Channel channel, final RemotingCommand request, final long timeoutMillis)throws InterruptedException, RemotingTooMuchRequestException, RemotingTimeoutException, RemotingSendRequestException {request.markOnewayRPC();...boolean acquired = this.semaphoreOneway.tryAcquire(timeoutMillis, TimeUnit.MILLISECONDS);final SemaphoreReleaseOnlyOnce once = new SemaphoreReleaseOnlyOnce(this.semaphoreOneway);channel.writeAndFlush(request).addListener(new ChannelFutureListener() {@Overridepublic void operationComplete(ChannelFuture f) throws Exception {once.release();if (!f.isSuccess()) {log.warn("send a request command to channel <" + channel.remoteAddress() + "> failed.");}}});...}无需监听结果
关键设计点:使用信号量Semaphore控制并发数
是通道瞬间并发度,不同于流控qps
oneway模式:不同于同步调用 异步调用 这里不关心返回值 所以无需记录id到待响应table
▐ server受理请求 路由
监听请求
class NettyServerHandler extends SimpleChannelInboundHandler<RemotingCommand> {@Overrideprotected void channelRead0(ChannelHandlerContext ctx, RemotingCommand msg) throws Exception {processMessageReceived(ctx, msg);}}public void processMessageReceived(ChannelHandlerContext ctx, RemotingCommand msg) throws Exception {final RemotingCommand cmd = msg;if (cmd != null) {switch (cmd.getType()) {// 来自client的请求case REQUEST_COMMAND:processRequestCommand(ctx, cmd);break;// 来自client的响应case RESPONSE_COMMAND:processResponseCommand(ctx, cmd);break;default:break;}}}public void processRequestCommand(final ChannelHandlerContext ctx, final RemotingCommand cmd) {// 路由关系 线程池配置 查询 final Pair<NettyRequestProcessor, ExecutorService> matched = this.processorTable.get(cmd.getCode());final Pair<NettyRequestProcessor, ExecutorService> pair = null == matched ? this.defaultRequestProcessor : matched;final int opaque = cmd.getOpaque();...Runnable run = new Runnable() {@Overridepublic void run() {...final RemotingResponseCallback callback = new RemotingResponseCallback() {@Overridepublic void callback(RemotingCommand response) {... // 非oneway模式 才需要回写responseif (!cmd.isOnewayRPC()) {...ctx.writeAndFlush(response); ...}}};...// 使用指定的业务处理器processor处理业务NettyRequestProcessor processor = pair.getObject1();RemotingCommand response = processor.processRequest(ctx, cmd);callback.callback(response); ...}};...// 包装为线程任务 放到配置的线程池中执行final RequestTask requestTask = new RequestTask(run, ctx.channel(), cmd);pair.getObject2().submit(requestTask);...}关键设计点
抽象复用:
client 和 server的 网络通信读模块是高度一致的,所以抽象出来共有的部分,复用代码,继承结构:

是一个很标准的抽象复用案例, 但需注意在两个角色(client server)中同一份代码是有不一样的解读链路
路由实现:
利用code - processor - pool 的三者映射关系方便的拿到对应业务的处理器及其独立的线程池,进行任务投递
设计理念类似观察者模式,添加观察者-业务处理器(这里仅单个观察者),当事件来了(socket消息读取)后,通知到所有观察者进行具体业务处理。
▐ client 监听响应
监听 同步调用结果
class NettyClientHandler extends SimpleChannelInboundHandler<RemotingCommand> { @Override protected void channelRead0(ChannelHandlerContext ctx, RemotingCommand msg) throws Exception {processMessageReceived(ctx, msg);}}public void processMessageReceived(ChannelHandlerContext ctx, RemotingCommand msg) throws Exception {final RemotingCommand cmd = msg;if (cmd != null) {switch (cmd.getType()) {// 来自server的请求case REQUEST_COMMAND:processRequestCommand(ctx, cmd);break;// 来自server的响应case RESPONSE_COMMAND:processResponseCommand(ctx, cmd);break;default:break;}}}public void processResponseCommand(ChannelHandlerContext ctx, RemotingCommand cmd) {final int opaque = cmd.getOpaque();// 从待响应table中找到响应对应的请求final ResponseFuture responseFuture = responseTable.get(opaque);if (responseFuture != null) {responseFuture.setResponseCommand(cmd);responseTable.remove(opaque);if (responseFuture.getInvokeCallback() != null) {// 异步调用 回调callbackexecuteInvokeCallback(responseFuture);} else {// 同步调用// 写入正常结果 并唤起wait的线程responseFuture.putResponse(cmd);public void putResponse(final RemotingCommand responseCommand) {this.responseCommand = responseCommand;this.countDownLatch.countDown();}responseFuture.release();}} else {log.warn("receive response, but not matched any request, " + RemotingHelper.parseChannelRemoteAddr(ctx.channel()));log.warn(cmd.toString());}}关键设计点
异步协调 && 同步等待 && 唤起机制
读取到来自server响应数据的线程 -> 通过待响应table查找当前响应归属的请求 -> 操作其countDownLatch定向唤起等待结果的请求线程
同步结果唤起条件:写入异常 || 等待超时 || 读取到来自server的对应id的响应
// 同步等待结果
RemotingCommand responseCommand = responseFuture.waitResponse(timeoutMillis);
监听 异步调用结果
class NettyClientHandler extends SimpleChannelInboundHandler<RemotingCommand> {@Overrideprotected void channelRead0(ChannelHandlerContext ctx, RemotingCommand msg) throws Exception {processMessageReceived(ctx, msg);}}public void processMessageReceived(ChannelHandlerContext ctx, RemotingCommand msg) throws Exception {final RemotingCommand cmd = msg;if (cmd != null) {switch (cmd.getType()) {// 来自server的请求case REQUEST_COMMAND:processRequestCommand(ctx, cmd);break;// 来自server的响应case RESPONSE_COMMAND:processResponseCommand(ctx, cmd);break;default:break;}}}public void processResponseCommand(ChannelHandlerContext ctx, RemotingCommand cmd) {final int opaque = cmd.getOpaque();// 从待响应table中找到响应对应的请求final ResponseFuture responseFuture = responseTable.get(opaque);if (responseFuture != null) {responseFuture.setResponseCommand(cmd);responseTable.remove(opaque);if (responseFuture.getInvokeCallback() != null) {// 异步调用executeInvokeCallback(responseFuture);} else {// 同步调用// 写入结果 并唤起wait的线程responseFuture.putResponse(cmd);public void putResponse(final RemotingCommand responseCommand) {this.responseCommand = responseCommand;this.countDownLatch.countDown();}responseFuture.release();}} else {log.warn("receive response, but not matched any request, " + RemotingHelper.parseChannelRemoteAddr(ctx.channel()));log.warn(cmd.toString());}}private void executeInvokeCallback(final ResponseFuture responseFuture) {ExecutorService executor = this.getCallbackExecutor();...executor.submit(new Runnable() {@Overridepublic void run() {try {responseFuture.executeInvokeCallback();} catch (Throwable e) {log.warn("execute callback in executor exception, and callback throw", e);} finally {responseFuture.release();}}});... }关键设计点
异步协调 && callback机制
读取到来自server响应数据的线程 -> 通过待响应table查找当前响应归属的请求 -> 回调callback
异步结果回调callback条件:写入异常 || 等待超时 || 读取到来自server的对应id的响应
另外callback执行采用了cas机制限制仅执行一次

模块升级-微服务化通信工具
why?
从业务视角开发来看,通信模块依然是比较基础的,对于普通开发者,希望能够像hsf一样,简单的定制协议service,契合java接口实现多态机制,不希望每次都去根据code或其他url之类的手动去分发路由,显得过于原始。
how?
参考hsf系列的远程调用方式,使用动态代理规范化协议传输,使用泛化反射机制便捷调用。
封装程度跟灵活程度往往是成反比的,注意不要过度设计,尽可能保留原始通信模块的灵活。
▐ 使用方式
定义接口 和 实现
public interface ServiceHello {String sayHello(String a, String b);Integer sayHelloInteger(Integer a, Integer b);
}
import com.uext.remote.rf.service.ServiceHello;
public class ServiceHelloImpl implements ServiceHello {@Overridepublic String sayHello(String a, String b) {return "hello " + a + " " + b;}@Overridepublic Integer sayHelloInteger(Integer a, Integer b) {return 1000 + a + b;}
}同hsf,接口interface可打包后提供给消费者,实现类隐藏于提供者代码中
启动provider 注册服务监听
import com.alibaba.fastjson.JSON;
import com.uext.remote.rf.provider.ServiceHelloImpl;
import com.uext.remote.rf.provider.ServiceWorldImpl;
import com.uext.remote.rf.service.ServiceHello;
import com.uext.remote.rf.service.ServiceWorld;public class TestServer {public static void main(String[] args) throws Exception {ApiProviderBean apiProviderBean = new ApiProviderBean();apiProviderBean.setPort(8888);apiProviderBean.init();apiProviderBean.register(ServiceHello.class, new ServiceHelloImpl());apiProviderBean.register(ServiceWorld.class, new ServiceWorldImpl());System.out.println("start ok " + JSON.toJSONString(apiProviderBean));System.in.read();}
}
启动服务端,注册一些需要暴露的服务,通过接口和接口的实现类的实例进行绑定
启动consumer 发起调用
import com.uext.remote.rf.service.ServiceHello;
import com.uext.remote.rf.service.ServiceWorld;
import org.apache.rocketmq.remoting.netty.NettyClientConfig;
import org.apache.rocketmq.remoting.netty.NettyRemotingClient;
public class TestClient {public static void main(String[] args) throws Exception {// 初始化一个连接客户端NettyClientConfig nettyServerConfig = new NettyClientConfig();NettyRemotingClient remotingClient = new NettyRemotingClient(nettyServerConfig, null);remotingClient.start();ApiConsumerBean apiConsumerBean = new ApiConsumerBean();apiConsumerBean.setRemotingClient(remotingClient);apiConsumerBean.setInterfac(ServiceHello.class);apiConsumerBean.setTimeOut(30000L);apiConsumerBean.setAddr("127.0.0.1:8888");ServiceHello serviceHello = apiConsumerBean.getProxy();ApiConsumerBean apiConsumerBean2 = new ApiConsumerBean();apiConsumerBean2.setRemotingClient(remotingClient);apiConsumerBean2.setInterfac(ServiceWorld.class);apiConsumerBean2.setTimeOut(30000L);apiConsumerBean2.setAddr("127.0.0.1:8888");ServiceWorld serviceWorld = apiConsumerBean2.getProxy();System.out.println(serviceHello.sayHello("a", "b"));System.out.println(serviceHello.sayHelloInteger(1, 2));serviceWorld.sayWorld("aa", "bb");System.in.read();}
}
初始化一个长连接客户端, 获取接口远程实现实例, 发起调用。
日志输出
Connected to the target VM, address: '127.0.0.1:49830', transport: 'socket'
start ok {"index":{"com.uext.remote.hsf.service.ServiceWorld":{"public abstract void com.uext.remote.hsf.service.ServiceWorld.sayWorld(java.lang.String,java.lang.String)":{}},"com.uext.remote.hsf.service.ServiceHello":{"public abstract java.lang.Integer com.uext.remote.hsf.service.ServiceHello.sayHelloInteger(java.lang.Integer,java.lang.Integer)":{},"public abstract java.lang.String com.uext.remote.hsf.service.ServiceHello.sayHello(java.lang.String,java.lang.String)":{}}},"port":8888,"remotingServer":{"callbackExecutor":{"activeCount":0,"completedTaskCount":0,"corePoolSize":4,"largestPoolSize":0,"maximumPoolSize":4,"poolSize":0,"queue":[],"rejectedExecutionHandler":{},"shutdown":false,"taskCount":0,"terminated":false,"terminating":false,"threadFactory":{}},"rPCHooks":[]}}
world aa bb
Connected to the target VM, address: '127.0.0.1:53211', transport: 'socket'
hello a b
1003▐ 实现方式
请求头 参数协议
import lombok.Data;
import org.apache.rocketmq.remoting.CommandCustomHeader;
import org.apache.rocketmq.remoting.exception.RemotingCommandException;
@Data
public class CommonHeader implements CommandCustomHeader{/*** com.uext.remote.hsf.service.ServiceHello*/String interfaceName;/*** public abstract java.lang.String com.uext.remote.hsf.service.ServiceHello.sayHello(java.lang.String,java.lang.String)*/String methodName;String argsJsonJson;@Overridepublic void checkFields() throws RemotingCommandException {}
}
使用接口interface package url 和 方法 method的作为识别码,用以路由选择。
其中动态参数问题,需要考虑如何解决解码为方法参数对应的不同类型,本文采用简易实现(json)。
provider实现代码
import com.alibaba.fastjson.JSON;
import com.alibaba.fastjson.TypeReference;
import io.netty.channel.ChannelHandlerContext;
import lombok.Data;
import org.apache.rocketmq.remoting.netty.*;
import org.apache.rocketmq.remoting.protocol.RemotingCommand;
import java.lang.reflect.Method;
import java.lang.reflect.Parameter;
import java.util.*;
@Data
public class ApiProviderBean {private int port = 8888;// 长连接实例private NettyRemotingServer remotingServer;public void init() throws Exception {NettyServerConfig nettyServerConfig = new NettyServerConfig();nettyServerConfig.setListenPort(port);remotingServer = new NettyRemotingServer(nettyServerConfig, null);remotingServer.registerProcessor(0, new NettyRequestProcessor() {@Overridepublic RemotingCommand processRequest(ChannelHandlerContext ctx, RemotingCommand request) throws Exception {// 请求数据解析CommonHeader commonHeader = (CommonHeader) request.decodeCommandCustomHeader(CommonHeader.class);// 路由查找Map<String/*method*/, Call> map = index.get(commonHeader.getInterfaceName());Call call = Objects.requireNonNull(map, "interface not exists " + commonHeader.getInterfaceName()).get(commonHeader.getMethodName());if(call == null){throw new RuntimeException("method not exists " + commonHeader.getMethodName());}// 参数解码 todo 优化解码编码Parameter[] ts = call.method.getParameters();List<Object> args = new ArrayList<>();List<String> argsJson = JSON.parseObject(commonHeader.argsJsonJson, new TypeReference<List<String>>(){});for (int i = 0; i < argsJson.size(); i++) {// 根据method规范 逐一反序列化args.add(JSON.parseObject(argsJson.get(i), ts[i].getType()));}// 反射调用Object res = call.method.invoke(call.instance, args.toArray(new Object[0]));// 结果编码 回传 todo 优化解码编码RemotingCommand response = RemotingCommand.createResponseCommand(0, null);if(res != null) {response.setBody(JSON.toJSONBytes(res));}return response;}@Overridepublic boolean rejectRequest() {return false;}}, null);remotingServer.start();}private static class Call{Object instance;Method method;}private Map<String/*interface*/, Map<String/*method*/, Call>> index = new HashMap<>();/*** @param interfac 接口 协议* @param impl 实现类的实例*/public synchronized <T> void register(Class<T> interfac, T impl){// 建立 接口-实现类-方法 路由关系String iname = interfac.getName();Map<String/*method*/, Call> map = index.get(iname);if(map == null){map = new LinkedHashMap<>();index.put(iname, map);}for (Method declaredMethod : interfac.getDeclaredMethods()) {Call call = new Call();call.instance = impl;call.method = declaredMethod;map.put(declaredMethod.toString(), call);}}
}
关键在于 注册协议(interface)和实现类, 维护映射路由关系。
收到channel请求的数据后,解码,根据映射路由关系进行反射调用拿到结果,编码结果,回写到channel
由于通道code 定义为int,但为了灵活配置接口及实现,不想硬编码,所以丢失了自定义不同业务线程池的特性,如果有需要可以重构通道code为string,然后把相关路由协议序列化到通道code中。
consumer实现代码
import com.alibaba.fastjson.JSON;
import lombok.Data;
import org.apache.rocketmq.remoting.netty.NettyRemotingClient;
import org.apache.rocketmq.remoting.protocol.RemotingCommand;
import java.lang.reflect.InvocationHandler;
import java.lang.reflect.Method;
import java.lang.reflect.Proxy;
import java.nio.charset.StandardCharsets;
import java.util.ArrayList;
import java.util.List;
@Data
public class ApiConsumerBean implements InvocationHandler {/*** 超时时间*/private Long timeOut = 3000L;/*** 目标 ip:port*/private String addr = "127.0.0.1:8888";/*** 实现类*/private Class<?> interfac;/*** 长连接实例*/private NettyRemotingClient remotingClient;/*** 获取协议 代理实例*/public <T> T getProxy() throws IllegalArgumentException {return (T) Proxy.newProxyInstance(Thread.currentThread().getContextClassLoader(), new Class[]{interfac}, this);}/*** 规范编码协议*/@Overridepublic Object invoke(Object target, Method method, Object[] args) throws Throwable {if (Object.class.equals(method.getDeclaringClass())) {return method.invoke(this, args);}// 协议编码入参CommonHeader header = new CommonHeader();header.setInterfaceName(interfac.getName());header.setMethodName(method.toString());// todo 优化解码编码List<String> argJson = new ArrayList<>();for (Object arg : args) {argJson.add(JSON.toJSONString(arg));}header.setArgsJsonJson(JSON.toJSONString(argJson));// 定义通道code 0 为 远程使用RemotingCommand request = RemotingCommand.createRequestCommand(0, header);Object res = null;if(method.getReturnType() != null) {RemotingCommand response = remotingClient.invokeSync(addr, request, timeOut);// 协议解码结果 todo 优化解码编码if(response.getBody() != null && response.getBody().length > 0) {res = JSON.parseObject(new String(response.getBody(), StandardCharsets.UTF_8), method.getReturnType());}}else{remotingClient.invokeOneway(addr, request, timeOut);}return res;}
}
关键在于 委托接口(interface)的调用实现, 动态代理为: 根据协议编码, 包装request之后写入channel
同步等待, 所以采用了同步调用模式
收到channel响应的结果后, 解码, 返回结果
其中无返回值的接口, 不关心响应结果, 可使用oneway方式调用
▐ 更进一步 注册中心 ip自动选择
引入注册中心 zk 或 namesrv,通过中心化协调,让某一些consumer自动选择某一台provider,并同时可以支持配置中心化下放,实现服务治理,越来越像微服务(dubbo)框架了哈。
当然,在跟多业务场景中,是无法引入其他中间件的,能少依赖就少依赖,降低复杂度。
在内网环境中,绝大部分项目采用Axxx一站式发布部署,配套Nxxxxxxx集群云资源管理,是支持按应用名动态获取当前集群ip清单的。
curl http://xxxxx.xxxx
{"num": 164,"result": [{"dns_ip": "13.23.xx.xxx",  "state": "working_online"},...],"start": 0,"total": 164
}
那么我们是否可以依赖该 ip清单,用来做本地hash ip自动选择呢?
当然可以,配合可用性心跳探测,每台机器节点自己维护一份可用性提供者消费者清单缓存,通过一致性hash等算法选择机器匹配机器。
那么就得到了一个简易版的低依赖,去中心化,高可用的微服务通信框架。

团队介绍
大淘宝技术开放平台,是淘宝天猫与外部生态互联互通的重要开放途径,通过开放的产品技术把一系列基础服务像水、电、煤一样输送给我们的商家、开发者、社区媒体以及其他合作伙伴,推动行业的定制、创新、进化,并最终促成新商业文明生态圈。
我们是一支技术能力雄厚,有着光荣历史传统的技术团队。在历年双十一战场上,团队都表现着优异的成绩。这里承载着每秒百万级的业务处理,90%的订单通过订单推送服务实时地推送到商家的ERP系统完成电商作业,通过奇门开放的ERP-WMS场景已经成为仓储行业标准。随着新零售业务的持续探索与快速发展,我们渴求各路高手加入,参与核心系统架构设计、性能调优,开放模式创新等富有技术挑战的工作。
¤ 拓展阅读 ¤
3DXR技术 | 终端技术 | 音视频技术
服务端技术 | 技术质量 | 数据算法
相关文章:
详解rocketMq通信模块升级构想
本文从开发者的角度深入解析了基于netty的通信模块, 并通过简易扩展实现微服务化通信工具雏形, 适合于想要了解netty通信框架的使用案例, 想了解中间件通信模块设计, 以及微服务通信底层架构的同学。希望此文能给大家带来通信模块架构灵感。 概述 网络通信是很常见的需求&#…...

【BOOST程序库】对字符串的处理
基本概念这里不解释了,代码中详细解释了BOOST程序库中对于字符串每一个方法的详细用法: 注意:这里每实践一个方法,都将上面实践过的方法进行了注释,如果全部取消注释,会出现重命名的问题。 #include <…...
(学习笔记-内存管理)虚拟内存
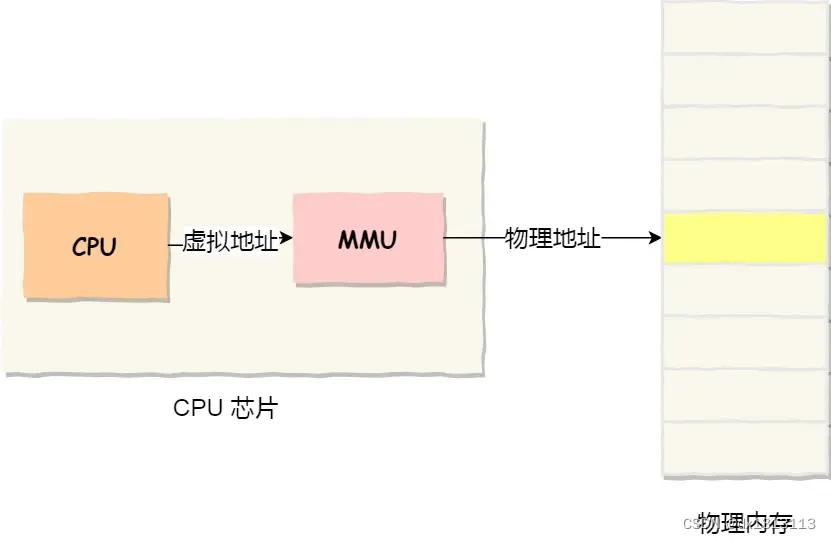
单片机是没有操作系统的,每次写完代码,都需要借助工具把程序烧录进去,这样程序才能跑起来。另外,单片机的CPU是直接操作内存的[物理地址]。 在这种情况下,要想在内存中同时运行两个程序是不可能的。如果第一个程序在 2…...
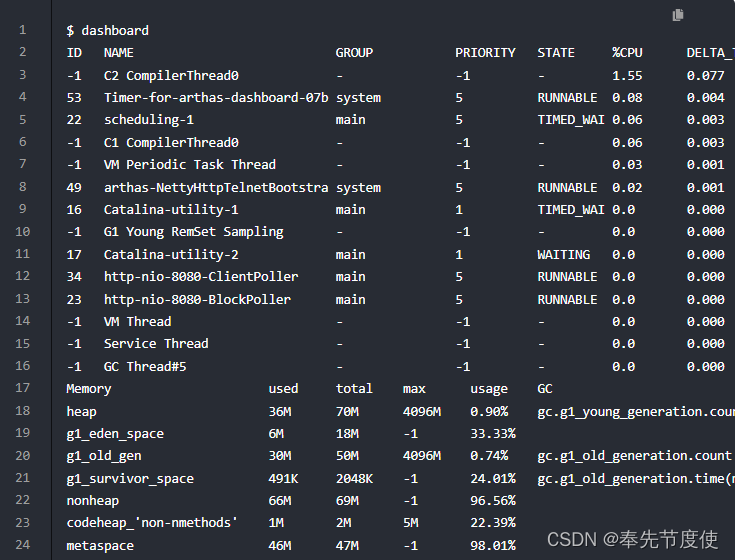
JVM理论(七)性能监控与调优
概述 性能优化的步骤 性能监控:就是通过以非强行或入侵方式收集或查看应用程序运行状态,包括如下问题 GC频繁CPU过载过高OOM内存泄漏死锁程序响应时间较长性能分析:通常在系统测试环境或者开发环境进行分析 通过查看程序日志以及GC日志,或者运用命令行工…...
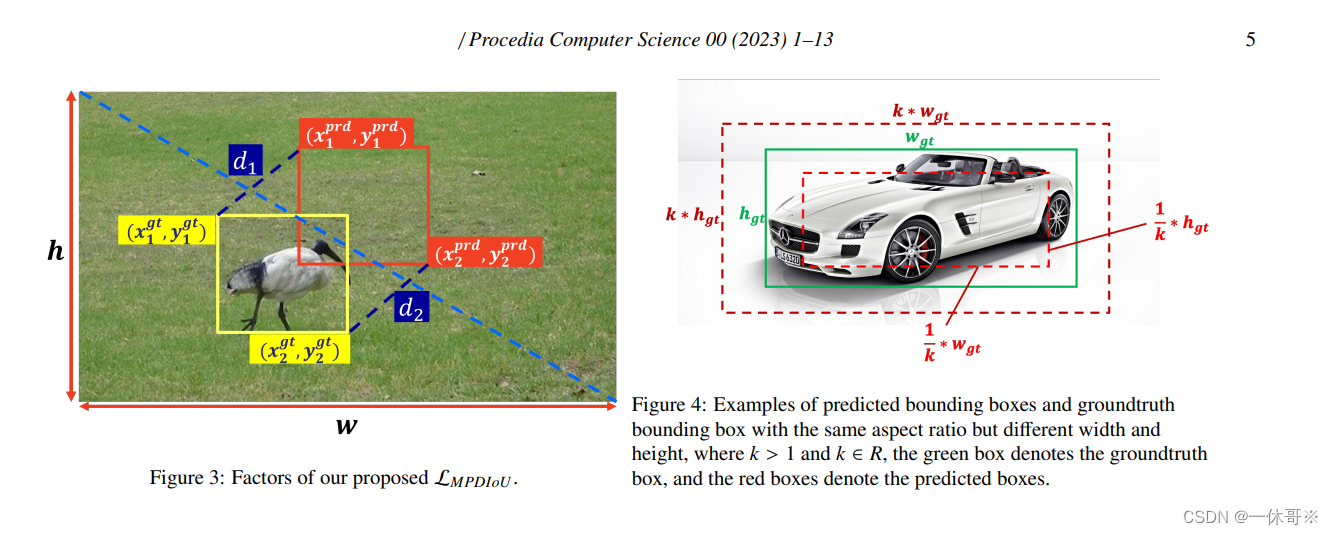
复现YOLOv8改进最新MPDIoU:有效和准确的边界盒回归的损失,打败G/E/CIoU,效果明显!!!
MPDIoU: A Loss for Efficient and Accurate Bounding Box Regression 论文简介MPDIoU核心设计思路论文方法实验部分加入YOLOv5代码论文地址:https://arxiv.org/pdf/2307.07662.pdf 论文简介 边界盒回归(Bounding box regression, BBR)广泛应用于目标检测和实例分割,是目标…...

LT6911C 是一款HDMI 1.4到双端口MIPIDSI/CSI或者LVDS加音频的一款高性能芯片
LT6911C 1.描述: LT6911C是一款高性能的HDMI1.4到MIPIDSI/CSI/LVDS芯片,用于VR/智能手机/显示器应用程序。对于MIPIDSI/CSI输出,LT6911C具有可配置的单端口或双端口MIPIDSI/CSI,具有1个高速时钟通道和1个~4个高速数据通道&#…...
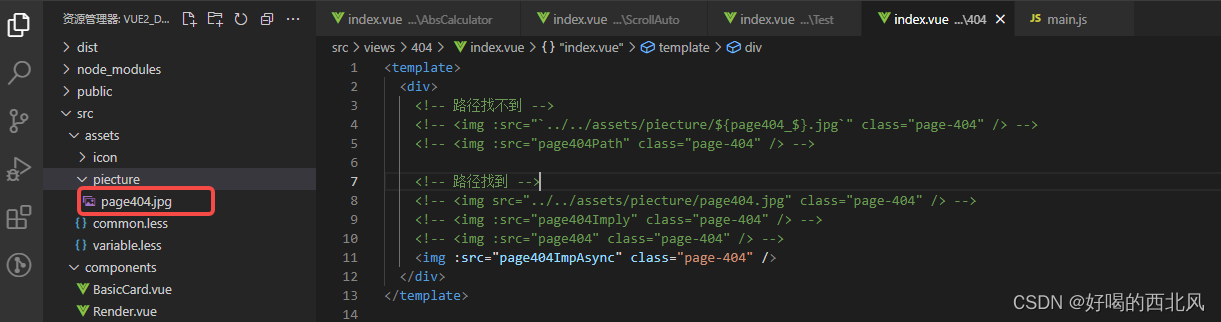
vue动态引入静态资源
vue动态引入静态资源 静态资源位置(../../assets/piecture/page404.jpg)或者(/assets/piecture/page404.jpg) 错误引入方式 错误引入方式(一) <template><div><img :src"../../asset…...

perl 强制覆盖拷贝文件
如果你想在Perl中进行文件拷贝时强制覆盖目标文件(如果目标文件已经存在),你可以使用标准模块File::Copy提供的cp函数,它允许你指定是否覆盖目标文件。 以下是一个示例,展示了如何在Perl中进行强制覆盖拷贝文件&#…...

C语言每日一题之整数求二进制1的个数
今天分享一道题目,用三种方法来求解 二进制1的个数 方法1 我们的十进制除10和取余数就可以得到我们每一位的数字,那我们的二进制也可 以 #include<stdio.h> int num_find_1(unsigned int n) {int count 0;while (n){if (1 n % 2){count;}n / 2…...

AcWing 4443.无限区域
原题链接:AcWing 4443.无限区域 题目来源:夏季每日一题2023 给定一个无限大的二维平面,设点 S 为该平面的中心点。 设经过点 S 的垂直方向的直线为 P,如果直线 P 是一个圆的切线,且切点恰好为点 S,那么&a…...
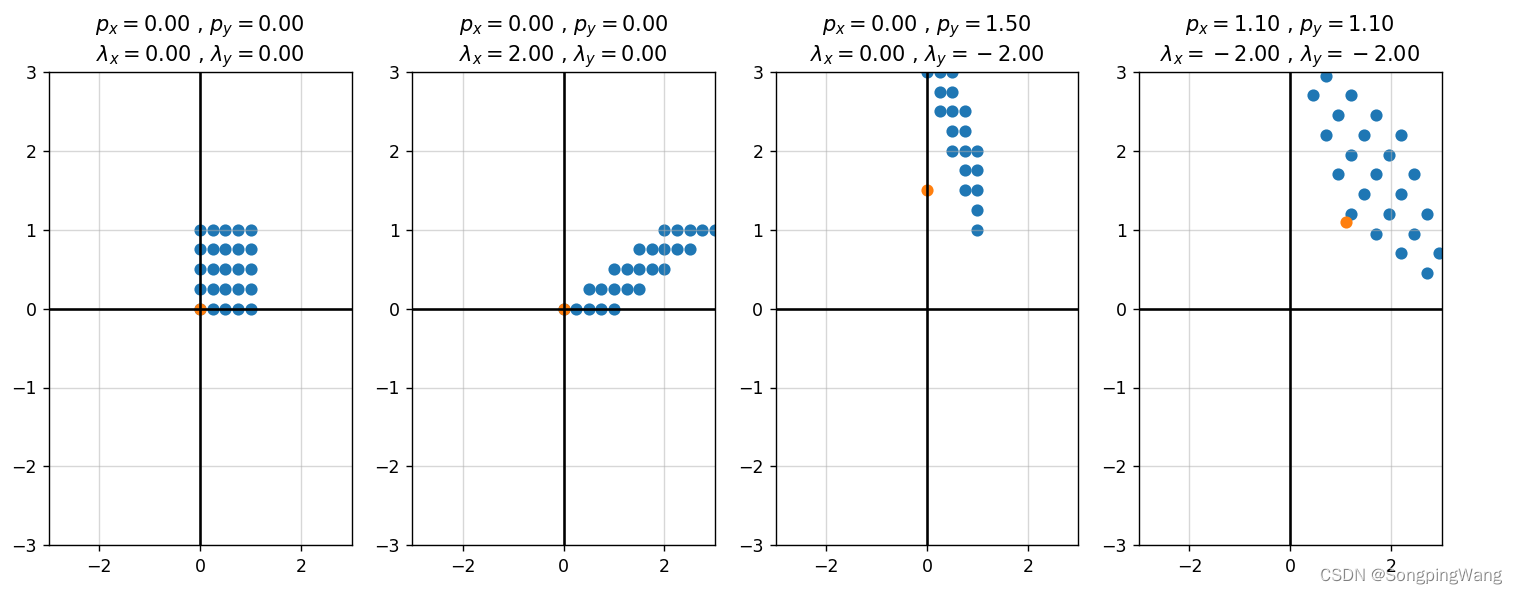
2D坐标系下的点的转换矩阵(平移、缩放、旋转、错切)
文章目录 1. 平移 (Translation)2. 缩放 (Scaling)3. 旋转 (Rotation)4. 错切 (Shearing)5. 镜像 (Reflection) 1. 平移 (Translation)…...

【Rabbitmq】报错:ERROR CachingConnectionFactory Channel shutdown: channel error;
报错内容 ERROR CachingConnectionFactory Channel shutdown: channel error; protocol method: #method<channel.close>(reply-code406, reply-textPRECONDITION_FAILED - unknown delivery tag 1, class-id60, method-id80) 原因 默认是自动ack,然后你代码…...

el-table组件的el-table-column电脑端使用fixed属性固定,移动端不使用固定,怎么实现?
要在电脑端使用 fixed 固定列,而在移动端不使用,可以使用 CSS 媒体查询结合 Vue 的动态绑定来实现。以下是一个示例代码: <template><el-table><el-table-columnprop"name"label"Name":fixed"isDesk…...
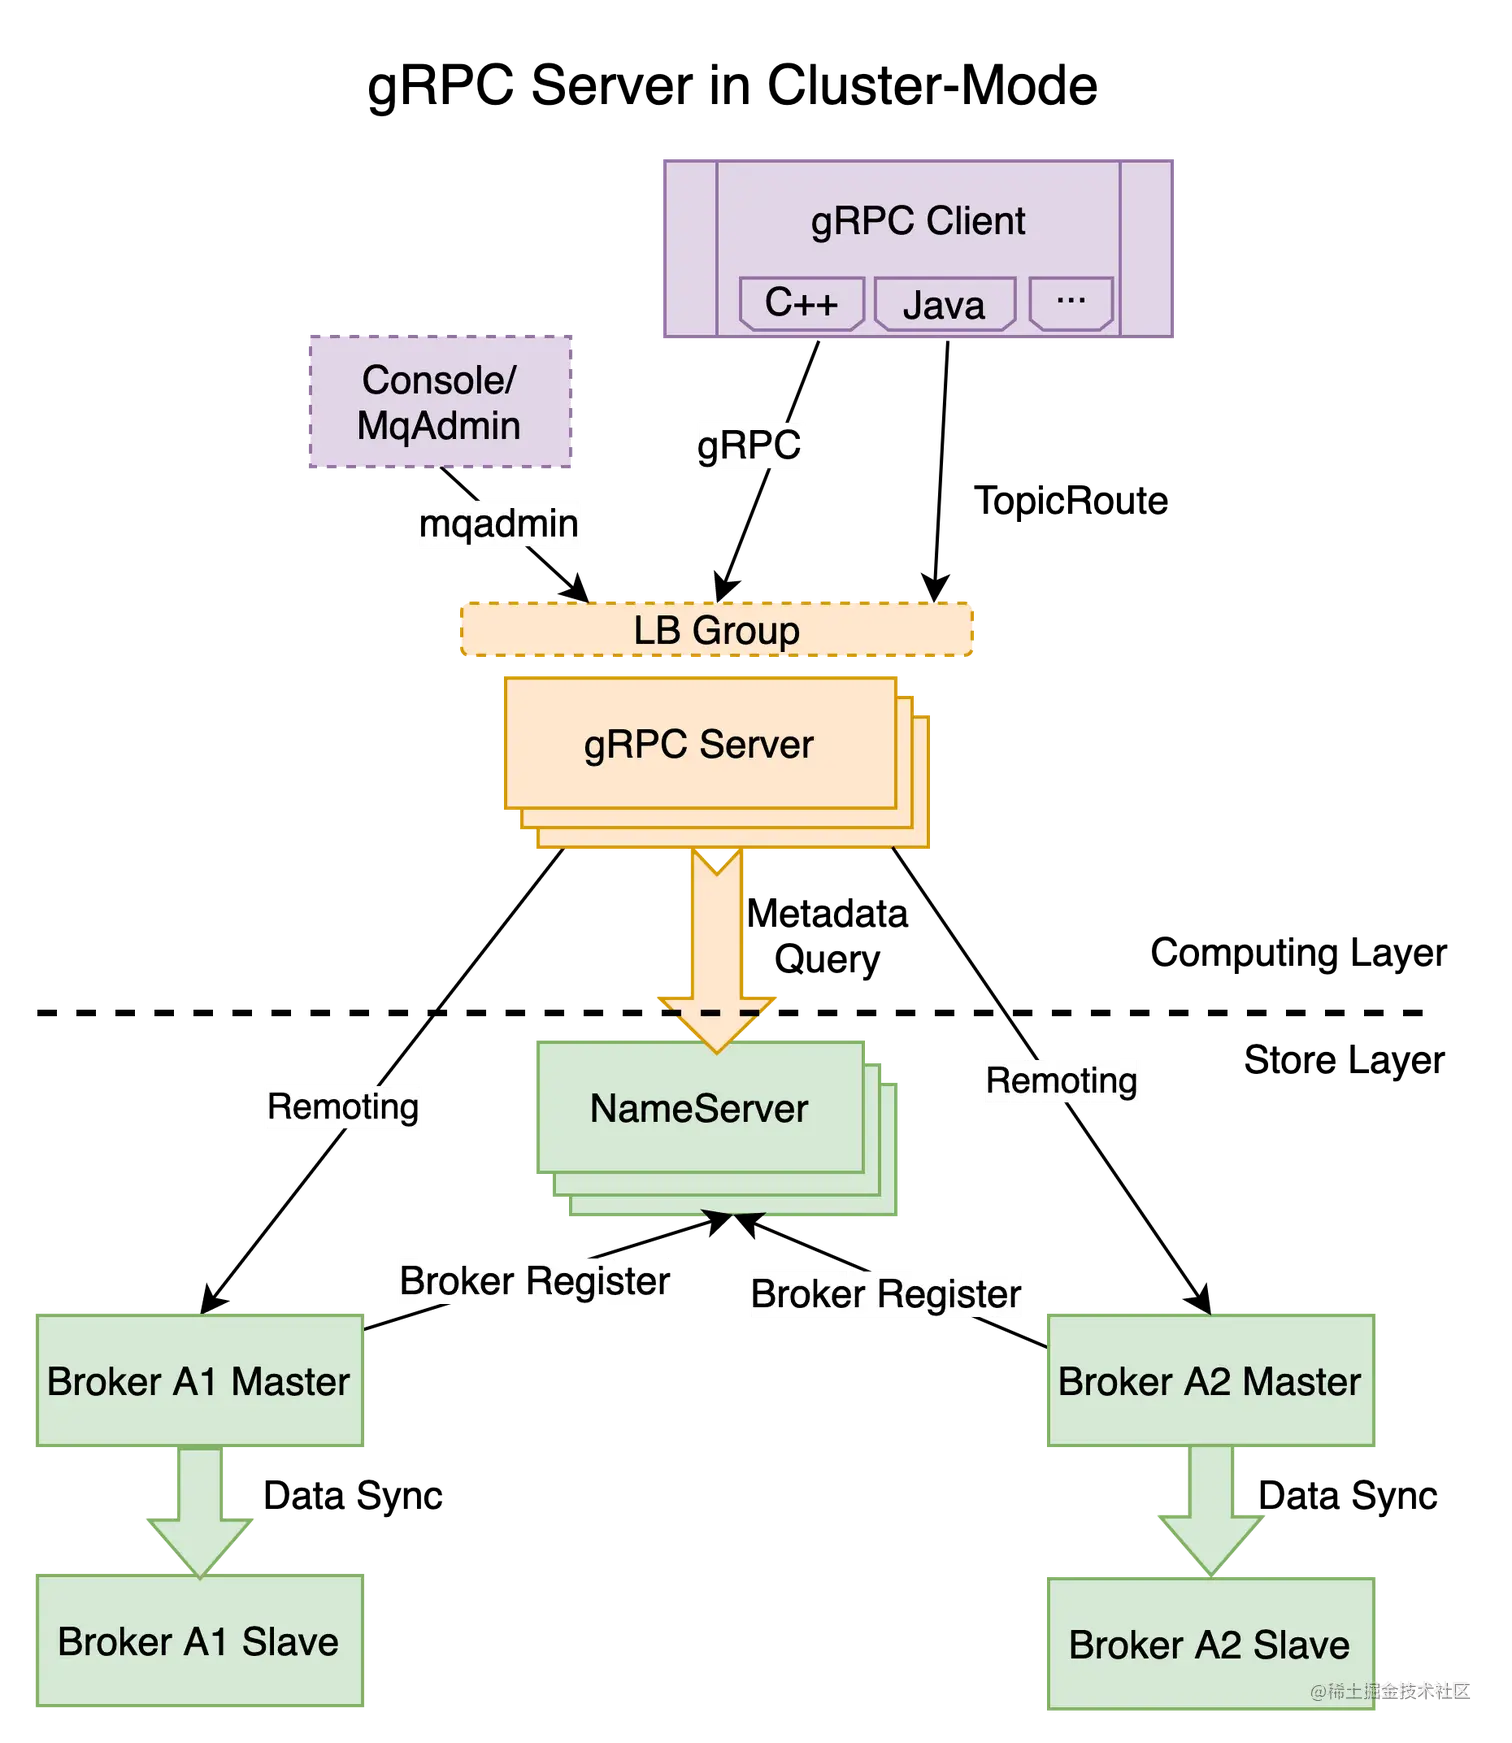
RocketMQ 行业分享
5.0的架构发生了重大调整,添加了一层rocketmq-proxy,可以通过grpc的方式接入。 参考 https://juejin.cn/post/7199413150973984827...

物联网场景中的边缘计算解决方案有哪些?
在物联网场景中,边缘计算是一种重要的解决方案,用于在物联网设备和云端之间进行实时数据处理、分析和决策。HiWoo Box作为工业边缘网关设备,具备边缘计算能力,包括单点公式计算、Python脚本编程以及规则引擎,它为物联网…...

【C++ 进阶】学习导论:C/C++ 进阶学习路线、大纲与目标
目录 一、C 学习路线 二、C 课程大纲与学习目标 (1)第一阶段:C 语言基础 (2)第二阶段:C 高级编程 (3)第三阶段:C 核心编程与桌面应用开发 (4…...
【数据结构】实验七:字符串
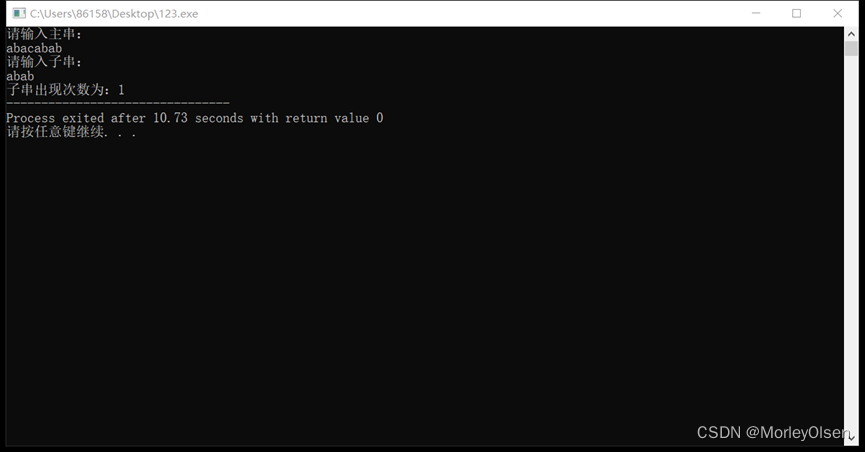
实验七 字符串实验报告 一、实验目的与要求 1)巩固对串的理解; 2)掌握串的基本操作实现; 3)掌握 BF 和 KMP 算法思想。 二、实验内容 1. 给定一个字符串ababcabcdabcde和一个子串abcd,查找字串是否在主串中出现。…...

排序算法、
描述 由小到大输出成一行,每个数字后面跟一个空格。 输入 三个整数 输出 输入三个整数,按由小到大的顺序输出。 输入样例 1 2 3 1 输出样例 1 1 2 3 输入样例 2 4 5 2 输出样例 2 2 4 5 代码一(如下)࿱…...

rbd快照管理、rbd快照克隆原理与实现、rbd镜像开机自动挂载、ceph文件系统、对象存储、配置对象存储客户端、访问Dashboard
day04 day04快照快照克隆开机自动挂载ceph文件系统使用MDS对象存储配置服务器端配置客户端访问Dashborad 快照 快照可以保存某一时间点时的状态数据快照是映像在特定时间点的只读逻辑副本希望回到以前的一个状态,可以恢复快照使用镜像、快照综合示例 # 1. 在rbd存…...

vue、vuex、vue-router初学导航配合elementui及vscode快捷键
目录 一、vue资源 1.vue知识库汇总 2.vuejs组件 3.Vue.js 组件编码规范 目标 #目录 #基于模块开发...

AI Agent在智能风控中的实战:多智能体欺诈检测与预警
AI Agent在智能风控中的实战:多智能体欺诈检测与预警 你有没有过明明是正常交易却被银行冻结账户的糟糕体验?或是听说过某电商平台上线新活动首日就被黑产团伙薅走数千万补贴的新闻?随着黑产欺诈向团伙化、专业化、动态化演进,传统依赖规则引擎、单模型机器学习的风控体系已…...

Jetson Orin Nano 升级jetpack5.1.2刷机过程记录
一.刷机起因 orin nano 接了个IMX477的摄像头,用 命令行DISPLAY:0.0 nvgstcapture-1.0 显示的画面有撕裂,让卖家查问题,卖家测试没有撕裂,对比环境,orin nano出厂默认的是jetpack5.1.1,卖家用的jetpack5.1.2版本,为了解决差异,要升级jetpack版本,前后搞了2天半,记录一下. 另外…...

机器学习结合基因无关通路映射:从临床数据挖掘新药靶点
1. 项目概述:当机器学习遇见代谢通路,如何从数据中“挖”出新药靶点?在生物医学研究的前沿,我们正面临一个核心矛盾:一方面,我们拥有海量的临床数据,比如血糖、血压、BMI等指标;另一…...

INT8量化下TVA注意力对齐精度保障方案
重磅预告:本专栏将独家连载系列丛书《智能体视觉技术与应用》部分精华内容,该书是世界首套系统阐述“因式智能体”视觉理论与实践的专著,特邀美国 TypeOne 公司首席科学家、斯坦福大学博士 Bohan 担任技术顾问。Bohan先生师从美国三院院士、“…...

万星easy-vibe:描述需求即发布 零基础无需学语法
开源Easy-Vibe是一套开源AI编程学习方案,把学习顺序从先学语法再做项目翻转为直接做项目。文章拆解了项目驱动、提示词编写、AI编辑器和多Agent协作的完整流程,解释了为什么想法比语法更重要。 github上datawhalechina/easy-vibe:它在GitHub…...

MPC Video Renderer终极指南:如何在Windows上实现专业级视频渲染体验
MPC Video Renderer终极指南:如何在Windows上实现专业级视频渲染体验 【免费下载链接】VideoRenderer Внешний видео-рендерер 项目地址: https://gitcode.com/gh_mirrors/vi/VideoRenderer MPC Video Renderer是一款专为Windows平台设计…...

MNE-Python 第9天学习笔记:源定位基础
一、什么是源定位? 1.1 通俗理解 到目前为止,我们分析的是"头皮上的脑电":头皮电极 → 记录头皮表面的电位↓这就像在地球表面测量地震波我们想知道的是:震源在哪里?多深?源定位 从头皮电位反推…...

5分钟掌握m4s-converter:将B站缓存视频无损转换为MP4的终极指南
5分钟掌握m4s-converter:将B站缓存视频无损转换为MP4的终极指南 【免费下载链接】m4s-converter 一个跨平台小工具,将bilibili缓存的m4s格式音视频文件合并成mp4 项目地址: https://gitcode.com/gh_mirrors/m4/m4s-converter 你是否曾在B站缓存了…...

3个核心问题:如何突破Cursor AI的使用限制并持续获得Pro功能体验?
3个核心问题:如何突破Cursor AI的使用限制并持续获得Pro功能体验? 【免费下载链接】cursor-free-vip [Support 0.45](Multi Language 多语言)自动注册 Cursor Ai ,自动重置机器ID , 免费升级使用Pro 功能: …...

Windows上直接安装APK文件:告别模拟器的轻量级安卓应用安装方案
Windows上直接安装APK文件:告别模拟器的轻量级安卓应用安装方案 【免费下载链接】APK-Installer An Android Application Installer for Windows 项目地址: https://gitcode.com/GitHub_Trending/ap/APK-Installer 还在为笨重的安卓模拟器烦恼吗?…...