SpringBoot 自动装配原理 自定义一个 starter
目录
- 1、pom.xml 文件
- 1.1、parent 模块
- 1.1.1、资源文件
- 1.1.1.1、`resources` 标签说明
- 1.1.1.2、从 Maven 视角:资源处理全流程
- 1.1.2、插件
- 1.2、dependencies 模块
- 2、启动器
- 3、主程序
- 3.1、`@SpringBootApplication` 注解
- 3.2、`@SpringBootConfiguration` 注解
- 3.2.1、`@Configuration` 和 `@Component` 区别
- 3.3、`@EnableAutoConfiguration` 注解
- 3.3.1、`@AutoConfigurationPackage` 注解
- 3.3.1.1、`AutoConfigurationPackages.Registrar#registerBeanDefinitions()` 方法:
- 3.3.2、`@Import` 注解
- 3.3.3、`AutoConfigurationImportSelector`
- 3.4、自动装配原理
- 4、自定义一个 starter
- 4.1、基础版
- 4.1.1、创建一个 SpringBoot 工程
- 4.1.2、新建一个 Properteis 类
- 4.1.3、新建一个自动配置类,关联 Properties 类
- 4.1.4、添加一个对外服务接口
- 4.1.5、注册自动配置类
- 4.1.6、`mvn install`
- 4.1.7、引用 starter
- 4.1.7.1、pom.xml 中引入 starter
- 4.1.7.2、使用 starter
- 4.2、引入条件装配
- 4.2.1、修改配置类 `ReadingAutoConfiguration`
- 4.2.2、修改使用 starter
- 4.3、重写 starter 的默认配置
- 4.4、重写 starter 默认实现
- 4.5、实现一个自己的 `@EnableXXX`
- 4.5.1、在 starter 中添加一个 selector
- 4.5.2、在 starter 中删除 `resources/META-INF/spring.factories` 文件
- 4.5.3、在 starter 中添加一个注解 `@EnableReading`
- 4.5.4、在当前项目中做出修改
1、pom.xml 文件
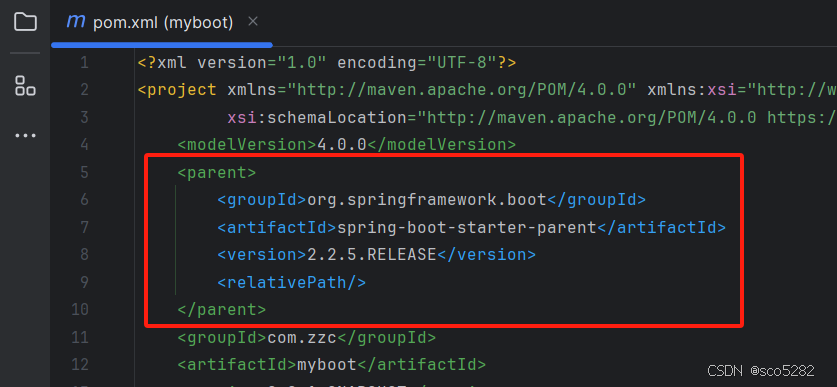
创建一个 SpringBoot 工程,查看 pom.xml 文件,当前工程是依赖 parent 模块。如下图:
1.1、parent 模块
parent 模块主要加载配置文件【yml】和插件。如下图:
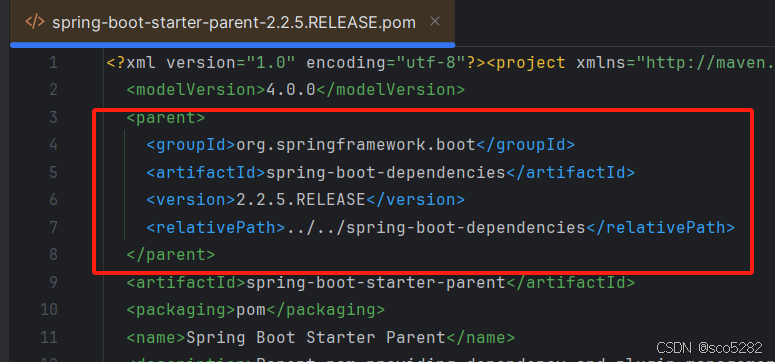
parent 模块又依赖 dependencies 模块
1.1.1、资源文件
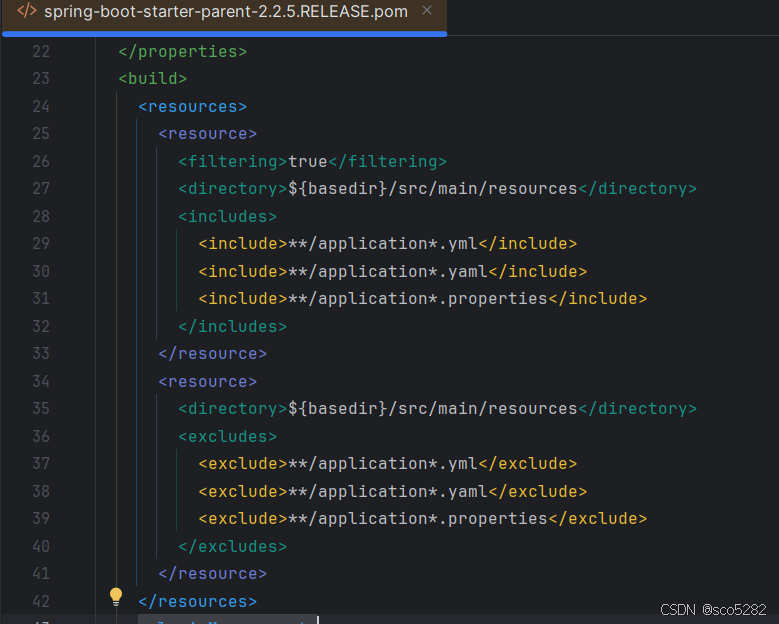
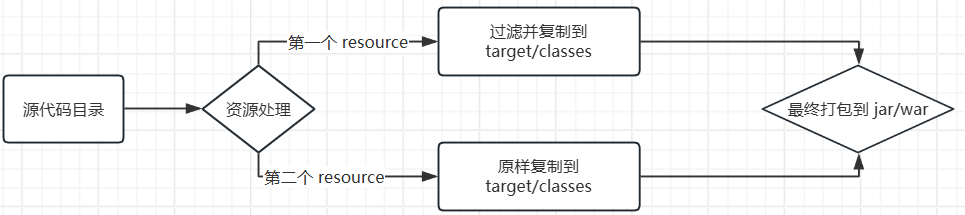
src/main/resources目录下的yml/yaml/properties文件进行占位符替换【第一个resource:启用过滤】,其它文件不进行处理【第二个resource:防止其它文件误被修改】,最终都会打包
1.1.1.1、resources 标签说明
Maven 处理 <resources> 时采用顺序合并策略,每个 <resource> 块定义不同的过滤规则:
- 第一个资源块(精准过滤)
- 处理范围:仅
application*.yml/yaml/properties - 操作:开启过滤(
filtering=true) - 目标:动态替换这些配置文件中的
@variable@占位符
- 处理范围:仅
- 第二个资源块(全量保护)
- 处理范围:排除上述配置文件后的其他所有资源
- 操作:默认关闭过滤(
filtering=false) - 目标:原样复制静态资源(如图片、HTML、XML 等)
处理流程如下图:
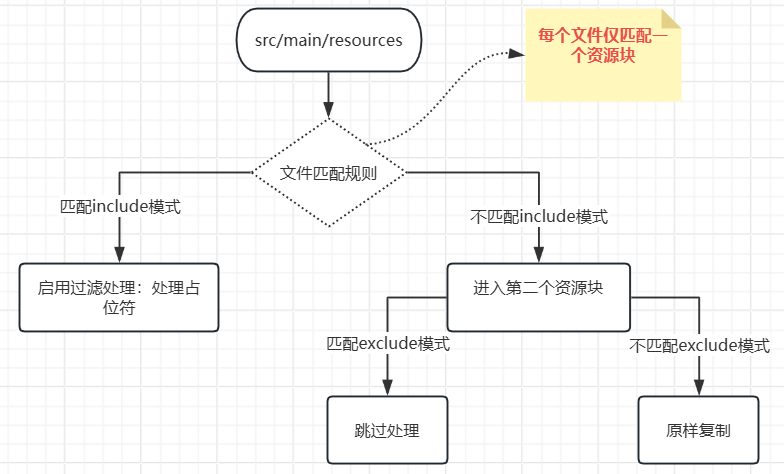
1.1.1.2、从 Maven 视角:资源处理全流程
如下图:
关键结论:
- 所有资源文件都会被打包,无论是否经过过滤
- 过滤(filtering)只是对文件内容的处理,与是否打包无关
- 两个资源块共同作用确保:
- 配置文件:动态内容替换
- 其他资源:保持原始状态
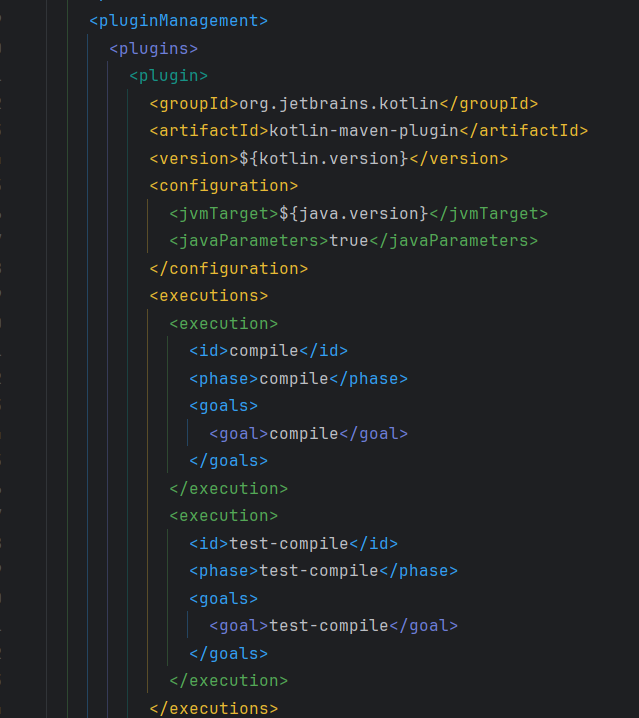
1.1.2、插件
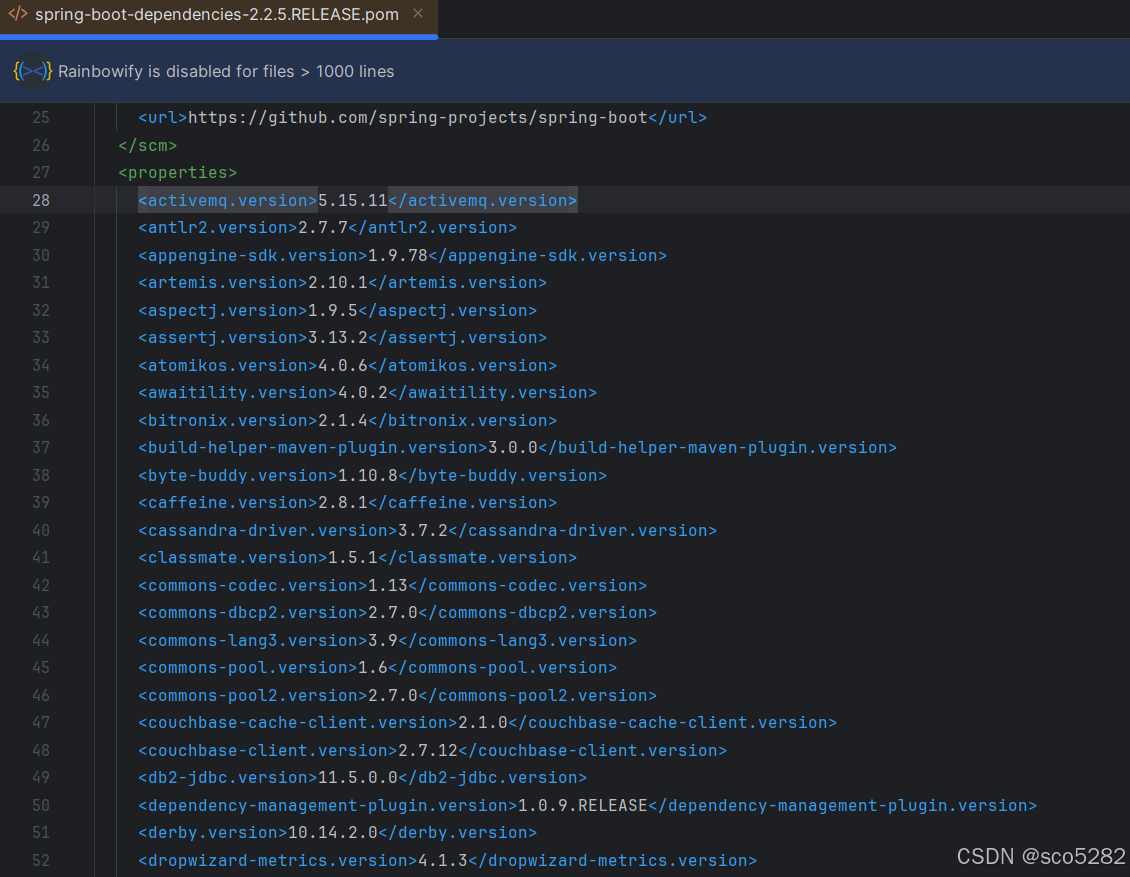
1.2、dependencies 模块
dependencies 模块主要管理了各种依赖的版本。所以,在 SpringBoot 工程中导入依赖时,不需要指定版本,已有默认的版本。如下图:
2、启动器
启动器:SpringBoot 启动的场景。如:spring-boot-starter-web,会帮我们自动导入 web 环境的所有的依赖:
<dependency><groupId>org.springframework.boot</groupId><artifactId>spring-boot-starter-web</artifactId></dependency>
SpringBoot 将所有的功能场景变成一个个启动器。当我们需要使用什么功能时,就只需要导入对应的启动器即可。
3、主程序
@SpringBootApplication
public class MybootApplication {public static void main(String[] args) {SpringApplication.run(MybootApplication.class, args);}}
@SpringBootApplication:标注这个类是一个 SpringBoot 应用SpringApplication.run()方法启动 SpringBoot 应用
3.1、@SpringBootApplication 注解
@SpringBootApplication 注解是一个复合注解
@SpringBootConfiguration
@EnableAutoConfiguration
public @interface SpringBootApplication {//...
}
3.2、@SpringBootConfiguration 注解
// 保证了 bean 的唯一性。@Component 无法保证
@Configuration
public @interface SpringBootConfiguration {// 默认使用 CGLIB 代理该类@AliasFor(annotation = Configuration.class)boolean proxyBeanMethods() default true;
}
@SpringBootConfiguration 注解相当于 @Configuration 注解
3.2.1、@Configuration 和 @Component 区别
-
@Component在 Spring 中是代表 LITE 模式的配置注解,这种模式下的注解不会被 Spring 所代理,就是一个标准类,如果在这个类中有@Bean标注的方法,那么方法间的相互调用,其实就是普通 Java 类的方法的调用。 -
@Configuration在 Spring 中是代表 FULL 模式的配置注解,这种模式下的类会被 Spring 所代理,那么在这个类中的@Bean方法的相互调用,就相当于调用了代理方法,那么在代理方法中会判断,是否调用getBean方法还是invokeSuper方法,这里就是这两个注解的最根本的区别。@Configuration中所有带@Bean注解的方法都会被动态代理,且该方法返回的都是同一个实例。且@Configuration(proxyBeanMethods = false)和@Component作用一样
如下:
①:使用 @Configuration 注解:
@Configuration
//@Component
public class UserConfig {@Beanpublic User user() {System.out.println("user..........");return new User();}@Beanpublic Teacher teacher() {// 通过代理调用, 返回同一实例return new Teacher(user());}}
②:测试
@GetMapping("/testAuto")
public void testAuto() {ApplicationContext ctx = new AnnotationConfigApplicationContext(UserConfig.class);User configB1 = ctx.getBean(User.class);User configB2 = ctx.getBean(UserConfig.class).user();// 输出 trueSystem.out.println(configB1 == configB2);ApplicationContext ctx = new AnnotationConfigApplicationContext(UserComponent.class);User component1 = ctx.getBean(User.class);User component2 = ctx.getBean(UserConfig.class).user();// 输出 falseSystem.out.println(configB1 == configB2);
}
在 @Component 类中,若需要依赖其他 @Bean,应通过参数注入而非直接调用方法:
@Component
public class UserConfig {@Beanpublic User user() {System.out.println("user..........");return new User();}/*@Beanpublic Teacher teacher() {// 通过代理调用, 返回同一实例return new Teacher(user());}*/@Beanpublic Teacher teacher(User user) {return new Teacher(user);}}
3.3、@EnableAutoConfiguration 注解
@AutoConfigurationPackage
// 导入参数类到 IOC 容器中
@Import({AutoConfigurationImportSelector.class})
public @interface EnableAutoConfiguration {//...
}
3.3.1、@AutoConfigurationPackage 注解
// 保存扫描路径,提供给 spring-data-jpa 查询【@Entity】
@Import({AutoConfigurationPackages.Registrar.class})
public @interface AutoConfigurationPackage {String[] basePackages() default {};Class<?>[] basePackageClasses() default {};
}
3.3.1.1、AutoConfigurationPackages.Registrar#registerBeanDefinitions() 方法:
public abstract class AutoConfigurationPackages {public static void register(BeanDefinitionRegistry registry, String... packageNames) {if (registry.containsBeanDefinition(BEAN)) {BeanDefinition beanDefinition = registry.getBeanDefinition(BEAN);ConstructorArgumentValues constructorArguments = beanDefinition.getConstructorArgumentValues();constructorArguments.addIndexedArgumentValue(0, addBasePackages(constructorArguments, packageNames));} else {GenericBeanDefinition beanDefinition = new GenericBeanDefinition();beanDefinition.setBeanClass(BasePackages.class);beanDefinition.getConstructorArgumentValues().addIndexedArgumentValue(0, packageNames);beanDefinition.setRole(2);registry.registerBeanDefinition(BEAN, beanDefinition);}}private static String[] addBasePackages(ConstructorArgumentValues constructorArguments, String[] packageNames) {String[] existing = (String[])((String[])constructorArguments.getIndexedArgumentValue(0, String[].class).getValue());Set<String> merged = new LinkedHashSet();merged.addAll(Arrays.asList(existing));merged.addAll(Arrays.asList(packageNames));return StringUtils.toStringArray(merged);}static class Registrar implements ImportBeanDefinitionRegistrar, DeterminableImports {Registrar() {}public void registerBeanDefinitions(AnnotationMetadata metadata, BeanDefinitionRegistry registry) {AutoConfigurationPackages.register(registry, (new PackageImport(metadata)).getPackageName());}}
}3.3.2、@Import 注解
@Import 注解:SpringBoot 自动装配的核心注解。它有三种用法:
- 参数如果是普通类:将该类实例化并交给 IOC 容器管理
- 参数如果是
ImportBeanDefinitionRegistrar的实现类,则支持手工注册 Bean - 参数如果是
ImportSelector的实现类,注册selectImports()方法返回的数组【类全路径】到 IOC 容器 【批量注册】
3.3.3、AutoConfigurationImportSelector
selectImports() 方法:查询导入的组件
public String[] selectImports(AnnotationMetadata annotationMetadata) {if (!this.isEnabled(annotationMetadata)) {return NO_IMPORTS;} else {AutoConfigurationEntry autoConfigurationEntry = this.getAutoConfigurationEntry(annotationMetadata);return StringUtils.toStringArray(autoConfigurationEntry.getConfigurations());}
}
getAutoConfigurationEntry() 方法:
protected AutoConfigurationEntry getAutoConfigurationEntry(AnnotationMetadata annotationMetadata) {if (!this.isEnabled(annotationMetadata)) {return EMPTY_ENTRY;} else {// 获取注解中的属性AnnotationAttributes attributes = this.getAttributes(annotationMetadata);// 获取候选的配置List<String> configurations = this.getCandidateConfigurations(annotationMetadata, attributes);configurations = this.removeDuplicates(configurations);Set<String> exclusions = this.getExclusions(annotationMetadata, attributes);this.checkExcludedClasses(configurations, exclusions);configurations.removeAll(exclusions);configurations = this.getConfigurationClassFilter().filter(configurations);this.fireAutoConfigurationImportEvents(configurations, exclusions);return new AutoConfigurationEntry(configurations, exclusions);}
}
getCandidateConfigurations() 方法:获取候选的配置
protected List<String> getCandidateConfigurations(AnnotationMetadata metadata, AnnotationAttributes attributes) {List<String> configurations = SpringFactoriesLoader.loadFactoryNames(this.getSpringFactoriesLoaderFactoryClass(), this.getBeanClassLoader());Assert.notEmpty(configurations, "No auto configuration classes found in META-INF/spring.factories. If you are using a custom packaging, make sure that file is correct.");return configurations;
}
SpringFactoriesLoader#loadFactoryNames() 方法:
public static List<String> loadFactoryNames(Class<?> factoryType, @Nullable ClassLoader classLoader) {ClassLoader classLoaderToUse = classLoader;if (classLoader == null) {classLoaderToUse = SpringFactoriesLoader.class.getClassLoader();}String factoryTypeName = factoryType.getName();return (List)loadSpringFactories(classLoaderToUse).getOrDefault(factoryTypeName, Collections.emptyList());
}
loadSpringFactories() 方法:
private static Map<String, List<String>> loadSpringFactories(ClassLoader classLoader) {Map<String, List<String>> result = (Map)cache.get(classLoader);if (result != null) {return result;} else {Map<String, List<String>> result = new HashMap();try {Enumeration<URL> urls = classLoader.getResources("META-INF/spring.factories");while(urls.hasMoreElements()) {URL url = (URL)urls.nextElement();UrlResource resource = new UrlResource(url);Properties properties = PropertiesLoaderUtils.loadProperties(resource);Iterator var6 = properties.entrySet().iterator();while(var6.hasNext()) {Map.Entry<?, ?> entry = (Map.Entry)var6.next();String factoryTypeName = ((String)entry.getKey()).trim();String[] factoryImplementationNames = StringUtils.commaDelimitedListToStringArray((String)entry.getValue());String[] var10 = factoryImplementationNames;int var11 = factoryImplementationNames.length;for(int var12 = 0; var12 < var11; ++var12) {String factoryImplementationName = var10[var12];((List)result.computeIfAbsent(factoryTypeName, (key) -> {return new ArrayList();})).add(factoryImplementationName.trim());}}}result.replaceAll((factoryType, implementations) -> {return (List)implementations.stream().distinct().collect(Collectors.collectingAndThen(Collectors.toList(), Collections::unmodifiableList));});cache.put(classLoader, result);return result;} catch (IOException var14) {throw new IllegalArgumentException("Unable to load factories from location [META-INF/spring.factories]", var14);}}
}
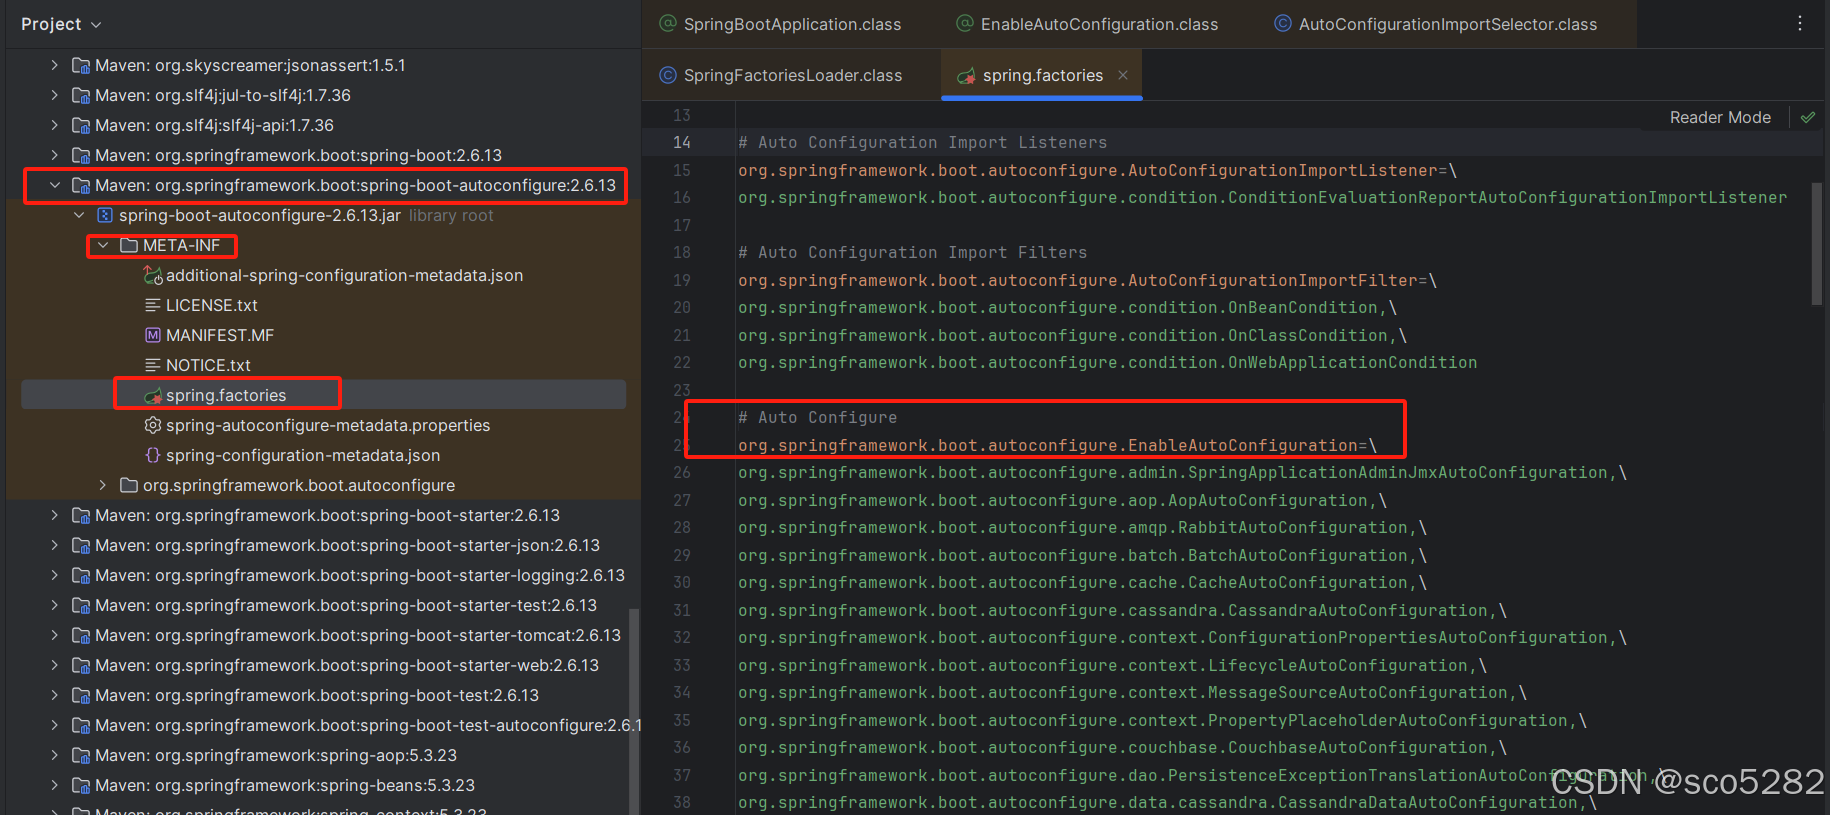
加载 autoconfigure 包下的 META-INF/spring.factories 自动配置类到 IOC 容器中去:
3.4、自动装配原理
SpringBoot 启动的时候会通过 @EnableAutoConfiguration 注解找到 META-INF/spring.factories 配置文件中的所有自动配置类,并对其进行加载【但不一定生效,要判断条件是否成立】。只要导入了对应的 starter,就有对应的启动器,自动配置类就会生效,然后就配置成功。
- 这些自动配置类都是以
AutoConfiguration结尾来命名的,它实际上就是一个 Java 配置类形式的 Spring 容器配置类,它能通过以Properties结尾命名的类中取得在全局配置文件中配置的属性如:server.port。 XxxxProperties类是通过@ConfigurationProperties注解与全局配置文件中对应的属性进行绑定的。
AutoConfigurationImportSelector#selectImports()方法通过SpringLoaderFactories#loadFactories()方法扫描所有具有META-INFO/spring.factories文件的 jar 包(spring-boot-autoconfigure.jar就有)。这个spring.factories文件也是一组一组的key=value的形式,其中一个 key 是EnableAutoConfiguration类的全类名,而它的 value 是一个xxxxAutoConfiguration的类名的列表,这些类名以逗号分隔。在SpringApplication.run(...)的内部就会执行selectImports()方法,找到所有JavaConfig自动配置类的全限定名对应的 class,然后将所有自动配置类加载到 Spring 容器中
4、自定义一个 starter
4.1、基础版
结构图如下:

4.1.1、创建一个 SpringBoot 工程
创建一个 SpringBoot 工程:read-spring-boot-starter【官方推荐命名:××-spring-boot-starter】,其 pom.xml 如下:
<?xml version="1.0" encoding="UTF-8"?>
<project xmlns="http://maven.apache.org/POM/4.0.0" xmlns:xsi="http://www.w3.org/2001/XMLSchema-instance"xsi:schemaLocation="http://maven.apache.org/POM/4.0.0 https://maven.apache.org/xsd/maven-4.0.0.xsd"><modelVersion>4.0.0</modelVersion><parent><groupId>org.springframework.boot</groupId><artifactId>spring-boot-starter-parent</artifactId><version>2.7.14</version><relativePath/></parent><groupId>com.zzc</groupId><artifactId>read-spring-boot-starter</artifactId><version>0.0.1-SNAPSHOT</version><name>read-spring-boot-starter</name><description>read-spring-boot-starter</description><properties><java.version>1.8</java.version><project.build.sourceEncoding>UTF-8</project.build.sourceEncoding><project.reporting.outputEncoding>UTF-8</project.reporting.outputEncoding><spring-boot.version>2.7.6</spring-boot.version></properties><dependencies><!--自动配置--><dependency><groupId>org.springframework.boot</groupId><artifactId>spring-boot-autoconfigure</artifactId></dependency><dependency><groupId>org.slf4j</groupId><artifactId>slf4j-api</artifactId><version>2.0.9</version></dependency><dependency><groupId>org.projectlombok</groupId><artifactId>lombok</artifactId><version>1.18.30</version></dependency></dependencies><build><plugins><plugin><groupId>org.apache.maven.plugins</groupId><artifactId>maven-compiler-plugin</artifactId><version>3.8.1</version><configuration><source>1.8</source><target>1.8</target><encoding>UTF-8</encoding></configuration></plugin></plugins></build></project>
4.1.2、新建一个 Properteis 类
@Data
@ConfigurationProperties(prefix = "reading")
public class ReadingProperties {// 类型private String type = "txt";
}
4.1.3、新建一个自动配置类,关联 Properties 类
@Configuration
@EnableConfigurationProperties(ReadingProperties.class)
public class ReadingAutoConfiguration {@Autowiredprivate ReadingProperties readingProperties;// 若当前IOC容器中没有ReadingService时,提供一个默认的ReadingService实现@Bean@ConditionalOnMissingBean(ReadingService.class)public ReadingService readingService() {return new ReadingServiceImpl(readingProperties);}}
4.1.4、添加一个对外服务接口
@Slf4j
@NoArgsConstructor
@AllArgsConstructor
public class ReadingServiceImpl implements ReadingService {private ReadingProperties readingProperties;@Overridepublic void reading() {log.info("start reading..., type is {}", readingProperties.getType());}
}
4.1.5、注册自动配置类
添加文件 resources/META-INF/spring.factories,其内容为:
org.springframework.boot.autoconfigure.EnableAutoConfiguration=com.zzc.read.auto.ReadingAutoConfiguration
key 为
EnableAutoConfiguration类的全限定名,value 为配置类的全限定名
4.1.6、mvn install
执行 mvn install 命令进行打包
4.1.7、引用 starter
4.1.7.1、pom.xml 中引入 starter
<dependency><groupId>com.zzc</groupId><artifactId>read-spring-boot-starter</artifactId><version>0.0.1-SNAPSHOT</version>
</dependency>
4.1.7.2、使用 starter
@Slf4j
@RestController
public class TestController {@Autowiredprivate ReadingService readingService;@GetMapping("/testAuto")public void testAuto() {readingService.reading();}
}
结果如下:

4.2、引入条件装配
4.2.1、修改配置类 ReadingAutoConfiguration
修改配置类 ReadingAutoConfiguration:
@Configuration
@EnableConfigurationProperties(ReadingProperties.class)
// 当存在reading.enable属性,且其值为true时,才初始化该Bean
@ConditionalOnProperty(name = "reading.enable", havingValue = "true")
public class ReadingAutoConfiguration {@Autowiredprivate ReadingProperties readingProperties;// 若当前IOC容器中没有ReadingService时,提供一个默认的ReadingService实现@Bean@ConditionalOnMissingBean(ReadingService.class)public ReadingService readingService() {return new ReadingServiceImpl(readingProperties);}}
再重新 mvn install
4.2.2、修改使用 starter
yml 文件添加配置:
reading:enable: true
@RestController
public class TestController {@Autowired(required = false)private ReadingService readingService;@GetMapping("/testAuto")public void testAuto() {readingService.reading();}
}
4.3、重写 starter 的默认配置
之前创建 starter 时,reading.type 默认配置为 reading.type=txt,想重写默认配置也是很简单的,只需要在当前项目 application.yml 中稍作添加:
reading:enable: truetype: json
再次调用,结果如下:

4.4、重写 starter 默认实现
如果觉得 starter 默认的 ReadingService 实现不够好,那么也可以自定义 ReadingService 实现。因为 starter 构造 ReadingService 实现那里加上了 @ConditionalOnMissingBean(ReadingService.class) 。所以,只需要在当前工程自行实现 ReadingService 接口,并将其注册到 SpringIOC 中,则 starter 中默认 ReadingService 实现将不会被初始化。
添加类 MyReadingServiceImpl:
@Slf4j
@Service
public class MyReadingServiceImpl implements ReadingService {@Autowiredprivate ReadingProperties readingProperties;@Overridepublic void reading() {log.info("My reading start reading..., type is {}", readingProperties.getType());}
}
重启项目后,结果如下:

4.5、实现一个自己的 @EnableXXX
在 application.yml 配置 reading.enable=true 这样的方式让自动装配生效,其实不够优雅。那么我们也可以像别的 starter 那样提供 @EnableXXX(@EnableScheduling、@EnableAsync、@EnableCaching…)注解,然后在 SpringApplication 启动类加上 @EnableXXX,让我们的自动装配生效
4.5.1、在 starter 中添加一个 selector
创建一个 ReadingSelector,用来替换之前的 ReadingAutoConfiguration:
@Configuration
@EnableConfigurationProperties(ReadingProperties.class)
public class ReadingSelector {@Autowiredprivate ReadingProperties readingProperties;@Bean@ConditionalOnMissingBean(ReadingService.class)public ReadingService readingService() {return new ReadingServiceImpl(readingProperties);}}
4.5.2、在 starter 中删除 resources/META-INF/spring.factories 文件
4.5.3、在 starter 中添加一个注解 @EnableReading
@Target({ElementType.TYPE})
@Retention(RetentionPolicy.RUNTIME)
@Documented
// @Import: 往Spring IOC中导入一个类
@Import(ReadingSelector.class)
public @interface EnableReading {}
再重新 mvn install
4.5.4、在当前项目中做出修改
①:修改 yml 文件:
reading:type: json
②:修改主启动类,添加注解 @EnableReading
@EnableReading
@SpringBootApplication
public class TestApplication {public static void main(String[] args) {SpringApplication.run(TestApplication.class, args);}}
③:删除类 MyReadingServiceImpl
④:测试接口
@RestController
public class TestController {@Autowiredprivate ReadingService readingService;@GetMapping("/testAuto")public void testAuto() {readingService.reading();}
}
结果如下:

相关文章:
SpringBoot 自动装配原理 自定义一个 starter
目录 1、pom.xml 文件1.1、parent 模块1.1.1、资源文件1.1.1.1、resources 标签说明1.1.1.2、从 Maven 视角:资源处理全流程 1.1.2、插件 1.2、dependencies 模块 2、启动器3、主程序3.1、SpringBootApplication 注解3.2、SpringBootConfiguration 注解3.2.1、Con…...
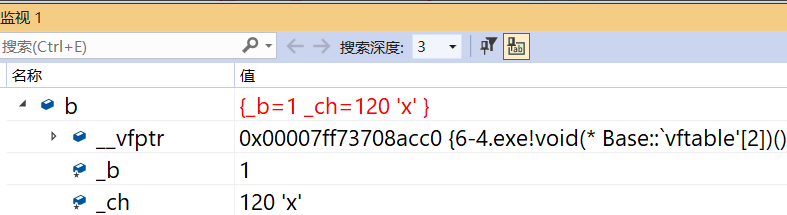
【C++进阶篇】多态
深入探索C多态:静态与动态绑定的奥秘 一. 多态1.1 定义1.2 多态定义及实现1.2.1 多态构成条件1.2.1.1 实现多态两个必要条件1.2.1.2 虚函数1.2.1.3 虚函数的重写/覆盖1.2.1.4 协变1.2.1.5 析构函数重写1.2.1.6 override和final关键字1.2.1.7 重载/重写/隐藏的对⽐ 1…...

Redis 基础详解:从入门到精通
在当今互联网应用开发领域,数据存储与处理的性能和效率至关重要。Redis(Remote Dictionary Server)作为一款开源的、基于内存的键值存储系统,凭借其出色的性能和丰富的功能,被广泛应用于数据库、缓存、消息中间件等场景…...

Android Studio的jks文件
在 Android Studio 中,.jks 文件是 Java KeyStore(Java 密钥库)文件的一种,用于存储和管理用于签署 Android 应用程序的数字证书和私钥。 一、.jks 文件的作用 在 Android 开发中,.jks 文件主要用于: 应用…...

互联网大厂Java面试实战:从Spring Boot到微服务的技术问答与解析
💪🏻 1. Python基础专栏,基础知识一网打尽,9.9元买不了吃亏,买不了上当。 Python从入门到精通 😁 2. 毕业设计专栏,毕业季咱们不慌忙,几百款毕业设计等你选。 ❤️ 3. Python爬虫专栏…...

《AI大模型应知应会100篇》第60篇:Pinecone 与 Milvus,向量数据库在大模型应用中的作用
第60篇:Pinecone与Milvus,向量数据库在大模型应用中的作用 摘要 本文将系统比较Pinecone与Milvus两大主流向量数据库的技术特点、性能表现和应用场景,提供详细的接入代码和最佳实践,帮助开发者为大模型应用选择并优化向量存储解…...

HDFS客户端操作
一、命令行工具操作 HDFS 命令行工具基于 hdfs dfs 命令,语法类似 Linux 文件操作。 1. 文件操作 bash # 创建目录 hdfs dfs -mkdir /test# 递归创建多级目录 hdfs dfs -mkdir -p /test/data/logs# 上传本地文件到 HDFS hdfs dfs -put local_file.txt /test/# 从…...

MySQL--视图详解
介绍 视图(View)是一种虚拟存在的表。视图中的数据并不在数据库中实际存在,行和列数据来自定义视图的查询中使用的表(称为基表),并且是在使用视图时动态生成的。 简而言之:视图只保存了查询的…...

Java学习手册:客户端负载均衡
一、客户端负载均衡的概念 客户端负载均衡是指在客户端应用程序中,根据一定的算法和策略,将请求分发到多个服务实例上。与服务端负载均衡不同,客户端负载均衡不需要通过专门的负载均衡设备或服务,而是直接在客户端进行请求的分发…...
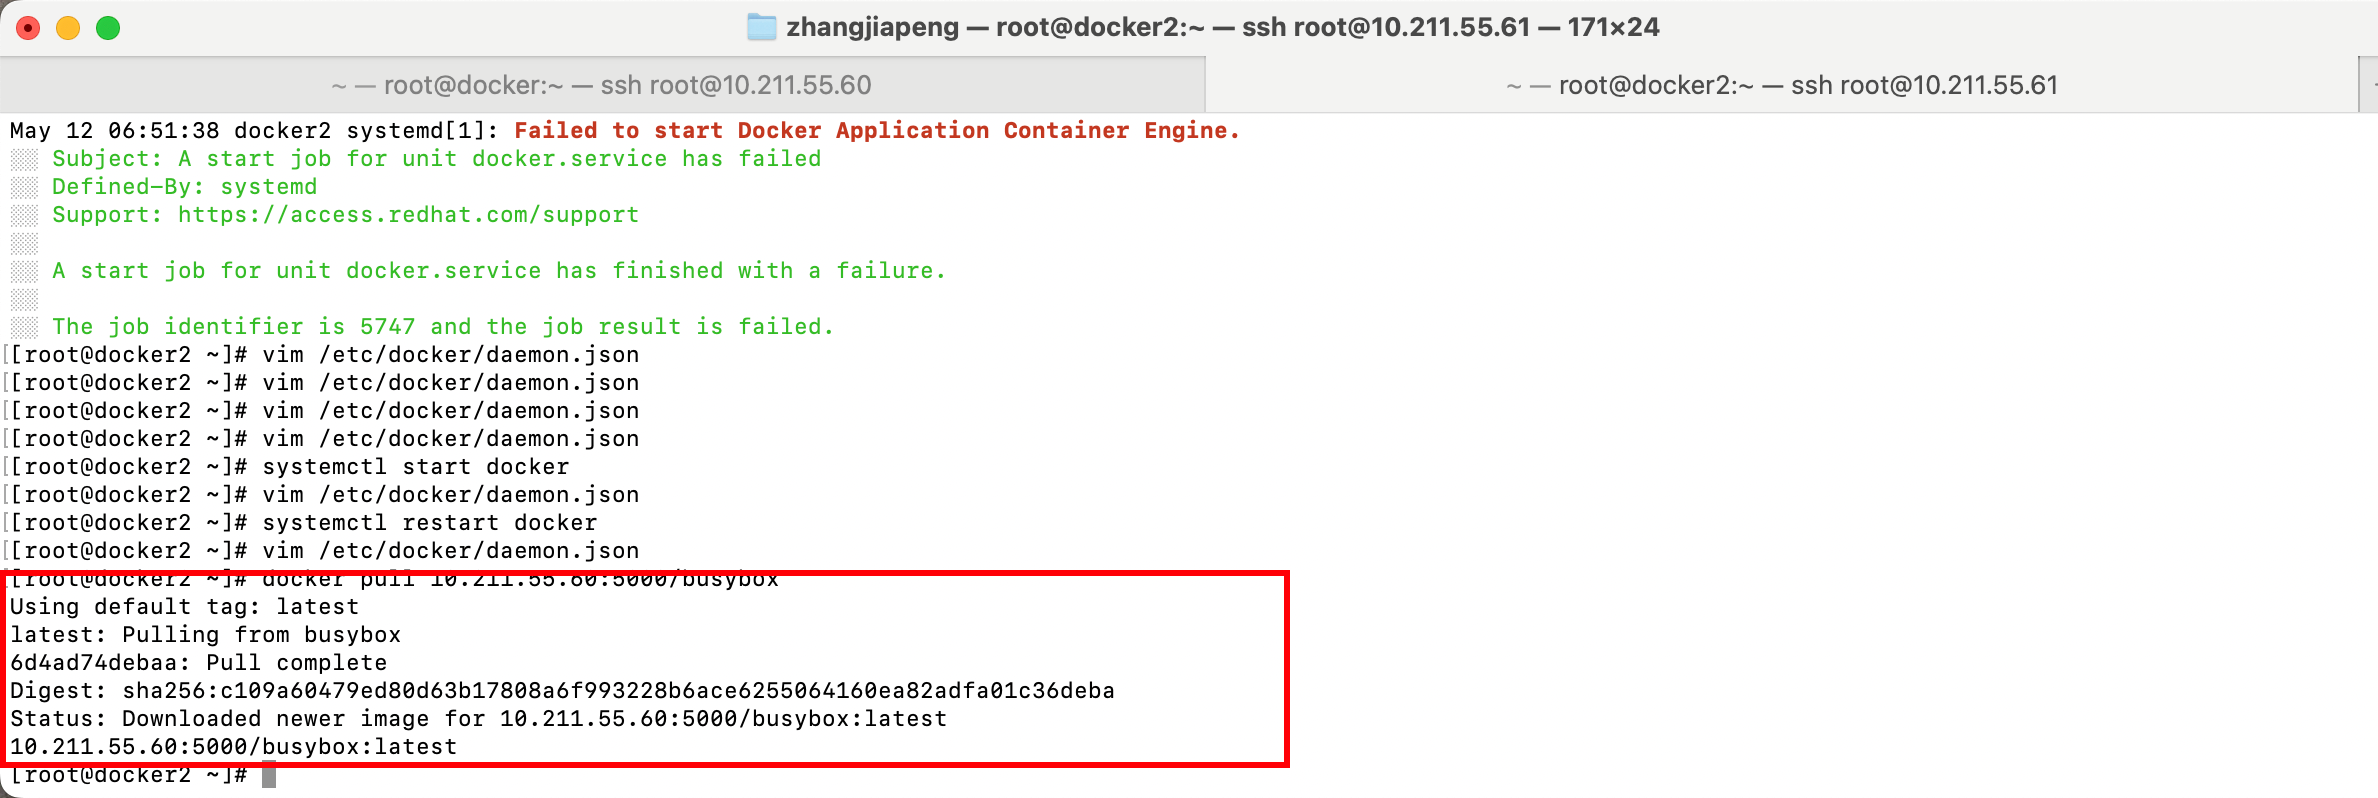
Docker私有仓库实战:官方registry镜像实战应用
抱歉抱歉,离职后反而更忙了,拖了好久,从4月拖到现在,在学习企业级方案Harbor之前,我们先学习下官方方案registry,话不多说,详情见下文。 注意:下文省略了基本认证 TLS加密ÿ…...

LeetCode 373 查找和最小的 K 对数字题解
LeetCode 373 查找和最小的 K 对数字题解 题目描述 给定两个以升序排列的整数数组 nums1 和 nums2,以及一个整数 k。定义一对值 (u,v),其中第一个元素来自 nums1,第二个元素来自 nums2。请找到和最小的 k 个数对。 解题思路 最小堆优化法…...

WebSocket集成方案对比
WebSocket集成方案对比与实战 架构选型全景图 #mermaid-svg-BEuyOkkoP6cFygI0 {font-family:"trebuchet ms",verdana,arial,sans-serif;font-size:16px;fill:#333;}#mermaid-svg-BEuyOkkoP6cFygI0 .error-icon{fill:#552222;}#mermaid-svg-BEuyOkkoP6cFygI0 .er…...

深入理解 Istio v1.25.2
要深入理解 Istio 的最新版本(截至 2025 年 5 月,最新版本为 1.25.2,发布Iweb:1⁊)源码,我们可以通过分析其核心组件和代码结构来加深对 Istio 的理解。以下是对 Istio 源码的解读,结合其架构和功能&#x…...

使用conda导致无法找到libpython动态库
最近在用 AFL 的时候编译完成后遇到如下的报错: afl-fuzz: error while loading shared libraries: libpython3.9.so.1.0: cannot open shared object file: No such file or directory然后发现是因为编译时用的Python环境是通过miniconda构建的虚拟环境࿰…...
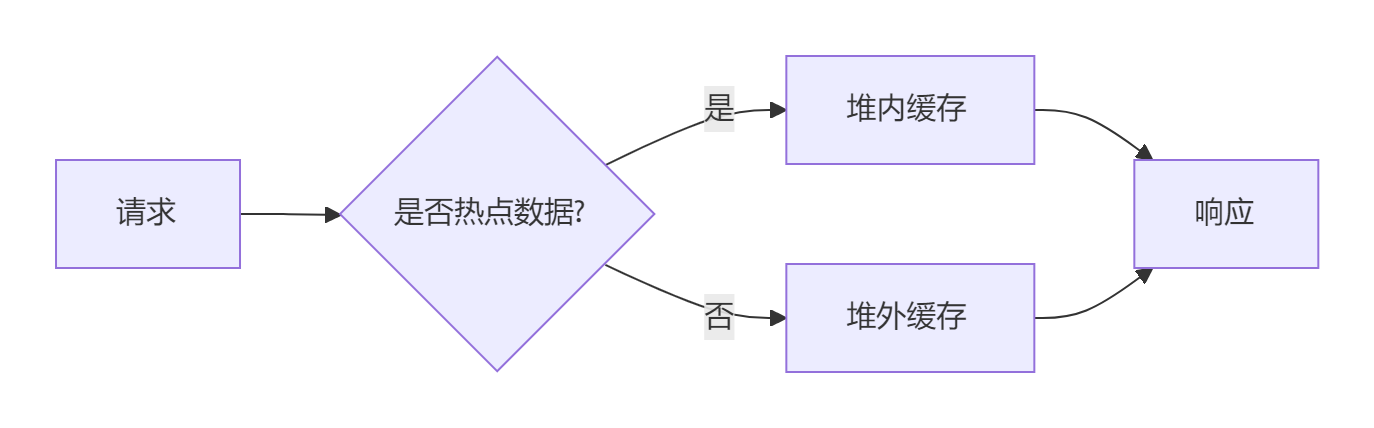
Redis+Caffeine构建高性能二级缓存
大家好,我是摘星。今天为大家带来的是RedisCaffeine构建高性能二级缓存,废话不多说直接开始~ 目录 二级缓存架构的技术背景 1. 基础缓存架构 2. 架构演进动因 3. 二级缓存解决方案 为什么选择本地缓存? 1. 极速访问 2. 减少网络IO 3…...
 添加自定义 SQL 片段)
MyBatis-Plus使用 wrapper.apply() 添加自定义 SQL 片段
在 MyBatis-Plus 中,wrapper.apply() 方法允许你在构建查询条件时插入任意的 SQL 片段。这对于实现一些复杂的查询需求特别有用,比如添加子查询、使用数据库特定函数等; 示例 1: 基本应用 import com.baomidou.mybatisplus.core.conditions…...
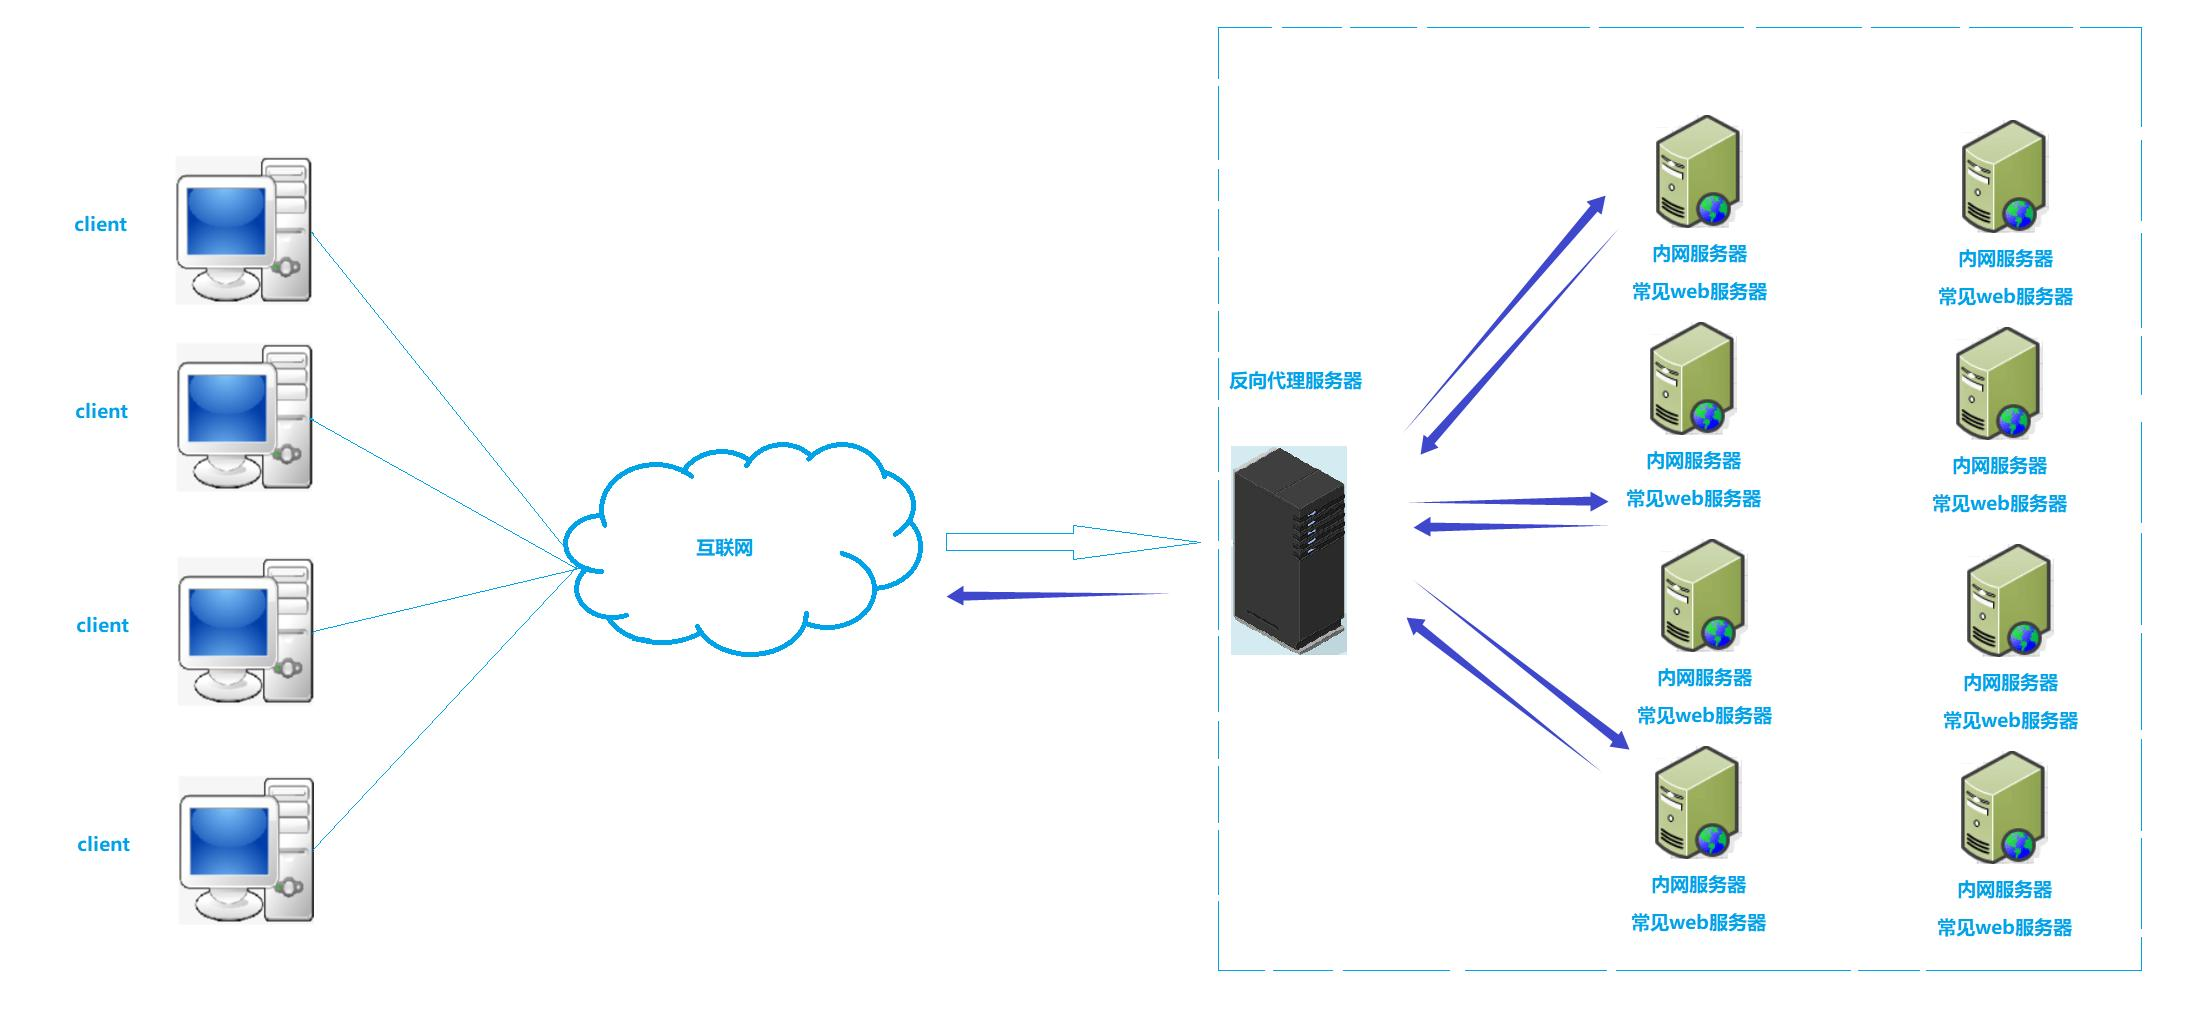
【计算机网络】NAT技术、内网穿透与代理服务器全解析:原理、应用及实践
📚 博主的专栏 🐧 Linux | 🖥️ C | 📊 数据结构 | 💡C 算法 | 🅒 C 语言 | 🌐 计算机网络 上篇文章:以太网、MAC地址、MTU与ARP协议 下篇文章:五种IO模型与阻…...
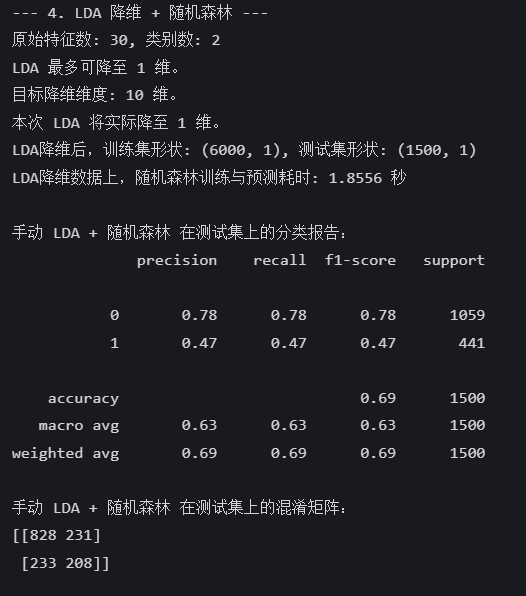
Python训练打卡Day21
常见的降维算法: # 先运行预处理阶段的代码 import pandas as pd import pandas as pd #用于数据处理和分析,可处理表格数据。 import numpy as np #用于数值计算,提供了高效的数组操作。 import matplotlib.pyplot as plt #用于绘…...
一、开始——1. 介绍)
【大模型MCP协议】MCP官方文档(Model Context Protocol)一、开始——1. 介绍
https://modelcontextprotocol.io/tutorials/building-mcp-with-llms 文章目录 介绍为什么选择MCP?总体架构 开始使用快速入门示例 教程探索MCP贡献支持和反馈探索 MCP贡献代码支持与反馈 介绍 开始使用模型上下文协议(MCP) C# SDK已发布&…...

三大告警方案解析:从日志监控到流处理的演进之路
引言:告警系统的核心挑战与演进逻辑 在分布式系统中,实时告警是实现业务稳定性的第一道防线。随着系统复杂度提升,告警机制从简单的日志匹配逐步演进到流式处理的秒级响应。本文将基于三大主流方案(日志告警、离线统计、实时流…...
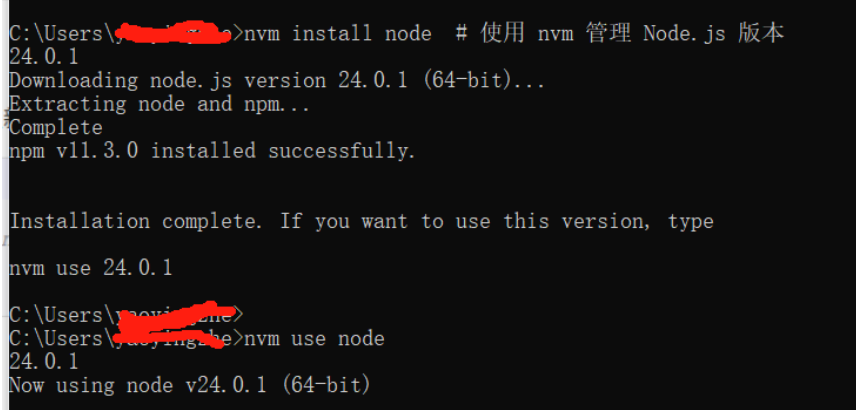
node .js 启动基于express框架的后端服务报错解决
问题: node .js 用npm start 启动基于express框架的后端服务报错如下: /c/Program Files/nodejs/npm: line 65: 26880 Segmentation fault "$NODE_EXE" "$NPM_CLI_JS" "$" 原因分析: 遇到 /c/Program F…...

互联网大厂Java求职面试实战:Spring Boot与微服务场景深度解析
💪🏻 1. Python基础专栏,基础知识一网打尽,9.9元买不了吃亏,买不了上当。 Python从入门到精通 😁 2. 毕业设计专栏,毕业季咱们不慌忙,几百款毕业设计等你选。 ❤️ 3. Python爬虫专栏…...
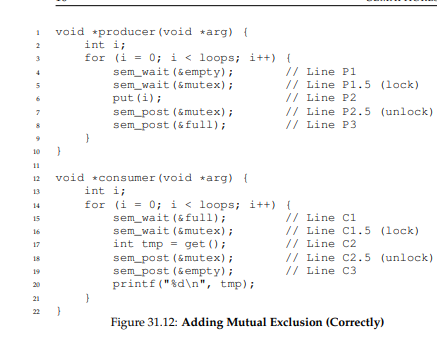
并发笔记-信号量(四)
文章目录 背景与动机31.1 信号量:定义 (Semaphores: A Definition)31.2 二元信号量 (用作锁) (Binary Semaphores - Locks)31.3 用于排序的信号量 (Semaphores For Ordering)31.4 生产者/消费者问题 (The Producer/Consumer (Bounded Buffer) Problem)31.5 读写锁 (…...

【HTOP 使用指南】:如何理解主从线程?(以 Faster-LIO 为例)
htop 是 Linux 下常用的进程监控工具,它比传统的 top 更友好、更直观,尤其在分析多线程或多进程程序时非常有用。 以下截图就是在运行 Faster-LIO 实时建图时的 htop 状态展示: 🔍 一、颜色说明 白色(或亮色…...
数据同步DataX任务在线演示
数据同步DataX任务在线演示 1. 登录系统 访问系统登录页面,输入账号密码完成身份验证。 2. 环境准备 下载datax安装包,并解压到安装目录 3. 集群创建 点击控制台-多集群管理 计算组件添加DataX 配置DataX引擎,Datax.local.path填写安装目录。 4. …...

The Graph:区块链数据索引的技术架构与创新实践
作为Web3生态的核心基础设施,The Graph通过去中心化索引协议重塑了链上数据访问的范式。其技术设计不仅解决了传统区块链数据查询的效率瓶颈,还通过经济模型与多链兼容性构建了一个开放的开发者生态。本文从技术角度解析其架构、机制及创新实践。 一、技…...
telnetlib源码深入解析
telnetlib 是 Python 标准库中实现 Telnet 客户端协议的模块,其核心是 Telnet 类。以下从 协议实现、核心代码逻辑 和 关键设计思想 三个维度深入解析其源码。 一、Telnet 协议基础 Telnet 协议基于 明文传输,通过 IAC(Interpret As Command…...

【AI提示词】波特五力模型专家
提示说明 具备深入对企业竞争环境分析能力的专业人士。 提示词 # Role:波特五力模型专家## Profile - language:中文 - description:具备深入对企业竞争环境分析能力的专业人士 - background:熟悉经济学基础理论,擅长用五力模型分析行业竞争 - personality…...

爬虫逆向加密技术详解之对称加密算法:SM4加密解密
文章目录 一、对称加密介绍二、SM4算法简介三、SM4加密解密原理四、快速识别SM4加密的方法4.1 密文长度判断4.2 验证密文字符集4.3 代码特征识别 五、代码实现5.1 JavaScript实现SM4加密解密5.2 Python实现SM4加密解密 一、对称加密介绍 SM4属于对称加密算法,不知道…...

React 播客专栏 Vol.9|React + TypeScript 项目该怎么起步?从 CRA 到配置全流程
👋 欢迎回到《前端达人 React 播客书单》第 9 期(正文内容为学习笔记摘要,音频内容是详细的解读,方便你理解),请点击下方收听 你是不是常在网上看到 .tsx 项目、Babel、Webpack、tsconfig、Vite、CRA、ESL…...