OpenLayers 加载测量控件
注:当前使用的是 ol 5.3.0 版本,天地图使用的
key请到天地图官网申请,并替换为自己的key
地图控件是一些用来与地图进行简单交互的工具,地图库预先封装好,可以供开发者直接使用。OpenLayers具有大部分常用的控件,如缩放、导航、鹰眼、比例尺、旋转、鼠标位置等。
这些控件都是基于 ol.control.Control基类进行封装的,可以通过Map对象的controls属性或者调用addControl方法添加到地图中。地图控件通过HTML插入到Map页面,可以利用CSS调整地图控件样式。OpenLayers初始化地图时利用ol.control.default默认加载了缩放控件(ol.control.Zoom)
本节主要介绍创建测量控件。
1. 创建绘制对象结构
创建绘制对象结构
<div class="measure-control" id="measure-control"><label>Geometry type </label><select id="select-type"><option value="length">Length</option><option value="area">Area</option></select><label class="checkbox"><input type="checkbox" id="geodesic"/>use geodesic measures</label>
</div>
测量工具及测量提示框样式。
.measure-control {position: relative;background: #434343a8;width: 30%;margin: 0 auto;top: 19px;padding: 5px 10px;border-radius: 5px;color: #fff;
}/*提示框信息样式*/
.tooltip{position:relative;background:rgba(0,0,0,.5);border-radius:4px;color:#ffffff;padding:4px 8px;opacity:0.7;white-space:nowrap
}
.tooltip-measure{opacity:1;font-weight:bold
}
.tooltip-static{background-color:#ffcc33;color:black;border:1px solid white
}
.tooltip-measure:before,.tooltip-static:before{border-top: 6px solid rgba(0, 0, 0, 0.5);border-right: 6px solid transparent;border-left: 6px solid transparent;content: "";position: absolute;bottom: -6px;margin-left: -7px;left: 50%;
}
.tooltip-static:before {border-top-color: #ffcc33;
}
2. 创建矢量图层
创建矢量图层需要添加矢量数据源,然后添加矢量图层并设置其样式。
// 创建矢量图层
const vectorSource = new ol.source.Vector()
const vectorLayer = new ol.layer.Vector({source: vectorSource,style: new ol.style.Style({fill: new ol.style.Fill({// 填充色color:'rgba(255,255,255,0.2)'}),stroke: new ol.style.Stroke({color: '#ffcc33', // 边线颜色width: 2.5    // 边线宽度}),// 圆形点样式image: new ol.style.Circle({radius: 7, // 圆形点半径fill: new ol.style.Fill({color:'#ffcc33' // 圆形点填充色})})})
})
map.addLayer(vectorLayer)
3. 添加绘制交互对象
监听选择绘制类型,根据不同类型绘制几何对象
function addInteraction() {const type = selectType.value === 'area' ? 'Polygon' : 'LineString'draw = new ol.interaction.Draw({source: vectorSource,type: type,style: new ol.style.Style({fill: new ol.style.Fill({color:"rgba(255,255,255,0.2)"}),stroke: new ol.style.Stroke({color:"#ffcc33",lineDash:[10,10],width:2}),image: new ol.style.Circle({radius: 5,fill: new ol.style.Fill({color:'rgba(255,255,255,0.2)'})})})})map.addInteraction(draw)createMeasureTooltip() // 测量工具提示框createHelpTooltip() // 帮助信息提示框框let listener = null// 监听开始绘制事件draw.on('drawstart', function (evt) {// 绘制要素sketch = evt.feature// 绘制坐标let tooltipCoord = evt.coordinate// 绑定change事件,根据绘制几何图形类型得到测量距离或者面积,并将其添加到测量工具提示框listener = sketch.getGeometry().on('change', evt=> {// 绘制的几何对象const geom = evt.targetlet output = 0if (geom instanceof ol.geom.Polygon) {output = formatArea(geom)tooltipCoord = geom.getInteriorPoint().getCoordinates()} else {output = formatLength(geom)tooltipCoord = geom.getLastCoordinate()}// 将测量值添加到提示框measureTooltipElement.innerHTML = output// 设置测量提示工具框的位置measureTooltip.setPosition(tooltipCoord)})}, this)draw.on('drawend', function(evt) {measureTooltipElement.className = 'tooltip tooltip-static'measureTooltip.setOffset([0, -7])sketch = nullmeasureTooltipElement = nullcreateMeasureTooltip()ol.Observable.unByKey(listener)},this)
}
4. 创建帮助信息提示框
function createHelpTooltip() {if (helpTooltip) {helpTooltipElement.parentNode.removeChild(helpTooltipElement)}helpTooltipElement = document.createElement('div')helpTooltipElement.className = 'tooltip hidden'helpTooltip = new ol.Overlay({element: helpTooltipElement,offset: [15, 0],positioning:'center-left'})map.addOverlay(helpTooltip)
}
5. 创建测量提示框
function createMeasureTooltip() {if (measureTooltipElement) {measureTooltipElement.parentNode.removeChild(measureTooltipElement)}measureTooltipElement = document.createElement('div') measureTooltipElement.className = 'tooltip tooltip-measure'measureTooltip = new ol.Overlay({element: measureTooltipElement,offset: [0, -15],positioning:'bottom-center'})map.addOverlay(measureTooltip)
}
6. 创建面积与长度测量方法
// 创建距离测算方法
function formatLength(line) {let length = 0if (geodesicCheckBox.checked) {// 经纬度测量,曲面面积const sourcePrj = map.getView().getProjection()length = ol.sphere.getLength(line,{'projection':sourcePrj,'radius':678137})} else {length = Math.round(line.getLength()*100)/100}let output = 0;if (length > 100) {output = (Math.round(length / 1000 * 100) / 100) + ' ' + 'km'; //换算成KM单位} else {output = (Math.round(length * 100) / 100) + ' ' + 'm'; //m为单位}return output;//返回线的长度
}
// 创建面积测算方法
function formatArea (polygon) {let area = 0;if (geodesicCheckBox.checked) {//若使用测地学方法测量const sourceProj = map.getView().getProjection();//地图数据源投影坐标系const geom = (polygon.clone().transform(sourceProj, 'EPSG:4326')); //将多边形要素坐标系投影为EPSG:4326area = Math.abs(ol.sphere.getArea(geom, { "projection": sourceProj, "radius": 6378137 })); //获取面积} else {area = polygon.getArea();//直接获取多边形的面积}let output = 0;if (area > 10000) {output = (Math.round(area / 1000000 * 100) / 100) + ' ' + 'km<sup>2</sup>'; //换算成KM单位} else {output = (Math.round(area * 100) / 100) + ' ' + 'm<sup>2</sup>';//m为单位}return output; //返回多边形的面积
};
7. 监听鼠标移动事件
// 添加地图鼠标移动事件
const drawPolygonMsg = "Click to continue drawing the polygon"
const drawLineMsg = "Click to continue drawing the line"
// 鼠标移动事件处理函数
const pointerMoveHandler = evt=> {if (evt.dragging) {return}let helpMsg = "Click to start drawing" // 默认提示信息// 判断绘制的几何类型,设置对应信息提示框if (sketch) {const geom = sketch.getGeometry()if (geom instanceof ol.geom.Polygon) {helpMsg = drawPolygonMsg} else if (geom instanceof ol.geom.LineString) {helpMsg = drawLineMsg}}helpTooltipElement.innerHTML = helpMsg // helpTooltip.setPosition(evt.coordinate)$(helpTooltipElement).removeClass('hidden') // 移除隐藏样式}
map.on('pointermove', pointerMoveHandler) // 绑定鼠标移动事件,动态显示帮助信息提示框
$(map.getViewport()).on('mouseout', evt=> {$(helpTooltipElement).addClass('hidden')
})
8. 完整代码
其中libs文件夹下的包需要更换为自己下载的本地包或者引用在线资源。
<!DOCTYPE html>
<html>
<head><meta http-equiv="Content-Type" content="text/html; charset=utf-8" /><title>加载测量控件</title><meta charset="utf-8" /><script src="../libs/js/ol-5.3.3.js"></script><script src="../libs/js/jquery-2.1.1.min.js"></script><link rel="stylesheet" href="../libs/css//ol.css"><style>* {padding: 0;margin: 0;font-size: 14px;font-family: '微软雅黑';}html,body{width:100%;height:100%;}#map {position: absolute;width: 100%;height: 100%;}.measure-control {position: relative;background: #434343a8;width: 30%;margin: 0 auto;top: 19px;padding: 5px 10px;border-radius: 5px;color: #fff;}/*提示框信息样式*/.tooltip{position:relative;background:rgba(0,0,0,.5);border-radius:4px;color:#ffffff;padding:4px 8px;opacity:0.7;white-space:nowrap}.tooltip-measure{opacity:1;font-weight:bold}.tooltip-static{background-color:#ffcc33;color:black;border:1px solid white}.tooltip-measure:before,.tooltip-static:before{border-top: 6px solid rgba(0, 0, 0, 0.5);border-right: 6px solid transparent;border-left: 6px solid transparent;content: "";position: absolute;bottom: -6px;margin-left: -7px;left: 50%;}.tooltip-static:before {border-top-color: #ffcc33;}</style>
</head>
<body><div id="map" title="地图显示"></div><div class="measure-control" id="measure-control"><label>Geometry type </label><select id="select-type"><option value="length">Length</option><option value="area">Area</option></select><label class="checkbox"><input type="checkbox" id="geodesic"/>use geodesic measures</label></div>
</body>
</html>
<script>//==============================================================================////============================天地图服务参数简单介绍============================////================================vec:矢量图层=================================////================================img:影像图层=================================////================================cva:注记图层=================================////=========================其中:_c表示经纬度,_w表示投影=======================////==============================================================================//const TDTImgLayer = new ol.layer.Tile({title: "天地图影像图层",source: new ol.source.XYZ({url: "http://t0.tianditu.com/DataServer?T=img_c&x={x}&y={y}&l={z}&tk=2a890fe711a79cafebca446a5447cfb2",attibutions: "天地图注记描述",crossOrigin: "anoymous",wrapX: false})})const TDTVecLayer = new ol.layer.Tile({title: "天地图矢量图层",source: new ol.source.XYZ({url: "http://t0.tianditu.com/DataServer?T=vec_c&x={x}&y={y}&l={z}&tk=2a890fe711a79cafebca446a5447cfb2",attibutions: "天地图注记描述",crossOrigin: "anoymous",wrapX: false})})const map = new ol.Map({target: "map",loadTilesWhileInteracting: true,view: new ol.View({// center: [11444274, 12707441],center: [12992990, 13789010],// center: ol.proj.fromLonLat([102,25.5]),zoom: 15,worldsWrap: true,minZoom: 1,maxZoom: 20,}),controls: ol.control.defaults().extend([new ol.control.MousePosition()])})map.addLayer(TDTVecLayer)map.addLayer(TDTImgLayer)// 创建矢量图层const vectorSource = new ol.source.Vector()const vectorLayer = new ol.layer.Vector({source: vectorSource,style: new ol.style.Style({fill: new ol.style.Fill({// 填充色color:'rgba(255,255,255,0.2)'}),stroke: new ol.style.Stroke({color: '#ffcc33', // 边线颜色width: 2.5// 边线宽度}),// 顶点样式image: new ol.style.Circle({radius: 7,fill: new ol.style.Fill({color:'#ffcc33'})})})})map.addLayer(vectorLayer)let draw = null // 绘制对象let sketch = null // 当前绘制要素let helpTooltipElement = null // 创建提示框let helpTooltip = null// 创建测量工具提示框let measureTooltipElement = nulllet measureTooltip = nullconst geodesicCheckBox = document.getElementById('geodesic')// 创建测量交互函数const selectType = document.getElementById('select-type')selectType.onchange = evt=> {// 移除交互式控件if (draw) {map.removeInteraction(draw)}// 添加交互式控件进行测量addInteraction()}addInteraction()function addInteraction() {const type = selectType.value === 'area' ? 'Polygon' : 'LineString'draw = new ol.interaction.Draw({source: vectorSource,type: type,style: new ol.style.Style({fill: new ol.style.Fill({color:"rgba(255,255,255,0.2)"}),stroke: new ol.style.Stroke({color:"#ffcc33",lineDash:[10,10],width:2}),image: new ol.style.Circle({radius: 5,fill: new ol.style.Fill({color:'rgba(255,255,255,0.2)'})})})})map.addInteraction(draw)createMeasureTooltip() // 测量工具提示框createHelpTooltip() // 帮助信息提示框框let listener = null// 监听开始绘制事件draw.on('drawstart', function (evt) {// 绘制要素sketch = evt.feature// 绘制坐标let tooltipCoord = evt.coordinate// 绑定change事件,根据绘制几何图形类型得到测量距离或者面积,并将其添加到测量工具提示框listener = sketch.getGeometry().on('change', evt=> {// 绘制的几何对象const geom = evt.targetlet output = 0if (geom instanceof ol.geom.Polygon) {output = formatArea(geom)tooltipCoord = geom.getInteriorPoint().getCoordinates()} else {output = formatLength(geom)tooltipCoord = geom.getLastCoordinate()}// 将测量值添加到提示框measureTooltipElement.innerHTML = output// 设置测量提示工具框的位置measureTooltip.setPosition(tooltipCoord)})}, this)draw.on('drawend', function(evt) {measureTooltipElement.className = 'tooltip tooltip-static'measureTooltip.setOffset([0, -7])sketch = nullmeasureTooltipElement = nullcreateMeasureTooltip()ol.Observable.unByKey(listener)},this)}function createHelpTooltip() {if (helpTooltip) {helpTooltipElement.parentNode.removeChild(helpTooltipElement)}helpTooltipElement = document.createElement('div')helpTooltipElement.className = 'tooltip hidden'helpTooltip = new ol.Overlay({element: helpTooltipElement,offset: [15, 0],positioning:'center-left'})map.addOverlay(helpTooltip)}function createMeasureTooltip() {if (measureTooltipElement) {measureTooltipElement.parentNode.removeChild(measureTooltipElement)}measureTooltipElement = document.createElement('div') measureTooltipElement.className = 'tooltip tooltip-measure'measureTooltip = new ol.Overlay({element: measureTooltipElement,offset: [0, -15],positioning:'bottom-center'})map.addOverlay(measureTooltip)}// 创建面积与距离测算方法function formatLength(line) {let length = 0if (geodesicCheckBox.checked) {// 经纬度测量,曲面面积const sourcePrj = map.getView().getProjection()length = ol.sphere.getLength(line,{'projection':sourcePrj,'radius':678137})} else {length = Math.round(line.getLength()*100)/100}let output = 0;if (length > 100) {output = (Math.round(length / 1000 * 100) / 100) + ' ' + 'km'; //换算成KM单位} else {output = (Math.round(length * 100) / 100) + ' ' + 'm'; //m为单位}return output;//返回线的长度}function formatArea (polygon) {let area = 0;if (geodesicCheckBox.checked) {//若使用测地学方法测量const sourceProj = map.getView().getProjection();//地图数据源投影坐标系const geom = (polygon.clone().transform(sourceProj, 'EPSG:4326')); //将多边形要素坐标系投影为EPSG:4326area = Math.abs(ol.sphere.getArea(geom, { "projection": sourceProj, "radius": 6378137 })); //获取面积} else {area = polygon.getArea();//直接获取多边形的面积}let output = 0;if (area > 10000) {output = (Math.round(area / 1000000 * 100) / 100) + ' ' + 'km<sup>2</sup>'; //换算成KM单位} else {output = (Math.round(area * 100) / 100) + ' ' + 'm<sup>2</sup>';//m为单位}return output; //返回多边形的面积};// 添加地图鼠标移动事件const drawPolygonMsg = "Click to continue drawing the polygon"const drawLineMsg = "Click to continue drawing the line"// 鼠标移动事件处理函数const pointerMoveHandler = evt=> {if (evt.dragging) {return}let helpMsg = "Click to start drawing" // 默认提示信息// 判断绘制的几何类型,设置对应信息提示框if (sketch) {const geom = sketch.getGeometry()if (geom instanceof ol.geom.Polygon) {helpMsg = drawPolygonMsg} else if (geom instanceof ol.geom.LineString) {helpMsg = drawLineMsg}}helpTooltipElement.innerHTML = helpMsg // helpTooltip.setPosition(evt.coordinate)$(helpTooltipElement).removeClass('hidden') // 移除隐藏样式}map.on('pointermove', pointerMoveHandler) // 绑定鼠标移动事件,动态显示帮助信息提示框$(map.getViewport()).on('mouseout', evt=> {$(helpTooltipElement).addClass('hidden')})
</script>
❝
OpenLayers示例数据下载,请回复关键字:ol数据
全国信息化工程师-GIS 应用水平考试资料,请回复关键字:GIS考试
❝
【GIS之路】 已经接入了智能助手,欢迎关注,欢迎提问。
欢迎访问我的博客网站-长谈GIS:
http://shanhaitalk.com
都看到这了,不要忘记点赞、收藏 + 关注 哦 !
本号不定时更新有关 GIS开发 相关内容,欢迎关注 !
相关文章:

OpenLayers 加载测量控件
注:当前使用的是 ol 5.3.0 版本,天地图使用的key请到天地图官网申请,并替换为自己的key 地图控件是一些用来与地图进行简单交互的工具,地图库预先封装好,可以供开发者直接使用。OpenLayers具有大部分常用的控件&#x…...

.NET ORM开发手册:基于SqlSugar的高效数据访问全攻略
SqlSuger是一个国产,开源ORM框架,具有高性能,使用方便,功能全面的特点,支持.NET Framework和.NET Core,支持各种关系型数据库,分布式数据库,时序数据库。 官网地址:SqlS…...

【PostgreSQL】数据探查工具1.0研发可行性方案
👉 点击关注不迷路 👉 点击关注不迷路 👉 点击关注不迷路 想抢先解锁数据自由的宝子,速速戳我!评论区蹲一波 “蹲蹲”,揪人唠唠你的超实用需求! 【PostgreSQL】数据探查工具1.0研发可行性方案,数据调研之秒解析数据结构,告别熬夜写 SQL【PostgreSQL】数据探查工具…...

C++ 内存管理与单例模式剖析
目录 引言 一、堆上唯一对象:HeapOnly类 (一)设计思路 (二)代码实现 (三)使用示例及注意事项 二、栈上唯一对象:StackOnly类 (一)设计思路 ࿰…...
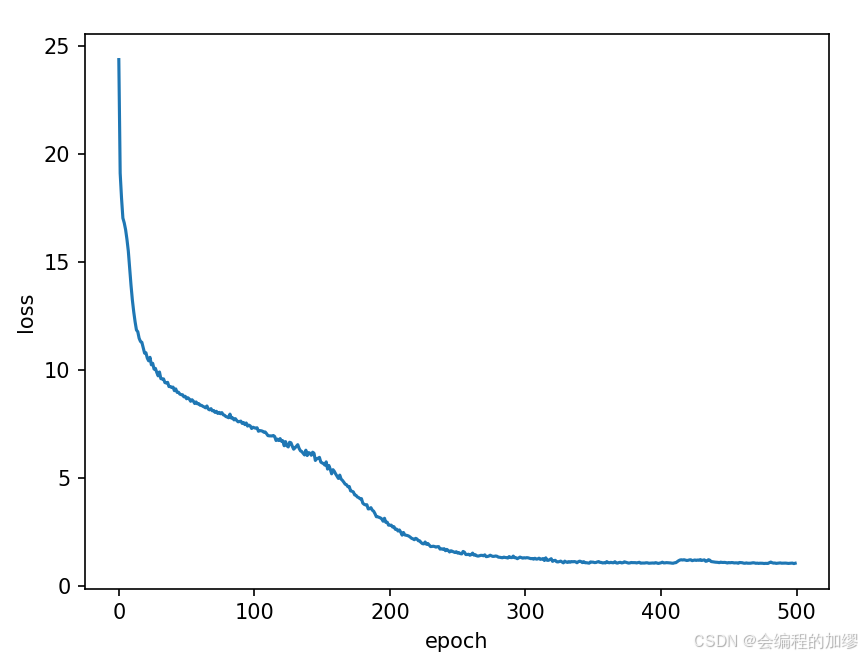
算法学习——从零实现循环神经网络
从零实现循环神经网络 一、任务背景二、数据读取与准备1. 词元化2. 构建词表 三、参数初始化与训练1. 参数初始化2. 模型训练 四、预测总结 一、任务背景 对于序列文本来说,如何通过输入的几个词来得到后面的词一直是大家关注的任务之一,即:…...
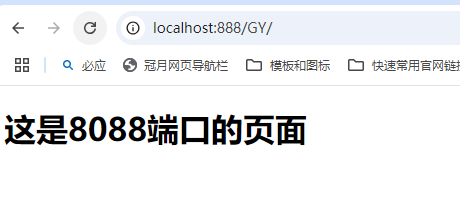
win10使用nginx做简单负载均衡测试
一、首先安装Nginx: 官网链接:https://nginx.org/en/download.html 下载完成后,在本地文件中解压。 解压完成之后,打开conf --> nginx.config 文件 1、在 http 里面加入以下代码 upstream GY{#Nginx是如何实现负载均衡的&a…...
2025电工杯数学建模B题思路数模AI提示词工程
我发布的智能体链接:数模AI扣子是新一代 AI 大模型智能体开发平台。整合了插件、长短期记忆、工作流、卡片等丰富能力,扣子能帮你低门槛、快速搭建个性化或具备商业价值的智能体,并发布到豆包、飞书等各个平台。https://www.coze.cn/search/n…...

软考软件评测师——软件工程之开发模型与方法
目录 一、核心概念 二、主流模型详解 (一)经典瀑布模型 (二)螺旋演进模型 (三)增量交付模型 (四)原型验证模型 (五)敏捷开发实践 三、模型选择指南 四…...

前端表单中 `readOnly` 和 `disabled` 属性的区别
前端表单中 readOnly 和 disabled 属性的区别 定义与适用范围 readOnly 是一种属性,仅适用于 <input> 和 <textarea> 元素。当设置了此属性时,用户无法修改这些元素的内容,但仍能聚焦并选中文本。disabled 则是一个更广泛的属性…...
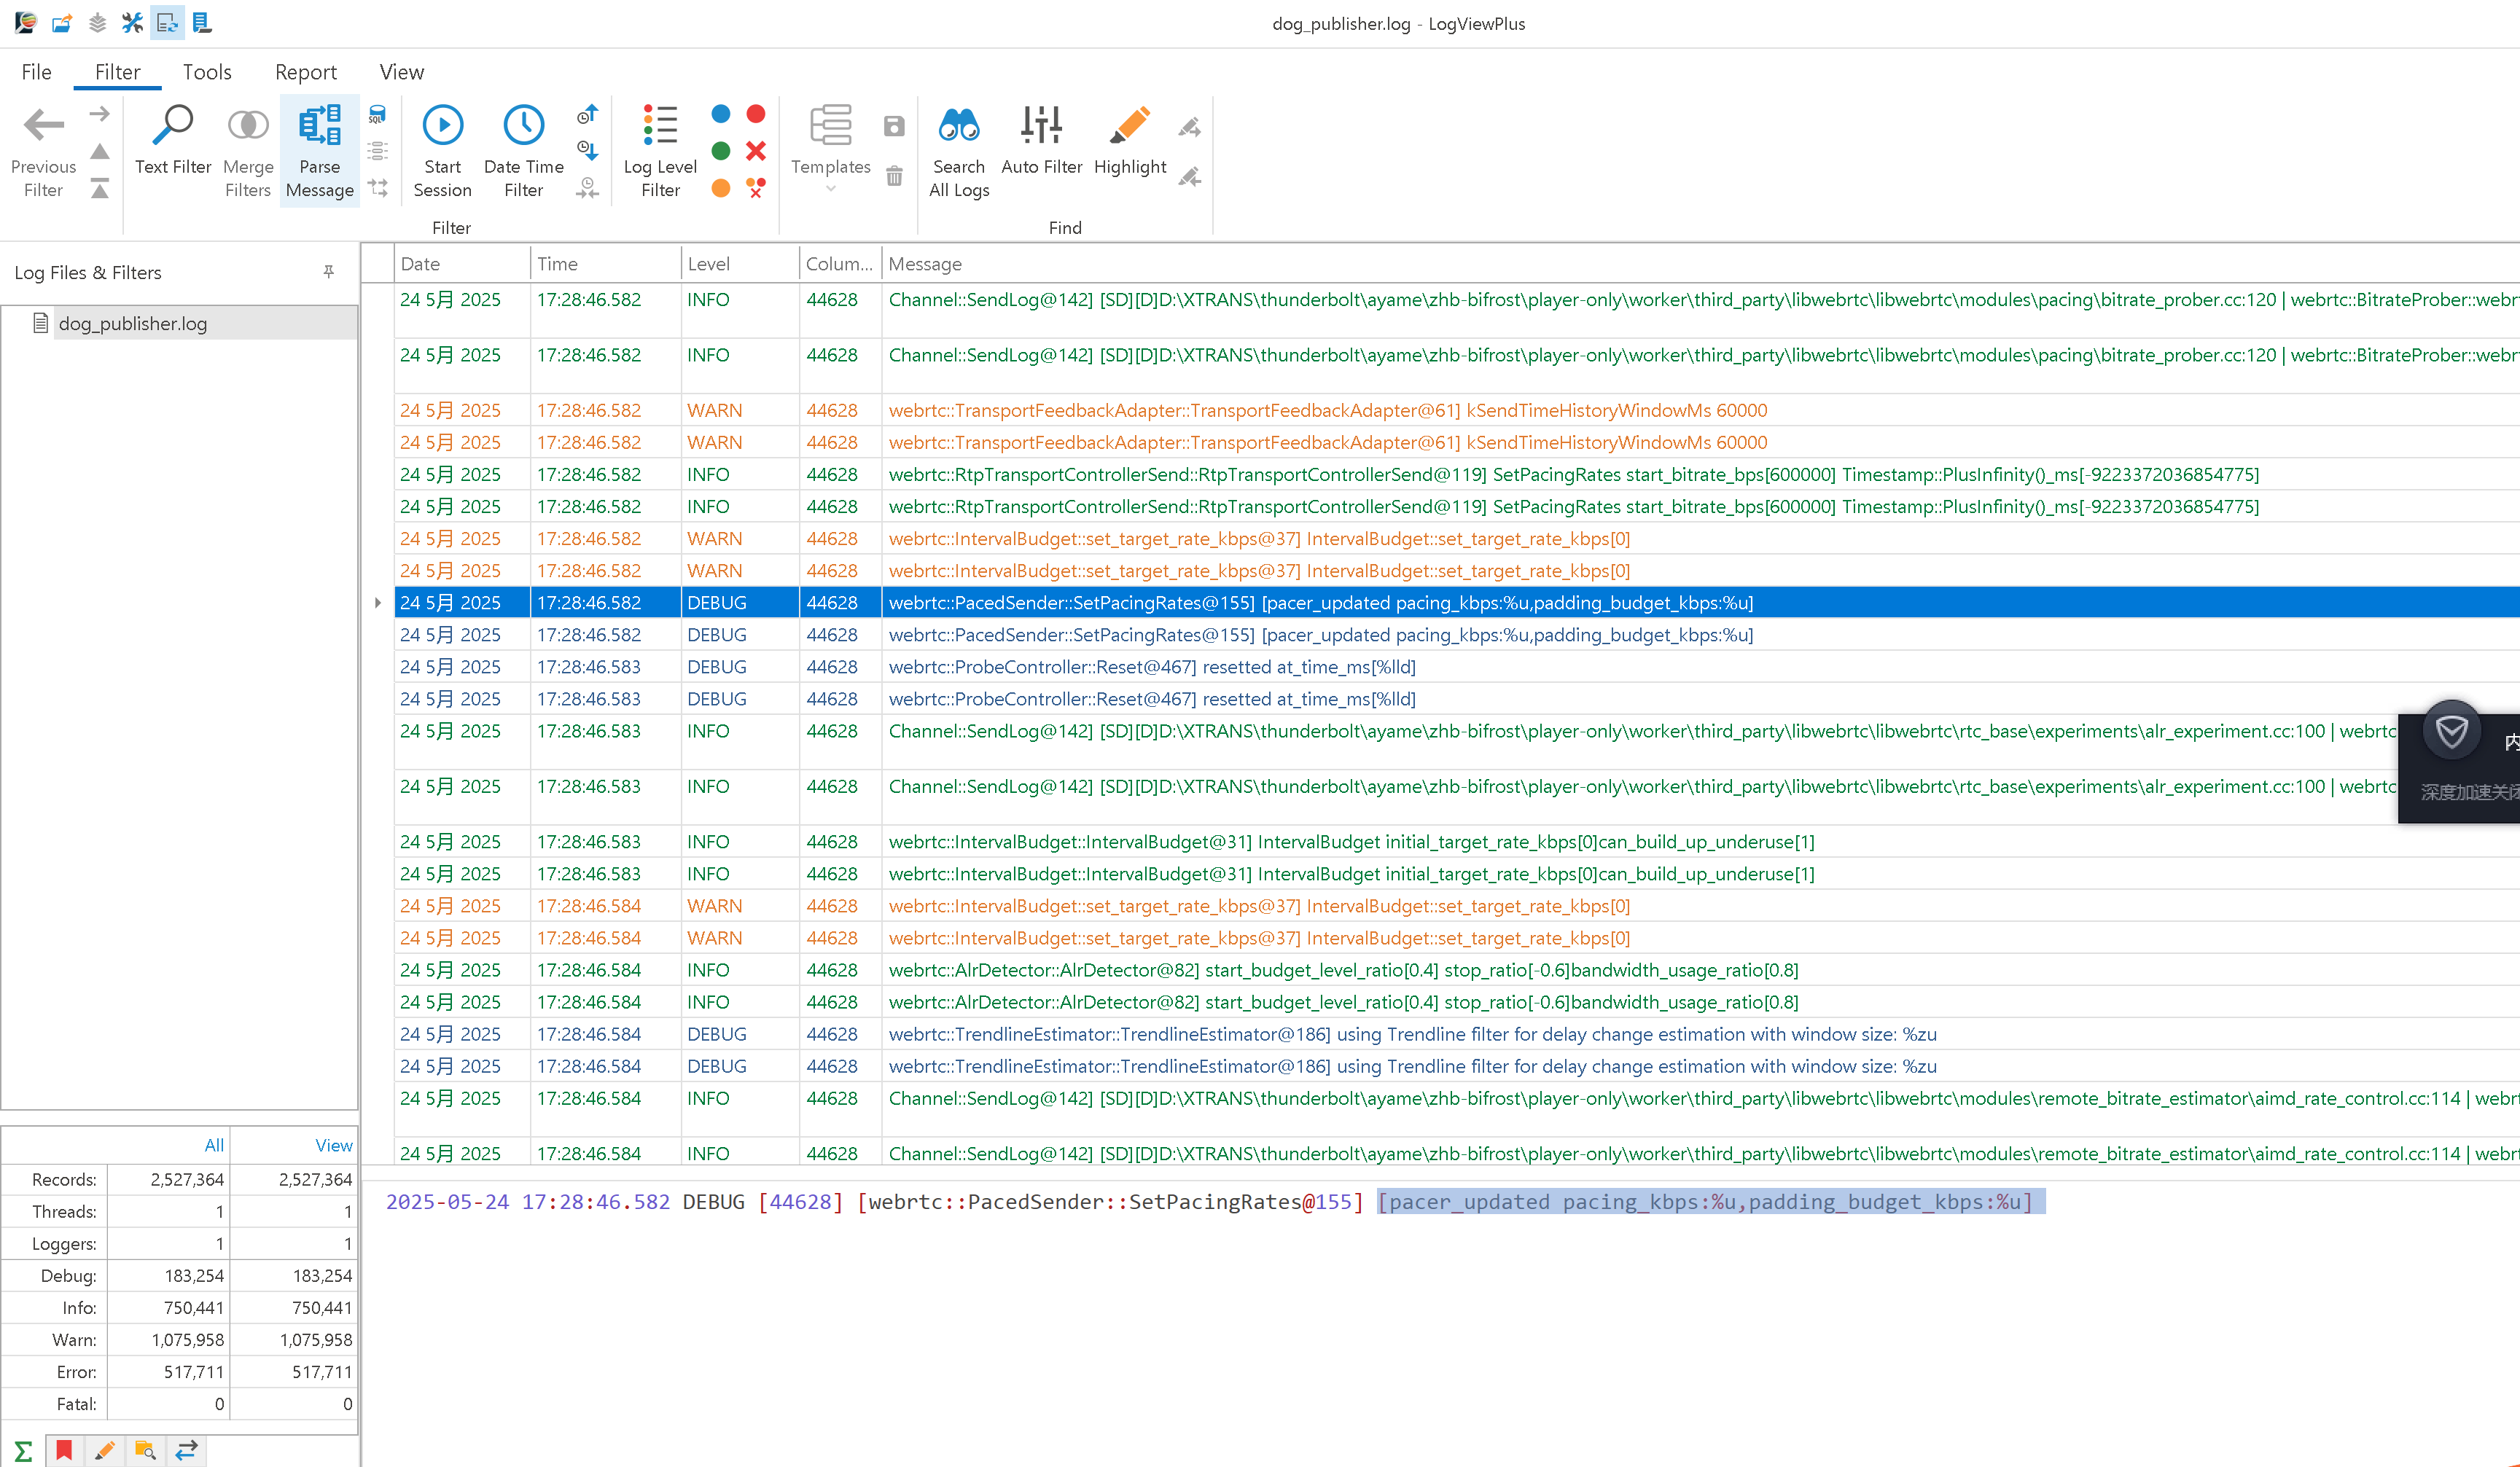
【日志软件】hoo wintail 的替代
hoo wintail 的替代 主要问题是日志大了以后会卡有时候日志覆盖后,改变了,更新了,hoo wintail可能无法识别需要重新打开。 有很多类似的日志监控软件可以替代。以下是一些推荐的选项: 免费软件 BareTail 轻量级的实时日志查看…...
)
OceanBase数据库全面指南(基础入门篇)
文章目录 一、OceanBase 简介与安装配置指南1.1 OceanBase 核心特点1.2 架构解析1.3 安装部署实战1.3.1 硬件要求1.3.2 安装步骤详解1.3.3 配置验证二、OceanBase 基础 SQL 语法入门2.1 数据查询(SELECT)2.1.1 基础查询语法2.1.2 实际案例演示2.2 数据操作(INSERT/UPDATE/DE…...

异步处理与事件驱动中的模型调用链设计
异步处理与事件驱动中的模型调用链设计 在现代AI系统中,尤其是在引入了大模型(如LLM)或多步骤生成流程的业务场景中,传统的同步调用模型已越来越难以应对延迟波动、资源竞争和流程耦合等问题。为了提升系统响应效率、降低调用失败…...

redis配置带验证的主从复制
IP地址主机名192.168.10.161redis161192.168.10.162redis162192.168.10.163redis163 配置主机host161,redis服务连接密码为123456主机host162设置连接host61的redis服务密码 给host161主机的Redis服务设置连接密码,如果从服务器不指定连接密码无法同…...
Ollama-OCR:基于Ollama多模态大模型的端到端文档解析和处理
基本介绍 Ollama-OCR是一个Python的OCR解析库,结合了Ollama的模型能力,可以直接处理 PDF 文件无需额外转换,轻松从扫描版或原生 PDF 文档中提取文本和数据。根据使用的视觉模型和自定义提示词,Ollama-OCR 可支持多种语言…...

OpenCV CUDA 模块中图像过滤------创建一个拉普拉斯(Laplacian)滤波器函数createLaplacianFilter()
操作系统:ubuntu22.04 OpenCV版本:OpenCV4.9 IDE:Visual Studio Code 编程语言:C11 算法描述 cv::cuda::createLaplacianFilter 是 OpenCV CUDA 模块中的一个函数,用于创建一个 拉普拉斯(Laplacian)滤波器…...
图论学习笔记 3
自认为写了很多,后面会出 仙人掌、最小树形图 学习笔记。 多图警告。 众所周知王老师有一句话: ⼀篇⽂章不宜过⻓,不然之后再修改使⽤的时候,在其中找想找的东⻄就有点麻烦了。当然⽂章也不宜过多,不然想要的⽂章也不…...

在单片机中如何在断电前将数据保存至DataFlash?
几年前,我做过一款智能插座,需要带电量计量的功能, 比如有个参数是总共用了多少度电 (kWh),这个是需要实时掉存保存的数据。 那问题来了,如果家里突然停电,要怎么在断电前将数据保存至Flash? 问…...
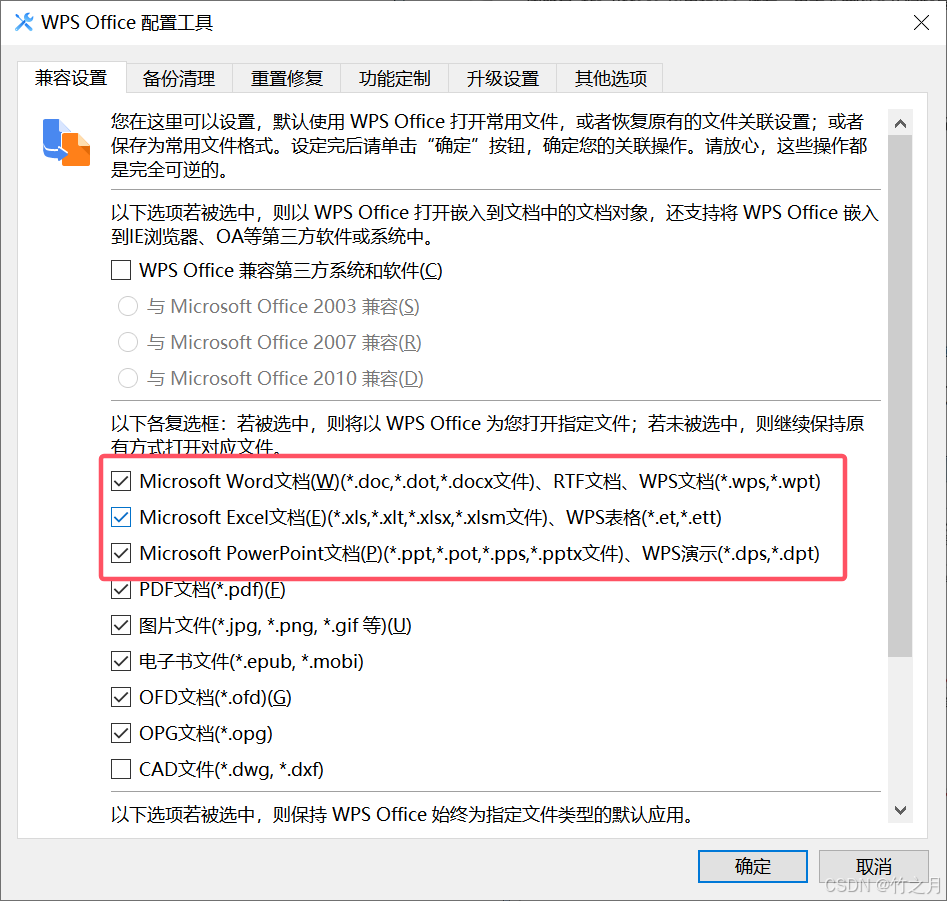
【将WPS设置为默认打开方式】--突然无法用WPS打开文件
1. 点击【开始】——【WPS Office】——【配置工具】; 2. 在出现的弹窗中,点击【高级】; 3. 在“兼容设置”中,将复选框勾上,点击【确定】。...
电子人的分水岭-FPGA模电和数电
为什么模电这么难学?一文带你透彻理解模电 ——FPGA是“前期数电,后期模电”的典型代表 在电子工程的世界里,有两门基础课程让无数学生“闻之色变”:数字电路(数电) 和 模拟电路(模电࿰…...

(6)python爬虫--selenium
文章目录 前言一、初识selenium二、安装selenium2.1 查看chrome版本并禁止chrome自动更新2.1.1 查看chrome版本2.1.2 禁止chrome更新自动更新 2.2 安装对应版本的驱动程序2.3安装selenium包 三、selenium关于浏览器的使用3.1 创建浏览器、设置、打开3.2 打开/关闭网页及浏览器3…...
Python之两个爬虫案例实战(澎湃新闻+网易每日简报):附源码+解释
目录 一、案例一:澎湃新闻时政爬取 (1)数据采集网站 (2)数据介绍 (3)数据采集方法 (4)数据采集过程 二、案例二:网易每日新闻简报爬取 (1&#x…...

HarmonyOS NEXT~鸿蒙系统与mPaaS三方框架集成指南
HarmonyOS NEXT~鸿蒙系统与mPaaS三方框架集成指南 1. 概述 1.1 鸿蒙系统简介 鸿蒙系统(HarmonyOS)是华为开发的分布式操作系统,具备以下核心特性: 分布式架构:支持跨设备无缝协同微内核设计:提高安全性和性能一次开…...

系统安全及应用学习笔记
系统安全及应用学习笔记 一、账号安全控制 (一)账户管理策略 冗余账户处理 非登录账户:Linux 系统中默认存在如 bin、daemon 等非登录账户,其登录 Shell 应为 /sbin/nologin,需定期检查确保未被篡改。冗余账户清理&…...

STC89C52RC/LE52RC
STC89C52RC 芯片手册原理图扩展版原理图 功能示例LED灯LED灯的常亮效果LED灯的闪烁LED灯的跑马灯效果:从左到右,从右到左 数码管静态数码管数码管计数App.cApp.hCom.cCom.hDir.cDir.hInt.cInt.hMid.cMid.h 模板mian.cApp.cApp.hCom.cCom.hDir.cDir.hInt.…...
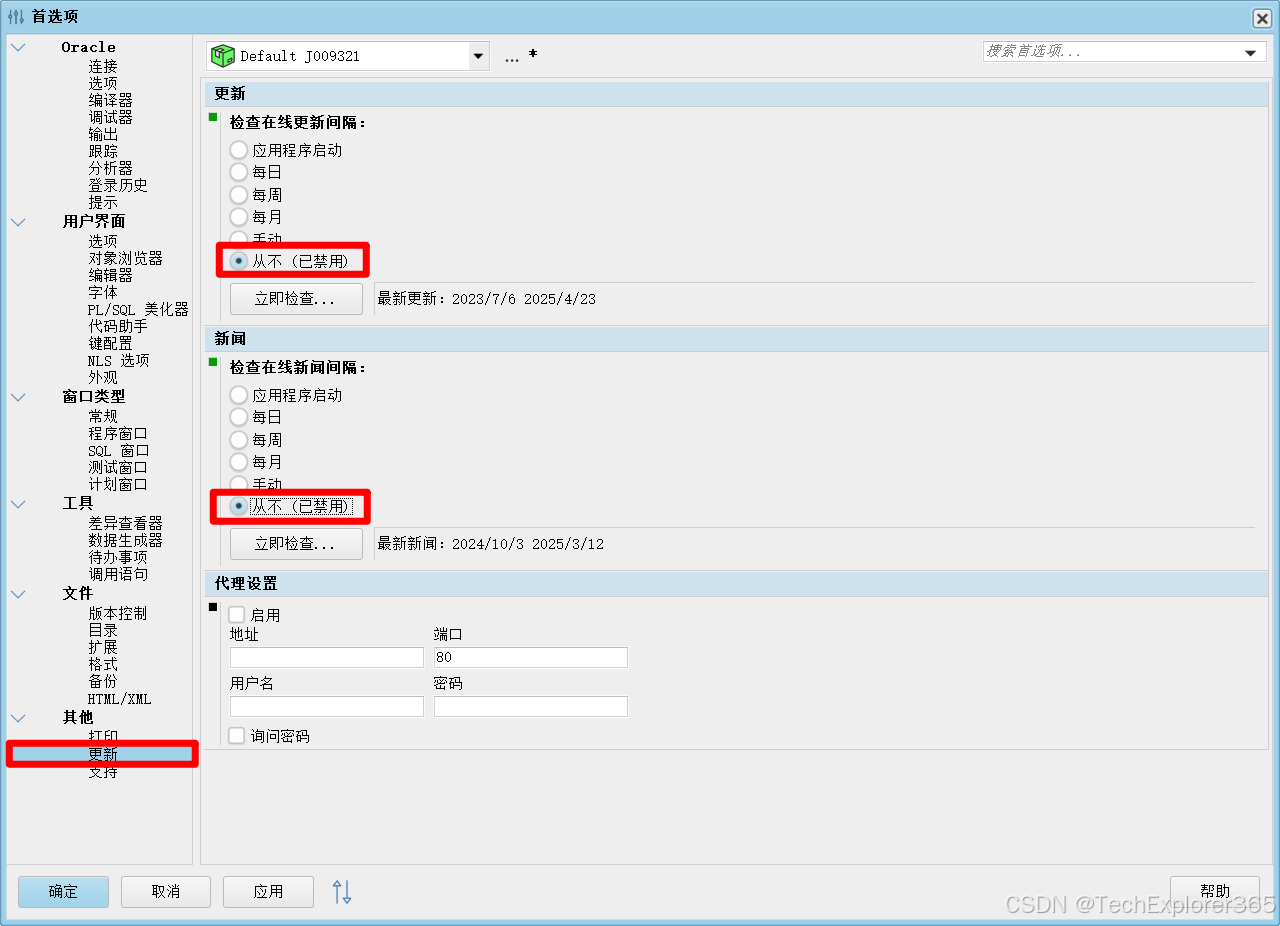
✨ PLSQL卡顿优化
✨ PLSQL卡顿优化 1.📂 打开首选项2.🔧 Oracle连接配置3.⛔ 关闭更新和新闻 1.📂 打开首选项 2.🔧 Oracle连接配置 3.⛔ 关闭更新和新闻...

yum命令常用选项
刷新仓库列表 sudo yum repolist清理 Yum 缓存并生成新的缓存 sudo yum clean all sudo yum makecache验证 EPEL 源是否已正确启用 sudo yum repolist enabled安装软件包 sudo yum install <package-name> -y更新软件包 sudo yum update -y仅更新指定的软件包。 su…...
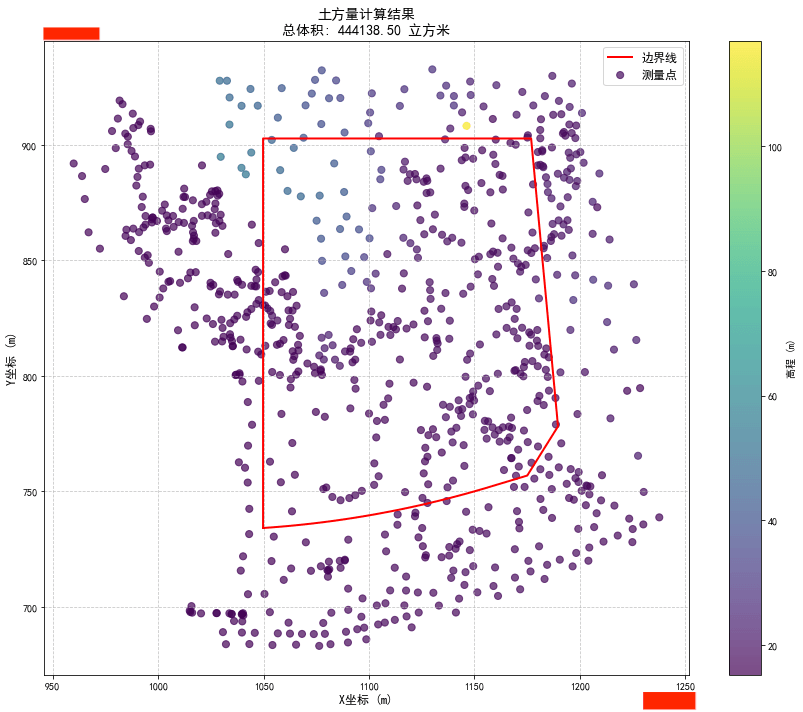
python+vlisp实现对多段线范围内土方体积的计算
#在工程中,经常用到计算土方回填、土方开挖的体积。就是在一个范围内,计算土被挖走,或者填多少,这个需要测量挖填前后这个范围内的高程点。为此,我开发一个app,可以直接在autocad上提取高程点,然…...

鸿蒙Flutter实战:25-混合开发详解-5-跳转Flutter页面
概述 在上一章中,我们介绍了如何初始化 Flutter 引擎,本文重点介绍如何添加并跳转至 Flutter 页面。 跳转原理 跳转原理如下: 本质上是从一个原生页面A 跳转至另一个原生页面 B,不过区别在于,页面 B是一个页面容器…...
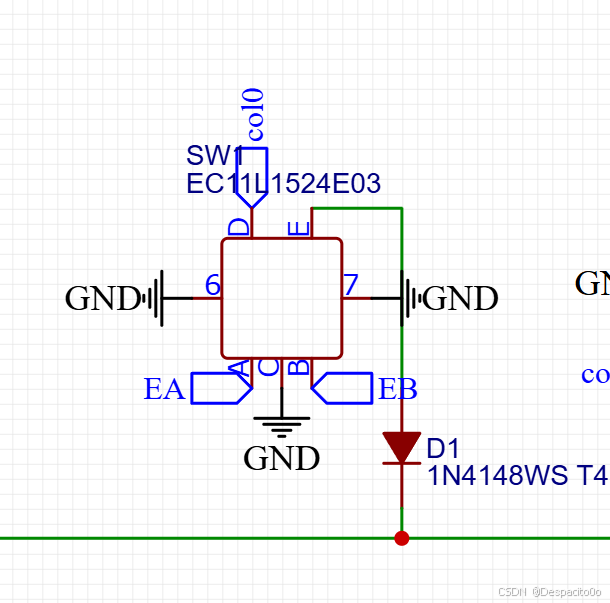
APM32小系统键盘PCB原理图设计详解
APM32小系统键盘PCB原理图设计详解 一、APM32小系统简介 APM32微控制器是国内半导体厂商推出的一款高性能ARM Cortex-M3内核微控制器,与STM32高度兼容,非常适合DIY爱好者用于自制键盘、开发板等电子项目。本文将详细讲解如何基于APM32 CBT6芯片设计一款…...

【C/C++】多线程开发:wait、sleep、yield全解析
文章目录 多线程开发:wait、sleep、yield全解析1 What简要介绍详细介绍wait() — 条件等待(用于线程同步)sleep() — 睡觉,定时挂起yield() — 自愿让出 CPU 2 区别以及建议区别应用场景建议 3 三者协作使用示例 多线程开发&#…...