SpringBoot自动配置、启动器原理爆肝解析(干货满满)
文章目录
- 前言
- 一、SpringBoot优势概要
- 二、SpringBoot自动配置
- 1. ☠注意☠
- 2.自动配置详解
- 三、Starter(场景启动器)原理
- 总结
前言
本文详细解析面试重点—SpringBoot自动配置原理、场景启动器原理,深入源码,直接上干货、绝不拖泥带水。
一、SpringBoot优势概要
一句话:约定大于配置,简化Spring的简化
- 内嵌Web服务器
- 环境启动器starter的使用,简化构建配置
- 无需编写繁琐XML文件
二、SpringBoot自动配置
1. ☠注意☠
首先,要明确自动配置和自动装配的区别。
自动装配是SpringBoot的概念,是通过条件注解和配置元数据的方式,根据应用程序的依赖和环境,自动为应用程序进行配置。
自动装配是Spring的概念,是Spring框架通过依赖注入(Dependency Injection)机制来实现的,它通过自动根据类型或名称匹配来自动关联和装配Bean。
!!!!网络上有很多文章、视频张嘴就是SpringBoot的自动装配,这些基本不用看了,属实有些乐色!
2.自动配置详解
- 创建一个SpringBoot2项目用作示例:
主配置类:
package com.example;import org.springframework.boot.SpringApplication;
import org.springframework.boot.autoconfigure.SpringBootApplication;@SpringBootApplication
public class SpringBootTestApplication {public static void main(String[] args) {SpringApplication.run(SpringBootTestApplication.class, args);}}
POM文件:
<?xml version="1.0" encoding="UTF-8"?>
<project xmlns="http://maven.apache.org/POM/4.0.0" xmlns:xsi="http://www.w3.org/2001/XMLSchema-instance"xsi:schemaLocation="http://maven.apache.org/POM/4.0.0 https://maven.apache.org/xsd/maven-4.0.0.xsd"><modelVersion>4.0.0</modelVersion><packaging>pom</packaging><parent><groupId>org.springframework.boot</groupId><artifactId>spring-boot-starter-parent</artifactId><version>2.5.0</version><relativePath/> <!-- lookup parent from repository --></parent><groupId>com.example</groupId><artifactId>SpringBoot-Test</artifactId><version>0.0.1-SNAPSHOT</version><name>SpringBoot-Test</name><description>SpringBoot-Test</description><properties><java.version>8</java.version></properties><dependencies><dependency><groupId>org.springframework.boot</groupId><artifactId>spring-boot-starter-web</artifactId></dependency><dependency><groupId>org.springframework.boot</groupId><artifactId>spring-boot-starter-test</artifactId><scope>test</scope></dependency><build><plugins><plugin><groupId>org.springframework.boot</groupId><artifactId>spring-boot-maven-plugin</artifactId></plugin></plugins></build></project>- 项目结构分析
通过主配置类可以看出SpringBoot的最重要注解是@SpringBootApplication
通过POM文件可知SpringBoot项目的父项目是spring-boot-starter-parent
- @SpringBootApplication详解
在IDEA中按住CTRL键进入@SpringBootApplication注解:
package org.springframework.boot.autoconfigure;import ...;@Target({ElementType.TYPE})
@Retention(RetentionPolicy.RUNTIME)
@Documented
@Inherited
@SpringBootConfiguration
@EnableAutoConfiguration
@ComponentScan(excludeFilters = {@Filter(type = FilterType.CUSTOM,classes = {TypeExcludeFilter.class}
), @Filter(type = FilterType.CUSTOM,classes = {AutoConfigurationExcludeFilter.class}
)}
)
public @interface SpringBootApplication {@AliasFor(annotation = EnableAutoConfiguration.class)Class<?>[] exclude() default {};......
}
可以看到@SpringBootApplication主要由:
@SpringBootConfiguration、@EnableAutoConfiguration、@ComponentScan注解构成
我们逐个分析以上三个注解:
1. @SpringBootConfiguration注解
源码:
@Target({ElementType.TYPE})
@Retention(RetentionPolicy.RUNTIME)
@Documented
@Configuration
@Indexed
public @interface SpringBootConfiguration {@AliasFor(annotation = Configuration.class)boolean proxyBeanMethods() default true;
}
可以看出该注解由@Configuration注解和其他注解组成,所以,该注解的作用和@Configuration注解作用相似,代表当前是一个SpringBoot配置类。
2. @EnableAutoConfiguration注解
源码:
@Target({ElementType.TYPE})
@Retention(RetentionPolicy.RUNTIME)
@Documented
@Inherited
@AutoConfigurationPackage
@Import({AutoConfigurationImportSelector.class})
public @interface EnableAutoConfiguration {String ENABLED_OVERRIDE_PROPERTY = "spring.boot.enableautoconfiguration";Class<?>[] exclude() default {};String[] excludeName() default {};
}
该注解包含的注解主要有:@AutoConfigurationPackage、@Import({AutoConfigurationImportSelector.class})
- @AutoConfigurationPackage源码:
@Target({ElementType.TYPE})
@Retention(RetentionPolicy.RUNTIME)
@Documented
@Inherited
@Import({Registrar.class})
public @interface AutoConfigurationPackage {String[] basePackages() default {};Class<?>[] basePackageClasses() default {};
}
可以看出@AutoConfigurationPackage通过内部的@Import注解向IOC容器中导入了类: Registrar.class
Registrar.class源码:
static class Registrar implements ImportBeanDefinitionRegistrar, DeterminableImports {Registrar() {}public void registerBeanDefinitions(AnnotationMetadata metadata, BeanDefinitionRegistry registry) {AutoConfigurationPackages.register(registry, (String[])(new AutoConfigurationPackages.PackageImports(metadata)).getPackageNames().toArray(new String[0]));}public Set<Object> determineImports(AnnotationMetadata metadata) {return Collections.singleton(new AutoConfigurationPackages.PackageImports(metadata));}}
发现,@AutoConfigurationPackage利用Registrar给容器中导入一系列组件,将主配置类所在包下的所有组件导入容器中。
- @Import({AutoConfigurationImportSelector.class})源码:
public class AutoConfigurationImportSelector implements DeferredImportSelector, BeanClassLoaderAware, ResourceLoaderAware, BeanFactoryAware, EnvironmentAware, Ordered{.......
}
发现AutoConfigurationImportSelector实现了DeferredImportSelector接口,这就不得不提一下@Import注解的使用方式了,可以看看这篇文章:
@Import三种使用方式
@Import作用是向IOC容器中导入组建,其中有一种就是实现ImportSelector接口,并实现其中的selectImports方法,该方法的作用是返回一个由想要导入IOC容器的对象组成的数组。
查看AutoConfigurationImportSelector中实现的selectImports方法:
public String[] selectImports(AnnotationMetadata annotationMetadata) {if (!this.isEnabled(annotationMetadata)) {return NO_IMPORTS;} else {AutoConfigurationImportSelector.AutoConfigurationEntry autoConfigurationEntry = this.getAutoConfigurationEntry(annotationMetadata);return StringUtils.toStringArray(autoConfigurationEntry.getConfigurations());}}
发现其中调用了getAutoConfigurationEntry方法,继续跟进:
protected AutoConfigurationImportSelector.AutoConfigurationEntry getAutoConfigurationEntry(AnnotationMetadata annotationMetadata) {if (!this.isEnabled(annotationMetadata)) {return EMPTY_ENTRY;} else {AnnotationAttributes attributes = this.getAttributes(annotationMetadata);List<String> configurations = this.getCandidateConfigurations(annotationMetadata, attributes);configurations = this.removeDuplicates(configurations);Set<String> exclusions = this.getExclusions(annotationMetadata, attributes);this.checkExcludedClasses(configurations, exclusions);configurations.removeAll(exclusions);configurations = this.getConfigurationClassFilter().filter(configurations);this.fireAutoConfigurationImportEvents(configurations, exclusions);return new AutoConfigurationImportSelector.AutoConfigurationEntry(configurations, exclusions);}}
很明显,getAutoConfigurationEntry方法又调用了getCandidateConfigurations方法,继续深入:
protected List<String> getCandidateConfigurations(AnnotationMetadata metadata, AnnotationAttributes attributes) {List<String> configurations = SpringFactoriesLoader.loadFactoryNames(this.getSpringFactoriesLoaderFactoryClass(), this.getBeanClassLoader());Assert.notEmpty(configurations, "No auto configuration classes found in META-INF/spring.factories. If you are using a custom packaging, make sure that file is correct.");return configurations;}
发现getCandidateConfigurations调用了SpringFactoriesLoader的loadFactoryNames方法:
public static List<String> loadFactoryNames(Class<?> factoryType, @Nullable ClassLoader classLoader) {ClassLoader classLoaderToUse = classLoader;if (classLoader == null) {classLoaderToUse = SpringFactoriesLoader.class.getClassLoader();}String factoryTypeName = factoryType.getName();return (List)loadSpringFactories(classLoaderToUse).getOrDefault(factoryTypeName, Collections.emptyList());}
此方法又调用了loadSpringFactories方法:
private static Map<String, List<String>> loadSpringFactories(ClassLoader classLoader) {Map<String, List<String>> result = (Map)cache.get(classLoader);if (result != null) {return result;} else {HashMap result = new HashMap();try {Enumeration urls = classLoader.getResources("META-INF/spring.factories");while(urls.hasMoreElements()) {URL url = (URL)urls.nextElement();UrlResource resource = new UrlResource(url);Properties properties = PropertiesLoaderUtils.loadProperties(resource);Iterator var6 = properties.entrySet().iterator();while(var6.hasNext()) {Entry<?, ?> entry = (Entry)var6.next();String factoryTypeName = ((String)entry.getKey()).trim();String[] factoryImplementationNames = StringUtils.commaDelimitedListToStringArray((String)entry.getValue());String[] var10 = factoryImplementationNames;int var11 = factoryImplementationNames.length;for(int var12 = 0; var12 < var11; ++var12) {String factoryImplementationName = var10[var12];((List)result.computeIfAbsent(factoryTypeName, (key) -> {return new ArrayList();})).add(factoryImplementationName.trim());}}}result.replaceAll((factoryType, implementations) -> {return (List)implementations.stream().distinct().collect(Collectors.collectingAndThen(Collectors.toList(), Collections::unmodifiableList));});cache.put(classLoader, result);return result;} catch (IOException var14) {throw new IllegalArgumentException("Unable to load factories from location [META-INF/spring.factories]", var14);}}}
可以看出其从META-INF/spring.factories位置来加载一个文件。默认扫描我们当前系统里面所有META-INF/spring.factories位置的文件。经过一层层返回之后,使用@Import注解导入到IOC容器
3. @ComponentScan注解
@ComponentScan(excludeFilters = {@Filter(type = FilterType.CUSTOM,classes = {TypeExcludeFilter.class}
), @Filter(type = FilterType.CUSTOM,classes = {AutoConfigurationExcludeFilter.class}
)}
此注解作用是默认扫描主配置类所在包及其子包中的@Component注解及其衍生注解
三、Starter(场景启动器)原理
1. 什么是场景启动器
Spring Boot场景启动器(Starter)是Spring Boot框架提供的一种便利机制,用于快速引入和配置特定场景下所需的依赖项。每个场景启动器都是一个独立的Maven项目,它提供了一组相关的依赖和配置,以便简化和加速特定场景下的应用程序开发。
2. 场景启动器特点
- 集成依赖项:每个场景启动器都定义了一组相关的依赖项。这些依赖项被认为在特定场景中非常有用,比如Web开发、数据库访问、消息队列等等。通过使用场景启动器,开发者可以快速引入和配置所需的依赖项,而无需手动添加和管理这些依赖项。
- 自动配置:场景启动器还提供了一些默认的自动配置,旨在简化特定场景下的配置工作。这些自动配置通常基于Spring Boot的条件注解和配置元数据机制,根据应用程序的依赖和环境来自动配置必要的组件和选项。通过使用场景启动器,开发者可以快速启动和运行基本的应用程序,而无需过多关注和编写配置代码。
- 统一引入和管理:场景启动器通过简化和标准化依赖项的引入和配置,提供了一种统一的方式来解决常见的开发场景。开发者可以通过在项目的pom.xml文件中添加相应的场景启动器依赖,一次性引入和管理所有相关的依赖项,从而简化了项目的依赖管理和版本冲突的问题。
3. 以spring-boot-starter-web为示例
import ....;@Configuration(proxyBeanMethods = false
)
@ConditionalOnWebApplication(type = Type.SERVLET
)
@ConditionalOnClass({Servlet.class, DispatcherServlet.class, WebMvcConfigurer.class})
@ConditionalOnMissingBean({WebMvcConfigurationSupport.class})
@AutoConfigureOrder(-2147483638)
@AutoConfigureAfter({DispatcherServletAutoConfiguration.class, TaskExecutionAutoConfiguration.class, ValidationAutoConfiguration.class})
public class WebMvcAutoConfiguration {public static final String DEFAULT_PREFIX = "";public static final String DEFAULT_SUFFIX = "";private static final String SERVLET_LOCATION = "/";public WebMvcAutoConfiguration() {}@Bean@ConditionalOnMissingBean({HiddenHttpMethodFilter.class})@ConditionalOnProperty(prefix = "spring.mvc.hiddenmethod.filter",name = {"enabled"})public OrderedHiddenHttpMethodFilter hiddenHttpMethodFilter() {return new OrderedHiddenHttpMethodFilter();}@Bean@ConditionalOnMissingBean({FormContentFilter.class})@ConditionalOnProperty(prefix = "spring.mvc.formcontent.filter",name = {"enabled"},matchIfMissing = true)public OrderedFormContentFilter formContentFilter() {return new OrderedFormContentFilter();}static class OptionalPathExtensionContentNegotiationStrategy implements ContentNegotiationStrategy {private static final String SKIP_ATTRIBUTE = PathExtensionContentNegotiationStrategy.class.getName() + ".SKIP";private final ContentNegotiationStrategy delegate;OptionalPathExtensionContentNegotiationStrategy(ContentNegotiationStrategy delegate) {this.delegate = delegate;}public List<MediaType> resolveMediaTypes(NativeWebRequest webRequest) throws HttpMediaTypeNotAcceptableException {Object skip = webRequest.getAttribute(SKIP_ATTRIBUTE, 0);return skip != null && Boolean.parseBoolean(skip.toString()) ? MEDIA_TYPE_ALL_LIST : this.delegate.resolveMediaTypes(webRequest);}}static class ResourceChainResourceHandlerRegistrationCustomizer implements WebMvcAutoConfiguration.ResourceHandlerRegistrationCustomizer {private final Resources resourceProperties;ResourceChainResourceHandlerRegistrationCustomizer(Resources resourceProperties) {this.resourceProperties = resourceProperties;}
以上文中的SpringBoot自动配置为基础,可知SpringBoot会扫描我们引入的依赖中的META-INF目录下的spring.factories文件中以EnableAutoConfiguration为key的值,将其加入到IOC容器中,但是并不是所有的对象都会加入到IOC容器中,应为这些starter的主配置类中都会有@Conditional注解来指定约束条件:
- @ConditionalOnBean:当容器里有指定 Bean 的条件下
- @ConditionalOnMissingBean:当容器里没有指定 Bean 的情况下
- @ConditionalOnSingleCandidate:当指定 Bean 在容器中只有一个,或者虽然有多个但是指定首选 Bean
- @ConditionalOnClass:当类路径下有指定类的条件下
- @ConditionalOnMissingClass:当类路径下没有指定类的条件下
- @ConditionalOnProperty:指定的属性是否有指定的值
- @ConditionalOnResource:类路径是否有指定的值
- @ConditionalOnExpression:基于 SpEL 表达式作为判断条件
- @ConditionalOnJava:基于 Java 版本作为判断条件
- @ConditionalOnJndi:在 JNDI 存在的条件下差在指定的位置
- @ConditionalOnNotWebApplication:当前项目不是 Web 项目的条件下
- @ConditionalOnWebApplication:当前项目是 Web 项 目的条件下
4. starter整体结构
xxxAutoConfiguration:starter中的主配置类,其中定义了特定条件和默认配置文件的指定
xxxProperties:默认文件,可以在我们使用starter的时候进行配置覆盖,这里重点体现了springboot的约定大于配置。
总结
SpringBoot 使用@EnableAutoConfiguration开启自动配置功能,通过@Import注解加载实现了ImportSelector接口的类并最终加载META-INF/spring.factories中的自动配置类实现自动装配,自动配置类其实就是通过@Conditional按需加载的配置类,想要其生效必须引入spring-boot-starter-xxx包实现起步依赖。
相关文章:
)
SpringBoot自动配置、启动器原理爆肝解析(干货满满)
文章目录 前言一、SpringBoot优势概要二、SpringBoot自动配置1. ☠注意☠2.自动配置详解 三、Starter(场景启动器)原理总结 前言 本文详细解析面试重点—SpringBoot自动配置原理、场景启动器原理,深入源码,直接上干货、绝不拖泥带…...

chrome扩展控制popup页面动态切换
文章目录 1、通过控制元素的显示隐藏达到popup页面切换的效果2、通过监听页面重新加载完成不同popup的切换3、直接修改popup页面location.href,无需刷新页面 1、通过控制元素的显示隐藏达到popup页面切换的效果 下面在mv2版本的API下完成 实际上通过控制页面元素实…...
:PyTorch常用函数)
【AI】《动手学-深度学习-PyTorch版》笔记(三):PyTorch常用函数
AI学习目录汇总 1、torch.arange 返回一维张量(一维数组),官网说明,常见的三种用法如下 输入:torch.arange(5) 输出:tensor([0, 1, 2, 3, 4]) 输入:torch.arange(5, 16) 输出:tensor([ 5, 6, 7, 8, 9, 10, 11, 12, 13, 14, 15]) 输入:torch.arange(1, 25, 2) …...

某文化馆三维建模模型-glb格式-三维漫游-室内导航测试
资源描述 某文化馆某个楼层的三维建模模型,glb格式,适用于three.js开发,可用来做一些三维室内漫游测试和室内导航测试 资源下载地址...
网络安全 Day19-计算机网络基础知识04(网络协议)
计算机网络基础知识04(网络协议) 1. ARP1.1 ARP通讯原理1.2 arp欺骗1.3 ARP欺骗与预防1.4 排查ARP病毒 2. DHCP工作原理(自动分配内网IP)3. TCP协议三次握手、四次挥手原理4. DNS协议工作原理 1. ARP Linux查看arp:ar…...

Verilog语法学习——LV5_位拆分与运算
LV5_位拆分与运算 题目来源于牛客网 [牛客网在线编程_Verilog篇_Verilog快速入门 (nowcoder.com)](https://www.nowcoder.com/exam/oj?page1&tabVerilog篇&topicId301) 题目 题目描述: 现在输入了一个压缩的16位数据,其实际上包含了四个数据…...

❤️创意网页:创意动态画布~缤纷移动涂鸦~图片彩色打码
✨博主:命运之光 🌸专栏:Python星辰秘典 🐳专栏:web开发(简单好用又好看) ❤️专栏:Java经典程序设计 ☀️博主的其他文章:点击进入博主的主页 前言:欢迎踏入…...

数值分析第六章节 用Python实现解线性方程组的迭代法
参考书籍:数值分析 第五版 李庆杨 王能超 易大义编 第5章 解线性方程组的迭代法 文章声明:如有发现错误,欢迎批评指正 文章目录 迭代法的基本概念雅可比迭代法与高斯-塞格尔迭代法雅可比迭代法高斯-塞格尔迭代法 迭代法的基本概念 6.1.1引言…...

【低代码专题方案】使用iPaaS平台下发数据,快捷集成MDM类型系统
01 场景背景 伴随着企业信息化建设日趋完善化、体系化,使用的应用系统越来越多,业务发展中沉淀了大量数据。主数据作为数据治理中枢,保存大量标准数据库,如何把庞大的数据下发到各个业务系统成了很棘手的问题。 传统的数据下发方…...
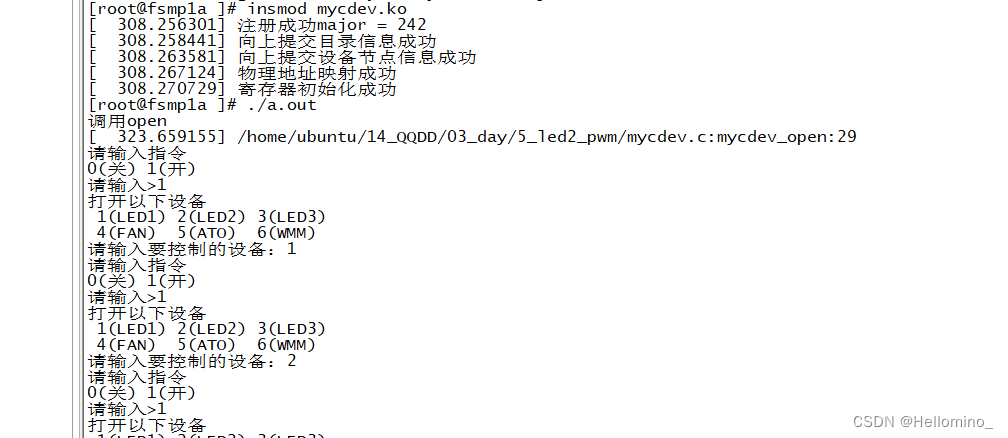
驱动开发 day3 (模块化驱动启动led,蜂鸣器,风扇,震动马达)
模块化驱动启动led,蜂鸣器,风扇,震动马达并加上Makefile 封装模块化驱动,可自由安装卸载驱动,便于驱动更新(附图) 1.安装模块驱动同时初始化各个设备并使能 2.该驱动会自动创建驱动节点. 3.通过c函数程序输入控制各个设备 4.卸载模块驱动 //编译驱动…...

数据结构与算法基础-学习-27-图之最短路径之Dijkstra(迪杰斯特拉)算法
一、最短路径应用案例 例如从北京到上海旅游,有多条路可以到目的地,哪条路线最短,哪条路线最省钱,就是典型的最短路径问题。 二、最短路径问题分类 最短路径问题可以分为两类,第一类为:两点间最短路径。第…...
Windows Server 2012 能使用的playwright版本
由于在harkua_bot里面使用到了playwright,我的服务器又是Windows Server 2012 R2,最新版playwright不支持Windows Server 2012 R2,支持Windows Server 2016以上,所以有了这个需求 https://cdn.npmmirror.com/binaries/playwright…...

css实现溢出变为省略号
单行文本溢出省略 text-overflow:规定当文本溢出时,显示省略符号来代表被修剪的文本 white-space:设置文字在一行显示,不能换行 overflow:文字长度超出限定宽度,则隐藏超出的内容overflow设为hidden&#…...

nginx如何配置两个服务器的连接
nginx 中通过server_name listen的方式配置多个服务器 nginx配置两个站点的windows操作方法,双域名双站点...

Linux环境Arduino IDE中配置ATOM S3
linux选择ubuntu发行版。 硬件设备有多小呢: 功能超级强大。 之前的ROS1和ROS2案例已经全部移植完成并测试结束(三轮纯人力校验😎)。 官网文档信息非常非常好: https://docs.m5stack.com/zh_CN/quick_start/atoms3…...
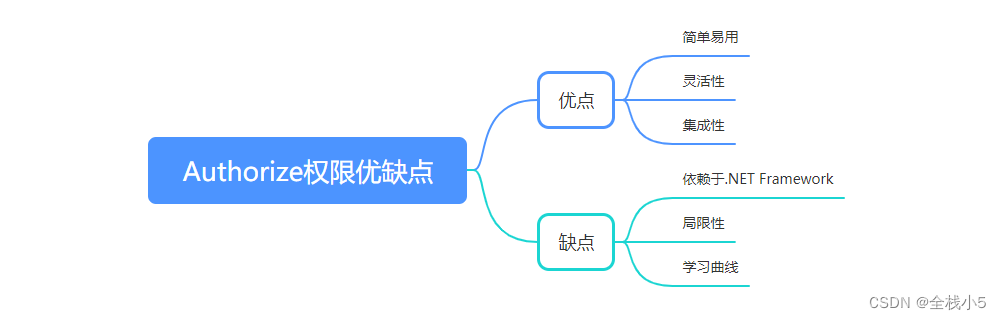
【C#】.Net Framework框架下的Authorize权限类
2023年,第31周,第3篇文章。给自己一个目标,然后坚持总会有收货,不信你试试! 在C#的.NET Framework中,你可以使用Authorize类来处理权限认证。Authorize类位于System.Web.Mvc命名空间中,它提供了…...

C++ list底层实现原理
文章目录 一、list底层实现二、类构成三、构造函数四、迭代器五、获取第一个元素六、获取最后一个元素七、插入元素 一句话:list底层实现一个双向循环链表 一、list底层实现 一个双向循环链表 二、类构成 class list : protected_List_base_list_base.lsit_impl…...

C#实现数字验证码
开发环境:VS2019,.NET Core 3.1,ASP.NET Core API 1、建立一个验证码控制器 新建两个方法Create和Check,Create用于创建验证码,Check用于验证它是否有效。 声明一个静态类变量存放列表,列表中存放包含令…...

Git的常用命令以及使用场景
文章目录 1.前言2.工作区,暂存区,版本库简介3.Git的常用命令4.版本回退5.撤销修改6.删除文件7.总结 1.前言 在学习Git命令之前,需要先了解工作区,暂存区和版本库这三个概念 2.工作区,暂存区,版本库简介 在使用Git进行版本控制时,有三个重要的概念:工作…...

tcp keepalive
tcp keepalive用于检查两者之间的链路是否正常,或防止链路断开。 一旦建立了TCP连接,该连接被定义为有效,直到一方关闭它。一旦连接进入连接状态,它将无限期地保持连接状态。但实际上,这种联系不会无限期地持续下去。如…...

无机布防火卷帘门价格怎么算?按尺寸定制,按需报价
无机布防火卷帘门作为建筑防火分区的核心设备,价格一直是工程采购的关注重点。很多用户在询价时,会发现不同厂家的报价差异较大,这是因为无机布防火卷帘门的价格并非按统一单价计算,而是完全根据项目的实际需求定制化核算。 &…...

配置OpenClaw Agent使用Taotoken作为后端模型提供商
🚀 告别海外账号与网络限制!稳定直连全球优质大模型,限时半价接入中。 👉 点击领取海量免费额度 配置OpenClaw Agent使用Taotoken作为后端模型提供商 基础教程类,指导希望使用OpenClaw等Agent工具的开发者,…...

MongoDB Limit 与 Skip 方法详解
MongoDB Limit 与 Skip 方法详解 引言 MongoDB 是一个高性能、可伸缩的文档存储系统,它提供了强大的数据存储和查询功能。在处理大量数据时,Limit 与 Skip 方法是 MongoDB 中常用的查询优化工具。本文将详细介绍 MongoDB 中的 Limit 与 Skip 方法,包括其基本用法、性能影响…...

关联规则挖掘在Calabi-Yau流形Hodge数分析中的应用与复现
1. 项目概述:当数据挖掘遇见高维几何在理论物理和代数几何的交叉领域,Calabi-Yau流形一直扮演着核心角色。这些具有特殊拓扑结构的空间,不仅是弦理论中额外维度紧化的关键候选者,其本身丰富的数学性质也吸引着无数研究者。然而&am…...
)
别再手动编译了!Matlab一键调用CEC2017测试函数的完整配置指南(附30个函数调用示例)
别再手动编译了!Matlab一键调用CEC2017测试函数的完整配置指南(附30个函数调用示例) 算法研究者们常常需要借助标准测试函数来验证优化算法的性能,而CEC2017测试函数集因其复杂性和多维度的挑战性,成为评估算法鲁棒性的…...

别再只用递归了!用C语言栈实现非递归快速排序,内存效率提升实战
从递归到迭代:C语言栈实现非递归快速排序的工程实践 在嵌入式开发和大规模数据处理场景中,递归实现的快速排序常常面临栈溢出风险。当排序10万个元素的数组时,递归深度可能达到log₂100000≈17层,在仅有2KB栈空间的STM32F103上极易…...

用图神经网络做缺陷定位,准确率比传统方法高出30%
在现代软件工程的复杂迷宫中,缺陷定位始终是测试团队面临的核心挑战。想象这样一个场景:一个电商系统在特定压力条件下偶发订单丢失,日志中只留下泛泛的超时错误,问题可能深藏在上百个微服务的调用链、分布式事务的竞态条件或某个…...
到底怎么设?附场景实测)
Unity新手避坑指南:NavMesh烘焙参数(Agent Radius/Height)到底怎么设?附场景实测
Unity导航系统深度解析:Agent参数设置与场景适配实战在Unity游戏开发中,导航系统(Navigation System)是实现角色智能移动的核心模块。对于刚接触Unity导航系统的开发者来说,Agent Radius(代理半径)和Agent Height(代理身高)这两个参数的设置往…...

保姆级教程:Multisim 14.0 从下载到汉化,手把手教你避开安装过程中的那些坑
Multisim 14.0 终极安装指南:从零开始到完美汉化的全流程解析 对于电子工程和自动化领域的学习者与从业者而言,Multisim 14.0 无疑是一款不可或缺的电路设计与仿真工具。然而,许多用户在初次安装过程中常常遇到各种棘手问题,导致软…...

污水管网在线监测系统,精准定位污水偷排源头
当前,城市地下排水管网普遍存在“看不见、摸不着”的监管难题。污水偷排、漏检等现场层出不穷,依赖人工进行监测管理的方式无疑是十分困难的。因此,管理部门需要灵活运用先进技术,积极转变观念,实现对污水管网的定量、…...