【大数据之Flume】四、Flume进阶之复制和多路复用、负载均衡和故障转移、聚合案例
1 复制和多路复用
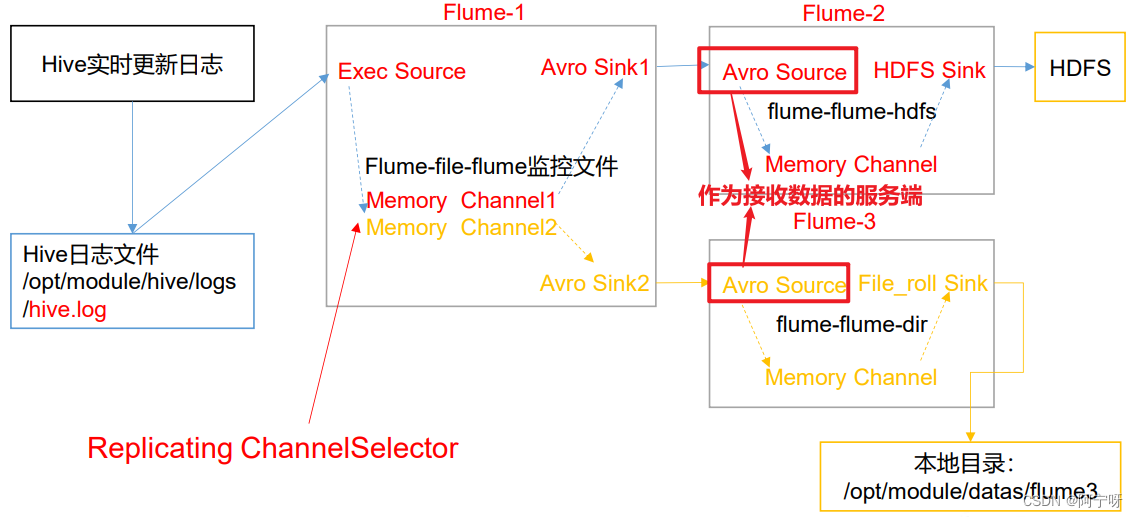
(1)需求:使用 Flume-1 监控文件变动(可以用Exec Source或Taildir Source),Flume-1 将变动内容传递给 Flume-2(用Avro Sink传),(用Avro Source接)Flume-2 负责存储到 HDFS。同时 Flume-1 将变动内容传递给 Flume-3,Flume-3 负责输出到 Local FileSystem。
(2)分析:
步骤:
(1)在/opt/module/flume-1.9.0/job 目录下创建 group1 文件夹,在/opt/module/flume-1.9.0/目录下创建 data 文件夹,在该文件夹下创建flume文件夹。
(2)在 group1创建 flume-file-flume.conf:配置 1 个接收日志文件的source 和两个 channel、两个 sink,分别输送给 flume-flume- hdfs 和 flume-flume-dir。
vim  flume-file-flume.conf# Name the components on this agent
a1.sources = r1
a1.sinks = k1 k2
a1.channels = c1 c2
#将数据流复制给所有 channel
a1.sources.r1.selector.type = replicating# Describe/configure the source
a1.sources.r1.type = exec
a1.sources.r1.command = tail -F /opt/module/flume-1.9.0/logs/flume.log
a1.sources.r1.shell = /bin/bash -c# Describethe sink
# sink 端的 avro 是一个数据发送者
a1.sinks.k1.type = avro
a1.sinks.k1.hostname = hadoop102
a1.sinks.k1.port = 4141# sink 端的 avro 是一个数据发送者
a1.sinks.k2.type= avro
a1.sinks.k2.hostname = hadoop102
a1.sinks.k2.port = 4142# Describe thechannel
a1.channels.c1.type = memory
a1.channels.c1.capacity = 1000
a1.channels.c1.transactionCapacity = 100a1.channels.c2.type= memory
a1.channels.c2.capacity = 1000
a1.channels.c2.transactionCapacity = 100# Bind the source and sink to the channel
a1.sources.r1.channels = c1 c2
a1.sinks.k1.channel = c1
a1.sinks.k2.channel =c2
(3)在group1下创建flume-flume-hdfs.conf:配置上级 Flume 输出的 Source,输出是到 HDFS 的Sink。
vim flume-flume-hdfs.conf# Name the components on this agent
a2.sources = r1
a2.sinks = k1
a2.channels = c1# Describe/configure the source
# source 端的 avro 是一个数据接收服务
a2.sources.r1.type= avro
a2.sources.r1.bind = hadoop102
a2.sources.r1.port = 4141# Describe the sink
a2.sinks.k1.type= hdfs
a2.sinks.k1.hdfs.path = hdfs://hadoop102:8020/flume2/%Y%m%d/%H
#上传文件的前缀
a2.sinks.k1.hdfs.filePrefix = flume2-
#是否按照时间滚动文件夹
a2.sinks.k1.hdfs.round= true
#多少时间单位创建一个新的文件夹
a2.sinks.k1.hdfs.roundValue = 1
#重新定义时间单位
a2.sinks.k1.hdfs.roundUnit = hour
#是否使用本地时间戳
a2.sinks.k1.hdfs.useLocalTimeStamp = true
#积攒多少个Event 才 flush 到 HDFS 一次
a2.sinks.k1.hdfs.batchSize = 100
#设置文件类型,可支持压缩
a2.sinks.k1.hdfs.fileType = DataStream
#多久生成一个新的文件
a2.sinks.k1.hdfs.rollInterval= 30
#设置每个文件的滚动大小大概是 128M
a2.sinks.k1.hdfs.rollSize = 134217700
#文件的滚动与Event 数量无关
a2.sinks.k1.hdfs.rollCount = 0# Describe thechannel
a2.channels.c1.type = memory
a2.channels.c1.capacity = 1000
a2.channels.c1.transactionCapacity = 100# Bind the source and sink to the channel
a2.sources.r1.channels = c1
a2.sinks.k1.channel = c1
(4)在group1下创建flume-flume-dir.conf:配置上级 Flume 输出的 Source,输出是到本地目录的 Sink。
vim flume-flume-dir.conf# Name the components on this agent
a3.sources = r1
a3.sinks = k1
a3.channels = c2# Describe/configure the source
a3.sources.r1.type = avro
a3.sources.r1.bind = hadoop102
a3.sources.r1.port = 4142# Describe the sink
a3.sinks.k1.type= file_roll
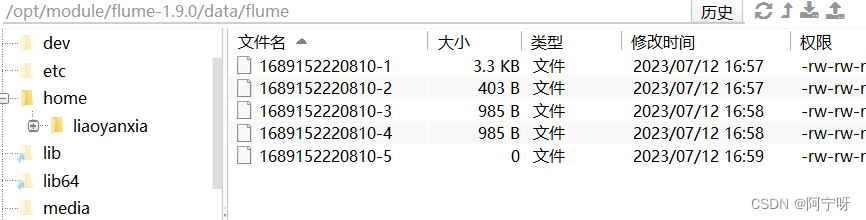
a3.sinks.k1.sink.directory = /opt/module/flume-1.9.0/data/flume# Describe the channel
a3.channels.c2.type = memory
a3.channels.c2.capacity = 1000
a3.channels.c2.transactionCapacity = 100# Bind the source and sink to the channel
a3.sources.r1.channels = c2
a3.sinks.k1.channel = c2
提示:输出的本地目录必须是已经存在的目录,如果该目录不存在,并不会在本地创建新的目录。
(5)先开启HDFS,再分别启动flume-flume-hdfs、flume-flume-dir、flume-file-flume。
服务器要先开启,再开启客户端,
myhadoop.sh startbin/flume-ng agent -n a2 -c conf/ -f job/group1/flume-flume-hdfs.conf
bin/flume-ng agent -n a3 -c conf/ -f job/group1/flume-flume-dir.conf
bin/flume-ng agent -n a1 -c conf/ -f job/group1/flume-file-flume.conf
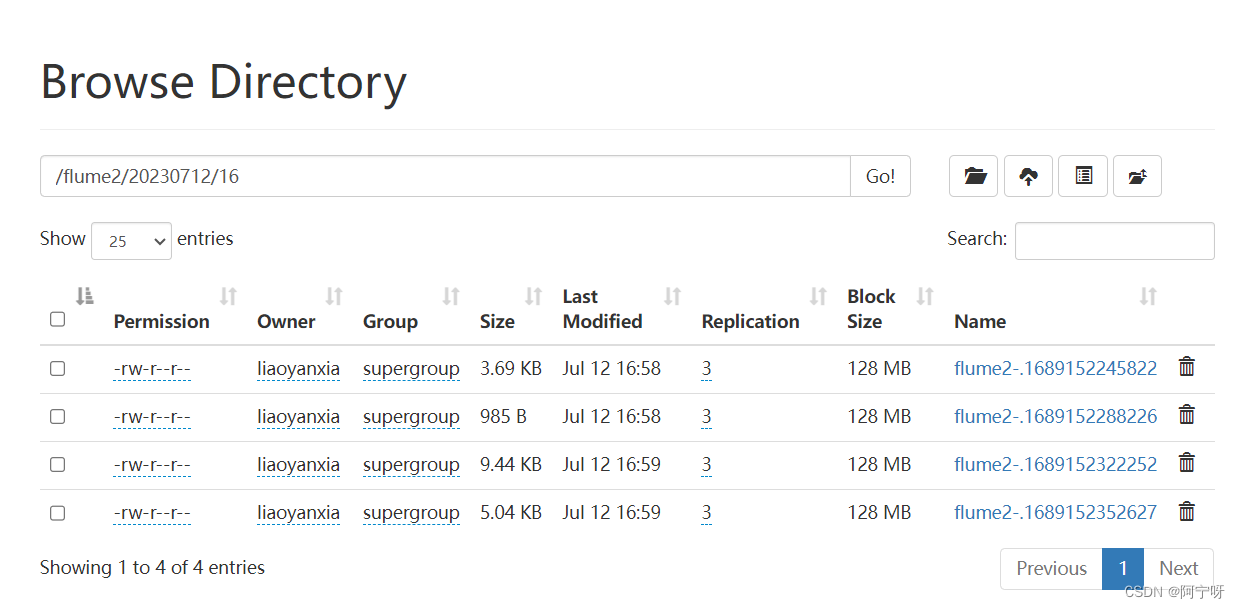
(6)检查HDFS上的数据
2 负载均衡和故障转移
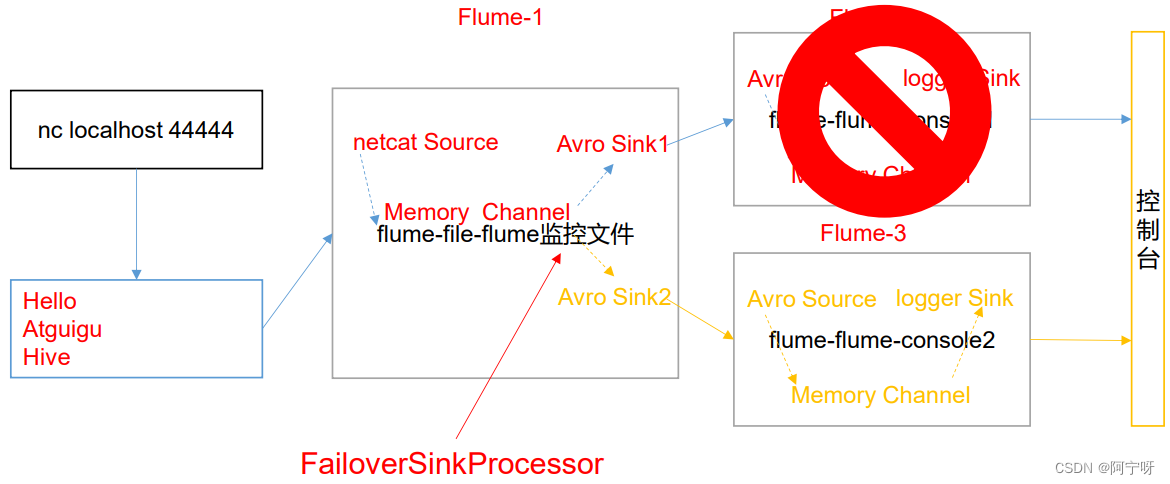
(1)故障转移需求:使用 Flume1 监控一个端口,其 sink 组中的 sink 分别对接 Flume2 和 Flume3,采用FailoverSinkProcessor,实现故障转移的功能。
(2)分析:
步骤:
(1)在/opt/module/flume-1.9.0/job 目录下创建 group2 文件夹,在该文件夹下创建flume-netcat-flume.conf、flume-flume-console1.conf、flume-flume-console2.conf。
(2)flume-netcat-flume.conf:配置 1 个 netcat source 和 1 个 channel、1 个 sink group(2 个 sink),分别输送给 flume-flume-console1.conf、flume-flume-console2.conf。
# Name the components on this agent
a1.sources = r1
a1.channels = c1
a1.sinkgroups = g1
a1.sinks = k1 k2# Describe/configure the source
a1.sources.r1.type = netcat
a1.sources.r1.bind = localhost
a1.sources.r1.port =44444a1.sinkgroups.g1.processor.type = failover
a1.sinkgroups.g1.processor.priority.k1 = 5
a1.sinkgroups.g1.processor.priority.k2 = 10
a1.sinkgroups.g1.processor.maxpenalty = 10000# Describe the sink
a1.sinks.k1.type = avro
a1.sinks.k1.hostname = hadoop102
a1.sinks.k1.port = 4141a1.sinks.k2.type = avro
a1.sinks.k2.hostname = hadoop102
a1.sinks.k2.port = 4142# Describe the channel
a1.channels.c1.type = memory
a1.channels.c1.capacity = 1000
a1.channels.c1.transactionCapacity = 100# Bind the source and sink to the channel
a1.sources.r1.channels = c1
a1.sinkgroups.g1.sinks = k1 k2
a1.sinks.k1.channel = c1
a1.sinks.k2.channel =c1
(3)创建 flume-flume-console1.conf:配置上级 Flume 输出的 Source,输出是到本地控制台。
# Name the components on this agent
a2.sources = r1
a2.sinks = k1
a2.channels = c1# Describe/configure the source
a2.sources.r1.type = avro
a2.sources.r1.bind = hadoop102
a2.sources.r1.port = 4141# Describe the sink
a2.sinks.k1.type = logger# Describe the channel
a2.channels.c1.type = memory
a2.channels.c1.capacity = 1000
a2.channels.c1.transactionCapacity = 100# Bind the source and sink to the channel
a2.sources.r1.channels = c1
a2.sinks.k1.channel = c1
(4)创建 flume-flume-console2.conf:配置上级 Flume 输出的 Source,输出是到本地控制台。
# Name the components on this agent
a3.sources = r1
a3.sinks = k1
a3.channels = c1# Describe/configure the source
a3.sources.r1.type = avro
a3.sources.r1.bind = hadoop102
a3.sources.r1.port = 4142# Describe the sink
a3.sinks.k1.type = logger# Describe the channel
a3.channels.c1.type = memory
a3.channels.c1.capacity = 1000
a3.channels.c1.transactionCapacity = 100# Bind the source and sink to the channel
a3.sources.r1.channels = c1
a3.sinks.k1.channel = c1
(5)执行配置文件,分别开启对应配置文件: flume-flume-console2.conf , flume-flume-console1.conf , flume-netcat-flume.conf。
同样是需要先开启服务端,再开客户端。
bin/flume-ng agent -c conf/ -n a3 -f job/group2/flume-flume-console2.conf -Dflume.root.logger=INFO,console
bin/flume-ng agent -c conf/ -n a2 -f job/group2/flume-flume-console1.conf -Dflume.root.logger=INFO,console
bin/flume-ng agent -c conf/ -n a1 -f job/group2/flume-netcat-flume.conf
(6)使用 netcat 工具向本机的 44444 端口发送内容
nc localhost 44444
(7)查看Flume2 及 Flume3 的控制台打印日志。
Flume3优先级更高。

(8)将 Flume3 kill,观察 Flume2 的控制台打印情况。


负载均衡需求:
使用 Flume1 监控一个端口,其 sink 组中的 sink 分别对接 Flume2 和 Flume3,采用FailoverSinkProcessor,实现负载均衡的功能。
步骤:
只需要修改flume-netcat-flume.conf中a1.sinkgroups.g1.processor的配置内容,把原来相关的内容都删除掉,添加以下,其余相同。
a1.sinkgroups.g1.processor.type = load_balance;
#使用退避算法轮询sink组
a1.sinkgroups.g1.processor.backoff = true;
3 聚合
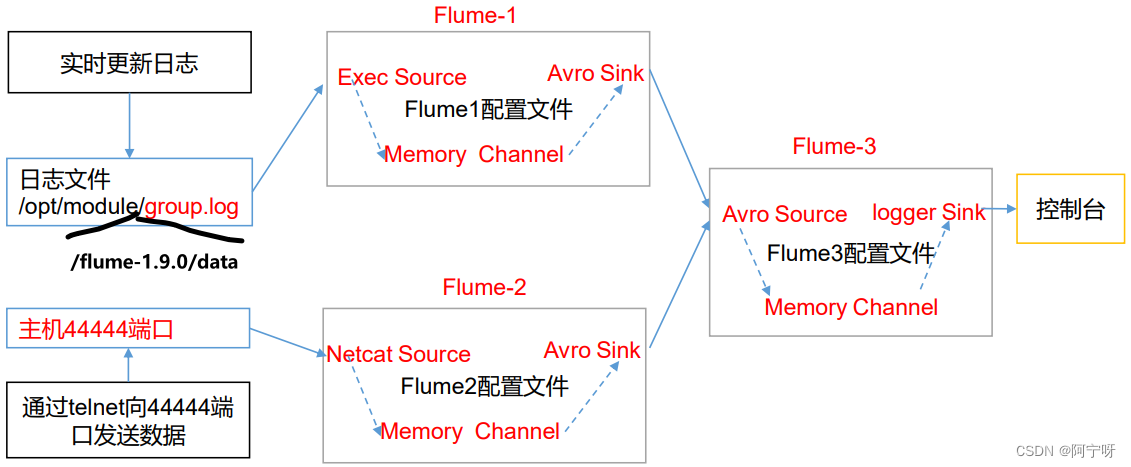
(1)需求:hadoop102 上的Flume-1 监控文件/opt/module/flume-1.9.0/group.log,hadoop103 上的Flume-2 监控某一个端口的数据流,Flume-1 与 Flume-2 将数据发送给 hadoop104 上的 Flume-3,Flume-3 将最终数据打印到控制台。
(2)分析:
步骤:
(1)在opt/module/flume-1.9.0/job 目录下创建一个group3 文件夹;分发整个Flume给hadoop103、hadoop104。
(2)在 hadoop102 上创建配置文件flume1-logger-flume.conf:配置 Source 用于监控 hive.log 文件,配置 Sink 输出数据到下一级Flume,并在/opt/module/flume-1.9.0/data下创建空白的文件group.log。
# Name the components on this agent
a1.sources = r1
a1.sinks = k1
a1.channels = c1# Describe/configure the source
a1.sources.r1.type = exec
a1.sources.r1.command = tail -F /opt/module/flume-1.9.0/data/group.log
a1.sources.r1.shell= /bin/bash -c# Describe the sink
a1.sinks.k1.type = avro
a1.sinks.k1.hostname = hadoop104
a1.sinks.k1.port = 4141# Describe the channel
a1.channels.c1.type = memory
a1.channels.c1.capacity = 1000
a1.channels.c1.transactionCapacity = 100# Bind the source and sink to the channel
a1.sources.r1.channels = c1
a1.sinks.k1.channel = c1
(3)在 hadoop103 上创建配置文件flume2-netcat-flume.conf:配置 Source 监控端口 44444 数据流,配置Sink 数据到下一级Flume。
# Name the components on this agent
a2.sources = r1
a2.sinks = k1
a2.channels = c1# Describe/configure the source
a2.sources.r1.type = netcat
a2.sources.r1.bind = hadoop103
a2.sources.r1.port = 44444# Describe the sink
a2.sinks.k1.type = avro
a2.sinks.k1.hostname = hadoop104
a2.sinks.k1.port = 4141# Use a channel which buffers events in memory
a2.channels.c1.type = memory
a2.channels.c1.capacity = 1000
a2.channels.c1.transactionCapacity = 10# Bind the source and sink to the channel
a2.sources.r1.channels = c1
a2.sinks.k1.channel = c1
(4)在 hadoop104 上创建配置文件flume3-flume-logger.conf:配置 source 用于接收 flume1 与 flume2 发送过来的数据流,最终合并后 sink 到控制台
# Name the components on this agent
a3.sources = r1
a3.sinks = k1
a3.channels = c1# Describe/configure the source
a3.sources.r1.type = avro
a3.sources.r1.bind = hadoop104
a3.sources.r1.port = 4141# Describe the sink# Describe the sink
a3.sinks.k1.type = logger# Describe the channel
a3.channels.c1.type = memory
a3.channels.c1.capacity = 1000
a3.channels.c1.transactionCapacity = 100# Bind the source and sink to the channel
a3.sources.r1.channels = c1
a3.sinks.k1.channel = c1
(5)在各主机上分别执行配置文件:flume3-flume-logger.conf,flume2-netcat-flume.conf,flume1-logger-flume.conf。
[lyx@hadoop104 flume-1.9.0]$ bin/flume-ng agent -c conf/ -n a3 -f job/group3/flume3-flume-logger.conf -Dflume.root.logger=INFO,console
[lyx@hadoop103 flume-1.9.0]$ bin/flume-ng agent -c conf/ -n a2 -f job/group3/flume2-netcat-flume.conf
[lyx@hadoop102 flume-1.9.0]$ bin/flume-ng agent -c conf/ -n a1 -f job/group3/flume1-logger-flume.conf
(6)在 hadoop102 上向/opt/module/flume-1.9.0/data 目录下的 group.log 追加内容
[lyx@hadoop102 data]$ echo 'hello' > group.log
(7)在 hadoop103 上向 44444 端口发送数据
nc hadoop103 44444
(8)查看hadoop104上的数据。

相关文章:
【大数据之Flume】四、Flume进阶之复制和多路复用、负载均衡和故障转移、聚合案例
1 复制和多路复用 (1)需求:使用 Flume-1 监控文件变动(可以用Exec Source或Taildir Source),Flume-1 将变动内容传递给 Flume-2(用Avro Sink传),(用Avro Sou…...

前端学习--vue2--插槽
写在前面: 这个用法是在使用组件和创建组件中 文章目录 介绍简单使用多个插槽省写默认/后备内容作用域插槽常用实例Element-ui的el-table 废弃用法slot attributeslot-scope attribute 介绍 我们在定义一些组件的时候,由于组件内文字想要自定义&#…...
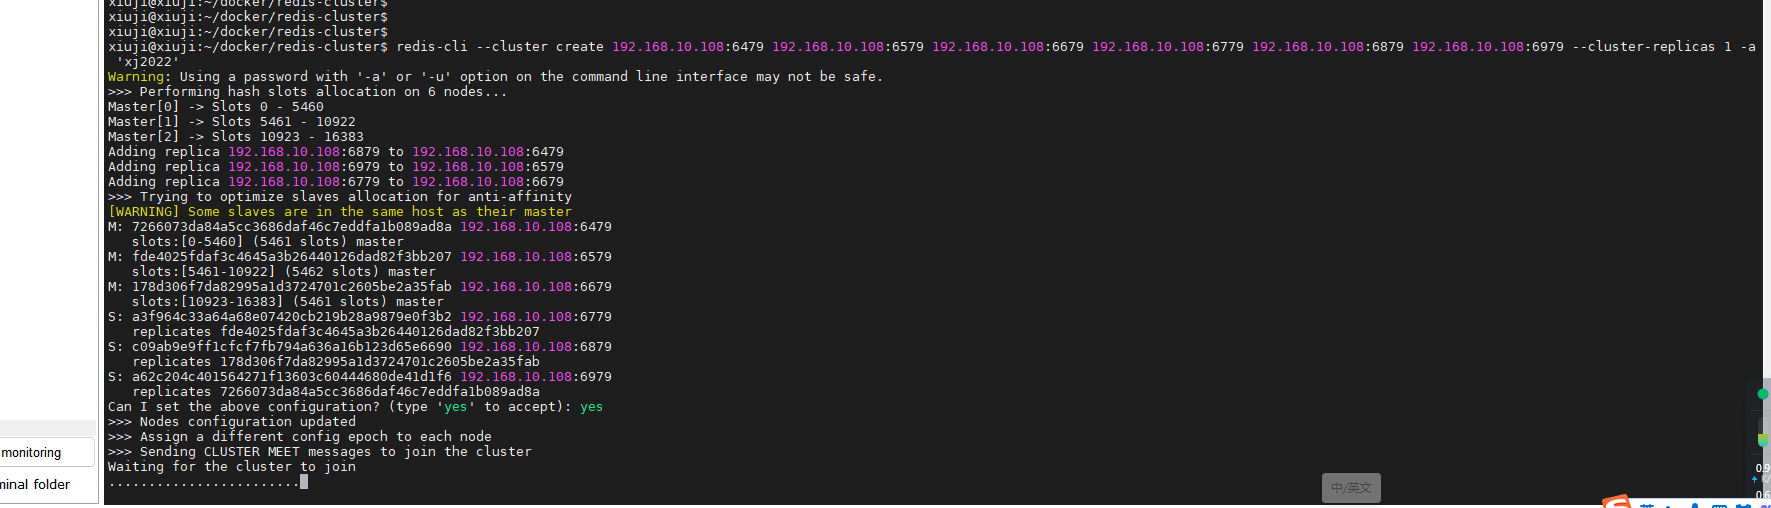
使用 Docker Compose 部署 Redis Cluster 集群,轻松搭建高可用分布式缓存
Redis Cluster(Redis 集群)是 Redis 分布式解决方案的一部分,它旨在提供高可用性、高性能和横向扩展的功能。Redis Cluster 能够将多个 Redis 节点组合成一个分布式集群,实现数据分片和负载均衡,从而确保在大规模应用场…...

在Spring Boot框架中集成 Spring Security
在Spring Boot框架中集成 Spring Security 目录 技术介绍SpringSecurity的核心功能:SpringSecurity特点:具体实现 1、集成依赖2、修改spring security实现service.impl.UserDetailsServiceImpl类 代码1具体解释代码2具体解释 实现config.SecurityConfi…...

登月再进一步:Apollo自动驾驶的里程碑
前言 「作者主页」:雪碧有白泡泡 「个人网站」:雪碧的个人网站 「推荐专栏」: ★java一站式服务 ★ ★前端炫酷代码分享 ★ ★ uniapp-从构建到提升★ ★ 从0到英雄,vue成神之路★ ★ 解决算法,一个专栏就够了★ ★ 架…...
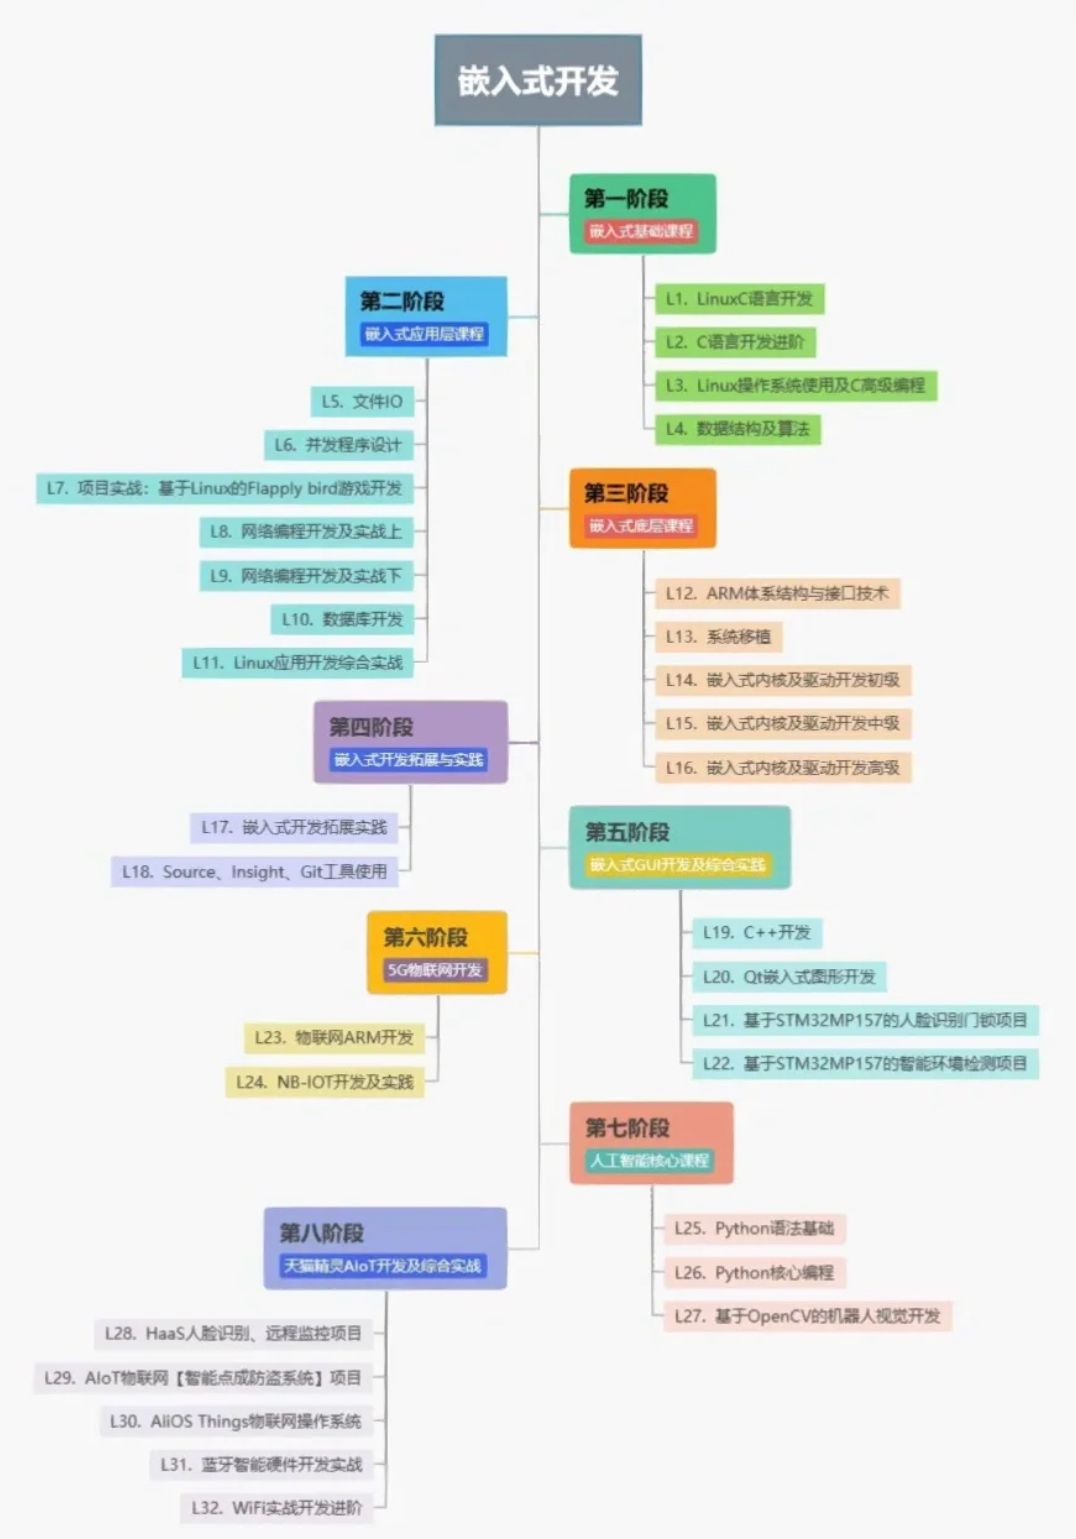
嵌入式一开始该怎么学?学习单片机
学习单片机: 模电数电肯定必须的,玩单片机大概率这两门课都学过,学过微机原理更好。 直接看野火的文档,芯片手册,外设手册。 学单片机不要纠结于某个型号,我认为stm32就OK,主要是原理和感觉。…...

Spring事件监听器ApplicationListener
目录 介绍 spirng启动后启动某方法 介绍 ApplicationEvent以及Listener是Spring为我们提供的一个事件监听、订阅的实现,内部实现原理是观察者设计模式,设计初衷也是为了系统业务逻辑之间的解耦,提高可扩展性以及可维护性。事件发布者并不需…...
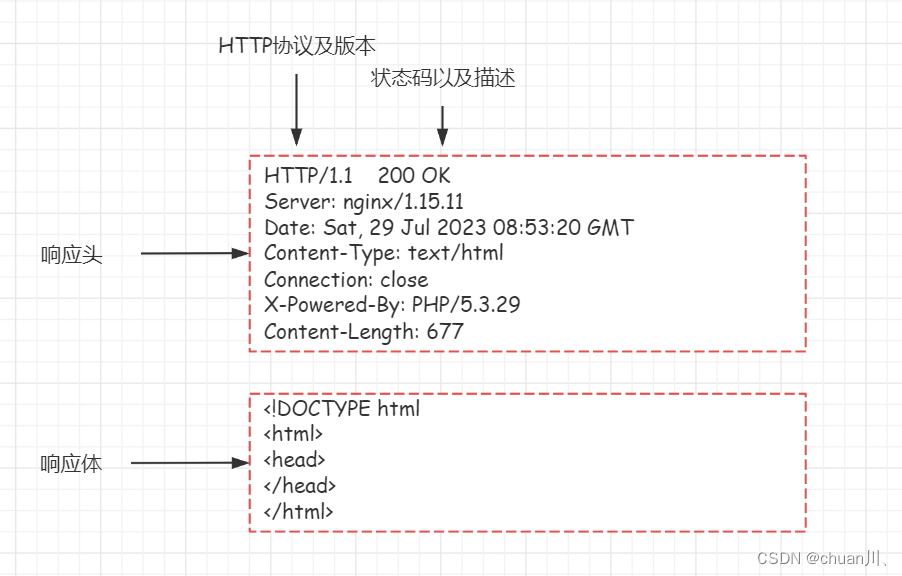
安全学习DAY10_HTTP数据包
HTTP数据包 文章目录 HTTP数据包小节导图Request请求数据包结构Request请求方法(方式)请求头(Header)Response响应数据包结构Response响应数据包状态码状态码作用:部分状态码详解判断网站文件是否存在的状态码…...
云原生落地实践的25个步骤
一、什么是云原生? 云原生从字面意思上来看可以分成云和原生两个部分。 云是和本地相对的,传统的应用必须跑在本地服务器上,现在流行的应用都跑在云端,云包含了IaaS,、PaaS和SaaS。 原生就是土生土长的意思,我们在开始…...

Stable diffusion 三大基础脚本 提示词矩阵,载入提示词,XYZ图表讲解
目录 0.本章讲解 1.提示词矩阵(prompt matrix) 1.2.提示词矩阵功能选项 1.2.1.把可变部分放在提示词文本的开头 1.2.2.为每张图片使用不同随机种子 1.2.3.选择提示词 1.2.4.选择分割符 1.2.5.宫格图边框(像素) 2.从文本框或文件载入提示词(Pro…...
uniapp uni-combox 下拉提示无匹配项(完美解决--附加源码解决方案及思路)
问题描述 匆匆忙忙又到了周一啦,一大早就来了一个头疼的问题,把我难得团团转,呜呜呜~ 下面我用代码的方式展示出来,看下你的代码是否与我的不同。 解决方案 <uni-forms-item label"名称" name"drugName&quo…...

10. Mybatis 项目的创建
目录 1. Mybatis 概念 2. 第一个 Mybits 查询 2.1 创建数据库和表 2.2 添加 Mybatis 框架支持 2.3 添加配置文件 2.4 配置 MyBatis 中的 XML 路径 2.5 添加业务代码 在学习 Mybatis 之前,我们需要知道 Mybatis 和 Spring 没有任何的关系。如果一定要强调二者…...
简介)
历年 Nobel prize in Physics (诺贝尔物理学奖)简介
历年 Fields Medal 与 Nobel prize in Physics 简介 Nobel prize in Physics 1901年12月10日 诺贝尔逝世5周年纪念日首次颁发诺贝尔奖。1916年 第一次世界大战 1914.7 至 1918.11诺贝尔物理学奖空缺1931年诺贝尔物理学奖空缺1934年诺贝尔物理学奖空缺1940年—1942年 第二次世界…...
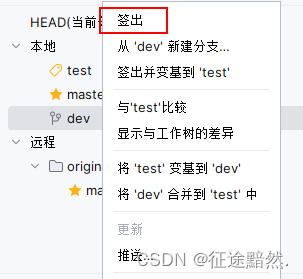
IDEA中Git面板操作介绍 变基、合并、提取、拉取、签出
IDEA中Git面板操作介绍 变基、合并、提取、拉取、签出 面板介绍 变基、合并 提取、拉取 签出、Checkout 面板介绍 如图,在IDEA的Git面板中,仓库会分为本地仓库和远程仓库,代码仓库里面放的是各个分支。 分支前面的书签🔖标志…...

Android Studio开发简易APP添加代办事项
创建xml布局页 <?xml version="1.0" encoding="utf-8"?> <LinearLayout xmlns:android="http://schemas.android.com/apk/res/android"xmlns:tools="http://schemas.android.com/tools"android:layout_width...
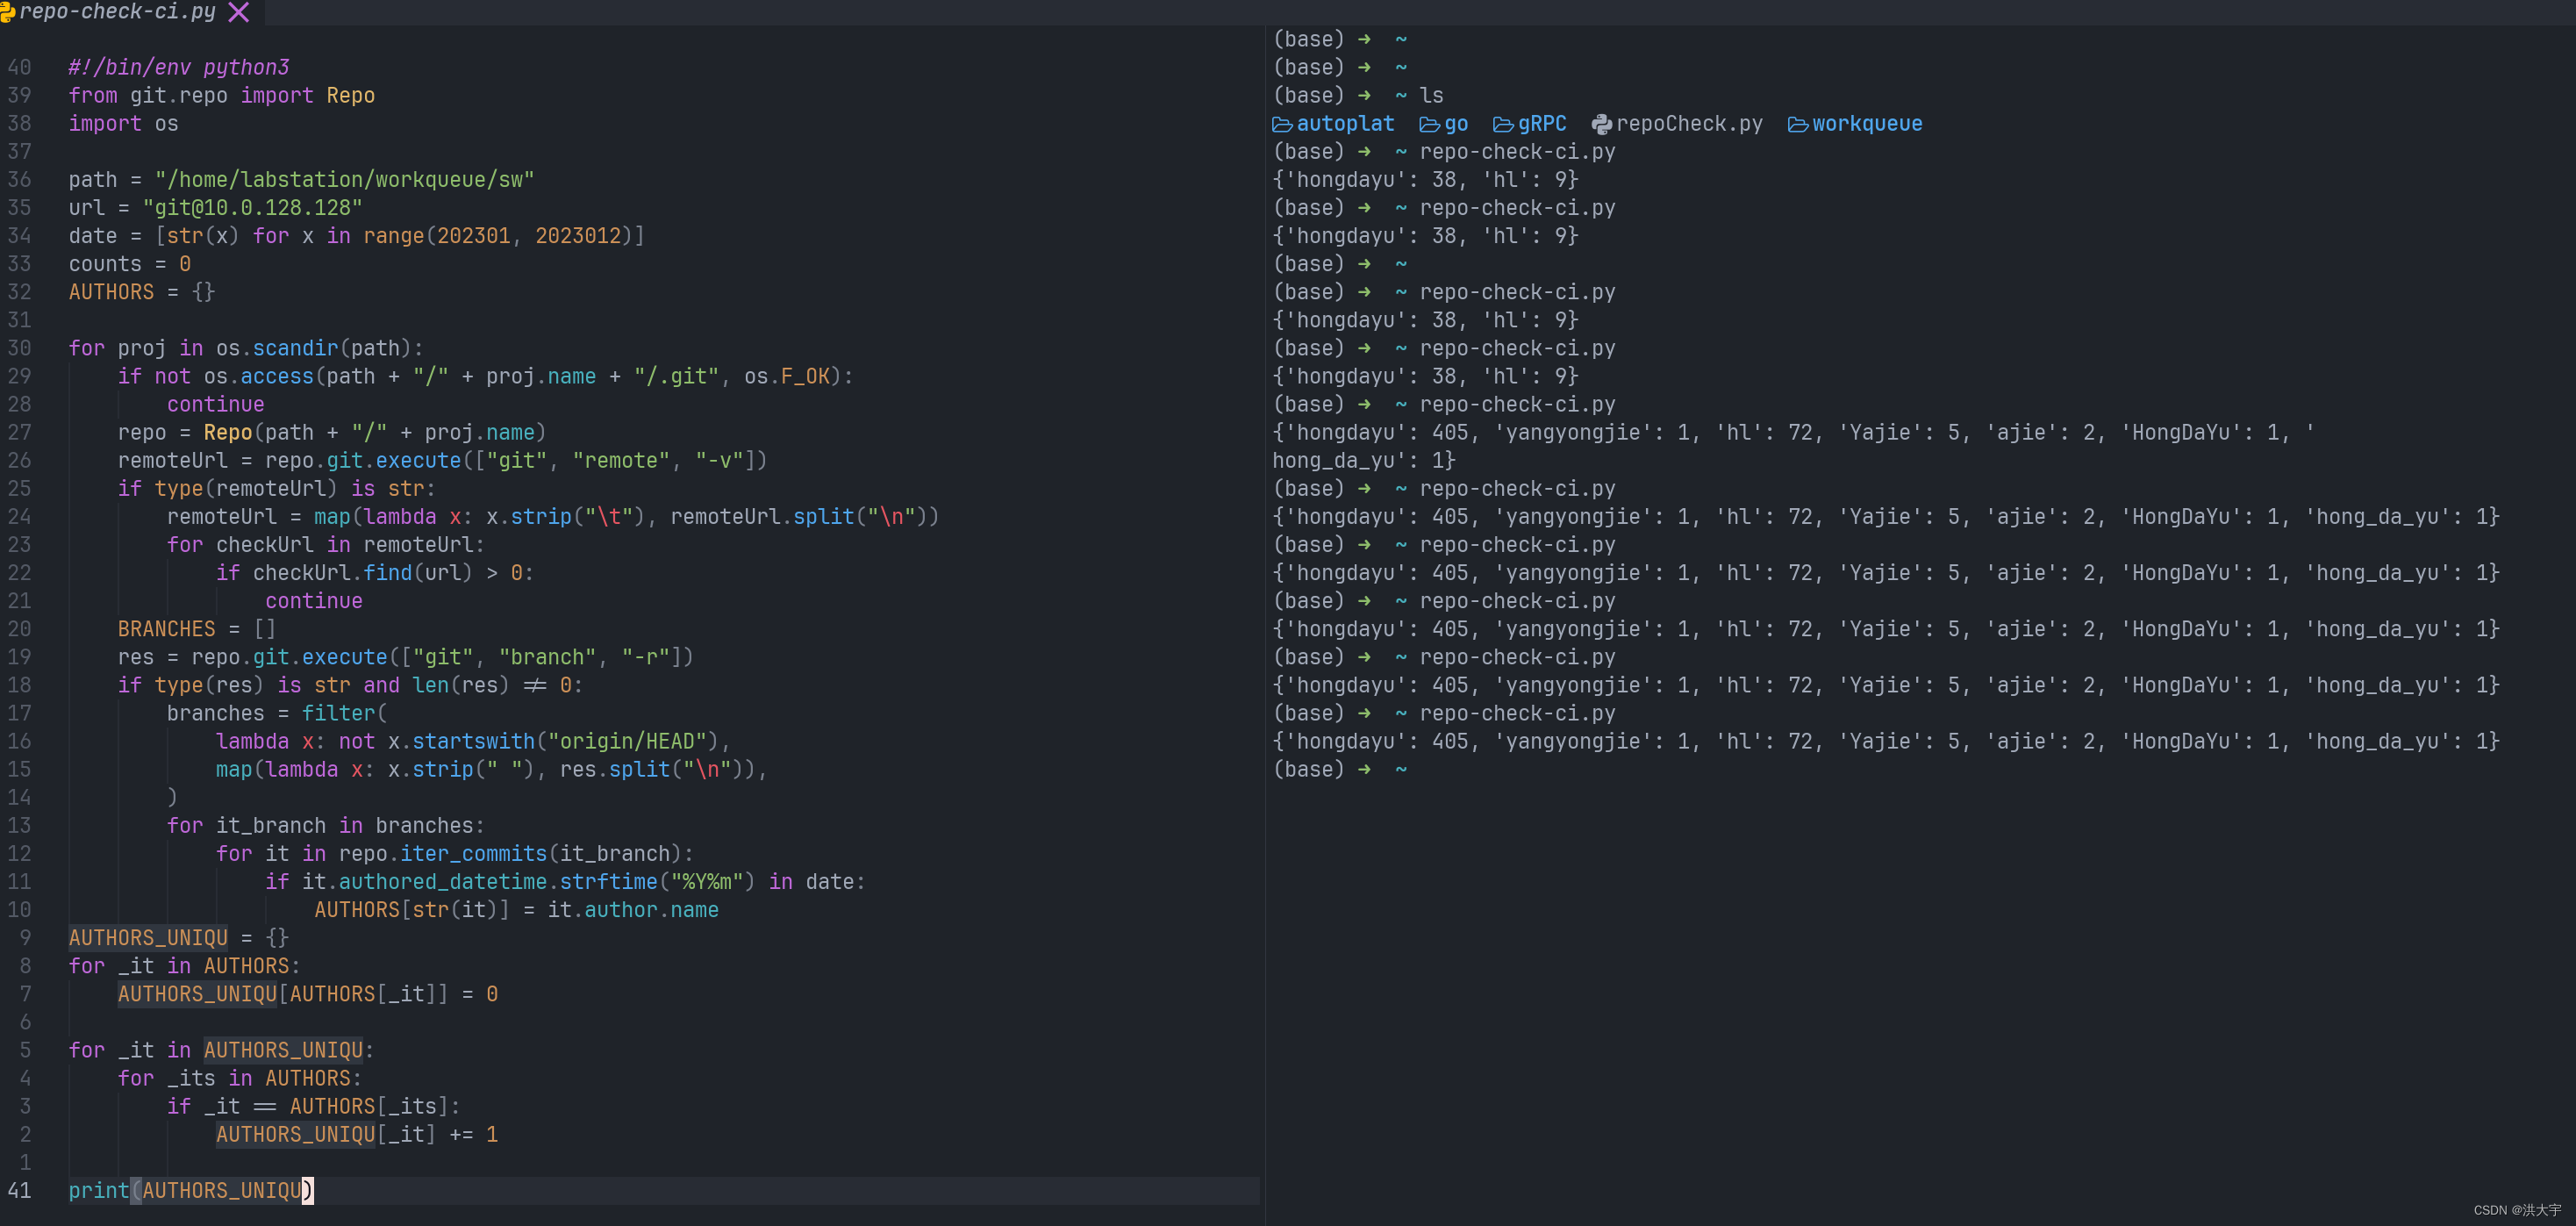
python 统计所有的 仓库 提交者的提交次数
字典去重 YYDS 然后再写入excel 表 yyds #!/bin/env python3 from git.repo import Repo import os import pandas as pdspath "/home/labstation/workqueue/sw" url "git10.0.128.128" date [str(x) for x in range(202307, 202308)] datefmt "%…...
)
018-从零搭建微服务-系统服务(五)
写在最前 如果这个项目让你有所收获,记得 Star 关注哦,这对我是非常不错的鼓励与支持。 源码地址(后端):https://gitee.com/csps/mingyue 源码地址(前端):https://gitee.com/csps…...

HarmonyOS 开发基础(三)登录页面单向数据绑定(父组件向子组件传参)
一、目录结构认识 开发软件目录截图部分文件夹说明 文件组织结构图 二、完成单向数据绑定 index.etx // 导出方式直接从文件夹 import MyInput from "../common/commons/myInput" Entry Component /* 组件可以基于struct实现,组件不能有继承关系&am…...
发npm包
重点文件 .github -> workflow -> .yml文件 发自己的包 新建dev分支,合并到master后自动执行 fork别人的包 fork -> base dev新建本地rebase-dev分支 -> 提交push后合并至dev -> dev合并至master后自动执行 值得注意的是,fork别人的…...
<el-empty>
<el-empty> 是 Element UI 框架中提供的一个组件,用于显示空状态的占位内容。Element UI 是一套基于 Vue.js 的组件库,用于构建响应式和易用的用户界面。 <el-empty> 组件在应用中常用于以下场景: 当数据为空时,可以…...

量子纠错码与硬件定制逻辑门的优化实现
1. 量子纠错码与硬件定制逻辑门概述量子纠错码(QECC)是容错量子计算的核心组件,其核心思想是通过编码将量子信息分布在多个物理量子比特上,利用稳定子(stabilizer)测量来检测和纠正错误。在众多QECC中&…...

魔兽争霸3终极兼容方案:5分钟解决Win10/Win11运行问题
魔兽争霸3终极兼容方案:5分钟解决Win10/Win11运行问题 【免费下载链接】WarcraftHelper Warcraft III Helper , support 1.20e, 1.24e, 1.26a, 1.27a, 1.27b 项目地址: https://gitcode.com/gh_mirrors/wa/WarcraftHelper 还在为魔兽争霸3在现代Windows系统上…...

大模型稀疏激活:MoE架构的工程实践与负载均衡
1. 这不是参数堆砌,而是“动态稀疏激活”的工程革命你可能已经看到过那条刷屏的推文:“GPT-4有1.8万亿参数,但每生成一个token只用其中2%。”——这句话像一道闪电劈开了大模型圈的认知惯性。它背后没有玄学,没有营销话术…...

巨噬细胞M1型与M2型的差异
巨噬细胞具有高度的功能可塑性,依据微环境信号的不同,可极化为功能迥异的M1型(经典活化)与M2型(替代活化)两大表型。两者在活化机制、代谢特征及生物学功能上呈现出显著的“阴阳”对立与平衡。1. 活化诱导与…...
)
模拟几种数据融合协作频谱感知技术在认知无线电应用中性能研究(Matlab代码实现)
💥💥💞💞欢迎来到本博客❤️❤️💥💥 🏆博主优势:🌞🌞🌞博客内容尽量做到思维缜密,逻辑清晰,为了方便读者。 ⛳️座右铭&a…...

【Elasticsearch从入门到精通】第06篇:Elasticsearch重要系统参数设置——防止启动检查失败
上一篇【第05篇】Elasticsearch配置详解——config.yml核心配置项全解析 下一篇【第07篇】Elasticsearch集群安全配置 摘要 将Elasticsearch部署到生产环境时,操作系统层面的参数配置往往是被忽视的关键环节。ES通过Bootstrap Checks机制在启动时强制检测这些参数&…...

K8s集群健康监控、Pod调度与配置存储卷
33.Kubernets对集群Pod和健康容器状态如何进行监控和检测的。 K8s通过kubelet节点监控,使用三种探针来监控和管理容器监控状态,每种探针在容器生命周期种的不同阶段发挥不同的作用。 34.解释LivenessProbes探针的作用及其适用场景。 LivenessProbes存活探…...

通达信缠论量化插件:自动化技术分析新体验
通达信缠论量化插件:自动化技术分析新体验 【免费下载链接】Indicator 通达信缠论可视化分析插件 项目地址: https://gitcode.com/gh_mirrors/ind/Indicator 通达信缠论量化插件是一款基于缠论理论的智能分析工具,通过算法自动化识别K线走势中的关…...

物流物联网降本增效:LoRa、NB-IoT等低功耗无线技术选型与实战
1. 项目概述:当“省电”成为物流降本增效的隐形王牌最近和几个做仓储和车队管理的朋友聊天,大家不约而同都在吐槽同一个问题:设备电费和管理成本。一个大型仓库里,成千上万个传感器、电子标签、手持终端,光是电池更换和…...
:状态管理选型)
React 从入门到生产(五):状态管理选型
创作者: Yardon | GitHub: github.com/YardonYan | 版本: v1.0 什么时候需要状态管理 先泼一盆冷水:大多数 React 应用不需要 Redux。 这句话不是我说的,是 Redux 的作者 Dan Abramov 本人说的。他在 2020 年就公…...