【kubernetes】k8s单master集群环境搭建及kuboard部署
k8s入门学习环境搭建
学习于许大仙: https://www.yuque.com/fairy-era
k8s官网 https://kubernetes.io/
kuboard官网 https://kuboard.cn/
基于k8s 1.21.10版本
前置环境准备
一主两从,三台虚拟机
| CPU | 内存 | 硬盘 | 角色 | 主机名 | IP | hostname | 操作系统 |
|---|---|---|---|---|---|---|---|
| 4C | 16G | 50G | master | k8s-master | 192.168.8.11 | k8s-master | centos7.9 |
| 4C | 16G | 50G | worker(node) | k8s-node1 | 192.168.8.22 | k8s-node1 | centos7.9 |
| 4C | 16G | 50G | worker(node) | k8s-node2 | 192.168.8.33 | k8s-node2 | centos7.9 |
系统内核版本升级
#查看内核版本,太低建议升级,具体操作详见许大仙笔记
cat /etc/redhat-release
uname -sr
设置主机名及主机名解析
#各节点,分别进行设置
hostnamectl set-hostname k8s-master
hostnamectl set-hostname k8s-node1
hostnamectl set-hostname k8s-node2
cat >> /etc/hosts << EOF
127.0.0.1   $(hostname)
192.168.8.11 k8s-master
192.168.8.22 k8s-node1
192.168.8.33 k8s-node2
EOF
时间同步
ntpdate time.windows.com
#命令不存在则执行
yum install ntpdate -y
防火墙关闭,仅开发环境
systemctl status firewalld
systemctl stop firewalld
systemctl disable firewalld
关闭SELinux
#查看是否开启
getenforce
#关闭,需要重启主机
sed -i 's/enforcing/disabled/' /etc/selinux/config
#再次查看
关闭swap
#需要重启
sed -ri 's/.*swap.*/#&/' /etc/fstab
#查看,swap是否为0
free -m
iptables配置
#将桥接的 IPv4 流量传递到 iptables 的链
# 可能没有,追加
echo "net.ipv4.ip_forward = 1" >> /etc/sysctl.conf
echo "net.bridge.bridge-nf-call-ip6tables = 1" >> /etc/sysctl.conf
echo "net.bridge.bridge-nf-call-iptables = 1" >> /etc/sysctl.conf
echo "net.ipv6.conf.all.disable_ipv6 = 1" >> /etc/sysctl.conf
echo "net.ipv6.conf.default.disable_ipv6 = 1" >> /etc/sysctl.conf
echo "net.ipv6.conf.lo.disable_ipv6 = 1" >> /etc/sysctl.conf
echo "net.ipv6.conf.all.forwarding = 1"  >> /etc/sysctl.confmodprobe br_netfilter
sysctl -p
开启ipvs
yum -y install ipset ipvsadm
cat > /etc/sysconfig/modules/ipvs.modules <<EOF
#!/bin/bash
modprobe -- ip_vs
modprobe -- ip_vs_rr
modprobe -- ip_vs_wrr
modprobe -- ip_vs_sh
modprobe -- nf_conntrack
EOFchmod 755 /etc/sysconfig/modules/ipvs.modules && bash /etc/sysconfig/modules/ipvs.modules && lsmod | grep -e ip_vs -e nf_conntrack_ipv4
部署docker
三台虚拟机均需部署
#安装docker
##卸载旧版本
sudo yum remove docker \docker-client \docker-client-latest \docker-common \docker-latest \docker-latest-logrotate \docker-logrotate \docker-engineyum -y install gcc
yum -y install gcc-c++
yum -y install yum-utils
yum-config-manager --add-repo https://mirrors.aliyun.com/docker-ce/linux/centos/docker-ce.repo
yum makecache fast
yum list docker-ce --showduplicates | sort -r
yum -y install docker-ce-3:20.10.8-3.el7.x86_64 docker-ce-cli-1:20.10.8-3.el7.x86_64 containerd.io
# 启动 Docker
systemctl start docker
# 开启自动启动
systemctl enable docker
#查看是否安装成功
docker version#镜像加速配置
sudo mkdir -p /etc/docker
tee /etc/docker/daemon.json <<-'EOF'
{"exec-opts": ["native.cgroupdriver=systemd"],	"registry-mirrors": ["https://du3ia00u.mirror.aliyuncs.com","https://docker.m.daocloud.io","https://hub-mirror.c.163.com","https://mirror.baidubce.com","https://docker.nju.edu.cn","https://docker.mirrors.sjtug.sjtu.edu.cn"],"live-restore": true,"log-driver":"json-file","log-opts": {"max-size":"500m", "max-file":"3"},"max-concurrent-downloads": 10,"max-concurrent-uploads": 5,"storage-driver": "overlay2"
}
EOF#重启docker
sudo systemctl daemon-reload
sudo systemctl restart docker
k8s安装
k8s镜像获取
#添加阿里云的 Kubernetes 的 YUM 源
cat > /etc/yum.repos.d/kubernetes.repo << EOF
[kubernetes]
name=Kubernetes
baseurl=https://mirrors.aliyun.com/kubernetes/yum/repos/kubernetes-el7-x86_64
enabled=1
gpgcheck=0
repo_gpgcheck=0
gpgkey=https://mirrors.aliyun.com/kubernetes/yum/doc/yum-key.gpg https://mirrors.aliyun.com/kubernetes/yum/doc/rpm-package-key.gpg
EOF#安装 kubelet 、kubeadm 和  kubectl
yum install -y kubelet-1.21.10 kubeadm-1.21.10 kubectl-1.21.10vim /etc/sysconfig/kubelet
# 修改
KUBELET_EXTRA_ARGS="--cgroup-driver=systemd"
KUBE_PROXY_MODE="ipvs"
#开机自启动
systemctl enable kubeletkubeadm config images list
#有大佬已经将墙外的 Docker 镜像同步到 DockerHub 中,
#地址在这里:https://github.com/x-mirrors/gcr.io ,大家可以去看看。
docker pull registry.cn-hangzhou.aliyuncs.com/google_containers/kube-apiserver:v1.21.10
docker pull registry.cn-hangzhou.aliyuncs.com/google_containers/kube-controller-manager:v1.21.10
docker pull registry.cn-hangzhou.aliyuncs.com/google_containers/kube-scheduler:v1.21.10
docker pull registry.cn-hangzhou.aliyuncs.com/google_containers/kube-proxy:v1.21.10
docker pull registry.cn-hangzhou.aliyuncs.com/google_containers/pause:3.4.1
docker pull registry.cn-hangzhou.aliyuncs.com/google_containers/etcd:3.4.13-0
docker pull registry.cn-hangzhou.aliyuncs.com/google_containers/coredns:v1.8.0
#给 coredns 镜像重新打 tag
docker tag registry.cn-hangzhou.aliyuncs.com/google_containers/coredns:v1.8.0 registry.cn-hangzhou.aliyuncs.com/google_containers/coredns/coredns:v1.8.0
部署master节点
在 192.168.8.11 机器上部署 Kubernetes 的 Master 节点
# 由于默认拉取镜像地址k8s.gcr.io国内无法访问,这里需要指定阿里云镜像仓库地址
kubeadm init \--apiserver-advertise-address=192.168.8.11 \--image-repository=registry.cn-hangzhou.aliyuncs.com/google_containers \--kubernetes-version=v1.21.10 \--service-cidr=10.96.0.0/16 \--pod-network-cidr=10.244.0.0/16#注意:
#● apiserver-advertise-address 一定要是主机的 IP 地址。
#● apiserver-advertise-address 、service-cidr 和 pod-network-cidr 不能在同一个网络范围内。
#● 不要使用 172.17.0.1/16 网段范围,因为这是 Docker 默认使用的。
执行成功的完整日志内容:
[root@k8s-master ~]# kubeadm init \
>   --apiserver-advertise-address=192.168.8.11 \
>   --image-repository=registry.cn-hangzhou.aliyuncs.com/google_containers \
>   --kubernetes-version=v1.21.10 \
>   --service-cidr=10.96.0.0/16 \
>   --pod-network-cidr=10.244.0.0/16
[init] Using Kubernetes version: v1.21.10
[preflight] Running pre-flight checks
[preflight] Pulling images required for setting up a Kubernetes cluster
[preflight] This might take a minute or two, depending on the speed of your internet connection
[preflight] You can also perform this action in beforehand using 'kubeadm config images pull'
[certs] Using certificateDir folder "/etc/kubernetes/pki"
[certs] Generating "ca" certificate and key
[certs] Generating "apiserver" certificate and key
[certs] apiserver serving cert is signed for DNS names [k8s-master kubernetes kubernetes.default kubernetes.default.svc kubernetes.default.svc.cluster.local] and IPs [10.96.0.1 192.168.8.11]
[certs] Generating "apiserver-kubelet-client" certificate and key
[certs] Generating "front-proxy-ca" certificate and key
[certs] Generating "front-proxy-client" certificate and key
[certs] Generating "etcd/ca" certificate and key
[certs] Generating "etcd/server" certificate and key
[certs] etcd/server serving cert is signed for DNS names [k8s-master localhost] and IPs [192.168.8.11 127.0.0.1 ::1]
[certs] Generating "etcd/peer" certificate and key
[certs] etcd/peer serving cert is signed for DNS names [k8s-master localhost] and IPs [192.168.8.11 127.0.0.1 ::1]
[certs] Generating "etcd/healthcheck-client" certificate and key
[certs] Generating "apiserver-etcd-client" certificate and key
[certs] Generating "sa" key and public key
[kubeconfig] Using kubeconfig folder "/etc/kubernetes"
[kubeconfig] Writing "admin.conf" kubeconfig file
[kubeconfig] Writing "kubelet.conf" kubeconfig file
[kubeconfig] Writing "controller-manager.conf" kubeconfig file
[kubeconfig] Writing "scheduler.conf" kubeconfig file
[kubelet-start] Writing kubelet environment file with flags to file "/var/lib/kubelet/kubeadm-flags.env"
[kubelet-start] Writing kubelet configuration to file "/var/lib/kubelet/config.yaml"
[kubelet-start] Starting the kubelet
[control-plane] Using manifest folder "/etc/kubernetes/manifests"
[control-plane] Creating static Pod manifest for "kube-apiserver"
[control-plane] Creating static Pod manifest for "kube-controller-manager"
[control-plane] Creating static Pod manifest for "kube-scheduler"
[etcd] Creating static Pod manifest for local etcd in "/etc/kubernetes/manifests"
[wait-control-plane] Waiting for the kubelet to boot up the control plane as static Pods from directory "/etc/kubernetes/manifests". This can take up to 4m0s
[apiclient] All control plane components are healthy after 6.501963 seconds
[upload-config] Storing the configuration used in ConfigMap "kubeadm-config" in the "kube-system" Namespace
[kubelet] Creating a ConfigMap "kubelet-config-1.21" in namespace kube-system with the configuration for the kubelets in the cluster
[upload-certs] Skipping phase. Please see --upload-certs
[mark-control-plane] Marking the node k8s-master as control-plane by adding the labels: [node-role.kubernetes.io/master(deprecated) node-role.kubernetes.io/control-plane node.kubernetes.io/exclude-from-external-load-balancers]
[mark-control-plane] Marking the node k8s-master as control-plane by adding the taints [node-role.kubernetes.io/master:NoSchedule]
[bootstrap-token] Using token: hrshel.j815bn8ato6fea8u
[bootstrap-token] Configuring bootstrap tokens, cluster-info ConfigMap, RBAC Roles
[bootstrap-token] configured RBAC rules to allow Node Bootstrap tokens to get nodes
[bootstrap-token] configured RBAC rules to allow Node Bootstrap tokens to post CSRs in order for nodes to get long term certificate credentials
[bootstrap-token] configured RBAC rules to allow the csrapprover controller automatically approve CSRs from a Node Bootstrap Token
[bootstrap-token] configured RBAC rules to allow certificate rotation for all node client certificates in the cluster
[bootstrap-token] Creating the "cluster-info" ConfigMap in the "kube-public" namespace
[kubelet-finalize] Updating "/etc/kubernetes/kubelet.conf" to point to a rotatable kubelet client certificate and key
[addons] Applied essential addon: CoreDNS
[addons] Applied essential addon: kube-proxyYour Kubernetes control-plane has initialized successfully!To start using your cluster, you need to run the following as a regular user:mkdir -p $HOME/.kubesudo cp -i /etc/kubernetes/admin.conf $HOME/.kube/configsudo chown $(id -u):$(id -g) $HOME/.kube/configAlternatively, if you are the root user, you can run:export KUBECONFIG=/etc/kubernetes/admin.confYou should now deploy a pod network to the cluster.
Run "kubectl apply -f [podnetwork].yaml" with one of the options listed at:https://kubernetes.io/docs/concepts/cluster-administration/addons/Then you can join any number of worker nodes by running the following on each as root:kubeadm join 192.168.8.11:6443 --token hrshel.j815bn8ato6fea8u \--discovery-token-ca-cert-hash sha256:ba5ee81176dca1b21bdbdae9488dc4699131e4bcec5e860556e7b4c0ff7644c4
根据日志提示,执行脚本
mkdir -p $HOME/.kube
sudo cp -i /etc/kubernetes/admin.conf $HOME/.kube/config
sudo chown $(id -u):$(id -g) $HOME/.kube/config
# 如果是 root 用户,还可以执行如下命令
export KUBECONFIG=/etc/kubernetes/admin.conf
#默认的 token 有效期为 24 小时,当过期之后,该 token 就不能用了,这时可以使用如下的命令创建 token
kubeadm token create --print-join-command
# 生成一个永不过期的token
kubeadm token create --ttl 0 --print-join-command

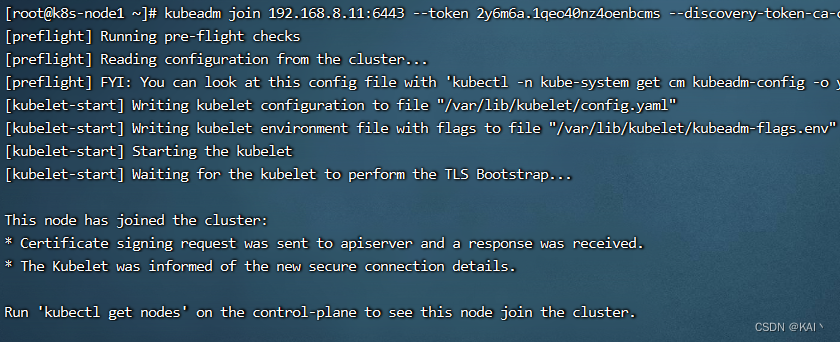
部署node节点
#根据上面的日志提示,在两个节点执行如下命令
kubeadm join 192.168.8.11:6443 --token 2y6m6a.1qeo40nz4oenbcms --discovery-token-ca-cert-hash sha256:ba5ee81176dca1b21bdbdae9488dc4699131e4bcec5e860556e7b4c0ff7644c4
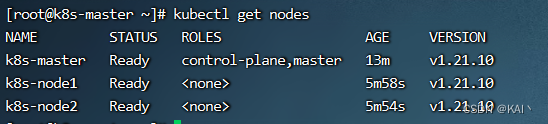
此时查看节点状态,都是not ready状态
kubectl get nodes
部署网络插件
#在master节点执行
kubectl apply -f https://projectcalico.docs.tigera.io/v3.19/manifests/calico.yaml

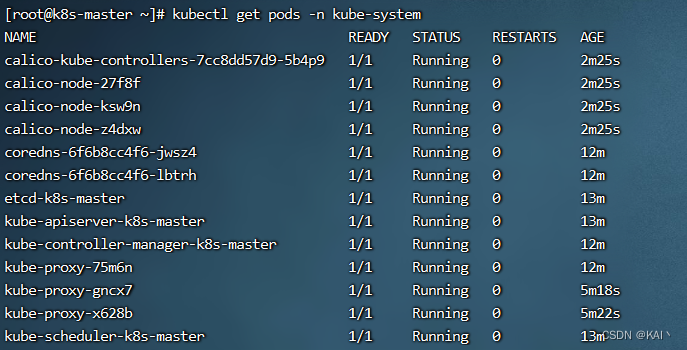
#查看部署 CNI 网络插件进度
kubectl get pods -n kube-system
#或
watch kubectl get pods -n kube-system
再次查看节点状态
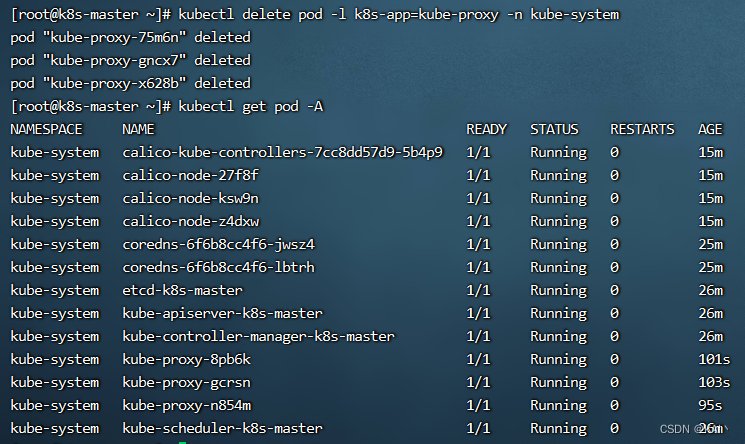
kubectl edit cm kube-proxy -n kube-system
#修改mode为"ipvs"模式
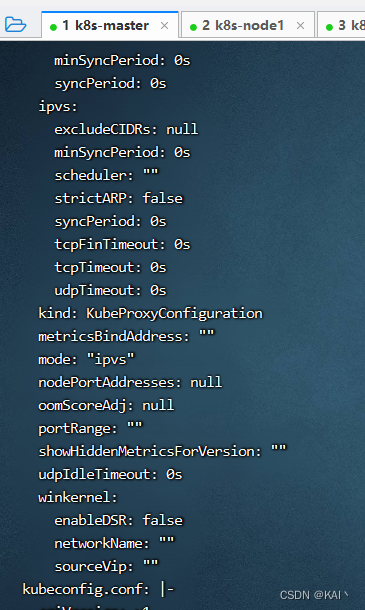
#删除 kube-proxy ,让 Kubernetes 集群自动创建新的 kube-proxy :
kubectl delete pod -l k8s-app=kube-proxy -n kube-system
允许Node节点使用kubectl
让 Node 节点也能使用 kubectl 命令
默认情况下,只有 Master 节点才有 kubectl 命令,但是有些时候我们也希望在 Node 节点上执行 kubectl 命令
# node节点执行 192.168.8.22 和 192.168.8.33
mkdir -pv ~/.kube
touch ~/.kube/config# 主节点执行
# 192.168.8.11
scp /etc/kubernetes/admin.conf root@192.168.8.22:~/.kube/config
# 192.168.8.11
scp /etc/kubernetes/admin.conf root@192.168.8.33:~/.kube/config
测试部署nginx
#部署 Nginx
kubectl create deployment nginx --image=nginx:1.14-alpine
#暴露端口
kubectl expose deployment nginx --port=80 --type=NodePort
#查看服务状态
kubectl get pods,svc

部署成功

k8s命令,自动补全配置
# 安装
yum -y install bash-completion
# 自动补全
echo 'source <(kubectl completion bash)' >>~/.bashrc
kubectl completion bash >/etc/bash_completion.d/kubectl
# 全局
kubectl completion bash | sudo tee /etc/bash_completion.d/kubectl > /dev/null
source /usr/share/bash-completion/bash_completion
kuboard安装
入门学习,官方推荐使用内建用户库方式。
在主节点运行即可
sudo docker run -d \--restart=unless-stopped \--name=kuboard \-p 80:80/tcp \-p 10081:10081/tcp \-e KUBOARD_ENDPOINT="http://k8s-master:80" \-e KUBOARD_AGENT_SERVER_TCP_PORT="10081" \-v /root/kuboard-data:/data \eipwork/kuboard:v3# 也可以使用镜像 swr.cn-east-2.myhuaweicloud.com/kuboard/kuboard:v3 ,可以更快地完成镜像下载。# 请不要使用 127.0.0.1 或者 localhost 作为内网 IP \# Kuboard 不需要和 K8S 在同一个网段,Kuboard Agent 甚至可以通过代理访问 Kuboard Server \
默认
- 用户名:
admin - 密 码:
Kuboard123
访问,添加已有集群,根据提示操作即可,相当人性化。
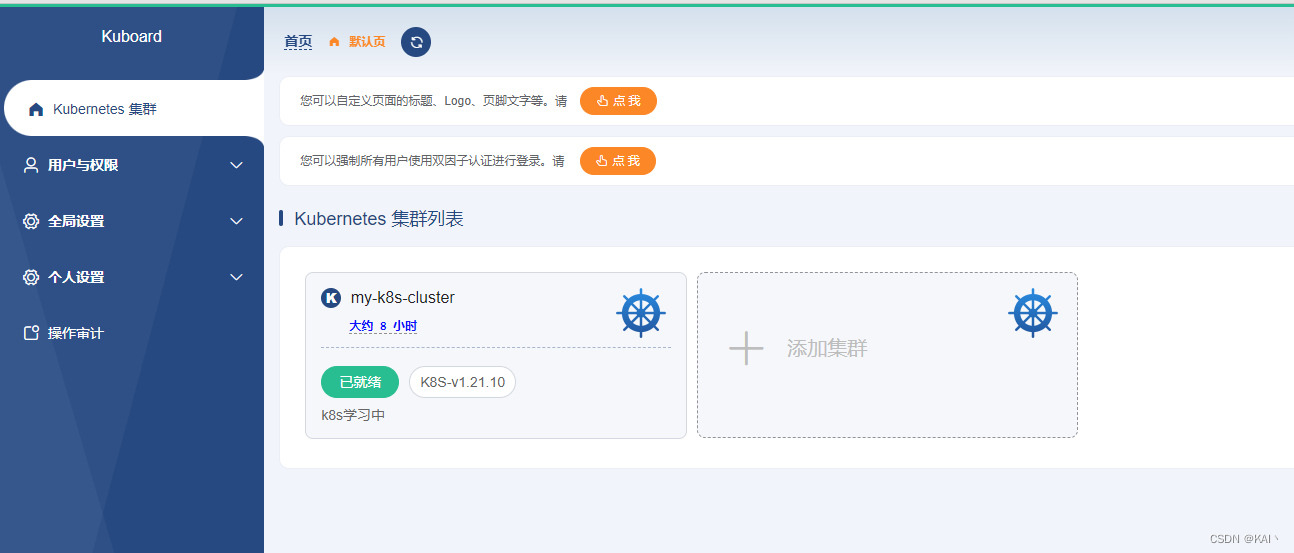

在名称空间中,可以查看到之前创建的nginx

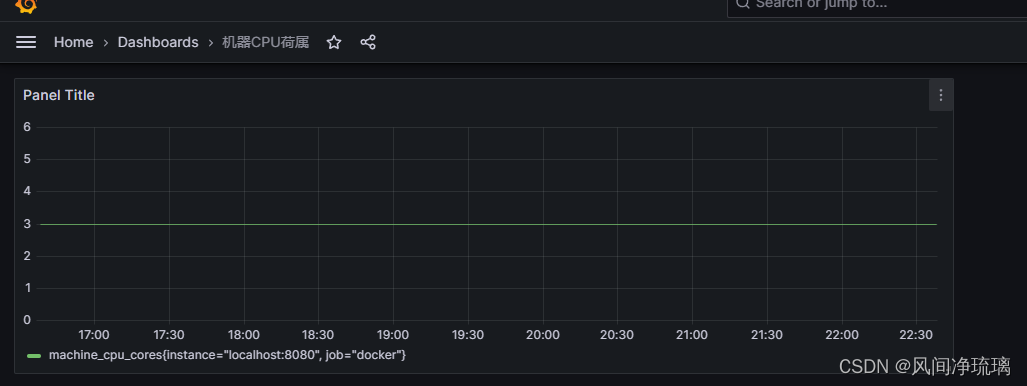
需要在K8s中安装metrics-server,否则无法查看计算资源信息
(具体操作,见许大仙笔记中的k8s生态链路整合篇)
安装完毕后,可以看到集群的cpu、内存信息

相关文章:
【kubernetes】k8s单master集群环境搭建及kuboard部署
k8s入门学习环境搭建 学习于许大仙: https://www.yuque.com/fairy-era k8s官网 https://kubernetes.io/ kuboard官网 https://kuboard.cn/ 基于k8s 1.21.10版本 前置环境准备 一主两从,三台虚拟机 CPU内存硬盘角色主机名IPhostname操作系统4C16G50Gmasterk8s-mast…...
0802|IO进程线程 day5 进程概念
一、进程的基础 1.1 什么是进程 1)进程是程序的一次执行过程 程序:是静态的,它是存储在外存上的可执行二进制文件;进程:动态的概念,它是程序的一次执行过程,包括了进程的创建,调度、…...
4 Promethues监控主机和容器
目录 目录 1. 监控节点 1.1 安装Node exporter 解压包 拷贝至目标目录 查看版本 1.2 配置Node exporter 1.3 配置textfile收集器 1.4 启动systemd收集器 1.5 基于Docker节点启动node_exporter 1.6 抓取Node Exporter 1.7 过滤收集器 2. 监控Docker容器 2.1 运行cAdviso…...
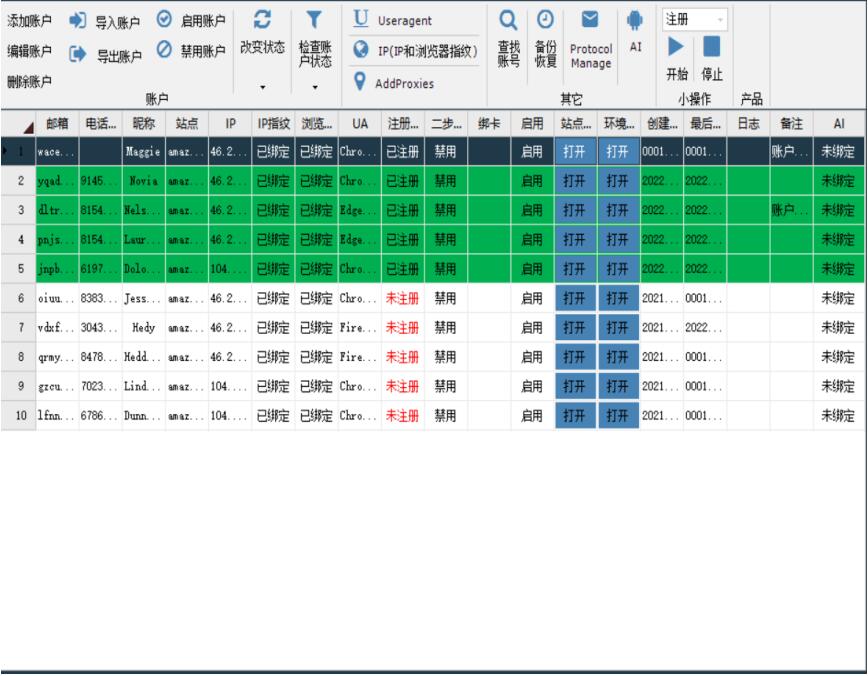
亚马逊买家账号ip关联怎么处理
对于亚马逊买家账号,同样需要注意IP关联问题。在亚马逊的眼中,如果多个买家账号共享相同的IP地址,可能会被视为潜在的操纵、违规或滥用行为。这种情况可能导致账号受到限制或处罚。 处理亚马逊买家账号IP关联问题,建议采取以下步骤…...
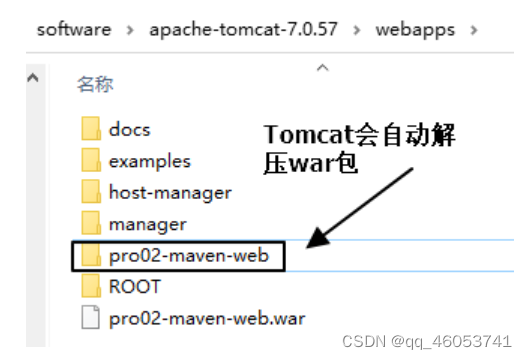
NO4 实验四:生成Web工程
1、说明 使用 mvn archetype:generate 命令生成 Web 工程时,需要使用一个专门的 archetype。这个专门生成 Web 工程骨架的 archetype 可以参照官网看到它的用法: 2、操作 注意:如果在上一个工程的目录下执行 mvn archetype&…...
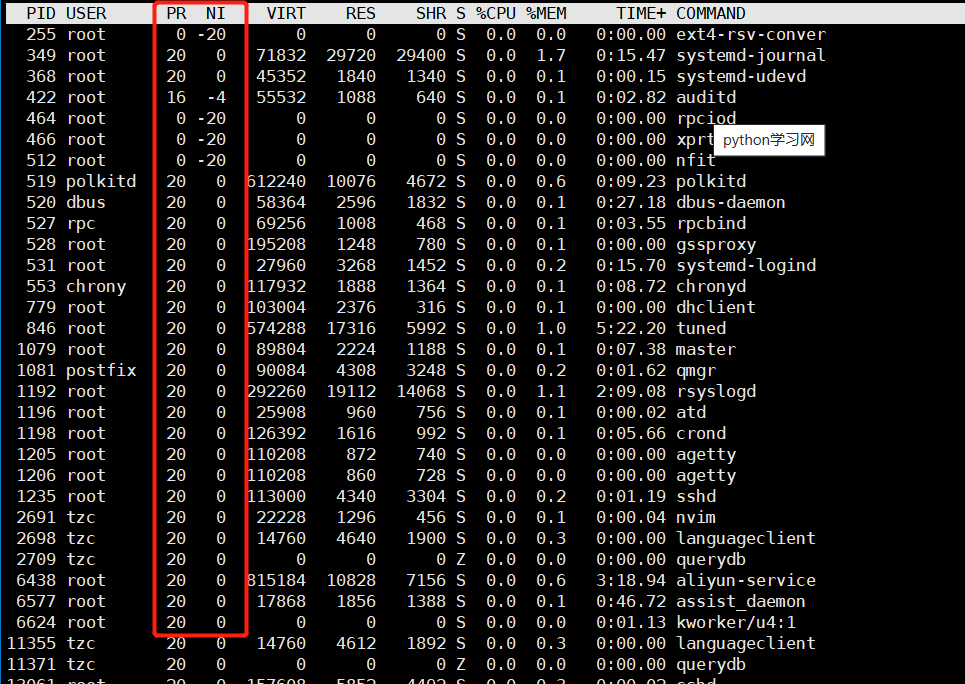
【linux】进程
文章目录 前言一、概念基本概念进程-PCBtask_structtask_struct内容分类 二、查看和创建进程查看进程PID创建进程 三、进程状态五、僵尸进程和孤儿进程僵尸进程孤儿进程获取进程退出码 四、进程优先级基本概念查看系统进程PRI and NI用top命令更改已存在进程的nice 前言 我们常…...

电商高并发设计之SpringBoot整合Redis实现布隆过滤器
文章目录 问题背景前言布隆过滤器原理使用场景基础中间件搭建如何实现布隆过滤器引入依赖注入RedisTemplate布隆过滤器核心代码Redis操作布隆过滤器验证 总结 问题背景 研究布隆过滤器的实现方式以及使用场景 前言 本篇的代码都是参考SpringBootRedis布隆过滤器防恶意流量击穿缓…...

SpringBoot第25讲:SpringBoot集成MySQL - MyBatis 注解方式
SpringBoot第25讲:SpringBoot集成MySQL - MyBatis 注解方式 本文是SpringBoot第25讲,上文主要介绍了Spring集成MyBatis访问MySQL,采用的是XML配置方式;我们知道除了XML配置方式,MyBatis还支持注解方式。本文主要介绍Sp…...

服务器返回 413 Request Entity Too Large
问题 上传一个大于1.5M的文件时,报错:413 Request Entity Too Large 使用的配置 1、用的是docker环境,还有一层代理,代理用的镜像是:jwilder/nginx-proxy 2、docker里是有php和nginx 确认配置 docker里的php和ngi…...
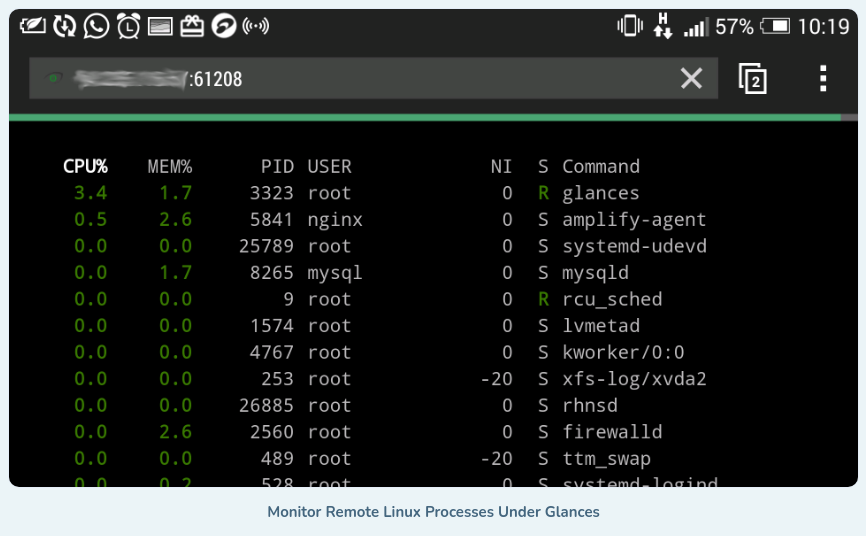
如何一目了然地监控远程 Linux 系统
动动发财的小手,点个赞吧! Glances 是一款免费的开源、现代、跨平台、实时 top 和类似 htop 的系统监控工具,与同类工具相比,它提供了先进的功能,并且可以在不同的模式下运行:作为独立模式、客户端/服务器模…...
9.环境对象和回调函数
9.1环境对象 指的是函数内部特殊的变量this,它代表着当前函数运行时所处的环境 作用: 弄清楚this的指向,可以让我们代码更简洁 ➢函数的调用方式不同,this指代的对象也不同 ➢[谁调用,this 就指代谁] 是判断this指向的…...
实验例程软件分析概览)
51单片机(普中HC6800-EM3 V3.0)实验例程软件分析概览
本专栏将分析普中HC6800-EM3 V3.0 (9.22)\5--实验程序\基础实验例程中的各个例程的代码。 引言:本专栏将对历程中的关键代码进行分析与拓展,再学习一遍51,记录与各位一起进步。 下面是文件列表: E:\USER\000study\000_51单片机\000普中HC6800-EM3 V3.0 (9.22)\5--实…...
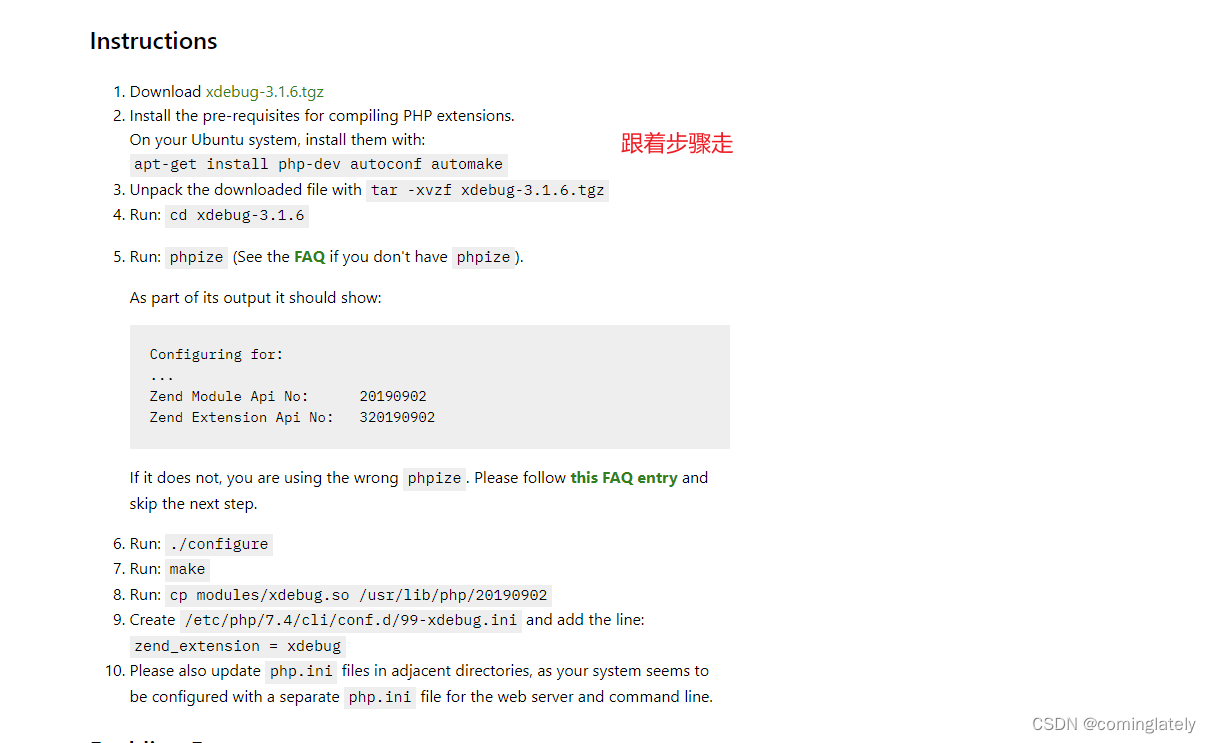
ubuntu18.04 安装php7.4-xdebug
文章目录 场景解决 场景 apt install php7.4-xdebug 下载失败, 只好通过编译解决了 解决 https://xdebug.org/wizard 输入php -i的执行结果...

java 定时任务不按照规定时间执行
这里写目录标题 使用异步启动可能出现的问题排查代码中添加的定时任务步骤是否正确排查是否任务阻塞,如果定时任务出现异常阻塞后,将不会在次执行java中多个Scheduled定时器不执行为了让Scheduled效率更高,我们可以通过两种方法将定时任务变成…...
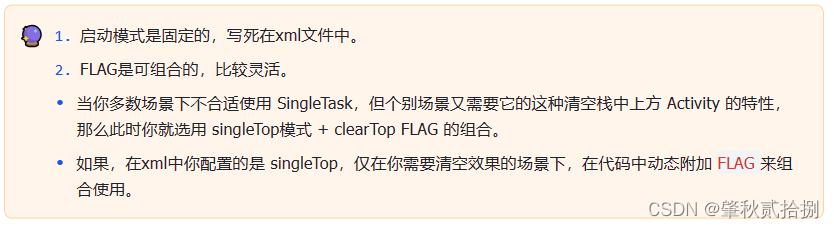
Android复习(Android基础-四大组件)—— Activity
Activity作为四大组件之首,是使用最为频繁的一种组件,中文直接翻译为"活动",不过如果被翻译为"界面"会更好理解。正常情况,除了Window,Dialog和Toast , 我们能见到的界面只有Activity。…...
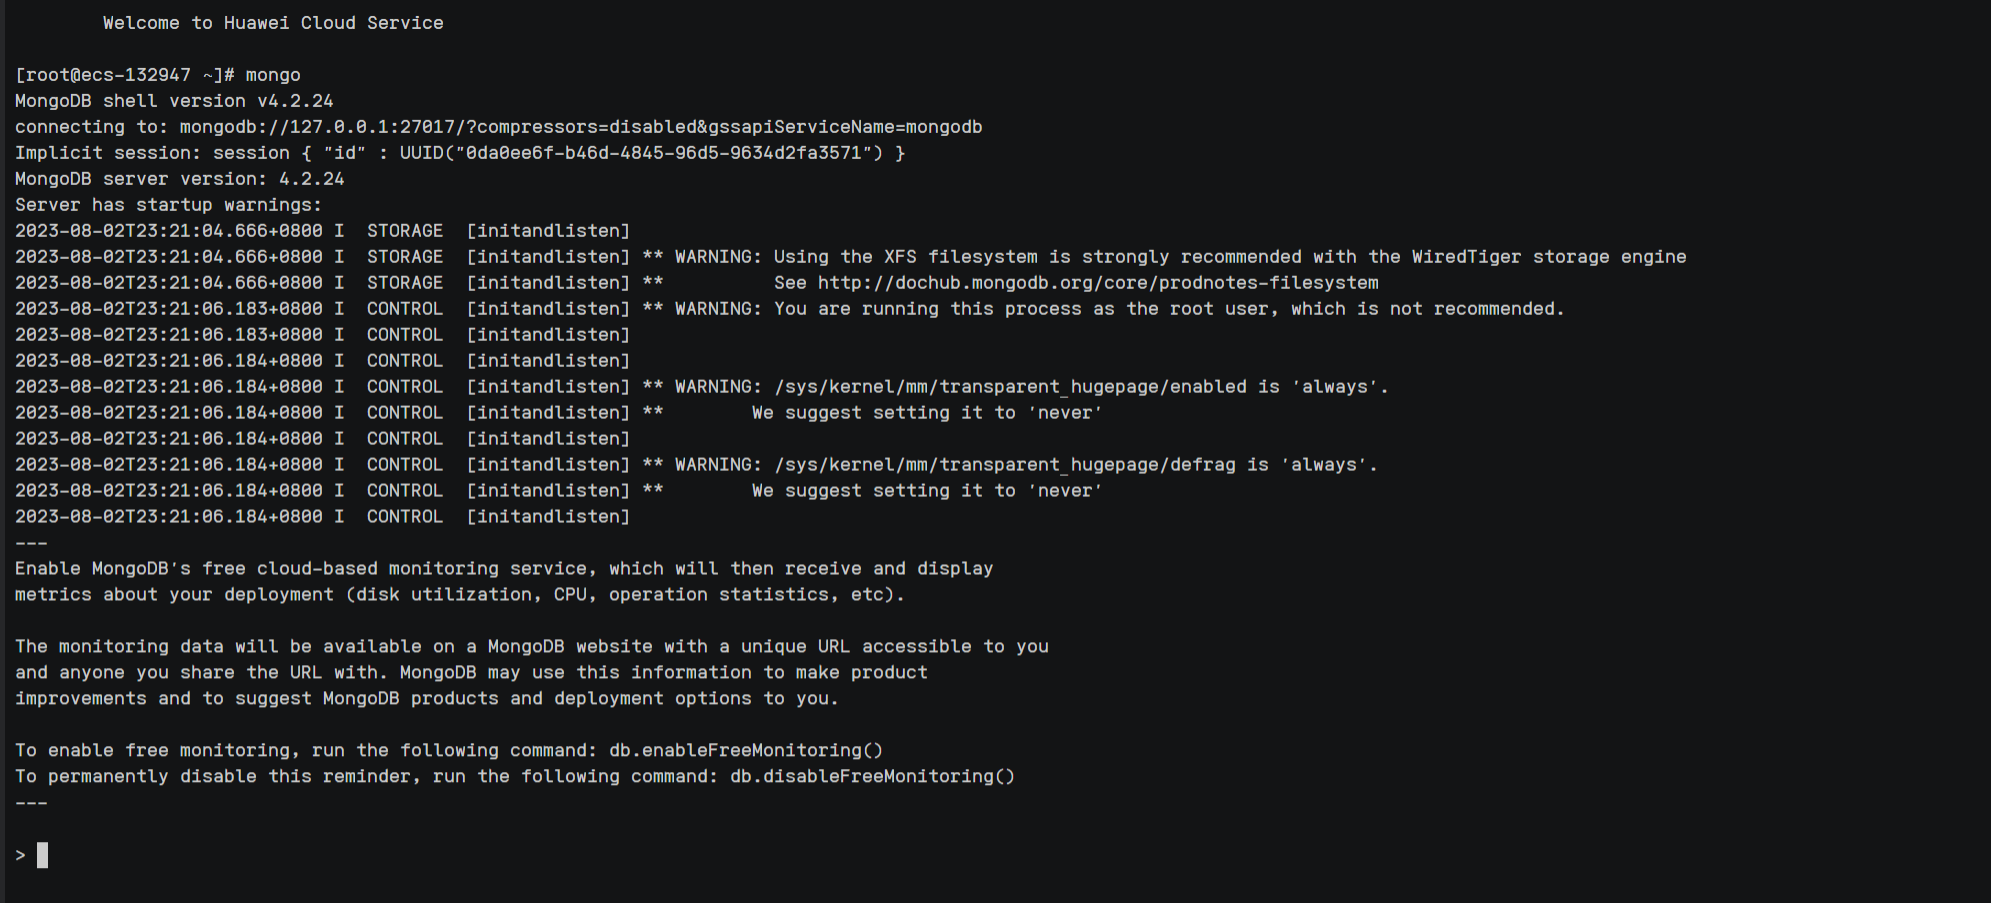
Linux系统安装部署MongoDB完整教程(图文详解)
前言:本期给大家分享一下目前最新Linux系统安装部署MongoDB完整教程,我的服务器采用的是Centos7,在部署之前我重装了我的服务器,目的是为了干净整洁的给大家演示我是如何一步步的操作的,整体部署还是挺简洁,…...
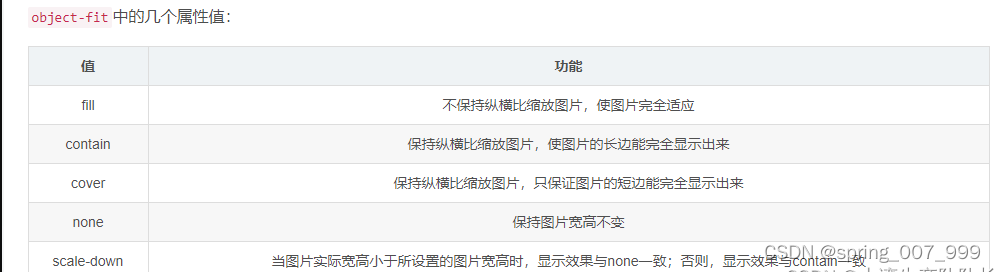
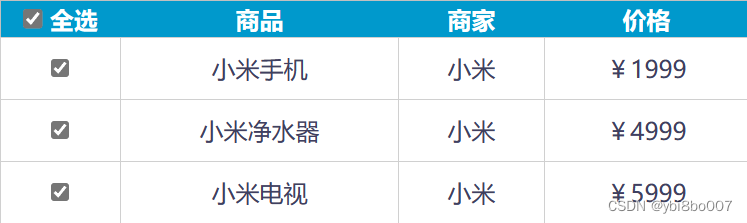
CSS图片放到<div>里面,自适应宽高全部显示,点击图片跳到新页面预览,点击旋转按钮图片可旋转
有一个需求是图片放到一个固定宽高的<div>里面,不管是横图还是竖图,都要全部显示出来并且保持图片的长宽比例不变形,点击图片可以跳到一个新页面预览,代码如下: <!DOCTYPE html> <html> <head>…...
二阶段web基础与http协议
dns与域名 网络是基于tcp/ip协议进行通信和连接的 应用层-----传输层-----网络层-----数据链路层-----物理层 ip地址,每一台主机都有一个唯一的地址标识(固定的ip地址) 1.区分用户和计算机 2.通信 ip地址的问题在于32位二进制数组成的&…...

SpringBoot+Freemark根据html模板动态导出PDF
SpringBootFreemark根据html模板导出PDF 1、引入maven2、两个工具类2.1 test.html模板2.2 test.html模板中的Freemark语法 3、controller导出pdf 1、引入maven 导出pdf的一些必要jar包 <dependency><groupId>org.projectlombok</groupId><artifactId>…...
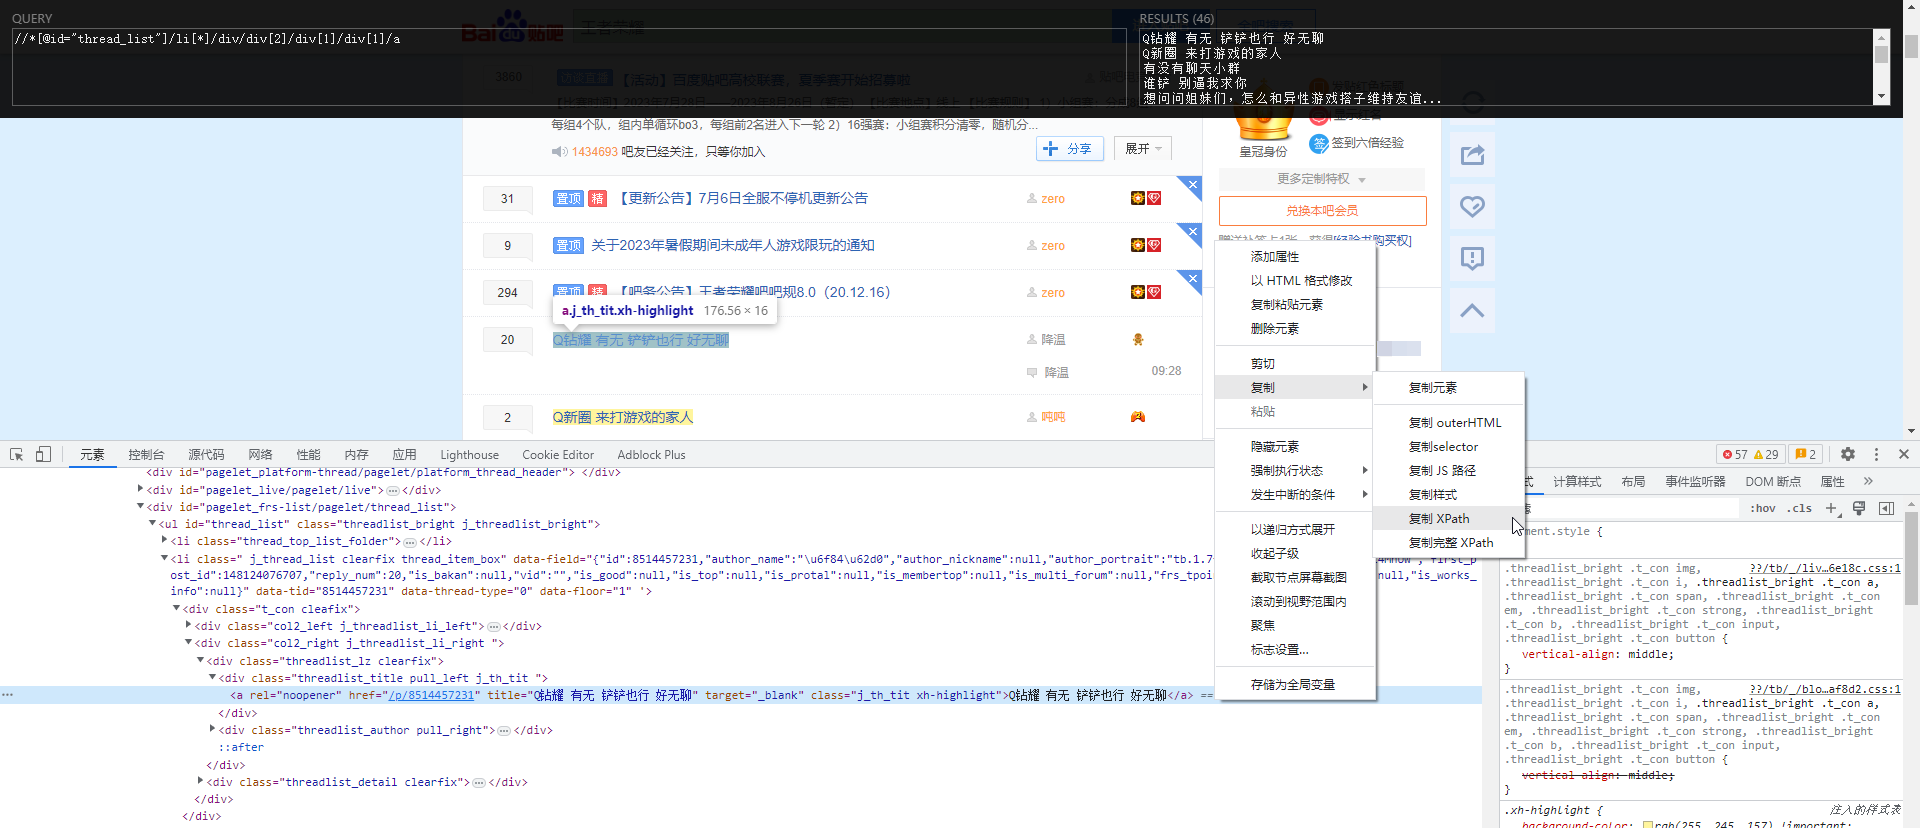
XPath数据提取与贴吧爬虫应用示例
XPath数据提取与贴吧爬虫应用示例 XpathXpath概述Xpath Helper插件 XPath语法基本语法查找特定节点选取未知节点选取若干路径 lxml模块使用说明使用示例 百度贴吧爬虫 Xpath Xpath概述 XPath(XML Path Language)是一种用于在XML文档中定位和选择节点的语…...
实战选型指南)
别再乱用分支了!Flowable四种网关(排他/并行/包容/事件)实战选型指南
Flowable四大网关实战选型:从混乱到精准的决策艺术当你在设计一个请假审批流程时,是否遇到过这样的困惑:部门经理审批后需要同时通知HR和财务,但某些特殊情况下又需要跳过财务直接归档?这种看似简单的业务需求…...

告别浪费!SolidWorks企业级共享方案,实现降本增效全攻略
还在为 SolidWorks 高昂的硬件投入和混乱的图纸管理头疼?告别“一人一机”的浪费模式,企业级共享方案才是降本增效的正解。这套攻略基于“1 台高性能服务器 云飞云共享云桌面”架构,帮你把硬件成本砍掉 60%,把软件利用率翻倍。一…...

Windows终极PDF处理工具:3步免费安装Poppler完整指南
Windows终极PDF处理工具:3步免费安装Poppler完整指南 【免费下载链接】poppler-windows Download Poppler binaries packaged for Windows with dependencies 项目地址: https://gitcode.com/gh_mirrors/po/poppler-windows 你是否曾经为在Windows上处理PDF文…...
适合全体毕业生)
口碑最好的AI论文写作工具推荐(从文献整理到论文成稿全流程)适合全体毕业生
还在为选题方向纠结、文献资料翻找耗时、开题报告无从下手、论文框架反复修改、查重率居高不下、降重过程痛苦不堪,甚至答辩PPT还要临时抱佛脚?作为学术新手、应届生或本科硕士毕业生,面对论文写作的重重关卡,流程复杂、操作门槛高…...

探索Windows 10上的Android世界:揭秘WSA-Windows-10项目的3个技术突破
探索Windows 10上的Android世界:揭秘WSA-Windows-10项目的3个技术突破 【免费下载链接】WSA-Windows-10 This is a backport of Windows Subsystem for Android to Windows 10. 项目地址: https://gitcode.com/gh_mirrors/ws/WSA-Windows-10 想象一下&#…...

交流电机驱动器的三种控制模式:前沿切相、后沿切相与同步模式详解
1. 项目概述:一个能玩出花的交流电机驱动器在汽车改装、工业控制或者一些创客项目里,驱动一个交流电机听起来简单,但想让它听话地变速、正反转,甚至实现软启动和精确同步,往往就得搬出笨重又昂贵的工业变频器。今天分享…...

武汉国电华美串联谐振试验装置,现场用着心里有底
在高压试验现场干了这么多年,这位老师傅常说,一台好的串联谐振装置,就是试验人员的胆。面对GIS、大型变压器、超高压电缆这些大电容试品,没有趁手的谐振设备,交流耐压试验根本没法干。16875kVA/225kV这个规格ÿ…...

如何快速上手DeepPurpose?5分钟完成你的第一个药物-靶点相互作用预测模型
如何快速上手DeepPurpose?5分钟完成你的第一个药物-靶点相互作用预测模型 【免费下载链接】DeepPurpose A Deep Learning Toolkit for DTI, Drug Property, PPI, DDI, Protein Function Prediction (Bioinformatics) 项目地址: https://gitcode.com/gh_mirrors/de…...

16个分片+2副本:pg_shard的master_create_worker_shards最佳实践
16个分片2副本:pg_shard的master_create_worker_shards最佳实践 【免费下载链接】pg_shard ATTENTION: pg_shard is superseded by Citus, its more powerful replacement 项目地址: https://gitcode.com/gh_mirrors/pg/pg_shard pg_shard作为PostgreSQL的分…...

如何快速解锁中兴光猫权限:zteOnu工具完整使用指南
如何快速解锁中兴光猫权限:zteOnu工具完整使用指南 【免费下载链接】zteOnu A tool that can open ZTE onu device factory mode 项目地址: https://gitcode.com/gh_mirrors/zt/zteOnu 中兴光猫作为家庭网络的核心设备,其强大的硬件性能常常被默认…...