Vue [Day4]
组件的三大组成部分
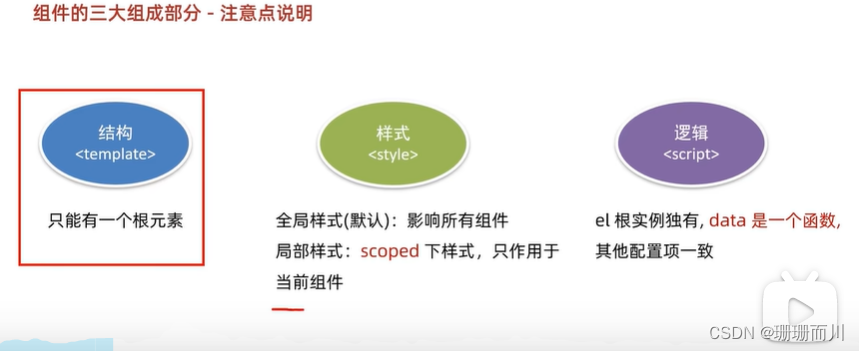
组件的样式冲突 scoped
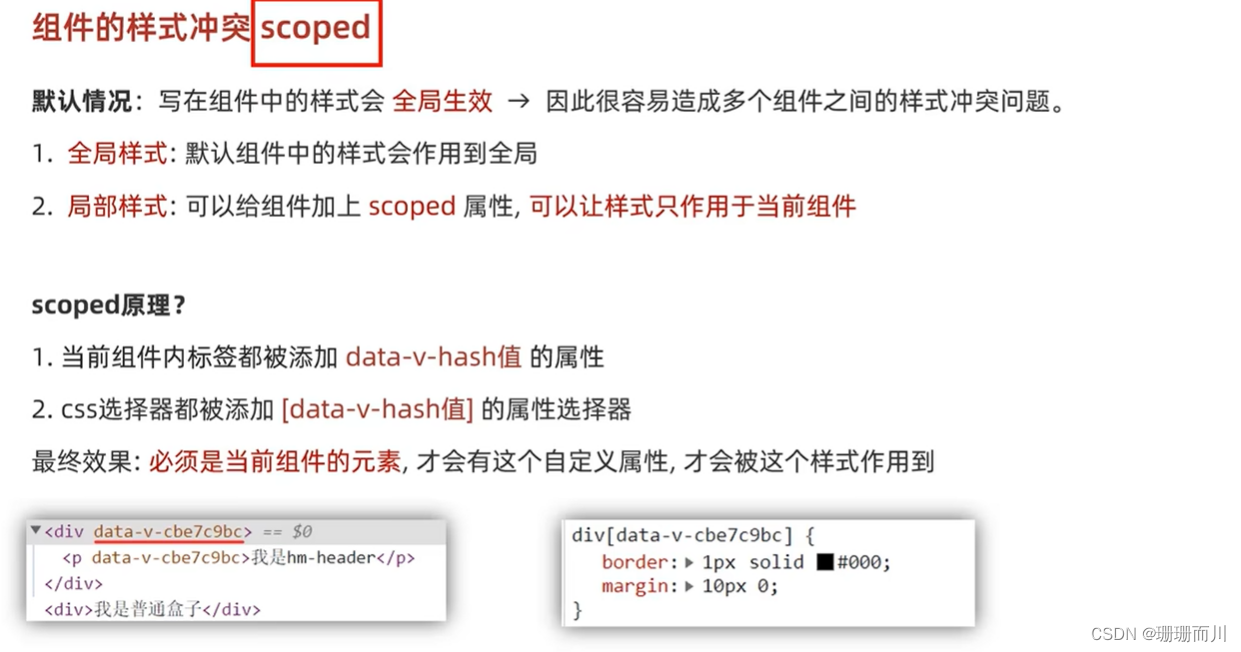
<style scoped></style>
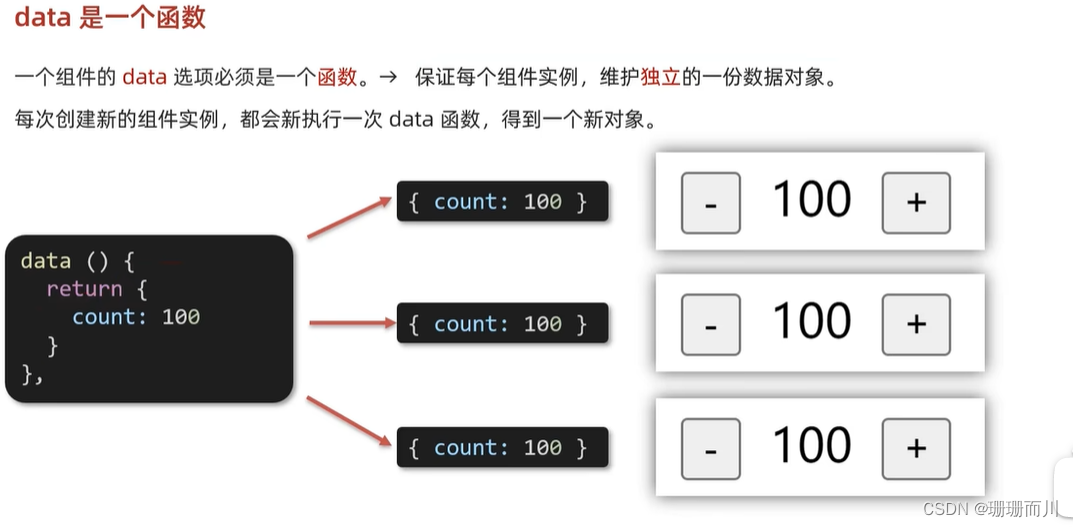
data 是一个函数
components/BaseButton.vue
<template><div class="BaseButton"><button @click="count--">-</button><span>{{ count }}</span><button @click="count++">+</button></div>
</template><script>
export default {// data必须写成函数,不能是对象data() {return {count: 999}}
}
</script><style>
</style>
App.vue
<template><div id="app"><BaseButton></BaseButton><BaseButton></BaseButton><BaseButton></BaseButton></div>
</template><script>
import BaseButton from './components/BaseButton.vue'export default {name: 'App',components: {BaseButton}
}
</script><style>
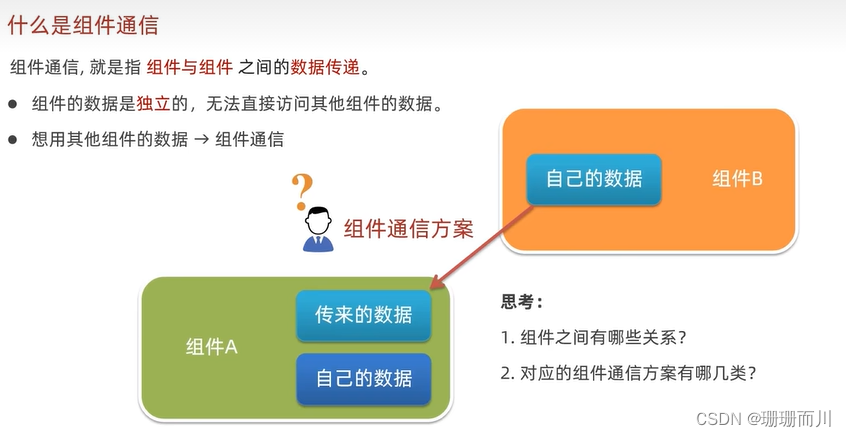
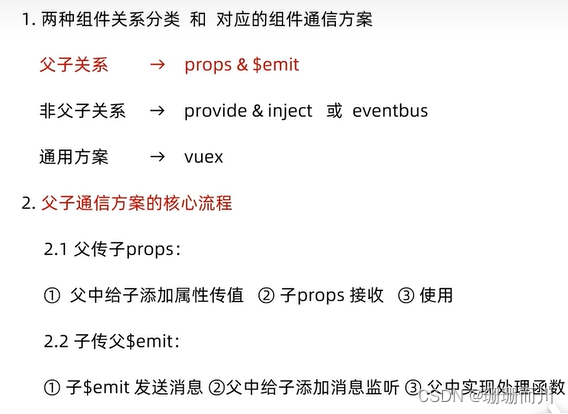
</style>组件通信
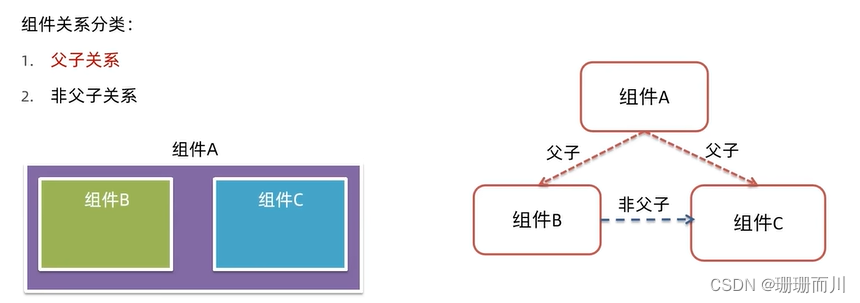
父 -> 子 props
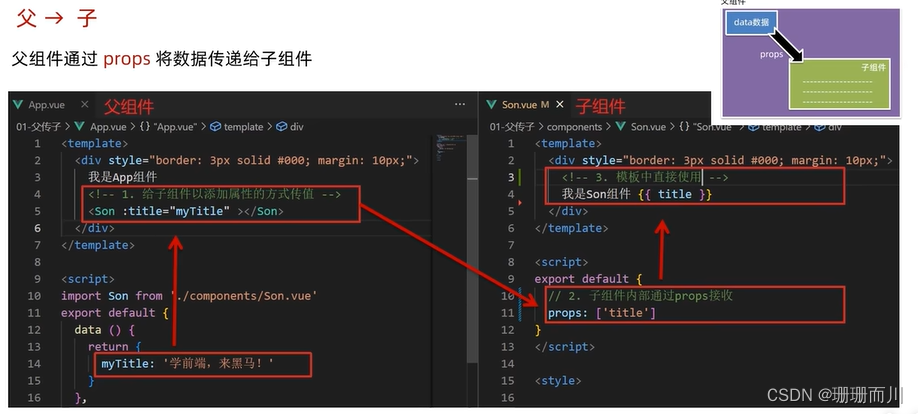
components/SonTest.vue
<template><div class="son">{{ title }}<!-- 渲染使用 --></div>
</template><script>
export default {// 2.通过props进行接受// 这里的名字必须和App.vue里的<Son :title="MyTitle"></Son> 相同props: ['title']
}
</script><style  scoped>
div {border: 1px solid black;width: 100px;height: 100px;
}
</style>
App.vue
<template><div id="app">我是爸爸<!-- 1.给组件标签,添加属性的方式,传值 --><SonTest :title="MyTitle"></SonTest></div>
</template><script>
import SonTest from './components/SonTest.vue'export default {components: {SonTest},data() {return {MyTitle: 'slxhhhh'}}
}
</script><style  >
div {border: 1px solid black;width: 300px;height: 200px;
}
</style>
prop概念
 components/UserInfo.vue
<template><div class="UserInfo"><h1>个人信息</h1><h3>姓名{{ username }}</h3><h3>年龄{{ age }}</h3><h3>是否单身{{ isSingle }}</h3><h3>座驾{{ car.brand }}</h3><h3>兴趣爱好{{ hobby.join('、') }}</h3></div>
</template><script>
export default {props: ['username', 'age', 'isSingle', 'car', 'hobby']
}
</script><style>
</style>
App.vue
<template><div id="app"><UserInfo:username="username":age="age":isSingle="isSingle":car="car":hobby="hobby"></UserInfo></div>
</template><script>
import UserInfo from './components/UserInfo.vue'export default {components: {UserInfo},data() {return {username: 'slx',age: 20,isSingle: true,car: {brand: 'affrf'},hobby: ['aaaa', 'cccc', 'bbbb']}}
}
</script><style  >
div {border: 1px solid black;width: 300px;height: 400px;
}
</style>
props校验
类型校验 基础写法+完整写法

components/BaseProgress.vue
<template><div class="BaseProgress"><div class="progress"><!-- 在这里面width  不用加{{}}    并且{}里面 是js对象  ,所以要遵守驼峰命名法 也就是 background-color 要变成 backgroundColor--><divclass="inner":class="{low: w < 50,high: w > 70,over: w == 100}":style="{ width: w + '%' }"><span>{{ w }}%</span></div></div></div>
</template><script>
export default {// 没有校验// props: ['w']// 1.基础校验// props: {//     // 校验的属性名:类型  Number、String Boolean//     w: Number// }// 2.完整写法(类型、非空、默认、自定义校验props: {w: {// 写成对象形式type: Number,// required: true,default: 10,validator(value) {// return falseconsole.log(value)if (value >= 0 && value <= 100) {return true}console.log('传入的值要是0~100')return false}}}
}
</script><style scoped>
.BaseProgress {margin: 10px;
}.progress {width: 300px;height: 40px;margin-bottom: 40px;background-color: #cdf92c;border-radius: 25px;padding: 5px;
}.inner {background-color: #0df6c7;border-radius: 25px;height: 35px;margin-top: 3px;/* width: 20%; */
}.low {background-color: #92ee61;
}.high {background-color: rgb(141, 179, 216);
}.over {background-color: rgb(0, 128, 255);
}.inner span {width: 100%;text-align: right;display: block;line-height: 90px;
}
</style>
App.vue
<template><div id="app"><!-- 没传值,就用默认的10 --><BaseProgress></BaseProgress><BaseProgress :w="width"></BaseProgress></div>
</template><script>
import BaseProgress from './components/BaseProgress.vue'export default {components: {BaseProgress},data() {return {// width: 'sfsd'width: 20}}
}
</script><style >
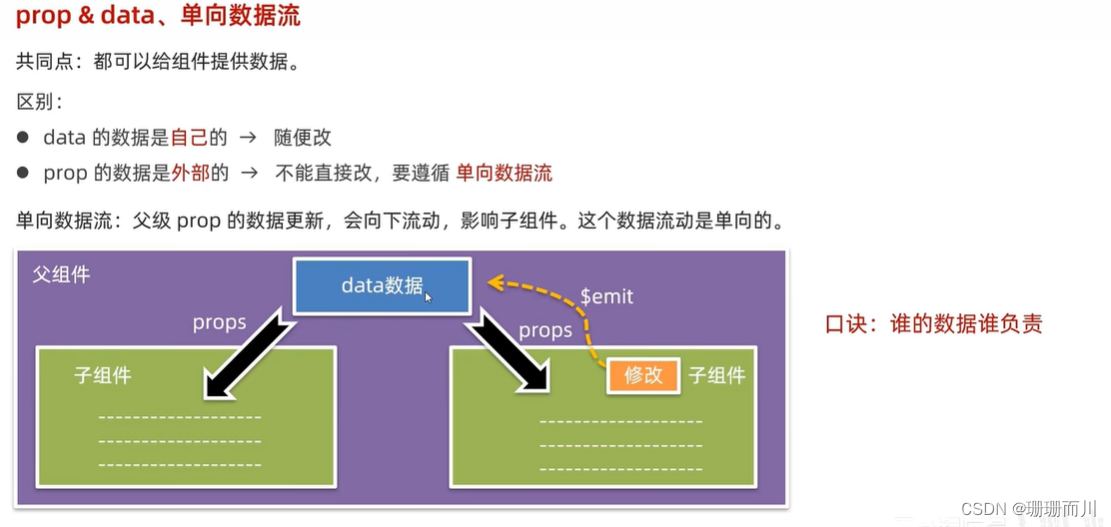
</style>prop & data 、单向数据流
 components/BaseProgress.vue
<template><div class="BaseProgress"><div class="progress"><!-- 在这里面width  不用加{{}}    并且{}里面 是js对象  ,所以要遵守驼峰命名法 也就是 background-color 要变成 backgroundColor--><divclass="inner":class="{low: w < 50,high: w > 70,over: w == 100}":style="{ width: w + '%' }"><span>{{ w }}%</span></div></div><button @click="handleFn(75)">设置75%</button><button @click="handleFn(100)">设置100%</button><!-- props传过来的数据(外部数据),不能直接改 --></div>
</template><script>
export default {props: {w: {// 写成对象形式type: Number,// required: true,default: 10,validator(value) {if (value >= 0 && value <= 100) {return true}console.log('传入的值要是0~100')return false}}},methods: {handleFn(tt) {this.$emit('changeWidth', tt)}}// 父组件的props更新,会单向向下流动,影响到子组件
}
</script><style scoped>
.BaseProgress {margin: 10px;
}.progress {width: 300px;height: 40px;margin-bottom: 40px;background-color: #cdf92c;border-radius: 25px;padding: 5px;
}.inner {background-color: #0df6c7;border-radius: 25px;height: 35px;margin-top: 3px;/* width: 20%; */
}.low {background-color: #92ee61;
}.high {background-color: rgb(141, 179, 216);
}.over {background-color: rgb(0, 128, 255);
}.inner span {width: 100%;text-align: right;display: block;line-height: 90px;
}
</style>
App.vue
<template><div id="app"><!-- 没传值,就用默认的10 --><!-- <BaseProgress></BaseProgress> --><BaseProgress :w="width" @changeWidth="changeFn"></BaseProgress></div>
</template><script>
import BaseProgress from './components/BaseProgress.vue'export default {components: {BaseProgress},data() {return {// width: 'sfsd'width: 20}},methods: {changeFn(tt) {this.width = tt}}
}
</script><style >
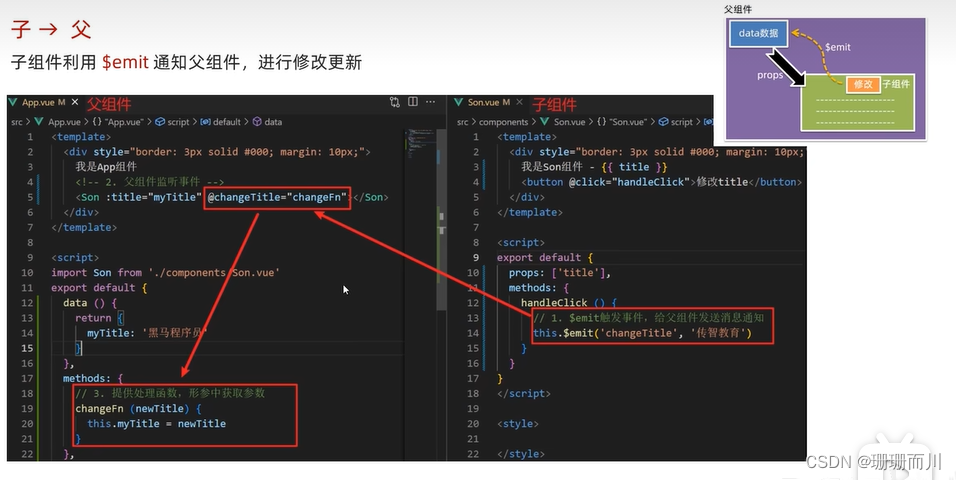
</style>子 -> 父 $emit
components/Son.vue
<template><div class="son" style="border: 3px solid #000; margin: 10px">我是Son组件 {{ title }}<button @click="changeFn">修改title</button></div>
</template><script>
export default {name: 'Son-Child',props: ['title'],methods: {changeFn() {// 通过this.$emit() 向父组件发送通知this.$emit('changTitle','传智教育')},},
}
</script><style>
</style>
App.vue
<template><div class="app" style="border: 3px solid #000; margin: 10px">我是APP组件<!-- 2.父组件对子组件的消息进行监听 --><Son :title="myTitle" @changTitle="handleChange"></Son></div>
</template><script>
import Son from './components/Son.vue'
export default {name: 'App',data() {return {myTitle: '学前端,就来黑马程序员',}},components: {Son,},methods: {// 3.提供处理函数,提供逻辑handleChange(newTitle) {this.myTitle = newTitle},},
}
</script><style>
</style>
总结
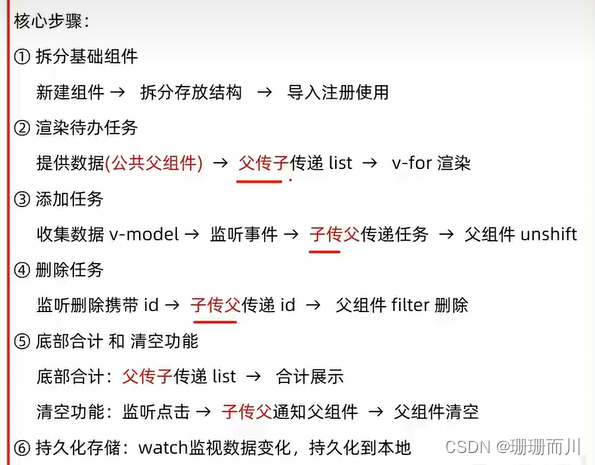
【综合案例】——小黑记事本— 组件版
components/TodoHeader.vue
<template><div class="head"><h1>小黑记事本</h1><input@keyup.enter="handleAdd"v-model="todoName"type="text"placeholder="请输入待办事项"/><button @click="handleAdd">添加任务</button></div>
</template><script>
export default {data() {return {todoName: ''}},methods: {handleAdd() {if (this.todoName.trim() == '') {// 输入许多的空格,无效输入,不让添加alert('请输入内容')return}this.$emit('add', this.todoName)// 点击添加之后,输入框清空this.todoName = ''}}
}
</script><style>
.head {width: 243px;/* background-color: #584949; */
}input {height: 30px;vertical-align: middle;
}.head button {height: 30px;
}
</style>
components/TodoMain.vue
<template><section class="body"><ul><li v-for="(item, index) in todoList" :key="item.id"><span>{{ index + 1 }}</span><span class="content">{{ item.name }}</span><button @click="handleDel(item.id)">×</button></li></ul></section>
</template><script>
export default {props: {todoList: Array},methods: {handleDel(tt) {this.$emit('del', tt)}}
}
</script><style>
* {box-sizing: border-box;margin: 0;padding: 0;list-style: none;
}
.body li {width: 234px;height: 50px;display: flex;line-height: 50px;/* justify-content: space-between; */background-color: #de8282;border-bottom: black solid 2px;
}.body li .content {flex: 1;
}.body li button {height: 50%;align-self: center;display: none;
}.body li:hover button {display: block;width: 20px;
}
</style>
components/TodoFooter.vue
<template><div v-show="todoList.length > 0" class="footer"><span>合计:<strong>{{ todoList.length }}</strong></span><button @click="clear()">清空任务</button></div>
</template><script>
export default {props: {todoList: Array},methods: {clear() {this.$emit('clear')}}
}
</script><style>
.footer {width: 234px;display: flex;justify-content: space-between;
}
</style>
components/App.vue
<template><div id="app"><TodoHeader @add="handleAdd"></TodoHeader><TodoMain :todoList="todoList" @del="handleDel"></TodoMain><TodoFooter @clear="handleClear" :todoList="todoList"></TodoFooter></div>
</template><script>
import TodoHeader from './components/TodoHeader.vue'
import TodoMain from './components/TodoMain.vue'
import TodoFooter from './components/TodoFooter.vue'
export default {components: {TodoHeader,TodoMain,TodoFooter},// 渲染功能:// 1.提供数据:写在公共的父组件 App.vue// 2.通过父组件,将数据传递给TodoMain// 3.利用v-for 渲染// 添加功能// 1.收集表单数据 v-model// 2.监听事件(回车+点击 都要添加// 3.子传父 将任务名称传给父App.vue// 4.进行添加 unshift(自己的数据,自己负责)// 删除功能// 1.监听事件(删除的点击) 携带id// 2.子传父,将删除的id传给父组件App.vue// 3.父组件删除 filter(自己的数据,自己负责)// 底部合计:父传子list 渲染// 清空功能:子传父,通知到父组件 父组件清空// 持久化存储:watch深度监视-> 往本地存 -> 进入页面优先读取本地data() {return {todoList: JSON.parse(localStorage.getItem('list')) || [{ id: 1, name: '吃水果' },{ id: 2, name: '喝酸奶' }]}},methods: {handleAdd(todoName) {this.todoList.unshift({id: +new Date(),name: todoName})},handleDel(tt) {this.todoList = this.todoList.filter((item) => item.id != tt)},handleClear() {this.todoList = []}},watch: {todoList: {deep: true,handler(newValue) {localStorage.setItem('list', JSON.stringify(newValue))}}}
}
</script><style >
#app {/* width: 234px;height: 200px;display: flex;flex-direction: column; */margin: 50px 50px;
}
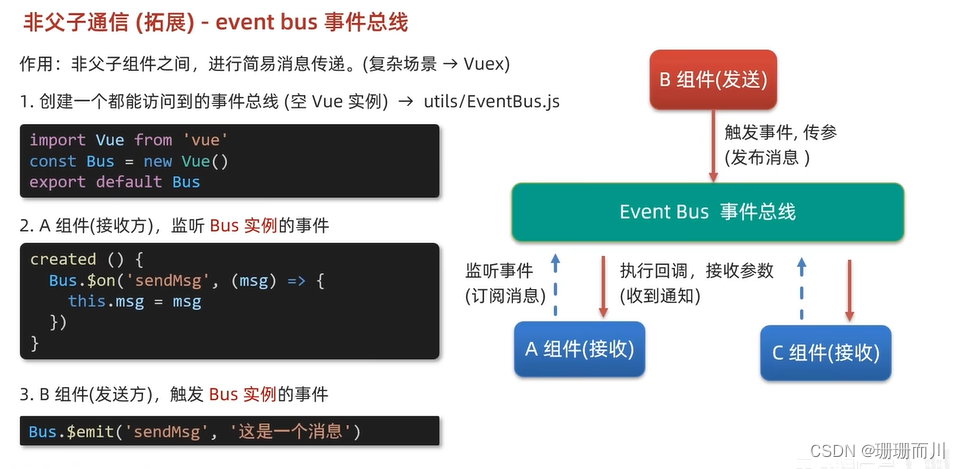
</style>非父子通信 event bus事件总线
 components/BaseA.vue
<template><div class="A">我是A组件(接收方)<p>{{ msg }}</p></div>
</template><script>
import Bus from '../utils/EventBus'
export default {created() {// 2.在A组件(接受方)监听Bus的事件(订阅消息)// 事件名,回调Bus.$on('sendMsg', (msg) => {console.log(msg)this.msg = msg})},data() {return {msg: ''}}
}
</script><style>
.A {width: 200px;height: 100px;border: 1px solid black;
}
</style>
components/BaseB.vue
<template><div class="B">我是B组件(发布方)<button @click="clickSend">发布通知</button></div>
</template><script>
import Bus from '../utils/EventBus'
export default {methods: {clickSend() {// 3.B组件(发送方)触发事件的方式传递参数(发布消息)Bus.$emit('sendMsg', '恐龙扛狼') // Bus.$on('sendMsg', (msg) => {})和这里的名字同名}}
}
</script><style>
.B {width: 200px;height: 100px;border: 1px solid black;
}
</style>
App.vue
<template><div id="app"><BaseA></BaseA><BaseB></BaseB></div>
</template><script>import BaseA from './components/BaseA.vue'
import BaseB from './components/BaseB.vue'
export default {components: {BaseA,BaseB}
}
</script><style>
</style>
utils/EventBus.js
utils通常用来放工具
// 创建一个都能访问到的事件总线(空的Vue实例)
import Vue from 'vue'const Bus = new Vue()export default Bus
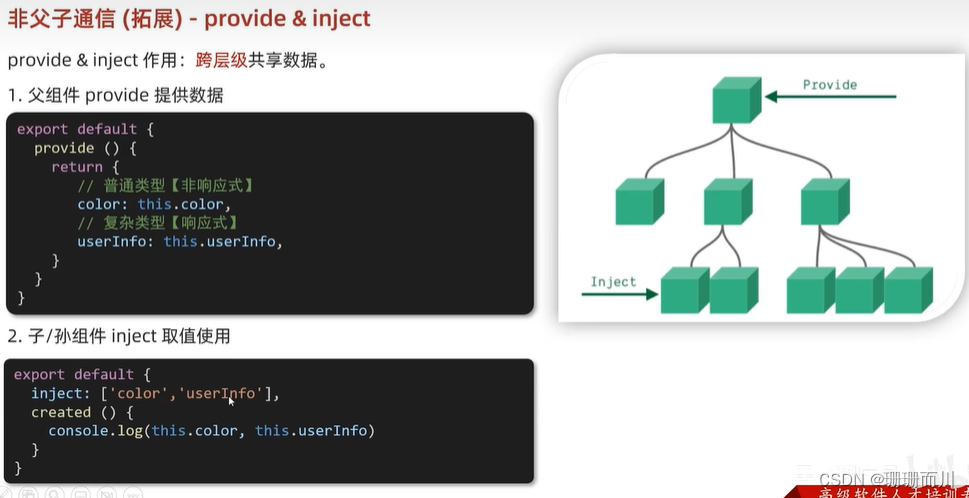
非父子通信——provide & inject(扩展)
v-model原理
 $evevnt也就是e
如果应用于复选框,就是check属性,和change事件的合写
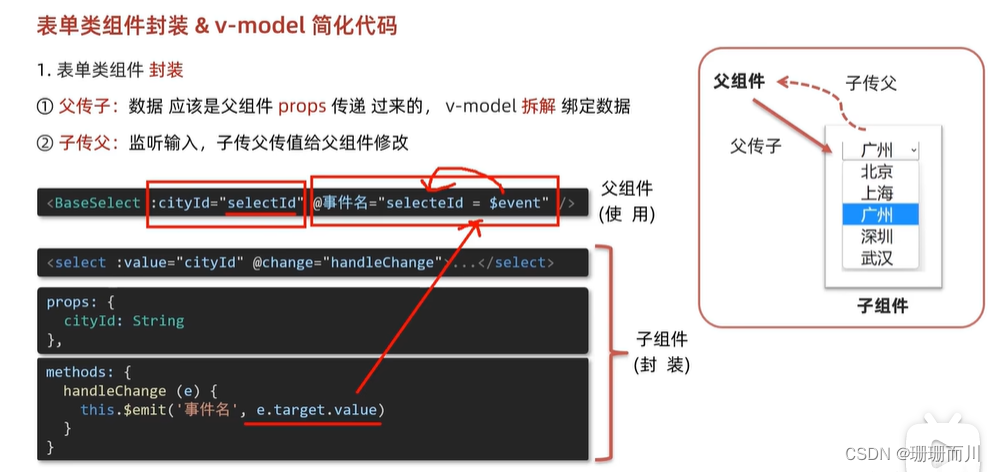
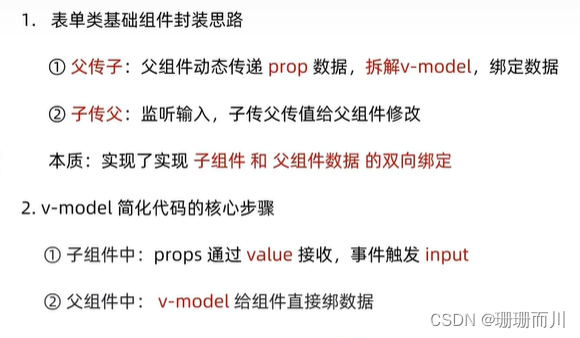
表单类组件封装
 components/BaseSelect.vue
<template><div class="BaseSelect"><!-- <select v-model="cityId">这样写是不行的,因为父组件的数据,只能父组件改,而v-model是双向的,他在尝试更改父亲的数据,他要造反,要谋权篡位,所以报错了  --><!-- :value="cityId"   用来父传子@change="handleChange" 用来子传父--><select :value="cityId" @change="handleChange"><option value="101">北京</option><option value="102">深圳</option><option value="103">上海</option><option value="104">广州</option><option value="105">辽宁</option><option value="106">福建</option></select></div>
</template><script>
export default {props: {cityId: String},methods: {handleChange(e) {console.log(e.target.value)this.$emit('changeId', e.target.value)}}
}
</script><style>
</style>
App.vue
<<template><!-- :cityId="selectId"  用来父传子@changeId="selectId = $event"   用来子传父--><BaseSelect :cityId="selectId" @changeId="selectId = $event"></BaseSelect>
</template><script>
import BaseSelect from './components/BaseSelect.vue'
export default {components: {BaseSelect},data() {return {selectId: '106'}}
}
</script><style>
</style>
@changeId="selectId = $event " 中的$event是什么
在Vue中,$event是一个特殊的变量,用于在事件处理函数中访问触发事件时传递的数据。它代表了事件对象,包含了与事件相关的信息。
在你提供的代码中,@changeId="selectId = $event"表示当 BaseSelect 组件触发 changeId 事件时,将事件对象中的数据赋值给 selectId。
具体来说,$event 是一个占位符,用于接收传递给事件处理函数的参数。在这个例子中,BaseSelect 组件在触发 changeId 事件时,会将选中的城市ID作为参数传递给事件处理函数。然后,通过 $event 来访问这个参数,并将其赋值给 selectId。
例如,如果 BaseSelect 组件在触发 changeId 事件时传递了一个值为 123 的参数,那么 selectId 将被赋值为 123。代码示例中的 @changeId=“selectId = $event” 就是将事件对象中的数据赋值给 selectId 的方式。
请注意,$event 只是一个约定俗成的命名,你也可以使用其他变量名来接收事件对象中的数据。例如,你可以使用 @changeId=“selectId = value”,其中 value 是你自己定义的变量名,它将接收事件对象中的数据。
总之,$event 是Vue中的一个特殊变量,用于在事件处理函数中访问事件对象中传递的数据。它可以帮助你在事件处理函数中获取和处理事件的相关信息。
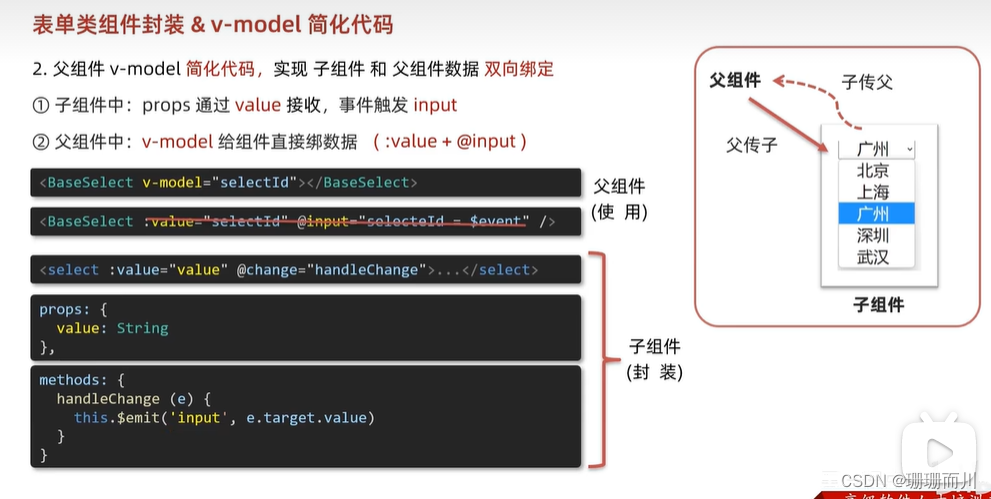
v-model 简化代码
 components/BaseSelect.vue
<template><div class="BaseSelect"><!-- :value="value"  父传子 --><select :value="value" @change="handleChange"><option value="101">北京</option><option value="102">深圳</option><option value="103">上海</option><option value="104">广州</option><option value="105">辽宁</option><option value="106">福建</option></select></div>
</template><script>
export default {// 父传子props: {value: String},methods: {// 子传父// 监听handleChange(e) {console.log(e.target.value)this.$emit('input', e.target.value)}}
}
</script><style>
</style>
App.vue
<template><!-- v-model => :value(父传子)  + @input  子传父 --><BaseSelect v-model="selectId"></BaseSelect>
</template><script>
import BaseSelect from './components/BaseSelect.vue'
export default {components: {BaseSelect},data() {return {selectId: '106'}}
}
</script><style>
</style>
小结
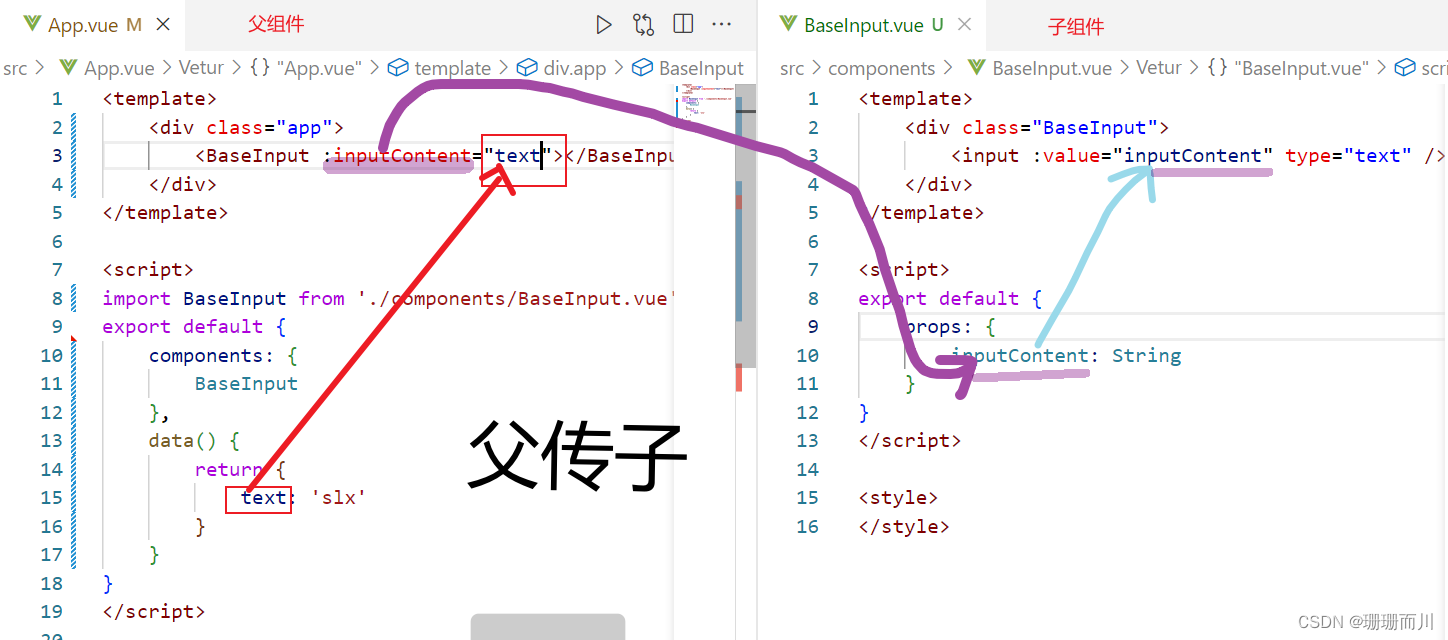
封装输入框组件
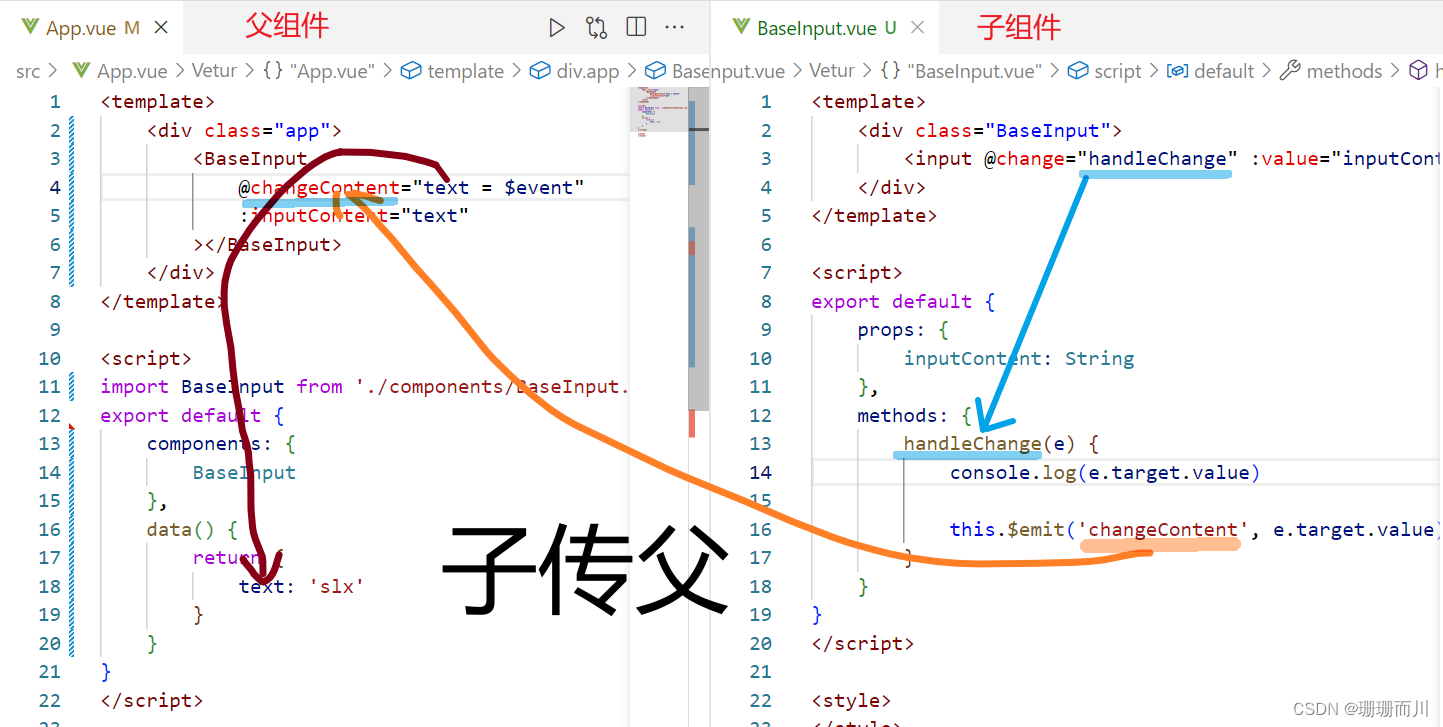
components/BaseInput.vue
<template><div class="BaseInput"><input @change="handleChange" :value="value" type="text" /></div>
</template><script>
export default {props: {value: String},methods: {handleChange(e) {console.log(e.target.value)this.$emit('input', e.target.value)}}
}
</script><style>
</style>
App.vue
<template><div class="app"><BaseInput v-model="text"></BaseInput></div>
</template><script>
import BaseInput from './components/BaseInput.vue'
export default {components: {BaseInput},data() {return {text: 'slx'}}
}
</script><style>
</style>
.sync修饰符
 在书写上比较比v-model麻烦,所以,封装表单还是v-model,其余的用.sync较好
components/SB.vue
<template><div v-show="visable" class="base-dialog-wrap"><div class="base-dialog"><div class="title"><h3>温馨提示:</h3><button @click="close" class="close">x</button></div><div class="content"><p>你确认要退出本系统么?</p></div><div class="footer"><button @click="close">确认</button><button @click="close">取消</button></div></div></div>
</template><script>
export default {props: {visable: Boolean},methods: {close() {this.$emit('update:visable', false)}}
}
</script><style scoped>
.base-dialog-wrap {width: 300px;height: 200px;box-shadow: 2px 2px 2px 2px #ccc;position: fixed;left: 50%;top: 50%;transform: translate(-50%, -50%);padding: 0 10px;z-index: 9;background-color: #fff;
}
.base-dialog .title {display: flex;justify-content: space-between;align-items: center;border-bottom: 2px solid #000;
}
.base-dialog .content {margin-top: 38px;
}
.base-dialog .title .close {width: 20px;height: 20px;cursor: pointer;line-height: 10px;
}
.footer {display: flex;justify-content: flex-end;margin-top: 26px;
}
.footer button {width: 80px;height: 40px;
}
.footer button:nth-child(1) {margin-right: 10px;cursor: pointer;
}
</style>
App.vue
<template><div class="app"><button @click="isShow = true">退出按钮</button><div :class="{ show_bg: isShow }"><SB :visable.sync="isShow"></SB><!-- :visable.sync => :visable + @update:visable --></div></div>
</template><script>
import SB from './components/SB.vue'
export default {data() {return {isShow: false}},methods: {},components: {SB}
}
</script><style>
.show_bg {position: absolute;top: 0;z-index: 2;width: 100%;height: 100%;background-color: #c4bbbba4;
}
</style>
ref 和 $refs

获取dom元素
<div ref="mychart" class="BaseEchart"></div>var myChart = echarts.init(this.$refs.mychart)
components/BaseEchart.vue
<template><div ref="mychart" class="BaseEchart"></div>
</template><script>
import * as echarts from 'echarts'
export default {mounted() {// var myChart = echarts.init(document.querySelector('.BaseEchart'))var myChart = echarts.init(this.$refs.mychart)var option = {xAxis: {type: 'category',data: ['Mon', 'Tue', 'Wed', 'Thu', 'Fri', 'Sat', 'Sun']},yAxis: {type: 'value'},series: [{data: [120, 200, 150, 80, 70, 110, 130],type: 'bar'}]}option && myChart.setOption(option)}
}
</script><!-- <style scoped> -->
<style >
.BaseEchart {width: 500px;height: 500px;
}
</style>
App.vue
<template><div class="app"><div class="BaseEchart">捣乱的div</div><BaseEchart></BaseEchart></div>
</template><script>
import BaseEchart from './components/BaseEchart.vue'export default {components: {BaseEchart}
}
</script><style  >
</style>
获取组件实例

componentes/BaseForm.vue
<template><div class="BaseForm">用户名: <input v-model="username" type="text" /><br />密码: <input v-model="password" type="text" /><br /></div>
</template><script>
export default {data() {return {username: '',password: ''}},methods: {getValues() {return {username: this.username,psd: this.password}},clearValues() {this.username = ''this.password = ''}}
}
</script><style>
</style>
App.vue
<template><div class="app"><BaseForm ref="Form"></BaseForm><button @click="getDate">获取数据</button><button @click="clearDate">清空数据</button></div>
</template><script>
import BaseForm from './components/BaseForm.vue'
export default {components: {BaseForm},methods: {getDate() {console.log('www')console.log(this.$refs.Form.getValues())},clearDate() {this.$refs.Form.clearValues()}}
}
</script><style>
</style>
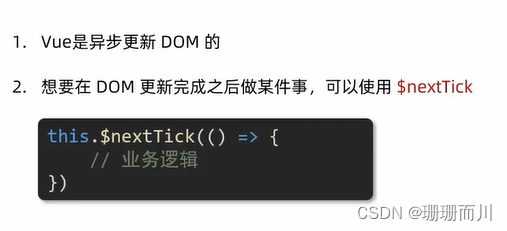
Vue 异步更新、$nextTick
App.vue
<template><div class="app"><div v-if="isEdit"><input ref="inp" v-model="editValue" type="text" /><button @click="over">ok</button></div><div v-else>{{ title }}<button @click="changeTitle">edit</button></div></div>
</template><script>
export default {data() {return {editValue: '',title: '我是title',isEdit: false}},methods: {changeTitle() {// 1.显示输入框(异步dom更新this.isEdit = true// 2.让输入框获取焦点// $nextTick等dom更新完,立刻执行函数体this.$nextTick(() => {this.$refs.inp.focus()})},over() {this.title = this.editValuethis.isEdit = false}}
}
</script><style>
</style>
相关文章:
Vue [Day4]
组件的三大组成部分 组件的样式冲突 scoped <style scoped></style>data 是一个函数 components/BaseButton.vue <template><div class"BaseButton"><button click"count--">-</button><span>{{ count }}</…...

google chrome 官方下载
官方渠道: 1、链接直接打开就可以下载,最新版实时更新。 32位(x86):https://dl.google.com/tag/s/installdataindex/update2/installers/ChromeStandaloneSetup.exe 64位(x64):htt…...
Misc取证学习
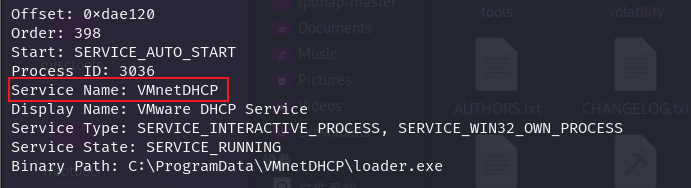
文章目录 Misc取证学习磁盘取证工具veracryto挂载fat文件DiskGenius 磁盘取证例题[RCTF2019]disk 磁盘[](https://ciphersaw.me/ctf-wiki/misc/disk-memory/introduction/#_2)内存取证工具volatility 内存取证例题数字取证赛题0x01.从内存中获取到用户admin的密码并且破解密码 …...

vue打包到jar资源访问被shiro拦截
1.shiro放发对静态资源的拦截// filterMap.put("/202307171550/**", "anon"); // filterMap.put("/config/**", "anon"); // filterMap.put("/index.html", "anon"); 2.装载资源访问 priva…...
)
选择排序(指针法)
描述 用选择法对10个整数排序。 输入 输入包含10个整数,用空格分隔。 输出 输出排序后的结果,用空格分隔。 输入样例 1 3 1 4 1 5 9 2 6 5 3 输出样例 1 1 1 2 3 3 4 5 5 6 9 输入样例 2 2 4 6 8 10 12 14 16 18 20 输出样例 2 2 4 6 8 1…...
8.6 day07 休息+剑指offer
文章目录 06从尾到头打印链表03数组中重复的数字04二维数组中的查找05 替换空格06重建二叉树背英语单词,看了二十页 06从尾到头打印链表 从尾到头遍历链表 方法一就是用栈来辅助,栈的结构是先进后出的,将链表中的元素加入到栈中去࿰…...
K8S系列文章 之 容器存储基础 Volume
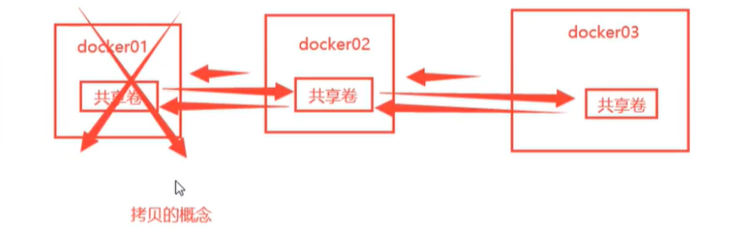
Volume Volume是容器数据卷。我们经常创建删除一些容器,但有时候需要保留容器中的一些数据,这时候就用到了Volume。它也是容器之间数据共享的技术,可以将容器中产生的数据同步到本地。实际就是把容器中的目录挂载到运行着容器的服务器或个人…...
【CHI】架构介绍
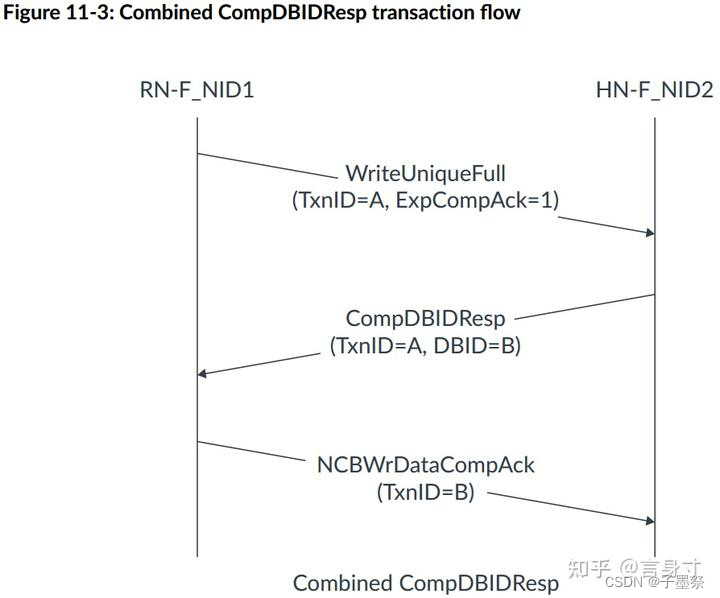
Learn the architecture - Introducing AMBA CHI AMBA CHI协议导论--言身寸 1. AMBA CHI简介 一致性集线器接口(CHI)是AXI一致性扩展(ACE)协议的演进。它是Arm提供的高级微控制器总线架构(AMBA)的一部分。…...
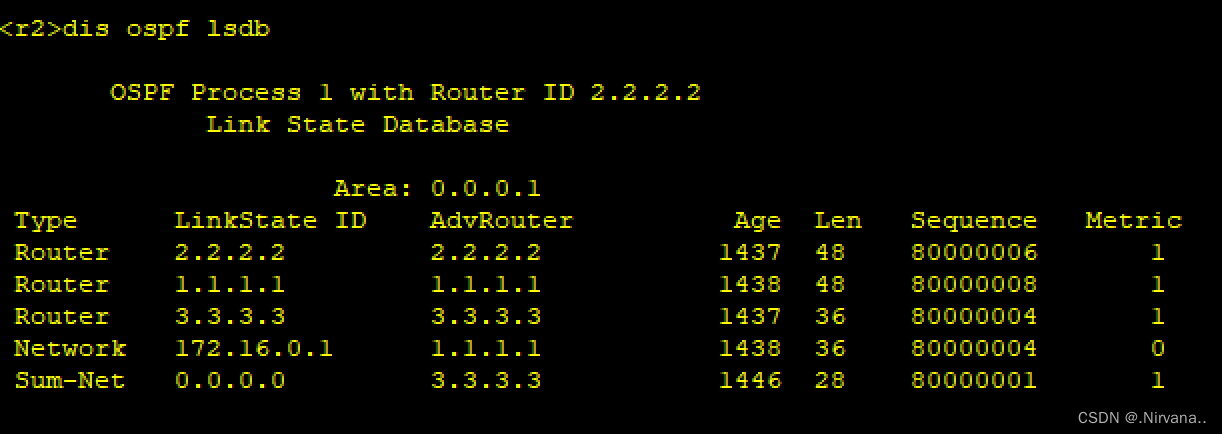
hcip的ospf综合实验
题目 拓扑图 IP地址分配及环回 R1 < Huawei>sy Enter system view, return user view with CtrlZ. [Huawei]sysname r1 [r1]int g0/0/0 [r1-GigabitEthernet0/0/0]ip add 172.16.0.1 27 Aug 6 2023 19:03:33-08:00 r1 %%01IFNET/4/LINK_STATE(l)[0]:The line protocol I…...
AP5179 高端电流采样降压恒流驱动IC SOP8 LED车灯电源驱动
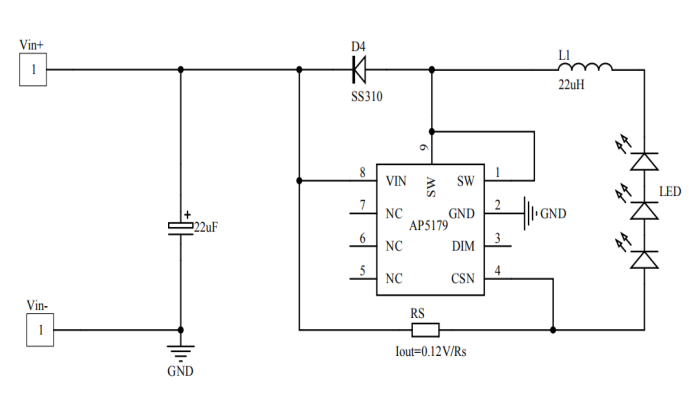
产品描述 AP5179是一款连续电感电流导通模式的降压恒流源,用于驱动一颗或多颗串联LED输入电压范围从 5 V 到 60V,输出电流 最大可达 2.0A 。根据不同的输入电压和外部器件, 可以驱动高达数十瓦的 LED。内置功率开关,采用高端电流…...

vue3+vite项目配置ESlint、pritter插件
配置ESlint、pritter插件 在 Vue 3 Vite 项目中,你可以通过以下步骤配置 ESLint 和 Prettier 插件: 安装插件: 在项目根目录下,打开终端并执行以下命令安装 ESLint 和 Prettier 插件: npm install eslint prettier e…...

K8S kubeadm搭建
kubeadm搭建整体步骤 1)所有节点进行初始化,安装docker引擎和kubeadm kubelet kubectl 2)生成集群初始化配置文件并进行修改 3)使用kubeadm init根据初始化配置文件生成K8S的master控制管理节点 4)安装CNI网络插件&am…...

Squeeze-and-Excitation Networks阅读笔记一
文章目录 Abstract1 INTRODUCTION Abstract 卷积算子(convolution operator)是卷积神经网络(cnn)的核心组成部分,它使网络能够通过融合每层局部接受域内的空间和通道信息来构建信息特征。广泛的先前研究已经调查了这种…...
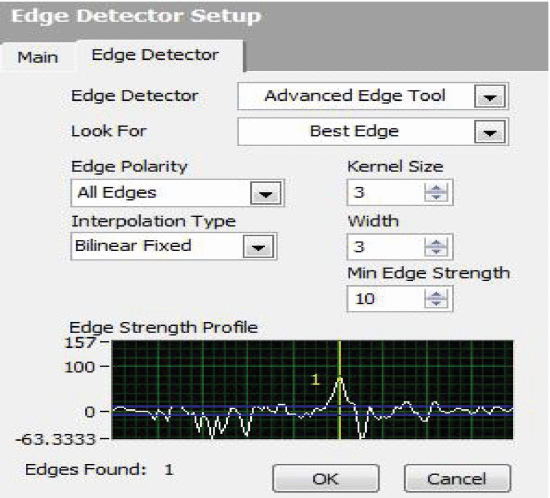
LabVIEW开发3D颈动脉图像边缘检测
LabVIEW开发3D颈动脉图像边缘检测 近年来,超声图像在医学领域对疾病诊断具有重要意义。边缘检测是图像处理技术的重要组成部分。边缘包含图像信息。边缘检测的主要目的是根据强度和纹理等属性识别图像中均匀区域的边界。超声(US)图像存在视觉…...

python10.4.3
10.4.3重构 错误实例 import jsondef laoyonghu(): #获取老用户名字filenameusername.jsonwith open(filename) as f:usernamejson.load(f)return usernamedef xinyonghu(): #获取新用户名字filenameusername.jsonusernameinput("whats your name:")with ope…...

系统架构设计高级技能 · 软件架构概念、架构风格、ABSD、架构复用、DSSA(一)【系统架构设计师】
系列文章目录 系统架构设计高级技能 软件架构概念、架构风格、ABSD、架构复用、DSSA(一)【系统架构设计师】 系统架构设计高级技能 系统质量属性与架构评估(二)【系统架构设计师】 系统架构设计高级技能 软件可靠性分析与设计…...
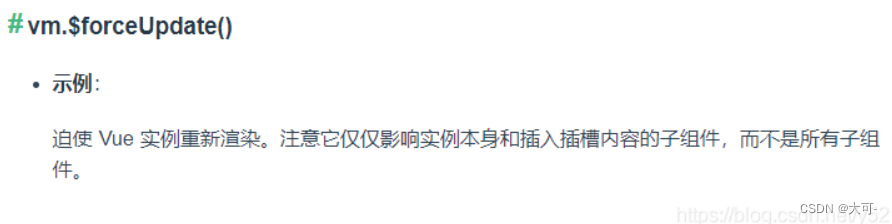
Vue中,$forceUpdate()的使用
在Vue官方文档中指出,$forceUpdate具有强制刷新的作用。 那在vue框架中,如果data中有一个变量:age,修改他,页面会自动更新。 但如果data中的变量为数组或对象,我们直接去给某个对象或数组添加属性,页面是识…...
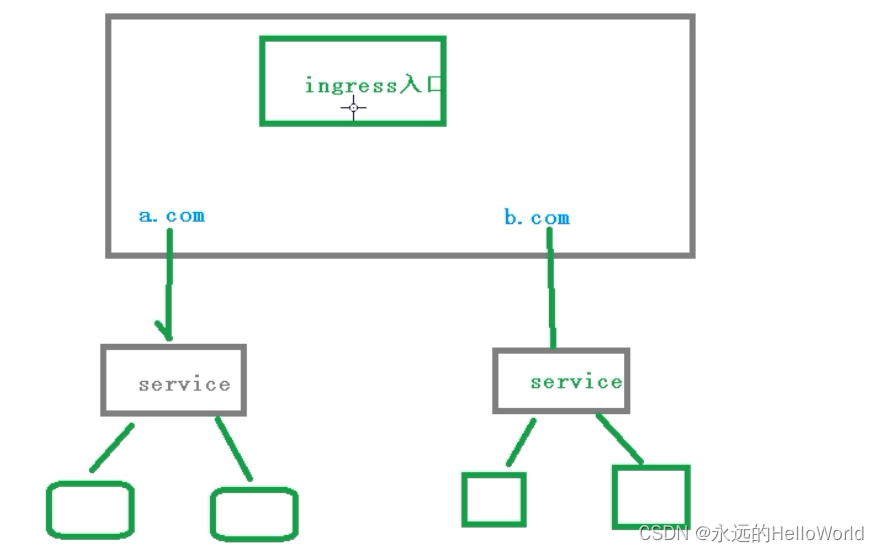
K8s中的Ingress
1.把端口号对外暴露,通过ip端口号进行访问 使用Service里面的NodePort实现 2.NodePort缺陷 在每个节点上都会起到端口,在访问时候通过任何节点,通过节点ip暴露端口号实现访问 意味着每个端口只能使用一次,一个端口对应一个应用…...

c++调用ffmpeg api录屏 并进行udp组播推流
代码及工程见https://download.csdn.net/download/daqinzl/88155241 开发工具:visual studio 2019 播放,采用ffmpeg工具集里的ffplay.exe, 执行命令 ffplay udp://224.1.1.1:5001 主要代码如下: #include "pch.h" #include <iostream>…...
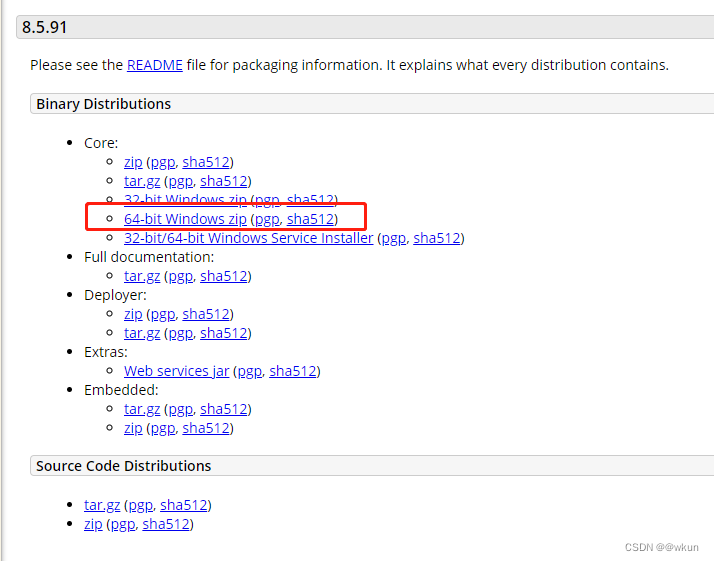
war包方式安装linux和windows的geoserver
注意: 从Java 9开始,Oracle已经不再单独提供JRE(Java Runtime Environment)了,而是直接将JRE集成在JDK(Java Development Kit)中。这是因为JRE包含了运行Java程序所需的环境,而JDK除…...

告别ET1100?聊聊AX58100这颗高性价比EtherCAT从站芯片的升级体验
告别ET1100?AX58100高性价比EtherCAT从站芯片的工业升级实战 当工业设备制造商面临从传统控制架构向实时以太网迁移时,EtherCAT从站芯片的选型往往成为关键转折点。十年前,ET1100凭借其稳定的性能和相对友好的开发门槛,成为许多工…...

Sketchfab数据提取终极指南:打破在线3D模型下载壁垒的完整解决方案
Sketchfab数据提取终极指南:打破在线3D模型下载壁垒的完整解决方案 【免费下载链接】sketchfab sketchfab download userscipt for Tampermonkey by firefox only 项目地址: https://gitcode.com/gh_mirrors/sk/sketchfab 你是否曾在Sketchfab上发现完美的3D…...

3分钟掌握猫抓扩展:轻松捕获网页视频的终极秘籍
3分钟掌握猫抓扩展:轻松捕获网页视频的终极秘籍 【免费下载链接】cat-catch 猫抓 浏览器资源嗅探扩展 / cat-catch Browser Resource Sniffing Extension 项目地址: https://gitcode.com/GitHub_Trending/ca/cat-catch 你是否曾经遇到过这样的情况࿱…...

Arm Neoverse CMN-700 HN-F寄存器架构与缓存一致性配置详解
1. Arm Neoverse CMN-700 HN-F寄存器架构概述在现代SoC设计中,一致性互连网络(Coherent Mesh Network)是实现多核处理器高效协同工作的核心基础设施。作为Arm Neoverse平台的关键组件,CMN-700通过其独特的网格拓扑结构和分布式节点…...

轻量级配置中心zcf:中小团队微服务配置管理实战指南
1. 项目概述:一个轻量级、高可用的配置中心最近在梳理团队内部的技术栈,发现一个挺有意思的现象:很多中小型项目,甚至是一些快速迭代的业务线,在配置管理上依然处于一种“原始”状态。要么是各种application.yml、appl…...

Apache Burr框架:构建可观测有状态数据应用的核心原理与实践
1. 项目概述:一个用于构建和评估数据产品的Python框架如果你正在处理数据密集型应用,比如推荐系统、个性化广告或者任何需要根据用户行为实时调整策略的场景,你肯定遇到过这样的困境:模型训练和离线评估做得再好,一旦上…...

基于Claude API构建可编程AI智能体:从对话到自动化生产单元
1. 项目概述:从Claude中“招聘”一个AI伙伴最近在GitHub上看到一个挺有意思的项目,叫“hire-from-claude”。初看这个标题,你可能会有点摸不着头脑:Claude不是Anthropic公司开发的那个AI助手吗?怎么还能从它那里“招聘…...
)
Cesium动态泛光效果实战:手把手教你用d3kit插件打造炫酷城市光效(附完整代码)
Cesium动态泛光效果实战:手把手教你用d3kit插件打造炫酷城市光效(附完整代码) 当夜幕降临,城市天际线被霓虹灯勾勒出流动的轮廓,这种视觉冲击力正是现代三维可视化项目的灵魂所在。本文将带你用d3kit这个轻量级插件&am…...

解密ComfyUI-WanVideoWrapper:在ComfyUI中突破AI视频生成的技术壁垒
解密ComfyUI-WanVideoWrapper:在ComfyUI中突破AI视频生成的技术壁垒 【免费下载链接】ComfyUI-WanVideoWrapper 项目地址: https://gitcode.com/GitHub_Trending/co/ComfyUI-WanVideoWrapper 你是否曾想过将脑海中的创意场景转化为生动的视频内容࿰…...

基于Trinket M0与伺服电机的宠物激光护目镜DIY全攻略
1. 项目概述与核心思路给自家毛孩子做个赛博朋克风的万圣节装备,这个想法在我脑子里盘桓很久了。市面上那些宠物装饰要么千篇一律,要么就是简单的布料缝制,总感觉少了点“硬核”的趣味。直到我看到伺服电机和激光二极管这两个小玩意儿&#x…...