Harbor企业镜像仓库部署
目录
一、Harbor 架构构成
二、部署harbor环境
1、安装docker-ce(所有主机)
2、阿里云镜像加速器
3、部署Docker Compose 服务
4、部署 Harbor 服务
5、启动并安装 Harbor
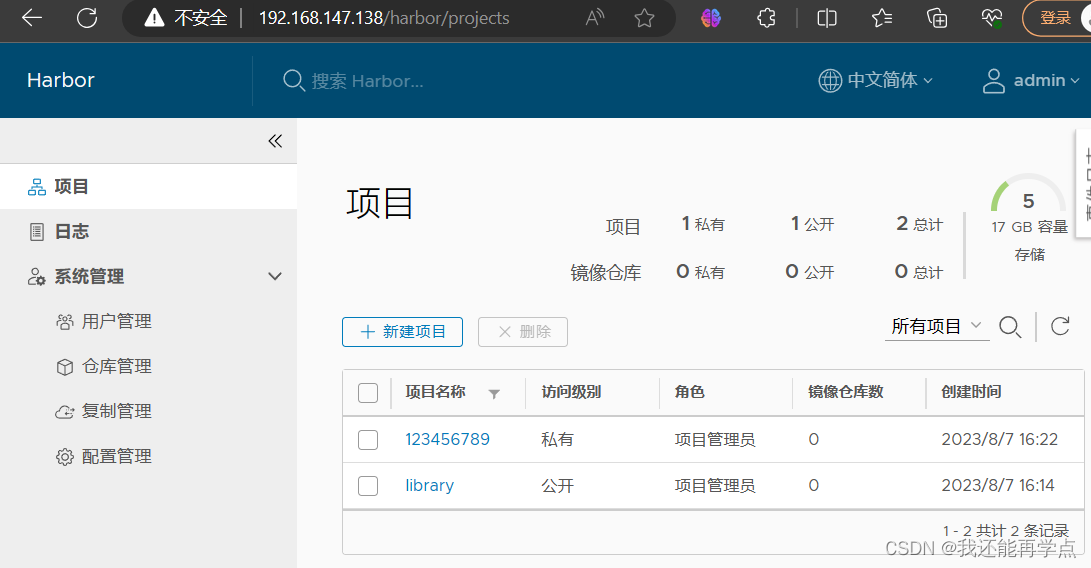
6、创建一个新项目
三、客户端上传镜像
1、在 Docker 客户端配置操作如下:
2、重启 Docker,再次登录
3、再次登录 Harbor
4、下载体积小一点的镜像进行测试
5、镜像打标签及上传到 123456789 项目里面
四、日常操作
1、 通过 Harbor Web 创建项目
2、创建Harbor用户
3、在客户端上用普通账户镜像操作
4、查看日志
5、管理 Harbor
1)、停止/启动/重启 Harbor
2)、修改 Harbor.cfg 配置文件
3)、移除 Harbor 服务容器同时保留镜像数据/数据库
4)、移除 Harbor 服务容器全部数据(重新部署时采用)
1、为Harbor配置https
1)创建自己的CA证书
2)生成证书签名请求
3)生成注册表主机的证书
4)查看证书情况
5)信任自签发的域名证书
6)将自签ca证书添加到系统信任
7)关闭现有harbor
8)修改harbor.cfg配置文件
9)重新安装harbor私有镜像仓库
一、Harbor 架构构成
- Proxy:Harbor 的 Registry、UI、token 等服务。通过一个前置的反向代理统一接收浏览器Docker 客户端的请求,并将请求转发给后端不同的服务。
- Registry:负责储存Docker镜像,并处理 Docker push/pull 命令。由于要对用户进行访问控制,即不同用户对Docker image有不同的读写权限,Registry会指向一个 token服务,强制用户的每次 Docker pull/push 请求都要携带一个合法的token,Registry会通过公钥对 token 进行解密验证。
- Core services 这是 Harbor 的核心功能,主要提供以下服务
- UI(Harbor-ui):提供图形化界面,帮助用户管理 Registry 上的镜像(image), 并对用户进行授权。
- Webhook:为了及时获取 registry 上image状态变化的情况,在Registry上配置webhook,把状态变化传递给UI模块。
- 6.Token 服务:负责根据用户权限给每个Docker push/pull命令签发token.Docker客户端向 Regiøstry服务发起的请求,如果不包含token,会被重定向到这里,获得token后再重新向 Registry进行请求。
- Database(Harbor-db):为 core services 提供数据库服务,负责储存用户权限、审计日志、Docker image 分组信息等数据。
- Log collector(Harbor-log):为了帮助监控 Harbor 运行,负责收集其他组件的log,供日后进行分析。
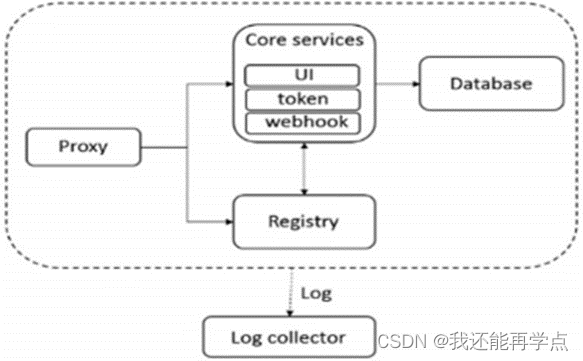
Harbor的每个组件都是以Docker容器的形式构建的,因此,使用Docker Compose 来 对它进行部署。在源代码中(https://github.com/vmware/Harbor), 用于部署Harbor的Docker Compose 模板位于 Harbor/make/docker-compose.tpl。
案列环境
| 角色 | 操作系统 | 主机名 | IP地址 | 软件 |
| 仓库服务 | CentOS7.5-1 | master | 192.168.147.138 | docker-ce docker-compose Harbor-offline |
| 仓库服务 | CentOS7.5-2 | slave | 192.168.147.139 | docker-ce docker-compose Harbor-offline |
| Docker客户端 | CentOS7.5-3 | client | 192.168.147.140 | docker-ce |
二、部署harbor环境
1、安装docker-ce(所有主机)
[root@localhost ~]# wget -O /etc/yum.repos.d/CentOS-Base.repo http://mirrors.aliyun.com/repo/Centos-7.repo[root@localhost ~]# yum -y install yum-utils device-mapper-persistent-data lvm2
[root@localhost ~]# yum-config-manager --add-repo http://mirrors.aliyun.com/docker-ce/linux/centos/docker-ce.repo[root@localhost ~]# ls /etc/yum.repos.d/
backup  Centos-Base.repo  CentOS-Media.repo  docker-ce.repo[root@localhost ~]# yum -y install docker-ce
[root@localhost ~]# systemctl start docker
[root@localhost ~]# systemctl enable docker
Created symlink from /etc/systemd/system/multi-user.target.wants/docker.service to /usr/lib/systemd/system/docker.service.2、阿里云镜像加速器
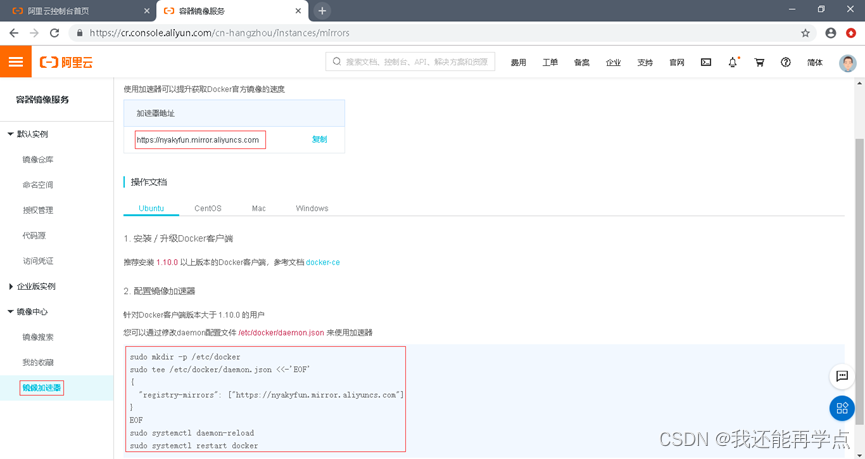
[root@master ~]#  cat << END > /etc/docker/daemon.json
> {
>         "registry-mirrors":[ "https://nyakyfun.mirror.aliyuncs.com" ]
> }
> END
3、部署Docker Compose 服务
下载最新 Docker-Compose(master、slave)
[root@slave ~]# ll-rw-r--r--. 1 root root 10867152 8月   3 19:22 docker-compose
[root@master ~]# chmod +x /usr/local/bin/docker-compose
查看 Docker-Compose 版本判断安装是否成功
[root@master ~]#  docker-compose --version
docker-compose version 1.21.1, build 5a3f1a3
4、部署 Harbor 服务
Harbor 被部署为多个 Docker 容器,因此可以部署在任何支持 Docker 的 Linux 发行版上。目标主机需要安装 Python、Docker 和 Docker Compose。
下载 Harbor 安装程序(master、slave)
[root@master ~]# ll
总用量 642752
-rw-------. 1 root root      1257 7月  18 16:47 anaconda-ks.cfg
-rw-r--r--. 1 root root 658170229 8月   7 10:32 harbor-offline-installer-v1.6.1.tgz
[root@master ~]# tar xf harbor-offline-installer-v1.6.1.tgz -C /usr/local/
[root@harbor01 ~]# vim /usr/local/harbor/harbor.cfg7 hostname = 192.168.147.138
关于 Harbor.cfg 配置文件中有两类参数,所需参数和可选参数。
所需参数:这些参数需要在配置文件 Harbor.cfg 中设置。如果用户更新它们并运行 install.sh 脚本重新安装 Harbor,参数将生效。具体参数如下:
- hostname:用于访问用户界面和 register 服务。它应该是目标机器的 IP 地址或完全限定的域名(FQDN),例如 192.168.200.111或 www.crushlinux.com。不要使用 localhost 或 127.0.0.1 为主机名。
- ui_url_protocol:(http 或 https,默认为 http)用于访问 UI 和令牌/通知服务的协议。如果公证处于启用状态,则此参数必须为 https。
- max_job_workers:镜像复制作业线程。
- db_password:用于 db_auth 的 MySQL 数据库 root 用户的密码。
- customize_crt:打开或关闭,默认打开。打开此属性时,准备脚本创建私钥和根证书,用于生成/验证注册表令牌。当由外部来源提供密钥和根证书时,将此属性设置为 off。
- ssl_cert:SSL 证书的路径,仅当协议设置为 https 时才应用。
- ssl_cert_key:SSL 密钥的路径,仅当协议设置为 https 时才应用。
- secretkey_path:用于在复制策略中加密或解密远程 register 密码的密钥路径。
可选参数:这些参数对于更新是可选的,即用户可以将其保留为默认值,并在启动时生效,随后对这些参数的更新,Harbor.cfg 将被忽略。
注意:如果选择通过 UI 设置这些参数,请确保在启动 Harbour 后立即执行此操作。具体来说,必须在注册或在 Harbor 中创建任何新用户之前设置所需的 auth_mode。当系统中有用户时(除了默认的 admin 用户), auth_mode 不能被修改。具体参数如下:
- 电子邮件设置:Harbor 需要这些参数才能向用户发送“密码重置”电子邮件,并且只有在需要该功能时才需要。请注意,在默认情况下 SSL 连接时没有启用。如果SMTP 服务器需要 SSL,但不支持 STARTTLS,那么应该通过设置启用 SSL email_ssl = TRUE。
- harbor_admin_password:管理员的初始密码,只在 Harbour 第一次启动时生效。之后,此设置将被忽略,并且应在 UI 中设置管理员的密码。请注意,默认的用户名/密码是 admin/Harbor12345。
- auth_mode:使用的认证类型,默认情况下,它是 db_auth,即凭据存储在数据库中。对于 LDAP 身份验证,请将其设置为 ldap_auth。
- self_registration:( 打开或关闭,默认打开)启用/禁用用户注册功能。禁用时,新用户只能由 Admin 用户创建,只有管理员用户可以在 Harbour 中创建新用户。注意:当 auth_mode 设置为 ldap_auth 时,自注册功能将始终处于禁用状态,并且该标志被忽略。
- token_expiration:由令牌服务创建的令牌的到期时间(分钟),默认为 30 分钟。
- project_creation_restriction:用于控制哪些用户有权创建项目的标志。默认情况下,每个人都可以创建一个项目。如果将其值设置为“adminonly”,那么只有admin 可以创建项目。
- verify_remote_cert:打开或关闭,默认打开。此标志决定了当 Harbour 与远程register 实例通信时是否验证 SSL/TLS 证书。将此属性设置为 off 将绕过 SSL/TLS验证,这在远程实例具有自签名或不可信证书时经常使用。
另外,默认情况下Harbor 将镜像存储在本地文件系统上。在生产环境中,可以考虑使用其他存储后端而不是本地文件系统,如 S3、Openstack Swif、Ceph 等。需要更新 common/templates/registry/config.yml 文件。
5、启动并安装 Harbor
[root@master ~]# sh /usr/local/harbor/install.sh
[Step 4]: starting Harbor ...
Creating network "harbor_harbor" with the default driver
Creating harbor-log ... done
Creating harbor-adminserver ... done
Creating registry           ... done
Creating harbor-db          ... done
Creating redis              ... done
Creating harbor-ui          ... done
Creating harbor-jobservice  ... done
Creating nginx              ... done✔ ----Harbor has been installed and started successfully.----Now you should be able to visit the admin portal at http://192.168.147.138.
For more details, please visit https://github.com/goharbor/harbor .
如果一切都正常,应该可以打开浏览器访问 http://192.168.147.138的管理页面,默认的管理员用户名和密码是 admin/Harbor12345。
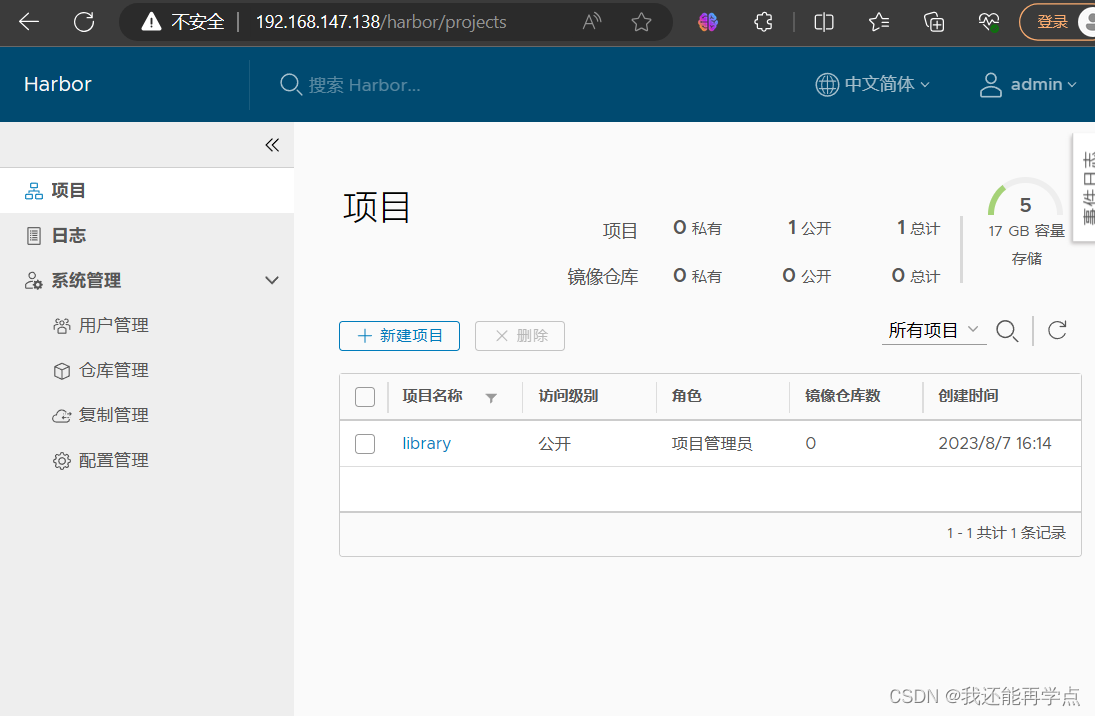
至此, Harbor已经搭建完成,具体在WEB UI下面操作也是非常的简单,只有几个选项。
6、创建一个新项目
输入用户名和密码登录界面后可以创建一个新项目。点击“+项目”按钮。
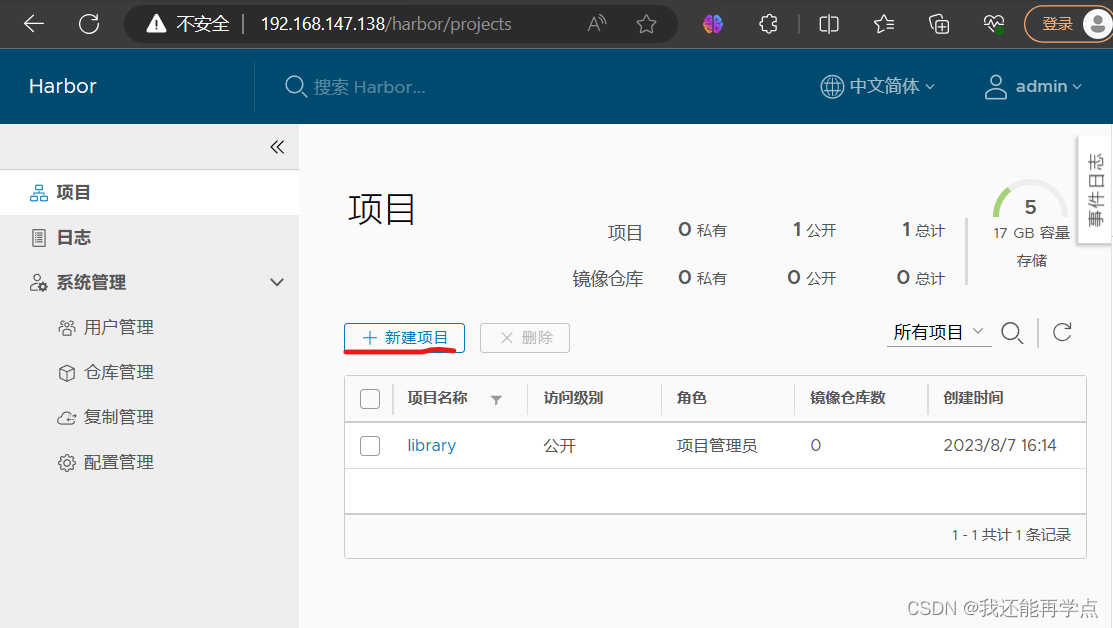
填写项目名称为“123456789”。点击确定。
可以使用 Docker 命令在Harbor本地通过 127.0.0.1 来登录和推送镜像了。默认情况下, Register 服务器在端口 80 上侦听。
登录 Harbor。
[root@master ~]# docker login -u admin -p Harbor12345 http://127.0.0.1
WARNING! Using --password via the CLI is insecure. Use --password-stdin.
WARNING! Your password will be stored unencrypted in /root/.docker/config.json.
Configure a credential helper to remove this warning. See
https://docs.docker.com/engine/reference/commandline/login/#credentials-storeLogin Succeeded
下载体积小点的镜像进行测试。
[root@master ~]# docker pull busybox
Using default tag: latest
latest: Pulling from library/busybox
5cc84ad355aa: Pull complete
Digest: sha256:5acba83a746c7608ed544dc1533b87c737a0b0fb730301639a0179f9344b1678
Status: Downloaded newer image for busybox:latest
docker.io/library/busybox:latest
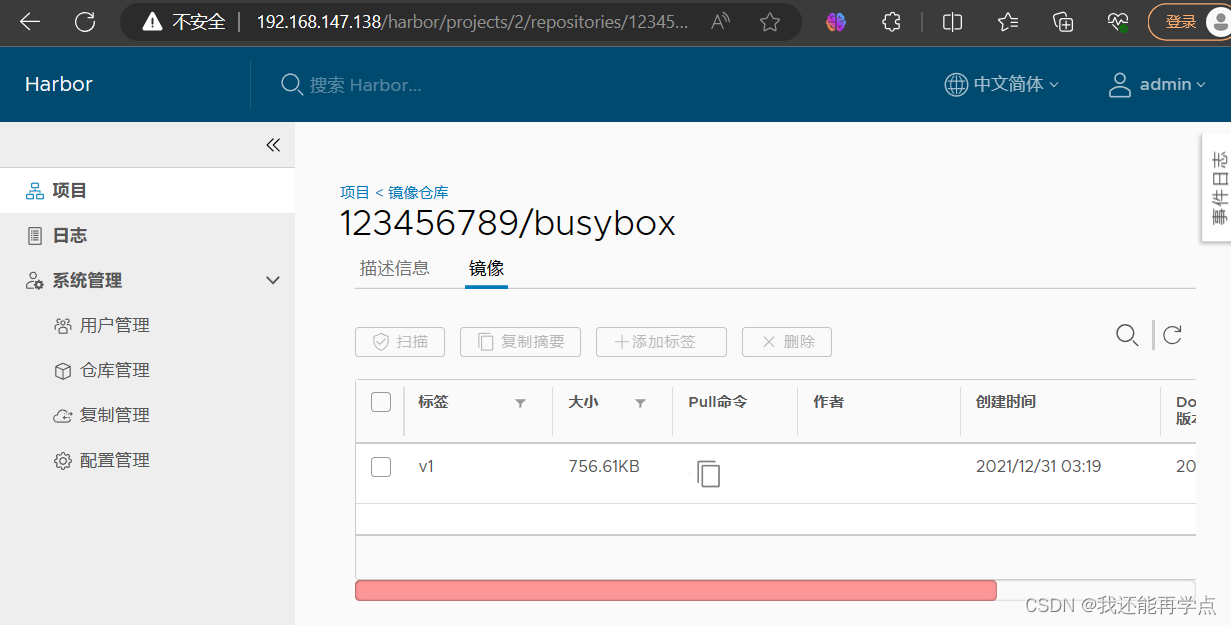
镜像打 tag。
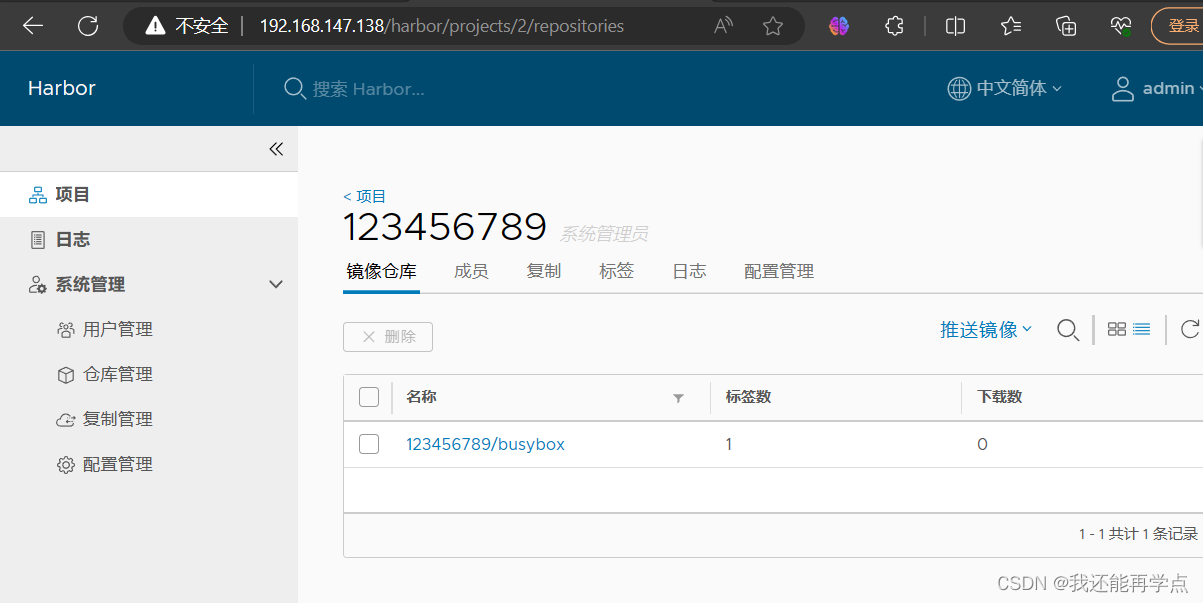
[root@master ~]# docker tag busybox 127.0.0.1/123456789/busybox:v1上传镜像到 Harbor。
[root@master ~]# docker push 127.0.0.1/123456789/busybox:v1
The push refers to repository [127.0.0.1/123456789/busybox]
01fd6df81c8e: Pushed
v1: digest: sha256:62ffc2ed7554e4c6d360bce40bbcf196573dd27c4ce080641a2c59867e732dee size: 527
在 Harbor 界面 123456789目录下就可以看见这个镜像,以及这个镜像的一些信息。
三、客户端上传镜像
以上操作都是在 harbor01 服务器本地操作,如果其他客户端上传镜像到 Harbor,就会报如下错误。出现这问题的原因是 Docker 自从 1.3.X 之后 Docker Registry 交互默认使用的是 HTTPS,但是搭建私有镜像默认使用的是 HTTP 服务,所以与私有镜像交互时出现以下错误。
[root@client ~]# docker login -u admin -p Harbor12345 http://192.168.147.138
WARNING! Using --password via the CLI is insecure. Use --password-stdin.
Error response from daemon: Get "https://192.168.147.138/v2/": net/http: request canceled while waiting for connection (Client.Timeout exceeded while awaiting headers)
1、在 Docker 客户端配置操作如下:
解决办法是:在 Docker server 启动的时候,增加启动参数,默认使用 HTTP 访问
[root@client ~]# vim /usr/lib/systemd/system/docker.service
13 ExecStart=/usr/bin/dockerd -H fd:// --containerd=/run/containerd/containerd.sock --insecure-registry 192.168.147.138
2、重启 Docker,再次登录
[root@client ~]# systemctl daemon-reload
[root@client ~]# systemctl restart docker
3、再次登录 Harbor
[root@client ~]# docker login -u admin -p Harbor12345 192.168.147.138
WARNING! Using --password via the CLI is insecure. Use --password-stdin.
WARNING! Your password will be stored unencrypted in /root/.docker/config.json.
Configure a credential helper to remove this warning. See
https://docs.docker.com/engine/reference/commandline/login/#credentials-storeLogin Succeeded
4、下载体积小一点的镜像进行测试
[root@client ~]# docker pull cirros
Using default tag: latest
latest: Pulling from library/cirros
d0b405be7a32: Pull complete
bd054094a037: Pull complete
c6a00de1ec8a: Pull complete
Digest: sha256:1e695eb2772a2b511ccab70091962d1efb9501fdca804eb1d52d21c0933e7f47
Status: Downloaded newer image for cirros:latest
docker.io/library/cirros:latest
5、镜像打标签及上传到 123456789 项目里面
[root@client ~]# docker tag cirros 192.168.147.138/123456789/cirros:v1
[root@client ~]# docker push 192.168.147.138/123456789/cirros:v1
The push refers to repository [192.168.147.138/123456789/cirros]
984ad441ec3d: Pushed
f0a496d92efa: Pushed
e52d19c3bee2: Pushed
v1: digest: sha256:483f15ac97d03dc3d4dcf79cf71ded2e099cf76c340f3fdd0b3670a40a198a22 size: 943
查看 Harbor 的 web 管理界面,123456789项目里面有两个镜像。

四、日常操作
1、 通过 Harbor Web 创建项目
点击“+项目”时按规范填写项目名称。项目级别:私有即不勾选(勾选后会变为"公开")。如果设置为公共仓库,则所有人对此项目下的镜像拥有读权限,命令行中不需要执行"Docker login"即可下载镜像,镜像操作与Docker hub 一致。
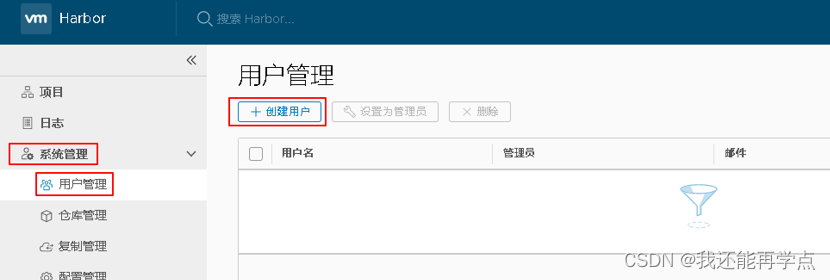
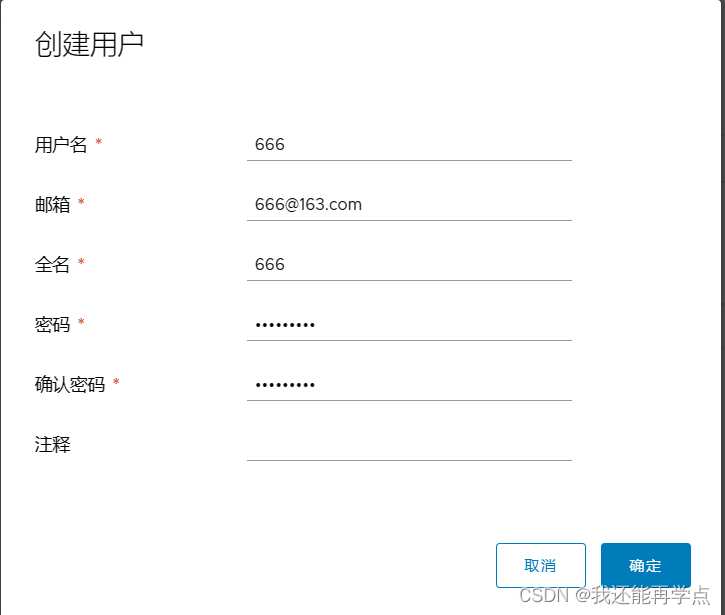
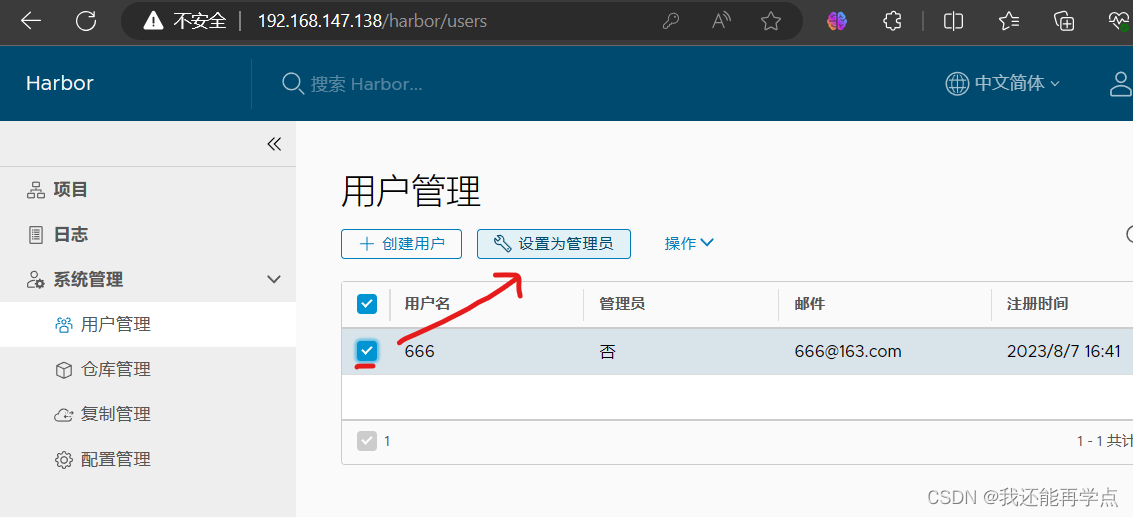
2、创建Harbor用户
创建用户并分配权限
系统管理->用户管理->创建用户,填写用户名为“666”,邮箱为 666@163.com,全名为“666”,密码为“Abc123456”,注释为“管理员”
添加项目成员
项目-> 123456789->成员->+成员,填写上述创建的用户并分配角色为“项目管理员”。

3、在客户端上用普通账户镜像操作
删除上述打标签的本地镜像
[root@client ~]# docker rmi 192.168.147.138/123456789/cirros:v1
Untagged: 192.168.147.138/123456789/cirros:v1
Untagged: 192.168.147.138/123456789/cirros@sha256:483f15ac97d03dc3d4dcf79cf71ded2e099cf76c340f3fdd0b3670a40a198a22
[root@client ~]# docker images
REPOSITORY   TAG       IMAGE ID       CREATED       SIZE
cirros       latest    f9cae1daf5f6   2 years ago   12.6MB
首先退出当前用户,然后使用上述创建的账户666 登录。
[root@client ~]# docker logout 192.168.147.138
Removing login credentials for 192.168.147.138
[root@client ~]# docker login 192.168.147.138
Username: 666
Password:
WARNING! Your password will be stored unencrypted in /root/.docker/config.json.
Configure a credential helper to remove this warning. See
https://docs.docker.com/engine/reference/commandline/login/#credentials-storeLogin Succeeded
下载 192.168.147.138/123456789/cirros 标签为 v1 的镜像。
[root@client ~]# docker pull 192.168.147.138/123456789/cirros:v1
v1: Pulling from 123456789/cirros
Digest: sha256:483f15ac97d03dc3d4dcf79cf71ded2e099cf76c340f3fdd0b3670a40a198a22
Status: Downloaded newer image for 192.168.147.138/123456789/cirros:v1
192.168.147.138/123456789/cirros:v1
[root@client ~]# docker images
REPOSITORY                         TAG       IMAGE ID       CREATED       SIZE
192.168.147.138/123456789/cirros   v1        f9cae1daf5f6   2 years ago   12.6MB
cirros                             latest    f9cae1daf5f6   2 years ago   12.6MB
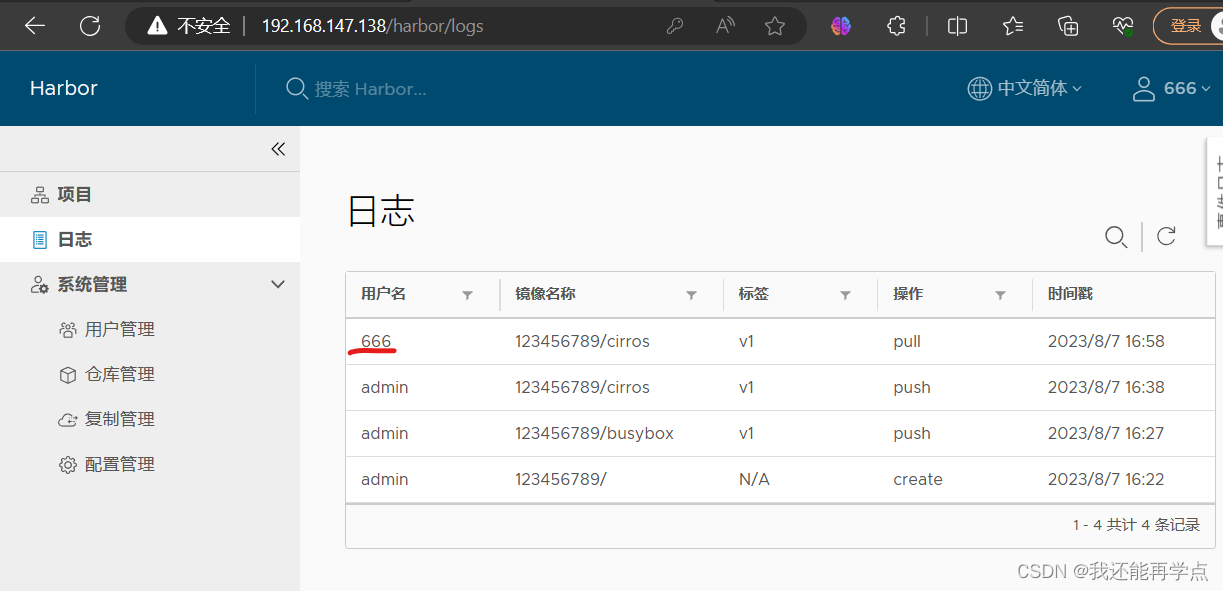
4、查看日志
Web 界面日志,操作日志按时间顺序记录用户相关操作。
5、管理 Harbor
可以使用 docker-compose来管理Harbor。一些有用的命令如下所示(必须在与docker-compose.yml 相同的目录中运行)。
1)、停止/启动/重启 Harbor
[root@master ~]# cd /usr/local/harbor/
[root@master harbor]# docker-compose stop | start | restart
2)、修改 Harbor.cfg 配置文件
要更改 Harbor 的配置文件时,请先停止现有的 Harbor 实例并更新 harbor.cfg;然后运行 prepare 脚本来填充配置;最后重新创建并启动 Harbour 的实例。
[root@master harbor]# docker-compose down -v
Removing nginx              ... done
Removing harbor-jobservice  ... done
Removing harbor-ui          ... done
Removing harbor-db          ... done
Removing redis              ... done
Removing registry           ... done
Removing harbor-adminserver ... done
Removing harbor-log         ... done
Removing network harbor_harbor
[root@master harbor]# vim harbor.cfg
[root@master harbor]# ./prepare
Clearing the configuration file: ./common/config/adminserver/env
Clearing the configuration file: ./common/config/ui/env
Clearing the configuration file: ./common/config/ui/app.conf
Clearing the configuration file: ./common/config/ui/private_key.pem
Clearing the configuration file: ./common/config/db/env
Clearing the configuration file: ./common/config/jobservice/env
Clearing the configuration file: ./common/config/jobservice/config.yml
Clearing the configuration file: ./common/config/registry/config.yml
Clearing the configuration file: ./common/config/registry/root.crt
Clearing the configuration file: ./common/config/registryctl/env
Clearing the configuration file: ./common/config/registryctl/config.yml
Clearing the configuration file: ./common/config/nginx/nginx.conf
Clearing the configuration file: ./common/config/log/logrotate.conf
loaded secret from file: /data/secretkey
Generated configuration file: ./common/config/nginx/nginx.conf
Generated configuration file: ./common/config/adminserver/env
Generated configuration file: ./common/config/ui/env
Generated configuration file: ./common/config/registry/config.yml
Generated configuration file: ./common/config/db/env
Generated configuration file: ./common/config/jobservice/env
Generated configuration file: ./common/config/jobservice/config.yml
Generated configuration file: ./common/config/log/logrotate.conf
Generated configuration file: ./common/config/registryctl/env
Generated configuration file: ./common/config/ui/app.conf
Generated certificate, key file: ./common/config/ui/private_key.pem, cert file: ./common/config/registry/root.crt
The configuration files are ready, please use docker-compose to start the service.
[root@master harbor]# docker-compose up -d
Creating network "harbor_harbor" with the default driver
Creating harbor-log ... done
Creating harbor-db          ... done
Creating harbor-adminserver ... done
Creating registry           ... done
Creating redis              ... done
Creating harbor-ui          ... done
Creating nginx              ... done
Creating harbor-jobservice  ... done
3)、移除 Harbor 服务容器同时保留镜像数据/数据库
[root@harbor harbor]# docker-compose down -v 4)、移除 Harbor 服务容器全部数据(重新部署时采用)
持久数据,如镜像,数据库等在宿主机的/data/目录下,日志在宿主机的
/var/log/Harbor/目录下
[root@master harbor]# rm -r /data/database/
[root@master harbor]# rm -r /data/registry/
五、Harbor安全设置
1、为Harbor配置https
1)创建自己的CA证书
[root@master harbor]# yum -y install openssl
[root@master harbor]# mkdir -p /data/ssl
[root@master harbor]# cd /data/ssl/
[root@master ssl]#  openssl req -newkey rsa:4096 -nodes -sha256 -keyout ca.key -x509 -days 365 -out ca.crt
Generating a 4096 bit RSA private key
..................................................................................................................++
................................++
writing new private key to 'ca.key'
-----
You are about to be asked to enter information that will be incorporated
into your certificate request.
What you are about to enter is what is called a Distinguished Name or a DN.
There are quite a few fields but you can leave some blank
For some fields there will be a default value,
If you enter '.', the field will be left blank.
-----
Country Name (2 letter code) [XX]:CN
State or Province Name (full name) []:beijing
Locality Name (eg, city) [Default City]:beijing
Organization Name (eg, company) [Default Company Ltd]:skl
Organizational Unit Name (eg, section) []:skl
Common Name (eg, your name or your server's hostname) []:www.skl.com
Email Address []:
2)生成证书签名请求
[root@master ssl]#  openssl req -newkey rsa:4096 -nodes -sha256 -keyout ca.key -x509 -days 365 -out ca.crt
Generating a 4096 bit RSA private key
..................................................................................................................++
................................++
writing new private key to 'ca.key'
-----
You are about to be asked to enter information that will be incorporated
into your certificate request.
What you are about to enter is what is called a Distinguished Name or a DN.
There are quite a few fields but you can leave some blank
For some fields there will be a default value,
If you enter '.', the field will be left blank.
-----
Country Name (2 letter code) [XX]:CN
State or Province Name (full name) []:beijing
Locality Name (eg, city) [Default City]:beijing
Organization Name (eg, company) [Default Company Ltd]:skl
Organizational Unit Name (eg, section) []:skl
Common Name (eg, your name or your server's hostname) []:www.skl.com
Email Address []:
[root@master ssl]# openssl req -newkey rsa:4096 -nodes -sha256 -keyout www.crushlinux.com.key -out www.crushlinux.com.csr
Generating a 4096 bit RSA private key
...............................................................................++
..........................................................................................................................................++
writing new private key to 'www.crushlinux.com.key'
-----
You are about to be asked to enter information that will be incorporated
into your certificate request.
What you are about to enter is what is called a Distinguished Name or a DN.
There are quite a few fields but you can leave some blank
For some fields there will be a default value,
If you enter '.', the field will be left blank.
-----
Country Name (2 letter code) [XX]:CN
State or Province Name (full name) []:beijing
Locality Name (eg, city) [Default City]:beijing
Organization Name (eg, company) [Default Company Ltd]:skl
Organizational Unit Name (eg, section) []:skl
Common Name (eg, your name or your server's hostname) []:www.skl.com
Email Address []:Please enter the following 'extra' attributes
to be sent with your certificate request
A challenge password []:
An optional company name []:
3)生成注册表主机的证书
[root@master ssl]# openssl x509 -req -days 365 -in www.crushlinux.com.csr -CA ca.crt -CAkey ca.key -CAcreateserial -out www.crushlinux.com.crt
Signature ok
subject=/C=CN/ST=beijing/L=beijing/O=skl/OU=skl/CN=www.skl.com
Getting CA Private Key
4)查看证书情况
[root@master ssl]# ls -l
总用量 24
-rw-r--r--. 1 root root 2000 8月   7 18:12 ca.crt
-rw-r--r--. 1 root root 3272 8月   7 18:12 ca.key
-rw-r--r--. 1 root root   17 8月   7 18:20 ca.srl
-rw-r--r--. 1 root root 1883 8月   7 18:20 www.crushlinux.com.crt
-rw-r--r--. 1 root root 1691 8月   7 18:19 www.crushlinux.com.csr
-rw-r--r--. 1 root root 3272 8月   7 18:19 www.crushlinux.com.key
5)信任自签发的域名证书
由于CA证书是我们自己签发的,Linux操作系统是不信任的,因此我们需要把证书加入到系统的信任证书里。
6)将自签ca证书添加到系统信任
[root@master ssl]# cp www.crushlinux.com.crt /etc/pki/ca-trust/source/anchors/
[root@master ssl]# update-ca-trust extract
[root@master ssl]# update-ca-trust enable
[root@master ssl]#  mkdir -p /etc/ssl/harbor
[root@master ssl]# cp /data/ssl/www.crushlinux.com.key /etc/ssl/harbor/
[root@master ssl]# cp /data/ssl/www.crushlinux.com.crt /etc/ssl/harbor/
[root@master ssl]#  ll /etc/ssl/harbor/
总用量 8
-rw-r--r--. 1 root root 1883 8月   7 18:22 www.crushlinux.com.crt
-rw-r--r--. 1 root root 3272 8月   7 18:22 www.crushlinux.com.key
7)关闭现有harbor
[root@master ssl]# cd /usr/local/harbor/
[root@master harbor]# docker-compose stop
Stopping harbor-jobservice  ... done
Stopping nginx              ... done
Stopping harbor-ui          ... done
Stopping redis              ... done
Stopping registry           ... done
Stopping harbor-adminserver ... done
Stopping harbor-db          ... done
Stopping harbor-log         ... done
[root@master harbor]# docker rm -f $(docker ps -qa)
8cbc99060b15
a610c0fe3eab
770b6b4fa0b0
00603caaec4e
1d7d980e55ba
cf1a1bf4b356
1dabb9d0cfca
62fa72f52efd
8)修改harbor.cfg配置文件
[root@master harbor]# vim harbor.cfg 7 hostname = www.skl.com11 ui_url_protocol = https23 ssl_cert = /etc/ssl/harbor/www.crushlinux.com.crt24 ssl_cert_key = /etc/ssl/harbor/www.crushlinux.com.key
9)重新安装harbor私有镜像仓库
[root@master harbor]#./install.sh --with-notary --with-clair ##--with-notary启用镜像签名;--with-clair启用漏洞扫描
正版要钱我没钱就不给你们演示了
相关文章:
Harbor企业镜像仓库部署
目录 一、Harbor 架构构成 二、部署harbor环境 1、安装docker-ce(所有主机) 2、阿里云镜像加速器 3、部署Docker Compose 服务 4、部署 Harbor 服务 5、启动并安装 Harbor 6、创建一个新项目 三、客户端上传镜像 1、在 Docker 客户端配置操作如下…...
:分类问题-softmax回归)
【AI】《动手学-深度学习-PyTorch版》笔记(十一):分类问题-softmax回归
AI学习目录汇总 1、线性回归和softmax回归的区别 1)连续值与离散值 线性回归模型,适用于输出为连续值的情景。 softmax回归模型,适用于输出为离散值的情景。例如图像类别,就需要对离散值进行预测。softmax回归模型引入了softmax运算,使输出更适合离散值的预测和训练。 …...
(含代码)(完工于2023.8.3))
【排序算法略解】(十种排序的稳定性,时间复杂度以及实现思想)(含代码)(完工于2023.8.3)
文章目录 1、冒泡排序/选择排序/插入排序冒泡排序(Bubble Sort)选择排序(Selection Sort)插入排序(Insertion Sort) 2、希尔排序(Shells Sort)3、快速排序(Quick Sort)4、堆排序(Heap Sort)5、归并排序(Merge Sort)6、桶排序/计数排序/基数排序桶排序(Bucket sort)计数排序(Cou…...
学编程实用网站
牛客网:面试刷题和面试经验分享的网站牛客网 - 找工作神器|笔试题库|面试经验|实习招聘内推,求职就业一站解决_牛客网 (nowcoder.com)https://www.nowcoder.com/ 慕课网:在线学习 慕课网-程序员的梦工厂 (imooc.com)https://www.imooc.com/ …...

Camunda 7.x 系列【5】 员工请假流程模型
有道无术,术尚可求,有术无道,止于术。 本系列Spring Boot 版本 2.7.9 本系列Camunda 版本 7.19.0 源码地址:https://gitee.com/pearl-organization/camunda-study-demo 文章目录 1. 概述2. 模型设计2.1 基础配置2.2 启动事件2.3 填写请假单2.4 上级领导审批3.5 经理审批3…...
【C++从0到王者】第十七站:手把手教你写一个stack和queue及deque的底层原理
文章目录 一、stack1.利用适配器2.栈的实现 二、queue三、deque1.deque介绍2.deque的接口3.deque的基本使用4.deque的效率5.deque的原理 一、stack 1.利用适配器 我们不可能写了一份数组栈以后,还要在手写一个链式栈,这样显得太冗余了。于是我们可以利…...
ffmpeg.c源码与函数关系分析
介绍 FFmpeg 是一个可以处理音视频的软件,功能非常强大,主要包括,编解码转换,封装格式转换,滤镜特效。FFmpeg支持各种网络协议,支持 RTMP ,RTSP,HLS 等高层协议的推拉流,…...

GD32F103待机模式与唤醒
GD32F103待机模式与唤醒,本程序使用RTC报警唤醒。 电源管理单元有3种省电模式:睡眠模式,深度睡眠模式和待机模式; 进入待机模式的步骤如下: 若需要RTC闹钟输出,则需要将TAMPER-RTC映射到PC13引脚; 若需要LXTAL晶振32.768KHz&…...
【Linux初阶】基础IO - 动静态库 | 初识、生成、链接、加载
🌟hello,各位读者大大们你们好呀🌟 🍭🍭系列专栏:【Linux初阶】 ✒️✒️本篇内容:动静态库初识,库的含义,静态库的生成与链接,gcc/g默认链接方式,…...

为Git仓库设置签名信息
前言 在首次使用git版本库或创建新的仓库时,需要为其仓库设定管理员和管理员邮箱。 在为仓库添加管理员和邮箱地址时,有以下两种情况: (1)全局模式:首次创建,后面做为默认使用,对当…...

iOS开发Swift开发UI页面链式调用库推荐
首页链接 https://github.com/zhiguangqiao/ChainableUIKit 安装方法 pod ChainableUIKit调用片段 UIButton import ChainableUIKitprivate let button UIButton().chain.setTitleColor(.init(hex: "#9583EB"), state: .normal).setTitle("全部视频",…...
ClickHouse SQL与引擎--基本使用(一)
1.查看所有的数据库 show databases; 2.创建库 CREATE DATABASE zabbix ENGINE Ordinary; ATTACH DATABASE ck_test ENGINE Ordinary;3.创建本地表 CREATE TABLE IF NOT EXISTS test01(id UInt64,name String,time UInt64,age UInt8,flag UInt8 ) ENGINE MergeTree PARTI…...

2023-08-07力扣今日七题-好题
链接: 剑指 Offer 11. 旋转数组的最小数字 154. 寻找旋转排序数组中的最小值 II 题意: 找一个数组里的最小值,这个数组是有非递减数组旋转而来的,旋转n次表示把前n个数移动到数组末尾 解: 很有趣的二分ÿ…...
支持多用户协同的思维导图TeamMapper
什么是 TeamMapper ? TeamMapper 是基于 Mindmapp 开发的用于绘制思维导图的 Web 应用程序。它使得思维导图变得简单,你可以托管并创建您自己的思维导图。与您的团队分享您的思维导图会议并在思维导图上进行协作。 软件特点: 创建࿱…...
【Vue】Parsing error: No Babel config file detected for ... vue
报错 Parsing error: No Babel config file detected for E:\Study\Vue网站\实现防篡改的水印\demo02\src\App.vue. Either disable config file checking with requireConfigFile: false, or configure Babel so that it can find the config files. …...

2023-08-07力扣今日五题
链接: 剑指 Offer 53 - II. 0~n-1中缺失的数字 题意: 如题 解: 长度n的递增数组里,要找0到n中没出现的那个数字,那么出现的下标是0到n-1,一一对应即可,都出现了就是n没有 实际…...
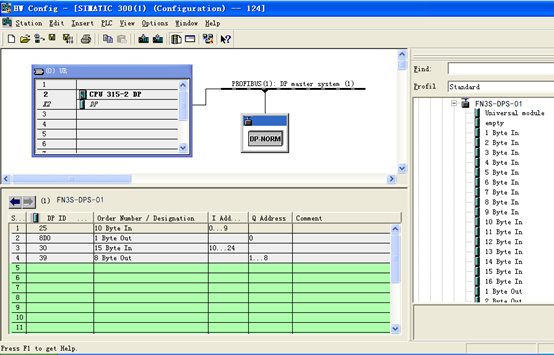
ETHERCAT转PROFIBUS连接到300plc的配置方法
由于捷米JM-DP-ECT,是自主研发的一款PROFIBUS从站功能的通讯网关,它的主要功能是将ETHERCAT设备接入到PROFIBUS网络中生产环境比较复杂有多个设备采用不同的协议这极大的阻碍了,各个设备的数据互通。 JM-DP-ECT这个小小的网关可不简单&#x…...
Spring Boot配置文件与日志文件
1. Spring Boot 配置文件 我们知道, 当我们创建一个Spring Boot项目之后, 就已经有了配置文件存在于目录结构中. 1. 配置文件作用 整个项目中所有重要的数据都是在配置文件中配置的,比如: 数据库的连接信息 (包含用户名和密码的设置) ;项目的启动端口;第三方系统的调…...

可解释性分析的一些类别(草稿)(视觉)
目录 1.交互性解释 2. 本身具有解释性的模型 3.如何将可解释性分析应用到生成模型 参考文献 视觉领域从2020年开始可以分为两块,一个是图像分类,一个是图像生成。 图像分类:输入一张图片,输出语义标签,就是这张图…...
HTTPS-RSA握手
RSA握手过程 HTTPS采用了公钥加密和对称加密结合的方式进行数据加密和解密 RSA握手是HTTPS连接建立过程中的一个关键步骤,用于确保通信双方的身份验证和生成对称加密所需的密钥 通过RSA握手过程,客户端和服务器可以协商出一个共享的对称密钥,…...

从Gamma函数到泊松分布:一个概率论中的含参量积分实用案例解析
Gamma函数与泊松分布:概率论中的数学之美 在数据科学和机器学习的实践中,概率分布构成了建模的基石。当我们深入探究这些分布背后的数学原理时,Gamma函数以其优雅的性质和广泛的应用脱颖而出。它不仅连接了离散与连续概率世界,更在…...

为内部知识库问答机器人接入Taotoken多模型增强回答效果
🚀 告别海外账号与网络限制!稳定直连全球优质大模型,限时半价接入中。 👉 点击领取海量免费额度 为内部知识库问答机器人接入Taotoken多模型增强回答效果 构建一个高效的企业内部知识库问答机器人,核心挑战在于如何让…...

通过用量看板分析团队大模型API消耗发现优化调用策略的机会
🚀 告别海外账号与网络限制!稳定直连全球优质大模型,限时半价接入中。 👉 点击领取海量免费额度 通过用量看板分析团队大模型API消耗发现优化调用策略的机会 作为团队的技术负责人,确保大模型API调用在满足业务需求的…...

氘可来昔替尼常见副作用为鼻咽炎头痛及腹泻,如何应对?
任何口服药物的临床价值,都必须在疗效与安全性的天平上找到精准的平衡点。氘可来昔替尼以PASI 75应答率的全面胜出证明了自己在银屑病治疗中的卓越地位,而其不良反应谱同样经过了严苛的临床验证。鼻咽炎、头痛和腹泻构成了这款药物最需关注的三大安全信号…...

告别鼠标点击,微博图片批量下载的轻松方案
告别鼠标点击,微博图片批量下载的轻松方案 【免费下载链接】weiboPicDownloader Download weibo images without logging-in 项目地址: https://gitcode.com/gh_mirrors/we/weiboPicDownloader 还记得那个周末的下午吗?你喜欢的博主发布了九宫格美…...

DLA功耗优化验证:tegrastats实战指南
重磅预告:本专栏将独家连载系列丛书《智能体视觉技术与应用》部分精华内容,该书是世界首套系统阐述“因式智能体”视觉理论与实践的专著,特邀美国 TypeOne 公司首席科学家、斯坦福大学博士 Bohan 担任技术顾问。Bohan先生师从美国三院院士、“…...

实战解锁:在Blender中掌握专业级MMD动画制作全流程
实战解锁:在Blender中掌握专业级MMD动画制作全流程 【免费下载链接】blender_mmd_tools MMD Tools is a blender addon for importing/exporting Models and Motions of MikuMikuDance. 项目地址: https://gitcode.com/gh_mirrors/bl/blender_mmd_tools MMD …...

使用curl命令调试Taotoken API接口的常见问题排查
🚀 告别海外账号与网络限制!稳定直连全球优质大模型,限时半价接入中。 👉 点击领取海量免费额度 使用curl命令调试Taotoken API接口的常见问题排查 基础教程类,面向所有需要通过HTTP直接与API交互的开发者,…...
)
Midjourney辉光效果失效诊断手册(含12个隐性触发条件与4类GPU显存陷阱)
更多请点击: https://codechina.net 第一章:Midjourney辉光效果失效诊断手册(含12个隐性触发条件与4类GPU显存陷阱) 辉光效果(Glow Effect)在 Midjourney v6 的 --style raw 模式下常被用于强化主体边缘光…...

从‘找不到dll’到流畅运行:一份给VS2022新手的Zbar+OpenCV3.6.0环境配置避坑指南
从“找不到dll”到流畅运行:VS2022下ZbarOpenCV3.6.0环境配置全解析 当你第一次在Visual Studio 2022中尝试整合Zbar和OpenCV 3.6.0时,可能会遇到各种令人沮丧的错误提示。最常见的就是那个让人头疼的“找不到libzbar64-0.dll”问题。本文将带你一步步解…...