Spring-1-深入理解Spring XML中的依赖注入(DI):简化Java应用程序开发
学习目标
前两篇文章我们介绍了什么是Spring,以及Spring的一些核心概念,并且快速快发一个Spring项目,以及详细讲解IOC,今天详细介绍一些DI(依赖注入)
能够配置setter方式注入属性值
能够配置构造方式注入属性值
能够理解什么是自动装配
一、依赖注入(DI配置)
1 依赖注入方式【重点】
思考:向一个类中传递数据的方式有几种?(给类中的属性赋值)
-
setter方法
-
构造方法
思考:依赖注入描述了在容器中建立bean与bean之间依赖关系的过程,注入数据类型有哪些?
-
简单类型=八种基本数据类型+String
-
引用类型
1.1 依赖注入的两种方式
- setter注入
-
简单类型
-
引用类型(很常用)
-
- 构造器注入
-
简单类型
-
引用类型
-
2 setter方式注入
思考:setter方式注入使用什么子标签?
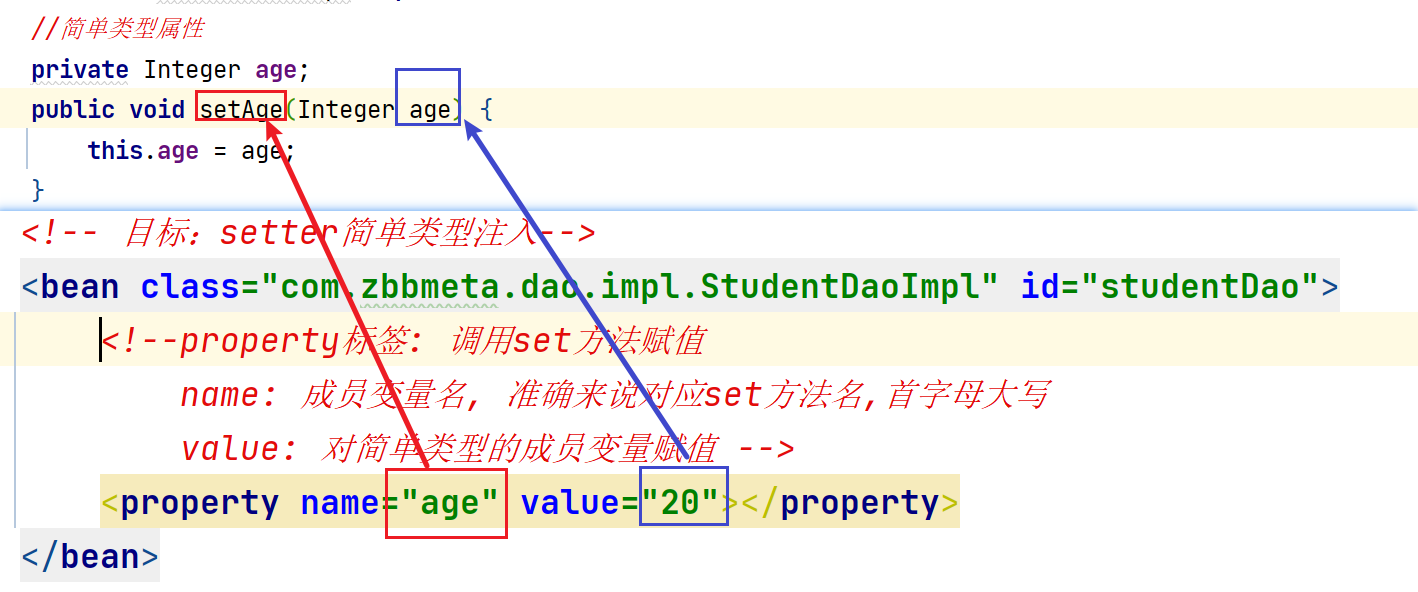
property标签: 调用set方法赋值
name: 成员变量名, 准确来说对应set方法名,首字母大写
value: 对简单类型的成员变量赋值
ref: 对引用类型的成员变量赋值
2.1简单类型setter注入
格式:
<!-- property标签: 调用set方法赋值name: 成员变量名, 准确来说对应set方法名,首字母大写value: 对简单类型的成员变量赋值 -->
<property name="age" value="20"></property>
2.2 引用类型setter注入
格式:
<!--property标签: 调用set方法赋值name: 成员变量名, 准确来说对应set方法名,首字母大写ref: 对引用类型的成员变量赋值, 引用的对象 -->
<property name="studentDao" ref="studentDao">
</property>
2.3 setter注入代码实现
【第0步】创建项目
【第1步】导入Spring坐标
【第2步】导入Student实体类
【第3步】定义Spring管理的类(接口)
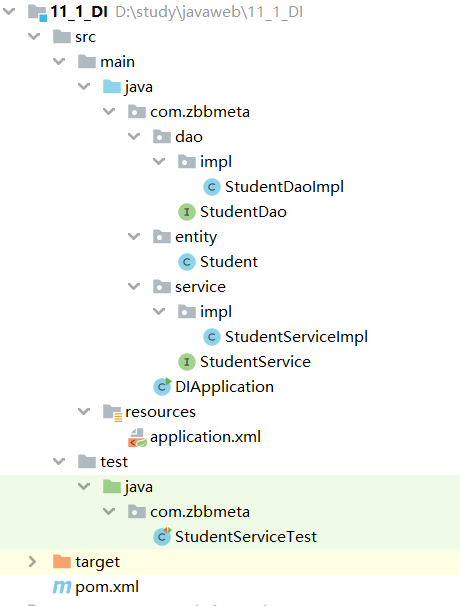
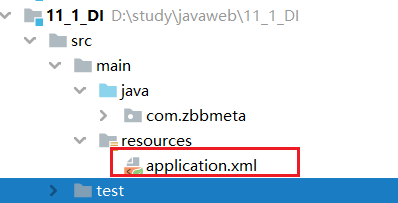
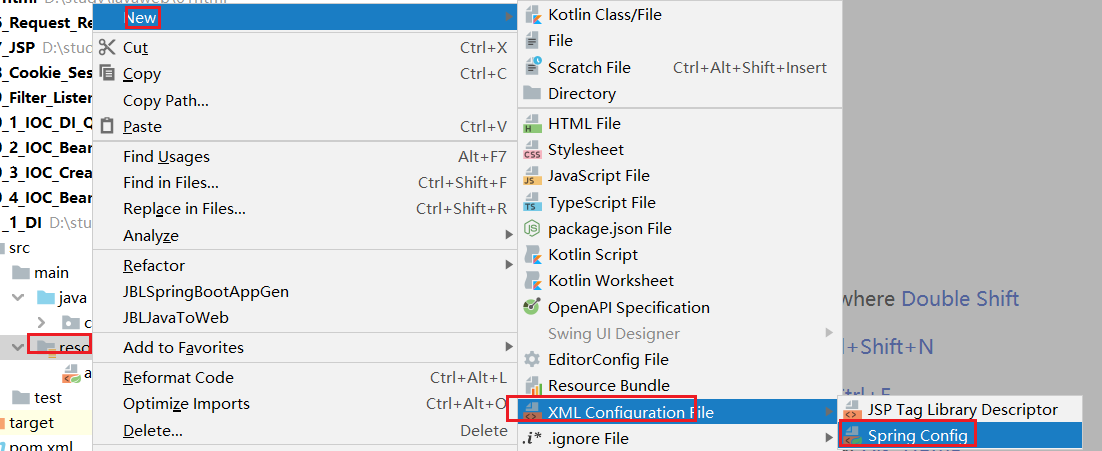
【第4步】创建Spring配置文件在resources目录下创建`application.xml`,配置setter的简单类型
【第5步】在test目录下创建`StudentServiceTest`,进行测试
【第6步】在`application.xml`,配置对应引用类型注入
【第7步】测试
【第0步】创建项目
【第1步】导入Spring坐标
<dependencies><!--导入spring的坐标spring-context,对应版本是5.2.10.RELEASE--><dependency><groupId>org.springframework</groupId><artifactId>spring-context</artifactId><version>5.3.15</version></dependency><!-- 导入junit的测试包 --><dependency><groupId>org.junit.jupiter</groupId><artifactId>junit-jupiter</artifactId><version>5.8.2</version><scope>test</scope></dependency><dependency><groupId>org.projectlombok</groupId><artifactId>lombok</artifactId><version>1.18.28</version></dependency></dependencies>
【第2步】导入Student实体类
@Data
@ToString
@AllArgsConstructor
public class Student {private String name;private String address;private Integer age;private Integer status;
}
【第3步】定义Spring管理的类(接口)
-
StudentDao接口和StudentDaoImpl实现类用于简单类型注入
package com.zbbmeta.dao;public interface StudentDao {/*** 添加学生*/void save();
}
public class StudentDaoImpl implements StudentDao {//简单类型属性private Integer age;public void setAge(Integer age) {this.age = age;}@Overridepublic void save() {System.out.println("DAO: 年龄:"+this.age);System.out.println("DAO: 添加学生信息到数据库...");}
}
-
StudentService接口和StudentServiceImpl实现类用于引用类型注入
package com.zbbmeta.service;public interface StudentService {/*** 添加学生*/void save();
}
package com.zbbmeta.service.impl;import com.zbbmeta.dao.StudentDao;
import com.zbbmeta.service.StudentService;public class StudentServiceImpl implements StudentService {//创建成员对象private StudentDao studentDao ;//提供依赖对象对应的setter方法public void setStudentDao(StudentDao studentDao) {this.studentDao = studentDao;}@Overridepublic void save() {System.out.println("Service: 添加学生信息到数据库...");studentDao.save();}
}【第4步】创建Spring配置文件在resources目录下创建application.xml,配置setter的简单类型
-
定义application.xml文件中创建StudentDao类到IOC容器,并实现简单类型注入
<?xml version="1.0" encoding="UTF-8"?>
<beans xmlns="http://www.springframework.org/schema/beans"xmlns:xsi="http://www.w3.org/2001/XMLSchema-instance"xsi:schemaLocation="http://www.springframework.org/schema/beans http://www.springframework.org/schema/beans/spring-beans.xsd"><!-- 目标:setter简单类型注入--><bean class="com.zbbmeta.dao.impl.StudentDaoImpl" id="studentDao">
<!--        property标签: 调用set方法赋值name: 成员变量名, 准确来说对应set方法名,首字母大写value: 对简单类型的成员变量赋值 --><property name="age" value="20"></property></bean>
</beans>
【第5步】在test目录下创建StudentServiceTest,进行测试
package com.zbbmeta;import com.zbbmeta.dao.StudentDao;
import com.zbbmeta.service.StudentService;
import org.junit.jupiter.api.Test;
import org.springframework.context.support.ClassPathXmlApplicationContext;public class StudentServiceTest {//目标:测试setter的简单类型的注入@Testpublic void test1(){//1.根据配置文件application.xml创建IOC容器ClassPathXmlApplicationContext ac = new ClassPathXmlApplicationContext("application.xml");//2.从IOC容器里面获取id="bookService"对象StudentDao studentDao = (StudentDao) ac.getBean("studentDao");//3.执行对象方法studentDao.save();//4.关闭容器ac.close();}
-
控制台结果:

【第6步】在application.xml,配置引用类型注入
<!-- 目标:setter引用类型注入--><bean class="com.zbbmeta.service.impl.StudentServiceImpl" id="studentService"><!--property标签: 调用set方法赋值name: 成员变量名, 准确来说对应set方法名,首字母大写ref: 对引用类型的成员变量赋值, 引用的对象 --><property name="studentDao" ref="studentDao"></property></bean>
【第7步】测试
//目标:测试setter的引用类型的注入@Testpublic void test2(){//1.根据配置文件application.xml创建IOC容器ClassPathXmlApplicationContext ac = new ClassPathXmlApplicationContext("application.xml");//2.从IOC容器里面获取id="bookService"对象StudentService studentService = (StudentService) ac.getBean("studentService");//3.执行对象方法studentService.save();//4.关闭容器ac.close();}
-
控制台结果


3 构造器方式注入
思考:构造方式注入使用什么子标签?
3.1 构造器注入简单类型
格式:配置中使用constructor-arg标签value属性注入简单类型
<!--constructor-arg标签: 调用构造函数方法赋值name: 成员变量名, 准确来说对应构造方法中参数名称value: 简单类型,方法参数对应的值-->
<constructor-arg name="age" value="30"></constructor-arg>
2.2 构造器注入引用类型
格式:配置中使用constructor-arg标签ref属性注入引用类型
<!--constructor-arg标签: 调用构造函数方法赋值name: 成员变量名, 准确来说对应构造方法中参数名称ref: 引用类型,属性注入引用类型对象-->
<constructor-arg name="studentDao" ref="studentDao"></constructor-arg>
3.3 构造器注入代码实现
【第0步】创建`11_2_DI_Construce`项目结构
【第1步】导入依赖坐标
【第2步】导入Student实体类
【第3步】定义Spring管理的类(接口)
【第4步】创建Spring配置文件在resources目录下创建`application.xml`,配置构造器注入简单类型
【第5步】在test目录下创建`StudentServiceTest`,进行测试
【第6步】在`application.xml`,配置构造器注入引用类型
【第7步】测试
【第0步】创建11_2_DI_Construce项目结构

【第1步】导入依赖坐标
和之前项目依赖一致
【第2步】导入Student实体类
和之前一致
【第3步】定义Spring管理的类(接口)
-
StudentDao接口和StudentDaoImpl实现类实现构造器注入简单类型
package com.zbbmeta.dao;public interface StudentDao {/*** 添加学生*/void save();
}
package com.zbbmeta.dao.impl;import com.zbbmeta.dao.StudentDao;public class StudentDaoImpl implements StudentDao {//简单类型属性private Integer age;public StudentDaoImpl(Integer age){System.out.println("DAO: 注入简单类型 age");this.age =age;}@Overridepublic void save() {System.out.println("DAO: 年龄:"+this.age);System.out.println("DAO: 添加学生信息到数据库...");}
}-
StudentService接口和StudentServiceImpl实现类实现构造器注入引用类型
package com.zbbmeta.service;public interface StudentService {/*** 添加学生*/void save();
}
package com.zbbmeta.service.impl;import com.zbbmeta.dao.StudentDao;
import com.zbbmeta.service.StudentService;public class StudentServiceImpl implements StudentService {//创建成员对象private StudentDao studentDao ;public StudentServiceImpl(StudentDao studentDao){System.out.println("StudentService: 注入引用类型studentDao");this.studentDao =studentDao;}@Overridepublic void save() {System.out.println("Service: 添加学生信息到数据库...");studentDao.save();}
}【第4步】创建Spring配置文件在resources目录下创建application.xml,配置构造器注入简单类型

-
定义application.xml配置文件并配置StudentDaoImpl实现构造器注入简单类型
<?xml version="1.0" encoding="UTF-8"?>
<beans xmlns="http://www.springframework.org/schema/beans"xmlns:xsi="http://www.w3.org/2001/XMLSchema-instance"xsi:schemaLocation="http://www.springframework.org/schema/beans http://www.springframework.org/schema/beans/spring-beans.xsd"><!-- 目标:构造器依赖注入简单类型【了解】--><bean class="com.zbbmeta.dao.impl.StudentDaoImpl" id="studentDao"><!--constructor-arg标签: 调用构造函数方法赋值name: 成员变量名, 准确来说对应构造方法中参数名称value: 简单类型,方法参数对应的值--><constructor-arg name="age" value="30"></constructor-arg></bean>
</beans>
【第5步】在test目录下创建StudentServiceTest,进行测试
package com.zbbmeta;import com.zbbmeta.dao.StudentDao;
import com.zbbmeta.service.StudentService;
import org.junit.jupiter.api.Test;
import org.springframework.context.support.ClassPathXmlApplicationContext;public class StudentServiceTest {//目标:测试构造器的简单类型的注入@Testpublic void test1(){//1.根据配置文件application.xml创建IOC容器ClassPathXmlApplicationContext ac = new ClassPathXmlApplicationContext("application.xml");//2.从IOC容器里面获取id="studentDao"对象StudentDao studentDao = (StudentDao) ac.getBean("studentDao");//3.执行对象方法studentDao.save();//4.关闭容器ac.close();}
}
-
控制台结果:


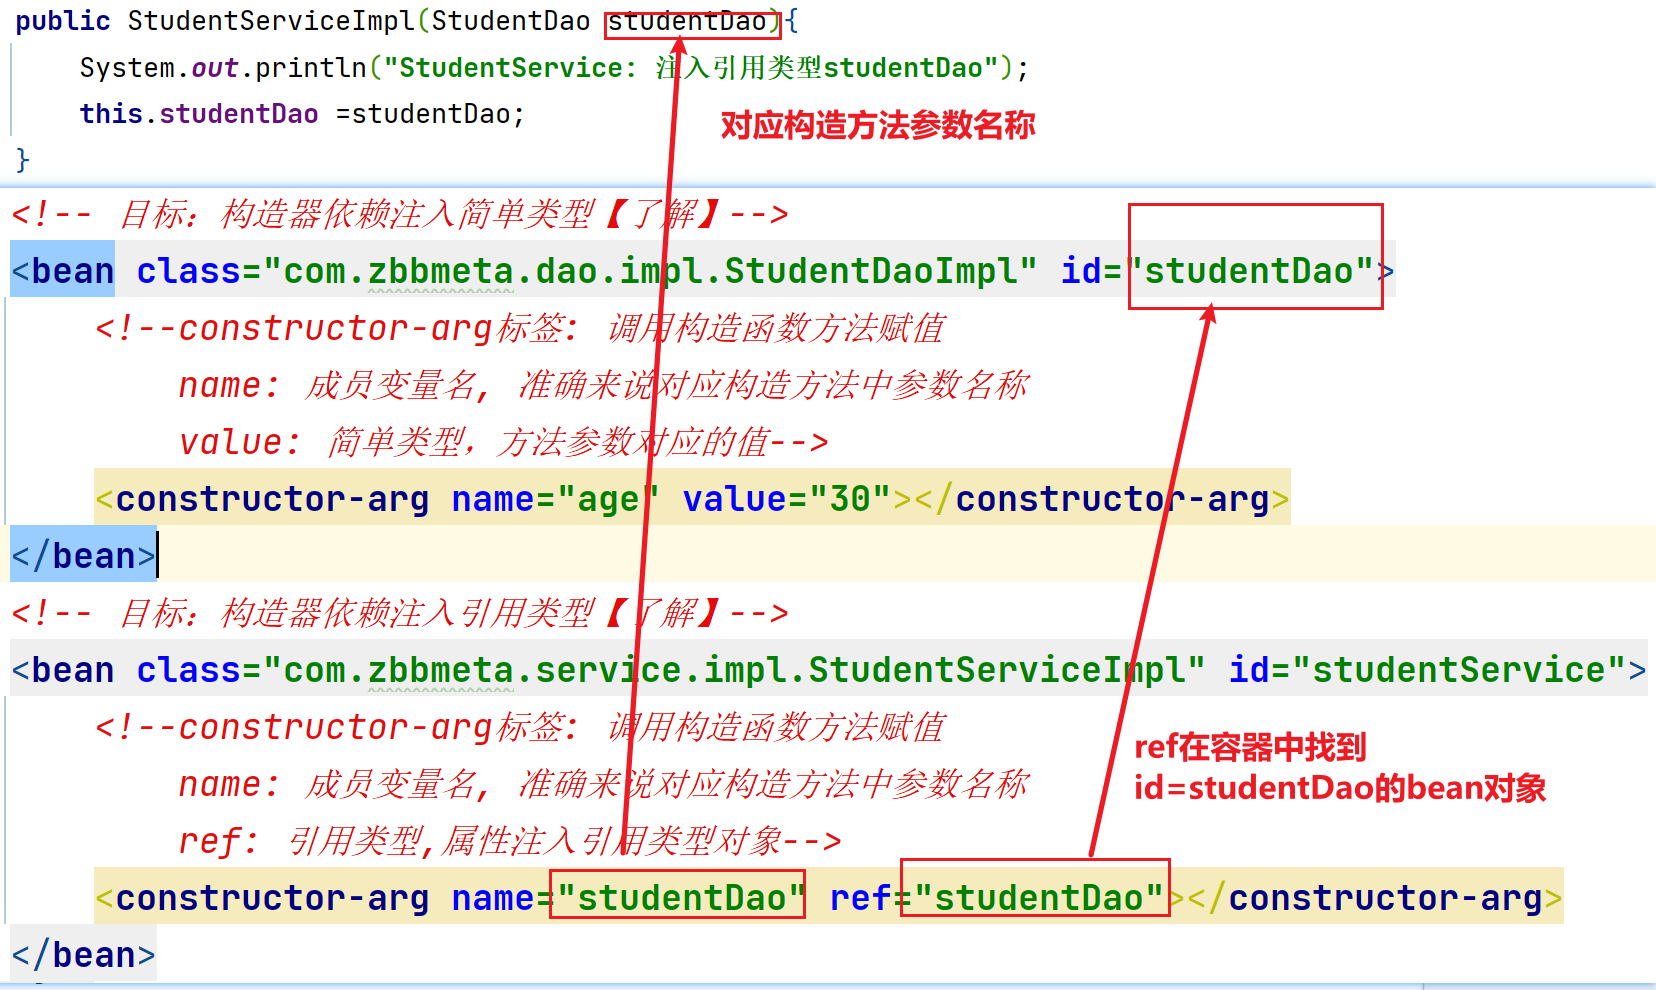
**【第6步】在application.xml,配置构造器注入引用类型 **
<!-- 目标:构造器依赖注入引用类型【了解】-->
<bean class="com.zbbmeta.service.impl.StudentServiceImpl" id="studentService"><!--constructor-arg标签: 调用构造函数方法赋值name: 成员变量名, 准确来说对应构造方法中参数名称ref: 引用类型,属性注入引用类型对象--><constructor-arg name="studentDao" ref="studentDao"></constructor-arg>
</bean>
【第7步】测试
//目标:测试setter的引用类型的注入@Testpublic void test2(){//1.根据配置文件application.xml创建IOC容器ClassPathXmlApplicationContext ac = new ClassPathXmlApplicationContext("application.xml");//2.从IOC容器里面获取id="bookService"对象StudentService studentService = (StudentService) ac.getBean("studentService");//3.执行对象方法studentService.save();//4.关闭容器ac.close();}
-
控制台结果

4 依赖自动装配【理解】
4.1 自动装配概念
-
IoC容器根据bean所依赖的资源在容器中自动查找并注入到bean中的过程称为自动装配
- 自动装配方式
-
按类型
-
按名称
-
按构造方法
-
autowire: 自动装配, 在容器中找对应对象,自动给成员变量赋值byType: 通过类型注入byName: 通过名字注入constructor: 通过构造器注入no: 不自动注入
4.2 自动装配类型
4.2.1 依赖类型自动装配
配置中使用bean标签autowire属性设置自动装配的类型
byType使用按类型装配时(byType)必须保障容器中相同类型的bean唯一,推荐使用
格式:
<!--给成员变量赋值autowire: 自动装配, 在容器中找对应对象,自动给成员变量赋值byType: 通过类型注入byName: 通过名字注入constructor: 通过构造器注入no: 不自动注入
-->
<bean class="com.zbbmeta.service.impl.StudentServiceImpl" id="studentService" autowire="byType">
</bean>
4.2.2依赖bean容器名字自动装配
配置中使用bean标签autowire属性设置自动装配的类型
byName使用按名称装配时(byName)必须保障容器中具有指定名称的bean,不推荐使用
<!--
autowire="byType" 根据成员属性名自动注入
-->
<bean class="com.zbbmeta.service.impl.StudentServiceImpl" id="studentService2" autowire="byName">
</bean>
4.2.3 依赖bean容器根据构造器自动装配注入
配置中使用bean标签autowire属性设置自动装配的类型
constructor
<!--
autowire="constructor"
据成员的所属类型去IOC容器中查找一样类型的对象进行调用构造函数进行给成员赋值
-->
<bean class="com.zbbmeta.service.impl.StudentServiceImpl" id="studentService3" autowire="constructor">
</bean>
4.3 依赖自动装配代码实现
【第0步】创建11_2_DI_Autowire项目
【第1步】导入依赖坐标
【第2步】导入Student实体类
【第3步】定义Spring管理的类(接口)
【第4步】创建Spring配置文件在resources目录下创建`application.xml`
【第5步】在test目录下创建`StudentServiceTest`
【第0步】创建11_2_DI_Autowire项目

【第1步】导入Spring坐标
和之前项目依赖一致
【第1步】导入依赖坐标
和之前一致
【第3步】定义Spring管理的类(接口)
-
StudentDao接口和StudentDaoImpl实现类
package com.zbbmeta.dao;public interface StudentDao {/*** 添加学生*/void save();
}
package com.zbbmeta.dao.impl;import com.zbbmeta.dao.StudentDao;public class StudentDaoImpl implements StudentDao {@Overridepublic void save() {System.out.println("DAO: 添加学生信息到数据库...");}
}
-
StudentService接口和StudentServiceImpl实现类
package com.zbbmeta.service;public interface StudentService {/*** 添加学生*/void save();
}
package com.zbbmeta.service.impl;import com.zbbmeta.dao.StudentDao;
import com.zbbmeta.service.StudentService;public class StudentServiceImpl implements StudentService {//创建成员对象private StudentDao studentDao ;//提供依赖对象对应的setter方法public void setStudentDao(StudentDao studentDao) {this.studentDao = studentDao;}//构造函数StudentServiceImpl(){}public StudentServiceImpl(StudentDao studentDao) {System.out.println("Service 构造器方法");this.studentDao=studentDao;}@Overridepublic void save() {System.out.println("Service: 添加学生信息到数据库...");studentDao.save();}
}
【第4步】创建Spring配置文件在resources目录下创建application.xml

-
定义application.xml配置文件
<?xml version="1.0" encoding="UTF-8"?>
<beans xmlns="http://www.springframework.org/schema/beans"xmlns:xsi="http://www.w3.org/2001/XMLSchema-instance"xsi:schemaLocation="http://www.springframework.org/schema/beans http://www.springframework.org/schema/beans/spring-beans.xsd"><!--目标:自动装配(自动注入)--><bean class="com.zbbmeta.dao.impl.StudentDaoImpl" id="studentDao"></bean><!--autowire="byType" 根据类型自动注入【重点】成员属性:private StudentDao studentDao ;  根据成员的所属类型去IOC容器中查找一样类型的对象进行调用成员的setStudentDao(参数)注入数据--><bean class="com.zbbmeta.service.impl.StudentServiceImpl" id="studentService" autowire="byType"></bean><!--
autowire="byName" 根据成员属性名自动注入
成员属性:private StudentDao studentDao ;  根据成员的属性名字去IOC容器中查找一样名称的对象进行调用成员的setStudentDao(参数)注入数据--><bean class="com.zbbmeta.service.impl.StudentServiceImpl" id="studentService2" autowire="byName"></bean><!--autowire="constructor" 成员属性:private StudentDao studentDao构造函数:public StudentServiceImpl(StudentDao studentDao){this.studentDao = studentDao;}据成员的所属类型去IOC容器中查找一样类型的对象进行调用构造函数进行给成员赋值--><bean class="com.zbbmeta.service.impl.StudentServiceImpl" id="studentService3" autowire="constructor"></bean>
</beans>
**【第5步】在test目录下创建StudentServiceTest进行测试
package com.zbbmeta;import com.zbbmeta.dao.StudentDao;
import com.zbbmeta.service.StudentService;
import org.junit.jupiter.api.Test;
import org.springframework.context.support.ClassPathXmlApplicationContext;public class StudentServiceTest {//目标:根据类型自动注入@Testpublic void test1(){//1.根据配置文件application.xml创建IOC容器ClassPathXmlApplicationContext ac = new ClassPathXmlApplicationContext("application.xml");//2.从IOC容器里面获取id="studentService"对象StudentService studentService = (StudentService) ac.getBean("studentService");//3.执行对象方法studentService.save();//4.关闭容器ac.close();}//目标:测试自动注入根据名称查找注入@Testpublic void test2(){//1.根据配置文件application.xml创建IOC容器ClassPathXmlApplicationContext ac = new ClassPathXmlApplicationContext("application.xml");//2.从IOC容器里面获取id="bookService"对象StudentService studentService = (StudentService) ac.getBean("studentService2");//3.执行对象方法studentService.save();//4.关闭容器ac.close();}//目标:测试构造器根据名称查找注入@Testpublic void test3(){//1.根据配置文件application.xml创建IOC容器ClassPathXmlApplicationContext ac = new ClassPathXmlApplicationContext("application.xml");//2.从IOC容器里面获取id="bookService"对象StudentService studentService = (StudentService) ac.getBean("studentService3");//3.执行对象方法studentService.save();//4.关闭容器ac.close();}
}
5 集合注入
5.1 注入数组类型数据
格式:
<!--调用setArray方法给成员array赋值-->
<property name="array"><array><!--new String("数据") 引用类型赋值--><bean class="java.lang.String" id="s"><constructor-arg value="100"></constructor-arg></bean><!--简单类型赋值--><value>200</value><value>300</value></array>
</property>
5.2 注入List类型数据
格式:
<!--调用setList方法给成员list赋值-->
<property name="list"><list><value>张三</value><value>李四</value><value>王五</value></list>
</property>
5.3 注入Set类型数据
格式:
<!--调用setSet方法给成员set赋值-->
<property name="set"><set><value>珠海</value><value>江门</value><value>惠州</value></set>
</property>
5.4 注入Map类型数据
<!--调用setMap方法给成员map赋值-->
<property name="map"><map><entry key="country" value="china"></entry><entry key="province" value="广东"></entry><entry key="city" value="广州"></entry></map>
</property>
5.5 注入Properties类型数据
<!--调用setMap方法给成员map赋值-->
<property name="properties"><props><prop key="country">china</prop><prop key="province">广东</prop><prop key="city">广州</prop></props>
</property>
说明:property标签表示setter方式注入,构造方式注入constructor-arg标签内部也可以写<array>、<list>、<set>、<map>、<props>标签
5.6 集合注入完整代码
【第0步】在11_3_DI_Autowired的entity包下创建Person类
【第1步】创建Spring配置文件在resources目录下创建`application-person.xml`
【第2步】在test目录下创建`PersonTest`
【第0步】在11_3_DI_Autowired的entity包下创建Person类
package com.zbbmeta.entity;import java.util.*;public class Person {private String[] array;private List<String> list;private Set<String> set;private Map<String,Object> map;private Properties properties;public Person() {}public Person(String[] array, List<String> list, Set<String> set, Map<String, Object> map, Properties properties) {this.array = array;this.list = list;this.set = set;this.map = map;this.properties = properties;}/*** 获取* @return array*/public String[] getArray() {return array;}/*** 设置* @param array*/public void setArray(String[] array) {this.array = array;}/*** 获取* @return list*/public List<String> getList() {return list;}/*** 设置* @param list*/public void setList(List<String> list) {this.list = list;}/*** 获取* @return set*/public Set<String> getSet() {return set;}/*** 设置* @param set*/public void setSet(Set<String> set) {this.set = set;}/*** 获取* @return map*/public Map<String, Object> getMap() {return map;}/*** 设置* @param map*/public void setMap(Map<String, Object> map) {this.map = map;}/*** 获取* @return properties*/public Properties getProperties() {return properties;}/*** 设置* @param properties*/public void setProperties(Properties properties) {this.properties = properties;}@Overridepublic String toString() {return "User{" +"array=" + Arrays.toString(array) +", list=" + list +", set=" + set +", map=" + map +", properties=" + properties +'}';}
}
【第1步】创建Spring配置文件在resources目录下创建application-person.xml
<?xml version="1.0" encoding="UTF-8"?>
<beans xmlns="http://www.springframework.org/schema/beans"xmlns:xsi="http://www.w3.org/2001/XMLSchema-instance"xsi:schemaLocation="http://www.springframework.org/schema/beans http://www.springframework.org/schema/beans/spring-beans.xsd"><!--目标:创建User对象并依赖注入赋值--><bean class="com.zbbmeta.entity.Person" id="person"><!--调用setArray方法给成员array赋值--><property name="array"><array><!--new String("数据") 引用类型赋值--><bean class="java.lang.String" id="s"><constructor-arg value="100"></constructor-arg></bean><!--简单类型赋值--><value>200</value><value>300</value></array></property><!--调用setList方法给成员list赋值--><property name="list"><list><value>张三</value><value>李四</value><value>王五</value></list></property><!--调用setSet方法给成员set赋值--><property name="set"><set><value>珠海</value><value>江门</value><value>惠州</value></set></property><!--调用setMap方法给成员map赋值--><property name="map"><map><entry key="country" value="china"></entry><entry key="province" value="广东"></entry><entry key="city" value="广州"></entry></map></property><!--调用setMap方法给成员map赋值--><property name="properties"><props><prop key="country">china</prop><prop key="province">广东</prop><prop key="city">广州</prop></props></property></bean>
</beans>
【第2步】在test目录下创建PersonTest
package com.zbbmeta;import com.zbbmeta.entity.Person;
import org.junit.jupiter.api.Test;
import org.springframework.context.support.ClassPathXmlApplicationContext;public class PersonTest {@Testpublic void test(){//1.创建IOC容器ClassPathXmlApplicationContext ac = new ClassPathXmlApplicationContext("application-person.xml");//2.获取对象Person person = ac.getBean(Person.class); //根据指定类型去IOC容器中查找对象//3.打印对象System.out.println(person);//4.关闭容器ac.close();}
}
相关文章:
Spring-1-深入理解Spring XML中的依赖注入(DI):简化Java应用程序开发
学习目标 前两篇文章我们介绍了什么是Spring,以及Spring的一些核心概念,并且快速快发一个Spring项目,以及详细讲解IOC,今天详细介绍一些DI(依赖注入) 能够配置setter方式注入属性值 能够配置构造方式注入属性值 能够理解什么是自动装配 一、…...
负载均衡–HAProxy安装及搭建tidb数据库负载服务
作为一名开发人员,随着经验的增加和技术的沉淀,需要提高自己架构方面的知识,同时对于一个企业来说,搭建一套高可用、高性能的技术架构,对于公司的业务开展和提高服务的性能也是大有裨益的。本文重点从软件安装和搭建ti…...

Django各种缓存的配置
Django提供了多种缓存后端,如内存缓存、文件缓存、数据库缓存、Memcached和Redis等。根据项目需求选择合适的缓存后端。 settings配置 在Django项目的settings.py文件中,找到或新增CACHES配置项。根据所选的缓存后端,配置相应的参数。以下是…...
实现跨域的几种方式
原理 前后端的分离导致了跨域的产生 跨域的三要素:协议 域名 端口 三者有一个不同即产生跨域 例如: http://www.csdn.com https://www.csdn.com 由于协议不同,端口不同而产生跨域 注:http的默认端口80,https的默…...
OpenCV: 对“google::protobuf::internal::Release_CompareAndSwap”的未定义
解决办法: 需要在文件 protobuf/src/google/protobuf/stubs/atomicops_internals_generic_gcc.h 中的以下补丁 inline Atomic64 Release_CompareAndSwap(volatile Atomic64* ptr, Atomic64 old_value, …...

无涯教程-Perl - References(引用)
Perl引用是一个标量数据类型,该数据类型保存另一个值的位置,该值可以是标量,数组或哈希。 创建引用 变量,子程序或值创建引用很容易,方法是在其前面加上反斜杠,如下所示: $scalarref \$foo; $arrayref …...

马斯克收购AI.com域名巩固xAI公司地位;如何评估大型语言模型的性能
🦉 AI新闻 🚀 AI拍照小程序妙鸭相机上线商业工作站并邀请摄影师进行内测 摘要:AI拍照小程序妙鸭相机将上线面向商业端的工作站,并邀请摄影师进行模板设计的内测。妙鸭相机希望为行业提供更多生态产品,扩大行业规模&a…...
uni-app:实现点击按钮出现底部弹窗(uni.showActionSheet+自定义)
一、通过uni.showActionSheet实现底部选择 效果 代码 <template><view><button click"showActionsheet">点击打开弹窗</button></view> </template><script> export default {methods: {showActionsheet() {uni.showAct…...

flume系列之:监控zookeeper的flume配置写入节点,新增和删除flume agent节点,通过ansible自动部署和卸载flume agent
flume系列之:监控zookeeper的flume配置写入节点,新增和删除flume agent节点,通过ansible自动部署和卸载flume agent 一、相关技术二、流程梳理三、部署和删除flume agent效果四、监控zookeeper节点五、新增zookeeper节点部署flume agent六、删除zookeeper节点删除flume agen…...
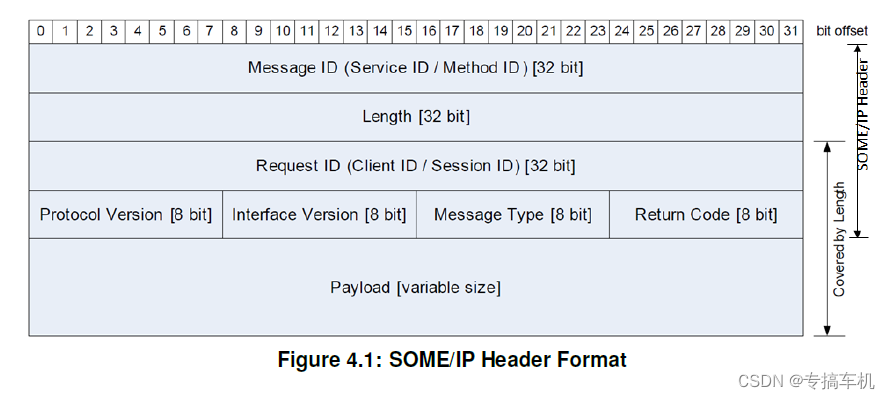
了解以太网通信中的九阳神功 - SOME/IP协议
智能座舱SOME/IP通信 概述SOME/IP基础协议SOME/IP SD协议通信行为流程开机流程关机行为行为时序总结概述 SOME/IP协议是目前国内座舱SOA化应用比较广泛的一种ECU或车辆网络内设备之间交换数据的网络通信协议。它允许不同车辆组件,如发动机控制单元、信息娱乐系统、车身控制模…...

redis List类型命令
在Redis中,List(列表)是一种有序的、可重复的数据结构,它支持插入、删除和获取元素的操作。以下是一些常见的Redis List类型命令: LPUSH:将一个或多个值从列表的左侧插入。LPUSH key value1 value2 ...其中…...
)
【博客685】prometheus 出现NaN场景以及如何去除干扰(Not a Number)
prometheus 出现NaN场景以及如何去除干扰(Not a Number) 1、在prometheus中使用NaN来表示无效数值或者结果 场景: 一些监控系统使用 NaN 作为空值或缺失值,但在 Prometheus 中 NaN 只是另一个浮点值。Prometheus 表示缺失数据的方式是让数据缺失。Prom…...
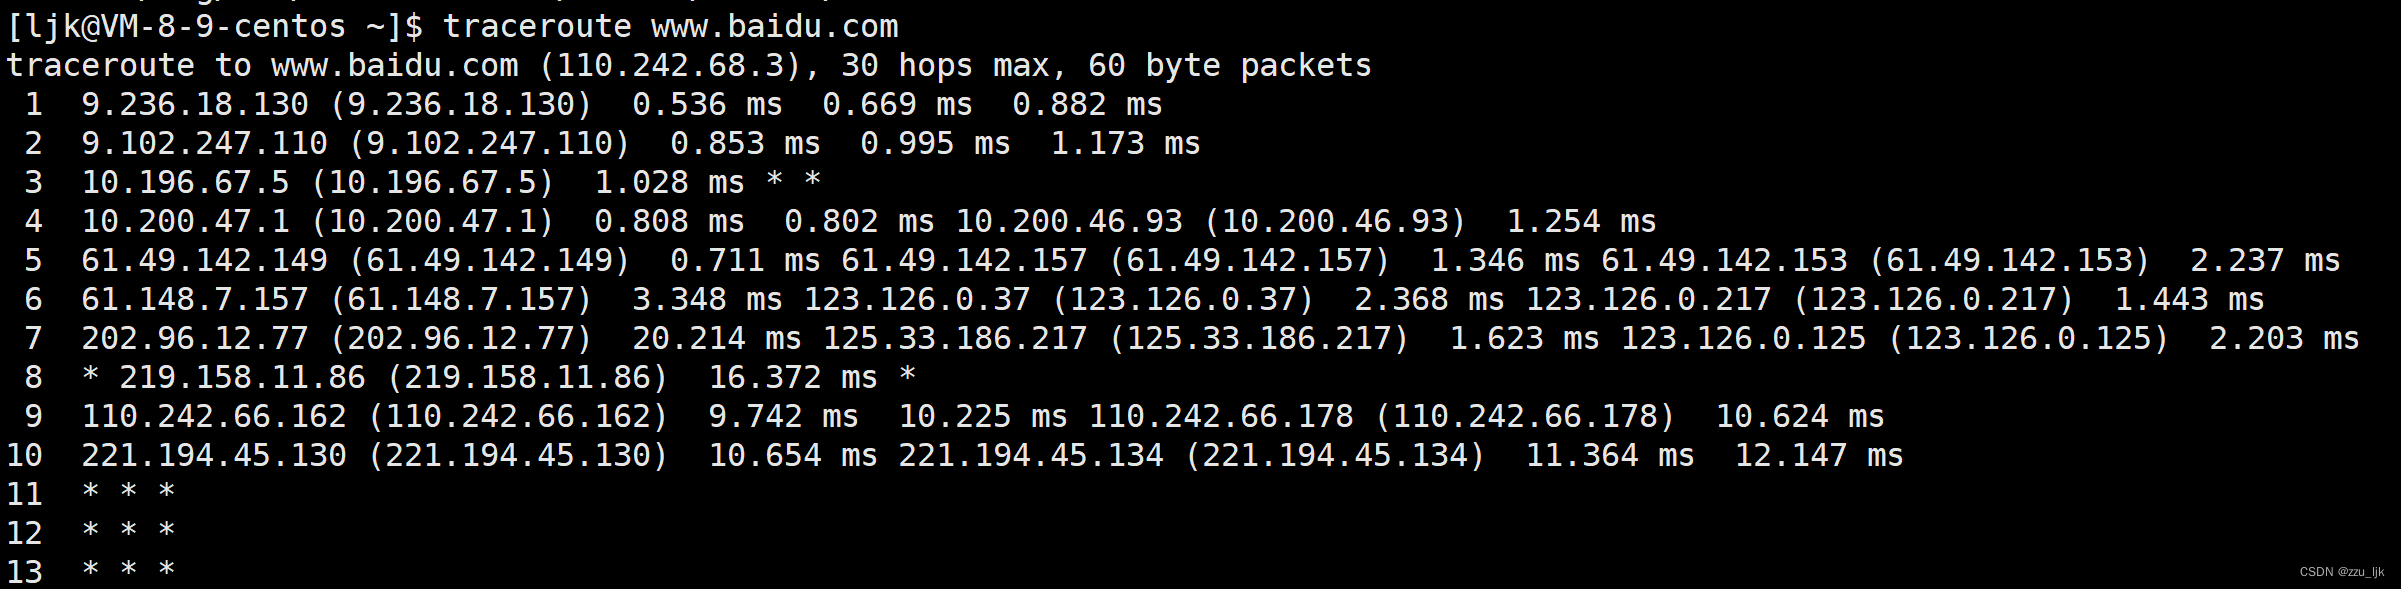
【计算机网络】网络层协议 -- ICMP协议
文章目录 1. ICMP协议简介2. ICMP协议格式3. ping命令4. ping命令与端口号没有关系!!!5. traceroute命令 1. ICMP协议简介 ICMP(Internet Control Message Protocol,控制报文协议),用于在IP主机…...

机器学习---facebook的案例学习
import pandas as pd import matplotlib.pyplot as plt import seaborn as sbn from sklearn.model_selection import train_test_split,GridSearchCV from sklearn.preprocessing import StandardScaler from sklearn.neighbors import KNeighborsClassifier # 使用pandas读…...
OpenMMLab MMDetectionV3.1.0-SAM(环境安装、模型测试、训练以及模型后处理工具)
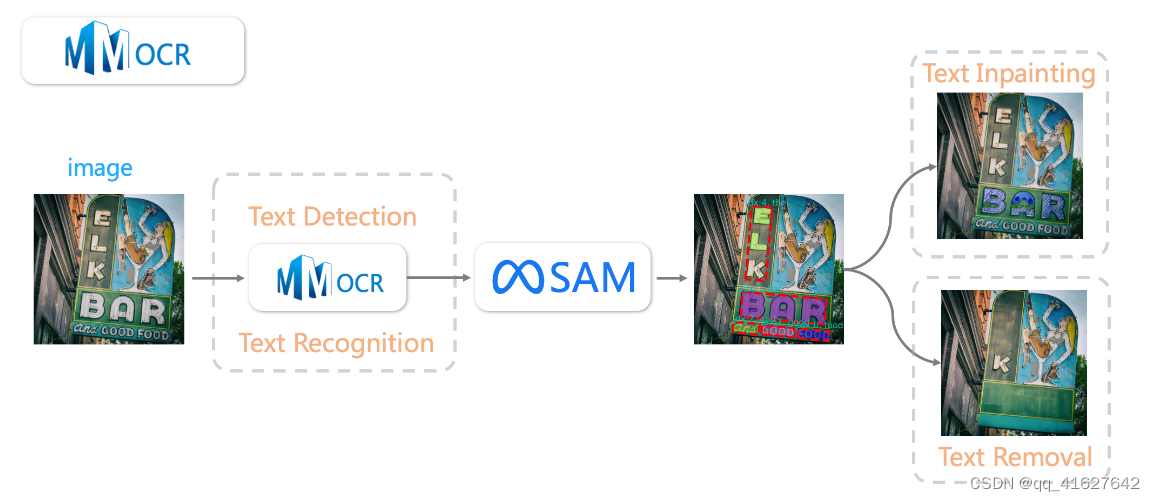
OpenMMLab Playground 概况 当前通用目标检测的研究方向正在朝着大型多模态模型发展。除了图像输入之外,最近的研究成果还结合了文本模式来提高性能。添加文本模态后,通用检测算法的一些非常好的属性开始出现,例如: 可以利用大量…...
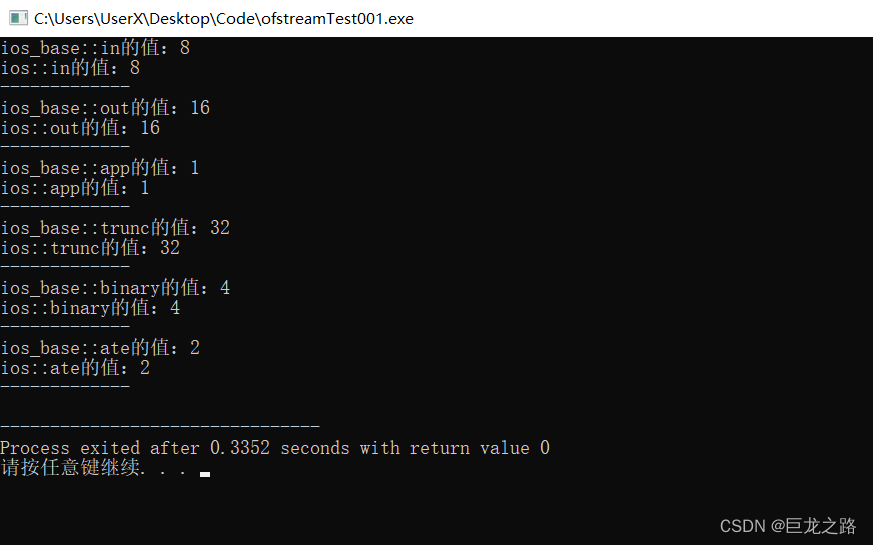
ios_base::out和ios::out、ios_base::in和ios::in、ios_base::app和ios::app等之间有什么区别吗?
2023年8月2日,周三晚上 今天我看到了这样的两行代码: std::ofstream file("example.txt", std::ios_base::out);std::ofstream file("example.txt", std::ios::out);这让我产生了几个疑问: 为什么有时候用ios_base::o…...

PostgreSQL 使用SQL
发布主题 设置发布为true 这个语句是针对 PostgreSQL 数据库中的逻辑复制功能中的逻辑发布(Logical Publication)进行设置的。 PostgreSQL 中,逻辑复制是一种基于逻辑日志的复制方法,允许将数据更改从一个数据库实例复制到另一…...
文本三剑客(grep))
Shell编程基础(十四)文本三剑客(grep)
文本三剑客(grep) 使用场景基本使用返回值参数 使用场景 主要用于查找,过滤文本数据;该数据可以来自文件,也可以来自管道流等等。 grep除了原有的实现,后来还出现了以下扩展实现 egrep:支持扩展…...
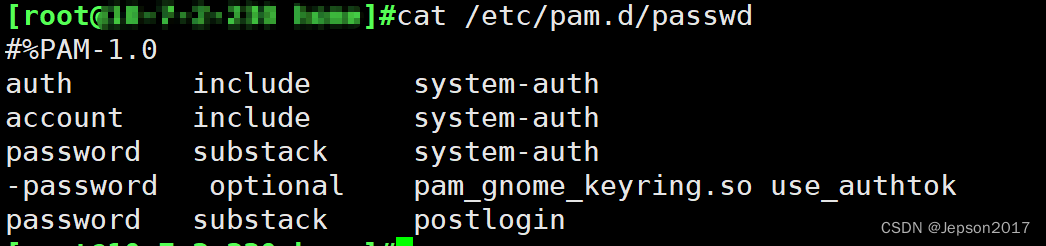
Linux root用户执行修改密码命令,提示 Permission denied
问题 linux系统中(ubuntu20),root用户下执行passwd命令,提示 passwd: Permission denied ,如下图: 排查 1.执行 ll /usr/bin/passwd ,查看文件权限是否正确,正常情况是 -rwsr-xr…...
Java面向对象学习第三部分
一、Static修饰符 static是静态的意思,基本概念如下: Static分类: 一般我们分类都是按照是否使用static修饰进行分类。分为静态变量(类变量)、实例变量。 静态变量和实例变量的比较: 比较,…...

Linux字符设备驱动开发:从内核注册到/dev节点创建的完整实践
1. 项目概述:从零到一,理解Linux内核的“门牌号”管理在Linux的世界里,一切皆文件。这个哲学理念不仅体现在我们熟悉的普通文件上,更深刻地内嵌于设备管理中。当你敲下ls -l /dev命令,看到那些tty、null、random等文件…...

SPT-AKI存档编辑器完整指南:快速定制你的离线塔科夫体验
SPT-AKI存档编辑器完整指南:快速定制你的离线塔科夫体验 【免费下载链接】SPT-AKI-Profile-Editor Программа для редактирования профиля игрока на сервере SPT-AKI 项目地址: https://gitcode.com/gh_mirrors…...

从Halcon助手到你的程序:手把手教你将HSmartWindow中的ROI区域‘抠’出来并用起来
从Halcon助手到C#程序:ROI区域的高效迁移与应用实战 在工业视觉开发中,ROI(Region of Interest)的交互式调整是核心痛点之一。许多开发者习惯在Halcon助手中反复调试ROI参数,却苦于无法将这些精心调整的区域无缝迁移到…...

二供泵站PLC智慧升级物联网方案解析
某二供水务企业计划为各个老旧泵站进行改造升级,要求实现远程启停、自动控泵、高温预警、水质/视频/电气全量采集,泵站集中管理等功能,统一接入污水厂总平台,实现精细化管理与高效运维。对此,物通博联提供高效可靠的二…...

AgiBot X1实时内核配置:Linux实时补丁与性能优化终极指南
AgiBot X1实时内核配置:Linux实时补丁与性能优化终极指南 【免费下载链接】agibot_x1_infer The inference module for AgiBot X1. 项目地址: https://gitcode.com/gh_mirrors/agi/agibot_x1_infer AgiBot X1是一款先进的人形机器人,其infer模块&…...
:零服务器搭建个人/团队通用大模型API驱动的论文阅读与推荐平台)
AI Daily Paper Reader(ADPR):零服务器搭建个人/团队通用大模型API驱动的论文阅读与推荐平台
一、背景 AI领域论文每日增长数量惊人,arXiv 上仅计算机科学相关的新论文每天就有上百篇。对于科研人员、研究生或AI从业者来说,如何高效筛选、阅读并跟踪与自己研究方向相关的论文,已成为日常工作中最耗时的一环。 传统的解决方案…...
 I2C CST816T触摸屏适配)
全志 V821 韦东山 Avaota-F1-B (3) I2C CST816T触摸屏适配
功能还在调试一、硬件连接/**********CST816T********** 1.引脚连接 PD18 -> i2c_clk PD18 -> i2c_sda PD22 -> tp_rst PD23 -> tp_int二、设备树修改tina-v821-v1.3/device/config/chips/v821/configs/avaota_f1/linux-5.4-ansc/board.dtstwi1_pins_default: twi1…...

Frida检测绕过本质:四大系统级锚点与工程化规避策略
1. 这不是“反检测”,而是对 Frida 运行机制的诚实理解很多人一看到“Frida 检测绕过”就本能地往“对抗”“隐藏”“伪装”上想,甚至直接去搜“frida hide”“frida stealth bypass”,结果踩进一堆过时、失效、逻辑错乱的 patch 坑里。我做过…...

通过Hermes Agent自定义供应商配置接入Taotoken多模型
🚀 告别海外账号与网络限制!稳定直连全球优质大模型,限时半价接入中。 👉 点击领取海量免费额度 通过Hermes Agent自定义供应商配置接入Taotoken多模型 对于使用Hermes Agent构建智能体应用的开发者而言,直接对接单一…...
)
2026最新版|程序员/小白大模型转行全攻略(零基础入门+路径规划+避坑指南,收藏必看)
2026年,AI大模型依旧是互联网技术圈的绝对核心风口,行业技术迭代速度持续加快,传统开发赛道内卷加剧、薪资封顶、岗位缩减等问题愈发凸显。无数基层程序员陷入职业瓶颈,零基础新手也苦于传统技术入门难、竞争大。 反观大模型赛道&…...