mousedown拖拽功能(vue3+ts)
因为项目有rem适配,使用第三方插件无法处理适配问题,所有只能自己写拖拽功能了
拖拽一般都会想到按下,移动,放开,但是本人亲测,就在div绑定一个按下事件就行了(在事件里面写另外两个事件),另外两个绑上,会莫名其妙卡死,那种莫名其妙的问题
推荐几个开发调试时使用的第三方拖动插件吧,虽然没用上,但是他们是真的好vue-drag-resize和vuedraggable,其中前者更轻量化,后者功能更全
主要功能:
效果图:
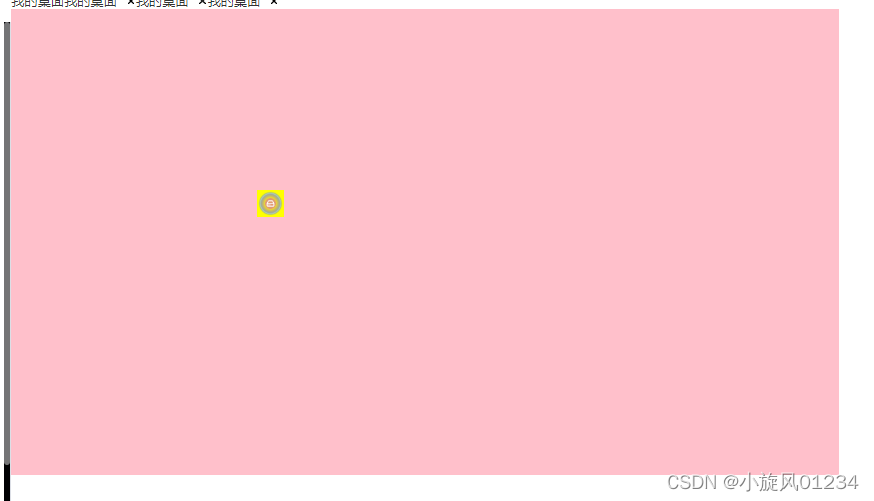
界面:(就是大的父盒子包着几个小盒子,盒子里面有图片和文字)
<div class="range" id="range" ref="range"><divclass="iconItem"v-for="(item, index) in pointList":key="index"@mousedown.stop.prevent.native="mousedown($event, item)":style="{left: item.dx + 'px',top: item.dy + 'px','z-index': item.zIndex,}"><!--@mousemove.stop.prevent.native="mousemove($event, item)"@mouseup.stop.prevent.native="mouseup($event, item)"--><imgdraggable="false":src="typeList[item.type].src":alt="typeList[item.type].name + item.EName"/><span>{{ typeList[item.type].name + item.EName }}</span></div></div>
逻辑:
<script setup lang="ts">
import { ref, reactive, watch, computed, Ref } from "vue";
import { mapPunctuation } from "@/utils/youran";
let rem = ref(0.005208); // 10/1920  做好功能给上面的left top乘上去就行了 left: item.dx * rem + 'px'const range: Ref = ref(null);// 这里只是把存在文件里的base64图片文件取出来,
let typeList = reactive([{type: 1,src: "",name: "球机-摄像头",},{type: 2,src: "",name: "抢机-摄像头",},{type: 3,src: "",name: "无源打卡设备",},{type: 4,src: "",name: "无源打卡设备",},{type: 5,src: "",name: "反向控制",},
]);typeList.forEach((item, index) => {item.src = mapPunctuation[index].src;
});let pointList = ref([{fId: "111",type: 1,EId: "",EName: "",dx: 0,dy: 0,zIndex: 2,},
]);// 鼠标事件
let downType = ref(false);
let disX = 0;
let disY = 0;
let odiv: any = null;
let mousedown = (e: any, item: any) => {downType.value = true;console.log("按下事件");odiv = e.target;disX = e.clientX - odiv.offsetLeft;disY = e.clientY - odiv.offsetTop;document.onmousemove = (e) => {console.log("移动事件");//计算元素位置(需要判断临界值)let left = e.clientX - disX;let top = e.clientY - disY;let { offsetHeight: pondModelHeight, offsetWidth: pondModelWidth } =range.value;let { offsetHeight: sonNodeHeight, offsetWidth: sonNodeWidth } = odiv;// 左上角(left)if (left < 0) {left = 0;}if (top < 0) {top = 0;}// 左下角if (top > pondModelHeight - sonNodeHeight) {top = pondModelHeight - sonNodeHeight;}if (left > pondModelWidth - sonNodeWidth) {left = pondModelWidth - sonNodeWidth;}item.dx = left;item.dy = top;item.zIndex = 999;};document.onmouseup = (e) => {console.log("放开事件");document.onmousemove = null;document.onmouseup = null;item.zIndex = 1;odiv = null;};
};
</script>
css:本来不该放出来,但是我在这里踩坑了,觉得其他人也会(img图片有默认的拖拽,很难禁止,所以拿一个伪元素直接放在img上面,不给点img就不会踩坑)
.range {width: 960px;height: 540px;background-color: pink;position: relative;.iconItem {position: absolute;left: 10px;top: 10px;z-index: 2;display: flex;align-items: center;cursor: move;user-select: none;width: 32px;height: 32px;background: yellow;img {width: 32px;height: 32px;}// 关键&::before {content: " ";width: 100%;height: 100%;position: absolute;top: 0;left: 0;z-index: 3;}&:hover {// span {// display: block;// }}span {display: none;font-size: 12px;font-family: YouSheBiaoTiHei;color: red;}}}
完整代码:(建议按照上面的一点点复制吧,有几个文件是外部的base64图片)
<template><div class="PastureMap"><div class="mapContent"><div class="mapBox"><div class="range" id="range" ref="range"><divclass="iconItem"v-for="(item, index) in pointList":key="index"@mousedown.stop.prevent.native="mousedown($event, item)":style="{left: item.dx + 'px',top: item.dy + 'px','z-index': item.zIndex,}"><!--@mousemove.stop.prevent.native="mousemove($event, item)"@mouseup.stop.prevent.native="mouseup($event, item)"--><imgdraggable="false":src="typeList[item.type].src":alt="typeList[item.type].name + item.EName"/><span>{{ typeList[item.type].name + item.EName }}</span></div></div></div><div class="operationPanel"><div class="addIConCard"><div class="title"><span>新增图标</span></div><div class="box"><div class="bgImg"><div class="left"><span>背景图:</span></div><div class="right"><button>选择图片</button><span>建议尺寸:960*540</span></div></div><div class="iconBtnForm"><div class="cell"><div class="left"><span>圈舍</span></div><div class="right"><input type="text" placeholder="请选择圈舍" /></div></div><div class="cell"><div class="left"><span>设备编号</span></div><div class="right"><input type="text" placeholder="请输入设备编号" /></div></div><div class="cell"><div class="left"><span>类型</span></div><div class="right"><input type="text" placeholder="请选择类型" /></div></div></div><div class="addBtn"><button>新增</button></div></div></div><div class="iconList"><div class="item" v-for="(item, index) in pointList" :key="index"><div class="left"><span>类型</span></div><div class="right"><input type="text" placeholder="名称" /></div><div class="del"><img src="" alt="del" /></div></div></div></div></div></div>
</template><script setup lang="ts">
import { ref, reactive, watch, computed, Ref } from "vue";
import { mapPunctuation } from "@/utils/youran";
let rem = ref(0.005208); // 10/1920const range: Ref = ref(null);
let typeList = reactive([{type: 1,src: "",name: "球机-摄像头",},{type: 2,src: "",name: "抢机-摄像头",},{type: 3,src: "",name: "无源打卡设备",},{type: 4,src: "",name: "无源打卡设备",},{type: 5,src: "",name: "反向控制",},
]);typeList.forEach((item, index) => {item.src = mapPunctuation[index].src;
});let pointList = ref([{fId: "111",type: 1,EId: "",EName: "",dx: 0,dy: 0,zIndex: 2,},
]);// 鼠标事件
let downType = ref(false);
let disX = 0;
let disY = 0;
let odiv: any = null;
let mousedown = (e: any, item: any) => {downType.value = true;console.log("按下事件");odiv = e.target;disX = e.clientX - odiv.offsetLeft;disY = e.clientY - odiv.offsetTop;document.onmousemove = (e) => {console.log("移动事件");//计算元素位置(需要判断临界值)let left = e.clientX - disX;let top = e.clientY - disY;let { offsetHeight: pondModelHeight, offsetWidth: pondModelWidth } =range.value;let { offsetHeight: sonNodeHeight, offsetWidth: sonNodeWidth } = odiv;// 左上角(left)if (left < 0) {left = 0;}if (top < 0) {top = 0;}// 左下角if (top > pondModelHeight - sonNodeHeight) {top = pondModelHeight - sonNodeHeight;}if (left > pondModelWidth - sonNodeWidth) {left = pondModelWidth - sonNodeWidth;}item.dx = left;item.dy = top;item.zIndex = 999;};document.onmouseup = (e) => {console.log("放开事件");document.onmousemove = null;document.onmouseup = null;item.zIndex = 1;odiv = null;};
};
</script><style lang="less" scoped>
.PastureMap {height: 100%;.mapContent {display: flex;height: 100%;.mapBox {flex: 1;height: 100%;.range {width: 960px;height: 540px;background-color: pink;position: relative;.iconItem {position: absolute;left: 10px;top: 10px;z-index: 2;display: flex;align-items: center;cursor: move;user-select: none;width: 32px;height: 32px;background: yellow;img {width: 32px;height: 32px;}&::before {content: " ";width: 100%;height: 100%;position: absolute;top: 0;left: 0;z-index: 3;}&:hover {// span {//   display: block;// }}span {display: none;font-size: 12px;font-family: YouSheBiaoTiHei;color: red;}}}}.operationPanel {width: 270px;.addIConCard {.title {span {}}.box {.bgImg {display: flex;align-items: center;.left {}.right {}}.iconBtnForm {.cell {display: flex;align-items: center;.left {span {}}.right {input {}}}}}}.iconList {.item {display: flex;align-items: center;position: relative;.left {span {}}.right {input {}}.del {position: absolute;top: 0;right: 0;}}}}}
}
</style>
相关文章:
mousedown拖拽功能(vue3+ts)
因为项目有rem适配,使用第三方插件无法处理适配问题,所有只能自己写拖拽功能了 拖拽一般都会想到按下,移动,放开,但是本人亲测,就在div绑定一个按下事件就行了(在事件里面写另外两个事件&#x…...

【论文阅读】基于深度学习的时序异常检测——TransAD
系列文章链接 数据基础:多维时序数据集简介 论文一:2022 Anomaly Transformer:异常分数预测 论文二:2022 TransAD:异常分数预测 论文链接:TransAD.pdf 代码库链接:https://github.com/imperial…...

NLPCC 出版部分相关源码记录
目录 Download Unzip Author Title Affiliation Check number of tex Zip Rename Delete Download import requests from bs4 import BeautifulSoup# 登录网站并获取登录后的 session def login(username, password):login_url https://example.com/loginsession re…...
【Windbg】通过网络调试windows内核
环境 windows版本:win10_x64 1901 windbg版本:1.2306.12001.0 HOST 1、windbg软件设置。 点击菜单文件,然后如下图操作。 2、等待连接。 ************* Waiting for Debugger Extensions Gallery to Initialize **************>>&…...
代码随想录算法训练营之JAVA|第二十四天| 93. 复原 IP 地址
今天是第24天刷leetcode,立个flag,打卡60天。 算法挑战链接 93. 复原 IP 地址https://leetcode.cn/problems/restore-ip-addresses/ 第一想法 题目理解:将一串数字字符串变成正确的ip格式的字符串。 这类题目是切分字符串,ip一…...
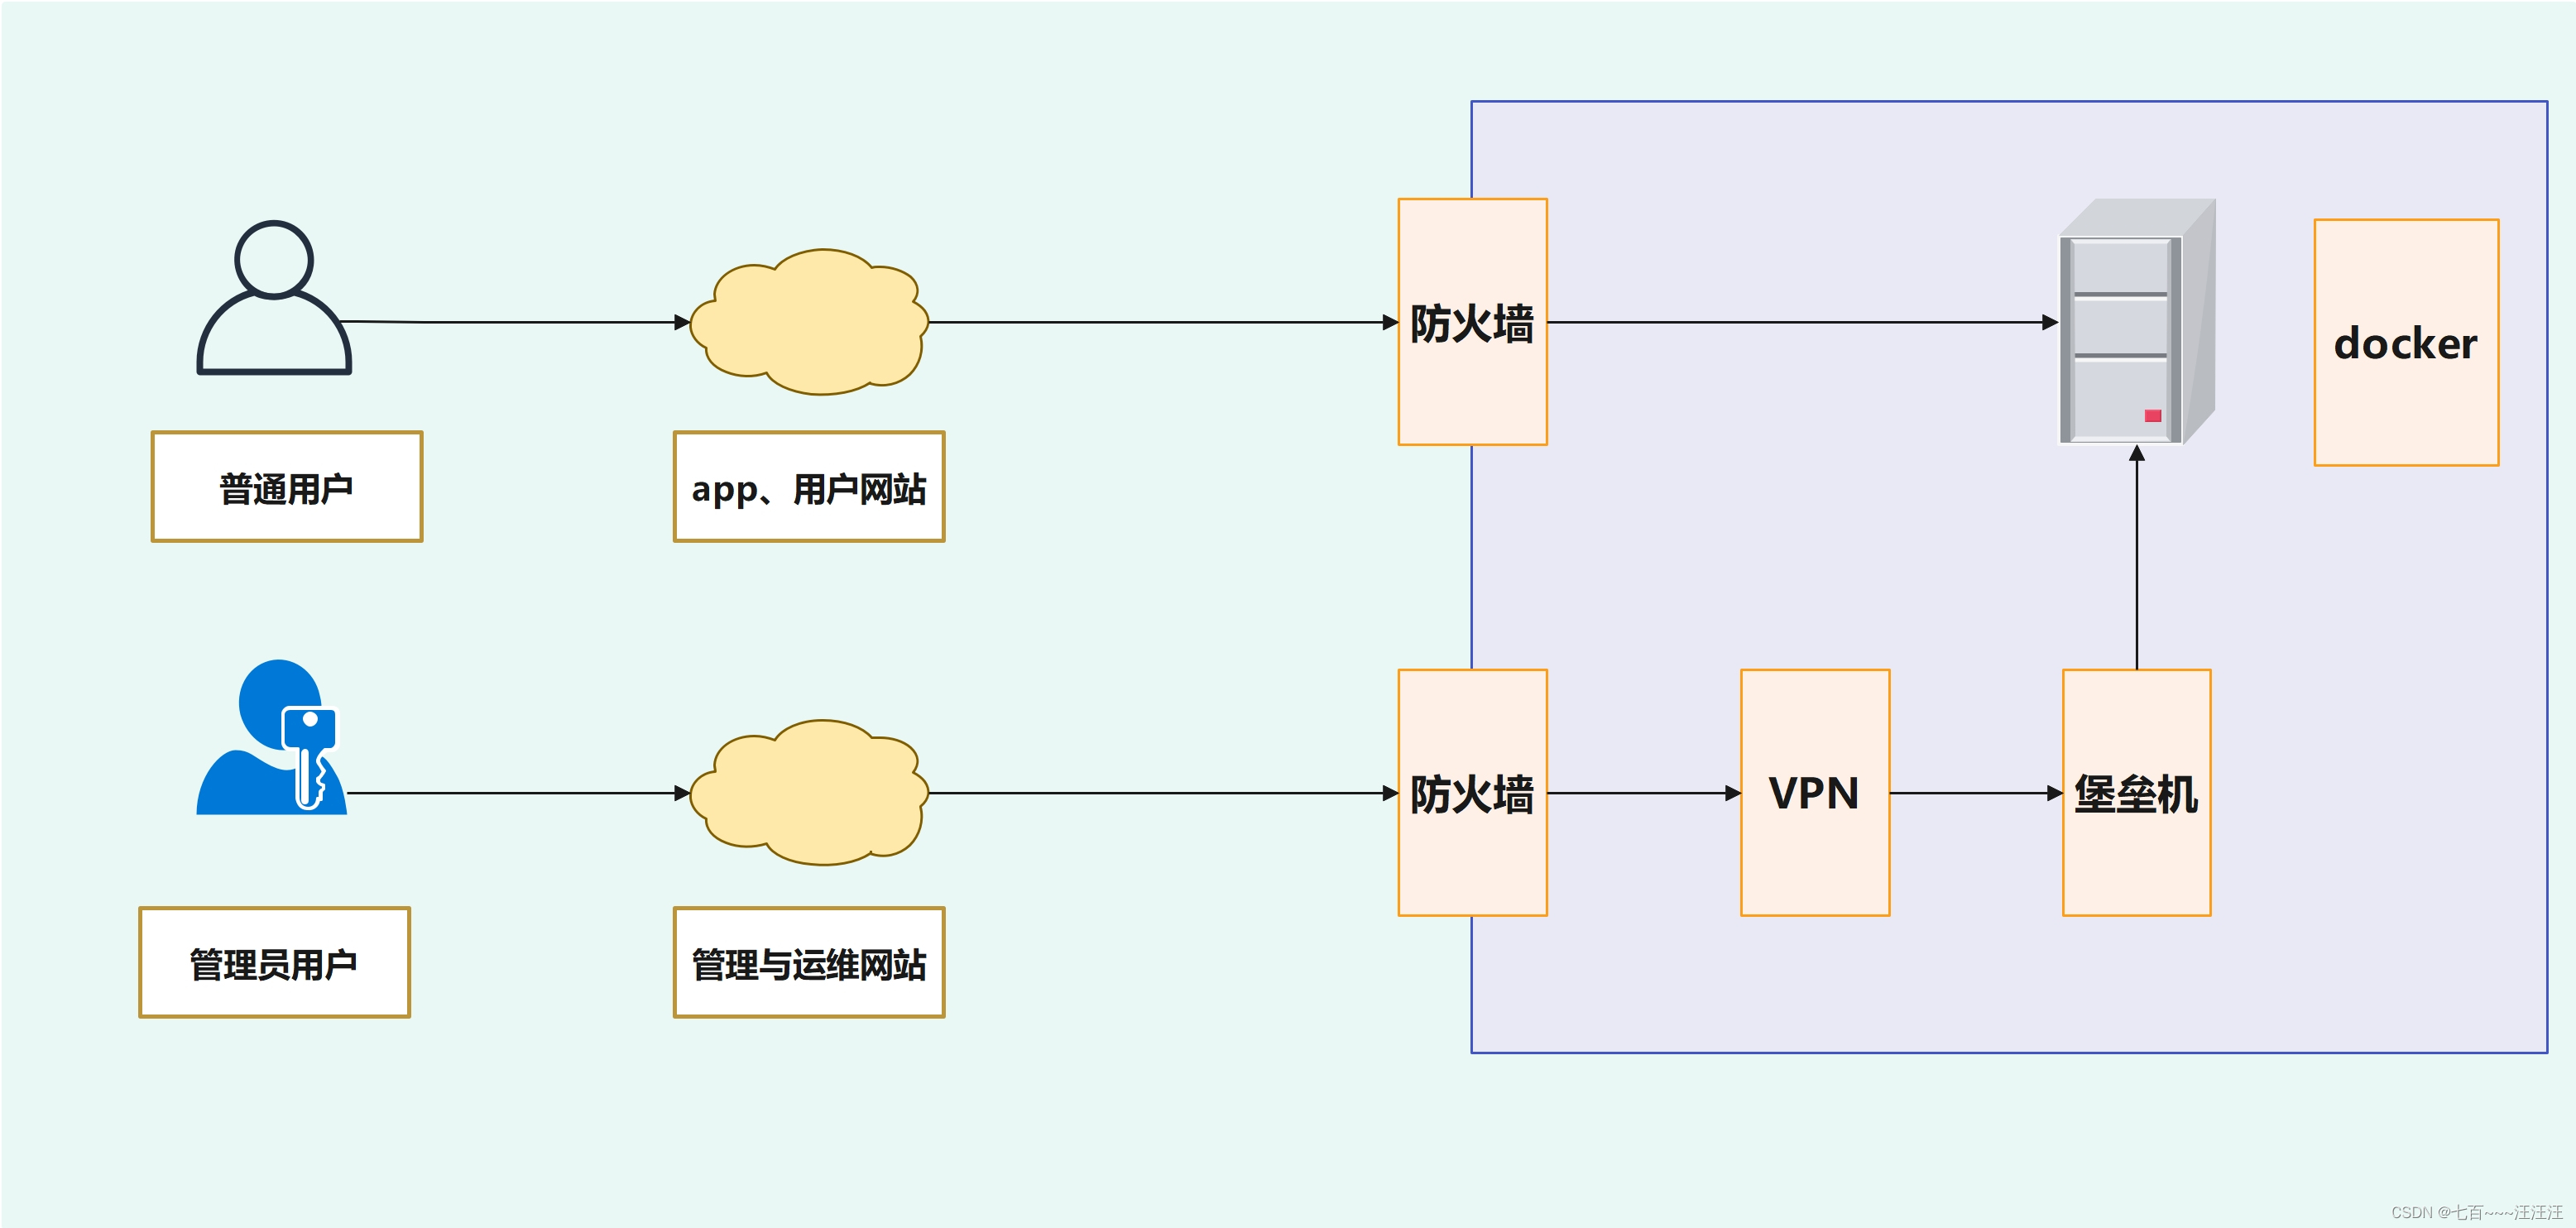
网络安全 Day30-运维安全项目-堡垒机部署
运维安全项目-堡垒机部署 1. 运维安全项目-架构概述2. 运维安全项目之堡垒机2.1 堡垒机概述2.2 堡垒机选型2.3 环境准备2.4 部署Teleport堡垒机2.4.1 下载与部署2.4.2 启动2.4.3 浏览器访问teleport2.4.4 进行配置2.4.5 安装teleport客户端 2.5 teleport连接服务器 1. 运维安全…...

电脑文件夹备份命令
电脑文件夹备份 cmd窗口输入shell:startup 将备份.bat文件放到,自启动文件夹下 bat文件内容写以下就可以了 Xcopy "D:\文件\" "F:\文件备份\" /E/H/C/I/y...
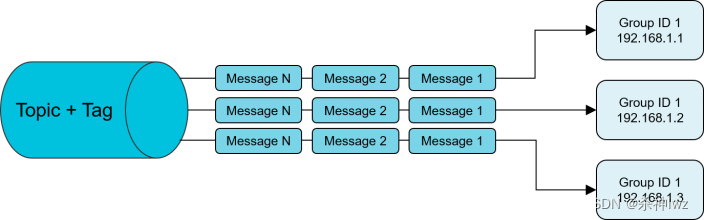
RocketMQ Learning(一)
目录 一、RocketMQ 0、RocketMQ的产品发展 1、RocketMQ安装 1.1、windows下的安装 注意事项 1.2、Linux下的安装 1.3、源码的安装 1.4、控制台 2、消息发送方式 2.1、发送同步消息 2.2、发送异步消息 2.3、单向发送 3、消息消费方式 3.1、负载均衡模式࿰…...
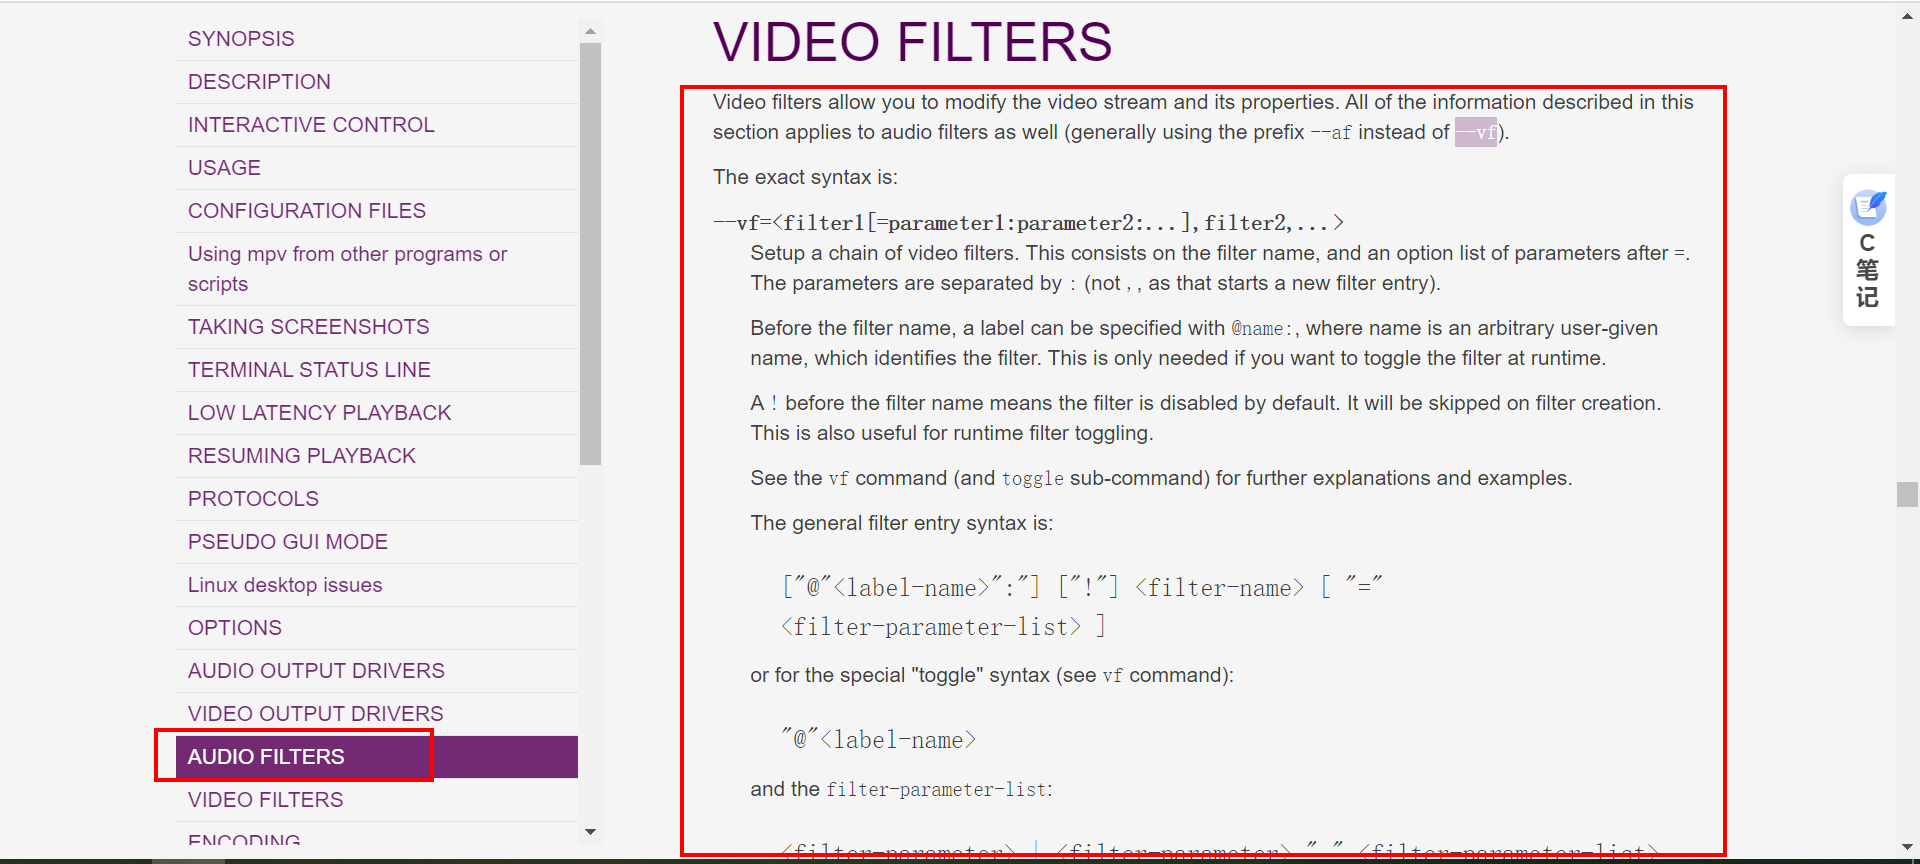
libmpv使用滤镜处理视频进行播放
一、前言 作为一个功能强大的多媒体框架,libmpv为开发者提供了广泛的功能和灵活的控制权。滤镜是libmpv的一个重要特性,允许开发者对视频进行各种实时处理和增强,从而满足用户对于个性化、创意化和高质量视频体验的需求。 滤镜是一种在视频渲染过程中应用特定效果的技术。…...

Harbor.cfg 配置文件参数详解
目录 Harbor.cfg 配置文件参数详解 所需参数: hostname: ui_url_protocol: max_job_workers: db_password: customize_crt: ssl_cert: ssl_cert_key: secretkey_path&#…...
模仿火星科技 基于cesium+ 贴地测量+可编辑
当您进入Cesium的编辑贴地测量世界,下面是一个详细的操作过程,帮助您顺利使用这些功能: 1. 创建提示窗: 启动Cesium应用,地图场景将打开,欢迎您进入编辑模式。在屏幕的一角,一个友好的提示窗将…...
模仿火星科技 基于cesium+角度测量+高度测量+可编辑
1. 创建提示窗: 启动Cesium应用,地图场景将打开,欢迎您进入编辑模式。 在屏幕的一角,一个友好的提示窗将呈现,随着您的操作,它会为您提供有用的信息和指导。 2. 绘制面积: 轻轻点击鼠标左键&a…...

Codeforces の 动态规划
Codeforces Round 785 (Div. 2) - C. Palindrome Basis dp(9/100) 题目链接 思路:整数划分基础上加一个判断回文的条件 整数划分思路:背包容量为n,物品有体积为1~n n种,每种无数个,求使背包恰好装满的方案数——完全背…...
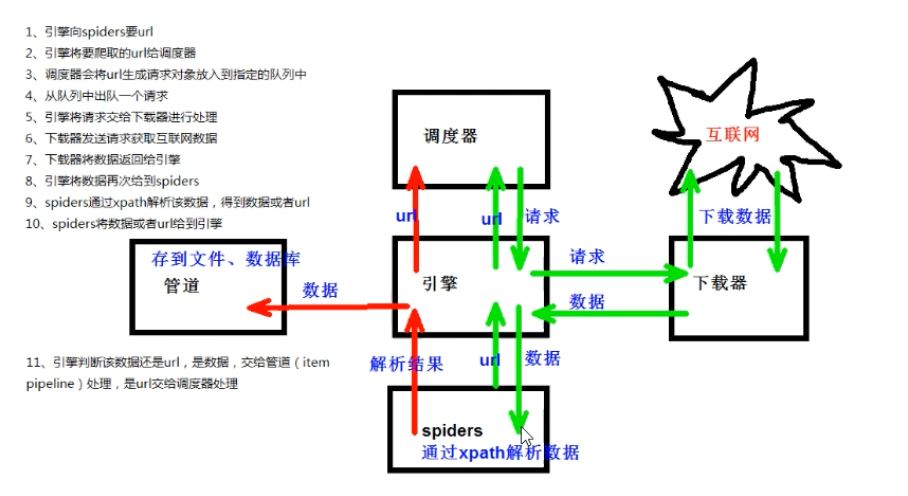
数学建模-爬虫系统学习
尚硅谷Python爬虫教程小白零基础速通(含python基础爬虫案例) 内容包括:Python基础、Urllib、解析(xpath、jsonpath、beautiful)、requests、selenium、Scrapy框架 python基础 进阶(字符串 列表 元组 字典…...
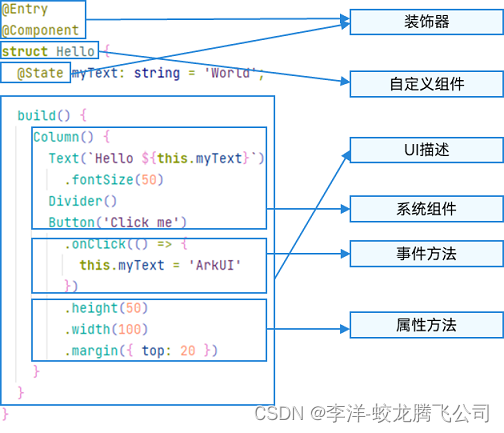
HarmonyOS/OpenHarmony应用开发-ArkTS语言渲染控制概述
ArkUI通过自定义组件的build()函数和builder装饰器中的声明式UI描述语句构建相应的UI。 在声明式描述语句中开发者除了使用系统组件外,还可以使用渲染控制语句来辅助UI的构建,这些渲染控制语句包括控制组件是否显示的条件渲染语句,基于数组数…...

【力扣刷题 | 第二十五天】
目录 前言: 474. 一和零 - 力扣(LeetCode) 总结: 前言: 今天我们依旧暴打动态规划 474. 一和零 - 力扣(LeetCode) 给你一个二进制字符串数组 strs 和两个整数 m 和 n 。 请你找出并返回 strs 的最大子集…...

GO学习之 函数(Function)
GO系列 1、GO学习之Hello World 2、GO学习之入门语法 3、GO学习之切片操作 4、GO学习之 Map 操作 5、GO学习之 结构体 操作 6、GO学习之 通道(Channel) 7、GO学习之 多线程(goroutine) 8、GO学习之 函数(Function) 9、GO学习之 接口(Interface) 文章目录 GO系列前言一、什么是…...

Jstack线上问题排查
1.top查找出哪个进程消耗的cpu高。执行top命令,默认是进程视图,其中PID是进程号(记下进程号) 2.top中shifth 或“H”查找出哪个线程消耗的cpu高 (记下最高的几个线程号) jstack 进程号 >> pid-cpu.…...
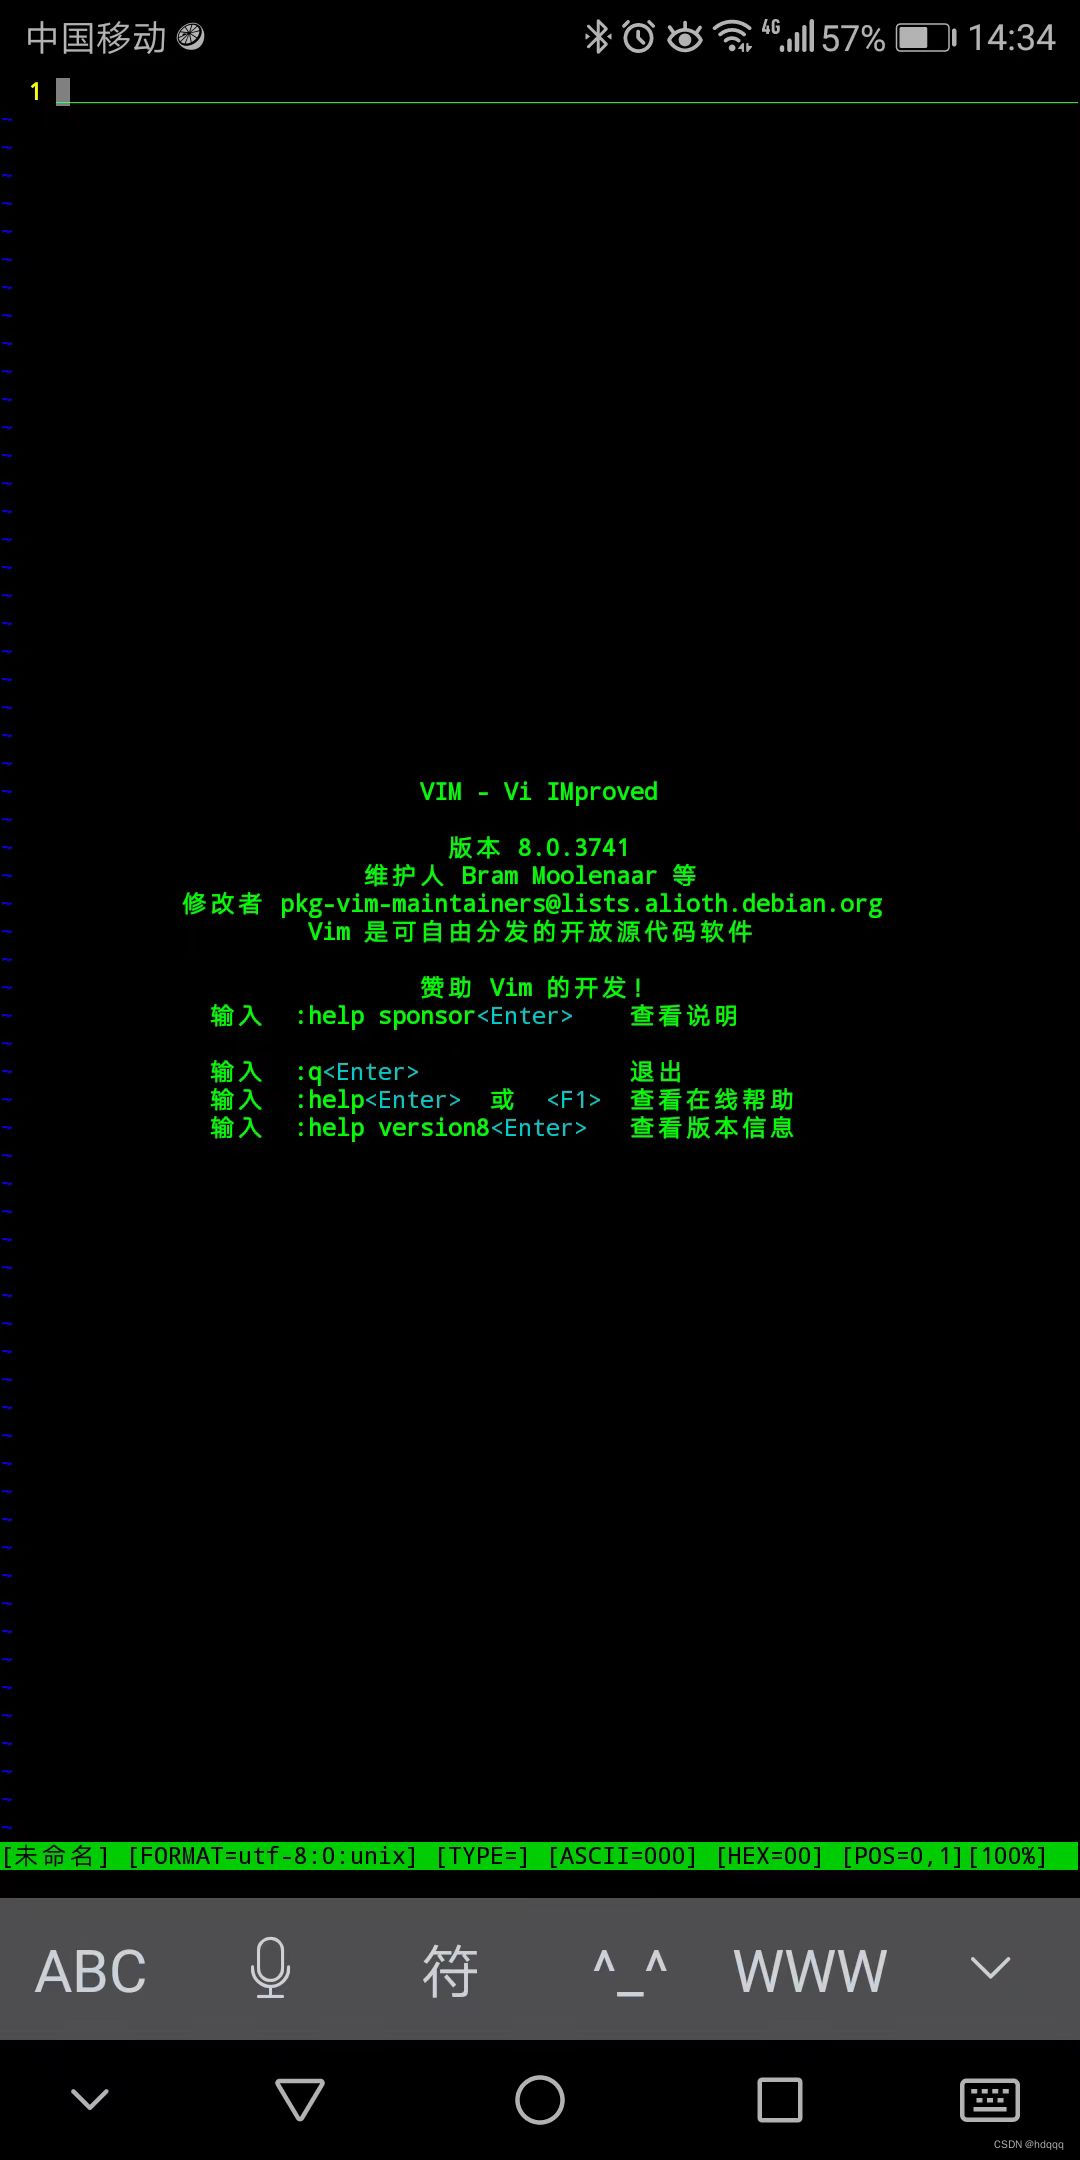
VIM 编辑器: Bram Moolenaar
VIM 用了很长时间, 个人的 VIM 配置文件差不多10年没有更新了。以前写程序的时候, 编辑都用这个。 linux kernel, boost规模的代码都不在话下。现在虽然代码写的少了,依然是我打开文件的首选。 现在用手机了,配个蓝牙键…...

鸿蒙应用开发指南:从零开始构建一款智能音乐播放器
介绍 随着鸿蒙操作系统的发布,开发者们迫不及待地想要探索鸿蒙应用的开发。本篇博客将以构建一款智能音乐播放器为例,带你一步步了解鸿蒙应用开发的技术要点和实践。我们将使用HarmonyOS的开发环境和MarkDown进行排版,方便你快速上手。 准备…...

印地语语音合成落地难?ElevenLabs官方未披露的4大限制、3种绕过技巧,及2个替代模型性能对比数据
更多请点击: https://kaifayun.com 第一章:印地语语音合成落地难?ElevenLabs官方未披露的4大限制、3种绕过技巧,及2个替代模型性能对比数据 ElevenLabs对印地语支持的真实现状 ElevenLabs虽在API文档中标注“支持印地语&#x…...

Zygo测试驱动开发实践:如何为解释器编写可靠的测试套件
Zygo测试驱动开发实践:如何为解释器编写可靠的测试套件 【免费下载链接】zygomys Zygo is a Lisp interpreter written in 100% Go. Central use case: dynamically compose Go struct trees in a zygo script, then invoke compiled Go functions on those trees. …...
)
Midjourney大画幅风格实战手册(从失效黑边到完美展陈:2023全球TOP 50商业项目验证的7大避坑节点)
更多请点击: https://kaifayun.com 第一章:Midjourney大画幅风格的本质解构与视觉范式跃迁 大画幅风格并非单纯指图像物理尺寸的放大,而是Midjourney通过隐式参数空间重构所催生的一种高密度视觉语义范式——它融合了胶片颗粒质感、景深压缩…...

Vue3 入门学习
Vue3 技术文章大纲Vue3 核心特性与优势Composition API 的设计理念与优势Composition API 是 Vue3 的核心特性之一,旨在解决 Options API 在复杂组件中逻辑分散的问题。通过 setup 函数,可以将相关逻辑组织在一起,提高代码的可读性和可维护性…...

SubAgent 进阶:LLM 策略、工具借用与 Skill 嵌套
标签:Java SubAgent LLM策略 llmFactory allowedTools Skill嵌套 j-langchain 前置阅读:SubAgent 基础:拥有自主工具的子代理 适合人群:已掌握 SubAgent 基础用法,希望灵活控制模型选择、工具权限与多层嵌套的 Java 开…...

告别Python依赖:用Libtorch C++ API将PyTorch模型封装成独立DLL/动态库
工业级AI集成:用Libtorch C构建高可用模型动态库 当AI模型需要从实验环境走向生产系统时,Python的依赖地狱和性能瓶颈往往成为绊脚石。本文将手把手带您实现从PyTorch模型到标准化C动态库的完整蜕变,打造一个既保持Python开发效率,…...

MulimgViewer:高效多图像浏览与对比工具
MulimgViewer:高效多图像浏览与对比工具 【免费下载链接】MulimgViewer MulimgViewer is a multi-image viewer that can open multiple images in one interface, which is convenient for image comparison and image stitching. 项目地址: https://gitcode.com…...
)
YOLOv8无人机红外识别检测系统(项目源码+YOLO数据集+模型权重+UI界面+python+深度学习+环境配置)
摘要 面向无人机平台的红外目标检测在夜间及低能见度环境下具有重要应用价值。本文基于YOLOv8构建了一套针对车辆与行人的红外检测系统,数据集包含4类目标(Car、DontCare、OtherVehicle、Person),共计10128张训练图像、715张验证…...

Tidal-Media-Downloader:3分钟掌握终极Tidal音乐下载方案
Tidal-Media-Downloader:3分钟掌握终极Tidal音乐下载方案 【免费下载链接】Tidal-Media-Downloader Download TIDAL Music On Windows/Linux/MacOs (PYTHON/C#) 项目地址: https://gitcode.com/gh_mirrors/ti/Tidal-Media-Downloader 还在为无法随时随地畅享…...

ODT怎么转PDF?2026年实测5种转换方法与在线工具对比
ODT(OpenDocument Text)是开源办公软件默认的文档格式,但在实际工作和分享中,PDF的通用性和防篡改特性让它成为更优选择。很多人拿到ODT文件后都会面临同一个问题:怎样才能快速转成PDF?本文将从多个角度展示…...