Vue3组件库
Vue组件库
Vite+Vue3+Typescript+TSX
1、项目搭建
1.1、创建项目(yarn)
D:\WebstromProject>yarn create vite
yarn create v1.22.19
[1/4] Resolving packages...
[2/4] Fetching packages...
[3/4] Linking dependencies...
[4/4] Building fresh packages...success Installed "create-vite@4.4.1" with binaries:- create-vite- cva
√ Project name: ... chenxing
√ Select a framework: » Vue
√ Select a variant: » TypeScriptScaffolding project in D:\WebstromProject\chenxing...Done. Now run:cd chenxingyarnyarn devDone in 6.95s.
1.2、基础依赖
1、@types/node
# @types/node
yarn add -D @types/node
2、Jsx
# @vitejs/plugin-vue-jsx
yarn add -D @vitejs/plugin-vue-jsx
3、eslint
# eslint、vite-plugin-eslint(vite运行的时候自动检测eslint规范)
yarn add -D eslint
yarn add -D vite-plugin-eslint
4、prettier
# prettier、eslint-config-prettier(关掉所有和Prettier冲突的ESLint的配置)、eslint-plugin-prettier(将Prettier的rules以插件的形式加入到 ESLint里面)
yarn add -D prettier eslint-config-prettier eslint-plugin-prettier
5、sass
# sass
yarn add -D sass
1.3、项目配置
1、关闭Option Api
import {defineConfig} from 'vite'
import vue from '@vitejs/plugin-vue'// https://vitejs.dev/config/
export default defineConfig({define: {// 关闭Vue Options Api__VUE_OPTIONS_API__: false},plugins: [vue()],
})
2、Jsx配置
import {defineConfig} from 'vite'
import vue from '@vitejs/plugin-vue'
import vueJsxPlugin from "@vitejs/plugin-vue-jsx";// https://vitejs.dev/config/
export default defineConfig({define: {// 关闭Vue Options Api__VUE_OPTIONS_API__: false},plugins: [vue(),vueJsxPlugin({})],
})
3、路径别名
src修改为examples,新增examples同级文件夹packages作为UI组件位置
import { defineConfig } from "vite";
import vue from "@vitejs/plugin-vue";
import vueJsxPlugin from "@vitejs/plugin-vue-jsx";
import * as path from "path";// https://vitejs.dev/config/
export default defineConfig({base: "./",define: {// 关闭Vue Options Api__VUE_OPTIONS_API__: false,},plugins: [vue(), vueJsxPlugin({})],resolve: {// 配置路径别名alias: {"@": path.resolve(__dirname, "./examples"),},},
});
1.4、eslint
1、初始化eslint
PS D:\WebstromProject\chenxing> npx eslint --init
You can also run this command directly using 'npm init @eslint/config'.
? How would you like to use ESLint? ...To check syntax only
> To check syntax and find problems
√ How would you like to use ESLint? · problems
√ What type of modules does your project use? · esm
√ Which framework does your project use? · vue
√ Does your project use TypeScript? · No / Yes
√ Where does your code run? · browser, node
√ What format do you want your config file to be in? · JavaScript
The config that you've selected requires the following dependencies:@typescript-eslint/eslint-plugin@latest eslint-plugin-vue@latest @typescript-eslint/parser@latest
√ Would you like to install them now? · No / Yes
√ Which package manager do you want to use? · yarn
Installing @typescript-eslint/eslint-plugin@latest, eslint-plugin-vue@latest, @typescript-eslint/parser@latest
2、.eslintrc.cjs
module.exports = {"env": {"browser": true,"es2021": true,"node": true},"extends": ["eslint:recommended","plugin:@typescript-eslint/recommended","plugin:vue/vue3-essential"],"overrides": [{"env": {"node": true},"files": [".eslintrc.{js,cjs}"],"parserOptions": {"sourceType": "script"}}],"parserOptions": {"ecmaVersion": "latest","parser": "@typescript-eslint/parser","sourceType": "module"},"plugins": ["@typescript-eslint","vue"],"rules": {}
}
3、package.json
{"name": "chenxing","private": true,"version": "0.0.0","type": "module","scripts": {"dev": "vite","build": "vue-tsc && vite build","preview": "vite preview","lint": "eslint . --ext .vue,.js,.ts,.jsx,.tsx --fix"},"dependencies": {"vue": "^3.3.4"},"devDependencies": {"@typescript-eslint/eslint-plugin": "^6.3.0","@typescript-eslint/parser": "^6.3.0","@vitejs/plugin-vue": "^4.2.3","@vitejs/plugin-vue-jsx": "^3.0.1","eslint": "^8.46.0","eslint-plugin-vue": "^9.17.0","typescript": "^5.0.2","vite": "^4.4.5","vite-plugin-eslint": "^1.8.1","vue-tsc": "^1.8.5"}
}
4、webstrom配置
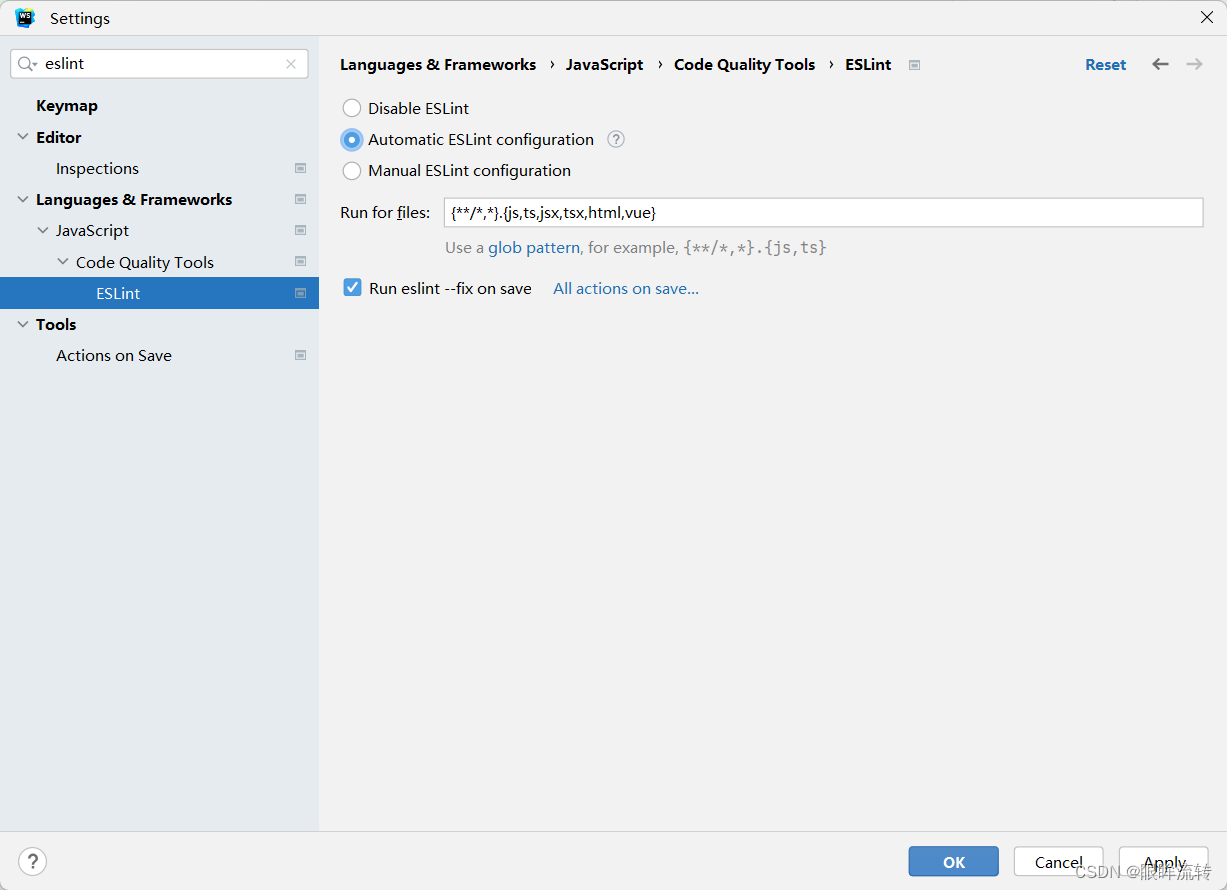
1.5、prettier
1、.prettierrc.cjs
module.exports = {printWidth: 80, // 单行长度tabWidth: 2, // 缩进长度useTabs: false, // 使用空格代替tab缩进semi: true, // 句末使用分号singleQuote: false, // 使用单引号
}
2、.eslintrc.cjs
module.exports = {"env": {"browser": true,"es2021": true,"node": true},"extends": ["eslint:recommended","plugin:@typescript-eslint/recommended","plugin:vue/vue3-essential",'plugin:prettier/recommended','eslint-config-prettier'],"overrides": [{"env": {"node": true},"files": [".eslintrc.{js,cjs}"],"parserOptions": {"sourceType": "script"}}],"parserOptions": {"ecmaVersion": "latest","parser": "@typescript-eslint/parser","sourceType": "module"},"plugins": ["@typescript-eslint","vue"],"rules": {}
}
3、package.json
{"name": "chenxing","private": true,"version": "0.0.0","type": "module","scripts": {"dev": "vite","build": "vue-tsc && vite build","preview": "vite preview","lint": "eslint . --ext .vue,.js,.ts,.jsx,.tsx","prettier": "prettier --write ./**/*.{vue,ts,tsx,js,jsx,css,less,scss,json,md}"},"dependencies": {"vue": "^3.3.4"},"devDependencies": {"@types/node": "^20.4.10","@typescript-eslint/eslint-plugin": "^6.3.0","@typescript-eslint/parser": "^6.3.0","@vitejs/plugin-vue": "^4.2.3","@vitejs/plugin-vue-jsx": "^3.0.1","eslint": "^8.47.0","eslint-config-prettier": "^9.0.0","eslint-plugin-prettier": "^5.0.0","eslint-plugin-vue": "^9.17.0","prettier": "^3.0.1","sass": "^1.65.1","typescript": "^5.0.2","vite": "^4.4.5","vite-plugin-eslint": "^1.8.1","vue-tsc": "^1.8.5"}
}
4、webstrom配置

2、Button组件
2.1、基础组件
在package下新建components目录,components下新建button目录,button下新建src目录和index.ts文件,src目录下新建button.tsx和type.ts
1、button.tsx
import { defineComponent, toRefs } from "vue";
import { PropsType, propsType } from "./type";
import "../style/index.scss";export default defineComponent({name: "XButton",props: propsType,setup(props: PropsType, { slots }) {const { type } = toRefs(props);console.log(type);return () => {return (<div class={`button button-${type.value}`}>{slots.default ? slots.default() : "Button"}</div>);};},
});
2、type.ts
import { ExtractPropTypes, PropType } from "vue";// buttonType
type type = "default" | "success" | "warning" | "fail";// props参数类型
export const propsType = {type: {type: String as PropType<type>,default: "default",},
};export type PropsType = ExtractPropTypes<typeof propsType>;
3、index.ts
import XButton from "./src/button";
import { App } from "vue";export default {install(app: App) {app.component(XButton.name, XButton);},
};
2.2、样式
src同级新建chenxing.scss(通用样式抽离),src同级新建style目录,style下新建index.scss
1、chenxing.scss
$fontSize: var(--font-size, 14px);
$fontColor: #3c3c3c;
$lineHeight: 1.2rem;
$border-radius: var(--border-radius, 2px);// 基础样式
* {margin: 0; // 清除所有元素外边距padding: 0; // 清除所有元素内边距outline: none; // 清除所有元素轮廓线box-sizing: border-box !important; // 规定盒子模型。content-box:宽度和高度分别应用到元素的内容框。在宽度和高度之外绘制元素的内边距和边框;border-box:为元素指定的任何内边距和边框都将在已设定的宽度和高度内进行绘制。font-family: system-ui; // html基准字体font-size: $fontSize; // html基准字体大小color: $fontColor; // html基准字体颜色line-height: $lineHeight; // html基准行高
}:not(i) {&:before,&:after {margin: 0; // 清除所有元素外边距padding: 0; // 清除所有元素内边距outline: none; // 清除所有元素轮廓线box-sizing: border-box !important; // 规定盒子模型。content-box:宽度和高度分别应用到元素的内容框。在宽度和高度之外绘制元素的内边距和边框;border-box:为元素指定的任何内边距和边框都将在已设定的宽度和高度内进行绘制。}
}html,
body {position: relative; // html,body相对定位,防止body直接子节点乱飞
}
2、index.scss
@import "packages/components/chenxing";$button-types: (success: var(--button-success, green),warning: var(--button-warning, yellow),fail: var(--button-fail, red));.button {display: inline-block;border-radius: 5px;padding: .75rem 1rem;@each $type, $color in $button-types {&.button-#{$type} {background-color: $color;color: #ffffff;}}
}
2.3、尺寸
1、index.tsx
import { defineComponent, toRefs } from "vue";
import { PropsType, propsType } from "./type";
import "../style/index.scss";export default defineComponent({name: "XButton",props: propsType,setup(props: PropsType, { slots }) {const { type, size } = toRefs(props);console.log(type, size);return () => {return (<div class={`button button-${type.value} button-${size.value}`}>{slots.default ? slots.default() : "Button"}</div>);};},
});
2、type.ts
import { ExtractPropTypes, PropType } from "vue";// buttonType
type type = "default" | "success" | "warning" | "fail";// buttonSize
type size = "small" | "proper" | "large";// props参数类型
export const propsType = {type: {type: String as PropType<type>,default: "default",},size: {type: String as PropType<size>,default: "proper",},
};export type PropsType = ExtractPropTypes<typeof propsType>;
3、index.scss
@import "packages/components/chenxing";$buttonTypes: (success: green,warning: yellow,fail: red
);$buttonSizes: (small: .25rem .75rem,proper: .75rem 1rem,large: 1rem 1.25rem,
);.button {display: inline-block;border-radius: 5px;// default typebackground-color: blue;color: #ffffff;// default sizefont-size: $fontSize;padding: .75rem 1rem;margin: .25rem .5rem;// $button-types@each $type, $color in $buttonTypes {&.button-#{$type} {background-color: $color;color: #ffffff;}}// $button-sizes@each $size, $padding in $buttonSizes {&.button-#{$size} {padding: $padding;}}
}
2.4、块/行内
1、index.tsx
import { defineComponent, toRefs } from "vue";
import { PropsType, propsType } from "./type";
import "../style/index.scss";export default defineComponent({name: "XButton",props: propsType,setup(props: PropsType, { slots }) {const { type, size, disable, display } = toRefs(props);console.log(type, size, disable, display);return () => {return (<divclass={`button button-${type.value} button-${size.value} button-${display.value}>{slots.default ? slots.default() : "Button"}</div>);};},
});
2、type.ts
import { ExtractPropTypes, PropType } from "vue";type type = "default" | "success" | "warning" | "fail";type size = "small" | "proper" | "large";type display = "inline" | "block";// props参数类型
export const propsType = {type: {type: String as PropType<type>,default: "default",},size: {type: String as PropType<size>,default: "proper",},display: {type: String as PropType<display>,default: "inline-block",},
};export type PropsType = ExtractPropTypes<typeof propsType>;
3、index.scss
@import "packages/components/chenxing";$buttonTypes: (success: green,warning: yellow,fail: red
);$buttonSizes: (small: .25rem .75rem,proper: .75rem 1rem,large: 1rem 1.25rem,
);$buttonDisplay: (inline: inline-block, block: block);.button {border-radius: 5px;// default typebackground-color: blue;color: #ffffff;// default sizefont-size: $fontSize;padding: .75rem 1rem;margin: .25rem .5rem;// default displaydisplay: inline-block;// type@each $type, $color in $buttonTypes {&.button-#{$type} {background-color: $color;color: #ffffff;}}// size@each $size, $padding in $buttonSizes {&.button-#{$size} {padding: $padding;}}// display@each $display, $displayItem in $buttonDisplay {&.button-#{$display} {display: $displayItem;}}
}
2.5、禁用
1、index.tsx
import { defineComponent, toRefs } from "vue";
import { PropsType, propsType } from "./type";
import "../style/index.scss";export default defineComponent({name: "XButton",props: propsType,setup(props: PropsType, { slots }) {const { type, size, disable, display } = toRefs(props);console.log(type, size, disable, display);const Display = disable.value ? "disable" : "";return () => {return (<divclass={`button button-${type.value} button-${size.value} button-${display.value} ${Display}`}>{slots.default ? slots.default() : "Button"}</div>);};},
});
2、type.ts
import { ExtractPropTypes, PropType } from "vue";type type = "default" | "success" | "warning" | "fail";type size = "small" | "proper" | "large";type display = "inline" | "block";// props参数类型
export const propsType = {type: {type: String as PropType<type>,default: "default",},size: {type: String as PropType<size>,default: "proper",},display: {type: String as PropType<display>,default: "inline-block",},disable: {type: Boolean,default: false,},
};export type PropsType = ExtractPropTypes<typeof propsType>;
3、index.scss
@import "packages/components/chenxing";$buttonTypes: (success: green,warning: yellow,fail: red
);$buttonSizes: (small: .25rem .75rem,proper: .75rem 1rem,large: 1rem 1.25rem,
);$buttonDisplay: (inline: inline-block, block: block);.button {border-radius: 5px;// default typebackground-color: blue;color: #ffffff;// default sizefont-size: $fontSize;padding: .75rem 1rem;margin: .25rem .5rem;// default displaydisplay: inline-block;// type@each $type, $color in $buttonTypes {&.button-#{$type} {background-color: $color;color: #ffffff;}}// size@each $size, $padding in $buttonSizes {&.button-#{$size} {padding: $padding;}}// display@each $display, $displayItem in $buttonDisplay {&.button-#{$display} {display: $displayItem;}}// disable&.disable {pointer-events: none;opacity: .3;}
}
2.6、使用
main.ts
import { createApp } from "vue";
import "./style.css";
import App from "./App.vue";
// import XButton from "../packages/components/button";
import Chenxing from "../packages/components";createApp(App).use(Chenxing).mount("#app");
App.vue
<script setup lang="ts">
import XButton from "../packages/components/button/src";
</script><template><XButton>按钮</XButton><XButton type="success">按钮</XButton><XButton type="warning">按钮</XButton><XButton type="fail">按钮</XButton><br /><XButton type="success" size="small">按钮</XButton><XButton type="warning" size="proper">按钮</XButton><XButton type="fail" size="large">按钮</XButton><br /><XButton disable type="success">按钮</XButton><XButton :disable="true" type="warning">按钮</XButton><XButton :disable="false" type="fail">按钮</XButton><br /><XButton :disable="false" type="fail" display="block">按钮</XButton>
</template><style scoped></style>
3、组件统一注册
components下新建index.ts
3.1、index.ts
// 导入button组件
import { App } from "vue";
import XButton from "./button/src/button";// 组件列表
const components = [XButton];export default {install(app: App) {components.forEach((component) => {app.component(component.name, component);});},
};
3.2、使用
1、main.ts
import { createApp } from "vue";
import "./style.css";
import App from "./App.vue";
// import XButton from "../packages/components/button";
import Chenxing from "../packages/components";createApp(App).use(Chenxing).mount("#app");
2、App.vue
<script setup lang="ts">
import XButton from "../packages/components/button/src/button";
</script><template><XButton></XButton>
</template><style scoped></style>
相关文章:
Vue3组件库
Vue组件库 ViteVue3TypescriptTSX 1、项目搭建 1.1、创建项目(yarn) D:\WebstromProject>yarn create vite yarn create v1.22.19 [1/4] Resolving packages... [2/4] Fetching packages... [3/4] Linking dependencies... [4/4] Building fresh pa…...

AUTOSAR从入门到精通-【应用篇】基于 CAN/LIN 总线的智能配电监控系统的研究设计
目录 前言 国内外研究现状 CAN 总线和 LIN 总线技术 2.1CAN 总线技术 2.1.1 通信模型...

数据安全服务能力评定资格证书-申请流程
数据安全服务能力评定(以下简称能力评定)是指对数据安全服务提供商从事数据安全服务综合能力的评定,包括技术能力、服务能力、质量保证能力、人员构成与素质、经营业绩、资产状况等要素。 用于对中华人民共和国境内的数据安全服务提供商提供…...
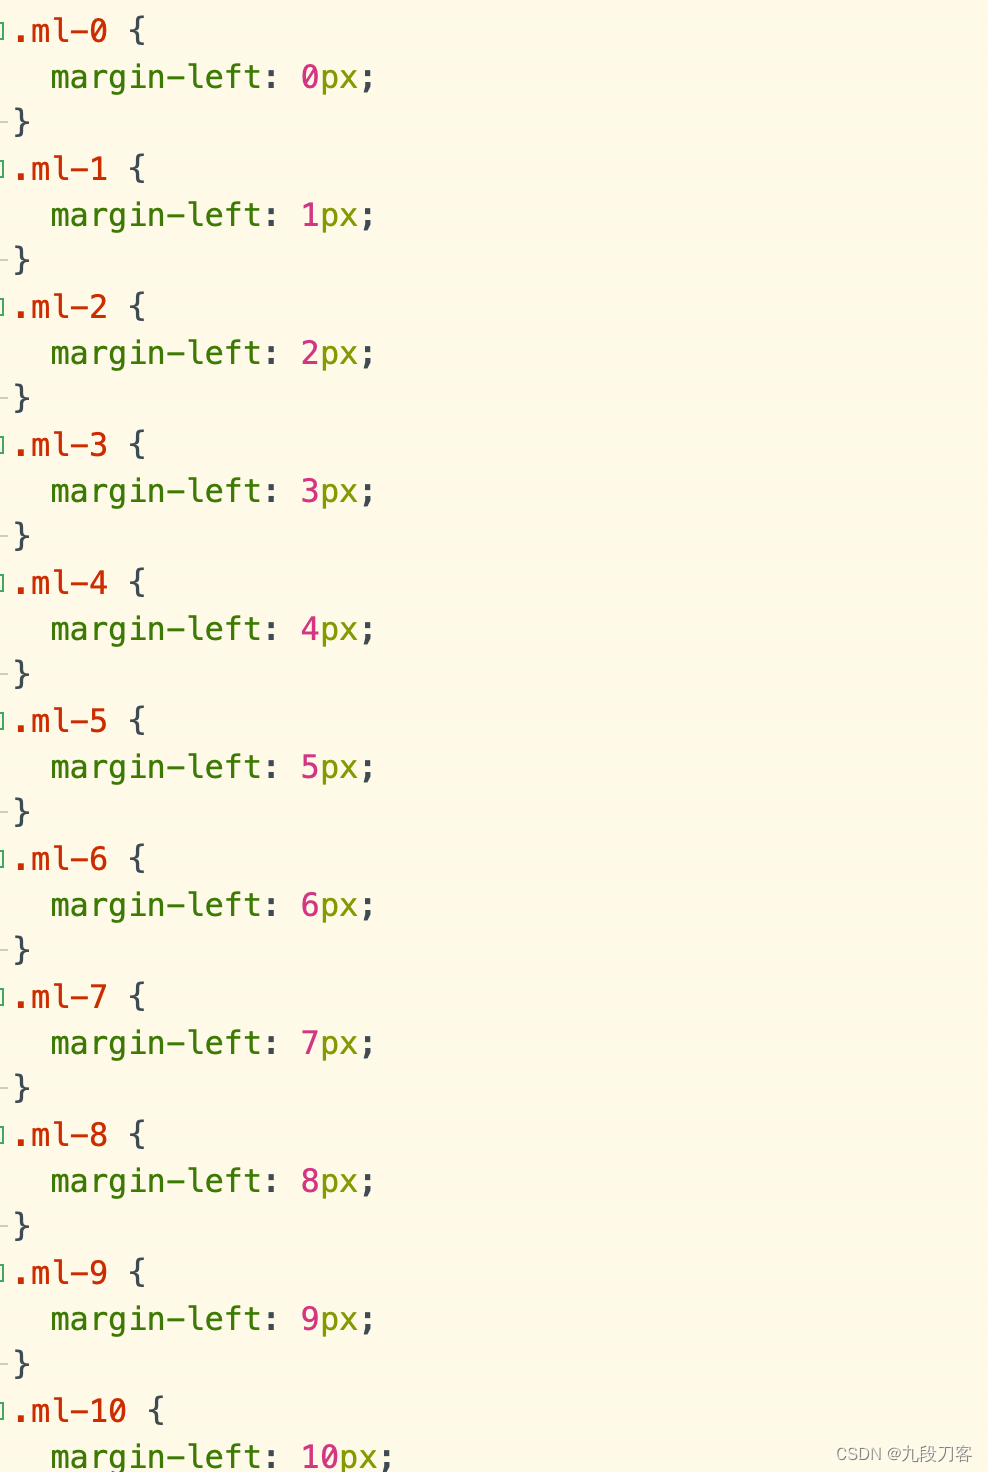
用js快速生成一个简单的css原子库 例如: .mr-18 .pl-18
第三方css原子库的缺点 比如 tailwindcss,有学习成本最开始写的时候效率可能还没有我们自己手写效率高,需要配置,会有原始样式被覆盖的问题;总之就是一个字重 自己搓的优点 学习成本低灵活不会有副作用 <!DOCTYPE html>…...

Java鹰眼轨迹服务 轻骑小程序 运动健康与社交案例
Java地图专题课 基本API BMapGLLib 地图找房案例 MongoDB 百度地图鹰眼轨迹服务 鹰眼轨迹服务概述 鹰眼是一套轨迹管理服务,提供各端SDK和API供开发者便捷接入,追踪所管理的车辆/人员等运动物体。 基于鹰眼提供的接口和云端服务,开发者可以迅…...

【产品经理】微信小程序隐私保护指引
为了分辨用户,开发者将在获取你的明示同意后,收集你的微信昵称、头像。 为了显示距离,开发者将在获取你的明示同意后,收集你的位置信息。 开发者收集你的地址,用于获取位置信息。 开发者收集你的发票信息࿰…...

springboot创建websocket服务端
springboot创建websocket服务端 1.配置类 package com.neusoft.airport.websocket;import org.springframework.context.annotation.Bean; import org.springframework.context.annotation.Configuration; import org.springframework.web.socket.server.standard.ServerEndp…...

网络安全攻防实战:探索互联网发展史
大家好,我是沐尘而生。 互联网发展史:数字世界的壮阔画卷 从早期的ARPANET到今天的万物互联,互联网经历了漫长的发展过程。然而,随着技术的进步,网络安全问题也随之而来。我们不仅要探索互联网的壮阔历程,…...
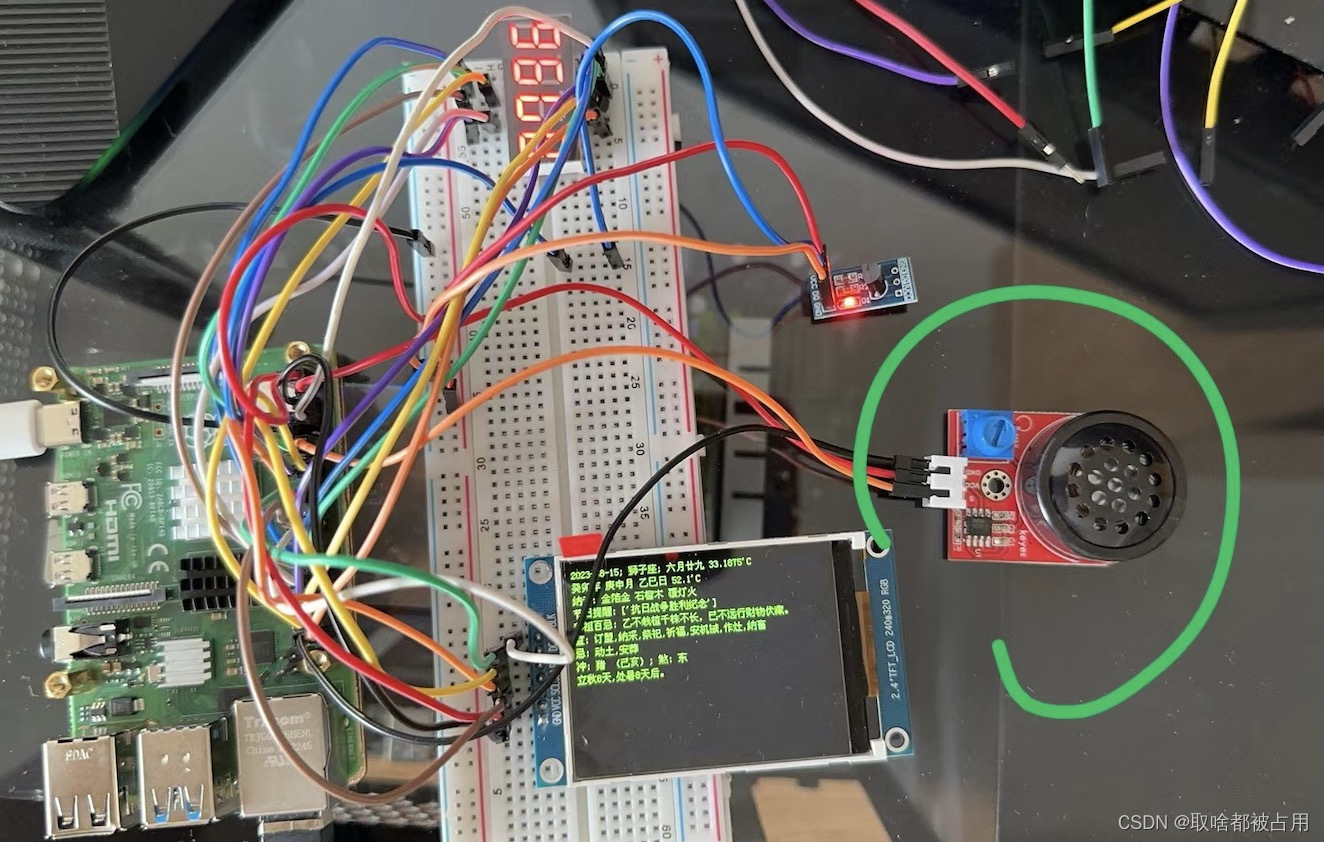
pwm接喇叭搞整点报时[keyestudio的8002模块]
虽然现在查看时间很方便,但是其实好像我的时间观念却越来越差。于是决定搞一个整点报时,时常提醒自己时光飞逝,不要老是瞎墨迹。 这篇主要讲一下拼装方式和配置,就差不多了。不涉及什么代码。3针的元器件,去掉正负接线…...

配置listener tcps加密 enable SSL encryption for Oracle SQL*Net
一 配置客户端和服务端的wallet 2端配置方法一致,相互添加证书 orapki wallet create -wallet “/u01/oracle/wallet” -pwd Wdkf984jkkgekj434FKFD -auto_login_local orapki wallet add -wallet “/u01/oracle/wallet” -pwd Wdkf984jkkgekj434FKFD -dn “CNho…...
)
【Sklearn】基于逻辑回归算法的数据分类预测(Excel可直接替换数据)
【Sklearn】基于逻辑回归算法的数据分类预测(Excel可直接替换数据) 1.模型原理2.模型参数3.文件结构4.Excel数据5.下载地址6.完整代码7.运行结果1.模型原理 逻辑回归是一种用于二分类问题的统计学习方法,尽管名字中含有“回归”,但实际上是一种分类算法。它的基本原理是通…...

自然数的拆分问题
题目描述 任何一个大于 11 的自然数 n,总可以拆分成若干个小于 n 的自然数之和。现在给你一个自n,要求你求出 n 的拆分成一些数字的和。每个拆分后的序列中的数字从小到大排序。然后你需要输出这些序列,其中字典序小的序列需要优先输出。 输…...
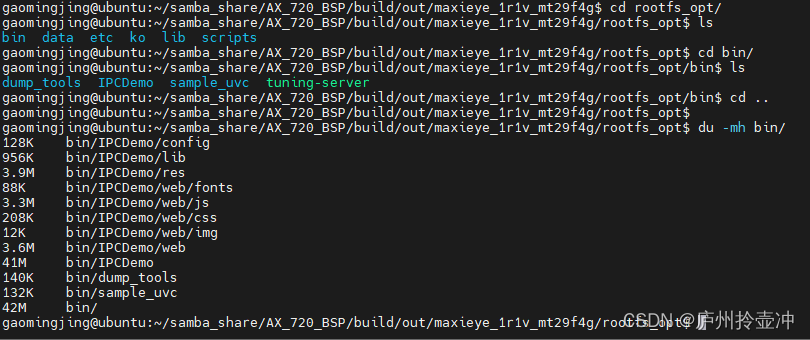
du -mh命令
du 命令查看每个文件夹大小(du 命令用法详解),du 命令的英文全拼是 disk usage,意思是占用的磁盘空间,该命令可以显示目录或文件的大小。 在执行“ du ”命令时,使用“ -h ”参数会以“人类可读格式”显示…...

MySQL 8 group by 报错 this is incompatible with sql_mode=only_full_group_by
文章目录 sql_mode配置ONLY_FULL_GROUP_BYSTRICT_TRANS_TABLESNO_ZERO_IN_DATENO_ZERO_DATEERROR_FOR_DIVISION_BY_ZERONO_AUTO_CREATE_USERNO_ENGINE_SUBSTITUTION 局部修改配置windows修改配置Linux修改配置 sql_mode配置 ONLY_FULL_GROUP_BY 用于控制是否允许对查询结果进…...

Mongodb (四十一)
提示:文章写完后,目录可以自动生成,如何生成可参考右边的帮助文档 目录 前言 一、概述 1.1 相关概念 1.2 特性 二、应用场景 三、安装 四、目录结构 五、默认数据库 六、 数据库操作 6.1 库操作 6.2 文档操作 七、MongoDB数据库备份 7.1 备…...
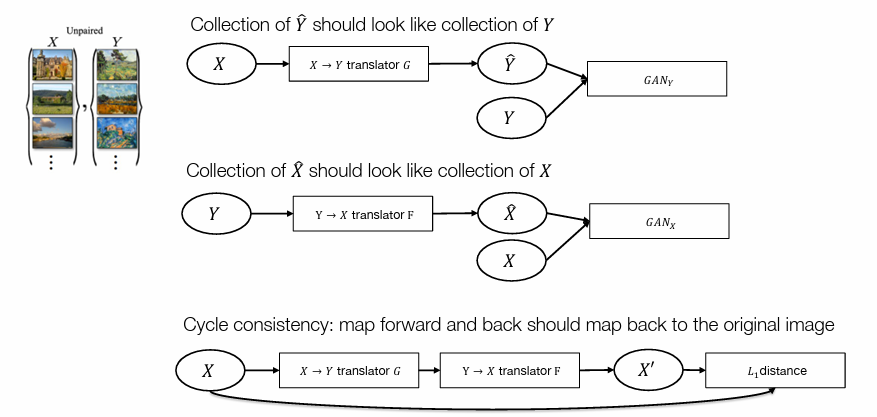
16 dlsys GAN
和有监督的分类工作不同,生成任务的目标更不明确。难以评价生成结果的好坏。 Oracle discriminator 假设我们有一个先知判别器oracle discriminator可以分辨我们生成的内容是真还是假。 D(x) 表示判别数据为真的概率。 我们想让生产成的结果足够真实,所…...

css3-flex布局:基础使用 / Flexbox布局
一、理解flex 二、理解Flex布局(又称Flexbox布局) Flex布局(又称Flexbox布局)是一种基于Web的CSS3布局模式,其目的是为了更加灵活和自适应地布置各种各样的网页元素。Flex布局通过将一个父容器分割为一个或多个弹性项…...
MYSQL-习题掌握
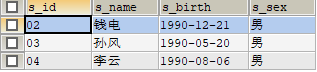
文章目录 SQL基本操作1 设计表操作1.1 关系表字段1.2 关系表创建1.3 关系表数据1.4 关系表关系 2 SQL操作2.1 SQL 1-102.2 SQL 11-202.3 SQL 21-302.4 SQL 31-402.5 SQL 41-50 SQL基本操作 1 设计表操作 1.1 关系表字段 1 学生表 student s_ids_names_births_sex学生编号学…...

Python-迭代
1、迭代器 迭代器是一个对象,它可以记录遍历的相关信息,迭代器对象从集合的第一个元素开始访问,直到所有的元素被访问完结束。迭代器有两个基本的方法:iter() 和 next()。我们都过命令行工具,了解一下python的底层迭代…...

【论文阅读】DEPCOMM:用于攻击调查的系统审核日志的图摘要(SP-2022)
Xu Z, Fang P, Liu C, et al. Depcomm: Graph summarization on system audit logs for attack investigation[C]//2022 IEEE Symposium on Security and Privacy (SP). IEEE, 2022: 540-557. 1 摘要 提出了 DEPCOMM,这是一种图摘要方法,通过将大图划…...

从0到1构建DeepSeek企业级隔离体系:4类租户场景×3种SLA等级×2套审计回溯机制
更多请点击: https://intelliparadigm.com 第一章:DeepSeek资源隔离方案的总体架构设计 DeepSeek资源隔离方案以“多租户安全边界 动态资源契约”为核心设计理念,构建覆盖计算、内存、存储与网络四维资源的统一隔离层。该架构采用分层解耦结…...

Cursor Free VIP:终极解决方案,5步实现Cursor Pro永久免费使用
Cursor Free VIP:终极解决方案,5步实现Cursor Pro永久免费使用 【免费下载链接】cursor-free-vip [Support 0.45](Multi Language 多语言)自动注册 Cursor Ai ,自动重置机器ID , 免费升级使用Pro 功能: You…...

3大绝技:Gifsicle如何让命令行成为GIF动画的终极编辑器?
3大绝技:Gifsicle如何让命令行成为GIF动画的终极编辑器? 【免费下载链接】giflossy Merged into Gifsicle! 项目地址: https://gitcode.com/gh_mirrors/gi/giflossy 在数字内容创作的世界里,GIF动画一直占据着特殊地位——它轻量、兼容…...

算法日记 | C++ 结构体
算法日记 | C 结构体实战:如何优雅地处理“复杂数据”?👋 大家好。今天我们来点轻松但同样重要的基础内功—— 结构体 (Struct) 。很多同学写代码时,还在用 a[100], b[100], c[100] 这样散乱的数组来存数据吗?一旦数据…...

低查重AI写教材秘诀大揭秘!高效工具助你快速生成专业教材
一、AI教材写作的现状与需求 在编写教材之前,选择合适的工具常常让人感到无比纠结!如果用普通的办公软件,功能显得太过于简单,想要搭建框架或者规范格式,都只能依靠手工操作;而如果选择了专业的教材编写工…...

书匠策AI毕业论文功能到底有多离谱?科普博主亲测后整个人都愣住了
各位被毕业论文折磨到怀疑人生的同学,我是你们的论文科普老朋友。 今天不讲文献怎么读、不讲选题怎么选,咱们换个画风——我花了整整一周,把书匠策AI(h 官网直达:www.shujiangce.com微信搜一搜"书匠策AI"&a…...

如何快速掌握Poppins字体:免费开源的多语言设计终极指南
如何快速掌握Poppins字体:免费开源的多语言设计终极指南 【免费下载链接】Poppins Poppins, a Devanagari Latin family for Google Fonts. 项目地址: https://gitcode.com/gh_mirrors/po/Poppins 还在为多语言项目寻找完美的字体解决方案而烦恼吗ÿ…...

5分钟终极指南:如何用KMS_VL_ALL_AIO一键搞定Windows和Office激活难题
5分钟终极指南:如何用KMS_VL_ALL_AIO一键搞定Windows和Office激活难题 【免费下载链接】KMS_VL_ALL_AIO Smart Activation Script 项目地址: https://gitcode.com/gh_mirrors/km/KMS_VL_ALL_AIO 还在为Windows激活烦恼吗?每次重装系统后都要到处寻…...

Unity中Newtonsoft.Json三种安装方式深度对比
1. 为什么Unity项目里装个Json库要纠结三天?——从一次崩溃说起Newtonsoft.Json,也就是大家常说的Json.NET,在C#生态里几乎是序列化的代名词。但放到Unity里,它却是个“熟悉的陌生人”:你写惯了JsonConvert.SerializeO…...

2026年电工杯AB题|基础可冲!免费参赛 + 高含金量,保研 / 综测加分必看!重磅更新|独家原创|Python|Matlab代码|数学建模|论文|
💥💥💞💞欢迎来到本博客❤️❤️💥💥 🏆博主优势:🌞🌞🌞博客内容尽量做到思维缜密,逻辑清晰,为了方便读者。 ⛳️座右铭&a…...