Ubuntu20.04如何安装虚拟机(并安装Android)
安装虚拟机(KVM)
这种KVM只能安装windows无法安装安卓
(From https://phoenixnap.com/kb/ubuntu-install-kvm)
A type 2 hypervisor enables users to run isolated instances of other operating systems inside a host system. As a Linux based OS, Ubuntu supports a wide range of virtualization solutions.
Aside from popular third-party apps, such as VirtualBox and VMWare, the Linux kernel has its own virtualization module called KVM (Kernel-based Virtual Machine).
In this tutorial you will learn how to install and set up KVM on Ubuntu 20.04.
Prerequisites
A system running Ubuntu 20.04
An account with sudo privileges
Access to the command line/terminal
Check Virtualization Support on Ubuntu 20.04
1. Before you begin with installing KVM, check if your CPU supports hardware virtualization via egrep command:
egrep -c '(vmx|svm)' /proc/cpuinfoCheck the number in the output:

If the command returns a value of 0, your processor is not capable of running KVM. On the other hand, any other number means you can proceed with the installation.
2. Now, check if your system can use KVM acceleration by typing:
sudo kvm-okThe output should look like this:

If kvm-ok returns an error stating KVM acceleration cannot be used, try solving the problem by installing cpu-checker.
3. To install cpu-checker, run the following command:
sudo apt install cpu-checker4. When the installation completes, restart the terminal.
You are now ready to start installing KVM.
Note: When it is performed for servers, hardware virtualization is referred to as server virtualization.
Install KVM on Ubuntu 20.04
To enable KVM virtualization on Ubuntu 20.04:
Install related packages using apt
Authorize users to run VMs
Verify that the installation was successful
Step 1: Install KVM Packages
1. First, update the repositories:
sudo apt update2. Then, install essential KVM packages with the following command:
sudo apt install qemu-kvm libvirt-daemon-system libvirt-clients bridge-utilsThis will start the installation of four KVM packages:

3. When prompted, type Y, press ENTER, and wait for the installation to finish.
Step 2: Authorize Users
1. Only members of the libvirt and kvm user groups can run virtual machines. Add a user to the libvirt group by typing:
sudo adduser ‘username’ libvirtReplace username with the actual username.

2. Now do the same for the kvm group:
sudo adduser ‘[username]’ kvm
Note: If you need to remove a user from the libvirt or kvm group, just replace adduser with deluser in the command above.
Step 3: Verify the Installation
1. Confirm the installation was successful by using the virsh command:
virsh list --allYou can expect an output as seen below:

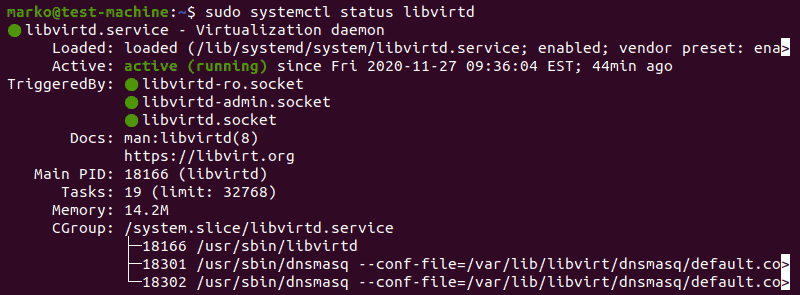
2. Or use the systemctl command to check the status of libvirtd:
sudo systemctl status libvirtdIf everything is functioning properly, the output returns an active (running) status.
3. Press Q to quit the status screen.
4. If the virtualization daemon is not active, activate it with the following command:
sudo systemctl enable --now libvirtdCreating a Virtual Machine on Ubuntu 20.04
1. Before you choose one of the two methods listed below, install virt-manager, a tool for creating and managing VMs:
sudo apt install virt-manager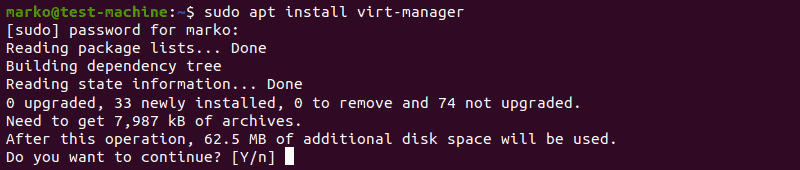
2. Type Y and press ENTER. Wait for the installation to finish.
Make sure you download an ISO containing the OS you wish to install on a VM and proceed to pick an installation method.
Method 1: Virt Manager GUI
1. Start virt-manager with:
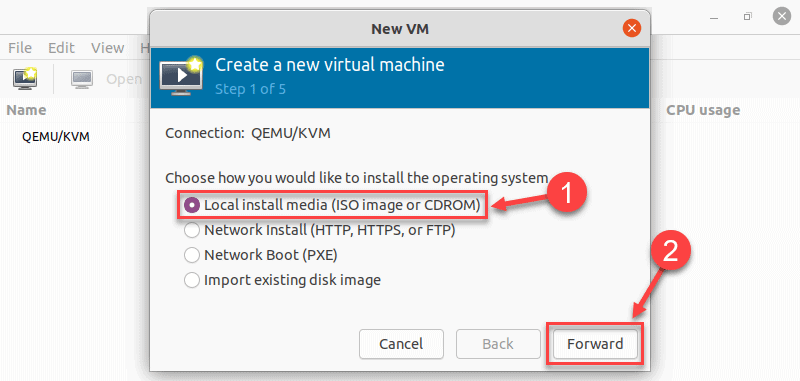
sudo virt-manager2. In the first window, click the computer icon in the upper-left corner.

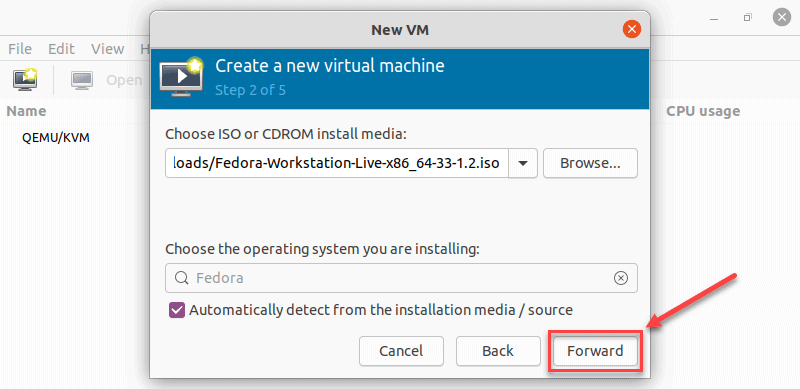
3. In the dialogue box that opens, select the option to install the VM using an ISO image. Then click Forward.
4. In the next dialogue, click Browse Local and navigate to the path where you stored the ISO you wish to install.

5. The ISO you chose in the previous window populates the field in Step 2. Proceed to Step 3 by clicking Forward.
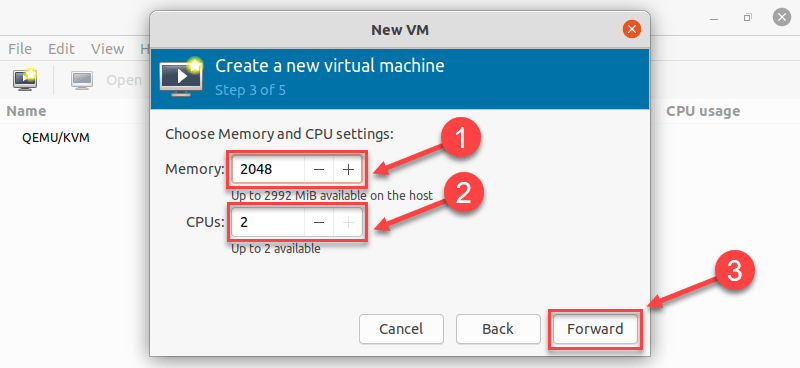
6. Enter the amount of RAM and the number of CPUs you wish to allocate to the VM and proceed to the next step.
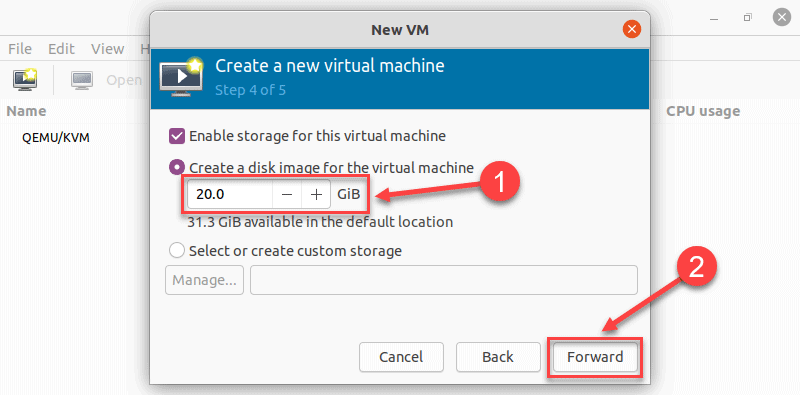
7. Allocate hard disk space to the VM. Click Forward to go to the last step.
8. Specify the name for your VM and click Finish to complete the setup.
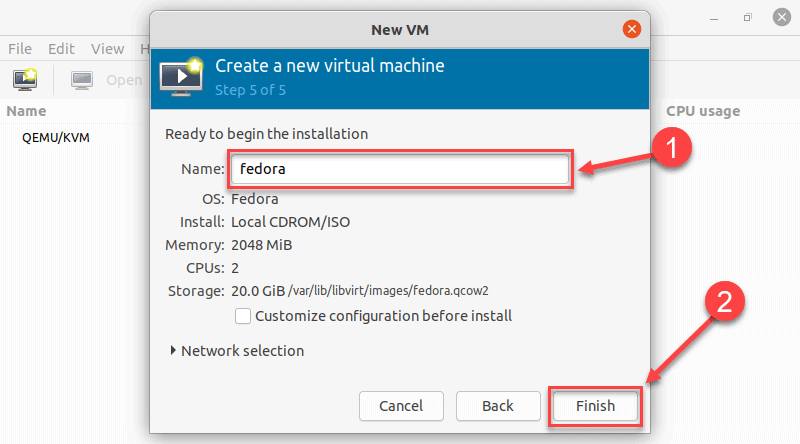
9. The VM starts automatically, prompting you to start installing the OS that’s on the ISO file.
Method 2: Using Command Line
Use the virt-install command to create a VM via Linux terminal. The syntax is:
virt-install --option1=value --option2=value ...In the following example, virt-install is used to install Fedora 33 Workstation.
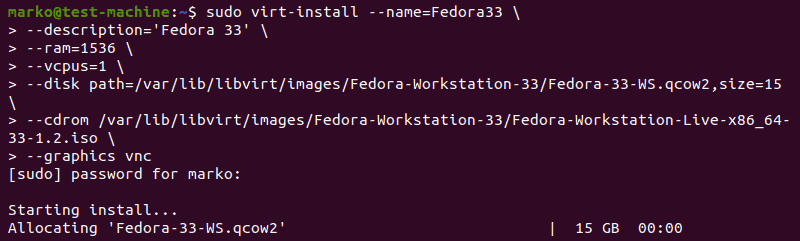
Tip: For tidier appearance of commands with many options, type a back-slash after each option. That way, when you press Enter, the command will not execute, and the cursor will go to the next line.
Options behind the command serve to define the parameters of the installation.
Here is what each of them means:
Option | Description |
--name | The name you give to the VM |
--description | A short description of the VM |
--ram | The amount of RAM you wish to allocate to the VM |
--vcpus | The number of virtual CPUs you wish to allocate to the VM |
--disk | The location of the VM on your disk (if you specify a qcow2 disk file that does not exist, it will be automatically created) |
--cdrom | The location of the ISO file you downloaded |
--graphics | Specifies the display type |
Conclusion
After reading this article, you should know how to install KVM on Ubuntu 20.04. Additionally, the article describes two methods of setting up virtual machines, using the virt-manager GUI and the virt-install command.
安装虚拟机(VirtualBox)
(From https://beebom.com/run-android-on-linux-using-virtual-machine/)
Recently, we curated a list of top Android emulators for Linux systems and were disappointed to find that there is no proper application that can mimic Android on a Linux distro. That said, we did find a cool way to run Android on Linux using a virtual machine with Play Store support. And in fact, it works better than emulators due to better binary translation and desktop-like features. So in this article, we are going to show you how to run Android on Linux using a virtual machine. On that note, let’s go ahead and learn about the steps without any delay.
Run Android on Linux Using Virtual Machine
Before we go ahead, let me briefly explain how we are going to run Android on Linux. We are going to use an open-source project called Android-x86 that ports ARM-based Android OS to x86 based systems. Basically, with Android-x86’s ISO image, you can boot Android on any desktop platform, be it Windows or Linux.
You can also install and run the best of Android games and apps on your Linux machine. So here are the instructions that you have to go through to install Android on Linux as a virtual machine. You can click on the link below to seamlessly move between various sections.
Table Of Contents
Basic Setup
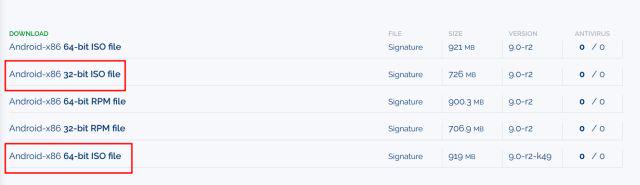
1. First of all, download the ISO image of Android 9 from here. Depending on your computer architecture, choose either a 64-bit or 32-bit ISO image. By the way, currently, Android 9 is the latest OS ported for desktop computers.
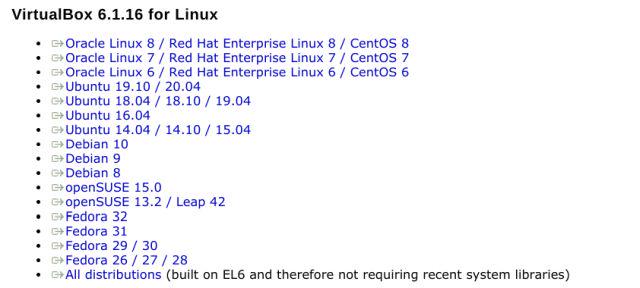
2. Once you have downloaded the Android ISO image, go ahead and download VirtualBox. You can find the setup file for all Linux distributions from here. After the download is complete, install VirtualBox on your system.
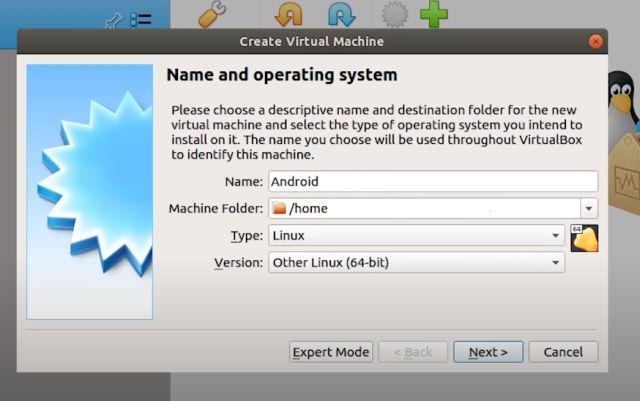
3. Here, I am running VirtualBox on Ubuntu. Now, click on “New” on the menubar and give a name to your virtual machine. For example, I have entered “Android”. Further, select the Type as “Linux” and choose “Other Linux (64-bit)” under Version. If you have a 32-bit machine then select “Other Linux (32-bit)”. Finally, click on “Next”.
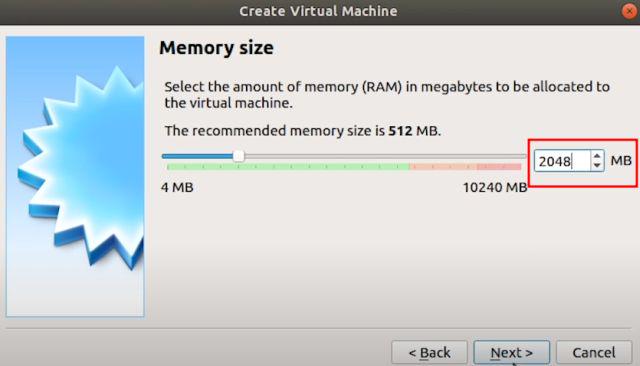
4. On the next window, allot at least 2GB of RAM. If you have extra RAM available, increase it to 4GB for better performance while using Android.
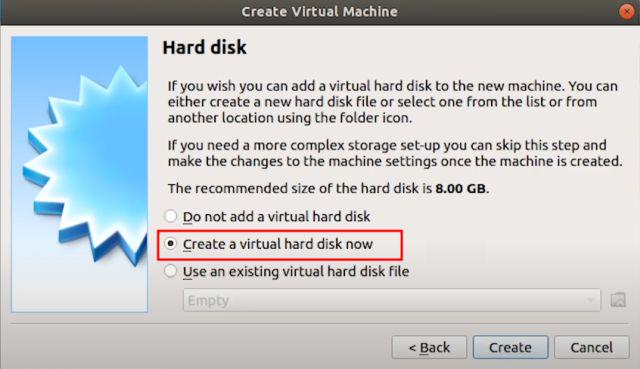
5. Next, select “Create a virtual hard disk now” and click on “Create”.
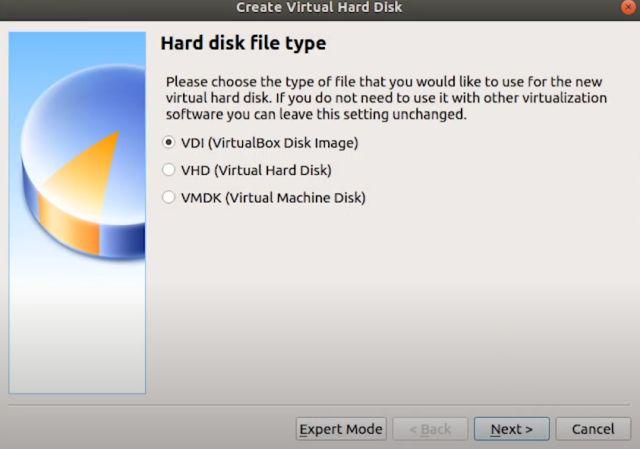
6. Further, select “VDI” and click on “Next”.
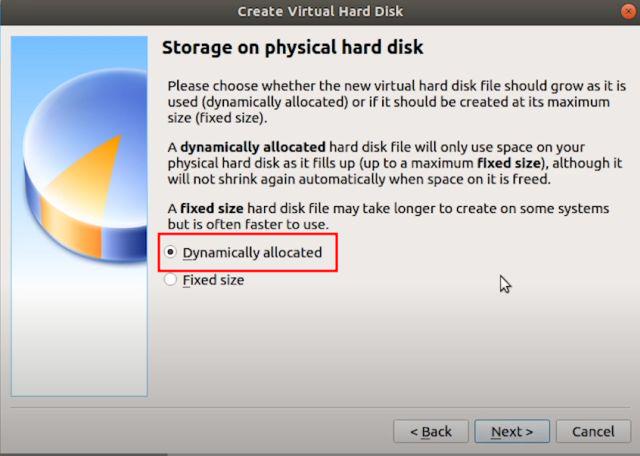
7. Select “Dynamically allocated” and click on “Next”.
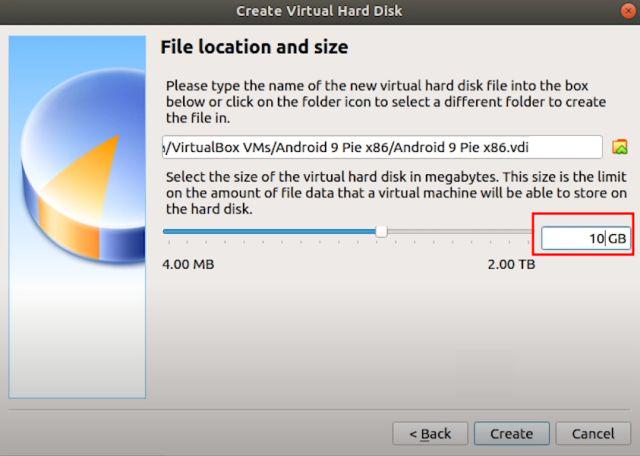
8. Here, enter the amount of storage that you want to allot to Android. The default is 8GB, but you can increase the storage to 16GB or more depending on your usage. Finally, click on “Create”.
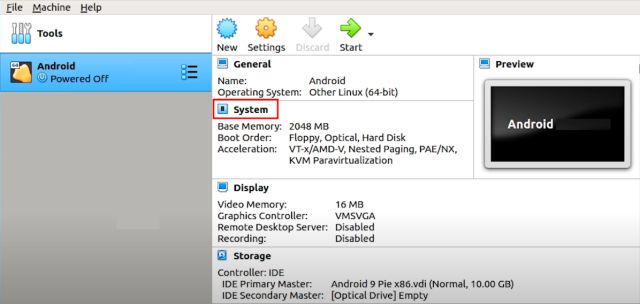
Configure the Android Virtual Machine on Linux
1. Now that you have created the VM, it’s time to configure a few things so that you get the best performance while running Android on Linux. On the VirtualBox, click on “System“.
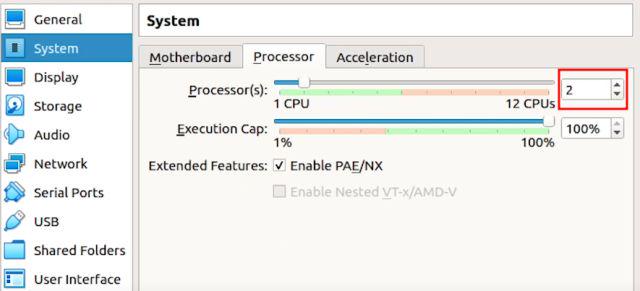
2. Move to the “Processor” tab and allot at least 2 CPU cores. You can also increase it to 4 for better gaming performance.
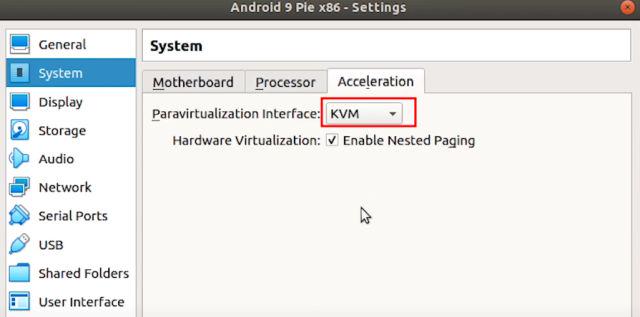
3. Next, switch to the “Acceleration” tab and choose “KVM” from the drop-down menu.
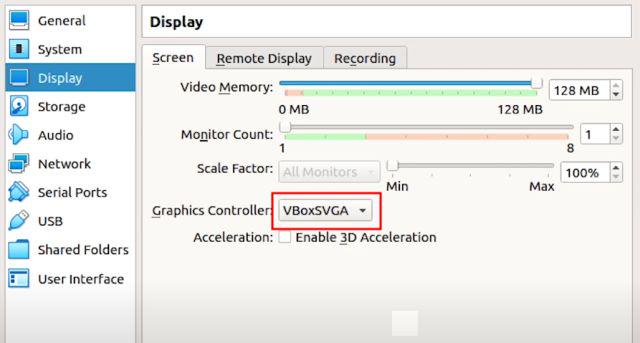
4. Once you have done that, move to the “Display” section and change the “Graphics controller” to “VBoxSVGA“. This is the most important step otherwise you will be stuck on a blank screen. Besides that, increase the Video Memory to at least 64-128MB.
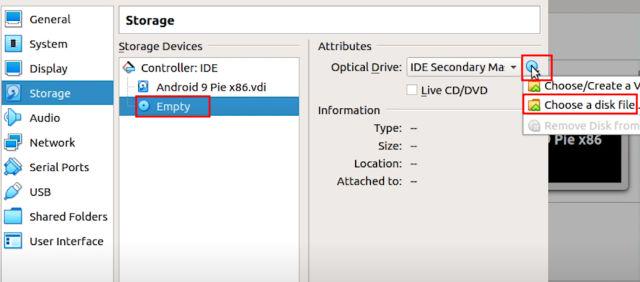
5. Finally, go to “Storage” and select the “Empty” sub-menu. Here, click on the disc icon and select “Choose a disk file”.
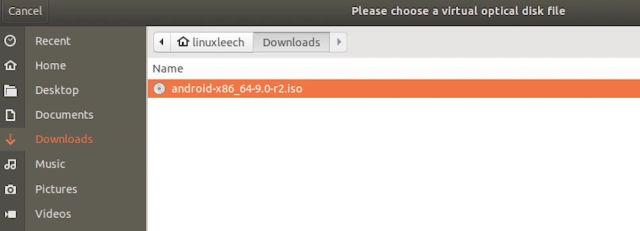
6. Now, select the Android ISO image that you downloaded in the first step. You are basically done. Simply, click on the “OK” button.
Boot Android within Linux
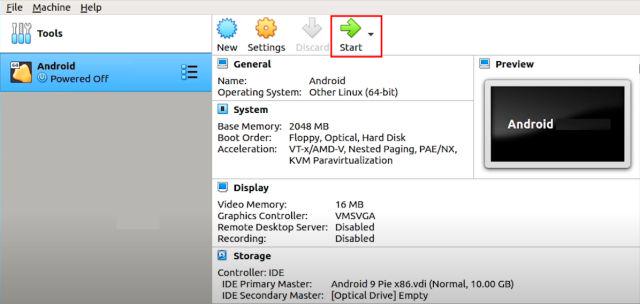
1. After the basic setup and configuration, you are now ready to boot Android on Linux. Simply, select “Android” on the left pane and then click on “Start“.
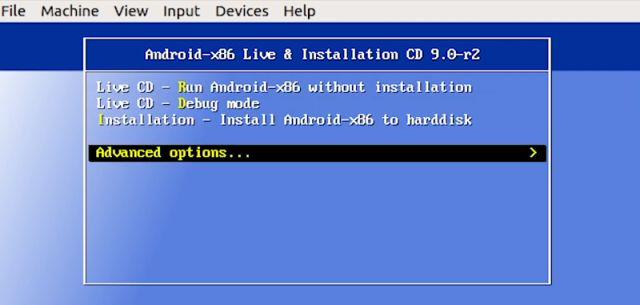
2. Here, move to the “Advanced options“.
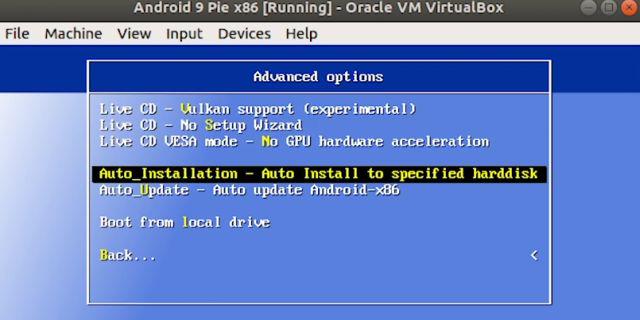
3. Now, select “Auto_Installation…” and hit enter.
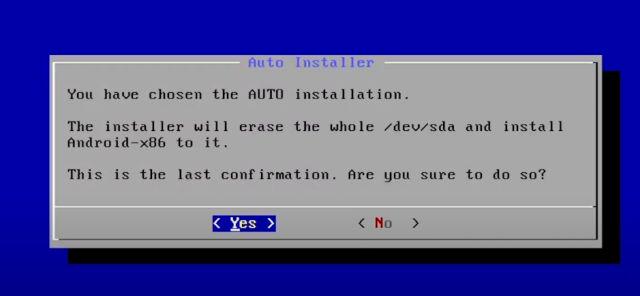
4. On the next screen, select “Yes” and hit enter.
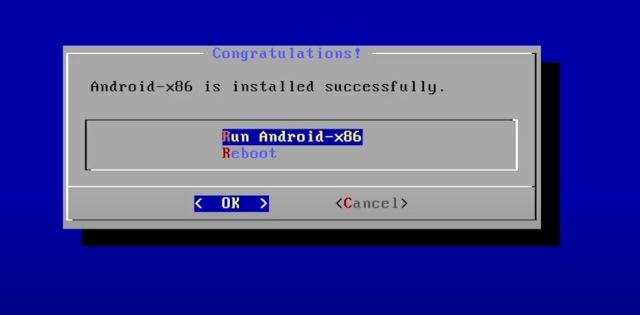
5. Finally, you will get the option to “Run Android-x86” on your Linux machine. Press enter and Android will starting booting on your Linux machine then and there.
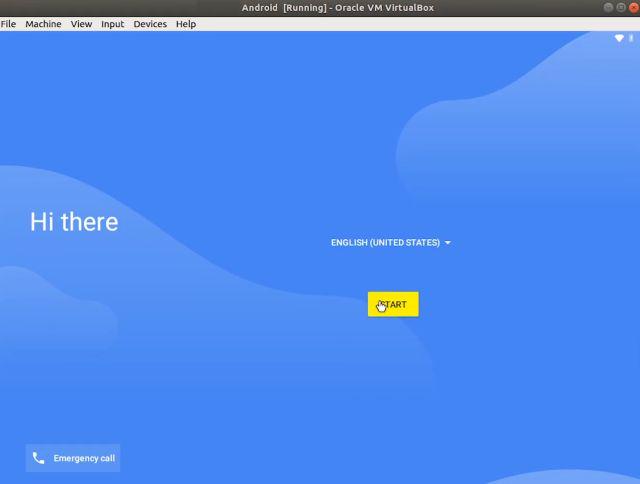
6. You can go through the initial setup screen just like Android smartphones.
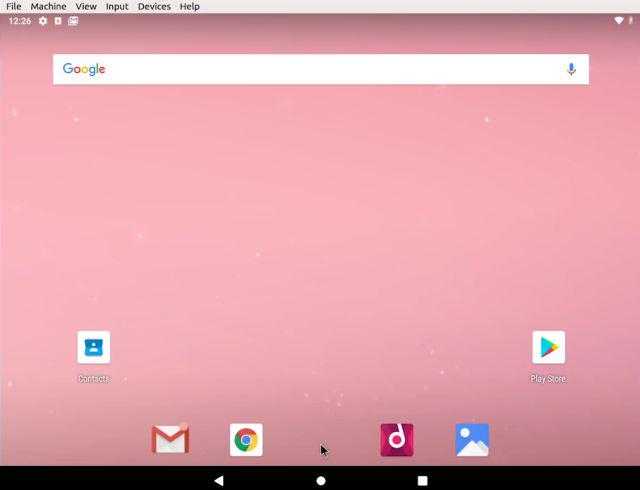
7. Finally, there you have it. Android 9 running on Linux with near-native performance. How great is that? Now onwards, you just need to press the “Start” button in VirtualBox and Android will be ready for you.
9. In case, you want to delete Android from Linux then simply right-click on the Android VM that you have created and choose “Remove”.
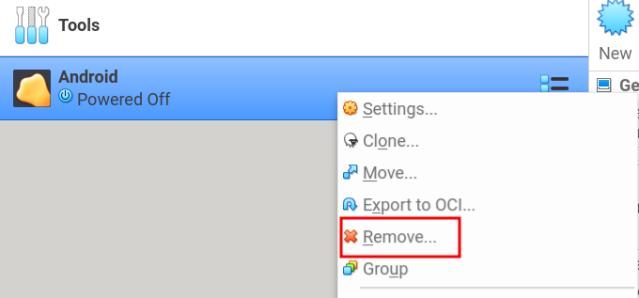
10. Next, click on “Delete all files”. It will remove the virtual hard drive and all associated files freeing up all the space on your computer. That’s it.

Install Android VM on Linux and Enjoy Android Games and Apps
So that is how you can install and run Android on Linux without using an emulator. One of the added benefits of this setup is that it makes things possible that you cannot do on your Android smartphone like taking screenshots on Snapchat without notifying sender, screen recording of protected content, playing games like PUBG, and much more.
You can even use Android as a desktop with the Taskbar launcher that ships with Android-x86 ISO image. Anyway, that is all from us. If you are facing any issue then do comment down below and let us know. We will surely try to help you out.
Solve network issue
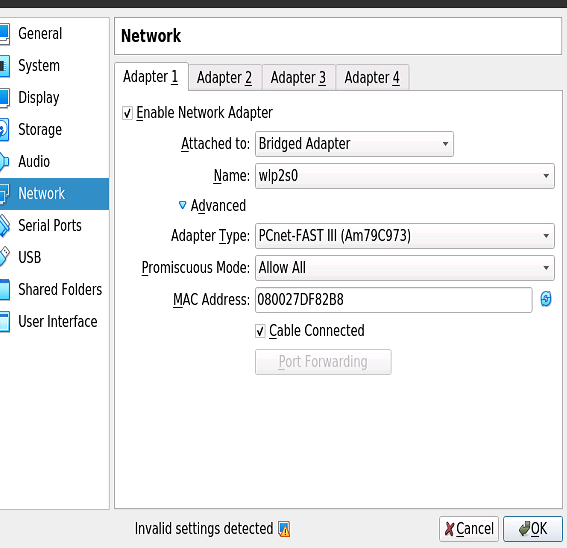
(From https://askubuntu.com/questions/363003/no-internet-connection-on-virtualbox-windows-7-as-guest-ubuntu-13-04-as-host)
125
I was having the same problem on Ubuntu 12.10 64bit using Virtualbox 4.2.22. Here are the steps I took to solve my problem:
Open Virtualbox Manager
Select the machine you cannot get internet on in the left pane
Click the Settings button in the top menu
Click Network in the left pane in the settings window
Switched to Bridged Adapter in the Attached to drop-down menu
Select the name of the network adapter you are currently using on your host machine. I am using wireless so I chose eth0 which is my wireless network adapter. You can check which adapter you are currently using by opening the terminal (CTRL+ALT+T by default) and running ifconfig. It will probably be the eth adapter that shows an inet addr and shows data transfer next to RX bytes.
Under Advanced, make sure the machine is using the Desktop Adapter Type
Under Advanced, make sure Promiscuous Mode is set to Allow All
Under Advanced, make sure Cable connected is checked on
Hit OK to save your changes
Start your VM
At that point you should be able to start a web browser in your VM and get a connection. This video provided the information I listed above, even though they are using a Windows 7 host with a Windows Server guest.
This is an image showing an example of the settings you need (taken from this answer).
相关文章:
Ubuntu20.04如何安装虚拟机(并安装Android)
安装虚拟机(KVM)这种KVM只能安装windows无法安装安卓(From https://phoenixnap.com/kb/ubuntu-install-kvm)A type 2 hypervisor enables users to run isolated instances of other operating systems inside a host system. As a Linux based OS, Ubun…...

【腾讯一面】我对我的Java基础不自信了
我对我的Java基础不自信了1、List和set的区别?2、HashSet 是如何保证不重复的3、HashMap是线程安全的吗,为什么不是线程安全的?4、HashMap的扩容过程5、Java获取反射的三种方法6、Redis持久化机制原理7、redis持久化的方式各有哪些优缺点1、L…...

前端都在聊什么 - 第 2 期
Hello 小伙伴们早上、中午、下午、晚上、深夜好,我是爱折腾的 jsliang~「前端都在聊什么」是 jsliang 日常写文章/做视频/玩直播过程中,小伙伴们的提问以及我的解疑整理。本期对应 2023 年的 01.16-01.31 这个时间段。本期针对「规划」「工作」「学习」「…...
每天一道大厂SQL题【Day11】微众银行真题实战(一)
每天一道大厂SQL题【Day11】微众银行真题实战(一) 大家好,我是Maynor。相信大家和我一样,都有一个大厂梦,作为一名资深大数据选手,深知SQL重要性,接下来我准备用100天时间,基于大数据岗面试中的经典SQL题&…...
 -- 不可不知的开发术语)
Cosmos 基础教程(一) -- 不可不知的开发术语
CometBFT DOC 您可以在本节中找到几个技术术语的概述,包括每个术语的解释和进一步资源的链接——在使用Cosmos SDK进行开发时,所有这些都是必不可少的。 在本节中,您将了解以下术语: Cosmos and Interchain LCD RPC Protobuf -协议缓冲…...

JAVA JDK 常用工具类和工具方法
目录 Pair与Triple Lists.partition-将一个大集合分成若干 List集合操作的轮子 对象工具Objects 与ObjectUtils 字符串工具 MapUtils Assert断言 switch语句 三目表达式 IOUtils MultiValueMap MultiMap JAVA各个时间类型的转换(LocalDate与Date类型&a…...
Spring Bean循环依赖
解决SpringBean循环依赖为什么需要3级缓存?回答:1级Map保存单例bean。2级Map 为了保证产生循环引用问题时,每次查询早期引用对象,都拿到同一个对象。3级Map保存ObjectFactory对象。数据结构1级Map singletonObjects2级Map earlySi…...
Hive 2.3.0 安装部署(mysql 8.0)
Hive安装部署 一.Hive的安装 1、下载apache-hive-2.3.0-bin.tar.gz 可以自行下载其他版本:http://mirror.bit.edu.cn/apache/hive/ 2.3.0版本链接:https://pan.baidu.com/s/18NNVdfOeuQzhnOHVcFpnSw 提取码:xc2u 2、用mobaxterm或者其他连接…...

IPD术语表
简称英文全称中文ABPannual business plan年度商业计划ABCactivity -based costing基于活动的成本估算ABMactivity -based management基于活动的管理ADCPavailability decision check point可获得性决策评审点AFDanticipatory failure determination预防错误决定AMEadvanced ma…...

目标检测损失函数 yolos、DETR为例
yolos和DETR,除了yolos没有卷积层以外,几乎所有操作都一样。 HF官方文档 因为目标检测模型,实际会输出几百几千个“框”,所以损失函数计算比较复杂。损失函数为偶匹配损失 bipartite matching loss,参考此blog targe…...
linux系统编程2--网络编程socket
在linux系统编程中网络编程是使用socket(套接字),socket这个词可以表示很多概念:在TCP/IP协议中,“IP地址TCP或UDP端口号”唯一标识网络通讯中的一个进程,“IP地址端口号”就称为socket。在TCP协议中&#…...

FPGA纯Verilog实现任意尺寸图像缩放,串口指令控制切换,贴近真实项目,提供工程源码和技术支持
目录1、前言2、目前主流的FPGA图像缩放方案3、本方案的优越性4、详细设计方案5、vivado工程详解6、上板调试验证并演示7、福利:工程源码获取1、前言 代码使用纯verilog实现,没有任何ip,可在Xilinx、Intel、国产FPGA间任意移植; 图…...
| 代码+思路+重要知识点)
华为OD机试题 - 最长合法表达式(JavaScript)| 代码+思路+重要知识点
最近更新的博客 华为OD机试题 - 字符串加密(JavaScript) 华为OD机试题 - 字母消消乐(JavaScript) 华为OD机试题 - 字母计数(JavaScript) 华为OD机试题 - 整数分解(JavaScript) 华为OD机试题 - 单词反转(JavaScript) 使用说明 参加华为od机试,一定要注意不要完全背…...

L1-005 考试座位号
L1-005 考试座位号 每个 PAT 考生在参加考试时都会被分配两个座位号,一个是试机座位,一个是考试座位。正常情况下,考生在入场时先得到试机座位号码,入座进入试机状态后,系统会显示该考生的考试座位号码,考试…...

Obsidian + remotely save + 坚果云:实现电脑端和手机端的同步
写在前面:近年来某象笔记广告有增无减,不堪其扰,便转投其它笔记,Obsidian、OneNote、Notion、flomo都略有使用,本人更偏好obsidian操作简单,然其官方同步资费甚高,囊中羞涩,所幸可通…...

对比学习MoCo损失函数infoNCE理解(附代码)
MoCo loss计算采用的损失函数是InfoNCE: 下面是MoCo的伪代码,MoCo这个loss的实现就是基于cross entropy loss。 将k作为q的正样本,因为k与q是来自同一张图像的不同视图;将queue作为q的负样本,因为queue中含有大量…...
logd守护进程
logd守护进程1、adb logcat命令2、logd守护进程启动2.1 logd文件目录2.2 main方法启动3、LogBuffer缓存大小3.1 缓存大小优先级设置3.2 缓存大小相关代码位置android12-release1、adb logcat命令 命令功能adb bugreport > bugreport.txtbugreport 日志adb shell dmesg >…...
【汽车雷达通往自动驾驶的关键技术】
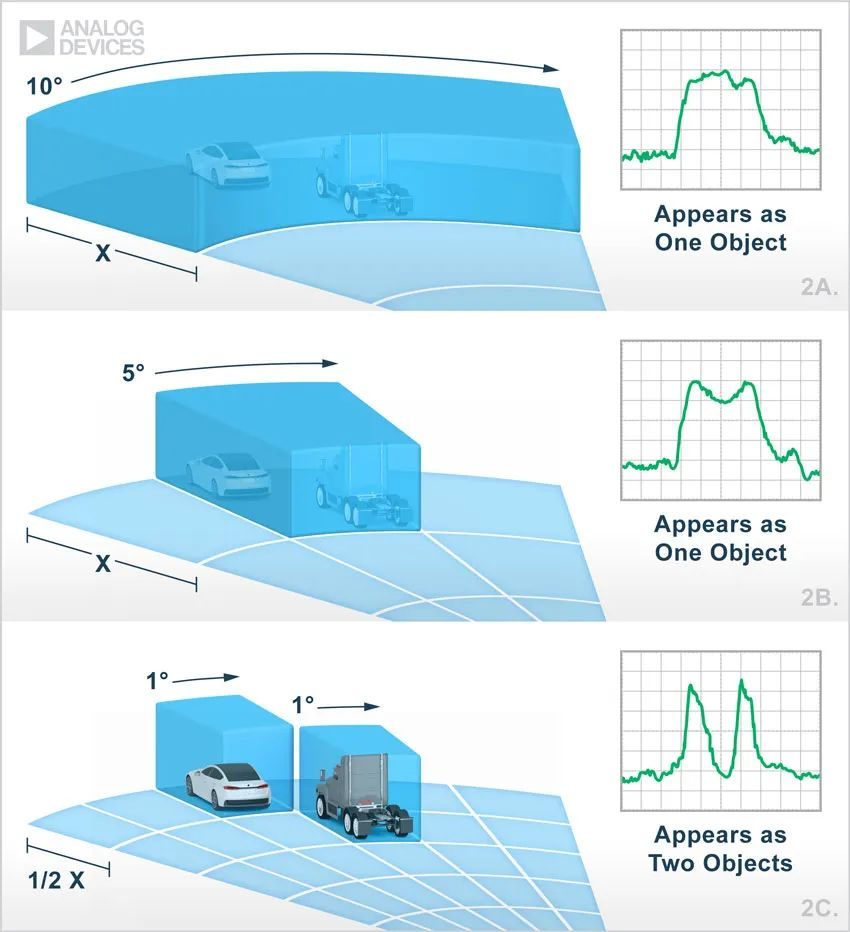
本文编辑:调皮哥的小助理 现代汽车雷达装置比手机还小,能探测前方、后方或侧方的盲点位置是否存在障碍物,但这还不百分之百实现全自动驾驶的。传统的汽车雷达分辨率都不高,只能“看到”一团东西,可以检测到汽车周围存在…...

2023实习面经
实习面经 秋招笔试面试全记录 字节-电商 字节实习一面: 二分类的损失函数是什么,怎么算?多分类的损失函数怎么算?如果文本分类的标签有多个,比如一个文本同时属于多个label那怎么办?如果文本分类里面的…...

linux shell 入门学习笔记2shell脚本
什么是shell脚本 当命令或者程序语句写在文件中,我们执行文件,读取其中的代码,这个程序就称之为shell脚本。 有了shell脚本肯定是要有对应的解释器了,常见的shell脚本解释器有sh、python、perl、tcl、php、ruby等。一般这种使用文…...
 1.什么是 Shell?)
Shell应用手册(一) 1.什么是 Shell?
Shell应用手册(一) 1.什么是 Shell?一句话总结:Shell 是操作系统的"翻译官",它站在用户和内核之间,把你说的"人话"翻译成计算机能懂的"机器话"。一、先从一个生活场景说起 想象一下你去国外餐厅吃饭…...

终极pix2pix训练指南:200个epoch完整流程与实战技巧
终极pix2pix训练指南:200个epoch完整流程与实战技巧 【免费下载链接】pix2pix-tensorflow Tensorflow port of Image-to-Image Translation with Conditional Adversarial Nets https://phillipi.github.io/pix2pix/ 项目地址: https://gitcode.com/gh_mirrors/pi…...

基于Ubuntu20.04的SenseVoice-Small高性能部署方案
基于Ubuntu20.04的SenseVoice-Small高性能部署方案 语音识别技术正逐渐成为人机交互的重要桥梁,而如何在生产环境中高效部署模型成为很多开发者的实际需求。本文将手把手带你完成SenseVoice-Small在Ubuntu20.04系统上的高性能部署。 1. 环境准备与系统优化 在开始部…...

Legacy iOS Kit:让旧款iPhone/iPad重获新生的终极解决方案
Legacy iOS Kit:让旧款iPhone/iPad重获新生的终极解决方案 【免费下载链接】Legacy-iOS-Kit An all-in-one tool to restore/downgrade, save SHSH blobs, jailbreak legacy iOS devices, and more 项目地址: https://gitcode.com/gh_mirrors/le/Legacy-iOS-Kit …...

PDF-Extract-Kit-1.0精彩案例:IEEE论文PDF中LaTeX公式无损提取演示
PDF-Extract-Kit-1.0精彩案例:IEEE论文PDF中LaTeX公式无损提取演示 1. 引言:当学术研究遇上PDF公式提取难题 如果你经常需要阅读或处理学术论文,尤其是IEEE这类技术文档,一定遇到过这样的烦恼:看到一篇论文里的公式非…...

OpenClaw故障排查:Qwen3.5-9B接口响应超时解决方案
OpenClaw故障排查:Qwen3.5-9B接口响应超时解决方案 1. 问题背景与现象描述 上周我在本地部署了Qwen3.5-9B-AWQ-4bit模型,并通过OpenClaw对接使用时,突然遭遇了接口响应超时问题。具体表现为:当发送包含长文本或图片base64编码的…...

万象熔炉 | Anything XL快速上手:拖拽上传参考图进行ControlNet扩展
万象熔炉 | Anything XL快速上手:拖拽上传参考图进行ControlNet扩展 安全声明:本文仅讨论本地化部署的AI图像生成技术,所有数据处理均在用户本地设备完成,不涉及任何网络传输或云端服务,确保数据隐私和安全。 1. 工具简…...

DeerFlow GPU算力优化:vLLM加速Qwen3-4B推理性能调优
DeerFlow GPU算力优化:vLLM加速Qwen3-4B推理性能调优 1. 引言:当深度研究遇上推理瓶颈 想象一下,你正在使用一个强大的AI研究助手,它能帮你搜索资料、分析数据、撰写报告,甚至生成播客。但每次你提出一个稍微复杂点的…...

Claude Code交互体验对比:轻量级Phi-3-mini在代码任务上的表现
Claude Code交互体验对比:轻量级Phi-3-mini在代码任务上的表现 1. 开篇:小身材也有大能量 当提到代码生成模型,很多人首先想到的是Claude Code这类云端大模型。但今天我们要测试的Phi-3-mini-4k-instruct-gguf,这个只有3.8B参数…...

阿里云YUM源配置避坑指南
在CentOS 7上安装MySQL 8时,正确配置阿里云提供的YUM源是确保安装顺利、避免依赖冲突的关键。核心步骤包括清理系统旧有冲突软件包、配置稳定的软件源、处理GPG密钥验证问题。以下是一个结合官方实践和阿里云镜像优化的详细方案。 一、 核心步骤与对比 为了清晰展…...