Anolis 8.6 下 Redis 7.2.0 集群搭建和配置
Redis 7.2.0 搭建和集群配置
- 一.Redis 下载与单机部署
- 1.Redis 下载
- 2.虚拟机配置
- 3.Redis 单机源码安装和测试
- 4.Java 单机连接测试
- 1.Pom 依赖
- 2.配置文件
- 3.启动类
- 4.配置类
- 5.单元测试
- 6.测试结果
- 二.Redis 集群部署
- 1.主从
- 1.从节点配置
- 2.Java 测试
- 2.哨兵
- 1.哨兵节点配置
- 2.复制一个哨兵节点(双哨兵)
- 3.Java 测试访问哨兵
- 3.集群
- 1.集群配置文件修改
- 2.Java 访问 Redis 集群测试
一.Redis 下载与单机部署
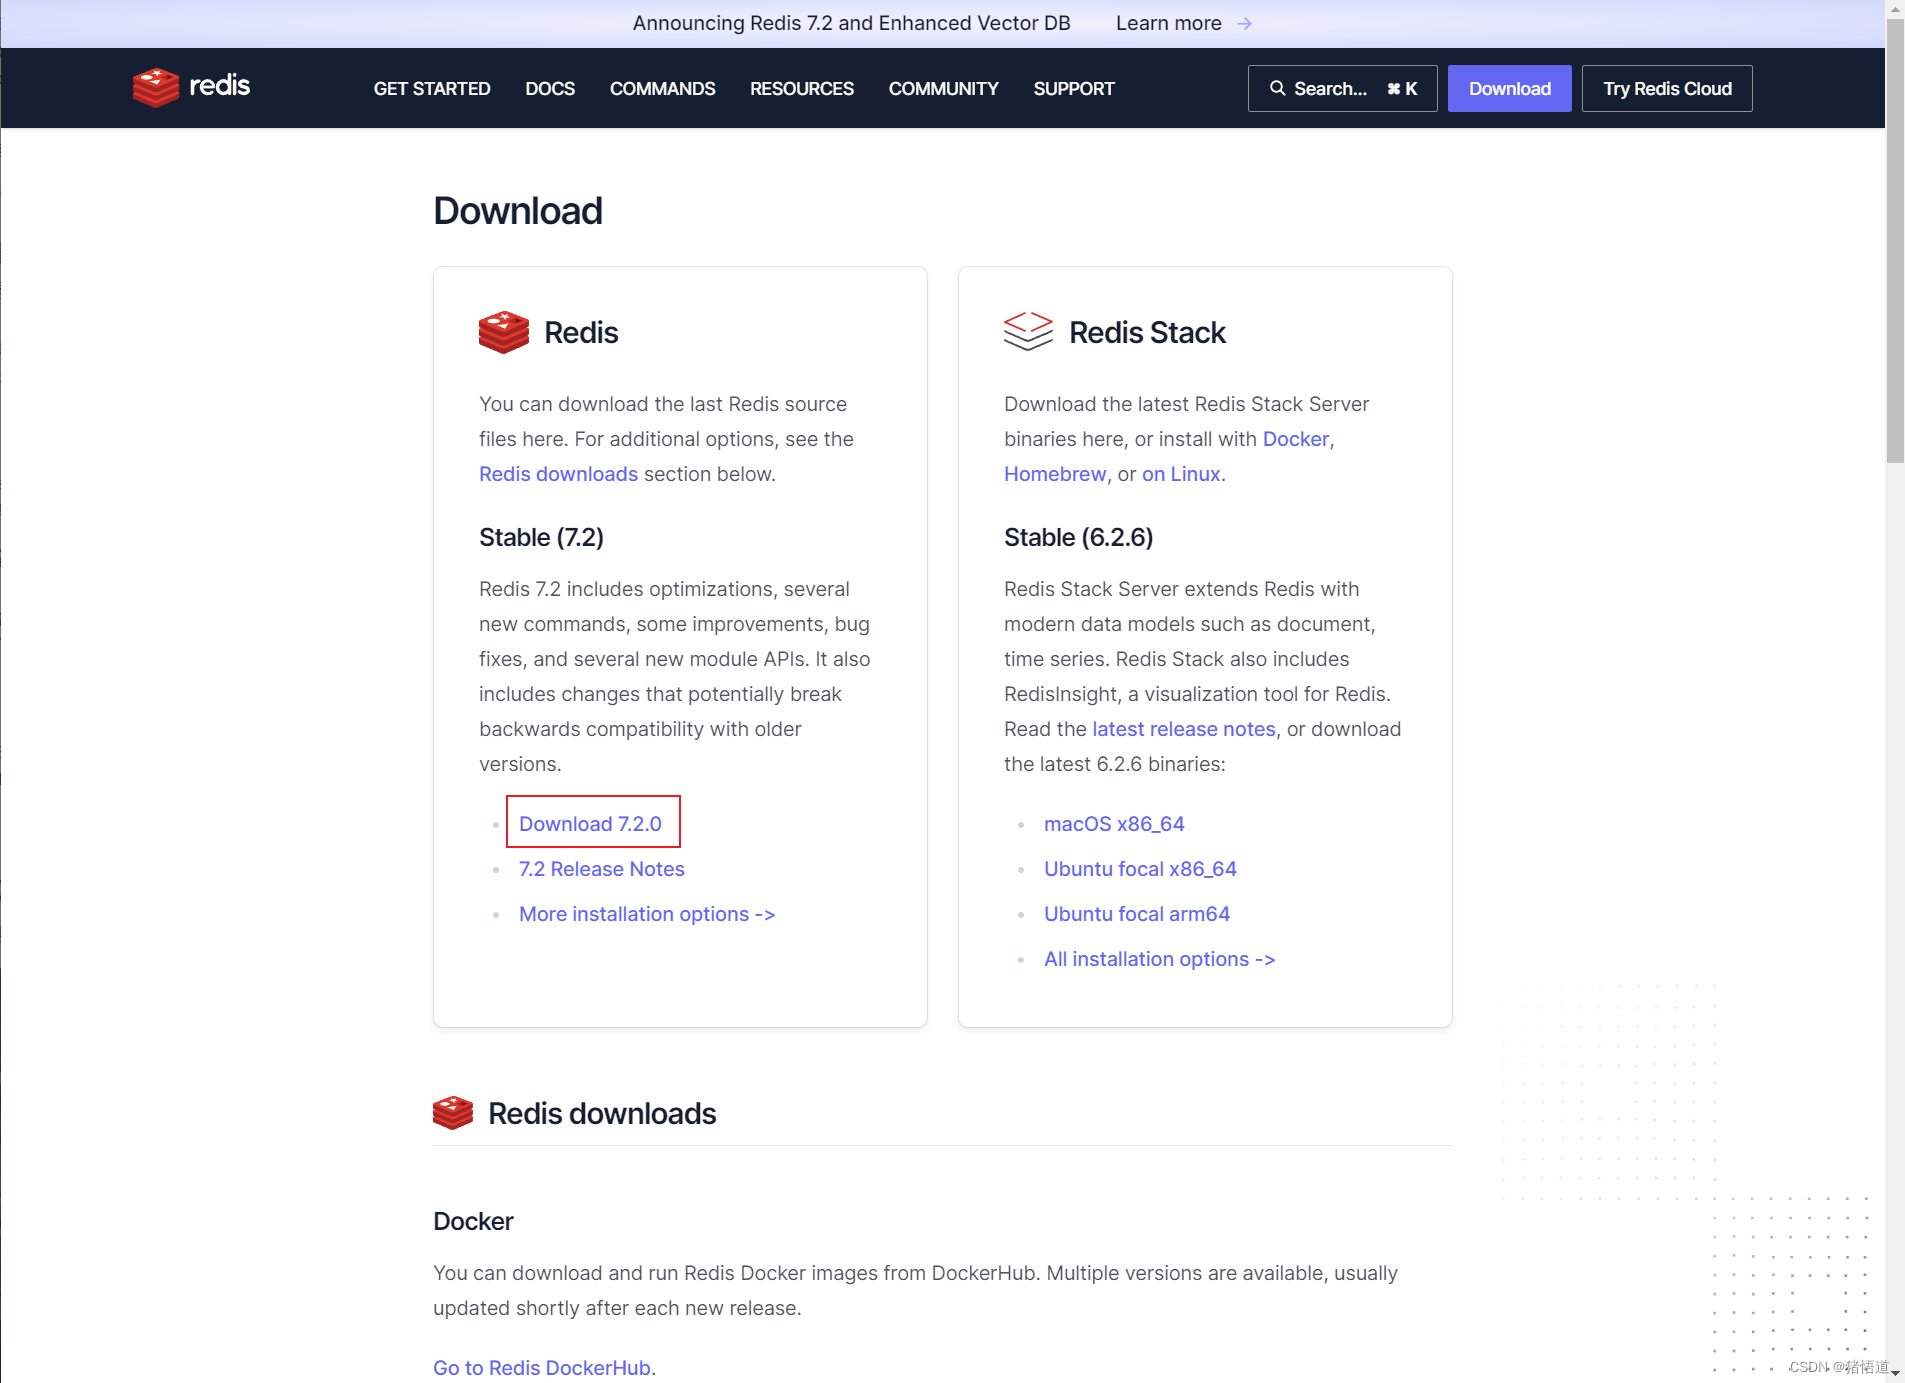
1.Redis 下载
Redis 官网
2.虚拟机配置
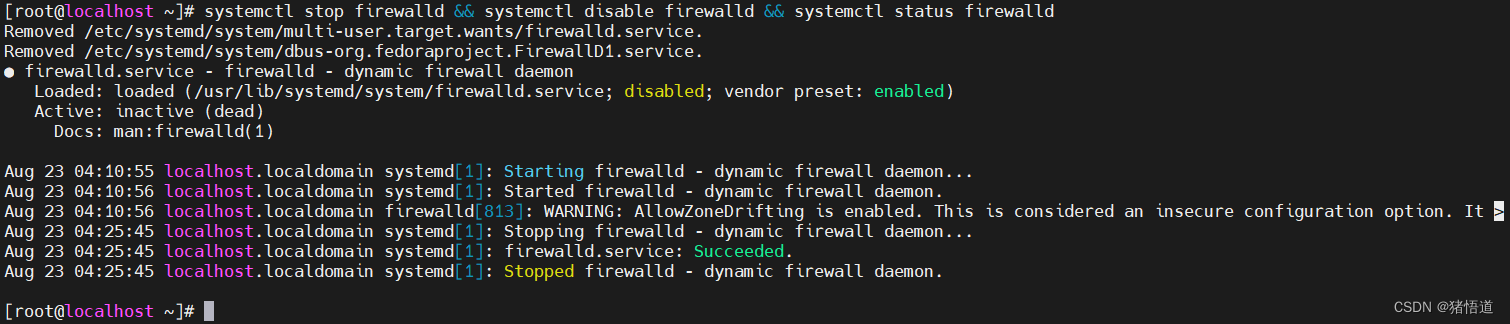
## 1.关闭防火墙
systemctl stop firewalld && systemctl disable firewalld && systemctl status firewalld
## 2.配置域名解析
echo '192.168.1.103 rd1' >> /etc/hosts
echo '192.168.1.104 rd2' >> /etc/hosts
echo '192.168.1.105 rd3' >> /etc/hosts
echo '192.168.1.106 rd4' >> /etc/hosts
echo '192.168.1.107 rd5' >> /etc/hosts
echo '192.168.1.108 rd6' >> /etc/hosts
关闭并禁用防火墙
3.Redis 单机源码安装和测试
## 1.解压缩
tar zxvf redis-7.2.0.tar.gz
## 2.进入源码安装目录
cd /home/redis-7.2.0/src/
## 3.编译和安装
make && make install PREFIX=/usr/local/redis
## 4.进入Redis解压目录
cd /home/redis-7.2.0/
## 5.修改配置
vim redis.conf
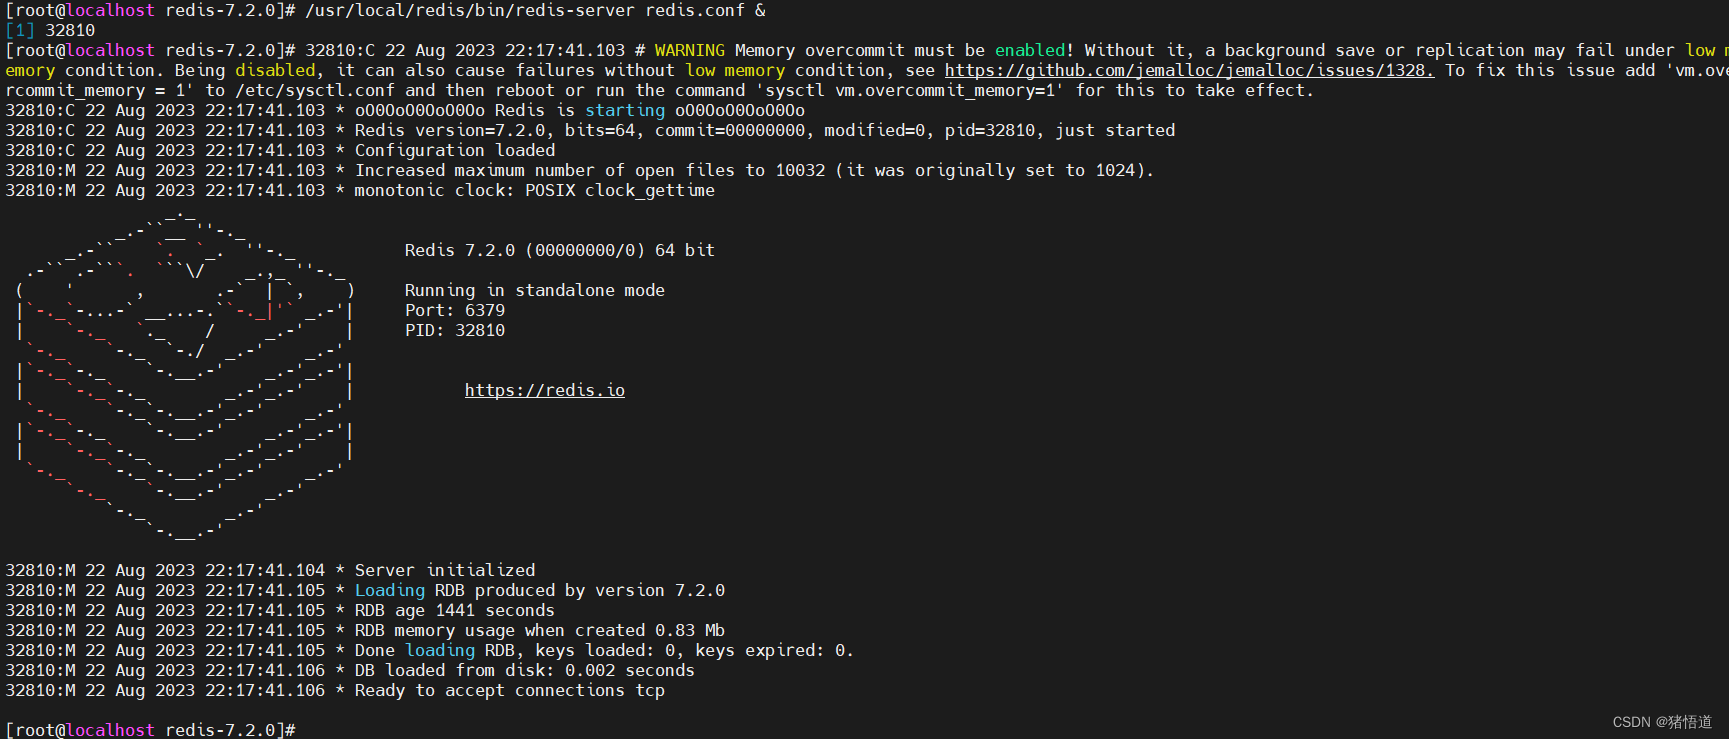
## 6.启动服务
/usr/local/redis/bin/redis-server redis.conf &
## 7.停止服务
kill -9 `ps aux |grep redis|grep -v grep | awk '{print $2}'`
以下行号仅供参考,增加配置后会有微小变动
| 行号 | 原值 | 新值 | 含义 |
|---|---|---|---|
| 87 | bind 127.0.0.1 -::1 | bind 0.0.0.0 -::1 | 绑定地址 |
| 111 | protected-mode yes | #protected-mode no | 防火墙保护 |
| 533 | replicaof | replicaof rd1 6379 | 配置主节点(主从同步) |
| 541 | masterauth | masterauth 123456 | 配置主节点密码(主从同步) |
| 535 | requirepass 123456 | 密码(在空行添加) |
哨兵配置(可在配置哨兵模式时参考)
| 行号 | 原值 | 新值 | 含义 |
|---|---|---|---|
| 92 | sentinel monitor | sentinel monitor mymaster 192.168.1.103 6379 1 | 哨兵初始监控的主机地址 |
| 112 | sentinel auth-pass mymaster MySUPER–secret-0123passw0rd | sentinel auth-pass mymaster 123456 | 哨兵配置主节点密码(保持所有节点密码一致,避免重新选取主节点后连接失败) |
| 170 | requirepass | requirepass 456789 | 哨兵密码 |
服务启动
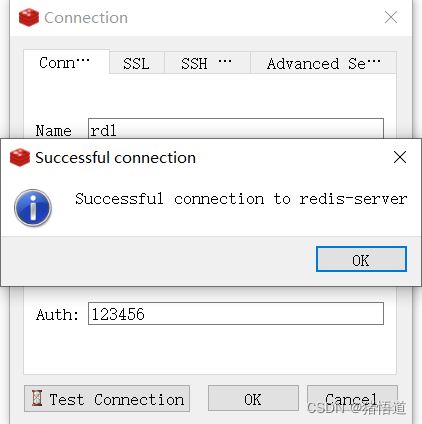
连接测试
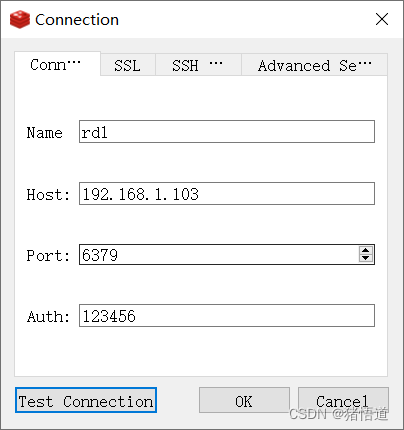
连接
4.Java 单机连接测试
1.Pom 依赖
<?xml version="1.0" encoding="UTF-8"?>
<project xmlns="http://maven.apache.org/POM/4.0.0"xmlns:xsi="http://www.w3.org/2001/XMLSchema-instance"xsi:schemaLocation="http://maven.apache.org/POM/4.0.0 http://maven.apache.org/xsd/maven-4.0.0.xsd"><modelVersion>4.0.0</modelVersion><groupId>org.example</groupId><artifactId>redis-demo</artifactId><version>1.0-SNAPSHOT</version><properties><maven.compiler.source>20</maven.compiler.source><maven.compiler.target>20</maven.compiler.target><project.build.sourceEncoding>UTF-8</project.build.sourceEncoding></properties><dependencies><dependency><groupId>org.springframework.boot</groupId><artifactId>spring-boot-starter-web</artifactId><version>3.1.2</version></dependency><dependency><groupId>org.springframework.boot</groupId><artifactId>spring-boot-starter-data-redis</artifactId><version>3.1.2</version></dependency><dependency><groupId>org.apache.commons</groupId><artifactId>commons-pool2</artifactId><version>2.11.1</version></dependency><!-- 测试类 --><dependency><groupId>junit</groupId><artifactId>junit</artifactId><version>4.13.2</version></dependency><dependency><groupId>org.springframework.boot</groupId><artifactId>spring-boot-starter-test</artifactId><version>3.1.2</version></dependency></dependencies>
</project>
2.配置文件
spring:data:redis:host: 192.168.1.103port: 6379password: 123456
3.启动类
package org.example;import org.springframework.boot.SpringApplication;
import org.springframework.boot.autoconfigure.SpringBootApplication;/*** @author zhuwd && moon* @Description* @create 2023-08-22 22:28*/
@SpringBootApplication
public class RedisApp {public static void main(String[] args) {SpringApplication.run(RedisApp.class,args);}
}
4.配置类
package org.example.config;import org.springframework.beans.factory.annotation.Autowired;
import org.springframework.context.annotation.Bean;
import org.springframework.data.redis.connection.RedisConnectionFactory;
import org.springframework.data.redis.core.RedisTemplate;
import org.springframework.data.redis.serializer.StringRedisSerializer;
import org.springframework.stereotype.Component;/*** @author zhuwd && moon* @Description* @create 2023-08-22 22:29*/
@Component
public class RedisConfig {private RedisConnectionFactory redisConnectionFactory;@Autowiredpublic void setRedisConnectionFactory(RedisConnectionFactory redisConnectionFactory) {this.redisConnectionFactory = redisConnectionFactory;}@Bean(name = "redisTemplate")public RedisTemplate<String, Object> redisTemplate(){RedisTemplate<String, Object> redisTemplate = new RedisTemplate<>();// 序列化keyredisTemplate.setKeySerializer(new StringRedisSerializer());redisTemplate.setValueSerializer(new StringRedisSerializer());// 序列化hashredisTemplate.setHashKeySerializer(new StringRedisSerializer());redisTemplate.setHashValueSerializer(new StringRedisSerializer());// 连接redis数据库redisTemplate.setConnectionFactory(redisConnectionFactory);return redisTemplate;}
}
5.单元测试
import org.example.RedisApp;
import org.junit.Test;
import org.junit.runner.RunWith;
import org.springframework.beans.factory.annotation.Autowired;
import org.springframework.boot.test.context.SpringBootTest;
import org.springframework.data.redis.core.RedisTemplate;
import org.springframework.test.context.junit4.SpringRunner;/*** @author zhuwd && moon* @Description* @create 2023-08-22 22:29*/
@RunWith(SpringRunner.class)
@SpringBootTest(classes = RedisApp.class)
public class TestApp {@AutowiredRedisTemplate<String, Object> redisTemplate;@Testpublic void test(){redisTemplate.opsForValue().set("test","haha");}
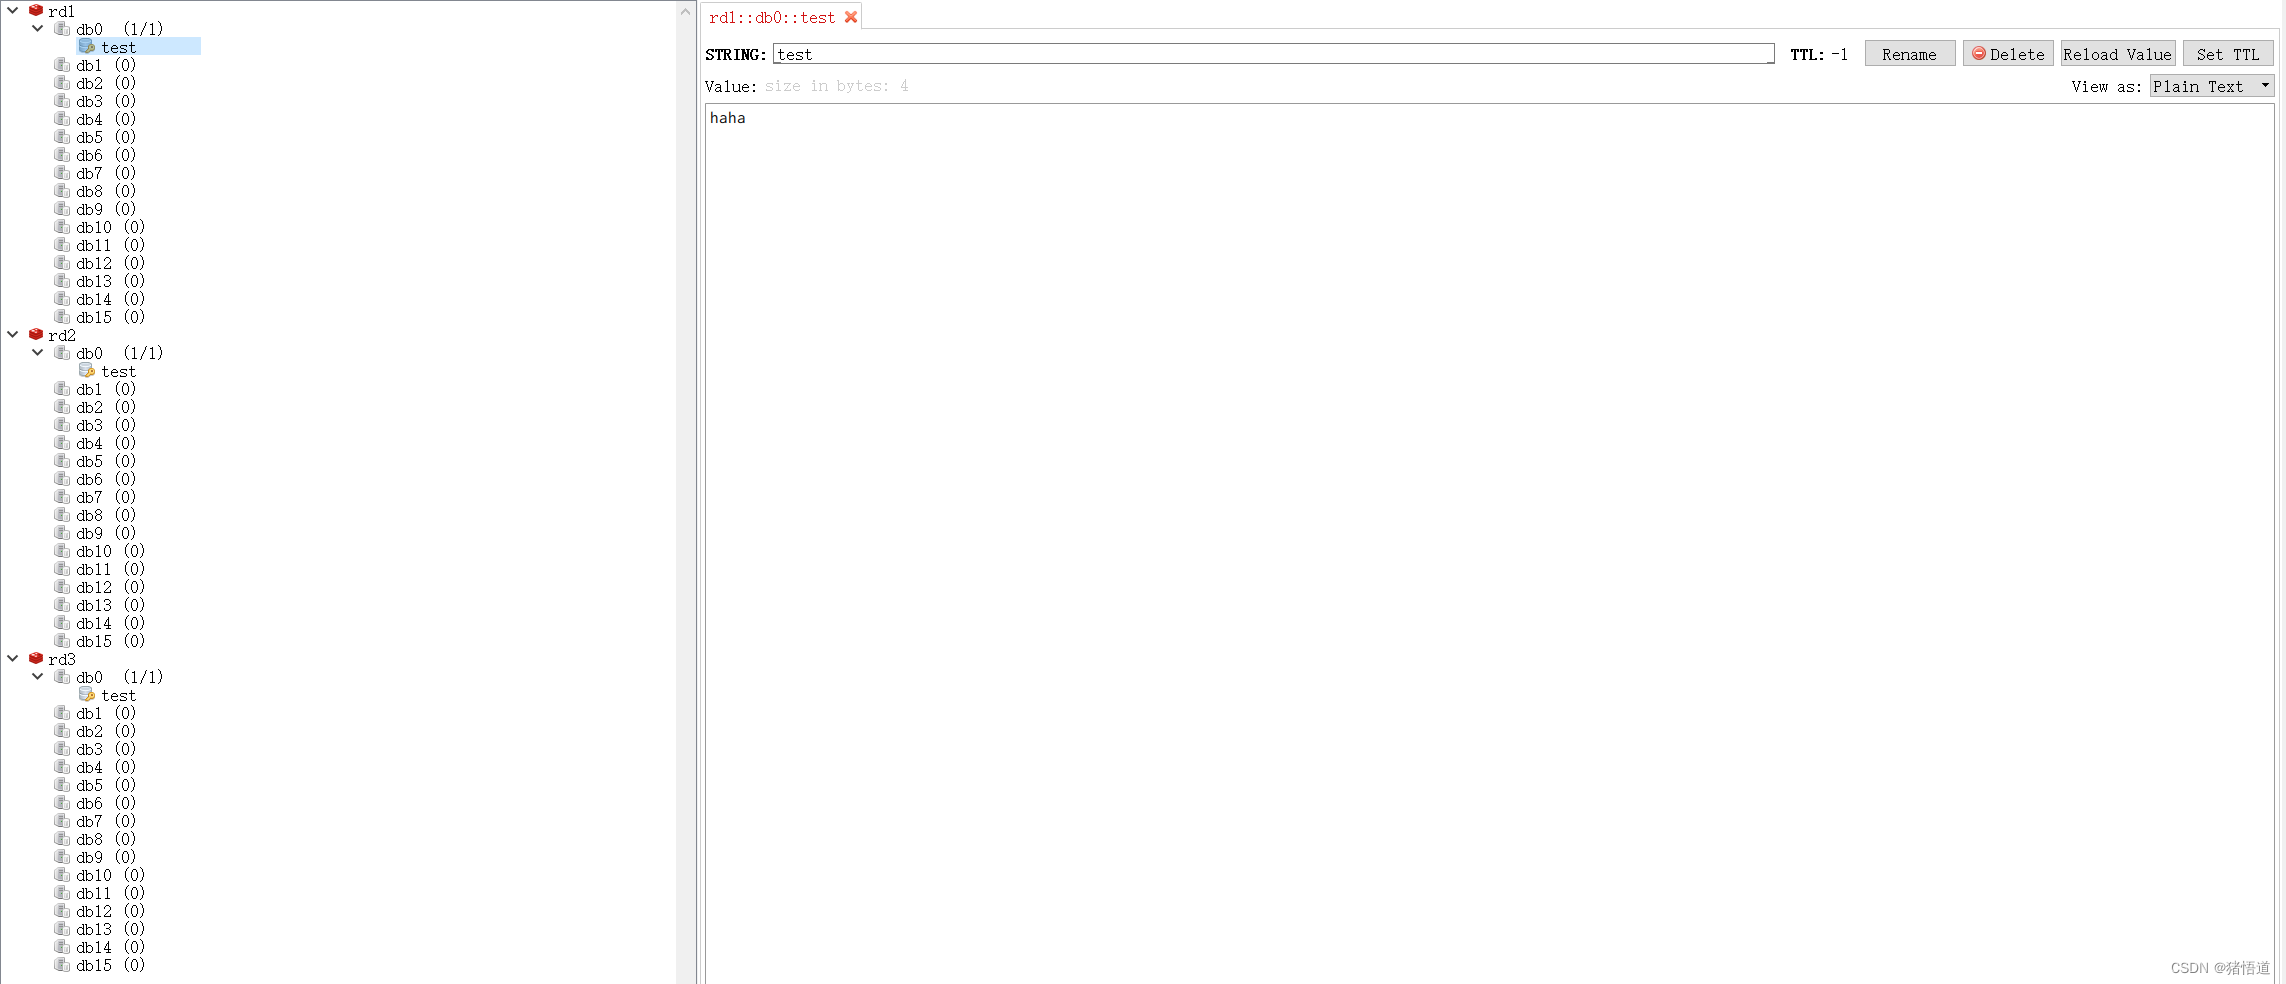
}6.测试结果
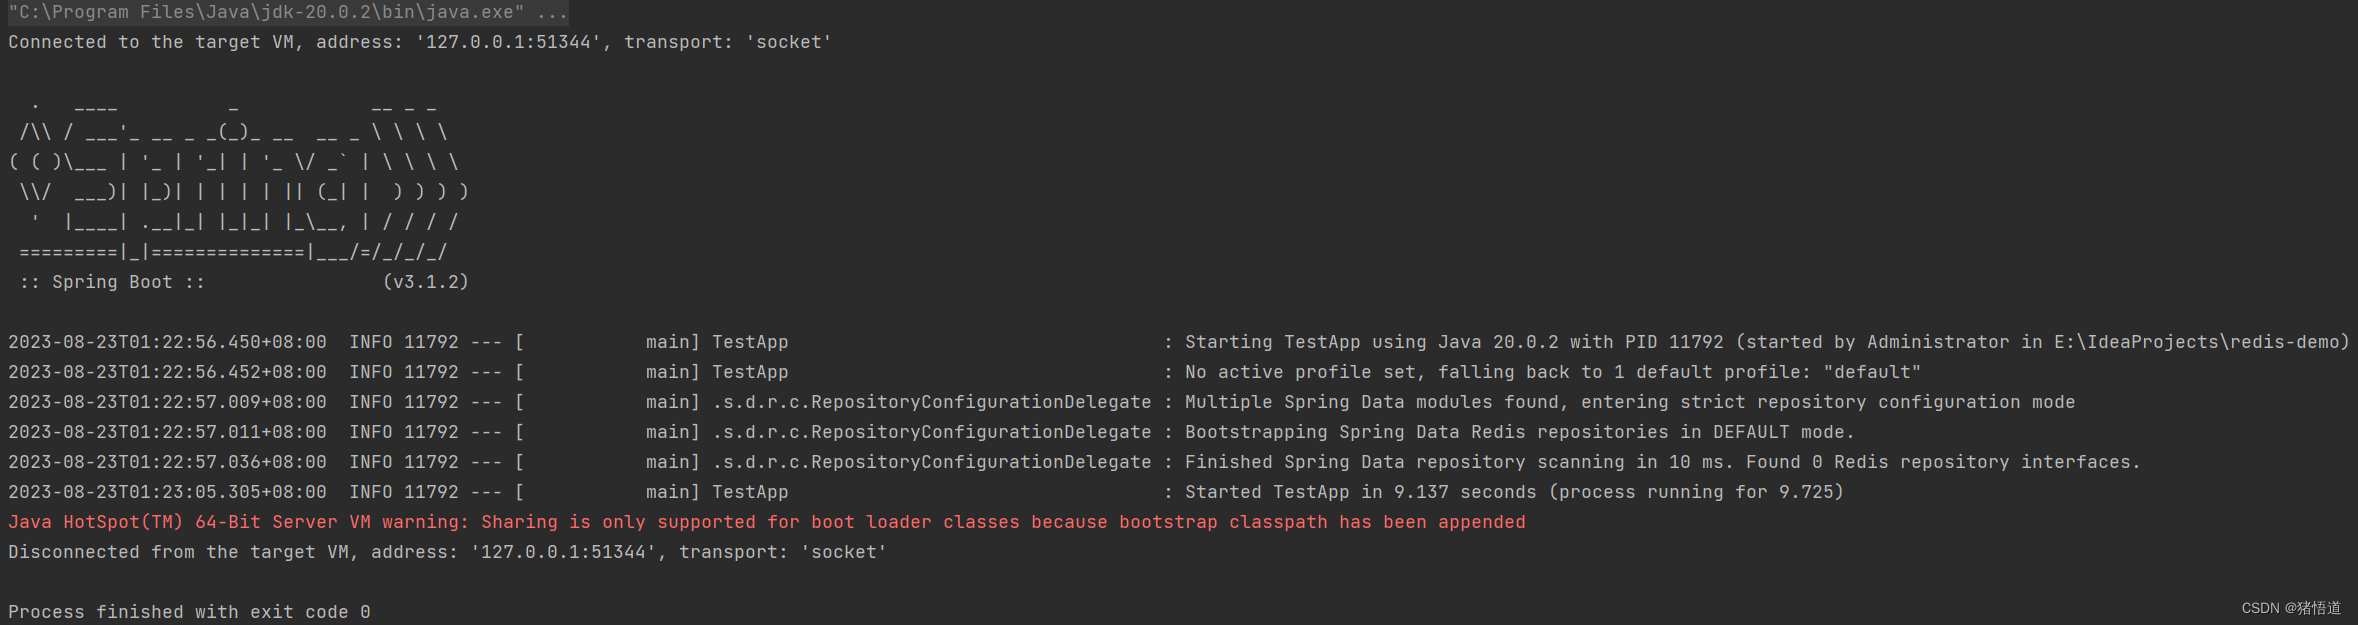
查看值

二.Redis 集群部署
集群信息
| Host | IP |
|---|---|
| rd1 | 192.168.1.103 |
| rd2 | 192.168.1.104 |
| rd3 | 192.168.1.105 |
| rd4 | 192.168.1.106 |
| rd5 | 192.168.1.107 |
| rd6 | 192.168.1.108 |
## 1.将修改后的配置文件复制到安装目录
cp /home/redis-7.2.0/redis.conf /usr/local/redis/
1.主从
1.从节点配置
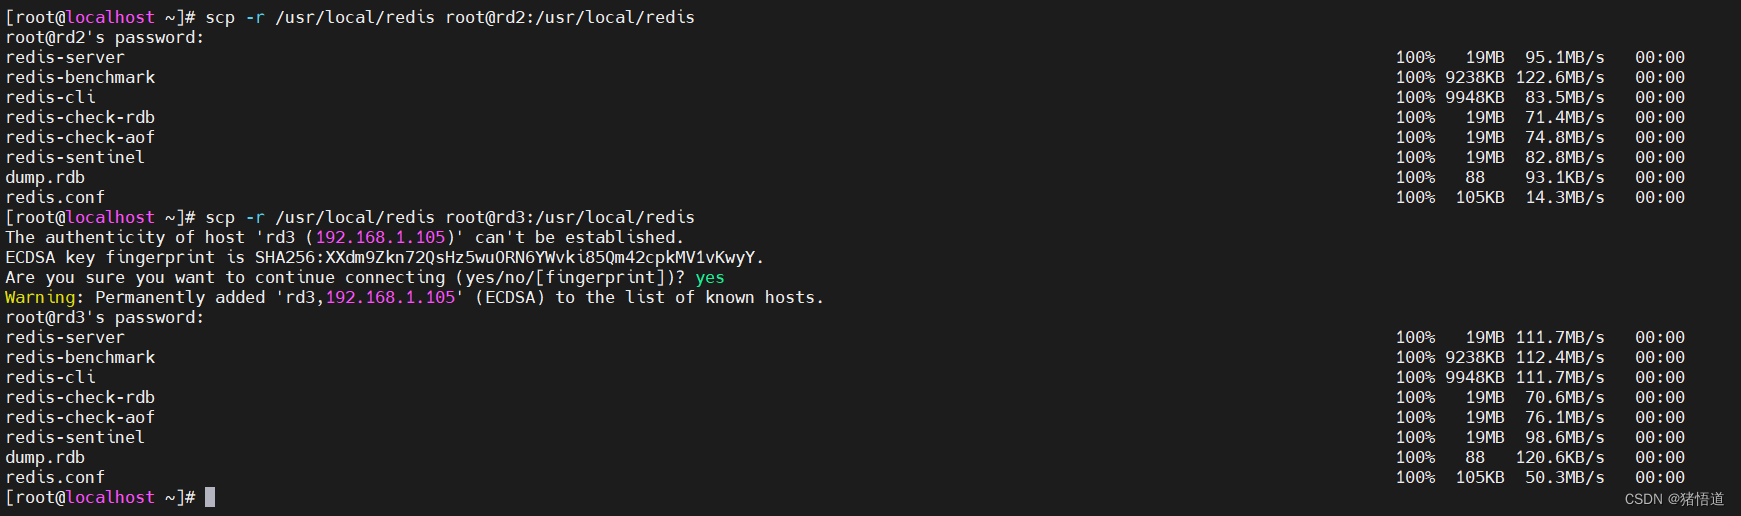
## 1.将 Redis 包拷贝到 rd2 / rd3
scp -r /usr/local/redis root@rd2:/usr/local/redis
scp -r /usr/local/redis root@rd3:/usr/local/redis
## 2.修改 rd2 / rd3 上 redis.conf 配置增加主节点信息 replicaof rd1 6379 / masterauth 123456
vi /usr/local/redis/redis.conf
## 3.依次启动 rd1 rd2 rd3
/usr/local/redis/bin/redis-server /usr/local/redis/redis.conf &
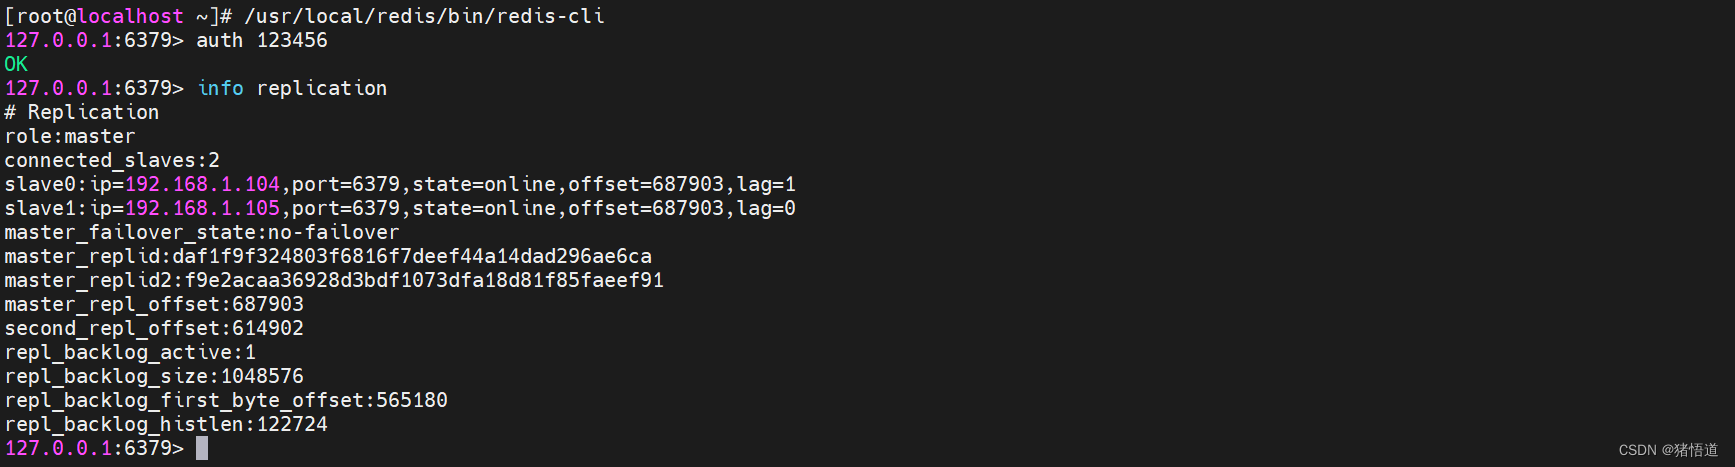
## 4.客户端连接
/usr/local/redis/bin/redis-cli
## 5.认证
auth 123456
Redis 安装包复制
增加主节点配置

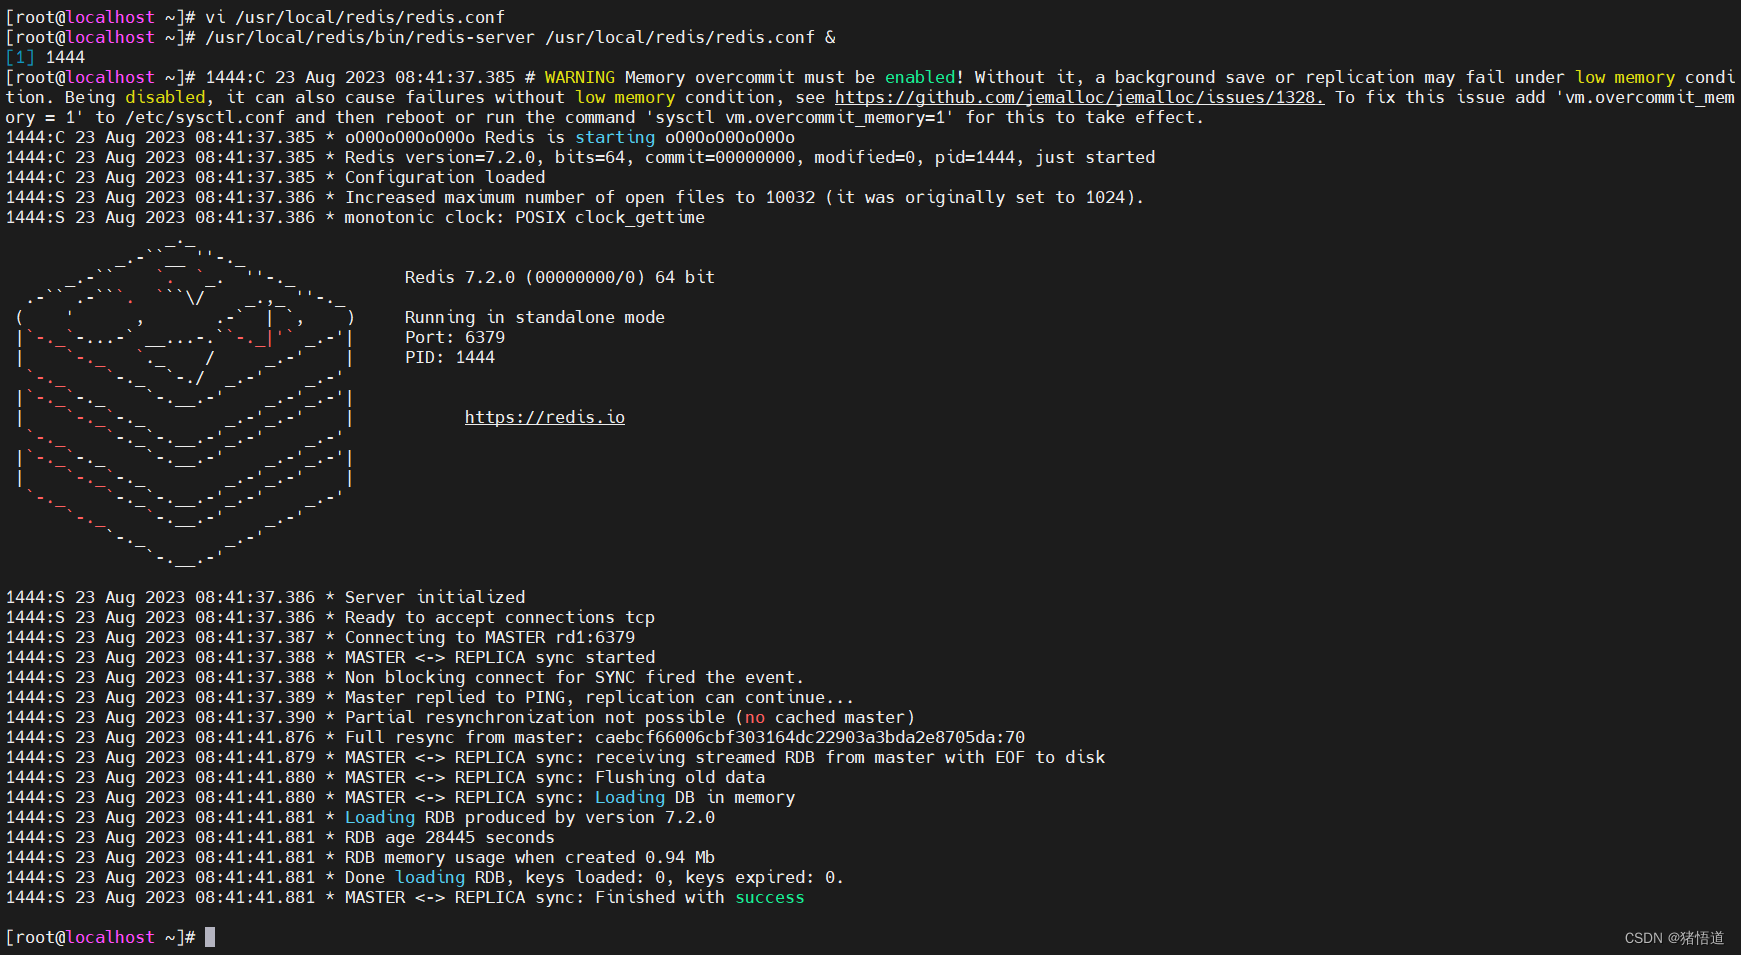
主节点启动信息
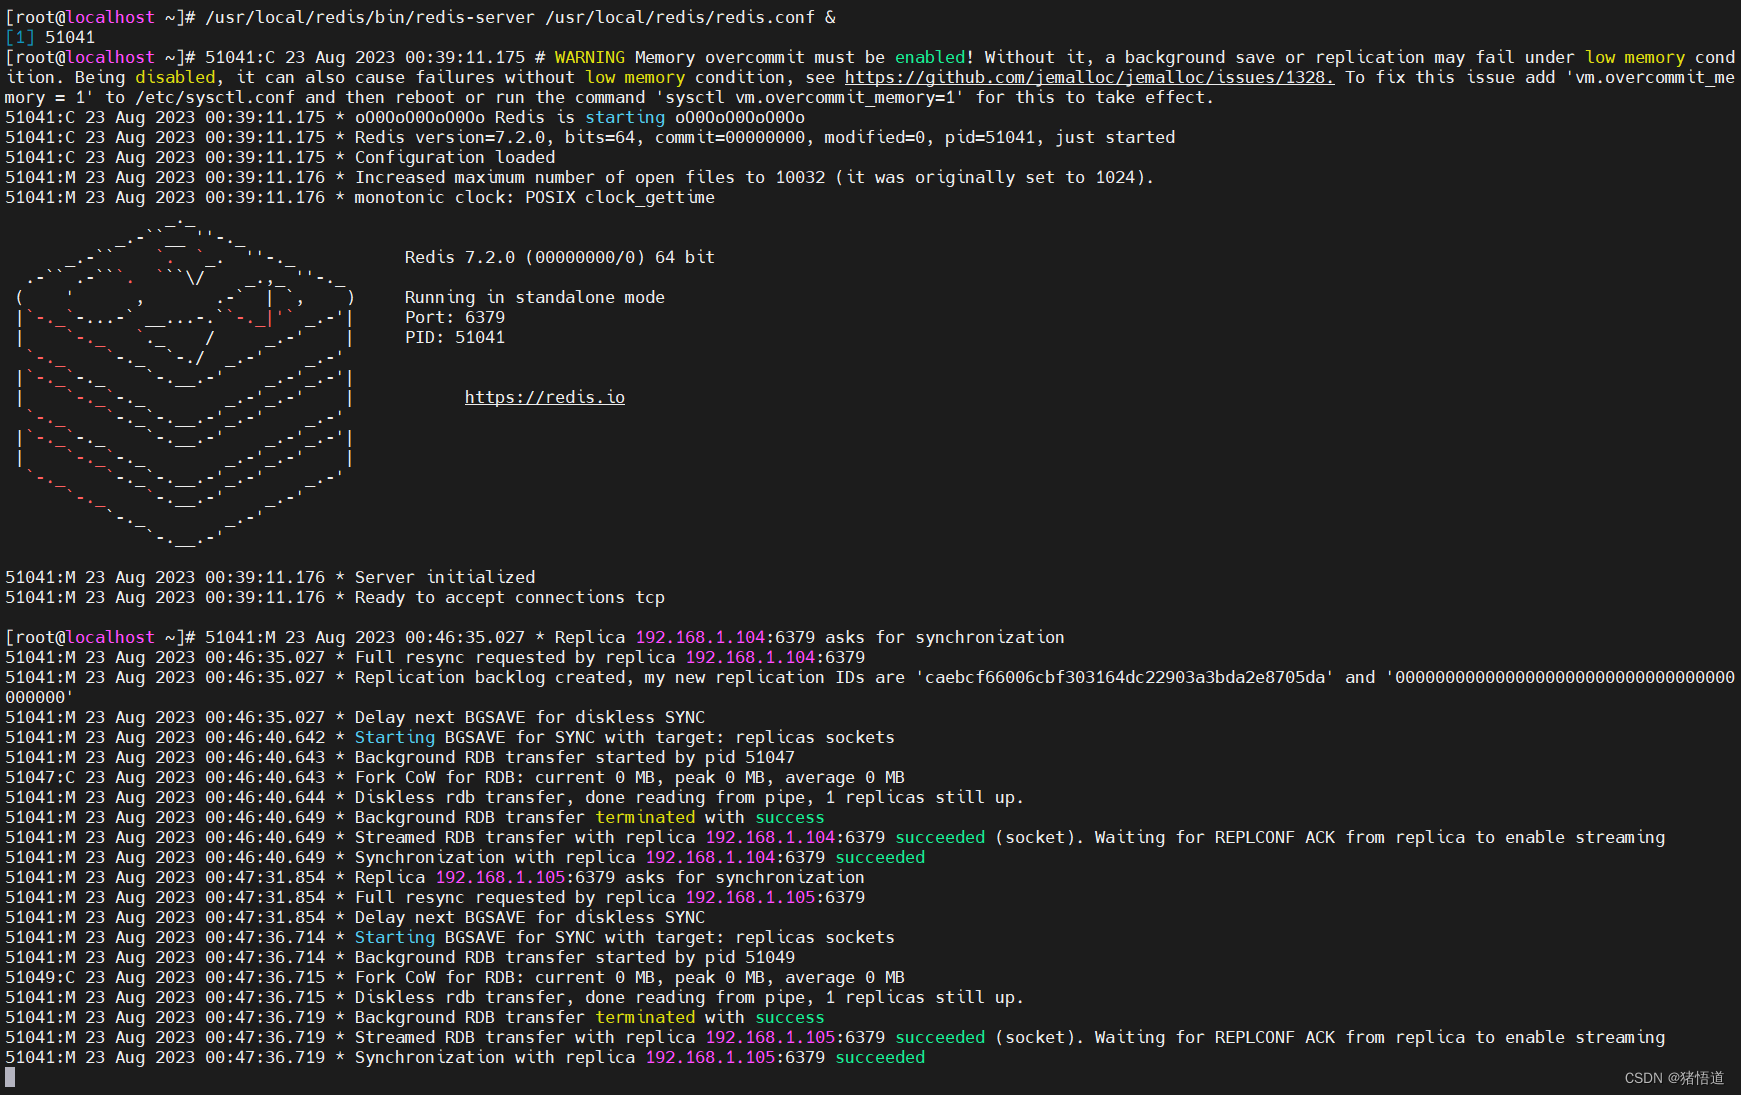
从节点启动信息
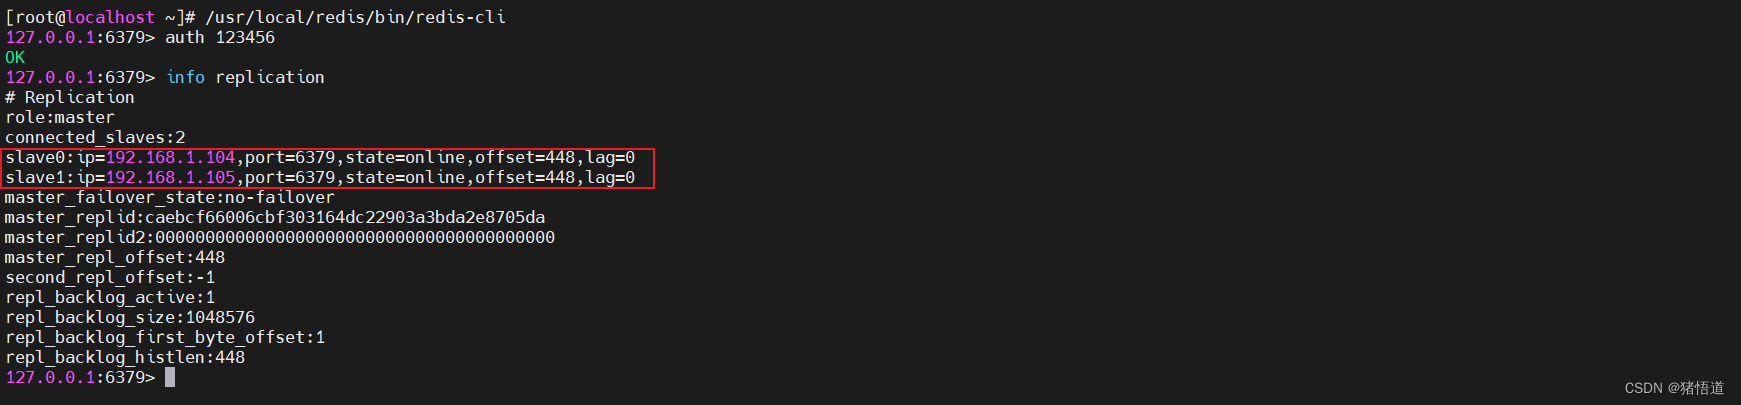
查看主从信息
2.Java 测试
通过上面测试代码写入主节点
主从模式故障不支持自动恢复,需要人为处理,从节点读需要手动写读取代码
2.哨兵
1.哨兵节点配置
## 1.复制 redis 包到 rd4
scp -r /usr/local/redis root@rd4:/usr/local/redis
## 2.拷贝 sentinel 配置文件
scp -r /home/redis-7.2.0/sentinel.conf root@rd4:/usr/local/redis/
## 3.修改哨兵配置
# sentinel monitor <master-redis-name> <master-redis-ip> <master-redis-port> <quorum>
# quorum 表示当有多少个 sentinel 认为一个 master 失效时才算真正失效(取值参考 sentinels/2 + 1)
vi /usr/local/redis/sentinel.conf
## 将 92 行修改为 sentinel monitor mymaster 192.168.1.103 6379 1
## 在 112 行增加 sentinel auth-pass mymaster 123456
## 在 170 行增加 requirepass 123456
## 4.启动哨兵
/usr/local/redis/bin/redis-sentinel /usr/local/redis/sentinel.conf &
## 5.查看信息
/usr/local/redis/bin/redis-cli -p 26379
127.0.0.1:26379> info
修改配置

哨兵启动信息,注意端口为 26379

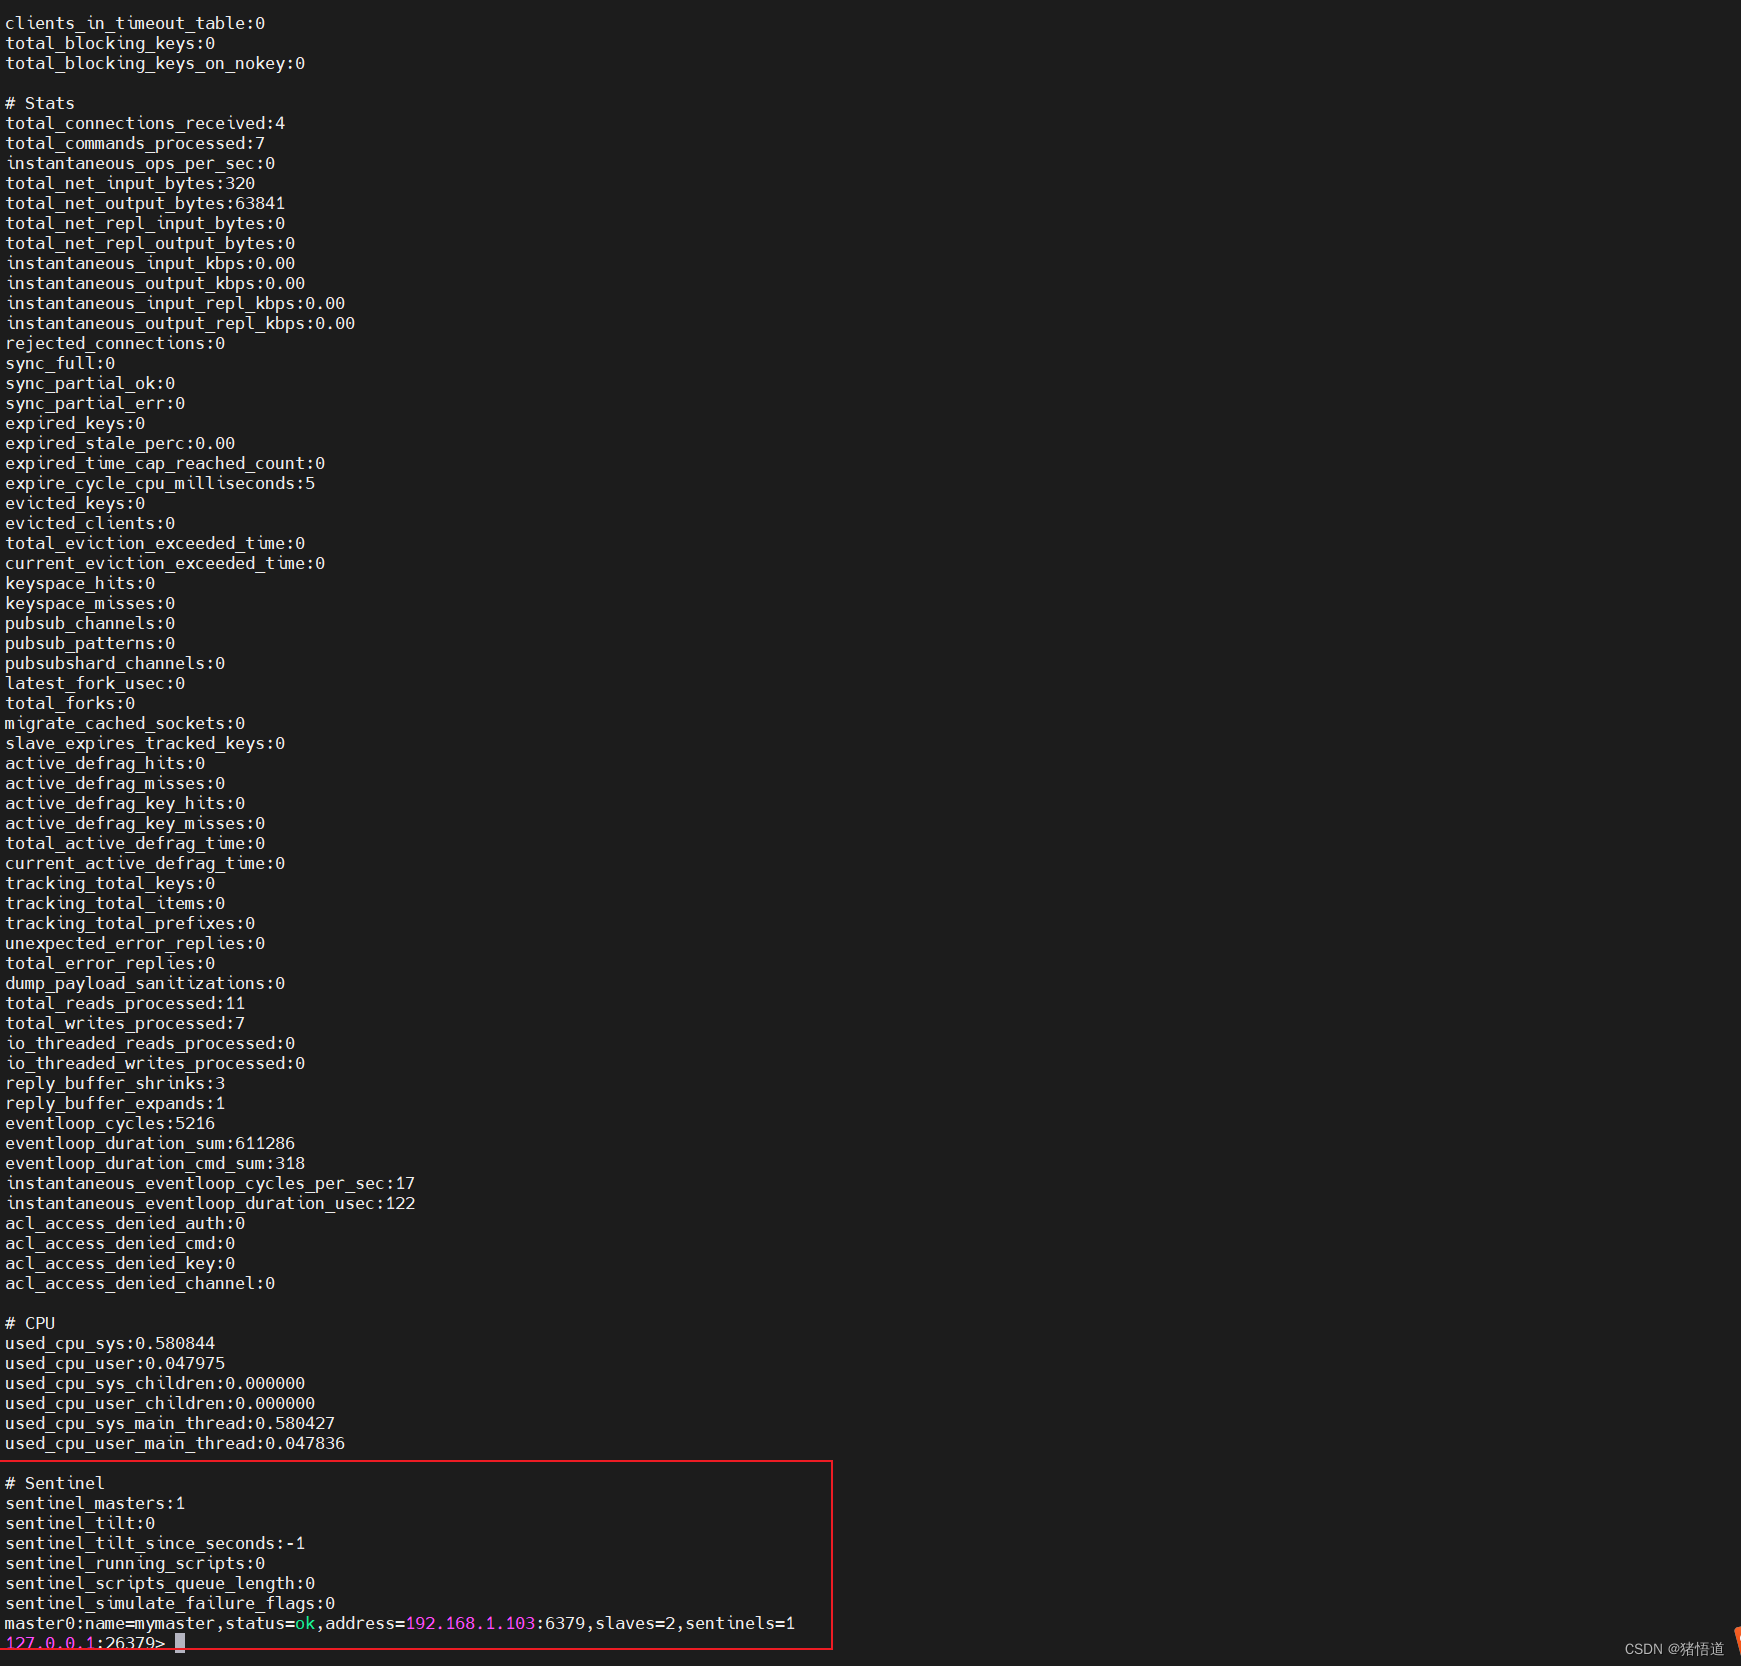
查看哨兵信息
2.复制一个哨兵节点(双哨兵)
## 1.停止所有节点
kill -9 `ps aux |grep redis|grep -v grep | awk '{print $2}'`
## 2.创建日志目录
mkdir -p logfile /var/log/redis
## 3.修改配置文件 增加日志输出 大概 355 行
vi /usr/local/redis/redis.conf
vi /usr/local/redis/sentinel.conf
## 增加 logfile /var/log/redis/redis.log
## 增加 logfile /var/log/redis/sentinel.log
## 4.复制配置好的哨兵文件到 rd5
scp -r /usr/local/redis root@rd5:/usr/local/redis
## 5.启动 rd1 / rd2 / rd3
/usr/local/redis/bin/redis-server /usr/local/redis/redis.conf &
## 6.启动 rd4 / rd5 的哨兵
/usr/local/redis/bin/redis-sentinel /usr/local/redis/sentinel.conf &
3.Java 测试访问哨兵
配置文件
spring:data:redis:password: 123456 # 访问主从节点的密码sentinel:master: mymasternodes: 192.168.1.106:26379,192.168.1.107:26379password: 123456 # 访问哨兵的密码lettuce:pool:max-idle: 50min-idle: 10max-active: 100max-wait: 1000logging:level:root: infoio.lettuce.core: debugorg.springframework.data.redis: debug配置类
package org.example.config;import io.lettuce.core.ReadFrom;
import org.springframework.beans.factory.annotation.Qualifier;
import org.springframework.boot.autoconfigure.data.redis.RedisProperties;
import org.springframework.context.annotation.Bean;
import org.springframework.data.redis.connection.RedisClusterConfiguration;
import org.springframework.data.redis.connection.RedisConnectionFactory;
import org.springframework.data.redis.connection.RedisSentinelConfiguration;
import org.springframework.data.redis.connection.RedisStandaloneConfiguration;
import org.springframework.data.redis.connection.lettuce.LettuceConnectionFactory;
import org.springframework.data.redis.connection.lettuce.LettucePoolingClientConfiguration;
import org.springframework.data.redis.core.RedisTemplate;
import org.springframework.data.redis.serializer.StringRedisSerializer;
import org.springframework.stereotype.Component;import java.time.Duration;
import java.util.HashSet;/*** @author zhuwd && moon* @Description* @create 2023-08-22 22:29*/
@Component
public class RedisConfig {/*** 配置 Redis 工厂* @param properties* @return*/@Bean(name = "redisConnectionFactory")public RedisConnectionFactory redisConnectionFactory(RedisProperties properties) {//取配置RedisProperties.Cluster cluster = properties.getCluster();RedisProperties.Sentinel sentinel = properties.getSentinel();RedisProperties.Pool pool = properties.getLettuce().getPool();//池化配置LettucePoolingClientConfiguration poolingClientConfiguration = LettucePoolingClientConfiguration.builder().readFrom(ReadFrom.ANY_REPLICA).build();if (null != pool){if (pool.getMaxIdle() > 0){poolingClientConfiguration.getPoolConfig().setMaxIdle(pool.getMaxIdle());}if (pool.getMinIdle() > 0){poolingClientConfiguration.getPoolConfig().setMinIdle(pool.getMinIdle());}if (pool.getMaxActive() > 0){poolingClientConfiguration.getPoolConfig().setMaxTotal(pool.getMaxActive());}if (pool.getMaxWait().compareTo(Duration.ZERO) > 0){poolingClientConfiguration.getPoolConfig().setMaxWait(pool.getMaxWait());}}//Redis 配置if (null != cluster){//集群RedisClusterConfiguration clusterConfiguration = new RedisClusterConfiguration(cluster.getNodes());if (null != properties.getPassword()){clusterConfiguration.setPassword(properties.getPassword());}if (null != cluster.getMaxRedirects()){clusterConfiguration.setMaxRedirects(cluster.getMaxRedirects());}return new LettuceConnectionFactory(clusterConfiguration,poolingClientConfiguration);} else if (null != sentinel){//哨兵RedisSentinelConfiguration sentinelConfiguration = new RedisSentinelConfiguration(sentinel.getMaster(),new HashSet<>(sentinel.getNodes()));sentinelConfiguration.setSentinelPassword(sentinel.getPassword());sentinelConfiguration.setPassword(properties.getPassword());//设置从节点读return new LettuceConnectionFactory(sentinelConfiguration,poolingClientConfiguration);} else {//单机RedisStandaloneConfiguration config = new RedisStandaloneConfiguration();config.setHostName(properties.getHost());config.setPort(properties.getPort());config.setPassword(properties.getPassword());return new LettuceConnectionFactory(config);}}/*** redis 配置* @param redisConnectionFactory* @return*/@Bean(name = "redisTemplate")public RedisTemplate<String, Object> redisTemplate(@Qualifier("redisConnectionFactory") RedisConnectionFactory redisConnectionFactory){RedisTemplate<String, Object> redisTemplate = new RedisTemplate<>();// 序列化keyredisTemplate.setKeySerializer(new StringRedisSerializer());redisTemplate.setValueSerializer(new StringRedisSerializer());// 序列化hashredisTemplate.setHashKeySerializer(new StringRedisSerializer());redisTemplate.setHashValueSerializer(new StringRedisSerializer());// 连接redis数据库redisTemplate.setConnectionFactory(redisConnectionFactory);return redisTemplate;}}
启动类
package org.example;import org.springframework.boot.SpringApplication;
import org.springframework.boot.autoconfigure.SpringBootApplication;/*** @author zhuwd && moon* @Description* @create 2023-08-22 22:28*/
@SpringBootApplication
public class RedisApp {public static void main(String[] args) {SpringApplication.run(RedisApp.class,args);}
}
测试类
package org.example.controller;import org.springframework.beans.factory.annotation.Autowired;
import org.springframework.data.redis.core.RedisTemplate;
import org.springframework.web.bind.annotation.GetMapping;
import org.springframework.web.bind.annotation.RequestMapping;
import org.springframework.web.bind.annotation.RestController;/*** @author zhuwd && moon* @Description* @create 2023-08-23 20:13*/
@RequestMapping("/redis")
@RestController
public class RedisTest {@AutowiredRedisTemplate<String, Object> redisTemplate;@GetMapping("/write")public void write(String key,String val){redisTemplate.opsForValue().set(key,val);}@GetMapping("/read")public void read(String key){System.out.println(redisTemplate.opsForValue().get(key));}
}
查看主节点:/usr/local/redis/bin/redis-cli -p 26379
启动服务
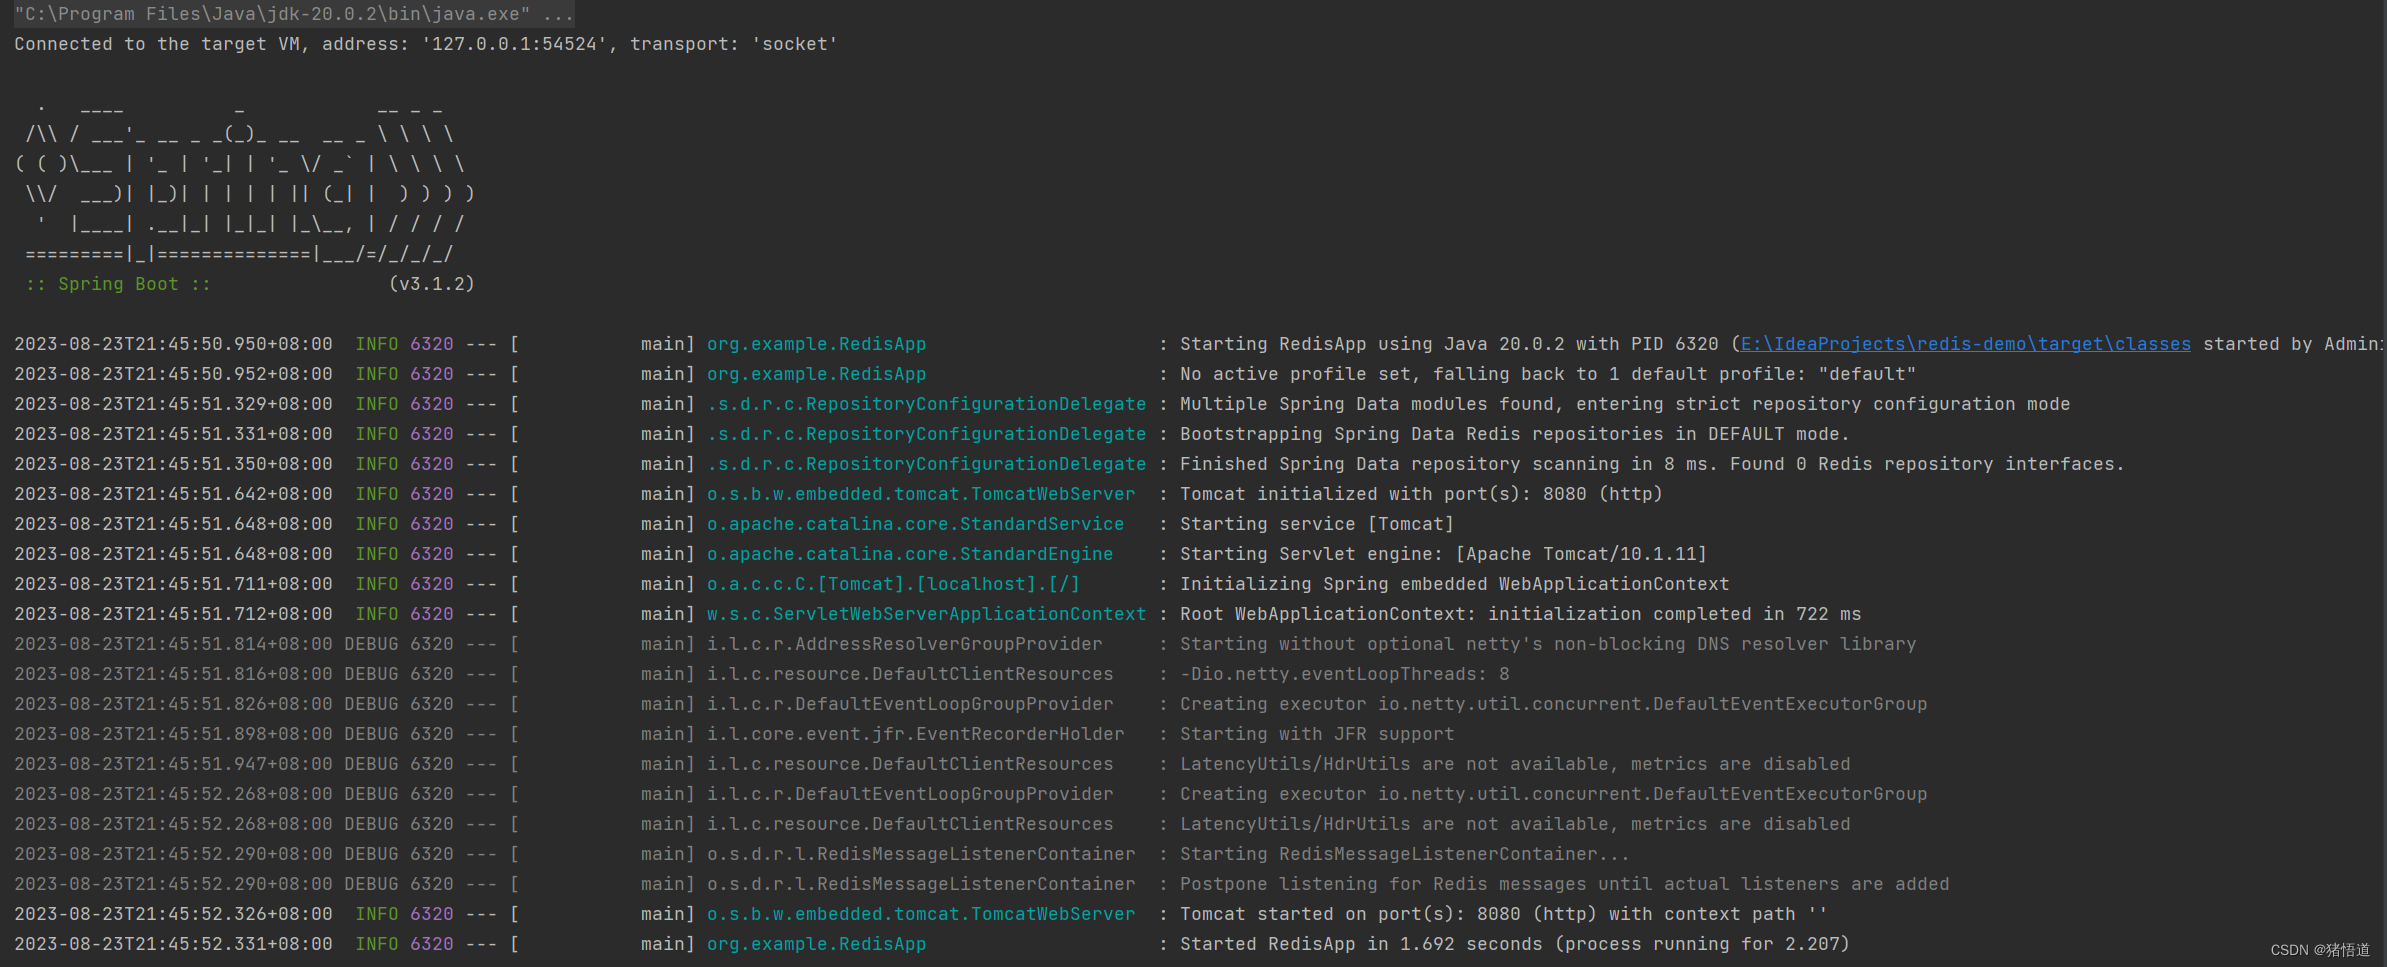
测试写集群:127.0.0.1:8080/redis/write?key=test&val=hello
写节点:rd3

读数据:rd2

杀掉主节点并等待:kill -9 ps aux |grep redis|grep -v grep | awk '{print $2}'

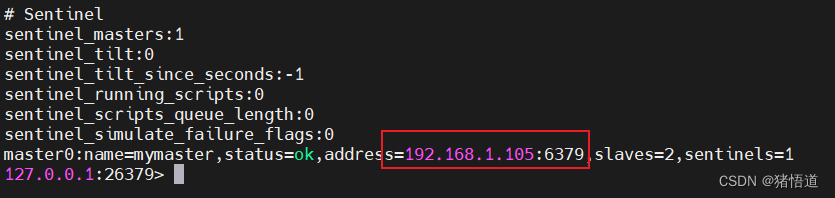
查看 rd4 哨兵,主节点切为 rd2

查看 rd5 哨兵,主节点
写测试:127.0.0.1:8080/redis/write?key=test&val=reHello

读测试:127.0.0.1:8080/redis/read?key=test

恢复 rd5 服务:/usr/local/redis/bin/redis-server /usr/local/redis/redis.conf &

通过 rd1 查看从节点信息
3.集群
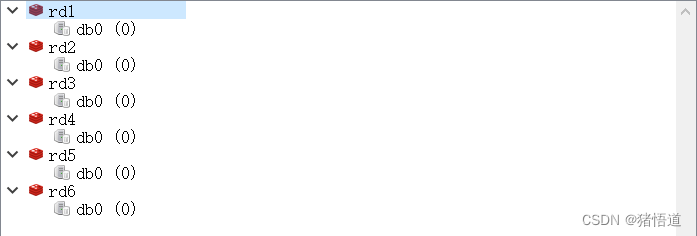
清除之前测试写入的数据
查找持久化文件:find / -type f -name dump.rdb 如果存在也删掉
1.集群配置文件修改
## 1.在 rd1 复制配置文件
cp /home/redis-7.2.0/redis.conf /usr/local/redis/redis-cluster.conf
## 2.编辑
vim /usr/local/redis/redis-cluster.conf
## 设置密码 requirepass 123456
## 关闭保护模式 protected-mode no
## 开启集群 cluster-enabled yes 约1586行
## 设置配置文件 cluster-config-file redis-cluster.conf 约1594行
## 设置超时 cluster-node-timeout 15000 约1600行
## 设置主节点密码 masterauth 123456
## 设置日志 logfile /var/log/redis/redis-cluster.log
## 3.将 redis-cluster.conf 分发到 rd2 / rd3 / rd4 / rd5 / rd6
scp /usr/local/redis/redis-cluster.conf root@rd2:/usr/local/redis/
scp /usr/local/redis/redis-cluster.conf root@rd3:/usr/local/redis/
scp /usr/local/redis/redis-cluster.conf root@rd4:/usr/local/redis/
scp /usr/local/redis/redis-cluster.conf root@rd5:/usr/local/redis/
scp /usr/local/redis/redis-cluster.conf root@rd6:/usr/local/redis/
## 4.依次启动 rd1 / rd2 /rd3 /rd4 /rd5 / rd6
/usr/local/redis/bin/redis-server /usr/local/redis/redis-cluster.conf &
## 5.清空已有数据
## 5.创建集群 在任一节点执行
## -a 密码认证,若没写密码无效带这个参数
## --cluster create 创建集群实例列表 IP:PORT IP:PORT IP:PORT IP:PORT IP:PORT IP:PORT
## --cluster-replicas 复制因子1(即每个主节点需2个从节点)
/usr/local/redis/bin/redis-cli -a 123456 --cluster create --cluster-replicas 1 192.168.1.103:6379 192.168.1.104:6379 192.168.1.105:6379 192.168.1.106:6379 192.168.1.107:6379 192.168.1.108:6379
启动所有节点服务
创建集群:集群至少要三个主节点,
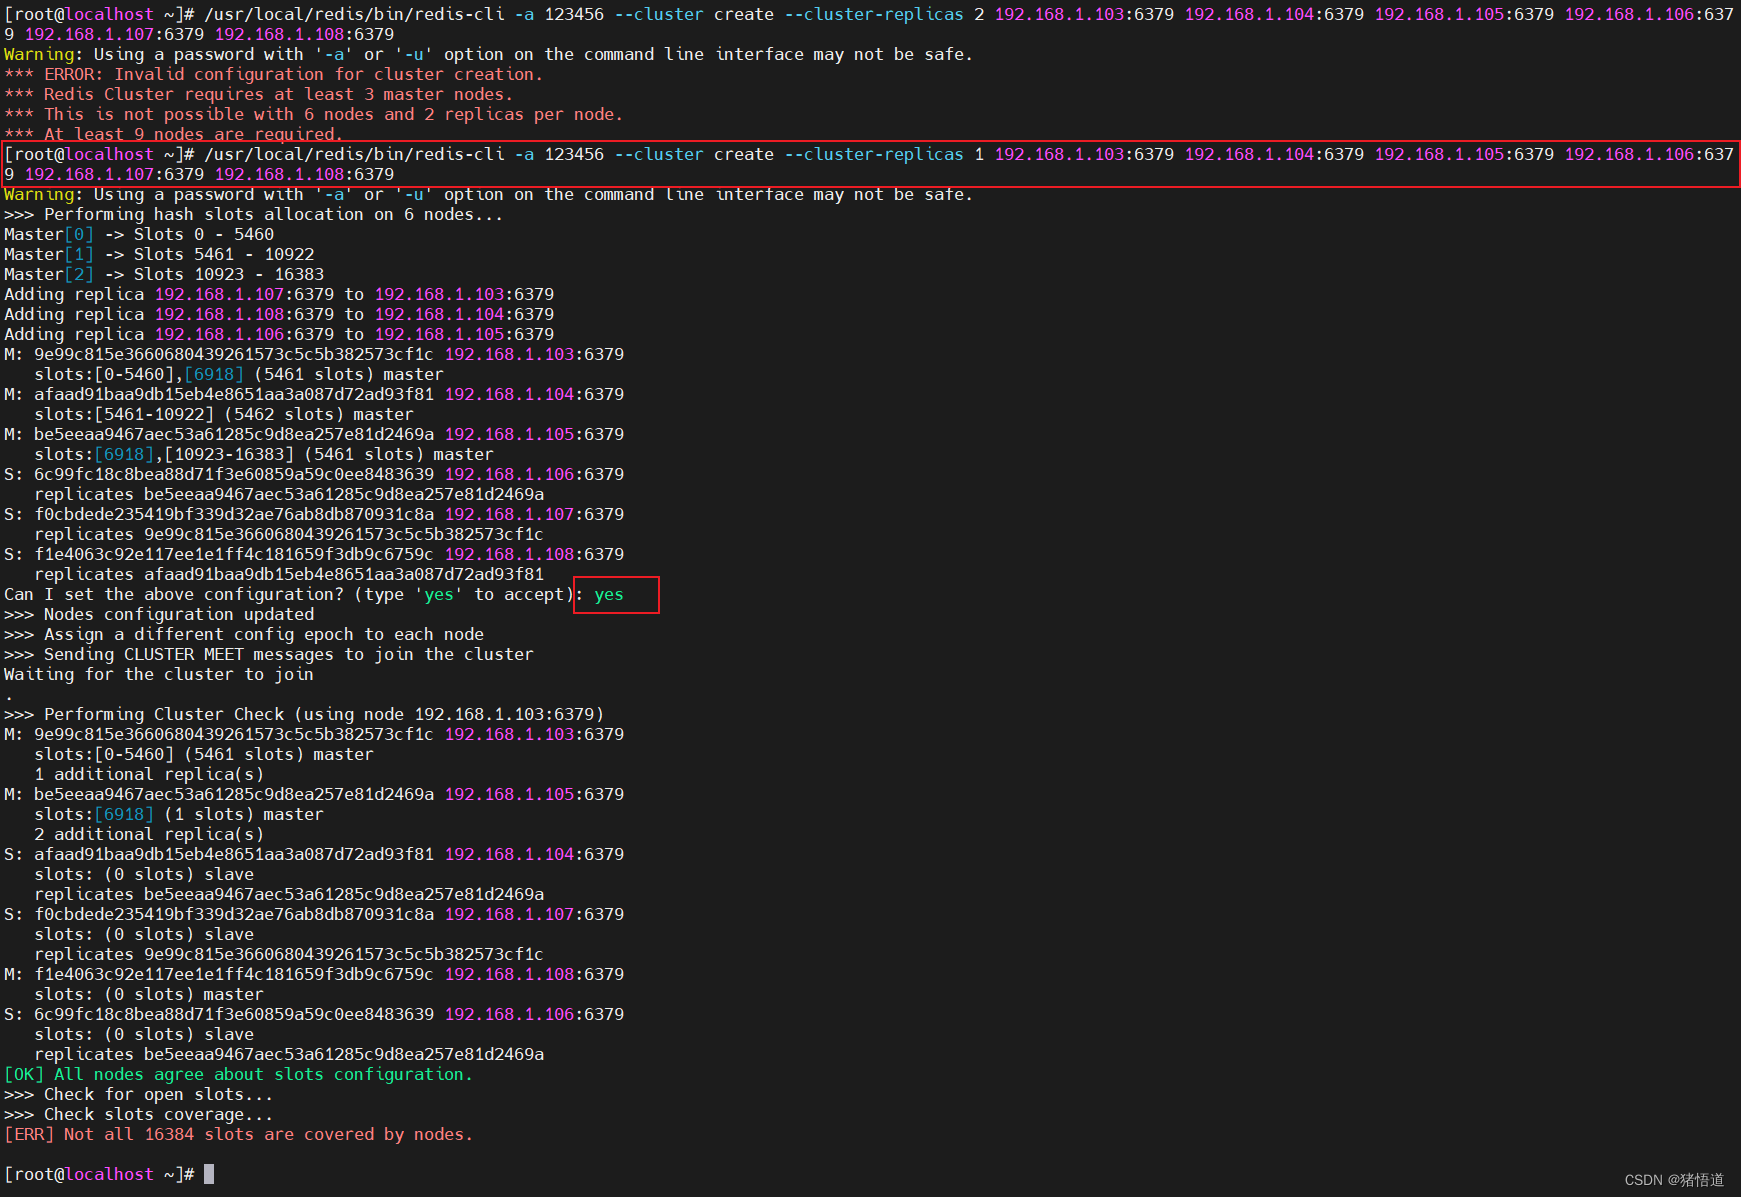
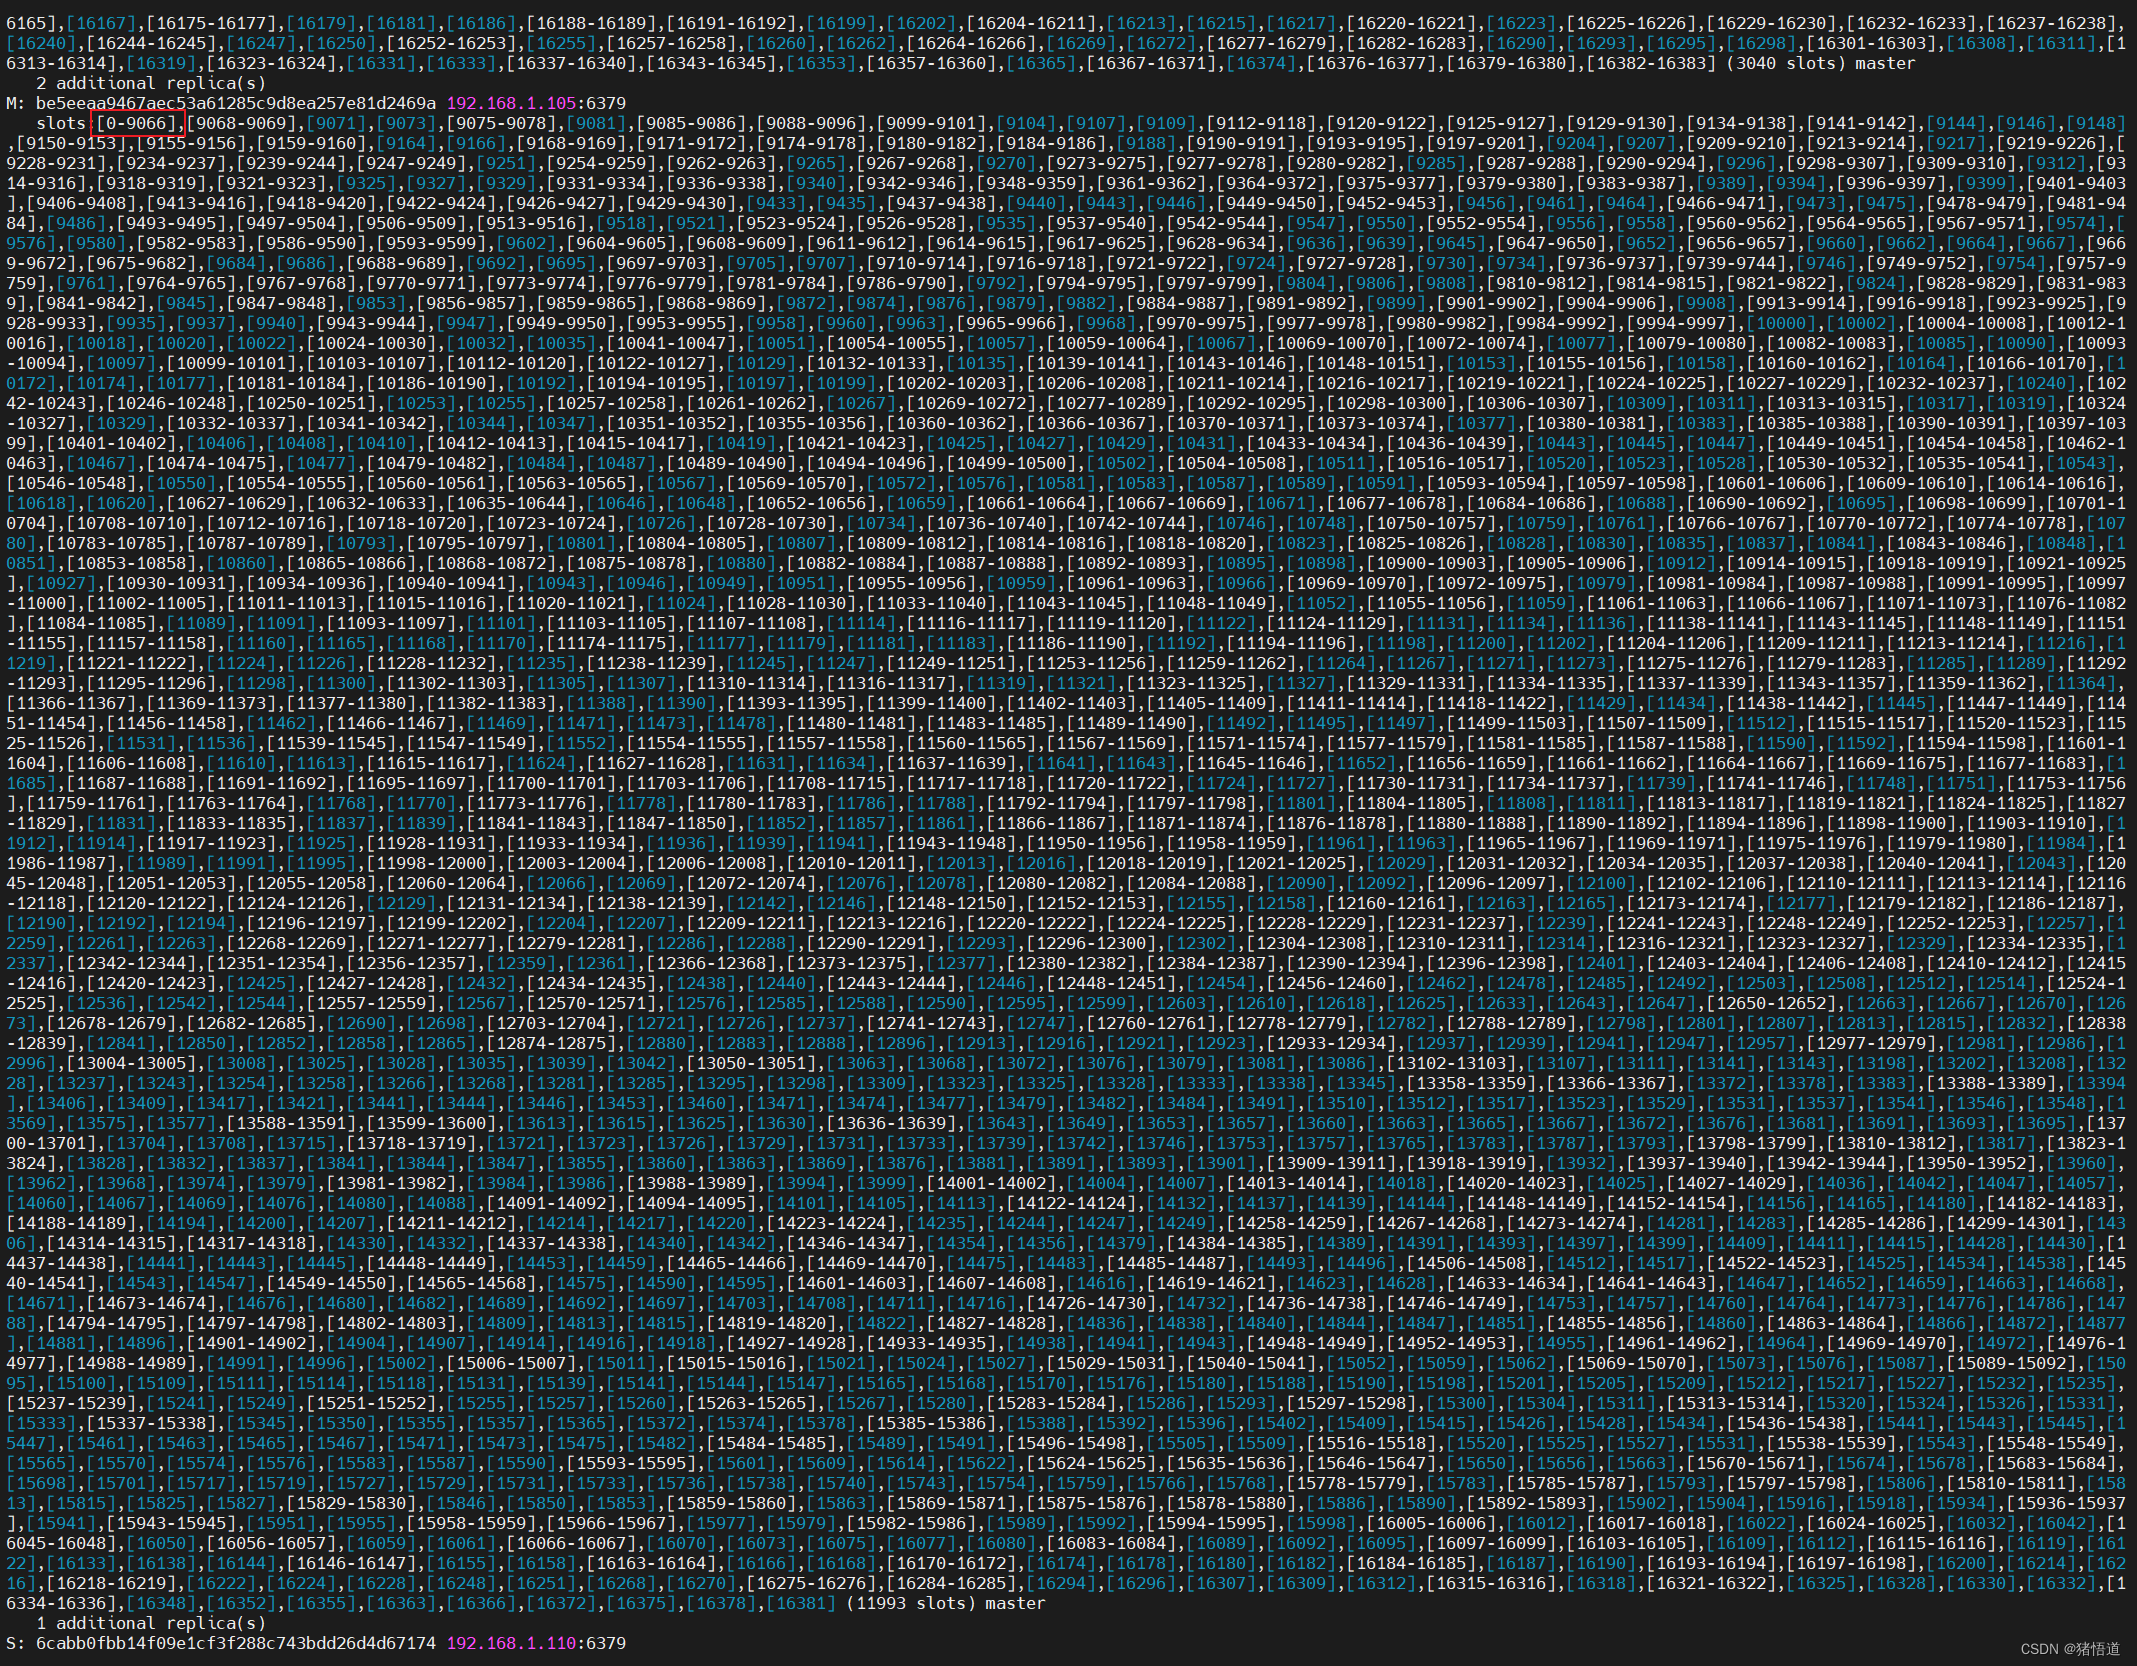
查看集群信息和集群节点

新建三台虚拟机
| Host | IP |
|---|---|
| rd7 | 192.168.1.109 |
| rd8 | 192.168.1.110 |
| rd9 | 192.168.1.111 |
## 1.新建三台虚拟机并分发配置 rd7 / rd8 /rd9
scp -r /usr/local/redis root@192.168.1.109:/usr/local/
scp -r /usr/local/redis root@192.168.1.110:/usr/local/
scp -r /usr/local/redis root@192.168.1.111:/usr/local/
## 2.创建日志目录 / 关闭防火墙并禁用
mkdir -p /var/log/redis
systemctl stop firewalld && systemctl disable firewalld
## 3.启动 rd7 / rd8 /rd9
/usr/local/redis/bin/redis-server /usr/local/redis/redis-cluster.conf &
## 4.将新节点添加到当前集群 在 rd1 执行
## -a 密码认证,若没写密码无效带这个参数
## --cluster add-node 创建集群实例列表 IP:PORT IP:PORT IP:PORT IP:PORT IP:PORT IP:PORT
## 要有一个节点为当前集群的节点
## /usr/local/redis/bin/redis-cli -a 123456 --cluster add-node 192.168.1.109:6379 192.168.1.110:6379 192.168.1.111:6379 192.168.1.103:6379
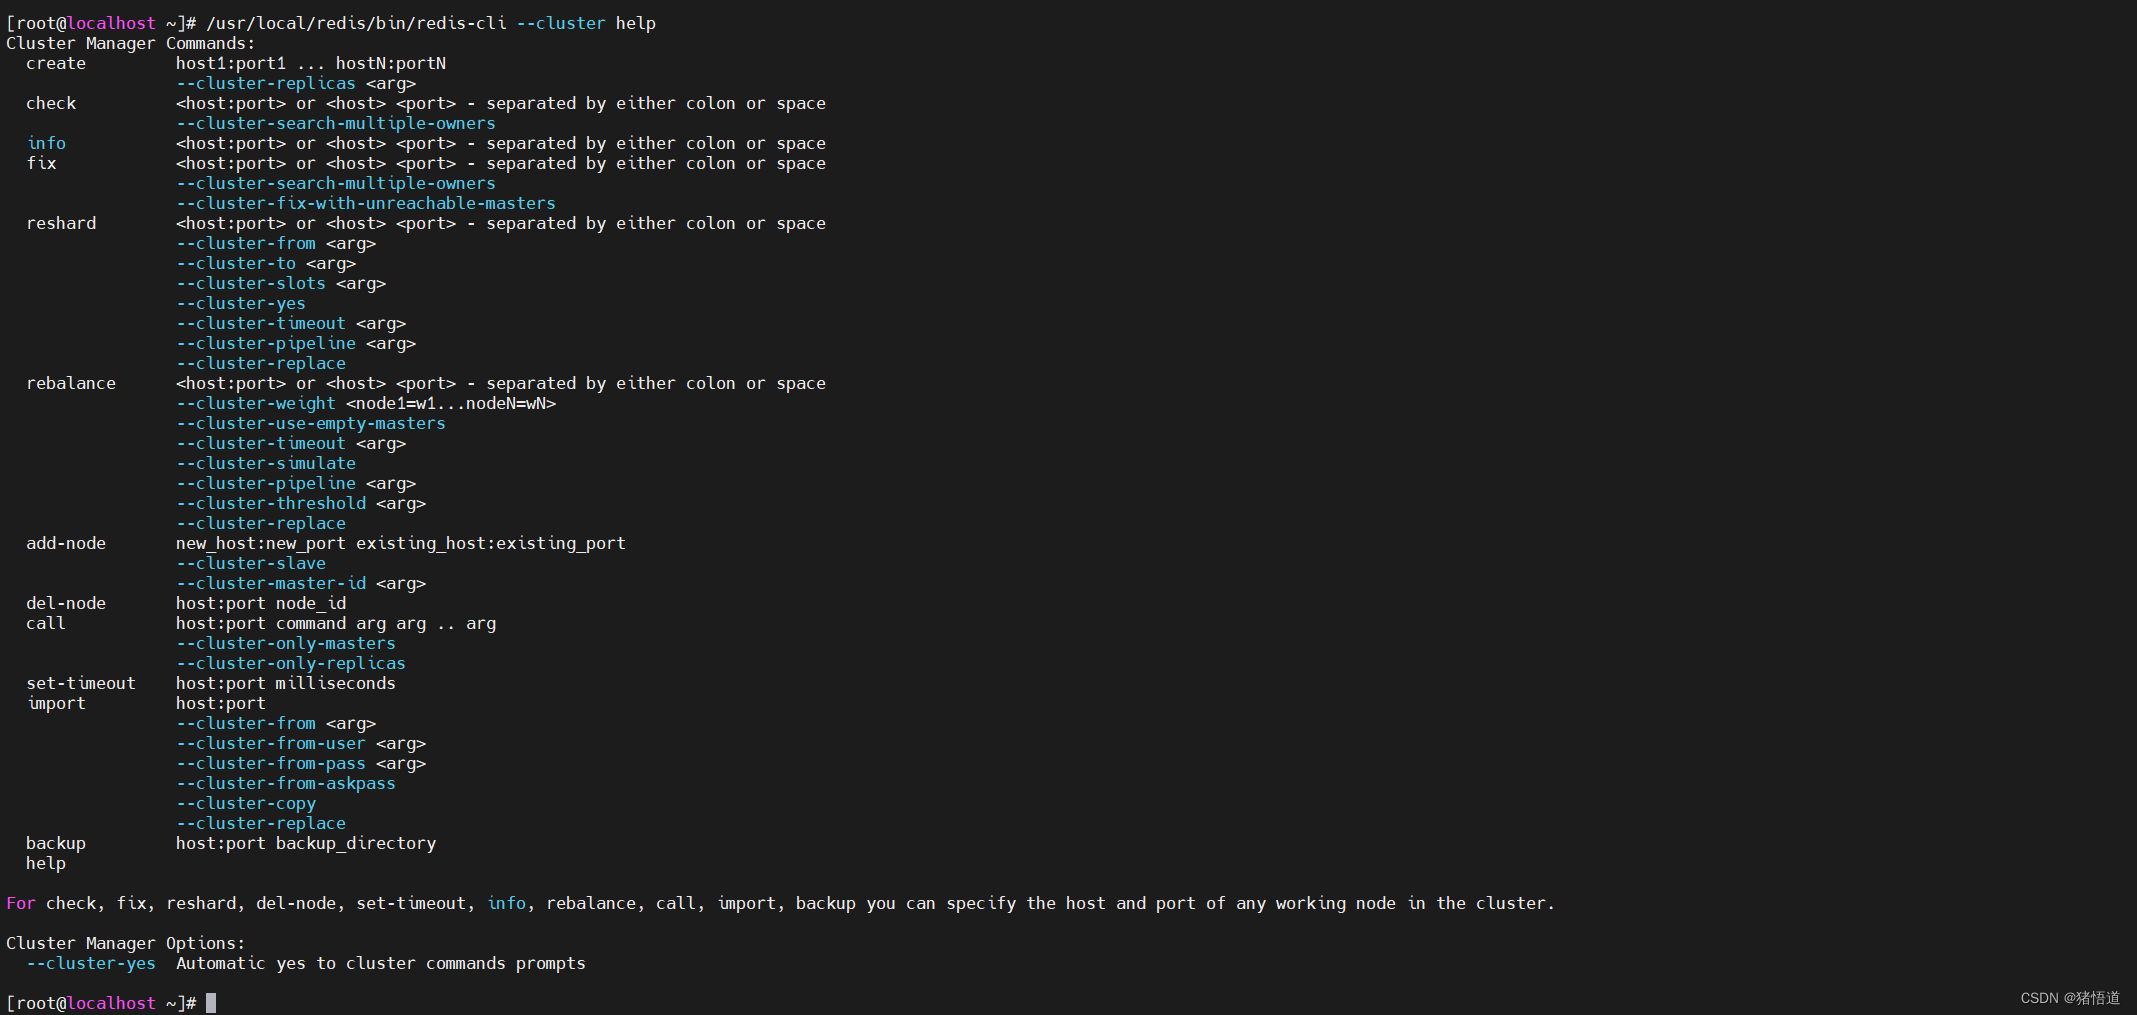
查看集群命令说明:/usr/local/redis/bin/redis-cli --cluster help
## 添加主节点
/usr/local/redis/bin/redis-cli -a 123456 --cluster add-node 192.168.1.109:6379 192.168.1.103:6379
## 如果 slot 分配不均,可以用如下命令修复集群
## 分配不均报错如下 [ERR] Not all 16384 slots are covered by nodes.
/usr/local/redis/bin/redis-cli -a 123456 --cluster fix 192.168.1.103:6379
## 执行 resharding 指令来为它分配 hash slots
## 执行下面命令后要依次设置移动 slot 的节点 ID 源节点列表,可直接用 all
/usr/local/redis/bin/redis-cli -a 123456 --cluster reshard 192.168.1.103:6379
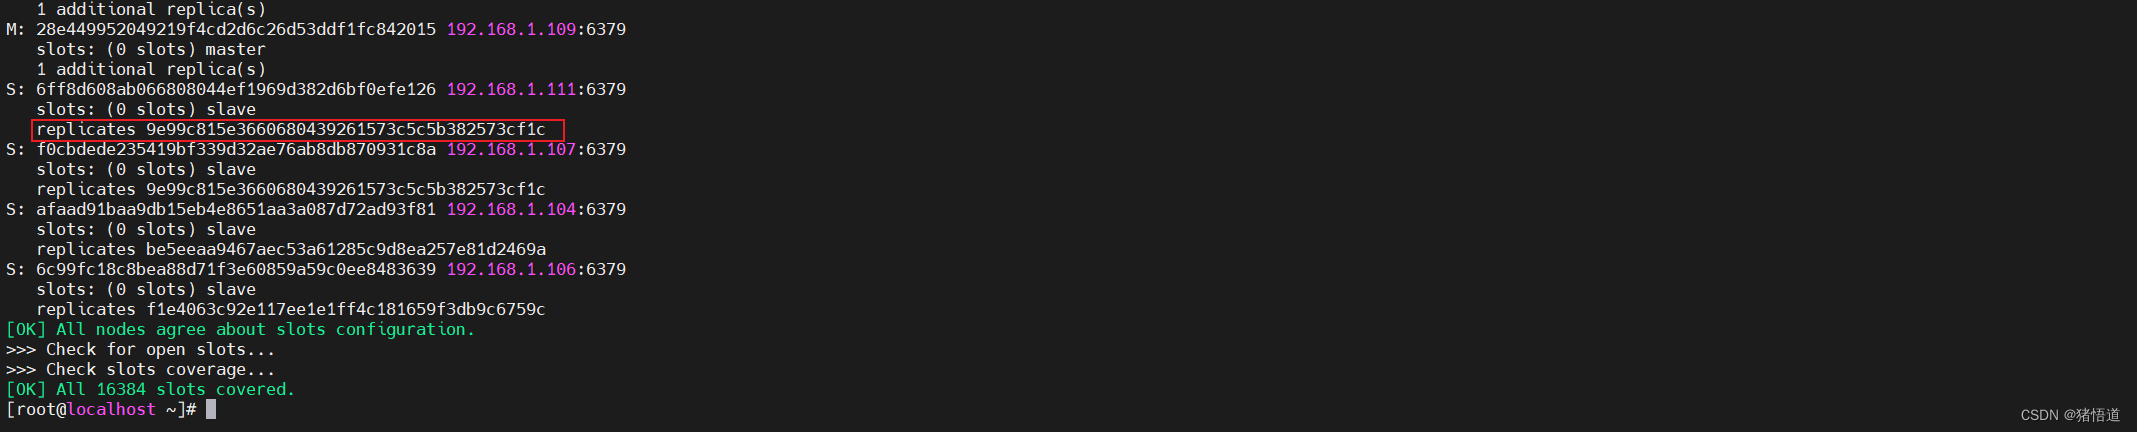
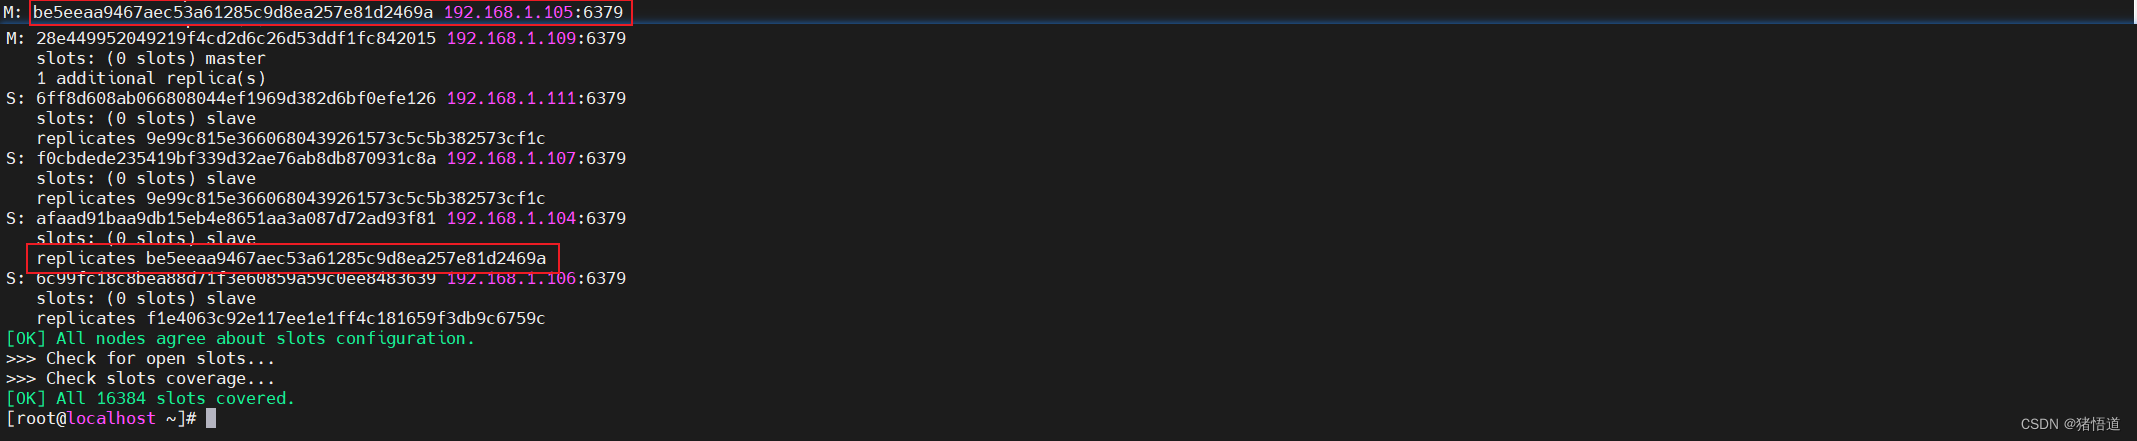
添加主节点并查看结果(部分截图)

查看主从节点状态:/usr/local/redis/bin/redis-cli -a 123456 --cluster check 192.168.1.103:6379 | grep ‘M|S’

## 随机添加从节点,优先添加到从节点少的节点下
/usr/local/redis/bin/redis-cli -a 123456 --cluster add-node 192.168.1.110:6379 192.168.1.103:6379 --cluster-slave
## 添加到指定主节点下(添加到 103 即 rd1 下面)
/usr/local/redis/bin/redis-cli -a 123456 --cluster add-node 192.168.1.111:6379 192.168.1.103:6379 --cluster-slave --cluster-master-id 9e99c815e3660680439261573c5c5b382573cf1c
随机添加

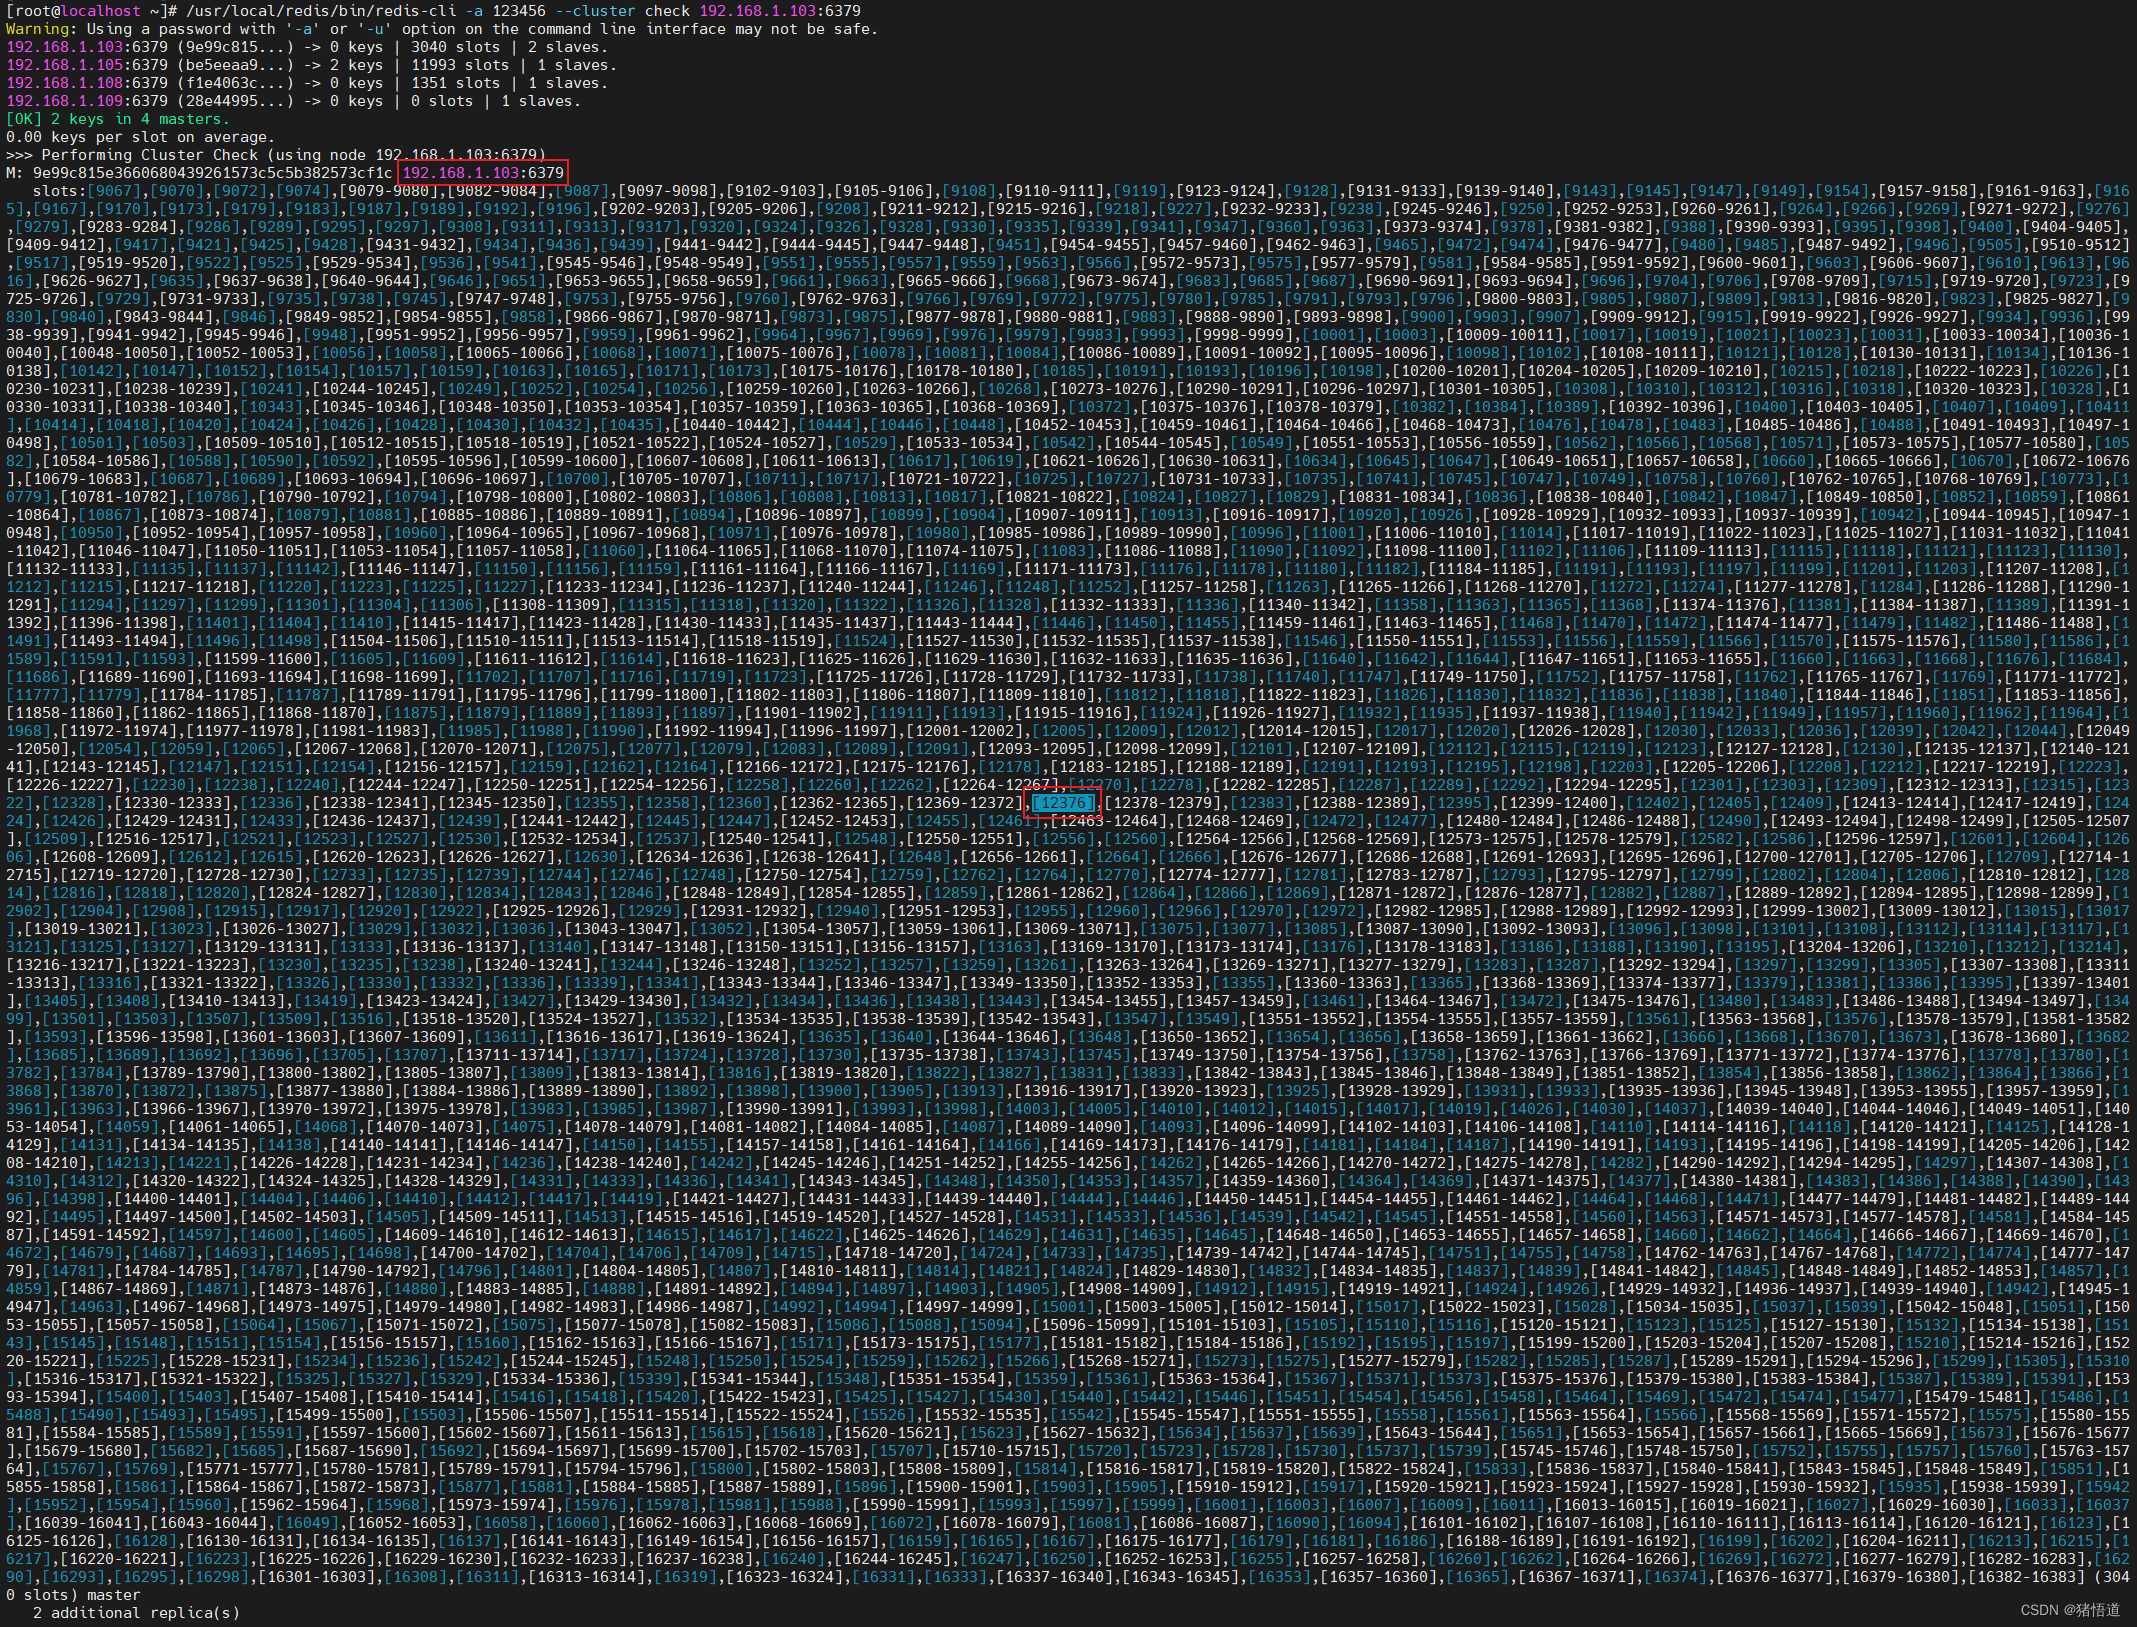
查看主从节点状态:/usr/local/redis/bin/redis-cli -a 123456 --cluster check 192.168.1.103:6379
2.Java 访问 Redis 集群测试
配置集群主节点
spring:data:redis:password: 123456 # 访问主从节点的密码cluster:max-redirects: 10nodes: 192.168.1.103:6379,192.168.1.105:6379,192.168.1.108:6379,192.168.1.109:6379lettuce:pool:max-idle: 50min-idle: 10max-active: 100max-wait: 1000enabled: truelogging:level:root: infoio.lettuce.core: debugorg.springframework.data.redis: debug修改插入方法计算 SLOT
package org.example.controller;import io.lettuce.core.codec.CRC16;
import org.springframework.beans.factory.annotation.Autowired;
import org.springframework.data.redis.core.RedisTemplate;
import org.springframework.web.bind.annotation.GetMapping;
import org.springframework.web.bind.annotation.RequestMapping;
import org.springframework.web.bind.annotation.RestController;/*** @author zhuwd && moon* @Description* @create 2023-08-23 20:13*/
@RestController
@RequestMapping("/redis")
public class RedisTest {@AutowiredRedisTemplate<String, Object> redisTemplate;private static final int SLOT_S = 16384;@GetMapping("/write")public void write(String key,String val){int slot = CRC16.crc16(key.getBytes())%SLOT_S;redisTemplate.opsForValue().set(key,val);System.out.println("slot " + slot + " key " + key + " val " + val);}@GetMapping("/read")public void read(String key){System.out.println(redisTemplate.opsForValue().get(key));}
}
测试插入数据:127.0.0.1:8080/redis/write?key=test&val=reHello
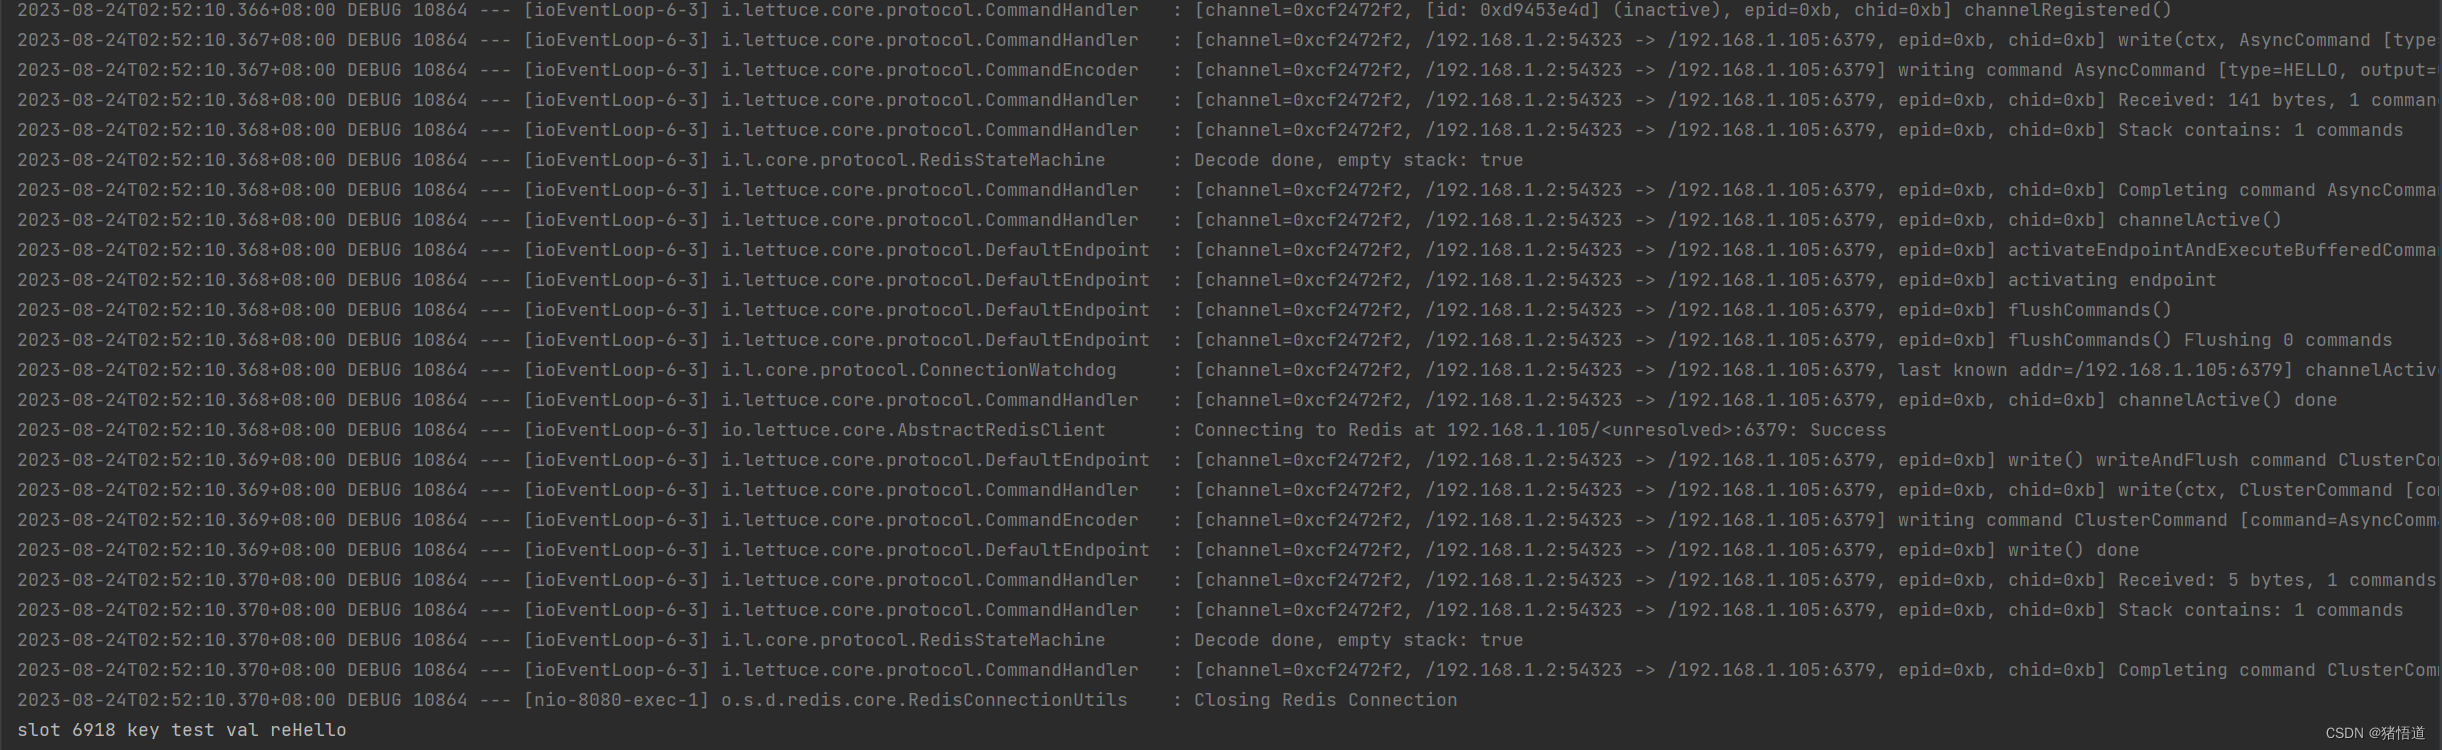
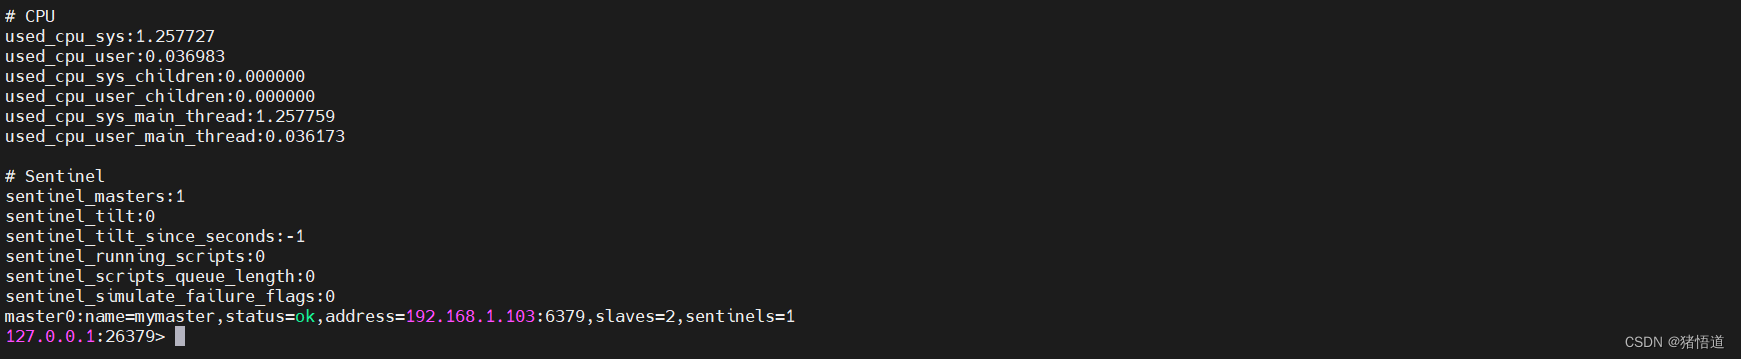
查看日志插入主节点为 rd3【192.168.1.105】,槽号为 6918
读数据:127.0.0.1:8080/redis/read?key=test
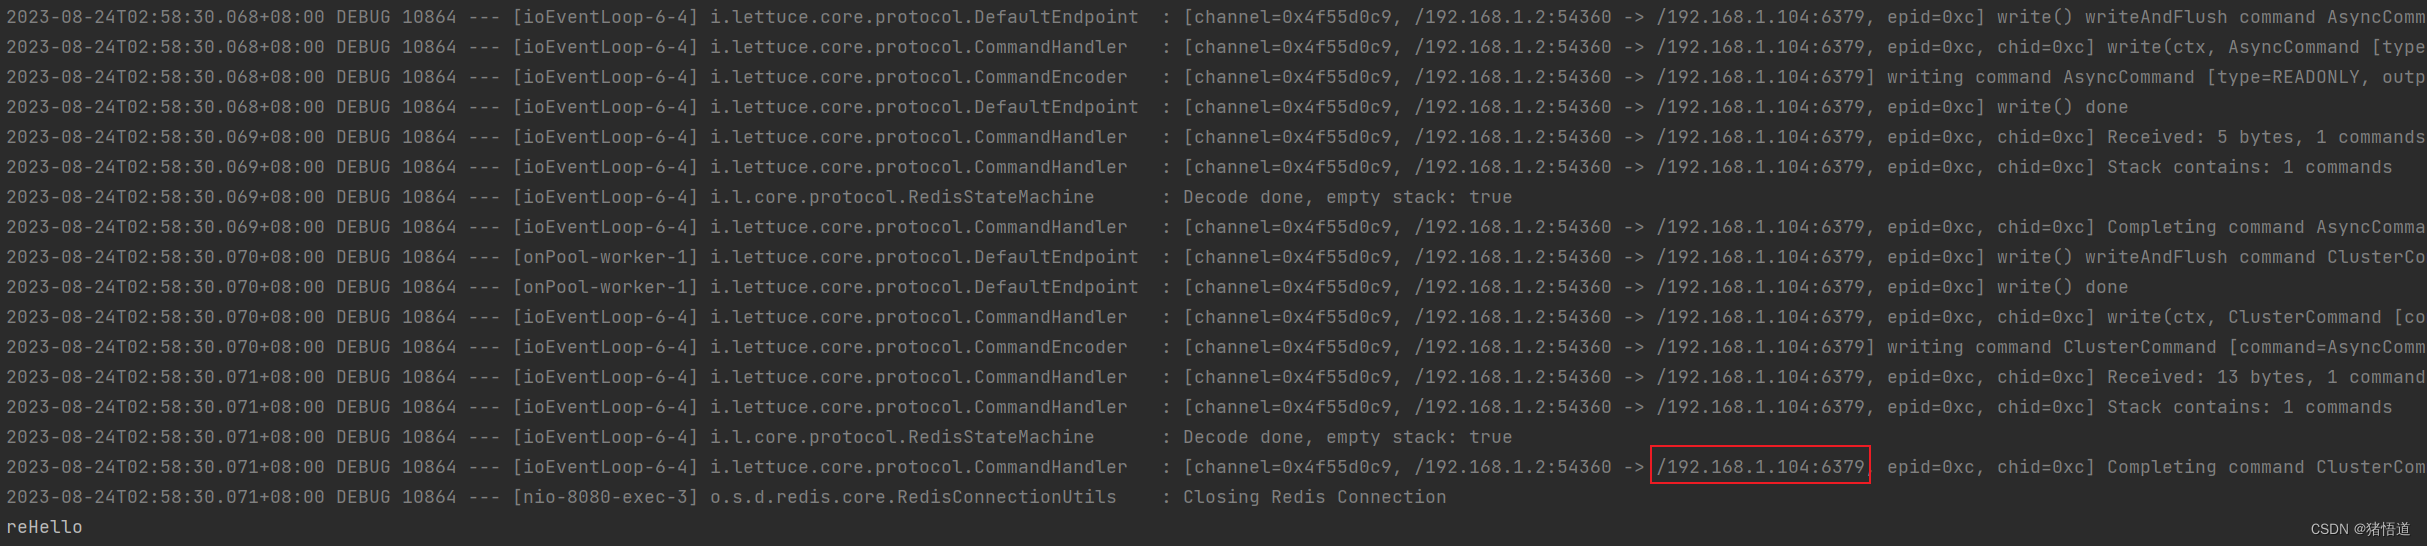
从节点 192.168.1.104 为 rd2,查看其是否为 rd3 从节点:/usr/local/redis/bin/redis-cli -a 123456 --cluster check 192.168.1.103:6379
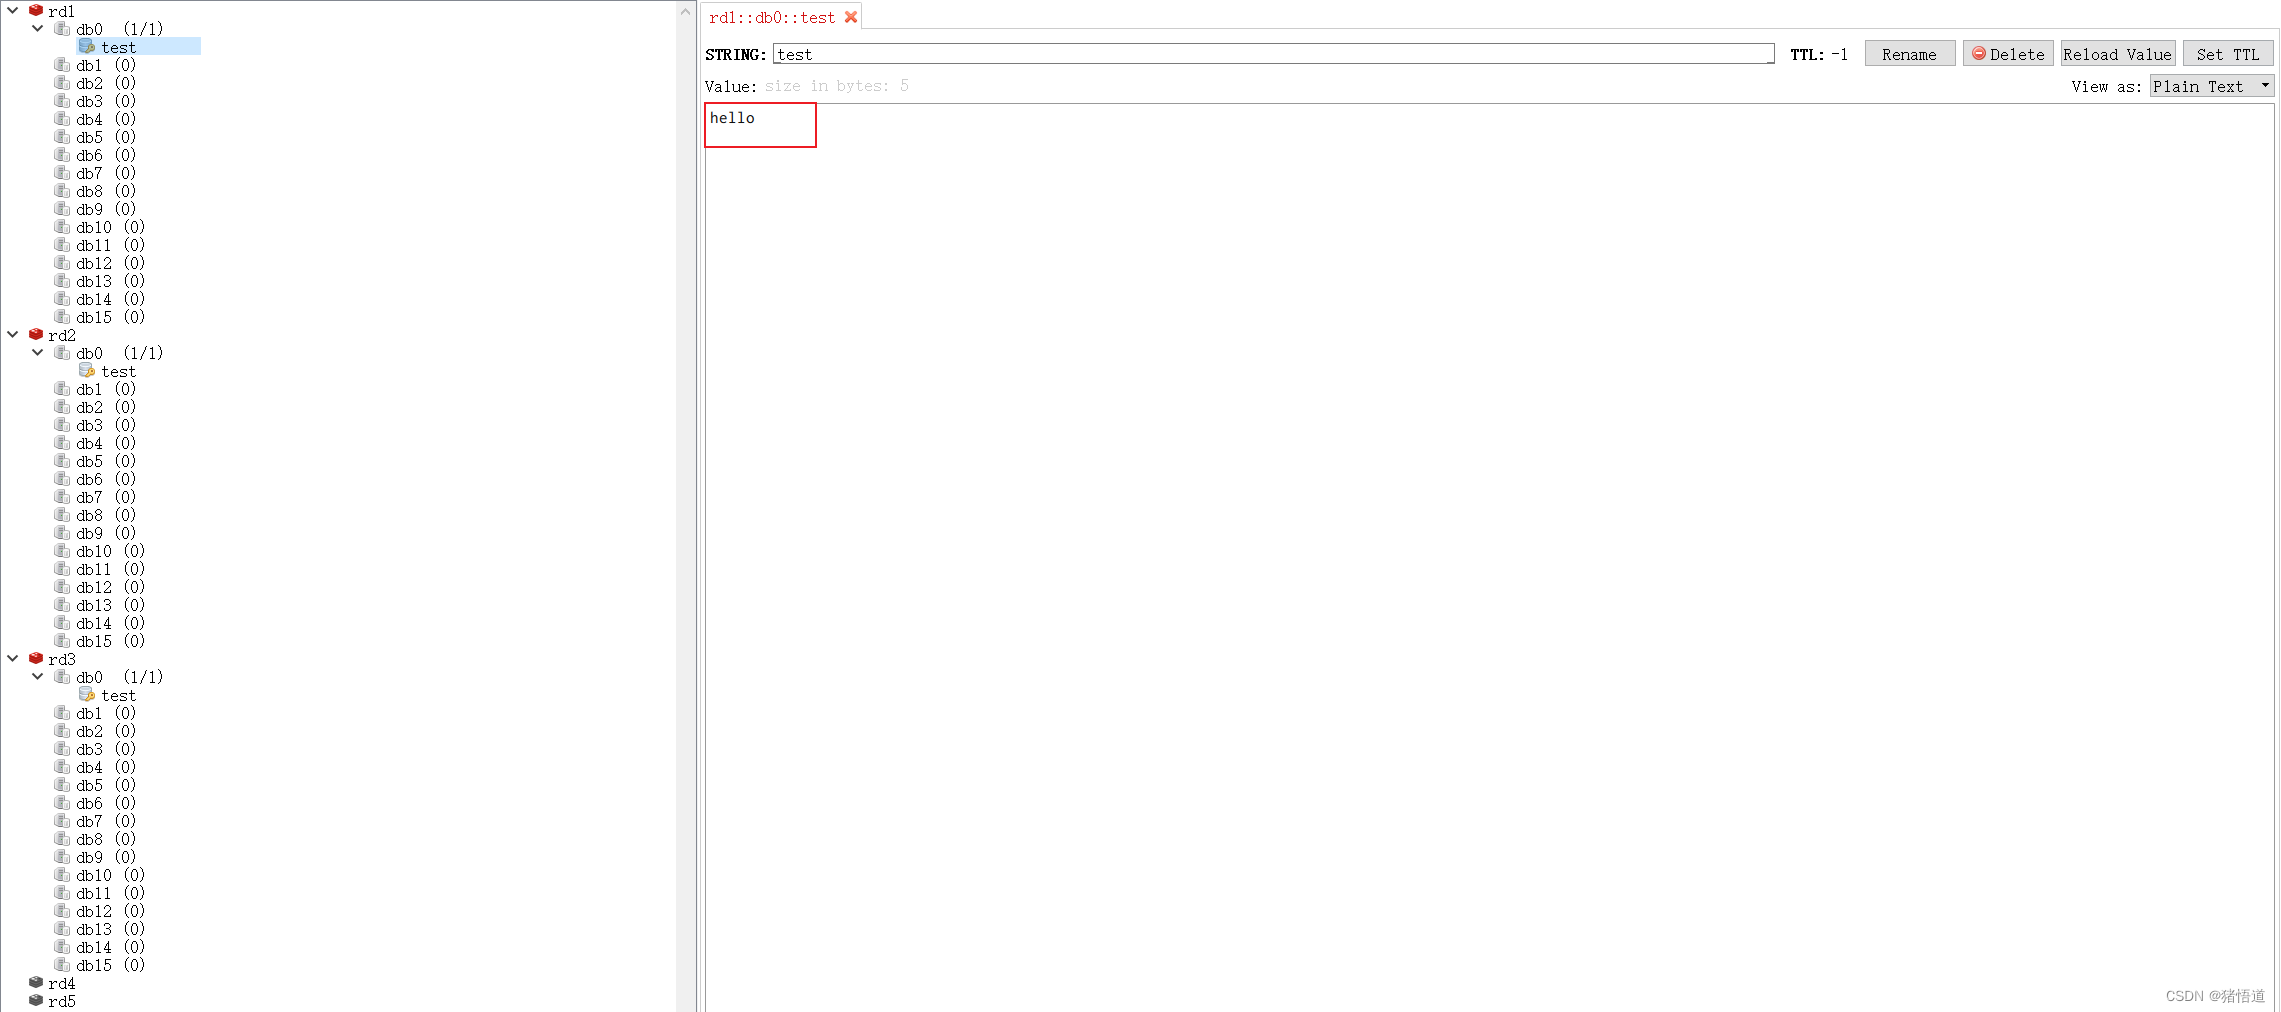
客户端查看数据

查看集群槽号 12376 属于 103 节点 rd1
插入 Key 测试其节点:127.0.0.1:8080/redis/write?key=RedisTJXY&val=12376

查看客户端数据


相关文章:
Anolis 8.6 下 Redis 7.2.0 集群搭建和配置
Redis 7.2.0 搭建和集群配置 一.Redis 下载与单机部署1.Redis 下载2.虚拟机配置3.Redis 单机源码安装和测试4.Java 单机连接测试1.Pom 依赖2.配置文件3.启动类4.配置类5.单元测试6.测试结果 二.Redis 集群部署1.主从1.从节点配置2.Java 测试 2.哨兵1.哨兵节点配置2.复制一个哨兵…...

综合能源系统(8)——综合能源系统支撑技术
综合能源系统关键技术与典型案例 何泽家,李德智主编 1、大数据技术 1.1、大数据技术概述 大数据是指无法在一定时间范围内用常规软件工具进行捕捉、管理和处理的数据集合,是需要新处理模式才能具有更强的决策力、洞察发现力和流程优化能力的海量、高…...

MySQL5.7数据目录结构
以CentOS7为例,数据目录为/var/lib/mysql/,其内容如下: [rootscentos szc]# ll /var/lib/mysql/ total 122952 -rw-r----- 1 mysql mysql 56 Jan 15 16:02 auto.cnf -rw------- 1 mysql mysql 1680 Jan 15 16:02 ca-key.pem -rw-r…...

Python Opencv实践 - 图像直方图均衡化
import cv2 as cv import numpy as np import matplotlib.pyplot as pltimg cv.imread("../SampleImages/pomeranian.png", cv.IMREAD_COLOR) print(img.shape)#图像直方图计算 #cv.calcHist(images, channels, mask, histSize, ranges, hist, accumulate) #images&…...

GAN:对抗生成网络,前向传播和后巷传播的区别
目录 GAN:对抗生成网络 损失函数 判别器开始波动很大,先调整判别器 生成样本和真实样本的统一:真假难辨编辑 文字专图片编辑 头像转表情包编辑 头像转3D编辑 后向传播 1. 前向传播(forward) 2. 反向传播&…...

压力变送器的功能与应用
压力变送器是用于测量气体或者液体等介质压力的设备,能够将压力转化为4 G信号传输到监控平台,工作人员可以在电脑或者手机上登录平台查看监测到的数据,并根据数据制定下一步的计划。 压力变送器的功能: 压力变送器采用了高性能感…...
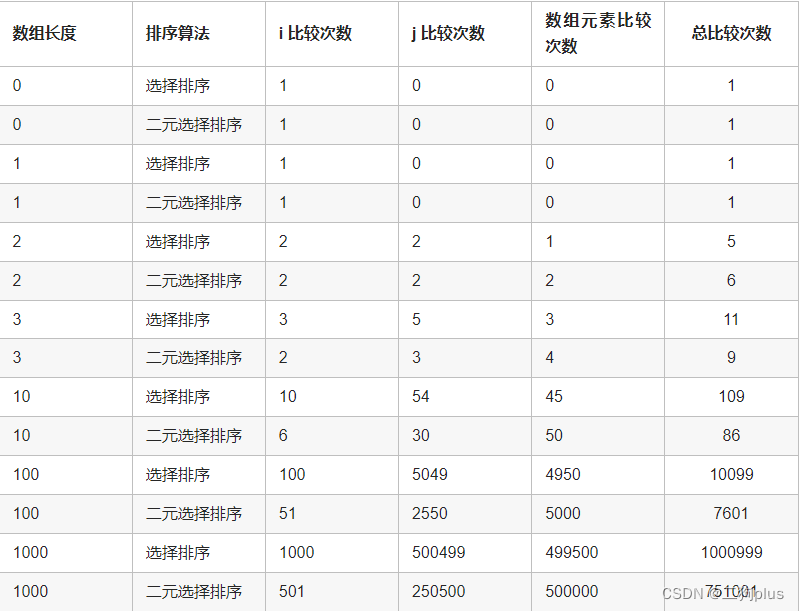
排序算法:选择排序
选择排序的思想是:双重循环遍历数组,每经过一轮比较,找到最小元素的下标,将其交换至首位。 public static void selectionSort(int[] arr) {int minIndex;for (int i 0; i < arr.length - 1; i) {minIndex i;for (int j i …...

Windows运行Spark所需的Hadoop安装
解压文件 复制bin目录 找到winutils-master文件hadoop对应的bin目录版本 全部复制替换掉hadoop的bin目录文件 复制hadoop.dll文件 将bin目录下的hadoop.dll文件复制到System32目录下 配置环境变量 修改hadoop-env.cmd配置文件 注意jdk装在非C盘则完全没问题,如果装在…...

KusionStack使用文档
下载安装 1. 安装 Kusionup 如果想自定义默认安装版本,可以运行下述命令(将最后的 openlatest 替换为你想要默认安装的版本号就就行): curl -s "http://kusion-public.oss-cn-hzfinance.aliyuncs.com/cli/kusionup/script…...
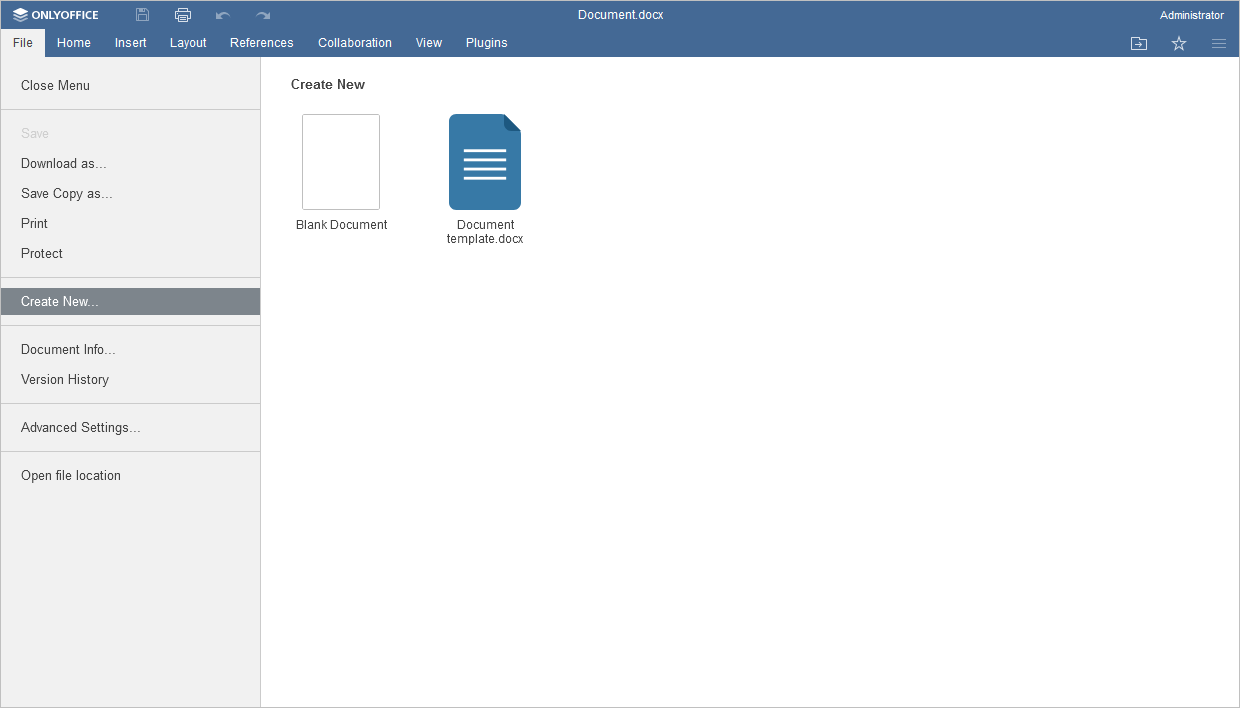
ONLYOFFICE 文档如何与 Alfresco 进行集成
ONLYOFFICE 文档是一款开源办公套件,其是包含文本文档、电子表格、演示文稿、数字表单、PDF 查看器和转换工具的协作性编辑工具。要在 Alfresco 中使用 ONLYOFFICE 协作功能,可以将他们连接集成。阅读本文,了解这如何实现。 关于 ONLYOFFICE…...
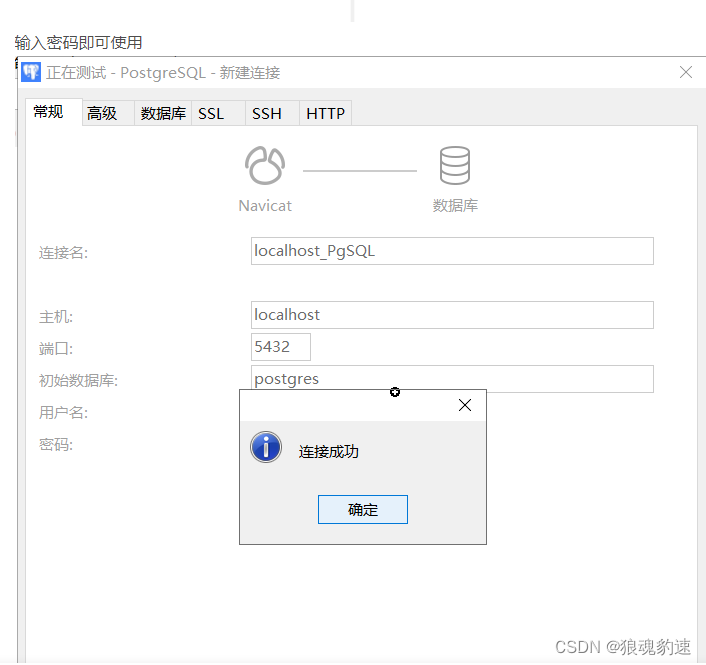
PostgreSQL下载路径与安装步骤
PgSQL介绍 PgSQL和MySQL一样是一种关系模型的数据库,全称为PostgreSQL 数据库。 优势:PgSQL是一种可扩展、可靠、可定制的数据库管理系统,具有良好的数据完整性和安全性,支持多种操作系统,包括 Linux、Windows、MacOS …...

如何在PHP中编写条件语句
引言 决策是生活不可缺少的一部分。从平凡的着装决定,到改变人生的工作和家庭决定。在开发中也是如此。要让程序做任何有用的事情,它必须能够对某种输入做出响应。当用户点击网站上的联系人按钮时,他们希望被带到联系人页面。如果什么都没有…...
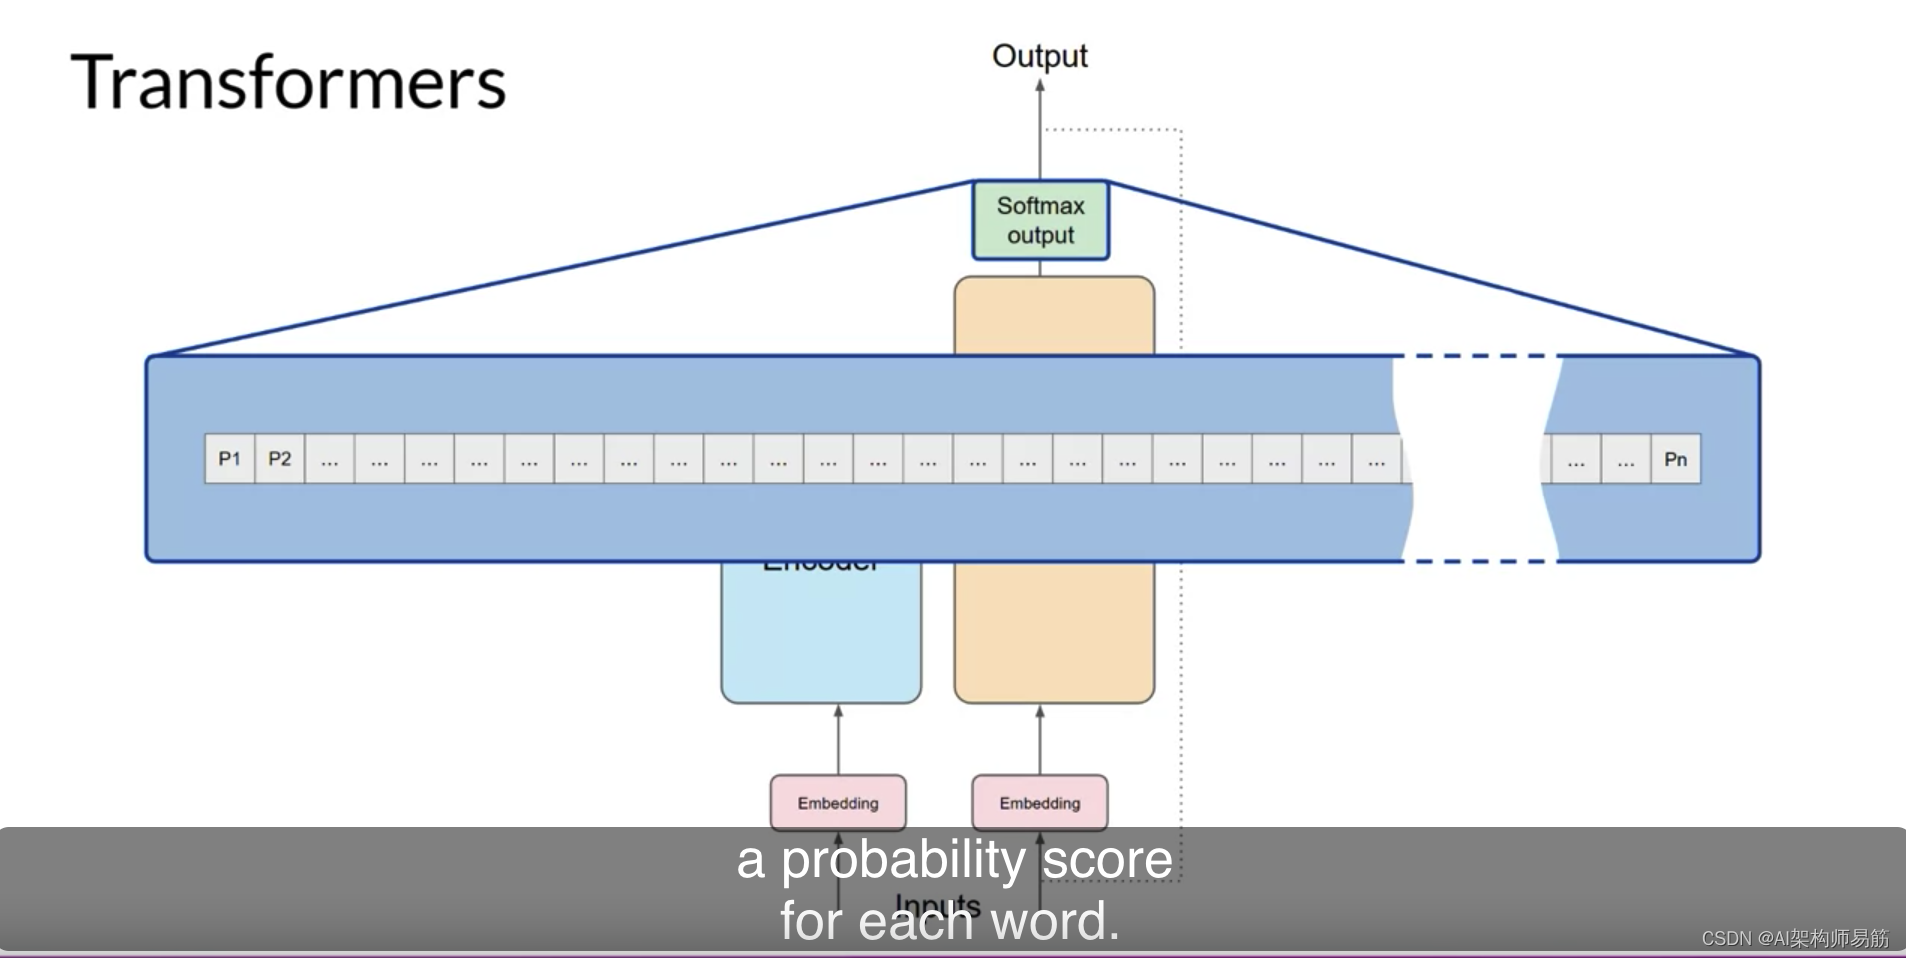
LLM架构自注意力机制Transformers architecture Attention is all you need
使用Transformers架构构建大型语言模型显著提高了自然语言任务的性能,超过了之前的RNNs,并导致了再生能力的爆炸。 Transformers架构的力量在于其学习句子中所有单词的相关性和上下文的能力。不仅仅是您在这里看到的,与它的邻居每个词相邻&…...
计算机网络 QA
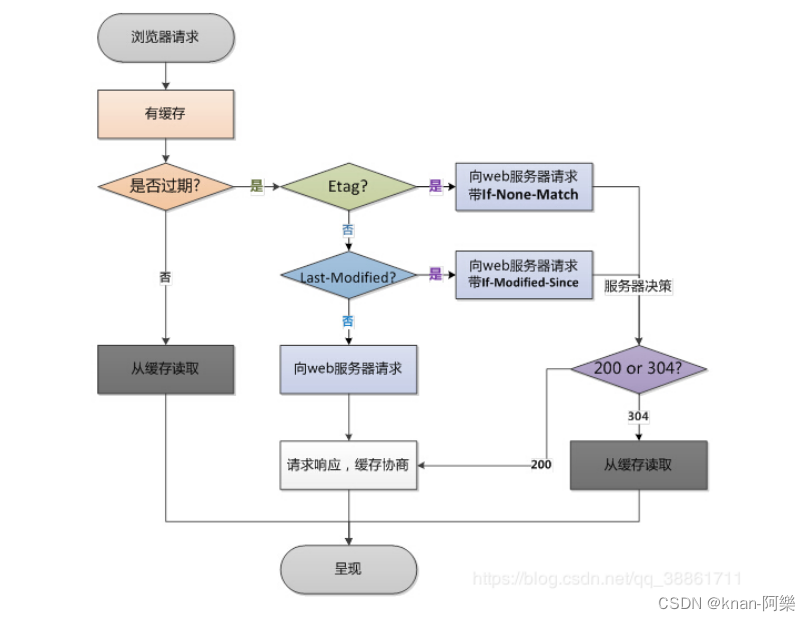
DNS 的解析过程 浏览器缓存。当用户通过浏览器访问某域名时,浏览器首先会在自己的缓存中查找是否有该域名对应的 IP 地址(曾经访问过该域名并且没有清空缓存)系统缓存。当浏览器缓存中无域名对应的 IP 地址时,会自动检测用户计算机…...
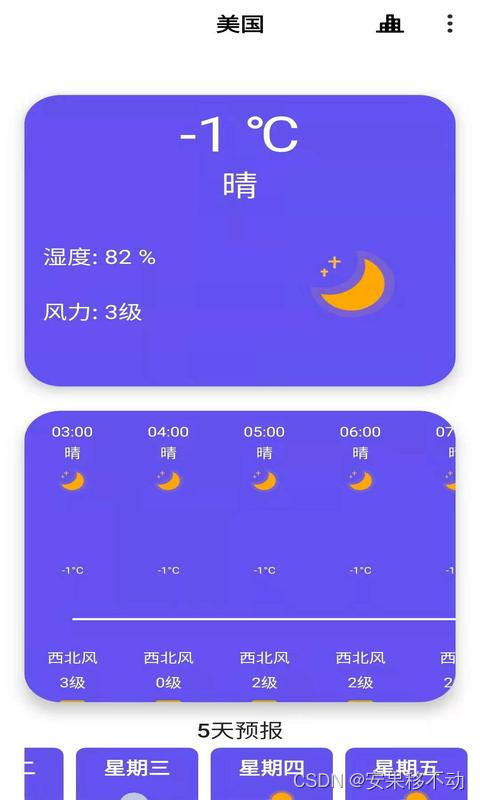
安果天气预报 产品介绍
软件介绍版本号 2.0.5 安果天气预报:全世界覆盖,中国定制 想要查找北京、上海、纽约、东京还是巴黎的天气?一款简约的天气预 报应用为你呈现。专注于为用户提供纯净的天气体验,我们不发送任何打扰的通知。包含空气质量、能见度、…...
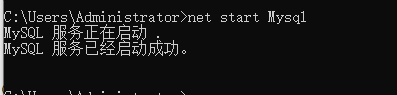
net start Mysql 启动服务时 ,显示“Mysql服务正在启动 Mysql服务无法启动 服务没有报告任何错误
一、问题 有时候,输入net start Mysql 启动服务时 mysql>net start Mysql 显示 Mysql服务正在启动 Mysql服务无法启动 服务没有报告任何错误 二、原因 由于mysql的默认端口是3306,因此在启动服务的时候,如果此端口被占用,就会出…...

DAY24
题目一 啊 看着挺复杂 其实很简单 第一种方法 就是纵轴是怪兽编号 横轴是能力值 看看能不能打过 逻辑很简单 看看能不能打得过 打过的就在花钱和直接打里面取小的 打不过就只能花钱 这种方法就导致 如果怪兽的能力值很大 那么我们就需要很大的空间 所以引出下一种做法 纵…...
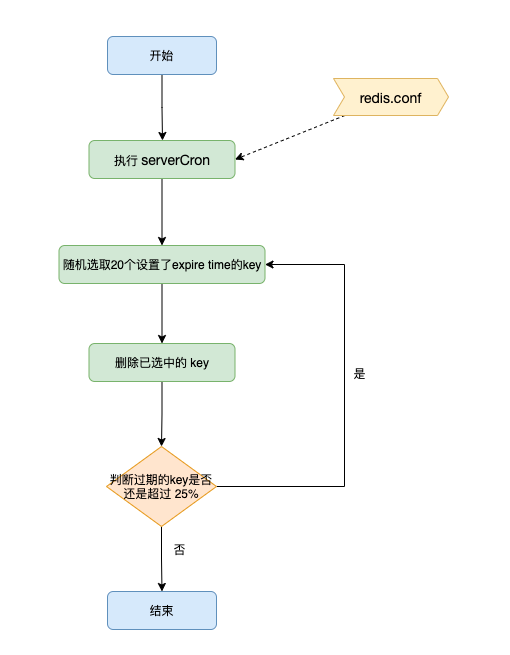
Redis过期数据的删除策略
1 介绍 Redis 是一个kv型数据库,我们所有的数据都是存放在内存中的,但是内存是有大小限制的,不可能无限制的增量。 想要把不需要的数据清理掉,一种办法是直接删除,这个咱们前面章节有详细说过;另外一种就是…...

如何使用CSS实现一个拖拽排序效果?
聚沙成塔每天进步一点点 ⭐ 专栏简介⭐ 实现拖拽排序效果的CSS和JavaScript示例⭐ HTML 结构⭐ CSS 样式 (styles.css)⭐ JavaScript 代码 (script.js)⭐ 实现说明⭐ 写在最后 ⭐ 专栏简介 前端入门之旅:探索Web开发的奇妙世界 记得点击上方或者右侧链接订阅本专栏哦…...

leetcode 118.杨辉三角
⭐️ 题目描述 🌟 leetcode链接:https://leetcode.cn/problems/pascals-triangle/description/ 代码: class Solution { public:vector<vector<int>> generate(int numRows) {// 先开空间vector<vector<int>> v;v.…...

6 个 AI Agent Skill 实战推荐:每天省出 2 小时的自动化方案
引言Agent 能帮我们做的事越来越多 -- 写文案、做封面、盯数据、找选题。但很多人装上 Agent 之后发现,它除了聊天和写几段文案,好像什么也干不了。问题不在 Agent。就像刚买回来的手机,没装 App 之前就是块砖。Agent 出厂自带的能力有限&…...
)
从单机到联网:手把手教你用NetCA为Oracle数据库配置‘电话线’(监听程序与本地网络服务)
从单机到联网:手把手教你用NetCA为Oracle数据库配置‘电话线’ 想象一下,你刚搬进一栋新公寓,已经熟悉了家里的水电开关(本地Oracle安装),但还没登记电话号码(监听程序)和录入邻居联…...

32位寄存器全解析:逆向分析与系统底层开发的基石
1. 从零开始:为什么32位寄存器是逆向分析的基石如果你刚开始接触逆向工程或者系统底层开发,面对一堆以E开头的寄存器缩写,是不是感觉有点头大?EAX、EBP、ESP……这些看起来神秘的代号,其实是理解程序如何“思考”和“行…...

运算放大器:从虚短虚断到负反馈,掌握模拟电路核心设计
1. 从“石头”与“水库”到“运算放大器”:一个电子世界的演化故事如果你拆开过任何一台现代电子设备,从手机到汽车,从血糖仪到工业机器人,你大概率会找到一个或多个不起眼的八脚或十四脚黑色小方块——运算放大器。它不像CPU那样…...
)
【微信取证篇】从微信收藏文件看微信存储加密逻辑(附解密工具思路)
1. 微信收藏文件的存储结构解析 第一次打开微信收藏夹时,你可能不会想到那些随手保存的图片、视频和文档,在手机存储里竟会以三种完全不同的形态存在。作为一名长期研究移动应用数据存储的开发者,我发现微信对收藏文件的处理方式堪称"精…...

MAA智能助手:5分钟掌握《明日方舟》全自动日常管理终极方案
MAA智能助手:5分钟掌握《明日方舟》全自动日常管理终极方案 【免费下载链接】MaaAssistantArknights 《明日方舟》小助手,全日常一键长草!| A one-click tool for the daily tasks of Arknights, supporting all clients. 项目地址: https:…...

书匠策AI论文生存指南:降重降AIGC,2025届毕业生的“反内卷外挂“
🎬 开场:一场关于"论文能不能活着毕业"的生存实验 朋友们,今天咱不开学术讲座,咱开一场生存发布会。 2025年写毕业论文是什么体验?你辛辛苦苦码了两万字,满怀信心点了查重——好家伙࿰…...

LinkSwift:2025年开源网盘直链下载助手的完整指南
LinkSwift:2025年开源网盘直链下载助手的完整指南 【免费下载链接】Online-disk-direct-link-download-assistant 一个基于 JavaScript 的网盘文件下载地址获取工具。基于【网盘直链下载助手】修改 ,支持 百度网盘 / 阿里云盘 / 中国移动云盘 / 天翼云盘…...

声磁同步定点仪怎么选?这份选购经验干货分享
做工厂电缆故障检测、地埋电缆探测的工程人员,多半都踩过定点仪的坑:设备抗干扰差,复杂厂区地下管线密集,找半天定不准点位,开挖错位置不仅耽误工期,额外的开挖成本、停产损失动辄几万到几十万。作为常年跟…...

力扣17,电话号码的字母组合
class Solution { public: //设置一个map,用来数字与字母比对unordered_map<char, string> _mp{{2,"abc"},{3,"def"},{4,"ghi"},{5,"jkl"},{6,"mno"},{7,"pqrs"},{8,"tuv"},{9,"…...