Nginx 核心配置
一.全局配置
1.1 Nginx 全局配置说明
user  nginx nginx;                 # 启动Nginx⼯作进程的⽤⼾和组
worker_processes  [number | auto]; # 启动Nginx⼯作进程的数量
worker_cpu_affinity 00000001 00000010 00000100 00001000;
# 将Nginx⼯作进程绑定到指定的CPU核⼼,默认Nginx是不进⾏进程绑定的,绑定并不是意味着当前nginx进程独
# 占以⼀核⼼CPU,但是可以保证此进程不会运⾏在其他核⼼上,这就极⼤减少了nginx的⼯作进程在不同的cpu核
# ⼼上的来回跳转,减少了CPU对进程的资源分配与回收以及内存管理等,因此可以有效的提升nginx服务器的性
# 能。 此处CPU有四颗核心。也可写成:
worker_cpu_affinity 0001 0010 0100 1000;# 错误⽇志记录配置,语法:error_log file  [debug | info | notice | warn | error | crit | alert | emerg]
# error_log  logs/error.log;
# error_log  logs/error.log  notice;
error_log  /apps/nginx/logs/error.log error;# pid⽂件保存路径
pid        /apps/nginx/logs/nginx.pid;worker_priority 0; # ⼯作进程nice值,-20~19
worker_rlimit_nofile 65536; # 这个数字包括Nginx的所有连接(例如与代理服务器的连接等),⽽不仅仅是与# 客⼾端的连接,另⼀个考虑因素是实际的并发连接数不能超过系统级别的最⼤打开⽂件数的限制.
[root@s2 ~]# watch -n1  'ps -axo pid,cmd,nice | grep nginx' #验证进程优先级daemon off;  # 前台运⾏Nginx服务⽤于测试、docker等环境。
master_process off|on; #是否开启Nginx的master-woker⼯作模式,仅⽤于开发调试场景。events { # 事件模型配置参数worker_connections  65536;  # 设置单个⼯作进程的最⼤并发连接数use epoll; # 使⽤epoll事件驱动,Nginx⽀持众多的事件驱动,⽐如select、poll、epoll,只能设置在events模块中设置。accept_mutex on; # 优化同⼀时刻只有⼀个请求⽽避免多个睡眠进程被唤醒的设置,on为防⽌被同时唤醒默# 认为off,全部唤醒的过程也成为"惊群",因此nginx刚安装完以后要进⾏适当的优化。multi_accept on; # Nginx服务器的每个⼯作进程可以同时接受多个新的⽹络连接,但是需要在配置⽂件中# 配置,此指令默认为关闭,即默认为⼀个⼯作进程只能⼀次接受⼀个新的⽹络连接,打开后⼏个同时接受多个。
}
1.2 http 配置块说明
http {include mime.types; # 导⼊⽀持的⽂件类型default_type application/octet-stream; # 设置默认的类型,会提⽰下载不匹配的类型⽂件# ⽇志配置部分# log_format main '$remote_addr - $remote_user [$time_local] "$request" '# '$status $body_bytes_sent "$http_referer" '# '"$http_user_agent" "$http_x_forwarded_for"';# access_log logs/access.log main;# ⾃定义优化参数sendfile on; # 实现⽂件零拷⻉#tcp_nopush on; # 在开启了sendfile的情况下,合并请求后统⼀发送给客⼾端。#tcp_nodelay off; # 在开启了keepalived模式下的连接是否启⽤TCP_NODELAY选项,当为off时,延# 迟0.2s发送,默认On时,不延迟发送,⽴即发送⽤⼾相应报⽂。#keepalive_timeout 0;keepalive_timeout 65 65; # 设置会话保持时间#gzip on; # 开启⽂件压缩server {listen 80; # 设置监听地址和端⼝server_name localhost; # 设置server name,可以以空格隔开写多个并⽀持正则表达式,如# *.magedu.com www.magedu.* www.(site\d+)\.magedu\.com$ default_server#charset koi8-r; # 设置编码格式,默认是俄语格式,可以改为utf-8#access_log logs/host.access.log main;location / {root html;index index.html index.htm;}#error_page 404 /404.html;# redirect server error pages to the static page /50x.html#error_page 500 502 503 504 /50x.html; # 定义错误⻚⾯location = /50x.html {root html;}# proxy the PHP scripts to Apache listening on 127.0.0.1:80##location ~ \.php$ { #以http的⽅式转发php请求到指定web服务器# proxy_pass http://127.0.0.1;#}# pass the PHP scripts to FastCGI server listening on 127.0.0.1:9000##location ~ \.php$ { #以fastcgi的⽅式转发php请求到php处理# root html;# fastcgi_pass 127.0.0.1:9000;# fastcgi_index index.php;# fastcgi_param SCRIPT_FILENAME /scripts$fastcgi_script_name;# include fastcgi_params;#}# deny access to .htaccess files, if Apache's document root# concurs with nginx's one##location ~ /\.ht { #拒绝web形式访问指定⽂件,如很多的⽹站都是通过.htaccess⽂件来改变⾃⼰的重定向等功能。# deny all;#}location ~ /passwd.html {deny all;}}# another virtual host using mix of IP-, name-, and port-based configuration##server { #⾃定义虚拟server# listen 8000;# listen somename:8080;# server_name somename alias another.alias;# location / {# root html;# index index.html index.htm; #指定默认⽹⻚⽂件,此指令由ngx_http_index_module模块提供# }#}# HTTPS server##server { #https服务器配置# listen 443 ssl;# server_name localhost;# ssl_certificate cert.pem;# ssl_certificate_key cert.key;# ssl_session_cache shared:SSL:1m;# ssl_session_timeout 5m;# ssl_ciphers HIGH:!aNULL:!MD5;# ssl_prefer_server_ciphers on;# location / {# root html;# index index.html index.htm;# }location /linux38/passwd.ht {deny all;}#}
二. 核心配置示例
基于不同的 IP、不同的端⼝以及不⽤得域名实现不同的虚拟主机,依赖于核⼼模块
ngx_http_core_module 实现。
2.1 新建⼀个 PC web 站点
root@ubuntu-suosuoli-node1:/etc/nginx/conf.d# vim blog.conf
server {listen 80;server_name blog.suosuoli.cn;location / {root  /var/www/html/suosuoli;index index.html index.htm;}location /about {alias /var/www/html/about;index index.html;}}
}root@ubuntu-suosuoli-node1:/var/www/html# mkdir suosuoli
root@ubuntu-suosuoli-node1:/var/www/html# vim suosuoli/index.html
root@ubuntu-suosuoli-node1:/var/www/html# cat suosuoli/index.html
<!DOCTYPE html>
<head>
It's a test messsage!
</head>
<body>
<h1>Nice , it works!!</h1>
</body>root@ubuntu-suosuoli-node1:/etc/nginx/conf.d# vim ../nginx.conf
include /apps/nginx/conf/conf.d/*.conf;
......
root@ubuntu-suosuoli-node1:/etc/nginx/conf.d# nginx -t
nginx: the configuration file /etc/nginx/nginx.conf syntax is ok
nginx: configuration file /etc/nginx/nginx.conf test is successfulroot@ubuntu-suosuoli-node1:/etc/nginx/conf.d# nginx -s reload
在c:\Windows\System32\drivers\etc\hosts新增一条解析
172.20.2.189 blog.suosuoli.cn mob.suosuoli.cn
然后访问验证http://blog.suosuoli.cn
2.2 新建一个移动端站点
root@ubuntu-suosuoli-node1:/etc/nginx/conf.d# vim mob.conf
server {listen 80;server_name mob.suosuoli.cn;location / {root /var/www/html/suosuoli-mob;}
}root@ubuntu-suosuoli-node1:/var/www/html# mkdir suosuoli-mobroot@ubuntu-suosuoli-node1:/var/www/html# vim suosuoli-mob/index.html
root@ubuntu-suosuoli-node1:/var/www/html# cat suosuoli-mob/index.html
<!DOCTYPE html>
<head>
It's a test messsage!
</head>
<body>
<h1>Nice , it works!! BTW, this is your mobile site!!</h1>
</body>root@ubuntu-suosuoli-node1:/etc/nginx/conf.d# nginx -t
nginx: the configuration file /etc/nginx/nginx.conf syntax is ok
nginx: configuration file /etc/nginx/nginx.conf test is successfulroot@ubuntu-suosuoli-node1:/etc/nginx/conf.d# nginx -s reload
然后访问验证http://mob.suosuoli.cn
2.3 root 与 alias 配置指令
root 指令用来指定 web 站点的根目录(家目录),在使用 location 配置块时,
用户访问的文件的绝对路径为root/location,如:
location /about {root /data/nginx/html;index index.html
}
此时用户访问http://blog.suosuoli.cn/about,则打开/data/nginx/html/about/index.html
alias 则是定义一个别名,使用 alias 定义的资源地址替代用户输入的 URI, 如:
location /about {alias /data/suosuoli/about;index index.html
}
此时用户访问http://blog.suosuoli.cn/about,则打开/data/suosuoli/about/index.html
具体的例子
server {server_name blog.suosuoli.cn;location / {root  /var/www/html/suosuoli;index index.html index.htm;}# 用户最终访问到的内容/var/www/html/about1/index.htmllocation /about1 {root /var/www/html;index index.html;}# 用户访问到的内容/about2-->/var/www/html/suosuoli/about/index.htmllocation /about2 { #  #使⽤alias的时候URI后⾯如果加了斜杠则下⾯的路径配置必须加斜杠,否则403alias /var/www/html/suosuoli/about;index index.html;}}
}# /var/www/html 下必须有一个目录名为 about ,这样使用roo指令才可以访问到/var/www/html/about
# 下的index.html
root@ubuntu-suosuoli-node1:/var/www/html# mkdir about1
root@ubuntu-suosuoli-node1:/var/www/html# vim about1/index.html
root@ubuntu-suosuoli-node1:/var/www/html# cat about1/index.html
I'm root.root@ubuntu-suosuoli-node1:/var/www/html# mkdir suosuoli/about
root@ubuntu-suosuoli-node1:/var/www/html# echo "I'm alias." > suosuoli/about/index.htmlroot@ubuntu-suosuoli-node1:/etc/nginx/conf.d# nginx -t
nginx: the configuration file /etc/nginx/nginx.conf syntax is ok
nginx: configuration file /etc/nginx/nginx.conf test is successfulroot@ubuntu-suosuoli-node1:/etc/nginx/conf.d# nginx -s reload
访问http://blog.suosuoli.cn/about1
访问http://blog.suosuoli.cn/about2
2.4 location 配置指令的使用
使用location指令时,其匹配 URI 时可以支持正则表达式,该正则表达式遵循相应
的规则。在没有使⽤正则表达式的时候,nginx 会先在 server 配置块中的多个 location
选取匹配度最⾼的⼀个 URI(URI 也就是⽤⼾请求的字符串,即域名后⾯的 web 资源路径),
如果匹配成功就结束搜索和匹配其它块,并使⽤此 location 处理此请求。
Nginx 的 location 中使用的正则符号规则如下:
语法规则: location [=|~|~*|^~] /URI/ { … }
| 匹配符号 | 规则 |
|---|---|
| = | ⽤于标准 URI 前,需要请求字串与 URI 精确匹配,如果匹配成功就停⽌向下匹配并⽴即处理请求。 |
| ~ | ⽤于标准 URI 前,表⽰包含正则表达式并且区分⼤⼩写,并且匹配 |
| !~ | ⽤于标准 URI 前,表⽰包含正则表达式并且区分⼤⼩写,并且不匹配 |
| ~* | ⽤于标准 URI 前,表⽰包含正则表达式并且不区分⼤写,并且匹配 |
| !~* | ⽤于标准 URI 前,表⽰包含正则表达式并且不区分⼤⼩写,并且不匹配 |
| ^~ | ⽤于标准 URI 前,表⽰包含正则表达式并且匹配以什么开头 |
| $ | ⽤于标准 URI 前,表⽰包含正则表达式并且匹配以什么结尾 |
| \ | ⽤于标准 URI 前,表⽰包含正则表达式并且转义字符。可以转. * ?等 |
| * | ⽤于标准 URI 前,表⽰包含正则表达式并且代表任意⻓度的任意字符 |
如下图,红框 1 表示用户的请求 URI,红框 2 表示 Nginx 的 location 配置块
中事先定义的匹配字符,当红框 1 的内容和红框 2 的字符串满足正则规则时,就匹配
成功。
2.4.1 精确匹配访问资源
精确匹配时在 location 和 URI 之间使用=,这种用法通常用在长时间不变更
的资源上,例如
server {server_name blog.suosuoli.cn;location / {root  /var/www/html/suosuoli;index index.html index.htm;}location = /devops.png {root /var/www/html/images;index index.html;}
}root@ubuntu-suosuoli-node1:/etc/nginx/conf.d# nginx -t
nginx: the configuration file /etc/nginx/nginx.conf syntax is ok
nginx: configuration file /etc/nginx/nginx.conf test is successfulroot@ubuntu-suosuoli-node1:/etc/nginx/conf.d# nginx -s reload
访问http://blog.suosuli.cn/devops.png
2.4.2 URI 区分大小写匹配
区分大小写匹配,在 location 和 URI 之间使用~,例如:
server {server_name blog.suosuoli.cn;location / {root  /var/www/html/suosuoli;index index.html index.htm;}location ~ /devop.?\.png {root /var/www/html/images;index index.html;}root@ubuntu-suosuoli-node1:/etc/nginx/conf.d# nginx -t
nginx: the configuration file /etc/nginx/nginx.conf syntax is ok
nginx: configuration file /etc/nginx/nginx.conf test is successfulroot@ubuntu-suosuoli-node1:/etc/nginx/conf.d# nginx -s reload
访问:http://blog.suosuoli.cn/devops.png
访问:http://blog.suosuoli.cn/devoPs.png
2.4.3 URI 不区分大小写匹配
不区分大小写匹配,在 location 和 URI 之间使用~*,对⽤⼾请求
的 uri 做模糊匹配,也就是 uri 中⽆论都是⼤写、都是⼩写或者⼤⼩
写混合,此模式也都会匹配,通常使⽤此模式匹配⽤⼾ request 中的
静态资源并继续做下⼀步操作。例如:
server {server_name blog.suosuoli.cn;location / {root  /var/www/html/suosuoli;index index.html index.htm;}location ~* /devop.?\.png {root /var/www/html/images;index index.html;}注意:
# 对于不区分⼤⼩写的location,则可以访问任意⼤⼩写结尾的图⽚⽂件,如区分⼤⼩写则只
# 能访问aa.jpg,不区分⼤⼩写则可以访问aa.jpg以外的资源⽐如Aa.JPG、aA.jPG这样的混
# 合名称⽂件,但是要求nginx服务器的资源⽬录有相应的⽂件,⽐如有Aa.JPG有aA.jPG。root@ubuntu-suosuoli-node1:/var/www/html# cp images/devops.png images/devoPs.pngroot@ubuntu-suosuoli-node1:/etc/nginx/conf.d# nginx -t
nginx: the configuration file /etc/nginx/nginx.conf syntax is ok
nginx: configuration file /etc/nginx/nginx.conf test is successfulroot@ubuntu-suosuoli-node1:/etc/nginx/conf.d# nginx -s reload
访问:http://blog.suosuoli.cn/devops.png
访问:http://blog.suosuoli.cn/devoPs.png
2.4.4 以部分资源名称开头的匹配
root@ubuntu-suosuoli-node1:/var/www/html# mkdir suosuoli/{index1,index2} -pv
mkdir: created directory 'suosuoli/index1'
mkdir: created directory 'suosuoli/index2'
root@ubuntu-suosuoli-node1:/var/www/html# echo "index1" > suosuoli/index1/index.html
root@ubuntu-suosuoli-node1:/var/www/html# echo "index2" > suosuoli/index2/index.htmlroot@ubuntu-suosuoli-node1:/etc/nginx/conf.d# vim blog.conf
server {server_name blog.suosuoli.cn;location / {root  /var/www/html/suosuoli;index index.html index.htm;}location ^~ /index1 {    # 注意:/var/www/html/suousoli下要有index1文件夹root /var/www/html/suosuoli;index index.html;}location /index2 {alias /var/www/html/suosuoli/index2;index index.html;}}root@ubuntu-suosuoli-node1:/etc/nginx/conf.d# nginx -t
nginx: the configuration file /etc/nginx/nginx.conf syntax is ok
nginx: configuration file /etc/nginx/nginx.conf test is successful
root@ubuntu-suosuoli-node1:/etc/nginx/conf.d# nginx -s reload
访问:http://blog.suosuoli.cn/index1
访问:http://blog.suosuoli.cn/index2
2.4.5 以文件名后缀结尾的资源匹配
匹配以某些类型的文件后缀结尾的资源一般用于动静分离,即将对静态资源的访问定向
到某个位置,这些静态资源皆存储于此。
server {server_name blog.suosuoli.cn;location / {root /var/www/html/suosuoli;index index.html index.htm;}location ~* \.(gif|jpg|jpeg|bmp|webp|svg|png|tiff|tif|ico|wmf|js|css)$ {root /var/www/html/images;index picture.html;}}
访问:http://blog.suosuoli.cn/*.(png|svg|jpg|...)
2.4.6 匹配优先级说明
location 配置块中的通配符的匹配顺序:
= ---> ^~ ---> ~/~* ----> /
即是:
(location = URI {...}) ---> (location 完整URI {...}) --->
(location ^~ URI {...}) ---> (location ~/~* URI {...}) --->
(location 部分URI {...}) ---> (location / {...})
location ~* /devops.jpg {index index.html;root /var/www/html/images;}location = /devops.jpg { #通常⽤于精确匹配指定⽂件,如favicon.ico、employcode.js、index.jsp等index index.html;root /var/www/html/suosuoli/images;}
由于优先级关系,以上配置将会导致访问:http:blog.suosuoli.cn/devops.jpg时
访问的是/var/www/html/suosuoli/images/devops.jpg
生产时大致可以如下配置匹配顺序:
location = / {   # 由于日常访问中,直接访问"/"的类型比较多,在第一个location配置"= /"可以加速访问,原因是在该处匹配后就立即处理请求了。/data/html;index index.html index.htm;
}location / {......;
}# 接着配置静态资源的匹配规则,由于实际应用中大部分图片等静态资源常常由
# 应用命名,会自带各种字符,大小写字母夹杂,所以忽略大小写。
location ^~ /static/ {......;
}
# 或者
location ~* \.(gif|jpg|jpeg|bmp|webp|svg|png|tiff|tif|ico|wmf|js|css)$ {root /var/www/html/static;index index.html;}# 给多个web应用配置资源匹配规则
location ~* /application1 {......;
}location ~* /application2 {......;
}
2.5 Nginx 四层访问控制
Nginx 的四层访问控制基于模块ngx_http_access_module实现,可以通过匹配
客户端 IP 地址进行限制。
root@ubuntu-suosuoli-node1:/var/www/html# mkdir red-zone
root@ubuntu-suosuoli-node1:/var/www/html# echo "It's red-zone,mind your behavior." > red-zone/index.htmlserver {server_name blog.suosuoli.cn;location / {root  /var/www/html/suosuoli;index index.html index.htm;}location /red-zone {root /var/www/html;index index.html index.htm;deny 172.20.1.1;allow 172.20.0.0/16;deny all;}
}
物理机172.20.1.1访问:http://blog.suosuoli.cn/red-zone/
在172.20.0.0/16网段的另一台机子上修改一下 hosts 文件
vim /etc/hosts
172.20.2.37  blog.suosuoli.cn
并在172.20.2.37访问:http://blog.suosuoli.cn/red-zone/
2.6 Nginx 账户认证功能
root@ubuntu-suosuoli-node1:~# htpasswd -cmb /etc/nginx/conf.d/.htpasswd user1 stevenux
Adding password for user user1
root@ubuntu-suosuoli-node1:~# htpasswd -mb /etc/nginx/conf.d/.htpasswd user2 stevenux
Adding password for user user2
root@ubuntu-suosuoli-node1:~# cat /etc/nginx/conf.d/.htpasswd
user1:$apr1$Ldf9UL25$sKYSQJI7YU5QoP09DNckd.
user2:$apr1$5WMJZBsa$KAGjRkkmV1JuOnXcHBHus1root@ubuntu-suosuoli-node1:/etc/nginx/conf.d# vim blog.confserver {server_name web.suosuoli.cn;location / {root  /var/www/html/suosuoli;index index.html index.htm;}location /red-zone {satisfy all;root /var/www/html;index index.html index.htm;deny 172.20.1.1;allow 172.20.0.0/16;deny all;auth_basic  "Input passwd to log in.";auth_basic_user_file conf.d/.htpasswd;}}# satisfy all|any;
# 如果ngx_http_access_module、ngx_http_auth_basic_module、ngx_http_auth_request_module或
# ngx_http_auth_jwt_module模块中的所有(all)或至少一个(any)模块允许访问,则允许访问。
访问:http://web.suosuoli.cn/red-zone/
2.7 自定义错误页面
root@ubuntu-suosuoli-node1:/var/www/html# echo "Oops,what you want is not find." > error.htmlroot@ubuntu-suosuoli-node1:/etc/nginx/conf.d# vim blog.conf
server {server_name blog.suosuoli.cn;location / {root  /var/www/html/suosuoli;index index.html index.htm;}error_page 500 502 503 504 404 /error.html;location = /error.html {root /var/www/html;}
}root@ubuntu-suosuoli-node1:/etc/nginx/conf.d# nginx -t
nginx: the configuration file /etc/nginx/nginx.conf syntax is ok
nginx: configuration file /etc/nginx/nginx.conf test is successful
root@ubuntu-suosuoli-node1:/etc/nginx/conf.d# nginx -s reload
访问不存在的页面:http://blog.suosuoli.cn/not_exist_page/
2.8 自定义访问日志
root@ubuntu-suosuoli-node1:/etc/nginx/conf.d# vim blog.conf
server {server_name blog.suosuoli.cn;location / {root  /var/www/html/suosuoli;index index.html index.htm;}error_page 500 502 503 504 404 /error.html;access_log /var/log/suosuoli-blog/blog-suosuoli-cn.access.log;error_log /var/log/suosuoli-blog/blog-suosuoli-cn.error.log;location = /error.html {root /var/www/html;}
}
上:正常访问访问http://blog.suousoli.cn
下:不存在页面访问,访问http://blog.suousoli.cn/not_exist_page
2.9 try_files 指令
try_files 用于检测需要访问的资源是否存在,其会按顺序检查⽂件是否存在,返回第
⼀个找到的⽂件或⽂件夹(结尾加斜线表⽰为⽂件夹),如果所有⽂件或⽂件夹都找不到,
会进⾏⼀个内部重定向到 try_files 后面的最后⼀个参数。只有最后⼀个参数可以引起
⼀个内部重定向,之前的参数只设置内部 URI 的指向。最后⼀个参数是回退 URI 且必须
存在,否则会出现内部 500 错误。
root@ubuntu-suosuoli-node1:/var/www/html# mkdir try
root@ubuntu-suosuoli-node1:/var/www/html# echo "This is the second match." > try/index.html
root@ubuntu-suosuoli-node1:/var/www/html# echo "This is your last reply." > try/default.htmlroot@ubuntu-suosuoli-node1:/etc/nginx/conf.d# vim blog.conf
server {server_name blog.suosuoli.cn;location / {root  /var/www/html/suosuoli;index index.html index.htm;}location /try {root /var/www/html;index index.html;try_files $uri $uri/index.html $uri.html /try/default.html;}
红-访问:http://blog.suosuoli.cn/try/index
绿-访问:http://blog.suosuoli.cn/try/not_exist_page
上面当访问到http://blog.suosuoli.xn/try/xx.html等不存在的 uri 会显⽰default.html,
还可以将最后一个匹配自定义为状态码,如果是⾃定义的状态码则会显⽰在返回数据的状态码中。
root@ubuntu-suosuoli-node1:/etc/nginx/conf.d# vim blog.confserver {server_name blog.suosuoli.cn;location / {root /var/www/html/suosuoli;index index.html index.htm;}location /try {root /var/www/html;index index.html;#try_files $uri $uri/index.html $uri.html /try/default.html;try_files $uri $uri/index.html $uri/$uri.html =500;}
访问到http://blog.suosuoli.cn/try/xx.html时如下图,显示了自定义的 500 状态码。
2.10 长连接配置
Nginx 长连接使用指令keepalive_timeout number1 [number2];设置。第一个参数number1
设置一个超时,在此期间,服务器端上的 keep-alive 客户机连接将保持打开状态。number1的
数值为 0 表⽰禁⽌⻓连接,默认为 75s,通常配置在 http 字段作为站点全局配置。number2表
示在服务器处理请求后响应头中的Keep-Alive键。如:
在配置时keepalive_timeout 65 66;则浏览器收到响应后的Keep-Alive字段如下:
Keep-Alive:timeout=66,及实际的长连接时间number1可以和值number2不同。另外,
指令keepalive_requests number; 则设置在⼀次⻓连接上所允许请求的资源的最⼤次数,默
认为 100 次。
值得注意的是:为了释放每个连接的内存分配(通常每个连接会消耗一些内存),需要周期性地
关闭连接。因此,使用过高的最大请求数可能会导致过多的内存使用,不建议这样做。
root@ubuntu-suosuoli-node1:/etc/nginx/conf.d# vim blog.conf
server {server_name blog.suosuoli.cn;keepalive_requests 5;keepalive_timeout 65 66;location / {root  /var/www/html/suosuoli;index index.html index.htm;}
}# 使用另一台虚拟机测试
[root@node1 html]# telnet blog.suosuoli.cn 80
Trying 172.20.2.189...
Connected to blog.suosuoli.cn.
Escape character is '^]'.
GET / HTTP/1.1          # 键入请求方法(GET)、请求的资源(/)和HTTP协议(HTTP/1.1)
HOST:blog.suosuoli.cn   # 键入主机名# 回车,表示请求头结束
HTTP/1.1 200 OK         # 响应头如下
Server: nginx/1.14.0 (Ubuntu)
Date: Sun, 05 Jan 2020 04:37:57 GMT
Content-Type: text/html
Content-Length: 104
Last-Modified: Sat, 04 Jan 2020 12:26:21 GMT
Connection: keep-alive
Keep-Alive: timeout=66
ETag: "5e10846d-68"
Accept-Ranges: bytes<!DOCTYPE html>     # 响应体内容
<head>It's a test messsage!
</head>
<body><h1>Nice , it works!!</h1>
</body>
物理机访问http://blog.suosuoli.cn并使用调试模式查看键Keep-Alive的值
2.11 配置为下载服务器
Nginx 可以配置为下载服务器,像阿里云和清华大学的镜像源站点都是基于 Nginx
来配置为下载服务器的。需要如下几个配置指令:
autoindex  on | off; # 开启或者关闭列表生成
autoindex_format html | xml | json | jsonp; # 规定生成的列表格式,默认为html格式
autoindex_exact_size  on; # 对于html格式的列表,使用确切的字节大小表示文件还是四舍五入为KB/MB/GB
autoindex_localtime  on; # 对于html格式的列表,规定列表中显示文件信息的时间时区,使用本地时区还是UTC时区
limit_rate rate; # 限制响应给客⼾端的传输速率,单位是bytes/second,默认值0表⽰⽆限制
# 如:
limit_rate 10k;
ngx_http_autoindex_module模块用来处理以斜杠字符(‘/’)结尾的请求,并生成
一个目录列表返回给客户端。通常,当ngx_http_index_module模块找不到索引文
件时,请求会被传递给 ngx_http_autoindex_module 模块。
root@ubuntu-suosuoli-node1:/var/www/html# mkdir suo/{image,files}/{2019,2020} -pv
mkdir: created directory 'suo'
mkdir: created directory 'suo/image'
mkdir: created directory 'suo/image/2019'
mkdir: created directory 'suo/image/2020'
mkdir: created directory 'suo/files'
mkdir: created directory 'suo/files/2019'
mkdir: created directory 'suo/files/2020'
root@ubuntu-suosuoli-node1:/var/www/html# tree  suo
suo
├── files
│   ├── 2019
│   └── 2020
└── image├── 2019└── 2020
root@ubuntu-suosuoli-node1:/var/www/html# cp images/devops.png suo/image/2020/
root@ubuntu-suosuoli-node1:/var/www/html# cp images/nginx.png suo/files/2020/
root@ubuntu-suosuoli-node1:/var/www/html# tree suo
suo
├── files
│   ├── 2019
│   └── 2020
│       └── nginx.png
└── image├── 2019└── 2020└── devops.pngroot@ubuntu-suosuoli-node1:/etc/nginx/conf.d# vim blog.conf
server {server_name blog.suosuoli.cn;keepalive_requests 5;keepalive_timeout 65 66;location / {root  /var/www/html/suosuoli;index index.html index.htm;}location /suo {autoindex on;autoindex_exact_size on;autoindex_localtime on;# autoindex_format json;root /var/www/html;}
}
2.12 配置为上传服务器
Nginx 作为上传服务时,需要配置一些必须的配置项,比如允许上传的单个文件
大小等。不同的场景往往配置不同。
client_max_body_size 1m;       # 设置允许客⼾端上传单个⽂件的最⼤值,默认值为1m
client_body_buffer_size size;   # ⽤于接收每个客⼾端请求报⽂的body部分的缓冲区⼤⼩;默认16k;# 超出此⼤⼩时,其将被暂存到磁盘上的由下⾯client_body_temp_path指令所定义的位置
client_body_temp_path path [level1 [level2 [level3]]]; # 设定存储客⼾端请求报⽂的body部分的临时存储路# 径及⼦⽬录结构和数量,⽬录名为16进制的数字,# 使⽤hash之后的值从后往前截取1位、2位、2位作为⽂件名:
root@ubuntu-suosuoli-node1:/etc/nginx/conf.d# vim blog.conf
server {server_name blog.suosuoli.cn;keepalive_requests 5;keepalive_timeout 65 66;client_max_body_size 10m;client_body_buffer_size 16k;client_body_temp_path /var/www/html/suosuoli/temp 1 2 2;# 1级⽬录占1位16进制,即2^4=16个⽬录  0-f# 2级⽬录占2位16进制,即2^8=256个⽬录 00-ff# 3级⽬录占2位16进制,即2^8=256个⽬录 00-fflocation / {root  /var/www/html/suosuoli;index index.html index.htm;}
}root@ubuntu-suosuoli-node1:/var/www/html# tree suosuoli/temp/  # reload Nginx⾃动创建temp⽬录
suosuoli/temp/0 directories, 0 files
2.13 其它的配置
keepalive_disable none | browser ...;  # 对哪种浏览器禁⽤⻓连接limit_except method ... { ... } # 仅⽤于location配置块;限制客⼾端使⽤除了指定的请求⽅法之外的其它⽅法# method:GET, HEAD, POST, PUT, DELETE,MKCOL, COPY, MOVE, OPTIONS, PROPFIND, PROPPATCH, LOCK, UNLOCK, PATCH
limit_except GET {allow 192.168.0.0/24;allow 192.168.7.101;deny  all;
}
limit_except配置示例:除了 GET 方法之外的其它方法只允许172.20.1.1
主机访问。
location /upload {root /var/www/html/suosuoli;index index.html;limit_except GET {allow 172.20.1.1;deny all;}
}
aio on | off  # 是否启⽤asynchronous file I/O(AIO)功能,需要编译开启# linux 2.6以上内核提供以下⼏个系统调⽤来⽀持aio:
1、SYS_io_setup:建⽴aio 的context
2、SYS_io_submit: 提交I/O操作请求
3、SYS_io_getevents:获取已完成的I/O事件
4、SYS_io_cancel:取消I/O操作请求
5、SYS_io_destroy:毁销aio的context
directio size | off; # 操作完全和aio相反,aio是读取⽂件⽽directio是写⽂件到磁盘# 直接I/O默认为关闭,当⽂件⼤于等于给定⼤⼩时写磁盘,例如directio 4m# 同步(直接)写磁盘,⽽⾮写缓存。open_file_cache off; # 是否缓存打开过的⽂件信息
open_file_cache max=N [inactive=time];
# nginx可以缓存以下三种信息:#(1) ⽂件元数据:⽂件的描述符、⽂件⼤⼩和最近⼀次的修改时间#(2) 打开的⽬录结构#(3) 没有找到的或者没有权限访问的⽂件的相关信息# max=N:可缓存的缓存项上限数量;达到上限后会使⽤LRU(Least recently used,最近最少使⽤)算法实现管理
inactive=time; # 缓存项的⾮活动时⻓,在此处指定的时⻓内未被命中的或命中的次数少于open_file_cache_min_uses指令所指定的次数的缓存项即为⾮活动项,将被删除
open_file_cache_errors on | off; # 是否缓存查找时发⽣错误的⽂件⼀类的信息,默认值为off
open_file_cache_min_uses number;# open_file_cache指令的inactive参数指定的时⻓内,⾄少被命中此处指定的次数⽅可被归类为活动项# 默认值为1
open_file_cache_valid time;# 缓存项有效性的检查验证频率,默认值为60sopen_file_cache max=10000 inactive=60s; # 最⼤缓存10000个⽂件,⾮活动数据超时时⻓60s
open_file_cache_valid    60s;           # 每间隔60s检查⼀下缓存数据有效性
open_file_cache_min_uses 5;             # 60秒内⾄少被命中访问5次才被标记为活动数据
open_file_cache_errors   on;            # 缓存错误信息
server_tokens off;                      # 隐藏Nginx server版本
相关文章:

Nginx 核心配置
一.全局配置 1.1 Nginx 全局配置说明 user nginx nginx; # 启动Nginx⼯作进程的⽤⼾和组 worker_processes [number | auto]; # 启动Nginx⼯作进程的数量 worker_cpu_affinity 00000001 00000010 00000100 00001000; # 将Nginx⼯作进程绑定到指定的CPU核⼼…...
yum命令安装程序
Ubuntu图系统的安装命令: top命令: df -h查看磁盘占用信息 网络状态监控 环境变量和¥符号的用法: 上传下载命令: 压缩解压常见:的压缩格式 tar tar解压:...

什么是CSS中的BFC?
①什么是BFC BFC 全称:Block Formatting Context, 名为 “块级格式化上下文”。 W3C官方解释为:BFC它决定了元素如何对其内容进行定位,以及与其它元素的关系和相互作用,当涉及到可视化布局时,Block Forma…...
探讨uniapp的页面问题
1 新建页面 uni-app中的页面,默认保存在工程根目录下的pages目录下。 每次新建页面,均需在pages.json中配置pages列表; 未在pages.json -> pages 中注册的页面,uni-app会在编译阶段进行忽略。pages.json的完整配置参考&am…...
【跨域异常】
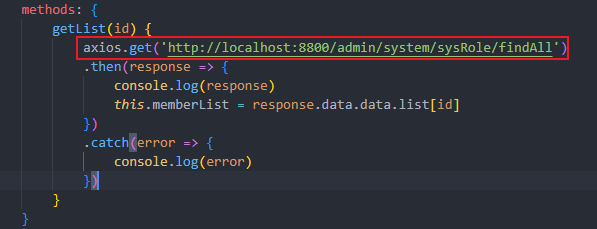
想在前端使用vue获取后端接口的数据,但是报了跨域异常,如下图所示。 一种解决的方式是,在后端Controller接口上加上CrossOrigin,从后端解决跨域问题。 还要注意前端请求的url要加上协议,比如http://...

上市公司环境信息披露(含环境负债、管理、监管、业绩与治理披露,2008-2022)
数据简介:环境信息披露是督促企业履行社会责任,推动国民经济社会全面绿色转型和加快实现“双碳”目标的重要抓手。环境信息披露理论缘起于社会责任理论,发展于合法性理论、利益相关者理论、制度理论和信号传递理论等。 结合相关理论…...
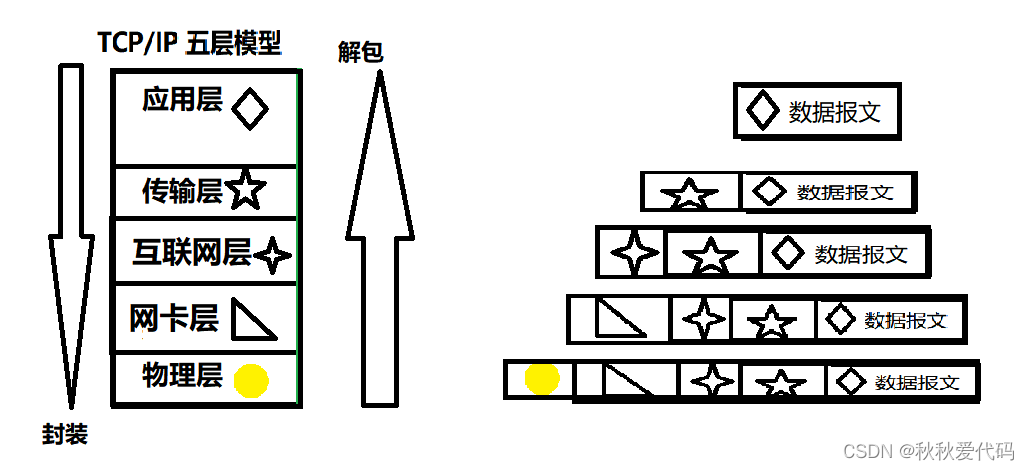
网络基础入门
认识协议 协议其实是一种约定 网络协议初识: 1.内核上以结构体形式呈现 2.操作系统要进行协议管理--先描述,在管理 3.协议的本质是软件,软件是可以分层的,(联系C继承多态的知识 ) 可以参考 ࿱…...

Oracle工具之SQLLDR
1. 什么是SQLLDR SQLLDR是Oracle服务端自带的工具,用于快速导入大批量数据。 2. 常规路径加载/直接路径加载 sqlldr导入有两种模式,常规路径加载和直接路径加载,默认使用常规路径加载,当directy或者directtrue时,使用…...

探索pytest:Python自动化测试的新境界
在当今的软件开发领域,测试已经不仅仅是一个简单的步骤,而是确保软件质量的核心环节。Python,作为全球最受欢迎的编程语言之一,拥有丰富的测试框架和工具。而在这其中,pytest无疑是最受欢迎和最具影响力的一个。本文将…...
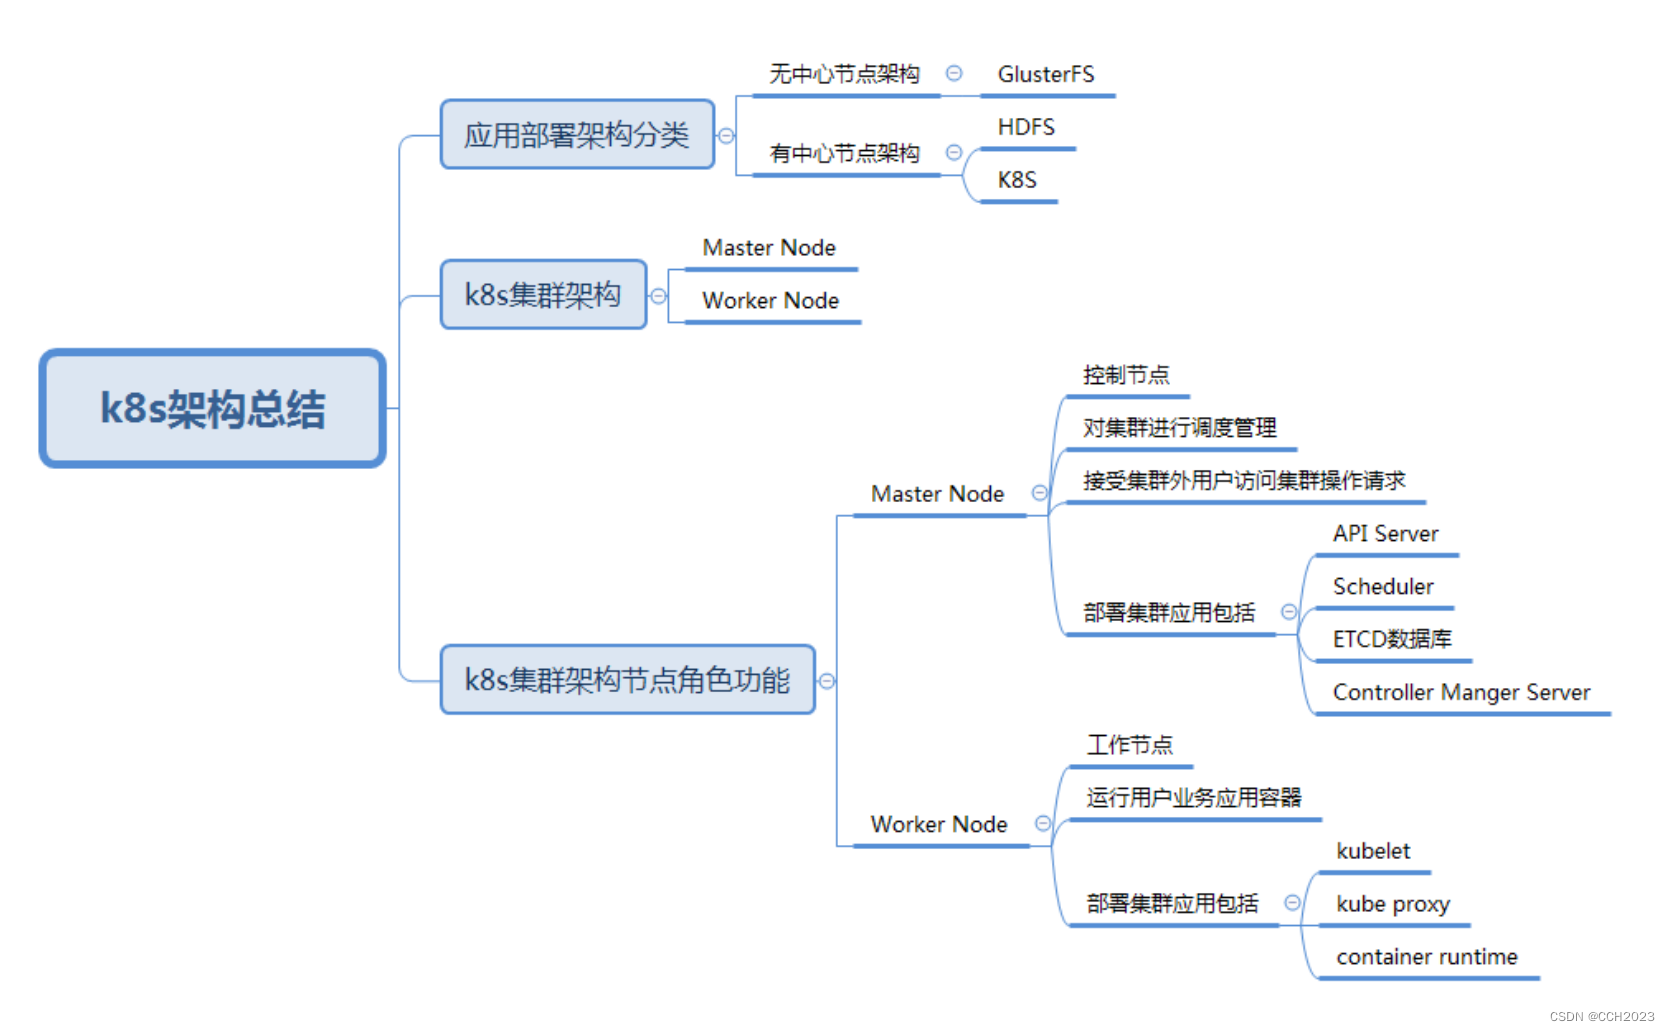
K8s学习笔记4
场景: 项目研发部门最近要进行应用运行基础环境迁移,需要由原先的虚拟机环境迁移到K8s集群环境中,以便应对开发快速部署和快速测试的需要,因此,需要准备一套可以用于开发需求的K8s集群,但是对于仅有容器基…...

Kafka 学习笔记
😀😀😀创作不易,各位看官点赞收藏. 文章目录 Kafka 学习笔记1、消息队列 MQ2、Kafka 下载安装2.1、Zookeeper 方式启动2.2、KRaft 协议启动2.3、Kafka 集群搭建 3、Kafka 之生产者3.1、Java 生产者 API3.2、Kafka 生产者生产分区3…...
vue实现表格的动态高度
需求:表格能够根据窗口的大小自动适配页面高度 防抖和节流函数的使用场景是当需要对频繁触发的事件进行限制时,例如: 防抖函数常用于限制用户在短时间内多次触发某一事件,例如搜索框输入并搜索,当用户一直在输入时,我们可以使用防抖函数来避免多次请求搜索结果,减轻服…...

HodlSoftware-免费在线PDF工具箱 加解密PDF 集成隐私保护功能
HodlSoftware是什么 HodlSoftware是一款免费在线PDF工具箱,集合编辑 PDF 的简单功能,可以对PDF进行加解密、优化压缩PDF、PDF 合并、PDF旋转、PDF页面移除和分割PDF等操作,而且工具集成隐私保护功能,文件只在浏览器本地完成&…...

09 数据库开发-MySQL
文章目录 1 数据库概述2 MySQL概述2.1 MySQL安装2.1.1 解压&添加环境变量2.1.2 初始化MySQL2.1.3 注册MySQL服务2.1.4 启动MySQL服务2.1.5 修改默认账户密码2.1.6 登录MySQL 2.2 卸载MySQL2.3 连接服务器上部署的数据库2.4 数据模型2.5 SQL简介2.5.1 SQL通用语法2.3.2 分类…...
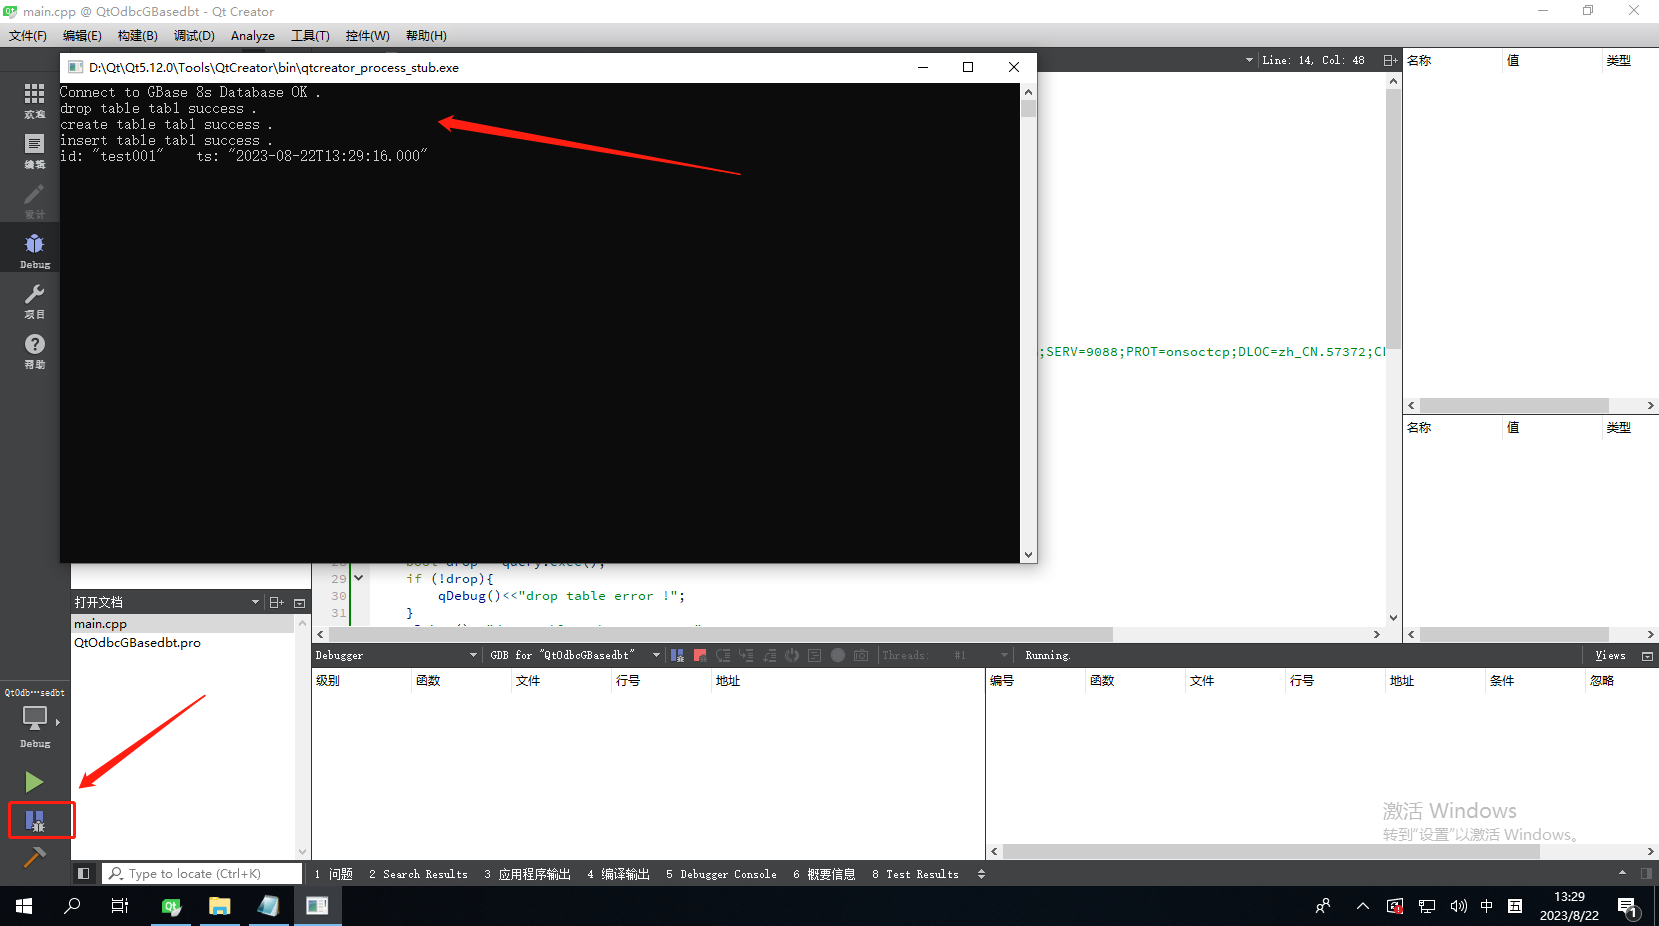
QT通过ODBC连接GBase 8s数据库(Windows)示例
示例环境: 操作系统:Windows 10 64位数据库及CSDK版本:GBase 8s V8.8_3.0.0_1 64位QT:5.12.0 64位 1,CSDK安装及ODBC配置 1.1,免安装版CSDK 下载免安装版的CSDK驱动,地址:https:…...

Java-三个算法冒泡-选择排序,二分查找
Java算法: 冒泡排序; 解析:将前后两个数对比,将大的数(或小的)调换至后面,每轮将对比过程中的最大(或最小)数,调到最后面。每轮对比数减一;初始对比数为数组…...
docker版jxTMS使用指南:使用jxTMS提供数据
本文讲解了如何jxTMS的数据访问框架,整个系列的文章请查看:docker版jxTMS使用指南:4.4版升级内容 docker版本的使用,请查看:docker版jxTMS使用指南 4.0版jxTMS的说明,请查看:4.0版升级内容 4…...

阿里 MySQL 规范
阿里 MySQL 规范 1. 建库建表规范 【推荐】库名与应用/服务名称尽量一致。 【强制】表名不使用复数名词。 说明:表名应该仅仅表示表里面的实体内容,不应该表示实体数量,对应于DO类名也是单数形式,符合表达习惯。 【推荐】表的…...

C++ Primer阅读笔记--动态内存和智能指针
目录 1--动态内存管理 2--shared_ptr类 2-1--make_shared 函数 2-2--引用计数 2-3--get 3--new和delete 4--shared_ptr和new结合使用 5--unique_ptr 6--weak_ptr 1--动态内存管理 new:在动态内存中为对象分配空间并返回一个指向该对象的指…...
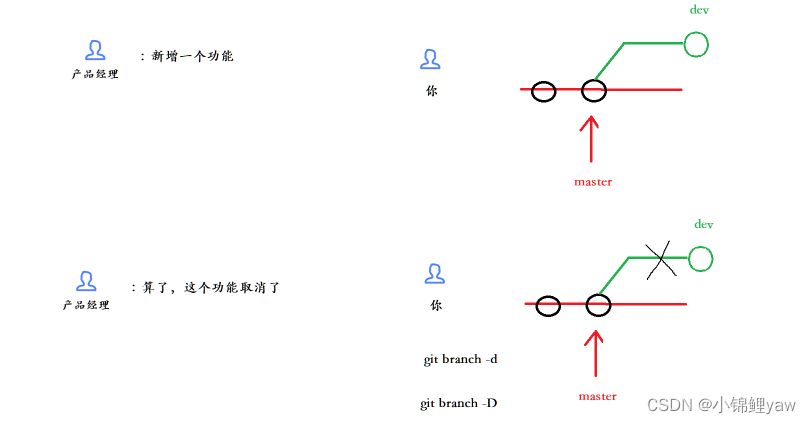
git分支管理策略
git的基础操作以及常用命令在上篇博客哦~ git原理与基本使用 1.分支管理 1.主分支 在版本回退⾥,我们已经知道,每次提交,Git都把它们串成⼀条时间线,这条时间线就可以理解为是⼀个分⽀。截⽌到⽬前,只有⼀条时间线&…...

边缘计算是5G应用的核心平台 , 产业空间广阔
5G引入三大应用场景,eMBB(高速移动通信)、mMTC(大规模机器通信)、URLLC(低时延高可靠),为克服传输网的性能瓶颈,边缘计算成为5G网络的核心网络技术之一。为进一步拓展运营…...

免费开源AMD Ryzen调试工具终极指南:从零掌握SMUDebugTool完整使用教程
免费开源AMD Ryzen调试工具终极指南:从零掌握SMUDebugTool完整使用教程 【免费下载链接】SMUDebugTool A dedicated tool to help write/read various parameters of Ryzen-based systems, such as manual overclock, SMU, PCI, CPUID, MSR and Power Table. 项目…...
)
老板惊呆了!Laravel 接入 OnlyOffice 后,团队协作效率翻 3 倍(附安全加固方案)
文章目录老板惊呆了!Laravel 接入 OnlyOffice 后,团队协作效率翻 3 倍(附安全加固方案)一、整体架构二、准备工作:OnlyOffice 服务(Docker 版)三、Laravel 后端集成1. 安装必要依赖2. 配置 Only…...

制造业供应链优化指南 精益物流落地方法与工具解析
制造业供应链优化离不开物流体系精细化升级,面向工厂运营与供应链从业者,本文拆解精益物流四大核心原则,详解五类落地工具的应用逻辑与实操场景,适配企业流程优化、成本管控、效率提升工作落地。引言:从技术视角看制造…...

Linux服务器安全加固实战:SSH+防火墙+权限最小化三重防护
1. 这不是“加个密码就完事”的安全,而是让服务器真正扛住真实攻击的第一道防线很多人以为 Linux 安全加固就是改个 root 密码、关掉 telnet、再装个 fail2ban 就算交差了。我去年帮一家做跨境电商 SaaS 的客户做渗透复测时,他们运维同事就是这么干的——…...

如何用Blender3mfFormat插件完美处理3MF文件:终极3D打印工作流指南
如何用Blender3mfFormat插件完美处理3MF文件:终极3D打印工作流指南 【免费下载链接】Blender3mfFormat Blender add-on to import/export 3MF files 项目地址: https://gitcode.com/gh_mirrors/bl/Blender3mfFormat 你是否曾经在Blender中为3D打印工作流而烦…...

英雄联盟智能助手Seraphine:如何用Python让游戏数据成为你的制胜法宝?
英雄联盟智能助手Seraphine:如何用Python让游戏数据成为你的制胜法宝? 【免费下载链接】Seraphine 英雄联盟战绩查询工具 项目地址: https://gitcode.com/gh_mirrors/se/Seraphine 还在为排位赛中的信息不对称而苦恼吗?每次进入BP阶段…...

有哪些AI论文网站是真的坚守学术严谨,而不是空洞拼凑?
在 AI 写作技术迅猛发展的当下,越来越多的论文工具涌现出来,声称能快速生成高质量学术内容。然而,真正经得起推敲的却寥寥无几。许多工具看似功能强大,实则存在逻辑混乱、术语错误、格式不规范等硬伤,生成的文章缺乏深…...

RK3576开发板RTC硬件扩展与Linux时间管理实战指南
1. 项目概述与核心价值在嵌入式开发中,尤其是在像RK3576这类高性能AIoT开发板上,一个稳定可靠的实时时钟(RTC)往往是项目从“玩具”走向“产品”的关键一步。它不仅仅是显示个时间那么简单,更是系统日志时间戳准确、定…...

基于RK3576开发板的人脸检测算法部署实战:从环境搭建到性能优化
1. 项目概述与核心价值最近在做一个嵌入式视觉项目,需要在一块性能与功耗平衡的板子上跑实时人脸检测。经过一番选型,最终锁定了瑞芯微的RK3576开发板。这板子集成了NPU,对于跑轻量级神经网络模型来说,性价比相当不错。人脸检测作…...