IA-YOLO项目中DIP模块的初级解读
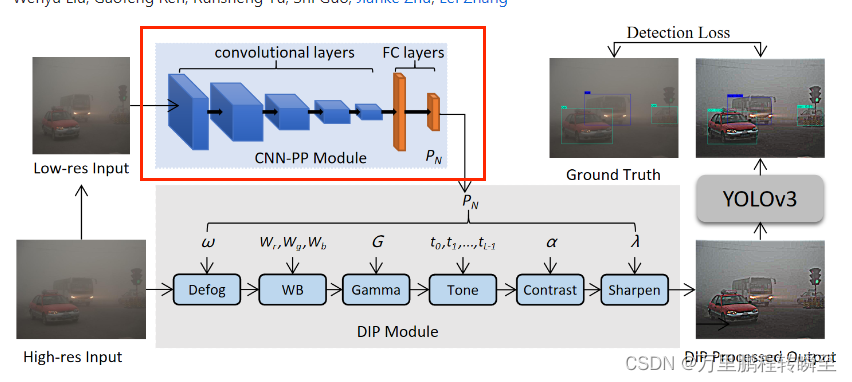
IA-YOLO项目源自论文Image-Adaptive YOLO for Object Detection in Adverse Weather Conditions,其提出端到端方式联合学习CNN-PP和YOLOv3,这确保了CNN-PP可以学习适当的DIP,以弱监督的方式增强图像检测。IA-YOLO方法可以自适应地处理正常和不利天气条件下的图像。阅读论文发现只介绍了IA-YOLO的实际效果,对DIP模块和CNN-PP介绍较少,故此查阅源码分析其实现。
通过分析发现,IA-YOLO使用filtered_image_batch 与 input_data_clean的mse loss优化CNN-PP模块的输出。故此可以看出CNN-PP | DIP实则是可以从IA-YOLO中剥离出来,单独作为数据优化模块使用,若需要考虑IA-YOLO项目的使用,应该对比研究其它图像增强模块。
1、IA-YOLO项目的使用
1.1、安装命令
$ git clone https://github.com/wenyyu/Image-Adaptive-YOLO.git
$ cd Image-Adaptive-YOLO
# Require python3 and tensorflow
$ pip install -r ./docs/requirements.txt
1.2、相关数据集
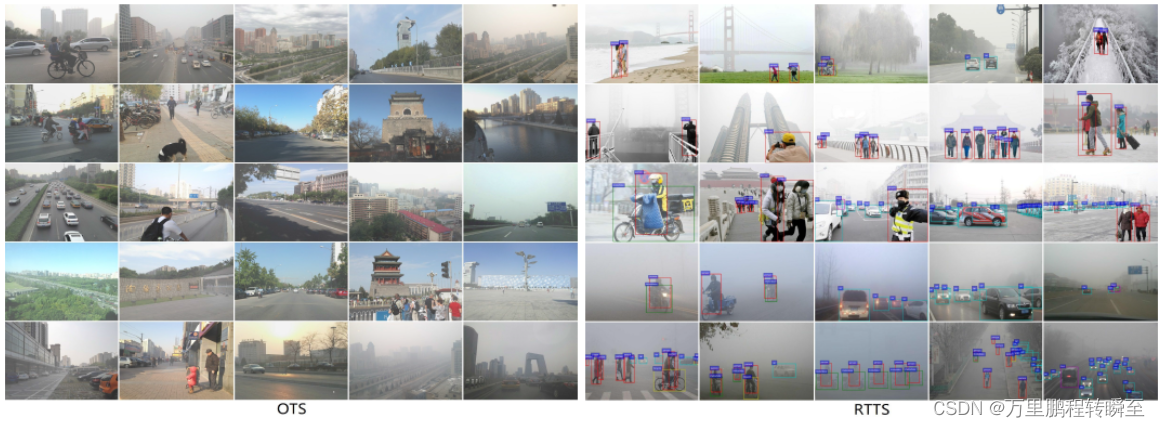
以下两个数据集是IA-YOLO使用到的外部数据集(其还使用了voc数据集和foggy_voc数据集)。
ExDark : https://github.com/cs-chan/Exclusively-Dark-Image-Dataset/tree/master/Dataset
RTTS: https://sites.google.com/view/reside-dehaze-datasets/reside-%CE%B2
1.3 基本使用
Train and Evaluate on the datasets
- Download VOC PASCAL trainval and test data
$ wget http://host.robots.ox.ac.uk/pascal/VOC/voc2007/VOCtrainval_06-Nov-2007.tar
$ wget http://host.robots.ox.ac.uk/pascal/VOC/voc2012/VOCtrainval_11-May-2012.tar
$ wget http://host.robots.ox.ac.uk/pascal/VOC/voc2007/VOCtest_06-Nov-2007.tar
Extract all of these tars into one directory and rename them, which should have the following basic structure.
VOC           # path:  /home/lwy/work/code/tensorflow-yolov3/data/VOC
├── test
|    └──VOCdevkit
|        └──VOC2007 (from VOCtest_06-Nov-2007.tar)
└── train└──VOCdevkit└──VOC2007 (from VOCtrainval_06-Nov-2007.tar)└──VOC2012 (from VOCtrainval_11-May-2012.tar)$ python scripts/voc_annotation.py
- Generate Voc_foggy_train and Voc_foggy_val dataset offline
# generate ten levels' foggy training images and val images, respectively
$ python ./core/data_make.py
- Edit core/config.py to configure
--vocfog_traindata_dir'  = '/data/vdd/liuwenyu/data_vocfog/train/JPEGImages/'
--vocfog_valdata_dir'    = '/data/vdd/liuwenyu/data_vocfog/val/JPEGImages/'
--train_path             = './data/dataset_fog/voc_norm_train.txt'
--test_path              = './data/dataset_fog/voc_norm_test.txt'
--class_name             = './data/classes/vocfog.names'
- Train and Evaluate
$ python train.py # we trained our model from scratch.
$ python evaluate.py
$ cd ./experiments/.../mAP & python main.py
- More details of Preparing dataset or Train with your own dataset
reference the implementation tensorflow-yolov3.
2、CNN-PP与DIP模块实现
在IA-YOLO论文中提到了不少数据处理知识,如生成带雾图片、可微的DIP模块、CNN-PP模块等。这里主要介绍可微的DIP模块、CNN-PP模块的实现与训练
2.1 主体流程
如论文中所述,缩略图与原始图的清晰化参数是一样的,为节省计算量CNN-PP输入的是低分辨率的原始图像,其输出的参数用于DIP模块进行图像清晰化;而DIP模块则使用CNN-PP输出的参数优化图像,最后交给yolov3模型进行预测
2.2 主体代码
为了便于进行对比实验,IA-YOLO通过在yolov3.py(包含去雾filter)或yolov3_lowlight.py(不包含去雾filter,对图像随机进行亮度处理)中使用isp_flag作为配置项目决定是否使用CNN-PP与DIP模块。代码示意如下:
#代码地址:https://github.com/wenyyu/Image-Adaptive-YOLO/blob/main/core/yolov3_lowlight.pydef __build_nework(self, input_data, isp_flag, input_data_clean):filtered_image_batch = input_dataself.filter_params = input_datafilter_imgs_series = []if isp_flag:with tf.variable_scope('extract_parameters_2'):input_data = tf.image.resize_images(input_data, [256, 256], method=tf.image.ResizeMethod.BILINEAR)#---------对原始图像进行下采样filter_features = common.extract_parameters_2(input_data, cfg, self.trainable)#-----CNN-PP计算出DIP模块的参数# filter_features = tf.random_normal([1, 10], 0.5, 0.1)filters = cfg.filtersfilters = [x(input_data, cfg) for x in filters]#-----生成DIP模块filter_parameters = []for j, filter in enumerate(filters):with tf.variable_scope('filter_%d' % j):print(' creating filter:', j, 'name:', str(filter.__class__), 'abbr.',filter.get_short_name())print(' filter_features:', filter_features.shape)filtered_image_batch, filter_parameter = filter.apply(filtered_image_batch, filter_features)#-----DIP模块中filter使用CNN-PP参数优化图像filter_parameters.append(filter_parameter)filter_imgs_series.append(filtered_image_batch)print(' output:', filtered_image_batch.shape)self.filter_params = filter_parametersself.image_isped = filtered_image_batchself.filter_imgs_series = filter_imgs_seriesrecovery_loss = tf.reduce_sum(tf.pow(filtered_image_batch - input_data_clean, 2.0))#/(2.0 * batch_size)#正常的yolov3代码训练使用流程input_data = filtered_image_batch
在if isp_flag:内的代码简单介绍了CNN-DIP模块和DIP模块的使用
在if isp_flag:外的代码为正常的yolov3训练代码。
2.3 CNN-PP模块的实现
完整代码:https://github.com/wenyyu/Image-Adaptive-YOLO/blob/main/core/common.py
def extract_parameters_2(net, cfg, trainable):output_dim = cfg.num_filter_parameters# net = net - 0.5min_feature_map_size = 4print('extract_parameters_2 CNN:')channels = 16print(' ', str(net.get_shape()))net = convolutional(net, filters_shape=(3, 3, 3, channels), trainable=trainable, name='ex_conv0',downsample=True, activate=True, bn=False)net = convolutional(net, filters_shape=(3, 3, channels, 2*channels), trainable=trainable, name='ex_conv1',downsample=True, activate=True, bn=False)net = convolutional(net, filters_shape=(3, 3, 2*channels, 2*channels), trainable=trainable, name='ex_conv2',downsample=True, activate=True, bn=False)net = convolutional(net, filters_shape=(3, 3, 2*channels, 2*channels), trainable=trainable, name='ex_conv3',downsample=True, activate=True, bn=False)net = convolutional(net, filters_shape=(3, 3, 2*channels, 2*channels), trainable=trainable, name='ex_conv4',downsample=True, activate=True, bn=False)net = tf.reshape(net, [-1, 2048])features = ly.fully_connected(net,64,scope='fc1',activation_fn=lrelu,weights_initializer=tf.contrib.layers.xavier_initializer())filter_features = ly.fully_connected(features,output_dim,scope='fc2',activation_fn=None,weights_initializer=tf.contrib.layers.xavier_initializer())return filter_features
查阅代码,可预见CNN-DIP为一个普通的CNN网络,其输出结构由cfg.num_filter_parameters所决定,具体值为14(不包含去雾filter)或15(包含去雾filter)
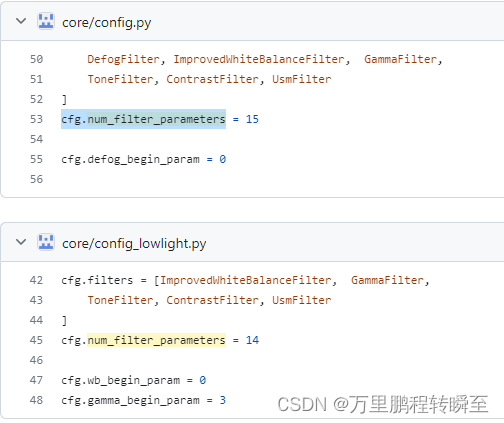
此外,在config.py中定义了一些其他DIP、CNN-PP参数项
cfg.filters = [DefogFilter, ImprovedWhiteBalanceFilter,  GammaFilter,ToneFilter, ContrastFilter, UsmFilter
]
cfg.num_filter_parameters = 15cfg.defog_begin_param = 0cfg.wb_begin_param = 1
cfg.gamma_begin_param = 4
cfg.tone_begin_param = 5
cfg.contrast_begin_param = 13
cfg.usm_begin_param = 14cfg.curve_steps = 8
cfg.gamma_range = 3
cfg.exposure_range = 3.5
cfg.wb_range = 1.1
cfg.color_curve_range = (0.90, 1.10)
cfg.lab_curve_range = (0.90, 1.10)
cfg.tone_curve_range = (0.5, 2)
cfg.defog_range = (0.1, 1.0)
cfg.usm_range = (0.0, 5)# Masking is DISABLED
cfg.masking = False
cfg.minimum_strength = 0.3
cfg.maximum_sharpness = 1
cfg.clamp = False###########################################################################
# CNN Parameters
###########################################################################
cfg.source_img_size = 64
cfg.base_channels = 32
cfg.dropout_keep_prob = 0.5
# G and C use the same feed dict?
cfg.share_feed_dict = True
cfg.shared_feature_extractor = True
cfg.fc1_size = 128
cfg.bnw = False
# number of filters for the first convolutional layers for all networks
#                      (stochastic/deterministic policy, critic, value)
cfg.feature_extractor_dims = 4096
2.4 DIP模块的实现
DIP模块实质为堆叠的可微分滤波器,其实现功能包括 Defog、白平衡(WB)、伽玛、对比度、Tone 和Sharpen,其是实现代码主要在filters.py中,部分辅助代码在util_filters.py中 在作者实现中有filters.py和filters_lowlight.py,二者没有本质区别,filters.py为包含去雾参数的filer(代码中有部分注释未删除),而filters_lowlight.py为后期更新代码实现了不包含去雾参数的filer(删除了原有的注释)
filters.py实现
下面代码中部分用到了tf的api来处理图像,但其所有的Filter子类均非tf.layer对象,使用tf——api处理图像只为了实现对CNN-PP输出结果的可微分
import tensorflow as tf
import numpy as np
import tensorflow.contrib.layers as ly
from util_filters import lrelu, rgb2lum, tanh_range, lerp
import cv2
import math
class Filter:def __init__(self, net, cfg):self.cfg = cfg# self.height, self.width, self.channels = list(map(int, net.get_shape()[1:]))# Specified in child classesself.num_filter_parameters = Noneself.short_name = Noneself.filter_parameters = Nonedef get_short_name(self):assert self.short_namereturn self.short_namedef get_num_filter_parameters(self):assert self.num_filter_parametersreturn self.num_filter_parametersdef get_begin_filter_parameter(self):return self.begin_filter_parameterdef extract_parameters(self, features):# output_dim = self.get_num_filter_parameters(# ) + self.get_num_mask_parameters()# features = ly.fully_connected(#     features,#     self.cfg.fc1_size,#     scope='fc1',#     activation_fn=lrelu,#     weights_initializer=tf.contrib.layers.xavier_initializer())# features = ly.fully_connected(#     features,#     output_dim,#     scope='fc2',#     activation_fn=None,#     weights_initializer=tf.contrib.layers.xavier_initializer())return features[:, self.get_begin_filter_parameter():(self.get_begin_filter_parameter() + self.get_num_filter_parameters())], \features[:, self.get_begin_filter_parameter():(self.get_begin_filter_parameter() + self.get_num_filter_parameters())]# Should be implemented in child classesdef filter_param_regressor(self, features):assert False# Process the whole image, without masking# Should be implemented in child classesdef process(self, img, param, defog, IcA):assert Falsedef debug_info_batched(self):return Falsedef no_high_res(self):return False# Apply the whole filter with maskingdef apply(self,img,img_features=None,defog_A=None,IcA=None,specified_parameter=None,high_res=None):assert (img_features is None) ^ (specified_parameter is None)if img_features is not None:filter_features, mask_parameters = self.extract_parameters(img_features)filter_parameters = self.filter_param_regressor(filter_features)else:assert not self.use_masking()filter_parameters = specified_parametermask_parameters = tf.zeros(shape=(1, self.get_num_mask_parameters()), dtype=np.float32)if high_res is not None:# working on high res...passdebug_info = {}# We only debug the first image of this batchif self.debug_info_batched():debug_info['filter_parameters'] = filter_parameterselse:debug_info['filter_parameters'] = filter_parameters[0]# self.mask_parameters = mask_parameters# self.mask = self.get_mask(img, mask_parameters)# debug_info['mask'] = self.mask[0]#low_res_output = lerp(img, self.process(img, filter_parameters), self.mask)low_res_output = self.process(img, filter_parameters, defog_A, IcA)if high_res is not None:if self.no_high_res():high_res_output = high_reselse:self.high_res_mask = self.get_mask(high_res, mask_parameters)# high_res_output = lerp(high_res,#                        self.process(high_res, filter_parameters, defog, IcA),#                        self.high_res_mask)else:high_res_output = None#return low_res_output, high_res_output, debug_inforeturn low_res_output, filter_parametersdef use_masking(self):return self.cfg.maskingdef get_num_mask_parameters(self):return 6# Input: no need for tanh or sigmoid# Closer to 1 values are applied by filter more strongly# no additional TF variables insidedef get_mask(self, img, mask_parameters):if not self.use_masking():print('* Masking Disabled')return tf.ones(shape=(1, 1, 1, 1), dtype=tf.float32)else:print('* Masking Enabled')with tf.name_scope(name='mask'):# Six parameters for one filterfilter_input_range = 5assert mask_parameters.shape[1] == self.get_num_mask_parameters()mask_parameters = tanh_range(l=-filter_input_range, r=filter_input_range,initial=0)(mask_parameters)size = list(map(int, img.shape[1:3]))grid = np.zeros(shape=[1] + size + [2], dtype=np.float32)shorter_edge = min(size[0], size[1])for i in range(size[0]):for j in range(size[1]):grid[0, i, j,0] = (i + (shorter_edge - size[0]) / 2.0) / shorter_edge - 0.5grid[0, i, j,1] = (j + (shorter_edge - size[1]) / 2.0) / shorter_edge - 0.5grid = tf.constant(grid)# Ax + By + C * L + Dinp = grid[:, :, :, 0, None] * mask_parameters[:, None, None, 0, None] + \grid[:, :, :, 1, None] * mask_parameters[:, None, None, 1, None] + \mask_parameters[:, None, None, 2, None] * (rgb2lum(img) - 0.5) + \mask_parameters[:, None, None, 3, None] * 2# Sharpness and inversioninp *= self.cfg.maximum_sharpness * mask_parameters[:, None, None, 4,None] / filter_input_rangemask = tf.sigmoid(inp)# Strengthmask = mask * (mask_parameters[:, None, None, 5, None] / filter_input_range * 0.5 +0.5) * (1 - self.cfg.minimum_strength) + self.cfg.minimum_strengthprint('mask', mask.shape)return mask# def visualize_filter(self, debug_info, canvas):#   # Visualize only the filter information#   assert Falsedef visualize_mask(self, debug_info, res):return cv2.resize(debug_info['mask'] * np.ones((1, 1, 3), dtype=np.float32),dsize=res,interpolation=cv2.cv2.INTER_NEAREST)def draw_high_res_text(self, text, canvas):cv2.putText(canvas,text, (30, 128),cv2.FONT_HERSHEY_SIMPLEX,0.8, (0, 0, 0),thickness=5)return canvasclass ExposureFilter(Filter):#gamma_param is 2*exposure_range + exposure_rangedef __init__(self, net, cfg):Filter.__init__(self, net, cfg)self.short_name = 'E'self.begin_filter_parameter = cfg.exposure_begin_paramself.num_filter_parameters = 1def filter_param_regressor(self, features):return tanh_range(-self.cfg.exposure_range, self.cfg.exposure_range, initial=0)(features)def process(self, img, param, defog, IcA):return img * tf.exp(param[:, None, None, :] * np.log(2))# def visualize_filter(self, debug_info, canvas):#   exposure = debug_info['filter_parameters'][0]#   if canvas.shape[0] == 64:#     cv2.rectangle(canvas, (8, 40), (56, 52), (1, 1, 1), cv2.FILLED)#     cv2.putText(canvas, 'EV %+.2f' % exposure, (8, 48),#                 cv2.FONT_HERSHEY_SIMPLEX, 0.3, (0, 0, 0))#   else:#     self.draw_high_res_text('Exposure %+.2f' % exposure, canvas)class UsmFilter(Filter):#Usm_param is in [Defog_range]def __init__(self, net, cfg):Filter.__init__(self, net, cfg)self.short_name = 'UF'self.begin_filter_parameter = cfg.usm_begin_paramself.num_filter_parameters = 1def filter_param_regressor(self, features):return tanh_range(*self.cfg.usm_range)(features)def process(self, img, param, defog_A, IcA):def make_gaussian_2d_kernel(sigma, dtype=tf.float32):radius = 12x = tf.cast(tf.range(-radius, radius + 1), dtype=dtype)k = tf.exp(-0.5 * tf.square(x / sigma))k = k / tf.reduce_sum(k)return tf.expand_dims(k, 1) * kkernel_i = make_gaussian_2d_kernel(5)print('kernel_i.shape', kernel_i.shape)kernel_i = tf.tile(kernel_i[:, :, tf.newaxis, tf.newaxis], [1, 1, 1, 1])# outputs = []# for channel_idx in range(3):#     data_c = img[:, :, :, channel_idx:(channel_idx + 1)]#     data_c = tf.nn.conv2d(data_c, kernel_i, [1, 1, 1, 1], 'SAME')#     outputs.append(data_c)pad_w = (25 - 1) // 2padded = tf.pad(img, [[0, 0], [pad_w, pad_w], [pad_w, pad_w], [0, 0]], mode='REFLECT')outputs = []for channel_idx in range(3):data_c = padded[:, :, :, channel_idx:(channel_idx + 1)]data_c = tf.nn.conv2d(data_c, kernel_i, [1, 1, 1, 1], 'VALID')outputs.append(data_c)output = tf.concat(outputs, axis=3)img_out = (img - output) * param[:, None, None, :] + img# img_out = (img - output) * 2.5 + imgreturn img_outclass UsmFilter_sigma(Filter):#Usm_param is in [Defog_range]def __init__(self, net, cfg):Filter.__init__(self, net, cfg)self.short_name = 'UF'self.begin_filter_parameter = cfg.usm_begin_paramself.num_filter_parameters = 1def filter_param_regressor(self, features):return tanh_range(*self.cfg.usm_range)(features)def process(self, img, param, defog_A, IcA):def make_gaussian_2d_kernel(sigma, dtype=tf.float32):radius = 12x = tf.cast(tf.range(-radius, radius + 1), dtype=dtype)k = tf.exp(-0.5 * tf.square(x / sigma))k = k / tf.reduce_sum(k)return tf.expand_dims(k, 1) * kkernel_i = make_gaussian_2d_kernel(param[:, None, None, :])print('kernel_i.shape', kernel_i.shape)kernel_i = tf.tile(kernel_i[:, :, tf.newaxis, tf.newaxis], [1, 1, 1, 1])# outputs = []# for channel_idx in range(3):#     data_c = img[:, :, :, channel_idx:(channel_idx + 1)]#     data_c = tf.nn.conv2d(data_c, kernel_i, [1, 1, 1, 1], 'SAME')#     outputs.append(data_c)pad_w = (25 - 1) // 2padded = tf.pad(img, [[0, 0], [pad_w, pad_w], [pad_w, pad_w], [0, 0]], mode='REFLECT')outputs = []for channel_idx in range(3):data_c = padded[:, :, :, channel_idx:(channel_idx + 1)]data_c = tf.nn.conv2d(data_c, kernel_i, [1, 1, 1, 1], 'VALID')outputs.append(data_c)output = tf.concat(outputs, axis=3)img_out = (img - output) * param[:, None, None, :] + imgreturn img_outclass DefogFilter(Filter):#Defog_param is in [Defog_range]def __init__(self, net, cfg):Filter.__init__(self, net, cfg)self.short_name = 'DF'self.begin_filter_parameter = cfg.defog_begin_paramself.num_filter_parameters = 1def filter_param_regressor(self, features):return tanh_range(*self.cfg.defog_range)(features)def process(self, img, param, defog_A, IcA):print('      defog_A:', img.shape)print('      defog_A:', IcA.shape)print('      defog_A:', defog_A.shape)tx = 1 - param[:, None, None, :]*IcA# tx = 1 - 0.5*IcAtx_1 = tf.tile(tx, [1, 1, 1, 3])return (img - defog_A[:, None, None, :])/tf.maximum(tx_1, 0.01) + defog_A[:, None, None, :]class GammaFilter(Filter):  #gamma_param is in [-gamma_range, gamma_range]def __init__(self, net, cfg):Filter.__init__(self, net, cfg)self.short_name = 'G'self.begin_filter_parameter = cfg.gamma_begin_paramself.num_filter_parameters = 1def filter_param_regressor(self, features):log_gamma_range = np.log(self.cfg.gamma_range)return tf.exp(tanh_range(-log_gamma_range, log_gamma_range)(features))def process(self, img, param, defog_A, IcA):param_1 = tf.tile(param, [1, 3])return tf.pow(tf.maximum(img, 0.0001), param_1[:, None, None, :])# return img# def visualize_filter(self, debug_info, canvas):#   gamma = debug_info['filter_parameters']#   cv2.rectangle(canvas, (8, 40), (56, 52), (1, 1, 1), cv2.FILLED)#   cv2.putText(canvas, 'G 1/%.2f' % (1.0 / gamma), (8, 48),#               cv2.FONT_HERSHEY_SIMPLEX, 0.3, (0, 0, 0))class ImprovedWhiteBalanceFilter(Filter):def __init__(self, net, cfg):Filter.__init__(self, net, cfg)self.short_name = 'W'self.channels = 3self.begin_filter_parameter = cfg.wb_begin_paramself.num_filter_parameters = self.channelsdef filter_param_regressor(self, features):log_wb_range = 0.5mask = np.array(((0, 1, 1)), dtype=np.float32).reshape(1, 3)# mask = np.array(((1, 0, 1)), dtype=np.float32).reshape(1, 3)print(mask.shape)assert mask.shape == (1, 3)features = features * maskcolor_scaling = tf.exp(tanh_range(-log_wb_range, log_wb_range)(features))# There will be no division by zero here unless the WB range lower bound is 0# normalize by luminancecolor_scaling *= 1.0 / (1e-5 + 0.27 * color_scaling[:, 0] + 0.67 * color_scaling[:, 1] +0.06 * color_scaling[:, 2])[:, None]return color_scalingdef process(self, img, param, defog, IcA):return img * param[:, None, None, :]# return img# def visualize_filter(self, debug_info, canvas):#   scaling = debug_info['filter_parameters']#   s = canvas.shape[0]#   cv2.rectangle(canvas, (int(s * 0.2), int(s * 0.4)), (int(s * 0.8), int(#       s * 0.6)), list(map(float, scaling)), cv2.FILLED)class ColorFilter(Filter):def __init__(self, net, cfg):Filter.__init__(self, net, cfg)self.curve_steps = cfg.curve_stepsself.channels = int(net.shape[3])self.short_name = 'C'self.begin_filter_parameter = cfg.color_begin_paramself.num_filter_parameters = self.channels * cfg.curve_stepsdef filter_param_regressor(self, features):color_curve = tf.reshape(features, shape=(-1, self.channels,self.cfg.curve_steps))[:, None, None, :]color_curve = tanh_range(*self.cfg.color_curve_range, initial=1)(color_curve)return color_curvedef process(self, img, param, defog, IcA):color_curve = param# There will be no division by zero here unless the color filter range lower bound is 0color_curve_sum = tf.reduce_sum(param, axis=4) + 1e-30total_image = img * 0for i in range(self.cfg.curve_steps):total_image += tf.clip_by_value(img - 1.0 * i / self.cfg.curve_steps, 0, 1.0 / self.cfg.curve_steps) * \color_curve[:, :, :, :, i]total_image *= self.cfg.curve_steps / color_curve_sumreturn total_image# def visualize_filter(self, debug_info, canvas):#   curve = debug_info['filter_parameters']#   height, width = canvas.shape[:2]#   for i in range(self.channels):#     values = np.array([0] + list(curve[0][0][i]))#     values /= sum(values) + 1e-30#     scale = 1#     values *= scale#     for j in range(0, self.cfg.curve_steps):#       values[j + 1] += values[j]#     for j in range(self.cfg.curve_steps):#       p1 = tuple(#           map(int, (width / self.cfg.curve_steps * j, height - 1 -#                     values[j] * height)))#       p2 = tuple(#           map(int, (width / self.cfg.curve_steps * (j + 1), height - 1 -#                     values[j + 1] * height)))#       color = []#       for t in range(self.channels):#         color.append(1 if t == i else 0)#       cv2.line(canvas, p1, p2, tuple(color), thickness=1)class ToneFilter(Filter):def __init__(self, net, cfg):Filter.__init__(self, net, cfg)self.curve_steps = cfg.curve_stepsself.short_name = 'T'self.begin_filter_parameter = cfg.tone_begin_paramself.num_filter_parameters = cfg.curve_stepsdef filter_param_regressor(self, features):tone_curve = tf.reshape(features, shape=(-1, 1, self.cfg.curve_steps))[:, None, None, :]tone_curve = tanh_range(*self.cfg.tone_curve_range)(tone_curve)return tone_curvedef process(self, img, param, defog, IcA):# img = tf.minimum(img, 1.0)# param = tf.constant([[0.52, 0.53, 0.55, 1.9, 1.8, 1.7, 0.7, 0.6], [0.52, 0.53, 0.55, 1.9, 1.8, 1.7, 0.7, 0.6],#                       [0.52, 0.53, 0.55, 1.9, 1.8, 1.7, 0.7, 0.6], [0.52, 0.53, 0.55, 1.9, 1.8, 1.7, 0.7, 0.6],#                       [0.52, 0.53, 0.55, 1.9, 1.8, 1.7, 0.7, 0.6], [0.52, 0.53, 0.55, 1.9, 1.8, 1.7, 0.7, 0.6]])# param = tf.constant([[0.52, 0.53, 0.55, 1.9, 1.8, 1.7, 0.7, 0.6]])# param = tf.reshape(#     param, shape=(-1, 1, self.cfg.curve_steps))[:, None, None, :]tone_curve = paramtone_curve_sum = tf.reduce_sum(tone_curve, axis=4) + 1e-30total_image = img * 0for i in range(self.cfg.curve_steps):total_image += tf.clip_by_value(img - 1.0 * i / self.cfg.curve_steps, 0, 1.0 / self.cfg.curve_steps) \* param[:, :, :, :, i]# p_cons = [0.52, 0.53, 0.55, 1.9, 1.8, 1.7, 0.7, 0.6]# for i in range(self.cfg.curve_steps):#   total_image += tf.clip_by_value(img - 1.0 * i / self.cfg.curve_steps, 0, 1.0 / self.cfg.curve_steps) \#                  * p_cons[i]total_image *= self.cfg.curve_steps / tone_curve_sumimg = total_imagereturn img# def visualize_filter(self, debug_info, canvas):#   curve = debug_info['filter_parameters']#   height, width = canvas.shape[:2]#   values = np.array([0] + list(curve[0][0][0]))#   values /= sum(values) + 1e-30#   for j in range(0, self.curve_steps):#     values[j + 1] += values[j]#   for j in range(self.curve_steps):#     p1 = tuple(#         map(int, (width / self.curve_steps * j, height - 1 -#                   values[j] * height)))#     p2 = tuple(#         map(int, (width / self.curve_steps * (j + 1), height - 1 -#                   values[j + 1] * height)))#     cv2.line(canvas, p1, p2, (0, 0, 0), thickness=1)class VignetFilter(Filter):def __init__(self, net, cfg):Filter.__init__(self, net, cfg)self.short_name = 'V'self.begin_filter_parameter = cfg.vignet_begin_paramself.num_filter_parameters = 1def filter_param_regressor(self, features):return tf.sigmoid(features)def process(self, img, param):return img * 0  # + param[:, None, None, :]def get_num_mask_parameters(self):return 5# Input: no need for tanh or sigmoid# Closer to 1 values are applied by filter more strongly# no additional TF variables insidedef get_mask(self, img, mask_parameters):with tf.name_scope(name='mask'):# Five parameters for one filterfilter_input_range = 5assert mask_parameters.shape[1] == self.get_num_mask_parameters()mask_parameters = tanh_range(l=-filter_input_range, r=filter_input_range,initial=0)(mask_parameters)size = list(map(int, img.shape[1:3]))grid = np.zeros(shape=[1] + size + [2], dtype=np.float32)shorter_edge = min(size[0], size[1])for i in range(size[0]):for j in range(size[1]):grid[0, i, j,0] = (i + (shorter_edge - size[0]) / 2.0) / shorter_edge - 0.5grid[0, i, j,1] = (j + (shorter_edge - size[1]) / 2.0) / shorter_edge - 0.5grid = tf.constant(grid)# (Ax)^2 + (By)^2 + Cinp = (grid[:, :, :, 0, None] * mask_parameters[:, None, None, 0, None]) ** 2 + \(grid[:, :, :, 1, None] * mask_parameters[:, None, None, 1, None]) ** 2 + \mask_parameters[:, None, None, 2, None] - filter_input_range# Sharpness and inversioninp *= self.cfg.maximum_sharpness * mask_parameters[:, None, None, 3,None] / filter_input_rangemask = tf.sigmoid(inp)# Strengthmask *= mask_parameters[:, None, None, 4,None] / filter_input_range * 0.5 + 0.5if not self.use_masking():print('* Masking Disabled')mask = mask * 0 + 1else:print('* Masking Enabled')print('mask', mask.shape)return mask# def visualize_filter(self, debug_info, canvas):#   brightness = float(debug_info['filter_parameters'][0])#   cv2.rectangle(canvas, (8, 40), (56, 52), (brightness, brightness,#                                             brightness), cv2.FILLED)#class ContrastFilter(Filter):def __init__(self, net, cfg):Filter.__init__(self, net, cfg)self.short_name = 'Ct'self.begin_filter_parameter = cfg.contrast_begin_paramself.num_filter_parameters = 1def filter_param_regressor(self, features):# return tf.sigmoid(features)return tf.tanh(features)def process(self, img, param, defog, IcA):luminance = tf.minimum(tf.maximum(rgb2lum(img), 0.0), 1.0)contrast_lum = -tf.cos(math.pi * luminance) * 0.5 + 0.5contrast_image = img / (luminance + 1e-6) * contrast_lumreturn lerp(img, contrast_image, param[:, :, None, None])# return lerp(img, contrast_image, 0.5)# def visualize_filter(self, debug_info, canvas):#   exposure = debug_info['filter_parameters'][0]#   cv2.rectangle(canvas, (8, 40), (56, 52), (1, 1, 1), cv2.FILLED)#   cv2.putText(canvas, 'Ct %+.2f' % exposure, (8, 48),#               cv2.FONT_HERSHEY_SIMPLEX, 0.3, (0, 0, 0))class WNBFilter(Filter):def __init__(self, net, cfg):Filter.__init__(self, net, cfg)self.short_name = 'BW'self.begin_filter_parameter = cfg.wnb_begin_paramself.num_filter_parameters = 1def filter_param_regressor(self, features):return tf.sigmoid(features)def process(self, img, param, defog, IcA):luminance = rgb2lum(img)return lerp(img, luminance, param[:, :, None, None])# def visualize_filter(self, debug_info, canvas):#   exposure = debug_info['filter_parameters'][0]#   cv2.rectangle(canvas, (8, 40), (56, 52), (1, 1, 1), cv2.FILLED)#   cv2.putText(canvas, 'B&W%+.2f' % exposure, (8, 48),#               cv2.FONT_HERSHEY_SIMPLEX, 0.3, (0, 0, 0))class LevelFilter(Filter):def __init__(self, net, cfg):Filter.__init__(self, net, cfg)self.short_name = 'Le'self.begin_filter_parameter = cfg.level_begin_paramself.num_filter_parameters = 2def filter_param_regressor(self, features):return tf.sigmoid(features)def process(self, img, param):lower = param[:, 0]upper = param[:, 1] + 1lower = lower[:, None, None, None]upper = upper[:, None, None, None]return tf.clip_by_value((img - lower) / (upper - lower + 1e-6), 0.0, 1.0)# def visualize_filter(self, debug_info, canvas):#   level = list(map(float, debug_info['filter_parameters']))#   level[1] += 1#   cv2.rectangle(canvas, (8, 40), (56, 52), (1, 1, 1), cv2.FILLED)#   cv2.putText(canvas, '%.2f %.2f' % tuple(level), (8, 48),#               cv2.FONT_HERSHEY_SIMPLEX, 0.25, (0, 0, 0))class SaturationPlusFilter(Filter):def __init__(self, net, cfg):Filter.__init__(self, net, cfg)self.short_name = 'S+'self.begin_filter_parameter = cfg.saturation_begin_paramself.num_filter_parameters = 1def filter_param_regressor(self, features):return tf.sigmoid(features)def process(self, img, param, defog, IcA):img = tf.minimum(img, 1.0)hsv = tf.image.rgb_to_hsv(img)s = hsv[:, :, :, 1:2]v = hsv[:, :, :, 2:3]# enhanced_s = s + (1 - s) * 0.7 * (0.5 - tf.abs(0.5 - v)) ** 2enhanced_s = s + (1 - s) * (0.5 - tf.abs(0.5 - v)) * 0.8hsv1 = tf.concat([hsv[:, :, :, 0:1], enhanced_s, hsv[:, :, :, 2:]], axis=3)full_color = tf.image.hsv_to_rgb(hsv1)param = param[:, :, None, None]color_param = paramimg_param = 1.0 - paramreturn img * img_param + full_color * color_param# def visualize_filter(self, debug_info, canvas):#   exposure = debug_info['filter_parameters'][0]#   if canvas.shape[0] == 64:#     cv2.rectangle(canvas, (8, 40), (56, 52), (1, 1, 1), cv2.FILLED)#     cv2.putText(canvas, 'S %+.2f' % exposure, (8, 48),#                 cv2.FONT_HERSHEY_SIMPLEX, 0.3, (0, 0, 0))#   else:#     self.draw_high_res_text('Saturation %+.2f' % exposure, canvas)
util_filters.py实现
这里移除了大部分与filter.py不相干的代码,仅保留lrelu, rgb2lum, tanh_range, lerp 4个函数。
def lrelu(x, leak=0.2, name="lrelu"):with tf.variable_scope(name):f1 = 0.5 * (1 + leak)f2 = 0.5 * (1 - leak)return f1 * x + f2 * abs(x)def rgb2lum(image):image = 0.27 * image[:, :, :, 0] + 0.67 * image[:, :, :,1] + 0.06 * image[:, :, :, 2]return image[:, :, :, None]def tanh01(x):return tf.tanh(x) * 0.5 + 0.5def tanh_range(l, r, initial=None):def get_activation(left, right, initial):def activation(x):if initial is not None:bias = math.atanh(2 * (initial - left) / (right - left) - 1)else:bias = 0return tanh01(x + bias) * (right - left) + leftreturn activationreturn get_activation(l, r, initial)def lerp(a, b, l):return (1 - l) * a + l * b
3、CNN-PP与DIP模块训练与优化
3.1 loss设计
这里只探讨与CNN-PP优化相关的loss。
通过观察yolov3.py中的__build_nework函数,可以看到最后recovery_loss 的实现为:recovery_loss = tf.reduce_sum(tf.pow(filtered_image_batch - input_data_clean, 2.0))#/(2.0 * batch_size)
其中filtered_image_batch 作为直接参与yolov3模型前向传播的对象,使用filtered_image_batch 与 input_data_clean的mse loss优化CNN-PP模块的输出。故此可以看出CNN-PP | DIP实则是可以从IA-YOLO中剥离出来,单独作为数据优化模块使用。
def __build_nework(self, input_data, isp_flag, input_data_clean, defog_A, IcA):filtered_image_batch = input_dataself.filter_params = input_datafilter_imgs_series = []if isp_flag:# start_time = time.time()with tf.variable_scope('extract_parameters_2'):input_data = tf.image.resize_images(input_data, [256, 256], method=tf.image.ResizeMethod.BILINEAR)filter_features = common.extract_parameters_2(input_data, cfg, self.trainable)# filter_features = tf.random_normal([1, 15], 0.5, 0.1)filters = cfg.filtersfilters = [x(filtered_image_batch, cfg) for x in filters]filter_parameters = []for j, filter in enumerate(filters):with tf.variable_scope('filter_%d' % j):print(' creating filter:', j, 'name:', str(filter.__class__), 'abbr.',filter.get_short_name())print(' filter_features:', filter_features.shape)filtered_image_batch, filter_parameter = filter.apply(filtered_image_batch, filter_features, defog_A, IcA)filter_parameters.append(filter_parameter)filter_imgs_series.append(filtered_image_batch)print(' output:', filtered_image_batch.shape)self.filter_params = filter_parameters# end_time = time.time()# print('filters所用时间:', end_time - start_time)# input_data_shape = tf.shape(input_data)# batch_size = input_data_shape[0]recovery_loss = tf.reduce_sum(tf.pow(filtered_image_batch - input_data_clean, 2.0))#/(2.0 * batch_size)
然后模型主体返回的loss如下,可见其就是基于filtered_image_batch 与input_data_clean所计算的mse loss。其中filtered_image_batch 是DIP模块基于input_data所生成的,而input_data_clean不知是怎么了来的。
def compute_loss(self, label_sbbox, label_mbbox, label_lbbox, true_sbbox, true_mbbox, true_lbbox):with tf.name_scope('smaller_box_loss'):loss_sbbox = self.loss_layer(self.conv_sbbox, self.pred_sbbox, label_sbbox, true_sbbox,anchors = self.anchors[0], stride = self.strides[0])with tf.name_scope('medium_box_loss'):loss_mbbox = self.loss_layer(self.conv_mbbox, self.pred_mbbox, label_mbbox, true_mbbox,anchors = self.anchors[1], stride = self.strides[1])with tf.name_scope('bigger_box_loss'):loss_lbbox = self.loss_layer(self.conv_lbbox, self.pred_lbbox, label_lbbox, true_lbbox,anchors = self.anchors[2], stride = self.strides[2])with tf.name_scope('giou_loss'):giou_loss = loss_sbbox[0] + loss_mbbox[0] + loss_lbbox[0]with tf.name_scope('conf_loss'):conf_loss = loss_sbbox[1] + loss_mbbox[1] + loss_lbbox[1]with tf.name_scope('prob_loss'):prob_loss = loss_sbbox[2] + loss_mbbox[2] + loss_lbbox[2]with tf.name_scope('recovery_loss'):recovery_loss = self.recovery_lossreturn giou_loss, conf_loss, prob_loss, recovery_loss
3.2 input_data_clean追溯
train相关代码
通过追溯代码train.py,可以发现input_data_clean为trainset返回的图像。
此外,以下代码也反应了带雾与不带雾的数据传播流程,可以预见的带雾流程更加复杂。同时,针对DefogFilter有各种暗通道计算方法,预计是用于DefogFilter 。而据博主的了解,去雾极为耗时,而在IA-YOLO论文中却没有仔细说明train与train_lowlight的差异,仅描述了使用CNN-PP和DIP仅增加13ms的处理时间。
而在train_lowlight.py中,数据forword流程则更加简单,仅使用np.power(train_data[0], lowlight_param)模拟生成低亮度数据
def train(self):self.sess.run(tf.global_variables_initializer())try:print('=> Restoring weights from: %s ... ' % self.initial_weight)self.loader.restore(self.sess, self.initial_weight)except:print('=> %s does not exist !!!' % self.initial_weight)print('=> Now it starts to train YOLOV3 from scratch ...')self.first_stage_epochs = 0def DarkChannel(im):b, g, r = cv2.split(im)dc = cv2.min(cv2.min(r, g), b);return dcdef AtmLight(im, dark):[h, w] = im.shape[:2]imsz = h * wnumpx = int(max(math.floor(imsz / 1000), 1))darkvec = dark.reshape(imsz, 1)imvec = im.reshape(imsz, 3)indices = darkvec.argsort(0)indices = indices[(imsz - numpx):imsz]atmsum = np.zeros([1, 3])for ind in range(1, numpx):atmsum = atmsum + imvec[indices[ind]]A = atmsum / numpxreturn Adef DarkIcA(im, A):im3 = np.empty(im.shape, im.dtype)for ind in range(0, 3):im3[:, :, ind] = im[:, :, ind] / A[0, ind]return DarkChannel(im3)for epoch in range(1, 1+self.first_stage_epochs+self.second_stage_epochs):if epoch <= self.first_stage_epochs:train_op = self.train_op_with_frozen_variableselse:train_op = self.train_op_with_all_variablespbar = tqdm(self.trainset)train_epoch_loss, test_epoch_loss = [], []for train_data in pbar:if args.fog_FLAG:# start_time = time.time()dark = np.zeros((train_data[0].shape[0], train_data[0].shape[1], train_data[0].shape[2]))defog_A = np.zeros((train_data[0].shape[0], train_data[0].shape[3]))IcA = np.zeros((train_data[0].shape[0], train_data[0].shape[1], train_data[0].shape[2]))if DefogFilter in cfg.filters:# print("**************************")for i in range(train_data[0].shape[0]):dark_i = DarkChannel(train_data[0][i])defog_A_i = AtmLight(train_data[0][i], dark_i)IcA_i = DarkIcA(train_data[0][i], defog_A_i)dark[i, ...] = dark_idefog_A[i, ...] = defog_A_iIcA[i, ...] = IcA_iIcA = np.expand_dims(IcA, axis=-1)_, summary, train_step_loss, train_step_loss_recovery, global_step_val = self.sess.run([train_op, self.write_op, self.loss, self.recovery_loss, self.global_step], feed_dict={self.input_data: train_data[0],self.defog_A: defog_A,self.IcA: IcA,self.label_sbbox: train_data[1],self.label_mbbox: train_data[2],self.label_lbbox: train_data[3],self.true_sbboxes: train_data[4],self.true_mbboxes: train_data[5],self.true_lbboxes: train_data[6],self.input_data_clean: train_data[7],self.trainable: True,})else:_, summary, train_step_loss, global_step_val = self.sess.run([train_op, self.write_op, self.loss, self.global_step], feed_dict={self.input_data: train_data[7],self.label_sbbox: train_data[1],self.label_mbbox: train_data[2],self.label_lbbox: train_data[3],self.true_sbboxes: train_data[4],self.true_mbboxes: train_data[5],self.true_lbboxes: train_data[6],self.input_data_clean: train_data[7],self.trainable: True,})train_epoch_loss.append(train_step_loss)self.summary_writer.add_summary(summary, global_step_val)pbar.set_description("train loss: %.2f" % train_step_loss)
通过对train相关代码分析,发现input_data_clean是由dataloader直接返回的
dataset相关代码
在dataset.py中的__next__函数中发现代码:image, bboxes, clean_image = self.parse_annotation(annotation)
再度深入追溯parse_annotation函数:
- 1、发现关键代码
clean_image, bboxes = utils.image_preporcess(np.copy(image), [self.train_input_size, self.train_input_size], np.copy(bboxes)),通过分析发现,image_preporcess仅为图像resize函数 - 2、通过追溯parse_annotation函数内
if random.randint(0, 2) > 0:分支内读取图片的代码发现如下,可以看到foggy_image, clean_image分别为不同的图片路径读取而来。
image = cv2.imread(image_path)img_name = image_path.split('/')[-1]image_name = img_name.split('.')[0]image_name_index = img_name.split('.')[1]bboxes = np.array([list(map(lambda x: int(float(x)), box.split(','))) for box in line[1:]])if random.randint(0, 2) > 0:beta = random.randint(0, 9)beta = 0.01 * beta + 0.05if self.data_train_flag:img_name = args.vocfog_traindata_dir + image_name \+ '_' + ("%.2f" % beta) + '.' + image_name_indexelse:img_name = args.vocfog_valdata_dir + image_name \+ '_' + ("%.2f" % beta) + '.' + image_name_indexfoggy_image = cv2.imread(img_name)clean_image = image '''aug 代码'''return foggy_image, bboxes, clean_image
- 3、通过以上分析可以发现train过程中的image实际为带雾的图像
实则为data_make.py根据原始图像生成的,而clean_image 则为原始图像。
4 、生成带雾图片
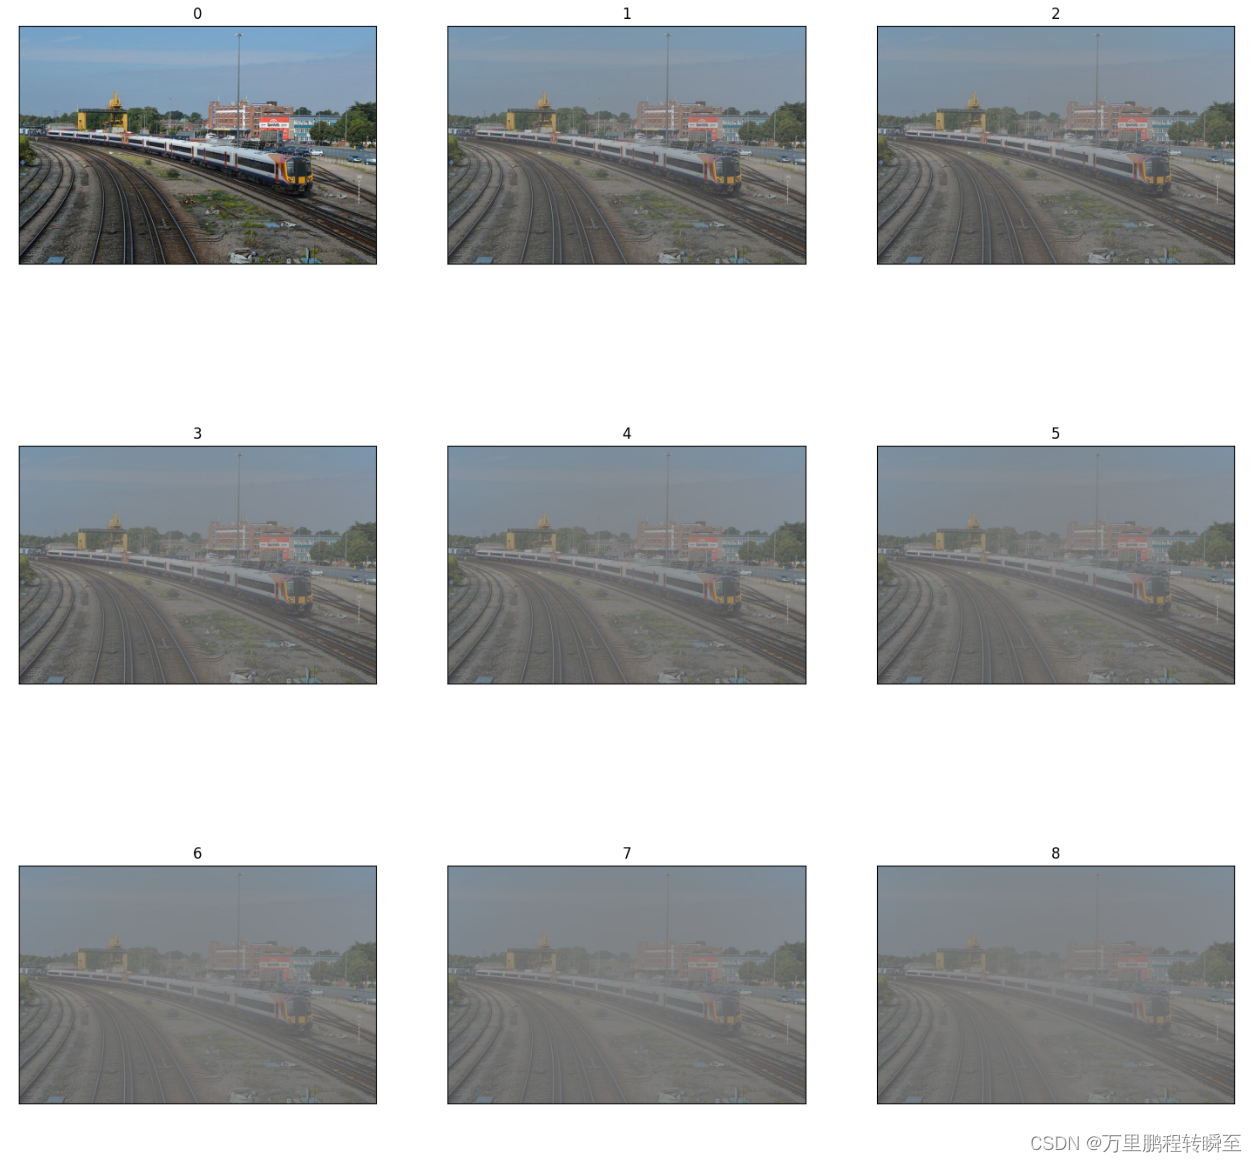
在IA-YOLO论文中提到了基于大气散射模型的逆向操作使用代码生成不同等级的带雾图片,其代码在data_make.py,将核心函数进行抽取后,形成以下代码。
import numpy as np
import os
import cv2
import math
from numba import jit
import random
from PIL import Image
from ImgUilt import *#生成带雾图片,i为雾气的等级
@jit()
def AddHaz_loop(img_f, i):(row, col, chs) = img_f.shapeA = 0.5  # beta = 0.08  beta = 0.01 * i + 0.05# 0.03size = math.sqrt(max(row, col)) center = (row // 2, col // 2)  for j in range(row):for l in range(col):d = -0.04 * math.sqrt((j - center[0]) ** 2 + (l - center[1]) ** 2) + sizetd = math.exp(-beta * d)img_f[j][l][:] = img_f[j][l][:] * td + A * (1 - td)img_f = np.clip(img_f*255, 0, 255).astype(np.uint8)return img_fpath = r"D:\实战项目\datasets\coco128\images\train2017\000000000071.jpg"
image = np.array(Image.open(path))
all_list=[image]
for i in range(11):img_f = image/255(row, col, chs) = image.shapefoggy_image = AddHaz_loop(img_f, i)all_list.append(foggy_image)#img=Image.fromarray(img_f)
myimshowsCL(all_list,rows=4,cols=3)
生成的带雾图像如下所示,其中myimshowsCL函数源自 python工具方法 28 2.3 单图、多图、网格显示
data_make.py
以下代码为读取voc数据生成带雾图像。
import numpy as np
import os
import cv2
import math
from numba import jit
import random# only use the image including the labeled instance objects for training
def load_annotations(annot_path):print(annot_path)with open(annot_path, 'r') as f:txt = f.readlines()annotations = [line.strip() for line in txt if len(line.strip().split()[1:]) != 0]return annotations# print('*****************Add haze offline***************************')
def parse_annotation(annotation):line = annotation.split()image_path = line[0]# print(image_path)img_name = image_path.split('/')[-1]# print(img_name)image_name = img_name.split('.')[0]# print(image_name)image_name_index = img_name.split('.')[1]# print(image_name_index)#'/data/vdd/liuwenyu/data_vocfog/train/JPEGImages/'if not os.path.exists(image_path):raise KeyError("%s does not exist ... " %image_path)image = cv2.imread(image_path)for i in range(10):@jit()def AddHaz_loop(img_f, center, size, beta, A):(row, col, chs) = img_f.shapefor j in range(row):for l in range(col):d = -0.04 * math.sqrt((j - center[0]) ** 2 + (l - center[1]) ** 2) + sizetd = math.exp(-beta * d)img_f[j][l][:] = img_f[j][l][:] * td + A * (1 - td)return img_fimg_f = image/255(row, col, chs) = image.shapeA = 0.5  # beta = 0.08  beta = 0.01 * i + 0.05size = math.sqrt(max(row, col)) center = (row // 2, col // 2)  foggy_image = AddHaz_loop(img_f, center, size, beta, A)img_f = np.clip(foggy_image*255, 0, 255)img_f = img_f.astype(np.uint8)img_name = '/data/vdd/liuwenyu/data_vocfog/train/JPEGImages/' + image_name \+ '_' + ("%.2f"%beta) + '.' + image_name_index#img_name = '/data/vdd/liuwenyu/data_vocfog/val/JPEGImages/' + image_name \#   + '_' + ("%.2f"%beta) + '.' + image_name_indexcv2.imwrite(img_name, img_f)if __name__ == '__main__':an = load_annotations('/home/liuwenyu.lwy/code/defog_yolov3/data/dataset/voc_norm_train.txt')#an = load_annotations('/home/liuwenyu.lwy/code/defog_yolov3/data/dataset/voc_norm_test.txt')ll = len(an)print(ll)for j in range(ll):parse_annotation(an[j])
相关文章:
IA-YOLO项目中DIP模块的初级解读
IA-YOLO项目源自论文Image-Adaptive YOLO for Object Detection in Adverse Weather Conditions,其提出端到端方式联合学习CNN-PP和YOLOv3,这确保了CNN-PP可以学习适当的DIP,以弱监督的方式增强图像检测。IA-YOLO方法可以自适应地处理正常和不…...
MathType7.4mac最新版本数学公式编辑器安装教程
MathType7.4中文版是一款功能强大且易于使用的公式编辑器。该软件可与word软件配合使用,有效提高了教学人员的工作效率,避免了一些数学符号和公式无法在word中输入的麻烦。新版MathType7.4启用了全新的LOGO,带来了更多对数学符号和公式的支持…...
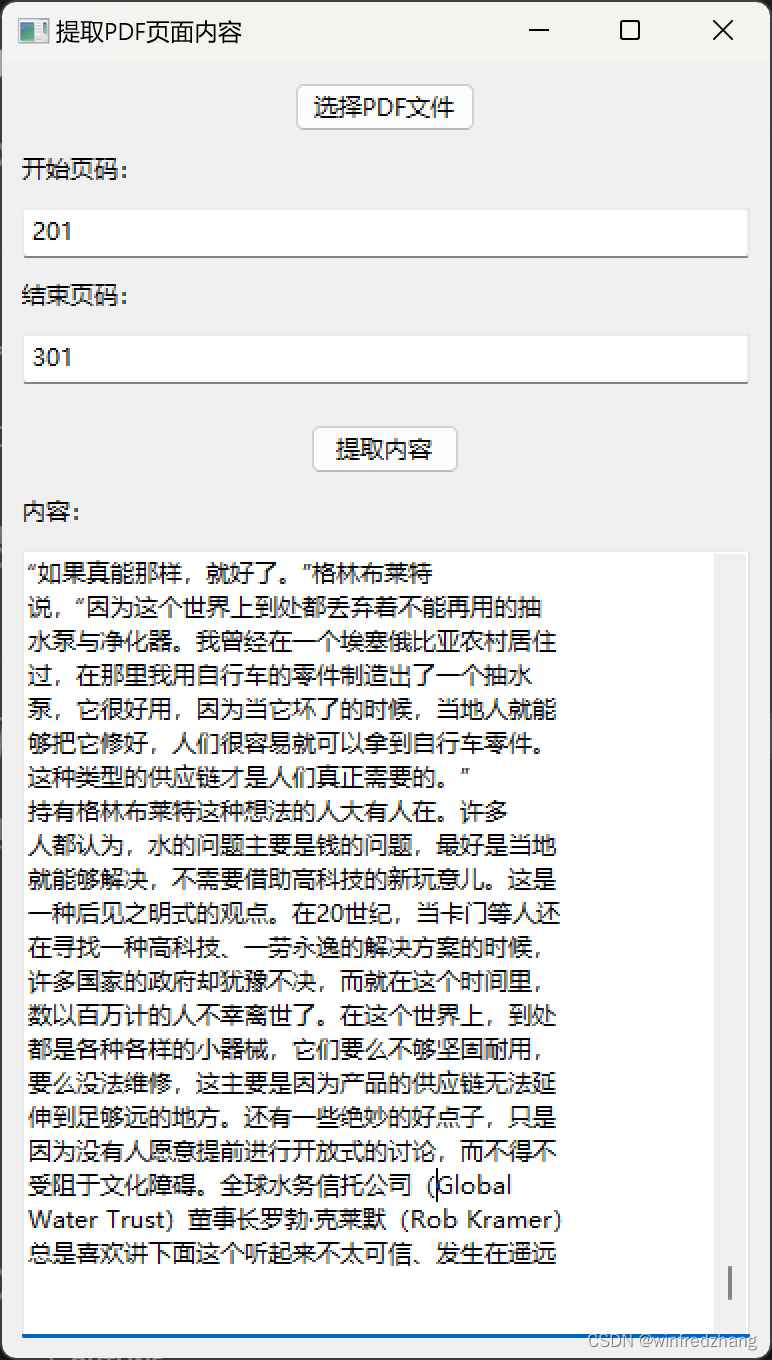
为Claude的分析内容做准备:提取PDF页面内容的简易应用程序
由于Claude虽然可以分析整个文件,但是对文件的大小以及字数是有限制的,为了将pdf文件分批传入Claude人工智能分析和总结文章内容,才有了这篇博客: 在本篇博客中,我们将介绍一个基于 wxPython 和 PyMuPDF 库编写的简易的…...
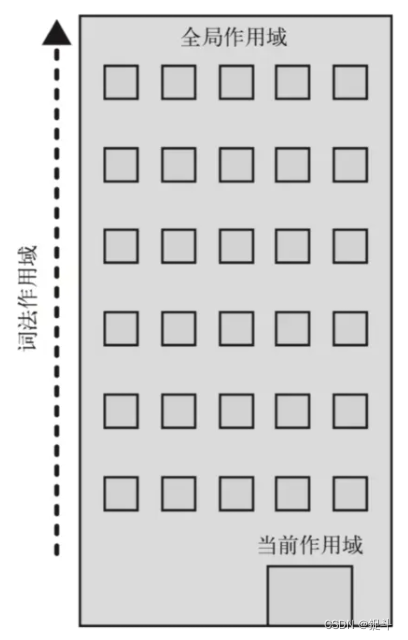
js中作用域的理解?
1.作用域 作用域,即变量(变量作用域又称上下文)和函数生效(能被访问)的区域或集合 换句话说,作用域决定了代码区块中变量和其他资源的可见性 举个例子 function myFunction() {let inVariable "函数内部变量"; } myFunction();//要先执行这…...
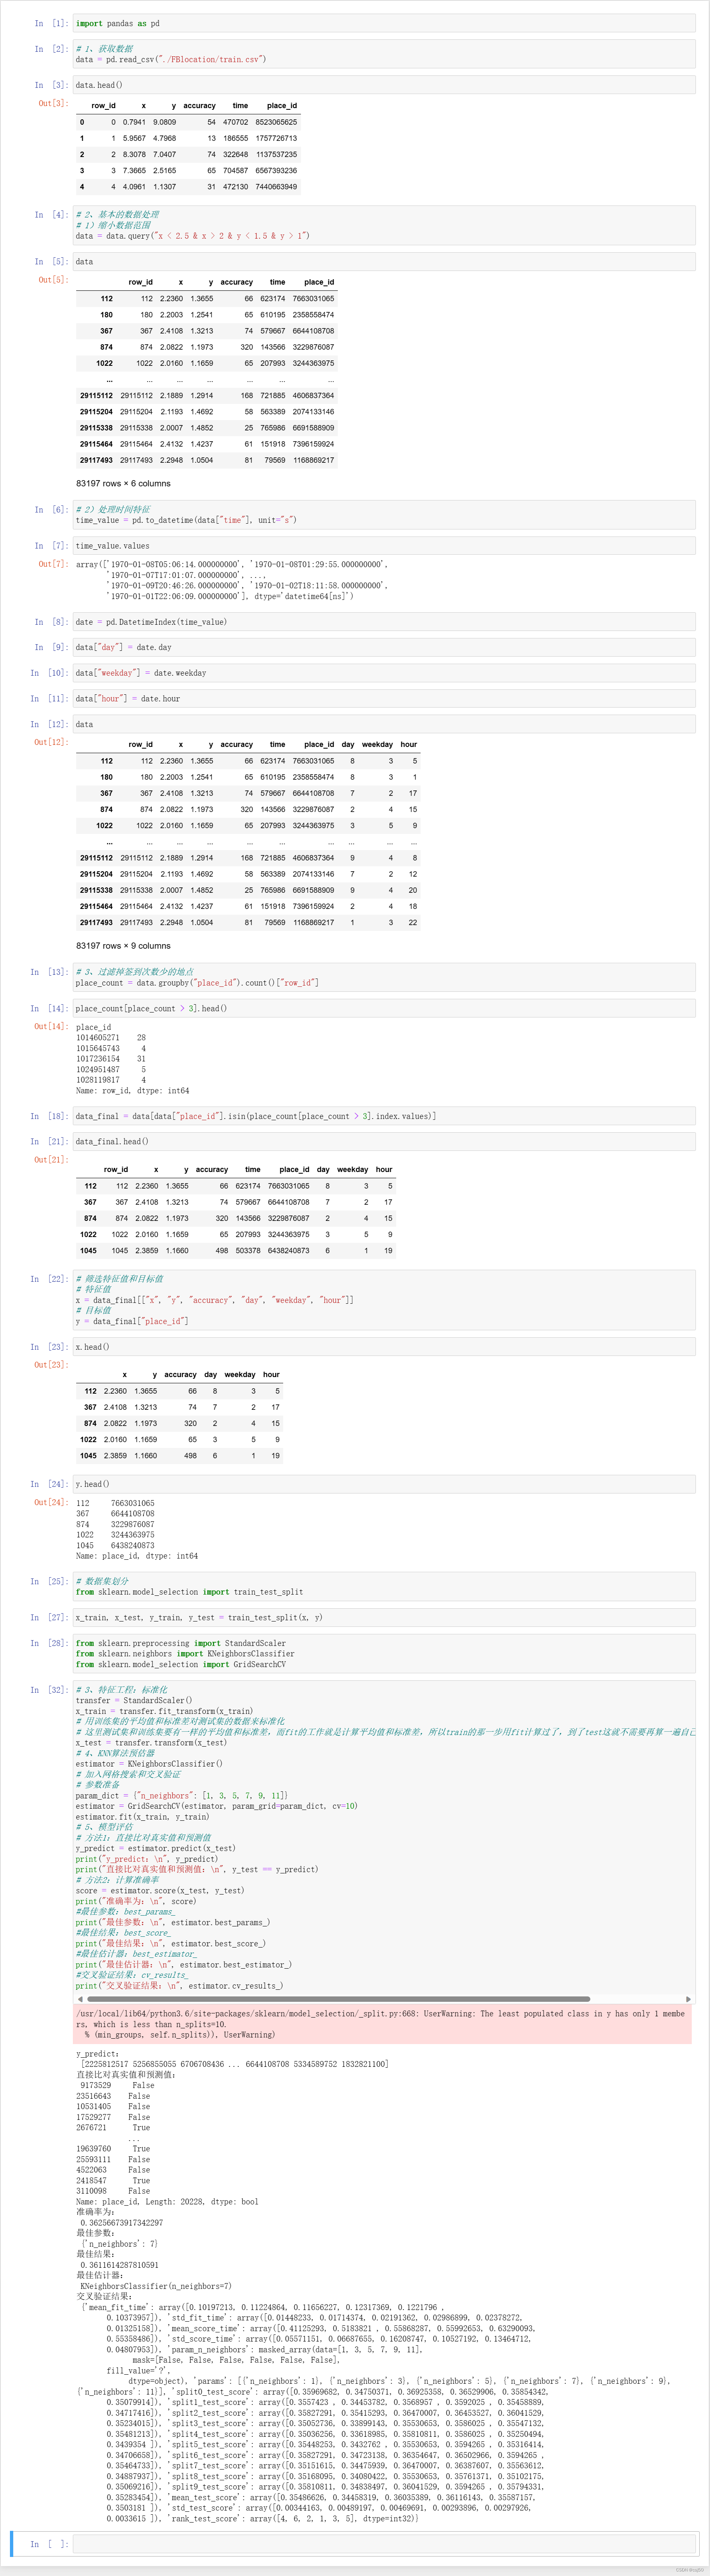
机器学习基础之《分类算法(4)—案例:预测facebook签到位置》
一、背景 1、说明 2、数据集 row_id:签到行为的编码 x y:坐标系,人所在的位置 accuracy:定位的准确率 time:时间戳 place_id:预测用户将要签到的位置 3、数据集下载 https://www.kaggle.com/navoshta/gr…...

【Java】反射 之 调用方法
调用方法 我们已经能通过Class实例获取所有Field对象,同样的,可以通过Class实例获取所有Method信息。Class类提供了以下几个方法来获取Method: Method getMethod(name, Class...):获取某个public的Method(包括父类&a…...
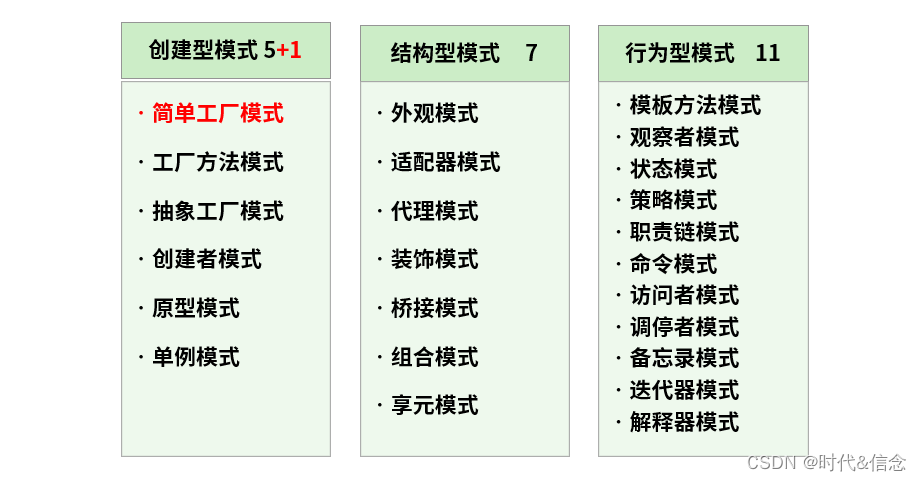
Java——单例设计模式
什么是设计模式? 设计模式是在大量的实践中总结和理论化之后优选的代码结构、编程风格、以及解决问题的思考方式。设计模式免去我们自己再思考和摸索。就像是经典的棋谱,不同的棋局,我们用不同的棋谱、“套路”。 经典的设计模式共有23种。…...

Java实现excel表数据的批量存储(结合easyexcel插件)
场景:加哥最近在做项目时,苦于系统自身并未提供数据批量导入的功能还不能自行添加上该功能,且自身不想手动一条一条将数据录入系统。随后,自己使用JDBC连接数据库、使用EasyExcel插件读取表格并将数据按照业务逻辑批量插入数据库完…...
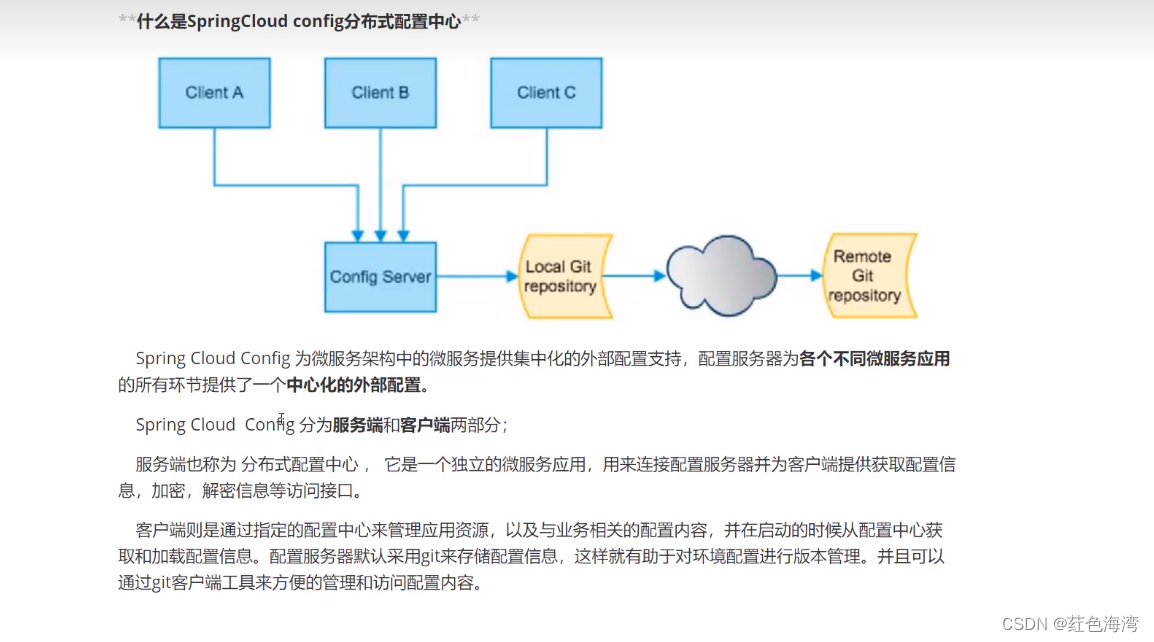
Config:客户端连接服务器访问远程
springcloud-config: springcloud-config push pom <?xml version"1.0" encoding"UTF-8"?> <project xmlns"http://maven.apache.org/POM/4.0.0"xmlns:xsi"http://www.w3.org/2001/XMLSchema-instance"xsi:schemaLocatio…...

【KMP算法-代码随想录】
目录 1.什么是KMP2.什么是next数组3.什么是前缀表(1)前后缀含义(2)最长公共前后缀(3)前缀表的必要性 4.计算前缀表5.前缀表与next数组(1)使用next数组来匹配 6.构造next数组…...
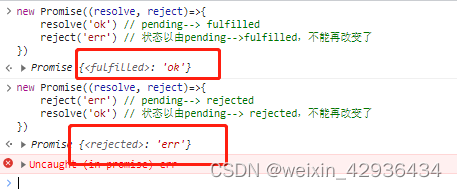
【手写promise——基本功能、链式调用、promise.all、promise.race】
文章目录 前言一、前置知识二、实现基本功能二、实现链式调用三、实现Promise.all四、实现Promise.race总结 前言 关于动机,无论是在工作还是面试中,都会遇到Promise的相关使用和原理,手写Promise也有助于学习设计模式以及代码设计。 本文主…...
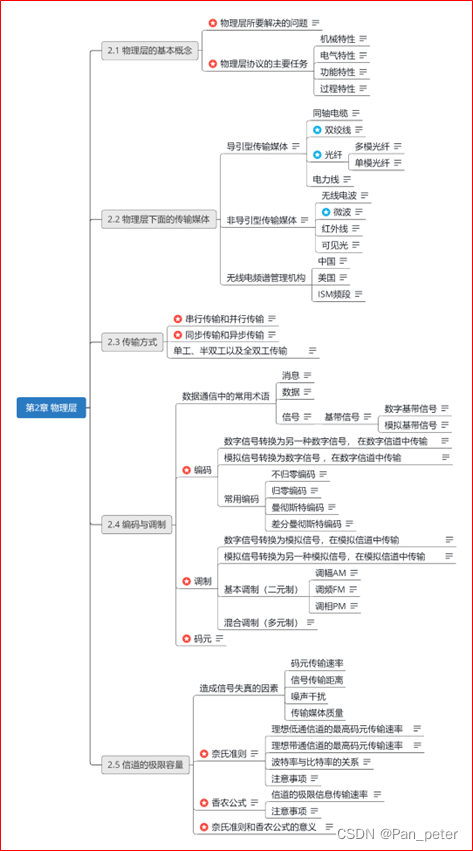
计算机网络-笔记-第二章-物理层
目录 二、第二章——物理层 1、物理层的基本概念 2、物理层下面的传输媒体 (1)光纤、同轴电缆、双绞线、电力线【导引型】 (2)无线电波、微波、红外线、可见光【非导引型】 (3)无线电【频谱的使用】 …...

前端开发中的单伪标签清除和双伪标签清除
引言 在前端开发中,我们经常会遇到一些样式上的问题,其中之一就是伪元素造成的布局问题。为了解决这个问题,我们可以使用伪标签清除技术。本篇博客将介绍单伪标签清除和双伪标签清除的概念、用法和示例代码,并详细解释它们的原理…...

云计算中的数据安全与隐私保护策略
文章目录 1. 云计算中的数据安全挑战1.1 数据泄露和数据风险1.2 多租户环境下的隔离问题 2. 隐私保护策略2.1 数据加密2.2 访问控制和身份验证 3. 应对方法与技术3.1 零知识证明(Zero-Knowledge Proofs)3.2 同态加密(Homomorphic Encryption&…...
MacOS软件安装包分享(附安装教程)
目录 一、软件简介 二、软件下载 一、软件简介 MacOS是一种由苹果公司开发的操作系统,专门用于苹果公司的计算机硬件。它被广泛用于创意和专业应用程序,如图像设计、音频和视频编辑等。以下是关于MacOS的详细介绍。 1、MacOS的历史和演变 MacOS最初于…...

【linux进程概念】
目录: 冯诺依曼体系结构操作系统进程 基本概念描述进程-PCBtask_struct-PCB的一种task_ struct内容分类组织进程查看进程 fork()函数 冯诺依曼体系结构 我们常见的计算机,如笔记本。我们不常见的计算机,如服务器,大部分都遵守冯诺…...

直击成都国际车展:远航汽车多款车型登陆车展,打造完美驾乘体验
随着市场渗透率日益高涨,新能源汽车成为今年成都国际车展的关注焦点。在本届车展上,新能源品牌占比再创新高,覆盖两个展馆,印证了当下新能源汽车市场的火爆。作为大运集团重磅打造的高端品牌,远航汽车深度洞察高端智能…...

android nv21 转 yuv420sp
上面两个函数的目标都是将NV21格式的数据转换为YUV420P格式,但是它们在处理U和V分量的方式上有所不同。 在第一个函数NV21toYUV420P_1中,U和V分量的处理方式是这样的:对于U分量,它从NV21数据的Y分量之后的每个奇数位置取数据&…...

使用Nacos与Spring Boot实现配置管理
🌷🍁 博主猫头虎 带您 Go to New World.✨🍁 🦄 博客首页——猫头虎的博客🎐 🐳《面试题大全专栏》 文章图文并茂🦕生动形象🦖简单易学!欢迎大家来踩踩~🌺 &a…...
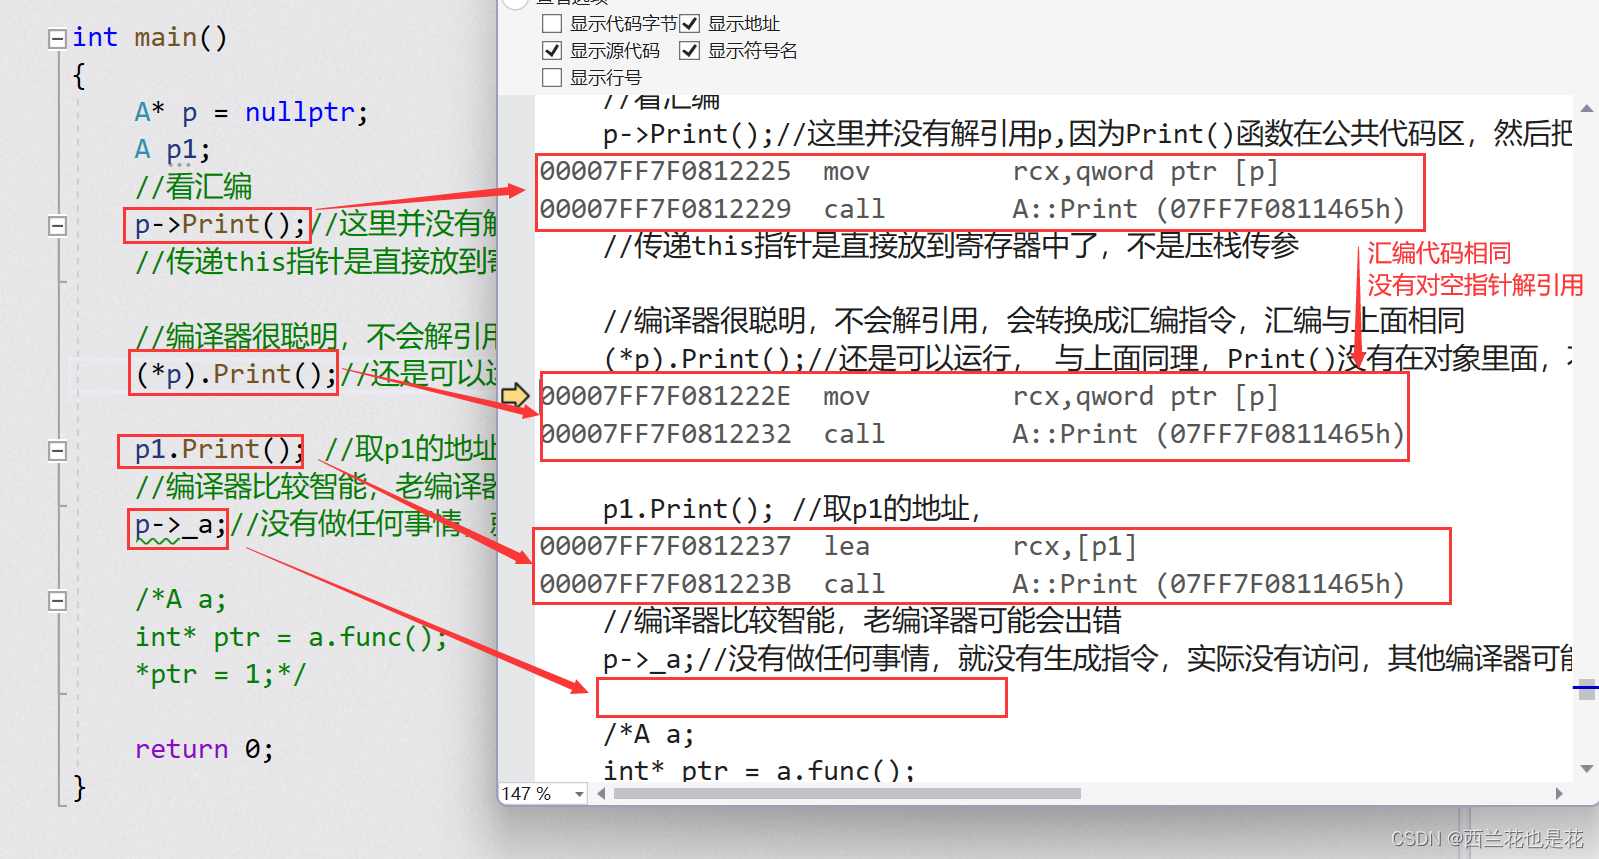
初识【类和对象】
目录 1.面向过程和面向对象初步认识 2.类的引入 3.类的定义 4.类的访问限定符及封装 5.类的作用域 6.类的实例化 7.类的对象大小的计算 8.类成员函数的this指针 1.面向过程和面向对象初步认识 C语言是面向过程的,关注的是过程,分析出求解问题的…...

Arm编译器与64位inode文件系统兼容性问题解析
1. 64位inode文件系统与Arm编译器的兼容性问题解析在嵌入式开发领域,Arm编译器工具链是构建可靠、高效嵌入式系统的核心工具。然而,当开发者使用现代网络文件系统(如NFSv3)或分布式文件系统(如Ceph、CXFS)时…...

MySQL调优实战:MySQL日志机制深入解析,redo/undo/binlog/slow/error日志底层全通透
一、MySQL五大日志总览(全局认知)MySQL 日志严格分为两层:Server层日志 InnoDB引擎层日志。这是90%人混淆的根源:1.1 Server层日志(所有引擎通用)Binlog(二进制日志):主…...

收藏!小白程序员必看:搞定RAG知识库,解锁大模型核心技能!
文章强调知识库是RAG系统的核心,其质量直接影响智能问答效果。构建知识库并非简单处理数据,而是涉及多数据源整合、复杂格式处理、数据更新与版本管理、文档召回优化及系统架构设计等关键环节。作者指出,随着数据量增长,完善的知识…...
)
Python(循环中断)
目录 1.break---终止整个循环 1.1 基本概念 1.2 基本用法示例 1.3 典型应用场景 1.4 break 与 else 的经典搭配 2. continue —— 跳过本次迭代 2.1 基本概念 2.2 基本用法示例 2.3 典型应用场景 2.4 continue与 else 3. break vs continue —— 对比总结 4. pass …...

SABIC工程塑料创新材料解决方案与发展前景分析
SABIC工程塑料凭借其卓越的耐高温性、机械强度及化学稳定性,成为高端制造领域不可或缺的创新材料解决方案。其未来发展将深度契合汽车轻量化、5G通信及新能源产业升级需求,市场前景广阔。工程塑料作为高端制造业的核心基础材料,其性能直接决定…...

Unity版本降级实战指南:从2021.1回退到2019.4的四步硬核操作
1. 为什么Unity版本降级不是“回退安装”那么简单 在Unity项目开发中,很多人把“降级”理解成卸载新版本、重装旧版本、再拖进工程——就像换手机系统时刷回上个固件。但Unity的版本管理机制远比这复杂得多。我第一次遇到从2021.1.7f1c1往回降到2019.4.17f1c1的问题…...

终极游戏模组管理指南:Nexus Mods App如何让你轻松玩转模组世界
终极游戏模组管理指南:Nexus Mods App如何让你轻松玩转模组世界 【免费下载链接】NexusMods.App Home of the development of the Nexus Mods App 项目地址: https://gitcode.com/gh_mirrors/ne/NexusMods.App 厌倦了手动安装模组时的各种冲突和兼容性问题&a…...

面试:怎么设计客服 Agent对话状态机的?
面试:怎么设计客服 Agent对话状态机的? 这个问题问得好,我结合我们当时的设计思路具体讲讲。 对话状态机的核心设计思路 客服场景的状态机和其他业务系统不太一样——它既要处理业务状态(订单走到哪一步了),又要处理对话状态(用户在哪个节点、槽位填了多少),还得处理…...

压路机远程监控运维管理平台方案
某压路机设备制造商发现传统的“卖设备售后维修”模式已难以为继。其售出的设备遍布各地工地,由于缺乏远程数据交互手段,制造商总部如同“盲人摸象”:既无法实时掌握设备在工地的具体位置和作业状态,也难以在设备出现电气故障或PL…...
亲测靠谱的AI论文平台,毕业生收藏备用)
(良心整理)亲测靠谱的AI论文平台,毕业生收藏备用
毕业季论文写起来是不是总感觉难上加难?选题纠结、资料找不全、写作卡壳、查重压力大、格式总是不对…… 这份亲测有效的AI论文工具合集,帮你一键解决写作难题,涵盖中英文写作、全流程辅助、专项功能,免费和高性价比的都有&#x…...