Code Lab - 34
GAT里面有一些地方看的不是太懂(GAT里Multi Attention的具体做法),暂时找了参考代码,留一个疑问
1. 一个通用的GNN Stack
import torch_geometric
import torch
import torch_scatter
import torch.nn as nn
import torch.nn.functional as Fimport torch_geometric.nn as pyg_nn
import torch_geometric.utils as pyg_utilsfrom torch import Tensor
from typing import Union, Tuple, Optional
from torch_geometric.typing import (OptPairTensor, Adj, Size, NoneType,OptTensor)from torch.nn import Parameter, Linear
from torch_sparse import SparseTensor, set_diag
from torch_geometric.nn.conv import MessagePassing
from torch_geometric.utils import remove_self_loops, add_self_loops, softmaxclass GNNStack(torch.nn.Module):def __init__(self, input_dim, hidden_dim, output_dim, args, emb=False):super(GNNStack, self).__init__()conv_model = self.build_conv_model(args.model_type)self.convs = nn.ModuleList()self.convs.append(conv_model(input_dim, hidden_dim))#assert(断言)  用于判断一个表达式,在表达式条件为 false 的时候触发异常assert (args.num_layers >= 1), 'Number of layers is not >=1'for l in range(args.num_layers-1):self.convs.append(conv_model(args.heads * hidden_dim, hidden_dim))# post-message-passingself.post_mp = nn.Sequential(nn.Linear(args.heads * hidden_dim, hidden_dim), nn.Dropout(args.dropout), nn.Linear(hidden_dim, output_dim))self.dropout = args.dropoutself.num_layers = args.num_layersself.emb = embdef build_conv_model(self, model_type):if model_type == 'GraphSage':return GraphSageelif model_type == 'GAT':# When applying GAT with num heads > 1, you need to modify the # input and output dimension of the conv layers (self.convs),# to ensure that the input dim of the next layer is num heads# multiplied by the output dim of the previous layer.# HINT: In case you want to play with multiheads, you need to change the for-loop that builds up self.convs to be# self.convs.append(conv_model(hidden_dim * num_heads, hidden_dim)), # and also the first nn.Linear(hidden_dim * num_heads, hidden_dim) in post-message-passing.return GATdef forward(self, data):x, edge_index, batch = data.x, data.edge_index, data.batchfor i in range(self.num_layers):x = self.convs[i](x, edge_index)x = F.relu(x)x = F.dropout(x, p=self.dropout,training=self.training)x = self.post_mp(x)if self.emb == True:return xreturn F.log_softmax(x, dim=1)def loss(self, pred, label):return F.nll_loss(pred, label)
2. 实现GraphSage和GAT
2.1 GraphSage
class GraphSage(MessagePassing):def __init__(self, in_channels, out_channels, normalize = True,bias = False, **kwargs): super(GraphSage, self).__init__(**kwargs)self.in_channels = in_channelsself.out_channels = out_channelsself.normalize = normalize# self.lin_l is the linear transformation that you apply to embedding for central node.self.lin_l=Linear(in_channels,out_channels) #Wl# self.lin_r is the linear transformation that you apply to aggregated message from neighbors.self.lin_r=Linear(in_channels,out_channels) #Wrself.reset_parameters()def reset_parameters(self):self.lin_l.reset_parameters()self.lin_r.reset_parameters()def forward(self, x, edge_index, size = None):# 调用propagation函数进行消息传递:propagate(edge_index, x=(x_i, x_j), extra=(extra_i, extra_j), size=size)# 我们将只使用邻居节点(x_j)的表示,因此默认情况下我们为中心节点和邻居节点传递与x=(x,x)相同的表示out1 = self.lin_l(x)out2 = self.propagate(edge_index,x = (x,x),size = size)out2 = self.lin_r(out2)out = out1 + out2if self.normalize:out = F.normalize(out)return out# 供propagate调用,对于所有(i,j)边,构造从邻点j到中心点i的信息# x_j表示 所有邻点的特征嵌入矩阵 def message(self, x_j):out = x_jreturn out# 聚合邻居信息def aggregate(self, inputs, index, dim_size = None):# The axis along which to index number of nodes.node_dim = self.node_dimout = torch_scatter.scatter(inputs,index,node_dim,dim_size=dim_size,reduce='mean')return out
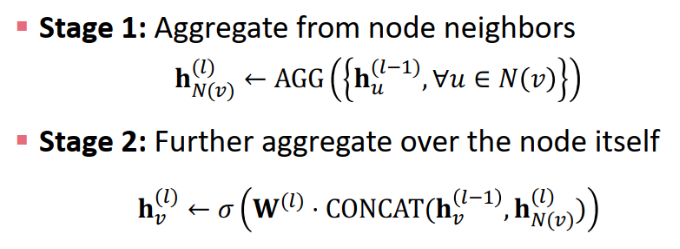
2.2 GAT
class GAT(MessagePassing):def __init__(self, in_channels, out_channels, heads = 2,negative_slope = 0.2, dropout = 0., **kwargs):super(GAT, self).__init__(node_dim=0, **kwargs)self.in_channels = in_channelsself.out_channels = out_channelsself.heads = headsself.negative_slope = negative_slopeself.dropout = dropout# self.lin_l is the linear transformation that you apply to embeddings # Pay attention to dimensions of the linear layers, since we're using multi-head attention.self.lin_l = Linear(in_channels,heads*out_channels) #W_l 这里的in_channels就是已经乘过heads的数字self.lin_r = self.lin_l #W_r# Define the attention parameters \overrightarrow{a_l/r}^T in the above intro.self.att_l = Parameter(torch.Tensor(1, heads, out_channels))self.att_r = Parameter(torch.Tensor(1, heads, out_channels))self.reset_parameters()def reset_parameters(self):nn.init.xavier_uniform_(self.lin_l.weight)nn.init.xavier_uniform_(self.lin_r.weight)nn.init.xavier_uniform_(self.att_l)nn.init.xavier_uniform_(self.att_r)def forward(self, x, edge_index, size = None):H, C = self.heads, self.out_channelsx_l = self.lin_l(x)x_r = self.lin_r(x)x_l = x_l.view(-1,H,C)x_r = x_r.view(-1,H,C)alpha_l = (x_l * self.att_l).sum(axis=1) #*是逐元素相乘(每个特征对应的所有节点一样处理?)。sum的维度是H(聚合)。alpha_r = (x_r * self.att_r).sum(axis=1)out = self.propagate(edge_index, x=(x_l, x_r), alpha=(alpha_l, alpha_r),size=size)out = out.view(-1, H * C)return outdef message(self, x_j, alpha_j, alpha_i, index, ptr, size_i):#alpha:[E, C]alpha = alpha_i + alpha_j #leakyrelu的对象alpha = F.leaky_relu(alpha,self.negative_slope)alpha = softmax(alpha, index, ptr, size_i)alpha = F.dropout(alpha, p=self.dropout, training=self.training).unsqueeze(1) #[E,1,C]out = x_j * alpha #通过计算得到的alpha来计算节点信息聚合值(得到h_i^') #[E,H,C]return outdef aggregate(self, inputs, index, dim_size = None):out = torch_scatter.scatter(inputs, index, dim=self.node_dim, dim_size=dim_size, reduce='sum')return out3. 训练
3.1 优化器
import torch.optim as optimdef build_optimizer(args, params):weight_decay = args.weight_decayfilter_fn = filter(lambda p : p.requires_grad, params)if args.opt == 'adam':optimizer = optim.Adam(filter_fn, lr=args.lr, weight_decay=weight_decay)elif args.opt == 'sgd':optimizer = optim.SGD(filter_fn, lr=args.lr, momentum=0.95, weight_decay=weight_decay)elif args.opt == 'rmsprop':optimizer = optim.RMSprop(filter_fn, lr=args.lr, weight_decay=weight_decay)elif args.opt == 'adagrad':optimizer = optim.Adagrad(filter_fn, lr=args.lr, weight_decay=weight_decay)if args.opt_scheduler == 'none':return None, optimizerelif args.opt_scheduler == 'step':scheduler = optim.lr_scheduler.StepLR(optimizer, step_size=args.opt_decay_step, gamma=args.opt_decay_rate)elif args.opt_scheduler == 'cos':scheduler = optim.lr_scheduler.CosineAnnealingLR(optimizer, T_max=args.opt_restart)return scheduler, optimizer3.2 训练
import timeimport networkx as nx
import numpy as np
import torch
import torch.optim as optim
from tqdm import trange
import pandas as pd
import copyfrom torch_geometric.datasets import TUDataset
from torch_geometric.datasets import Planetoid
from torch_geometric.data import DataLoaderimport torch_geometric.nn as pyg_nnimport matplotlib.pyplot as pltdef train(dataset, args):print("Node task. test set size:", np.sum(dataset[0]['test_mask'].numpy()))print()test_loader = loader = DataLoader(dataset, batch_size=args.batch_size, shuffle=False)# build modelmodel = GNNStack(dataset.num_node_features, args.hidden_dim, dataset.num_classes, args)scheduler, opt = build_optimizer(args, model.parameters())# trainlosses = []test_accs = []best_acc = 0best_model = Nonefor epoch in trange(args.epochs, desc="Training", unit="Epochs"):total_loss = 0model.train()for batch in loader:opt.zero_grad()pred = model(batch)label = batch.ypred = pred[batch.train_mask]label = label[batch.train_mask]loss = model.loss(pred, label)loss.backward()opt.step()total_loss += loss.item() * batch.num_graphstotal_loss /= len(loader.dataset)losses.append(total_loss)if epoch % 10 == 0:test_acc = test(test_loader, model)test_accs.append(test_acc)if test_acc > best_acc:best_acc = test_accbest_model = copy.deepcopy(model)else:test_accs.append(test_accs[-1])return test_accs, losses, best_model, best_acc, test_loaderdef test(loader, test_model, is_validation=False, save_model_preds=False, model_type=None):test_model.eval()correct = 0# Note that Cora is only one graph!for data in loader:with torch.no_grad():# max(dim=1) returns values, indices tuple; only need indicespred = test_model(data).max(dim=1)[1]label = data.ymask = data.val_mask if is_validation else data.test_mask# node classification: only evaluate on nodes in test setpred = pred[mask]label = label[mask]if save_model_preds:print ("Saving Model Predictions for Model Type", model_type)data = {}data['pred'] = pred.view(-1).cpu().detach().numpy()data['label'] = label.view(-1).cpu().detach().numpy()df = pd.DataFrame(data=data)# Save locally as csvdf.to_csv('CORA-Node-' + model_type + '.csv', sep=',', index=False)correct += pred.eq(label).sum().item()total = 0for data in loader.dataset:total += torch.sum(data.val_mask if is_validation else data.test_mask).item()return correct / totalclass objectview(object):def __init__(self, d):self.__dict__ = d
for args in [{'model_type': 'GraphSage', 'dataset': 'cora', 'num_layers': 2, 'heads': 1, 'batch_size': 32, 'hidden_dim': 32, 'dropout': 0.5, 'epochs': 500, 'opt': 'adam', 'opt_scheduler': 'none', 'opt_restart': 0, 'weight_decay': 5e-3, 'lr': 0.01},
]:args = objectview(args)for model in ['GraphSage']:args.model_type = model# Match the dimension.if model == 'GAT':args.heads = 2else:args.heads = 1if args.dataset == 'cora':dataset = Planetoid(root='/tmp/cora', name='Cora')else:raise NotImplementedError("Unknown dataset") test_accs, losses, best_model, best_acc, test_loader = train(dataset, args) print("Maximum test set accuracy: {0}".format(max(test_accs)))print("Minimum loss: {0}".format(min(losses)))# Run test for our best model to save the predictions!test(test_loader, best_model, is_validation=False, save_model_preds=True, model_type=model)print()plt.title(dataset.name)plt.plot(losses, label="training loss" + " - " + args.model_type)plt.plot(test_accs, label="test accuracy" + " - " + args.model_type)plt.legend()plt.show()相关文章:
Code Lab - 34
GAT里面有一些地方看的不是太懂(GAT里Multi Attention的具体做法),暂时找了参考代码,留一个疑问 1. 一个通用的GNN Stack import torch_geometric import torch import torch_scatter import torch.nn as nn import torch.nn.fun…...
)
后端返回文件流,前端怎么导出、下载(8种方法可实现)
在前端导出和下载后端返回的文件流时,可以使用以下几种方法: 使用window.open()方法: 在前端使用window.open()方法打开一个新的窗口或标签页,并将后端返回的文件流作为URL传递给该方法。浏览器会自动下载该文件。例如:…...

什么是 ThreadLocal?
ThreadLocal 是 Java 中的一个类,用于在多线程环境下,为每个线程提供独立的变量副本。每个线程可以通过 ThreadLocal 存储和获取数据,而不会影响其他线程的数据。这在某些情况下非常有用,特别是当多个线程需要访问共享数据,但又希望保持数据的隔离性时。 ThreadLocal 主要…...
CANOCO5.0实现冗余分析(RDA)最详细步骤
在地理及生态领域会常使用RDA分析,RDA的实现路径也有很多,今天介绍一下CANOCO软件的实现方法。 1.软件安装 时间调整到2010年 2.数据处理 得有不同的物种或者样点数值,再加上环境因子数据。 3.软件运行 4.结果解读 结果解读主要把握这几点…...

【tkinter 专栏】掷骰子游戏
文章目录 前言本章内容导图1. 需求分析2. 系统功能结构3. 设计流程4. 系统开发环境5. 系统预览6. 窗口布局7. 功能实现用户和电脑选择骰子的点数大小摇骰子过程实现判断游戏结果单击开始按钮进行游戏源代码汇总前言 本专栏将参考《Python GUI 设计 tkinter 从入门到实践》书籍…...
19 NAT穿透|python高级
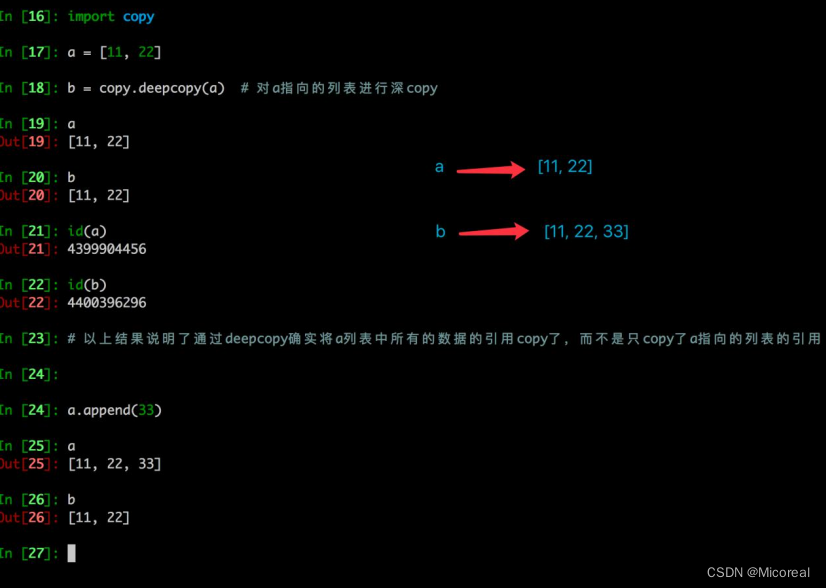
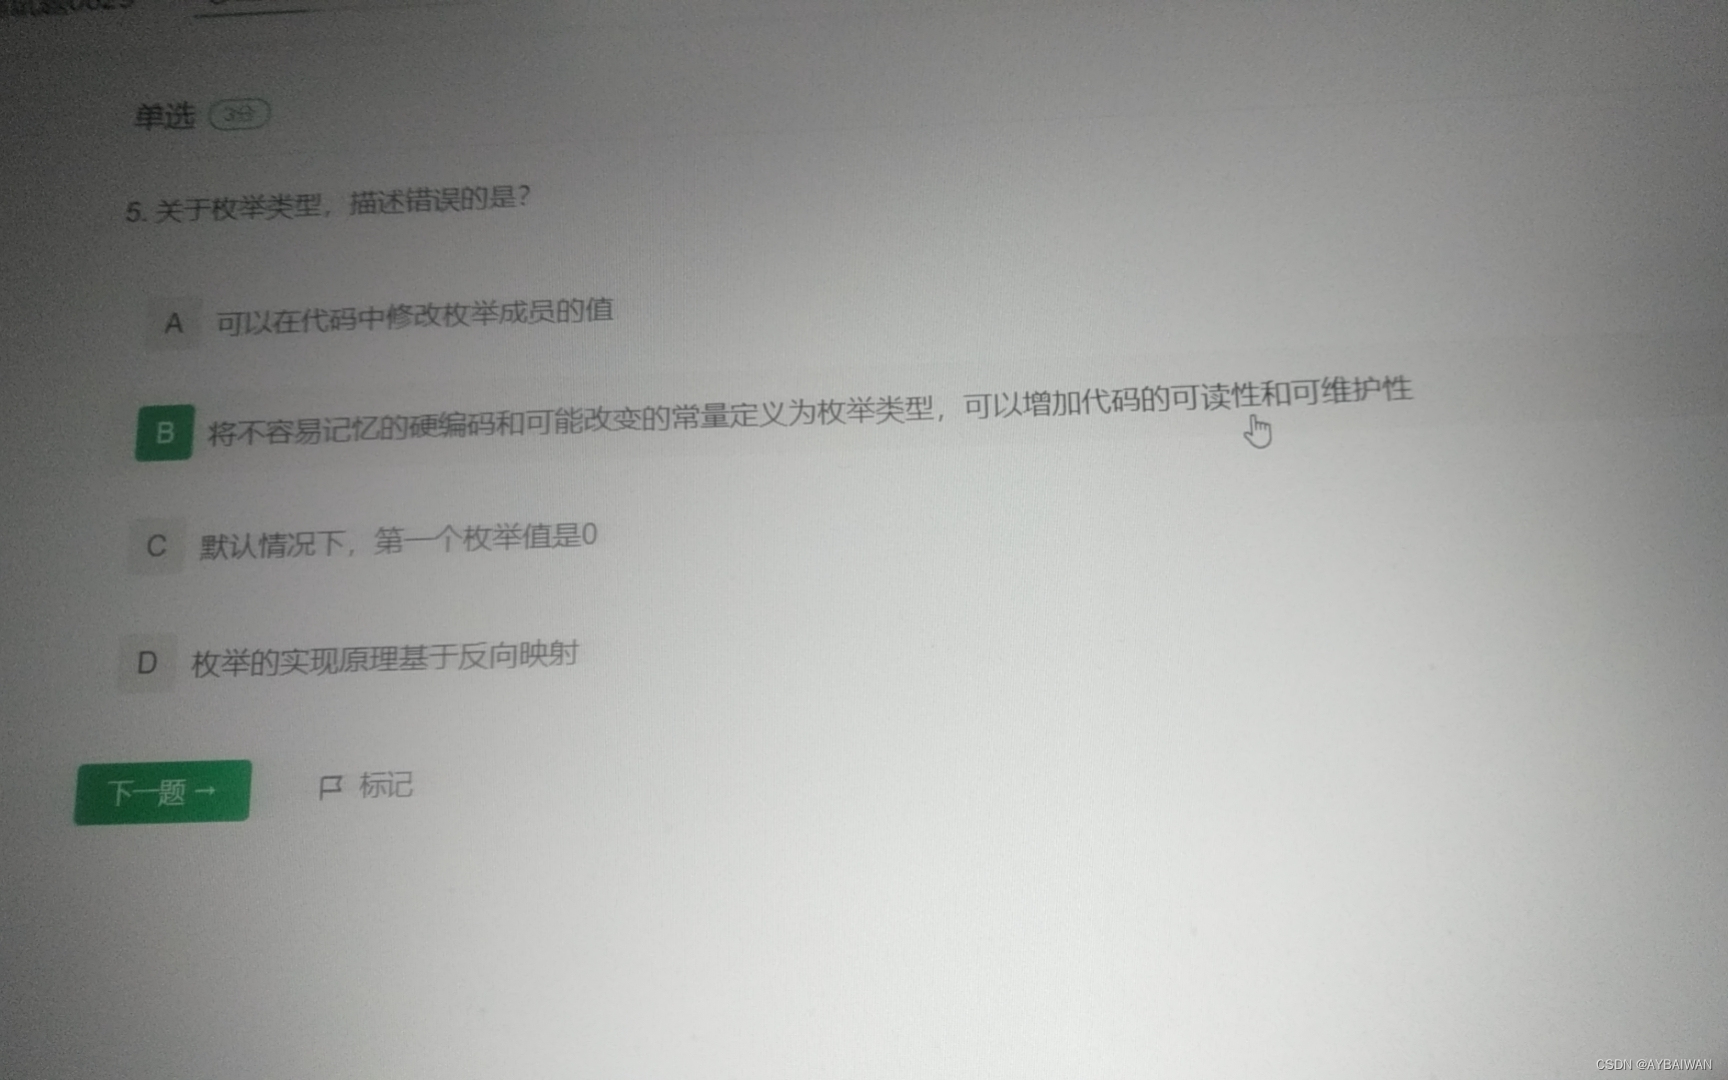
文章目录 网络通信过程NAT穿透 python高级GIL锁深拷贝与浅拷贝私有化import导入模块工厂模式多继承以及 MRO 顺序烧脑题property属性property装饰器property类属性 魔法属性\_\_doc\_\_\_\_module\_\_ 和 \_\_class\_\_\_\_init\_\_\_\_del\_\_\_\_call\_\_\_\_dict\_\_\_\_str…...
2023常见前端面试题
以下是一些2023年秋招常见的前端面试题及其答案: 1. 请解释一下什么是前端开发? 前端开发是指使用HTML、CSS和JavaScript等技术来构建网页和用户界面的过程。前端开发人员负责将设计师提供的视觉设计转化为可交互的网页,并确保网页在不同设备…...

登录校验-JWT令牌-生成和校验
目录 JWT-生成 具体代码 运行结果如下 JWT-校验 具体代码 运行结果如下 小结 JWT-生成 具体代码 /*** 测试JWT令牌的生成*/Testpublic void TestJWT() {// 设置自定义内容Map<String, Object> claims new HashMap<>();claims.put("id", 1);claims…...
GIT 常用指令
基础指令 $ git init #初始化仓库,在该文件夹创建的为workspace$ git add . #已暂存 [.通配符,全部添加]$ git commit -m "log add file" #提交到仓库,并写了日志 ”log add file“$ git status #查看状态,可查看被修改的文件…...
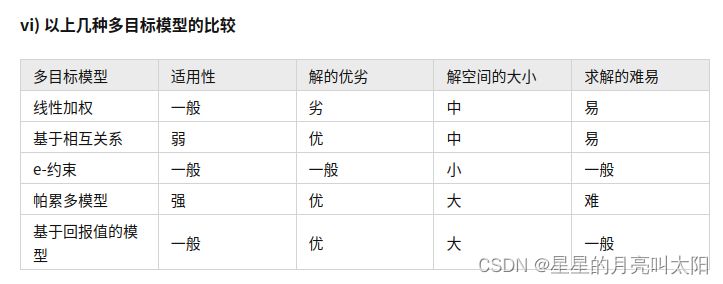
多目标优化
https://zhuanlan.zhihu.com/p/158705342 概念 单目标优化只有一个优化目标,所以可以比较其好坏。 但是多目标优化,在需要优化多个目标时,容易存在目标之间的冲突,一个目标的优化是以其他目标劣化为代价的,所以我们要…...

odoo的优势
plus,主要是为了能尽早通过开发者审核,加入到chatgpt4 api的开发中去,接入到我们odoo aiCenter中。4的回答,明显比3.5的更聪明了。 可能是由于国内的特殊情况吧,我们的chatgpt模块很受欢迎,我也被问了不少…...

Spring Boot(Vue3+ElementPlus+Axios+MyBatisPlus+Spring Boot 前后端分离)【三】
😀前言 本篇博文是关于Spring Boot(Vue3ElementPlusAxiosMyBatisPlusSpring Boot 前后端分离)【三】的分享,希望你能够喜欢 🏠个人主页:晨犀主页 🧑个人简介:大家好,我是晨犀,希望我…...
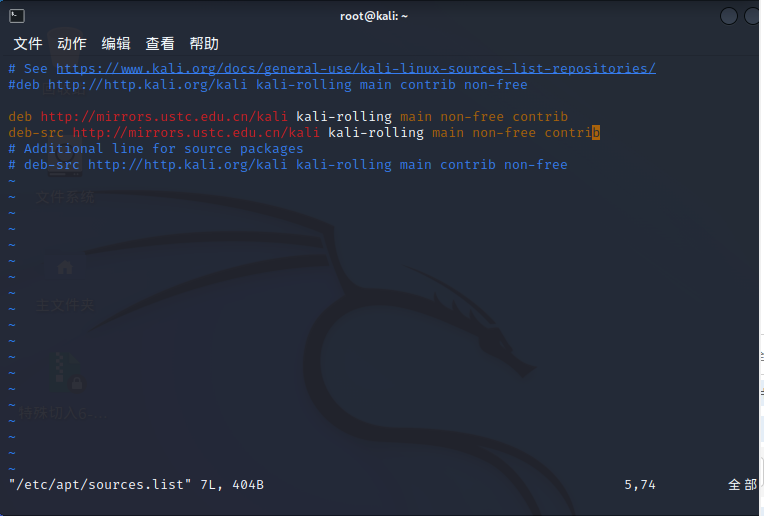
Kali 软件管理
kali 更新 1. 查看发行版本 ┌──(root㉿kali)-[~] └─# lsb_release -a No LSB modules are available. Distributor ID: Kali Description: Kali GNU/Linux Rolling Release: 2023.2 Codename: kali-rolling2. 查看内核版本 ┌──(root㉿kali)-[~] └─…...
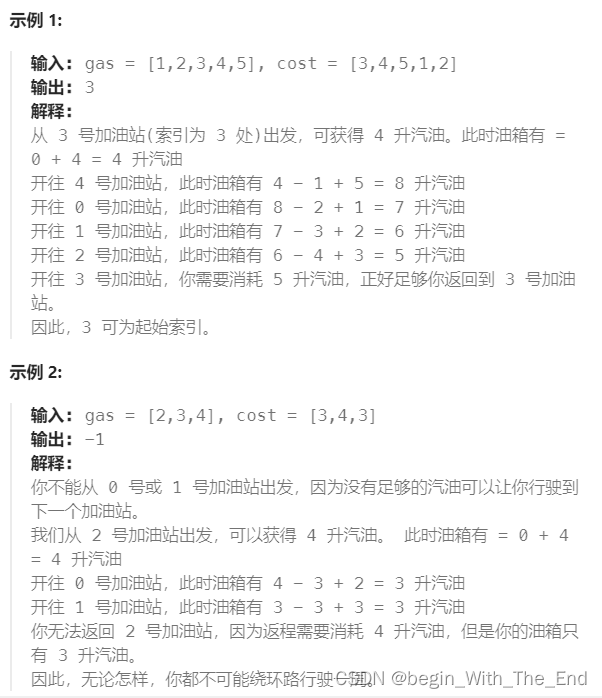
加油站【贪心算法】
加油站 在一条环路上有 n 个加油站,其中第 i 个加油站有汽油 gas[i] 升。 你有一辆油箱容量无限的的汽车,从第 i 个加油站开往第 i1 个加油站需要消耗汽油 cost[i] 升。你从其中的一个加油站出发,开始时油箱为空。 给定两个整数数组 gas 和…...
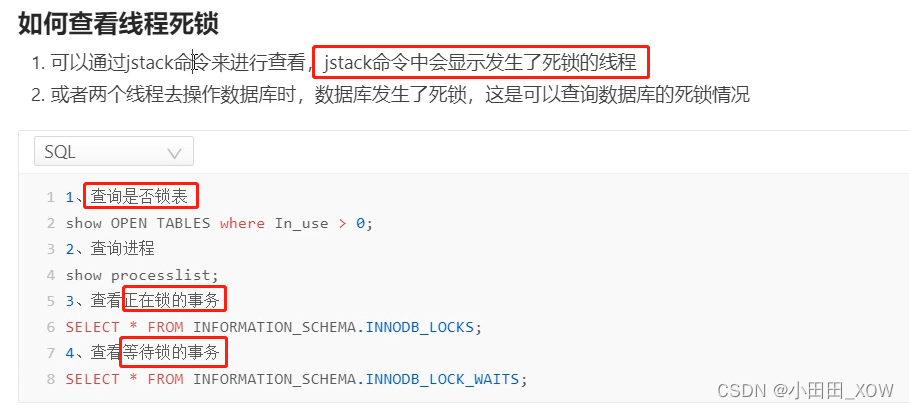
java八股文面试[多线程]——死锁、活锁、饥饿
DCL双重锁:TODO 如何预防死锁: 如何查看线程死锁: 知识来源: 【2023年面试】描述一下线程安全活跃态问题,以及竞态条件_哔哩哔哩_bilibili 【2023年面试】如何预防死锁_哔哩哔哩_bilibili 【并发与线程】阿里一面&…...
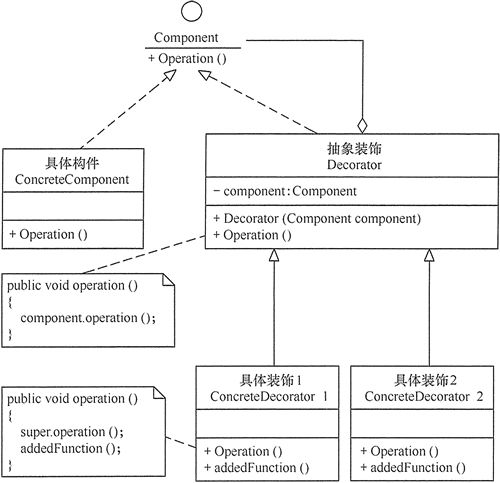
设计模式——装饰器模式
装饰器模式 装饰器模式(Decorator Pattern)允许向一个现有的对象添加新的功能,同时又不改变其结构。这种类型的设计模式属于结构型模式,它是作为现有的类的一个包装。 装饰器模式通过将对象包装在装饰器类中,以便动态…...

①matlab的命令掌握
目录 输入命令 命名变量 保存和加载变量 使用内置的函数和常量 输入命令 1.您可以通过在命令行窗口中 MATLAB 提示符 (>>) 后输入命令 任务 使用命令 3*5 将数值 3 和 5 相乘。 答案 3*5 2.除非另有指定,否则 MATLAB 会将计算结果存储在一个名为 ans…...
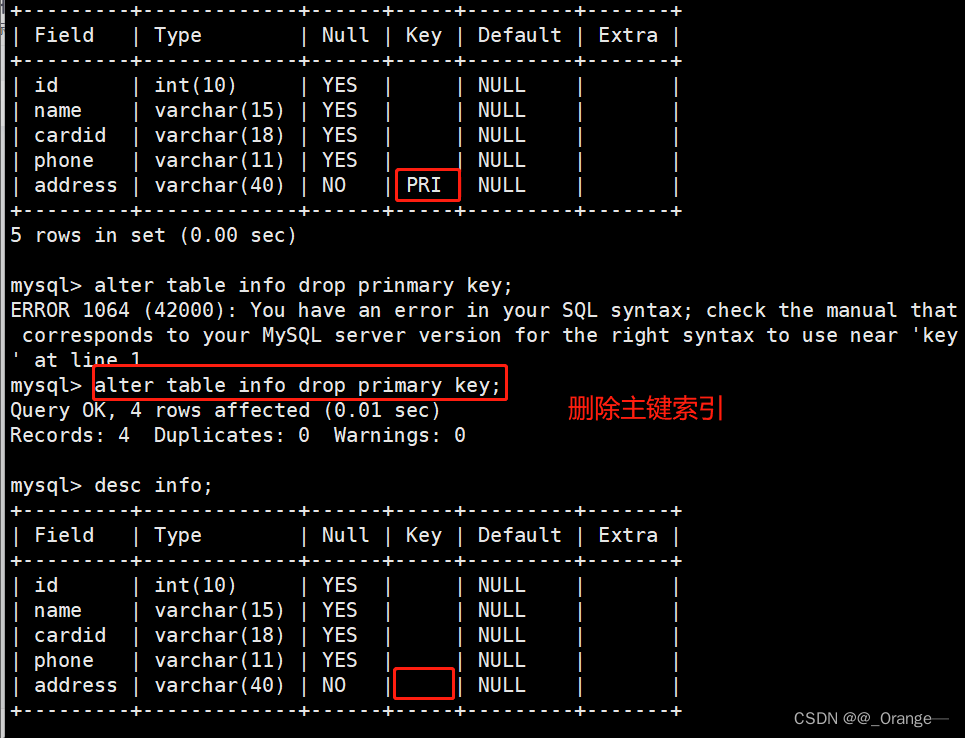
MySQL----索引
一、索引的概念 索引是一个排序的列表,在这个列表中存储着索引的值和包含这个值的数据所在行的物理地址(类似于c语言的链表通过指针指向数据记录的内存地址)。使用索引后可以不用扫描全表来定位某行的数据,而是先通过索引表找到该…...
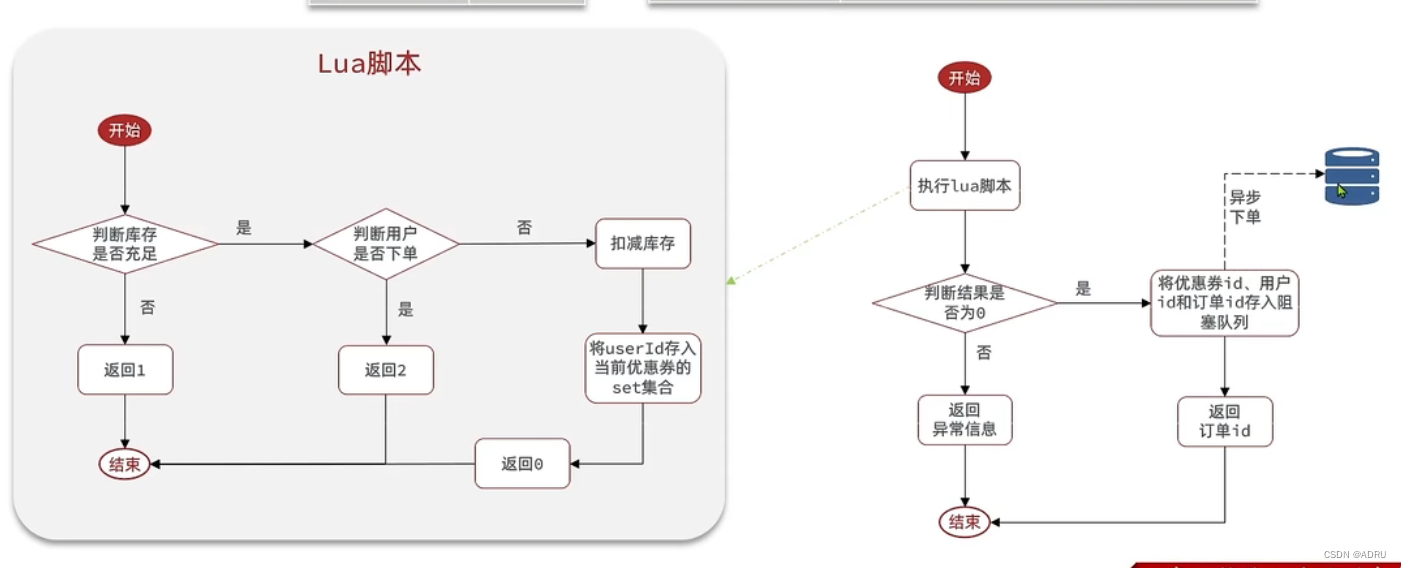
秒杀系统的业务流程以及优化方案(实现异步秒杀)
先看基本的业务流程 那么我们可以看到整个流程都是一个线程来完成的,这样的话耗时还是很长的,那么可不可以采用多线程去实现呢? 首先我们要思考怎么对业务进行拆分,可以想象一个我们去饭店点餐,会有前台接待ÿ…...
Java实现根据商品ID获取1688商品详情跨境属性数据,1688商品重量数据接口,1688API接口封装方法
要通过1688的API获取商品详情跨境属性数据,您可以使用1688开放平台提供的接口来实现。以下是一种使用Java编程语言实现的示例,展示如何通过1688开放平台API获取商品详情属性数据接口: 首先,确保您已注册成为1688开放平台的开发者…...

为什么你需要ZeroOmega:重新定义浏览器代理管理的新范式
为什么你需要ZeroOmega:重新定义浏览器代理管理的新范式 【免费下载链接】ZeroOmega Manage and switch between multiple proxies quickly & easily. 项目地址: https://gitcode.com/gh_mirrors/ze/ZeroOmega 在现代网络环境中,频繁切换代理…...

RustRedOps COM组件操作指南:从IActiveScript到IShellDispatch的完整示例
RustRedOps COM组件操作指南:从IActiveScript到IShellDispatch的完整示例 【免费下载链接】RustRedOps RustRedOps is a repository for advanced Red Team techniques focused on Rust 项目地址: https://gitcode.com/gh_mirrors/ru/RustRedOps RustRedOps是…...

城市综合管廊远程监控与智慧运维系统方案
某新区城市建设综合管廊,涵盖电力、燃气、供排水、通信等多种生命线,部署有风机、排水泵、电动阀门、气体传感器、温湿度传感器、液位传感器等设备,核心控制器为西门子PLC(S7协议),负责采集管廊内气体浓度、…...

macOS Homebrew 安装 MySQL
一、安装 MySQL1. 安装完整版 MySQL(服务端全套客户端)# 安装最新版 MySQL brew install mysql说明:brew install mysql 包含服务端 mysqld 命令行客户端 mysql自带工具:mysql、mysqldump、mysqladmin、mysqlshow 等常用运维工具…...

大模型应用
RAG 入门项目:项目简介:RAG(检索增强生成)核心分为离线处理与在线处理两条主线:离线处理:持续向私有向量知识库补充私有知识文档,可纳入模型训练截止后的最新资料,为模型提供参考依据…...

程序员会被产品经理替代吗?——当AI让“全栈”成为常态,我们的价值在哪里?
程序员会被产品经理替代吗?——当AI让“全栈”成为常态,我们的价值在哪里? 最近,V2EX上一个帖子引发了激烈讨论:随着AI能力的指数级增长,一个人就能完成从前需要整个团队才能做到的全栈开发。如果产品经理借…...

通过Taotoken聚合调用,在不同时段测试模型响应速度的观察
🚀 告别海外账号与网络限制!稳定直连全球优质大模型,限时半价接入中。 👉 点击领取海量免费额度 通过Taotoken聚合调用,在不同时段测试模型响应速度的观察 在构建依赖大模型能力的应用时,响应速度是一个直…...

从登录页到仪表盘:手把手教你为Vue2+Element后台管理系统添加中英文切换
从登录页到仪表盘:Vue2Element后台管理系统国际化实战指南 当产品经理突然要求为已有后台管理系统添加多语言支持时,许多开发者会陷入手忙脚乱的境地。本文将分享一套经过实战检验的国际化方案,不仅能快速实现基础功能,还能解决那…...

如何快速掌握NarratoAI:AI视频解说自动化的完整教程
如何快速掌握NarratoAI:AI视频解说自动化的完整教程 【免费下载链接】NarratoAI 利用AI大模型,一键解说并剪辑视频; Using AI models to automatically provide commentary and edit videos with a single click. 项目地址: https://gitcod…...
)
Midjourney色调分离终极手册(仅限Pro用户内部流通的17个未公开--no--参数组合)
更多请点击: https://codechina.net 第一章:Midjourney色调分离的核心原理与视觉语义边界 色调分离(Tonal Separation)在 Midjourney 并非原生参数,而是通过提示词工程、风格化权重控制与隐式潜在空间引导协同实现的视…...