yolov5和yolov7部署的研究
1.结论
onnx推理比torch快3倍, openvino比onnx快一丢丢。
| |](https://img-blog.csdnimg.cn/c9cd3b7ba3314772b927026c92e2bf3f.png)
yolov7.pt  转 onnx
python export.py --weights best_31.pt  --grid --end2end --simplify --topk-all 10 --iou-thres 0.65 --conf-thres 0.65  --img-size 320 320  --max-wh 200
可以看到yolov7的 onnx是包括nms的
2.onnx推理
# encoding=utf-8
import cv2
cuda = False
w = "best_31.onnx"
img = cv2.imread('3.png')import cv2
import time
import requests
import random
import numpy as np
import onnxruntime as ort
from PIL import Image
from pathlib import Path
from collections import OrderedDict,namedtupleproviders = ['CUDAExecutionProvider', 'CPUExecutionProvider'] if cuda else ['CPUExecutionProvider']
session = ort.InferenceSession(w, providers=providers)def letterbox(im, new_shape=(320, 320), color=(114, 114, 114), auto=True, scaleup=True, stride=32):# Resize and pad image while meeting stride-multiple constraintsshape = im.shape[:2]  # current shape [height, width]if isinstance(new_shape, int):new_shape = (new_shape, new_shape)# Scale ratio (new / old)r = min(new_shape[0] / shape[0], new_shape[1] / shape[1])if not scaleup:  # only scale down, do not scale up (for better val mAP)r = min(r, 1.0)# Compute paddingnew_unpad = int(round(shape[1] * r)), int(round(shape[0] * r))dw, dh = new_shape[1] - new_unpad[0], new_shape[0] - new_unpad[1]  # wh paddingif auto:  # minimum rectangledw, dh = np.mod(dw, stride), np.mod(dh, stride)  # wh paddingdw /= 2  # divide padding into 2 sidesdh /= 2if shape[::-1] != new_unpad:  # resizeim = cv2.resize(im, new_unpad, interpolation=cv2.INTER_LINEAR)top, bottom = int(round(dh - 0.1)), int(round(dh + 0.1))left, right = int(round(dw - 0.1)), int(round(dw + 0.1))im = cv2.copyMakeBorder(im, top, bottom, left, right, cv2.BORDER_CONSTANT, value=color)  # add borderreturn im, r, (dw, dh)names = ['box', 'box1']
colors = {name:[random.randint(0, 255) for _ in range(3)] for i,name in enumerate(names)}
t1=time.time()
img = cv2.cvtColor(img, cv2.COLOR_BGR2RGB)image = img.copy()
image, ratio, dwdh = letterbox(image, auto=False)
image = image.transpose((2, 0, 1))
image = np.expand_dims(image, 0)
image = np.ascontiguousarray(image)im = image.astype(np.float32)
im /= 255outname = [i.name for i in session.get_outputs()]inname = [i.name for i in session.get_inputs()]inp = {inname[0]:im}outputs = session.run(outname, inp)[0]ori_images = [img.copy()]for i,(batch_id,x0,y0,x1,y1,cls_id,score) in enumerate(outputs):image = ori_images[int(batch_id)]box = np.array([x0,y0,x1,y1])box -= np.array(dwdh*2)box /= ratiobox = box.round().astype(np.int32).tolist()cls_id = int(cls_id)score = round(float(score),3)name = names[cls_id]color = colors[name]name += ' '+str(score)cv2.rectangle(image,box[:2],box[2:],color,2)cv2.putText(image,name,(box[0], box[1] - 2),cv2.FONT_HERSHEY_SIMPLEX,0.75,[225, 255, 255],thickness=2)
print(time.time()-t1)
cv2.imshow('img',image)
cv2.waitKey(0)
你去看export.py会发现好像他没加上nms ,其实他是在end2end的时候加进去的
class End2End(nn.Module):'''export onnx or tensorrt model with NMS operation.'''def __init__(self, model, max_obj=100, iou_thres=0.45, score_thres=0.25, max_wh=None, device=None):super().__init__()device = device if device else torch.device('cpu')assert isinstance(max_wh,(int)) or max_wh is Noneself.model = model.to(device)self.model.model[-1].end2end = Trueself.patch_model = ONNX_TRT if max_wh is None else ONNX_ORTself.end2end = self.patch_model(max_obj, iou_thres, score_thres, max_wh, device)self.end2end.eval()def forward(self, x):x = self.model(x)x = self.end2end(x)return x
其中报错找不到onnxsim
需要安装 pip install onnxsim
这个是把模型缩小的
3. openvino安装报错
安装的连接
https://docs.openvino.ai/2023.0/openvino_docs_install_guides_overview.html?ENVIRONMENT=DEV_TOOLS&OP_SYSTEM=WINDOWS&VERSION=v_2023_0_1&DISTRIBUTION=PIP
我们安装后报错
!!!!!DLL load failed while importing _pyopenvino
解决方法:
1.https://github.com/openvinotoolkit/openvino/issues/18151
他告诉我们要去pypi上看文档
https://pypi.org/project/openvino/
文档上说要安装MSVC runtime 还给了下载连接
https://aka.ms/vs/17/release/vc_redist.x64.exe
我安装了并重启电脑不行
- https://github.com/openvinotoolkit/openvino/issues/15403
他告诉我们要把 openvino的lib路径加在电脑的环境变量
Add the path \envs<your env
name>\Lib\site-packages\openvino\libs into your enviroment path.Reboot your terminal, and everything is ok…
3.重启电脑
4.openvino推理
这个代码是openvino提供的,不过他们把pt转onnx的时候没有加上nms。所以在代码里他们又加上的nms。这里我给去掉了。
4.1 onnx 转 openvino
# encoding=utf-8
from openvino.tools import mo
from openvino.runtime import serializemodel = mo.convert_model('best_tiny.onnx')
# serialize model for saving IR
serialize(model, 'best_tiny.xml')
4.2 openvino推理包括nms
# encoding=utf-8
import timeimport numpy as np
import torch
from PIL import Image
from utils.datasets import letterbox
from utils.plots import plot_one_boxdef preprocess_image(img0: np.ndarray):"""Preprocess image according to YOLOv7 input requirements.Takes image in np.array format, resizes it to specific size using letterbox resize, converts color space from BGR (default in OpenCV) to RGB and changes data layout from HWC to CHW.Parameters:img0 (np.ndarray): image for preprocessingReturns:img (np.ndarray): image after preprocessingimg0 (np.ndarray): original image"""# resizeimg = letterbox(img0,new_shape=(320,320), auto=False)[0]# Convertimg = img.transpose(2, 0, 1)img = np.ascontiguousarray(img)return img, img0def prepare_input_tensor(image: np.ndarray):"""Converts preprocessed image to tensor format according to YOLOv7 input requirements.Takes image in np.array format with unit8 data in [0, 255] range and converts it to torch.Tensor object with float data in [0, 1] rangeParameters:image (np.ndarray): image for conversion to tensorReturns:input_tensor (torch.Tensor): float tensor ready to use for YOLOv7 inference"""input_tensor = image.astype(np.float32)  # uint8 to fp16/32input_tensor /= 255.0  # 0 - 255 to 0.0 - 1.0if input_tensor.ndim == 3:input_tensor = np.expand_dims(input_tensor, 0)return input_tensor# label names for visualization
NAMES = ['box', 'box1']# colors for visualization
COLORS = {name: [np.random.randint(0, 255) for _ in range(3)]for i, name in enumerate(NAMES)}from typing import List, Tuple, Dict
from utils.general import scale_coords, non_max_suppression
from openvino.runtime import Modeldef detect(model: Model, image_path, conf_thres: float = 0.25, iou_thres: float = 0.45, classes: List[int] = None, agnostic_nms: bool = False):"""OpenVINO YOLOv7 model inference function. Reads image, preprocess it, runs model inference and postprocess results using NMS.Parameters:model (Model): OpenVINO compiled model.image_path (Path): input image path.conf_thres (float, *optional*, 0.25): minimal accpeted confidence for object filteringiou_thres (float, *optional*, 0.45): minimal overlap score for remloving objects duplicates in NMSclasses (List[int], *optional*, None): labels for prediction filtering, if not provided all predicted labels will be usedagnostic_nms (bool, *optiona*, False): apply class agnostinc NMS approach or notReturns:pred (List): list of detections with (n,6) shape, where n - number of detected boxes in format [x1, y1, x2, y2, score, label]orig_img (np.ndarray): image before preprocessing, can be used for results visualizationinpjut_shape (Tuple[int]): shape of model input tensor, can be used for output rescaling"""output_blob = model.output(0)img = np.array(Image.open(image_path))preprocessed_img, orig_img = preprocess_image(img)input_tensor = prepare_input_tensor(preprocessed_img)t1 = time.time()predictions = torch.from_numpy(model(input_tensor)[output_blob])t2=time.time() - t1# predictions = predictions.unsqueeze(0)#pred = non_max_suppression(predictions, conf_thres, iou_thres, classes=classes, agnostic=agnostic_nms)return predictions, orig_img, input_tensor.shape,t2def draw_boxes(predictions: np.ndarray, input_shape: Tuple[int], image: np.ndarray, names: List[str], colors: Dict[str, int]):"""Utility function for drawing predicted bounding boxes on imageParameters:predictions (np.ndarray): list of detections with (n,6) shape, where n - number of detected boxes in format [x1, y1, x2, y2, score, label]image (np.ndarray): image for boxes visualizationnames (List[str]): list of names for each class in datasetcolors (Dict[str, int]): mapping between class name and drawing colorReturns:image (np.ndarray): box visualization result"""if not len(predictions):return image# Rescale boxes from input size to original image sizepredictions[:, 1:5] = scale_coords(input_shape[2:], predictions[:, 1:5], image.shape).round()# Write resultsfor index,x1,y1,x2,y2, cls, conf in predictions:label = f'{names[int(cls)]} {conf:.2f}'plot_one_box([x1,y1,x2,y2], image, label=label, color=colors[names[int(cls)]], line_thickness=1)return imagefrom openvino.runtime import Core
core = Core()
# read converted model
model = core.read_model('best_tiny.xml')
# load model on CPU device
compiled_model = core.compile_model(model, 'CPU')
t2=0
for i in  range(100):boxes, image, input_shape,t = detect(compiled_model, '3.png')t2+=t
print(t2/100)
# image_with_boxes = draw_boxes(boxes, input_shape, image, NAMES, COLORS)
# # visualize results
# import cv2
# cv2.imshow('img',image_with_boxes)
# cv2.waitKey(0)
5.yolov5 在转onnx的时候加上nms
修改yolov5的 export.py 中代码如下
import torch.nn as nn
import random
class ORT_NMS(torch.autograd.Function):'''ONNX-Runtime NMS operation'''@staticmethoddef forward(ctx,boxes,scores,max_output_boxes_per_class=torch.tensor([100]),iou_threshold=torch.tensor([0.45]),score_threshold=torch.tensor([0.25])):device = boxes.devicebatch = scores.shape[0]num_det = random.randint(0, 100)batches = torch.randint(0, batch, (num_det,)).sort()[0].to(device)idxs = torch.arange(100, 100 + num_det).to(device)zeros = torch.zeros((num_det,), dtype=torch.int64).to(device)selected_indices = torch.cat([batches[None], zeros[None], idxs[None]], 0).T.contiguous()selected_indices = selected_indices.to(torch.int64)return selected_indices@staticmethoddef symbolic(g, boxes, scores, max_output_boxes_per_class, iou_threshold, score_threshold):return g.op("NonMaxSuppression", boxes, scores, max_output_boxes_per_class, iou_threshold, score_threshold)
class ONNX_ORT(nn.Module):'''onnx module with ONNX-Runtime NMS operation.'''def __init__(self, max_obj=100, iou_thres=0.45, score_thres=0.25, max_wh=640, device=None):super().__init__()self.device = device if device else torch.device("cpu")self.max_obj = torch.tensor([max_obj]).to(device)self.iou_threshold = torch.tensor([iou_thres]).to(device)self.score_threshold = torch.tensor([score_thres]).to(device)self.max_wh = max_wh # if max_wh != 0 : non-agnostic else : agnosticself.convert_matrix = torch.tensor([[1, 0, 1, 0], [0, 1, 0, 1], [-0.5, 0, 0.5, 0], [0, -0.5, 0, 0.5]],dtype=torch.float32,device=self.device)def forward(self, x):boxes = x[:, :, :4]conf = x[:, :, 4:5]scores = x[:, :, 5:]scores *= confboxes @= self.convert_matrixmax_score, category_id = scores.max(2, keepdim=True)dis = category_id.float() * self.max_whnmsbox = boxes + dismax_score_tp = max_score.transpose(1, 2).contiguous()selected_indices = ORT_NMS.apply(nmsbox, max_score_tp, self.max_obj, self.iou_threshold, self.score_threshold)X, Y = selected_indices[:, 0], selected_indices[:, 2]selected_boxes = boxes[X, Y, :]selected_categories = category_id[X, Y, :].float()selected_scores = max_score[X, Y, :]X = X.unsqueeze(1).float()return torch.cat([X, selected_boxes, selected_categories, selected_scores], 1)class End2End(nn.Module):'''export onnx or tensorrt model with NMS operation.'''def __init__(self, model, max_obj=100, iou_thres=0.45, score_thres=0.25, max_wh=None, device=None):super().__init__()device = device if device else torch.device('cpu')assert isinstance(max_wh,(int)) or max_wh is Noneself.model = model.to(device)# self.model.model[-1].export = Trueself.patch_model = ONNX_ORTself.end2end = self.patch_model(max_obj, iou_thres, score_thres, max_wh, device)self.end2end.eval()def forward(self, x):x = self.model(x)x = self.end2end(x)return x
@try_export
def export_onnx(model, im, file, opset, dynamic, simplify, prefix=colorstr('ONNX:')):# YOLOv5 ONNX exportcheck_requirements('onnx>=1.12.0')import onnxLOGGER.info(f'\n{prefix} starting export with onnx {onnx.__version__}...')f = opt.weights.replace('.pt', '.onnx')  # filenameoutput_names = ['output0', 'output1'] if isinstance(model, SegmentationModel) else ['output0']if dynamic:dynamic = {'images': {0: 'batch', 2: 'height', 3: 'width'}}  # shape(1,3,640,640)if isinstance(model, SegmentationModel):dynamic['output0'] = {0: 'batch', 1: 'anchors'}  # shape(1,25200,85)dynamic['output1'] = {0: 'batch', 2: 'mask_height', 3: 'mask_width'}  # shape(1,32,160,160)elif isinstance(model, DetectionModel):dynamic['output0'] = {0: 'batch', 1: 'anchors'}  # shape(1,25200,85)model = End2End(model, opt.topk_all, opt.iou_thres, opt.conf_thres, 200, torch.device('cpu'))output_names = ['output']torch.onnx.export(model, im, f, verbose=False, opset_version=12, input_names=['images'],output_names=output_names,dynamic_axes=None)# Checksmodel_onnx = onnx.load(f)  # load onnx modelonnx.checker.check_model(model_onnx)  # check onnx model# # Metadata# d = {'stride': int(max(model.stride)), 'names': model.names}# for k, v in d.items():#     meta = model_onnx.metadata_props.add()#     meta.key, meta.value = k, str(v)# onnx.save(model_onnx, f)# Simplifyif simplify:try:# cuda = torch.cuda.is_available()# check_requirements(('onnxruntime-gpu' if cuda else 'onnxruntime', 'onnx-simplifier>=0.4.1'))import onnxsimLOGGER.info(f'{prefix} simplifying with onnx-simplifier {onnxsim.__version__}...')model_onnx, check = onnxsim.simplify(model_onnx)assert check, 'assert check failed'onnx.save(model_onnx, f)except Exception as e:LOGGER.info(f'{prefix} simplifier failure: {e}')return f, model_onnx
6. v5 v7 推理
def letterbox(img: Optional[np.arange],new_shape: List = (320, 320),color=(114, 114, 114),
) -> None:"""Resize and pad image while meeting stride-multiple constraintsArgs:img (_type_): _description_new_shape (tuple, optional): _description_. Defaults to (256, 256).color (tuple, optional): _description_. Defaults to (114, 114, 114).Returns:_type_: _description_"""shape = img.shape[:2]  # current shape [height, width]if isinstance(new_shape, int):new_shape = (new_shape, new_shape)# Scale ratio (new / old)r = min(new_shape[0] / shape[0], new_shape[1] / shape[1])# Compute paddingnew_unpad = int(round(shape[1] * r)), int(round(shape[0] * r))dw, dh = new_shape[1] - new_unpad[0], new_shape[0] - new_unpad[1]  # wh paddingdw /= 2  # divide padding into 2 sidesdh /= 2if shape[::-1] != new_unpad:  # resizeimg = cv2.resize(img, new_unpad, interpolation=cv2.INTER_LINEAR)top, bottom = int(round(dh - 0.1)), int(round(dh + 0.1))left, right = int(round(dw - 0.1)), int(round(dw + 0.1))img = cv2.copyMakeBorder(img, top, bottom, left, right, cv2.BORDER_CONSTANT, value=color)  # add borderreturn img, r, (dw, dh)class Model:def __init__(self, model_path: str, cuda: bool) -> None:"""Load modelArgs:model_path (str): _description_cuda (str): _description_"""providers = ['CUDAExecutionProvider', 'CPUExecutionProvider'] if cuda else ['CPUExecutionProvider']self.session = ort.InferenceSession(model_path, providers=providers)def detect(self,img: Optional[np.array],shape: List[int] = None,) -> Optional[np.array]:"""检测Args:img (Optional[np.array]): 图片conf_threshold (str, optional): 置信度. Defaults to 0.25.shape (List[int], optional): 图片大小. Defaults to None.Returns:Optional[np.array]: 一个大的box和2个小的box为一组"""img = cv2.cvtColor(img, cv2.COLOR_BGR2RGB)image = img.copy()if shape is None:shape = [320, 320]# 图片缩放image, ratio, dwdh = letterbox(image, shape)# Convert# img=np.repeat(img[:, :, np.newaxis], 3, axis=2)image = image.transpose((2, 0, 1))  #  3x416x416image = np.expand_dims(image, 0)image = np.ascontiguousarray(image)im = image.astype(np.float32)im /= 255outname = ['output']inp = {'images': im}outputs = self.session.run(outname, inp)[0]return outputsif __name__ == "__main__":model = Model(model_path="weights/yolov5n.onnx", cuda=False)import osnames = ['box', 'box1']colors = {name: [random.randint(0, 255) for _ in range(3)] for i, name in enumerate(names)}for name in os.listdir("img"):img = cv2.imread(os.path.join("img", name))result = model.detect(img, shape=[320, 320])for datas in result:boxs = []  for data in datas:box = data[:4].round().astype(np.int32).tolist()cls_id = int(data[4])score = round(float(data[5]), 3)name = names[cls_id]color = colors[name]name += ' ' + str(score)cv2.rectangle(img, box[:2], box[2:], color, 2)cv2.putText(img, name, (box[0], box[1] - 2), cv2.FONT_HERSHEY_SIMPLEX, 0.75, [225, 255, 255],thickness=2)cv2.imshow("Lines", img)cv2.waitKey(0)
相关文章:
yolov5和yolov7部署的研究
1.结论 onnx推理比torch快3倍, openvino比onnx快一丢丢。 | yolov7.pt 转 onnx python export.py --weights best_31.pt --grid --end2end --simplify --topk-all 10 --iou-thres 0.65 --conf-thres 0.65 --img-size 320 320 --max-wh 200可以看到yolov7的 onnx是包括nms…...
【JavaEE进阶】拦截器与统一功能处理
文章目录 一. 用户登录权限效验1. 最初用户登录验证2. Spring AOP 用户统一登录的验证3. Spring拦截器3.1 自定义拦截器3.2 将自定义拦截器设置到当前的项目中 4. 拦截器实现的原理 二. 统一的异常处理1. 统一的异常处理优点2. 统一的异常处理实现 三. 统一数据返回格式1. 统一…...
2023年智慧政务一网通办云平台顶层设计与建设方案PPT
导读:原文《2023年智慧政务一网通办云平台顶层设计与建设方案PPT》(获取来源见文尾),本文精选其中精华及架构部分,逻辑清晰、内容完整,为快速形成售前方案提供参考。 部分内容: 喜欢文章&#…...
安防监控/视频汇聚平台EasyCVR调用rtsp地址返回的IP不正确是什么原因?
安防监控/云存储/磁盘阵列存储/视频汇聚平台EasyCVR可拓展性强、视频能力灵活、部署轻快,可支持的主流标准协议有GB28181、RTSP/Onvif、RTMP等,以及厂家私有协议与SDK接入,包括海康Ehome、海大宇等设备的SDK等,能对外分发RTSP、RT…...

媒体服务器与视频服务器有什么区别
媒体服务器与视频服务器有什么区别 流媒体服务器用在远程教育,视频点播、网络电台、网络视频等方面。 直播过程中就需要使用流媒体服务器,一个完整的直播过程,包括采集、处理、编码、封包、推流、传输、转码、分发、解码、播放等过程…...
:循环语句)
菜鸟教程《Python 3 教程》笔记(11):循环语句
菜鸟教程《Python 3 教程》笔记(11) 11 循环语句11.1 while 循环11.1.1 while 循环使用 else 语句 11.2 for 语句11.2.1 for...else 11.3 break 和 continue 语句及循环中的 else 子句 11 循环语句 出处: 菜鸟教程 - Python3 循环语句 11.1…...
【DevOps视频笔记】8. Jenkins 配置
一、Jenkins 入门配置 1. 工具 / 插件 介绍 二、插件和工具配置 1. 配置 JDK 和 Maven Stage 1:将服务器中 JDK 和 Maven 映射到 jenkins 容器中 Stage 2:jenkins 全局配置中 -- 指定JAVA_HOME目录 Stage 3:jenkins 全局配置中 -- 指定…...

C# 在Color[] colorTable中快速找到Color的索引位置
C# 在Color[] colorTable中快速找到Color的索引位置 第一种方法: 如果您需要在Color[] colorTable中快速查找特定Color的索引位置,可以使用C#的Array.FindIndex方法。这个方法接受一个回调函数作为参数,该函数定义了如何判断数组元素是否与…...

go学习笔记 炒土豆丝
今天的主菜是土豆,就来个土豆丝吧。我的大致流程如下: 1.挑选白瓤土豆,洗它 2.土豆去皮 3.土豆切片,切丝,丝要粗细均匀 4.清洗几遍土豆丝,去除上面的淀粉,在清水中泡一小会 5.起锅,放…...
FPGA VR摄像机-拍摄和拼接立体 360 度视频
本文介绍的是 FPGA VR 相机的第二个版本,第一个版本是下面这样: 第一版地址: ❝ https://hackaday.io/project/26974-vr-camera-fpga-stereoscopic-3d-360-camera ❞ 本文主要介绍第二版本,第二版本的 VR 摄像机,能够以…...
vue集成mars3d后,basemaps加不上去
首先: <template> <div id"centerDiv" class"mapcontainer"> <mars-map :url"configUrl" οnlοad"onMapload" /> </div> </template> <script> import MarsMap from ../component…...

油管视频直接生成PPT的AI工具!剖析c.ai和Pi的用户需求;独立创业者的操作指南;广告大佬的三个AI绘画实战 | ShowMeAI日报
👀日报&周刊合集 | 🎡生产力工具与行业应用大全 | 🧡 点赞关注评论拜托啦! 🤖 2023 CCF BDCI 数字安全公开赛,大模型安全竞赛等你「码」力全开 网站:https://www.datafountain.cn/special/B…...

WebSocket- 前端篇
官网代码 // 为了浏览器兼容websocketconst WebSocket window.WebSocket || window.MozWebSocket// 创建连接 this.socket new WebSocket(ws://xxx)// 连接成功this.socket.onopen (res)>{console.log(websocket 连接成功)this.socket.send(入参字段) // 传递的参数字段}…...

如何在 Python 中将图像转换为 PDF
一、说明 如何使得图像转化成pdf文件, 想要将一个或多个图像转换为 PDF 文档?看看img2pdf和PyPDF2软件包就是您的最佳选择。 二、需要哪些程序包? 首先,您只需要一个 Python 环境,最好是 3.10 或更高版本。本教程中的代…...

使用python编写脚本测试目标主机的TCP端口连通性
使用Python的Socket模块的connect()函数来尝试连接目标主机的特定端口。如果连接成功,则说明该端口是打开的;否则,该端口是关闭的。 下面是一个示例脚本,可以检测目标IP的22端口是否开启: import socket def check_po…...

华为云云服务器评测|基于华为云云耀云服务器L实例开展性能评测,例如 MySQL、Clickhouse、Elasticsearch等等
在当今云计算时代,越来越多的企业和个人开始选择将应用部署在云服务器上,以便更好地满足高性能、可靠性和可扩展性等需求。而华为云云耀云服务器L实例不仅提供了高性能和可靠性的计算和存储资源,而且具有灵活和高效的成本控制,深受…...
Git分布式版本控制系统与github
第四阶段提升 时 间:2023年8月29日 参加人:全班人员 内 容: Git分布式版本控制系统与github 目录 一、案例概述 二、版本控制系统 (一) 本地版本控制 (二)集中化的版本控制系统 &…...
基于Java+SpringBoot+Vue前后端分离中国陕西民俗网设计和实现
博主介绍:✌全网粉丝30W,csdn特邀作者、博客专家、CSDN新星计划导师、Java领域优质创作者,博客之星、掘金/华为云/阿里云/InfoQ等平台优质作者、专注于Java技术领域和毕业项目实战✌ 🍅文末获取源码联系🍅 👇🏻 精彩专…...
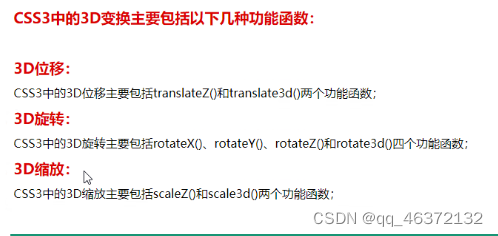
CSS3D+动画
CSS3D 1.css3D 给父元素设置 perspective:景深:近大远小的效果900-1200px这个范围内 transform-style:是否设置3D环境 flat 2D环境 默认值 perserve-3D环境 3D功能函数 1.位移: translateZ()translate3D(x,y,z) <!DOCTYPE html> <html lang"en"><h…...

list对象中如何根据对象中某个属性去重使用Java8流实现
list对象中如何根据对象中某个属性去重使用Java8流实现? 在 Java 8 的流操作中,可以使用 distinct 方法来对一个对象流进行去重,但是默认情况下它会使用对象的 equals() 方法来判断重复。如果你希望根据对象的某个属性进行去重,则可以使用 …...

别再只盯着IoU了!深入浅出聊聊边界框回归:从IoU到Shape-IoU的演进与选择
边界框回归的进化论:从IoU到Shape-IoU的技术跃迁与实战选型 当我们在计算机视觉领域谈论目标检测时,边界框回归就像是一场永不停歇的进化竞赛。从最初的IoU开始,这场竞赛已经经历了GIoU、DIoU、CIoU、SIoU等多个技术迭代,而最新登…...

PEMS交通数据实战:用Python从原始TXT到可视化分析的完整Pipeline
PEMS交通数据实战:用Python构建端到端分析管道的深度指南 当清晨第一缕阳光洒在加州高速公路上,数以万计的感应器已经开始悄无声息地记录着每辆车的轨迹。这些来自PEMS(Performance Measurement System)的海量数据,正等待着被转化为改善城市交…...

有这5个迹象,说明你公司内斗很严重!
见字如面,我是军哥!昨天,一位读者小王给我留言。他在某大厂担任项目经理,最近工作推进得很艰难。同一件事开了好几次会,领导就是不拍板。跨部门协作费力不讨好,谁都不愿负责,项目卡在那里没有进…...
)
保姆级教程:在ROS2 Humble上,用Orbbec Astra Pro深度相机搞定单目标定(附常见镜像问题解决)
保姆级教程:ROS2 Humble与Orbbec Astra Pro深度相机单目标定实战指南 深度相机在机器人视觉、三维重建等领域扮演着关键角色,而精确的相机标定则是确保数据可靠性的第一步。本文将手把手带你完成Orbbec Astra Pro在ROS2 Humble环境下的单目标定全流程&am…...

Hitboxer:专业级SOCD按键重映射工具,3分钟解决游戏输入冲突
Hitboxer:专业级SOCD按键重映射工具,3分钟解决游戏输入冲突 【免费下载链接】socd Key remapper for epic gamers 项目地址: https://gitcode.com/gh_mirrors/so/socd 还在为游戏中同时按下相反方向键导致角色卡顿而烦恼吗?Hitboxer是…...

Vibe Coding 灾难的爆发
AI 编程工具确实正在颠覆软件行业,但几乎比我所见过的任何事物都更属于那个"如果没有丰富的前期经验,你不应该在家尝试"的类别: Reddit 上 vibe coding 灾难故事堆积如山。除非你介入并为 AI 建立结构,否则它就会推送垃…...

车规级LGA封装RK3588开发板:硬件设计与车规应用实战解析
1. 项目概述:当“车规级”遇上“LGA封装”的RK3588 最近在嵌入式圈子里,一个消息引起了不小的讨论:深圳市九鼎创展科技推出了一款搭载LGA封装核心板的RK3588开发板,并且主打车规级应用。对于长期在工业控制和边缘计算领域摸爬滚打…...

HC7251晨芯阳科技内置MOS开关降压型LED恒流驱动器
HC7251是一款内置60V功率MOS 高效率、高精度的开关降压型大功率LED 恒流驱动芯片。HC7251采用固定关断时间的峰值电流控制方式,关断时间可通过外部电容进行调节,工作频率可根据用户要求而改变。HC7251通过调节外置的电流采样电阻,能控制高亮度…...

LAV Filters终极指南:深度解析开源DirectShow解码器的架构原理与实战配置
LAV Filters终极指南:深度解析开源DirectShow解码器的架构原理与实战配置 【免费下载链接】LAVFilters LAV Filters - Open-Source DirectShow Media Splitter and Decoders 项目地址: https://gitcode.com/gh_mirrors/la/LAVFilters LAV Filters是一套基于F…...
告别单一视角:用Transformer融合骨架与轮廓,实战提升步态识别鲁棒性
多模态步态识别实战:基于Transformer的骨架与轮廓融合技术 步态识别作为远距离身份认证的重要手段,在安防监控、智能门禁等领域展现出独特优势。然而传统单模态方法在面对换装、遮挡等现实场景时,识别性能往往大幅下降。2023年CVPR会议上提出…...