Android AGP8.1.0组件化初探
Android AGP8.1.0组件化初探

前言:
前面两篇完成了从AGP4.2到 AGP8.1.0的升级,本文是由于有哥们留言说在AGP8.0中使用ARouter组件化有问题,于是趁休息时间尝试了一下,写了几个demo,发现都没有问题,跳转和传值都是正常的,这里我也是直接从groovy转换成version-catalogs的依赖方式,由于之前升级过,所以这次很顺利,几分钟就完成了,直接上代码:
1.添加统一依赖:
[versions]
agp = "8.1.0"
androidx-espresso-core = "3.4.0"
androidx-junit = "1.1.3"
org-jetbrains-kotlin-android = "1.8.0"
core-ktx = "1.10.1"
junit = "4.13.2"
androidx-test-ext-junit = "1.1.5"
espresso-core = "3.5.1"
appcompat = "1.6.1"
material = "1.9.0"
constraintlayout = "2.1.4"
mmkv = "1.3.1"
utilcodex = "1.31.1"
arouter = "1.5.2"
arouter-compiler = "1.5.2"
org-jetbrains-kotlin-kapt = "1.8.0"[libraries]
androidx-espresso-core-3_4_0 = { module = "androidx.test.espresso:espresso-core", version.ref = "androidx-espresso-core" }
androidx-junit-1_1_3 = { module = "androidx.test.ext:junit", version.ref = "androidx-junit" }
core-ktx = { group = "androidx.core", name = "core-ktx", version.ref = "core-ktx" }
junit = { group = "junit", name = "junit", version.ref = "junit" }
androidx-test-ext-junit = { group = "androidx.test.ext", name = "junit", version.ref = "androidx-test-ext-junit" }
espresso-core = { group = "androidx.test.espresso", name = "espresso-core", version.ref = "espresso-core" }
appcompat = { group = "androidx.appcompat", name = "appcompat", version.ref = "appcompat" }
material = { group = "com.google.android.material", name = "material", version.ref = "material" }
constraintlayout = { group = "androidx.constraintlayout", name = "constraintlayout", version.ref = "constraintlayout" }
mmkv = { group = "com.tencent", name = "mmkv", version.ref = "mmkv" }
utilcodex = {group = "com.blankj",name = "utilcodex",version.ref = "utilcodex"}
arouter = {group = "com.alibaba",name = "arouter-api",version.ref = "arouter"}
arouter-compiler = {group = "com.alibaba",name = "arouter-compiler",version.ref = "arouter-compiler"}[plugins]
com-android-library = { id = "com.android.library", version.ref = "agp" }
com-android-application = { id = "com.android.application", version.ref = "agp" }
org-jetbrains-kotlin-android = { id = "org.jetbrains.kotlin.android", version.ref = "org-jetbrains-kotlin-android" }
org-jetbrains-kotlin-kapt = {id = "org.jetbrains.kotlin.kapt",version.ref = "org-jetbrains-kotlin-kapt"}[bundles]
2.添加lib-common组件配置:
@Suppress("DSL_SCOPE_VIOLATION")
plugins {alias(libs.plugins.com.android.library)alias(libs.plugins.org.jetbrains.kotlin.android)alias(libs.plugins.org.jetbrains.kotlin.kapt)
}
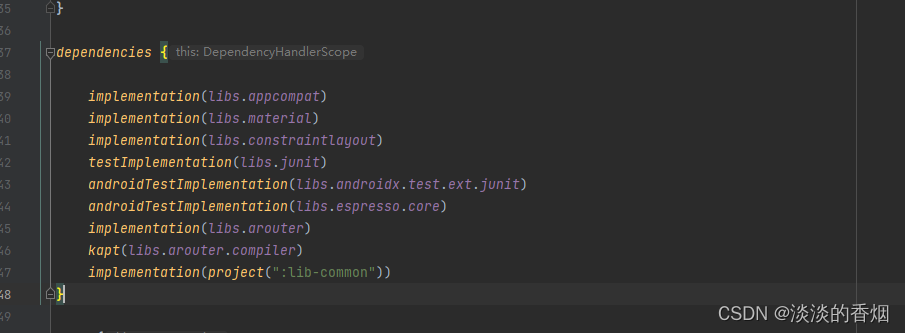
dependencies {implementation(libs.core.ktx)implementation(libs.appcompat)implementation(libs.material)implementation(libs.arouter)kapt(libs.arouter.compiler)testImplementation(libs.junit)androidTestImplementation(libs.androidx.test.ext.junit)androidTestImplementation(libs.espresso.core)
}kapt {arguments {arg("AROUTER_MODULE_NAME", project.name)}
}
完整配置:
@Suppress("DSL_SCOPE_VIOLATION")
plugins {alias(libs.plugins.com.android.library)alias(libs.plugins.org.jetbrains.kotlin.android)alias(libs.plugins.org.jetbrains.kotlin.kapt)
}android {namespace = "com.example.lib_cmmon"compileSdk = 33defaultConfig {//applicationId = "com.example.lib_cmmon"minSdk = 23targetSdk = 33// versionCode = 1// versionName = "1.0"testInstrumentationRunner = "androidx.test.runner.AndroidJUnitRunner"}buildTypes {release {isMinifyEnabled = falseproguardFiles(getDefaultProguardFile("proguard-android-optimize.txt"),"proguard-rules.pro")}}compileOptions {sourceCompatibility = JavaVersion.VERSION_17targetCompatibility = JavaVersion.VERSION_17}kotlinOptions {jvmTarget = "17"}
}dependencies {implementation(libs.core.ktx)implementation(libs.appcompat)implementation(libs.material)implementation(libs.arouter)kapt(libs.arouter.compiler)testImplementation(libs.junit)androidTestImplementation(libs.androidx.test.ext.junit)androidTestImplementation(libs.espresso.core)
}kapt {arguments {arg("AROUTER_MODULE_NAME", project.name)}
}
3.lib-common添加ARouter初始化:
/*** @author: njb* @date: 2023/8/26 22:21* @desc:*/
public class BaseApp extends Application {@Overridepublic void onCreate() {super.onCreate();initARouter();}private void initARouter() {ARouter.openDebug();ARouter.openLog();ARouter.init(this);}
}
4.添加lib-arouter组件配置:
@Suppress("DSL_SCOPE_VIOLATION")
plugins {alias(libs.plugins.com.android.library)alias(libs.plugins.org.jetbrains.kotlin.android)alias(libs.plugins.org.jetbrains.kotlin.kapt)
}android {namespace = "com.example.lib_arouter"compileSdk = 33defaultConfig {// applicationId = "com.example.lib_arouter"minSdk = 23targetSdk = 33//versionCode = 1// versionName = "1.0"testInstrumentationRunner = "androidx.test.runner.AndroidJUnitRunner"}buildTypes {release {isMinifyEnabled = falseproguardFiles(getDefaultProguardFile("proguard-android-optimize.txt"),"proguard-rules.pro")}}compileOptions {sourceCompatibility = JavaVersion.VERSION_17targetCompatibility = JavaVersion.VERSION_17}
}dependencies {implementation(libs.appcompat)implementation(libs.material)implementation(libs.constraintlayout)testImplementation(libs.junit)androidTestImplementation(libs.androidx.test.ext.junit)androidTestImplementation(libs.espresso.core)implementation(libs.arouter)kapt(libs.arouter.compiler)implementation(project(":lib-common"))
}kapt {arguments {arg("AROUTER_MODULE_NAME", project.name)}
}
5.调用ARouter初始化:
/*** @author: njb* @date: 2023/8/26 22:21* @desc:*/
public class ARouterApp  extends BaseApp {@Overridepublic void onCreate() {super.onCreate();}
}
6.主模块依赖配置:
@Suppress("DSL_SCOPE_VIOLATION")
plugins {alias(libs.plugins.com.android.application)alias(libs.plugins.org.jetbrains.kotlin.android)alias(libs.plugins.org.jetbrains.kotlin.kapt)
}android {namespace =  "com.example.writelogdemo"compileSdk = 33defaultConfig {applicationId  = "com.example.writelogdemo"minSdk = 23targetSdk = 33versionCode = 1versionName = "1.0"testInstrumentationRunner = "androidx.test.runner.AndroidJUnitRunner"}buildTypes {release {isMinifyEnabled = falseproguardFiles(getDefaultProguardFile("proguard-android-optimize.txt"),"proguard-rules.pro")}}compileOptions {sourceCompatibility = JavaVersion.VERSION_17targetCompatibility = JavaVersion.VERSION_17}kotlinOptions {jvmTarget = "17"}
}dependencies {implementation(libs.core.ktx)implementation(libs.appcompat)implementation(libs.material)implementation(libs.constraintlayout)testImplementation(libs.junit)androidTestImplementation(libs.androidx.test.ext.junit)androidTestImplementation(libs.espresso.core)implementation(libs.utilcodex)implementation(libs.arouter)kapt(libs.arouter.compiler)implementation(project(":lib-arouter"))implementation(project(":lib-common"))
}
7.添加ARouter组件化配置:
7.1 引入ARouter依赖:
这里我用的是catelog方式,所以使用kapt方式
@Suppress("DSL_SCOPE_VIOLATION")
plugins {alias(libs.plugins.com.android.library)alias(libs.plugins.org.jetbrains.kotlin.android)alias(libs.plugins.org.jetbrains.kotlin.kapt)
}implementation(libs.arouter)
kapt(libs.arouter.compiler)
7.2 添加模块名称配置:
kapt {arguments {arg("AROUTER_MODULE_NAME", project.name)}
}
7.3 主模块ARouter初始化:
/*** @author: njb* @date: 2023/8/25 22:36* @desc:*/
public class LogApp extends BaseApp {private static LogApp mInstance;@Overridepublic void onCreate() {super.onCreate();mInstance = this;}public static LogApp getInstance() {return mInstance;}
}
7.4 在Activity中绑定Arouter:
ARouter.getInstance().inject(this)
7.5 添加Arouter跳转和传值:
userList = arrayListOf("年龄18","John","身高180","体重60kg","性别female")
tvText.setOnClickListener {ARouter.getInstance().build("/test/TestSplashActivity").withString("name","test张三").withSerializable("userList",userList).navigation()
7.6 test模块添加跳转路径和数据接收:
@Route(path = "/test/TestSplashActivity")
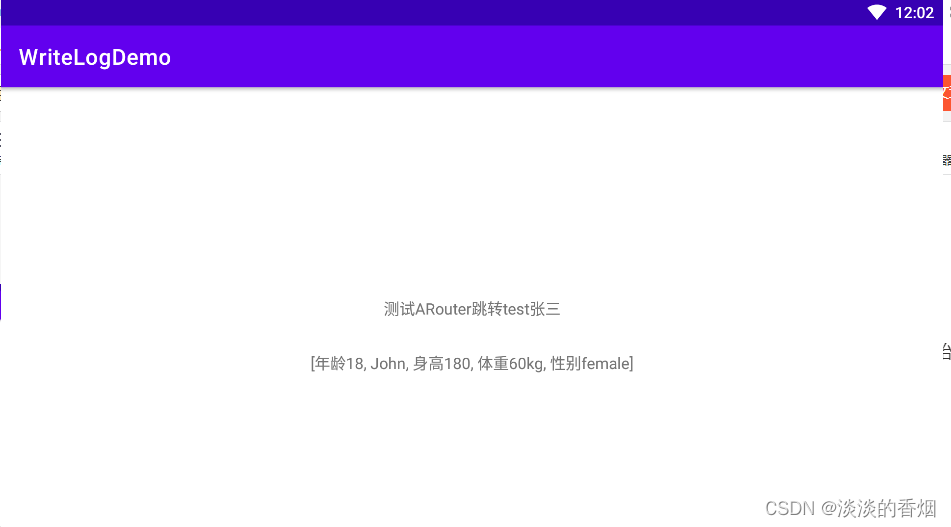
class TestSplashActivity : AppCompatActivity() {val TAG = "TestARouter"@Autowired(name = "name")@JvmFieldvar name: String = ""@Autowired(name = "userList")@JvmFieldvar mList:ArrayList<String> ?= nulloverride fun onCreate(savedInstanceState: Bundle?) {super.onCreate(savedInstanceState)setContentView(R.layout.activity_test_splash)ARouter.getInstance().inject(this)initView()}private fun initView() {tvName.text = "测试ARouter跳转$name"tvTextView.text = mList.toString()}
}
8.完整使用示例:
package com.example.writelogdemoimport androidx.appcompat.app.AppCompatActivity
import android.os.Bundle
import android.widget.TextView
import com.alibaba.android.arouter.launcher.ARouterclass MainActivity : AppCompatActivity() {private val tvText : TextView by lazy { findViewById(R.id.tvTest) }var userList:ArrayList<String> ?= nulloverride fun onCreate(savedInstanceState: Bundle?) {super.onCreate(savedInstanceState)setContentView(R.layout.activity_main)ARouter.getInstance().inject(this)userList = arrayListOf("年龄18","John","身高180","体重60kg","性别female")tvText.setOnClickListener {ARouter.getInstance().build("/test/TestSplashActivity").withString("name","test张三").withSerializable("userList",userList).navigation()}}
}
9.主模块布局:
<?xml version="1.0" encoding="utf-8"?>
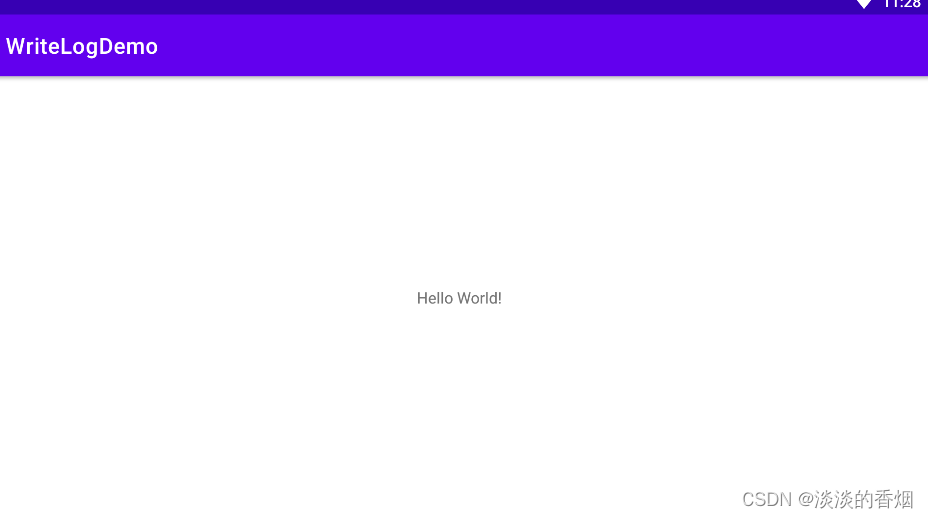
<androidx.constraintlayout.widget.ConstraintLayout xmlns:android="http://schemas.android.com/apk/res/android"xmlns:app="http://schemas.android.com/apk/res-auto"xmlns:tools="http://schemas.android.com/tools"android:layout_width="match_parent"android:layout_height="match_parent"tools:context=".MainActivity"><TextViewandroid:id="@+id/tvTest"android:layout_width="wrap_content"android:layout_height="wrap_content"android:text="Hello World!"app:layout_constraintBottom_toBottomOf="parent"app:layout_constraintEnd_toEndOf="parent"app:layout_constraintStart_toStartOf="parent"app:layout_constraintTop_toTopOf="parent" /></androidx.constraintlayout.widget.ConstraintLayout>
10.lib-arouter测试代码:
package com.example.lib_arouterimport android.annotation.SuppressLint
import android.os.Bundle
import android.util.Log
import android.widget.TextView
import androidx.appcompat.app.AppCompatActivity
import com.alibaba.android.arouter.facade.annotation.Autowired
import com.alibaba.android.arouter.facade.annotation.Route
import com.alibaba.android.arouter.launcher.ARouter@SuppressLint("CustomSplashScreen")
@Route(path = "/test/TestSplashActivity")
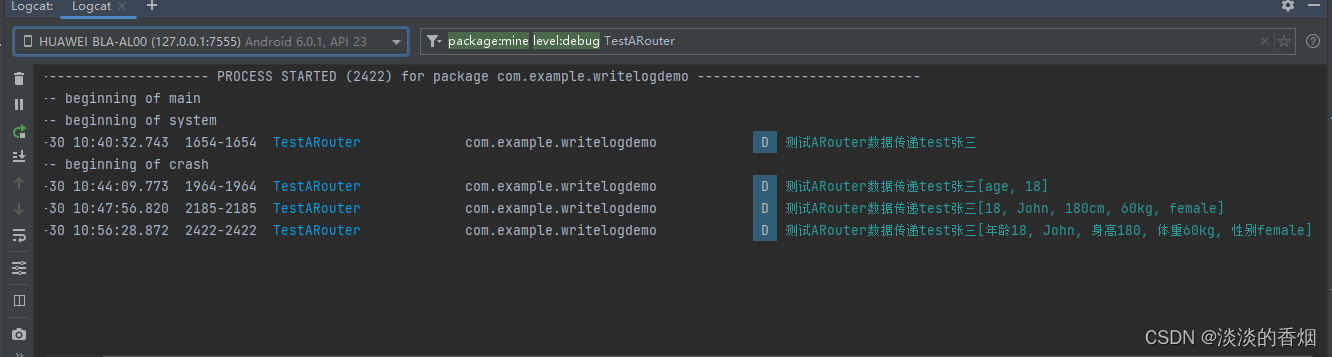
class TestSplashActivity : AppCompatActivity() {val TAG = "TestARouter"val tvName:TextView by lazy { findViewById(R.id.tv_name) }val tvTextView:TextView by lazy { findViewById(R.id.tv_test) }@Autowired(name = "name")@JvmFieldvar name: String = ""@Autowired(name = "userList")@JvmFieldvar mList:ArrayList<String> ?= nulloverride fun onCreate(savedInstanceState: Bundle?) {super.onCreate(savedInstanceState)setContentView(R.layout.activity_test_splash)ARouter.getInstance().inject(this)Log.d(TAG, "测试ARouter数据传递$name$mList")initView()}private fun initView() {tvName.text = nametvTextView.text = mList.toString()}
}
11.lib-arouter布局代码:
<?xml version="1.0" encoding="utf-8"?>
<androidx.constraintlayout.widget.ConstraintLayout xmlns:android="http://schemas.android.com/apk/res/android"xmlns:app="http://schemas.android.com/apk/res-auto"xmlns:tools="http://schemas.android.com/tools"android:layout_width="match_parent"android:layout_height="match_parent"tools:context=".TestSplashActivity"><TextViewandroid:id="@+id/tv_name"android:layout_width="wrap_content"android:layout_height="wrap_content"android:text="这是Arouter测试"app:layout_constraintBottom_toBottomOf="parent"app:layout_constraintEnd_toEndOf="parent"app:layout_constraintStart_toStartOf="parent"app:layout_constraintTop_toTopOf="parent" /><TextViewandroid:id="@+id/tv_test"android:layout_width="wrap_content"android:layout_height="wrap_content"android:layout_marginTop="30dp"android:text="这是数组"app:layout_constraintEnd_toEndOf="parent"app:layout_constraintStart_toStartOf="parent"app:layout_constraintTop_toBottomOf="@id/tv_name" /></androidx.constraintlayout.widget.ConstraintLayout>
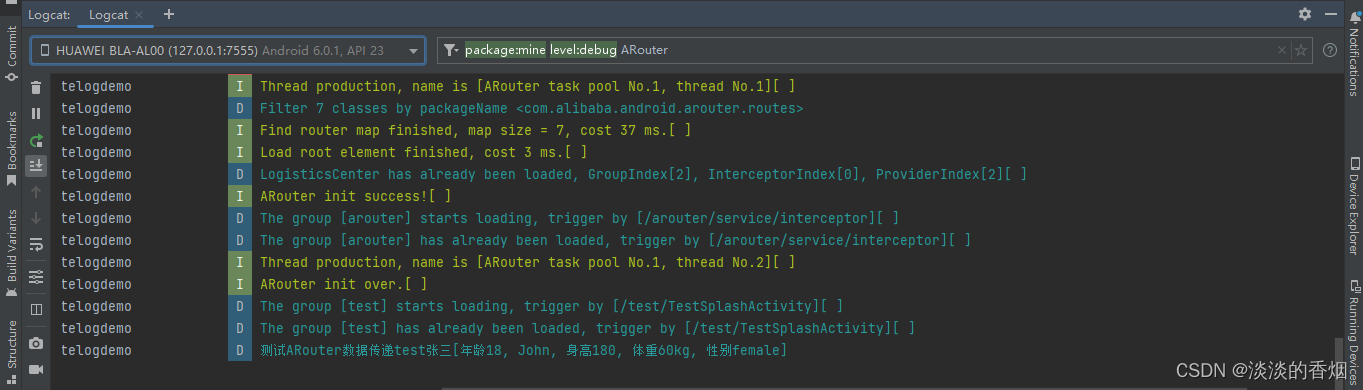
12.日志打印如下:
13.实现效果如下:
14.遇到问题:
14.1 测试模块配置不对
由于我是直接新建的模块,所以当作完整项目配置的,这里如果只是测试组件化需要修改配置
解决方法修改libs.plugins.com.android.application为libs.plugins.com.android.library
修改完成后可以正常运行:
14.2 跳转时提示path找不到
解决方法:
a.按照上面7中的步骤配置主模块和其他组件模块,一个都不能少。
b.同时在跳转时保证路径一致即可。
若配置完还有问题,请仔细检查每一步,直到正常跳转和数据传递,本人是亲自尝试了多个项目,基本上都没问题.
14.3 数据传递和接收问题
解决方法:
a.在kotlin中使用ARouter接收数据时需要使用@JvmField关键字
b.@Autowired(name = “name”),name一定要和传递时一致
c.传递数组时记得序列化,接收也是一样
15.AGP8.1.0小技巧:
15.1 在没有添加统一依赖时配置:
implementation("androidx.appcompat:appcompat:1.6.1")
implementation("com.google.android.material:material:1.9.0")
implementation("androidx.constraintlayout:constraintlayout:2.1.4")
testImplementation("junit:junit:4.13.2")
androidTestImplementation("androidx.test.ext:junit:1.1.5")
androidTestImplementation("androidx.test.espresso:espresso-core:3.5.1")
implementation("com.alibaba:arouter-api:1.5.2")
kapt("com.alibaba:arouter-compiler:1.5.2")
implementation(project(":lib-common"))
15.2 添加统一依赖库配置后:
如果添加了统一的catelog配置方式后导入依赖它会自动提示,不需要开发者手动导入,这点我感觉很爽,一键一直替换,用起来简直不要太安逸了,感兴趣的同学可以自行尝试,这里就简单举例。
16.总结:
以上就是今天博客的内容在AGP8.1.0中使用组件化和遇到问题,其实本文的目的不是在于如何使用,ARouter这个很简单,相信做过组件化的同学都会,只是需要遇到问题时学会分析和调试,要不然盲目猜测是不会有结果的。开发这条路任重而道远,希望大家都能上下求索,享受这个求索的过程,痛并快乐着,也很重要,新技术出来可以尝试,也可以根据自己需要调整,不一样说非得更新用这个新技术,只要能解决问题,咋好用咋来。
17.demo地址如下:
https://gitee.com/jackning_admin/write-log-demo
相关文章:
Android AGP8.1.0组件化初探
Android AGP8.1.0组件化初探 前言: 前面两篇完成了从AGP4.2到 AGP8.1.0的升级,本文是由于有哥们留言说在AGP8.0中使用ARouter组件化有问题,于是趁休息时间尝试了一下,写了几个demo,发现都没有问题,跳转和传…...
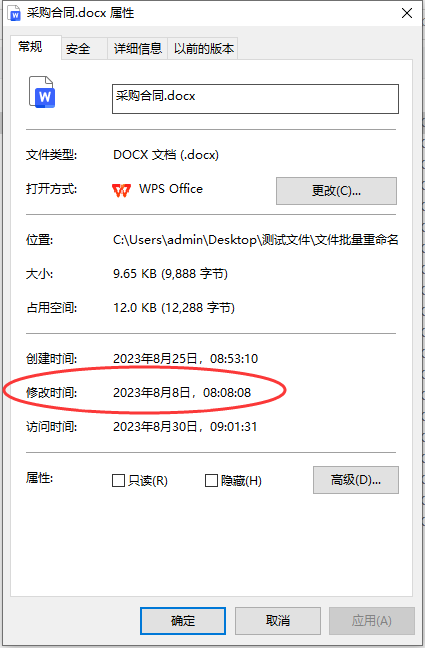
文件修改时间能改吗?怎么改?
文件修改时间能改吗?怎么改?修改时间是每个电脑文件具备的一个属性,它代表了这个电脑文件最后一次的修改时间,是电脑系统自动赋予文件的,相信大家都应该知道。我们右击鼠标某个文件,然后点击弹出菜单里面的…...

2023年下半年软考报名注意事项!
考试注意事项: 分数线:所有科目成绩全部在45分以上(含45分)通过考试;三科目的话,必须每科目都及格才算通过考试,只有一个不合格的,本次考试其他两个无效。 出成绩时间:预…...

【LeetCode每日一题】——274.H指数
文章目录 一【题目类别】二【题目难度】三【题目编号】四【题目描述】五【题目示例】六【题目提示】七【解题思路】八【时间频度】九【代码实现】十【提交结果】 一【题目类别】 排序 二【题目难度】 中等 三【题目编号】 274.H指数 四【题目描述】 给你一个整数数组 ci…...
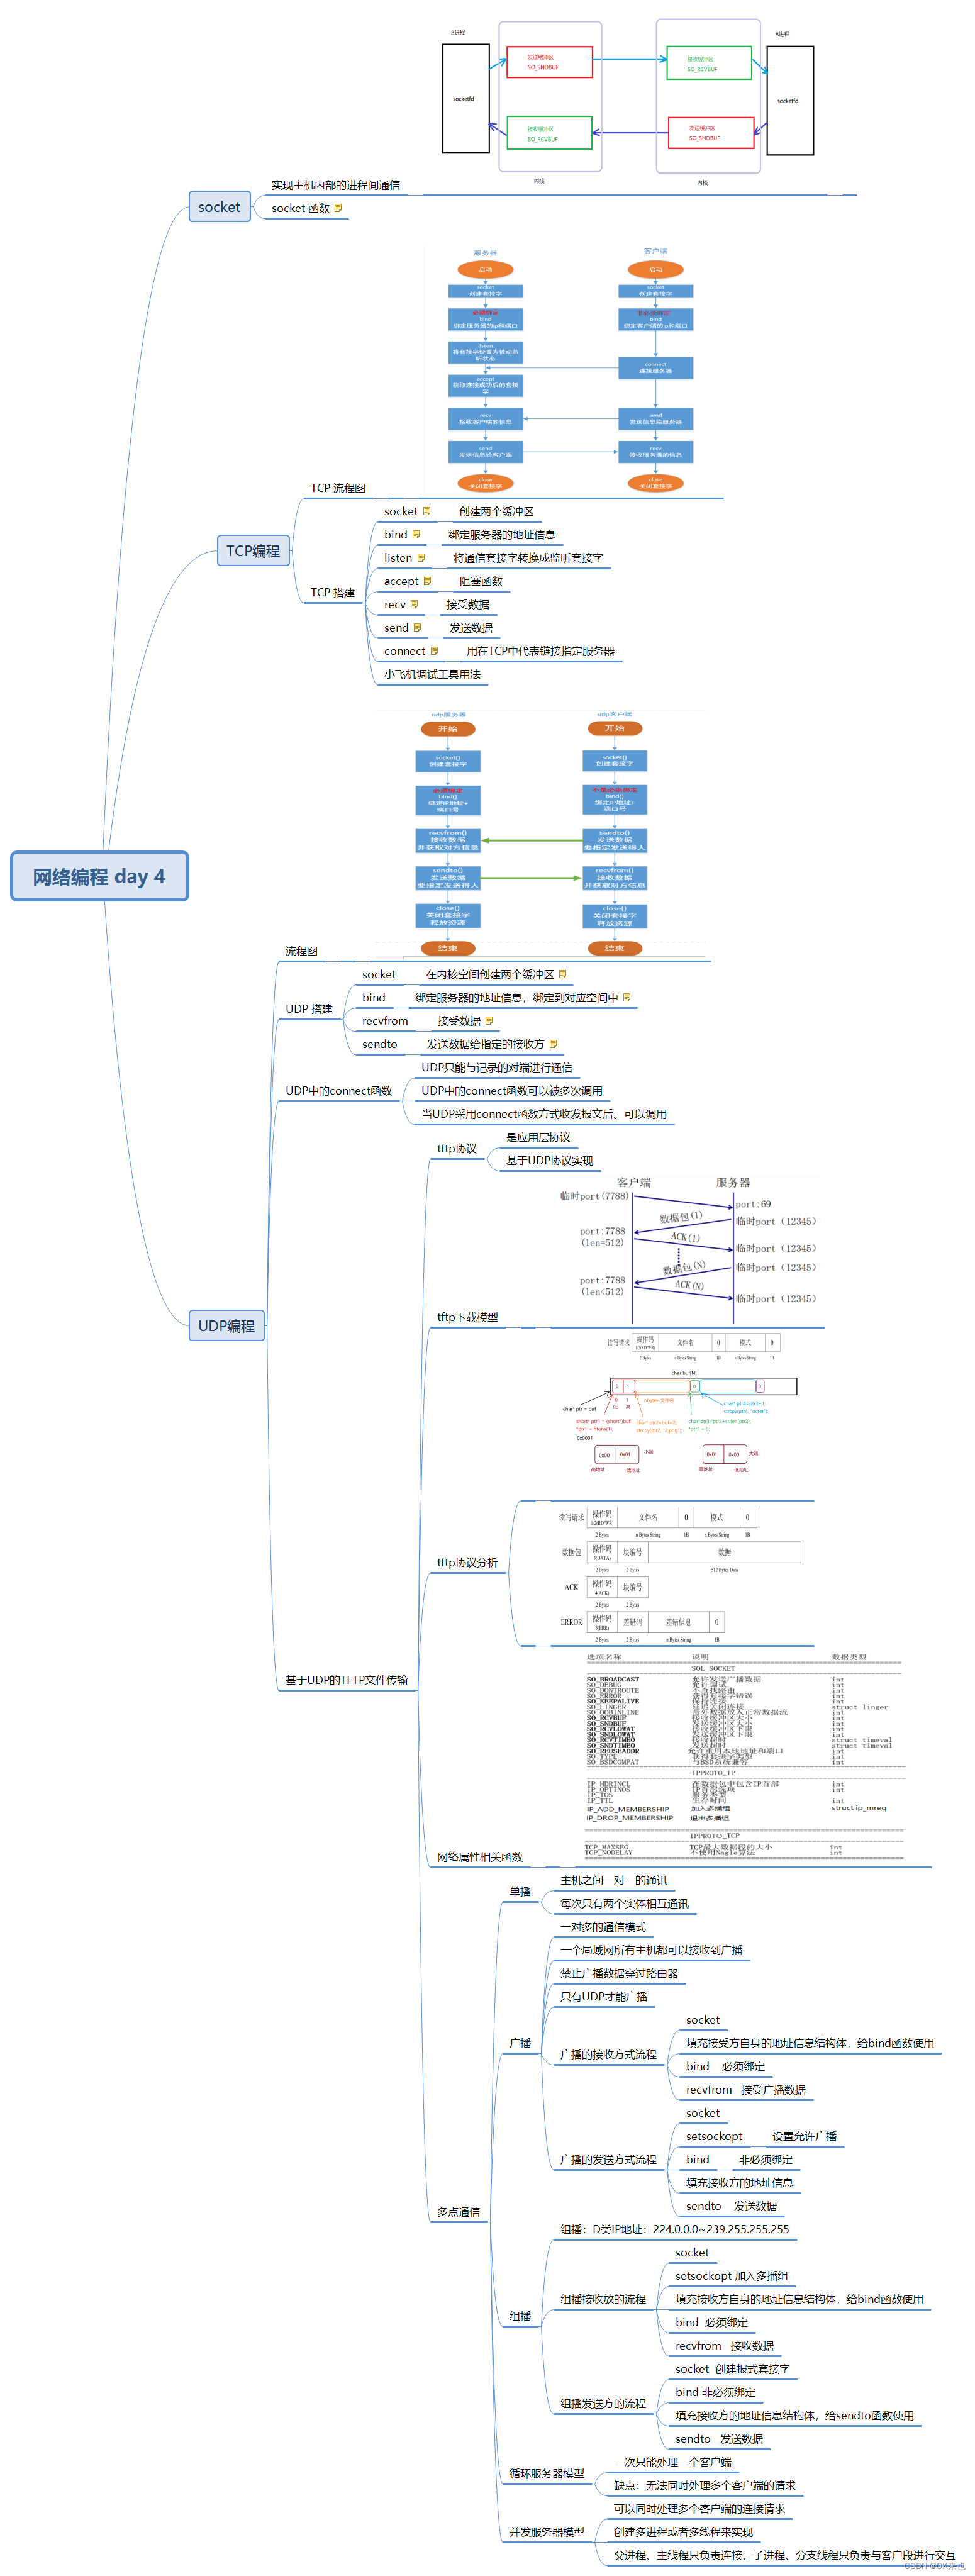
网络编程 day 4
1、多进程并发服务器根据流程图重新编写 #include <myhead.h>#define ERR_MSG(msg) do{\fprintf(stderr, "__%d__:", __LINE__); \perror(msg);\ }while(0)#define PORT 8888 //端口号,范围1024~49151 #define IP "192.168.11…...
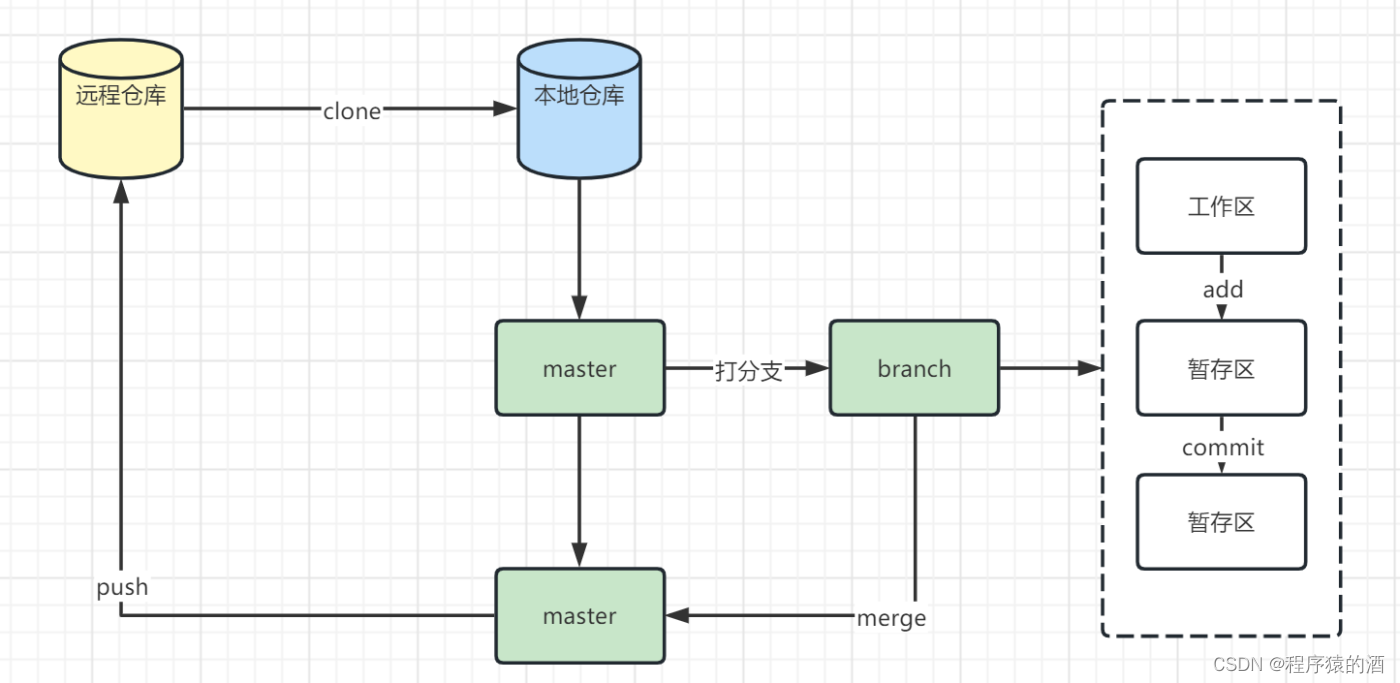
【Java架构-版本控制】-Git基础
本文摘要 Git作为版本控制工具,使用非常广泛,在此咱们由浅入深,分三篇文章(Git基础、Git进阶、Gitlab搭那家)来深入学习Git 文章目录 本文摘要1.Git仓库基本概念1.1 远程仓库(Remote)1.2 本地库(Repository) 2. Git仓库…...

ubuntu 挂载硬盘操作
1. 查看磁盘 sudo fdisk -l 2. 查看UUID sudo blkid记录下待挂载硬盘的UUID, 后面要使用 ps. 如果报错,检查是否已格式化硬盘 查看新硬盘的盘符,我的是/dev/sda,用下述命令格式化 sudo mkfs -t ext4 /dev/sda3. 创建挂载点 我的是在/mnt…...

关于商品活动的H5页面技术总结
背景 在单个html文件里面使用vue3、jquery等其他第三方js库,实现规定的页面效果,其中主要功能是从商品json数据中读取数据,然后可以通过搜索框、下拉框、左侧菜单来筛选商户信息。 页面布局 技术要点: 1、通过路由来进行页面布…...
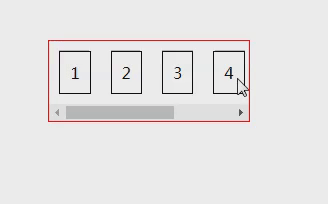
前端:横向滚动条,拖动进行左右滚动(含隐藏滚动条)
效果 代码 <!DOCTYPE html> <html lang"en"><head><meta charset"UTF-8"><meta http-equiv"X-UA-Compatible" content"IEedge"><meta name"viewport" content"widthdevice-width, i…...

Android JNI Bitmap指定颜色值替换
#include <jni.h> #include <string> #include <android/bitmap.h> #include <cmath> #include <android/log.h> //定义TAG之后,我们可以在LogCat通过TAG过滤出NDK打印的日志 #define TAG "BitmapOperationNative" // 定义…...
测试理论与方法----测试流程的第四个步骤:执行测试,提出缺陷
8、执行测试—–>提交缺陷报告 测试流程:执行测试—–>提交缺陷报告 1、缺陷的概述(回顾) 结果角度:实际结果和预期结果不一致 需求角度:所有不满足需求或超出需求的,都是缺陷 2、缺陷的相关属性…...

Stable Diffusion 提示词入门指南
前言 本文主要讲解 Stable Diffusion (下文简称 SD)提示词的用法,帮助大家生成更高质量的图片 本章节主要讲解文生图,其他类型读者可以自行探索。同时本文主要是以 Stable Diffusion Discard 的形式生成图片 如果各位对于图片隐…...

基于鹰栖息算法优化的BP神经网络(预测应用) - 附代码
基于鹰栖息算法优化的BP神经网络(预测应用) - 附代码 文章目录 基于鹰栖息算法优化的BP神经网络(预测应用) - 附代码1.数据介绍2.鹰栖息优化BP神经网络2.1 BP神经网络参数设置2.2 鹰栖息算法应用 4.测试结果:5.Matlab代…...

想要搞懂接口测试和功能测试有什么区别,那就必须知道他们的基本原理
本文主要分为两个部分: 第一部分:主要从问题出发,引入接口测试的相关内容并与前端测试进行简单对比,总结两者之前的区别与联系。但该部分只交代了怎么做和如何做?并没有解释为什么要做? 第二部分…...

Spring: HiddenHttpMethodFilter的用法
作用:将html表单提交的post请求转换为put请求或delete请求发给接口。 html不支持put和delete. 一、web.xml中配置过滤器 <filter><filter-name>HiddenHttpMethodFilter</filter-name><filter-class>org.springframework.web.filter.HiddenH…...

Vue入门学习(一)
一、Vue环境搭建及第一个Demo 1.1编程工具: 下载Vscode,并安装插件 在Extensions 选项中搜索插件: 1:Live Server:将当前项目作为根路径,启动一个服务端,这样右键就会有如下选项 2:Eclipse …...

软考:中级软件设计师:无线网,网络接入技术,ipv6
软考:中级软件设计师:无线网 提示:系列被面试官问的问题,我自己当时不会,所以下来自己复盘一下,认真学习和总结,以应对未来更多的可能性 关于互联网大厂的笔试面试,都是需要细心准备的 &#x…...
和 异步生成器(async*))
dart 学习 之 同步生成器(sync*)和 异步生成器(async*)
同步生成器(sync*)和异步生成器(async*)都是 Dart 中用于逐步产生多个值的生成器类型,但它们之间有一些重要的区别: 执行方式: 同步生成器(sync*): 同步生成器…...

JSX基础
1. JSX介绍 概念:JSX是 JavaScript XML(HTML)的缩写,表示在 JS 代码中书写 HTML 结构 作用:在React中创建HTML结构(页面UI结构) 优势: 采用类似于HTML的语法,降低学习成…...

Linux Day11---mbash项目(二)
观看本文之前请先阅读Linux Day10的相关内容 1.touch 1.1 open系统调用 int open(const char*path,int oflags,mode_t mode); oflags参数: O_APPEND:把写入数据追加在文件的末尾 O_TRUNC:把文件长度设置为0,丢弃已有的内容 O_CREAT:如果需要&#…...

当条形图遇上极坐标:径向与圆形条形图的视觉革命
1. 设计原理这两种图表把传统的笛卡尔坐标系换成极坐标系:角度表示类别,半径或角度长度表示数值。1.1. 径向条形图径向条形图本质上是将传统条形图的直角坐标系转换为极坐标系。在极坐标系中,每个数据点不再由(x, y)定位,而是由(角…...

Wan2.2-I2V-A14B文生视频模型落地实践:单卡4090D高效推理部署案例
Wan2.2-I2V-A14B文生视频模型落地实践:单卡4090D高效推理部署案例 1. 项目背景与价值 视频内容创作正成为数字时代的重要需求,但传统视频制作流程复杂、成本高昂。Wan2.2-I2V-A14B作为新一代文生视频模型,能够直接将文本描述转化为高质量视…...

保姆级教程:用SolidWorks URDF插件把你的机械设计变成Gazebo仿真模型
从SolidWorks到Gazebo:机械设计仿真全流程实战指南 机械工程师们常常面临一个挑战:如何在虚拟环境中快速验证设计方案的可行性?SolidWorks作为主流的三维设计工具,与Gazebo这一强大的机器人仿真平台结合,能够实现从概念…...

【Typst源文件】Typst 标题层级与样式定制
1. 标题层级:等号 的使用 Typst 使用等号 来定义标题,等号的数量决定标题层级。理论上没有层级限制,可以根据文档结构无限嵌套。一级标题二级标题三级标题四级标题五级标题六级标题七级标题八级标题使用示例IntroductionBackgroundPrevious…...

深入RK3588 NPU架构:从NVDLA远亲到CNN加速器的设计取舍与性能真相
RK3588 NPU架构深度解构:CNN加速器的设计哲学与性能边界 当一块指甲盖大小的芯片宣称能提供6 TOPS的AI算力时,我们不禁要问:这数字背后隐藏着怎样的工程智慧与妥协?RK3588的NPU模块正引发这样的思考——它既非纯粹的学术创新&…...
在OBC前级的应用)
基于Simulink的自抗扰控制(ADRC)在OBC前级的应用
手把手教你学Simulink——基于Simulink的自抗扰控制(ADRC)在OBC前级的应用 (附:OBC前级拓扑剖析+ADRC抗扰原理+TD/ESO/NLSEF算法推导+Simulink全模型搭建+动态响应/谐波抑制对比+实机部署指南) 摘要 车载充电机(OBC)前级作为交流-直流(AC-DC)整流核心,需将电网…...

网页资源提取工具:猫抓开源方案解决媒体获取难题
网页资源提取工具:猫抓开源方案解决媒体获取难题 【免费下载链接】cat-catch 猫抓 浏览器资源嗅探扩展 / cat-catch Browser Resource Sniffing Extension 项目地址: https://gitcode.com/GitHub_Trending/ca/cat-catch 在数字化学习与研究的过程中ÿ…...

如何高效使用猫抓cat-catch:5个关键技巧完全指南
如何高效使用猫抓cat-catch:5个关键技巧完全指南 【免费下载链接】cat-catch 猫抓 浏览器资源嗅探扩展 / cat-catch Browser Resource Sniffing Extension 项目地址: https://gitcode.com/GitHub_Trending/ca/cat-catch 你是否经常遇到这样的情况:…...

实测美胸-年美-造相Z-Turbo:一键部署,效果超乎想象
实测美胸-年美-造相Z-Turbo:一键部署,效果超乎想象 1. 镜像简介与核心特点 美胸-年美-造相Z-Turbo是基于Xinference框架部署的文生图模型服务,专为快速生成高质量图像而设计。这个镜像继承了Z-Image-Turbo的优秀基因,并针对特定…...
:基于BCILAB的P300信号处理与分类全流程解析)
脑机接口工具箱实战(一):基于BCILAB的P300信号处理与分类全流程解析
1. 认识P300与BCILAB工具箱 P300是脑电信号中一种特殊的诱发电位,通常在受试者识别到罕见或重要刺激后约300毫秒出现。这种信号在脑机接口研究中具有重要价值,比如拼写系统、注意力监测等应用场景。对于刚接触脑机接口的研究者来说,最大的挑…...