数据库必知必会:TiDB(11)TiDB集群安装
数据库必知必会:TiDB(11)TiDB集群安装
- TiDB集群安装
- 单机环境上安装集群
- 下载并安装TiUP工具
- 安装TiUP cluster组件
- 创建拓扑文件
- 配置SSH免密登录
- 检查安装要求
- 创建安装目录
- 部署集群
- 启动集群
- 验证集群启动
- 使用命令验证
- 通过Dashboard查看
- 通过Grafana查看
- 通过Prometheus查看
- 写在后面
TiDB集群安装
TiDB集群的安装,需要先安装一台中控机,然后通过中控机进行集群的安装及管理。
单机环境上安装集群
单机环境集群式将所有节点都安装在同一台服务器上。
在集群中,PD实例需要有3个,TiKV实例需要有3个,其余的实例可以只保留1个。
安装过程中,需要先安装中控机,然后通过中控机安装、管理集群。
下载并安装TiUP工具
通过命令下载并安装TiUP工具。
curl --proto '=https' --tlsv1.2 -sSf https://tiup-mirrors.pingcap.com/install.sh | sh
安装过程为:
wux_labs@wux-labs-vm:~$ curl --proto '=https' --tlsv1.2 -sSf https://tiup-mirrors.pingcap.com/install.sh | sh% Total    % Received % Xferd  Average Speed   Time    Time     Time  CurrentDload  Upload   Total   Spent    Left  Speed
100 7088k  100 7088k    0     0  1483k      0  0:00:04  0:00:04 --:--:-- 1561k
WARN: adding root certificate via internet: https://tiup-mirrors.pingcap.com/root.json
You can revoke this by remove /home/wux_labs/.tiup/bin/7b8e153f2e2d0928.root.json
Successfully set mirror to https://tiup-mirrors.pingcap.com
Detected shell: bash
Shell profile:  /home/wux_labs/.bashrc
/home/wux_labs/.bashrc has been modified to add tiup to PATH
open a new terminal or source /home/wux_labs/.bashrc to use it
Installed path: /home/wux_labs/.tiup/bin/tiup
===============================================
Have a try:     tiup playground
===============================================
wux_labs@wux-labs-vm:~$
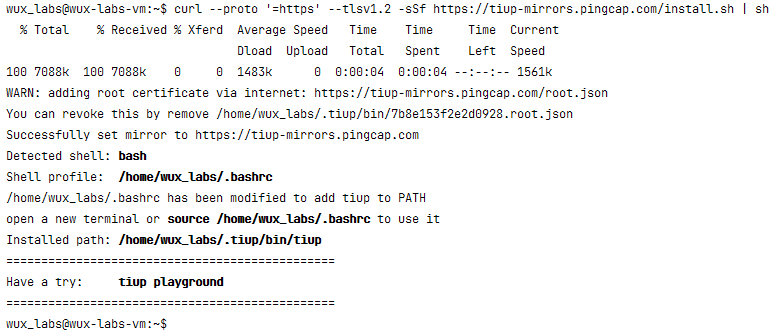
安装完成后,命令行中提示需要执行source /home/wux_labs/.bashrc让环境变量生效,实际上这是因为在执行installs.sh的时候往这个文件中追加了:
export PATH=/home/wux_labs/.tiup/bin:$PATH
按提示执行命令让环境变量生效即可,此时,tiup命令被添加到环境变量PATH中。
安装TiUP cluster组件
执行以下命令安装cluster组件:
tiup cluster
安装过程为:
wux_labs@wux-labs-vm:~$ tiup cluster
tiup is checking updates for component cluster ...timeout(2s)!
The component `cluster` version  is not installed; downloading from repository.
download https://tiup-mirrors.pingcap.com/cluster-v1.11.3-linux-amd64.tar.gz 8.44 MiB / 8.44 MiB 100.00% 7.00 MiB/s
Starting component `cluster`: /home/wux_labs/.tiup/components/cluster/v1.11.3/tiup-cluster
Deploy a TiDB cluster for productionUsage:tiup cluster [command]Available Commands:check       Perform preflight checks for the cluster.deploy      Deploy a cluster for productionstart       Start a TiDB clusterstop        Stop a TiDB clusterrestart     Restart a TiDB clusterscale-in    Scale in a TiDB clusterscale-out   Scale out a TiDB clusterdestroy     Destroy a specified clusterclean       (EXPERIMENTAL) Cleanup a specified clusterupgrade     Upgrade a specified TiDB clusterdisplay     Display information of a TiDB clusterprune       Destroy and remove instances that is in tombstone statelist        List all clustersaudit       Show audit log of cluster operationimport      Import an exist TiDB cluster from TiDB-Ansibleedit-config Edit TiDB cluster configshow-config Show TiDB cluster configreload      Reload a TiDB cluster's config and restart if neededpatch       Replace the remote package with a specified package and restart the servicerename      Rename the clusterenable      Enable a TiDB cluster automatically at bootdisable     Disable automatic enabling of TiDB clusters at bootreplay      Replay previous operation and skip successed stepstemplate    Print topology templatetls         Enable/Disable TLS between TiDB componentsmeta        backup/restore meta informationhelp        Help about any commandcompletion  Generate the autocompletion script for the specified shellFlags:-c, --concurrency int     max number of parallel tasks allowed (default 5)--format string       (EXPERIMENTAL) The format of output, available values are [default, json] (default "default")-h, --help                help for tiup--ssh string          (EXPERIMENTAL) The executor type: 'builtin', 'system', 'none'.--ssh-timeout uint    Timeout in seconds to connect host via SSH, ignored for operations that don't need an SSH connection. (default 5)-v, --version             version for tiup--wait-timeout uint   Timeout in seconds to wait for an operation to complete, ignored for operations that don't fit. (default 120)-y, --yes                 Skip all confirmations and assumes 'yes'Use "tiup cluster help [command]" for more information about a command.
wux_labs@wux-labs-vm:~$
这样TiUP cluster组件就安装完成。
创建拓扑文件
为了防止配置错误、提高配置效率,可以通过命令生成拓扑文件模板,然后基于模板修改拓扑配置。命令如下:
tiup cluster template > topology.yaml

由于是在一台服务器上部署多个实例,所以PD、TiKV的多个实例之间需要用不同的端口来进行区分,最终修改后的拓扑文件为:
global:user: "tidb"ssh_port: 22deploy_dir: "/tidb-deploy"data_dir: "/tidb-data"arch: "amd64"monitored:node_exporter_port: 9100blackbox_exporter_port: 9115server_configs:tidb:log.slow-threshold: 300tikv:readpool.storage.use-unified-pool: falsereadpool.coprocessor.use-unified-pool: truepd:replication.enable-placement-rules: truereplication.location-labels: ["host"]pd_servers:- host: wux-labs-vmclient_port: 23791peer_port: 23801deploy_dir: "/tidb-deploy/pd-23791"data_dir: "/tidb-data/pd-23791"log_dir: "/tidb-deploy/pd-23791/log"config:server.labels: { host: "logic-host-1" }- host: wux-labs-vmclient_port: 23792peer_port: 23802deploy_dir: "/tidb-deploy/pd-23792"data_dir: "/tidb-data/pd-23792"log_dir: "/tidb-deploy/pd-23792/log"- host: wux-labs-vmclient_port: 23793peer_port: 23803deploy_dir: "/tidb-deploy/pd-23793"data_dir: "/tidb-data/pd-23793"log_dir: "/tidb-deploy/pd-23793/log"tidb_servers:- host: wux-labs-vmtikv_servers:- host: wux-labs-vmport: 20161status_port: 20181deploy_dir: "/tidb-deploy/tikv-20161"data_dir: "/tidb-data/tikv-20161"log_dir: "/tidb-deploy/tikv-20161/log"config:server.labels: { host: "logic-host-1" }- host: wux-labs-vmport: 20162status_port: 20182deploy_dir: "/tidb-deploy/tikv-20162"data_dir: "/tidb-data/tikv-20162"log_dir: "/tidb-deploy/tikv-20162/log"config:server.labels: { host: "logic-host-2" }- host: wux-labs-vmport: 20163status_port: 20183deploy_dir: "/tidb-deploy/tikv-20163"data_dir: "/tidb-data/tikv-20163"log_dir: "/tidb-deploy/tikv-20163/log"config:server.labels: { host: "logic-host-3" }tiflash_servers:- host: wux-labs-vmmonitoring_servers:- host: wux-labs-vmgrafana_servers:- host: wux-labs-vmalertmanager_servers:- host: wux-labs-vm
配置SSH免密登录
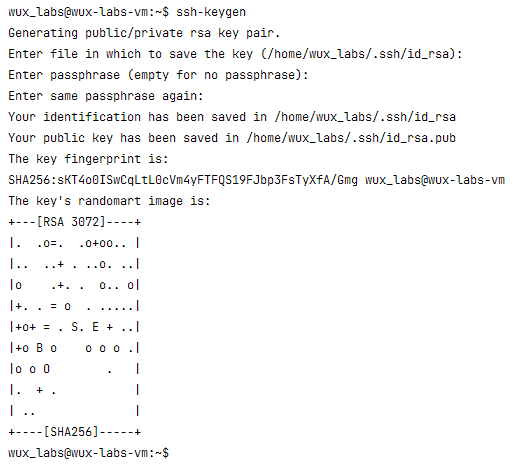
由于是通过中控机安装、管理集群,虽然是单机环境的集群,也需要配置一下SSH免密登录。
wux_labs@wux-labs-vm:~$ ssh-keygen
Generating public/private rsa key pair.
Enter file in which to save the key (/home/wux_labs/.ssh/id_rsa):
Enter passphrase (empty for no passphrase):
Enter same passphrase again:
Your identification has been saved in /home/wux_labs/.ssh/id_rsa
Your public key has been saved in /home/wux_labs/.ssh/id_rsa.pub
The key fingerprint is:
SHA256:sKT4o0ISwCqLtL0cVm4yFTFQS19FJbp3FsTyXfA/Gmg wux_labs@wux-labs-vm
The key's randomart image is:
+---[RSA 3072]----+
|.  .o=.  .o+oo.. |
|..  ..+ . ..o. ..|
|o    .+. .  o.. o|
|+. . = o  . .....|
|+o+ = . S. E + ..|
|+o B o    o o o .|
|o o O        .   |
|.  + .           |
| ..              |
+----[SHA256]-----+
wux_labs@wux-labs-vm:~$
检查安装要求
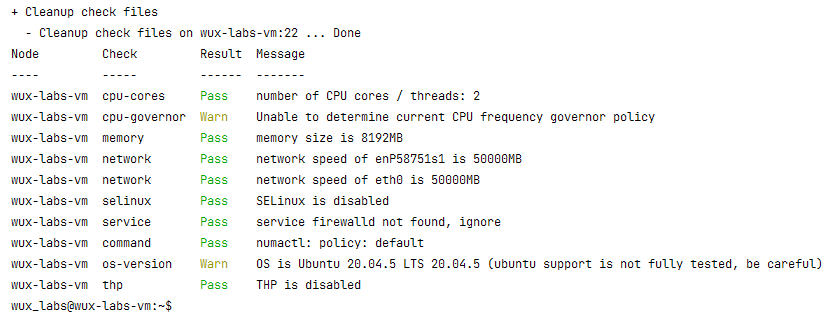
在安装集群之前,为了确保集群安装成功,需要先检查一下服务器是否满足安装集群的要求。执行以下命令进行检查:
tiup cluster check ./topology.yaml
检查过程为:
wux_labs@wux-labs-vm:~$ tiup cluster check ./topology.yaml
tiup is checking updates for component cluster ...
Starting component `cluster`: /home/wux_labs/.tiup/components/cluster/v1.11.3/tiup-cluster check ./topology.yaml+ Detect CPU Arch Name- Detecting node wux-labs-vm Arch info ... Done+ Detect CPU OS Name- Detecting node wux-labs-vm OS info ... Done
+ Download necessary tools- Downloading check tools for linux/amd64 ... Done
+ Collect basic system information
+ Collect basic system information- Getting system info of wux-labs-vm:22 ... Done
+ Check time zone- Checking node wux-labs-vm ... Done
+ Check system requirements
+ Check system requirements
+ Check system requirements
+ Check system requirements- Checking node wux-labs-vm ... Done- Checking node wux-labs-vm ... Done- Checking node wux-labs-vm ... Done- Checking node wux-labs-vm ... Done- Checking node wux-labs-vm ... Done- Checking node wux-labs-vm ... Done- Checking node wux-labs-vm ... Done- Checking node wux-labs-vm ... Done- Checking node wux-labs-vm ... Done- Checking node wux-labs-vm ... Done- Checking node wux-labs-vm ... Done- Checking node wux-labs-vm ... Done
+ Cleanup check files- Cleanup check files on wux-labs-vm:22 ... Done
Node         Check         Result  Message
----         -----         ------  -------
wux-labs-vm  sysctl        Fail    net.ipv4.tcp_syncookies = 1, should be 0
wux-labs-vm  sysctl        Fail    vm.swappiness = 60, should be 0
wux-labs-vm  sysctl        Fail    net.core.somaxconn = 4096, should be greater than 32768
wux-labs-vm  thp           Fail    THP is enabled, please disable it for best performance
wux-labs-vm  command       Fail    numactl not usable, bash: numactl: command not found
wux-labs-vm  os-version    Warn    OS is Ubuntu 20.04.5 LTS 20.04.5 (ubuntu support is not fully tested, be careful)
wux-labs-vm  cpu-cores     Pass    number of CPU cores / threads: 2
wux-labs-vm  memory        Pass    memory size is 8192MB
wux-labs-vm  selinux       Pass    SELinux is disabled
wux-labs-vm  service       Pass    service firewalld not found, ignore
wux-labs-vm  cpu-governor  Warn    Unable to determine current CPU frequency governor policy
wux-labs-vm  network       Pass    network speed of enP58751s1 is 50000MB
wux-labs-vm  network       Pass    network speed of eth0 is 50000MB
wux-labs-vm  limits        Fail    soft limit of 'nofile' for user 'tidb' is not set or too low
wux-labs-vm  limits        Fail    hard limit of 'nofile' for user 'tidb' is not set or too low
wux-labs-vm  limits        Fail    soft limit of 'stack' for user 'tidb' is not set or too low
wux_labs@wux-labs-vm:~$
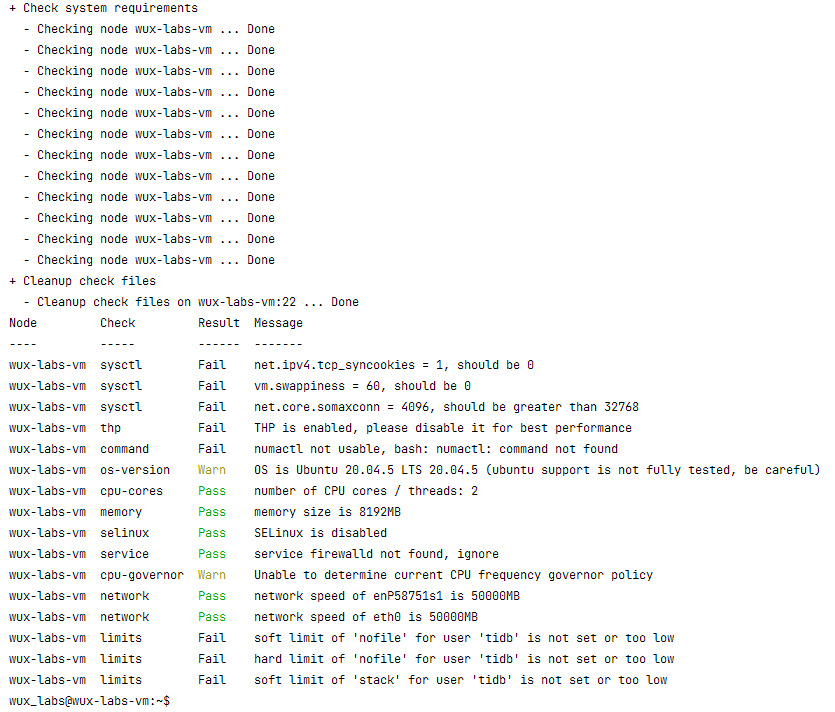
可以看到,检查结果中有失败的项目Fail的。
这里可以手工修复不满足的项,也可以通过以下命令在检查的时候自动修复不满足的。
tiup cluster check ./topology.yaml --apply
命令执行以后,会重复刚才的检查动作,并且在检查完后会多出一步修复的动作,修复不满足的项。
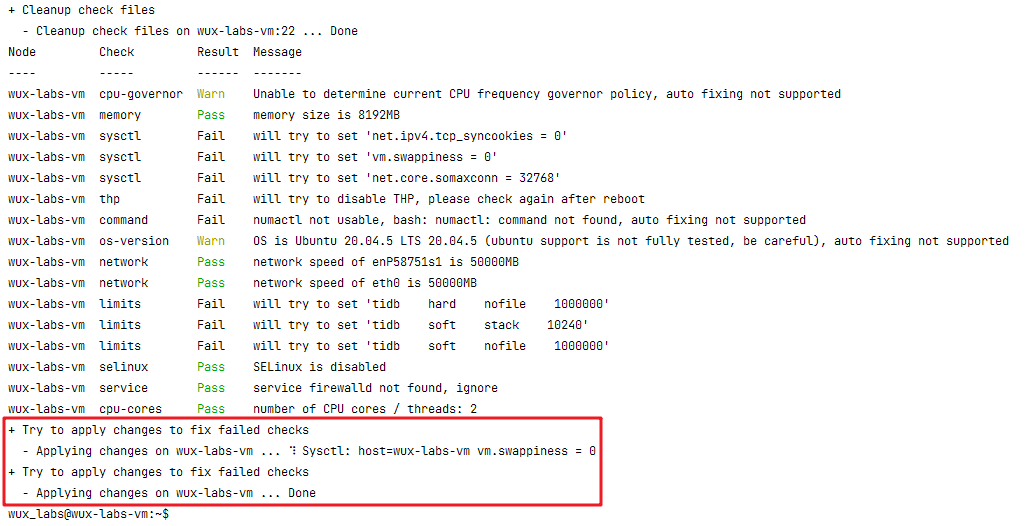
修复完成后再次执行检查,确保配置项都是满足要求的。
[外链图片转存失败,源站可能有防盗链机制,建议将图片保存下来直接上传(img-oBTP8oCO-1676959836469)(https://gitee.com/wux-labs/Blogs/raw/master/images/image-20230215233846044.png)]
这里还差一个numactl软件需要手动安装,在Ubuntu 20.04系统中,执行命令安装软件:
sudo apt-get install numactl

软件安装完成后,再次检查一下,最终检查结果为全部通过。
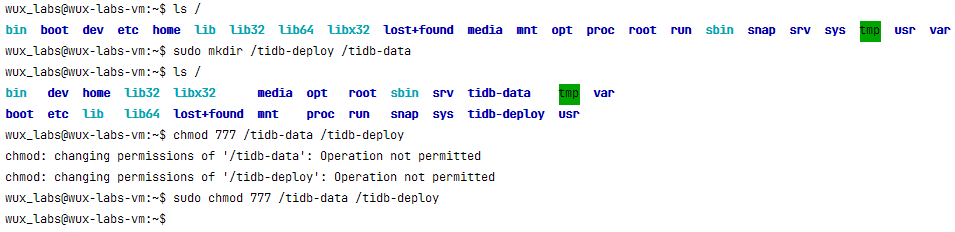
创建安装目录
由于我们指定了集群部署的目录是
deploy_dir: "/tidb-deploy"data_dir: "/tidb-data"
但是我们当前使用的用户并非root用户,所以需要先手动创建一下安装目录。
sudo mkdir /tidb-deploy /tidb-data
sudo chmod 777 /tidb-data /tidb-deploy
部署集群
所有检查项都通过以后,通过deploy部署命令部署TiDB集群,其中cluster1是部署的集群的名字。
tiup cluster deploy cluster1 v6.1.0 ./topology.yaml
在等待确认的地方输入y,确认继续安装。
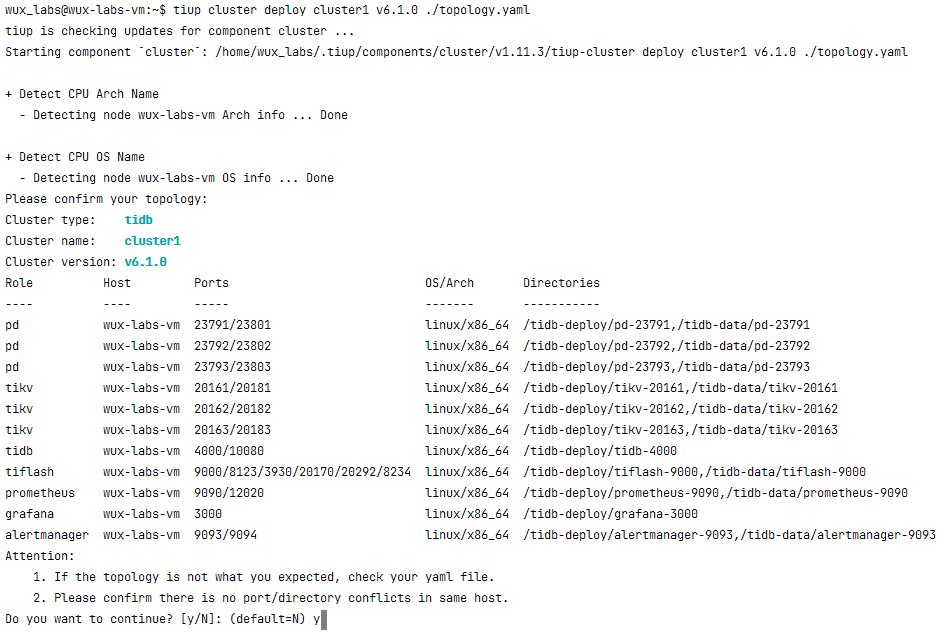
整个安装过程为:
wux_labs@wux-labs-vm:~$ tiup cluster deploy cluster1 v6.1.0 ./topology.yaml
tiup is checking updates for component cluster ...
Starting component `cluster`: /home/wux_labs/.tiup/components/cluster/v1.11.3/tiup-cluster deploy cluster1 v6.1.0 ./topology.yaml+ Detect CPU Arch Name- Detecting node wux-labs-vm Arch info ... Done+ Detect CPU OS Name- Detecting node wux-labs-vm OS info ... Done
Please confirm your topology:
Cluster type:    tidb
Cluster name:    cluster1
Cluster version: v6.1.0
Role          Host         Ports                            OS/Arch       Directories
----          ----         -----                            -------       -----------
pd            wux-labs-vm  23791/23801                      linux/x86_64  /tidb-deploy/pd-23791,/tidb-data/pd-23791
pd            wux-labs-vm  23792/23802                      linux/x86_64  /tidb-deploy/pd-23792,/tidb-data/pd-23792
pd            wux-labs-vm  23793/23803                      linux/x86_64  /tidb-deploy/pd-23793,/tidb-data/pd-23793
tikv          wux-labs-vm  20161/20181                      linux/x86_64  /tidb-deploy/tikv-20161,/tidb-data/tikv-20161
tikv          wux-labs-vm  20162/20182                      linux/x86_64  /tidb-deploy/tikv-20162,/tidb-data/tikv-20162
tikv          wux-labs-vm  20163/20183                      linux/x86_64  /tidb-deploy/tikv-20163,/tidb-data/tikv-20163
tidb          wux-labs-vm  4000/10080                       linux/x86_64  /tidb-deploy/tidb-4000
tiflash       wux-labs-vm  9000/8123/3930/20170/20292/8234  linux/x86_64  /tidb-deploy/tiflash-9000,/tidb-data/tiflash-9000
prometheus    wux-labs-vm  9090/12020                       linux/x86_64  /tidb-deploy/prometheus-9090,/tidb-data/prometheus-9090
grafana       wux-labs-vm  3000                             linux/x86_64  /tidb-deploy/grafana-3000
alertmanager  wux-labs-vm  9093/9094                        linux/x86_64  /tidb-deploy/alertmanager-9093,/tidb-data/alertmanager-9093
Attention:1. If the topology is not what you expected, check your yaml file.2. Please confirm there is no port/directory conflicts in same host.
Do you want to continue? [y/N]: (default=N) y
+ Generate SSH keys ... Done
+ Download TiDB components- Download pd:v6.1.0 (linux/amd64) ... Done- Download tikv:v6.1.0 (linux/amd64) ... Done- Download tidb:v6.1.0 (linux/amd64) ... Done- Download tiflash:v6.1.0 (linux/amd64) ... Done- Download prometheus:v6.1.0 (linux/amd64) ... Done- Download grafana:v6.1.0 (linux/amd64) ... Done- Download alertmanager: (linux/amd64) ... Done- Download node_exporter: (linux/amd64) ... Done- Download blackbox_exporter: (linux/amd64) ... Done
+ Initialize target host environments- Prepare wux-labs-vm:22 ... Done
+ Deploy TiDB instance- Copy pd -> wux-labs-vm ... Done- Copy pd -> wux-labs-vm ... Done- Copy pd -> wux-labs-vm ... Done- Copy tikv -> wux-labs-vm ... Done- Copy tikv -> wux-labs-vm ... Done- Copy tikv -> wux-labs-vm ... Done- Copy tidb -> wux-labs-vm ... Done- Copy tiflash -> wux-labs-vm ... Done- Copy prometheus -> wux-labs-vm ... Done- Copy grafana -> wux-labs-vm ... Done- Copy alertmanager -> wux-labs-vm ... Done- Deploy node_exporter -> wux-labs-vm ... Done- Deploy blackbox_exporter -> wux-labs-vm ... Done
+ Copy certificate to remote host
+ Init instance configs- Generate config pd -> wux-labs-vm:23791 ... Done- Generate config pd -> wux-labs-vm:23792 ... Done- Generate config pd -> wux-labs-vm:23793 ... Done- Generate config tikv -> wux-labs-vm:20161 ... Done- Generate config tikv -> wux-labs-vm:20162 ... Done- Generate config tikv -> wux-labs-vm:20163 ... Done- Generate config tidb -> wux-labs-vm:4000 ... Done- Generate config tiflash -> wux-labs-vm:9000 ... Done- Generate config prometheus -> wux-labs-vm:9090 ... Done- Generate config grafana -> wux-labs-vm:3000 ... Done- Generate config alertmanager -> wux-labs-vm:9093 ... Done
+ Init monitor configs- Generate config node_exporter -> wux-labs-vm ... Done- Generate config blackbox_exporter -> wux-labs-vm ... Done
Enabling component pdEnabling instance wux-labs-vm:23793Enabling instance wux-labs-vm:23792Enabling instance wux-labs-vm:23791Enable instance wux-labs-vm:23791 successEnable instance wux-labs-vm:23792 successEnable instance wux-labs-vm:23793 success
Enabling component tikvEnabling instance wux-labs-vm:20163Enabling instance wux-labs-vm:20161Enabling instance wux-labs-vm:20162Enable instance wux-labs-vm:20163 successEnable instance wux-labs-vm:20162 successEnable instance wux-labs-vm:20161 success
Enabling component tidbEnabling instance wux-labs-vm:4000Enable instance wux-labs-vm:4000 success
Enabling component tiflashEnabling instance wux-labs-vm:9000Enable instance wux-labs-vm:9000 success
Enabling component prometheusEnabling instance wux-labs-vm:9090Enable instance wux-labs-vm:9090 success
Enabling component grafanaEnabling instance wux-labs-vm:3000Enable instance wux-labs-vm:3000 success
Enabling component alertmanagerEnabling instance wux-labs-vm:9093Enable instance wux-labs-vm:9093 success
Enabling component node_exporterEnabling instance wux-labs-vmEnable wux-labs-vm success
Enabling component blackbox_exporterEnabling instance wux-labs-vmEnable wux-labs-vm success
Cluster `cluster1` deployed successfully, you can start it with command: `tiup cluster start cluster1 --init`
wux_labs@wux-labs-vm:~$
至此,集群就算是安装完成了,接下来就可以启动集群了。
启动集群
部署完成后,可以通过命令查看已安装的集群的信息。
- 列出集群列表
tiup cluster list

- 查看集群状态
tiup cluster display cluster1
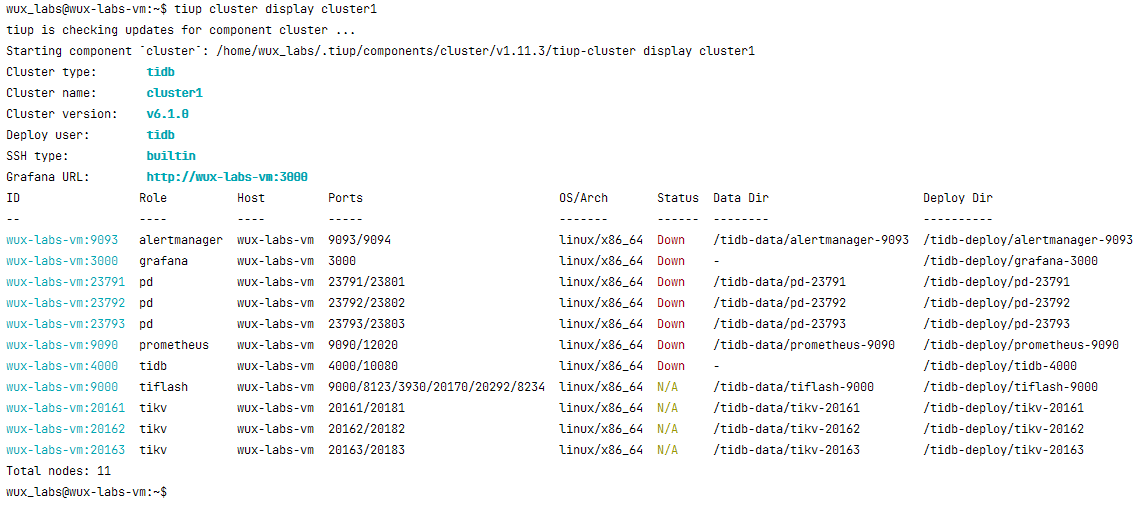
可以看到,当前集群中有11个实例节点,但是都没有启动。
按照提示可以启动集群,其中--init表示安全启动,启动后会给数据库的root用户生成一个密码。
tiup cluster start cluster1 --init
启动过程为:
wux_labs@wux-labs-vm:~$ tiup cluster start cluster1 --init
tiup is checking updates for component cluster ...
Starting component `cluster`: /home/wux_labs/.tiup/components/cluster/v1.11.3/tiup-cluster start cluster1 --init
Starting cluster cluster1...
+ [ Serial ] - SSHKeySet: privateKey=/home/wux_labs/.tiup/storage/cluster/clusters/cluster1/ssh/id_rsa, publicKey=/home/wux_labs/.tiup/storage/cluster/clusters/cluster1/ssh/id_rsa.pub
+ [Parallel] - UserSSH: user=tidb, host=wux-labs-vm
+ [Parallel] - UserSSH: user=tidb, host=wux-labs-vm
+ [Parallel] - UserSSH: user=tidb, host=wux-labs-vm
+ [Parallel] - UserSSH: user=tidb, host=wux-labs-vm
+ [Parallel] - UserSSH: user=tidb, host=wux-labs-vm
+ [Parallel] - UserSSH: user=tidb, host=wux-labs-vm
+ [Parallel] - UserSSH: user=tidb, host=wux-labs-vm
+ [Parallel] - UserSSH: user=tidb, host=wux-labs-vm
+ [Parallel] - UserSSH: user=tidb, host=wux-labs-vm
+ [Parallel] - UserSSH: user=tidb, host=wux-labs-vm
+ [Parallel] - UserSSH: user=tidb, host=wux-labs-vm
+ [ Serial ] - StartCluster
Starting component pdStarting instance wux-labs-vm:23793Starting instance wux-labs-vm:23791Starting instance wux-labs-vm:23792Start instance wux-labs-vm:23792 successStart instance wux-labs-vm:23791 successStart instance wux-labs-vm:23793 success
Starting component tikvStarting instance wux-labs-vm:20163Starting instance wux-labs-vm:20161Starting instance wux-labs-vm:20162Start instance wux-labs-vm:20162 successStart instance wux-labs-vm:20163 successStart instance wux-labs-vm:20161 success
Starting component tidbStarting instance wux-labs-vm:4000Start instance wux-labs-vm:4000 success
Starting component tiflashStarting instance wux-labs-vm:9000Start instance wux-labs-vm:9000 success
Starting component prometheusStarting instance wux-labs-vm:9090Start instance wux-labs-vm:9090 success
Starting component grafanaStarting instance wux-labs-vm:3000Start instance wux-labs-vm:3000 success
Starting component alertmanagerStarting instance wux-labs-vm:9093Start instance wux-labs-vm:9093 success
Starting component node_exporterStarting instance wux-labs-vmStart wux-labs-vm success
Starting component blackbox_exporterStarting instance wux-labs-vmStart wux-labs-vm success
+ [ Serial ] - UpdateTopology: cluster=cluster1
Started cluster `cluster1` successfully
The root password of TiDB database has been changed.
The new password is: '@2XKr^+9&nNZ3U07q6'.
Copy and record it to somewhere safe, it is only displayed once, and will not be stored.
The generated password can NOT be get and shown again.
wux_labs@wux-labs-vm:~$
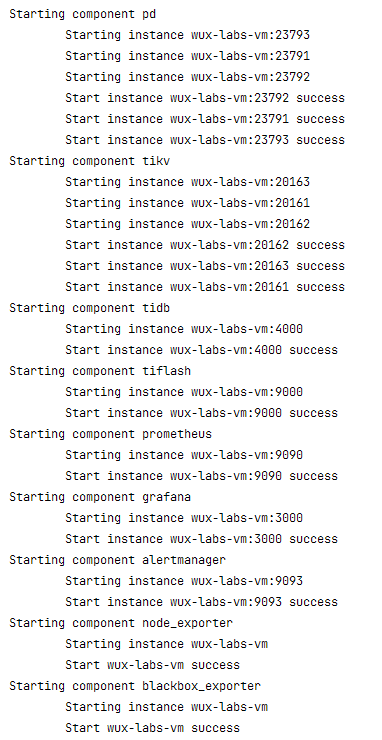
从这个日志中可以看出,TiDB的启动顺序为:

验证集群启动
使用命令验证
启动完成后,再次查看一下集群的状态。
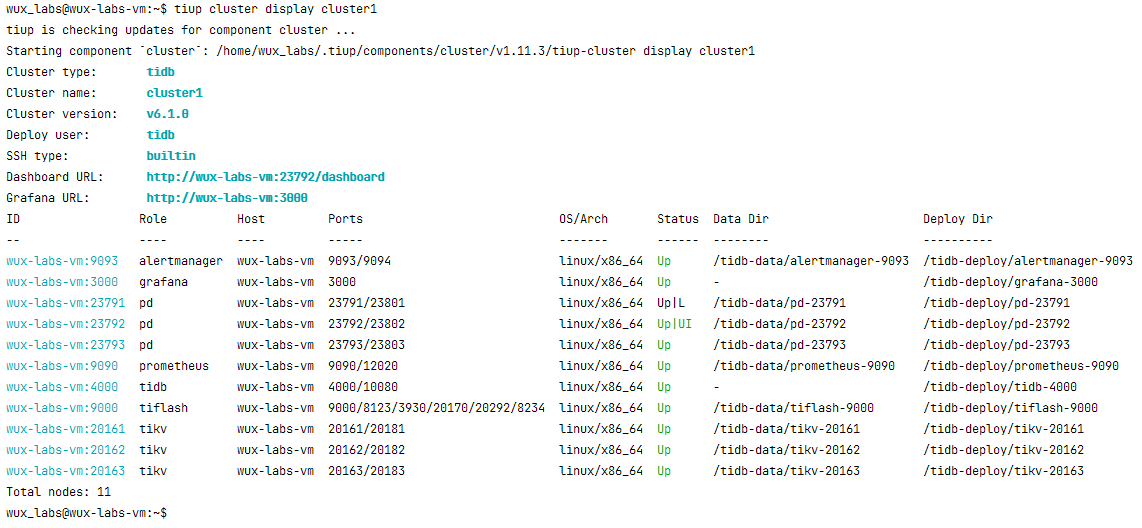
此时,TiDB的实例都启动了。
通过Dashboard查看
根据上面的结果,TiDB的Dashboard的地址为:http://wux-labs-vm:23792/dashboard,直接在浏览器中打开即可。
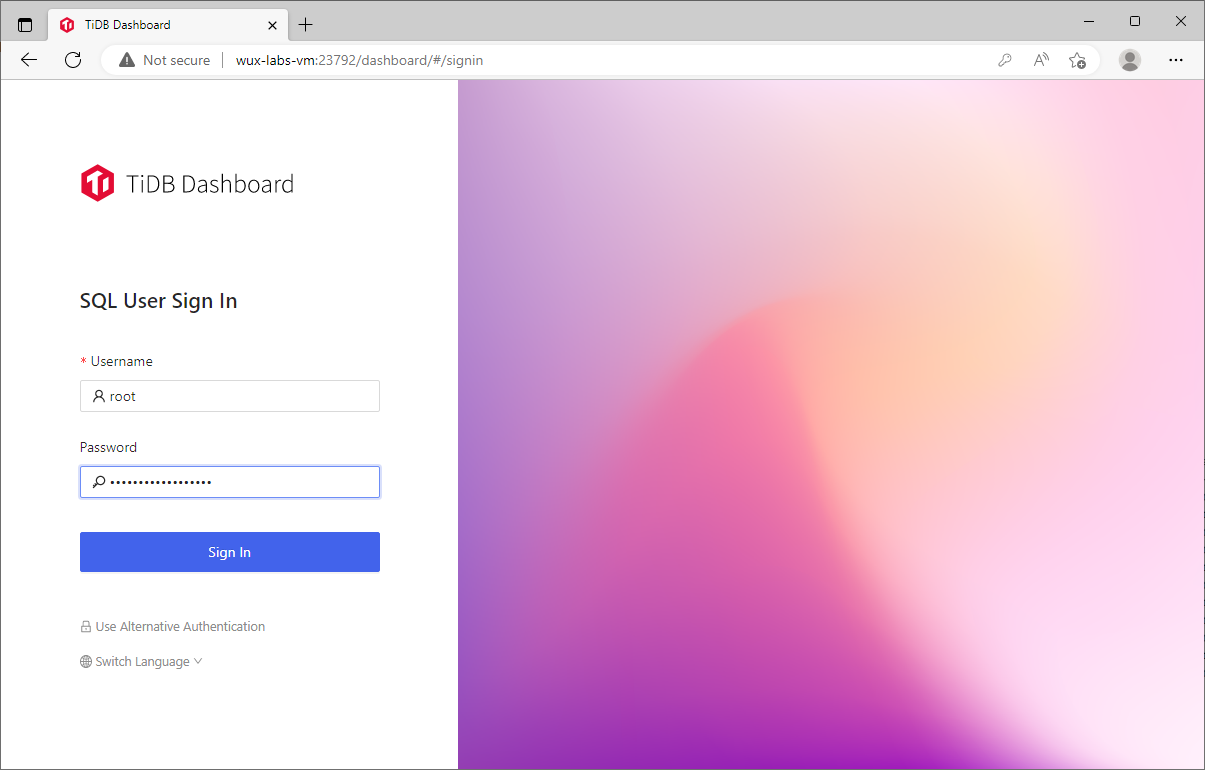
输入用户名和密码登录后可打开Dashboard界面。
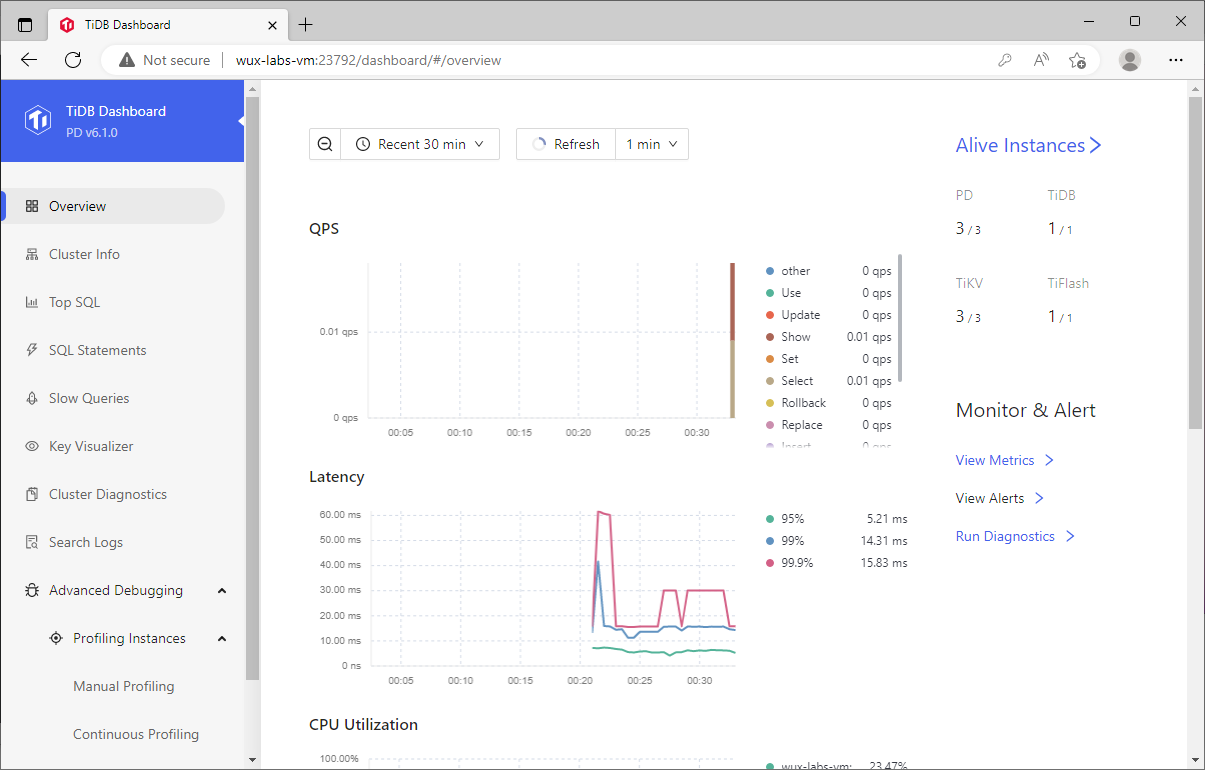
这里面可以实现TiDB数据库集群的监控。
通过Grafana查看
根据上面的结果,TiDB的Grafana的地址为:http://wux-labs-vm:3000,直接在浏览器中打开即可。
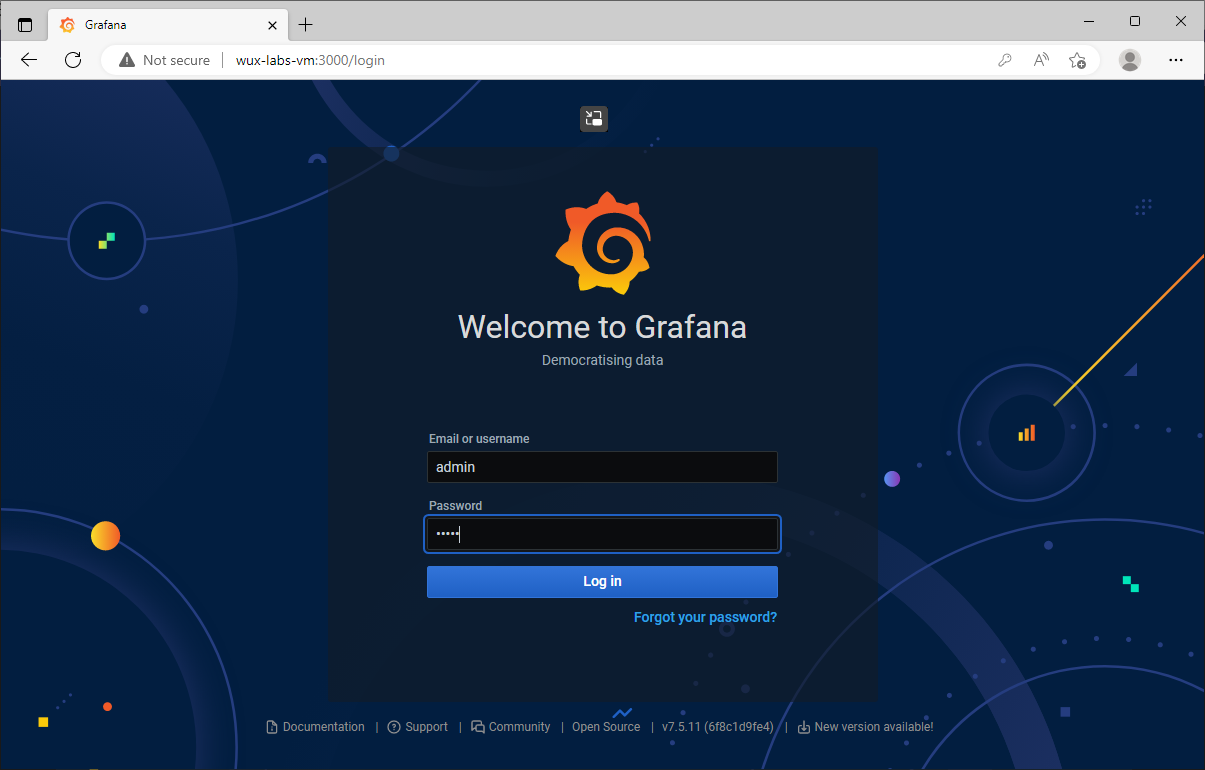
输入用户名和密码可以进入到监控界面。

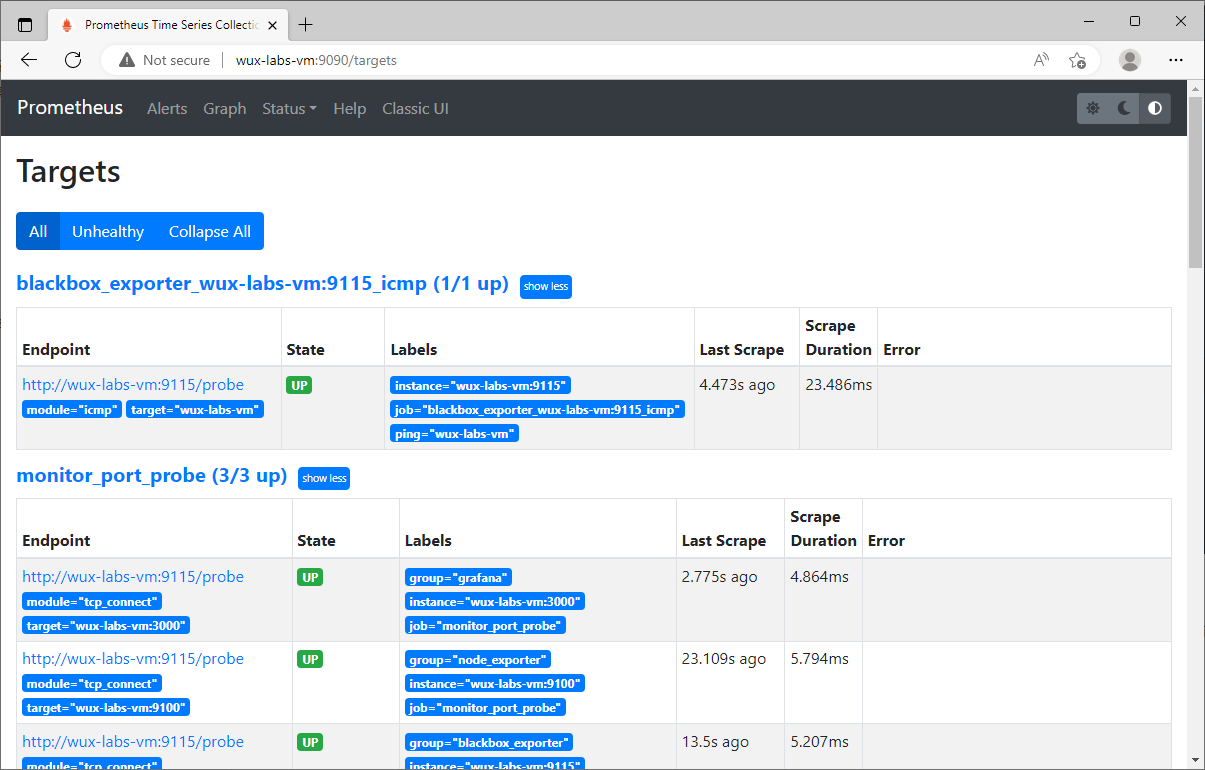
通过Prometheus查看
除了上面几种,还可以直接查看Prometheus的监控数据,地址是http://wux-labs-vm:9090/,直接浏览器打开即可。
写在后面
TiDB是分布式K-V数据库,对集群节点要求比较多,如果每个实例都分别在一台服务器上,则至少需要十几台服务器。单机环境仅作为模拟分布式集群用,不能用于生产环境。
相关文章:
数据库必知必会:TiDB(11)TiDB集群安装
数据库必知必会:TiDB(11)TiDB集群安装TiDB集群安装单机环境上安装集群下载并安装TiUP工具安装TiUP cluster组件创建拓扑文件配置SSH免密登录检查安装要求创建安装目录部署集群启动集群验证集群启动使用命令验证通过Dashboard查看通过Grafana查…...
ubuntu18安装Autoware 标定工具箱
参考链接:https://blog.csdn.net/zbr794866300/article/details/107109186#:~:textAutoware1.10%E4%BB%A5%E4%B8%8A%E7%9A%84%E8%BD%AF%E4%BB%B6%E9%83%BD%E9%9C%80%E8%A6%81%E5%8D%95%E7%8B%AC%E5%AE%89%E8%A3%85%E8%BF%99%E4%B8%AAcalibration%E6%A0%87%E5%AE%9A%…...

【面试题】ES6 如何将 Set 转化为数组
大厂面试题分享 面试题库后端面试题库 (面试必备) 推荐:★★★★★地址:前端面试题库Set 是 ES6 中新增的一种集合类型,类似于数组,但其成员的值是唯一的,即不会重复。关于Set,可以阅…...

vs2022 实现无线调试安卓(Windows)
文章目录VS安装安卓调试环境前提条件Android SDK 版本查看安卓开启无线调试开启开发者模式打开USB调试功能打开无线调试功能查看配对信息(再次点击无限调试,不是switch开关)准备电脑端输入adb命令配对安卓查看设备清单如果没有设备VS无线调试…...
手把手教你做插件(2)模块大串联
0,前言 这篇文章笔记比较简略,大部分的操作都是和上一篇文章重复了,建议先看上一节文章,直达电梯:UE4 手把手教你做插件(1) 从代码引用插件_asiwxy的博客-CSDN博客UE4 手把手教你创建插件https:…...

LU Accepted or Rejected过程介绍
本文介绍LU成功和失败的过程。 LU accepted过程 [MS->NW] MM__LOCATION_UPDATING_REQUEST(LU type:MM_NORMAL_LU) MM_T3210_TIMER_ID Timer starts [NW->MS] MM__LOCATION_UPDATING_ACCEPT MM_T3210_TIMER_ID Timer stopped 通过OTA消息LOCATION_UPDATE_REQUEST查看LU ty…...

Teradata退了? 无所谓,GBASE会出手
近期,就在2月15日,国内IT界有搞出个大瓜,Teradata以对中国当前及未来商业环境的不确定性,慎重考虑后决定退出中国运营,后续将进入中国公司关闭程序。Teradata是一家有着40多年历史的数据仓库企业,被业界专业…...
 | 机试题+算法思路+考点+代码解析 【2023】)
华为OD机试 - 病菌感染(Python) | 机试题+算法思路+考点+代码解析 【2023】
病菌感染 题目 在一个地图中(地图有N*N个区域组成) 有部分区域被感染病菌 感染区域每天都会把周围上下左右的四个区域感染 请根据给定的地图计算多少天以后全部区域都会被感染 如果初始地图上所有区域都被感染 或者没有被感染区域返回-1 备注 1 <= N < 200 输入 一行…...

前置知识-边值问题、打靶法、bvp 系列函数的用法
1.2 边值问题 微分方程边值问题(Boundary Value Problem,简称BVP)是微分方程求解中的一个重要问题。与初值问题(Initial Value Problem,简称IVP)不同,BVP是在某个区间内寻求微分方程解的特定边界条件下的解。 在实际问题中,许多微分方程的解必须满足一些特定的边界条…...

为什么越来越多的企业选择智能客服系统?
现在智能客服系统越来越普遍,但是大部分的企业在配备智能客服系统的同时也会配置人工客服。因为目前为止,智能客服并不可以完全取代人工客服。智能客服系统之所以能够受到众多企业的青睐,主要是存在以下几点原因: 1、反应速度快&a…...

打造一款日志分析工具
一、简介 作为一名安全从业者,网络安全事件的应急响应工作是必不可少的,那么在应急支撑时,针对大量的日志数据便需要借助自动化工具实现快速的归类检测,并提取出所需的关键日志数据。本篇文章主要通过利用python语言编写一款web日…...

网络编程基础知识
套接字类型:1.字节流套接字(stream) 2.数据报接套接字(datagram) 3.原始套接字(raw) 端口:1.周知端口: 0~1023 2.注册端口: 1024~49151 3.动态端口: 49152~65535 OSI七层协议结构应用层表示层会话层...
)
2023北京老博会(CBIAIE全国老年产业必参盛会)
CBIAIE北京老博会|把握政策导向,迎合市场需求,引导销售渠道建设,搭建国际化的商业平台; 2023第十届中国(北京)国际老年产业博览会(CBIAIE北京老博会) The 2023 tenth China (Beijin…...
【字典转模型 Objective-C语言】
一、点按钮,弹出的这个效果,这实际上是个Label, 这实际上是一个Label,点按钮弹出的这个效果, 设置一个Label的背景色、前景色、透明度、等等, 让它加进来,然后通过动画让它隐藏掉, 这就是,这个效果的实现思路, 咱们这个效果,先稍微往后放一放, 这个并不是重点…...
【LeetCode】剑指 Offer(6)
目录 写在前面: 题目:剑指 Offer 12. 矩阵中的路径 - 力扣(Leetcode) 题目的接口: 解题思路: 代码: 过啦!!! 写在最后: 写在前面ÿ…...

论文投稿指南——中文核心期刊推荐(法律)
【前言】 🚀 想发论文怎么办?手把手教你论文如何投稿!那么,首先要搞懂投稿目标——论文期刊 🎄 在期刊论文的分布中,存在一种普遍现象:即对于某一特定的学科或专业来说,少数期刊所含…...

Qt音视频开发15-动态切换解码内核的设计
一、前言 动态切换解码内核这个需求也是源自客户的真实需求,既然是动态切换,那肯定是运行期间切换,而不是通过改变标志位重新编译程序来切换,最开始做的就是这种方式,这样就是实现起来简单,但是用起来不够…...

concurrent-map 和 sync.Map,我该选择哪个?
官方的map并不是线程安全的,如果我们在多线程中并发对一个map进行读写操作,是会引发panic的。解决方案除了使用锁来对map进行保护外,还有两种方式:一,开源项目 concurrent-map 提供了可以用来做并发安全的map二&#x…...

华为OD机试 - 最少数量线段覆盖| 机试题算法思路 【2023】
最近更新的博客 华为OD机试 - 简易压缩算法(Python) | 机试题算法思路 【2023】 华为OD机试题 - 获取最大软件版本号(JavaScript) 华为OD机试 - 猜字谜(Python) | 机试题+算法思路 【2023】 华为OD机试 - 删除指定目录(Python) | 机试题算法思路 【2023】 华为OD机试 …...

【蓝桥集训】第五天——递推
作者:指针不指南吗 专栏:Acwing 蓝桥集训每日一题 🐾或许会很慢,但是不可以停下来🐾 文章目录1.砖块递推算法是一种简单的算法,通过已知条件,利用特定关系得出中间推论,逐步递推&…...

Phi-4-mini-reasoning保姆级教程:14GB显存跑通128K长上下文推理
Phi-4-mini-reasoning保姆级教程:14GB显存跑通128K长上下文推理 1. 模型介绍 Phi-4-mini-reasoning是微软推出的3.8B参数轻量级开源模型,专为数学推理、逻辑推导和多步解题等强逻辑任务设计。这个模型主打"小参数、强推理、长上下文、低延迟"…...

javaweb铁路火车接发车课程作业培训考试系统证书
目录同行可拿货,招校园代理 ,本人源头供货商铁路火车接发车课程作业培训考试系统证书的功能分析系统概述功能模块分析技术实现要点行业合规性扩展功能建议项目技术支持源码获取详细视频演示 :文章底部获取博主联系方式!同行可合作同行可拿货,招校园代理 …...

JetBrains IDE重置工具终极指南:30天试用无限续杯的完整教程
JetBrains IDE重置工具终极指南:30天试用无限续杯的完整教程 【免费下载链接】ide-eval-resetter 项目地址: https://gitcode.com/gh_mirrors/id/ide-eval-resetter 你是否经历过这样的场景:深夜加班赶项目,JetBrains IDE突然弹出&qu…...
)
告别while循环轮询!用STM32 HAL库定时器中断实现按键扫描(附状态机源码)
STM32高效按键处理实战:定时器中断与状态机的完美结合 在嵌入式开发中,按键处理看似简单却暗藏玄机。传统while循环轮询方式不仅占用CPU资源,还容易导致代码结构混乱。本文将带你用STM32 HAL库的定时器中断和状态机,实现一套高效、…...

GLM-4.1V-9B-Base效果展示:低光照/模糊图像中的主体鲁棒识别实例
GLM-4.1V-9B-Base效果展示:低光照/模糊图像中的主体鲁棒识别实例 1. 模型能力概览 GLM-4.1V-9B-Base是智谱开源的视觉多模态理解模型,专为复杂视觉场景设计。这个模型最令人印象深刻的能力之一,就是在低光照、模糊等恶劣图像条件下依然能准…...

利用快马平台自动化生成contextmenumanager提升前端开发效率
最近在开发一个后台管理系统时,遇到了一个很常见的需求:需要为表格、图表等元素添加右键菜单功能。这种需求看似简单,但实际开发中却要花费不少时间在重复的配置工作上。经过一番摸索,我发现利用InsCode(快马)平台可以大幅提升这类…...

告别命令行恐惧:FastbootEnhance如何让Android刷机变得像点菜一样简单?
告别命令行恐惧:FastbootEnhance如何让Android刷机变得像点菜一样简单? 【免费下载链接】FastbootEnhance A user-friendly Fastboot ToolBox & Payload Dumper for Windows 项目地址: https://gitcode.com/gh_mirrors/fa/FastbootEnhance 还…...

PCB开窗技术:提升电流承载能力的关键工艺
1. PCB开窗技术解析:从概念到应用在PCB设计领域,"开窗"这个术语经常被经验丰富的工程师挂在嘴边,但对于刚入行的新手来说,这个看似简单的操作背后却蕴含着不少设计门道。作为一名有十年硬件设计经验的工程师,…...

一键部署Chat2DB:Docker与cpolar打造跨地域数据库管理神器
1. 为什么你需要Chat2DB和Docker的黄金组合 最近两年有个特别明显的趋势:数据正在从专业领域走向全民化。我见过太多产品经理被SQL卡住脖子,市场团队等一份报表要排期三天,甚至财务同事为了跑个月度数据要专门请IT部门吃饭。直到去年第一次用…...

Oracle 身份证号码解析与年龄计算实战指南
1. 身份证号码解析基础 身份证号码作为个人身份标识,蕴含着丰富的个人信息。在Oracle数据库中处理身份证数据时,首先需要理解其编码规则。我国现行18位身份证号码由6位地区码、8位出生日期、3位顺序码和1位校验码组成。其中第7到14位就是关键的出生日期信…...