OpenGL学习日记之模型绘制
自己编译运行过程中遇到的一些问题
下载Assimp已编译的lib(因为我们公司的电脑有很多权限和限制,也不能自己安装一些没有报备的软件,所以愁方便我就没有用cMake自己编译了)找到一位免费分享的博主的。
https://blog.csdn.net/lady_killer9/article/details/89429092
系统找不到zlib.dll文件的解决方法
https://blog.csdn.net/LHXvs2015/article/details/120674525
https://www.cnblogs.com/yangjinbang/p/8330786.html
下载Assimp可识别的模型地址
https://learnopengl-cn.github.io/03%20Model%20Loading/03%20Model/
现实生活中,我们都是美术同学通过一些现代的绘图工具,为我们导出模型来绘制,建模工具会自己生成所有的顶点坐标、顶点法线和纹理坐标,我们开发者就不需要去关注这些细节了。
Mesh
Mesh俗称网格,一个网格代表可绘制的实体。我们自定义一个网格类
至少要包含一组顶点数据,这组顶点数据应该包含顶点坐标,顶点法线,已经顶点的uv坐标。
一组绘制顺序索引,用于EBO绑定。
一组贴图数据,用于纹理映射。
#pragma once
// Std. Includes
#include <string>
#include <fstream>
#include <sstream>
#include <iostream>
#include <vector>
using namespace std;
// GL Includes
#include <GL/glew.h> // Contains all the necessery OpenGL includes
#include <glm/glm.hpp>
#include <glm/gtc/matrix_transform.hpp>struct Vertex {// Positionglm::vec3 Position;// Normalglm::vec3 Normal;// TexCoordsglm::vec2 TexCoords;
};struct Texture {GLuint id;string type;aiString path;
};class Mesh {
public:  vector<Vertex> vertices;vector<GLuint> indices;vector<Texture> textures;//构造函数Mesh(vector<Vertex> vertices, vector<GLuint> indices, vector<Texture> textures){this->vertices = vertices;this->indices = indices;this->textures = textures;// Now that we have all the required data, set the vertex buffers and its attribute pointers.this->setupMesh();}void Draw(Shader shader){       GLuint diffuseNr = 1;GLuint specularNr = 1; //绑定贴图与采样器for (GLuint i = 0; i < this->textures.size(); i++){glActiveTexture(GL_TEXTURE0 + i);        stringstream ss;string number;string name = this->textures[i].type;if (name == "texture_diffuse")ss << diffuseNr++; else if (name == "texture_specular")ss << specularNr++; number = ss.str(); //保证每个uniform采样器对应着正确的纹理单元glUniform1i(glGetUniformLocation(shader.Program, (name + number).c_str()), i);           glBindTexture(GL_TEXTURE_2D, this->textures[i].id);}glUniform1f(glGetUniformLocation(shader.Program, "material.shininess"), 16.0f);glBindVertexArray(this->VAO);glDrawElements(GL_TRIANGLES, this->indices.size(), GL_UNSIGNED_INT, 0);glBindVertexArray(0);for (GLuint i = 0; i < this->textures.size(); i++){glActiveTexture(GL_TEXTURE0 + i);glBindTexture(GL_TEXTURE_2D, 0);}}
private:  GLuint VAO, VBO, EBO;//初始化各种缓冲和链接数据void setupMesh(){//初始化VAO,VBO,EBO 缓冲对象glGenVertexArrays(1, &this->VAO);glGenBuffers(1, &this->VBO);glGenBuffers(1, &this->EBO);glBindVertexArray(this->VAO);//将顶点数据初始化至缓冲中glBindBuffer(GL_ARRAY_BUFFER, this->VBO);glBufferData(GL_ARRAY_BUFFER, this->vertices.size() * sizeof(Vertex), &this->vertices[0], GL_STATIC_DRAW);//将绘制顺序索引初始到缓冲中glBindBuffer(GL_ELEMENT_ARRAY_BUFFER, this->EBO);glBufferData(GL_ELEMENT_ARRAY_BUFFER, this->indices.size() * sizeof(GLuint), &this->indices[0], GL_STATIC_DRAW);    glEnableVertexAttribArray(0);//将数据链接到顶点属性,告诉openGL如何解析这些数据glVertexAttribPointer(0, 3, GL_FLOAT, GL_FALSE, sizeof(Vertex), (GLvoid*)0);glEnableVertexAttribArray(1);glVertexAttribPointer(1, 3, GL_FLOAT, GL_FALSE, sizeof(Vertex), (GLvoid*)offsetof(Vertex, Normal));glEnableVertexAttribArray(2);glVertexAttribPointer(2, 2, GL_FLOAT, GL_FALSE, sizeof(Vertex), (GLvoid*)offsetof(Vertex, TexCoords));glBindVertexArray(0);}
};
模型类
现实生活中一个我们看到的模型都是由很多部位组成的,也可以说成是由很多mesh组合而成的,比如一张桌子,是由一个桌板加四个桌脚拼成的为了方便抽象,我们又封装了一层模型的类。
这个类主要就是去解析美术给我们的一个从Blender,Maya等工具导出的模型,将其拆分为一个Mesh数组,然后再调用Mesh类的绘制。
#pragma once
// Std. Includes
#include <string>
#include <fstream>
#include <sstream>
#include <iostream>
#include <map>
#include <vector>
using namespace std;
// GL Includes
#include <GL/glew.h> // Contains all the necessery OpenGL includes
#include <glm/glm.hpp>
#include <glm/gtc/matrix_transform.hpp>
#include <SOIL.h>
#include <assimp/Importer.hpp>
#include <assimp/scene.h>
#include <assimp/postprocess.h>#include "Mesh.h"GLint TextureFromFile(const char* path, string directory);class Model
{
public:/*  Functions   */// Constructor, expects a filepath to a 3D model.Model(string path){this->loadModel(path);}// Draws the model, and thus all its meshesvoid Draw(Shader shader){for (GLuint i = 0; i < this->meshes.size(); i++)this->meshes[i].Draw(shader);}private:/*  Model Data  */vector<Mesh> meshes;string directory;vector<Texture> textures_loaded;	// Stores all the textures loaded so far, optimization to make sure textures aren't loaded more than once.int mycount = 0;void loadModel(string path){Assimp::Importer importer;const aiScene* scene = importer.ReadFile(path, aiProcess_Triangulate | aiProcess_FlipUVs);     if (!scene || scene->mFlags == AI_SCENE_FLAGS_INCOMPLETE || !scene->mRootNode) // if is Not Zero{cout << "ERROR::ASSIMP:: " << importer.GetErrorString() << endl;return;}       this->directory = path.substr(0, path.find_last_of('/'));this->processNode(scene->mRootNode, scene);//printf("mesh个数: %d", mycount);}void processNode(aiNode* node, const aiScene* scene){for (GLuint i = 0; i < node->mNumMeshes; i++){           aiMesh* mesh = scene->mMeshes[node->mMeshes[i]];          this->meshes.push_back(this->processMesh(mesh, scene));}       for (GLuint i = 0; i < node->mNumChildren; i++){this->processNode(node->mChildren[i], scene);}}Mesh processMesh(aiMesh* mesh, const aiScene* scene){mycount++;vector<Vertex> vertices;vector<GLuint> indices;vector<Texture> textures;for (GLuint i = 0; i < mesh->mNumVertices; i++){Vertex vertex;glm::vec3 vector; vector.x = mesh->mVertices[i].x;vector.y = mesh->mVertices[i].y;vector.z = mesh->mVertices[i].z;vertex.Position = vector;vector.x = mesh->mNormals[i].x;vector.y = mesh->mNormals[i].y;vector.z = mesh->mNormals[i].z;vertex.Normal = vector;if (mesh->mTextureCoords[0]) {glm::vec2 vec;               vec.x = mesh->mTextureCoords[0][i].x;vec.y = mesh->mTextureCoords[0][i].y;vertex.TexCoords = vec;}elsevertex.TexCoords = glm::vec2(0.0f, 0.0f);vertices.push_back(vertex);}for (GLuint i = 0; i < mesh->mNumFaces; i++){aiFace face = mesh->mFaces[i];for (GLuint j = 0; j < face.mNumIndices; j++)indices.push_back(face.mIndices[j]);}if (mesh->mMaterialIndex >= 0){aiMaterial* material = scene->mMaterials[mesh->mMaterialIndex];            vector<Texture> diffuseMaps = this->loadMaterialTextures(material, aiTextureType_DIFFUSE, "texture_diffuse");textures.insert(textures.end(), diffuseMaps.begin(), diffuseMaps.end());vector<Texture> specularMaps = this->loadMaterialTextures(material, aiTextureType_SPECULAR, "texture_specular");textures.insert(textures.end(), specularMaps.begin(), specularMaps.end());}      return Mesh(vertices, indices, textures);}vector<Texture> loadMaterialTextures(aiMaterial* mat, aiTextureType type, string typeName){vector<Texture> textures;for (GLuint i = 0; i < mat->GetTextureCount(type); i++){aiString str;mat->GetTexture(type, i, &str);           GLboolean skip = false;for (GLuint j = 0; j < textures_loaded.size(); j++){if (std::strcmp(textures_loaded[j].path.C_Str(), str.C_Str()) == 0){textures.push_back(textures_loaded[j]);skip = true; break;}}if (!skip){  Texture texture;texture.id = TextureFromFile(str.C_Str(), this->directory);texture.type = typeName;texture.path = str;textures.push_back(texture);this->textures_loaded.push_back(texture); }}return textures;}
};GLint TextureFromFile(const char* path, string directory)
{  string filename = string(path);filename = directory + '/' + filename;GLuint textureID;glGenTextures(1, &textureID);int width, height;unsigned char* image = SOIL_load_image(filename.c_str(), &width, &height, 0, SOIL_LOAD_RGB);glBindTexture(GL_TEXTURE_2D, textureID);glTexImage2D(GL_TEXTURE_2D, 0, GL_RGB, width, height, 0, GL_RGB, GL_UNSIGNED_BYTE, image);glGenerateMipmap(GL_TEXTURE_2D);glTexParameteri(GL_TEXTURE_2D, GL_TEXTURE_WRAP_S, GL_REPEAT);glTexParameteri(GL_TEXTURE_2D, GL_TEXTURE_WRAP_T, GL_REPEAT);glTexParameteri(GL_TEXTURE_2D, GL_TEXTURE_MIN_FILTER, GL_LINEAR_MIPMAP_LINEAR);glTexParameteri(GL_TEXTURE_2D, GL_TEXTURE_MAG_FILTER, GL_LINEAR);glBindTexture(GL_TEXTURE_2D, 0);SOIL_free_image_data(image);return textureID;
}
最后就是渲染代码
```cpp
// Std. Includes
#include <string>// GLEW
#define GLEW_STATIC
#include <GL/glew.h>// GLFW
#include <GLFW/glfw3.h>// GL includes
#include "Shader.h"
#include "Camera.h"
#include "Model.h"// GLM Mathemtics
#include <glm/glm.hpp>
#include <glm/gtc/matrix_transform.hpp>
#include <glm/gtc/type_ptr.hpp>// Other Libs
#include <SOIL.h>// Properties
GLuint screenWidth = 800, screenHeight = 600;// Function prototypes
void key_callback(GLFWwindow* window, int key, int scancode, int action, int mode);
void scroll_callback(GLFWwindow* window, double xoffset, double yoffset);
void mouse_callback(GLFWwindow* window, double xpos, double ypos);
void Do_Movement();const GLuint WIDTH = 800, HEIGHT = 600;
// Camera
glm::vec3 cameraPos = glm::vec3(0.0f, 0.0f, 3.0f);
glm::vec3 cameraFront = glm::vec3(0.0f, 0.0f, -1.0f);
glm::vec3 cameraUp = glm::vec3(0.0f, 1.0f, 0.0f);
GLfloat yaw = -90.0f;	// Yaw is initialized to -90.0 degrees since a yaw of 0.0 results in a direction vector pointing to the right (due to how Eular angles work) so we initially rotate a bit to the left.
GLfloat pitch = 0.0f;
GLfloat lastX = WIDTH / 2.0;
GLfloat lastY = HEIGHT / 2.0;
bool keys[1024];
bool firstMouse = true;GLfloat deltaTime = 0.0f;
GLfloat lastFrame = 0.0f;// The MAIN function, from here we start our application and run our Game loop
int main()
{// Init GLFWglfwInit();glfwWindowHint(GLFW_CONTEXT_VERSION_MAJOR, 3);glfwWindowHint(GLFW_CONTEXT_VERSION_MINOR, 3);glfwWindowHint(GLFW_OPENGL_PROFILE, GLFW_OPENGL_CORE_PROFILE);glfwWindowHint(GLFW_RESIZABLE, GL_FALSE);GLFWwindow* window = glfwCreateWindow(screenWidth, screenHeight, "LearnOpenGL", nullptr, nullptr); // WindowedglfwMakeContextCurrent(window);// Set the required callback functionsglfwSetKeyCallback(window, key_callback);glfwSetCursorPosCallback(window, mouse_callback);glfwSetScrollCallback(window, scroll_callback);// OptionsglfwSetInputMode(window, GLFW_CURSOR, GLFW_CURSOR_DISABLED);// Initialize GLEW to setup the OpenGL Function pointersglewExperimental = GL_TRUE;glewInit();// Define the viewport dimensionsglViewport(0, 0, screenWidth, screenHeight);// Setup some OpenGL optionsglEnable(GL_DEPTH_TEST);// Setup and compile our shadersShader shader("VertexShaderSource2_2_1.txt", "FragmentShaderSource2_2_1.txt");// Load modelsModel ourModel("nanosuit/nanosuit.obj");// Draw in wireframe//glPolygonMode(GL_FRONT_AND_BACK, GL_LINE);// Game loopwhile (!glfwWindowShouldClose(window)){// Set frame timeGLfloat currentFrame = glfwGetTime();deltaTime = currentFrame - lastFrame;lastFrame = currentFrame;// Check and call eventsglfwPollEvents();Do_Movement();// Clear the colorbufferglClearColor(0.05f, 0.05f, 0.05f, 1.0f);glClear(GL_COLOR_BUFFER_BIT | GL_DEPTH_BUFFER_BIT);shader.Use();   // <-- Don't forget this one!// Transformation matricesglm::mat4 view(1);glm::mat4 projection(1);view = glm::lookAt(cameraPos, cameraPos + cameraFront, cameraUp);projection = glm::perspective(45.0f, (GLfloat)WIDTH / (GLfloat)HEIGHT, 0.1f, 100.0f);// Get the uniform locationsglUniformMatrix4fv(glGetUniformLocation(shader.Program, "projection"), 1, GL_FALSE, glm::value_ptr(projection));glUniformMatrix4fv(glGetUniformLocation(shader.Program, "view"), 1, GL_FALSE, glm::value_ptr(view));// Draw the loaded modelglm::mat4 model(1);model = glm::translate(model, glm::vec3(0.0f, -1.75f, 0.0f)); // Translate it down a bit so it's at the center of the scenemodel = glm::scale(model, glm::vec3(0.2f, 0.2f, 0.2f));	// It's a bit too big for our scene, so scale it downglUniformMatrix4fv(glGetUniformLocation(shader.Program, "model"), 1, GL_FALSE, glm::value_ptr(model));ourModel.Draw(shader);// Swap the buffersglfwSwapBuffers(window);}glfwTerminate();return 0;
}#pragma region "User input"// Moves/alters the camera positions based on user input
void Do_Movement()
{// Camera controlsGLfloat cameraSpeed = 5.0f * deltaTime;if (keys[GLFW_KEY_W])cameraPos += cameraSpeed * cameraFront;if (keys[GLFW_KEY_S])cameraPos -= cameraSpeed * cameraFront;if (keys[GLFW_KEY_A])cameraPos -= glm::normalize(glm::cross(cameraFront, cameraUp)) * cameraSpeed;if (keys[GLFW_KEY_D])cameraPos += glm::normalize(glm::cross(cameraFront, cameraUp)) * cameraSpeed;
}// Is called whenever a key is pressed/released via GLFW
void key_callback(GLFWwindow* window, int key, int scancode, int action, int mode)
{if (key == GLFW_KEY_ESCAPE && action == GLFW_PRESS)glfwSetWindowShouldClose(window, GL_TRUE);if (action == GLFW_PRESS)keys[key] = true;else if (action == GLFW_RELEASE)keys[key] = false;
}void mouse_callback(GLFWwindow* window, double xpos, double ypos)
{/*if (firstMouse)
{lastX = xpos;lastY = ypos;firstMouse = false;
}GLfloat xoffset = xpos - lastX;
GLfloat yoffset = lastY - ypos; // Reversed since y-coordinates go from bottom to left
lastX = xpos;
lastY = ypos;GLfloat sensitivity = 0.05;	// Change this value to your liking
xoffset *= sensitivity;
yoffset *= sensitivity;yaw += xoffset;
pitch += yoffset;// Make sure that when pitch is out of bounds, screen doesn't get flipped
if (pitch > 89.0f)pitch = 89.0f;
if (pitch < -89.0f)pitch = -89.0f;glm::vec3 front;
front.x = cos(glm::radians(yaw)) * cos(glm::radians(pitch));
front.y = sin(glm::radians(pitch));
front.z = sin(glm::radians(yaw)) * cos(glm::radians(pitch));
cameraFront = glm::normalize(front);*/
}void scroll_callback(GLFWwindow* window, double xoffset, double yoffset)
{}#pragma endregion
顶点着色器代码
#version 330 core
layout (location = 0) in vec3 position;
layout (location = 1) in vec3 normal;
layout (location = 2) in vec2 texCoords;out vec2 TexCoords;uniform mat4 model;
uniform mat4 view;
uniform mat4 projection;void main()
{gl_Position = projection * view * model * vec4(position, 1.0f);TexCoords = texCoords;
}
片段着色器代码
#version 330 corein vec2 TexCoords;out vec4 color;uniform sampler2D texture_diffuse1;void main()
{    color = vec4(texture(texture_diffuse1, TexCoords));
}
参考链接:https://learnopengl-cn.readthedocs.io/zh/latest/03%20Model%20Loading/03%20Model/
相关文章:
OpenGL学习日记之模型绘制
自己编译运行过程中遇到的一些问题 下载Assimp已编译的lib(因为我们公司的电脑有很多权限和限制,也不能自己安装一些没有报备的软件,所以愁方便我就没有用cMake自己编译了)找到一位免费分享的博主的。 https://blog.csdn.net/lady_killer9/article/deta…...

Springboot接口多个DTO入参的Postman上传方式
在Java中使用Spring Boot框架时,可以同时使用多个DTO作为方法参数。 TO(Data Transfer Object)是一个常见的设计模式,用于封装数据传输对象。它通常用于将数据从一个层传递到另一个层,例如将数据从服务层传递到控制器…...

软考各科目考核内容详细介绍,看这里
新手在准备报考软考时,都会遇到这样的一个问题——科目这么多,我适合考什么?要想知道自己适合报什么科目,就需要了解每个科目是什么,考什么等一系列的问题。 接下来,就为大家介绍一下软考的各个科目&#…...
连续时间信号与离散时间信号
前言 《信号与系统》是一门很难的课,也是许多学校考研要考的专业课,由于每周只有两节课,所以每次上完都要及时的去复习,这里参考的教材是奥本海姆著作,刘海棠译,北京:电子工业出版社࿰…...

TPM密钥管理、使用
前面讲过证书相关内容,除了在软件方面有所应用外,在硬件方面也有很多应用。本次讲一下TPM相关的内容。 一、TPM介绍 1.1背景 TCG基于硬件安全的架构是为应对1990s后期日益增多的复杂恶意软件攻击应用而生的。当时以及现在,抵御PC客户端网络…...
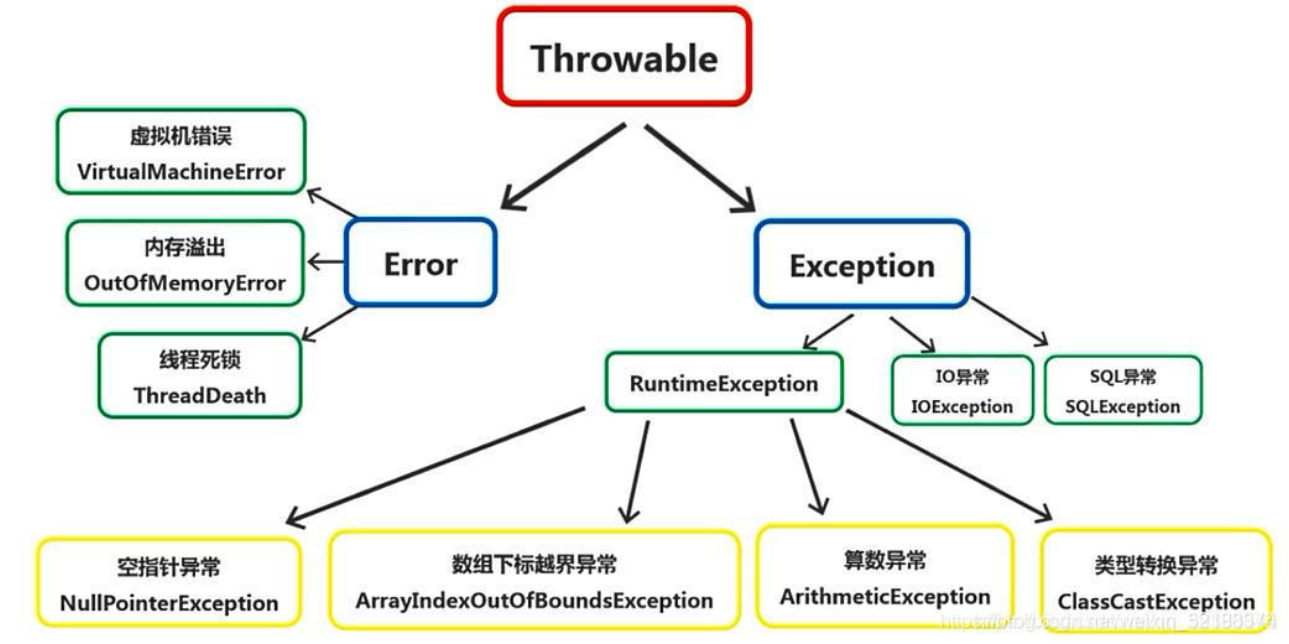
return和finally执行顺序、运行时异常与一般异常异同、error和exception区别、Java异常处理机制原理与应用
文章目录1.try {}里有一个return语句,那么紧跟在这个try后的finally{}里的code会不会被执行,什么时候被执行,在return前还是后?2.运行时异常与一般异常有何异同?3.java 程序中的错误有三种类型分别是什么4.error和exception有什么…...
我为什么放弃WinUI3
基于WinUI3开发HiNote已经有一个多月的时间了,算是做出来一个简单能用的C端软件。 基于个人的经历,说说其中的开发体验。 UI设计语言 无论是否抄袭苹果,WinUI3给人的感觉都是眼前一亮的。简洁美观,现代化,毛玻璃的美…...

2023年全国最新安全员精选真题及答案2
百分百题库提供安全员考试试题、建筑安全员考试预测题、建筑安全员ABC考试真题、安全员证考试题库等,提供在线做题刷题,在线模拟考试,助你考试轻松过关。 21.(单选题)静作用压路机在施工过程,要求实际含水量…...
计算机408考研先导课---C语言难点
以下为小编在重温C语言时,容易犯错的一些点,希望列出来对大家有一定帮助! 一、整型变量数的范围 类型说明符长度(字节)数的范围int4/2(有些为4字节,有些为2字节)-32768~32767short2…...

K8S 部署 Redis-Cluster 集群
本文使用 bitnami 镜像部署 redis-cluster 官方文档:https://github.com/bitnami/charts/tree/main/bitnami/redis-cluster 添加 bitnami 仓库 helm repo add bitnami https://charts.bitnami.com/bitnami自定义 values.yaml storageClass:集群的存储…...
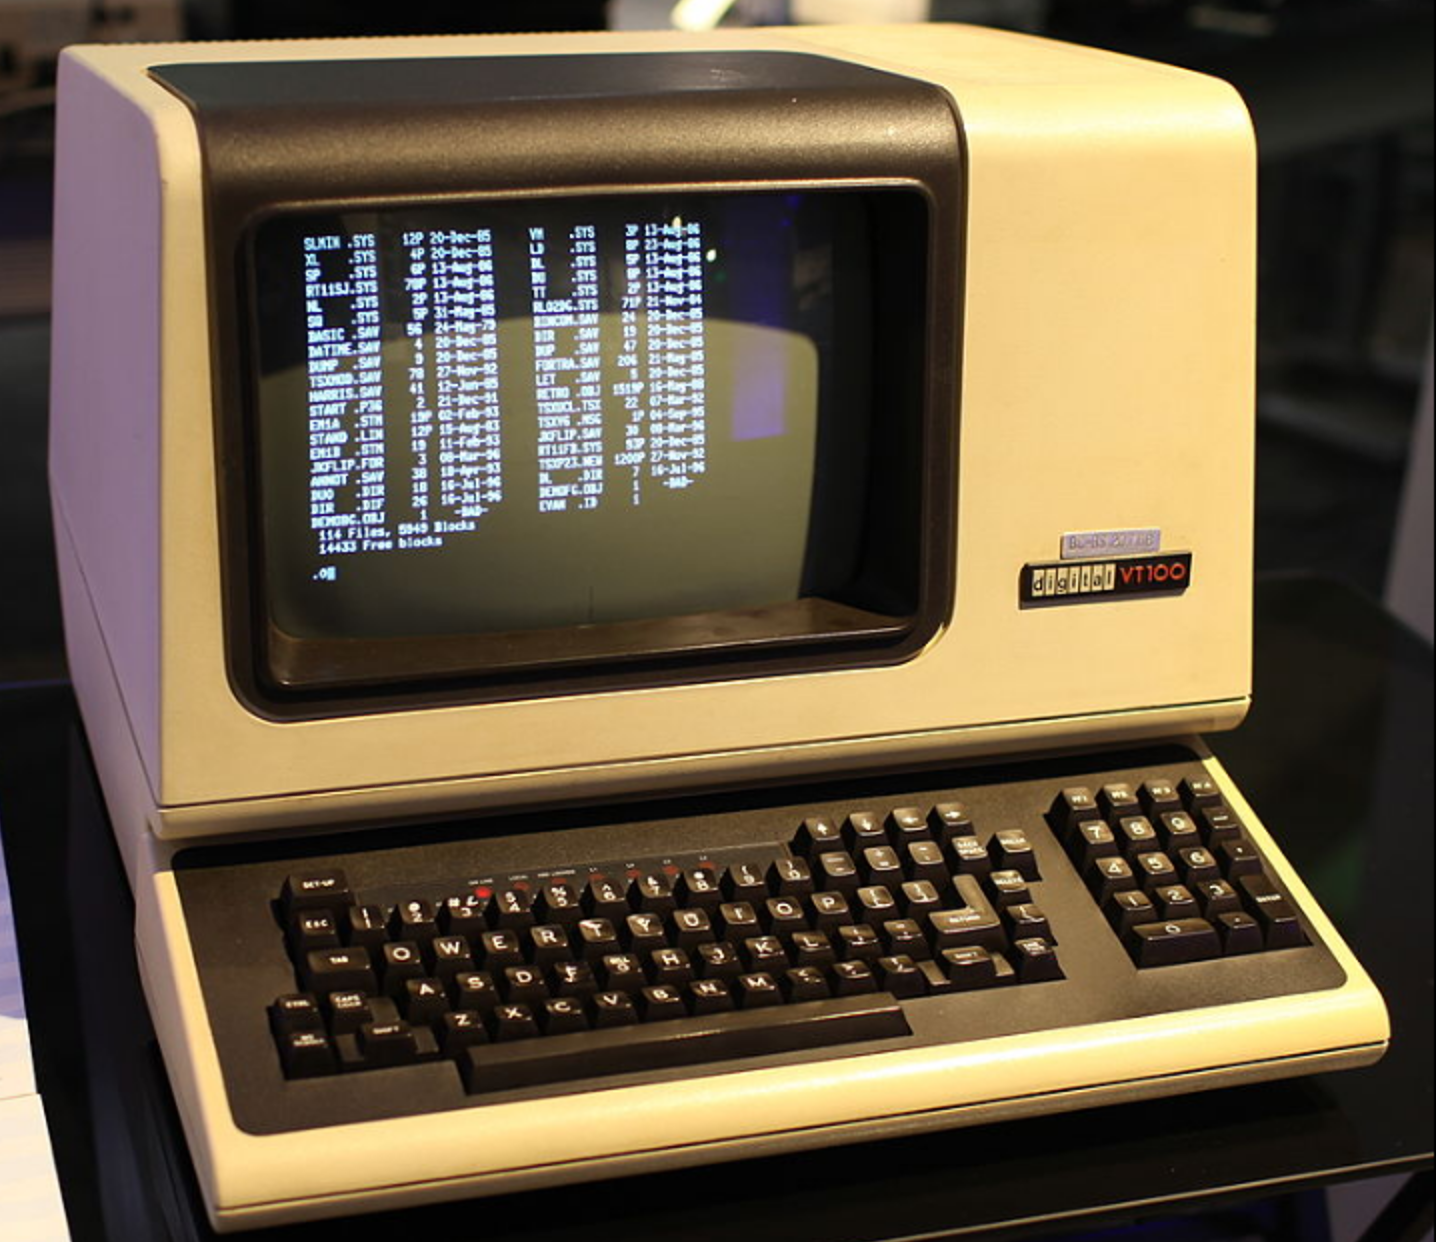
[oeasy]python0089_大型机的衰落_Dec小型机崛起_PDP_VAX网络
编码进化 回忆上次内容 上次 回顾了 计算机存储单位的演变 最小的读写单位 是 bit 8-bit 固定下来 成为了字节(Byte) 位数容量8-bit1Byte1024Byte1 KB1024 KB1 MB1024 MB1 GB1024 GB1 TB 存储字符时 第1位 是 标志位后7位 是 ascii具体的值 可以用 1Byte 存储 计算机之间 …...

Apache Shiro与Spring Security对比
Apache Shiro VS Spring Security 1.Spring Security 官方文档:https://spring.io/projects/spring-security#overview介绍: Spring Security是一个能够为基于Spring的企业应用系统提供声明式的安全访问控制解决方案的安全框架。它提供了一组可以在Spr…...

23春招-mysql事务相关高频面试题
1、什么是事务 对于一个事务,要么事务内的sql全部执行,要么都不执行 2、 事务的特性ACID 原子性 整个事务中所有的操作要么全部提交成功,要么全部失败会滚。 一致性 数据库总是从一个一致性状态转换到另一个一致性状态。假如有三个sql语句…...

天线理论知识1——基础概念介绍
基础概念介绍 文章目录 基础概念介绍前言一、主要参数二、天线的种类三、天线的测量前言 天线是用于发射和接收电磁波设备。其功能可以概括为转换自由空间中的电磁波和设备中的导行波。 一、主要参数 天线设计中要考虑的参数较多,包括 方向性函数:距离天线 r r r处的远区…...

【云原生之Docker实战】使用Docker部署StackEdit在线Markdown编辑器
【云原生之Docker实战】使用Docker部署StackEdit在线Markdown编辑器 一、StackEdit介绍1.StackEdit简介2.StackEdit中文版简介3.StackEdit中文版功能二、检查本地Docker环境1.检查系统版本2.检查系统Docker版本3.检查docker compose版本三、下载StackEdit镜像四、部署StackEdit…...

特征工程:特征构造以及时间序列特征构造
数据和特征决定了机器学习的上限,而模型和算法只是逼近这个上限而已。由此可见,特征工程在机器学习中占有相当重要的地位。在实际应用当中,可以说特征工程是机器学习成功的关键。 那特征工程是什么? 特征工程是利用数据领域的相关…...

单master部署简要步骤
准备多台服务器,选定一台为master例如设置ip为192.168.0.10,host: k8s.master,其他分别为 k8s.s11 192.168.0.11k8s.s12 192.168.0.12....hostname可以使用命令配置hostname k8s.masterip解析可以在hosts文件中写入,如果有内部dns解析可以在内…...
基础算法 --- 前缀和与差分)
【算法基础】(一)基础算法 --- 前缀和与差分
✨个人主页:bit me ✨当前专栏:算法基础 🔥专栏简介:该专栏主要更新一些基础算法题,有参加蓝桥杯等算法题竞赛或者正在刷题的铁汁们可以关注一下,互相监督打卡学习 🌹 🌹 dz…...

c++提高篇——stack容器
一、stack容器的基本概念 stack是一种先进后出(FILO)的数据结构,它只有一个出口。栈中只有顶端的元素才可以被外界使用。因此该容器不能有遍历行为。基本的结构如下: stack容器有些像手枪子弹的弹夹,其数据的出入栈可以以弹夹为参考。 二、…...
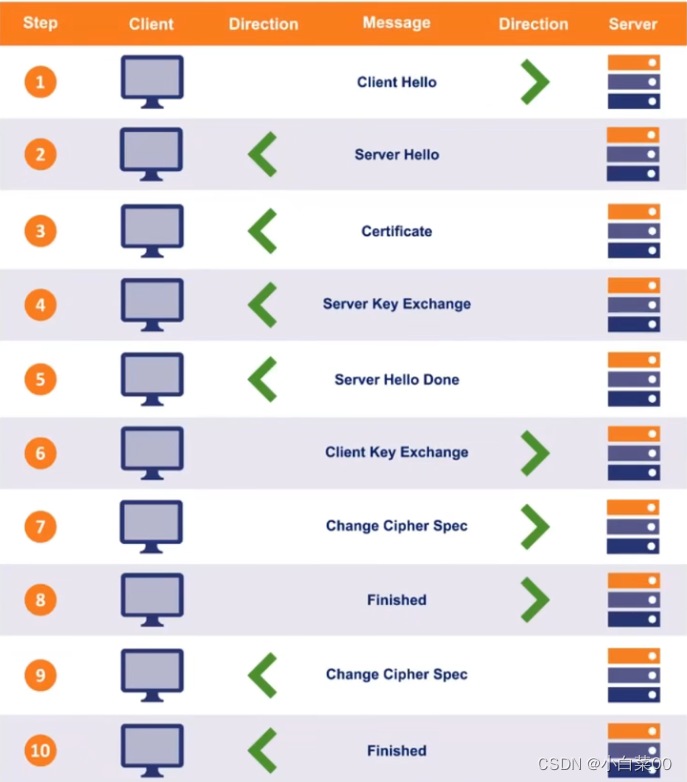
HTTP安全与HTTPS协议
目录 Http协议的安全问题 常见的加密方式 防止窃听 单向散列函数 单向散列值的特点 加密与解密 对称加密与非对称加密 对称加密的密钥配送问题 密钥配送问题的解决 非对称加密 前言: 公钥与私钥 非对称加密过程 混合密码系统 前言: 混合…...
)
从测速到配置:一套完整的cFosSpeed网络加速保姆级教程(适用于小白)
从零开始掌握cFosSpeed:网络加速全流程实战指南对于经常进行在线游戏、视频会议或大文件传输的用户来说,网络延迟和带宽利用率低下往往是影响体验的关键痛点。cFosSpeed作为一款专业的网络流量优化工具,能够显著改善这些问题,但许…...
)
Windows 10/11系统下,SecureCRT 8.7.2保姆级安装与激活图文指南(含Keygen使用避坑点)
Windows平台SecureCRT 8.7.2全流程部署与安全配置指南在当今远程运维与网络管理的日常工作中,一款可靠的终端仿真工具如同工程师的瑞士军刀。作为行业标杆的SecureCRT,其8.7.2版本在Windows 10/11环境下的部署却常让新手陷入各种技术陷阱——从安装路径选…...

嵌入式快速原型开发:基于Sceptre平台与LPC2148的实战指南
1. 项目概述:Sceptre,一个被低估的嵌入式快速原型利器 在嵌入式开发的世界里,我们总是在寻找那个“刚刚好”的平台:它要足够强大,能跑复杂的算法;要足够小巧,能塞进各种外壳;要足够便…...

解密高校教师必会的Gemini 3.1 Pro五大科研隐藏技能:从论文评估到创新点锁定
各位同仁好,我是七哥。一个在高校里从事人工智能相关领域研究,钻研用大模型AI实操的学术人。可以和七哥交流学术写作或Gemini、GPT、Claude等大模型学术实操相关问题,多多交流,相互成就,共同进步。 科研路上,有人发完顶刊顺利晋升,有人还在为创新点抓耳挠腮。 大多数教…...
原理与ScalableHD架构优化实践)
超维计算(HDC)原理与ScalableHD架构优化实践
1. 超维计算(HDC)基础解析超维计算(Hyperdimensional Computing, HDC)是一种受大脑信息处理机制启发的计算范式,其核心思想是用高维随机向量(通常称为超向量或HV)来表示和处理信息。与传统神经网…...
)
别再死磕USB HID了!用ESP32的Arduino框架手把手教你实现蓝牙鼠标键盘(附完整代码)
ESP32蓝牙HID实战:零基础打造自定义键盘鼠标 手里那块吃灰的ESP32开发板终于能派上用场了!上周我用它做了个无线演示控制器,在会议室里走着就能翻PPT,同事们都问是怎么实现的。其实秘诀就在于ESP32的蓝牙HID功能——不需要任何USB…...

武汉国电华美16875kVA串联谐振试验装置,这手活儿细
在超高压变电站和长距离电缆的现场,交流耐压试验是检验设备绝缘的“最后一关”。这位老师傅经手过不少大工程,他说,面对GIS、大型变压器这些“大块头”电容性试品,能不能顺利“过关”,往往就看串联谐振装置顶不顶得住。…...

操作符从浅入深的讲解
1. 操作符的分类 2. ⼆进制和进制转换 3. 原码、反码、补码 4. 移位操作符 5. 位操作符:&、|、^、~ 6. 单⽬操作符 7. 逗号表达式 8. 下标访问[]、函数调⽤() 9. 结构成员访问操作符 10. 操作符的属性:优先级、结合性 11. 表达式求值1.操作符的分类以…...

2026上海GEO生成式引擎优化服务商综合实力测评:谁在真正帮品牌进入AI答案
当企业在讨论“上海生成式引擎优化公司哪家好”时,这个问题本身就反映了市场一个关键的转折。两三年前,企业营销的主战场还是搜索引擎排名和官网访问量。现在,决策者开始频繁向DeepSeek、豆包、通义千问等AI工具提问,而这些生成式…...
运营管理与服务保障平台建设方案)
低空旅游观光与低空通勤(eVTOL)运营管理与服务保障平台建设方案
本方案旨在为eVTOL载具构建集运营管理、空中交通管制、安全保障与乘客服务于一体的数字化平台。通过微服务架构、5G-A融合感知、空域网格化与零信任安全等核心技术,解决高密度飞行中的资源调度与安全冲突问题。目标实现毫秒级冲突解算与15分钟内快速周转,…...