安卓 tcp 客户端
安卓 tcp 客户端
Server:8888 是Qt 写的Tcp 服务器 ip 是 192.168.2.103 port是8888
安卓手机运行 kotlin 语法的Tcp Client ,连接,收发数据
效果如下图
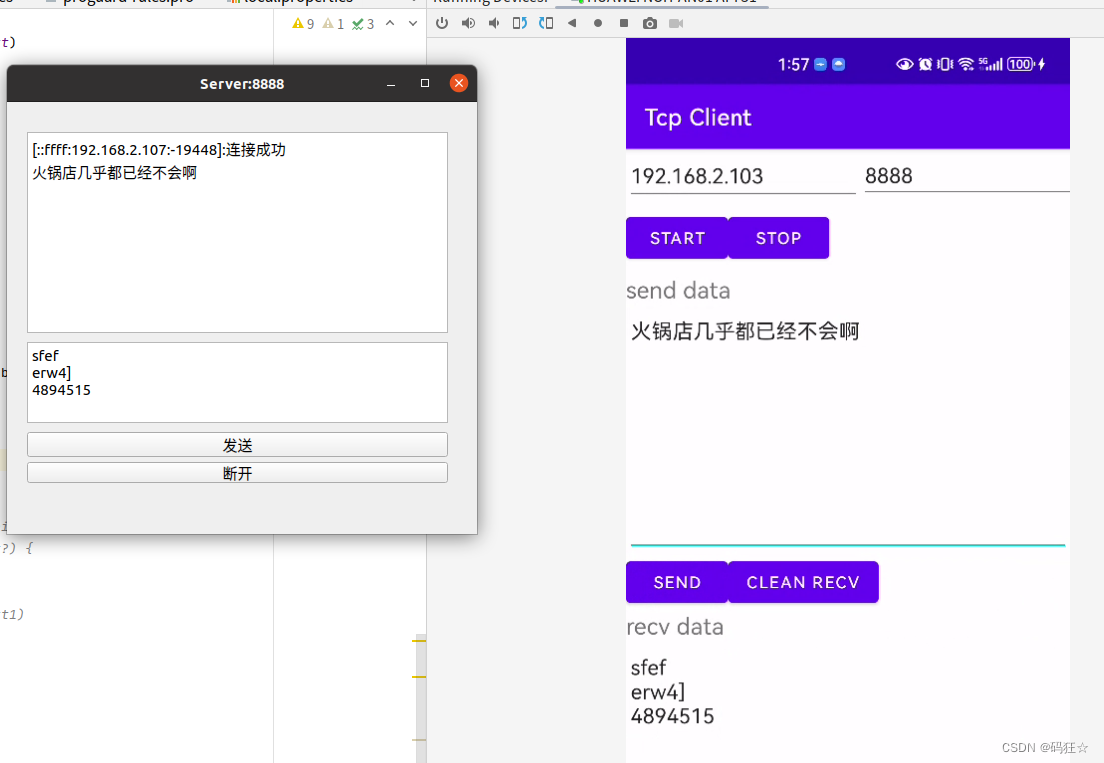
Tcpclient
package com.example.myapplicationimport android.os.Handler
import android.os.Looper
import android.util.Log
import java.io.BufferedReader
import java.io.BufferedWriter
import java.io.InputStreamReader
import java.io.OutputStreamWriter
import java.net.Socketclass TcpClient(private val ipAddress: String, private val port: Int) {private lateinit var socket: Socketprivate lateinit var reader: BufferedReaderprivate lateinit var writer: BufferedWriter// 接收线程private val messageReceiverThread = Thread {//主消息处理器,用于向外部发送tcp收到的数据val handler = Handler(Looper.getMainLooper())val buffer = StringBuilder()val charBuffer = CharArray(1024) // 调整缓冲区大小while (!Thread.currentThread().isInterrupted) {try {
//                val receivedData = reader.readLine() ?: ""
//                Log.d("TcpClient",receivedData)
//                handler.post {
//                    onDataReceived(receivedData)
//                }val bytesRead = reader.read(charBuffer)if (bytesRead == -1) {// 如果没有更多数据可读,则退出循环Log.d("TcpClient","continue")continue}// 清空缓冲区buffer.clear()// 将读取的数据追加到缓冲区buffer.append(charBuffer, 0, bytesRead)// 通知UI线程更新UIhandler.post {Log.d("TcpClient","buffer : "+buffer.toString())onDataReceived(buffer.toString())}} catch (e: Exception) {Log.e("TcpClient","Exception")e.printStackTrace()break}}}// 外部调用,定义数据接收监听器接口interface DataReceivedListener {fun onDataReceived(data: String)}private var dataReceivedListener: DataReceivedListener? = null// 外部调用,设置数据接收监听器fun setDataReceivedListener(listener: DataReceivedListener) {dataReceivedListener = listener}// 通知数据接收事件private fun onDataReceived(data: String) {dataReceivedListener?.onDataReceived(data)}// 1fun connectToServer() {try {socket = Socket(ipAddress, port)reader = BufferedReader(InputStreamReader(socket.getInputStream()))writer = BufferedWriter(OutputStreamWriter(socket.getOutputStream()))} catch (e: Exception) {e.printStackTrace()}}fun sendMessage(message: String) {try {writer.write(message)
//            writer.newLine()writer.flush()} catch (e: Exception) {e.printStackTrace()}}// 2fun startMessageReceiver() {messageReceiverThread.start()}fun stopMessageReceiver() {messageReceiverThread.interrupt()}fun close() {try {socket.close()} catch (e: Exception) {e.printStackTrace()}}
}
MainActivity
package com.example.myapplicationimport android.content.BroadcastReceiver
import android.content.Context
import android.content.Intent
import android.content.IntentFilter
import androidx.appcompat.app.AppCompatActivity
import android.os.Bundle
import android.os.Handler
import android.os.Looper
import android.text.Editable
import android.util.Log
import android.widget.Button
import android.widget.EditText
import android.widget.TextViewclass MainActivity : AppCompatActivity() {private lateinit var ipAddress: Stringprivate var port: Int = 0private lateinit var recvText: EditTextprivate lateinit var tcpClient: TcpClientoverride fun onCreate(savedInstanceState: Bundle?) {super.onCreate(savedInstanceState)setContentView(R.layout.activity_main)recvText = findViewById(R.id.recvText)// start tcpval startButton: Button = findViewById(R.id.startBtn)// 设置按钮点击事件startButton.setOnClickListener {// 设置IP地址和端口(请根据需要修改)ipAddress = findViewById<EditText?>(R.id.ipText).text.toString()port = findViewById<EditText?>(R.id.portNum).text.toString().toInt()// 创建TcpClient实例tcpClient = TcpClient(ipAddress, port)// 设置数据接收监听器tcpClient.setDataReceivedListener(object : TcpClient.DataReceivedListener {override fun onDataReceived(data: String) {// 在数据接收回调中更新UIupdateUI(data)}})// 在新线程中执行连接操作Thread {tcpClient.connectToServer()tcpClient.startMessageReceiver()}.start()}// stop tcpval stopBtn: Button = findViewById(R.id.stopBtn)stopBtn.setOnClickListener {Thread {tcpClient.stopMessageReceiver()tcpClient.close()}.start()}// send on threadval sendBtn: Button = findViewById(R.id.sendBtn)sendBtn.setOnClickListener {Thread {var sendText : EditText= findViewById(R.id.sendText)tcpClient.sendMessage(sendText.text.toString())}.start()}var cleanBtn:Button = findViewById(R.id.cleanBtn)cleanBtn.setOnClickListener {recvText.text.clear()}}private fun updateUI(data: String) {Log.d("MainActivity","data:"+data)val editableText = Editable.Factory.getInstance().newEditable(data)recvText.text?.append(editableText)}}
activity_main.xml
<?xml version="1.0" encoding="utf-8"?>
<LinearLayout xmlns:android="http://schemas.android.com/apk/res/android"xmlns:app="http://schemas.android.com/apk/res-auto"xmlns:tools="http://schemas.android.com/tools"android:id="@+id/linearLayout"android:layout_width="match_parent"android:layout_height="match_parent"android:orientation="vertical"tools:context=".MainActivity"><LinearLayoutandroid:layout_width="406dp"android:layout_height="53dp"android:orientation="horizontal"><EditTextandroid:id="@+id/ipText"android:layout_width="204dp"android:layout_height="47dp"android:layout_weight="4"android:ems="10"android:inputType="text"android:text="192.168.2.103" /><EditTextandroid:id="@+id/portNum"android:layout_width="204dp"android:layout_height="45dp"android:layout_weight="1"android:ems="10"android:inputType="number"android:text="8888" /></LinearLayout><LinearLayoutandroid:layout_width="409dp"android:layout_height="55dp"android:orientation="horizontal"><Buttonandroid:id="@+id/startBtn"android:layout_width="wrap_content"android:layout_height="wrap_content"android:text="start" /><Buttonandroid:id="@+id/stopBtn"android:layout_width="wrap_content"android:layout_height="wrap_content"android:text="stop" /><Spaceandroid:layout_width="wrap_content"android:layout_height="wrap_content"android:layout_weight="1" /></LinearLayout><TextViewandroid:id="@+id/textView2"android:layout_width="wrap_content"android:layout_height="wrap_content"android:text="send data"android:textSize="20sp" /><EditTextandroid:id="@+id/sendText"android:layout_width="match_parent"android:layout_height="148dp"android:layout_weight="4"android:ems="10"android:gravity="start|top"android:inputType="textMultiLine" /><LinearLayoutandroid:layout_width="match_parent"android:layout_height="wrap_content"android:orientation="horizontal"><Buttonandroid:id="@+id/sendBtn"android:layout_width="wrap_content"android:layout_height="wrap_content"android:text="send" /><Buttonandroid:id="@+id/cleanBtn"android:layout_width="wrap_content"android:layout_height="wrap_content"android:text="clean recv" /></LinearLayout><TextViewandroid:id="@+id/textView3"android:layout_width="wrap_content"android:layout_height="wrap_content"android:text="recv data"android:textSize="20sp" /><EditTextandroid:id="@+id/recvText"android:layout_width="match_parent"android:layout_height="202dp"android:layout_weight="4"android:ems="10"android:gravity="start|top"android:inputType="textMultiLine" /></LinearLayout>
AndroidManifest.xml 配置清单
<?xml version="1.0" encoding="utf-8"?>
<manifest xmlns:android="http://schemas.android.com/apk/res/android"package="com.example.myapplication"><uses-permission android:name="android.permission.INTERNET" /><uses-permission android:name="android.permission.ACCESS_WIFI_STATE" /><uses-permission android:name="android.permission.CHANGE_WIFI_STATE" /><applicationandroid:allowBackup="true"android:icon="@mipmap/ic_launcher"android:label="@string/app_name"android:roundIcon="@mipmap/ic_launcher_round"android:supportsRtl="true"android:theme="@style/Theme.MyApplication"><activityandroid:name=".MainActivity"android:exported="false"><intent-filter><action android:name="android.intent.action.MAIN" /><category android:name="android.intent.category.LAUNCHER" /></intent-filter></activity></application></manifest>
build.gradle (app)
plugins {id 'com.android.application'id 'org.jetbrains.kotlin.android'
}android {compileSdkVersion 30buildToolsVersion "30.0.3"defaultConfig {applicationId "com.example.myapplication"minSdkVersion 28targetSdkVersion 30versionCode 1versionName "1.0"testInstrumentationRunner "androidx.test.runner.AndroidJUnitRunner"}buildTypes {release {minifyEnabled falseproguardFiles getDefaultProguardFile('proguard-android-optimize.txt'), 'proguard-rules.pro'}}compileOptions {sourceCompatibility JavaVersion.VERSION_1_8targetCompatibility JavaVersion.VERSION_1_8}
}dependencies {implementation 'androidx.appcompat:appcompat:1.2.0'implementation 'com.google.android.material:material:1.2.1'implementation 'androidx.constraintlayout:constraintlayout:2.0.1'testImplementation 'junit:junit:4.+'androidTestImplementation 'androidx.test.ext:junit:1.1.2'androidTestImplementation 'androidx.test.espresso:espresso-core:3.3.0'
}
build.gradle (my proj )
使用国内镜像
// Top-level build file where you can add configuration options common to all sub-projects/modules.
buildscript {repositories {maven { url 'https://maven.aliyun.com/repository/google' }maven { url 'https://maven.aliyun.com/repository/jcenter' }maven { url 'https://maven.aliyun.com/repository/public' }maven { url 'https://maven.aliyun.com/repository/gradle-plugin' }
//        google()
//        mavenCentral()}dependencies {classpath "com.android.tools.build:gradle:4.2.1"classpath 'org.jetbrains.kotlin:kotlin-gradle-plugin:1.4.0'// NOTE: Do not place your application dependencies here; they belong// in the individual module build.gradle files}
}allprojects {repositories {maven { url 'https://maven.aliyun.com/repository/google' }maven { url 'https://maven.aliyun.com/repository/jcenter' }maven { url 'https://maven.aliyun.com/repository/public' }maven { url 'https://maven.aliyun.com/repository/gradle-plugin' }
//        google()
//        mavenCentral()
//        jcenter() // Warning: this repository is going to shut down soon}
}task clean(type: Delete) {delete rootProject.buildDir
}
相关文章:
安卓 tcp 客户端
安卓 tcp 客户端 Server:8888 是Qt 写的Tcp 服务器 ip 是 192.168.2.103 port是8888 安卓手机运行 kotlin 语法的Tcp Client ,连接,收发数据 效果如下图 Tcpclient package com.example.myapplicationimport android.os.Handler import android.os.Loo…...

flutter plugins插件【三】【Flutter Intl】
3、 Flutter Intl 多语言国际化 在Android Studio中菜单Tools找到flutter intl创建多语言配置。 创建后会在pubspec.yaml出现 flutter_intl:enabled: true 在工程的lib会生成l10n与generated文件夹 l10n包含 intl_en.arb intl_zn.arb 我们在intl_en.arb添加 { home: &quo…...
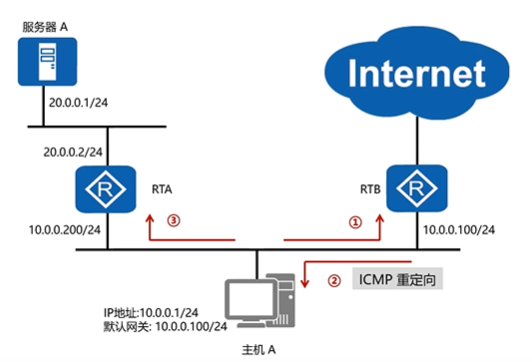
简单了解ICMP协议
目录 一、什么是ICMP协议? 二、ICMP如何工作? 三、ICMP报文格式 四、ICMP的作用 五、ICMP的典型应用 5.1 Ping程序 5.2 Tracert(Traceroute)路径追踪程序 一、什么是ICMP协议? ICMP因特网控制报文协议是一个差错报告机制,…...

MVCC究竟是什么?
1.MVCC概念 MVCC,全称多版本并发控制 MVCC究竟是什么? 通俗的来说MVCC就是为了在读取数据时不加锁来提高读取效率的一种办法,MVCC解决的是读写时线程安全问题,线程不用去抢占读写锁。MVCC中的读就是快照读,…...

Kafka知识点总结
常见名词 生产者和消费者 同一个消费组下的消费者订阅同一个topic时,只能有一个消费者收到消息 要想让订阅同一个topic的消费者都能收到信息,需将它们放到不同的组中 分区机制 启动方法 生成者和消费者监听客户端...

K8s最基本概念
1.K8s概述和特性 k8s是谷歌在2014年开业的容器化集群管理系统 使用K8s进行容器化应用部署 使用K8s利用应用扩展 k8s目标实施让部署容器化应用更加简洁高效-------集群管理系统 1.1 K8s特性 1) 自动装箱:基于容器对应用运行环境的资源配置 2)自…...

vulnhub渗透测试靶场练习2
靶场介绍 靶场名:easy_cloudantivirus 靶场地址:https://www.vulnhub.com/entry/boredhackerblog-cloud-av,453 环境搭建 依旧使用VM VirtualBox搭建靶场,攻击机使用的是VMware中的kali,需要将VMware虚拟机kali和virtualbox靶机…...

在R中安装TensorFlow、TensorFlow_Probability、numpy(R与Python系列第二篇)
目录 前言: 1-安装tensorflow库 Step1: 下载R包tensorflow Step2:安装TensorFlow库 Step3:导入R中 2-安装tensorflow_probability库 Step1:下载R包:tfprobability Step2:安装TensorFlow Probability …...

十大管理——项目成本管理
目录 1.成本管理概念 2.成本管理的四个过程域 2.1四个过程的整体理解 2.2四个过程的ITO口诀版记忆 2.3过程1——制定项目管理计划 2.4过程2——项目成本估算 2.5过程3——项目成本预算 2.5过程4——项目成本控制 3计算题 1.成本管理概念 项目成本管理就是要确保…...

Java BIO、NIO、AIO学习总结
前言:关于BIO/NIO/AIO的文章已经汗牛充栋,俺最近比较闲试图系统学习一下,希望大侠多多指教! 先来个例子理解一下概念,以银行取款为例: 同步 : 自己亲自出马持银行卡到银行取钱(使用…...
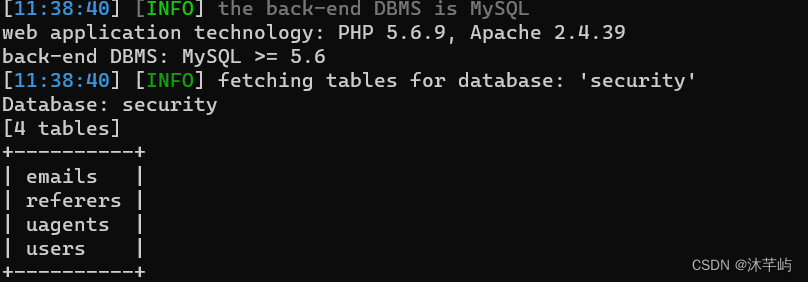
sql各种注入案例
目录 1.报错注入七大常用函数 1)ST_LatFromGeoHash (mysql>5.7.x) 2)ST_LongFromGeoHash (mysql>5.7.x) 3)GTID (MySQL > 5.6.X - 显错<200) 3.1 GTID 3.2 函数详解 3.3 注入过程( payload ) 4)ST_Pointfromgeohash (mysql>5.…...
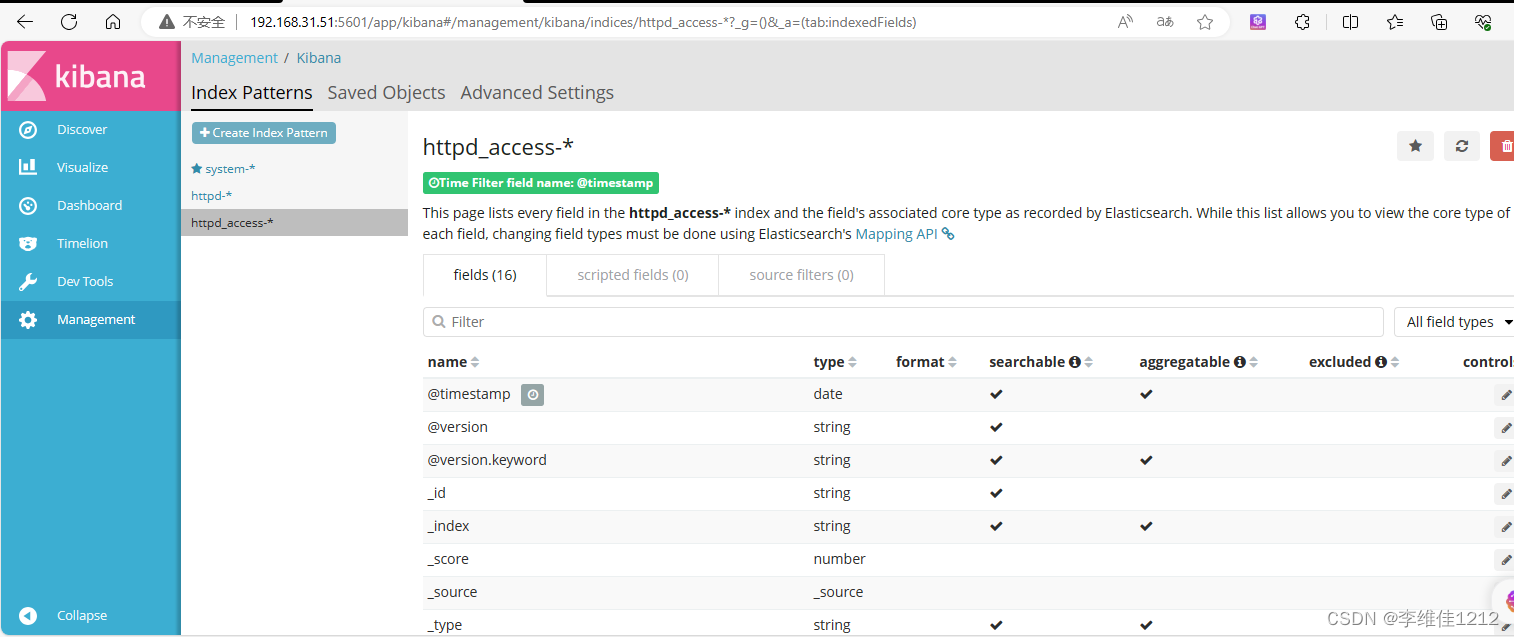
系统学习Linux-ELK日志收集系统
ELK日志收集系统集群实验 实验环境 角色主机名IP接口httpd192.168.31.50ens33node1192.168.31.51ens33noed2192.168.31.53ens33 环境配置 设置各个主机的ip地址为拓扑中的静态ip,并修改主机名 #httpd [rootlocalhost ~]# hostnamectl set-hostname httpd [root…...
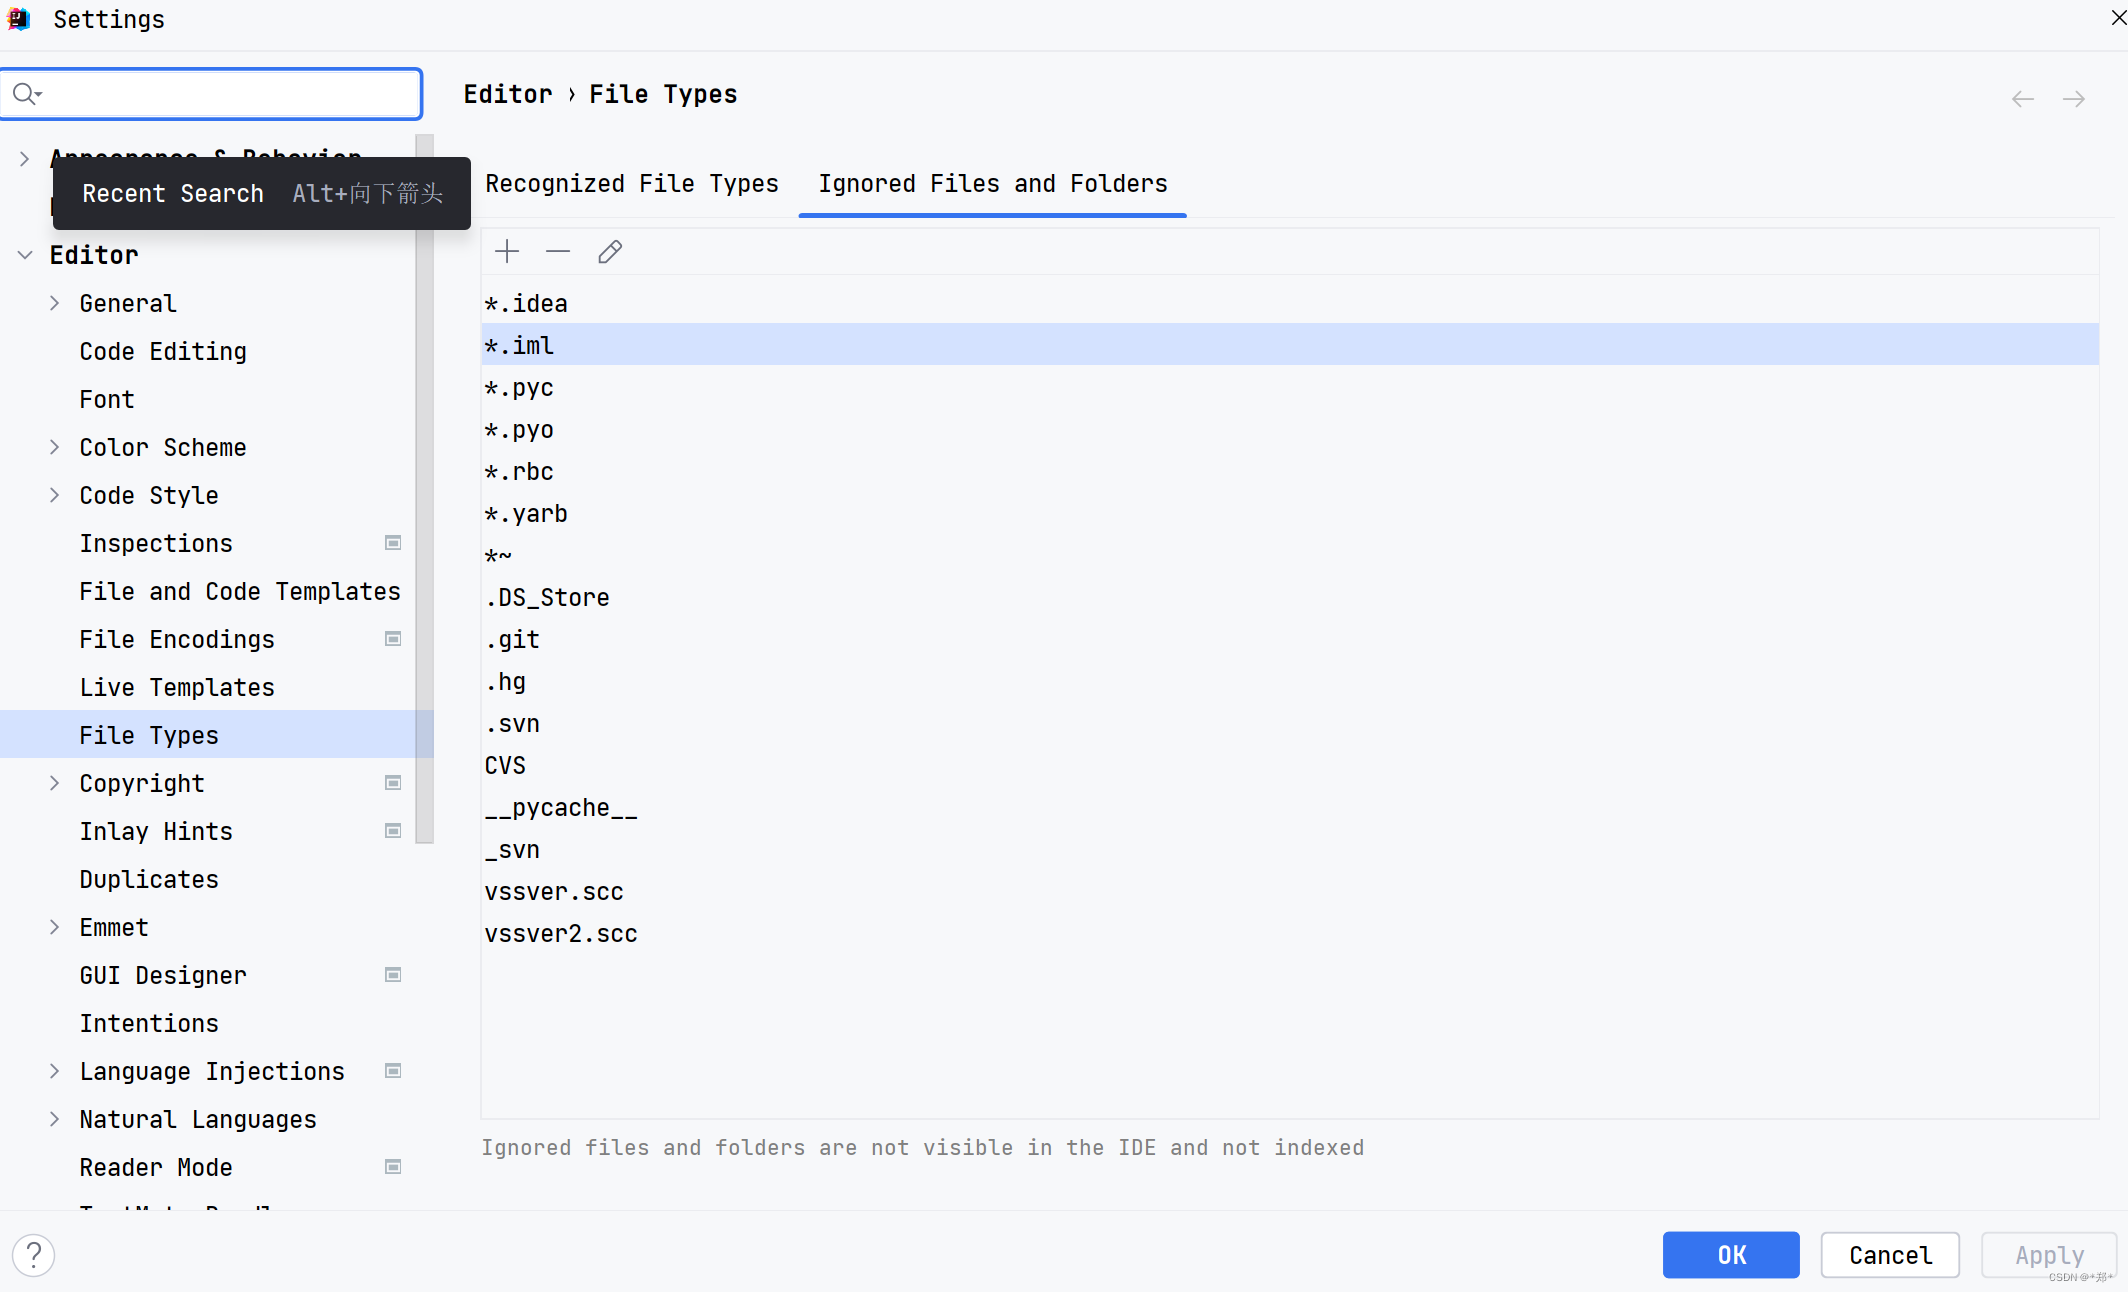
IDEA2023隐藏.idea和.iml文件
IDEA2023隐藏.idea和.iml文件 1. 打开file -> setting,快捷键CtrlAlts2. Editor -> File types3. 点击右侧Ignore files and folders一栏4. 添加需要忽略的文件5. 最重要一步 IDEA新建项目会自动生成一个.idea文件夹和.iml文件,开发中不需要对这两个文件修改&…...

【深入浅出C#】章节 9: C#高级主题:反射和动态编程
反射和动态编程是C#和其他现代编程语言中重要的高级主题,它们具有以下重要性: 灵活性和扩展性:反射允许程序在运行时动态地获取和操作类型信息、成员和对象实例,这使得程序更加灵活和具有扩展性。动态编程则使得程序能够根据运行…...
Gorm简单了解
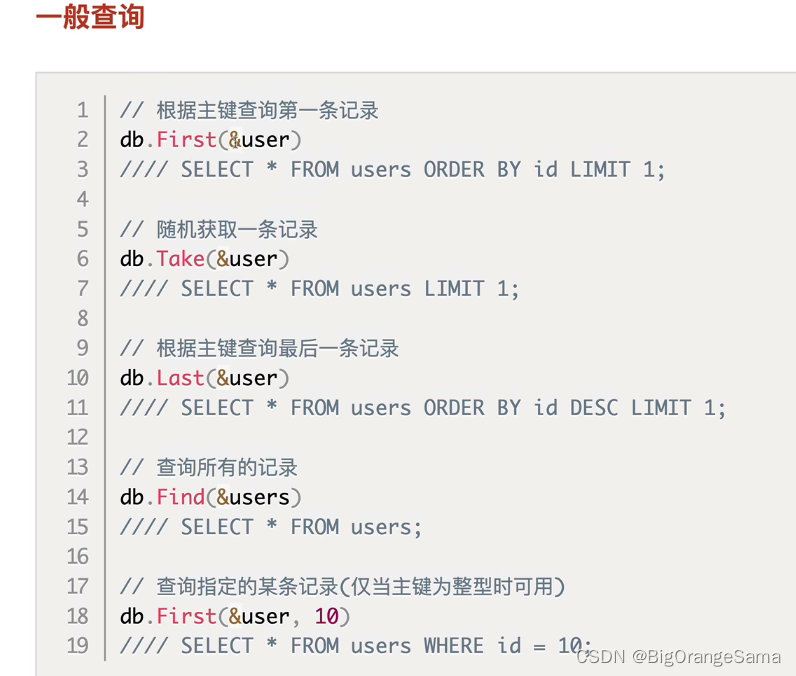
GORM 指南 | GORM - The fantastic ORM library for Golang, aims to be developer friendly. 04_GORM查询操作_哔哩哔哩_bilibili 前置: db调用操作语句中间加debug()可以显示对应的sql语句 1.Gorm模型定义(理解重点ÿ…...

第一百三十三回 StreamProvier
文章目录 概念介绍使用方法示例代码 我们在上一章回中介绍了通道相关的内容,本章回中将介绍 StreamProvider组件.闲话休提,让我们一起Talk Flutter吧。 概念介绍 在Flutter中Stream是经常使用的组件,对该组件的监听可以StremBuilder&#x…...
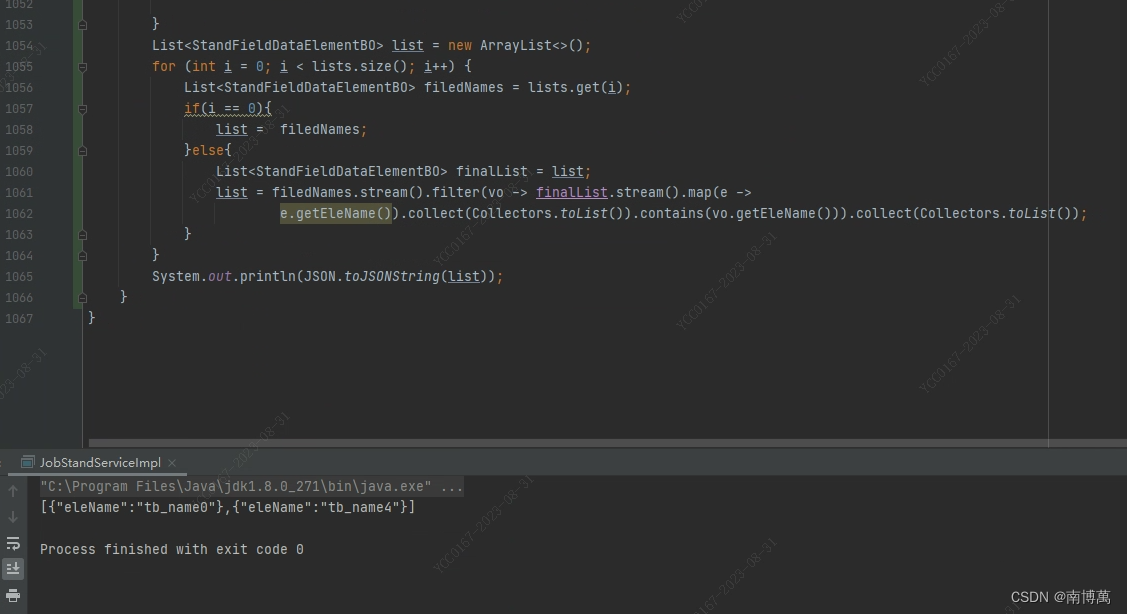
java 多个list取交集
java 多个list集合根据某个字段取出交集 模拟多个list集合,如下图 如果只有一个集合那么交集就是当前集合,如果有多个集合,那么第一个集合当做目标集合,在通过目标集合去和剩下的集合比较,取出相同的值,运…...
文件上传与下载
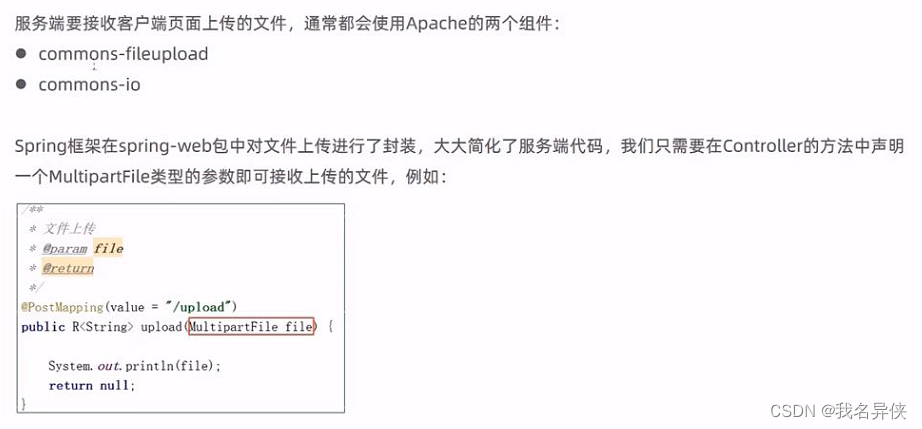
文章目录 1. 前端要求2. 后端要求 1. 前端要求 //采用post方法提交文件 method"post" //采用enctype属性 enctype"" //type属性要求 type"file"2. 后端要求 package com.itheima.reggie.controller;import com.itheima.reggie.common.R; impo…...

SpringBoot 整合 RabbitMQ
1. 创建 SpringBoot 工程 把版本改为 2.7.14 引入这两个依赖: <dependency><groupId>org.springframework.boot</groupId><artifactId>spring-boot-starter-amqp</artifactId></dependency><dependency><groupId>org.springfr…...

气象科普丨气象站的分类与应用
气象站是一种用于收集、分析和处理气象数据的设备。根据不同的应用场景和监测需求,气象站可以分为以下几类: 一、农业气象站 农业气象站是专门为农业生产服务的气象站,主要监测土壤温度、土壤湿度等参数,为农业生产提供科学依据…...

储能BMS HiL测试:原理、价值与工程实践全解析
1. 储能BMS HiL测试:为什么它是研发验证的“必选项”?在储能系统,尤其是大规模电池储能电站的研发过程中,电池管理系统(BMS)的可靠性与安全性是决定整个项目成败的基石。然而,传统的BMS测试方法…...
)
用emWin定时器给你的STM32 GUI界面“注入灵魂”:实现动态数据刷新与简易动画(基于WM_TIMER消息)
用emWin定时器为STM32 GUI注入动态交互的灵魂 在嵌入式设备的人机交互设计中,静态界面往往给人呆板的印象。想象一下工业仪表盘上凝固的数字,或是医疗设备上永不变化的指示灯——这种缺乏生命力的呈现方式不仅降低用户体验,还可能掩盖关键数据…...

setup-java企业级实践:大型项目的依赖缓存和版本矩阵测试
setup-java企业级实践:大型项目的依赖缓存和版本矩阵测试 【免费下载链接】setup-java Set up your GitHub Actions workflow with a specific version of Java 项目地址: https://gitcode.com/gh_mirrors/se/setup-java 在现代软件开发中,Java环…...

跨境物流监控进入“秒级预警”时代:实测实在Agent风险预警能力深度测评详解
摘要: 步入2026年,全球贸易数字化转型已从“信息化”跨越至“智能体化”阶段。跨境物流监控作为支撑全球供应链的核心枢纽,正面临红海危机常态化、信创国产化替代加速以及数据安全监管趋严的多重挑战。传统的人工监控与初级RPA方案在应对多变…...
)
零基础转专业计算机机试,我用这5道题帮你摸清浙工大出题套路(附C++代码)
零基础转专业计算机机试:5道真题破解浙工大出题密码(附C实战代码) 第一次面对计算机转专业机试时,我盯着屏幕上闪烁的光标,手指悬在键盘上方却不知从何下手。那种面对陌生题型的茫然感,至今记忆犹新。现在作…...
)
STM32串口高效通信秘籍:巧用DMA+空闲中断实现不定长数据收发(基于CubeIDE)
STM32串口高效通信秘籍:巧用DMA空闲中断实现不定长数据收发(基于CubeIDE) 在物联网设备和嵌入式系统开发中,串口通信是最基础也最关键的通信方式之一。无论是传感器数据采集、设备间通信还是与上位机交互,稳定高效的串…...

云深处冲刺科创板:年营收3.4亿,净利2868万 拟募资25亿 又一杭州6小龙拟IPO
雷递网 雷建平 5月19日杭州云深处科技股份有限公司(简称:“云深处”)日前递交招股书,准备在科创板上市。云深处计划募资25亿元,其中,11.7亿元用于具身算法及模型研发项目,5.54亿用于机器人本体与…...
)
告别模型水土不服:用TENT的熵最小化,5分钟搞定测试时域自适应(附PyTorch代码)
实战TENT:5行代码解决模型部署中的“水土不服”问题 想象一下这样的场景:你花费数月训练的自动驾驶视觉模型在实验室测试中准确率高达98%,但当它遇到真实世界的暴雨天气时,识别率瞬间暴跌至60%。这种"实验室王者,…...

NY345固态MT29F32T08GWLBHD6-24T:B
NY345固态MT29F32T08GWLBHD6-24T:B在智能制造、交通控制、能源监测等关键领域,每一次写入与读取都决定着系统运行的可靠性。美光(Micron)MT29F32T08GWLBHD6-24T:B,以其32Tb大容量、工业级封装和多模式灵活切换,成为嵌入…...

蓝桥杯嵌入式模拟赛2实战复盘:用STM32G431搞定LCD、LED、按键、PWM和串口
蓝桥杯嵌入式模拟赛2全流程实战解析:从零构建STM32G431多模块协同系统 当开发板的电源指示灯第一次亮起,LCD屏幕浮现出清晰的白色字符时,我知道这不仅仅是一次普通的练习——这是将分散的模块知识整合成完整系统的关键时刻。蓝桥杯嵌入式模拟…...