万字解读 Android 车机核心 :CarService 的构成和链路~

前言
关于 Android 车机,之前分析过方控上自定义按键的输入机制和中控上旋钮输入的原理,但都局限于 Car Service 内 Input 相关模块。
- 一文了解 Android 车机如何处理中控的旋钮输入
- 从实体按键看 Android 车载的自定义事件机制
本文将结合 Android 系统整体,对 CarService 的构成和链路对其做一个全面的分析和理解。
目录
- 构成
- CarServiceHelperService 系统服务
- CarService 核心服务 App
- builtin app
- updatable app
- Car 专用 API
- Car Apps
- CarService 启动链路
- Service 整体
- CarInputService 输入服务
- CarPropertyService 属性服务
- Vehicle 属性调用链路
- Car 获取
- CarPropertyManager 调用
- 总结
构成
1. CarServiceHelperService 系统服务
SystemServer 中专门为了 Automotive OS 设立的系统服务,用来管理车机的核心服务 CarService。该系统服务的具体实现实际上由 CarServiceHelperServiceUpdatableImpl 类完成,后面会提到。
System service side companion service for CarService. Starts car service and provide necessary API for CarService. Only for car product.
2. CarService 核心服务 App
Car Service App 实际上分为两个,一个是和系统服务直接交互的 builtin app,另一个是给该 built app 提供实际实现的 updatable app。
builtin app
系统中与车相关的核心 App,掌管最重要的 CarService 服务类。目录位于:
- packages/services/Car/service-builtin/
其 AndroidManifest.xml 文件如下,可以看到它具有系统权限、与 system uid 共享数据。
<manifest xmlns:android="http://schemas.android.com/apk/res/android"xmlns:androidprv="http://schemas.android.com/apk/prv/res/android"package="com.android.car"coreApp="true"android:sharedUserId="android.uid.system"><application android:label="@string/app_title"android:directBootAware="true"android:allowBackup="false"android:persistent="true"><service android:name=".CarService"android:singleUser="true"android:exported="true"><intent-filter><action android:name="android.car.ICar"/></intent-filter></service>...</application>
</manifest>
updatable app
builtin app 的所有具体实现以及后续支持的一堆服务都在 updatable app 中实现,目录见:
- packages/services/Car/service/
其 AndroidManifest.xml 文件如下,可以看到它也具有系统权限。
<manifest xmlns:android="http://schemas.android.com/apk/res/android"xmlns:androidprv="http://schemas.android.com/apk/prv/res/android"package="com.android.car.updatable"coreApp="true"><permission-group android:name="android.car.permission-group.CAR_MONITORING"android:icon="@drawable/perm_group_car"android:description="@string/car_permission_desc"android:label="@string/car_permission_label"/>...<application android:label="@string/app_title"android:directBootAware="true"android:allowBackup="false"></application>
</manifest>
3. Car 专用 API
Android 车机里提供给系统使用汽车相关能力的专用接口,源码实现在:
- packages/services/Car/car-lib/
看下它的 manifest 文件:
<manifest xmlns:android="http://schemas.android.com/apk/res/android"xmlns:androidprv="http://schemas.android.com/apk/prv/res/android"package="android.car" ><uses-sdk android:minSdkVersion="23" android:targetSdkVersion="23" />
</manifest>
再看下它的 bp 文件:
...
filegroup {name: "android.car-full-src",srcs: ["src/**/*.java","src/**/*.aidl",],visibility: ["//packages/services/Car/car-lib","//packages/services/Car/car-lib-module",],
}java_library {name: "android.car",srcs: [":android.car-full-src",],aidl: {include_dirs: ["packages/modules/Bluetooth/framework/aidl-export",],},libs: ["android.car.builtin","framework-annotations-lib","modules-utils-preconditions","framework-wifi","framework-bluetooth",],installable: true,sdk_version: "module_current",
}
可以看到它会编译到 android.car.jar 中,而非面向 AOSP 手机/平板的 android.jar 中。这也意味着如果要基于 Car 相关 API 开发,需要通过添加 Automotive os addon 的方式才能导入该 SDK。
这个 jar 囊括了我们常用的 Car、CarPowerManager、CarSettings 等,下面罗列了部分常用的 Car API:
-
android.car:包含了与车相关的基本API。例如:车辆后视镜,门,座位,窗口等
-
menu:车辆应用菜单相关API
-
cluster:仪表盘相关API
-
diagnostic:包含与汽车诊断相关的API。
-
hardware:车辆硬件相关API
-
cabin:座舱相关API
-
hvac:通风空调相关API。(hvac是Heating, ventilation and air conditioning的缩写)
-
property:属性相关API
-
radio:收音机相关API
-
input:输入相关API
-
media:多媒体相关API
-
navigation:导航相关API
-
settings:设置相关API
-
vms:汽车监测相关API
-
…
最后的实现会经由 AIDL 抵达上个章节的 CarService App。
4. Car Apps
提供 Automotive OS 内置的、专门为 Car 场景设计的 App,目录位于:
- packages/apps/Car/
比如面向 Car 的 SystemUI、Launcher、Settings、IME 等。
CarService 启动链路
Service 整体
SystemServer 会在启动系统服务的过程中依据 FEATURE_AUTOMOTIVE 的特性决定是否启动 AAOS 的系统服务 CarServiceHelperService。
public final class SystemServer implements Dumpable {...private static final String CAR_SERVICE_HELPER_SERVICE_CLASS ="com.android.internal.car.CarServiceHelperService";private void startOtherServices(@NonNull TimingsTraceAndSlog t) {t.traceBegin("startOtherServices");...mActivityManagerService.systemReady(() -> {Slog.i(TAG, "Making services ready");...boolean isAutomotive = mPackageManager.hasSystemFeature(PackageManager.FEATURE_AUTOMOTIVE);if (isAutomotive) {t.traceBegin("StartCarServiceHelperService");final SystemService cshs = mSystemServiceManager.startService(CAR_SERVICE_HELPER_SERVICE_CLASS);t.traceEnd();}...}, t);...}...
}
CarServiceHelperService 执行 onStart() 的时候,会将后续的工作交给 CarServiceHelperServiceUpdatableImpl 来处理。
其 onStart() 里调用 bindService() 绑定 action 为 “android.car.ICar”、package 为 “com.android.car” 的 Service,即构成章节里提到的 CarService 组件。
public class CarServiceHelperService extends SystemServiceimplements Dumpable, DevicePolicySafetyChecker, CarServiceHelperInterface {...@Overridepublic void onStart() {...mCarServiceHelperServiceUpdatable.onStart();}...
}public final class CommonConstants {...// CarService Constantspublic static final String CAR_SERVICE_INTERFACE = "android.car.ICar";...
}public final class CarServiceHelperServiceUpdatableImplimplements CarServiceHelperServiceUpdatable, Executor {...private static final String CAR_SERVICE_PACKAGE = "com.android.car";@Overridepublic void onStart() {Intent intent = new Intent(CAR_SERVICE_INTERFACE).setPackage(CAR_SERVICE_PACKAGE);Context userContext = mContext.createContextAsUser(UserHandle.SYSTEM, /* flags= */ 0);if (!userContext.bindService(intent, Context.BIND_AUTO_CREATE, this,mCarServiceConnection)) {Slogf.wtf(TAG, "cannot start car service");}}...
}
CarService 的实现都在父类 ServiceProxy 中,比如首先被调用的 onCreate(),内部将先调用 init()。
init() 将构建 mRealServiceClassName 的实例,而 mRealServiceClassName 变量来自于 UpdatablePackageDependency.java 中定义的 CAR_SERVICE_IMPL_CLASS 常量即 “com.android.car.CarServiceImpl”。
通过如下代码看到,这意味着将初始化 CarServiceImpl 实例。
public class CarService extends ServiceProxy {...public CarService() {super(UpdatablePackageDependency.CAR_SERVICE_IMPL_CLASS);// Increase the number of binder threads in car serviceBinderInternal.setMaxThreads(MAX_BINDER_THREADS);}...
}public class ServiceProxy extends Service {...@Overridepublic void onCreate() {init();mRealService.onCreate();}private void init() {mUpdatablePackageContext = UpdatablePackageContext.create(this);try {mRealServiceClass = mUpdatablePackageContext.getClassLoader().loadClass(mRealServiceClassName);// Use default constructor alwaysConstructor constructor = mRealServiceClass.getConstructor();mRealService = (ProxiedService) constructor.newInstance();mRealService.doAttachBaseContext(mUpdatablePackageContext);mRealService.setBuiltinPackageContext(this);} catch (Exception e) {throw new RuntimeException("Cannot load class:" + mRealServiceClassName, e);}}...
}public class UpdatablePackageDependency {/** {@code com.android.car.CarServiceImpl} class */public static final String CAR_SERVICE_IMPL_CLASS = "com.android.car.CarServiceImpl";...
}
init() 之后是执行创建出来的 CarServiceImpl 实例的 onCreate(),可以看到是继续创建关键类 ICarImpl 的实例并再次执行 init()。
public class CarServiceImpl extends ProxiedService {...@Overridepublic void onCreate() {...mICarImpl = new ICarImpl(this,getBuiltinPackageContext(),mVehicle,SystemInterface.Builder.defaultSystemInterface(this).build(),mVehicleInterfaceName);mICarImpl.init();...}...
}public class ICarImpl extends ICar.Stub {...ICarImpl( ... ) {...mHal = constructWithTrace(t, VehicleHal.class,() -> new VehicleHal(serviceContext, vehicle));...mCarPropertyService = constructWithTrace(t, CarPropertyService.class,() -> new CarPropertyService(serviceContext, mHal.getPropertyHal()));mCarDrivingStateService = constructWithTrace(t, CarDrivingStateService.class,() -> new CarDrivingStateService(serviceContext, mCarPropertyService));...mCarPowerManagementService = constructWithTrace(t, CarPowerManagementService.class,() -> new CarPowerManagementService(mContext, mHal.getPowerHal(),systemInterface, mCarUserService, powerPolicyDaemon));...mCarInputService = constructWithTrace(t, CarInputService.class,() -> new CarInputService(serviceContext, mHal.getInputHal(), mCarUserService,mCarOccupantZoneService, mCarBluetoothService));...List<CarServiceBase> allServices = new ArrayList<>();allServices.add(mCarPropertyService); // mCarUXRestrictionsService depends on itallServices.add(mCarPowerManagementService);allServices.add(mCarDrivingStateService);allServices.add(mCarInputService);......mAllServices = allServices.toArray(new CarServiceBase[allServices.size()]);mICarSystemServerClientImpl = new ICarSystemServerClientImpl();...}...
}
ICarImpl 的初始化将完成很多 vehicle 相关的重要工作:
- 将初始化和 vehicle HAL 层交互的
VehicleHal实例 - 遍历 ICarImpl 实例构造时候创建的各个扩展自 CarServiceBase 的实例,逐个调用 init() 初始化,比如:
- 掌管车辆硬件按键输入的
CarInputService - 掌管车辆属性的
CarPropertyService - 掌管车辆电源管理的
CarPowerManagementService - 掌管车辆驾驶状态的
CarDrivingStateService - 等等
- 掌管车辆硬件按键输入的
public class ICarImpl extends ICar.Stub {...void init() {...mHal.init();for (CarServiceBase service : mAllServices) {service.init();}...}...
}
下面以 CarInputService 和 CarPropertyService 为例,继续看某个具体的 CarServiceBase 初始化了什么。
CarInputService 输入服务
CarInputService 初始化是向和 VehicleHal 交互的 InputHalService 传递输入相关的监听器 Listener。
public class CarInputService ... {...@Overridepublic void init() {if (!mInputHalService.isKeyInputSupported()) {return;}mInputHalService.setInputListener(this);...}...
}
InputHalService 将依据是否支持按键输入、旋钮输入、自定义输入的配置决定是否向 VehicleHal 订阅 Input Property 变化。
public class InputHalService extends HalServiceBase {...private final VehicleHal mHal;public void setInputListener(InputListener listener) {boolean keyInputSupported;boolean rotaryInputSupported;boolean customInputSupported;synchronized (mLock) {if (!mKeyInputSupported && !mRotaryInputSupported && !mCustomInputSupported) {Slogf.w(TAG, "input listener set while rotary and key input not supported");return;}mListener = listener;keyInputSupported = mKeyInputSupported;rotaryInputSupported = mRotaryInputSupported;customInputSupported = mCustomInputSupported;}if (keyInputSupported) {mHal.subscribeProperty(this, HW_KEY_INPUT);}if (rotaryInputSupported) {mHal.subscribeProperty(this, HW_ROTARY_INPUT);}if (customInputSupported) {mHal.subscribeProperty(this, HW_CUSTOM_INPUT);}}...
}
CarPropertyService 属性服务
CarPropertyService 也是一样,向和 VehicleHal 打交道的 PropertyHalService 传递输入相关的监听器 Listener。
public class CarPropertyService extends ICarProperty.Stubimplements CarServiceBase, PropertyHalService.PropertyHalListener {@Overridepublic void init() {synchronized (mLock) {// Cache the configs list and permissions to avoid subsequent binder callsmConfigs = mHal.getPropertyList();mPropToPermission = mHal.getPermissionsForAllProperties();if (DBG) {Slogf.d(TAG, "cache CarPropertyConfigs " + mConfigs.size());}}mHal.setListener(this);}...
}
PropertyHalService 将 CarPropertyService 作为 Callback 暂存,等待来自 HAL 的 Vehicle Property 变化回调。
public class PropertyHalService extends HalServiceBase {/*** Set the listener for the HAL service* @param listener*/public void setListener(PropertyHalListener listener) {synchronized (mLock) {mListener = listener;}}...
}
Vehicle 属性调用链路
Car 获取链路
对于其他 App 来说,想要使用 Car API,得做些准备工作:
- 先获取 Car 实例
- 然后执行连接
- 成功之后获取具体功能的 Manager 实例
比如这段用 CarPropertyManager 的示例:
private Car mCar;private CarPropertyManager mCarPropertyManager;mCar = Car.createCar(this, /* handler= */ null, Car.CAR_WAIT_TIMEOUT_WAIT_FOREVER,(car, ready) -> {mCar = car;if (ready) {mCarPropertyManager =(CarPropertyManager) mCar.getCarManager(Car.PROPERTY_SERVICE);...}});
我们结合源码看下上面这个步骤的链路:
createCar() 首先检查当前 OS 是否属于 Automotive 版本,之后调用 Car 构造函数进行一些全局变量的准备。
public final class Car {...public static Car createCar(Context context, ServiceConnection serviceConnectionListener,@Nullable Handler handler) {if (!context.getPackageManager().hasSystemFeature(PackageManager.FEATURE_AUTOMOTIVE)) {Log.e(TAG_CAR, "FEATURE_AUTOMOTIVE not declared while android.car is used");return null;}try {return new Car(context, /* service= */ null , serviceConnectionListener,/* statusChangeListener= */ null, handler);} catch (IllegalArgumentException e) {// Expected when car service loader is not available.}return null;}private Car( ... ) {mContext = context;mEventHandler = determineEventHandler(handler);mMainThreadEventHandler = determineMainThreadEventHandler(mEventHandler);mService = service;if (service != null) {mConnectionState = STATE_CONNECTED;} else {mConnectionState = STATE_DISCONNECTED;}mServiceConnectionListenerClient = serviceConnectionListener;mStatusChangeCallback = statusChangeListener;// Store construction stack so that client can get help when it crashes when car service// crashes.if (serviceConnectionListener == null && statusChangeListener == null) {mConstructionStack = new RuntimeException();} else {mConstructionStack = null;}}...
}
connect() 首先检查是否重复请求连接了,确实需要连接的话调用 startCarService() 核心处理。
startCarService() 将绑定 CarService 服务。
public final class Car {...public void connect() throws IllegalStateException {synchronized (mLock) {if (mConnectionState != STATE_DISCONNECTED) {throw new IllegalStateException("already connected or connecting");}mConnectionState = STATE_CONNECTING;startCarService();}}private void startCarService() {Intent intent = new Intent();intent.setPackage(CAR_SERVICE_PACKAGE);intent.setAction(Car.CAR_SERVICE_INTERFACE_NAME);boolean bound = mContext.bindService(intent, mServiceConnectionListener,Context.BIND_AUTO_CREATE);synchronized (mLock) {if (!bound) {mConnectionRetryCount++;if (mConnectionRetryCount > CAR_SERVICE_BIND_MAX_RETRY) {Log.w(TAG_CAR, "cannot bind to car service after max retry");mMainThreadEventHandler.post(mConnectionRetryFailedRunnable);} else {mEventHandler.postDelayed(mConnectionRetryRunnable,CAR_SERVICE_BIND_RETRY_INTERVAL_MS);}} else {mEventHandler.removeCallbacks(mConnectionRetryRunnable);mMainThreadEventHandler.removeCallbacks(mConnectionRetryFailedRunnable);mConnectionRetryCount = 0;mServiceBound = true;}}}    ...
}
绑定成功之后,将 ICar AIDL 的本地接口代理赋值到 mService 变量(server 端在 CarService 的 ICarImpl 中),待使用。
public final class Car {...private final ServiceConnection mServiceConnectionListener =new ServiceConnection() {@Overridepublic void onServiceConnected(ComponentName name, IBinder service) {synchronized (mLock) {ICar newService = ICar.Stub.asInterface(service);if (mService != null && mService.asBinder().equals(newService.asBinder())) {// already connected.return;}mConnectionState = STATE_CONNECTED;mService = newService;}if (mStatusChangeCallback != null) {mStatusChangeCallback.onLifecycleChanged(Car.this, true);} else if (mServiceConnectionListenerClient != null) {mServiceConnectionListenerClient.onServiceConnected(name, service);}}@Overridepublic void onServiceDisconnected(ComponentName name) {...};...
}
getCarManager() 首先得确保 CarService 准备就绪了,然后再去缓存 Manager 实例的 HashMap mServiceMap 中查找是否已有现成的,最后才发起 AIDL 获取该功能的接口。
public final class Car {...private final HashMap<String, CarManagerBase> mServiceMap = new HashMap<>();public Object getCarManager(String serviceName) {CarManagerBase manager;synchronized (mLock) {if (mService == null) {Log.w(TAG_CAR, "getCarManager not working while car service not ready");return null;}manager = mServiceMap.get(serviceName);if (manager == null) {try {IBinder binder = mService.getCarService(serviceName);if (binder == null) {Log.w(TAG_CAR, "getCarManager could not get binder for service:"+ serviceName);return null;}manager = createCarManagerLocked(serviceName, binder);if (manager == null) {Log.w(TAG_CAR, "getCarManager could not create manager for service:"+ serviceName);return null;}mServiceMap.put(serviceName, manager);} catch (RemoteException e) {handleRemoteExceptionFromCarService(e);}}}return manager;}...
}
ICarImpl 则是依据约定好的 Manager 的 Service 端名称去 CarService 中返回启动时候创建的一堆具体服务。
比如:PROPERTY_SERVICE 的话返回 CarPropertyService,CAR_INPUT_SERVICE 返回 CarInputService。
public class ICarImpl extends ICar.Stub {...public IBinder getCarService(String serviceName) {if (!mFeatureController.isFeatureEnabled(serviceName)) {Slogf.w(CarLog.TAG_SERVICE, "getCarService for disabled service:" + serviceName);return null;}switch (serviceName) {...case Car.PROPERTY_SERVICE:case Car.SENSOR_SERVICE:case Car.VENDOR_EXTENSION_SERVICE:return mCarPropertyService;...case Car.CAR_INPUT_SERVICE:return mCarInputService;...default:IBinder service = null;if (mCarExperimentalFeatureServiceController != null) {service = mCarExperimentalFeatureServiceController.getCarService(serviceName);}if (service == null) {Slogf.w(CarLog.TAG_SERVICE, "getCarService for unknown service:"+ serviceName);}return service;}}...
}
CarPropertyManager 调用链路
Automotive OS 提供了 CarPropertyManager API 给第三方 App 读写车辆属性。参数 propId 来自于 VehiclePropertyIds 类中定义的属性 ID,当然也需要获得相应的 permission。
比如读写车窗属性的 ID 为 WINDOW_POS,需要 android.car.permission.CONTROL_CAR_WINDOWS 的权限。
读取 getProperty() 首先调用 checkSupportedProperty() 检查是否支持该属性,如果是 USER 相关的属性会抛出如下的异常:
Unsupported property:xxx
通过检查的向实现的 Service 发出读取调用。
public class CarPropertyManager extends CarManagerBase {public <E> CarPropertyValue<E> getProperty(@NonNull Class<E> clazz, int propId, int areaId) {checkSupportedProperty(propId);try {CarPropertyValue<E> propVal = mService.getProperty(propId, areaId);if (propVal != null && propVal.getValue() != null) {Class<?> actualClass = propVal.getValue().getClass();}return propVal;}...}private void checkSupportedProperty(int propId) {switch (propId) {case VehiclePropertyIds.INITIAL_USER_INFO:case VehiclePropertyIds.SWITCH_USER:case VehiclePropertyIds.CREATE_USER:case VehiclePropertyIds.REMOVE_USER:case VehiclePropertyIds.USER_IDENTIFICATION_ASSOCIATION:throw new IllegalArgumentException("Unsupported property: "+ VehiclePropertyIds.toString(propId) + " (" + propId + ")");}}...
}
ICarProperty aidl 的实现即位于上个章节分析到的 CarPropertyService 中。
-
先到存放所有 Property ID 的
SparseArray中检查是否确实存在该 Property,如果不存在的话打印 error 提醒并结束 -
获取该 Property 的 Permission 配置,如果不存在的话,抛出如下异常:
SecurityException: Platform does not have permission to read value for property Id: 0x…
-
assertPermission() 检查当前 Car Service 是否确实被授予了如上 Permission
-
最后调用持有的 PropertyHalService 继续发出读取的调用
public class CarPropertyService extends ICarProperty.Stubimplements CarServiceBase, PropertyHalService.PropertyHalListener {@Overridepublic CarPropertyValue getProperty(int prop, int zone) ... {synchronized (mLock) {if (mConfigs.get(prop) == null) {// Do not attempt to register an invalid propIdSlogf.e(TAG, "getProperty: propId is not in config list:0x" + toHexString(prop));return null;}}// Checks if android has permission to read property.String permission = mHal.getReadPermission(prop);if (permission == null) {throw new SecurityException("Platform does not have permission to read value for "+ "property Id: 0x" + Integer.toHexString(prop));}CarServiceUtils.assertPermission(mContext, permission);return runSyncOperationCheckLimit(() -> {return mHal.getProperty(prop, zone);});}...
}
PropertyHalService 首先调用 managerToHalPropId() 将 Property ID 转为 HAL 中该 ID 的定义,并再度检查该 HAL ID 是否确实存在。如果不存在的话亦抛出异常:
IllegalArgumentException:Invalid property Id : 0x…
接着,通过 VehicleHal 传递 HAL 中 ID 继续读取得到 HalPropValue,当读取的 value 存在的话,首先得获取该 Property 在 HAL 层和上层定义的 HalPropConfig 规则。
最后依据 config 将 value 解析成 CarPropertyValue 类型返回。
public class PropertyHalService extends HalServiceBase {
'/ '    ...public CarPropertyValue getProperty(int mgrPropId, int areaId)throws IllegalArgumentException, ServiceSpecificException {int halPropId = managerToHalPropId(mgrPropId);if (!isPropertySupportedInVehicle(halPropId)) {throw new IllegalArgumentException("Invalid property Id : 0x" + toHexString(mgrPropId));}// CarPropertyManager catches and rethrows exception, no need to handle here.HalPropValue value = mVehicleHal.get(halPropId, areaId);if (value == null) {return null;}HalPropConfig propConfig;synchronized (mLock) {propConfig = mHalPropIdToPropConfig.get(halPropId);}return value.toCarPropertyValue(mgrPropId, propConfig);}...
}
其实 VehicleHal 并未做太多处理就直接交给了 HalClient 来处理。
public class VehicleHal implements HalClientCallback {...public HalPropValue get(int propertyId)throws IllegalArgumentException, ServiceSpecificException {return get(propertyId, NO_AREA);}...public HalPropValue get(int propertyId, int areaId)throws IllegalArgumentException, ServiceSpecificException {return mHalClient.getValue(mPropValueBuilder.build(propertyId, areaId));}...
}
HalClient 通过 invokeRetriable() 进行超时为 50ms 的 internalGet() 调用:如果结果是 TRY_AGAIN 并且尚未超时的话,再次调用;反之已经超时或者结果成功获取到的话,即结束。
后续会再次检查该 Result 中的 status,是否是不合法的、空的值等等,通过检查的话则返回 HalPropValue 出去。
final class HalClient {...private static final int SLEEP_BETWEEN_RETRIABLE_INVOKES_MS = 50;HalPropValue getValue(HalPropValue requestedPropValue)throws IllegalArgumentException, ServiceSpecificException {ObjectWrapper<ValueResult> resultWrapper = new ObjectWrapper<>();resultWrapper.object = new ValueResult();int status = invokeRetriable(() -> {resultWrapper.object = internalGet(requestedPropValue);return resultWrapper.object.status;}, mWaitCapMs, mSleepMs);ValueResult result = resultWrapper.object;if (StatusCode.INVALID_ARG == status) {throw new IllegalArgumentException(getValueErrorMessage("get", requestedPropValue, result.errorMsg));}if (StatusCode.OK != status || result.propValue == null) {if (StatusCode.OK == status) {status = StatusCode.NOT_AVAILABLE;}throw new ServiceSpecificException(status, getValueErrorMessage("get", requestedPropValue, result.errorMsg));}return result.propValue;}private ValueResult internalGet(HalPropValue requestedPropValue) {final ValueResult result = new ValueResult();try {result.propValue = mVehicle.get(requestedPropValue);result.status = StatusCode.OK;result.errorMsg = new String();}...return result;}...
}
internalGet() 的实现由持有的 VehicleStub 实例的 get 方法完成,其实现对应于依据 HIDL 的配置调用 HAL 侧获取相应数据。
public abstract class VehicleStub {...@Nullablepublic abstract HalPropValue get(HalPropValue requestedPropValue)throws RemoteException, ServiceSpecificException;...
}
set 写入的链路和 get 大同小异,后面我会以车窗状态和开关操作为例,详细展开车辆属性 API 的使用和原理细节。
总结
我们通过一张表格来总结 CarService 相关组件的构成。
| Car 相关组件 | 所属进程 | 作用 |
|---|---|---|
| CarServiceHelperService | SystemServer | 管理 Car Serivce 的系统服务 |
| CarService | builtin app | Car 核心服务 |
| updatable app | Car 核心服务的具体实现 | |
| Car API | android.car.jar | Car API SDK |
| Car Apps | Launcher 等 | Car 专门设计的一系列 App |
而 CarService 在系统中的位置、与外部的交互链路,则是通过一张总图来直观把握:

- SystemServer 进程在系统启动的时候发现 OS 具备 Automotive 的 feature,则启动
CarServiceHelperService系统服务,并交由CarServiceHelperServiceUpdatableImpl实际负责和CarService的绑定 - CarService 的 builtin app 由父类
ServiceProxy完成中转,即反射出 updatable app 中CarServiceImpl实例 - CarServiceImpl 的初始化将构建
ICarImpl实例并构建内部的一堆具体服务CarServiceBase,比如负责输入的CarInputService、负责车辆属性的CarPropertyService等。 - 这些具体服务通过
HalServiceBase和 VehicleHal 进行交互,比如调度输入事件的InputHalService、读写/转换车辆属性的PropertyHalService等 - 后续的交给
VehicleHal通过 HIDL 和 HAL 层交互 - 其他 Apps 可以通过 Car lib 提供的
CarAPI 获取 CarService 中的服务接口即 ICarImpl - ICarImpl 通过启动时候注册的服务名称和 CarServiceBase 实例对照表向 Apps 返回对应的接口实例,比如控制、监听输入的
CarInputManager、读写车辆属性的CarPropertyManager - 其他 Apps 拿到这些 Manager 接口之后,像 AOSP 中使用 ActivityManager 等接口一样通过 AIDL 和 CarService 进行交互
推荐阅读
- 一文了解 Android 车机如何处理中控的旋钮输入
- 从实体按键看 Android 车载的自定义事件机制
- Android 车机初体验:Auto,Automotive 傻傻分不清楚?
参考文档 & 文章
- https://developer.android.google.cn/reference/android/car/hardware/property/CarPropertyManager
- https://developer.android.google.cn/reference/android/car/VehiclePropertyIds
- https://zhuanlan.zhihu.com/p/608622393
- https://www.jianshu.com/p/75da427d5682
相关文章:
万字解读 Android 车机核心 :CarService 的构成和链路~
前言 关于 Android 车机,之前分析过方控上自定义按键的输入机制和中控上旋钮输入的原理,但都局限于 Car Service 内 Input 相关模块。 一文了解 Android 车机如何处理中控的旋钮输入从实体按键看 Android 车载的自定义事件机制 本文将结合 Android 系…...

C#使用Panel
using System; using System.Collections.Generic; using System.ComponentModel; using System.Data; using System.Drawing; using System...
)
Jabbi的Rust学习日记(一)
Rust环境安装 Windows:Install Rust - Rust Programming Language (rust-lang.org) 访问网页,下载64bit | 32bit 版本 下载完成后打开,直接enter即可 Linux:输入指令 curl https://sh.rustup.rs-sSf | sh 我会报错,好像是链接不到这个网址&a…...
电脑磁盘分区形式是什么?如何更改?
磁盘分区形式介绍 在了解为什么以及如何更改分区形式之前,让我们对磁盘分区形式有一个基本的了解。一般来说,分区形式是指主引导记录(MBR)和 GUID 分区表(GPT)。 MBR和GPT是Windows系统中常用…...

Outlook无需API开发连接钉钉群机器人,实现新增会议日程自动发送群消息通知
Outlook用户使用场景: 在企业中,会议和活动的顺利举行对于业务运转和团队协作至关重要。然而,计划的变动总是无法避免,这可能会导致其他人的计划受到影响,打乱原有的安排。为了解决这个问题,许多企业开始使…...
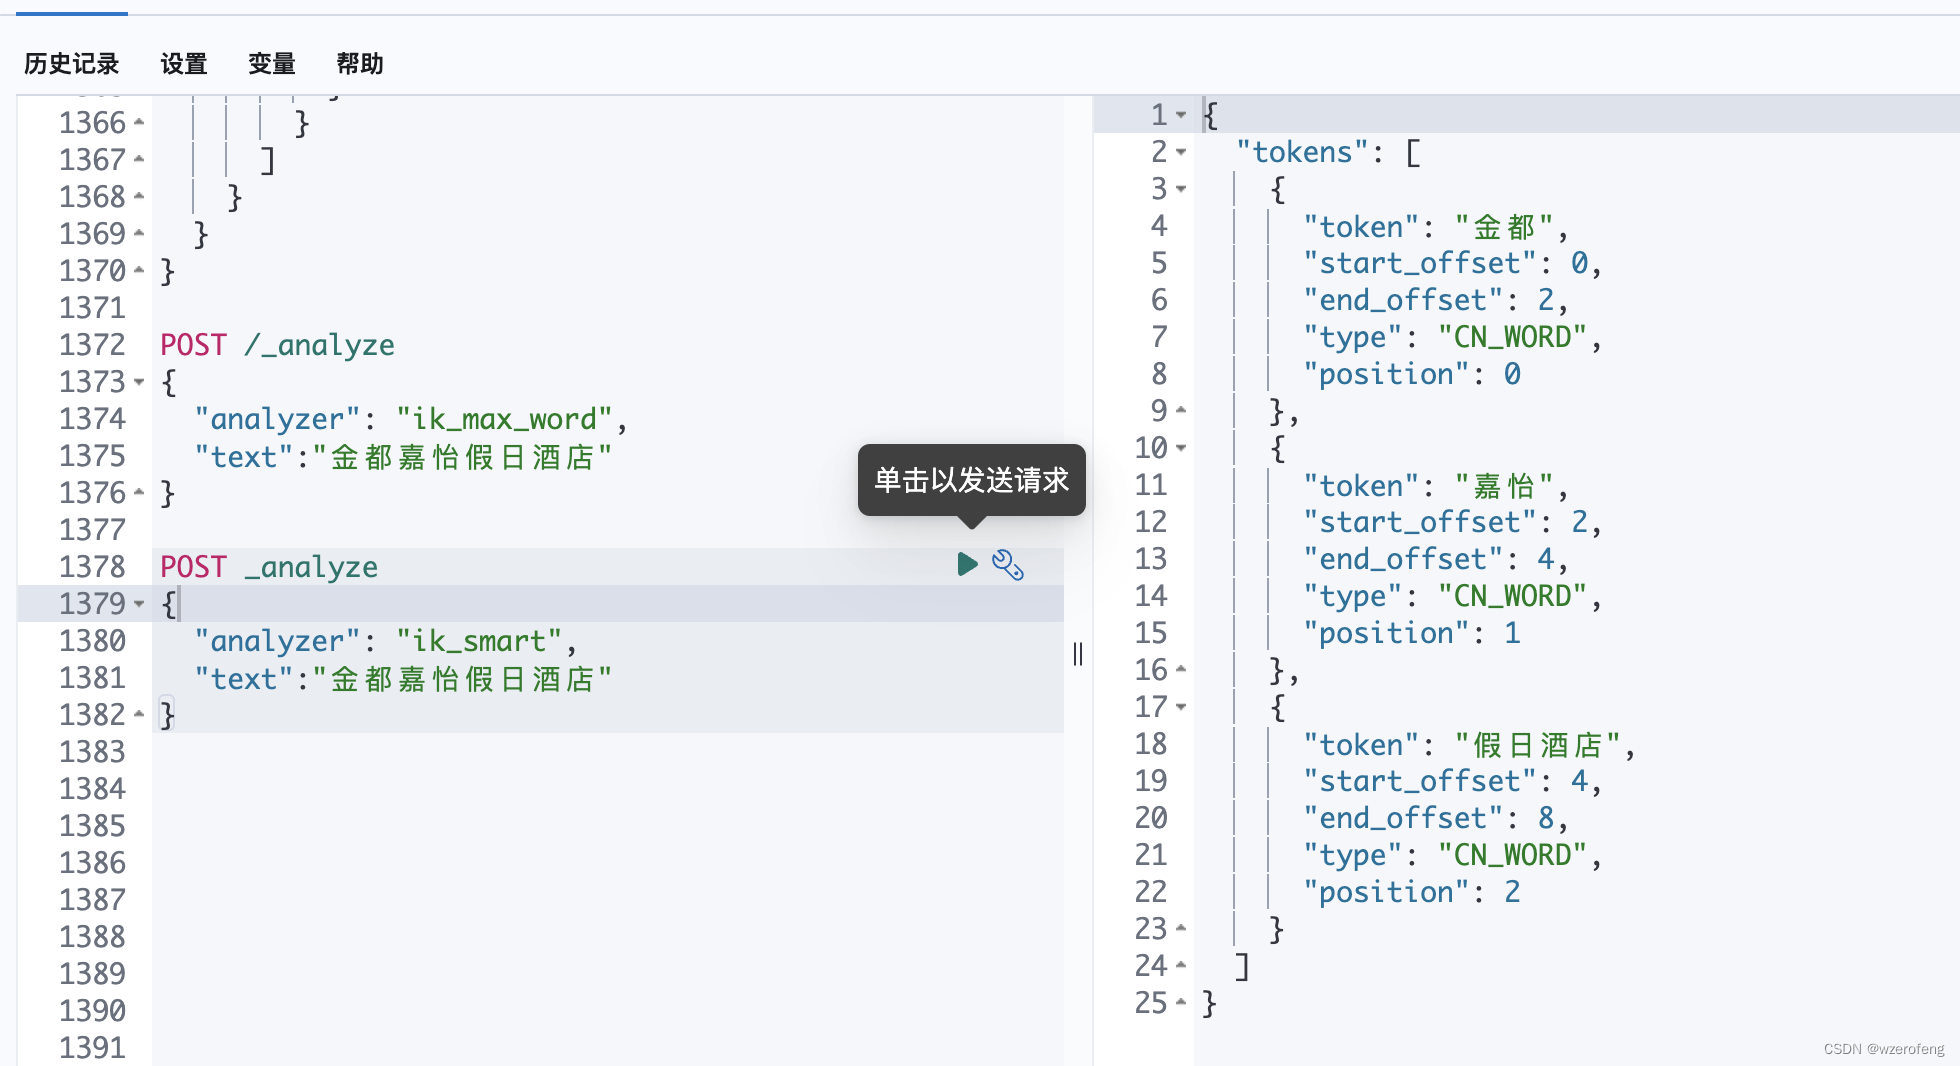
elasticsearch分析插件 安装analysis-ik
首先下载安装es 和 插件 ,注意 两者的版本要保持一致,如果要用到kibana 则三者保持一致 ik:https://github.com/medcl/elasticsearch-analysis-ik/releases es/kibana:https://www.elastic.co/cn/downloads/past-releases/ 然后在 es— elast…...

2023年股票大宗减持研究报告
第一章 股票大宗减持概述 1.1 概念 大宗减持是指通过大宗交易的方式进行减持,即达到规定的最低限额的证券单笔买卖申报,买卖双方经过协议达成一致并经交易所确定成交的证券交易,其中A股单笔交易数量在30万股(含)以上…...
VS编译.cu文件源文件无法打开matrix.h和mex.h问题
配置好cu和VS相关库文件后CUDA程序仍然报错:无法打开matrix.h和mex.h,解决办法: (1)这两个头文件是matlab中的,可能无法直接在VS中调用,可以通过添加外部依赖项的方法将matlab中的头文件的文件路…...
)
小bugs搜集和解决方法,亲测有效(2022-2023)
有些小bugs几行指令就能解决,写太多不好,这里就进行一个2022-2023这段时间的bugs collection和solution。 Deep Learning How to make really empty tensor? a nn.Torch([]) b torch.empty(2,3) for i in rang(3):a torch.cat(a, b, dim0)Mismatc…...
归并排序和快速排序的两种实现
在此之前我们已经介绍过归并排序和快速排序:浅谈归并排序与快速排序,但其中的实现都是基于递归的。本文将重新温故这两种算法并给出基于迭代的实现。 目录 1. 归并排序1.1 基于递归1.2 基于迭代 2. 快速排序2.1 基于递归2.2 基于迭代 1. 归并排序 1.1 基…...

C#,《小白学程序》第十四课:随机数(Random)第一,几种随机数的计算方法与代码
1 文本格式 /// <summary> /// 《小白学程序》第十四课:随机数(Random)第一,几种随机数的计算方法与代码 /// 本课初步接触一下随机数。 /// </summary> /// <param name"sender"></param> ///…...

[杂谈]-快速了解Modbus协议
快速了解Modbus协议 文章目录 快速了解Modbus协议1、为何 Modbus 如此受欢迎2、范围和数据速率3、逻辑电平4、层数5、网络与通讯6、数据帧格式7、数据类型8、服务器如何存储数据9、总结 Modbus 是一种流行的低速串行通信协议,广泛应用于自动化行业。 该协议由 Mo…...
WhatsApp的两个商业模式该如何选择
WhatsApp Business 是什么 目前 WhatsApp 提供两种商业模式,企业应根据自身需求选择相应版本。 第一个版本是 WhatsApp Business:初创企业只需一个手机应用程序,便可以个体单位与客户轻松互动; 另一个版本是 WhatsApp Business APIÿ…...
动态表单设计
动态表单设计 背景方案讨论基于上面分析,对比调研,自定义动态表单数据模型表单详解(一) 表单模板:jim_dynamic_form(二)表单数据类型:jim_form_data_type(三)…...

JAR will be empty - no content was marked for inclusion!
现象 在对自建pom依赖组件打包时,出现JAR will be empty - no content was marked for inclusion!错误。 方案 在pom中怎么加packaging标签内容为pom,标识只打包pom文件 <?xml version"1.0" encoding"UTF-8"?> ...<grou…...
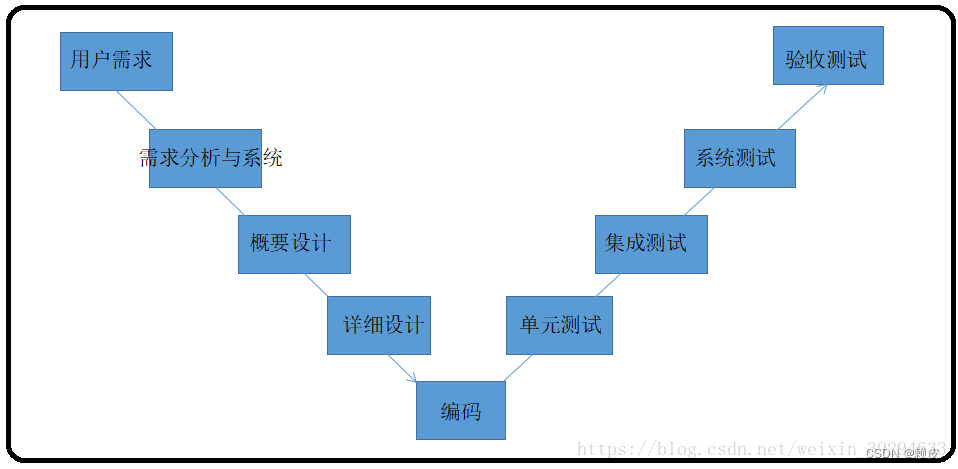
软件生命周期及流程【软件测试】
软件的生命周期 软件生命周期是软件开始研制到最终被废弃不用所经历的各个阶段。 瀑布型生命周期模型 规定了它们自上而下、相互衔接的固定次序,如同瀑布流水,逐级下落,具有顺序性和依赖性。每个阶段规定文档并需进行评审。 特点ÿ…...

2023高教社杯数学建模E题思路代码 - 黄河水沙监测数据分析
# 1 赛题 E 题 黄河水沙监测数据分析 黄河是中华民族的母亲河。研究黄河水沙通量的变化规律对沿黄流域的环境治理、气候变 化和人民生活的影响, 以及对优化黄河流域水资源分配、协调人地关系、调水调沙、防洪减灾 等方面都具有重要的理论指导意义。 附件 1 给出了位…...
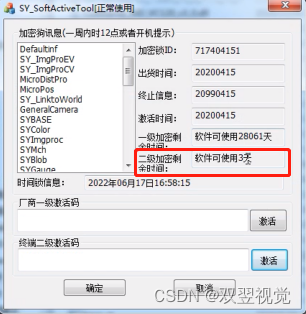
双翌保养码使用指南方法(一)
保养码使用指南一 为了确保软件的正常运行和有效使用,正确地使用保养码是至关重要的。以下是保养码使用的简单指南,以帮助您进行正确的操作。 1. 打开软件入口:首先,在您的电脑上打开文件夹,并找到s-y softactive tool…...
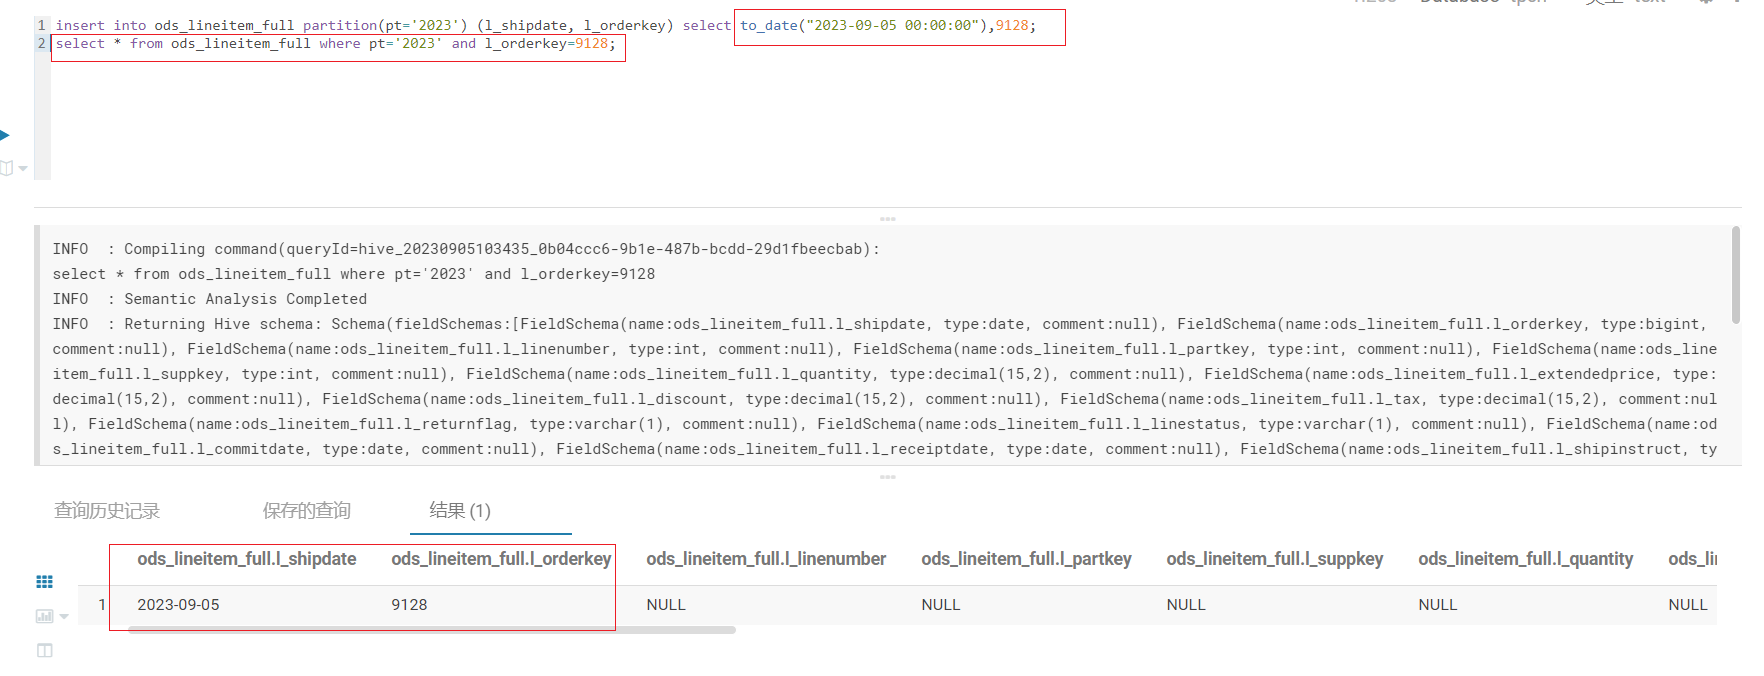
hive指定字段插入数据,包含了分区表和非分区表
1、建表 语句如下: CREATE EXTERNAL TABLE ods_lineitem_full (l_shipdate date,l_orderkey bigint,l_linenumber int,l_partkey int,l_suppkey int,l_quantity decimal(15, 2),l_extendedprice decimal(15, 2),l_discount de…...
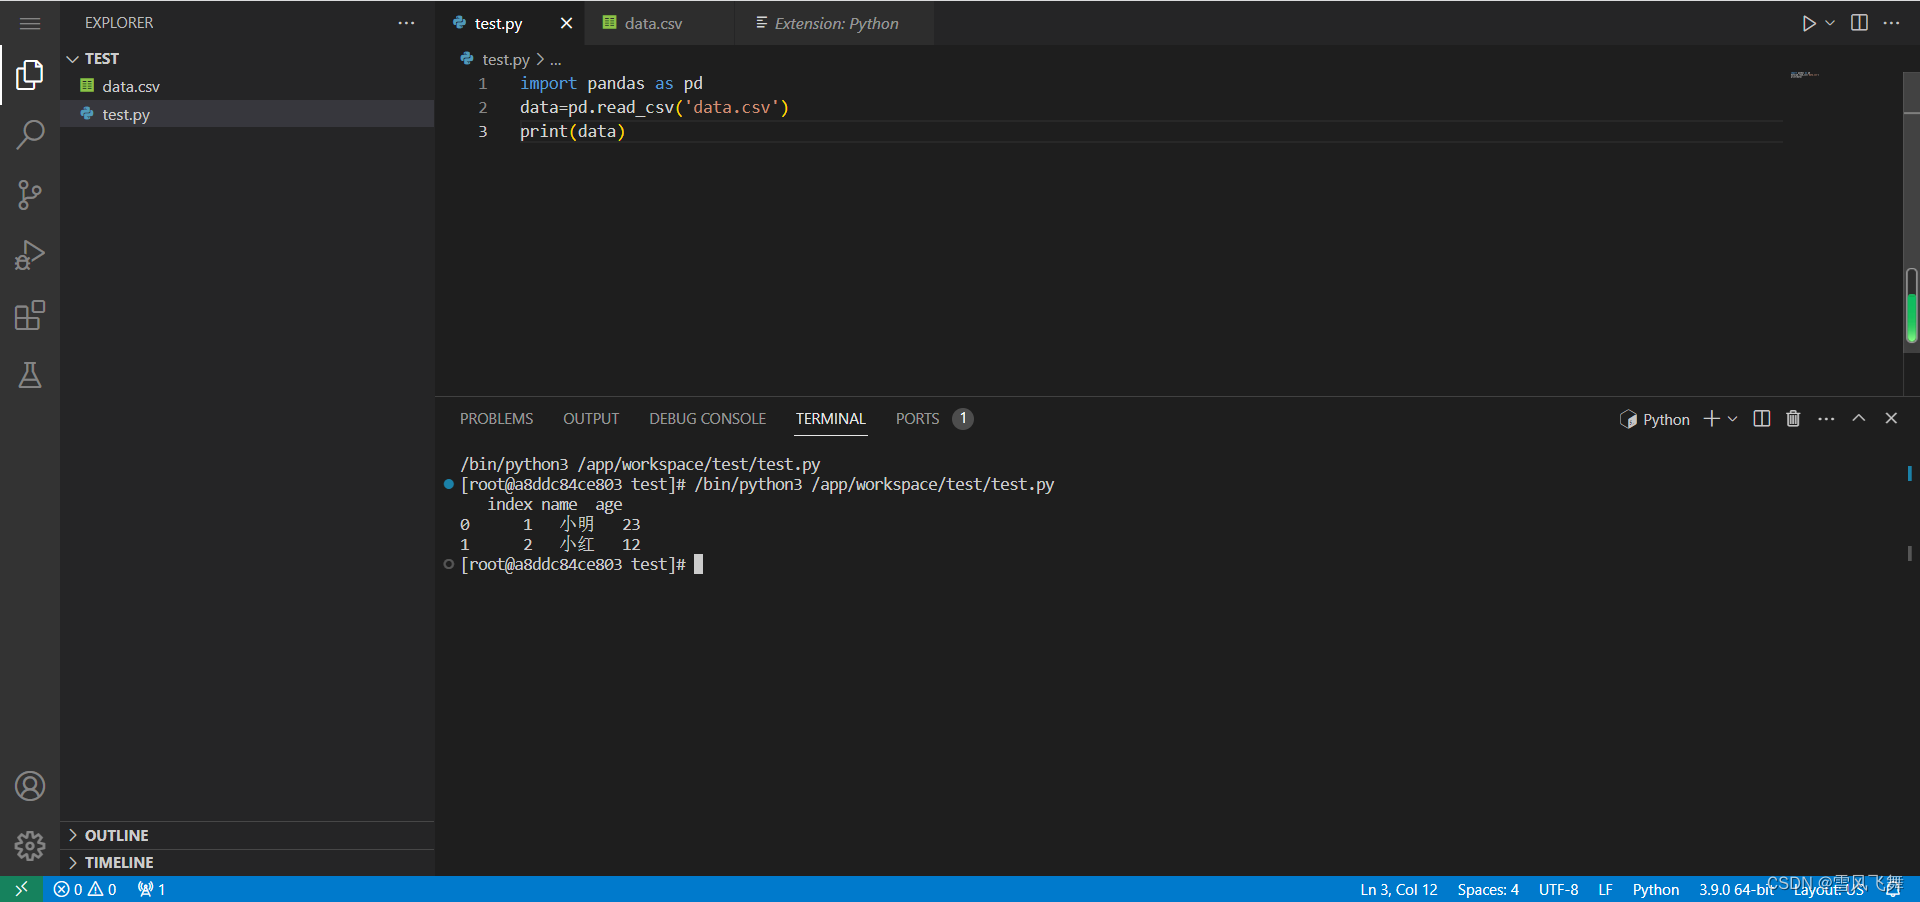
浏览器端vscode docker搭建(附带python环境)
dockerfile from centos:7 #安装python环境 run yum -y install wget openssl-devel bzip2-devel expat-devel gdbm-devel readline-devel zlib-devel libffi-devel gcc make run wget https://www.python.org/ftp/python/3.9.0/Python-3.9.0.tgz run tar -xvf Python-3.9.…...

ESP32-S3驱动JW01二氧化碳传感器:从供电陷阱到数据解析的实战指南
1. 硬件连接:电压匹配是生死线 第一次拿到JW01传感器时,我像往常一样顺手接上了ESP32-S3开发板的5V引脚——毕竟大多数传感器模块都标着"5V供电"的字样。结果串口监视器里一片死寂,连乱码都没有。翻出万用表测量才发现,…...

三步掌握BilibiliDown:打造你的B站视频离线收藏库
三步掌握BilibiliDown:打造你的B站视频离线收藏库 【免费下载链接】BilibiliDown (GUI-多平台支持) B站 哔哩哔哩 视频下载器。支持稍后再看、收藏夹、UP主视频批量下载|Bilibili Video Downloader 😳 项目地址: https://gitcode.com/gh_mirrors/bi/Bi…...

给数学恐惧症患者的DDPM前向扩散公式拆解:从‘图像变糊’到一行代码生成任意噪声图
给数学恐惧症患者的DDPM前向扩散公式拆解:从‘图像变糊’到一行代码生成任意噪声图 想象一下,你正在搅拌一杯咖啡。最初,咖啡是纯黑色的,但随着你不断加入牛奶,颜色逐渐变浅,最终变成一杯乳白色的液体。这…...

如何快速掌握正则表达式示例生成器:从入门到精通的完整指南
如何快速掌握正则表达式示例生成器:从入门到精通的完整指南 【免费下载链接】regexp-examples Generate strings that match a given regular expression 项目地址: https://gitcode.com/gh_mirrors/re/regexp-examples 正则表达式示例生成器(reg…...

H5扫码功能选型实战:微信JS-SDK vs 纯前端库,从公众号配置到代码封装的完整流程
H5扫码功能选型实战:微信JS-SDK vs 纯前端库的技术决策指南 当营销活动页需要实现"扫码领优惠券"功能时,技术团队突然陷入争论:是直接调用微信JS-SDK,还是采用纯前端扫码库?这个看似简单的技术决策ÿ…...

Win11Debloat系统优化工具:全面提升Windows性能的技术指南
Win11Debloat系统优化工具:全面提升Windows性能的技术指南 【免费下载链接】Win11Debloat A simple, lightweight PowerShell script that allows you to remove pre-installed apps, disable telemetry, as well as perform various other changes to declutter an…...
+ NVIDIA Container Toolkit)
Phi-4-mini-reasoning部署教程:容器化打包(Dockerfile)+ NVIDIA Container Toolkit
Phi-4-mini-reasoning部署教程:容器化打包(Dockerfile) NVIDIA Container Toolkit 1. 项目概述 Phi-4-mini-reasoning是微软推出的3.8B参数轻量级开源模型,专为数学推理、逻辑推导、多步解题等强逻辑任务设计。这款模型主打&quo…...
忍者像素绘卷惊艳案例:生成支持CSS Sprite切片的像素角色动作序列图
忍者像素绘卷惊艳案例:生成支持CSS Sprite切片的像素角色动作序列图 1. 像素艺术的新纪元 在游戏开发领域,像素艺术始终保持着独特的魅力。忍者像素绘卷作为一款基于Z-Image-Turbo深度优化的图像生成工具,为开发者带来了革命性的解决方案。…...

2026 Global Ion Exchange Resin Systems Market Trends:关税扰动下的工程水处理系统重构与产业链迁移逻辑
观点 离子交换树脂系统的竞争核心,已经不再是“树脂材料”,而是“系统工程能力 供应链组织能力”。 2026年关税变量的加入,本质上正在把这个行业从“化工材料赛道”,推向“工程系统全球制造网络”的复合竞争阶段。一、这不是树脂…...

别再死记硬背了!用DCM模式反激电路,手把手教你搞定宽电压输入的隔离电源
从零构建宽电压隔离电源:DCM反激电路实战指南 当你在深夜调试电路时突然闻到焦糊味,或是面对一堆烧毁的MOS管束手无策,是否想过——电源设计本可以更简单?本文将带你用工程师的思维重新理解反激变换器,避开教科书式的理…...