QT_dbus(ipc进程间通讯)
QT_dbus(ipc进程间通讯)
前言:
参考链接:
https://www.cnblogs.com/brt3/p/9614899.html
https://blog.csdn.net/weixin_43246170/article/details/120994311
https://blog.csdn.net/kchmmd/article/details/118605315
一个大型项目可能需要多个子程序同时运行,但是子程序之间的通讯就需要进程间通讯,DBUS是QT自带的组件,尝试使用一下。
1、创建包含多个子程序的工程


TEMPLATE = subdirs

2、第一个dbus试验:先建立session bus的连接,然后使用QT自带工具qdbusviewer演示使用


#include "mainwidget.h"
#include "qdebug.h"
#include "dbus/RPCClient.h"
#include "dbus/DBUSServer.h"
#include "dbus/MessageTip.h"
#include <QProcess>#include <QtDBus/QtDBus>
#include <QDBusError>MainWidget::MainWidget()
{QQmlApplicationEngine *m_pEngine = new QQmlApplicationEngine;QQmlComponent component(m_pEngine, QUrl(QStringLiteral("qrc:/main.qml")));QObject *mainObject = component.create();if (mainObject == nullptr) {qDebug() << "mainObject fail";return;}// 用于建立到session bus的连接QDBusConnection bus = QDBusConnection::sessionBus();// 在session bus上注册名为"com.test.hotel"的serviceif (!bus.registerService("com.test.hotel")) {qDebug() << bus.lastError().message();exit(1);}//一定要用实例化这种形式,使用定义的方式不行DBUSServer *dbusserver = new DBUSServer();// 注册名为"/dbusserver"的object。// "QDBusConnection::ExportAllSlots"表示把类DBUSServer的所有Slot都导出为这个Object的methodbus.registerObject("/dbusserver", dbusserver, QDBusConnection::ExportAllSlots);//bus.registerObject("/dbusserver", dbusserver, QDBusConnection::ExportAllSignal);
}
DBUSServer.cpp
#include "DBUSServer.h"
#include "qdebug.h"DBUSServer::DBUSServer()
{connect(this, SIGNAL(opendoor()), this, SLOT(onopenlight()));
}void DBUSServer::oncheckIn()
{qDebug() << "checkIn";emit opendoor();
}
void DBUSServer::oncheckOut()
{qDebug() << "oncheckOut";
}
void DBUSServer::onopenlight()
{qDebug() << "onopenlight";
}
int DBUSServer::onquery()
{return 50;
}
DBUSServer.h
#ifndef DBUSSERVER_H
#define DBUSSERVER_H
#include <QObject>
#include <QBrush>
class DBUSServer : public QObject
{Q_OBJECT
public:DBUSServer();public slots:void oncheckIn();void oncheckOut();int onquery();void onopenlight();signals:// Check in,参数为房间数,返回成功拿到的房间数void opendoor();private:int m_rooms;//QReadWriteLock m_lock;};
#endif // RPCSERVER_H
3、综合试验,经过几天的研究,决定以后采用下面的方法来进行进程间通讯
方法一:
说明:类似信号和槽(我个人认为是类似于MQTT协议的订阅和发布机制),
//函数说明:在不同进程之间建立信号和槽的关系,"on_hello"是自定义的信号的名(也可认为是发布的主题)
//参数1:服务器地址,参数2:路径(不填),参数3:Interface名称(不填),参数4:自定义信号(可认为是订阅信号),参数5:槽函数所在的对象,参数6:槽函数
QDBusConnection::sessionBus().connect("com.test.hotel", "", "", "on_hello", this, SLOT(onApplyvalueChanged(int)));//函数说明:真正发布消息的地方,只要是和"on_hello"建立连接的槽函数都会得到相应
QDBusMessage msg = QDBusMessage::createSignal("/dbusserver", "com.test.hotel", "on_hello");
msg << 456;  //如果带参数就这样加上要传的参数
QDBusConnection::sessionBus().send(msg);
方法二:
说明:这种方法虽然思路清晰,但是调用一次函数代码量比较多,不是太推荐
//参数1:服务器地址,参数2:路径,参数3:Interface名称,参数4:调用槽函数的名字
QDBusMessage message = QDBusMessage::createMethodCall("com.test.hotel","/dbusserver","com.test.hotel.show","oncheckIn");
//槽函数有几种情况:①有参数传入无参数返回,②有参数传入有参数返回,③无参数传入有参数返回
/*****************有参数传入有参数返回*****************/
message << 123;//给int oncheckIn(int value);这个槽函数传入的参数(如果没有参数需要传,此步骤不用写)
//发送消息并获取返回值
QDBusMessage response = QDBusConnection::sessionBus().call(message);
//判断method是否被正确返回
if (response.type() == QDBusMessage::ReplyMessage)
{//从返回参数获取返回值int value = response.arguments().takeFirst().toInt();qDebug() << QString("value =  %1").arg(value);
}
else
{qDebug() << "value method called failed!";
}/*****************有参数传入无参数返回*****************/
message << 123;//给int oncheckIn(int value);这个槽函数传入的参数(如果没有参数需要传,此步骤不用写)
//发送消息
QDBusMessage response = QDBusConnection::sessionBus().call(message);
//判断method是否被正确返回
if (response.type() == QDBusMessage::ReplyMessage)
{qDebug() << "value method called successfull";
}
else
{qDebug() << "value method called failed!";
}/*****************无参数传入无参数返回*****************/
//发送消息
QDBusMessage response = QDBusConnection::sessionBus().call(message);
//判断method是否被正确返回
if (response.type() == QDBusMessage::ReplyMessage)
{qDebug() << "value method called successfull";
}
else
{qDebug() << "value method called failed!";
}
方法三:
说明:这种方法虽然思路清晰,比方法二更简介一些,推荐使用
//参数1:服务器地址,参数2:路径,参数3:Interface名称
QDBusInterface interface("com.test.hotel", "/dbusserver", "com.test.hotel.show", QDBusConnection::sessionBus());
if (!interface.isValid()) {qDebug() << "dbus interface fail";return;
}
QDBusMessage response;
//调用槽函数分为三种:①有参数传入无参数返回,②有参数传入有参数返回,③无参数传入有参数返回
//response = interface.call("onquery", 158);//有参数传入有参数返回
response = interface.call("onquery");//无参数传入有参数返回/有参数传入无参数返回
//判断method是否被正确返回
if (response.type() == QDBusMessage::ReplyMessage) {//从返回参数获取返回值(没有返回值的返回0,有返回值的正常返回)int value = response.arguments().takeFirst().toInt();qDebug() << QString("value =  %1").arg(value);
}
else
{qDebug() << "value method called failed!";
}
工程源码展示:
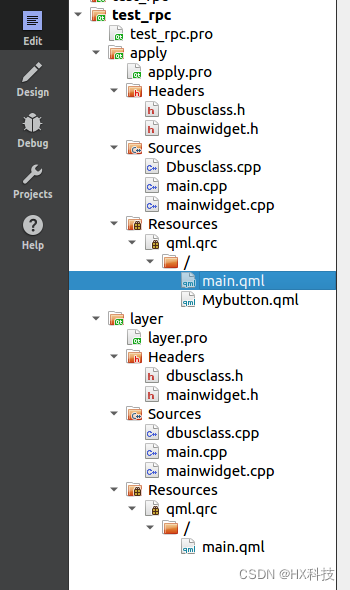
test_rpc.pro
TEMPLATE = subdirsSUBDIRS += \apply \layerapply/apply.pro
QT += quick \widgets \dbusCONFIG += c++11# The following define makes your compiler emit warnings if you use
# any Qt feature that has been marked deprecated (the exact warnings
# depend on your compiler). Refer to the documentation for the
# deprecated API to know how to port your code away from it.
DEFINES += QT_DEPRECATED_WARNINGS# You can also make your code fail to compile if it uses deprecated APIs.
# In order to do so, uncomment the following line.
# You can also select to disable deprecated APIs only up to a certain version of Qt.
#DEFINES += QT_DISABLE_DEPRECATED_BEFORE=0x060000    # disables all the APIs deprecated before Qt 6.0.0SOURCES += \Dbusclass.cpp \main.cpp \mainwidget.cppRESOURCES += qml.qrc# Additional import path used to resolve QML modules in Qt Creator's code model
QML_IMPORT_PATH =# Additional import path used to resolve QML modules just for Qt Quick Designer
QML_DESIGNER_IMPORT_PATH =# Default rules for deployment.
qnx: target.path = /tmp/$${TARGET}/bin
else: unix:!android: target.path = /opt/$${TARGET}/bin
!isEmpty(target.path): INSTALLS += targetHEADERS += \Dbusclass.h \mainwidget.h
apply/Headers/Dbusclass.h
#ifndef DBUSCLASS_H
#define DBUSCLASS_H
#include <QObject>
#include <QBrush>
class Dbusclass : public QObject
{Q_OBJECT//定义Interface名称为:"com.test.hotel.show"Q_CLASSINFO("D-Bus Interface", "com.test.apply.show")
public:Dbusclass();public slots:int oncheckIn(int value);//有参数传入有参数返回void oncheckOut(int value);//有参数传入无参数返回int onquery();//无参数传入有参数返回void onopenlight();//无参数传入无参数返回signals:void opendoor();private:int m_rooms;
};
#endif // RPCSERVER_H
apply/Headers/mainwidget.h
#ifndef MAINWIDGET_H
#define MAINWIDGET_H#include <QObject>
#include <QWidget>
#include <QQmlComponent>
#include <QQmlApplicationEngine>
#include <QQuickItem>
#include "Dbusclass.h"class MainWidget : public QObject
{Q_OBJECTpublic:MainWidget();protected slots:void onClickPageNo(bool enable);void onApplyvalueChanged(int value);void onApplystringChanged(QString value);void oncreateSignal();void onqDBusMessage();void onqDBusInterface();private:QQuickItem *m_applyItem = nullptr;QObject *m_applyObject = nullptr;
};#endif // MAINWIDGET_H
apply/Sources/Dbusclass.cpp
#include "Dbusclass.h"
#include "qdebug.h"
#include <QDebug>Dbusclass::Dbusclass()
{connect(this, SIGNAL(opendoor()), this, SLOT(onopenlight()));
}int Dbusclass::oncheckIn(int value)
{qDebug() << "checkIn:" << value;emit opendoor();return value;
}
void Dbusclass::oncheckOut(int value)
{qDebug() << "oncheckOut:" << value;
}
void Dbusclass::onopenlight()
{qDebug() << "onopenlight";
}
int Dbusclass::onquery()
{return 50;
}
apply/Sources/mainwidget.cpp
#include "mainwidget.h"
#include "qdebug.h"
#include "Dbusclass.h"
#include <QProcess>#include <QtDBus/QtDBus>
#include <QDBusError>
#include <QDBusMessage>MainWidget::MainWidget()
{QQmlApplicationEngine *m_pEngine = new QQmlApplicationEngine;QQmlComponent component(m_pEngine, QUrl(QStringLiteral("qrc:/main.qml")));QObject *mainObject = component.create();if (mainObject == nullptr) {qDebug() << "mainObject fail";return;}QList<QObject *> objectList = mainObject->findChildren<QObject *>("mybutton");if (objectList.isEmpty()) {qDebug() << "mybutton failed\n";return;}m_applyObject = objectList.last();connect(m_applyObject, SIGNAL(applyvalueChanged(int)), this, SLOT(onApplyvalueChanged(int)));connect(m_applyObject, SIGNAL(applystringChanged(QString)), this, SLOT(onApplystringChanged(QString)));connect(mainObject, SIGNAL(window_interface(bool)), this, SLOT(onClickPageNo(bool)));connect(mainObject, SIGNAL(createSignal()), this, SLOT(oncreateSignal()));connect(mainObject, SIGNAL(qDBusMessage()), this, SLOT(onqDBusMessage()));connect(mainObject, SIGNAL(qDBusInterface()), this, SLOT(onqDBusInterface()));// 用于建立到session bus的连接QDBusConnection bus = QDBusConnection::sessionBus();// 在session bus上注册名为"com.test.hotel"的serviceif (!bus.registerService("com.test.apply")) {qDebug() << bus.lastError().message();exit(1);}//一定要用实例化这种形式,使用定义的方式不行Dbusclass *dbusapply = new Dbusclass();// 注册名为"/dbusserver"的object。// "QDBusConnection::ExportAllSlots"表示把类DBUSServer的所有Slot都导出为这个Object的methodbus.registerObject("/dbusapply", dbusapply, QDBusConnection::ExportAllSlots);//bus.registerObject("/dbusapply", dbusapply, QDBusConnection::ExportAllSignal);//参数1:服务器地址,参数2:路径,参数3:Interface名称(不填),参数4:自定义信号(可认为是订阅信号),参数5:槽函数所在的对象,参数6:槽函数QDBusConnection::sessionBus().connect("com.test.layer", "", "", "on_layer", this, SLOT(onApplyvalueChanged(int)));
}void MainWidget::onClickPageNo(bool enable)
{//打开子程序QProcess *process = new QProcess();process->start("/home/zhou/work/test/build-test_rpc-Desktop_Qt_5_14_2_GCC_64bit-Debug/layer/layer");
}void MainWidget::onApplyvalueChanged(int value)
{qDebug() << "onApplyvalueChanged" << value;
}void MainWidget::onApplystringChanged(QString value)
{qDebug() << "onApplystringChanged" << value;
}void MainWidget::oncreateSignal()
{qDebug() << "oncreateSignal" ;QDBusMessage msg = QDBusMessage::createSignal("/dbuslayer", "com.test.layer.show", "on_apply");msg << 456;QDBusConnection::sessionBus().send(msg);
}void MainWidget::onqDBusMessage()
{qDebug() << "onqDBusMessage" ;QDBusMessage message = QDBusMessage::createMethodCall("com.test.layer","/dbuslayer","com.test.layer.show","oncheckIn");message << 234;//发送消息QDBusMessage response = QDBusConnection::sessionBus().call(message);//判断method是否被正确返回if (response.type() == QDBusMessage::ReplyMessage) {//从返回参数获取返回值int value = response.arguments().takeFirst().toInt();qDebug() << QString("value =  %1").arg(value);} else {qDebug() << "value method called failed!";}
}void MainWidget::onqDBusInterface()
{qDebug() << "onqDBusInterface" ;QDBusInterface interface("com.test.layer", "/dbuslayer", "com.test.layer.show", QDBusConnection::sessionBus());if (!interface.isValid()) {qDebug() << "dbus interface fail";return;}QDBusMessage response;response = interface.call("oncheckIn", 158);    // 有参数//判断method是否被正确返回if (response.type() == QDBusMessage::ReplyMessage) {//从返回参数获取返回值int value = response.arguments().takeFirst().toInt();qDebug() << QString("value =  %1").arg(value);} else {qDebug() << "value method called failed!";}
}
apply/Sources/main.cpp
#include <QGuiApplication>
#include <QQmlApplicationEngine>
#include "mainwidget.h"
#include "qdebug.h"
#include "qthread.h"int main(int argc, char *argv[])
{QCoreApplication::setAttribute(Qt::AA_EnableHighDpiScaling);QGuiApplication app(argc, argv);//    QQmlApplicationEngine engine;
//    const QUrl url(QStringLiteral("qrc:/main.qml"));
//    QObject::connect(&engine, &QQmlApplicationEngine::objectCreated,
//    &app, [url](QObject * obj, const QUrl & objUrl) {
//        if (!obj && url == objUrl) {
//            QCoreApplication::exit(-1);
//        }
//    }, Qt::QueuedConnection);
//    engine.load(url);MainWidget mainwidget;return app.exec();
}
apply/main.qml
import QtQuick 2.12
import QtQuick.Window 2.12
import QtQuick.Controls 2.12Window {visible: truewidth: 640height: 480objectName: "apply_window"title: qsTr("Hello apply")signal window_interface(bool enable)signal createSignal()signal qDBusMessage()signal qDBusInterface()Column{anchors.fill: parentspacing: 20Button{width: 140height: 50text: "开启界面2"onClicked: {window_interface(true)}}Button{width: 140height: 50text: "createSignal_发布消息"onClicked: {createSignal()}}Button{width: 140height: 50text: "QDBusMessage"onClicked: {qDBusMessage()}}Button{width: 140height: 50text: "QDBusInterface"onClicked: {qDBusInterface()}}Mybutton{width: 140height: 300}}
}
apply/Mybutton.qml
import QtQuick 2.0
import QtQuick.Controls 2.12Item {objectName: "mybutton"signal applyvalueChanged(int value)signal applystringChanged(string value)Column{spacing: 10Button{objectName: "button"width: 140height: 50text: "send1"onClicked: {applyvalueChanged(1)}}Button{width: 140height: 50text: "send2"onClicked: {applyvalueChanged(2)}}Button{width: 140height: 50text: "验证string"onClicked: {applystringChanged("{\"name\":\"lili\",\"age\":24,\"class\":6}")}}}
}
layer.pro
QT += quick
QT += widgets
QT += dbusCONFIG += c++11# The following define makes your compiler emit warnings if you use
# any Qt feature that has been marked deprecated (the exact warnings
# depend on your compiler). Refer to the documentation for the
# deprecated API to know how to port your code away from it.
DEFINES += QT_DEPRECATED_WARNINGS# You can also make your code fail to compile if it uses deprecated APIs.
# In order to do so, uncomment the following line.
# You can also select to disable deprecated APIs only up to a certain version of Qt.
#DEFINES += QT_DISABLE_DEPRECATED_BEFORE=0x060000    # disables all the APIs deprecated before Qt 6.0.0SOURCES += \dbusclass.cpp \main.cpp \mainwidget.cppRESOURCES += qml.qrc# Additional import path used to resolve QML modules in Qt Creator's code model
QML_IMPORT_PATH =# Additional import path used to resolve QML modules just for Qt Quick Designer
QML_DESIGNER_IMPORT_PATH =# Default rules for deployment.
qnx: target.path = /tmp/$${TARGET}/bin
else: unix:!android: target.path = /opt/$${TARGET}/bin
!isEmpty(target.path): INSTALLS += targetHEADERS += \dbusclass.h \mainwidget.h
layer/Herders/dbusclass.h
#ifndef DBUSCLASS_H
#define DBUSCLASS_H#include <QObject>class Dbusclass : public QObject
{Q_OBJECT//定义Interface名称为:"com.test.layer.show"Q_CLASSINFO("D-Bus Interface", "com.test.layer.show")
public:Dbusclass();public slots:int oncheckIn(int value);//有参数传入有参数返回
};#endif // DBUSCLASS_H
layer/Herders/mainwidget.h
#ifndef MAINWIDGET_H
#define MAINWIDGET_H#include <QObject>
#include <QQmlComponent>
#include <QQmlApplicationEngine>
#include <QQuickItem>class mainwidget : public QObject
{Q_OBJECT
public:mainwidget();public slots:void oncreateSignal();void onqDBusMessage();void onqDBusInterface();void onMessage_recv(int num);private:
};#endif // MAINWIDGET_H
layer/Sources/dbusclass.cpp
#include "dbusclass.h"
#include <QDebug>Dbusclass::Dbusclass()
{}int Dbusclass::oncheckIn(int value)
{qDebug() << "checkIn:" << value;return value;
}
layer/Sources/mainwidget.cpp
#include "mainwidget.h"
#include "dbusclass.h"
#include <QDBusMessage>
#include <QDBusConnection>
#include <QDBusInterface>
#include <QtDBus/QtDBus>mainwidget::mainwidget()
{QQmlApplicationEngine *m_pEngine = new QQmlApplicationEngine;QQmlComponent component(m_pEngine, QUrl(QStringLiteral("qrc:/main.qml")));QObject *mainObject = component.create();if (mainObject == nullptr) {qDebug() << "mainObject fail";return;}// 用于建立到session bus的连接QDBusConnection bus = QDBusConnection::sessionBus();// 在session bus上注册名为"com.test.hotel"的serviceif (!bus.registerService("com.test.layer")) {qDebug() << bus.lastError().message();exit(1);}//一定要用实例化这种形式,使用定义的方式不行Dbusclass *dbusclass = new Dbusclass();// 注册名为"/dbuslayer"的object。// "QDBusConnection::ExportAllSlots"表示把类DBUSServer的所有Slot都导出为这个Object的methodbus.registerObject("/dbuslayer", dbusclass, QDBusConnection::ExportAllSlots);connect(mainObject, SIGNAL(createSignal()), this, SLOT(oncreateSignal()));connect(mainObject, SIGNAL(qDBusMessage()), this, SLOT(onqDBusMessage()));connect(mainObject, SIGNAL(qDBusInterface()), this, SLOT(onqDBusInterface()));QDBusConnection::sessionBus().connect("com.test.apply", "", "", "on_apply", this, SLOT(onMessage_recv(int)));
}void mainwidget::oncreateSignal()
{qDebug() << "oncreateSignal";QDBusMessage msg = QDBusMessage::createSignal("/dbusapply", "com.test.apply.show", "on_layer");msg << 123;QDBusConnection::sessionBus().send(msg);
}void mainwidget::onqDBusMessage()
{qDebug() << "onLayer_reduce";QDBusMessage message = QDBusMessage::createMethodCall("com.test.apply","/dbusapply","com.test.apply.show","oncheckIn");message << 234;//发送消息QDBusMessage response = QDBusConnection::sessionBus().call(message);//判断method是否被正确返回if (response.type() == QDBusMessage::ReplyMessage) {//从返回参数获取返回值int value = response.arguments().takeFirst().toInt();qDebug() << QString("value =  %1").arg(value);} else {qDebug() << "value method called failed!";}
}void mainwidget::onqDBusInterface()
{qDebug() << "onLayer_reduce";QDBusInterface interface("com.test.apply", "/dbusapply", "com.test.apply.show", QDBusConnection::sessionBus());if (!interface.isValid()) {qDebug() << "dbus interface fail";return;}QDBusMessage response;response = interface.call("oncheckIn", 158);    // 有参数
//    response = interface.call("oncheckOut");    // 无参数
//    response = interface.call("onopenlight");//判断method是否被正确返回if (response.type() == QDBusMessage::ReplyMessage) {//从返回参数获取返回值int value = response.arguments().takeFirst().toInt();qDebug() << QString("value =  %1").arg(value);} else {qDebug() << "value method called failed!";}
}void mainwidget::onMessage_recv(int num)
{qDebug() << "onMessage_recv:" << num;
}
layer/Sources/main.cpp
#include <QGuiApplication>
#include <QQmlApplicationEngine>
#include "qdebug.h"
#include "mainwidget.h"int main(int argc, char *argv[])
{QCoreApplication::setAttribute(Qt::AA_EnableHighDpiScaling);QGuiApplication app(argc, argv);//    QQmlApplicationEngine engine;
//    const QUrl url(QStringLiteral("qrc:/main.qml"));
//    QObject::connect(&engine, &QQmlApplicationEngine::objectCreated,
//    &app, [url](QObject * obj, const QUrl & objUrl) {
//        if (!obj && url == objUrl) {
//            QCoreApplication::exit(-1);
//        }
//    }, Qt::QueuedConnection);
//    engine.load(url);mainwidget mainwidget;return app.exec();
}
layer/main.qml
import QtQuick 2.12
import QtQuick.Window 2.12
import QtQuick.Controls 2.12Window {visible: truewidth: 640height: 480title: qsTr("Hello layer")signal createSignal()signal qDBusMessage()signal qDBusInterface()Column{anchors.fill: parentspacing: 20Button{width: 140height: 50text: "createSignal_发布消息"onClicked: {createSignal()}}Button{width: 140height: 50text: "QDBusMessage"onClicked: {qDBusMessage()}}Button{width: 140height: 50text: "QDBusInterface"onClicked: {qDBusInterface()}}}
}
相关文章:
QT_dbus(ipc进程间通讯)
QT_dbus(ipc进程间通讯) 前言: 参考链接: https://www.cnblogs.com/brt3/p/9614899.html https://blog.csdn.net/weixin_43246170/article/details/120994311 https://blog.csdn.net/kchmmd/article/details/118605315 一个大型项目可能需要多个子程序同…...

华为OD机试 - 数组排序(C++) | 附带编码思路 【2023】
刷算法题之前必看 参加华为od机试,一定要注意不要完全背诵代码,需要理解之后模仿写出,通过率才会高。 华为 OD 清单查看地址:https://blog.csdn.net/hihell/category_12199283.html 华为OD详细说明:https://dream.blog.csdn.net/article/details/128980730 华为OD机试题…...
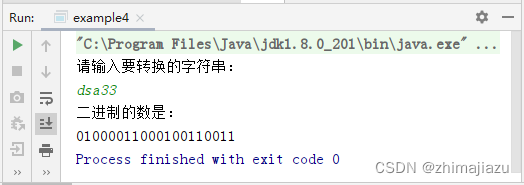
字符串转换为二进制-课后程序(JAVA基础案例教程-黑马程序员编著-第五章-课后作业)
【案例5-4】 字符串转换为二进制 【案例介绍】 1.任务描述 本例要求编写一个程序,从键盘录入一个字符串,将字符串转换为二进制数。在转换时,将字符串中的每个字符单独转换为一个二进制数,将所有二进制数连接起来进行输出。 案…...
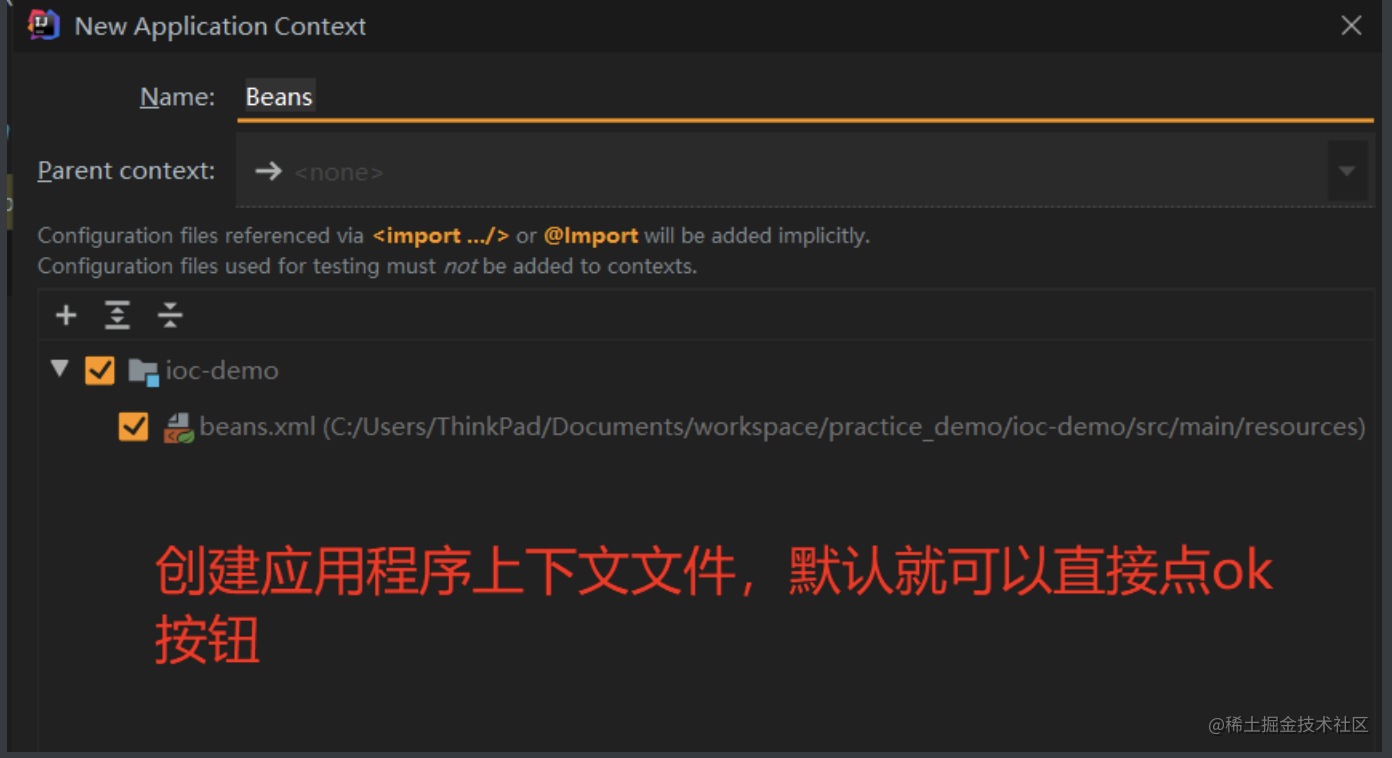
SpringIOC
一、为什么要使用Spring? Spring 是个java企业级应用的开源开发框架。Spring主要用来开发Java应用,但是有些扩展是针对构建J2EE平台的web应用。Spring 框架目标是简化Java企业级应用开发,并通过POJO为基础的编程模型促进良好的编程习惯。 为…...

Debezium系列之:基于数据库信号表和Kafka信号Topic两种技术方案实现增量快照incremental技术的详细步骤
Debezium系列之:基于数据库信号表和Kafka信号Topic两种技术方案实现增量快照incremental技术的详细步骤 一、需求背景二、增量快照技术实现的两种方案三、基于数据库信号表实现增量快照技术的原理1.基于水印的快照2.信令表3.增量快照4.连接起重启四、基于数据库信号表实现增量…...
 | 机试题+算法思路+考点+代码解析 【2023】)
华为OD机试 - 第 K 个最小码值的字母(Python) | 机试题+算法思路+考点+代码解析 【2023】
第 K 个最小码值的字母 题目 输入一个由n个大小写字母组成的字符串 按照 ASCII 码值从小到大进行排序 查找字符串中第k个最小 ASCII 码值的字母(k>=1) 输出该字母所在字符串中的位置索引(字符串的第一个位置索引为 0) k如果大于字符串长度则输出最大 ASCII 码值的字母所在…...
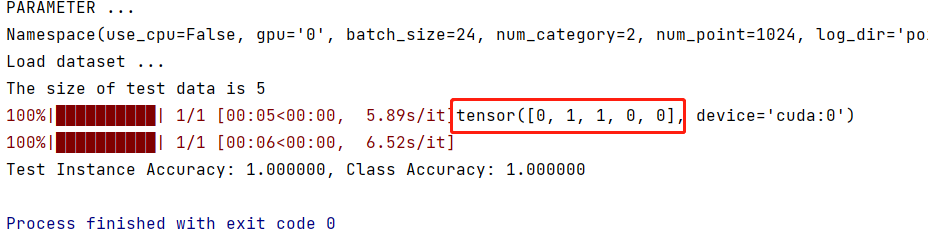
PointNet++训练自己的数据集(附源码)
本文针对PointNet强大的三维点云分类功能,详细讲解怎么训练自己的数据集,在此之前,需要确保已经能够跑通源码的训练和测试,如果没有,请参考PointNet的源码运行。数据放置1.1. 在mytensor_shape_names.txt中配置自己的分…...
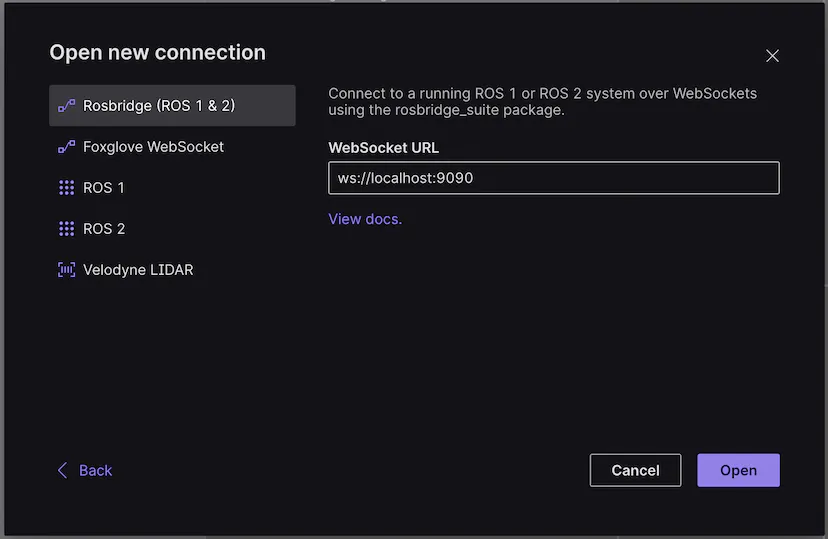
ROS2可视化利器---Foxglove Studio
0. 简介 之前作者已经讲了《ROS1可视化利器—Webviz》,然后就有读者问,ROS2有没有可以使用的可视化工具呢,答案是肯定的,除了plotjuggler这种ROS1和ROS2通用的可视化利器,还有一种全平台通用的软件FoxgloveStudio&…...
)
python实战应用讲解-【语法基础篇】流程控制-控制流的元素及语句(附示例代码)
目录 控制流的元素 条件 代码块 程序执行 代码块嵌套 控制流语句 if 语句...

[蓝桥杯 2019 省 A] 外卖店优先级
蓝桥杯 2019 年省赛 A 组 G 题题目描述“饱了么”外卖系统中维护着 N家外卖店,编号 1 ∼ N。每家外卖店都有一个优先级,初始时 (0 时刻)优先级都为0。每经过 1 个时间单位,如果外卖店没有订单,则优先级会减少 1&#x…...
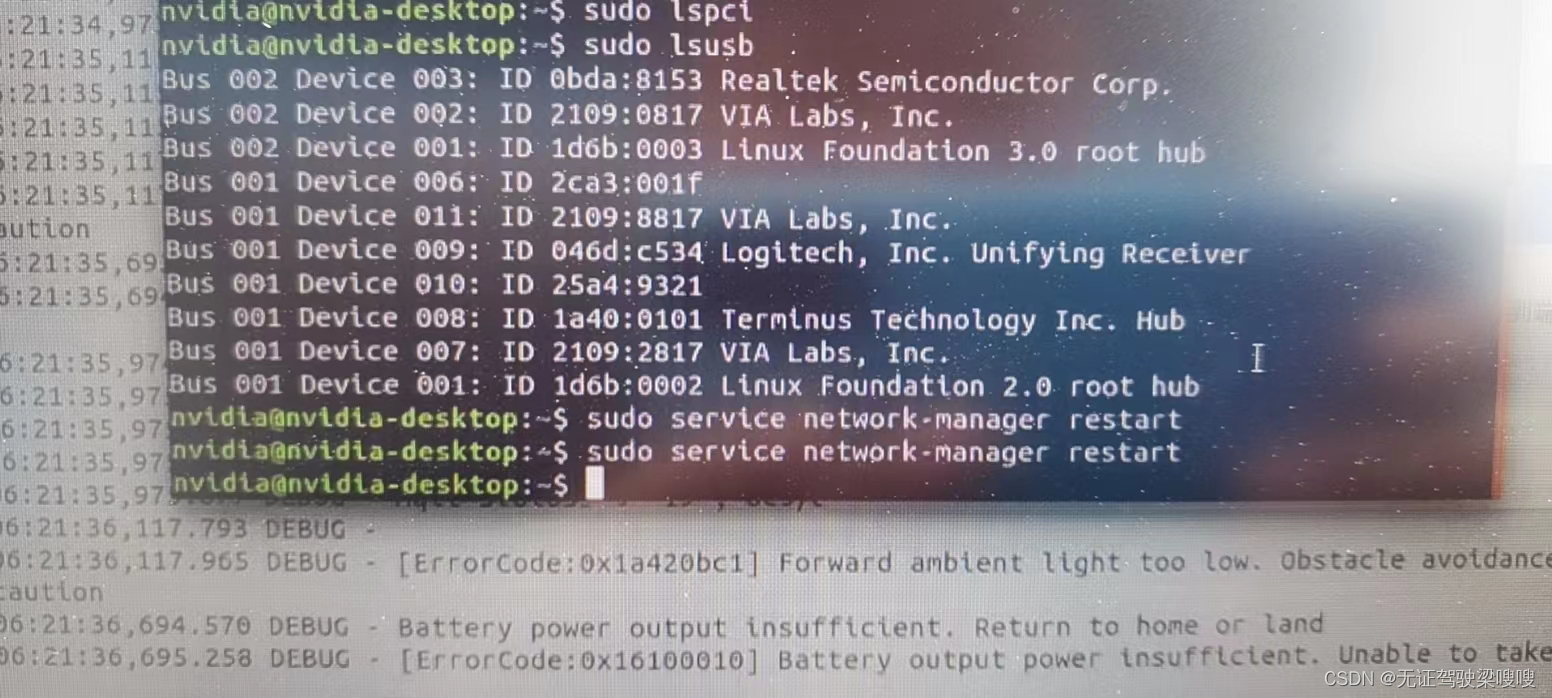
Jetson Xavier nx(ubuntu18.04)安装rtl8152网卡驱动和8192网卡驱动
含义 Bus 002 : 指明设备连接到哪条总线。 Device 003 : 表明这是连接到总线上的第二台设备。 ID : 设备的ID,包括厂商的ID和产品的ID,格式 厂商ID:产品ID。 Realtek Semiconductor Corp. RTL8153 Gigabit Ethernet Adapter:生产商名字和设备…...

Rocky 9.1操作系统实现zabbix6.0的安装部署实战
文章目录前言一. 实验环境二. 安装zabbix过程2.1. 安装zabbix源2.2 安装zabbix相关的软件2.3 安装数据库并启动2.4 开始初始化数据库:2.5 创建数据库实例及对应的用户2.6 导入官网提供的数据2.7 配置zabbix 服务的配置文件2.8. 启动服务2.9 从网页进行安装2.10 登陆…...
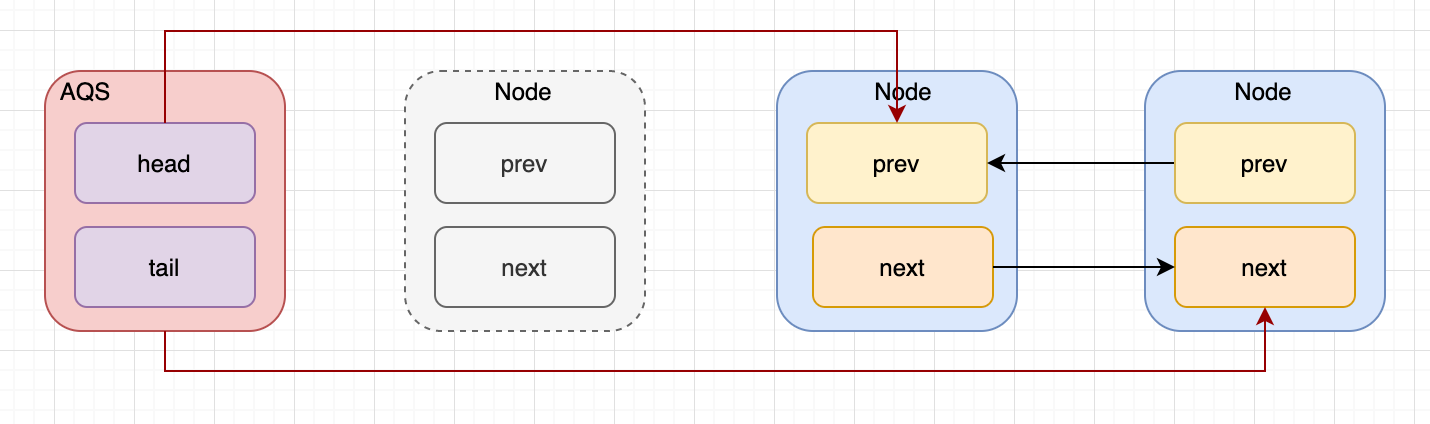
AQS-ReentrantLock
一、AQS 在 Lock 中,用到了一个同步队列 AQS,全称 AbstractQueuedSynchronizer,它是一个同步工具,也是 Lock 用来实现线程同步的核心组件。 1.AQS 的两种功能 独占和共享。 独占锁:每次只能有一个线程持有锁&#x…...

SpringCloud+Dubbo3 = 王炸 !
前言 全链路异步化的大趋势来了 随着业务的发展,微服务应用的流量越来越大,使用到的资源也越来越多。 在微服务架构下,大量的应用都是 SpringCloud 分布式架构,这种架构总体上是全链路同步模式。 全链路同步模式不仅造成了资源…...
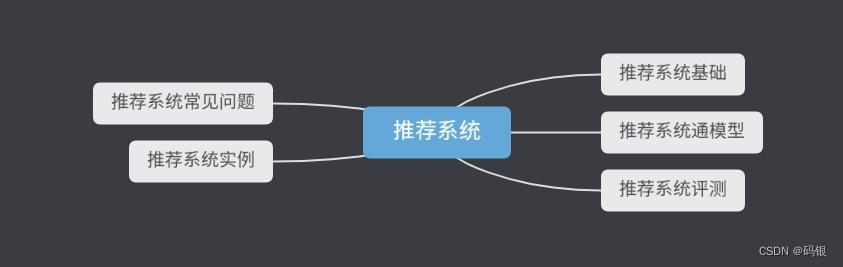
机器学习主要内容的思维导图
机器学习 机器学习: 定义:能够从经验中学习从而能够 把事情不断做好的计算机程序 人工智能的一个分支和 实现方式 理论基础:概率论 数理统计 线性代数 数学分析 数值逼近 最优化理论 计算复杂理论 核心要素:数据 算法 模型 机器…...

嵌套走马灯Carousel
Carousel 的应用很广泛,基础用法这里不多做阐述,感兴趣的可以去element-gui了解Carousel 组件。 今天主要是梳理嵌套走马灯的逻辑,背景如下: 需要对项目做一个展示,项目可能有一个或多个,同时一个项目可能…...
实战——缓存的使用
文章目录前言概述实践一、缓存数据一致1.更新缓存类2.删除缓存类二、项目实践(商城项目)缓存预热双缓存机制前言 对于我们日常开发的应用系统。由于MySQL等关系型数据库读写的并发量是有一定的上线的,当请求量过大时候那数据库的压力一定会上…...

2023年中职网络安全竞赛跨站脚本渗透解析-2(超详细)
跨站脚本渗透 任务环境说明:需求环境可私信博主! 服务器场景:Server2126(关闭链接)服务器场景操作系统:未知访问服务器网站目录1,根据页面信息完成条件,将获取到弹框信息作为flag提交;访问服务器网站目录2,根据页面信息完成条件,将获取到弹框信息作为flag提交;访问…...

Scala的简单使用
文章目录Scala的简单使用(一)交互模式1、命令行方式2、文件方式(二)编译模式1、创建源程序2、编译成字节码3、解释执行对象Scala的简单使用 Scala可以在交互模式和编译模式两种方式下运行 (一)交互模式 在…...
Java之前缀和算法
目录 一.前缀和 1.前缀和介绍 2.编程中的前缀和 二.一维数组的动态和 1.题目描述 2.问题分析 3.代码实现 三.除自身以外数组的乘积 1.题目描述 2.问题分析 3.代码实现 四.和为 K 的子数组 1.题目描述 2.问题分析 3.代码实现 五.形成两个异或相等数组的三元组数目…...
)
保姆级避坑指南:在Ubuntu 22.04上搞定ROS2 Humble、PX4与Gazebo的联合仿真(附Empy版本降级)
保姆级避坑指南:Ubuntu 22.04下ROS2 Humble与PX4联合仿真的21个关键陷阱当你在Ubuntu 22.04上第一次尝试搭建ROS2 Humble、PX4与Gazebo的联合仿真环境时,可能会遇到比预期更多的挑战。这不是一个简单的"复制粘贴命令就能完成"的任务——版本冲…...

通过用量看板分析团队大模型API消耗发现优化调用策略的机会
🚀 告别海外账号与网络限制!稳定直连全球优质大模型,限时半价接入中。 👉 点击领取海量免费额度 通过用量看板分析团队大模型API消耗发现优化调用策略的机会 作为团队的技术负责人,确保大模型API调用在满足业务需求的…...

yolo视频识别 车辆速度估计识别 yolo11视频实时速度测量与测速估计
文章目录YOLOv11:视频实时速度测量与测速估计一、YOLOv11概述二、速度测量原理三、距离测量方法四、应用场景五、实践案例以下是关于使用YOLOv11进行视频实时速度测量与测速估计的介绍: YOLOv11:视频实时速度测量与测速估计 随着计算机视觉…...

InVideo插件深度解析:如何在Unreal Engine中实现高效视频流播放与录制
InVideo插件深度解析:如何在Unreal Engine中实现高效视频流播放与录制 【免费下载链接】InVideo 基于UE4实现的rtsp的视频播放插件 项目地址: https://gitcode.com/gh_mirrors/in/InVideo InVideo是一个基于Unreal Engine 5开发的RTSP视频播放插件࿰…...
)
Claude端到端测试设计终极清单:覆盖17类非功能需求(含延迟敏感度分级、幻觉熔断阈值、多轮对话状态持久化验证)
更多请点击: https://kaifayun.com 第一章:Claude端到端测试设计的演进逻辑与核心范式 Claude端到端测试并非静态产物,而是随模型能力边界拓展、交互场景复杂化及可靠性要求升级而持续演化的工程实践。其演进逻辑根植于三个关键张力…...

如何快速定制Office界面:终极开源工具使用指南
如何快速定制Office界面:终极开源工具使用指南 【免费下载链接】office-ribbonx-editor An overhauled fork of the original Custom UI Editor for Microsoft Office, built with WPF 项目地址: https://gitcode.com/gh_mirrors/of/office-ribbonx-editor O…...

3大技术突破:重新定义Switch游戏安装性能极限
3大技术突破:重新定义Switch游戏安装性能极限 【免费下载链接】Awoo-Installer A No-Bullshit NSP, NSZ, XCI, and XCZ Installer for Nintendo Switch 项目地址: https://gitcode.com/gh_mirrors/aw/Awoo-Installer Awoo Installer是一款专为破解版Nintendo…...

使用Taotoken CLI工具一键配置多开发环境下的统一模型接入点
🚀 告别海外账号与网络限制!稳定直连全球优质大模型,限时半价接入中。 👉 点击领取海量免费额度 使用Taotoken CLI工具一键配置多开发环境下的统一模型接入点 在团队协作或管理多个AI应用项目时,一个常见的痛点是每个…...
详解 + 实例代码)
IDE 重构(Refactoring)详解 + 实例代码
IDE 重构(Refactoring)详解 实例代码 重构是指在不改变代码外部行为的前提下,对代码内部结构进行调整、优化,使代码更易读、易维护、易扩展的过程。IDE(集成开发环境)是重构的最强助手,它能自动…...

为什么你的PS手柄在Windows上无法畅玩游戏?3步解锁完美兼容方案
为什么你的PS手柄在Windows上无法畅玩游戏?3步解锁完美兼容方案 【免费下载链接】DS4Windows Like those other ds4tools, but sexier 项目地址: https://gitcode.com/gh_mirrors/ds/DS4Windows 你是否曾经兴奋地想在PC上使用心爱的PlayStation手柄ÿ…...