log4j2或者logback配置模版实现灵活输出服务名
介绍
在我们使用log4j2或者logback打印日志时,输出的内容中通常是一定要加上服务名的。以log4j2为例:
<!--输出控制台的配置-->
<Console name="Console" target="SYSTEM_OUT"><!-- 输出日志的格式 --><PatternLayout pattern="server-case %d{yyyy-MM-dd HH:mm:ss} %5p %c{1}:%L - %m%n"/>
</Console>
服务名为server-case,输出的内容为
server-case 2023-09-15 17:44:38  INFO ServerCaseApplication:648 - No active profile set, falling back to default profiles: default
server-case 2023-09-15 17:44:39  INFO TomcatWebServer:108 - Tomcat initialized with port(s): 7081 (http)
server-case 2023-09-15 17:44:39  INFO Http11NioProtocol:173 - Initializing ProtocolHandler ["http-nio-7081"]
server-case 2023-09-15 17:44:39  INFO StandardService:173 - Starting service [Tomcat]
...
但是有种情况,有的项目要部署在甲方内网或者连接甲方的资源。项目是同一套代码,但要服务于不同的甲方,所以一个项目会有不同的服务名的情况。
这样的话,服务名就不能写死,要根据不同的服务名来输出。
问题
有的人可能会想到直接设置一个对象实现EnvironmentAware接口中的setEnvironment(Environment environment),来获取environment来获取spring.application.name
但这样有问题,设置的这个对象是要在spring上下文中进行加载后才能获得environment,所以在这个对象加载之前的日志输出还是拿不到environment的
@Component
public class Test implements EnvironmentAware {private Environment environment;@Overridepublic void setEnvironment(final Environment environment) {this.environment = environment;System.setProperty("applicationName", Objects.requireNonNull(environment.getProperty("spring.application.name")));}
}
<!--输出控制台的配置-->
<Console name="Console" target="SYSTEM_OUT"><!-- 输出日志的格式 --><PatternLayout pattern="${sys:applicationName} %d{yyyy-MM-dd HH:mm:ss} %5p %c{1}:%L - %m%n"/>
</Console>
${sys:applicationName} 2023-09-18 10:18:34  INFO ServerCaseApplication:55 - Starting ServerCaseApplication on lukuan with PID 21472 (D:\idea_work_my\gitee\cook-frame\server\server-case\target\classes started by lukuan in D:\idea_work_my\gitee\cook-frame)
${sys:applicationName} 2023-09-18 10:18:34  INFO ServerCaseApplication:648 - No active profile set, falling back to default profiles: default
${sys:applicationName} 2023-09-18 10:18:34  INFO TomcatWebServer:108 - Tomcat initialized with port(s): 7081 (http)
${sys:applicationName} 2023-09-18 10:18:34  INFO Http11NioProtocol:173 - Initializing ProtocolHandler ["http-nio-7081"]
${sys:applicationName} 2023-09-18 10:18:34  INFO StandardService:173 - Starting service [Tomcat]
${sys:applicationName} 2023-09-18 10:18:34  INFO StandardEngine:173 - Starting Servlet engine: [Apache Tomcat/9.0.46]
${sys:applicationName} 2023-09-18 10:18:34  INFO [/]:173 - Initializing Spring embedded WebApplicationContext
${sys:applicationName} 2023-09-18 10:18:34  INFO ServletWebServerApplicationContext:285 - Root WebApplicationContext: initialization completed in 795 ms_ _   |_  _ _|_. ___ _ |    _
| | |\/|_)(_| | |_\  |_)||_|_\ /               |         3.5.1
service-case 2023-09-18 10:18:35  INFO ThreadPoolTaskExecutor:181 - Initializing ExecutorService 'applicationTaskExecutor'
service-case 2023-09-18 10:18:35  INFO PropertySourcedRequestMappingHandlerMapping:69 - Mapped URL path [/v2/api-docs] onto method [springfox.documentation.swagger2.web.Swagger2Controller#getDocumentation(String, HttpServletRequest)]
service-case 2023-09-18 10:18:35  INFO Http11NioProtocol:173 - Starting ProtocolHandler ["http-nio-7081"]
service-case 2023-09-18 10:18:35  INFO TomcatWebServer:220 - Tomcat started on port(s): 7081 (http) with context path ''
可以看到比较靠前的日志输出中的applicationName变量是没有被替换成真正的服务名的。
那怎么办呢?
分析
所以我们要从SpringBoot的启动过程入手
SpringApplication#run(String… args)
public ConfigurableApplicationContext run(String... args) {StopWatch stopWatch = new StopWatch();stopWatch.start();ConfigurableApplicationContext context = null;configureHeadlessProperty();SpringApplicationRunListeners listeners = getRunListeners(args);listeners.starting();try {ApplicationArguments applicationArguments = new DefaultApplicationArguments(args);ConfigurableEnvironment environment = prepareEnvironment(listeners, applicationArguments);configureIgnoreBeanInfo(environment);Banner printedBanner = printBanner(environment);context = createApplicationContext();prepareContext(context, environment, listeners, applicationArguments, printedBanner);refreshContext(context);afterRefresh(context, applicationArguments);stopWatch.stop();if (this.logStartupInfo) {new StartupInfoLogger(this.mainApplicationClass).logStarted(getApplicationLog(), stopWatch);}listeners.started(context);callRunners(context, applicationArguments);}catch (Throwable ex) {handleRunFailure(context, ex, listeners);throw new IllegalStateException(ex);}try {listeners.running(context);}catch (Throwable ex) {handleRunFailure(context, ex, null);throw new IllegalStateException(ex);}return context;
}
突破点在environment的创建这步骤,所以分析prepareEnvironment(listeners, applicationArguments)看能不能实现我们想要的需求
SpringApplication#prepareEnvironment
private ConfigurableEnvironment prepareEnvironment(SpringApplicationRunListeners listeners,ApplicationArguments applicationArguments) {// Create and configure the environmentConfigurableEnvironment environment = getOrCreateEnvironment();configureEnvironment(environment, applicationArguments.getSourceArgs());ConfigurationPropertySources.attach(environment);//经过debug发现当这步方法执行完后,environment.getProperty("spring.application.name")是可以获取值listeners.environmentPrepared(environment);bindToSpringApplication(environment);if (!this.isCustomEnvironment) {environment = new EnvironmentConverter(getClassLoader()).convertEnvironmentIfNecessary(environment,deduceEnvironmentClass());}ConfigurationPropertySources.attach(environment);return environment;
}
listeners.environmentPrepared(environment);为关键点,environment.getProperty("spring.application.name")就是在此进行完成的,所以我们要进入分析。
SpringApplicationRunListeners#environmentPrepared
void environmentPrepared(ConfigurableEnvironment environment) {for (SpringApplicationRunListener listener : this.listeners) {listener.environmentPrepared(environment);}
}
listeners有一个实现类EventPublishingRunListener
public void environmentPrepared(ConfigurableEnvironment environment) {this.initialMulticaster.multicastEvent(new ApplicationEnvironmentPreparedEvent(this.application, this.args, environment));
}
这里是发布了一个ApplicationEnvironmentPreparedEvent事件。
既然有发布,就有监听。我们接下来分析下监听事件的逻辑
ConfigFileApplicationListener#onApplicationEvent
public void onApplicationEvent(ApplicationEvent event) {if (event instanceof ApplicationEnvironmentPreparedEvent) {onApplicationEnvironmentPreparedEvent((ApplicationEnvironmentPreparedEvent) event);}if (event instanceof ApplicationPreparedEvent) {onApplicationPreparedEvent(event);}
}
private void onApplicationEnvironmentPreparedEvent(ApplicationEnvironmentPreparedEvent event) {List<EnvironmentPostProcessor> postProcessors = loadPostProcessors();postProcessors.add(this);AnnotationAwareOrderComparator.sort(postProcessors);for (EnvironmentPostProcessor postProcessor : postProcessors) {postProcessor.postProcessEnvironment(event.getEnvironment(), event.getSpringApplication());}
}
postProcessors有多个,其中ConfigFileApplicationListener就是设置spring.applicaton.name的值。至于怎么设置的,就不进去分析了,有兴趣的同学可以自行去仔细研究。
通常上述分析,我们知道了Environment设置spring.applicaton.name值的步骤,那么我们可不可以紧接着,这个设置步骤之后就进行自定义设值,然后让log4j2来取呢?
答案是当然可以!
让我们回到SpringApplicationRunListeners#environmentPrepared
SpringApplicationRunListeners#environmentPrepared
void environmentPrepared(ConfigurableEnvironment environment) {for (SpringApplicationRunListener listener : this.listeners) {listener.environmentPrepared(environment);}
}
默认listeners为一个,那我们只要自己实现一个,让listeners为2个,第一个默认执行完后,不就能紧接着执行我们的了吗,那我们分析下listeners是怎么来的
SpringApplication#getRunListeners
private SpringApplicationRunListeners getRunListeners(String[] args) {Class<?>[] types = new Class<?>[] { SpringApplication.class, String[].class };return new SpringApplicationRunListeners(logger,getSpringFactoriesInstances(SpringApplicationRunListener.class, types, this, args));
}
private <T> Collection<T> getSpringFactoriesInstances(Class<T> type, Class<?>[] parameterTypes, Object... args) {ClassLoader classLoader = getClassLoader();// Use names and ensure unique to protect against duplicatesSet<String> names = new LinkedHashSet<>(SpringFactoriesLoader.loadFactoryNames(type, classLoader));List<T> instances = createSpringFactoriesInstances(type, parameterTypes, classLoader, args, names);AnnotationAwareOrderComparator.sort(instances);return instances;
}
SpringFactoriesLoader.loadFactoryNames(type, classLoader)和自动装配的方法很像啊,那去看一眼
org.springframework.boot.SpringApplicationRunListener=\
org.springframework.boot.context.event.EventPublishingRunListener
果然在文件中指定了org.springframework.boot.context.event.EventPublishingRunListener,也就是默认的SpringApplicationRunListener实现类。
然后在分析createSpringFactoriesInstances看看是如何加载的
private <T> List<T> createSpringFactoriesInstances(Class<T> type, Class<?>[] parameterTypes,ClassLoader classLoader, Object[] args, Set<String> names) {List<T> instances = new ArrayList<>(names.size());for (String name : names) {try {Class<?> instanceClass = ClassUtils.forName(name, classLoader);Assert.isAssignable(type, instanceClass);Constructor<?> constructor = instanceClass.getDeclaredConstructor(parameterTypes);T instance = (T) BeanUtils.instantiateClass(constructor, args);instances.add(instance);}catch (Throwable ex) {throw new IllegalArgumentException("Cannot instantiate " + type + " : " + name, ex);}}return instances;
}
这里就是创建对象的过程了,用的是有参构造方法需要两个参数constructor, args,所以我们参考EventPublishingRunListener的结构来实现即可
实现
自定义SpringApplicationRunListener的实现类CustomEventPublishingRunListener
CustomEventPublishingRunListener
public class CustomEventPublishingRunListener implements SpringApplicationRunListener, Ordered {private static final String SPRING_APPLICATION_NAME = "spring.application.name";private final SpringApplication application;private final String[] args;public CustomEventPublishingRunListener(SpringApplication application, String[] args){this.application = application;this.args = args;}@Overridepublic int getOrder() {return 1;}@Overridepublic void environmentPrepared(ConfigurableEnvironment environment) {String applicationName = environment.getProperty(SPRING_APPLICATION_NAME);if (StringUtil.isNotEmpty(applicationName)) {System.setProperty("applicationName", applicationName);}}
}
- 有参构造方法中的
SpringApplication application, String[] args参数为固定的 - getOrder返回的值要为1,因为
EventPublishingRunListener中的getOrder返回值为0
在自动装配文件spring.factories指定位置
org.springframework.boot.SpringApplicationRunListener=\com.example.runlistener.CustomEventPublishingRunListener
在log4j2的xml文件中进行取值
<!--输出控制台的配置-->
<Console name="Console" target="SYSTEM_OUT"><!-- 输出日志的格式 --><PatternLayout pattern="${sys:applicationName} %d{yyyy-MM-dd HH:mm:ss} %5p %c{1}:%L - %m%n"/>
</Console>
输出结果
service-case 2023-09-18 14:57:25  INFO ServerCaseApplication:55 - Starting ServerCaseApplication on lukuan with PID 20004 (D:\idea_work_my\gitee\cook-frame\server\server-case\target\classes started by lukuan in D:\idea_work_my\gitee\cook-frame)
service-case 2023-09-18 14:57:25  INFO ServerCaseApplication:648 - No active profile set, falling back to default profiles: default
service-case 2023-09-18 14:57:25  INFO TomcatWebServer:108 - Tomcat initialized with port(s): 7081 (http)
service-case 2023-09-18 14:57:25  INFO Http11NioProtocol:173 - Initializing ProtocolHandler ["http-nio-7081"]
service-case 2023-09-18 14:57:25  INFO StandardService:173 - Starting service [Tomcat]
service-case 2023-09-18 14:57:25  INFO StandardEngine:173 - Starting Servlet engine: [Apache Tomcat/9.0.46]
service-case 2023-09-18 14:57:25  INFO [/]:173 - Initializing Spring embedded WebApplicationContext
service-case 2023-09-18 14:57:25  INFO ServletWebServerApplicationContext:285 - Root WebApplicationContext: initialization completed in 716 ms_ _   |_  _ _|_. ___ _ |    _
| | |\/|_)(_| | |_\  |_)||_|_\ /               |         3.5.1
service-case 2023-09-18 14:57:26  INFO ThreadPoolTaskExecutor:181 - Initializing ExecutorService 'applicationTaskExecutor'
service-case 2023-09-18 14:57:26  INFO PropertySourcedRequestMappingHandlerMapping:69 - Mapped URL path [/v2/api-docs] onto method [springfox.documentation.swagger2.web.Swagger2Controller#getDocumentation(String, HttpServletRequest)]
service-case 2023-09-18 14:57:26  INFO Http11NioProtocol:173 - Starting ProtocolHandler ["http-nio-7081"]
service-case 2023-09-18 14:57:26  INFO TomcatWebServer:220 - Tomcat started on port(s): 7081 (http) with context path ''
....
可以看到实现了我们想要的功能
相关文章:

log4j2或者logback配置模版实现灵活输出服务名
介绍 在我们使用log4j2或者logback打印日志时,输出的内容中通常是一定要加上服务名的。以log4j2为例: <!--输出控制台的配置--> <Console name"Console" target"SYSTEM_OUT"><!-- 输出日志的格式 --><Patter…...

使用HTTP爬虫ip中的常见误区与解决方法
在如今的互联网时代,为了保障个人隐私和实现匿名浏览,许多人选择使用HTTP爬虫ip。然而,由于缺乏了解和使用经验,常常会出现一些误区。本文将为大家介绍使用HTTP爬虫ip过程中常见的误区,并提供相应的解决方法࿰…...
MySQL学习笔记3
MySQL的源码编译安装: 1、参考MySQL的源码安装官方文档: 2、源码安装定制选项: 3、源码安装三部曲:配置、编译、安装。 4、软件安装包: mysql-boost-5.7.43.tar.gz 5、安装需求: 安装需求具体配置安装目…...

快速掌握ES6
什么是ES6 ES6(ECMAScript 6),也被称为ES2015,是JavaScript的第六个版本,于2015年发布。ES6引入了许多新的语法和功能,旨在提高JavaScript的开发效率和代码质量。 ES6的一些主要特性和改进包括࿱…...

电池厂提供excel电池曲线zcv到mtk电池曲线zcv转换
#encoding:utf8 #电池厂提供excel电池曲线zcv到mtk电池曲线zcv转换 import pandas as pd import openpyxl import math # 读取Excel文件 df pd.read_excel("a55-zcv.xlsx") for j in range(0,10): if(j<3): offset0 #T0~T2 if(j3): offset…...

重写和重载、抽象类和接口
文章目录 前言一、重载与重写1.重载(Overload)(1)条件(2)举例 2.重写(Override)(1)规则(2)举例 3.重载和重写区别 二、抽象类与接口1.抽象类&…...

Untiy UDP局域网 异步发送图片
同步画面有问题,传图片吧 using System.Text; using System.Net.Sockets; using System.Collections; using System.Collections.Generic; using UnityEngine; using UnityEngine.Events; using System.Net; using System; using System.Threading.Tasks; using Sy…...
移动端H5封装一个 ScrollList 横向滚动列表组件,实现向左滑动
效果: 1.封装组件: <template><div class"scroll-list"><divclass"scroll-list-content":style"{ background, color, fontSize: size }"ref"scrollListContent"><div class"scroll…...

Docker一键安装和基本配置
一键安装脚本 注:该脚本需要root权限 curl -sSL https://get.docker.com/ | sh非root组用户赋权 sudo groupadd docker # 若使用一键安装脚本会自动创建这个组,提示已存在 sudo gpasswd -a ${USER} docker # 将当前用户添加到docker组,也…...

MVC设计思想理解和ASP.NET MVC理解
三层模式 三层模式包括:UI层,业务逻辑层,数据访问层,模型层 MVC设计思想和ASP.NET MVC理解 MVC设计思想: MVC的思想就是把我们的程序分为三个核心的模块,这三个模块的详细介绍如下: 模型(Model) :负责封装与引用程序的业务逻辑相关的数据以及对数据的处理方法。模型层有对…...
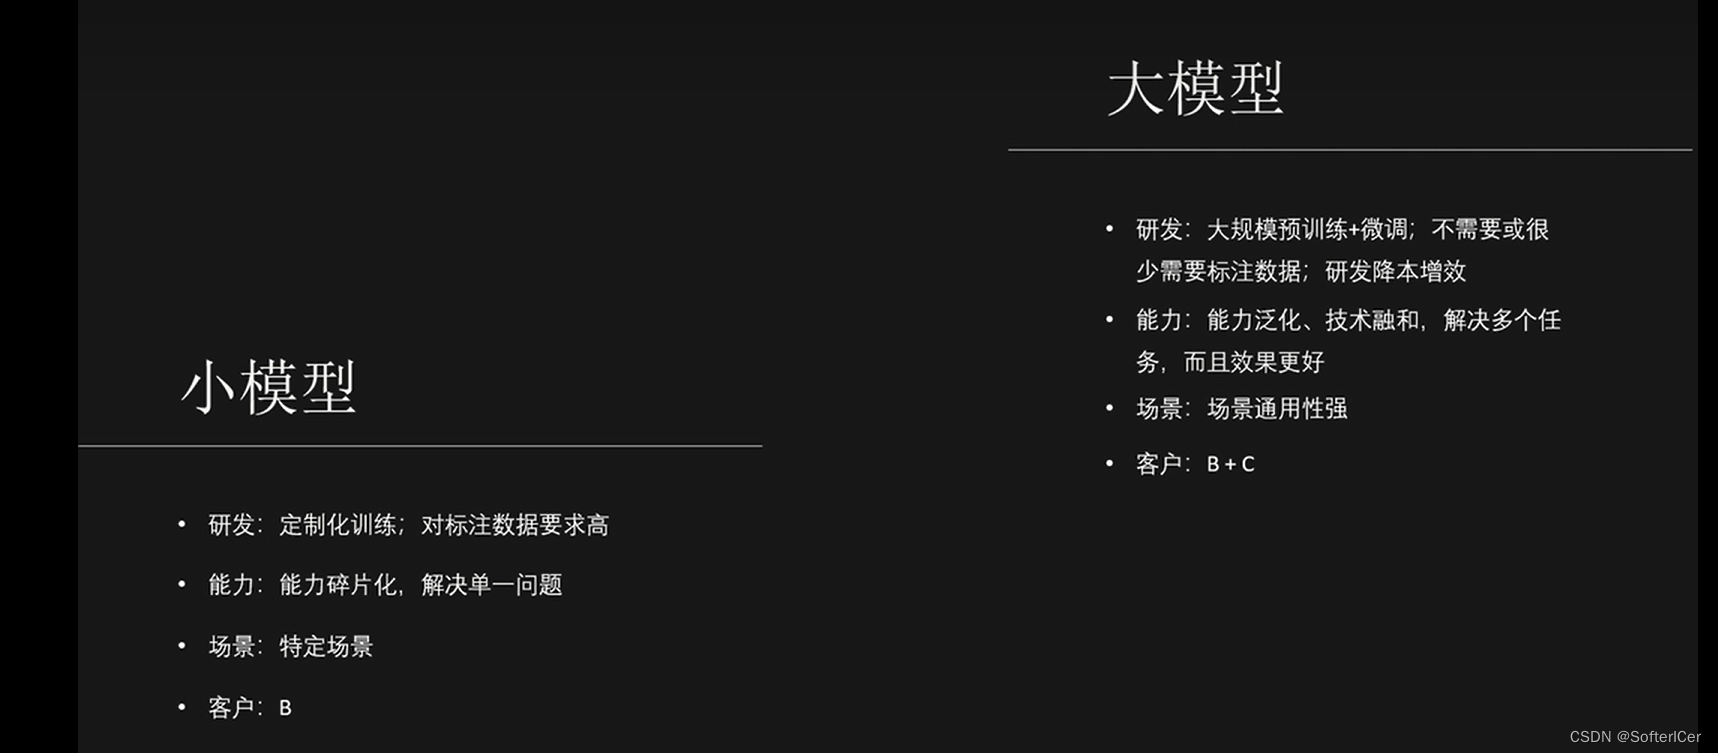
大模型应用选择对比
大模型应用选择对比 1、知识库对比:dify、fastgpt、langchatchat 2、agent构建器选择:flowise、langflow、bisheng 3、召回率提升方案...

c++STL概述
目录 STL基本概念 STL六大组件 STL的优点 STL三大组件 容器 算法 迭代器 普通的迭代器访问vector容器元素 算法for_each实现循环 迭代器指向的元素类型是自定义数据类型 迭代器指向容器 常用容器 string容器 string的基本概念 string容器的操作 string的构造函…...

利用容器技术优化DevOps流程
利用容器技术优化DevOps流程 随着云计算的快速发展,容器技术也日益流行。容器技术可以打包和分发应用程序,并实现快速部署和扩展。在DevOps流程中,容器技术可以大大优化开发、测试、部署和运维各个环节。本文将介绍如何利用容器技术优化DevO…...

91 # 实现 express 的优化处理
上一节实现 express 的请求处理,这一节来进行实现 express 的优化处理 让 layer 提供 match 方法去匹配 pathname,方便拓展让 layer 提供 handle_request 方法,方便拓展利用第三方库 methods 批量生成方法性能优化问题 进行路由懒加载&#…...
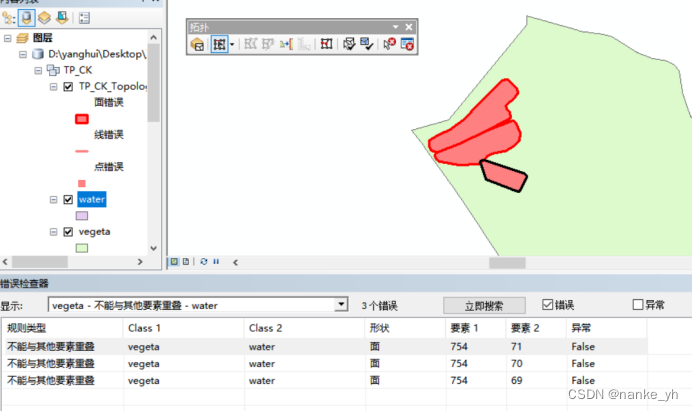
arcgis拓扑检查实现多个矢量数据之间消除重叠区域
目录 环境介绍: 操作任务: 步骤: 1、数据库和文件结构准备 2、建立拓扑规则 3、一直下一页默认参数后,进行拓扑检查 4、打开TP_CK_Topology,会自动带出拓扑要素,红色区域为拓扑错误的地方࿱…...

基于Vue+ELement搭建登陆注册页面实现后端交互
🎉🎉欢迎来到我的CSDN主页!🎉🎉 🏅我是Java方文山,一个在CSDN分享笔记的博主。📚📚 🌟推荐给大家我的专栏《ELement》。🎯🎯 …...

JS获取经纬度, 并根据经纬度得到城市信息
在JavaScript中,获取经纬度通常需要使用定位服务,比如HTML5的Geolocation API。然而拿到坐标后,将经纬度转换为城市信息,则需要使用逆地理编码服务接口,比如百度或者高德的 API, 但是他们收费都很高, 我们可以使用一些…...

mac m1 docker安装nacos
文章目录 引言I m1安装docker1.1 Docker 下载1.2 终端Docker相关命令II docker安装nacos2.1 安装nacos2.2 镜像启动see alsoMac 查看进程端口引言 使用docker方式安装是最方便的 I m1安装docker 1.1 Docker 下载 https://docs.docker.com/docker-for-mac/apple-silicon/点击…...
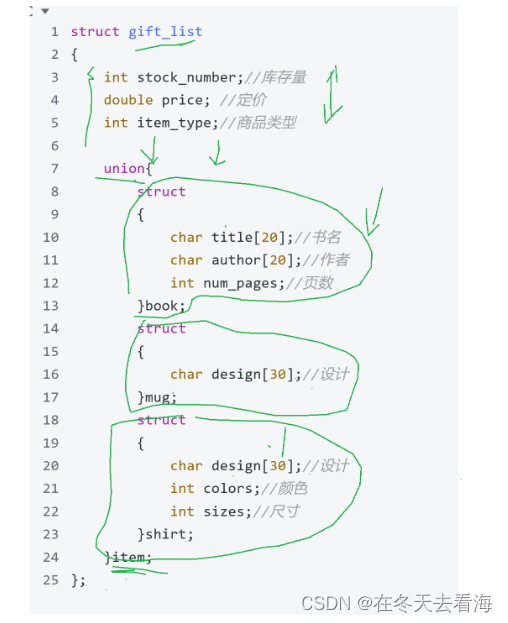
位段 联合体 枚举
Hello好久不见,今天分享的是接上次结构体没有分享完的内容,这次我们讲讲位段 枚举和联合体的概念以及他们的用法。 2.1 什么是位段 位段的声明和结构是类似的,有两个不同: 1.位段的成员必须是 int、unsigned int 或signed int 。 …...
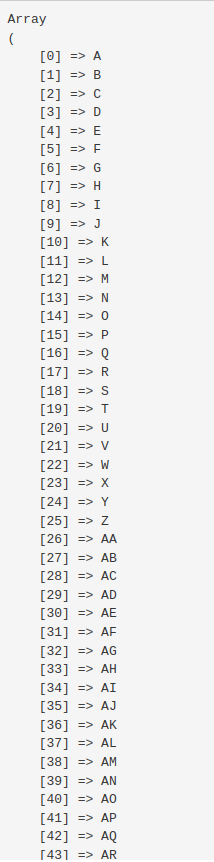
PHP循环获取Excel表头字母A-Z,当超过时输出AA,AB,AC,AD······
PHP循环获取Excel表头字母A-Z,当超过时输出AA,AB,AC,AD PHP循环生成Excel的列字母表 $count_num 26 * 27; $letter A; $arr []; while($count_num--){$arr[] $letter;$letter; }结果如下: 转为JSON更为直观: ["A","B&…...

Java数组工具类实战:设计不可实例化的静态工具类
实现一个工具类 MathUtils,满足以下要求: 1. 所有方法均为静态,且该类不能从外部实例化(提示:使用私有构造器)。 2. 提供三个静态方法:- maxArray(int[] arr):返回较大值;…...

基于ESP32的AIS转WiFi转换器:实现NMEA 0183数据无线传输
1. 项目概述:从VHF-AIS接收器到iPad的无线桥梁作为一名经常在海上折腾电子设备的航海爱好者,我最近遇到了一个挺实际的需求:我的主力导航设备是iPad上的iSailor应用,它功能强大、界面友好,但有个“硬伤”——它需要通过…...
)
37家金融客户紧急启用的DeepSeek扫描辅助加固包(含未公开API调用密钥策略)
更多请点击: https://kaifayun.com 第一章:DeepSeek漏洞扫描辅助的背景与战略价值 近年来,大模型在安全领域的应用正从辅助问答向深度协同防御演进。DeepSeek系列模型凭借其开源、高推理精度及强代码理解能力,成为构建智能化漏洞…...

5个必知的Universal-Updater高级功能:从QR扫描到后台安装
5个必知的Universal-Updater高级功能:从QR扫描到后台安装 【免费下载链接】Universal-Updater An easy to use app for installing and updating 3DS homebrew 项目地址: https://gitcode.com/gh_mirrors/un/Universal-Updater Universal-Updater是一款专为任…...

武汉国电华美串联谐振试验装置,现场用着心里有底
在高压试验现场干了这么多年,这位老师傅常说,一台好的串联谐振装置,就是试验人员的胆。面对GIS、大型变压器、超高压电缆这些大电容试品,没有趁手的谐振设备,交流耐压试验根本没法干。16875kVA/225kV这个规格ÿ…...

Python Android打包终极指南:5个实战技巧解决移动开发痛点
Python Android打包终极指南:5个实战技巧解决移动开发痛点 【免费下载链接】python-for-android Turn your Python application into an Android APK 项目地址: https://gitcode.com/gh_mirrors/py/python-for-android Python-for-Android(简称p4…...

为开源项目OpenClaw配置Taotoken作为其大模型服务后端
🚀 告别海外账号与网络限制!稳定直连全球优质大模型,限时半价接入中。 👉 点击领取海量免费额度 为开源项目OpenClaw配置Taotoken作为其大模型服务后端 OpenClaw 是一个功能强大的开源工具,它允许开发者便捷地调用各类…...

QKeyMapper完整指南:Windows上最强大的免费按键映射解决方案
QKeyMapper完整指南:Windows上最强大的免费按键映射解决方案 【免费下载链接】QKeyMapper [按键映射工具] QKeyMapper,Qt开发Win10&Win11可用,不修改注册表、不需重新启动系统,可立即生效和停止。支持游戏手柄映射到键鼠&…...

推理服务为什么一上张量并行就开始通信拖慢首 Token:从 All-Reduce 瓶颈到通信计算重叠的工程实战
一、问题的引入 部署 70B 以上大模型时,单卡显存往往捉襟见肘。张量并行(TP)把单层权重沿隐藏维度切分到多张 GPU,每张卡只存一部分。🎯 不少团队上线 TP 后遇到诡异现象:吞吐提升,首 Token 时间…...

导师推荐 AI论文网站测评:2026最新好用工具全解析
2026年真正好用的AI论文网站,核心看生成的论文质量、低AI味、格式正确、学术适配四大指标。综合实测,千笔AI、ThouPen、豆包、DeepSeek、Grammarly 是当前最值得推荐的梯队,覆盖从免费到付费、从中文到英文、从文科到理工的全场景需求。 一、…...