布局设计和实现:计算器UI【TableLayout、GridLayout】
一、使用TableLayout实现计算器UI
1.新建一个空白项目布局

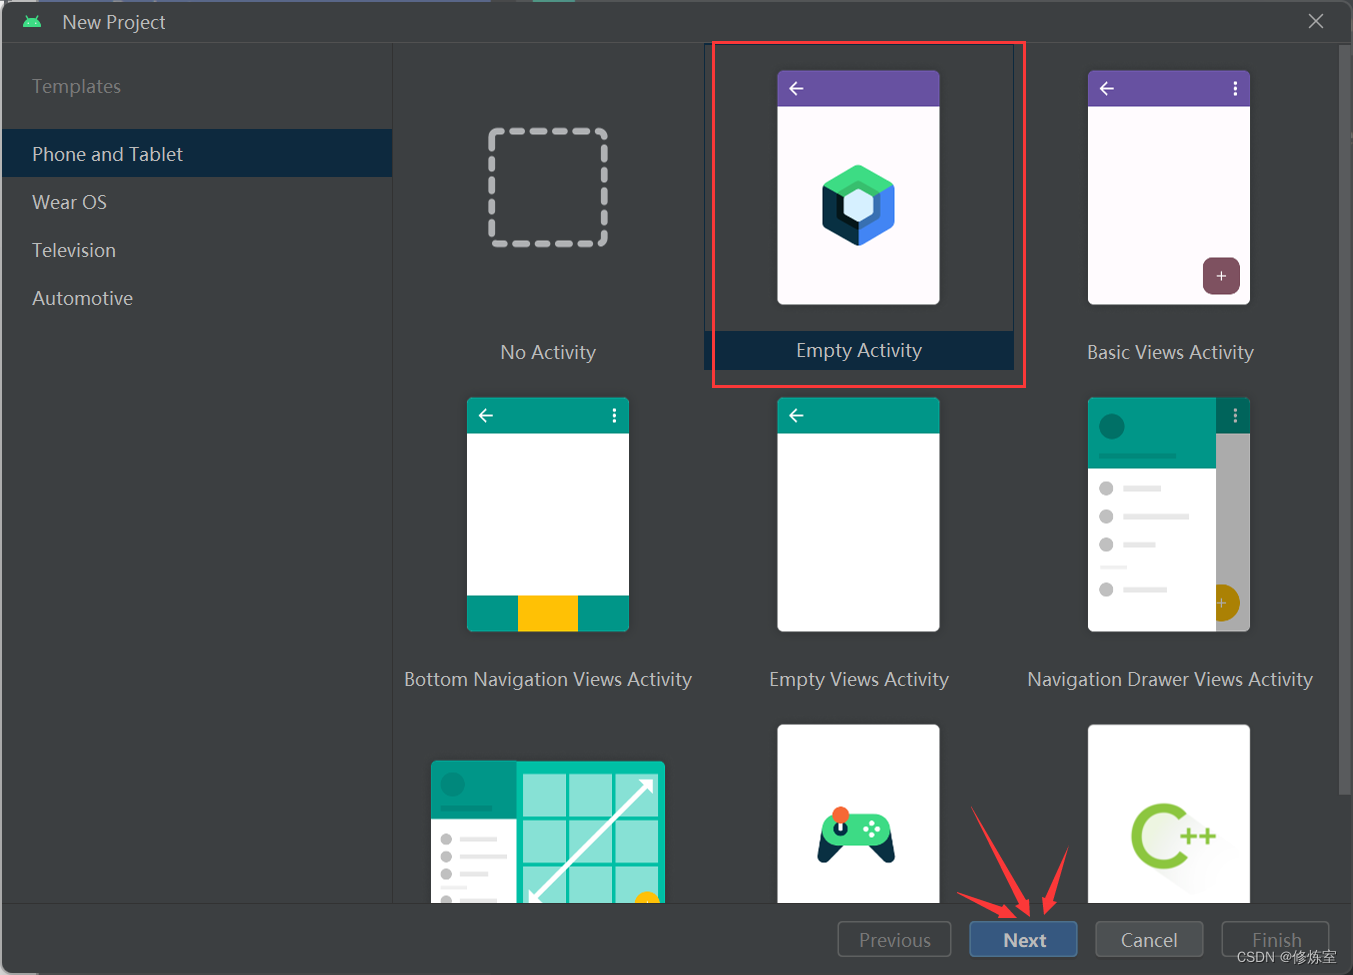
根据自己的需求输入其他信息

填写完成后,点击Finish即可
2. 设计UI界面
在res/layout文件夹中的XML文件中创建UI界面。在这个XML文件中,您可以使用TableLayout来设计计算器界面。
2.1 创建layout文件夹
但是默认创建出来的项目并不会包含layout布局文件夹,因此需要我们自行创建

在res目录内,右键单击鼠标,然后选择 “New” -> “Android Resource Directory” 选项。

在弹出的对话框中,将 “Directory name” 设置为 “layout”,然后点击 “OK”。

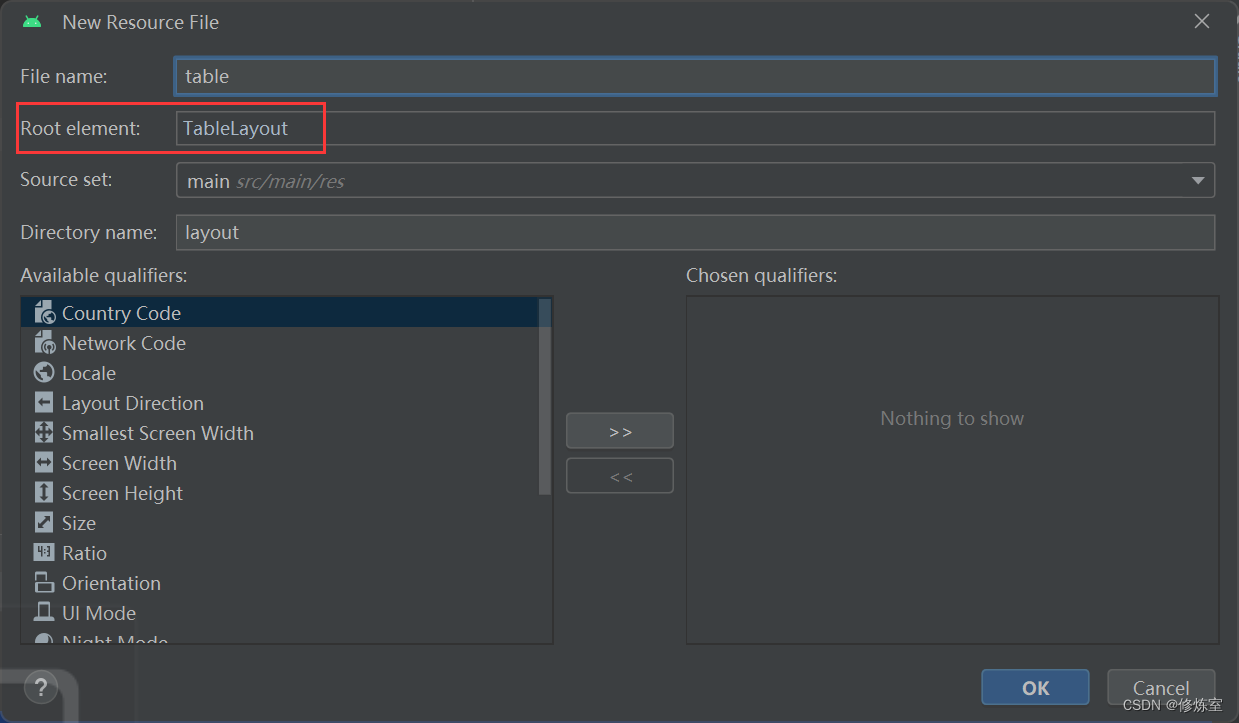
2.2 创建xml文件
在layout目录内,右键单击鼠标,然后选择 “New” -> “Layout Resource File” 选项。

修改一下信息
如果需要直接写XML代码,可点击右上角进行
Code切换

2.3编写布局代码
<?xml version="1.0" encoding="utf-8"?
<TableLayout xmlns:android="http://schemas.android.com/apk/res/android"android:layout_width="match_parent"android:layout_height="match_parent"android:background="#D8ECF3"><!-- 第一行,显示计算结果 --><TableRowandroid:layout_width="match_parent"android:layout_height="90dp"><TextViewandroid:gravity="bottom|right"android:textSize="70dp"android:singleLine="true"android:layout_margin="15dp"android:layout_width="match_parent"android:layout_height="120dp"android:id="@+id/textView"/></TableRow><TableRowandroid:layout_width="match_parent"android:layout_height="match_parent"android:layout_marginTop="10dp" ><Buttonandroid:id="@+id/btn_left"android:layout_marginLeft="10dp"android:gravity="center"android:layout_width="0dp"android:layout_height="wrap_content"android:layout_weight="1"android:textSize="25sp"android:text="("/><Buttonandroid:id="@+id/btn_right"android:layout_marginLeft="10dp"android:gravity="center"android:layout_width="0dp"android:layout_height="wrap_content"android:layout_weight="1"android:textSize="25sp"android:text=")"/><Buttonandroid:id="@+id/btn_quyu"android:layout_marginLeft="10dp"android:gravity="center"android:layout_width="0dp"android:layout_height="wrap_content"android:layout_weight="1"android:textSize="25sp"android:text="%"/><Buttonandroid:id="@+id/btn_CE"android:layout_marginLeft="10dp"android:gravity="center"android:layout_width="0dp"android:layout_height="wrap_content"android:layout_weight="1"android:textSize="25sp"android:text="CE"/></TableRow><TableRowandroid:layout_width="match_parent"android:layout_height="match_parent"android:layout_marginTop="10dp" ><Buttonandroid:id="@+id/btn_7"android:layout_marginLeft="10dp"android:gravity="center"android:layout_width="0dp"android:layout_height="wrap_content"android:layout_weight="1"android:textSize="25sp"android:text="7"/><Buttonandroid:id="@+id/btn_8"android:layout_marginLeft="10dp"android:gravity="center"android:layout_width="0dp"android:layout_height="wrap_content"android:layout_weight="1"android:textSize="25sp"android:text="8"/><Buttonandroid:id="@+id/btn_9"android:layout_marginLeft="10dp"android:gravity="center"android:layout_width="0dp"android:layout_height="wrap_content"android:layout_weight="1"android:textSize="25sp"android:text="9"/><Buttonandroid:id="@+id/btn_chu"android:layout_marginLeft="10dp"android:gravity="center"android:layout_width="0dp"android:layout_height="wrap_content"android:layout_weight="1"android:textSize="25sp"android:text="÷"/></TableRow><TableRowandroid:layout_width="match_parent"android:layout_height="match_parent"android:layout_marginTop="10dp" ><Buttonandroid:id="@+id/btn_4"android:layout_marginLeft="10dp"android:gravity="center"android:layout_width="0dp"android:layout_height="wrap_content"android:layout_weight="1"android:textSize="25sp"android:text="4"/><Buttonandroid:id="@+id/btn_5"android:layout_marginLeft="10dp"android:gravity="center"android:layout_width="0dp"android:layout_height="wrap_content"android:layout_weight="1"android:textSize="25sp"android:text="5"/><Buttonandroid:id="@+id/btn_6"android:layout_marginLeft="10dp"android:gravity="center"android:layout_width="0dp"android:layout_height="wrap_content"android:layout_weight="1"android:textSize="25sp"android:text="6"/><Buttonandroid:id="@+id/btn_cheng"android:layout_marginLeft="10dp"android:gravity="center"android:layout_width="0dp"android:layout_height="wrap_content"android:layout_weight="1"android:textSize="25sp"android:text="×"/></TableRow><TableRowandroid:layout_width="match_parent"android:layout_height="match_parent"android:layout_marginTop="10dp" ><Buttonandroid:id="@+id/btn_1"android:layout_marginLeft="10dp"android:gravity="center"android:layout_width="0dp"android:layout_height="wrap_content"android:layout_weight="1"android:textSize="25sp"android:text="1"/><Buttonandroid:id="@+id/btn_2"android:layout_marginLeft="10dp"android:gravity="center"android:layout_width="0dp"android:layout_height="wrap_content"android:layout_weight="1"android:textSize="25sp"android:text="2"/><Buttonandroid:id="@+id/btn_3"android:layout_marginLeft="10dp"android:gravity="center"android:layout_width="0dp"android:layout_height="wrap_content"android:layout_weight="1"android:textSize="25sp"android:text="3"/><Buttonandroid:id="@+id/btn_jian"android:layout_marginLeft="10dp"android:gravity="center"android:layout_width="0dp"android:layout_height="wrap_content"android:layout_weight="1"android:textSize="25sp"android:text="-"/></TableRow><TableRowandroid:layout_width="match_parent"android:layout_height="match_parent"android:layout_marginTop="10dp" ><Buttonandroid:id="@+id/btn_0"android:layout_marginLeft="10dp"android:gravity="center"android:layout_width="0dp"android:layout_height="wrap_content"android:layout_weight="1"android:textSize="25sp"android:text="0"/><Buttonandroid:id="@+id/btn_dian"android:layout_marginLeft="10dp"android:gravity="center"android:layout_width="0dp"android:layout_height="wrap_content"android:layout_weight="1"android:textSize="25sp"android:text="."/><Buttonandroid:id="@+id/btn_dengyu"android:layout_marginLeft="10dp"android:gravity="center"android:layout_width="0dp"android:layout_height="wrap_content"android:layout_weight="1"android:textSize="25sp"android:text="="/><Buttonandroid:id="@+id/btn_jia"android:layout_marginLeft="10dp"android:gravity="center"android:layout_width="0dp"android:layout_height="wrap_content"android:layout_weight="1"android:textSize="25sp"android:text="+"/></TableRow></TableLayout>
可以看到实现了这样的一个效果

-
第一个
TableRow:-
android:layout_width和android:layout_height属性设置为match_parent和90dp,表示这个 TableRow 的宽度会填满其父容器,并且高度为 90dp。 -
TextView元素是 TableRow 内的子元素。它有以下属性:android:gravity="bottom|right":文本在 TextView 中的对齐方式,文本在底部和右边对齐。android:textSize="70dp":文本的字体大小为 70dp。android:singleLine="true":文本只显示在一行内。android:layout_margin="15dp":设置 TextView 的外边距为 15dp。android:layout_width="match_parent"和android:layout_height="120dp":TextView 的宽度会填满 TableRow,高度为 120dp。android:id="@+id/textView":为 TextView 分配一个唯一的标识符。
-
-
第二个
TableRow:-
android:layout_width和android:layout_height属性设置为match_parent和match_parent,表示这个 TableRow 的宽度会填满其父容器,高度也会填满。 -
这个 TableRow 包含了四个 Button 元素,每个按钮代表不同的操作。
- 每个按钮的
android:id属性用于标识按钮。 android:layout_marginLeft="10dp":设置按钮之间的左外边距为 10dp。android:gravity="center":设置按钮内文本的对齐方式为居中。android:layout_width="0dp"和android:layout_weight="1":这些属性是使用权重来均分 TableRow 中的宽度。每个按钮的宽度都会根据权重平均分配,以使它们在 TableRow 中平均分布。android:textSize="25sp":按钮内文本的字体大小为 25sp。android:text:按钮上显示的文本内容。这个布局代码的作用是创建一个包含一个文本框和一组操作按钮的界面,可能用于一个简单的计算器或表达式输入界面。
- 每个按钮的
-
3.应用布局
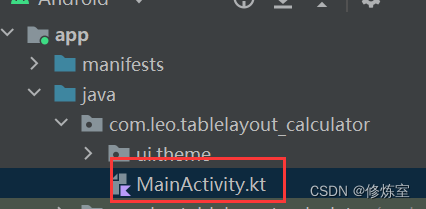
3.1 打开主文件
打开 Kotlin Activity 文件,通常是在 src/main/java/com/yourpackage/YourActivity.kt 中
3.2 修改内容视图
在 Activity 类的 onCreate 方法中,通过 setContentView 方法将布局文件设置为 Activity 的内容视图。假设您的布局文件名为 table.xml,在 onCreate 方法中添加以下代码:
class MainActivity : ComponentActivity() {override fun onCreate(savedInstanceState: Bundle?) {super.onCreate(savedInstanceState)setContentView(R.layout.table)}
}
需要注意以下几个条件:
- 确保替换
"table"为您的布局文件的实际名称(不包括文件扩展名)。这样,Android 就会将该布局文件加载到 Activity 中并显示出来。- 确保您的
table.xml文件位于res/layout目录中。通常,它应该是这个目录的子目录下的一个 XML 布局文件。- 在您的 Kotlin 代码中,您可以通过
findViewById方法来获取布局中的视图元素,例如,如果要获取布局中的某个按钮,可以这样做:
实现效果

二、使用GridLayout实现计算器UI
其他实现方式一样,对应的布局xml如下
<?xml version="1.0" encoding="utf-8"?>
<GridLayoutxmlns:android="http://schemas.android.com/apk/res/android"android:layout_width="match_parent"android:layout_height="match_parent"android:columnCount="4"android:rowCount="6"android:padding="16dp"android:layout_gravity="center"android:background="#D8ECF3"><TextViewandroid:gravity="bottom|right"android:textSize="70dp"android:singleLine="true"android:layout_margin="15dp"android:layout_width="match_parent"android:layout_height="120dp"android:layout_columnSpan="4"android:layout_rowSpan="2" /><Buttonandroid:gravity="center"android:layout_height="wrap_content"android:text="("android:textSize="24sp"android:layout_columnSpan="1"/><Buttonandroid:gravity="center"android:layout_height="wrap_content"android:text=")"android:textSize="24sp"android:layout_columnSpan="1"/><Buttonandroid:gravity="center"android:layout_height="wrap_content"android:text="%"android:textSize="24sp"android:layout_columnSpan="1"/><Buttonandroid:gravity="center"android:layout_height="wrap_content"android:layout_weight="1"android:text="CE"android:textSize="24sp"android:layout_columnSpan="1"/><!-- 第三行,数字按钮 --><Buttonandroid:layout_height="wrap_content"android:text="7"android:gravity="center"android:textSize="24sp"/><Buttonandroid:layout_height="wrap_content"android:text="8"android:gravity="center"android:textSize="24sp"/><Buttonandroid:layout_height="wrap_content"android:text="9"android:gravity="center"android:textSize="24sp"/><Buttonandroid:layout_height="wrap_content"android:text="÷"android:gravity="center"android:textSize="24sp"/><!-- 第四行,数字按钮 --><Buttonandroid:layout_height="wrap_content"android:text="4"android:gravity="center"android:textSize="24sp"/><Buttonandroid:layout_height="wrap_content"android:text="5"android:gravity="center"android:textSize="24sp"/><Buttonandroid:layout_height="wrap_content"android:text="6"android:gravity="center"android:textSize="24sp"/><Buttonandroid:layout_height="wrap_content"android:text="×"android:gravity="center"android:textSize="24sp"/><!-- 第五行,数字按钮 --><Buttonandroid:layout_height="wrap_content"android:text="1"android:gravity="center"android:textSize="24sp"/><Buttonandroid:layout_height="wrap_content"android:text="2"android:gravity="center"android:textSize="24sp"/><Buttonandroid:layout_height="wrap_content"android:text="3"android:gravity="center"android:textSize="24sp"/><Buttonandroid:layout_height="wrap_content"android:text="-"android:gravity="center"android:textSize="24sp"/><!-- 第六行,数字按钮、小数点和等号 --><Buttonandroid:layout_height="wrap_content"android:text="0"android:gravity="center"android:textSize="24sp"android:layout_columnSpan="1"/><Buttonandroid:layout_height="wrap_content"android:text="."android:gravity="center"android:textSize="24sp"/><Buttonandroid:layout_height="wrap_content"android:text="="android:gravity="center"android:textSize="24sp"android:layout_columnSpan="1"/><Buttonandroid:layout_height="wrap_content"android:text="+"android:gravity="center"android:textSize="24sp"/></GridLayout>
修改成下图即可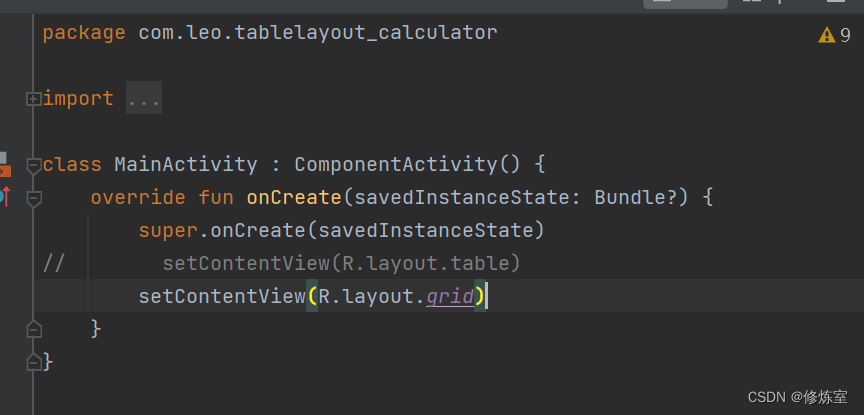
实现效果

相关文章:
布局设计和实现:计算器UI【TableLayout、GridLayout】
一、使用TableLayout实现计算器UI 1.新建一个空白项目布局 根据自己的需求输入其他信息 填写完成后,点击Finish即可 2. 设计UI界面 在res/layout文件夹中的XML文件中创建UI界面。在这个XML文件中,您可以使用TableLayout来设计计算器界面。 2.1 创建l…...
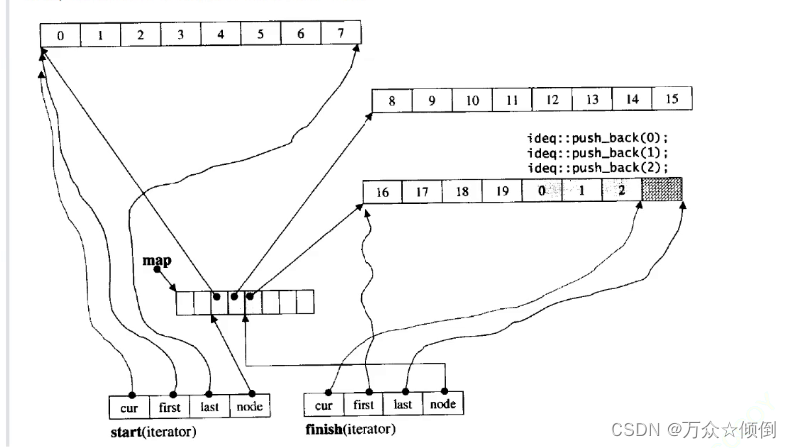
stack与queue的简单封装
前言: stack与queue即栈和队列,先进后出/先进先出的特性我们早已了然于心, 在学习数据结构时,我们利用c语言实现栈与队列,从结构体写起,利用数组或指针表示他们的数据成员,之后再一个个实现他们…...

ChatGPT使用技巧整理
目录 1. 让ChatGPT扮演专家角色2. 告诉ChatGPT你的身份3. 限制ChatGPT的回答长度4. 让ChatGPT一步步思考5. 明确你的要求和目的6. 提供充分的背景信息7. 始终结构化思考你的prompt1. 让ChatGPT扮演专家角色 当你们讨论的是市场营销问题时,你可以要求ChatGPT扮演一个具有20年从…...
机器学习笔记 - 维度诅咒的数学表达
1、点之间的距离 kNN分类器假设相似的点也可能有相同的标签。但是,在高维空间中,从概率分布中得出的点往往不会始终靠近在一起。 我们可以用一个简单的例子来说明这一点。 我们将在单位立方体内均匀地随机绘制点(如图所示),并研究该立方体内测试点的 k 个最近邻将占用多少…...

组合计数训练题解
CF40E 题目链接 点击打开链接 题目解法 首先,如果 n , m n,m n,m 一奇一偶,那么答案为 0 0 0 原因是从行和列的角度分析, − 1 -1 −1 个数的奇偶性不同 可以发现 k < max { n , m } k<\max\{n,m\} k<max{n,m} 的性质很微…...

P1095 [NOIP2007 普及组] 守望者的逃离
[NOIP2007 普及组] 守望者的逃离 - 洛谷 首先DP的套路就是先找状态 这题也找不出其他的状态了,只有时间一个 所以用f[i]表示时刻i能走多远 而仔细一想实际上决策只有跑、闪现、停三种决策 然而闪现的耗蓝要和跑步一同计算十分麻烦 于是把它们分开算࿱…...

Python函数绘图与高等代数互融实例(八):箱线图|误差棒图|堆积图
Python函数绘图与高等代数互融实例(一):正弦函数与余弦函数 Python函数绘图与高等代数互融实例(二):闪点函数 Python函数绘图与高等代数互融实例(三):设置X|Y轴|网格线 Python函数绘图与高等代数互融实例(四):设置X|Y轴参考线|参考区域 Python函数绘图与高等代数互融实例(五…...
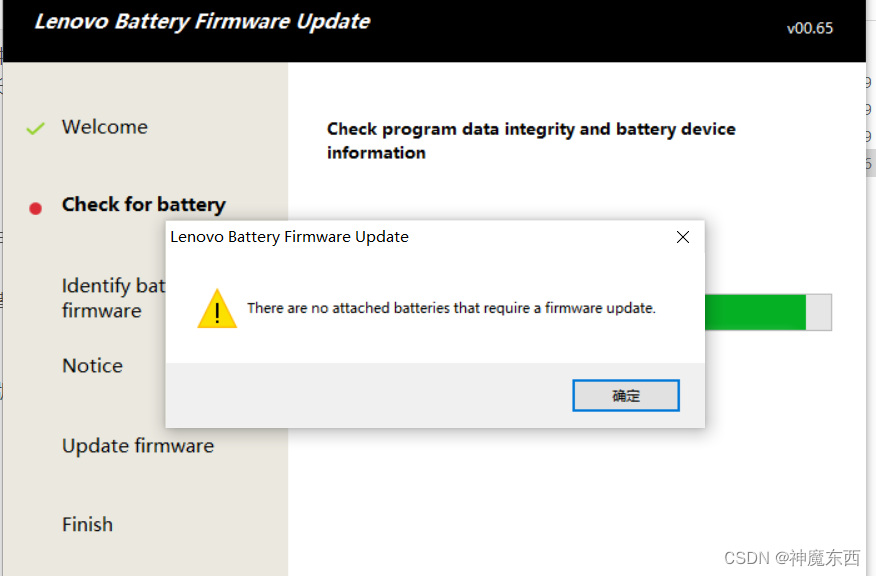
联想y7000 y7000p 2018/2019 不插电源 不插充电器, 直接关机 ,电量一直89%/87%/86%,V0005如何解决?
这种问题,没有外力破坏的话,电池不可能突然出事。这种一般是联想的固件问题,有可能发生在系统更新,或者突然的不正常关机或长时间电池过热,原因我不是很清楚。 既然发生了,根据我收集的解决方法,…...

stm32与esp8266通信
esp8266 #include <ESP8266WiFi.h> #include <ESP8266HTTPClient.h>// 测试HTTP请求用的URL // #define URL "http://162.14.107.118:8086/PC/modifyFoodPrice/0/6"// 测试HTTP请求用的URL // 设置wifi接入信息(请根据您的WiFi信息进行修改) const char…...

组合数 2.1 2.2
O(nlogn)预处理, O(1)查询 #include<bits/stdc.h> #define IOS ios::sync_with_stdio(0);cin.tie(0);cout.tie(0); #define endl \nusing namespace std;typedef pair<int, int> PII; typedef long long ll; typedef long double ld;const int N 1000…...

【数组的中心位置】python实现-附ChatGPT解析
1.题目 数组的中心位置 题目 给你一个整数数组 nums,请计算数组的中心位置。 数组中心位置是数组的一个下标,其左侧所有元素相乘的积等于右侧所有元素相乘的积。 数组第一个元素的左侧积为 1,最后一个元素的右侧积为 1。 如果数组有多个中心位置,应该返回最靠近左边的那一个…...
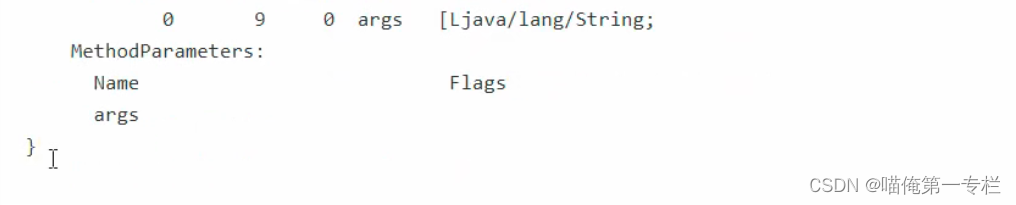
黑马JVM总结(二十三)
(1)字节码指令-init 方法体内有一些字节,对应着将来要由java虚拟机执行方法内的代码,构造方法里5个字节代码,main方法里有9个字节的代码 java虚拟机呢内部有一个解释器,这个解释器呢可以识别平台无关的字…...
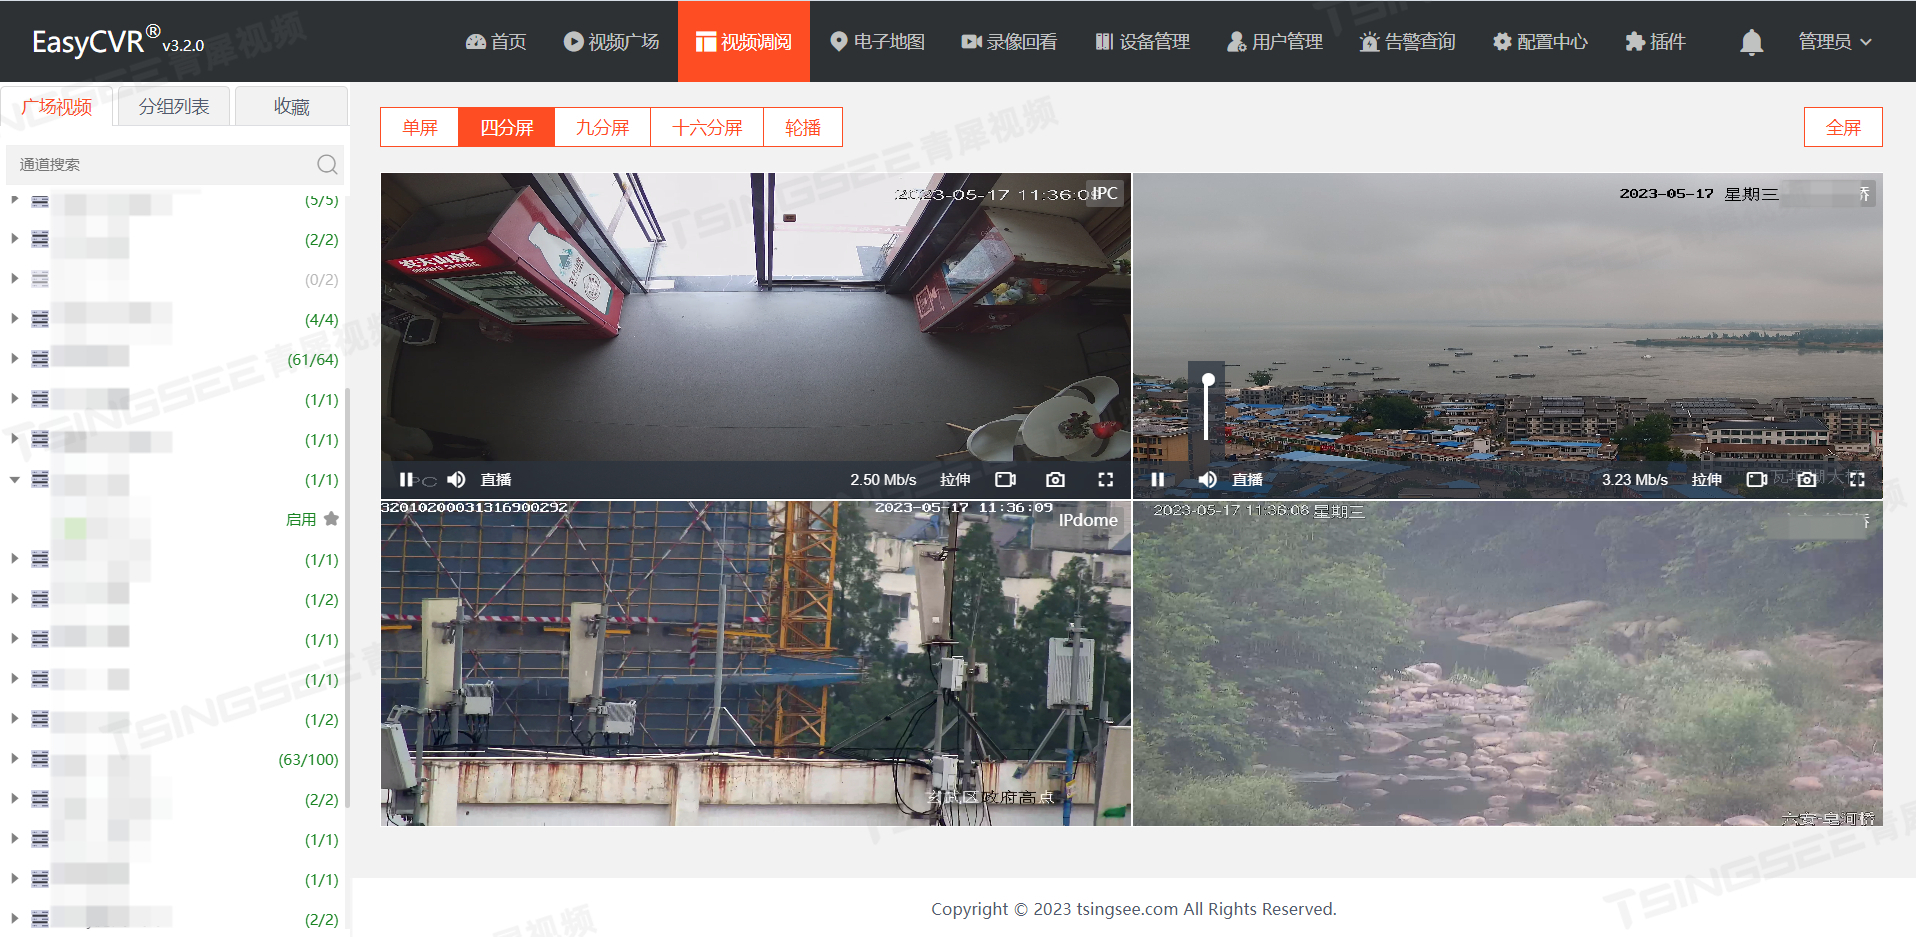
AI人体行为分析:玩手机/打电话/摔倒/攀爬/扭打检测及TSINGSEE场景解决方案
一、AI人体行为分析技术概述及场景 人体姿态分析/行为分析/动作识别AI算法,是一种利用人工智能技术对人体行为进行检测、跟踪和分析的方法。通过计算机视觉、深度学习和模式识别等技术,可以实现对人体姿态、动作和行为的自动化识别与分析。 在场景应用…...

HI_NAS linux 记录
dev/root 100% 占用解决记录 通过下面的命令查看各文件夹 大小 sudo du --max-depth1 -h # 统计当前文件夹下各个文件夹的大小显示为M 最终发现Var/log 占用很大空间 发现下面两个 log 占用空间很大,直接 rm-rf 即可 HI NAS python3 记录 # 安装pip3 sudo apt u…...
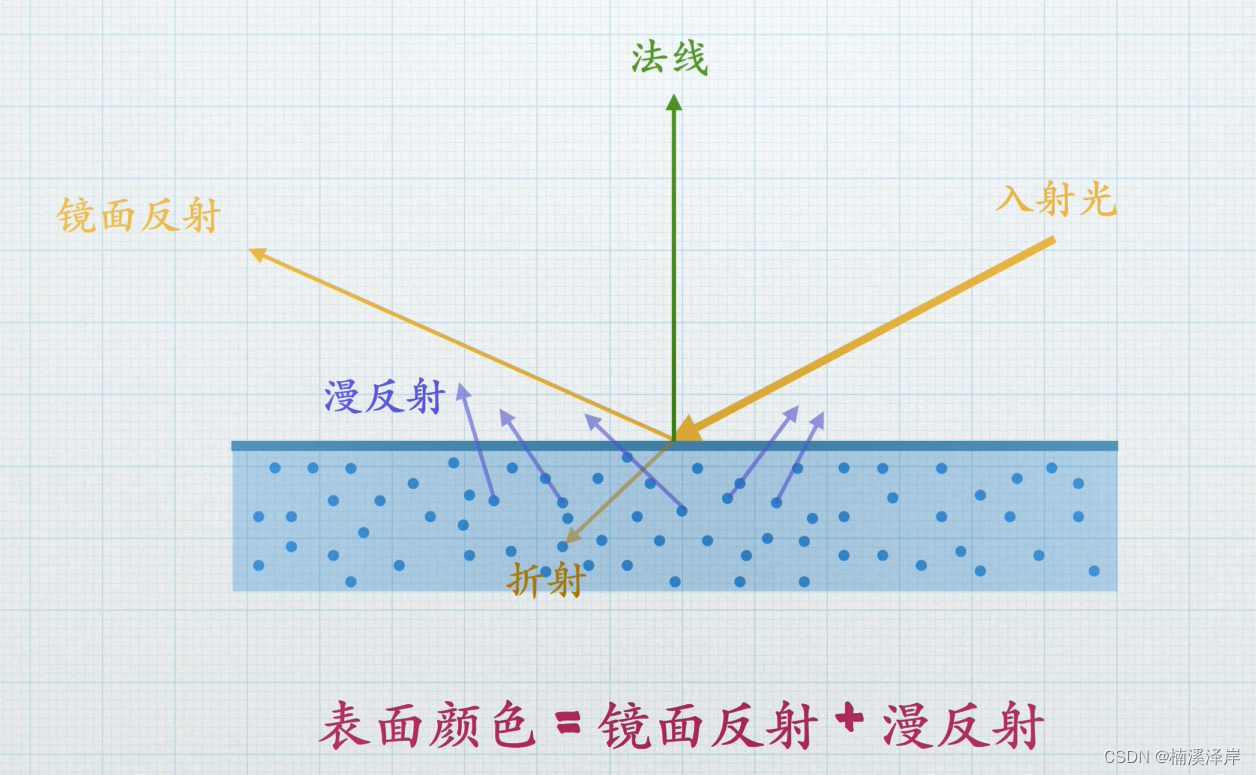
计算机图形学中的几何光学
文章目录 前言一、图形学中的光学二、光照模型1、经验型(简单)2、物理型(复杂) 前言 在学习Shader光照之前了解一下计算机图形学 一、图形学中的光学 镜面反射的效果例子:物体表面高光 慢反射的效果的例子:…...
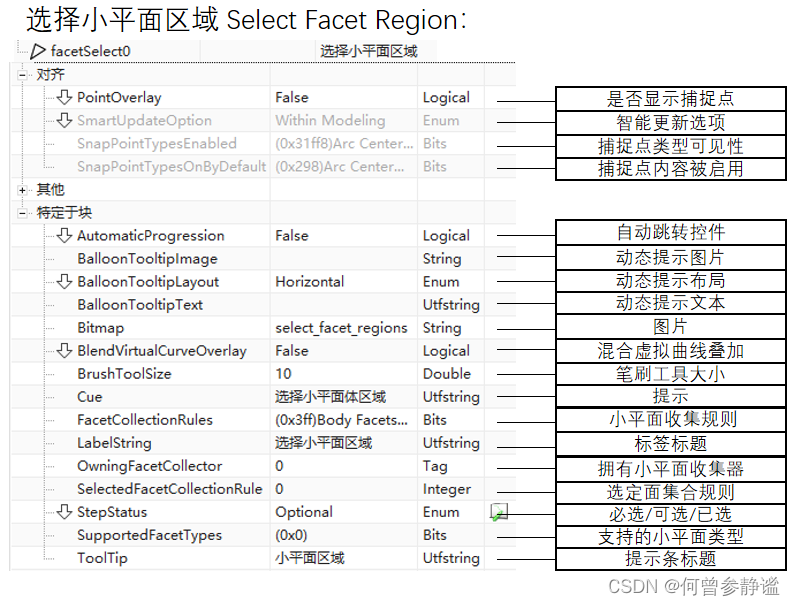
「UG/NX」BlockUI 选择小平面区域 Select Facet Region
✨博客主页何曾参静谧的博客📌文章专栏「UG/NX」BlockUI集合📚全部专栏「UG/NX」NX二次开发「UG/NX」BlockUI集合「VS」Visual Studio「QT」QT5程序设计「C/C」C/C程序设计「Win」Windows程序设计「DSA」数据结构与算法「File」数据文件格式 目录 控件说…...

【完全二叉树魔法:顺序结构实现堆的奇象】
本章重点 二叉树的顺序结构堆的概念及结构堆的实现堆的调整算法堆的创建堆排序TOP-K问题 1.二叉树的顺序结构 普通的二叉树是不适合用数组来存储的,因为可能会存在大量的空间浪费。而完全二叉树更适合使用顺序结构存储。现实中我们通常把堆(一种二叉树)使用顺序结构…...

Maven官方镜像仓库与阿里云云效Maven
一、Maven官方镜像仓库 download maven-3 右击复制链接地址,使用wget命令直接在linux中下载: wget 链接地址history 二、阿里云云效Maven 详情查看maven 配置指南 打开 maven 的配置文件( windows 机器一般在 maven 安装目录的 conf/…...

python系列教程215——列表解析与矩阵
朋友们,如需转载请标明出处:https://blog.csdn.net/jiangjunshow 声明:在人工智能技术教学期间,不少学生向我提一些python相关的问题,所以为了让同学们掌握更多扩展知识更好地理解AI技术,我让助理负责分享…...
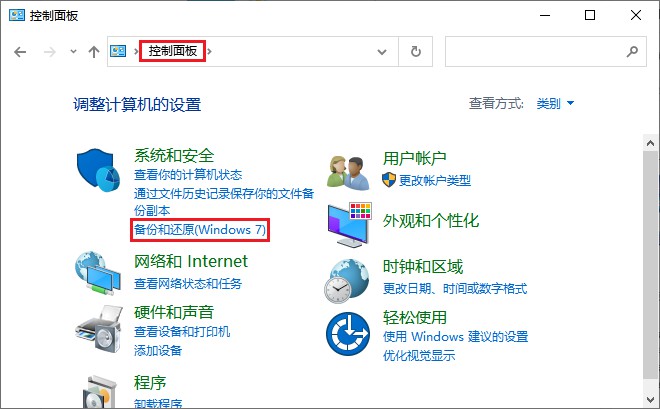
fonts什么文件夹可以删除吗?fonts文件夹删除了怎么恢复
在电脑上,fonts文件夹是存放字体文件的目录之一。尽管有时可能考虑删除该文件夹以节省硬盘空间或出于其他原因,但删除该文件夹可能会导致系统字体问题,影响用户的正常使用。因此,在删除之前需要考虑是否可以删除fonts文件夹&#…...

Musa并行搜索工具:重塑信息检索工作流,提升多源对比效率
1. 项目概述:重新定义你的搜索工作流如果你和我一样,每天的工作都离不开在浏览器里反复横跳——为了一个技术问题,先在 Google 搜一遍,再去 Stack Overflow 看看有没有新答案,接着打开 ChatGPT 问问它的看法࿰…...

【网络安全】什么是漏洞扫描?有哪些功能?
【网络安全】什么是漏洞扫描?有哪些功能? 一、什么是漏洞扫描? 漏洞扫描是指基于CVE、CNVD、CNNVD 等漏洞数据库,通过专用工具扫描手段对指定的远程或者本地的网络设备、主机、数据库、操作系统、中间件、业务系统等进行脆弱性评估…...

基于fnos-apps框架构建智能对话应用:从技能编排到生产部署
1. 项目概述:一个为现代对话应用而生的开源工具箱最近在折腾一个基于大语言模型的客服机器人项目,在集成各种外部工具和API时,遇到了一个老生常谈的问题:每个工具都有自己的调用方式、认证逻辑和错误处理,代码里很快就…...

用Wireshark抓包实战解析USB控制传输:从SETUP包到ACK的完整流程
用Wireshark实战拆解USB控制传输:从设备枚举到数据交互的深度解析 当你第一次插入USB设备时,主机和设备之间究竟发生了什么?那些看似神秘的SETUP令牌包、DATA0数据包背后隐藏着怎样的通信逻辑?本文将带你用Wireshark这个"网络…...
)
别再只盯着原理图了!用Python+OpenCV动手模拟激光三角测距(斜射/直射对比)
用PythonOpenCV模拟激光三角测距:斜射与直射的实战对比 激光三角测距技术听起来高大上,但真正理解它的精髓往往需要跳出公式推导的泥潭。作为一名长期在工业检测领域摸爬滚打的技术人员,我发现用代码模拟物理过程是最有效的学习方式。本文将…...

SAP资产会计进阶:深入理解AS91、AB01与ABLDT在期初数据处理中的角色与联动
SAP资产会计核心事务代码解析:AS91、AB01与ABLDT的协同逻辑与实战应用 在SAP S4 HANA资产模块的实施与运维中,期初数据处理往往是项目成败的关键节点。不同于日常资产操作,期初数据迁移涉及历史价值追溯、折旧逻辑重建以及多系统数据对齐等复…...

S32K144开发板调试实战:除了点灯,如何用S32DS的调试窗口快速排查变量异常问题?
S32K144开发板调试实战:变量异常排查与高效调试技巧 调试嵌入式系统时,最令人头疼的莫过于程序看似正常运行,但某些变量值却莫名其妙地偏离预期。作为一名长期使用S32 Design Studio(S32DS)进行S32K144开发的工程师&a…...

eFuse 的核心作用
它触及了设备安全性的核心机制——eFuse。 简而言之:一台已经烧录(blown)了 eFuse 的设备,其安全机制与未烧录 eFuse 的设备有本质区别,你之前在非 eFuse 设备上成功的代码修改(强制 check_key 返回 0)很可能在烧录了 eFuse 的设备上无效。 以下是详细解释: eFuse 的…...
?在事件处理里怎么用?)
45.什么是内联条件表达式(inline conditional expressions)?在事件处理里怎么用?
内联条件表达式指的是:你在 JSX 里直接用 JavaScript 条件语法(如三元 ? :、逻辑与 &&、逻辑或 ||)来决定事件处理函数是否执行、执行哪段逻辑,或给事件处理器提供一个默认值。它能让事件行为跟 props/state 动态绑定&am…...

售价99美元小工具Cricut Joy 2,功能实用但新手引导待改进!
产品初印象这款售价99美元的小工具并不完美,但它的功能和应用程序提供的模板正是用户所需要的。照顾他人、自我批评以及心理健康方面的困扰,让用户很难再像过去那样摆弄和涂鸦,然而Cricut Joy 2却让人心动不已。当有创作的心情时,…...