Flume最简单使用
文章目录
- 一、简介
- 1、定义
- 2、基础架构
- 二、快速入门
- 1、解压Flume
- 2、案例一:监控端口号
- 3、案例二:将空目录下文件
- 三、Flume进阶
- 1、Flume事务
- 2、Flume Agent内部原理
- 3、案例一:监控日志
- 4、案例二:多路复用和拦截器适应
- 4.1 原理
- 4.2 代码编写
- 4.3 编写配置文件
- 4.4 测试
- 5、案例三:聚合
- 四、Flume数据流监控
- 1、Ganglia简介
- 2、部署规划
- 3、修改配置文件:`hadoop101`
- 4、修改配置文件`3台`
- 5、启动服务
- 3、测试
一、简介
1、定义
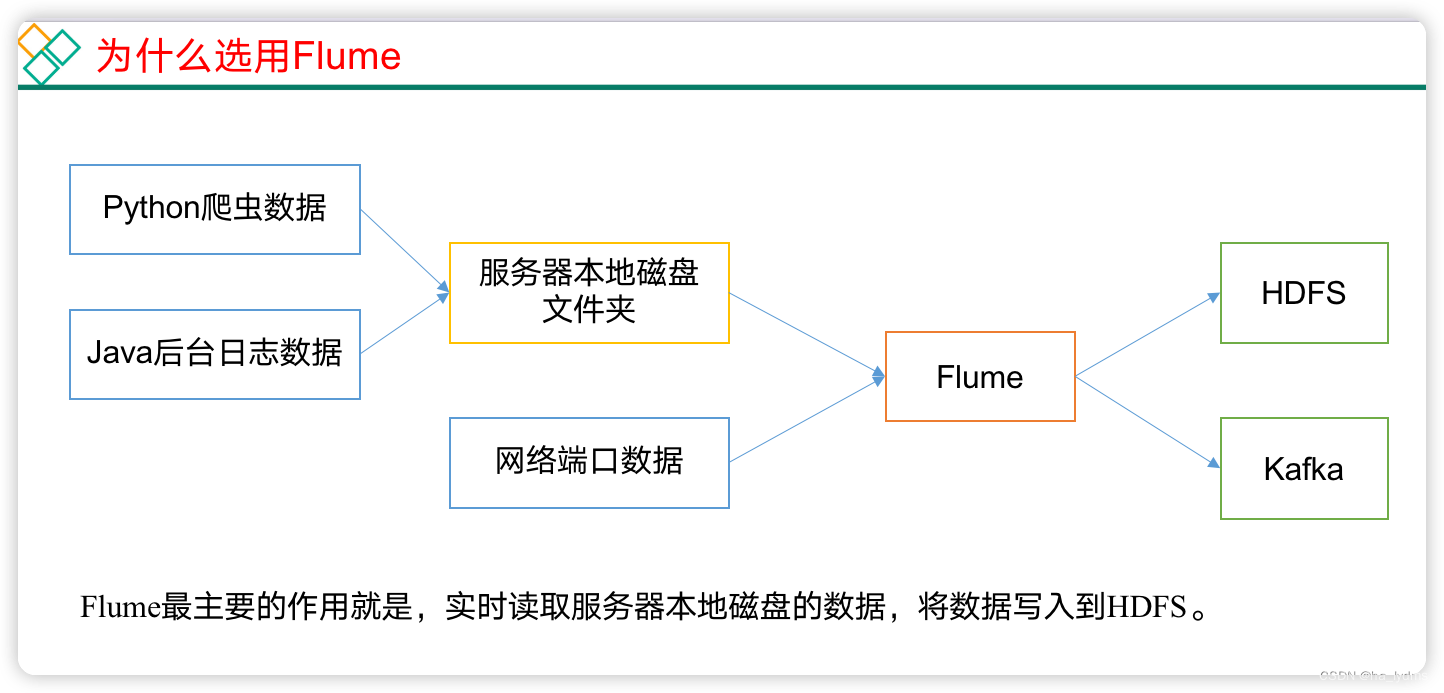
Flume是Cloudera提供的一个高可用的,高可靠的,分布式的海量日志采集、聚合和传输的系统。
Flume基于流式架构,灵活简单。
- Flume官网地址:http://flume.apache.org/
- 文档查看地址:http://flume.apache.org/FlumeUserGuide.html
- 下载地址:http://archive.apache.org/dist/flume/
2、基础架构
Flume组成架构如下图所示:

- Agent
Agent:Flume的部署单元,本质是一个JVM进程,Agent内部是以事件的形式将数据从源头送至目的。
组成:Agent主要有3个部分组成,Source、Channel、Sink。
- Source
Source:是负责接收数据到Flume Agent的组件。
特点:Source组件可以处理各种类型、各种格式的日志数据,
Source组件类型:
avro:本质是RPC框架,支持跨语言、跨平台的数据传输,avro Source在flume中多用于Agent的连接。netcat:本质是Linux下的端口类工具,netcat Source在Flume中用于采集端口传输的数据。exec:支持执行命令的,并将命令执行后的标准输出作为数据采集,多用于采集一个可追加文件。spooling directory:支持对一个目录进行监听,采集目录中一个或多个新生成的文件数据。taildir:支持对多个目录进行监听,采集一个或多个目录下的一个或多个可追加文件,支持断点续传。- 除此之外还有:thrift、jms、sequence generator、syslog、http、自定义Source。
- Sink
Sink:是负责发送数据到外部系统的Flume Agent的组件。
特点:Sink组件不断地轮询Channel中的事件且批量地移除它们,并将这些事件批量的、事务的写入到存储或索引系统、或者被发送到另一个Flume Agent。
Sink组件类型:
logger:logger Sink组件则是将数据写到成Flume框架的运行日志中,配合运行参数-Dflume.root.logger=INFO,console可以将Flume运行日志(其中就包含了采集的数据)输出到控制台,多用于测试环境。hdfs:hdfs Sink组件是负责将数据传输到HDFS分布式文件系统中。avro:avro Sink组件配合avro Source组件可以实现Agent的连接。file:file Sink组件是将采集到的数据直接输出到本地文件系统中,即linux的磁盘上。- 除此之外还有:thrift、ipc、HBase、solr、自定义Sink。
- Channel
**Channel:**是负责暂存数据的,是位于Source和Sink组件之间的缓冲区。
特点:
- 由于Channel组件的存在,使得Source和Sink组件可以运作在不同的速率上。
- Channel是线程安全的,可以同时处理几个Source的写入操作和几个Sink的读取操作。
Flume自带两种Channel:
- Memory Channel:基于内存的队列存储事件,适用于对数据安全性要求不高的场景。 快,不安全
- File Channel:基于磁盘存储事件,宕机数据不丢失,适用于对数据安全敏感度高的场景。 慢,安全
- Event
Event: agent中的事件,Flume数据传输的基本单元,以Event的形式将数据从源头送至目的地。
特点: Event由Header和Body两部分组成,
- Header:用来存放该event的一些属性,为K-V结构。
- Body:用来存放该条数据,形式为字节数组。
二、快速入门
1、解压Flume
wget https://gitcode.net/weixin_44624117/software/-/raw/master/software/Linux/Flume/apache-flume-1.9.0-bin.tar.gz
解压文件
tar -zxvf apache-flume-1.9.0-bin.tar.gz -C /opt/module/
修改文件目录名称
mv /opt/module/apache-flume-1.9.0-bin /opt/module/flume-1.9.0
将lib文件夹下的guava-11.0.2.jar删除以兼容Hadoop 3.1.3
rm /opt/module/flume-1.9.0/lib/guava-11.0.2.jar
2、案例一:监控端口号
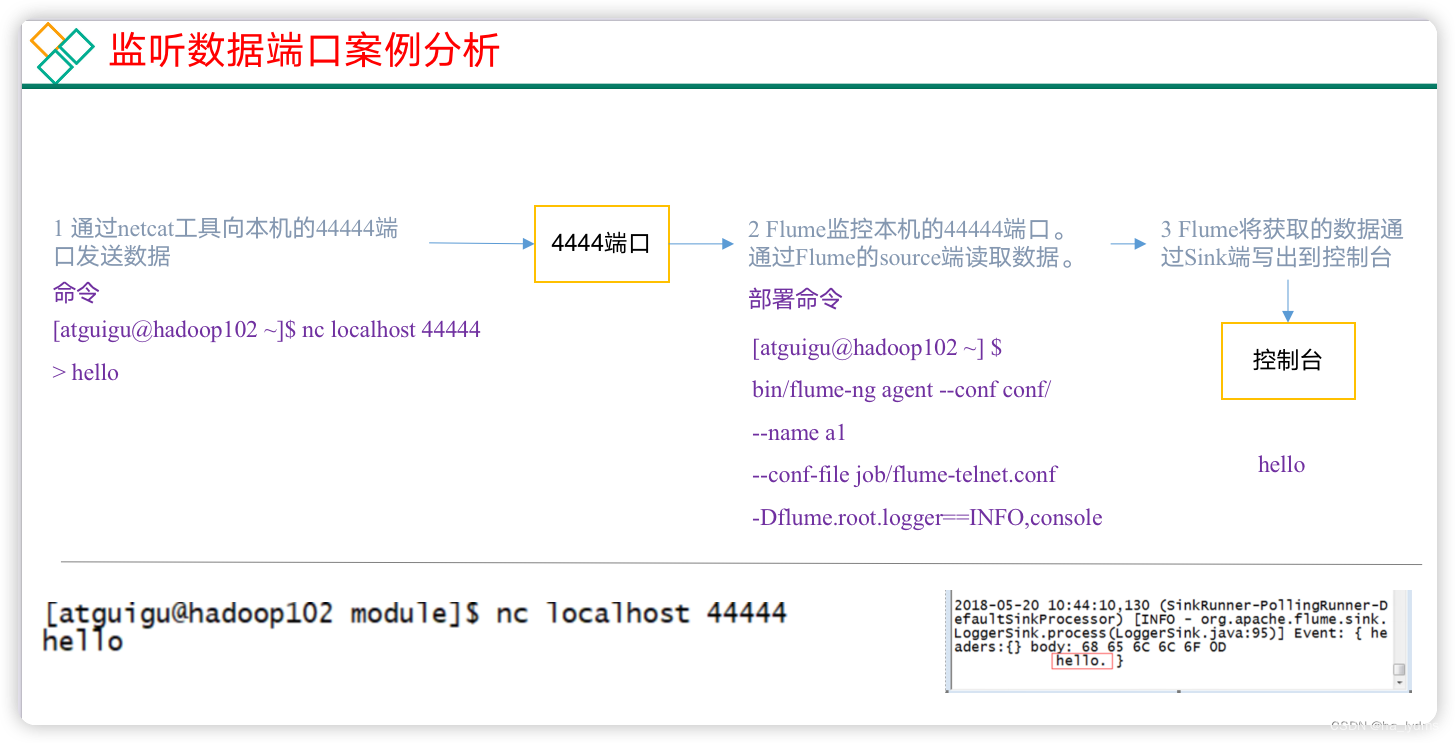
使用Flume监听一个端口,收集该端口数据,并打印到控制台。
安装netcat工具(发送Http请求)
sudo yum install -y nc
判断44444端口是否被占用
sudo netstat -nlp | grep 44444
在Flume目录下,创建job任务
cd /opt/module/flume-1.9.0
mkdir -p job/simpleCase
cd /opt/module/flume-1.9.0/job/simpleCase
添加配置文件
注:配置文件来源于官方手册http://flume.apache.org/FlumeUserGuide.html
vim flume-1-netcat-logger.con
#Name the components on this agent
a1.sources = r1
a1.sinks = k1
a1.channels = c1# Describe/configure the source
a1.sources.r1.type = netcat
a1.sources.r1.bind = localhost
a1.sources.r1.port = 44444# Describe the sink
a1.sinks.k1.type = logger # Use a channel which buffers events in memory
a1.channels.c1.type = memory
a1.channels.c1.capacity = 1000
a1.channels.c1.transactionCapacity = 100 # Bind the source and sink to the channel
a1.sources.r1.channels = c1
a1.sinks.k1.channel = c1
解释:
#Name the components on this agent
a1.sources = r1                                      # 为a1的Source组件命名为r1,多个组件用空格间隔
a1.sinks = k1                                        # 为a1的Sink组件命名为k1,多个组件用空格间隔
a1.channels = c1                                    # 为a1的Channel组件命名为c1,多个组件用空格间隔# Describe/configure the source
a1.sources.r1.type = netcat                      # 配置r1的类型
a1.sources.r1.bind = localhost                  # 配置r1的绑定地址(注意localhost和hadoop102的区别)
a1.sources.r1.port = 44444                       # 配置r1的监听端口# Describe the sink
a1.sinks.k1.type = logger                        # 配置k1的类型为logger,输出到控制台# Use a channel which buffers events in memory
a1.channels.c1.type = memory                    # 配置c1的类型为memory
a1.channels.c1.capacity = 1000                 # 配置c1的容量为1000个事件
a1.channels.c1.transactionCapacity = 100     # 配置c1的事务容量为100个事件# Bind the source and sink to the channel
a1.sources.r1.channels = c1                    # 配置r1的channel属性,指定r1连接到那个channel
a1.sinks.k1.channel = c1                        # 配置k1的channel属性,指定k1连接到那个channel
运行Flume监听端口
#	方式一:
bin/flume-ng agent --conf conf/ --name a1 --conf-file job/simpleCase/flume-1-netcat-logger.conf -Dflume.root.logger=INFO,console
#	方式二:bin/flume-ng agent -c conf/ -n a1 -f job/simpleCase/flume-1-netcat-logger.conf -Dflume.root.logger=INFO,console
参数说明:
--conf/-c:表示配置文件存储在conf/目录--name/-n:表示给agent起名为a1--conf-file/-f:指定读取的配置文件是在job/simpleCase文件夹下的flume-1-1netcat-logger.conf文件。-Dflume.root.logger=INFO,console:-D表示flume运行时动态修改flume.root.logger参数属性值,并将控制台日志打印级别设置为INFO级别。日志级别包括:log、info、warn、error。
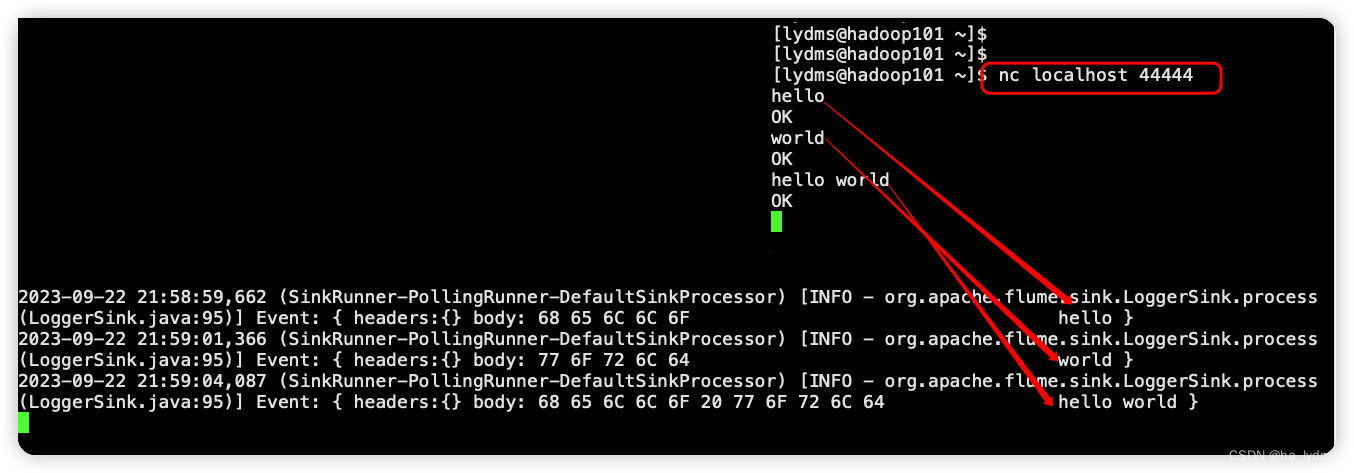
**测试:**在Hadoop101上启动nc,并发送请求
nc localhost 44444
hello
world
hello world
3、案例二:将空目录下文件
Source选择:
- Exec source:适用于监控一个实时追加的文件,不能实现断点续传;
- Spooldir Source:适合用于同步新文件,但不适合对实时追加日志的文件进行监听并同步;
- Taildir Source:适合用于监听多个实时追加的文件,并且能够实现断点续传。
案例需求:
- 使用Flume监听整个目录的实时追加文件,并上传至HDFS。
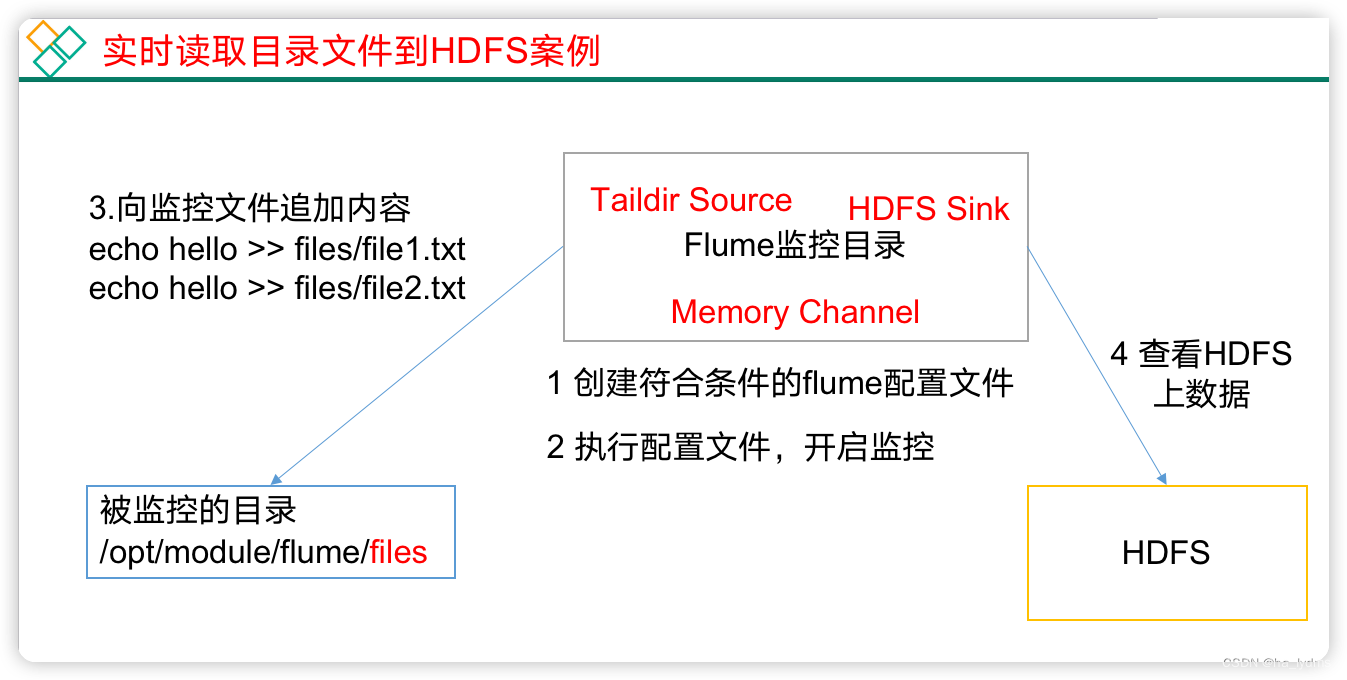
创建配置文件
cd /opt/module/flume-1.9.0/job/simpleCase
vim flume-2-taildir-hdfs.conf
配置文件
# Name the components on this agent
a2.sources = r1
a2.sinks = k1
a2.channels = c1# Describe/configure the source
a2.sources.r1.type = TAILDIR
a2.sources.r1.positionFile = /opt/module/flume-1.9.0/tail_dir.json
a2.sources.r1.filegroups = f1 f2
a2.sources.r1.filegroups.f1 = /opt/module/flume-1.9.0/datas/tailCase/files/.*file.*
a2.sources.r1.filegroups.f2 = /opt/module/flume-1.9.0/datas/tailCase/logs/.*log.*# Describe the sink
a2.sinks.k1.type = hdfs
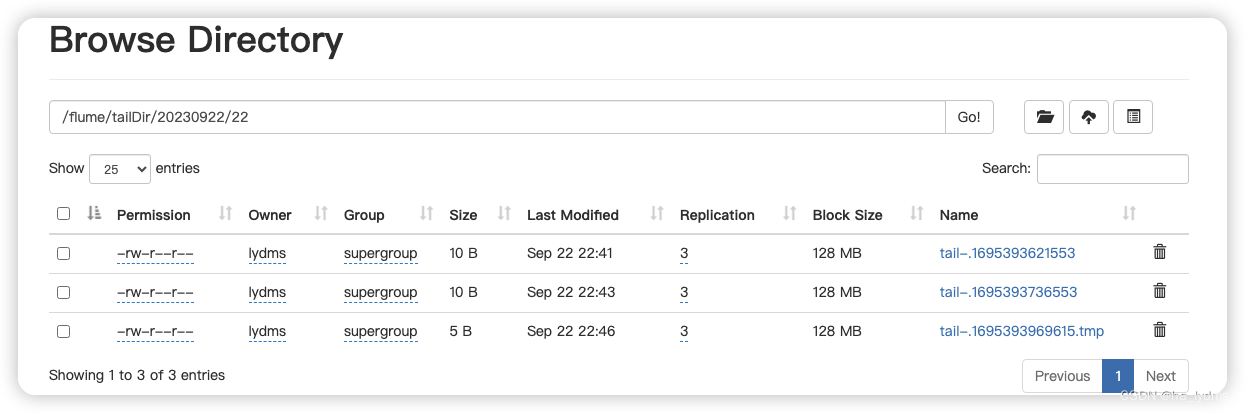
a2.sinks.k1.hdfs.path = hdfs://hadoop101:8020/flume/tailDir/%Y%m%d/%H
# 上传文件的前缀
a2.sinks.k1.hdfs.filePrefix = tail-
# 是否按照时间滚动文件夹
a2.sinks.k1.hdfs.round = true
# 多少时间单位创建一个新的文件夹
a2.sinks.k1.hdfs.roundValue = 1
# 重新定义时间单位
a2.sinks.k1.hdfs.roundUnit = hour
# 是否使用本地时间戳
a2.sinks.k1.hdfs.useLocalTimeStamp = true
# 积攒多少个Event才flush到HDFS一次
a2.sinks.k1.hdfs.batchSize = 100
# 设置文件类型,(可选择设置支持压缩的CompressedStream或者不支持压缩的DataStream)
a2.sinks.k1.hdfs.fileType = DataStream
# 多久生成一个新的文件
a2.sinks.k1.hdfs.rollInterval = 60
# 设置每个文件的滚动大小大概是128M
a2.sinks.k1.hdfs.rollSize = 134217700
# 文件的滚动与Event数量无关
a2.sinks.k1.hdfs.rollCount = 0# Use a channel which buffers events in memory
a2.channels.c1.type = memory
a2.channels.c1.capacity = 1000
a2.channels.c1.transactionCapacity = 100# Bind the source and sink to the channel
a2.sources.r1.channels = c1
a2.sinks.k1.channel = c1
启动监控
cd /opt/module/flume-1.9.0
bin/flume-ng agent --conf conf/ --name a2 --conf-file job/simpleCase/flume-2-taildir-hdfs.conf
测试
新建受监控目录
mkdir -p datas/tailCase/files
mkdir -p datas/tailCase/logs
在/opt/module/flume/datas/目录下创建tailCase/files文件夹向files文件夹下文件追加内容
测试/opt/module/flume-1.9.0/datas/tailCase/files/.*file.*
#	当前目录下会上传file的文件
cd /opt/module/flume-1.9.0/datas/tailCase/filestouch file1.txt
echo I am file1 >> file1.txt
touch log1.txt
echo I am log1 >> log1.txt
测试: /opt/module/flume-1.9.0/datas/tailCase/logs/.*log.*
#	当前目录下,会上传 log的文件
cd /opt/module/flume-1.9.0/datas/tailCase/logs
touch file2.txt
echo I am file2 >> file2.txt
touch log2.txt
echo I am log2 >> log2.txt
文件上传到HDFS上
断点续传监控
关掉flume采集程序,对logs/和files/下文件追加,再开启flume采集程序,验证flume的断点续传。
Taildir Source维护了一个json格式的position File,其会定期的往position File中更新每个文件读取到的最新的位置,因此能够实现断点续传。Position File的格式如下:
{"inode":2496272,"pos":12,"file":"/opt/module/flume/datas/tailCase/files/file1.txt"}
{"inode":2496275,"pos":12,"file":"/opt/module/flume/datas/tailCase/logs/log2.txt"}
注:Linux中储存文件元数据的区域就叫做inode,每个inode都有一个号码,操作系统用inode号码来识别不同的文件,Unix/Linux系统内部不使用文件名,而使用inode号码来识别文件。
三、Flume进阶
1、Flume事务
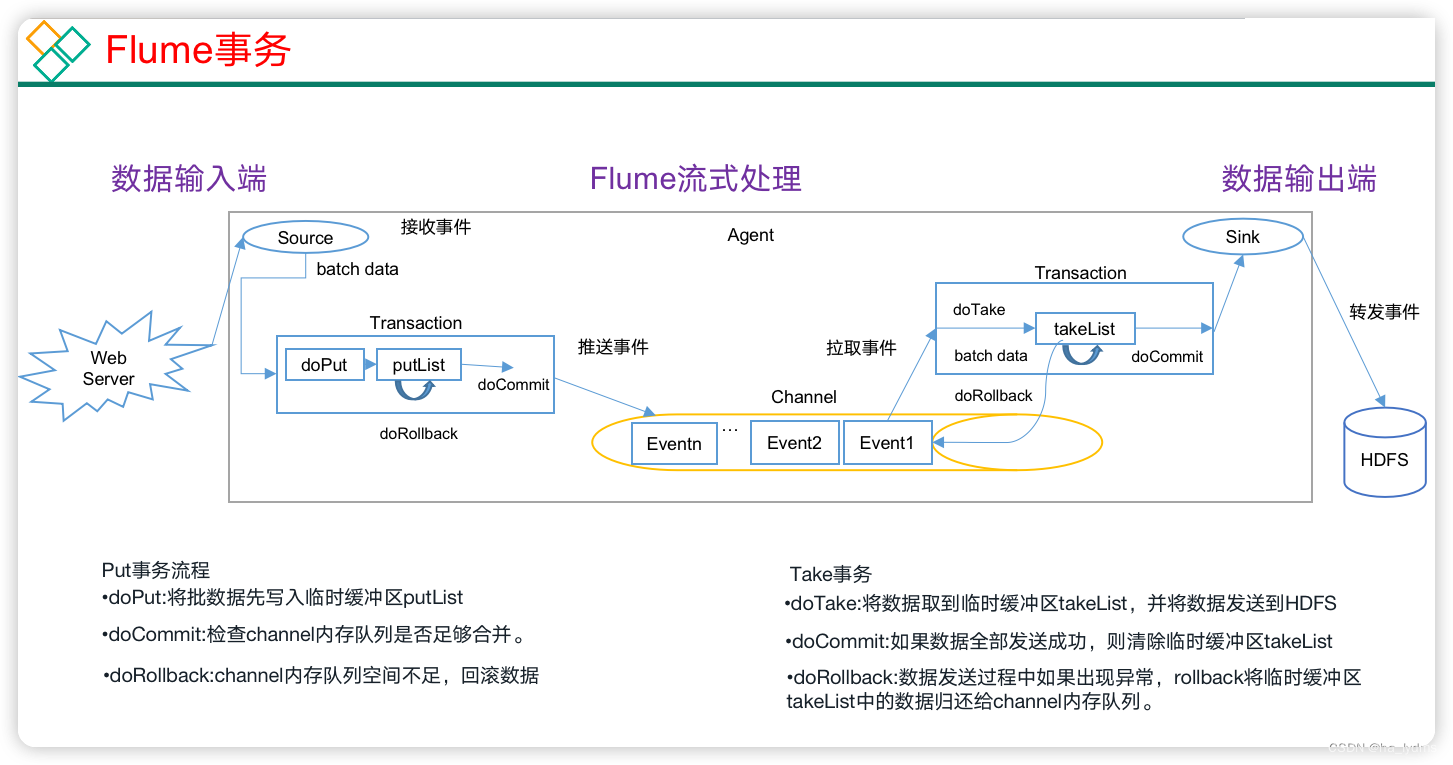
在Flume中一共有两个事务
- Put事务:在Source组件和Channel组件之间,保证Source组件到Channel组件之间数据传递的可靠性。
- take事务:在Channel组件和Sink组件之间,保证channel组件到Sink组件之间数据传输的可靠性。
Put事务流程
- source组件采集外部数据到agent内部,并且将数据包装为事件。
- source组件开始将事件传输到Channel组件中。
- 首先,会开启事务,在事务内部,通过doPut方法将一批数据放入到putlist中存储。
- 之后,调用doCommit方法,把putList中的所有Event放到Channel中,成功之后就清空putList。
失败重试机制
- putList在像channel中发送数据前会先检查channel中的容量是否放得下,放不下一个都不会放,调用doRollback
- 调用doRollback方法后,doRollback方法会进行两步操作:
- 将putList清空。
- 抛出ChannelException异常。
- source组件会捕捉到doRollback抛出的异常后,source就将刚才的一批数据重新采集,然后就开启一个新的事务。
- 数据批的大小取决于Source组件的配置参数batch size的值。
- putList的大小取决于Channel组件的配置参数transactionCapacity的值(capacity参数是指Channel的容量)。
Take事务流程
- Sink组件不断的轮询Channel,当其中有新的事件到达时,开启take事务。
- take事务开启后,会调用doTake方法将Channel组件中的Event剪切到takeList中。
- 当takeList中存放了batch size数量的Event之后,就会调用doCommit方法。
- doCommit方法中,首先会将数据写出到外部系统,成功后就会清空takeList。
- 当事务失败时,就会调用doRollback方法来进行回滚,就是将takeList中的数据原封不动的还给channel。
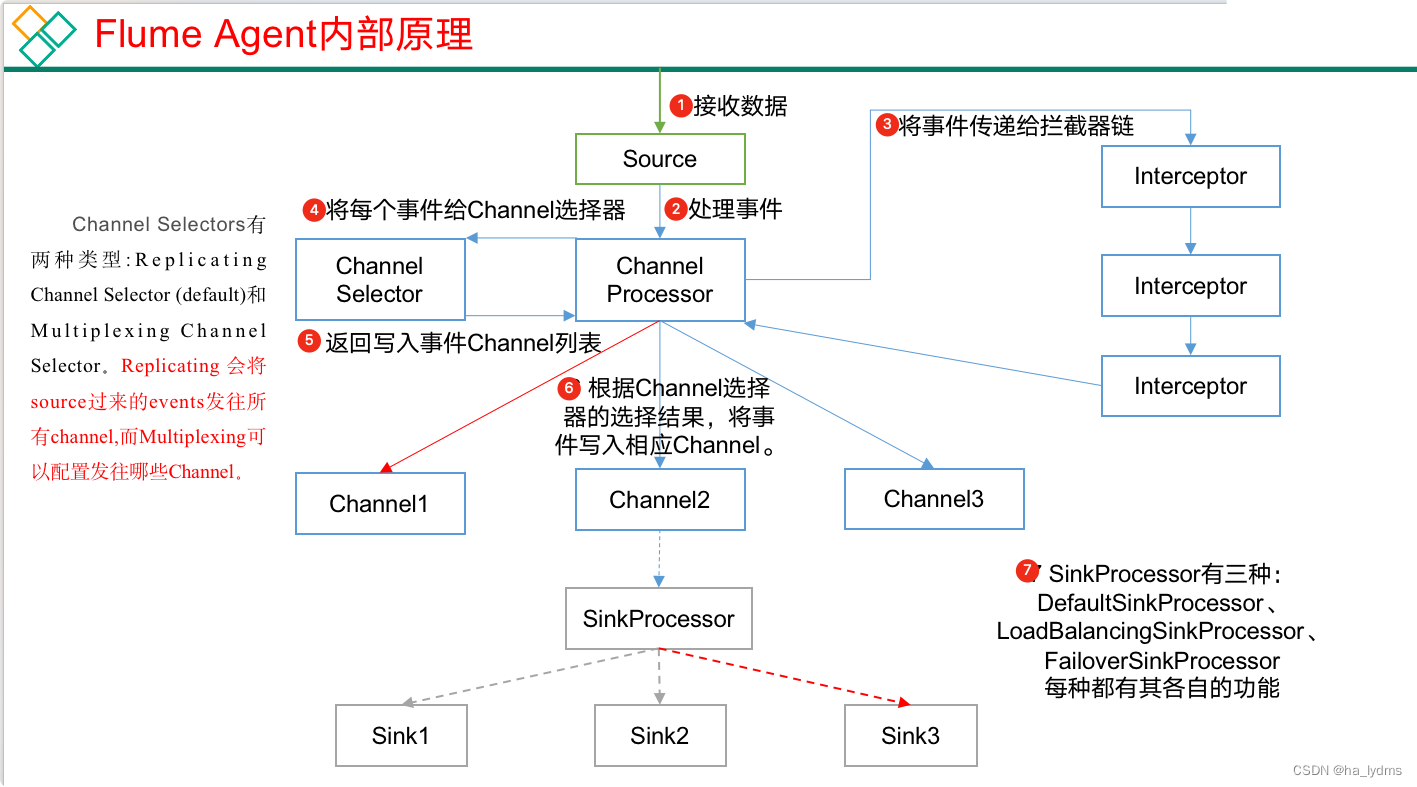
2、Flume Agent内部原理
| 组件名称 | 概述 | 组件包含类型 | 特点 |
|---|---|---|---|
| ChannelSelector | 选出Event将要发到那个channel | Replication Channel Selector | 复制,默认选项 |
| Multiplexing Channel Seletctor | 多路复用 | ||
| SinkProcessor | 通过配置不同类型的SinkProcess实现不同的功能 | DefaultSinkProcessor | 单个Sink,默认 |
| LoadBalancingSinkProcessor | 负载均衡 | ||
| FailoverSinkProcessor | 故障转移 |
执行流程
- Source组件采集外部数据到agent内部,并包装为Event
- 然后,将事件发送到ChannelProcessor中,
- 通过拦截器链中每个拦截器的拦截过滤,符合要求的Event会返回到ChannelProcessor中。
- 在通过ChannelSelector,根据不同的选择器来决定Event去往哪个Channel,然后返回到ChannelProcessor。
- 开启Put事务,将批量的Event发送到Channel中
- 更具SinkProcessor组件配置的类型不同,实现相应的功能(负载均衡或故障转移),最终都会且同一时刻只能有一个Sink去拉取数据。
- Sink组件不断的轮询Channel,当有新的Event到达Channel时,向外部系统写出。
3、案例一:监控日志
需求:
- 使用Flume-1监控文件变动。
- Flume-1将变动内容传递给Flume-2,Flume-2负责存储到HDFS。
- 同时Flume-1将变动内容传递给Flume-3,Flume-3负责输出到Local FileSystem。
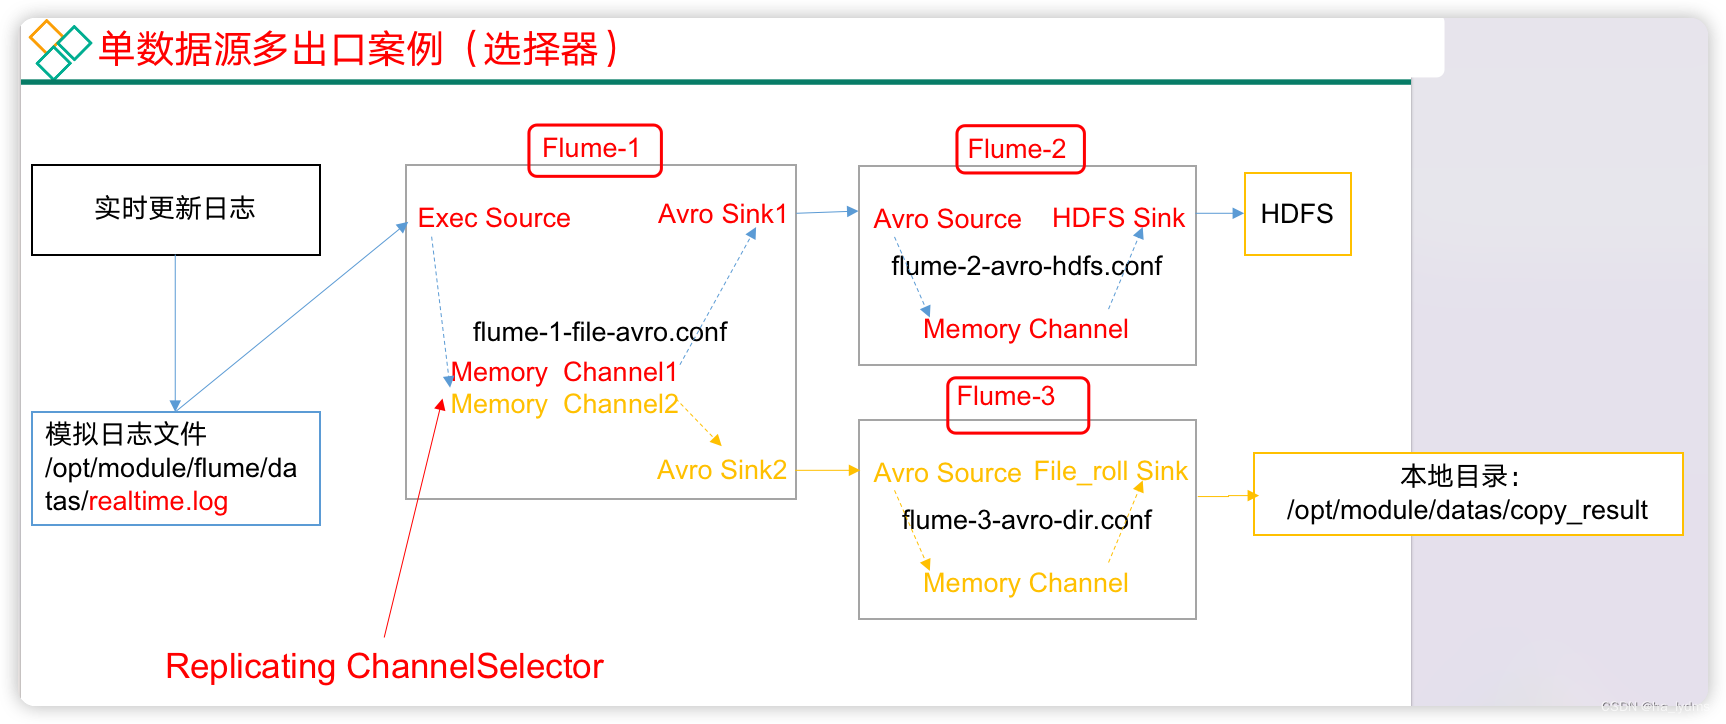
模拟日志文件:在/opt/module/flume/datas/目录下创建模拟日志文件realtime.log
mkdir -p /opt/module/flume-1.9.0/datas
touch /opt/module/flume-1.9.0/datas/realtime.log
复制的配置文件:在/opt/module/flume/job目录下创建enterprise/copy文件夹
mkdir -p /opt/module/flume-1.9.0/job/enterprise/copy
- Source:
flume-1-exec-avro.conf - Sink:``flume-2-avro-hdfs
和flume-3-avro-file`
配置文件1::flume-1-exec-avro.conf
vim /opt/module/flume-1.9.0/job/enterprise/copy/flume-1-exec-avro.conf
# Name the components on this agent
a1.sources = r1
a1.sinks = k1 k2
a1.channels = c1 c2
# 将数据流复制给所有channel,其实默认就是replicating
a1.sources.r1.selector.type = replicating# Describe/configure the source
a1.sources.r1.type = exec
a1.sources.r1.command = tail -F /opt/module/flume-1.9.0/datas/realtime.log
a1.sources.r1.shell = /bin/bash -c# Describe the sink
# sink端的avro是一个数据发送者
a1.sinks.k1.type = avro
a1.sinks.k1.hostname = hadoop101
a1.sinks.k1.port = 4141a1.sinks.k2.type = avro
a1.sinks.k2.hostname = hadoop101
a1.sinks.k2.port = 4142# Describe the channel
a1.channels.c1.type = memory
a1.channels.c1.capacity = 1000
a1.channels.c1.transactionCapacity = 100a1.channels.c2.type = memory
a1.channels.c2.capacity = 1000
a1.channels.c2.transactionCapacity = 100# Bind the source and sink to the channel
a1.sources.r1.channels = c1 c2
a1.sinks.k1.channel = c1
a1.sinks.k2.channel = c2
配置文件2:flume-2-avro-hdfs.conf
vim /opt/module/flume-1.9.0/job/enterprise/copy/flume-2-avro-hdfs.conf
# Name the components on this agent
a2.sources = r1
a2.sinks = k1
a2.channels = c1# Describe/configure the source
# source端的avro是一个数据接收服务
a2.sources.r1.type = avro
a2.sources.r1.bind = hadoop101
a2.sources.r1.port = 4141# Describe the sink
a2.sinks.k1.type = hdfs
a2.sinks.k1.hdfs.path = hdfs://hadoop101:8020/flume/copy/%Y%m%d/%H
# 上传文件的前缀
a2.sinks.k1.hdfs.filePrefix = copy-
# 是否按照时间滚动文件夹
a2.sinks.k1.hdfs.round = true
# 多少时间单位创建一个新的文件夹
a2.sinks.k1.hdfs.roundValue = 1
# 重新定义时间单位
a2.sinks.k1.hdfs.roundUnit = hour
# 是否使用本地时间戳
a2.sinks.k1.hdfs.useLocalTimeStamp = true
# 积攒多少个Event才flush到HDFS一次
a2.sinks.k1.hdfs.batchSize = 100
# 设置文件类型,可支持压缩
a2.sinks.k1.hdfs.fileType = DataStream
# 多久生成一个新的文件
a2.sinks.k1.hdfs.rollInterval = 60
# 设置每个文件的滚动大小大概是128M
a2.sinks.k1.hdfs.rollSize = 134217700
# 文件的滚动与Event数量无关
a2.sinks.k1.hdfs.rollCount = 0# Describe the channel
a2.channels.c1.type = memory
a2.channels.c1.capacity = 1000
a2.channels.c1.transactionCapacity = 100# Bind the source and sink to the channel
a2.sources.r1.channels = c1
a2.sinks.k1.channel = c1
配置文件3:flume-3-avro-file.conf
vim /opt/module/flume-1.9.0/job/enterprise/copy/flume-3-avro-file.conf
# Name the components on this agent
a3.sources = r1
a3.sinks = k1
a3.channels = c2# Describe/configure the source
a3.sources.r1.type = avro
a3.sources.r1.bind = hadoop101
a3.sources.r1.port = 4142# Describe the sink
a3.sinks.k1.type = file_roll
a3.sinks.k1.sink.directory = /opt/module/flume-1.9.0/datas/copy_result# Describe the channel
a3.channels.c2.type = memory
a3.channels.c2.capacity = 1000
a3.channels.c2.transactionCapacity = 100# Bind the source and sink to the channel
a3.sources.r1.channels = c2
a3.sinks.k1.channel = c2
mkdir /opt/module/flume-1.9.0/datas/copy_result
cd /opt/module/flume-1.9.0
bin/flume-ng agent -c conf/ -n a3 -f /opt/module/flume-1.9.0/job/enterprise/copy/flume-3-avro-file.conf
bin/flume-ng agent -c conf/ -n a2 -f /opt/module/flume-1.9.0/job/enterprise/copy/flume-2-avro-hdfs.conf
bin/flume-ng agent -c conf/ -n a1 -f /opt/module/flume-1.9.0/job/enterprise/copy/flume-1-exec-avro.conf
echo 2021-10-41 09-10-32 >> /opt/module/flume-1.9.0/datas/realtime.log
4、案例二:多路复用和拦截器适应
4.1 原理
需求:
使用flume采集服务器端口日志数据,需要按照日志类型的不同,将不同种类的日志发往不同分析系统。
原理
- 背景:在实际的开发中,一台服务器产生的日志类型可能有很多种,不同类型的日志可能需要发送到不同的分析系统。
此时会用到Flume的channel selecter中的Multiplexing结构。 - Multiplexing的原理是:根据event中Header的某个key的值,将不同的event发送到不同的Channel中。
- 自定义Interceptor:实现为不同类型的event的Header中的key赋予不同的值。
- 总结:在该案例中,我们以端口数据模拟日志,以数字和字母模拟不同类型的日志,我们需要自定义interceptor区分数字和字母,将其分别发往不同的分析系统(Channel)。

4.2 代码编写
Maven配置
<project xmlns="http://maven.apache.org/POM/4.0.0" xmlns:xsi="http://www.w3.org/2001/XMLSchema-instance"xsi:schemaLocation="http://maven.apache.org/POM/4.0.0 http://maven.apache.org/xsd/maven-4.0.0.xsd"><modelVersion>4.0.0</modelVersion><groupId>com.lydms</groupId><artifactId>first-flume</artifactId><version>1.0-SNAPSHOT</version><packaging>jar</packaging><name>first-flume</name><properties><project.build.sourceEncoding>UTF-8</project.build.sourceEncoding></properties><dependencies><dependency><groupId>junit</groupId><artifactId>junit</artifactId><version>3.8.1</version><scope>test</scope></dependency><dependency><groupId>org.apache.flume</groupId><artifactId>flume-ng-core</artifactId><version>1.9.0</version></dependency></dependencies><build><plugins><plugin><groupId>org.apache.maven.plugins</groupId><artifactId>maven-compiler-plugin</artifactId><configuration><source>6</source><target>6</target></configuration></plugin></plugins></build>
</project>
接口:
package com.lydms.flume.interceptor;import org.apache.flume.Context;
import org.apache.flume.Event;
import org.apache.flume.interceptor.Interceptor;import java.util.List;public class CustomInterceptor implements Interceptor {@Overridepublic void initialize() {}@Overridepublic Event intercept(Event event) {// 1. 从事件中获取数据byte[] body = event.getBody();// 2. 判断数据开头的字符是字母还是数据if (body[0] >= 'a' && body[0] <= 'z') {event.getHeaders().put("type", "letter");         // 是字母就在事件头部设置type类型为letter} else if (body[0] >= '0' && body[0] <= '9') {event.getHeaders().put("type", "number");         // 是数字就在事件头部设置type类型为number}// 3. 返回事件return event;}// 对批量事件进行拦截@Overridepublic List<Event> intercept(List<Event> events) {for (Event event : events) {intercept(event);}return events;}@Overridepublic void close() {}// 拦截器对象的构造对象public static class Builder implements Interceptor.Builder {@Overridepublic Interceptor build() {return new CustomInterceptor();}@Overridepublic void configure(Context context) {}}
}将项目打包,并导入到flume的lib目录下(/opt/module/flume-1.9.0/lib)。
4.3 编写配置文件
Hadoop101:添加配置文件
mkdir -p /opt/module/flume-1.9.0/job/custom/multi
vim /opt/module/flume-1.9.0/job/custom/multi/flume-1-netcat-avro.conf
# Name the components on this agent
a1.sources = r1
a1.sinks = k1 k2
a1.channels = c1 c2# Describe/configure the source
a1.sources.r1.type = netcat
a1.sources.r1.bind = localhost
a1.sources.r1.port = 44444
a1.sources.r1.interceptors = i1
#	Java文件目录
a1.sources.r1.interceptors.i1.type = com.lydms.flume.interceptor.CustomInterceptor$Builder
a1.sources.r1.selector.type = multiplexing
a1.sources.r1.selector.header = type
a1.sources.r1.selector.mapping.letter = c1
a1.sources.r1.selector.mapping.number = c2# Describe the sink
a1.sinks.k1.type = avro
a1.sinks.k1.hostname = hadoop102
a1.sinks.k1.port = 4141a1.sinks.k2.type=avro
a1.sinks.k2.hostname = hadoop103
a1.sinks.k2.port = 4242# Use a channel which buffers events in memory
a1.channels.c1.type = memory
a1.channels.c1.capacity = 1000
a1.channels.c1.transactionCapacity = 100# Use a channel which buffers events in memory
a1.channels.c2.type = memory
a1.channels.c2.capacity = 1000
a1.channels.c2.transactionCapacity = 100# Bind the source and sink to the channel
a1.sources.r1.channels = c1 c2
a1.sinks.k1.channel = c1
a1.sinks.k2.channel = c2
Hadoop102:添加配置文件
mkdir -p /opt/module/flume-1.9.0/job/custom/multi
vim /opt/module/flume-1.9.0/job/custom/multi/flume-2-avro-logger.conf
# agent
a2.sources=r1
a2.sinks = k1
a2.channels = c1# source
a2.sources.r1.type = avro
a2.sources.r1.bind = hadoop102
a2.sources.r1.port = 4141# sink
a2.sinks.k1.type = logger# Channel
a2.channels.c1.type = memory
a2.channels.c1.capacity = 1000
a2.channels.c1.transactionCapacity = 100# bind
a2.sinks.k1.channel = c1
a2.sources.r1.channels = c1
Hadoop103:添加配置文件
mkdir -p /opt/module/flume-1.9.0/job/custom/multi
vim /opt/module/flume-1.9.0/job/custom/multi/flume-3-avro-logger.conf
# agent
a3.sources = r1
a3.sinks = k1
a3.channels = c1# source
a3.sources.r1.type = avro
a3.sources.r1.bind = hadoop103
a3.sources.r1.port = 4242# sink
a3.sinks.k1.type = logger# Channel
a3.channels.c1.type = memory
a3.channels.c1.capacity = 1000
a3.channels.c1.transactionCapacity = 100# bind
a3.sinks.k1.channel = c1
a3.sources.r1.channels = c1
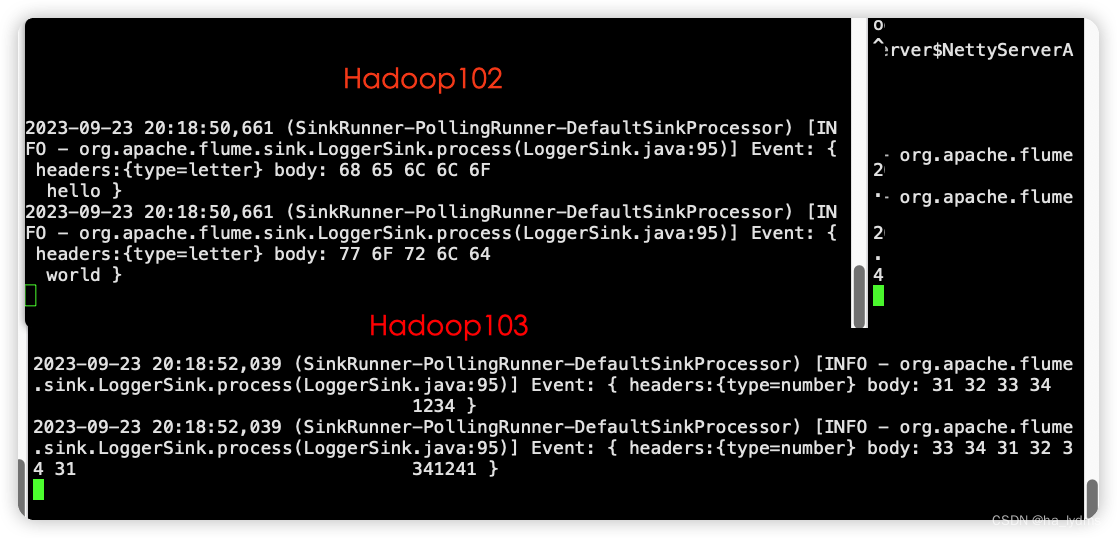
4.4 测试
启动项目
cd /opt/module/flume-1.9.0
bin/flume-ng agent -c conf/ -n a3 -f /opt/module/flume-1.9.0/job/custom/multi/flume-3-avro-logger.conf -Dflume.root.logger=INFO,console
bin/flume-ng agent -c conf/ -n a2 -f /opt/module/flume-1.9.0/job/custom/multi/flume-2-avro-logger.conf -Dflume.root.logger=INFO,console
bin/flume-ng agent -c conf/ -n a1 -f /opt/module/flume-1.9.0/job/custom/multi/flume-1-netcat-avro.conf -Dflume.root.logger=INFO,console
测试:
nc localhost 44444
hello
world
1231231
41341
5、案例三:聚合
案例:
hadoop102:flume-1监控文件/opt/module/flume-1.9.0/datas/.*file*.,hadoop103:flume-2监控某一个端口的数据流。hadoop104:flume-3,接收flume-1和flume-2的数据,flume-3将最终数据打印到控制台。

Hadoop101:配置文件flume-1-exec-avro.conf
mkdir /opt/module/flume-1.9.0/job/enterprise/juhe
vim /opt/module/flume-1.9.0/job/enterprise/juhe/flume-1-exec-avro.conf
# Name the components on this agent
a1.sources = r1
a1.sinks = k1
a1.channels = c1# Describe/configure the source
a1.sources.r1.type = exec
a1.sources.r1.command = tail -F /opt/module/flume-1.9.0/datas/realtime.log
a1.sources.r1.shell = /bin/bash -c# Describe the sink
a1.sinks.k1.type = avro
a1.sinks.k1.hostname = hadoop103
a1.sinks.k1.port = 4141# Describe the channel
a1.channels.c1.type = memory
a1.channels.c1.capacity = 1000
a1.channels.c1.transactionCapacity = 100# Bind the source and sink to the channel
a1.sources.r1.channels = c1
a1.sinks.k1.channel = c1
Hadoop102 :配置文件flume-2-netcat-avro.conf
mkdir -p /opt/module/flume-1.9.0/job/enterprise/juhe
vim /opt/module/flume-1.9.0/job/enterprise/juhe/flume-2-netcat-avro.conf
# Name the components on this agent
a2.sources = r1
a2.sinks = k1
a2.channels = c1# Describe/configure the source
a2.sources.r1.type = netcat
a2.sources.r1.bind = hadoop102
a2.sources.r1.port = 44444# Describe the sink
a2.sinks.k1.type = avro
a2.sinks.k1.hostname = hadoop103
a2.sinks.k1.port = 4141# Use a channel which buffers events in memory
a2.channels.c1.type = memory
a2.channels.c1.capacity = 1000
a2.channels.c1.transactionCapacity = 100# Bind the source and sink to the channel
a2.sources.r1.channels = c1
a2.sinks.k1.channel = c1
Hadoop103:配置文件flume-1-exec-avro.conf
mkdir -p /opt/module/flume-1.9.0/job/enterprise/juhe
vim /opt/module/flume-1.9.0/job/enterprise/juhe/flume-3-avro-logger.conf
# Name the components on this agent
a3.sources = r1
a3.sinks = k1
a3.channels = c1# Describe/configure the source
a3.sources.r1.type = avro
a3.sources.r1.bind = hadoop103
a3.sources.r1.port = 4141# Describe the sink
a3.sinks.k1.type = logger# Describe the channel
a3.channels.c1.type = memory
a3.channels.c1.capacity = 1000
a3.channels.c1.transactionCapacity = 100# Bind the source and sink to the channel
a3.sources.r1.channels = c1
a3.sinks.k1.channel = c1
测试:
#	Hadoop103
/opt/module/flume-1.9.0/bin/flume-ng agent –c conf/ -n a3 -f /opt/module/flume-1.9.0/job/enterprise/juhe/flume-3-avro-logger.conf -Dflume.root.logger=INFO,console
#	Hadoop102
/opt/module/flume-1.9.0/bin/flume-ng agent –c conf/ -n a2 -f /opt/module/flume-1.9.0/job/enterprise/juhe/flume-2-netcat-avro.conf
#	Hadoop101
/opt/module/flume-1.9.0/bin/flume-ng agent –c conf/ -n a1 -f /opt/module/flume-1.9.0/job/enterprise/juhe/flume-1-exec-avro.conf
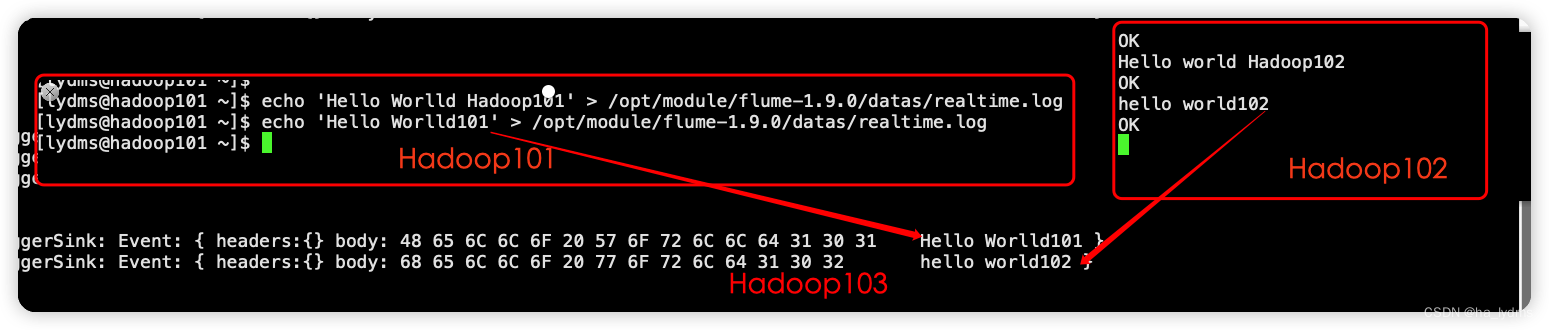
Hadoop101:向/opt/module/flume/datas/目录下的realtime.log追加内容
echo 'Hello Worlld Hadoop101' > /opt/module/flume-1.9.0/datas/realtime.log
Hadoop102:向44444端口发送数据
nc hadoop102 44444
hello world
Hadoop103:查看数据
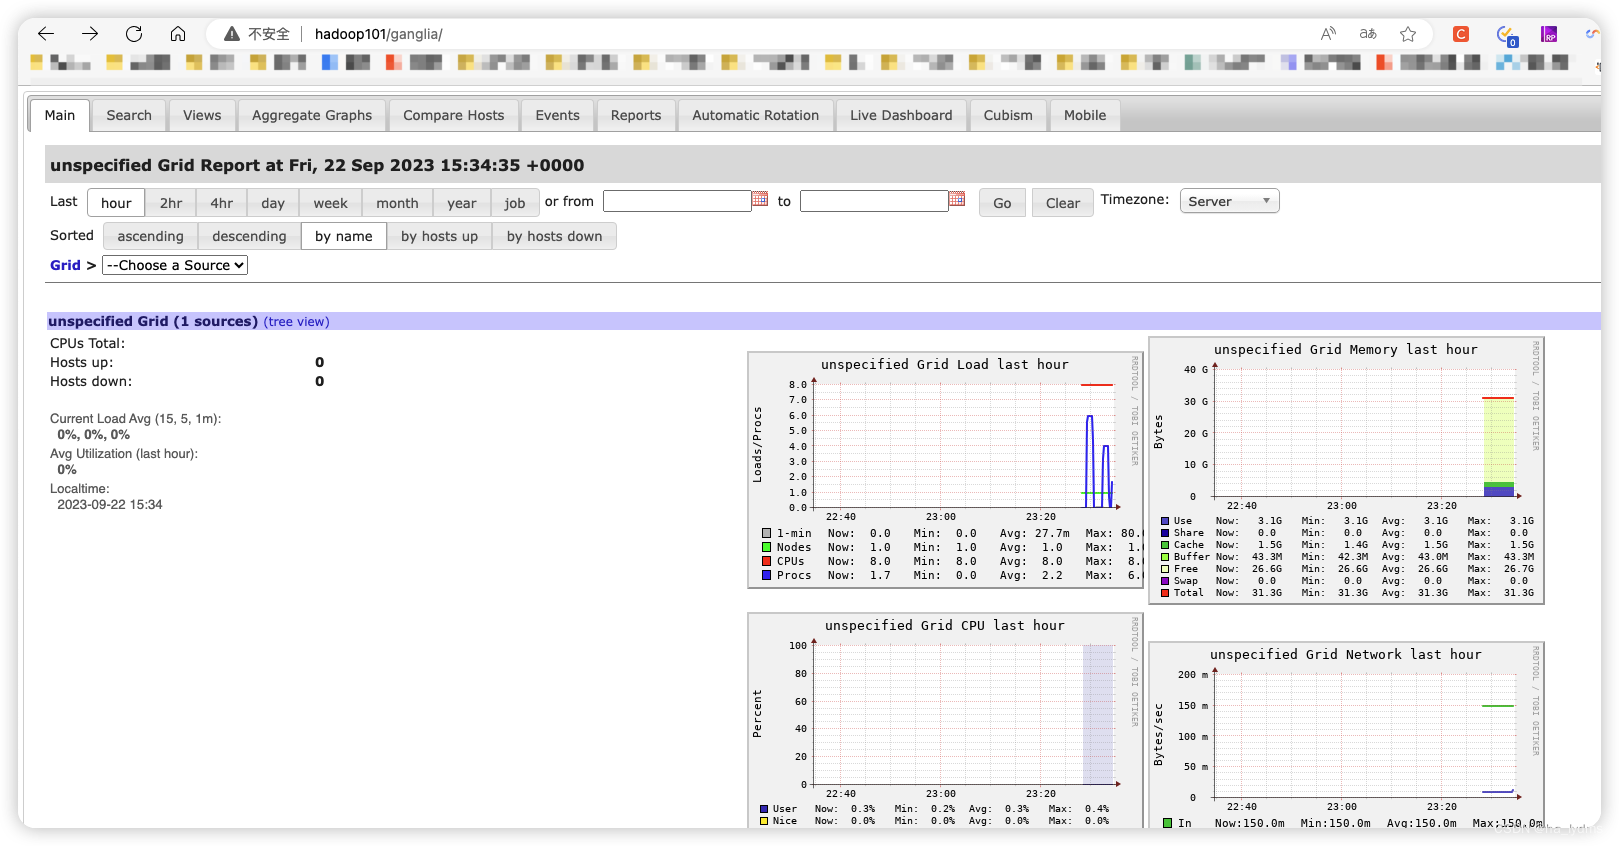
四、Flume数据流监控
1、Ganglia简介
Ganglia由gmond、gmetad和gweb三部分组成。
- gmond(Ganglia Monitoring Daemon):
是一种轻量级服务,安装在每台需要收集指标数据的节点主机上。
使用gmond,你可以很容易收集很多系统指标数据,如CPU、内存、磁盘、网络和活跃进程的数据等。 - gmetad(Ganglia Meta Daemon):
整合所有信息,并将其以RRD格式存储至磁盘的服务。 - gweb(Ganglia Web)Ganglia可视化工具:
gweb是一种利用浏览器显示gmetad所存储数据的PHP前端。
在Web界面中以图表方式展现集群的运行状态下收集的多种不同指标数据。
2、部署规划
| gweb | gmetad | gmod | |
|---|---|---|---|
| Hadoop101 | ture | true | true |
| Hadoop102 | true | ||
| Hadoop103 | true |
安装步骤
#	Hadoop101
sudo yum -y install epel-release
sudo yum -y install ganglia-gmetad
sudo yum -y install ganglia-web
sudo yum -y install ganglia-gmond#	Hadoop102
sudo yum -y install epel-release
sudo yum -y install ganglia-gmond#	Hadoop103
sudo yum -y install epel-release
sudo yum -y install ganglia-gmond
3、修改配置文件:hadoop101
修改配置:Hadoop101
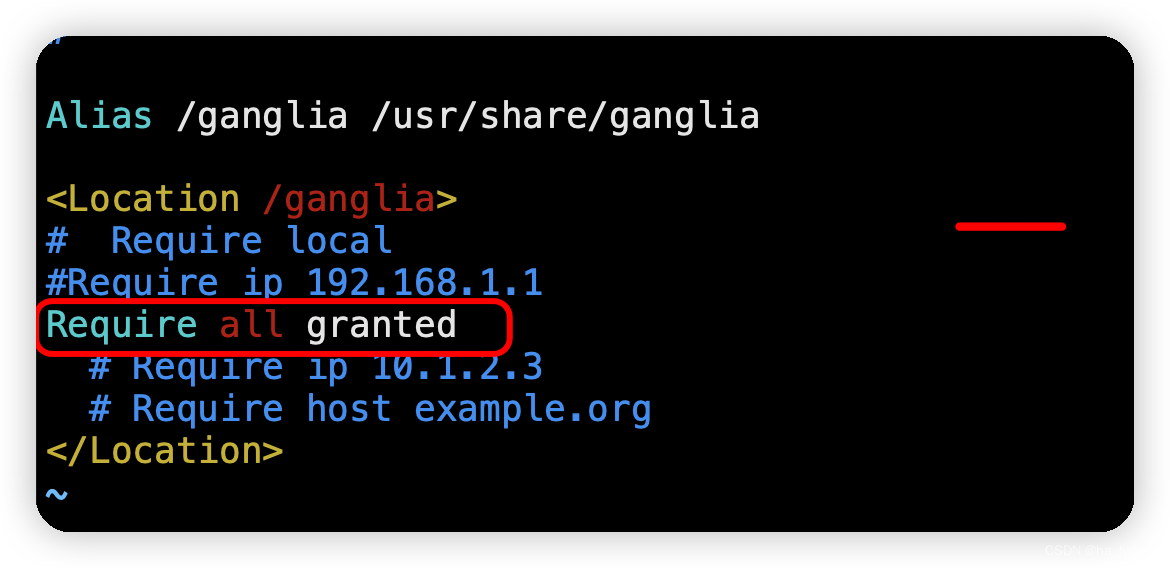
- 修改配置文件
/etc/httpd/conf.d/ganglia.conf
sudo vim /etc/httpd/conf.d/ganglia.conf
#	修改内容(2种配置。二选一)
Require ip 192.168.1.1
#	Require all granted
修改配置文件/etc/ganglia/gmetad.conf
sudo vim /etc/ganglia/gmetad.conf
#	修改内容
data_source "my cluster" hadoop101

修改配置文件/etc/selinux/config
sudo vim /etc/selinux/config
#	修改内容
SELINUX=disabled
SELINUXTYPE=targeted
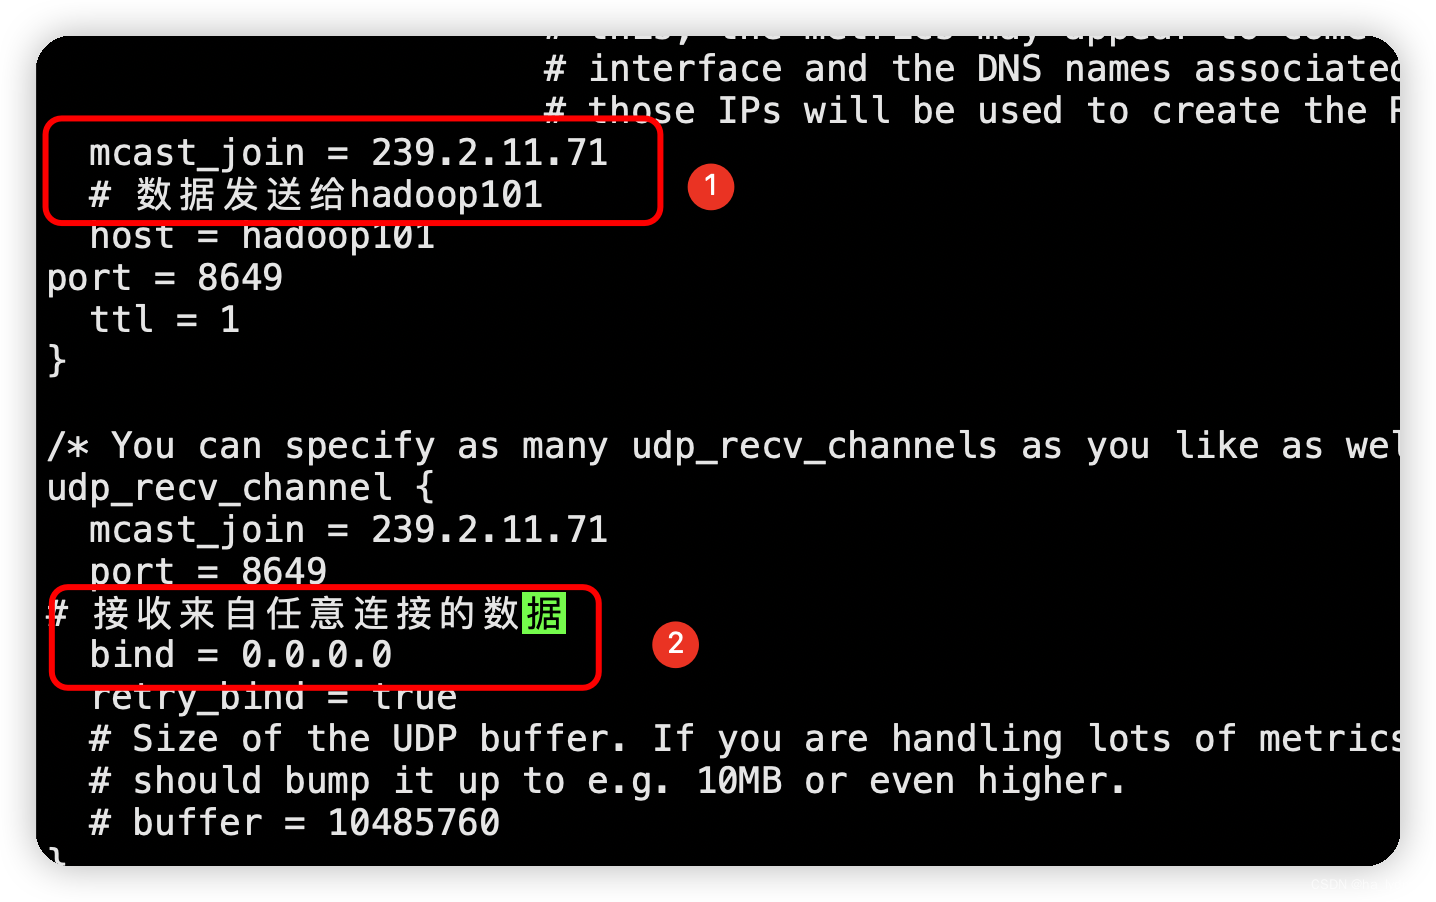
4、修改配置文件3台
修改配置:Hadoop101、Hadoop102、Hadoop103
修改配置文件/etc/sudganglia/gmond.conf
sudo vim /etc/ganglia/gmond.conf
#	修改内容==================
# 数据发送给hadoop101
host = hadoop101# 接收来自任意连接的数据
bind = 0.0.0.0
5、启动服务
修改文件权限
chown ganglia:ganglia /var/lib/ganglia
sudo chmod -R 777 /var/lib/ganglia
启动脚本(Hadoop101)
sudo systemctl start gmond
sudo systemctl start httpd
sudo systemctl start gmetad
连接地址:http://hadoop101/ganglia
当不能查看到页面时,修改配置文件,再重启。
Require ip 192.168.1.1
3、测试
 EventPutAttemptCountsource尝试写入Channel的事件总量 | 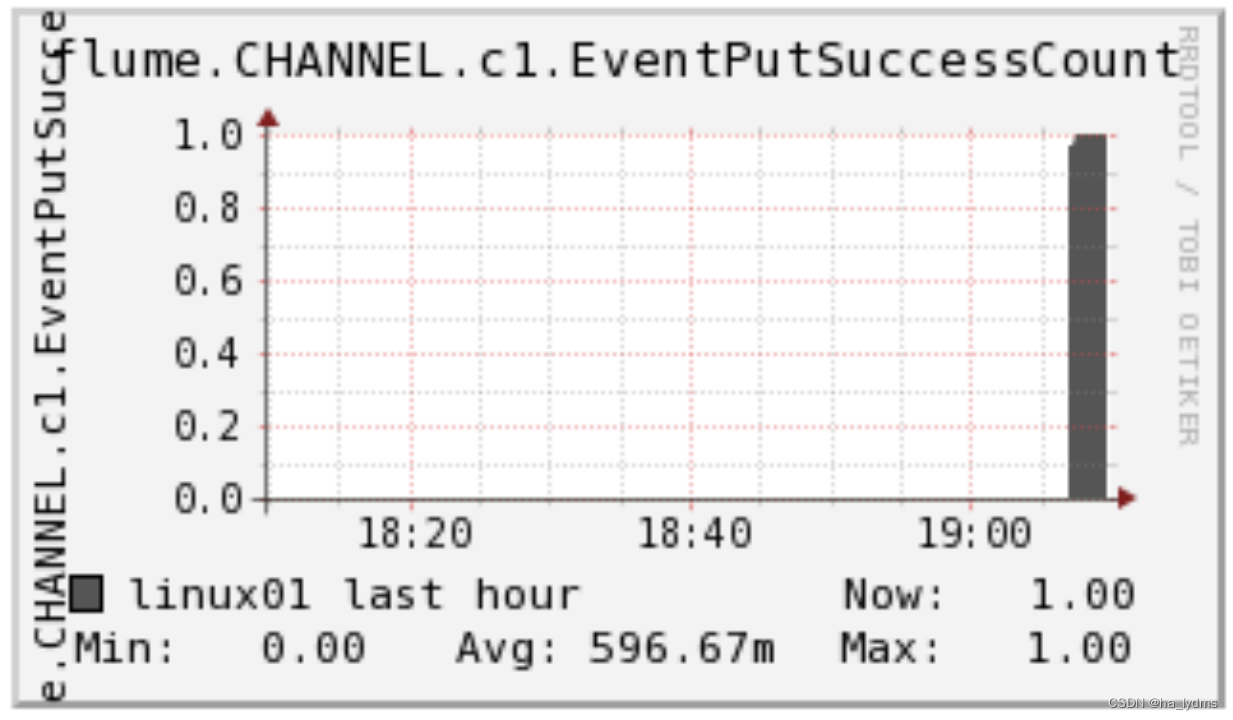 EventPutSuccessCount成功写入channel且提交的事件总量 EventPutSuccessCount成功写入channel且提交的事件总量 | 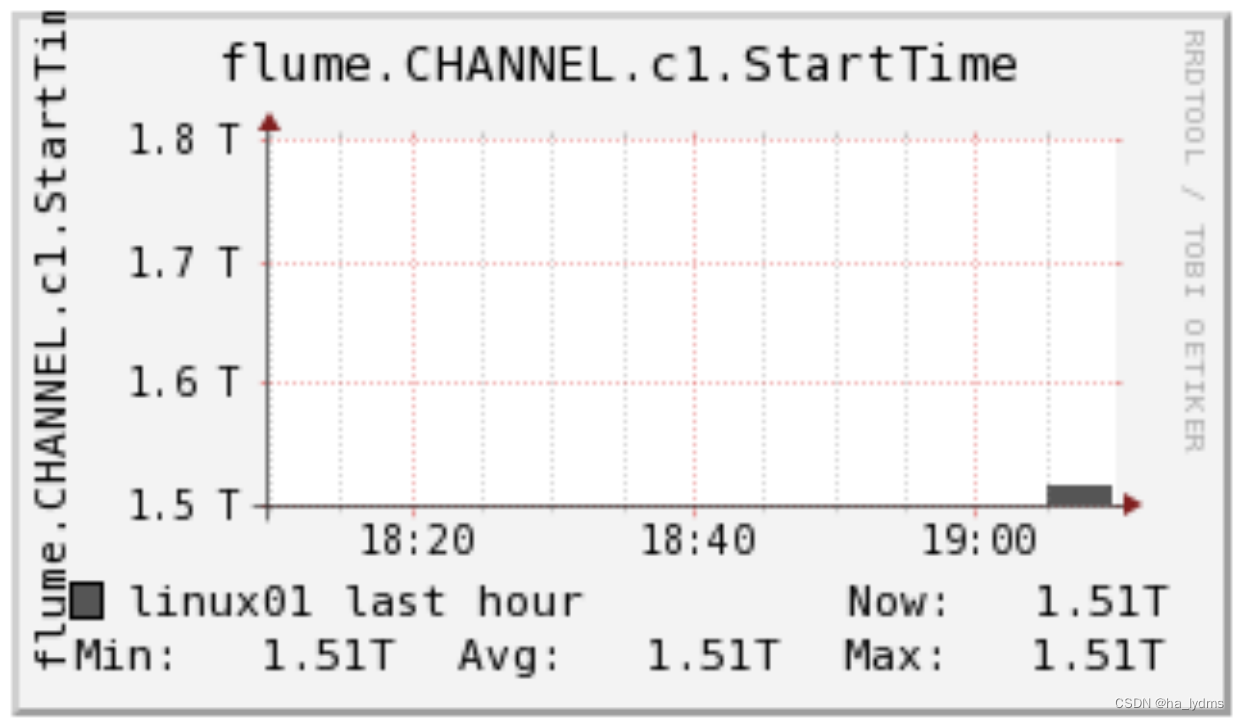 StartTimechannel停止时间 StartTimechannel停止时间 |
|---|---|---|
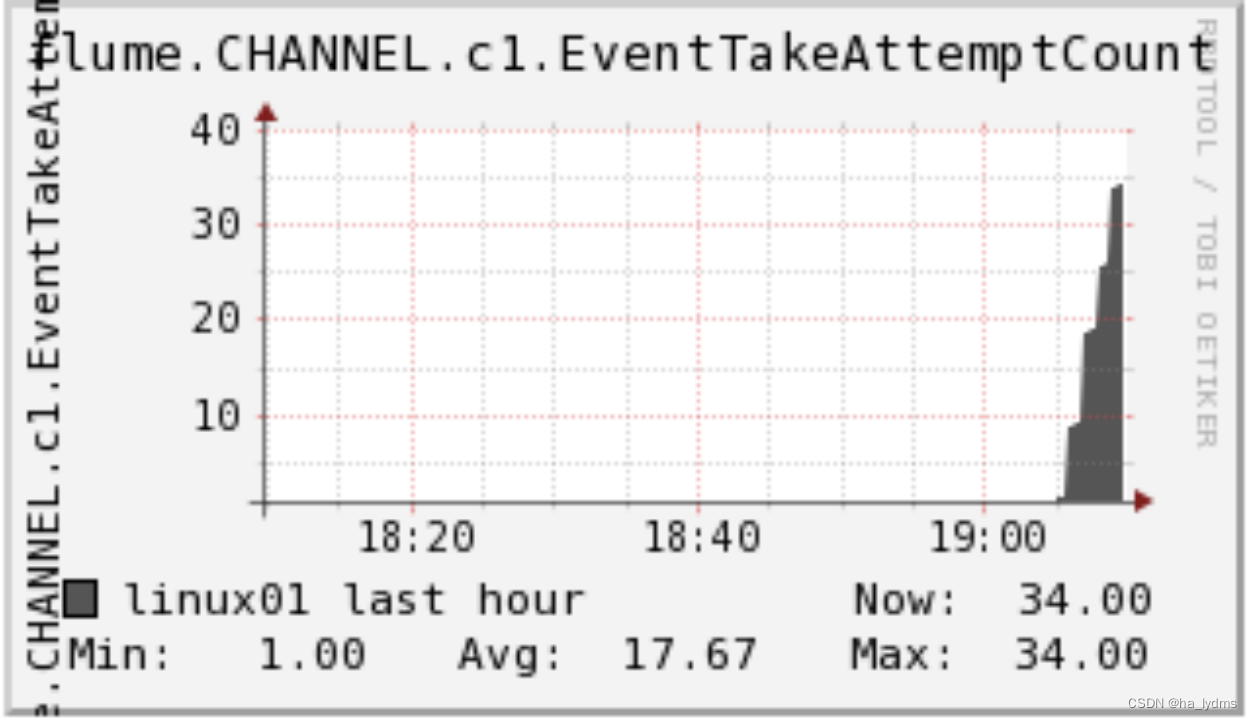 EventTakeAttemptCountsource尝试写入Channel的事件总量 EventTakeAttemptCountsource尝试写入Channel的事件总量 | 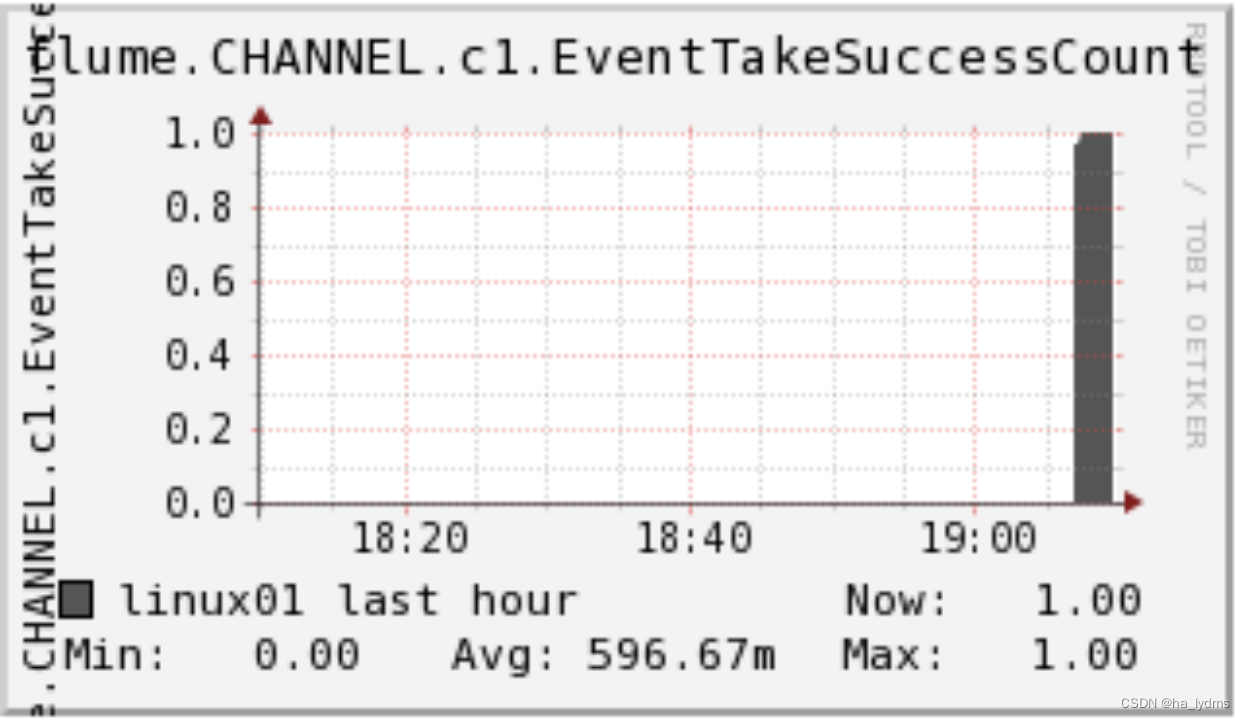 EventTakeSuccessCount成功写入channel且提交的事件总量 EventTakeSuccessCount成功写入channel且提交的事件总量 |  StopTimechannel停止时间 StopTimechannel停止时间 |
 ChannelSize目前Channel中事件的总数量 ChannelSize目前Channel中事件的总数量 |  ChannelFillPercentagechannel占用百分比 ChannelFillPercentagechannel占用百分比 | 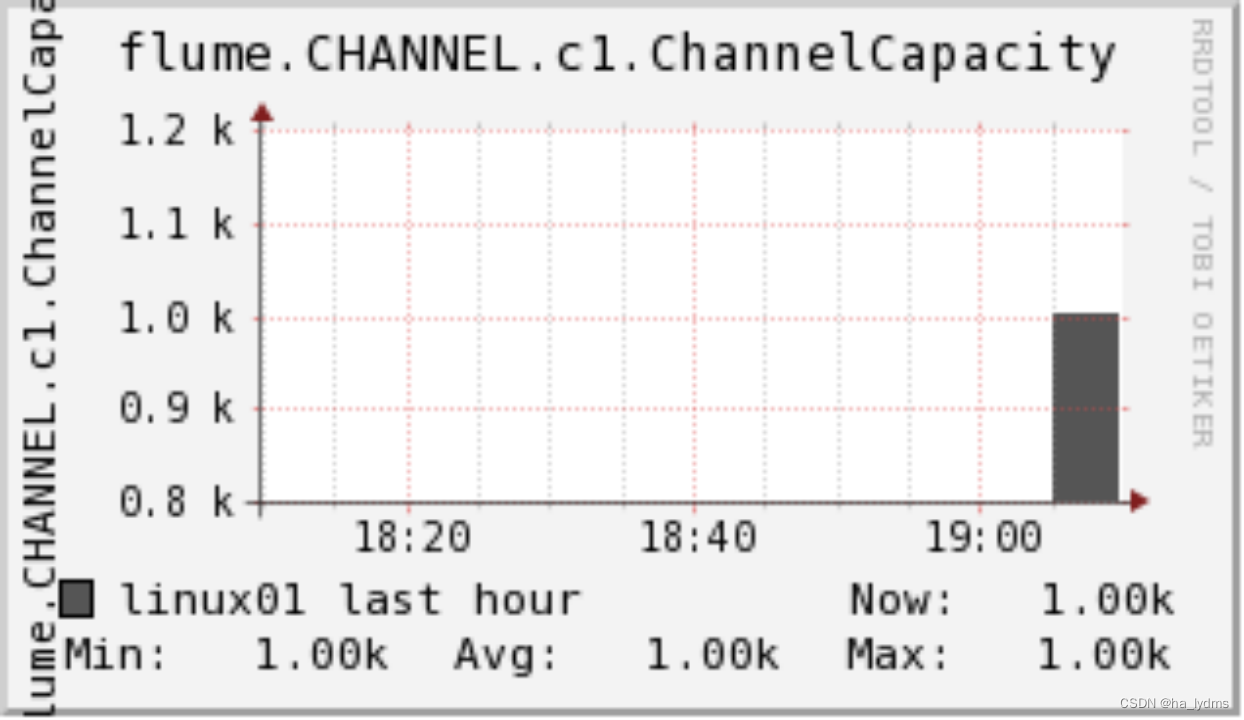 ChannelCapacitychannel的容量 ChannelCapacitychannel的容量 |
相关文章:
Flume最简单使用
文章目录 一、简介1、定义2、基础架构 二、快速入门1、解压Flume2、案例一:监控端口号3、案例二:将空目录下文件 三、Flume进阶1、Flume事务2、Flume Agent内部原理3、案例一:监控日志4、案例二:多路复用和拦截器适应4.1 原理4.2 …...

第2章 Java集合
2.1 谈谈你对Java集合的理解 难度:★★★ 重点:★★★★ 白话解析 集合类的概念还是比较重要的,不仅面试经常问,实际开发中也离不开。如果能把这道题真正理解了,集合可以说基本上没问题了。 集合就用来用存数据的,它提供了对数据增删改查和统计大小等方法。在Java中集合…...
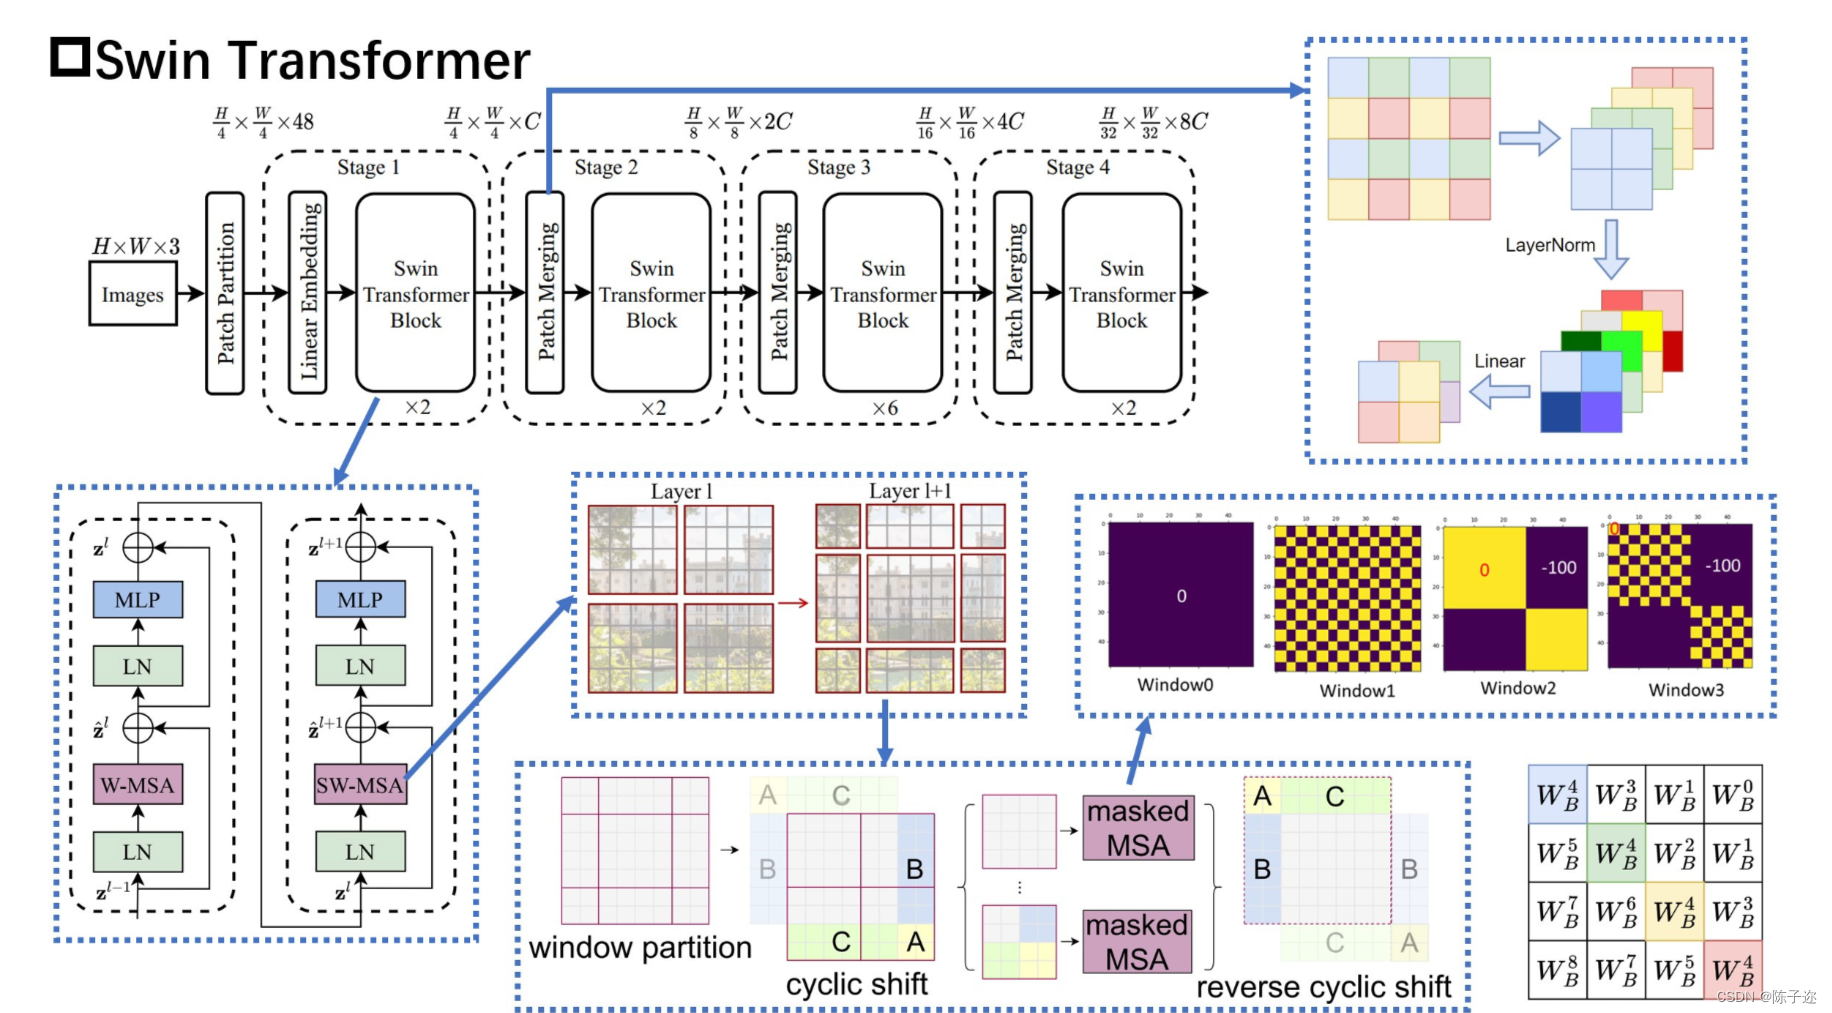
YOLOv5、YOLOv8改进:C3STR(Swin Transformer)
目录 1.介绍 2. YOLOv5、YOLOv8改进 2.1 common.py配置 2.2 yolo.py配置 2.3 yaml配置文件 1.介绍 视觉领域正在见证从 CNN 到 Transformers 的建模转变,纯 Transformer 架构在主要视频识别基准测试中达到了最高准确度。这些视频模型都建立在 Transformer 层之…...

AIGC百模大战
AIGC Artificial Intelligence Generated Content, 或者Generative Artificial Intelligence,它能够生成新的数据、图像、语音、视频、音乐等内容,从而扩展人工智能系统的应用范围。 生成式人工智能有可能给全球经济带来彻底的变化。根据高盛…...
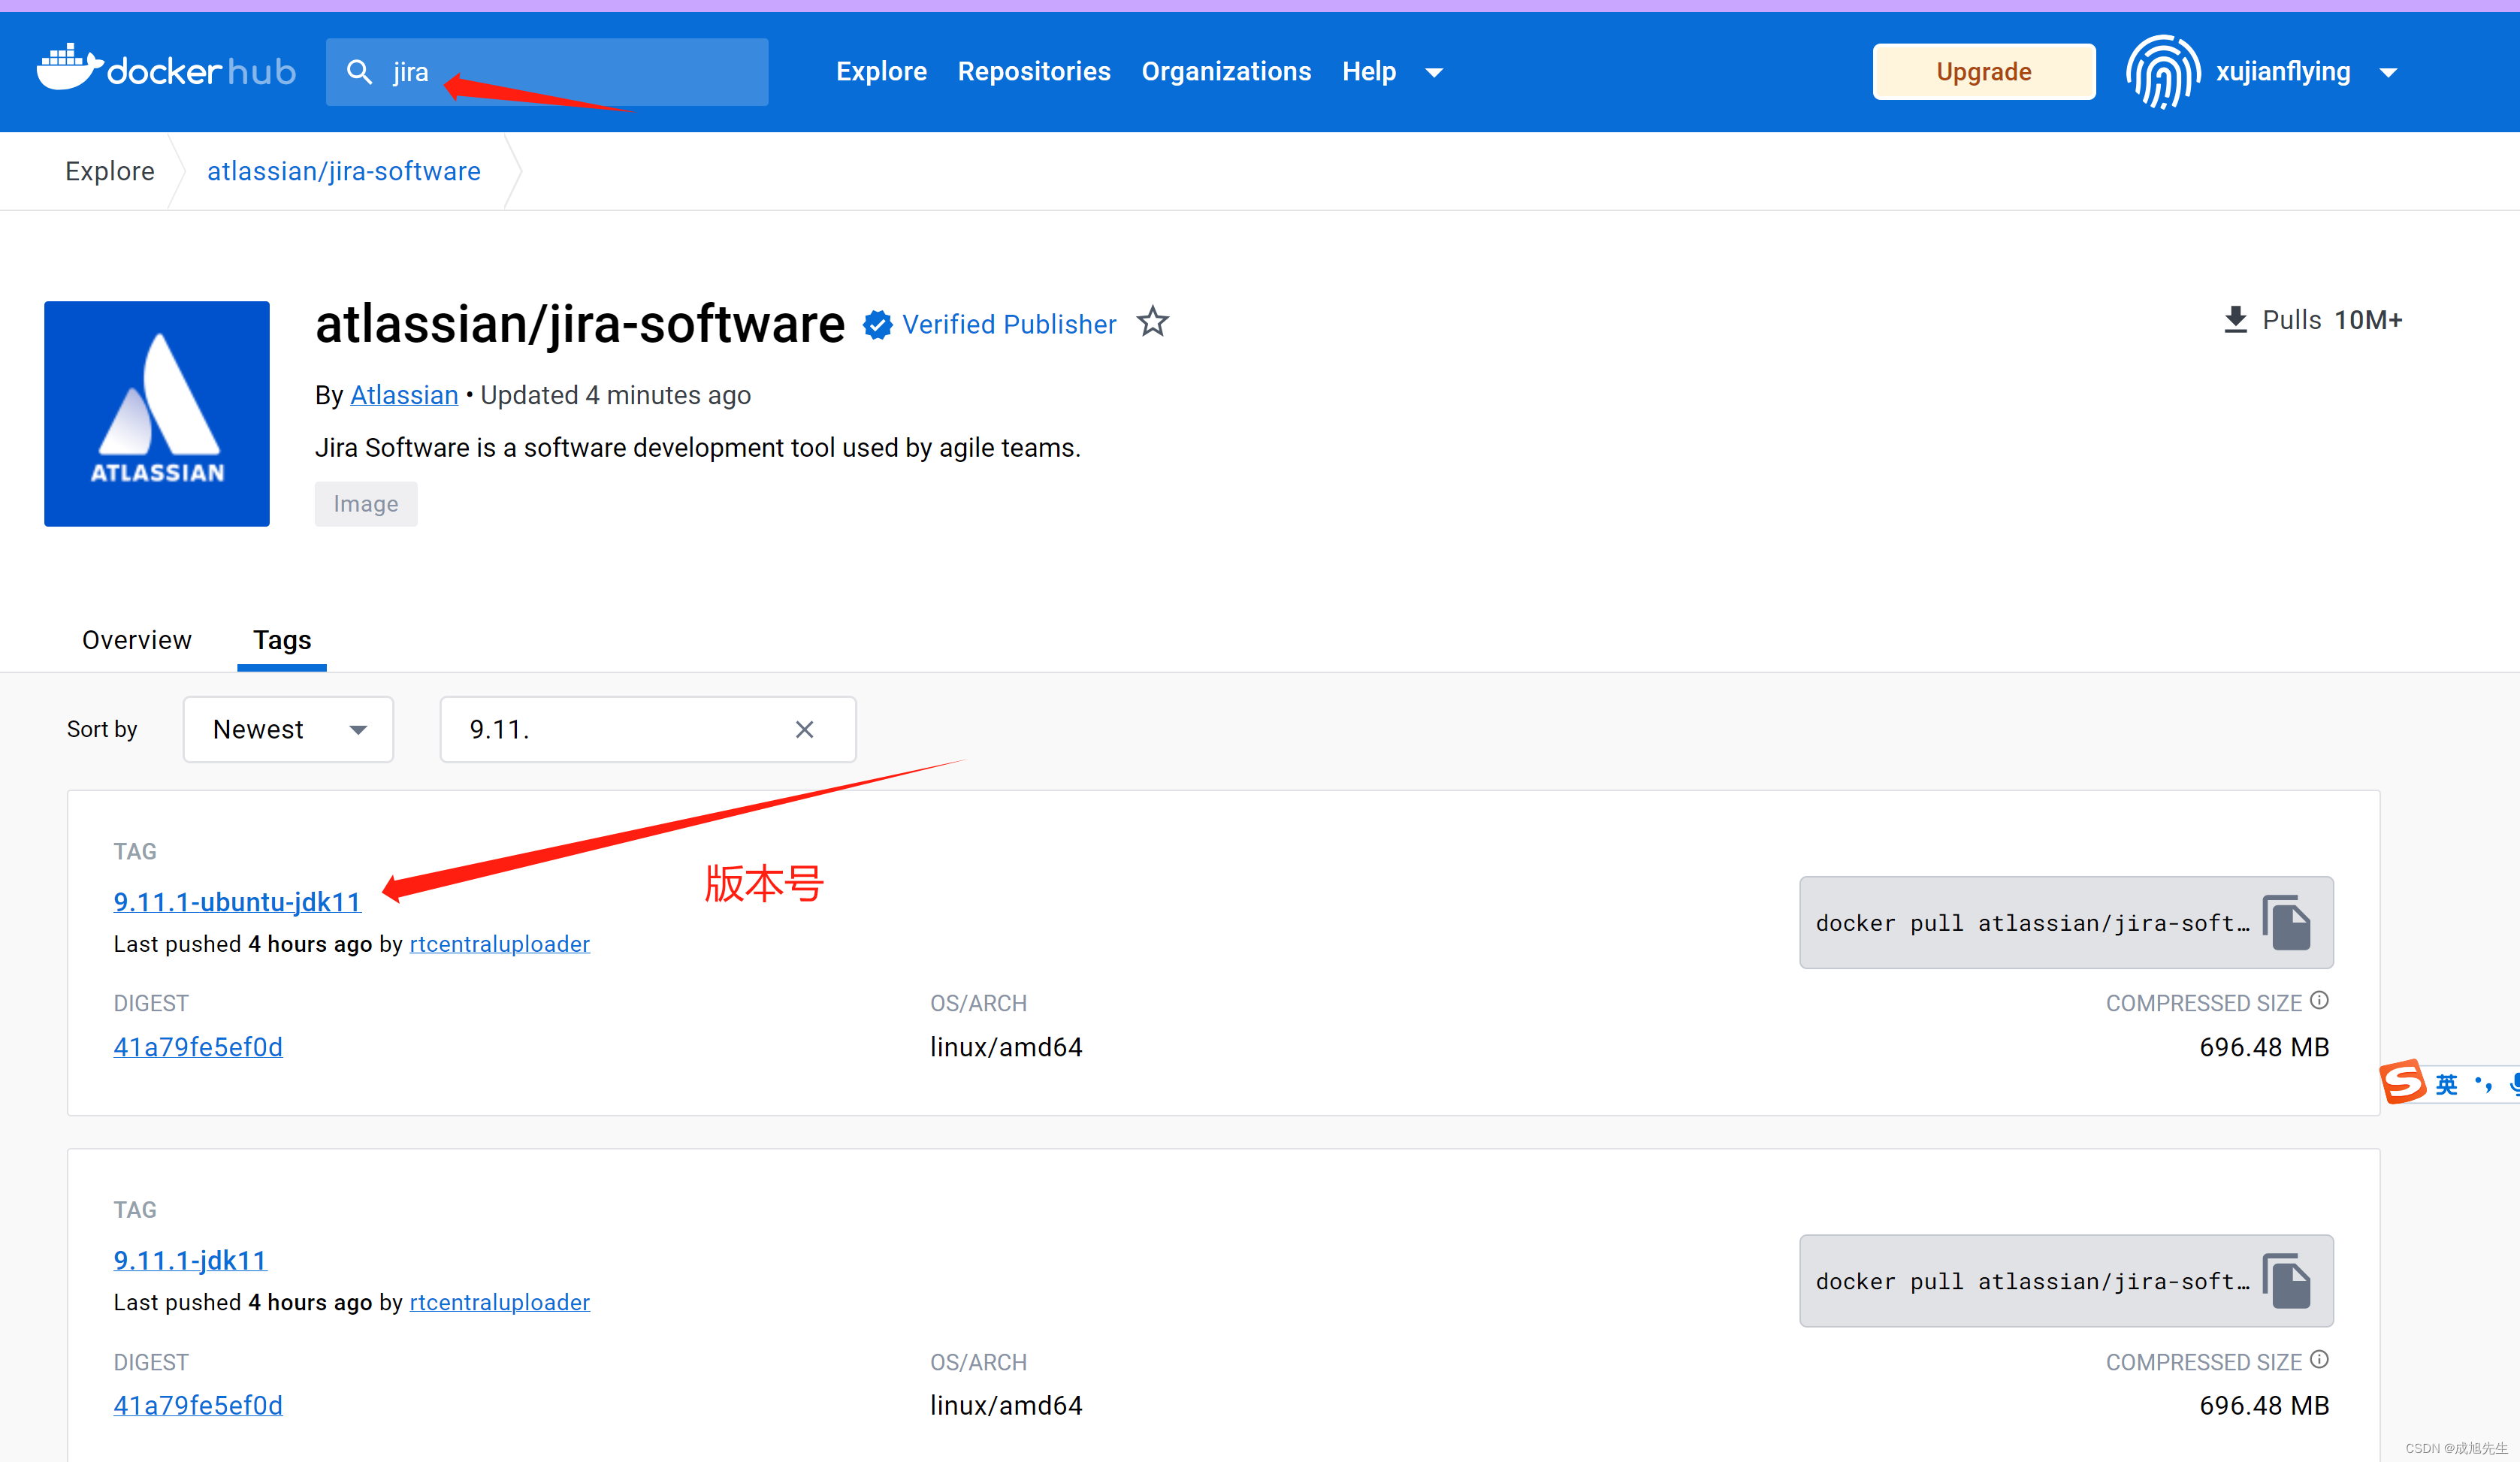
docker jira 一键安装含PJ(docker 一键安装jira)
docker jira 一键安装含PJ(docker 一键安装jira) 本文仅供参考学习,请勿用于商业用途本文用于Jira在Docker的安装,仅用于记录安装方式转载请注明来源Linux安装可参考链接Windows安装可查考链接Docker一键安装Confluence PJ条件允…...

认识一下Git
目录 Git Git下载 Git安装 Git初始化 Git操作 Git、GitLab、和Eclipse是公司中软件开发常用的组合: 1. Git:Git是一种分布式版本控制系统,用于跟踪文件和代码的变化。它提供了管理代码仓库的功能,可以记录每次提交的修改&am…...

只需4步使用Redis缓存优化Node.js应用
介绍 通过API获取数据时,会向服务器发出网络请求,收到响应数据。但是,此过程可能非常耗时,并且可能会导致程序响应时间变慢。 我们使用缓存来解决这个问题,客户端程序首先向API发送请求,将返回的数据存储…...

【react基础01】项目文件结构描述
react 项目文件结构描述 📂 REACTWORKSPACE📂 node_modules📂 public📄 favicon.ico📄 index.html📄 logo192.png📄 logo512.png📄 manifest.json📄 robots.txt …...
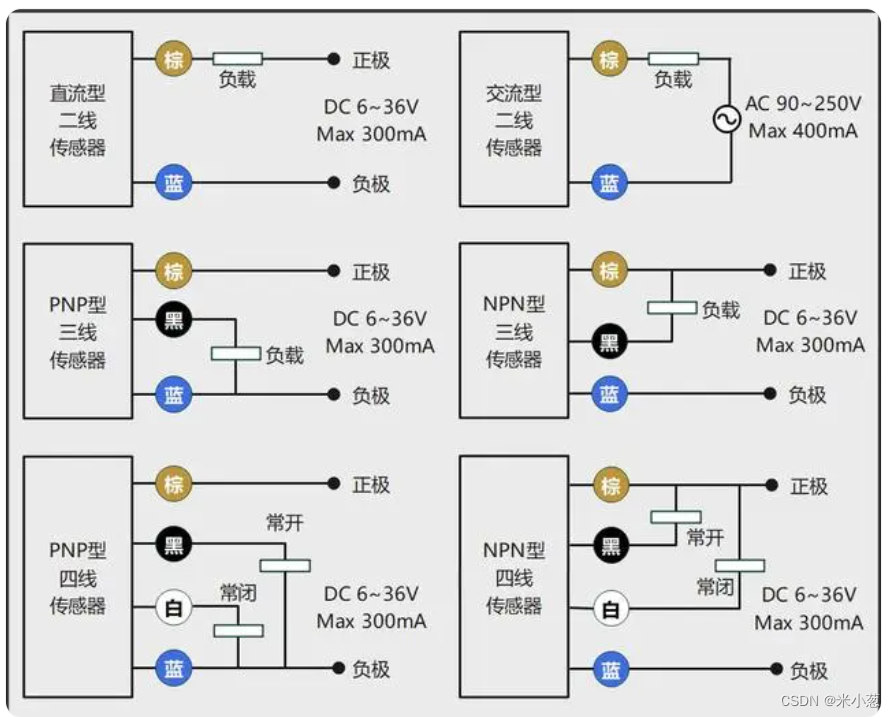
光电开关-NPN-PNP
基础概念 有信号 “检测到物体/有物体遮挡” 工作原理 NPN:表示共正电压,输出负电压【只能输出低电压或者悬空 常开常闭是指 输出有没有跟“地”接通】; NPN NO:表示常态下是常开的,检测到物体时黑色线输出一个负电压…...
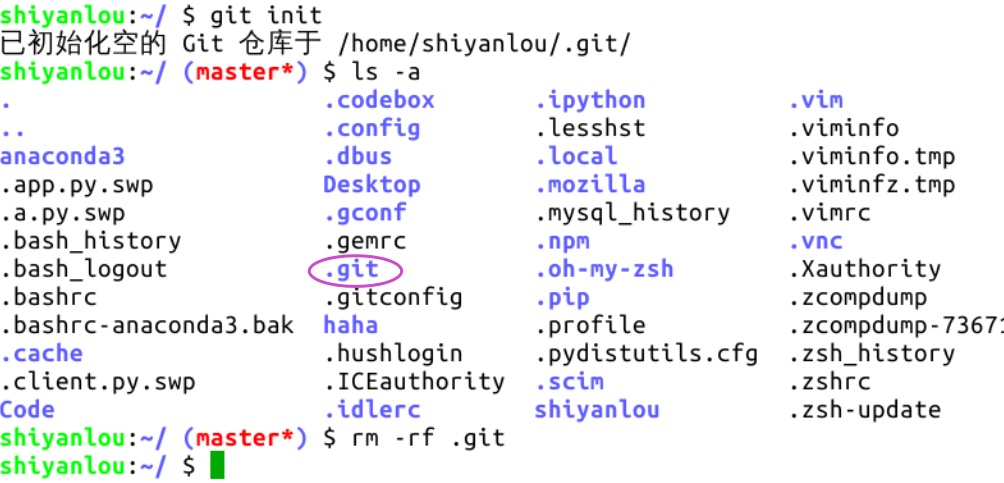
学会使用Git 和 GitHub
Git 和 GitHub 都是程序员每天都要用到的东西 —— 前者是目前最先进的 版本控制工具,拥有最多的用户,且管理着地球上最庞大的代码仓库;而后者是全球最大 同性交友 代码托管平台、开源社区。 在没有这两个工具时,编程可能是这样的…...
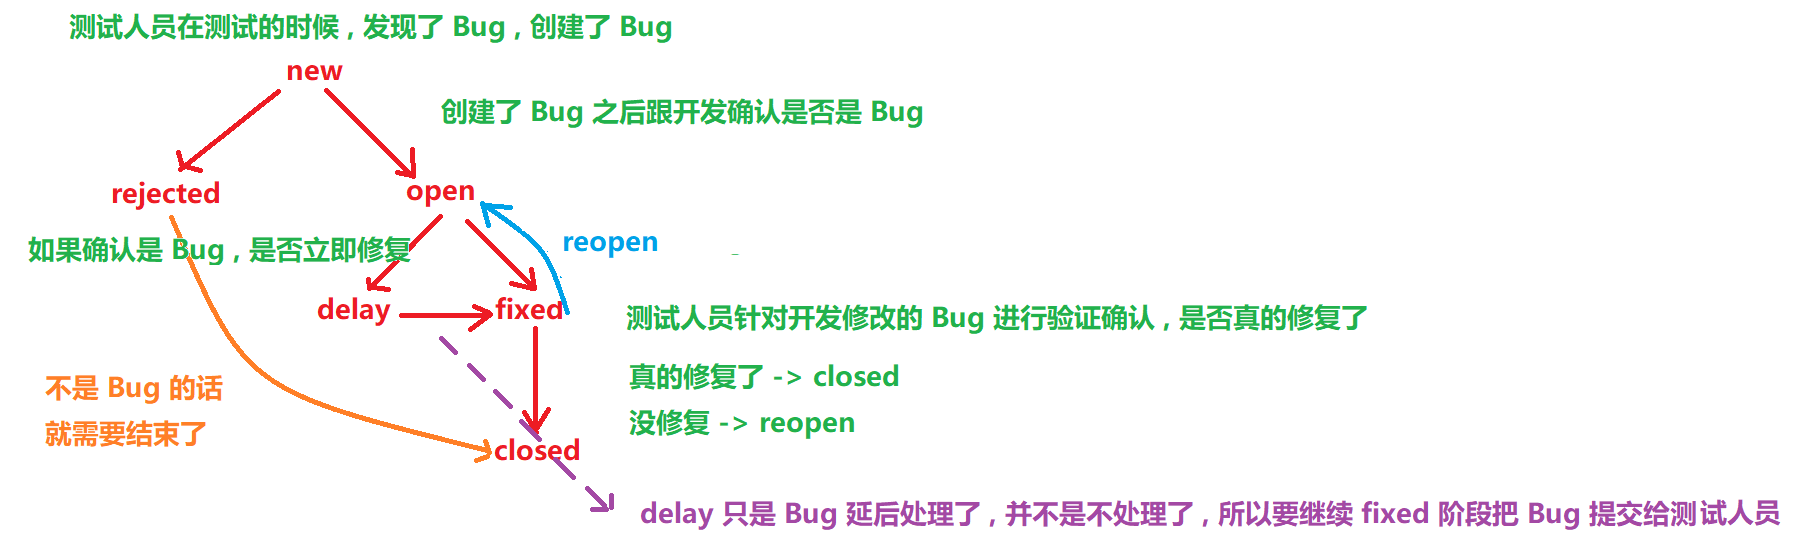
SoftwareTest3 - 要了人命的Bug
软件测试基础篇 一 . 如何合理的创建一个 Bug二 . Bug 等级2.1 崩溃2.2 严重2.3 一般2.4 次要 三 . Bug 的生命周期四 . 跟开发产生争执应该怎么解决 Hello , 大家好 , 又给大家带来新的专栏喽 ~ 这个专栏是专门为零基础小白从 0 到 1 了解软件测试基础理论设计的 , 虽然还不足…...

Linux系统中MySQL库的操作,实操sql代码
Linux系统中MySQL库的操作 本文主要是对linux系统下MySQL库操作的总结,包含创建、删除、修改数据库,数据库的编码格式和校验格式以及数据库的恢复和备份。 1.创建数据库 1.1基本语法: CREATE DATABASE [IF NOT EXISTS] db_name [create_s…...

Python基础分享之面向对象的进一步拓展
我们熟悉了对象和类的基本概念。我们将进一步拓展,以便能实际运用对象和类。 调用类的其它信息 上一讲中提到,在定义方法时,必须有self这一参数。这个参数表示某个对象。对象拥有类的所有性质,那么我们可以通过self,调…...
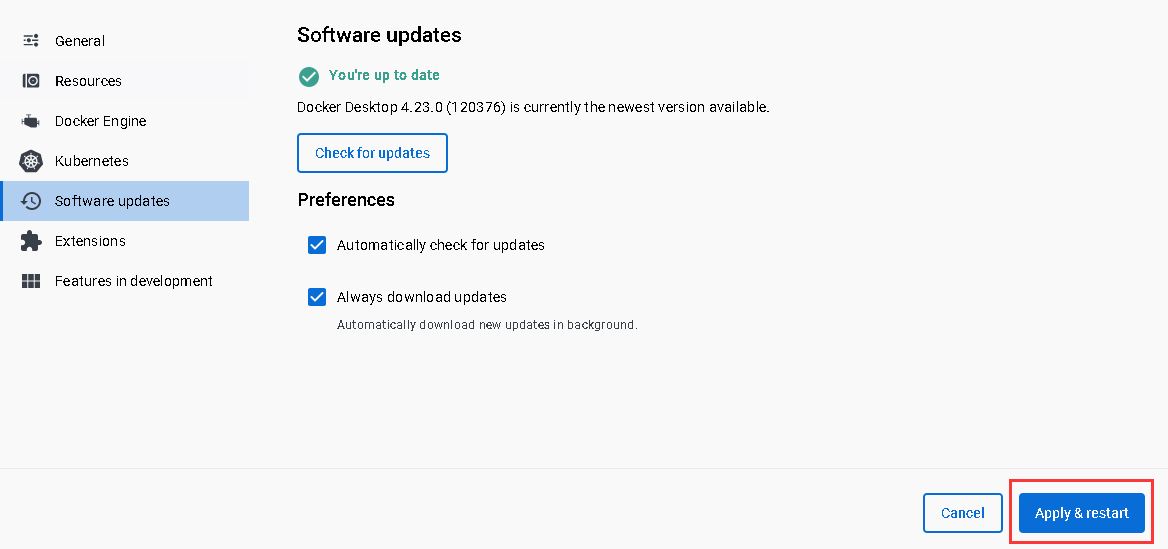
Windows安装Docker Desktop并配置镜像、修改内存占用大小
启用Hyper-V Win S 搜索控制面板 安装WSL2 第一种方法(推荐) 以管理员运行命令提示符,然后重启Docker Desktop wsl --updatewsl --set-default-version 2第2种方法去微软官网下载WSL2并安装 《微软官网下载WSL2》 配置WSL2最大内…...

Zipping
Zipping 信息收集端口扫描目录扫描webbanner信息收集 漏洞利用空字节绕过---->失败sqlI-preg_match bypass反弹shell 稳定维持 提权-共享库漏洞 参考:https://rouvin.gitbook.io/ibreakstuff/writeups/htb-season-2/zipping#sudo-privileges-greater-than-stock-…...

pytorch学习---实现线性回归初体验
假设我们的基础模型就是y wx b,其中w和b均为参数,我们使用y 3x0.8来构造数据x、y,所以最后通过模型应该能够得出w和b应该分别接近3和0.8。 步骤如下: 准备数据计算预测值计算损失,把参数的梯度置为0,进行反向传播…...

别再乱写git commit了
B站|公众号:啥都会一点的研究生 写在前面 在很长的一段时间中,使用git commit都是随心所欲,log肥肠简洁,随着代码的迭代,当时有多偷懒,返过头查看git日志就有多懊悔,就和写代码不写doc string…...
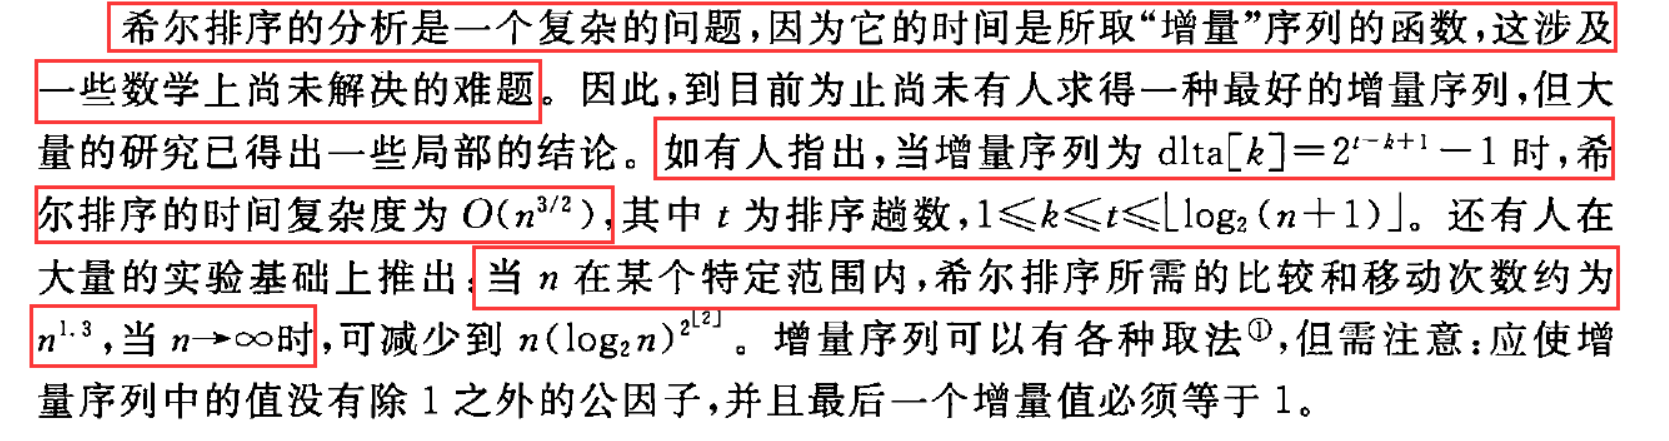
八大排序(一)冒泡排序,选择排序,插入排序,希尔排序
一、冒泡排序 冒泡排序的原理是:从左到右,相邻元素进行比较。每次比较一轮,就会找到序列中最大的一个或最小的一个。这个数就会从序列的最右边冒出来。 以从小到大排序为例,第一轮比较后,所有数中最大的那个数就会浮…...

泊松分布简要介绍
泊松分布是一种常见的离散概率分布,它用于描述某个时间段或区域内随机事件发生的次数。它得名于法国数学家西蒙丹尼泊松。 泊松分布的概率质量函数表示某个时间段或区域内事件发生次数的概率。如果随机变量 X 服从泊松分布,记作 X ~ Poisson(λ)&#x…...

C语言每日一题(10):无人生还
文章主题:无人生还🔥所属专栏:C语言每日一题📗作者简介:每天不定时更新C语言的小白一枚,记录分享自己每天的所思所想😄🎶个人主页:[₽]的个人主页🏄…...

Pangolin编译失败:OpenEXR版本冲突与编译器兼容性排查
1. 当Pangolin遇上OpenEXR:编译失败的真相 最近在Ubuntu 18.04上折腾Pangolin时,遇到了一个典型的编译问题:OpenEXR版本冲突导致的编译失败。这个问题特别有意思,因为它完美展示了现代C开发中常见的"版本地狱"现象。我花…...

通俗秒懂:储能控制器在电网调频中的关键作用与实现原理
1. 电网调频的"急救科"与"内科":为什么需要储能控制器? 想象一下电网就像人体的血液循环系统。频率稳定相当于血压稳定,一旦出现波动,轻则头晕目眩(电能质量下降),重则危及…...

【AI知识点】NP-Hard问题:从理论到实践的复杂性迷宫
1. 走进NP-Hard问题的复杂性迷宫 想象你站在一个巨大的迷宫入口,手里只有一张模糊的地图。每走几步就会遇到分叉路口,每个选择都可能让你离出口更近或更远——这就是NP-Hard问题给我的第一印象。作为计算复杂性理论中的"终极大Boss"࿰…...

[Linux][虚拟串口]x一个特殊的字节辟
简介 langchain专门用于构建LLM大语言模型,其中提供了大量的prompt模板,和组件,通过chain(链)的方式将流程连接起来,操作简单,开发便捷。 环境配置 安装langchain框架 pip install langchain langchain-community 其中…...

墨语灵犀完整指南:支持的语言列表+字符编码兼容性+特殊符号处理
墨语灵犀完整指南:支持的语言列表字符编码兼容性特殊符号处理 1. 产品概述 墨语灵犀(Moyu Lingxi)是一款基于腾讯混元大模型底座开发的深度翻译工具。与普通翻译软件不同,它将前沿的AI翻译技术融入"冷金笺"与"砚…...

5个高效技巧:downkyi批量下载完全指南
5个高效技巧:downkyi批量下载完全指南 【免费下载链接】downkyi 哔哩下载姬downkyi,哔哩哔哩网站视频下载工具,支持批量下载,支持8K、HDR、杜比视界,提供工具箱(音视频提取、去水印等)。 项目…...
用C++实现信奥题 P7069 [NWRRC 2014] Joy of Flight)
打卡信奥刷题(3081)用C++实现信奥题 P7069 [NWRRC 2014] Joy of Flight
P7069 [NWRRC 2014] Joy of Flight 题目描述 大意就是一架飞机要从起点飞到终点,飞机有最大空速,飞行最大时间,给出风速的变化和风如何影响飞机飞行,求出飞机是否能到达终点,如果能就输出飞机的位置变化。 雅各布&…...

DownKyi视频管理进阶指南:从新手到专家的实践路径
DownKyi视频管理进阶指南:从新手到专家的实践路径 【免费下载链接】downkyi 哔哩下载姬downkyi,哔哩哔哩网站视频下载工具,支持批量下载,支持8K、HDR、杜比视界,提供工具箱(音视频提取、去水印等࿰…...

运维工具汇总
一、远程工具列表 1. MobaXterm site: MobaXterm隧道使用_mobaxterm怎么读-CSDN博客 二、httpclient 1. small:https://zhuanlan.zhihu.com/p/701243358 2.small2: 客户端下载 | Reqable API抓包调试 API测试一站式工具 small2: https://reqable.com/zh-CN/download/ …...

STM32双路直流电机PWM驱动与霍尔编码器闭环控制
1. 项目概述DCMotorDrive 是专为 RenBuggy 平台设计的双路直流电机驱动固件模块,其核心目标是实现对两台独立直流电机的高精度 PWM 调速控制,并集成霍尔传感器反馈通道,支持实时速度与位移闭环。该模块并非通用电机驱动芯片(如 L2…...