基于FFmpeg的Android播放器
基于FFmpeg的Android播放器
文章目录
- 基于FFmpeg的Android播放器
- 1. 前言
- 2. 编译相关组件库
- 3. 解码器
- 4. 解码流程
- 5. 音频输出
- 6. 视频输出(需要优化)
1. 前言
FFmpeg是一个最有名的开源的编解码库,实现了通常的编解码逻辑。它还能够根据平台特性,与平台自有的硬件编解码器进行适配。经过一段时间的学习后,我使用FFmpeg在Android上实现了一个简单的支持硬件解码的视频播放器。在此写下这篇博客记录关键知识点。
代码在此:Android-VideoPlayer
整体上,该工程是基于FFmpeg的,不仅是基于FFmpeg的解码能力,而且一些标志位等直接使用FFmpeg的,不再另外包装。
2. 编译相关组件库
要使用FFmpeg,需要先将FFmpeg库本身以及它所需要的一些第三方库编译成Android平台库。具体编译脚本和库我已经完成并放到了github上,相关build下面都有readme,记录了编译的事项和相关步骤。
- FFmpeg6.0:FFmpeg_build。基于最新的FFmpeg6.0编译,该版本的最大变化是支持了NDK的MediaCodec框架,在此之前,FFmpeg桥接Android硬件解码器的方法是通过反射调用到Java层的MediaCodec,需要将数据从Native拷贝到Java层,开销比较大,用起来也比较麻烦。另外一个重大更新是支持了av1-mediacodec,av1是一种比HEVC更高效的编码格式,体积小,但是编解码开销比较大,而且由于格式比较新,最近两三代的手机处理器才支持了av1的硬解,而编码器更是延后,今年苹果的A17 pro才支持了av1编码。但是这个格式将来一定会占有非常大的市场,目前从YouTube下载的HDR视频已经都是av1格式了。为了支持Android硬解,需要开启一些编译开关,最重要的是mediacodec后缀的那几个decoder,在FFmpeg源码目录运行
./configure --list-decoders可以看到FFmpeg支持的所有的decoder。这个编译版本开启了非免费第三方库,不可用来商用,并且由于是练习,为了支持尽可能多的格式,没有进行过多裁切。 - libaom:aom_build, libaom是av1的编解码库,为了在老旧的cpu上支持av1解码,集成了该库。
- libx265 & libx264:x264_build,x265_build, H264与HEVC的编解码库,兜底用。
- fdk-aac & mp3lame:fdk-aac_build ,lame_build,aac与mp3的音频编解码库,一般都可以硬解。这里是为了编码做准备。
3. 解码器
目前,在Android系统中,支持的解码器就是那明确的几个。如果要使用硬件解码器,必须以名字来查询而不是codec_id。
#define HW_DEC_COUNT 7#define HW_DEC_H264 "h264_mediacodec"
#define HW_DEC_HEVC "hevc_mediacodec"
#define HW_DEC_VP8 "vp8_mediacodec"
#define HW_DEC_VP9 "vp9_mediacodec"
#define HW_DEC_AV1 "av1_mediacodec"
#define HW_DEC_MPEG2 "mpeg2_mediacodec"
#define HW_DEC_MPEG4 "mpeg4_mediacodec"const static AVCodecID HW_DECODERS[HW_DEC_COUNT] = {AVCodecID::AV_CODEC_ID_H264,AVCodecID::AV_CODEC_ID_HEVC,AVCodecID::AV_CODEC_ID_VP8,AVCodecID::AV_CODEC_ID_VP9,AVCodecID::AV_CODEC_ID_AV1,AVCodecID::AV_CODEC_ID_MPEG2VIDEO,AVCodecID::AV_CODEC_ID_MPEG4
};const static const char* HW_DECODER_NAMES[HW_DEC_COUNT] = {HW_DEC_H264,HW_DEC_HEVC,HW_DEC_VP8,HW_DEC_VP9,HW_DEC_AV1,HW_DEC_MPEG2,HW_DEC_MPEG4
};static bool supportHWDec(AVCodecID codecId) {for (AVCodecID id : HW_DECODERS) {if (id == codecId) {return true;}}return false;
}static const char* getHWDecName(AVCodecID codecId) {for (int i = 0; i < HW_DEC_COUNT; i++) {if (HW_DECODERS[i] == codecId) {return HW_DECODER_NAMES[i];}}return nullptr;
}
// 根据参数查找相应的decoder
bool FFmpegDecoder::init(AVCodecParameters *params, PreferCodecType preferType) {AVCodecID ffCodecID = AV_CODEC_ID_NONE;try {ffCodecID = AVCodecID(params->codec_id);} catch (...) {LOGE(TAG, "failed to convert %d to AVCodecID", params->codec_id);return false;}// 可以支持指定解码器类型。如果未指定,那就优先查找硬件解码器,找不到再去找软件解码器if (preferType == PreferCodecType::HW) {return findHWDecoder(params, ffCodecID);} else if (preferType == PreferCodecType::SW) {return findSWDecoder(params, ffCodecID);} else {if (findHWDecoder(params, ffCodecID)) {return true;}if (findSWDecoder(params, ffCodecID)) {return true;}return false;}
}// 查找硬件解码器
bool FFmpegDecoder::findHWDecoder(AVCodecParameters *params, AVCodecID codecId) {release();int ret;const char *hwDecName = getHWDecName(codecId);if (hwDecName == nullptr) {return false;}const AVCodec * aCodec = avcodec_find_decoder_by_name(hwDecName);if (aCodec == nullptr) {LOGE(TAG, "Can't find hw decoder for codec: {id = %d, hw_name = %s}", codecId, hwDecName);return false;} else {codec = const_cast<AVCodec *>(aCodec);}codecCtx = avcodec_alloc_context3(codec);if (!codecCtx) {LOGE(TAG, "failed to alloc codec context");return false;}ret = avcodec_parameters_to_context(codecCtx, params);if (ret < 0) {LOGE(TAG, "copy decoder params failed, err = %d", ret);return false;}for (int i = 0;;i++) {const AVCodecHWConfig *config = avcodec_get_hw_config(codec, i);if (config == nullptr) {LOGE(TAG, "%s hw config is null", codec->name);break;}if ((config->methods & AV_CODEC_HW_CONFIG_METHOD_HW_DEVICE_CTX) &&config->device_type == AVHWDeviceType::AV_HWDEVICE_TYPE_MEDIACODEC) {// 该解码器支持硬件解码out_hw_pix_format = config->pix_fmt;hwPixFormat = config->pix_fmt;codecCtx->get_format = get_hw_format;if (initHWDecoder(codecCtx, AVHWDeviceType::AV_HWDEVICE_TYPE_MEDIACODEC) < 0) {LOGE(TAG, "initHWDecoder failed");return false;} else {break;}}}ret = avcodec_open2(codecCtx, codec, nullptr);if (ret < 0) {char buf[100];av_make_error_string(buf, 100, ret);LOGE(TAG, "open codec failed for %s, err = %s", codec->name, buf);return false;}codecType = CodecType::HW;return true;
}// 查找软件解码器
bool FFmpegDecoder::findSWDecoder(AVCodecParameters *params, AVCodecID codecId) {release();int ret;const AVCodec * aCodec = avcodec_find_decoder(codecId);if (aCodec == nullptr) {LOGE(TAG, "Can't find decoder for codecID %d", codecId);return false;}codec = const_cast<AVCodec *>(aCodec);codecCtx = avcodec_alloc_context3(codec);if (!codecCtx) {LOGE(TAG, "failed to alloc codec context");return false;}ret = avcodec_parameters_to_context(codecCtx, params);if (ret < 0) {LOGE(TAG, "copy decoder params failed, err = %d", ret);return false;}ret = avcodec_open2(codecCtx, codec, nullptr);if (ret < 0) {char buf[100];av_make_error_string(buf, 100, ret);LOGE(TAG, "open codec failed for %s, err = %s", codec->name, buf);return false;}codecType = CodecType::SW;return true;
}
4. 解码流程
解码其实很简单。首先是先创建方便使用的音频和视频帧结构体,这两个结构体分别是AudioFrame和VideoFrame。其实也就是额外包含了一些属性方便访问和使用,内容物还是AVFrame。
对于解码,其实流程比较固定。
- 打开文件,获取对应的FormatContext与Codec。
- 通过AVFormatContext解复用,获取音频和视频的AVPacket,并将其存放到对应音频解码和视频解码的同步队列中,等待解码线程取用。
- 音频和视频解码线程从各自的AVPacket同步队列中取出AVPacket,并进行解码。解码完成后获取AVFrame,然后将其设置到AudioFrame和VideoFrame中,并存放到对应的同步队列中,等待同步线程取用。
- 同步线程从AudioFrame和VideoFrame的同步队列中取出已经解码好的数据,根据各自的pts来决定将AudioFrame和VideoFrame送到输出的时机。
音视频同步逻辑:在视频播放的过程中,音频是连续不断的,而视频却有不同帧率,所以同步是基于音频的时间戳。当然有些视频没有音频内容,此时就需要独立时钟来作为同步时间戳。
对于seek功能的支持:当用户进行seek时,置一个seekFlag为true。在解复用阶段,如果seekFlag为true,那解复用就对文件进行seek。同时对音视频AVPacket同步队列都清空,并向其中各存放一个seek标志的AVPacket。然后继续从seek点开始解复用。解码阶段在读取解复用存放的特殊AVPacket时,就对解码器进行reset,清空其内部缓存,然后存放两个seek标志分别到AVFrame的同步队列。在同步阶段,如果同步线程读取到任何一个具有seek标志的AVFrame,就停止输送到输出,并等待另一个同步队列读取到具有seek标志的AVFrame。在音视频都读取到seek标志之前,所有的AVFrame都弃用。读取到之后,重新进行同步。
解复用:
/** Read packet data from source.* If the packet has some flags like STREAM_FLAG_SOUGHT, this packet won't* contain data.* */
void Player::readStreamLoop() {if (!formatCtx) {LOGE(TAG, "no format context");return;}int ret;bool pushSuccess = false;while (!stopReadFlag) {AVPacket *packet = av_packet_alloc();if (!packet) {LOGE(TAG, "av_packet_alloc failed");return;}if (seekFlag) {int64_t pts = (int64_t) (seekPtsMS / 1000.0f * AV_TIME_BASE);LOGD(TAG, "meet seek, time = %lld", pts);int streamIndex = -1;
//            if (audioStreamIndex >= 0) {
//                pts = (int64_t)(seekPtsMS / av_q2d(formatCtx->streams[audioStreamIndex]->time_base));
//                streamIndex = audioStreamIndex;
//            } else if (videoStreamIndex >= 0) {
//                pts = (int64_t)(seekPtsMS / av_q2d(formatCtx->streams[videoStreamIndex]->time_base));
//                streamIndex = videoStreamIndex;
//            }av_seek_frame(formatCtx, streamIndex, pts, AVSEEK_FLAG_BACKWARD);// put a empty packet width flag STREAM_FLAG_SOUGHTif (enableAudio) {audioPacketQueue.clear();PacketWrapper *p = playerContext.getEmptyPacketWrapper();p->flags = STREAM_FLAG_SOUGHT;audioPacketQueue.forcePush(p);
//                audioDecodeSeekFlag = true;}if (enableVideo) {videoPacketQueue.clear();PacketWrapper *p = playerContext.getEmptyPacketWrapper();p->flags = STREAM_FLAG_SOUGHT;videoPacketQueue.forcePush(p);
//                videoDecodeSeekFlag = true;}//            syncSeekFlag = true;seekFlag = false;}ret = av_read_frame(formatCtx, packet);if (ret == 0) {if (packet->stream_index == audioStreamIndex && enableAudio) {PacketWrapper *pw = playerContext.getEmptyPacketWrapper();pw->setParams(packet);if (videoPacketQueue.getSize() == 0) {audioPacketQueue.forcePush(pw);} else {pushSuccess = audioPacketQueue.push(pw);if (!pushSuccess) {audioPacketQueue.forcePush(pw);}}} else if (packet->stream_index == videoStreamIndex && enableVideo) {PacketWrapper *pw = playerContext.getEmptyPacketWrapper();pw->setParams(packet);if (audioPacketQueue.getSize() == 0) {videoPacketQueue.forcePush(pw);} else {pushSuccess = videoPacketQueue.push(pw);if (!pushSuccess) {videoPacketQueue.forcePush(pw);}}} else {av_packet_unref(packet);av_packet_free(&packet);}} else if (ret == AVERROR_EOF) {av_packet_free(&packet);packet = nullptr;if (enableAudio) {PacketWrapper *pw = playerContext.getEmptyPacketWrapper();audioPacketQueue.forcePush(pw);}if (enableVideo) {PacketWrapper *pw = playerContext.getEmptyPacketWrapper();videoPacketQueue.forcePush(pw);}} else if (ret < 0) {LOGE(TAG, "av_read_frame failed");av_packet_free(&packet);packet = nullptr;return;}}
}
音频解码:
void Player::decodeAudioLoop() {if (!formatCtx) {return;}if (!audioDecoder) {LOGE(TAG, "audio decoder is null");return;}int ret;optional<PacketWrapper *> packetOpt;PacketWrapper *pw = nullptr;AVFrame *frame = nullptr;AudioFrame *audioFrame = nullptr;while (!stopDecodeAudioFlag && enableAudio) {packetOpt = audioPacketQueue.pop();if (!packetOpt.has_value()) {LOGE(TAG, "audio packetOpt has no value");break;}pw = packetOpt.value();if ((pw->flags & STREAM_FLAG_SOUGHT) == STREAM_FLAG_SOUGHT) {LOGD(TAG, "decode audio, meet a seek frame");playerContext.recyclePacketWrapper(pw);pw = nullptr;audioFrameQueue.clear();audioDecoder->flush();audioFrame = playerContext.getEmptyAudioFrame();audioFrame->flags |= STREAM_FLAG_SOUGHT;audioFrameQueue.forcePush(audioFrame);audioFrame = nullptr;continue;}ret = audioDecoder->sendPacket(pw->avPacket);if (ret < 0) {LOGE(TAG, "audio decoder send packet failed, err = %d", ret);break;}while (true) {frame = av_frame_alloc();ret = audioDecoder->receiveFrame(frame);if (ret < 0) {av_frame_unref(frame);av_frame_free(&frame);frame = nullptr;break;}audioFrame = playerContext.getEmptyAudioFrame();audioFrame->setParams(frame, audioStreamMap[audioStreamIndex].sampleFormat,formatCtx->streams[audioStreamIndex]->time_base);if (!audioFrameQueue.push(audioFrame)) {audioFrameQueue.push(audioFrame, false);}// DON'T delete AVFrame here, it will be carried to output by AudioFrameaudioFrame = nullptr;frame = nullptr;}if (ret == AVERROR(EAGAIN)) {
//            LOGD(TAG, "audio stream again");continue;} else if (ret == AVERROR_EOF) {
//            LOGD(TAG, "audio stream meets eof");break;} else {
//            LOGE(TAG, "audio decoder error: %d", ret);break;}}if (pw) {playerContext.recyclePacketWrapper(pw);}if (frame) {av_frame_unref(frame);av_frame_free(&frame);frame = nullptr;}if (audioFrame) {audioFrameQueue.push(audioFrame, false);audioFrame = nullptr;}LOGD(TAG, "audio decode loop finish");}
视频解码:
void Player::decodeVideoLoop() {if (!formatCtx) {return;}if (!videoDecoder) {LOGE(TAG, "video decoder is null");return;}int ret;optional<PacketWrapper *> packetOpt;PacketWrapper *pw = nullptr;AVFrame *frame = nullptr;VideoFrame *videoFrame = nullptr;while (!stopDecodeVideoFlag && enableVideo) {packetOpt = videoPacketQueue.pop();if (!packetOpt.has_value()) {LOGE(TAG, "video packetOpt has no value");break;}pw = packetOpt.value();if ((pw->flags & STREAM_FLAG_SOUGHT) == STREAM_FLAG_SOUGHT) {LOGD(TAG, "decode video, meet a seek frame");playerContext.recyclePacketWrapper(pw);pw = nullptr;videoFrameQueue.clear();videoDecoder->flush();videoFrame = playerContext.getEmptyVideoFrame();videoFrame->flags |= STREAM_FLAG_SOUGHT;videoFrameQueue.forcePush(videoFrame);videoFrame = nullptr;continue;}ret = videoDecoder->sendPacket(pw->avPacket);if (ret < 0) {LOGE(TAG, "video decoder send packet failed, err = %d", ret);break;}while (true) {frame = av_frame_alloc();ret = videoDecoder->receiveFrame(frame);if (ret < 0) {av_frame_unref(frame);av_frame_free(&frame);frame = nullptr;break;}videoFrame = playerContext.getEmptyVideoFrame();videoFrame->setParams(frame, AVPixelFormat(frame->format),formatCtx->streams[videoStreamIndex]->time_base);if (!videoFrameQueue.push(videoFrame)) {videoFrameQueue.push(videoFrame, false);}// DON'T delete AVFrame, it will be carried to output by VideoFrame.videoFrame = nullptr;frame = nullptr;}if (ret == AVERROR(EAGAIN)) {
//            LOGD(TAG, "video stream again");continue;} else if (ret == AVERROR_EOF) {
//            LOGD(TAG, "video stream meets eof");break;} else {
//            LOGE(TAG, "video decoder error: %d", ret);break;}}if (pw) {playerContext.recyclePacketWrapper(pw);}if (frame) {av_frame_unref(frame);av_frame_free(&frame);frame = nullptr;}if (videoFrame) {videoFrameQueue.push(videoFrame, false);videoFrame = nullptr;}LOGD(TAG, "video decode loop finish");}
同步代码:
void Player::syncLoop() {chrono::system_clock::time_point lastAudioWriteTime;chrono::system_clock::time_point lastVideoWriteTime;int64_t lastAudioPts = -1;int64_t lastVideoPts = -1;if (stateListener != nullptr) {stateListener->playStateChanged(true);}AudioFrame *audioFrame = unPlayedAudioFrame;unPlayedAudioFrame = nullptr;VideoFrame *videoFrame = unPlayedVideoFrame;unPlayedVideoFrame = nullptr;while (!stopSyncFlag) {if (enableAudio && enableVideo) {if (audioFrame == nullptr) {optional<AudioFrame *> frameOpt = audioFrameQueue.pop();if (frameOpt.has_value()) {audioFrame = frameOpt.value();} else {break;}}if (videoFrame == nullptr) {optional<VideoFrame *> frameOpt = videoFrameQueue.pop();if (frameOpt.has_value()) {videoFrame = frameOpt.value();} else {break;}}if (lastAudioPts == -1) {lastAudioPts = audioFrame->pts;}if (lastVideoPts == -1) {lastVideoPts = videoFrame->pts;}if ((audioFrame->flags & STREAM_FLAG_SOUGHT) == STREAM_FLAG_SOUGHT&& (videoFrame->flags & STREAM_FLAG_SOUGHT) == STREAM_FLAG_SOUGHT) {LOGD(TAG, "sync, meet both audio and video seek frame");playerContext.recycleAudioFrame(audioFrame);audioFrame = nullptr;playerContext.recycleVideoFrame(videoFrame);videoFrame = nullptr;continue;} else if ((audioFrame->flags & STREAM_FLAG_SOUGHT) == STREAM_FLAG_SOUGHT) {LOGD(TAG, "sync, meet audio seek frame");playerContext.recycleVideoFrame(videoFrame);videoFrame = nullptr;continue;} else if ((videoFrame->flags & STREAM_FLAG_SOUGHT) == STREAM_FLAG_SOUGHT) {LOGD(TAG, "sync, meet video seek frame");playerContext.recycleAudioFrame(audioFrame);audioFrame = nullptr;continue;}int64_t audioOutputPts = audioFrame->getOutputPts();if (videoFrame->pts <= audioOutputPts) {lastVideoPts = videoFrame->pts;videoOutput->write(videoFrame);videoFrame = nullptr;} else {int64_t outputFrames = (videoFrame->pts + 3 - audioOutputPts) * 1.0f / 1000 * audioFrame->sampleRate;outputFrames = min((int64_t)(audioFrame->numFrames - audioFrame->outputStartIndex), outputFrames);audioFrame->outputFrameCount = outputFrames;lastAudioPts = audioOutputPts;audioOutput->write(audioFrame);audioFrame->outputStartIndex += audioFrame->outputFrameCount;if (audioFrame->outputStartIndex == audioFrame->numFrames) {playerContext.recycleAudioFrame(audioFrame);audioFrame = nullptr;}}if (stateListener != nullptr) {stateListener->progressChanged(lastAudioPts, false);}} else if (enableVideo) {if (videoFrame == nullptr) {optional<VideoFrame *> frameOpt = videoFrameQueue.pop();if (frameOpt.has_value()) {videoFrame = frameOpt.value();} else {break;}}lastVideoPts = videoFrame->pts;videoOutput->write(videoFrame);videoFrame = nullptr;this_thread::sleep_for(chrono::milliseconds(17));if (stateListener != nullptr) {stateListener->progressChanged(lastVideoPts, false);}} else if (enableAudio) {if (audioFrame == nullptr) {optional<AudioFrame *> frameOpt = audioFrameQueue.pop();if (frameOpt.has_value()) {audioFrame = frameOpt.value();} else {break;}}lastAudioPts = audioFrame->pts;audioOutput->write(audioFrame);playerContext.recycleAudioFrame(audioFrame);audioFrame = nullptr;if (stateListener != nullptr) {stateListener->progressChanged(lastAudioPts, false);}} else {LOGE(TAG, "both audio and video disabled, break");break;}}if (audioFrame) {unPlayedAudioFrame = audioFrame;}if (videoFrame) {unPlayedVideoFrame = videoFrame;}if (stateListener != nullptr) {stateListener->playStateChanged(false);}
}
5. 音频输出
不同的平台使用不同的音频框架进行音频输出。Android平台我选择使用oboe。对音频输出我定义了一下接口来统一各平台的调用。
//
// Created by 祖国瑞 on 2022/9/5.
//#ifndef ANDROID_VIDEOPLAYER_IAUDIOOUTPUT_H
#define ANDROID_VIDEOPLAYER_IAUDIOOUTPUT_H#include <stdlib.h>
#include "PlayerContext.h"
#include "AudioFrame.h"
extern "C" {
#include "FFmpeg/libavformat/avformat.h"
}class IAudioOutput {
public:IAudioOutput(PlayerContext *playerContext) {this->playerCtx = playerContext;}virtual bool create(int sampleRate, int channels, AVSampleFormat sampleFormat) = 0;virtual void release() = 0;virtual void start() = 0;virtual void stop() = 0;virtual bool write(AudioFrame *audioFrame) = 0;virtual void write(uint8_t *buffer, int framesPerChannel) = 0;protected:PlayerContext *playerCtx = nullptr;
};#endif //ANDROID_VIDEOPLAYER_IAUDIOOUTPUT_H
由于oboe使用比较简单,这里就不单独列出来了。需要注意的是,由于源文件采样率及采样格式多种多样,音频框架不一定支持。所以在输出之前,使用FFmpeg的avresample来重采样。
6. 视频输出(需要优化)
视频输出使用OpenGL ES,这里还有很多需要优化,比如EGL的格式目前是写死的,对于超出8bit长度的像素格式,还是统一转换为了float32并建立纹理,YUV的非planner数据(例如NV21格式,U和V是混合在一个数据平面中交替出现的)需要切分成三个纹理使用。这样很多工作都是由cpu完成的,开销比较大,而且速度较慢。接下来会探索Android的ANativeBuffer支持的format,它与OpenGL ES的纹理格式是对应的,尽量减少cpu工作。
视频输出同样也对各平台规定了一个接口:
//
// Created by 祖国瑞 on 2022/9/5.
//#ifndef ANDROID_VIDEOPLAYER_IVIDEOOUTPUT_H
#define ANDROID_VIDEOPLAYER_IVIDEOOUTPUT_H#include <stdlib.h>
#include "VideoFrame.h"
#include "PlayerContext.h"
#include "SizeMode.h"class IVideoOutput {
public:IVideoOutput(PlayerContext *playerContext) {this->playerCtx = playerContext;};virtual bool setFormat(AVPixelFormat pixelFormat, AVColorSpace colorSpace, bool isHDR) = 0;virtual bool create(void *surface) = 0;virtual void release() = 0;virtual void setScreenSize(int32_t width, int32_t height) = 0;virtual bool isReady() = 0;virtual void write(VideoFrame* frame) = 0;virtual void setSizeMode(SizeMode mode) = 0;protected:PlayerContext *playerCtx;AVPixelFormat srcPixelFormat = AVPixelFormat::AV_PIX_FMT_NONE;
};#endif //ANDROID_VIDEOPLAYER_IVIDEOOUTPUT_H
对于Android平台,我使用OpenGL ES来渲染。
首先,shader部分很简单,其主要作用就是yuv转rgb。但是由于GPU天然适合做大量简单计算,所以我们可以在shader里去最大化兼容各种像素格式,例如10bit int,16bit float等。以及各种大尾序小尾序等。
static const char *vertexShaderCode ="#version 300 es\n""layout (location = 0) in vec3 aPos;\n""layout (location = 1) in vec2 aTexCoord;\n""out vec2 TexCoord;\n""void main() {\n"" gl_Position = vec4(aPos, 1.0f);\n"" TexCoord = aTexCoord;\n""}\n";static const char *yuv2rgbShaderCode ="#version 300 es\n""precision mediump float;\n""uniform sampler2D tex_y;\n""uniform sampler2D tex_u;\n""uniform sampler2D tex_v;\n""in vec2 TexCoord;\n""out vec4 FragColor;\n""void main() {\n"" float y = texture(tex_y, TexCoord).r - 0.0625f;\n"" float u = texture(tex_u, TexCoord).r - 0.5f;\n"" float v = texture(tex_v, TexCoord).r - 0.5f;\n"" float r = 1.164f * y + 1.793f * v;\n"" float g = 1.164f * y - 0.213f * u - 0.533f * v;\n"" float b = 1.164f * y + 2.112f * u;\n"" //float a = texture(tex_y, TexCoord).r;\n"" FragColor = vec4(r, g, b, 1.0f);\n""}\n";static const char *yuv16ui2rgbShaderCode ="#version 300 es\n""precision mediump float;\n""uniform usampler2D tex_y;\n""uniform usampler2D tex_u;\n""uniform usampler2D tex_v;\n""in vec2 TexCoord;\n""out vec4 FragColor;\n""void main() {\n"" float y = float(texture(tex_y, TexCoord).r) - 0.0625f;\n"" float u = float(texture(tex_u, TexCoord).r) - 0.5f;\n"" float v = float(texture(tex_v, TexCoord).r) - 0.5f;\n"" float r = 1.164f * y + 1.793f * v;\n"" float g = 1.164f * y - 0.213f * u - 0.533f * v;\n"" float b = 1.164f * y + 2.112f * u;\n"" //float a = texture(tex_y, TexCoord).r;\n"" FragColor = vec4(r, g, b, 1.0f);\n""}\n";static const char *rgbShaderCode ="#version 300 se\n""\n""uniform sampler2D tex_rgb;\n""\n""in vec2 TexCoord;\n""\n""out vec4 FragColor;\n""\n""void main() {\n"" FragColor = texture(tex_rgb, TexCoord);\n""}\n";
然后就是像素处理了,我们需要把各种像素布局和像素格式的图片转换为OpenGL ES可以接受的texture,然后才能在shader里进行处理。
首先是根据像素格式来确定使用哪种shader。
bool GLESRender::setFormat(AVPixelFormat format, AVColorSpace colorSpace, bool isHDR) {LOGD(TAG, "setFormat");if (!eglWindow.isReady()) {LOGE(TAG, "eglWindow is not ready");return false;}pixelType = get_pixel_type(format);pixelLayout = get_pixel_layout(format);if (pixelType == PixelType::None || pixelLayout == PixelLayout::None) {LOGE(TAG, "unsupported pixel format: %d", format);return false;}// 根据像素格式来确定texture的格式等。注意这里GLES的format与GL的format并不完全一致,有很多是用不了的。// 你可以参考Android的硬件buffer format与GLES的format的对应关系。// 链接在此:https://developer.android.google.cn/ndk/reference/group/a-hardware-bufferif (pixelType == PixelType::RGB) {switch (format) {case AV_PIX_FMT_RGB24:glDataType = GL_UNSIGNED_BYTE;glInternalFormat = GL_RGB;glDataFormat = GL_UNSIGNED_BYTE;glSupportFormat = true;break;case AV_PIX_FMT_RGB565LE:glDataType = GL_UNSIGNED_SHORT_5_6_5;glInternalFormat = GL_RGB;glDataFormat = GL_UNSIGNED_SHORT_5_6_5;glSupportFormat = true;break;case AV_PIX_FMT_RGB444LE:glDataType = GL_UNSIGNED_SHORT_4_4_4_4;glInternalFormat = GL_RGB;glDataFormat = GL_UNSIGNED_SHORT_4_4_4_4;glSupportFormat = true;break;default:LOGE(TAG, "unsupported RGB format: %d", format);return false;}if (!shader.compileShader(vertexShaderCode, rgbShaderCode)) {LOGE(TAG, "format = RGB24, compile shader failed");return false;}} else if (pixelType == PixelType::YUV) {yuvCompDepth = get_yuv_comp_depth(format);if (yuvCompDepth < 0) {LOGE(TAG, "get_yuv_comp_depth failed, format = %d", format);return false;}const char *fragmentCode;if (yuvCompDepth <= 8) {glDataType = GL_UNSIGNED_BYTE;glInternalFormat = GL_LUMINANCE;glDataFormat = GL_LUMINANCE;fragmentCode = yuv2rgbShaderCode;} else if (yuvCompDepth <= 16) {glDataType = GL_FLOAT;glInternalFormat = GL_R32F;glDataFormat = GL_RED;fragmentCode = yuv2rgbShaderCode;} else {LOGE(TAG, "unsupported yuvCompDepth: %d", yuvCompDepth);return false;}if (!shader.compileShader(vertexShaderCode, fragmentCode)) {LOGE(TAG, "format = %d, compile shader failed", format);return false;}eglWindow.makeCurrent();LOGD(TAG, "yuvCompDepth = %d", yuvCompDepth);} else {LOGE(TAG, "unsupported pixel format: %d", format);return false;}this->format = format;this->colorSpace = colorSpace;this->isHDR = isHDR;LOGD(TAG, "setFormat: format = %d, pixType = %d, glDataType = 0x%x", format, pixelType, glDataType);if (!shader.isReady()) {LOGE(TAG, "shader is not ready");return false;}return true;
}
拿到视频数据后,某些yuv数据需要将其转换成三个独立的纹理,再给OpenGL ES去处理。最关键的信息就是像素类型、像素布局和像素深度。
enum class PixelType {None = -1,RGB,YUV
};// 像素布局。
enum class PixelLayout {None = -1,// 多数yuv数据(例如YUV420P)都是planner,YUV三种像素是独立存储的,各占一个平面。Planner, // 多数RGB数据(例如RGB565)都是packet,RGB三像素依次存储,混编在一个平面内。Packet,// 半平面,Android平台的NV21和NV12就是这种格式,Y像素单独存储到一个平面,UV数据依次存储,混编在一个平面Semi_Planner,
};// 获取某种yuv格式的像素深度。一般都是8bit,现在有很多HDR视频是10bit。
// 目前还没有RGB相关的该方法,因为RGB图片本来就可以直接转为纹理,不需要单独处理。如果之后出现了与ANativeBuffer的格式不兼容的RGB格式,
// 也需要类似的处理。
int get_yuv_comp_depth(AVPixelFormat format);
然后就是将yuv数据分别读取到三个像素buffer中,方便之后转换为纹理。
bool read_yuv_pixel(AVFrame *frame, AVPixelFormat format, int64_t width, int64_t height,uint8_t *yBuffer, int *yWidth, int *yHeight,uint8_t *uBuffer, int *uWidth, int *uHeight,uint8_t *vBuffer, int *vWidth, int *vHeight) {PixelLayout layout = get_pixel_layout(format);if (layout == PixelLayout::Planner) {return read_yuv_planner(frame, format, width, height, yBuffer, yWidth, yHeight, uBuffer, uWidth, uHeight, vBuffer, vWidth, vHeight);} else if (layout == PixelLayout::Packet) {return read_yuv_packet(frame, format, width, height, yBuffer, yWidth, yHeight, uBuffer, uWidth, uHeight, vBuffer, vWidth, vHeight);} else if (layout == PixelLayout::Semi_Planner) {return read_yuv_semi_planner(frame, format, width, height, yBuffer, yWidth, yHeight, uBuffer, uWidth, uHeight, vBuffer, vWidth, vHeight);} else {return false;}
}
相关文章:

基于FFmpeg的Android播放器
基于FFmpeg的Android播放器 文章目录 基于FFmpeg的Android播放器1. 前言2. 编译相关组件库3. 解码器4. 解码流程5. 音频输出6. 视频输出(需要优化) 1. 前言 FFmpeg是一个最有名的开源的编解码库,实现了通常的编解码逻辑。它还能够根据平台特…...
osgPBR(十五)镜面IBL--查看不同级别的HDR环境贴图
首先,设置可以使用Mipmap,启用三线性过滤,设置最大级别和最小级别 osg::ref_ptr<osg::TextureCubeMap> tcm new osg::TextureCubeMap; tcm->setTextureSize(128, 128);tcm->setFilter(osg::Texture::MIN_FILTER, osg::Texture:…...
Docker的学习记录
Docker是一个被广泛使用的开源容器引擎,基于Go语言,遵从Apache2.0协议开源。 docker的三个概念:容器、镜像和仓库。 镜像(Image):镜像是Docker中的一个模板。通过 Docker镜像 来创建 Docker容器ÿ…...

Android Jetpack组件架构:ViewModel的原理
Android Jetpack组件架构:ViewModel的原理 导言 本篇文章是关于介绍ViewModel的,由于ViewModel的使用还是挺简单的,这里就不再介绍其的基本应用,我们主要来分析ViewModel的原理。 ViewModel的生命周期 众所周知,一般…...
学习笔记1.0)
数据分析(python)学习笔记1.0
《利用Python进行数据分析》(原书第2版) 《利用Python进行数据分析》(原书第2版) 《利用Python进行数据分析》(原书第2版) 社区和会议 除了网络搜索,科学、数据相关的Python邮件列表对于解决问题也非常有帮助。可以看看下列邮件列表: pydata:与数据分析和pandas相…...
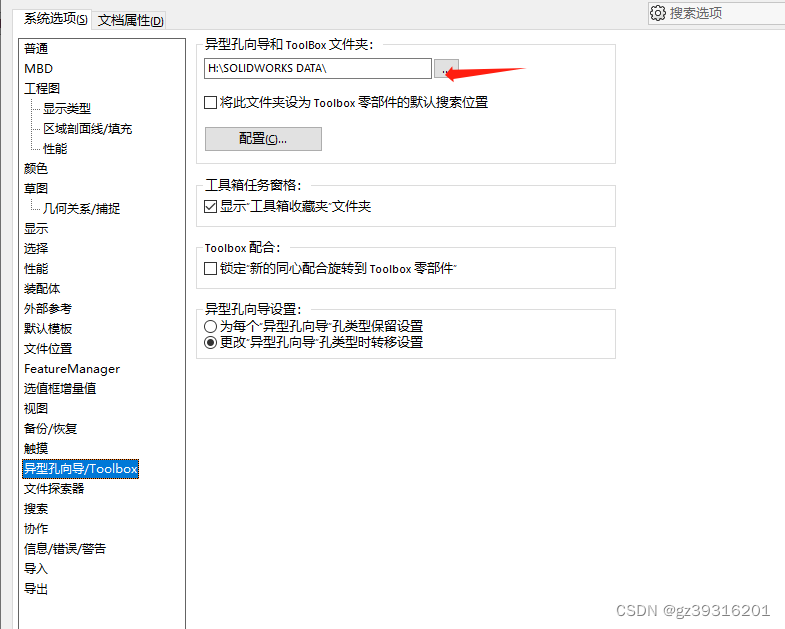
SW免安装的toolbox只读问题
把SOLIDWORKSDATA 整体复制到另外的目录,然后这里设置目录位置。不然原始位置有只读属性...
nodejs在pdf中绘制表格
需求 之前我已经了解过如何在pdf模板中填写字段了 nodejs根据pdf模板填入中文数据并生成新的pdf文件https://blog.csdn.net/ArmadaDK/article/details/132456324 但是当我具体使用的时候,我发现我的模板里面有表格,表格的长度是不固定的,所…...
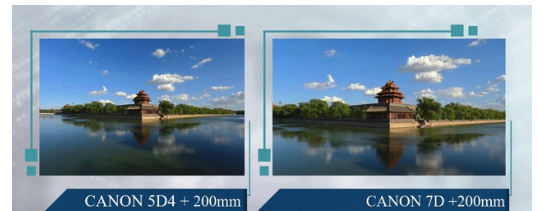
使用不同尺寸的传感器拍照时,怎么保证拍出同样视场范围的照片?
1、问题背景 使用竞品机做图像效果对比时,我们通常都会要求拍摄的照片要视场范围一致,这样才具有可比性。之前我会考虑用同样焦距、同样分辨率的设备去拍照对比就可以了,觉得相机的视场范围只由镜头焦距来决定。 但如果对于不同尺寸的传感器…...
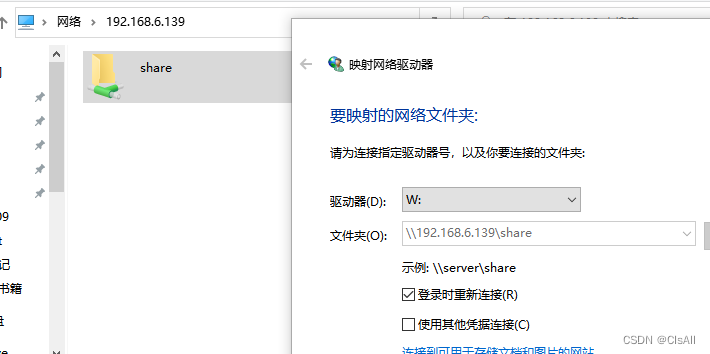
01-工具篇-windows与linux文件共享
一般来说绝大部分PC上装的系统均是windows,为了开发linux程序,会在PC上安装一个Vmware的虚拟机,在虚拟机上安装ubuntu18.04,由于windows上的代码查看软件、浏览器,通信软件更全,我们想只用ubuntu进行编译&a…...
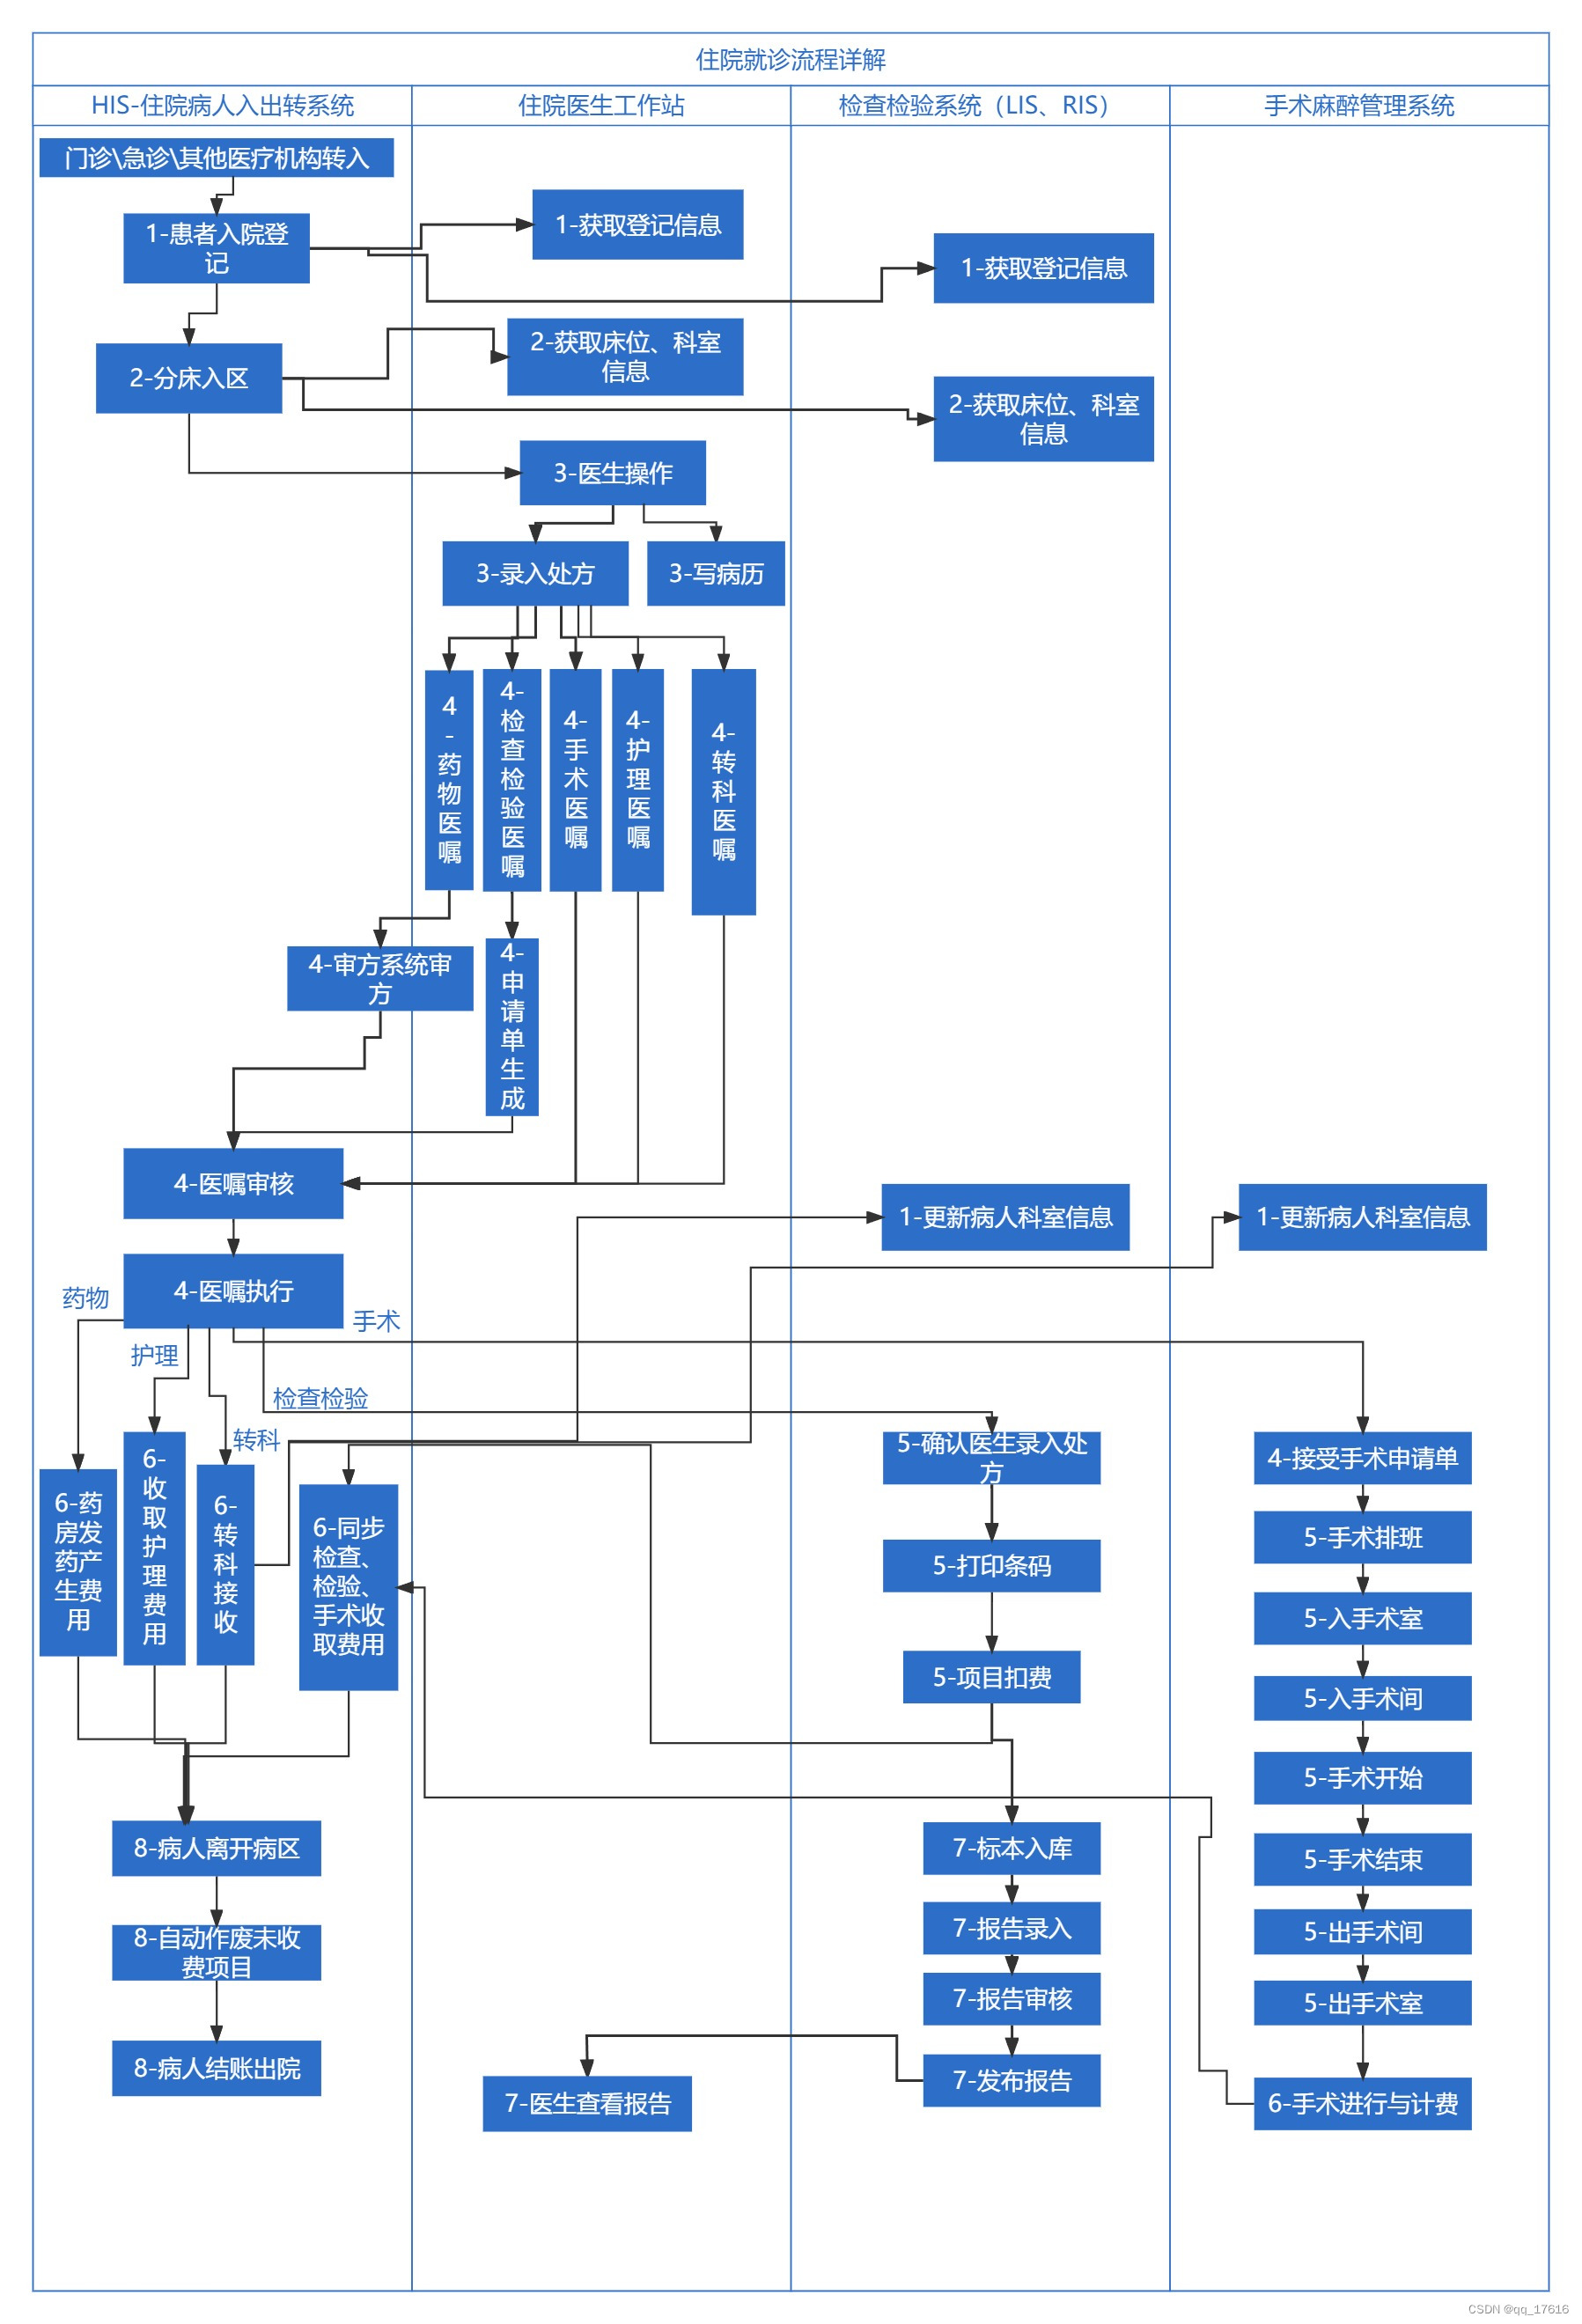
医疗实施-住院流程详解
住院就诊流程详解 1.病人入院登记2.病人进入病区3.医生操作病人4.医嘱录入与审核执行5. 医嘱收费前在对应业务系统的操作5.1.药物医嘱5.2.检查检验医嘱5.3.手术医嘱 6.住院医嘱费用的产生7. 医嘱收费后在对应业务系统的操作8. 病人出院 这篇文章是基于我的文章《医疗实施-住院就…...

本地连接服务器 jupyter notebook
本地连接服务器 jupyter notebook 一、前提工作二、服务器操作三、Windows 操作 一、前提工作 准备一台Linux云服务器新建一个用户,并切换到此用户安装 Anaconda 二、服务器操作 远程服务器上安装和配置 Jupyter Notebook: pip3 install jupyter接着…...
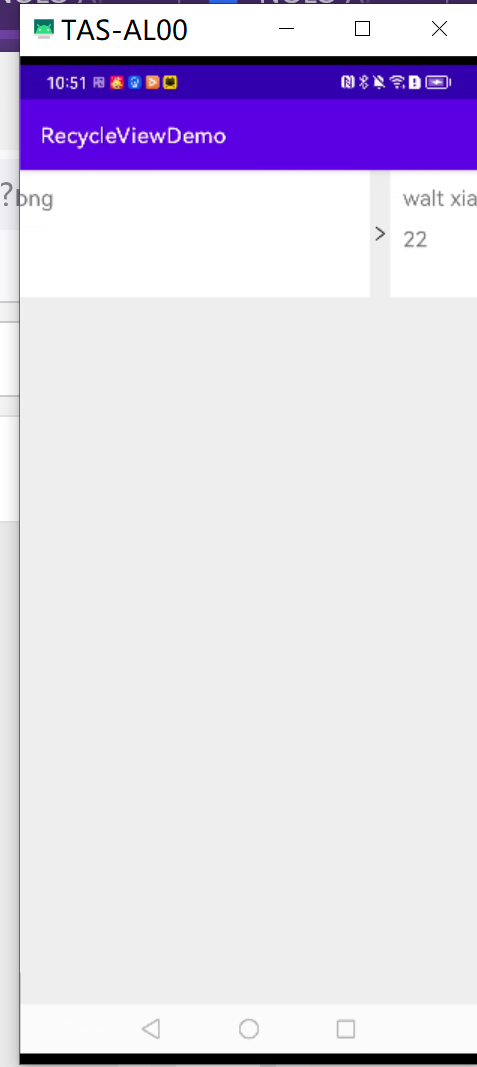
Android 使用Kotlin封装RecyclerView
文章目录 1.概述2.运行效果图3.代码实现3.1 扩展RecyclerView 3.2 扩展Adapter3.3 RecyclerView装饰绘制3.3.1 以图片实现分割线3.3.2 画网格线3.3.3空白的分割线3.3.4 不同方向上的分割线 3.4 使用方法 1.概述 在一个开源项目上看到了一个Android Kotlin版的RecyclerView封装…...
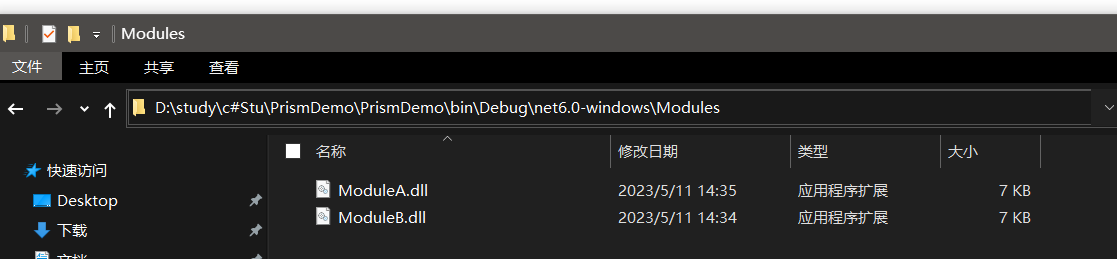
WPF 实现点击按钮跳转页面功能
方法1. 配置环境 首先添加prism依赖项,配置好所有文件。需要配置的有两个文件:App.xaml.cs和App.xaml App.xaml.cs using System.Data; using System.Linq; using System.Threading.Tasks; using System.Windows;namespace PrismDemo {/// <summa…...

关于http网络通信数据包封装的过程
当我们谈论网络通信时,数据在从源到目的地传输的过程中会通过多层网络协议。在每一层,都会添加一些头信息(和有时尾信息)来帮助处理和传输数据。这个过程被称为"封装"(Encapsulation)。简单来说&…...
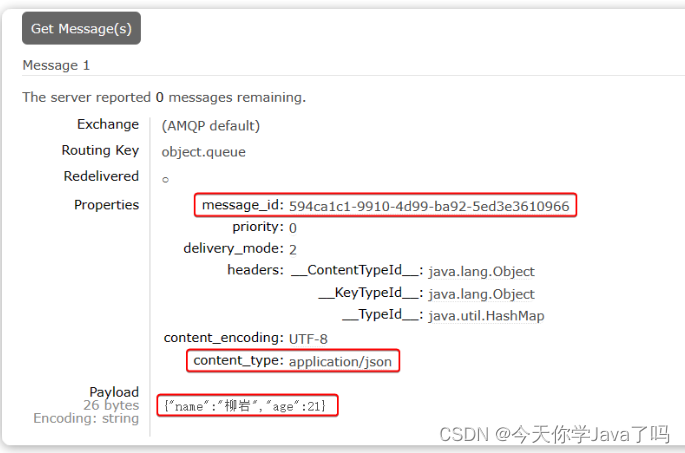
关于RabbitMQ你了解多少?
关于RabbitMQ你了解多少? 文章目录 关于RabbitMQ你了解多少?基础篇同步和异步MQ技术选型介绍和安装数据隔离SpringAMQP快速入门Work queues交换机Fanout交换机Direct交换机Topic交换机 声明队列和交换机MQ消息转换器 高级篇消息可靠性问题发送者的可靠性…...

Vulkan-着色器及编译SPIR-V
1.着色器模块介绍 Vulkan着色器代码一定要用字节码格式,而不是人类可读的语法如GLSL和HLSL。这个字节码就是SPIR-V,设计用于Vulkan和OpenCL。这是一个可以用于编写图形和计算着色器的格式,但是我们主要关注的是Vulkan的图形管线。使用字节码格…...
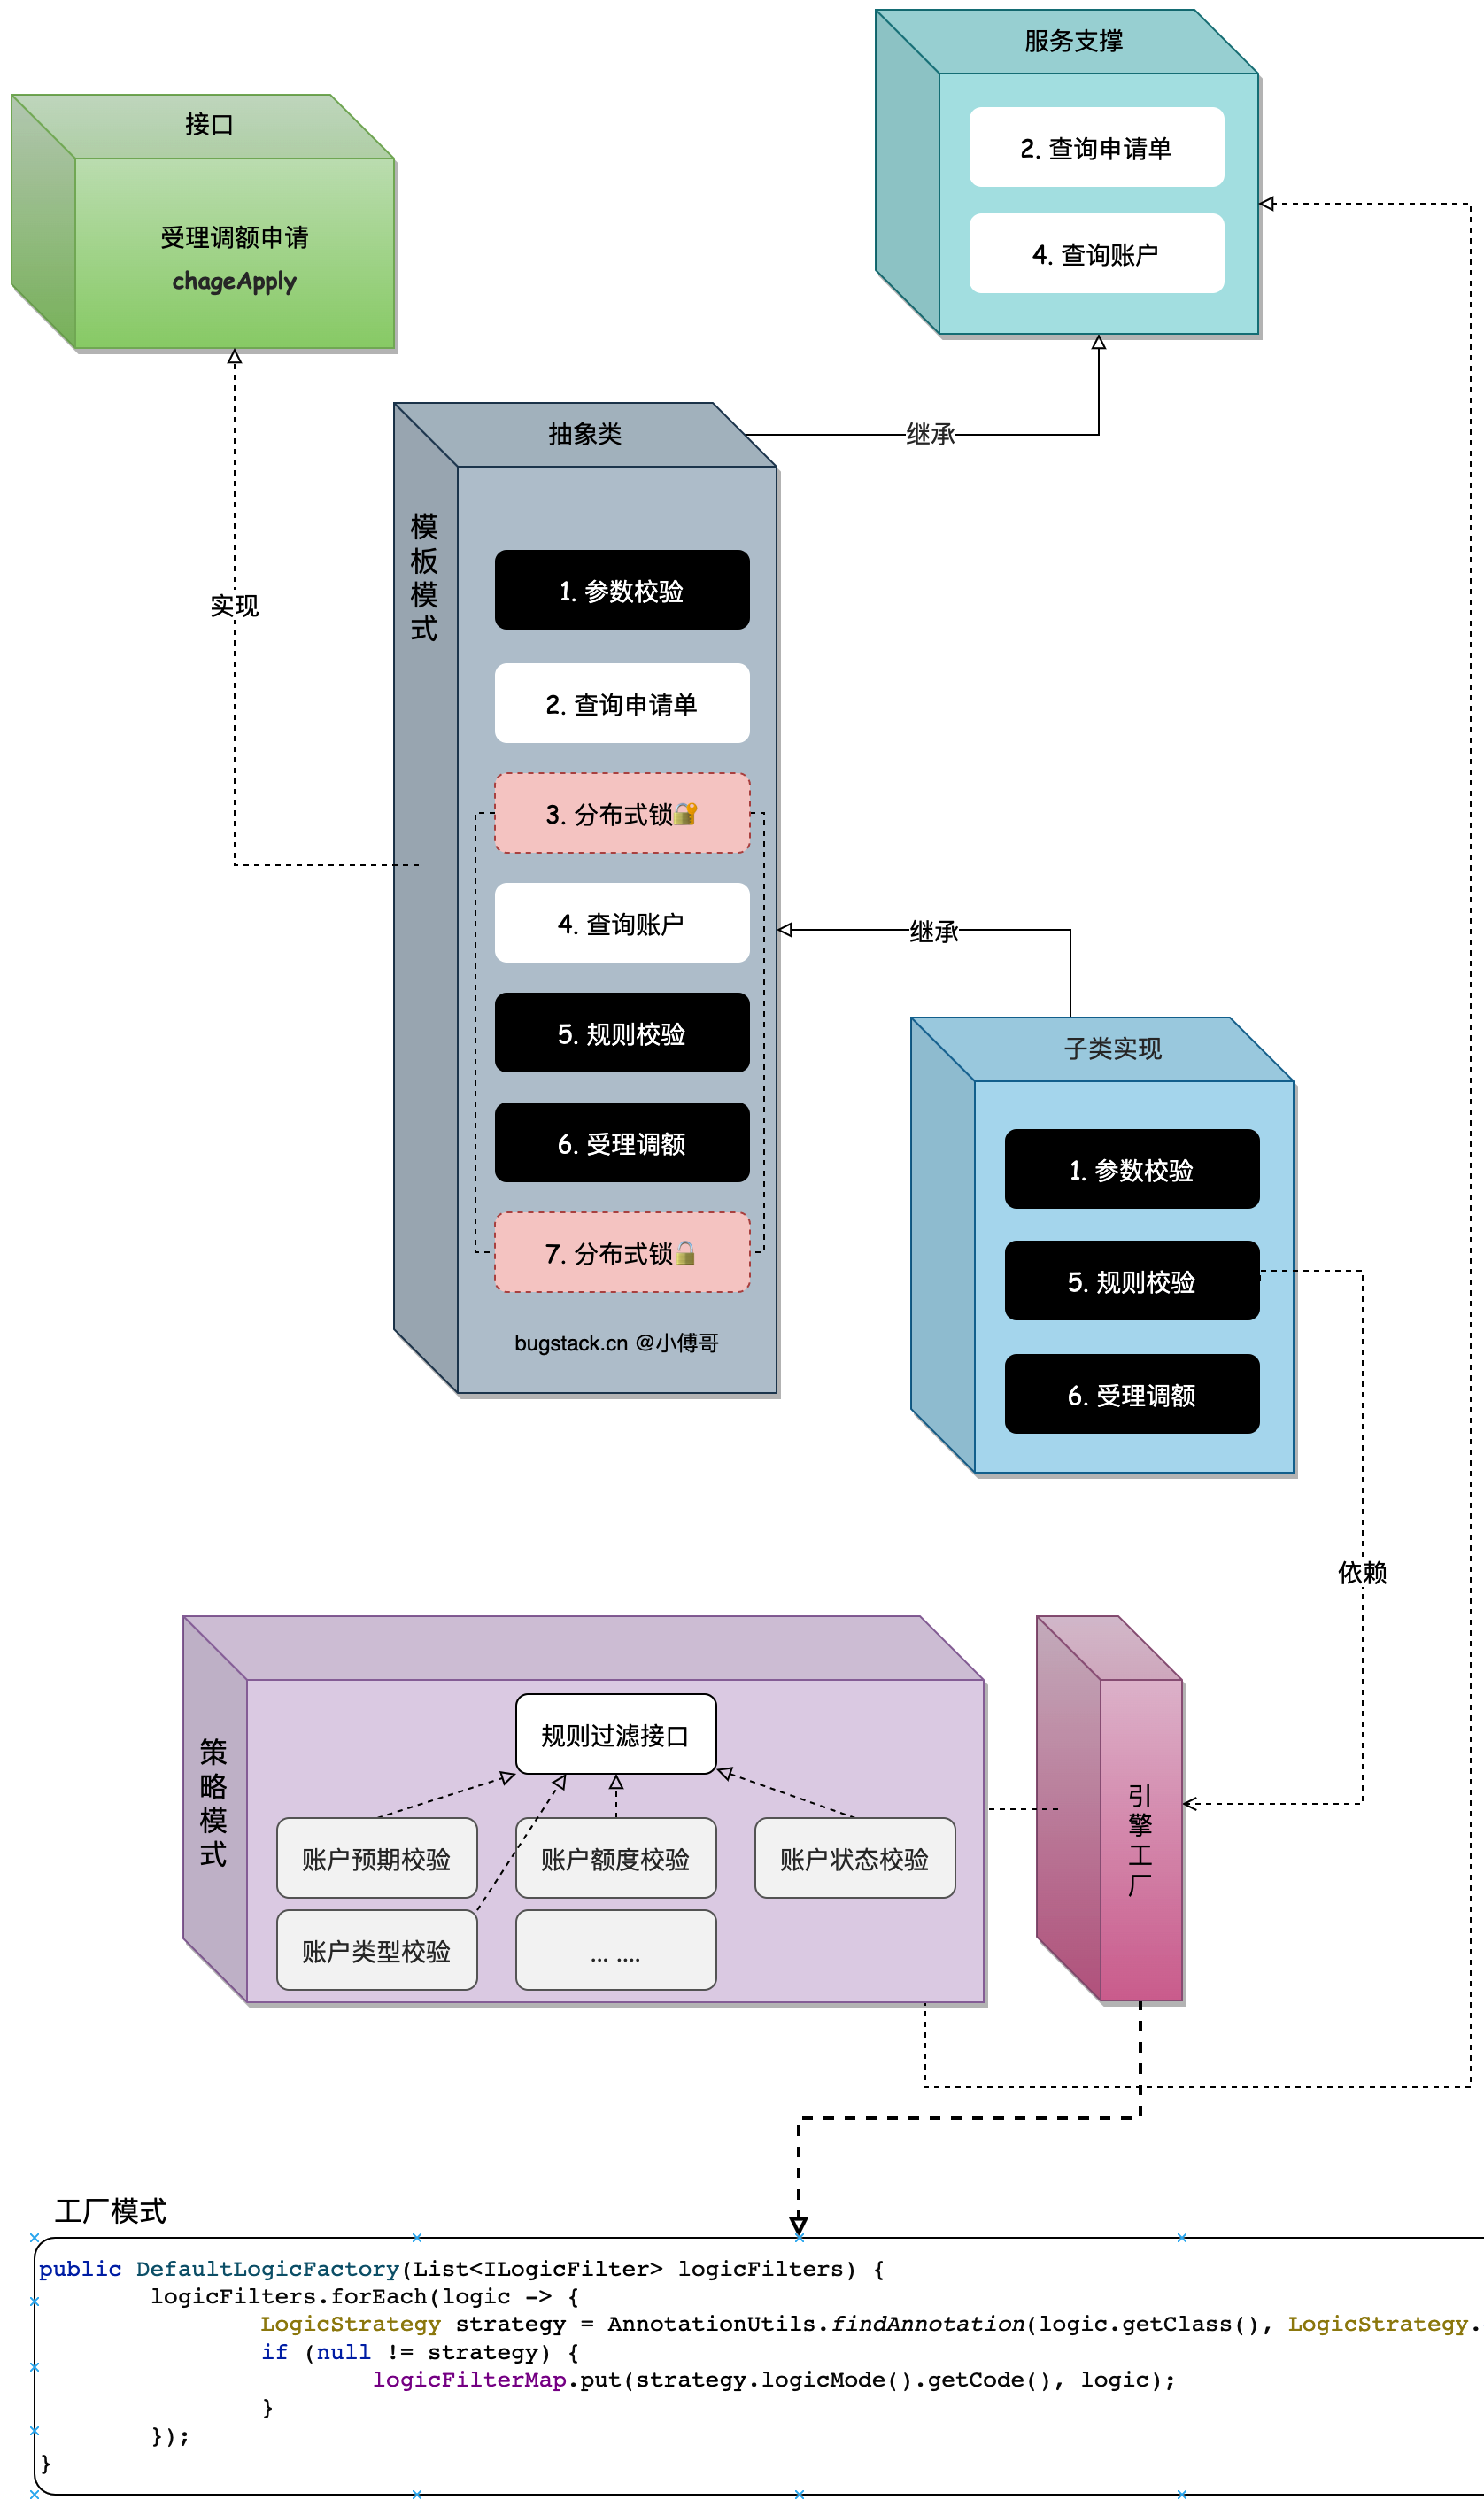
从MVC到DDD,该如何下手重构?
作者:付政委 博客:bugstack.cn 沉淀、分享、成长,让自己和他人都能有所收获!😄 大家好,我是技术UP主小傅哥。多年的 DDD 应用,使我开了技术的眼界! MVC 旧工程腐化严重,…...

论文阅读:基于隐马尔可夫模型的蛋白质多序列比对方法研究
本文来自chatpaper Basic Information: • Title: Research on Protein Multiple Sequence Alignment Method Based on Hidden Markov Model (基于隐马尔可夫模型的蛋白质多序列比对方法研究) • Authors: Zhan Qing • Affiliation: Harbin Institute of Technology (哈尔滨工…...

Vim同时打开多个文件
分屏模式 在 Vim 中,可以同时打开多个文件并使用分屏模式来查看它们。以下是一些常见的方法和命令: 在启动 Vim 时打开多个文件 使用 -o 选项打开文件并水平分屏: vim -o file1.txt file2.txt使用 -O 选项打开文件并垂直分屏: v…...

SpringCloudStreamkafka接收jsonarray字符串失败
文章目录 场景现象问题处理 场景现象 kafka作为消息队列,作为前端设备数据到后端消费的渠道,也被多个不同微服务消费一个服务与前端边缘计算设备建立socket消息,接收实时交通事件推送,再将事件发送到kafka里面。此处使用的是Spri…...

避开这些坑!医疗内窥镜Zemax优化时的高温灭菌与弯曲成像难题解决指南
医疗内窥镜光学系统设计实战:高温灭菌与弯曲成像的Zemax解决方案 在微创手术和工业检测领域,直径仅2.8mm的医疗内窥镜需要同时满足140广角视场、F2.0大光圈和10μm高分辨率的要求。更严峻的挑战来自使用环境——必须耐受135℃高温蒸汽灭菌,并…...

OpenClaw对话增强:nanobot模型微调提升任务理解准确率
OpenClaw对话增强:nanobot模型微调提升任务理解准确率 1. 为什么需要专业场景的模型微调 在测试OpenClaw基础版本时,我发现一个明显痛点:当处理专业领域的自动化任务时,通用大模型经常出现"理解偏差"。比如在医疗文献…...

OpenClaw操作录制:ollama-QwQ-32B学习人工流程生成自动化脚本
OpenClaw操作录制:ollama-QwQ-32B学习人工流程生成自动化脚本 1. 为什么需要操作录制功能 上周我在整理月度运营报告时,突然意识到自己正在重复第7次执行完全相同的操作流程:打开三个数据源表格→复制特定列→粘贴到汇总表→生成折线图→导…...

超越单一工具:在快马平台探索多模型ai辅助开发的全新工作流
在开发过程中,AI辅助工具已经逐渐成为提升效率的利器。最近我在尝试使用InsCode(快马)平台时,发现它提供的多模型AI辅助开发能力,远比单一工具更加强大和灵活。下面分享一个我实践的综合示例项目,展示如何利用平台的多模型能力优化…...

ArcGIS Pro模型构建器实战:从零搭建自动化地理处理工作流
1. 初识ArcGIS Pro模型构建器 第一次接触ArcGIS Pro的模型构建器时,我完全被它的可视化操作界面惊艳到了。这就像搭积木一样,不需要写一行代码,就能把复杂的地理处理流程串起来。记得当时有个项目需要批量处理上百个乡镇的耕地数据࿰…...

Linux文件系统架构与缓存机制解析
Linux文件系统架构与缓存机制深度解析1. 文件系统核心架构1.1 文件系统基本组织形式Linux文件系统采用分层结构设计,主要包含以下核心组件:块存储机制:硬盘被划分为固定大小的块(默认4KB),文件数据分散存储…...

用MediaPipe和Python做个隔空切水果游戏:从手势骨架提取到简单游戏逻辑实现
用MediaPipe和Python打造体感切水果游戏:从手势识别到游戏逻辑全解析 还记得小时候在街机厅玩《水果忍者》的畅快感吗?现在,我们完全可以用Python和MediaPipe技术,在电脑前通过手势隔空切水果!本文将带你从零开始&…...
)
别死记硬背了!用Python的NumPy库,5分钟搞定线性代数里的矩阵运算(附代码)
用Python的NumPy库轻松玩转线性代数:矩阵运算实战指南 线性代数作为现代科学与工程的基石,在机器学习、计算机图形学、量化金融等领域无处不在。但传统教材中抽象的数学符号和繁琐的手工计算,往往让学习者望而生畏。今天,我们将用…...

OpenClaw 的对话系统是否支持对话流程的可视化编辑?如何定义状态机?
关于OpenClaw对话系统是否支持对话流程的可视化编辑,目前公开的技术文档和社区讨论中并没有明确提及这一功能。从技术实现的角度来看,这类系统通常更侧重于底层对话状态管理和自然语言理解引擎的构建,而非面向产品经理或非技术人员的可视化编…...

Claude浏览器扩展漏洞允许通过任意网站实现零点击XSS提示注入
网络安全研究人员披露了Anthropic公司Claude谷歌浏览器扩展中存在的一个漏洞,攻击者只需诱使用户访问特定网页即可触发恶意提示注入。漏洞原理分析Koi Security研究员Oren Yomtov在提供给The Hacker News的报告中指出:"该漏洞允许任何网站静默地向该…...