CMake教程-第 5 步:安装和测试
CMake教程-第 5 步:安装和测试
- 1 CMake教程介绍
- 2 学习步骤
- Step 1: A Basic Starting Point
- Step 2: Adding a Library
- Step 3: Adding Usage Requirements for a Library
- Step 4: Adding Generator Expressions
- Step 5: Installing and Testing
- Step 6: Adding Support for a Testing Dashboard
- Step 7: Adding System Introspection
- Step 8: Adding a Custom Command and Generated File
- Step 9: Packaging an Installer
- Step 10: Selecting Static or Shared Libraries
- Step 11: Adding Export Configuration
- Step 12: Packaging Debug and Release
- 3 Step 5: Installing and Testing
- 3.1 Exercise 1 - Install Rules
- 3.1.1 目标
- 3.1.2 Helpful Resources(有用的资源)
- 3.1.3 Files to Edit(需编辑的文件)
- 3.1.4 Getting Started(入门指南)
- 3.1.5 Build and Run(构建并运行)
- 3.1.6 解决方案
- 3.1.7 CMakeLists.txt
- 3.1.8 MathFunctions/CMakeLists.txt
- 3.1.9 运行结果
- 3.2 Exercise 2 - Testing Support
- 3.2.1 目标
- 3.2.2 Helpful Resources(有用的资源)
- 3.2.3 Files to Edit(需编辑的文件)
- 3.2.4 Getting Started(入门指南)
- 3.2.5 Build and Run(构建并运行)
- 3.2.6 解决方案
- 3.2.7 CMakeLists.txt
- 3.2.8 运行结果
该文档是基于CMake的官方教程翻译而来,并稍微添加了自己的理解:
cmake的官方网站为:CMake Tutorial
1 CMake教程介绍
The CMake tutorial provides a step-by-step guide that covers common build system issues that CMake helps address. Seeing how various topics all work together in an example project can be very helpful.
CMake 教程提供了一个循序渐进的指南,涵盖了 CMake 可帮助解决的常见构建系统问题。在一个示例项目中了解各个主题是如何协同工作的,会非常有帮助。
2 学习步骤
The tutorial source code examples are available in this archive. Each step has its own subdirectory containing code that may be used as a starting point. The tutorial examples are progressive so that each step provides the complete solution for the previous step.
本文档中提供了教程源代码示例。每个步骤都有自己的子目录,其中包含可用作起点的代码。教程示例是循序渐进的,因此每一步都提供了前一步的完整解决方案。
Step 1: A Basic Starting Point
- Exercise 1 - Building a Basic Project
- Exercise 2 - Specifying the C++ Standard
- Exercise 3 - Adding a Version Number and Configured Header File
Step 2: Adding a Library
- Exercise 1 - Creating a Library
- Exercise 2 - Adding an Option
Step 3: Adding Usage Requirements for a Library
- Exercise 1 - Adding Usage Requirements for a Library
- Exercise 2 - Setting the C++ Standard with Interface Libraries
Step 4: Adding Generator Expressions
- Exercise 1 - Adding Compiler Warning Flags with Generator Expressions
Step 5: Installing and Testing
- Exercise 1 - Install Rules
- Exercise 2 - Testing Support
Step 6: Adding Support for a Testing Dashboard
- Exercise 1 - Send Results to a Testing Dashboard
Step 7: Adding System Introspection
- Exercise 1 - Assessing Dependency Availability
Step 8: Adding a Custom Command and Generated File
Step 9: Packaging an Installer
Step 10: Selecting Static or Shared Libraries
Step 11: Adding Export Configuration
Step 12: Packaging Debug and Release
3 Step 5: Installing and Testing
3.1 Exercise 1 - Install Rules
Often, it is not enough to only build an executable, it should also be installable. With CMake, we can specify install rules using the install() command. Supporting local installations for your builds in CMake is often as simple as specifying an install location and the targets and files to be installed.
通常情况下,仅仅构建可执行文件是不够的,它还应该是可安装的。在 CMake 中,我们可以使用 install() 命令指定安装规则。在 CMake 中支持本地安装,通常只需指定安装位置、目标和要安装的文件。
3.1.1 目标
Install the Tutorial executable and the MathFunctions library.
安装 Tutorial 可执行文件和 MathFunctions 库。
3.1.2 Helpful Resources(有用的资源)
- install()
3.1.3 Files to Edit(需编辑的文件)
- MathFunctions/CMakeLists.txt
- CMakeLists.txt
3.1.4 Getting Started(入门指南)
The starting code is provided in the Step5 directory. In this exercise, complete TODO 1 through TODO 4.
Step5 目录中提供了起始代码。在本练习中,完成 TODO 1 到 TODO 4。
First, update MathFunctions/CMakeLists.txt to install the MathFunctions and tutorial_compiler_flags libraries to the lib directory. In that same file, specify the install rules needed to install MathFunctions.h to the include directory.
首先,更新 MathFunctions/CMakeLists.txt,将 MathFunctions 和 tutorial_compiler_flags 库安装到 lib 目录。在同一文件中,指定将 MathFunctions.h 安装到 include 目录所需的安装规则。
Then, update the top level CMakeLists.txt to install the Tutorial executable to the bin directory. Lastly, any header files should be installed to the include directory. Remember that TutorialConfig.h is in the PROJECT_BINARY_DIR.
然后,更新顶级 CMakeLists.txt,将 Tutorial 可执行文件安装到 bin 目录。最后,任何头文件都应安装到 include 目录。请记住,TutorialConfig.h 位于 PROJECT_BINARY_DIR 中。
3.1.5 Build and Run(构建并运行)
Make a new directory called Step5_build. Run the cmake executable or the cmake-gui to configure the project and then build it with your chosen build tool.
新建一个名为 Step5_build 的目录。运行 cmake 可执行文件或 cmake-gui 配置项目,然后使用所选的构建工具构建项目。
Then, run the install step by using the --install option of the cmake command (introduced in 3.15, older versions of CMake must use make install) from the command line. This step will install the appropriate header files, libraries, and executables. For example:
然后,在命令行中使用 cmake 命令的 --install 选项(在 3.15 中引入,旧版本的 CMake 必须使用 make install)运行安装步骤。这一步将安装相应的头文件、库和可执行文件。例如
cmake --install .
For multi-configuration tools, don’t forget to use the --config argument to specify the configuration.
对于多配置工具,不要忘记使用 --config 参数指定配置。
cmake --install . --config Release
If using an IDE, simply build the INSTALL target. You can build the same install target from the command line like the following:
如果使用集成开发环境,只需构建 INSTALL 目标即可。你也可以通过命令行构建相同的安装目标,如下所示:
cmake --build . --target install --config Debug
The CMake variable CMAKE_INSTALL_PREFIX is used to determine the root of where the files will be installed. If using the cmake --install command, the installation prefix can be overridden via the --prefix argument. For example:
CMake 变量 CMAKE_INSTALL_PREFIX 用于确定安装文件的根目录。如果使用 cmake --install 命令,安装前缀可以通过 --prefix 参数覆盖。例如
cmake --install . --prefix "/home/myuser/installdir"
Navigate to the install directory and verify that the installed Tutorial runs.
导航至安装目录并验证已安装的Tutorial是否运行。
3.1.6 解决方案
The install rules for our project are fairly simple:
我们项目的安装规则相当简单:
For MathFunctions, we want to install the libraries and header file to the lib and include directories respectively.
对于 MathFunctions,我们要将库和头文件分别安装到 lib 和 include 目录中。
For the Tutorial executable, we want to install the executable and configured header file to the bin and include directories respectively.
对于 Tutorial 可执行文件,我们希望将可执行文件和配置的头文件分别安装到 bin 和 include 目录中。
So to the end of MathFunctions/CMakeLists.txt we add:
因此,在 MathFunctions/CMakeLists.txt 的末尾,我们添加了
TODO 1: Click to show/hide answer
TODO 1: MathFunctions/CMakeLists.txt
set(installable_libs MathFunctions tutorial_compiler_flags)
if(TARGET SqrtLibrary)list(APPEND installable_libs SqrtLibrary)
endif()
install(TARGETS ${installable_libs} DESTINATION lib)
and
TODO 2: Click to show/hide answer
TODO 2: MathFunctions/CMakeLists.txt
install(FILES MathFunctions.h DESTINATION include)
The install rules for the Tutorial executable and configured header file are similar. To the end of the top-level CMakeLists.txt we add:
教程可执行文件和配置头文件的安装规则类似。在顶层 CMakeLists.txt 的末尾添加
TODO 3,4: Click to show/hide answer
CMakeLists.txt
install(TARGETS Tutorial DESTINATION bin)
install(FILES "${PROJECT_BINARY_DIR}/TutorialConfig.h"DESTINATION include)
That is all that is needed to create a basic local install of the tutorial.
这就是在本地安装tutorial所需的一切。
3.1.7 CMakeLists.txt
cmake_minimum_required(VERSION 3.15)# set the project name and version
project(Tutorial VERSION 1.0)# specify the C++ standard
add_library(tutorial_compiler_flags INTERFACE)
target_compile_features(tutorial_compiler_flags INTERFACE cxx_std_11)# add compiler warning flags just when building this project via
# the BUILD_INTERFACE genex
set(gcc_like_cxx "$<COMPILE_LANG_AND_ID:CXX,ARMClang,AppleClang,Clang,GNU,LCC>")
set(msvc_cxx "$<COMPILE_LANG_AND_ID:CXX,MSVC>")
target_compile_options(tutorial_compiler_flags INTERFACE"$<${gcc_like_cxx}:$<BUILD_INTERFACE:-Wall;-Wextra;-Wshadow;-Wformat=2;-Wunused>>""$<${msvc_cxx}:$<BUILD_INTERFACE:-W3>>"
)# configure a header file to pass some of the CMake settings
# to the source code
configure_file(TutorialConfig.h.in TutorialConfig.h)# add the MathFunctions library
add_subdirectory(MathFunctions)# add the executable
add_executable(Tutorial tutorial.cxx)target_link_libraries(Tutorial PUBLIC MathFunctions tutorial_compiler_flags)# add the binary tree to the search path for include files
# so that we will find TutorialConfig.h
target_include_directories(Tutorial PUBLIC"${PROJECT_BINARY_DIR}")# TODO 3: Install Tutorial in the bin directory
# Hint: Use the TARGETS and DESTINATION parameters
install(TARGETS Tutorial DESTINATION bin)
# TODO 4: Install TutorialConfig.h to the include directory
# Hint: Use the FILES and DESTINATION parameters
install(FILES "${PROJECT_BINARY_DIR}/TutorialConfig.h"DESTINATION include)
3.1.8 MathFunctions/CMakeLists.txt
add_library(MathFunctions MathFunctions.cxx)# state that anybody linking to us needs to include the current source dir
# to find MathFunctions.h, while we don't.
target_include_directories(MathFunctionsINTERFACE ${CMAKE_CURRENT_SOURCE_DIR})# should we use our own math functions
option(USE_MYMATH "Use tutorial provided math implementation" ON)
if (USE_MYMATH)target_compile_definitions(MathFunctions PRIVATE "USE_MYMATH")# library that just does sqrtadd_library(SqrtLibrary STATICmysqrt.cxx)# link our compiler flags interface librarytarget_link_libraries(SqrtLibrary PUBLIC tutorial_compiler_flags)target_link_libraries(MathFunctions PRIVATE SqrtLibrary)
endif()# link our compiler flags interface library
target_link_libraries(MathFunctions PUBLIC tutorial_compiler_flags)# TODO 1: Create a variable called installable_libs that is a list of all
# libraries we want to install (e.g. MathFunctions and tutorial_compiler_flags)
# Then install the installable libraries to the lib folder.
# Hint: Use the TARGETS and DESTINATION parameters
set(installable_libs MathFunctions tutorial_compiler_flags)
if(TARGET SqrtLibrary)list(APPEND installable_libs SqrtLibrary)
endif()
install(TARGETS ${installable_libs} DESTINATION lib)# TODO 2: Install the library headers to the include folder.
# Hint: Use the FILES and DESTINATION parameters
install(FILES MathFunctions.h DESTINATION include)
3.1.9 运行结果
$ cmake --install . --prefix "/home/test/sda3/work"
-- Install configuration: ""
-- Installing: /home/test/sda3/work/lib/libMathFunctions.a
-- Installing: /home/test/sda3/work/lib/libSqrtLibrary.a
-- Installing: /home/test/sda3/work/include/MathFunctions.h
-- Installing: /home/test/sda3/work/bin/Tutorial
-- Installing: /home/test/sda3/work/include/TutorialConfig.h
$
3.2 Exercise 2 - Testing Support
CTest offers a way to easily manage tests for your project. Tests can be added through the add_test() command. Although it is not explicitly covered in this tutorial, there is a lot of compatibility between CTest and other testing frameworks such as GoogleTest.
CTest 提供了一种轻松管理项目测试的方法。可以通过 add_test() 命令添加测试。虽然本教程没有明确涉及,但 CTest 和其他测试框架(如 GoogleTest)之间有很多兼容性。
3.2.1 目标
Create unit tests for our executable using CTest.
使用 CTest 为我们的可执行文件创建单元测试。
3.2.2 Helpful Resources(有用的资源)
- enable_testing()
- add_test()
- function()
- set_tests_properties()
- ctest
3.2.3 Files to Edit(需编辑的文件)
- CMakeLists.txt
3.2.4 Getting Started(入门指南)
The starting source code is provided in the Step5 directory. In this exercise, complete TODO 5 through TODO 9.
Step5 目录中提供了起始源代码。在本练习中,完成 TODO 5 到 TODO 9。
First, we need to enable testing. Next, begin adding tests to our project using add_test(). We will work through adding 3 simple tests and then you can add additional testing as you see fit.
首先,我们需要启用测试。接下来,开始使用 add_test()为我们的项目添加测试。我们将添加 3 个简单的测试,然后您可以根据需要添加其他测试。
3.2.5 Build and Run(构建并运行)
Navigate to the build directory and rebuild the application. Then, run the ctest executable: ctest -N and ctest -VV. For multi-config generators (e.g. Visual Studio), the configuration type must be specified with the -C flag. For example, to run tests in Debug mode use ctest -C Debug -VV from the build directory (not the Debug subdirectory!). Release mode would be executed from the same location but with a -C Release. Alternatively, build the RUN_TESTS target from the IDE.
导航至构建目录并重建应用程序。然后运行 ctest 可执行文件:ctest -N 和 ctest -VV。对于多配置生成器(如 Visual Studio),必须使用 -C flag指定配置类型。例如,要在调试模式下运行测试,可从构建目录(而不是调试子目录!)使用 ctest -C Debug -VV。要在 Release 模式下运行测试,则应在同一目录下使用 -C Release。或者,从集成开发环境中构建 RUN_TESTS 目标。
3.2.6 解决方案
Let’s test our application. At the end of the top-level CMakeLists.txt file we first need to enable testing with the enable_testing() command.
让我们测试应用程序。在顶层 CMakeLists.txt 文件的末尾,我们首先需要使用 enable_testing() 命令启用测试。
TODO 5: Click to show/hide answer
TODO 5: CMakeLists.txt
enable_testing()
With testing enabled, we will add a number of basic tests to verify that the application is working correctly. First, we create a test using add_test() which runs the Tutorial executable with the parameter 25 passed in. For this test, we are not going to check the executable’s computed answer. This test will verify that application runs, does not segfault or otherwise crash, and has a zero return value. This is the basic form of a CTest test.
启用测试后,我们将添加一些基本测试,以验证应用程序是否正常运行。首先,我们使用 add_test()创建一个测试,在传入参数 25 后运行 Tutorial 可执行文件。在这个测试中,我们不会检查可执行文件的计算答案。该测试将验证应用程序是否运行,是否发生 segfault 或其他崩溃,以及返回值是否为零。这就是 CTest 测试的基本形式
TODO 6: Click to show/hide answer
TODO 6: CMakeLists.txt
add_test(NAME Runs COMMAND Tutorial 25)
Next, let’s use the PASS_REGULAR_EXPRESSION test property to verify that the output of the test contains certain strings. In this case, verifying that the usage message is printed when an incorrect number of arguments are provided.
接下来,让我们使用 PASS_REGULAR_EXPRESSION 测试属性来验证测试的输出是否包含特定字符串。在本例中,我们要验证当提供的参数数量不正确时,是否会打印使用信息。
TODO 7: Click to show/hide answer
TODO 7: CMakeLists.txt
add_test(NAME Usage COMMAND Tutorial)
set_tests_properties(UsagePROPERTIES PASS_REGULAR_EXPRESSION "Usage:.*number")
The next test we will add verifies the computed value is truly the square root.
下一个测试将验证计算值是否真的是平方根。
TODO 8: Click to show/hide answer
TODO 8: CMakeLists.txt
add_test(NAME StandardUse COMMAND Tutorial 4)
set_tests_properties(StandardUsePROPERTIES PASS_REGULAR_EXPRESSION "4 is 2")
This one test is not enough to give us confidence that it will work for all values passed in. We should add more tests to verify this. To easily add more tests, we make a function called do_test that runs the application and verifies that the computed square root is correct for given input. For each invocation of do_test, another test is added to the project with a name, input, and expected results based on the passed arguments.
这一个测试还不足以让我们确信它对所有传入的值都有效。我们应该添加更多测试来验证这一点。为了方便地添加更多测试,我们制作了一个名为 do_test 的函数,用于运行应用程序并验证给定输入的平方根计算结果是否正确。每次调用 do_test,都会在项目中添加另一个测试,测试名称、输入内容和根据传入参数的预期结果。
TODO 9: Click to show/hide answer
TODO 9: CMakeLists.txt
function(do_test target arg result)add_test(NAME Comp${arg} COMMAND ${target} ${arg})set_tests_properties(Comp${arg}PROPERTIES PASS_REGULAR_EXPRESSION ${result})
endfunction()# do a bunch of result based tests
do_test(Tutorial 4 "4 is 2")
do_test(Tutorial 9 "9 is 3")
do_test(Tutorial 5 "5 is 2.236")
do_test(Tutorial 7 "7 is 2.645")
do_test(Tutorial 25 "25 is 5")
do_test(Tutorial -25 "-25 is (-nan|nan|0)")
do_test(Tutorial 0.0001 "0.0001 is 0.01")
3.2.7 CMakeLists.txt
cmake_minimum_required(VERSION 3.15)# set the project name and version
project(Tutorial VERSION 1.0)# specify the C++ standard
add_library(tutorial_compiler_flags INTERFACE)
target_compile_features(tutorial_compiler_flags INTERFACE cxx_std_11)# add compiler warning flags just when building this project via
# the BUILD_INTERFACE genex
set(gcc_like_cxx "$<COMPILE_LANG_AND_ID:CXX,ARMClang,AppleClang,Clang,GNU,LCC>")
set(msvc_cxx "$<COMPILE_LANG_AND_ID:CXX,MSVC>")
target_compile_options(tutorial_compiler_flags INTERFACE"$<${gcc_like_cxx}:$<BUILD_INTERFACE:-Wall;-Wextra;-Wshadow;-Wformat=2;-Wunused>>""$<${msvc_cxx}:$<BUILD_INTERFACE:-W3>>"
)# configure a header file to pass some of the CMake settings
# to the source code
configure_file(TutorialConfig.h.in TutorialConfig.h)# add the MathFunctions library
add_subdirectory(MathFunctions)# add the executable
add_executable(Tutorial tutorial.cxx)target_link_libraries(Tutorial PUBLIC MathFunctions tutorial_compiler_flags)# add the binary tree to the search path for include files
# so that we will find TutorialConfig.h
target_include_directories(Tutorial PUBLIC"${PROJECT_BINARY_DIR}")# TODO 3: Install Tutorial in the bin directory
# Hint: Use the TARGETS and DESTINATION parameters
install(TARGETS Tutorial DESTINATION bin)
# TODO 4: Install TutorialConfig.h to the include directory
# Hint: Use the FILES and DESTINATION parameters
install(FILES "${PROJECT_BINARY_DIR}/TutorialConfig.h"DESTINATION include)
# TODO 5: Enable testing
enable_testing()# TODO 6: Add a test called Runs which runs the following command:
# $ Tutorial 25
add_test(NAME Runs COMMAND Tutorial 25)# TODO 7: Add a test called Usage which runs the following command:
# $ Tutorial
# Make sure the expected output is displayed.
# Hint: Use the PASS_REGULAR_EXPRESSION property with "Usage.*number"
add_test(NAME Usage COMMAND Tutorial)
set_tests_properties(UsagePROPERTIES PASS_REGULAR_EXPRESSION "Usage:.*number")# TODO 8: Add a test which runs the following command:
# $ Tutorial 4
# Make sure the result is correct.
# Hint: Use the PASS_REGULAR_EXPRESSION property with "4 is 2"
add_test(NAME StandardUse COMMAND Tutorial 4)
set_tests_properties(StandardUsePROPERTIES PASS_REGULAR_EXPRESSION "4 is 2")# TODO 9: Add more tests. Create a function called do_test to avoid copy +
# paste. Test the following values: 4, 9, 5, 7, 25, -25 and 0.0001.
function(do_test target arg result)add_test(NAME Comp${arg} COMMAND ${target} ${arg})set_tests_properties(Comp${arg}PROPERTIES PASS_REGULAR_EXPRESSION ${result})
endfunction()# do a bunch of result based tests
do_test(Tutorial 4 "4 is 2")
do_test(Tutorial 9 "9 is 3")
do_test(Tutorial 5 "5 is 2.236")
do_test(Tutorial 7 "7 is 2.645")
do_test(Tutorial 25 "25 is 5")
do_test(Tutorial -25 "-25 is (-nan|nan|0)")
do_test(Tutorial 0.0001 "0.0001 is 0.01")
3.2.8 运行结果
$ ctest -C Debug -VV
UpdateCTestConfiguration  from :/home/test/sda3/work/cmake/Step5_build/DartConfiguration.tcl
UpdateCTestConfiguration  from :/home/test/sda3/work/cmake/Step5_build/DartConfiguration.tcl
Test project /home/test/sda3/work/cmake/Step5_build
Constructing a list of tests
Done constructing a list of tests
Updating test list for fixtures
Added 0 tests to meet fixture requirements
Checking test dependency graph...
Checking test dependency graph end
test 1Start  1: Runs1: Test command: /home/test/sda3/work/cmake/Step5_build/Tutorial "25"
1: Test timeout computed to be: 10000000
1: Computing sqrt of 25 to be 13
1: Computing sqrt of 25 to be 7.46154
1: Computing sqrt of 25 to be 5.40603
1: Computing sqrt of 25 to be 5.01525
1: Computing sqrt of 25 to be 5.00002
1: Computing sqrt of 25 to be 5
1: Computing sqrt of 25 to be 5
1: Computing sqrt of 25 to be 5
1: Computing sqrt of 25 to be 5
1: Computing sqrt of 25 to be 5
1: The square root of 25 is 51/10 Test  #1: Runs .............................   Passed    0.00 sec
test 2Start  2: Usage2: Test command: /home/test/sda3/work/cmake/Step5_build/Tutorial
2: Test timeout computed to be: 10000000
2: /home/test/sda3/work/cmake/Step5_build/Tutorial Version 1.0
2: Usage: /home/test/sda3/work/cmake/Step5_build/Tutorial number2/10 Test  #2: Usage ............................   Passed    0.00 sec
test 3Start  3: StandardUse3: Test command: /home/test/sda3/work/cmake/Step5_build/Tutorial "4"
3: Test timeout computed to be: 10000000
3: Computing sqrt of 4 to be 2.5
3: Computing sqrt of 4 to be 2.05
3: Computing sqrt of 4 to be 2.00061
3: Computing sqrt of 4 to be 2
3: Computing sqrt of 4 to be 2
3: Computing sqrt of 4 to be 2
3: Computing sqrt of 4 to be 2
3: Computing sqrt of 4 to be 2
3: Computing sqrt of 4 to be 2
3: Computing sqrt of 4 to be 2
3: The square root of 4 is 23/10 Test  #3: StandardUse ......................   Passed    0.00 sec
test 4Start  4: Comp44: Test command: /home/test/sda3/work/cmake/Step5_build/Tutorial "4"
4: Test timeout computed to be: 10000000
4: Computing sqrt of 4 to be 2.5
4: Computing sqrt of 4 to be 2.05
4: Computing sqrt of 4 to be 2.00061
4: Computing sqrt of 4 to be 2
4: Computing sqrt of 4 to be 2
4: Computing sqrt of 4 to be 2
4: Computing sqrt of 4 to be 2
4: Computing sqrt of 4 to be 2
4: Computing sqrt of 4 to be 2
4: Computing sqrt of 4 to be 2
4: The square root of 4 is 24/10 Test  #4: Comp4 ............................   Passed    0.00 sec
test 5Start  5: Comp95: Test command: /home/test/sda3/work/cmake/Step5_build/Tutorial "9"
5: Test timeout computed to be: 10000000
5: Computing sqrt of 9 to be 5
5: Computing sqrt of 9 to be 3.4
5: Computing sqrt of 9 to be 3.02353
5: Computing sqrt of 9 to be 3.00009
5: Computing sqrt of 9 to be 3
5: Computing sqrt of 9 to be 3
5: Computing sqrt of 9 to be 3
5: Computing sqrt of 9 to be 3
5: Computing sqrt of 9 to be 3
5: Computing sqrt of 9 to be 3
5: The square root of 9 is 35/10 Test  #5: Comp9 ............................   Passed    0.00 sec
test 6Start  6: Comp56: Test command: /home/test/sda3/work/cmake/Step5_build/Tutorial "5"
6: Test timeout computed to be: 10000000
6: Computing sqrt of 5 to be 3
6: Computing sqrt of 5 to be 2.33333
6: Computing sqrt of 5 to be 2.2381
6: Computing sqrt of 5 to be 2.23607
6: Computing sqrt of 5 to be 2.23607
6: Computing sqrt of 5 to be 2.23607
6: Computing sqrt of 5 to be 2.23607
6: Computing sqrt of 5 to be 2.23607
6: Computing sqrt of 5 to be 2.23607
6: Computing sqrt of 5 to be 2.23607
6: The square root of 5 is 2.236076/10 Test  #6: Comp5 ............................   Passed    0.00 sec
test 7Start  7: Comp77: Test command: /home/test/sda3/work/cmake/Step5_build/Tutorial "7"
7: Test timeout computed to be: 10000000
7: Computing sqrt of 7 to be 4
7: Computing sqrt of 7 to be 2.875
7: Computing sqrt of 7 to be 2.65489
7: Computing sqrt of 7 to be 2.64577
7: Computing sqrt of 7 to be 2.64575
7: Computing sqrt of 7 to be 2.64575
7: Computing sqrt of 7 to be 2.64575
7: Computing sqrt of 7 to be 2.64575
7: Computing sqrt of 7 to be 2.64575
7: Computing sqrt of 7 to be 2.64575
7: The square root of 7 is 2.645757/10 Test  #7: Comp7 ............................   Passed    0.00 sec
test 8Start  8: Comp258: Test command: /home/test/sda3/work/cmake/Step5_build/Tutorial "25"
8: Test timeout computed to be: 10000000
8: Computing sqrt of 25 to be 13
8: Computing sqrt of 25 to be 7.46154
8: Computing sqrt of 25 to be 5.40603
8: Computing sqrt of 25 to be 5.01525
8: Computing sqrt of 25 to be 5.00002
8: Computing sqrt of 25 to be 5
8: Computing sqrt of 25 to be 5
8: Computing sqrt of 25 to be 5
8: Computing sqrt of 25 to be 5
8: Computing sqrt of 25 to be 5
8: The square root of 25 is 58/10 Test  #8: Comp25 ...........................   Passed    0.00 sec
test 9Start  9: Comp-259: Test command: /home/test/sda3/work/cmake/Step5_build/Tutorial "-25"
9: Test timeout computed to be: 10000000
9: The square root of -25 is 09/10 Test  #9: Comp-25 ..........................   Passed    0.00 sec
test 10Start 10: Comp0.000110: Test command: /home/test/sda3/work/cmake/Step5_build/Tutorial "0.0001"
10: Test timeout computed to be: 10000000
10: Computing sqrt of 0.0001 to be 0.50005
10: Computing sqrt of 0.0001 to be 0.250125
10: Computing sqrt of 0.0001 to be 0.125262
10: Computing sqrt of 0.0001 to be 0.0630304
10: Computing sqrt of 0.0001 to be 0.0323084
10: Computing sqrt of 0.0001 to be 0.0177018
10: Computing sqrt of 0.0001 to be 0.0116755
10: Computing sqrt of 0.0001 to be 0.0101202
10: Computing sqrt of 0.0001 to be 0.0100007
10: Computing sqrt of 0.0001 to be 0.01
10: The square root of 0.0001 is 0.01
10/10 Test #10: Comp0.0001 .......................   Passed    0.00 sec100% tests passed, 0 tests failed out of 10Total Test time (real) =   0.01 sec
$
相关文章:

CMake教程-第 5 步:安装和测试
CMake教程-第 5 步:安装和测试 1 CMake教程介绍2 学习步骤Step 1: A Basic Starting PointStep 2: Adding a LibraryStep 3: Adding Usage Requirements for a LibraryStep 4: Adding Generator ExpressionsStep 5: Installing and TestingStep 6: Adding Support f…...

移动应用-Android开发基础\核心知识点
Android开发基础 知识点 1 介绍了解2 系统体系架构3 四大应用组件4 移动操作系统优缺点5 开发工具6 配置工具7 下载相关资源8JDK下载安装流程9配置好SDK和JDK环境10 第一个Hello word11 AS开发前常用设置12模拟器使用运行13 真机调试14 AndroidUI基础布局15 加载展示XML布局16…...

Java读取并转换字符串中的浮点数
在写Android接收蓝牙数据的时候,由于传过来的蓝牙数据转换后都为字符串格式,但是需要从其中提取出来浮点数,所以通过查阅资料写出了从字符串中提取并转换为浮点数的方法,特记录下来以供参考。 目录 原始数据内容 提取字符串中的…...

SQL: 索引原理与创建索引的规范
SQL 索引是一种数据结构,用于加速数据库查询操作。它通过在表的列上创建索引,提供了一种快速查找数据的方法,减少了数据库的扫描和比较操作,从而提高了查询性能。索引根据其实现方式可以分为多种类型,如 B-树索引、哈希…...

基于STM32_DS18B20单总线传感器驱动
基于STM32_DS18B20单总线传感器驱动 文章目录 基于STM32_DS18B20单总线传感器驱动前言一、BS18B20?二、原理1.复位与检验2.基本命令3.唯一ROM识别码4.温度转换 三、驱动代码四、注意事项 前言 本文以一款典型的单总线传感器及其驱动——DS18B20为例,简单…...
目标识别项目实战:基于Yolov7-LPRNet的动态车牌目标识别算法模型(三)
前言 目标识别如今以及迭代了这么多年,普遍受大家认可和欢迎的目标识别框架就是YOLO了。按照官方描述,YOLOv8 是一个 SOTA 模型,它建立在以前 YOLO 版本的成功基础上,并引入了新的功能和改进,以进一步提升性能和灵活性…...

springboot线程池创建与使用
/*** author: zcs* Title: TaskPoolConfig* Description: 线程池配置* date: 2023/10/11 17:52*/ Component public class TaskPoolConfig {Bean(name "threadPoolTaskExecutor")public Executor taskExecutor() {ThreadPoolTaskExecutor taskExecutor new ThreadP…...

UDP和TCP特点(部分)对比:
传输层的两个主要协议:TCP 和 UDP UDP和TCP特点(部分)对比: UDP:无连接, 不可靠传输, 面向数据报, 全双工。 TCP:有连接, 可靠传输, 面向字节流…...
PostMan环境变量、全局变量、动态参数使用
一、环境准备 postmanmoco [{"description": "登录认证","request": {"uri": "/login","method": "post","forms": {"user": "admin","password": "a123…...

服务器数据恢复-服务器硬盘指示灯黄灯闪烁的数据恢复案例
服务器数据恢复环境: 服务器面板上的硬盘指示灯显示黄色是一种警告,提示指示灯对应的服务器硬盘已经被服务器识别出存在故障,硬盘即将下线。如果出现这种情况,建议服务器管理员/运维人员及时用完好的硬盘替换显示黄色指示灯对应的…...

ts 分发
在 TypeScript 中,"分发"(distributive)是指在条件类型中的联合类型上自动进行类型推断的机制。当使用条件类型操作联合类型时,TypeScript 会自动将联合类型中的每个成员都应用该条件类型。 下面是一个示例:…...

SQL中的group by使用注意事项
在 SQL 中,GROUP BY 语句用于将查询结果按照指定的列进行分组,并对每个分组计算聚合函数(如 SUM、AVG、COUNT 等)的值。一般情况下,如果查询中包含聚合函数,那么就需要使用 GROUP BY 语句将查询结果按照指定…...

矩阵剪辑系统源码----pc/手机端双开发
剪辑系统,剪辑矩阵系统,剪辑矩阵系统主要是针对抖音、快手、bili平台的一个工具,今天就来给大家交流一下这 个产品的主要功能以及构成。剪辑矩阵系统,矩阵剪辑系统源码-这产品主要功能就是一个视频剪辑功能,这个视频剪…...
0基础学习VR全景平台篇 第106篇:认识调色软件Lightroom
上课!全体起立~ 大家好,欢迎观看蛙色官方系列全景摄影课程! 正式开讲之前需要先引出一个概念:到底什么是调色? 比如说上面这张照片,你可能会具体的指出照片中的元素有天空、山脉、草地等…… 如果我们跳出我们的固…...
React如何优化减少组件间的重新Render
目前写了不少React的项目,发现React有些特点更灵活和注重细节,很多东西需要有一定的内功才能掌握好;比如在项目中常常遇到的组件重复渲染,有时候组件重复渲染如果内容是纯文本,不打印日志就不容易发现重复渲染了&#…...

mysql面试题44:MySQL数据库cpu飙升的话,要怎么处理?
该文章专注于面试,面试只要回答关键点即可,不需要对框架有非常深入的回答,如果你想应付面试,是足够了,抓住关键点 面试官:MySQL数据库cpu飙升的话,要怎么处理呢? 当MySQL数据库的CPU使用率飙升时,可能表示数据库负载过重或存在性能问题。以下是处理MySQL数据库CPU飙…...

动画圆圈文字标志效果
效果展示 CSS 知识点 实现圆圈文字animation 属性回顾 实现思路 从效果的实现思路很简单,其实就是两个圆圈就可以实现。外层大圆(灰色)用于圆圈文字的展示,而内圆(藏青色)主要用于存放 Logo 图片。布局采…...

【数据结构】二叉树--顺序结构及实现 (堆)
目录 一 二叉树的顺序结构 二 堆的概念及结构 三 堆的实现 1 包含所有接口 (Heap.h) 2 初始化,销毁和交换(Heap.c) 3 向上调整(Heap.c) 4 插入(Heap.c) 5 向下调整(Heap.c) 6 删除(Heap.c) 7 打印&#…...

适用于嵌入式单片机的差分升级通用库
转至:痞子衡嵌入式半月刊:第 81 期 1、mcu_bsdiff_upgrade - 适用于嵌入式单片机的差分升级通用库 mcu_bsdiff_upgrade 是一款适用于嵌入式单片机的差分升级库,通用所有单片机,如stm32、华大、复旦微、瑞萨等。适合嵌入式的差分升…...
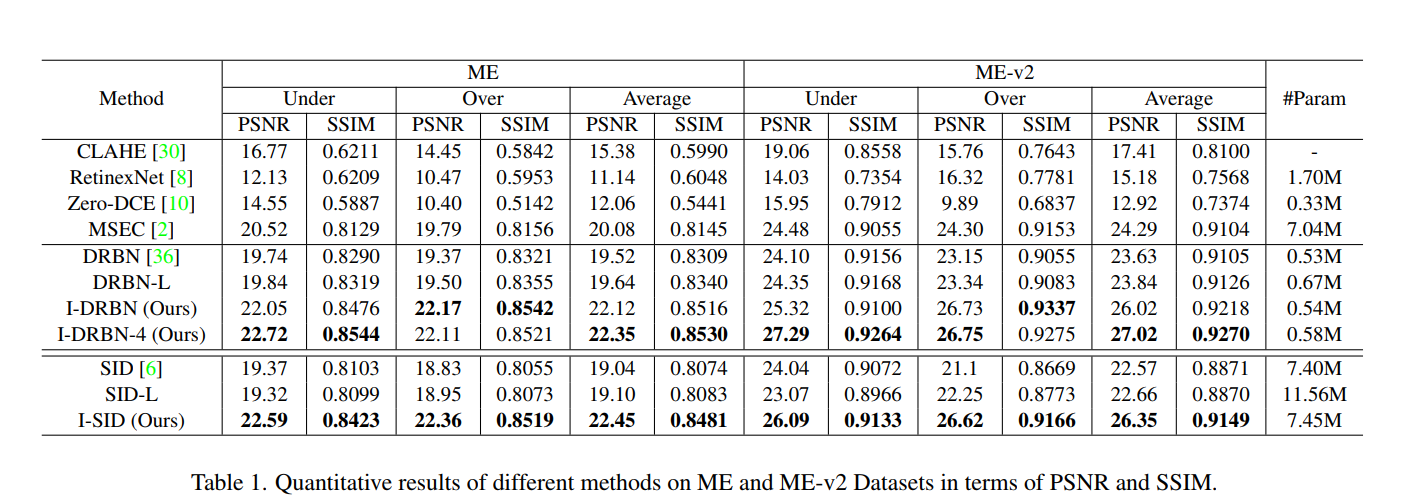
Exposure Normalization and Compensation for Multiple-Exposure Correction 论文阅读笔记
这是CVPR2022的一篇曝光校正的文章,是中科大的。一作作者按同样的思路(现有方法加一个自己设计的即插即用模块以提高性能的思路)在CVPR2023也发了一篇文章,名字是Learning Sample Relationship for Exposure Correction。 文章的…...

【从0开始学设计模式-6| 原型模式】
一个月没更新了,在找实习。。 其实还是懒了,其实每天花个半小时左右就能写一篇博客的。。。概念 原型模式(Prototype Pattern) 设计出来的目标就是:通过本体复制出与本体一样的分身(分身具有本体一样特性)定义…...

PyTorch 2.6 镜像使用教程:开箱即用,快速开启你的AI之旅
PyTorch 2.6 镜像使用教程:开箱即用,快速开启你的AI之旅 1. 为什么选择PyTorch 2.6镜像 PyTorch作为当前最流行的深度学习框架之一,其2.6版本带来了多项性能优化和新特性。但对于初学者来说,环境配置往往是最头疼的问题——CUDA…...

3大核心策略!Langchain-Chatchat RAG语义匹配效率提升实战指南
3大核心策略!Langchain-Chatchat RAG语义匹配效率提升实战指南 【免费下载链接】Langchain-Chatchat Langchain-Chatchat(原Langchain-ChatGLM)基于 Langchain 与 ChatGLM, Qwen 与 Llama 等语言模型的 RAG 与 Agent 应用 | Langchain-Chatch…...

忍者像素绘卷基础教程:3步完成‘火之意志’提示词→像素绘卷生成
忍者像素绘卷基础教程:3步完成火之意志提示词→像素绘卷生成 1. 认识忍者像素绘卷 忍者像素绘卷是一款基于Z-Image-Turbo深度优化的图像生成工具,它将传统忍者文化与16-Bit复古游戏美学完美结合。不同于常见的暗色调像素艺术,这款工具采用了…...

关键词SEO服务对网站排名有什么影响_关键词SEO服务与移动端优化有什么关系
SEO服务对网站排名有什么影响 在当前数字化时代,网站排名的重要性不言而喻。无论是企业、个人博客还是新媒体,网站的流量直接关系到业务的发展和品牌的影响力。而在这其中,关键词SEO服务起到了至关重要的作用。关键词SEO服务对网站排名究竟有…...

信号与系统核心知识点全解析
1.1 连续时间与离散时间信号1. 连续时间信号记为 x(t)自变量 t 取全体实数,在整个时间轴上都有定义图形是连续曲线2. 离散时间信号记为 x[n]自变量 n 只能取整数:…,−2,−1,0,1,2,…也叫序列,图形是一系列离散点离散信号可由连续信号采样得到…...

山东大学软件学院项目实训【个人1】
实验准备 经小组成员讨论最终决定开发基于大模型的法律文书智能摘要系统,由四人分工协作完成多源文档解析与数据预处理、结构化信息抽取与向量化存储、角色感知的个性化摘要生成、原文溯源与功能增强、文档分析管理与交互五个模块的内容。 创建gitee账号做好与队友…...

嵌入式开发代码比对工具实战指南
1. 单片机开发中的代码版本管理痛点 在嵌入式开发领域,代码版本管理是每个工程师的必修课。我经历过无数次深夜调试时,突然发现某个功能在上一版还能正常工作,最新修改后却出现了异常。这时候,快速定位两个版本间的代码差异就成了…...

免费域名会不会对网站SEO造成影响_免费域名对网站性能和访问速度有影响吗
免费域名会不会对网站SEO造成影响 在互联网时代,网站的建设和推广是每个企业和个人都必须面对的挑战。其中,域名作为网站的身份和地址,对于网站的SEO(搜索引擎优化)有着重要影响。而免费域名的出现,给许多…...

卓岚5143D网关+Modbus Slave调试全流程:从硬件连接到MQTT数据订阅
卓岚5143D网关与Modbus Slave协同调试实战指南 在工业物联网项目中,Modbus协议因其简单可靠的特点,至今仍是设备通信的主流选择。而将传统串口设备接入现代MQTT物联网平台时,网关设备的选择与配置往往成为关键难点。本文将基于卓岚5143D网关&…...