在不安全的集群上启用 Elasticsearch Xpack 安全性

本博文详细描述如何把一个没有启动安全的 Elasticsearch 集群升级为一个带有 HTTPS 访问的启用 Elasticsearch xpack 安全的集群。
为了增强 Elasticsearch 集群的安全性,你需要执行完全集群重启,并在客户端进行一些更改。 启用身份验证后,所有索引和搜索数据的请求都将需要用户名和密码或 token。
安装
如果你还不知道如何安装一个不含有安全的 Elasticsearch 8.x 集群,那么请参考之前的文章:
-
Elasticsearch:如何在 Docker 上运行 Elasticsearch 8.x 进行本地开发
-
Elastic Stack 8.0 安装 - 保护你的 Elastic Stack 现在比以往任何时候都简单 (参考文章的 “如何配置 Elasticsearch 不带安全性” 部分)
在本显示中,我们将参考上面的第二篇文章在本地部署一个不带安全的 Elasticsearch 集群。在第一次启动 Elasticsearch 之前,我们必须修改 elasticsearch.yml 文件如下:
xpack.security.enabled: false
xpack.security.http.ssl.enabled: false
只有这样的配置,我们才可以安装出一个没有任何安全的 Elasticsearch 集群。安装完毕后,我们可以在 http://localhost:9200 来访问 Elasticsearch 集群。
$ curl http://localhost:9200
{"name" : "liuxgm.local","cluster_name" : "elasticsearch","cluster_uuid" : "hHUucYL9Q0GhcC9QivRlDg","version" : {"number" : "8.10.0","build_flavor" : "default","build_type" : "tar","build_hash" : "e338da74c79465dfdc204971e600342b0aa87b6b","build_date" : "2023-09-07T08:16:21.960703010Z","build_snapshot" : false,"lucene_version" : "9.7.0","minimum_wire_compatibility_version" : "7.17.0","minimum_index_compatibility_version" : "7.0.0"},"tagline" : "You Know, for Search"
}
一旦安装完毕,我们在下面的步骤中来进行展示。
启动 xpack 安全
步骤:
- 创建 SSL Elastic 证书
- 将 SSL 证书复制到所有节点
- 更新 elasticsearch.yml
- 停止所有 Elasticsearch 节点
- 启动所有 Elasticsearch 节点
- 创建/重置内置用户密码
下面,我们分别进行展示各个步骤。
1. 创建 SSL Elastic 证书
- 要启用 TLS 通信,需要 SSL 证书。 首先创建 SSL 证书。 注意:只需创建一次证书并将其复制到所有节点。
-
创建 CA 证书。
./bin/elasticsearch-certutil ca --days 3650
[Press Enter]
[Press Enter]
$ pwd
/Users/liuxg/test/elasticsearch-8.10.0
$ ./bin/elasticsearch-certutil ca --days 3650
This tool assists you in the generation of X.509 certificates and certificate
signing requests for use with SSL/TLS in the Elastic stack.The 'ca' mode generates a new 'certificate authority'
This will create a new X.509 certificate and private key that can be used
to sign certificate when running in 'cert' mode.Use the 'ca-dn' option if you wish to configure the 'distinguished name'
of the certificate authorityBy default the 'ca' mode produces a single PKCS#12 output file which holds:* The CA certificate* The CA's private keyIf you elect to generate PEM format certificates (the -pem option), then the output will
be a zip file containing individual files for the CA certificate and private keyPlease enter the desired output file [elastic-stack-ca.p12]:
Enter password for elastic-stack-ca.p12 :
$ ls
LICENSE.txt bin elastic-stack-ca.p12 logs
NOTICE.txt config jdk.app modules
README.asciidoc data lib plugins在上面,我们可以看到生产的 elastic-stack-ca.p12 文件。如果你是针对 Linux 的安装,那么你的证书必须是位于 /usr/share/elasticsearch 目录下。
- 在单个节点上,为集群中的所有节点生成证书和私钥。
./bin/elasticsearch-certutil cert --ca elastic-stack-ca.p12 --days 3650
[Press Enter]
[Press Enter]
$ ./bin/elasticsearch-certutil cert --ca elastic-stack-ca.p12 --days 3650
This tool assists you in the generation of X.509 certificates and certificate
signing requests for use with SSL/TLS in the Elastic stack.The 'cert' mode generates X.509 certificate and private keys.* By default, this generates a single certificate and key for useon a single instance.* The '-multiple' option will prompt you to enter details for multipleinstances and will generate a certificate and key for each one* The '-in' option allows for the certificate generation to be automated by describingthe details of each instance in a YAML file* An instance is any piece of the Elastic Stack that requires an SSL certificate.Depending on your configuration, Elasticsearch, Logstash, Kibana, and Beatsmay all require a certificate and private key.* The minimum required value for each instance is a name. This can simply be thehostname, which will be used as the Common Name of the certificate. A fulldistinguished name may also be used.* A filename value may be required for each instance. This is necessary when thename would result in an invalid file or directory name. The name provided hereis used as the directory name (within the zip) and the prefix for the key andcertificate files. The filename is required if you are prompted and the nameis not displayed in the prompt.* IP addresses and DNS names are optional. Multiple values can be specified as acomma separated string. If no IP addresses or DNS names are provided, you maydisable hostname verification in your SSL configuration.* All certificates generated by this tool will be signed by a certificate authority (CA)unless the --self-signed command line option is specified.The tool can automatically generate a new CA for you, or you can provide your own withthe --ca or --ca-cert command line options.By default the 'cert' mode produces a single PKCS#12 output file which holds:* The instance certificate* The private key for the instance certificate* The CA certificateIf you specify any of the following options:* -pem (PEM formatted output)* -multiple (generate multiple certificates)* -in (generate certificates from an input file)
then the output will be be a zip file containing individual certificate/key filesEnter password for CA (elastic-stack-ca.p12) :
Please enter the desired output file [elastic-certificates.p12]:
Enter password for elastic-certificates.p12 : Certificates written to /Users/liuxg/test/elasticsearch-8.10.0/elastic-certificates.p12This file should be properly secured as it contains the private key for
your instance.
This file is a self contained file and can be copied and used 'as is'
For each Elastic product that you wish to configure, you should copy
this '.p12' file to the relevant configuration directory
and then follow the SSL configuration instructions in the product guide.For client applications, you may only need to copy the CA certificate and
configure the client to trust this certificate.
$ ls
LICENSE.txt data logs
NOTICE.txt elastic-certificates.p12 modules
README.asciidoc elastic-stack-ca.p12 plugins
bin jdk.app
config lib从上面的输出中我们可以看出来有一个新的文件 elastic-certificates.p12 被生成。
2. 拷贝 SSL 证书到所有的节点
针对子家压缩包进行安装的 Elasticsearch 来说,我们可以把刚生产的证书拷贝到相应的 config 目录下:
$ pwd
/Users/liuxg/test/elasticsearch-8.10.0
$ cp elastic-certificates.p12 config/
针对 Linux 环境,我们可以使用如下的命令来进行拷贝。必须在 “/usr/share/elasticsearch” 下创建 “elastic-certificates.p12” 文件。 创建 SSL 证书 (elastic-certificates.p12) 后,将其复制并粘贴到所有节点上。
mv /usr/share/elasticsearch/elastic-certificates.p12 /etc/elasticsearch/
chown elasticsearch:elasticsearch /etc/elasticsearch/ -R
3. 更新 elasticsearch.yml 文件
编辑 elasticsearch.yml 文件并添加或更新以下设置:
xpack.security.enabled: true
xpack.security.transport.ssl.enabled: true
xpack.security.transport.ssl.verification_mode: certificate
xpack.security.transport.ssl.client_authentication: required
xpack.security.transport.ssl.keystore.path: elastic-certificates.p12
xpack.security.transport.ssl.truststore.path: elastic-certificates.p12xpack.security.http.ssl:enabled: truekeystore.path: elastic-certificates.p12
如果你是按照本教程安装的没有设置任何安全的 Elasticsearch 集群,那么请删之前在安装时的如下两行,再进行粘贴上面的代码:
注意:证书的默认路径是 “/etc/elasticsearch/elastic-certificates.p12”。 还有:确保没有重复设置。
4. 停止所有的 Elasticsearch 节点
Linux:
service elasticsearch stop如果是字节压缩的安装,你可以使用 Ctrl + C 来终止集群的运行。
5. 启动所有 Elasticsearch 节点
从主节点开始,启动所有 Elasticsearch 节点。
Linux:
service elasticsearch start针对自解压的安装,你可以使用:
./bin/elasticsearch从主节点开始可确保 Elasticsearch 集群的核心在数据节点上线之前启动并运行。 此顺序对于维护集群稳定性和数据完整性非常重要。
6. 创建/重置内置用户密码
bin/elasticsearch-reset-password -u -i elastic$ pwd
/Users/liuxg/test/elasticsearch-8.10.0
$ ./bin/elasticsearch-setup-passwords interactive
******************************************************************************
Note: The 'elasticsearch-setup-passwords' tool has been deprecated. This command will be removed in a future release.
******************************************************************************Initiating the setup of passwords for reserved users elastic,apm_system,kibana,kibana_system,logstash_system,beats_system,remote_monitoring_user.
You will be prompted to enter passwords as the process progresses.
Please confirm that you would like to continue [y/N]yEnter password for [elastic]:
Reenter password for [elastic]:
Enter password for [apm_system]:
Reenter password for [apm_system]:
Enter password for [kibana_system]:
Reenter password for [kibana_system]:
Enter password for [logstash_system]:
Reenter password for [logstash_system]:
Enter password for [beats_system]:
Reenter password for [beats_system]:
Enter password for [remote_monitoring_user]:
Reenter password for [remote_monitoring_user]:
Changed password for user [apm_system]
Changed password for user [kibana_system]
Changed password for user [kibana]
Changed password for user [logstash_system]
passwordChanged password for user [beats_system]
Changed password for user [remote_monitoring_user]
Changed password for user [elastic]为方便说明,我们在上面把密码都设置为 “password”。
7. 测试
我们使用如下的命令来进行测试:
curl -k -u elastic:password https://localhost:9200$ curl -k -u elastic:password https://localhost:9200
{"name" : "liuxgm.local","cluster_name" : "elasticsearch","cluster_uuid" : "hHUucYL9Q0GhcC9QivRlDg","version" : {"number" : "8.10.0","build_flavor" : "default","build_type" : "tar","build_hash" : "e338da74c79465dfdc204971e600342b0aa87b6b","build_date" : "2023-09-07T08:16:21.960703010Z","build_snapshot" : false,"lucene_version" : "9.7.0","minimum_wire_compatibility_version" : "7.17.0","minimum_index_compatibility_version" : "7.0.0"},"tagline" : "You Know, for Search"
}常见问题及解决方案:
- SSL 证书路径:确保 “elastic-certificates.p12” 路径正确。 在 Debian 或 RPM 安装中,默认路径是 “/etc/elasticsearch”。
- SSL 证书权限:验证所有 Elasticsearch 节点是否具有 SSL 证书和足够的访问权限。
- SSL 证书密码:在证书创建过程中,未定义密码,但 Elasticsearch v8 可能有默认密码。 检查 “./bin/elasticsearch-keystore list” 并删除为“xpack.security.transport.ssl.*”定义的任何密码。
- Elasticsearch-Reset-Password 命令(1):确保您可以通过 localhost 访问 Elasticsearch。 如果没有,请在命令末尾添加 “—url”。 检查是否有任何代理问题。
- Elasticsearch-Reset-Password命令(2):该命令需要数据节点连接到集群,因为它需要将 elastic 用户密码添加到 '.security' 索引中。 在运行命令之前确保数据节点已连接。
- Kibana 不工作:Elasticsearch v8 之后,你无法在 Kibana 中使用 elastic 超级用户。 使用 “kibana_system” 用户。
- Kibana 系统无法登录:使用 elastic 用户登录 Kibana; “kibana_system” 用户保留用于 Kibana 和 Elasticsearch 之间的通信。
更多阅读:Security:如何安装 Elastic SIEM 和 EDR
相关文章:
在不安全的集群上启用 Elasticsearch Xpack 安全性
本博文详细描述如何把一个没有启动安全的 Elasticsearch 集群升级为一个带有 HTTPS 访问的启用 Elasticsearch xpack 安全的集群。 为了增强 Elasticsearch 集群的安全性,你需要执行完全集群重启,并在客户端进行一些更改。 启用身份验证后,所…...

vue清除动态路由
项目中往往都是添加动态路由,如何删除已经添加进来的路由往往被忽视,为此这里做一下记录: 查看vue-router路由文档 可以看出 Vue2中是通过matcher来进行重新赋值来进行清空的。 let createRouter () > new Router({mode: history, //ha…...

rsyslog实现将日志存储到mysql中
前提:准备好msql server或mariadb server; 1、安装rsyslog连接至mysql server的驱动模块; [13:24 rootcentos6.8~]# yum install -y rsyslog-mysql [13:24 rootcentos6.8~]# rpm -ql rsyslog-mysql /lib64/rsyslog/ommysql.so /usr/…...
2015架构案例(五十一)
第5题 【说明】某信息技术公司计划开发一套在线投票系统,用于为市场调研、信息调查和销售反馈等业务提供服务。该系统计划通过大量宣传和奖品鼓励的方式快速积累用户,当用户规模扩大到一定程度时,开始联系相关企业提供信息服务,并…...

亚马逊测评安全吗?
测评可以说是卖家非常宝贵的财富,通过测评和广告相结合,可以快速有效的提升店铺的产品销量,提高转化,提升listing权重,但现在很多卖家找真人测评补单后店铺出现问题导致大家对测评的安全性感到担忧,因为真人…...
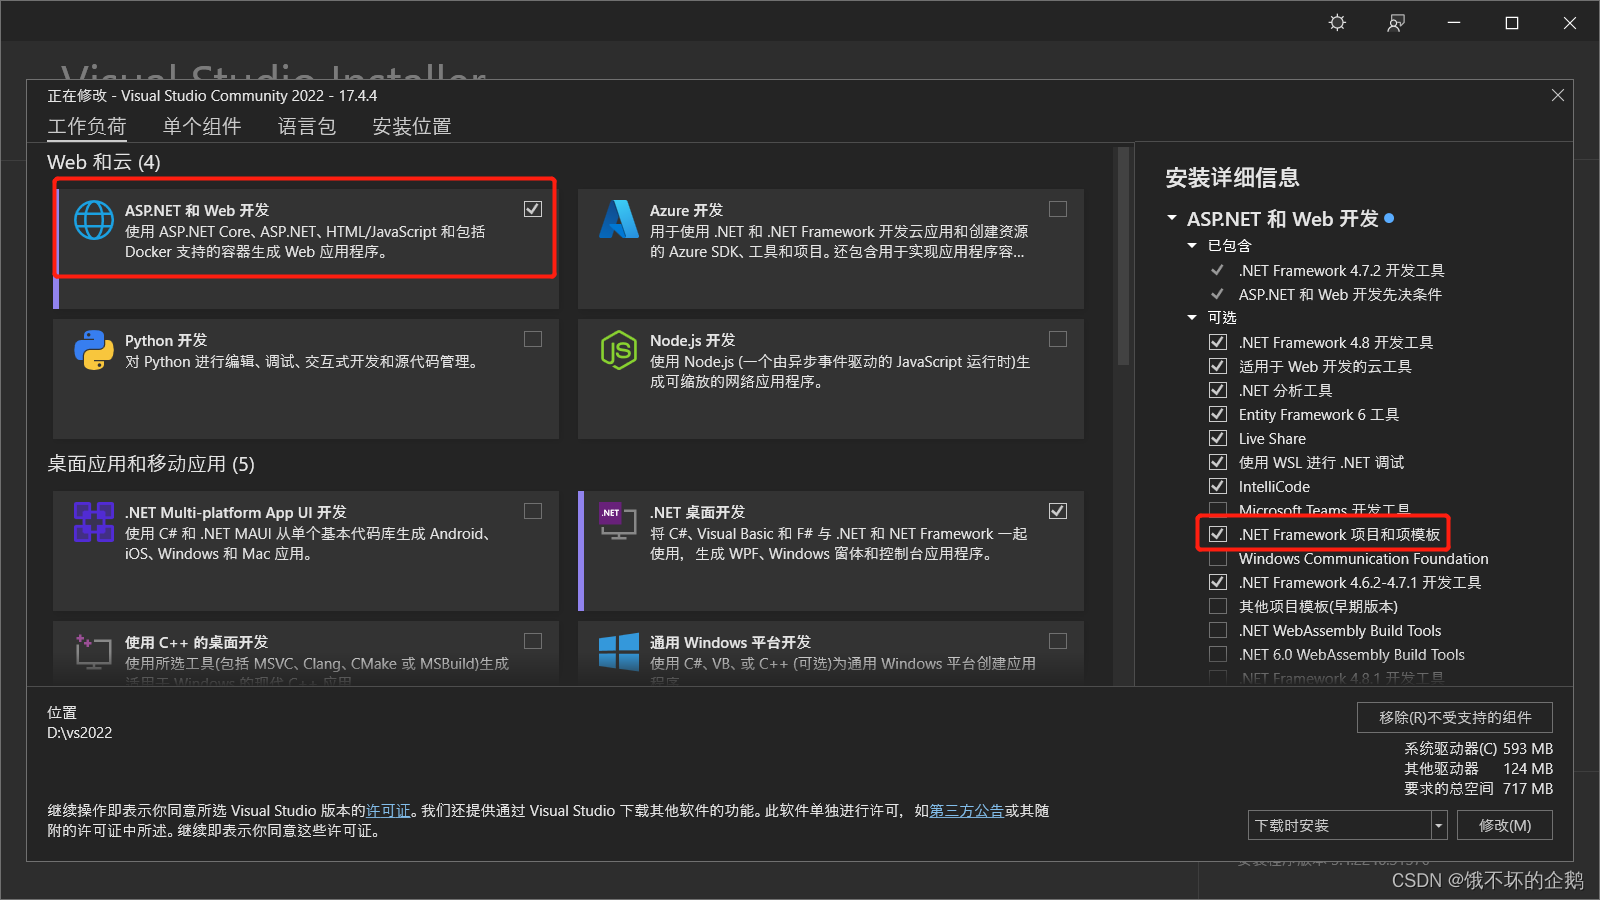
VS2022新建项目时没有ASP.NET Web应用程序 (.NET Framework)
问题:如图,VS2022新建项目时没有“ASP.NET Web应用程序 (.NET Framework)”的选项解决方法:点击跳转至修改安装选项界面选择安装该项即可:...
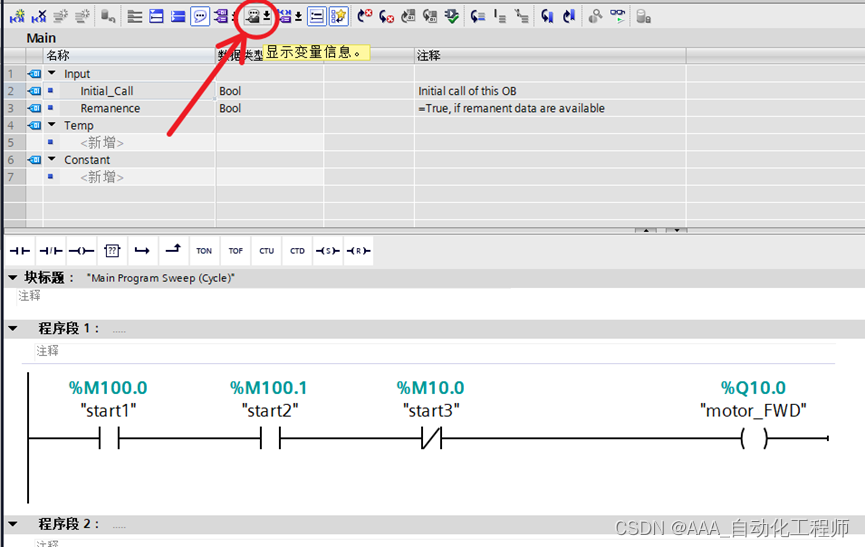
TIA博途软件中如何设置在程序中自动显示变量的注释信息?
TIA博途软件中如何设置在程序中自动显示变量的注释信息? 本例以TIA博途V15为例进行举例说明 如下图所示,新建一个项目后,打开PLC变量表,这里我选择几个变量进行举例说明,给这几个变量添加注释信息, 打开OB1,编写一句简单的程序,如下图所示,可以看到此时变量只显示名称…...
Hadoop3教程(一):Hadoop的定义、组成及全生态概览
文章目录 (1)定义1.1 发展历史1.2 三大发行版本1.3 Hadoop的优势1.4 Hadoop的组成 (13)HDFS概述(14)Yarn架构(15)MapReduce概述(16) HDFS、YARN、MapReduce三…...
成为数据分析师要具备什么能力——功法篇(上)
这篇文章适合做了一段时间数据分析工作,开始思考怎么继续提升自己的分析师、运营或者是实习了一段时间的同学,这时的你也许会想几个问题: 为什么我做出来的分析总觉得没有别人的那么高级? 老板为什么总说我的分析“太浅了”&#…...

【MySQL】Java的JDBC编程
目录 ♫什么是JDBC ♫JDBC常用接口和类 ♪Connection接口 ♪Statement对象 ♪ResultSet对象 ♫JDBC的使用 ♪添加“驱动包” ♪创建数据源,描述数据库服务器在哪 ♪和数据库服务器建立连接 ♪构建SQL语句 ♪执行SQL语句 ♪释放资源 ♫什么是JDBC 我们前面操…...
最简安装教程)
windows OpenCV(包含cuda)最简安装教程
windows OpenCV(包含cuda)最简安装教程 1. 在Windows下安装vcpkg vcpkg是一个开源的C包管理器,它能帮助我们轻松地安装和管理C库和工具。要在Windows上安装vcpkg,可以按照以下步骤进行: 克隆vcpkg仓库: 首…...

Vue3 + Nodejs 实战 ,文件上传项目--实现文件批量上传(显示实时上传进度)
目录 技术栈 1.后端接口实现 2.前端实现 2.1 实现静态结构 2.2 整合上传文件的数据 2.3 实现一键上传文件 2.4 取消上传 博客主页:専心_前端,javascript,mysql-CSDN博客 系列专栏:vue3nodejs 实战--文件上传 前端代码仓库:jiangjunjie…...

狂砸40亿美元,亚马逊向OpenAI竞争对手Anthropic投资
9 月 25 日下午,亚马逊在公司官网发布,向大模型公司 Anthropic 投资 40 亿美元, Anthropic以拥有对标 ChatGPT 的谈天机器人 Claude 而出名。 这项新的战略合作将结合双方在更安全的生成式AI领域的技术和专业知识,加速Anthropic未…...

目标检测YOLO实战应用案例100讲-基于YOLOv5_tiny算法的路面裂缝智能检测
目录 前言 国内外研究现状 公路路面裂缝检测方法现状 基于深度学习检测算法现状...

P5682 [CSP-J2019 江西] 次大值% 运算 set 去重的一道好题
#include <bits/stdc.h> using namespace std; int n, x, len, a[100010], ans; set<int> s; set<int>::iterator asd; int main() {/*a[n-1] 是最大的a[n-2] 可能是次大的a[n]%a[n-1]<a[n-1] 不可能是最大的,可能是次大的a[n-1]%a[n-2]<…...
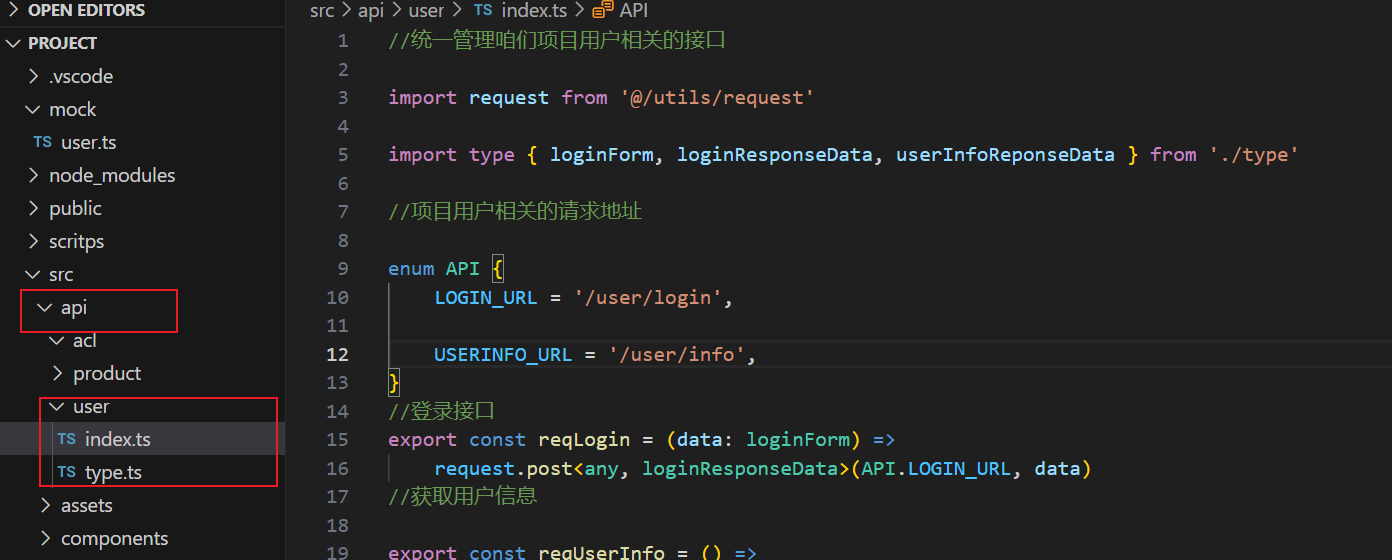
vue3后台管理框架之API接口统一管理
在开发项目的时候,接口可能很多需要统一管理。在src目录下去创建api文件夹去统一管理项目的接口; 参数请参考mock中的模拟接口 //统一管理咱们项目用户相关的接口import request from @/utils/requestimport type { loginForm, loginResponseData, userInfoReponseData } fro…...

线性表的插入、删除和查询操作
线性表的插入、删除和查询操作 1、定义线性表 定义一个线性结构,有列表默认长度设置为50,列表数量 #include <stdio.h> #define MaxSize 50typedef int Element; typedef struct{Element data[MaxSize];int length; }SqList;2、顺序表插入 插入…...

基于深度学习网络的疲劳驾驶检测算法matlab仿真
目录 1.算法运行效果图预览 2.算法运行软件版本 3.部分核心程序 4.算法理论概述 4.1疲劳检测理论概述 4.2 本课题说明 5.算法完整程序工程 1.算法运行效果图预览 2.算法运行软件版本 matlab2022a 3.部分核心程序 In_layer_Size [227 227 3]; img_size [224,…...

【文件系统】Linux文件系统的基本存储机制
Linux文件系统是Linux操作系统的重要组成部分,它负责管理计算机存储设备上的文件和目录。Linux文件系统采用类Unix的设计,具有强大的性能和可扩展性,支持多种文件系统类型,如ext4、XFS、Btrfs等。在项目存储架构的设计中ÿ…...
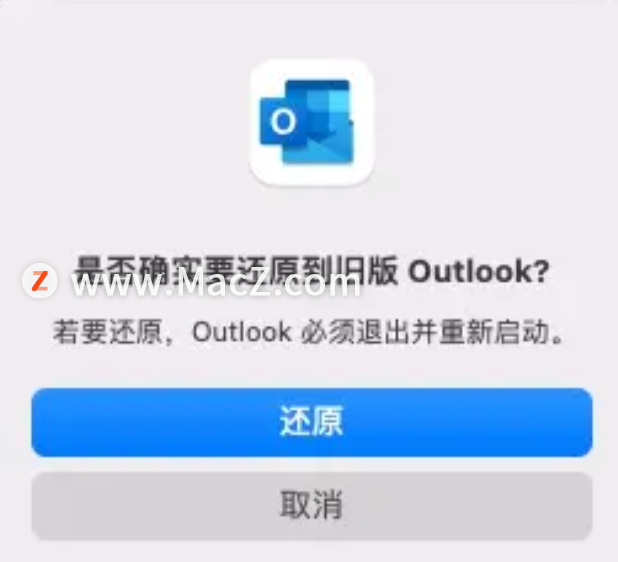
Outlook导入导出功能灰色,怎么解决
下载安装 Outlook 软件后,登陆账号,然后选择“文件” - “导出”,结果发现“导出”按钮是灰色的,根本无法导出。根据官方说法:由于配置没有完成或者office产品没有正确激活。outlook导出键为灰色原因由于配置没有完成或…...

OpenCore Legacy Patcher终极指南:5步让老旧Mac完美运行最新macOS系统
OpenCore Legacy Patcher终极指南:5步让老旧Mac完美运行最新macOS系统 【免费下载链接】OpenCore-Legacy-Patcher Experience macOS just like before 项目地址: https://gitcode.com/GitHub_Trending/op/OpenCore-Legacy-Patcher OpenCore Legacy Patcher是…...

【技术解析】基于主成分分析与神经网络的航空安全风险建模:从QAR数据预处理到实时预警仿真
1. 航空安全风险建模的技术背景 每次坐飞机时,你可能都好奇过:机长是如何确保飞行安全的?其实背后有一整套数据驱动的安全体系在支撑。QAR(快速存取记录器)就像飞机的"黑匣子",记录了上百项飞行参…...

终极指南:如何使用Autoclick实现Mac自动点击900次/秒
终极指南:如何使用Autoclick实现Mac自动点击900次/秒 【免费下载链接】Autoclick A simple Mac app that simulates mouse clicks 项目地址: https://gitcode.com/gh_mirrors/au/Autoclick 你是否厌倦了重复性的鼠标点击工作?无论是游戏中的重复操…...

安全聚合技术:原理、实现与多场景应用
1. 安全聚合技术概述安全聚合(Secure Aggregation)是一种多方安全计算技术,它允许多个互不信任的参与方在不泄露各自私有数据的前提下,共同计算出一个聚合结果。这项技术的核心价值在于解决了数据隐私与数据共享之间的矛盾&#x…...

WandEnhancer技术解密:如何通过本地化增强重新定义游戏修改体验
WandEnhancer技术解密:如何通过本地化增强重新定义游戏修改体验 【免费下载链接】Wand-Enhancer Advanced UX and interoperability extension for Wand (WeMod) app 项目地址: https://gitcode.com/gh_mirrors/we/Wand-Enhancer 你是否曾经面对游戏修改工具…...

智慧树自动刷课终极指南:3分钟快速上手Autovisor免费工具
智慧树自动刷课终极指南:3分钟快速上手Autovisor免费工具 【免费下载链接】Autovisor 2025智慧树刷课脚本 基于Python Playwright的自动化程序 [有免安装版] 项目地址: https://gitcode.com/gh_mirrors/au/Autovisor 还在为智慧树网课的手动操作烦恼吗&#…...

ncmdumpGUI:3分钟解锁网易云音乐ncm格式,让你的音乐无处不在
ncmdumpGUI:3分钟解锁网易云音乐ncm格式,让你的音乐无处不在 【免费下载链接】ncmdumpGUI C#版本网易云音乐ncm文件格式转换,Windows图形界面版本 项目地址: https://gitcode.com/gh_mirrors/nc/ncmdumpGUI 还在为网易云音乐下载的nc…...

Blitz.js全栈开发框架:零API理念与Next.js深度集成实战
1. 项目概述:一个颠覆性的全栈开发框架如果你和我一样,在过去的几年里,一直在React生态圈里打转,从Create React App到Next.js,再到尝试自己搭建一套包含身份验证、数据层、API路由的完整应用,那你一定对那…...

MCP-Commander:让AI助手操作本地文件与命令行的智能接口
1. 项目概述:一个连接思维与执行的智能接口最近在折腾AI工作流的时候,发现了一个挺有意思的项目,叫nmindz/mcp-commander。乍一看这个名字,可能有点摸不着头脑,但如果你正在尝试让大型语言模型(LLM…...

Linux内核C11升级:从C89到现代C语言的演进与挑战
1. 项目概述:一次内核语言的“心脏移植”手术最近Linux内核社区放出了一个重磅消息,未来计划将内核的C语言标准从使用了二十多年的C89/C90,升级到C11。这个消息一出,在开发者圈子里激起的讨论,不亚于当年从Python 2迁移…...