《视觉 SLAM 十四讲》V2 第 8 讲 视觉里程计2 【如何根据图像 估计 相机运动】【光流 —> 直接法】
OpenCV关于 光流的教程

文章目录
- 第 8 讲 视觉里程计 2
- 8.2 光流
- 8.3 实践: LK 光流 【Code】
- 本讲 CMakeLists.txt
- 8.4 直接法
- 8.5 实践: 双目的稀疏直接法 【Code】
- 8.5.4 直接法的优缺点
- 习题 8
- √ 题1 光流方法
- 题2
- 题3
- 题4
- 题5
第 8 讲 视觉里程计 2
P205 第8讲
光流法 跟踪 特征点
直接法 估计相机位姿
多层直接法
8.1 直接法
第 7 讲 使用特征点 估计 相机运动
缺点:
1、关键点的提取 与 描述子的计算 非常耗时
2、只使用 特征点,丢弃了大部分 可能有用的图像信息
3、无明显纹理信息的地方(白墙、空走廊),无法匹配
改进思路:

直接法不保留特征点

特征点法 估计 相机运动: 最小化 重投影误差(Reprojection error)
直接法:最小化 光度误差(Photometric error)。根据 像素的亮度信息估计相机运动
特征点法: 只能重构稀疏地图
直接法: 稀疏、稠密、半稠密

8.2 光流
直接法从光流演变
同:相同的假设条件
异:光流描述了像素在图像中的运动,直接法附带一个相机模型。
光流: 描述 像素 随时间 在图像之间运动的方法
稀疏光流: 计算部分像素运动。 Lucas-Kanade光流 【LK光流】
稠密光流: 计算所有像素。 Horn-Schunck光流


所有算法都是在一定假设下工作的。


LK 光流 常被用来 跟踪角点的运动。
8.3 实践: LK 光流 【Code】


8.3.2 用高斯牛顿法 实现光流


本讲 CMakeLists.txt
cmake_minimum_required(VERSION 2.8)
project(ch8)set(CMAKE_BUILD_TYPE "Release")
add_definitions("-DENABLE_SSE")
set(CMAKE_CXX_FLAGS "-std=c++11 ${SSE_FLAGS} -g -O3 -march=native")find_package(OpenCV 4 REQUIRED)
find_package(Sophus REQUIRED)
find_package(Pangolin REQUIRED)include_directories(${OpenCV_INCLUDE_DIRS}${G2O_INCLUDE_DIRS}${Sophus_INCLUDE_DIRS}"/usr/include/eigen3/"${Pangolin_INCLUDE_DIRS}
)add_executable(optical_flow optical_flow.cpp)
target_link_libraries(optical_flow ${OpenCV_LIBS})#[[   # 块注释
add_executable(direct_method direct_method.cpp)
target_link_libraries(direct_method ${OpenCV_LIBS} ${Pangolin_LIBRARIES} ${Sophus_LIBRARIES})
]]
报错:
/home/xixi/Downloads/slambook2-master/ch8/optical_flow.cpp:145:37: error: ‘CV_GRAY2BGR’ was not declared in this scope145 | cv::cvtColor(img2, img2_single, CV_GRAY2BGR);改为 cv::COLOR_GRAY2BGR。有3个地方
要是 cd build 还要改图片路径。
mkdir build && cd build
cmake ..
make
./optical_flow


optical_flow.cpp
//
// Created by Xiang on 2017/12/19.
//#include <opencv2/opencv.hpp>
#include <string>
#include <chrono>
#include <Eigen/Core>
#include <Eigen/Dense>using namespace std;
using namespace cv;string file_1 = "../LK1.png";  // first image
string file_2 = "../LK2.png";  // second image/// Optical flow tracker and interface
class OpticalFlowTracker {
public:OpticalFlowTracker(const Mat &img1_,const Mat &img2_,const vector<KeyPoint> &kp1_,vector<KeyPoint> &kp2_,vector<bool> &success_,bool inverse_ = true, bool has_initial_ = false) :img1(img1_), img2(img2_), kp1(kp1_), kp2(kp2_), success(success_), inverse(inverse_),has_initial(has_initial_) {}void calculateOpticalFlow(const Range &range);private:const Mat &img1;const Mat &img2;const vector<KeyPoint> &kp1;vector<KeyPoint> &kp2;vector<bool> &success;bool inverse = true;bool has_initial = false;
};/*** single level optical flow* @param [in] img1 the first image* @param [in] img2 the second image* @param [in] kp1 keypoints in img1* @param [in|out] kp2 keypoints in img2, if empty, use initial guess in kp1* @param [out] success true if a keypoint is tracked successfully* @param [in] inverse use inverse formulation?*/
void OpticalFlowSingleLevel(const Mat &img1,const Mat &img2,const vector<KeyPoint> &kp1,vector<KeyPoint> &kp2,vector<bool> &success,bool inverse = false,bool has_initial_guess = false
);/*** multi level optical flow, scale of pyramid is set to 2 by default* the image pyramid will be create inside the function* @param [in] img1 the first pyramid* @param [in] img2 the second pyramid* @param [in] kp1 keypoints in img1* @param [out] kp2 keypoints in img2* @param [out] success true if a keypoint is tracked successfully* @param [in] inverse set true to enable inverse formulation*/
void OpticalFlowMultiLevel(const Mat &img1,const Mat &img2,const vector<KeyPoint> &kp1,vector<KeyPoint> &kp2,vector<bool> &success,bool inverse = false
);/*** get a gray scale value from reference image (bi-linear interpolated)* @param img* @param x* @param y* @return the interpolated value of this pixel*/inline float GetPixelValue(const cv::Mat &img, float x, float y) {// boundary checkif (x < 0) x = 0;if (y < 0) y = 0;if (x >= img.cols - 1) x = img.cols - 2;if (y >= img.rows - 1) y = img.rows - 2;float xx = x - floor(x);float yy = y - floor(y);int x_a1 = std::min(img.cols - 1, int(x) + 1);int y_a1 = std::min(img.rows - 1, int(y) + 1);return (1 - xx) * (1 - yy) * img.at<uchar>(y, x)+ xx * (1 - yy) * img.at<uchar>(y, x_a1)+ (1 - xx) * yy * img.at<uchar>(y_a1, x)+ xx * yy * img.at<uchar>(y_a1, x_a1);
}int main(int argc, char **argv) {// images, note they are CV_8UC1, not CV_8UC3Mat img1 = imread(file_1, 0);Mat img2 = imread(file_2, 0);// key points, using GFTT here.vector<KeyPoint> kp1;Ptr<GFTTDetector> detector = GFTTDetector::create(500, 0.01, 20); // maximum 500 keypointsdetector->detect(img1, kp1);// now lets track these key points in the second image// first use single level LK in the validation picturevector<KeyPoint> kp2_single;vector<bool> success_single;OpticalFlowSingleLevel(img1, img2, kp1, kp2_single, success_single);// then test multi-level LKvector<KeyPoint> kp2_multi;vector<bool> success_multi;chrono::steady_clock::time_point t1 = chrono::steady_clock::now();OpticalFlowMultiLevel(img1, img2, kp1, kp2_multi, success_multi, true);chrono::steady_clock::time_point t2 = chrono::steady_clock::now();auto time_used = chrono::duration_cast<chrono::duration<double>>(t2 - t1);cout << "optical flow by gauss-newton: " << time_used.count() << endl;// use opencv's flow for validationvector<Point2f> pt1, pt2;for (auto &kp: kp1) pt1.push_back(kp.pt);vector<uchar> status;vector<float> error;t1 = chrono::steady_clock::now();cv::calcOpticalFlowPyrLK(img1, img2, pt1, pt2, status, error);t2 = chrono::steady_clock::now();time_used = chrono::duration_cast<chrono::duration<double>>(t2 - t1);cout << "optical flow by opencv: " << time_used.count() << endl;// plot the differences of those functionsMat img2_single;cv::cvtColor(img2, img2_single, cv::COLOR_GRAY2BGR);for (int i = 0; i < kp2_single.size(); i++) {if (success_single[i]) {cv::circle(img2_single, kp2_single[i].pt, 2, cv::Scalar(0, 250, 0), 2);cv::line(img2_single, kp1[i].pt, kp2_single[i].pt, cv::Scalar(0, 250, 0));}}Mat img2_multi;cv::cvtColor(img2, img2_multi, cv::COLOR_GRAY2BGR);for (int i = 0; i < kp2_multi.size(); i++) {if (success_multi[i]) {cv::circle(img2_multi, kp2_multi[i].pt, 2, cv::Scalar(0, 250, 0), 2);cv::line(img2_multi, kp1[i].pt, kp2_multi[i].pt, cv::Scalar(0, 250, 0));}}Mat img2_CV;cv::cvtColor(img2, img2_CV, cv::COLOR_GRAY2BGR);for (int i = 0; i < pt2.size(); i++) {if (status[i]) {cv::circle(img2_CV, pt2[i], 2, cv::Scalar(0, 250, 0), 2);cv::line(img2_CV, pt1[i], pt2[i], cv::Scalar(0, 250, 0));}}cv::imshow("tracked single level", img2_single);cv::imshow("tracked multi level", img2_multi);cv::imshow("tracked by opencv", img2_CV);cv::waitKey(0);return 0;
}void OpticalFlowSingleLevel(const Mat &img1,const Mat &img2,const vector<KeyPoint> &kp1,vector<KeyPoint> &kp2,vector<bool> &success,bool inverse, bool has_initial) {kp2.resize(kp1.size());success.resize(kp1.size());OpticalFlowTracker tracker(img1, img2, kp1, kp2, success, inverse, has_initial);parallel_for_(Range(0, kp1.size()),std::bind(&OpticalFlowTracker::calculateOpticalFlow, &tracker, placeholders::_1));
}void OpticalFlowTracker::calculateOpticalFlow(const Range &range) {// parametersint half_patch_size = 4;int iterations = 10;for (size_t i = range.start; i < range.end; i++) {auto kp = kp1[i];double dx = 0, dy = 0; // dx,dy need to be estimatedif (has_initial) {dx = kp2[i].pt.x - kp.pt.x;dy = kp2[i].pt.y - kp.pt.y;}double cost = 0, lastCost = 0;bool succ = true; // indicate if this point succeeded// Gauss-Newton iterationsEigen::Matrix2d H = Eigen::Matrix2d::Zero();    // hessianEigen::Vector2d b = Eigen::Vector2d::Zero();    // biasEigen::Vector2d J;  // jacobianfor (int iter = 0; iter < iterations; iter++) {if (inverse == false) {H = Eigen::Matrix2d::Zero();b = Eigen::Vector2d::Zero();} else {// only reset bb = Eigen::Vector2d::Zero();}cost = 0;// compute cost and jacobianfor (int x = -half_patch_size; x < half_patch_size; x++)for (int y = -half_patch_size; y < half_patch_size; y++) {double error = GetPixelValue(img1, kp.pt.x + x, kp.pt.y + y) -GetPixelValue(img2, kp.pt.x + x + dx, kp.pt.y + y + dy);;  // Jacobianif (inverse == false) {J = -1.0 * Eigen::Vector2d(0.5 * (GetPixelValue(img2, kp.pt.x + dx + x + 1, kp.pt.y + dy + y) -GetPixelValue(img2, kp.pt.x + dx + x - 1, kp.pt.y + dy + y)),0.5 * (GetPixelValue(img2, kp.pt.x + dx + x, kp.pt.y + dy + y + 1) -GetPixelValue(img2, kp.pt.x + dx + x, kp.pt.y + dy + y - 1)));} else if (iter == 0) {// in inverse mode, J keeps same for all iterations// NOTE this J does not change when dx, dy is updated, so we can store it and only compute errorJ = -1.0 * Eigen::Vector2d(0.5 * (GetPixelValue(img1, kp.pt.x + x + 1, kp.pt.y + y) -GetPixelValue(img1, kp.pt.x + x - 1, kp.pt.y + y)),0.5 * (GetPixelValue(img1, kp.pt.x + x, kp.pt.y + y + 1) -GetPixelValue(img1, kp.pt.x + x, kp.pt.y + y - 1)));}// compute H, b and set cost;b += -error * J;cost += error * error;if (inverse == false || iter == 0) {// also update HH += J * J.transpose();}}// compute updateEigen::Vector2d update = H.ldlt().solve(b);if (std::isnan(update[0])) {// sometimes occurred when we have a black or white patch and H is irreversiblecout << "update is nan" << endl;succ = false;break;}if (iter > 0 && cost > lastCost) {break;}// update dx, dydx += update[0];dy += update[1];lastCost = cost;succ = true;if (update.norm() < 1e-2) {// convergebreak;}}success[i] = succ;// set kp2kp2[i].pt = kp.pt + Point2f(dx, dy);}
}void OpticalFlowMultiLevel(const Mat &img1,const Mat &img2,const vector<KeyPoint> &kp1,vector<KeyPoint> &kp2,vector<bool> &success,bool inverse) {// parametersint pyramids = 4;double pyramid_scale = 0.5;double scales[] = {1.0, 0.5, 0.25, 0.125};// create pyramidschrono::steady_clock::time_point t1 = chrono::steady_clock::now();vector<Mat> pyr1, pyr2; // image pyramidsfor (int i = 0; i < pyramids; i++) {if (i == 0) {pyr1.push_back(img1);pyr2.push_back(img2);} else {Mat img1_pyr, img2_pyr;cv::resize(pyr1[i - 1], img1_pyr,cv::Size(pyr1[i - 1].cols * pyramid_scale, pyr1[i - 1].rows * pyramid_scale));cv::resize(pyr2[i - 1], img2_pyr,cv::Size(pyr2[i - 1].cols * pyramid_scale, pyr2[i - 1].rows * pyramid_scale));pyr1.push_back(img1_pyr);pyr2.push_back(img2_pyr);}}chrono::steady_clock::time_point t2 = chrono::steady_clock::now();auto time_used = chrono::duration_cast<chrono::duration<double>>(t2 - t1);cout << "build pyramid time: " << time_used.count() << endl;// coarse-to-fine LK tracking in pyramidsvector<KeyPoint> kp1_pyr, kp2_pyr;for (auto &kp:kp1) {auto kp_top = kp;kp_top.pt *= scales[pyramids - 1];kp1_pyr.push_back(kp_top);kp2_pyr.push_back(kp_top);}for (int level = pyramids - 1; level >= 0; level--) {// from coarse to finesuccess.clear();t1 = chrono::steady_clock::now();OpticalFlowSingleLevel(pyr1[level], pyr2[level], kp1_pyr, kp2_pyr, success, inverse, true);t2 = chrono::steady_clock::now();auto time_used = chrono::duration_cast<chrono::duration<double>>(t2 - t1);cout << "track pyr " << level << " cost time: " << time_used.count() << endl;if (level > 0) {for (auto &kp: kp1_pyr)kp.pt /= pyramid_scale;for (auto &kp: kp2_pyr)kp.pt /= pyramid_scale;}}for (auto &kp: kp2_pyr)kp2.push_back(kp);
}
8.4 直接法
光流: 首先追踪特征点位置,再根据这些位置确定相机的运动
- 很难保证全局的最优性。
——> 在后一步中,调整前一步的结果。


稀疏直接法:关键点,假设周围像素不变(因此不必计算描述子)。可快速求解相机位姿。
半稠密直接法:只使用带有梯度的像素点
稠密直接法:多数需要GPU加速
8.5 实践: 双目的稀疏直接法 【Code】
基于特征点的深度恢复(三角化)
基于块匹配的深度恢复
多层直接法 金字塔式

输出: 每个图像的每层金字塔上的追踪点,并输出运行时间。
源码改动:
1、
所有 SE3d 去掉 d
2、改路径
3、报错3
/home/xixi/Downloads/slambook2-master/ch8/direct_method.cpp:206:35: error: ‘CV_GRAY2BGR’ was not declared in this scope206 | cv::cvtColor(img2, img2_show, CV_GRAY2BGR);改为 cv::COLOR_GRAY2BGR。有3个地方
4、报错4
/usr/bin/ld: CMakeFiles/direct_method.dir/direct_method.cpp.o: in function `JacobianAccumulator::accumulate_jacobian(cv::Range const&)':
/home/xixi/Downloads/slambook2-master/ch8/direct_method.cpp:235: undefined reference to `Sophus::SE3::operator*(Eigen::Matrix<double, 3, 1, 0, 3, 1> const&) const'
/usr/bin/ld: CMakeFiles/direct_method.dir/direct_method.cpp.o: in function `DirectPoseEstimationSingleLayer(cv::Mat const&, cv::Mat const&, std::vector<Eigen::Matrix<double, 2, 1, 0, 2, 1>, Eigen::aligned_allocator<Eigen::Matrix<double, 2, 1, 0, 2, 1> > > const&, std::vector<double, std::allocator<double> >, Sophus::SE3&)':
/home/xixi/Downloads/slambook2-master/ch8/direct_method.cpp:178: undefined reference to `Sophus::SE3::exp(Eigen::Matrix<double, 6, 1, 0, 6, 1> const&)'
/usr/bin/ld: /home/xixi/Downloads/slambook2-master/ch8/direct_method.cpp:178: undefined reference to `Sophus::SE3::operator*(Sophus::SE3 const&) const'
Sophus库链接问题
add_executable(direct_method direct_method.cpp)
target_link_libraries(direct_method ${OpenCV_LIBS} ${Pangolin_LIBRARIES} ${Sophus_LIBRARIES})
byzanz-record -x 146 -y 104 -w 786 -h 533 -d 20 --delay=5 -c /home/xixi/myGIF/test.gif

这里程序运行感觉不太对,暂时不清楚哪里。
direct_method.cpp
#include <opencv2/opencv.hpp>
#include <sophus/se3.h>
#include <boost/format.hpp>
#include <pangolin/pangolin.h>using namespace std;typedef vector<Eigen::Vector2d, Eigen::aligned_allocator<Eigen::Vector2d>> VecVector2d;// Camera intrinsics
double fx = 718.856, fy = 718.856, cx = 607.1928, cy = 185.2157;
// baseline
double baseline = 0.573;
// paths
string left_file = "../left.png";
string disparity_file = "../disparity.png";
boost::format fmt_others("../%06d.png");    // other files// useful typedefs
typedef Eigen::Matrix<double, 6, 6> Matrix6d;
typedef Eigen::Matrix<double, 2, 6> Matrix26d;
typedef Eigen::Matrix<double, 6, 1> Vector6d;/// class for accumulator jacobians in parallel
class JacobianAccumulator {
public:JacobianAccumulator(const cv::Mat &img1_,const cv::Mat &img2_,const VecVector2d &px_ref_,const vector<double> depth_ref_,Sophus::SE3 &T21_) :img1(img1_), img2(img2_), px_ref(px_ref_), depth_ref(depth_ref_), T21(T21_) {projection = VecVector2d(px_ref.size(), Eigen::Vector2d(0, 0));}/// accumulate jacobians in a rangevoid accumulate_jacobian(const cv::Range &range);/// get hessian matrixMatrix6d hessian() const { return H; }/// get biasVector6d bias() const { return b; }/// get total costdouble cost_func() const { return cost; }/// get projected pointsVecVector2d projected_points() const { return projection; }/// reset h, b, cost to zerovoid reset() {H = Matrix6d::Zero();b = Vector6d::Zero();cost = 0;}private:const cv::Mat &img1;const cv::Mat &img2;const VecVector2d &px_ref;const vector<double> depth_ref;Sophus::SE3 &T21;VecVector2d projection; // projected pointsstd::mutex hessian_mutex;Matrix6d H = Matrix6d::Zero();Vector6d b = Vector6d::Zero();double cost = 0;
};/*** pose estimation using direct method* @param img1* @param img2* @param px_ref* @param depth_ref* @param T21*/
void DirectPoseEstimationMultiLayer(const cv::Mat &img1,const cv::Mat &img2,const VecVector2d &px_ref,const vector<double> depth_ref,Sophus::SE3 &T21
);/*** pose estimation using direct method* @param img1* @param img2* @param px_ref* @param depth_ref* @param T21*/
void DirectPoseEstimationSingleLayer(const cv::Mat &img1,const cv::Mat &img2,const VecVector2d &px_ref,const vector<double> depth_ref,Sophus::SE3 &T21
);// bilinear interpolation
inline float GetPixelValue(const cv::Mat &img, float x, float y) {// boundary checkif (x < 0) x = 0;if (y < 0) y = 0;if (x >= img.cols) x = img.cols - 1;if (y >= img.rows) y = img.rows - 1;uchar *data = &img.data[int(y) * img.step + int(x)];float xx = x - floor(x);float yy = y - floor(y);return float((1 - xx) * (1 - yy) * data[0] +xx * (1 - yy) * data[1] +(1 - xx) * yy * data[img.step] +xx * yy * data[img.step + 1]);
}int main(int argc, char **argv) {cv::Mat left_img = cv::imread(left_file, 0);cv::Mat disparity_img = cv::imread(disparity_file, 0);// let's randomly pick pixels in the first image and generate some 3d points in the first image's framecv::RNG rng;int nPoints = 2000;int boarder = 20;VecVector2d pixels_ref;vector<double> depth_ref;// generate pixels in ref and load depth datafor (int i = 0; i < nPoints; i++) {int x = rng.uniform(boarder, left_img.cols - boarder);  // don't pick pixels close to boarderint y = rng.uniform(boarder, left_img.rows - boarder);  // don't pick pixels close to boarderint disparity = disparity_img.at<uchar>(y, x);double depth = fx * baseline / disparity; // you know this is disparity to depthdepth_ref.push_back(depth);pixels_ref.push_back(Eigen::Vector2d(x, y));}// estimates 01~05.png's pose using this informationSophus::SE3 T_cur_ref;for (int i = 1; i < 6; i++) {  // 1~10cv::Mat img = cv::imread((fmt_others % i).str(), 0);// try single layer by uncomment this line// DirectPoseEstimationSingleLayer(left_img, img, pixels_ref, depth_ref, T_cur_ref);DirectPoseEstimationMultiLayer(left_img, img, pixels_ref, depth_ref, T_cur_ref);}return 0;
}void DirectPoseEstimationSingleLayer(const cv::Mat &img1,const cv::Mat &img2,const VecVector2d &px_ref,const vector<double> depth_ref,Sophus::SE3 &T21) {const int iterations = 10;double cost = 0, lastCost = 0;auto t1 = chrono::steady_clock::now();JacobianAccumulator jaco_accu(img1, img2, px_ref, depth_ref, T21);for (int iter = 0; iter < iterations; iter++) {jaco_accu.reset();cv::parallel_for_(cv::Range(0, px_ref.size()),std::bind(&JacobianAccumulator::accumulate_jacobian, &jaco_accu, std::placeholders::_1));Matrix6d H = jaco_accu.hessian();Vector6d b = jaco_accu.bias();// solve update and put it into estimationVector6d update = H.ldlt().solve(b);;T21 = Sophus::SE3::exp(update) * T21;cost = jaco_accu.cost_func();if (std::isnan(update[0])) {// sometimes occurred when we have a black or white patch and H is irreversiblecout << "update is nan" << endl;break;}if (iter > 0 && cost > lastCost) {cout << "cost increased: " << cost << ", " << lastCost << endl;break;}if (update.norm() < 1e-3) {// convergebreak;}lastCost = cost;cout << "iteration: " << iter << ", cost: " << cost << endl;}cout << "T21 = \n" << T21.matrix() << endl;auto t2 = chrono::steady_clock::now();auto time_used = chrono::duration_cast<chrono::duration<double>>(t2 - t1);cout << "direct method for single layer: " << time_used.count() << endl;// plot the projected pixels herecv::Mat img2_show;cv::cvtColor(img2, img2_show, cv::COLOR_GRAY2BGR);VecVector2d projection = jaco_accu.projected_points();for (size_t i = 0; i < px_ref.size(); ++i) {auto p_ref = px_ref[i];auto p_cur = projection[i];if (p_cur[0] > 0 && p_cur[1] > 0) {cv::circle(img2_show, cv::Point2f(p_cur[0], p_cur[1]), 2, cv::Scalar(0, 250, 0), 2);cv::line(img2_show, cv::Point2f(p_ref[0], p_ref[1]), cv::Point2f(p_cur[0], p_cur[1]),cv::Scalar(0, 250, 0));}}cv::imshow("current", img2_show);cv::waitKey();
}void JacobianAccumulator::accumulate_jacobian(const cv::Range &range) {// parametersconst int half_patch_size = 1;int cnt_good = 0;Matrix6d hessian = Matrix6d::Zero();Vector6d bias = Vector6d::Zero();double cost_tmp = 0;for (size_t i = range.start; i < range.end; i++) {// compute the projection in the second imageEigen::Vector3d point_ref =depth_ref[i] * Eigen::Vector3d((px_ref[i][0] - cx) / fx, (px_ref[i][1] - cy) / fy, 1);Eigen::Vector3d point_cur = T21 * point_ref;if (point_cur[2] < 0)   // depth invalidcontinue;float u = fx * point_cur[0] / point_cur[2] + cx, v = fy * point_cur[1] / point_cur[2] + cy;if (u < half_patch_size || u > img2.cols - half_patch_size || v < half_patch_size ||v > img2.rows - half_patch_size)continue;projection[i] = Eigen::Vector2d(u, v);double X = point_cur[0], Y = point_cur[1], Z = point_cur[2],Z2 = Z * Z, Z_inv = 1.0 / Z, Z2_inv = Z_inv * Z_inv;cnt_good++;// and compute error and jacobianfor (int x = -half_patch_size; x <= half_patch_size; x++)for (int y = -half_patch_size; y <= half_patch_size; y++) {double error = GetPixelValue(img1, px_ref[i][0] + x, px_ref[i][1] + y) -GetPixelValue(img2, u + x, v + y);Matrix26d J_pixel_xi;Eigen::Vector2d J_img_pixel;J_pixel_xi(0, 0) = fx * Z_inv;J_pixel_xi(0, 1) = 0;J_pixel_xi(0, 2) = -fx * X * Z2_inv;J_pixel_xi(0, 3) = -fx * X * Y * Z2_inv;J_pixel_xi(0, 4) = fx + fx * X * X * Z2_inv;J_pixel_xi(0, 5) = -fx * Y * Z_inv;J_pixel_xi(1, 0) = 0;J_pixel_xi(1, 1) = fy * Z_inv;J_pixel_xi(1, 2) = -fy * Y * Z2_inv;J_pixel_xi(1, 3) = -fy - fy * Y * Y * Z2_inv;J_pixel_xi(1, 4) = fy * X * Y * Z2_inv;J_pixel_xi(1, 5) = fy * X * Z_inv;J_img_pixel = Eigen::Vector2d(0.5 * (GetPixelValue(img2, u + 1 + x, v + y) - GetPixelValue(img2, u - 1 + x, v + y)),0.5 * (GetPixelValue(img2, u + x, v + 1 + y) - GetPixelValue(img2, u + x, v - 1 + y)));// total jacobianVector6d J = -1.0 * (J_img_pixel.transpose() * J_pixel_xi).transpose();hessian += J * J.transpose();bias += -error * J;cost_tmp += error * error;}}if (cnt_good) {// set hessian, bias and costunique_lock<mutex> lck(hessian_mutex);H += hessian;b += bias;cost += cost_tmp / cnt_good;}
}void DirectPoseEstimationMultiLayer(const cv::Mat &img1,const cv::Mat &img2,const VecVector2d &px_ref,const vector<double> depth_ref,Sophus::SE3 &T21) {// parametersint pyramids = 4;double pyramid_scale = 0.5;double scales[] = {1.0, 0.5, 0.25, 0.125};// create pyramidsvector<cv::Mat> pyr1, pyr2; // image pyramidsfor (int i = 0; i < pyramids; i++) {if (i == 0) {pyr1.push_back(img1);pyr2.push_back(img2);} else {cv::Mat img1_pyr, img2_pyr;cv::resize(pyr1[i - 1], img1_pyr,cv::Size(pyr1[i - 1].cols * pyramid_scale, pyr1[i - 1].rows * pyramid_scale));cv::resize(pyr2[i - 1], img2_pyr,cv::Size(pyr2[i - 1].cols * pyramid_scale, pyr2[i - 1].rows * pyramid_scale));pyr1.push_back(img1_pyr);pyr2.push_back(img2_pyr);}}double fxG = fx, fyG = fy, cxG = cx, cyG = cy;  // backup the old valuesfor (int level = pyramids - 1; level >= 0; level--) {VecVector2d px_ref_pyr; // set the keypoints in this pyramid levelfor (auto &px: px_ref) {px_ref_pyr.push_back(scales[level] * px);}// scale fx, fy, cx, cy in different pyramid levelsfx = fxG * scales[level];fy = fyG * scales[level];cx = cxG * scales[level];cy = cyG * scales[level];DirectPoseEstimationSingleLayer(pyr1[level], pyr2[level], px_ref_pyr, depth_ref, T21);}}
8.5.4 直接法的优缺点
优点:
1、省去计算特征点、描述子的时间
2、只要求有像素梯度,不需要特征点,可 在特征缺失的场合使用。
3、可以构建 半稠密 乃至 稠密的地图
缺点:
1、图像 强烈非凸。优化算法易进入极小,只有运动很小时直接法才能成功。金字塔的引入可以在一定程度上减小非凸的影响。
2、单个像素无区分度 ——> 图像块 or 相关性。500个点以上
3、强假设: 灰度值不变。 ——> 同时估计相机的曝光参数

习题 8

√ 题1 光流方法
1、除了LK光流,还有哪些光流方法?它们各有什么特点?

文档
稠密光流:
DIS(Dense Inverse Search,稠密逆搜索)光流算法:【低时间复杂度+有竞争力的精度】
DIS光流算法。这个类实现了密集逆搜索(DIS)光流算法。包括三个预设,带有预选参数,在速度和质量之间提供合理的权衡。但是,即使是最慢的预设也还是比较快的,如果你需要更好的质量,不关心速度,可以使用DeepFlow。
Till Kroeger, Radu Timofte, Dengxin Dai, and Luc Van Gool. Fast optical flow using dense inverse search. In Proceedings of the European Conference on Computer Vision (ECCV), 2016.
三部分:
- inverse search for patch correspondences;
- dense displacement field creation through patch aggregation along multiple scales; 多尺度斑块聚集 形成 密集位移场;
- variational refinement.
——————————
cv::FarnebackOpticalFlow
使用Gunnar Farneback算法计算密集光流。
- Two-Frame Motion Estimation Based on
Polynomial Expansion——————————
基于鲁棒局部光流(RLOF,robust local optical flow)算法和稀疏到密集插值方案的快速密集光流计算。
有相应的稀疏 API
——————————
“Dual TV L1” Optical Flow Algorithm.
C. Zach, T. Pock and H. Bischof, “A Duality Based Approach for Realtime TV-L1 Optical Flow”. Javier Sanchez, Enric Meinhardt-Llopis and Gabriele Facciolo. “TV-L1 Optical Flow Estimation”.
——————————
【基于翘曲理论的高精度光流估计:角误差更小,对参数变化不敏感,噪声鲁棒】Thomas Brox, Andres Bruhn, Nils Papenberg, and Joachim Weickert. High accuracy optical flow estimation based on a theory for warping. In Computer Vision-ECCV 2004, pages 25–36. Springer, 2004.
将一个连续的、旋转不变的能量泛函,用于光流计算,该泛函基于两个项:一个具有亮度常数和梯度常数假设的鲁棒数据项,结合一个保持不连续的时空 TV 正则化器。
cv::VariationalRefinement::calcUV()


稀疏光流
该类可以使用金字塔迭代Lucas-Kanade方法计算稀疏特征集的光流。

题2
2、 在本节程序的求图像梯度过程中,我们简单地求了 u + 1 u+1 u+1 和 u − 1 u-1 u−1 的灰度之差除以 2,作为 u u u 方向上的梯度值。这种做法有什么缺点?提示:对于距离较近的特征,变化应该较快;而距离较远的特征在图像中变化较慢,求梯度时能否利用此信息?
题3
3、直接法是否能和光流一样,提出“反向法”的概念?即,使用原始图像的梯度代替目标图像的梯度?
题4
4、使用Ceres或g2o实现稀疏直接法和半稠密直接法。
题5
单目直接法:在优化时 把 像素深度 也作为优化变量


相关文章:
《视觉 SLAM 十四讲》V2 第 8 讲 视觉里程计2 【如何根据图像 估计 相机运动】【光流 —> 直接法】
OpenCV关于 光流的教程 文章目录 第 8 讲 视觉里程计 28.2 光流8.3 实践: LK 光流 【Code】本讲 CMakeLists.txt 8.4 直接法8.5 实践: 双目的稀疏直接法 【Code】8.5.4 直接法的优缺点 习题 8√ 题1 光流方法题2题3题4题5 第 8 讲 视觉里程计 2 P205 …...

Unity DOTS System与SystemGroup概述
最近DOTS终于发布了正式的版本, 我们来分享以下DOTS里面System关键概念,方便大家上手学习掌握Unity DOTS开发。 对惹,这里有一个游戏开发交流小组,希望大家可以点击进来一起交流一下开发经验呀! System是迭代计算与处理World中的…...
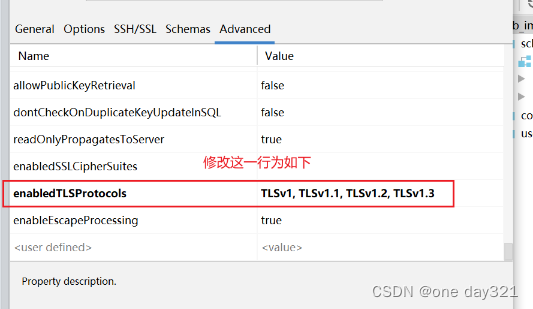
IDEA使用内置database数据库连接mysql报错:javax.net.ssl.SSLHandshakeException
参考一些博客的方式: 使用idea内置database连接数据库报错javax.net.ssl.SSLHandshakeException: No appropriate protocol_idea database ssl_你当像山的博客-CSDN博客 他们的方式是:在url后添加useSSLfalse 介绍另外一种方式: 点击datab…...

从Flink的Kafka消费者看算子联合列表状态的使用
背景 算子的联合列表状态是平时使用的比较少的一种状态,本文通过kafka的消费者实现来看一下怎么使用算子列表联合状态 算子联合列表状态 首先我们看一下算子联合列表状态的在进行故障恢复或者从某个保存点进行扩缩容启动应用时状态的恢复情况 算子联合列表状态主…...

CSS3 按钮
创建 CSS3 按钮可以通过组合样式属性和伪类来实现 <!DOCTYPE html> <html> <head><link rel"stylesheet" type"text/css" href"styles.css"> </head> <body><button class"basic-button">…...
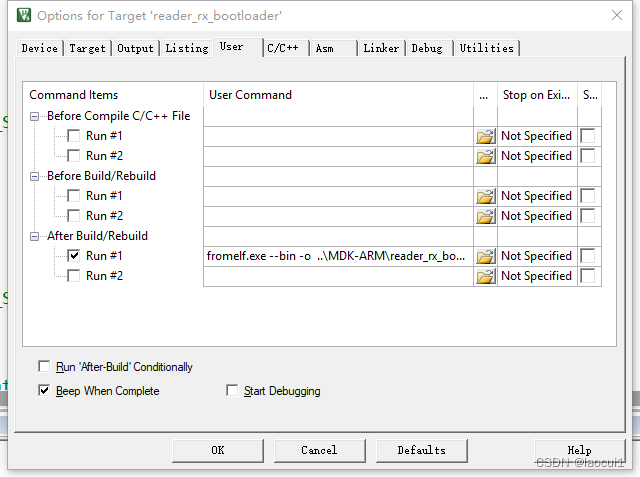
STM32 BootLoader设置
编写bootloader程序: 直接复制下面代码到自己程序中。 typedef void (*iapfun)(void); //定义一个函数类型的参数. iapfun jump2app; //设置栈顶地址 //addr:栈顶地址 __asm void MSR_MSP(u32 addr) {MSR MSP, r0 //set Main Stack valueBX r14 }//跳转到…...

django REST framework-使用与不使用的区别?
首先,来回顾一下传统的基于模板引擎的 django 开发工作流: 绑定 URL 和视图函数。当用户访问某个 URL 时,调用绑定的视图函数进行处理。 编写视图函数的逻辑。视图中通常涉及数据库的操作。 在视图中渲染 HTML 模板,返回 HTTP 响应…...

获取URL中的参数
获取URL中的参数 function getUrlParam(name) {var reg new RegExp("(^|&)" name "([^&]*)(&|$)");var r window.location.search.substr(1).match(reg);if (r ! null)return unescape(r[2]);return null; } 这个正则表达式就是一个URL路…...
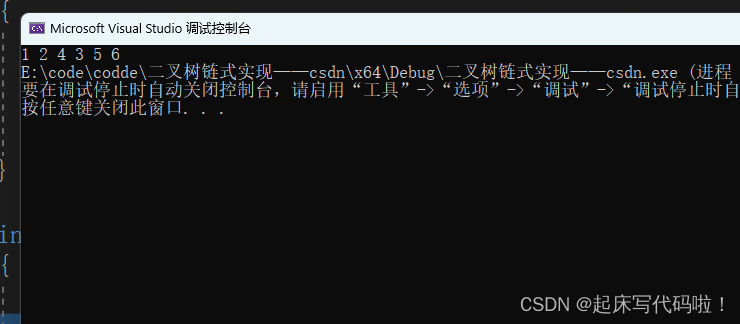
一起学数据结构(9)——二叉树的链式存储及相关功能实现
目录 1. 二叉树的链式存储: 2. 二叉树的前序遍历: 3. 二叉树的中序遍历: 4. 二叉树的后序遍历: 5. 统计二叉树的结点总数 6.统计二叉树的叶子结点数: 7. 统计二叉树第层的结点数量: 8. 二叉树的销毁…...

vue 后端返回二进制流-前端通过blob对象下载文件-图片
前言 在实际开发中我们经常会遇见下载文件的场景,比如下载合同,下载文件 下载文件有2种方式,一种是后端返回二进制流,前端通过blob对象接受根据不同类型下载 还有一种把地址直接在浏览器新窗口打开浏览器打开pdf可以预览和下载&…...
)
vue el-dialog封装成子组件(组件化)
前言 实际开发过程中我们经常听见组件化开发,但在实际开发过程中(没有人审查时)怎么方便来 我们有时是因为时间不够,所以把所有代码写在一个页面。当业务逻辑复杂时可能会有1k多行 虽然不能要求自己写出高效复用性高的组件&…...

爬虫教程 一 requests包的使用
request 简介 requests 是一个常用的 HTTP 请求库,可以方便地向网站发送 HTTP 请求,并获取响应结果。 response.text 和response.content的区别 response.text 类型:str解码类型: requests模块自动根据HTTP 头部对响应的编码作…...
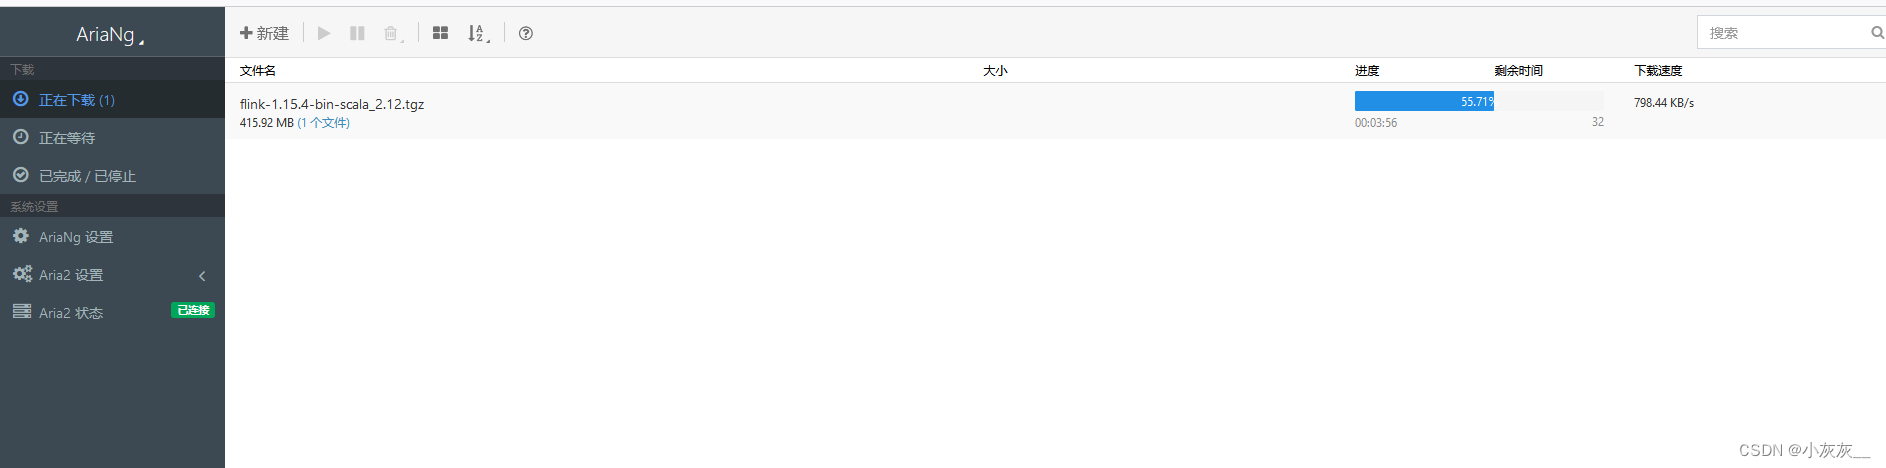
Aria2NG连接aria2-pro提示认证失败的处理办法
本文档适用于已经安装了aria2-pro和AriaNg的小伙伴~ 第一次登录管理端会提示”认证失败“ 这是因为aria设置了密码,需要在设置中配置上密码即可 配置完密码重新加载就可以正常使用啦 下载速度明显比以前快了很多 下载参考文档 Docker安装下载神器aria2并使用过程记…...
MYSQL 连接
高频 SQL 50 题(基础版) - 学习计划 - 力扣(LeetCode)全球极客挚爱的技术成长平台 1378. 使用唯一标识码替换员工ID SELECT COALESCE(unique_id, NULL) AS unique_id,name FROM Employees LEFT JOIN EmployeeUNI ON Employees.…...

SeaTunnel 换maven源,解决插件下载慢
SeaTunnel 是使用的mvnw命令,可以先执行一下install-plugin.sh然后终止 理论上应该可以直接执行mvnw,他就会去安装下载maven,目录就是下面的目录 然后去服务器目录修改 setting.xml文件,设置镜像源即可 /root/.m2/wrapper/dists/apache-maven-3.8.4-bin/52ccbt68d252mdldqsfsn…...

安卓14通过“冻结”缓存应用程序腾出CPU,提高性能和内存效率
本月早些时候,我们听说更新到安卓14似乎提高了谷歌Pixel 7和Pixel 6的效率——提高了电池寿命,并在这个过程中减少了热量的产生。现在看来,安卓14的增效功能细节已经公布。 安卓侦探Mishaal Rahman在X(前身为Twitter)…...

jupyter崩溃OOM,out of memory,jupyter代码写不进去,保存不了。
最近写一个比较长的数据处理代码,有快千行,然后经常代码没有写入,然后直接网页崩溃,给我干蒙了。我已经是jupyter版本的问题,弄了半天,弄完,还是有这个问题。然后就查了一下,发现是j…...
一文带你快速掌握爬虫开发中的一些高级调试技巧
文章目录 1. 写在前面2. Reply XHR(重新发起请求)3. copy as fecth(修改参数请求)4. copy()复制变量5. Web网页全屏截图6. 控制台安装使用npm7. 控制台中引用上次执行结果8. 控制台表展示对象数组 1. 写在前面 做过爬虫开发的人都…...

6.(vue3.x+vite)路由传参query与params区别
前端技术社区总目录(订阅之前请先查看该博客) 效果截图 一:路由传参有两种方式:params与query params与query区别 1:param,路由带“/”,query带“?” 2:query传过来的参数会显示到地址栏中 而params传过来的参数可以显示参数或隐藏参数到地址栏中(vue-router 4.1.4不…...

C++string的使用
CSDN的uu们,大家好。这里是C入门的第十六讲。 座右铭:前路坎坷,披荆斩棘,扶摇直上。 博客主页: 姬如祎 收录专栏:C专题 目录 1.构造函数 1.1 string() 1.2 string(const char* s) 1.3 string(const …...

别再复制粘贴了!深度优化你的TM1640驱动代码:效率与可维护性实战
TM1640驱动代码重构实战:从能用走向工业级 在嵌入式开发中,我们常常会遇到这样的场景:项目初期为了快速验证功能,直接从网上复制一段"能用就行"的驱动代码。但随着项目规模扩大,这些代码逐渐暴露出可维护性差…...

Wireshark实战:从抓包到文件还原,手把手教你导出HTTP传输的图片和压缩包
Wireshark实战:从抓包到文件还原的完整指南 在数字化办公环境中,文件传输已成为日常工作的基础环节。无论是企业内部的文档共享,还是网站上的资源下载,HTTP协议承载着海量的文件传输任务。当我们需要排查文件传输故障、分析网络行…...

ContextMenuManager:5分钟掌握Windows右键菜单管理的终极免费方案
ContextMenuManager:5分钟掌握Windows右键菜单管理的终极免费方案 【免费下载链接】ContextMenuManager 🖱️ 纯粹的Windows右键菜单管理程序 项目地址: https://gitcode.com/gh_mirrors/co/ContextMenuManager 你是否厌倦了每次右键点击文件时&a…...

这种界面和额外附加认证要求以前从来没有过
注册github账号很早就有了,但这种认证要求以前从来没有过。 自从上传了这个代码: mcp 桥接器 就多了认证要求。 发生了什么 :GitHub 现在要求所有活跃开发者都必须开启双重身份验证(2FA),以保护账号不被黑…...
)
NotebookLM提示工程在能源政策分析中的致命误区(附12个经NREL验证的Prompt模板)
更多请点击: https://codechina.net 第一章:NotebookLM能源技术研究 NotebookLM 是 Google 推出的基于 AI 的研究协作者工具,其核心能力在于对用户上传的私有文档进行语义理解与上下文关联。在能源技术领域,研究人员可借助 Noteb…...

LangGraph入门:构建有状态的AI Agent工作流
LangGraph 入门:用状态图构建 Agent手写 ReAct 循环容易写出 bug。LangGraph 用「状态图」的方式定义 Agent,把每一步定义为一个节点,跳转逻辑定义为边——清晰、可测试、可扩展。一、为什么需要 LangGraph 手写 Agent 循环的痛点:…...

ARMv9 CPYEN指令:内存拷贝优化技术详解
1. ARM内存拷贝指令CPYEN深度解析 在ARMv9架构中,内存拷贝操作通过专门的硬件指令得到了显著优化。CPYEN指令作为FEAT_MOPS特性的一部分,采用创新的三阶段流水线设计来提升数据传输效率。对于需要频繁处理内存块操作的系统开发者来说,理解这条…...

程序员录音转行动项工具口碑推荐 | 经筛选的实用方案
针对2026年程序员群体的录音转行动项需求,实测多款主流工具后,筛选出实用方案,可有效解决需求对接、会议访谈后,录音整理、任务提取耗时久、准确率不佳的痛点。本次评测选取多款主流办公类录音转写工具,围绕程序员核心…...

SAP UI5 里没有 BehaviorSubject,但有更贴近企业 UI 的状态流
问题: SAP UI5 的开发技术里,有类似 Angular 中 BehaviorSubject 的概念和用法? 我今天理解这个问题时,不能直接问 SAP UI5 里有没有一个类叫 BehaviorSubject,因为这个问法会把 Angular 和 SAP UI5 的编程范式强行拉到同一个坐标系里。更准确的问题应该是,SAP UI5 里有…...

Frenet Corridor Planner:自动驾驶路径规划的核心技术解析
1. Frenet Corridor Planner:自动驾驶路径规划的核心突破在自动驾驶技术栈中,路径规划模块承担着将决策指令转化为可执行轨迹的关键角色。面对城市道路中突然出现的占道车辆或行人,传统基于固定路径的规划方法往往显得力不从心。Frenet Corri…...