YOLOv5 添加 OTA,并使用 coco、CrowdHuman数据集进行训练。
YOLO-OTA
- 第一步:拉取 YOLOv5 的代码
- 第二步:添加 ComputeLossOTA 函数
- 第二步:修改 train 和 val 中损失函数为 ComputeLossOTA 函数
- 1、在 train.py 中 首先添加 ComputeLossOTA 库。
- 2、在 train.py 修改初始化的损失函数
- 3、在 train.py 修改一些必要的参数
- 4、修改一下 parser 参数,方便控制是否使用 OTALOSS
- 5、在 val.py 中修改一些必要的参数
- 开始训练
- 训练 coco128 数据集
- 训练 coco 数据集
- 训练 CrowdHuman 数据集
第一步:拉取 YOLOv5 的代码
git clone https://github.com/ultralytics/yolov5.git
第二步:添加 ComputeLossOTA 函数
打开 utils/loss.py 文件,向其中添加下面的部分:
import torch.nn.functional as F
from utils.metrics import box_iou
from utils.torch_utils import de_parallel
from utils.general import xywh2xyxyclass ComputeLossOTA:# Compute lossesdef __init__(self, model, autobalance=False):super(ComputeLossOTA, self).__init__()device = next(model.parameters()).device  # get model deviceh = model.hyp  # hyperparameters# Define criteriaBCEcls = nn.BCEWithLogitsLoss(pos_weight=torch.tensor([h['cls_pw']], device=device))BCEobj = nn.BCEWithLogitsLoss(pos_weight=torch.tensor([h['obj_pw']], device=device))# Class label smoothing https://arxiv.org/pdf/1902.04103.pdf eqn 3self.cp, self.cn = smooth_BCE(eps=h.get('label_smoothing', 0.0))  # positive, negative BCE targets# Focal lossg = h['fl_gamma']  # focal loss gammaif g > 0:BCEcls, BCEobj = FocalLoss(BCEcls, g), FocalLoss(BCEobj, g)det = de_parallel(model).model[-1]  # Detect() moduleself.balance = {3: [4.0, 1.0, 0.4]}.get(det.nl, [4.0, 1.0, 0.25, 0.06, .02])  # P3-P7self.ssi = list(det.stride).index(16) if autobalance else 0  # stride 16 indexself.BCEcls, self.BCEobj, self.gr, self.hyp, self.autobalance = BCEcls, BCEobj, 1.0, h, autobalancefor k in 'na', 'nc', 'nl', 'anchors', 'stride':setattr(self, k, getattr(det, k))def __call__(self, p, targets, imgs):  # predictions, targets, model   device = targets.devicelcls, lbox, lobj = torch.zeros(1, device=device), torch.zeros(1, device=device), torch.zeros(1, device=device)bs, as_, gjs, gis, targets, anchors = self.build_targets(p, targets, imgs)pre_gen_gains = [torch.tensor(pp.shape, device=device)[[3, 2, 3, 2]] for pp in p] # Lossesfor i, pi in enumerate(p):  # layer index, layer predictionsb, a, gj, gi = bs[i], as_[i], gjs[i], gis[i]  # image, anchor, gridy, gridxtobj = torch.zeros_like(pi[..., 0], device=device)  # target objn = b.shape[0]  # number of targetsif n:ps = pi[b, a, gj, gi]  # prediction subset corresponding to targets# Regressiongrid = torch.stack([gi, gj], dim=1)pxy = ps[:, :2].sigmoid() * 2. - 0.5#pxy = ps[:, :2].sigmoid() * 3. - 1.pwh = (ps[:, 2:4].sigmoid() * 2) ** 2 * anchors[i]pbox = torch.cat((pxy, pwh), 1)  # predicted boxselected_tbox = targets[i][:, 2:6] * pre_gen_gains[i]selected_tbox[:, :2] -= gridiou = bbox_iou(pbox, selected_tbox, CIoU=True)  # iou(prediction, target)if type(iou) is tuple:lbox += (iou[1].detach() * (1 - iou[0])).mean()iou = iou[0]else:lbox += (1.0 - iou).mean()  # iou loss# Objectnesstobj[b, a, gj, gi] = (1.0 - self.gr) + self.gr * iou.detach().clamp(0).type(tobj.dtype)  # iou ratio# Classificationselected_tcls = targets[i][:, 1].long()if self.nc > 1:  # cls loss (only if multiple classes)t = torch.full_like(ps[:, 5:], self.cn, device=device)  # targetst[range(n), selected_tcls] = self.cplcls += self.BCEcls(ps[:, 5:], t)  # BCE# Append targets to text file# with open('targets.txt', 'a') as file:#     [file.write('%11.5g ' * 4 % tuple(x) + '\n') for x in torch.cat((txy[i], twh[i]), 1)]obji = self.BCEobj(pi[..., 4], tobj)lobj += obji * self.balance[i]  # obj lossif self.autobalance:self.balance[i] = self.balance[i] * 0.9999 + 0.0001 / obji.detach().item()if self.autobalance:self.balance = [x / self.balance[self.ssi] for x in self.balance]lbox *= self.hyp['box']lobj *= self.hyp['obj']lcls *= self.hyp['cls']bs = tobj.shape[0]  # batch sizeloss = lbox + lobj + lclsreturn loss * bs, torch.cat((lbox, lobj, lcls)).detach()def build_targets(self, p, targets, imgs):indices, anch = self.find_3_positive(p, targets)device = torch.device(targets.device)matching_bs = [[] for pp in p]matching_as = [[] for pp in p]matching_gjs = [[] for pp in p]matching_gis = [[] for pp in p]matching_targets = [[] for pp in p]matching_anchs = [[] for pp in p]nl = len(p)    for batch_idx in range(p[0].shape[0]):b_idx = targets[:, 0]==batch_idxthis_target = targets[b_idx]if this_target.shape[0] == 0:continuetxywh = this_target[:, 2:6] * imgs[batch_idx].shape[1]txyxy = xywh2xyxy(txywh)pxyxys = []p_cls = []p_obj = []from_which_layer = []all_b = []all_a = []all_gj = []all_gi = []all_anch = []for i, pi in enumerate(p):b, a, gj, gi = indices[i]idx = (b == batch_idx)b, a, gj, gi = b[idx], a[idx], gj[idx], gi[idx]                all_b.append(b)all_a.append(a)all_gj.append(gj)all_gi.append(gi)all_anch.append(anch[i][idx])from_which_layer.append((torch.ones(size=(len(b),)) * i).to(device))fg_pred = pi[b, a, gj, gi]                p_obj.append(fg_pred[:, 4:5])p_cls.append(fg_pred[:, 5:])grid = torch.stack([gi, gj], dim=1)pxy = (fg_pred[:, :2].sigmoid() * 2. - 0.5 + grid) * self.stride[i] #/ 8.#pxy = (fg_pred[:, :2].sigmoid() * 3. - 1. + grid) * self.stride[i]pwh = (fg_pred[:, 2:4].sigmoid() * 2) ** 2 * anch[i][idx] * self.stride[i] #/ 8.pxywh = torch.cat([pxy, pwh], dim=-1)pxyxy = xywh2xyxy(pxywh)pxyxys.append(pxyxy)pxyxys = torch.cat(pxyxys, dim=0)if pxyxys.shape[0] == 0:continuep_obj = torch.cat(p_obj, dim=0)p_cls = torch.cat(p_cls, dim=0)from_which_layer = torch.cat(from_which_layer, dim=0)all_b = torch.cat(all_b, dim=0)all_a = torch.cat(all_a, dim=0)all_gj = torch.cat(all_gj, dim=0)all_gi = torch.cat(all_gi, dim=0)all_anch = torch.cat(all_anch, dim=0)pair_wise_iou = box_iou(txyxy, pxyxys)pair_wise_iou_loss = -torch.log(pair_wise_iou + 1e-8)top_k, _ = torch.topk(pair_wise_iou, min(10, pair_wise_iou.shape[1]), dim=1)dynamic_ks = torch.clamp(top_k.sum(1).int(), min=1)gt_cls_per_image = (F.one_hot(this_target[:, 1].to(torch.int64), self.nc).float().unsqueeze(1).repeat(1, pxyxys.shape[0], 1))num_gt = this_target.shape[0]cls_preds_ = (p_cls.float().unsqueeze(0).repeat(num_gt, 1, 1).sigmoid_()* p_obj.unsqueeze(0).repeat(num_gt, 1, 1).sigmoid_())y = cls_preds_.sqrt_()pair_wise_cls_loss = F.binary_cross_entropy_with_logits(torch.log(y/(1-y)) , gt_cls_per_image, reduction="none").sum(-1)del cls_preds_cost = (pair_wise_cls_loss+ 3.0 * pair_wise_iou_loss)matching_matrix = torch.zeros_like(cost, device=device)for gt_idx in range(num_gt):_, pos_idx = torch.topk(cost[gt_idx], k=dynamic_ks[gt_idx].item(), largest=False)matching_matrix[gt_idx][pos_idx] = 1.0del top_k, dynamic_ksanchor_matching_gt = matching_matrix.sum(0)if (anchor_matching_gt > 1).sum() > 0:_, cost_argmin = torch.min(cost[:, anchor_matching_gt > 1], dim=0)matching_matrix[:, anchor_matching_gt > 1] *= 0.0matching_matrix[cost_argmin, anchor_matching_gt > 1] = 1.0fg_mask_inboxes = (matching_matrix.sum(0) > 0.0).to(device)matched_gt_inds = matching_matrix[:, fg_mask_inboxes].argmax(0)from_which_layer = from_which_layer[fg_mask_inboxes]all_b = all_b[fg_mask_inboxes]all_a = all_a[fg_mask_inboxes]all_gj = all_gj[fg_mask_inboxes]all_gi = all_gi[fg_mask_inboxes]all_anch = all_anch[fg_mask_inboxes]this_target = this_target[matched_gt_inds]for i in range(nl):layer_idx = from_which_layer == imatching_bs[i].append(all_b[layer_idx])matching_as[i].append(all_a[layer_idx])matching_gjs[i].append(all_gj[layer_idx])matching_gis[i].append(all_gi[layer_idx])matching_targets[i].append(this_target[layer_idx])matching_anchs[i].append(all_anch[layer_idx])for i in range(nl):if matching_targets[i] != []:matching_bs[i] = torch.cat(matching_bs[i], dim=0)matching_as[i] = torch.cat(matching_as[i], dim=0)matching_gjs[i] = torch.cat(matching_gjs[i], dim=0)matching_gis[i] = torch.cat(matching_gis[i], dim=0)matching_targets[i] = torch.cat(matching_targets[i], dim=0)matching_anchs[i] = torch.cat(matching_anchs[i], dim=0)else:matching_bs[i] = torch.tensor([], device='cuda:0', dtype=torch.int64)matching_as[i] = torch.tensor([], device='cuda:0', dtype=torch.int64)matching_gjs[i] = torch.tensor([], device='cuda:0', dtype=torch.int64)matching_gis[i] = torch.tensor([], device='cuda:0', dtype=torch.int64)matching_targets[i] = torch.tensor([], device='cuda:0', dtype=torch.int64)matching_anchs[i] = torch.tensor([], device='cuda:0', dtype=torch.int64)return matching_bs, matching_as, matching_gjs, matching_gis, matching_targets, matching_anchs           def find_3_positive(self, p, targets):# Build targets for compute_loss(), input targets(image,class,x,y,w,h)na, nt = self.na, targets.shape[0]  # number of anchors, targetsindices, anch = [], []gain = torch.ones(7, device=targets.device).long()  # normalized to gridspace gainai = torch.arange(na, device=targets.device).float().view(na, 1).repeat(1, nt)  # same as .repeat_interleave(nt)targets = torch.cat((targets.repeat(na, 1, 1), ai[:, :, None]), 2)  # append anchor indicesg = 0.5  # biasoff = torch.tensor([[0, 0],[1, 0], [0, 1], [-1, 0], [0, -1],  # j,k,l,m# [1, 1], [1, -1], [-1, 1], [-1, -1],  # jk,jm,lk,lm], device=targets.device).float() * g  # offsetsfor i in range(self.nl):anchors = self.anchors[i]gain[2:6] = torch.tensor(p[i].shape)[[3, 2, 3, 2]]  # xyxy gain# Match targets to anchorst = targets * gainif nt:# Matchesr = t[:, :, 4:6] / anchors[:, None]  # wh ratioj = torch.max(r, 1. / r).max(2)[0] < self.hyp['anchor_t']  # compare# j = wh_iou(anchors, t[:, 4:6]) > model.hyp['iou_t']  # iou(3,n)=wh_iou(anchors(3,2), gwh(n,2))t = t[j]  # filter# Offsetsgxy = t[:, 2:4]  # grid xygxi = gain[[2, 3]] - gxy  # inversej, k = ((gxy % 1. < g) & (gxy > 1.)).Tl, m = ((gxi % 1. < g) & (gxi > 1.)).Tj = torch.stack((torch.ones_like(j), j, k, l, m))t = t.repeat((5, 1, 1))[j]offsets = (torch.zeros_like(gxy)[None] + off[:, None])[j]else:t = targets[0]offsets = 0# Defineb, c = t[:, :2].long().T  # image, classgxy = t[:, 2:4]  # grid xygwh = t[:, 4:6]  # grid whgij = (gxy - offsets).long()gi, gj = gij.T  # grid xy indices# Appenda = t[:, 6].long()  # anchor indicesindices.append((b, a, gj.clamp_(0, gain[3] - 1), gi.clamp_(0, gain[2] - 1)))  # image, anchor, grid indicesanch.append(anchors[a])  # anchorsreturn indices, anch
第二步:修改 train 和 val 中损失函数为 ComputeLossOTA 函数
1、在 train.py 中 首先添加 ComputeLossOTA 库。
# 63 行
from utils.loss import ComputeLoss, ComputeLossOTA
2、在 train.py 修改初始化的损失函数
# 263 行
if opt.losstype == "normloss":compute_loss = ComputeLoss(model)  # init loss class
elif opt.losstype == "otaloss":compute_loss = ComputeLossOTA(model)  # init loss class
3、在 train.py 修改一些必要的参数
因为 OTA 需要图片为收入,所以 ComputeLossOTA 和 ComputeLoss 相比,需要添加 imgs 为输入。
# 319 行
if opt.losstype == "normloss":loss, loss_items = compute_loss(pred, targets.to(device))  # loss scaled by batch_size
elif opt.losstype == "otaloss":loss, loss_items = compute_loss(pred, targets.to(device), imgs)  # loss scaled by batch_size
4、修改一下 parser 参数,方便控制是否使用 OTALOSS
parser.add_argument('--losstype', type=str, default="normloss", help='choose loss type: loss otaloss')
5、在 val.py 中修改一些必要的参数
# 212 行
# Loss
if compute_loss:# loss += compute_loss(train_out, targets)[1]  # box, obj, clsloss += compute_loss(train_out, targets, im)[1]  # box, obj, cls
开始训练
下载的话权重,去官网下载你需要的模型的权重。 如:yolov5s.pt
训练 coco128 数据集
Usage - Single-GPU training:$ python train.py --data coco128.yaml --weights yolov5s.pt --img 640  # from pretrained (recommended) $ python train.py --data coco128.yaml --weights '' --cfg yolov5s.yaml --img 640  # from scratch
# 使用 OTA $ python train.py --data coco128.yaml --weights yolov5s.pt -losstype otaloss  # from pretrained (recommended) -losstype otaloss$ python train.py --data coco128.yaml --weights '' --cfg yolov5s.yaml -losstype otaloss  # from scratchUsage - Multi-GPU DDP training:$ python -m torch.distributed.run --nproc_per_node 4 --master_port 1 train.py --data coco128.yaml --weights yolov5s.pt --img 640 --device 0,1,2,3
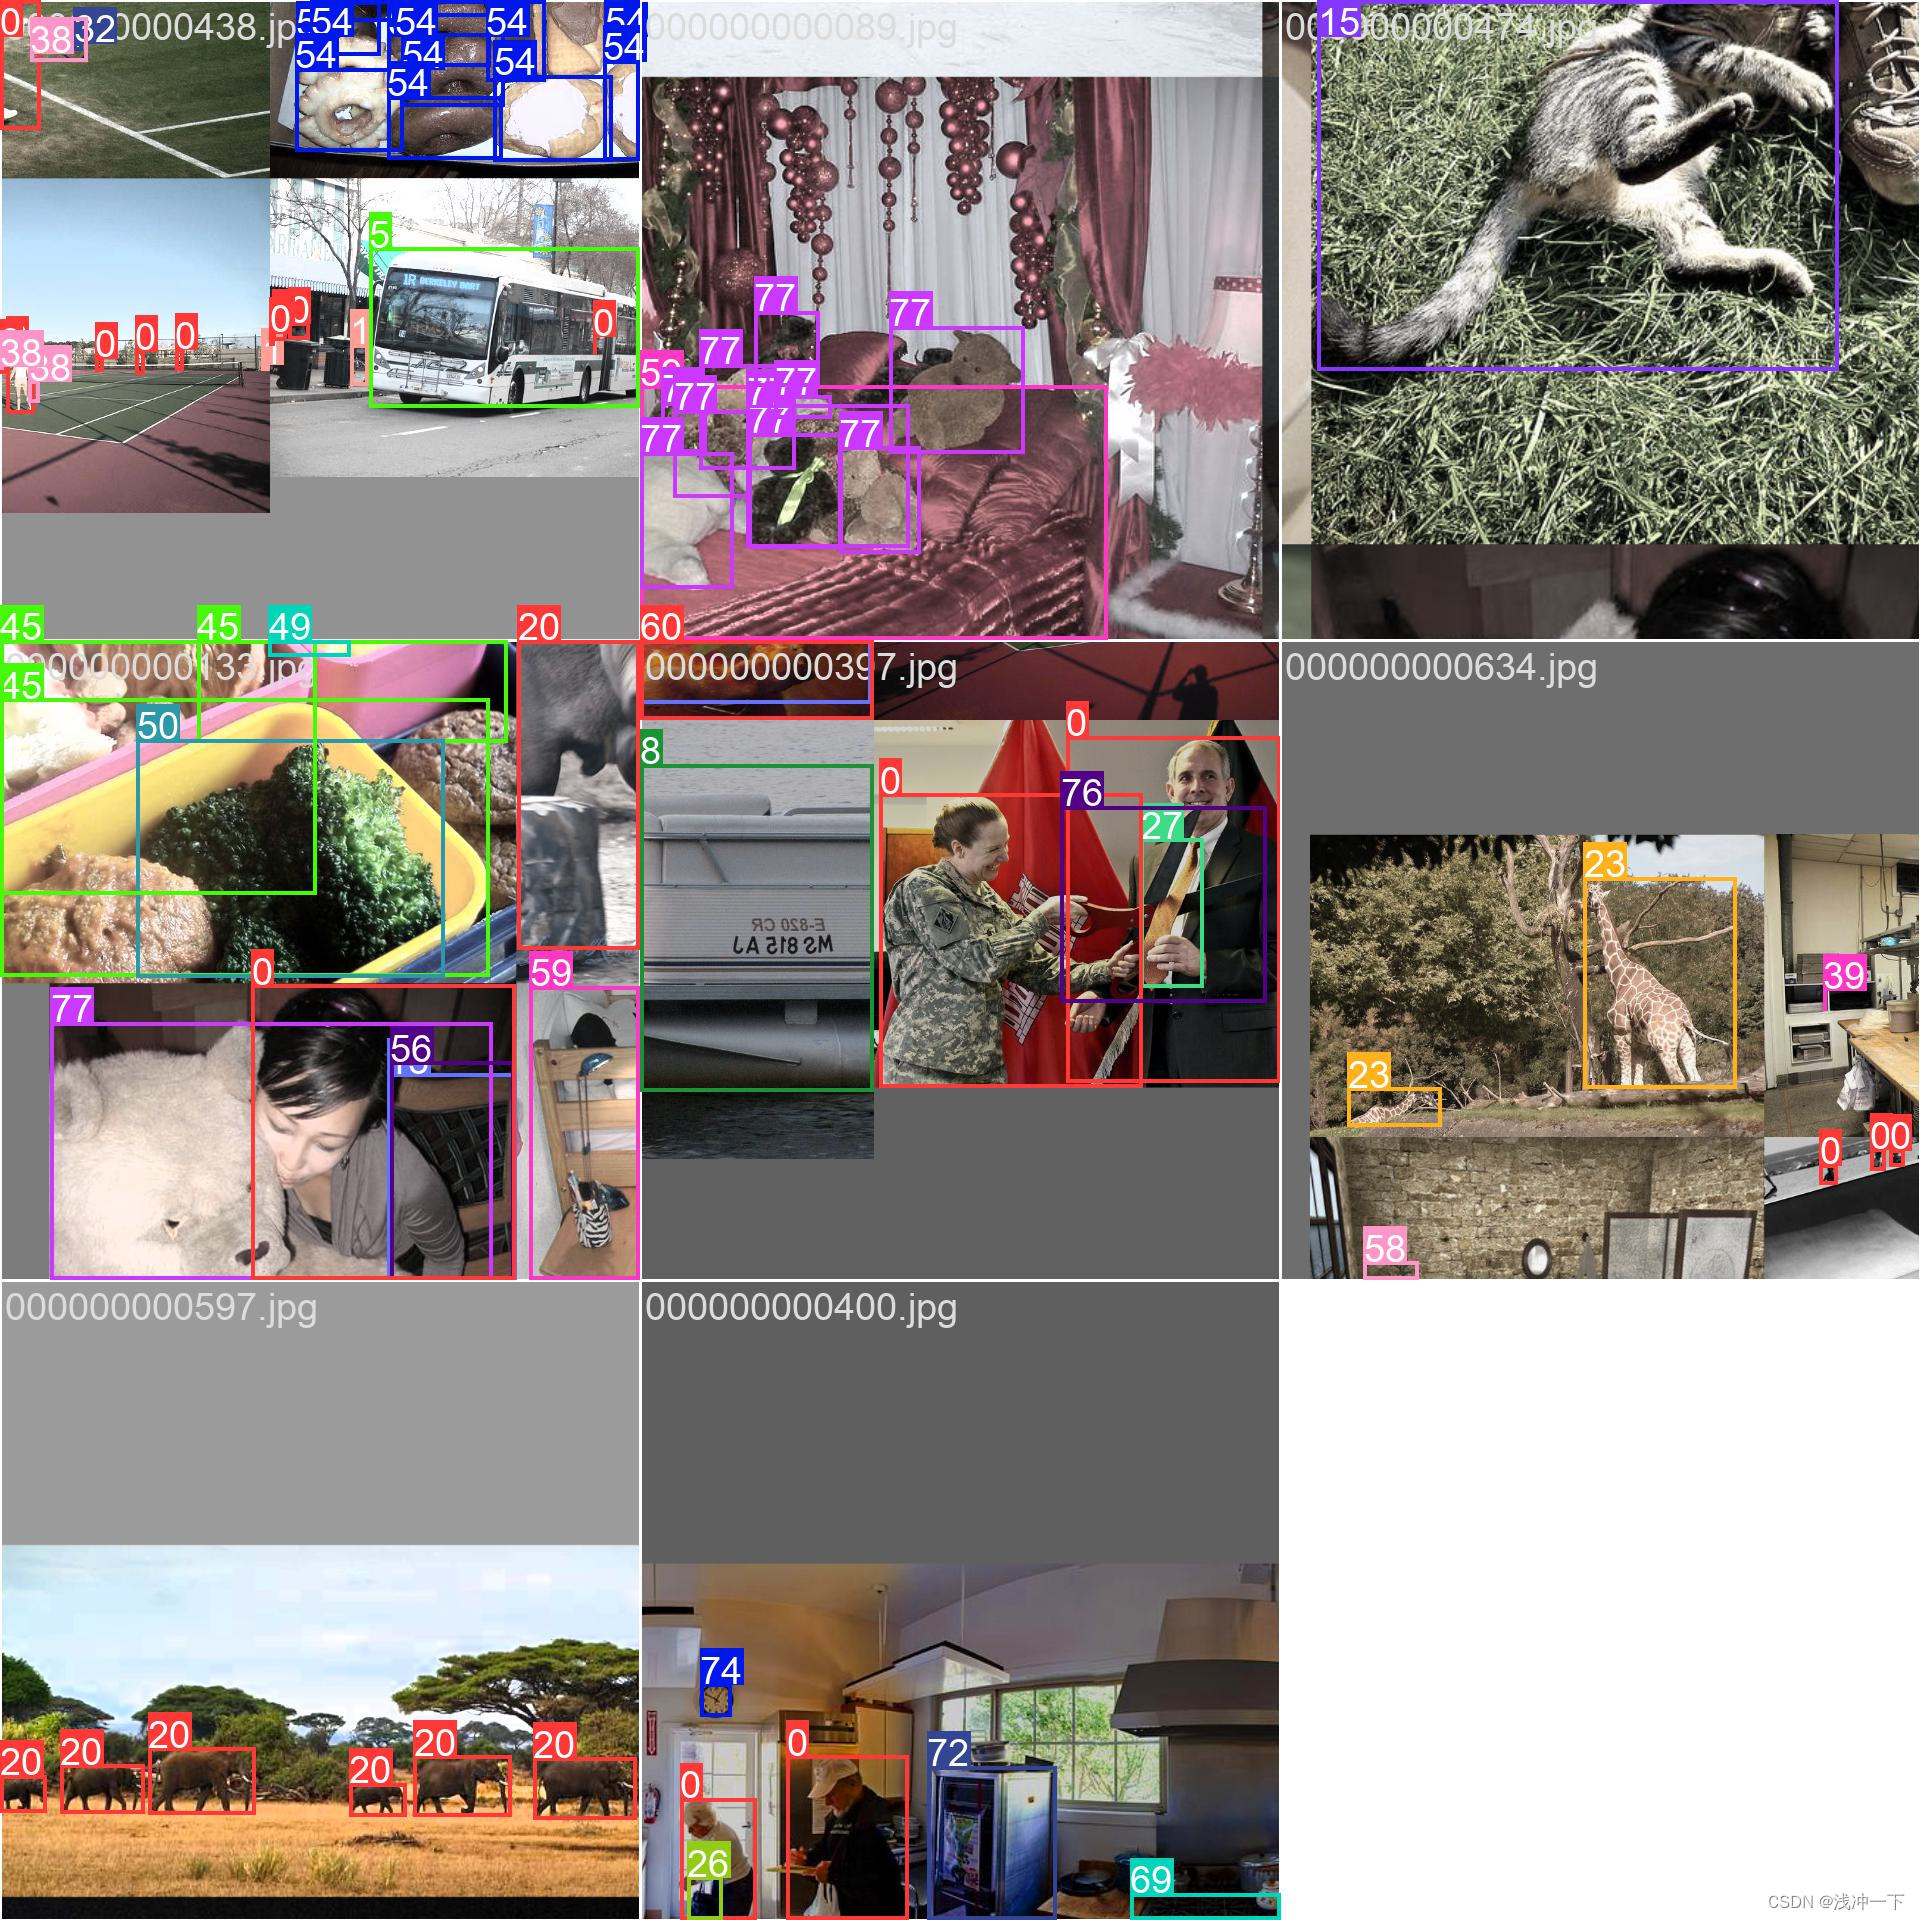
训练图片一个batch_size 如下:
训练 coco 数据集
使用 coco 进行训练的命令如下:
Usage - Single-GPU training:$ python train.py --data coco.yaml --weights yolov5s.pt --img 640 # from pretrained (recommended)$ python train.py --data coco.yaml --weights '' --cfg yolov5s.yaml --img 640 # from scratchUsage - Multi-GPU DDP training:$ python -m torch.distributed.run --nproc_per_node 4 --master_port 1 train.py --data coco.yaml --weights yolov5s.pt --img 640 --device 0,1,2,3
没有下载 coco 的话,这个命令会自动下载。最好在coco数据集里面自己新建一个 coco.ymal,内容可填写如下:
# COCO 2017 dataset http://cocodataset.org# download command/URL (optional)
# download: bash ./scripts/get_coco.sh# train and val data as 1) directory: path/images/, 2) file: path/images.txt, or 3) list: [path1/images/, path2/images/]
train: /home/adr/Desktop/Code/Python/2D/datasets/coco/train2017.txt  # 118287 images
val: /home/adr/Desktop/Code/Python/2D/datasets/coco/val2017.txt  # 5000 images
test: /home/adr/Desktop/Code/Python/2D/datasets/coco/test-dev2017.txt  # 20288 of 40670 images, submit to https://competitions.codalab.org/competitions/20794# number of classes
nc: 80# class names
names: [ 'person', 'bicycle', 'car', 'motorcycle', 'airplane', 'bus', 'train', 'truck', 'boat', 'traffic light','fire hydrant', 'stop sign', 'parking meter', 'bench', 'bird', 'cat', 'dog', 'horse', 'sheep', 'cow','elephant', 'bear', 'zebra', 'giraffe', 'backpack', 'umbrella', 'handbag', 'tie', 'suitcase', 'frisbee','skis', 'snowboard', 'sports ball', 'kite', 'baseball bat', 'baseball glove', 'skateboard', 'surfboard','tennis racket', 'bottle', 'wine glass', 'cup', 'fork', 'knife', 'spoon', 'bowl', 'banana', 'apple','sandwich', 'orange', 'broccoli', 'carrot', 'hot dog', 'pizza', 'donut', 'cake', 'chair', 'couch','potted plant', 'bed', 'dining table', 'toilet', 'tv', 'laptop', 'mouse', 'remote', 'keyboard', 'cell phone','microwave', 'oven', 'toaster', 'sink', 'refrigerator', 'book', 'clock', 'vase', 'scissors', 'teddy bear','hair drier', 'toothbrush' ]
这样使用其他 yolo 版本训练的时候,只需要把这个 coco.yaml 的文件的绝对路径给它也行。
python train.py --data /home/adr/Desktop/Code/Python/2D/datasets/coco.yaml --weights '' --cfg yolov5s.yaml
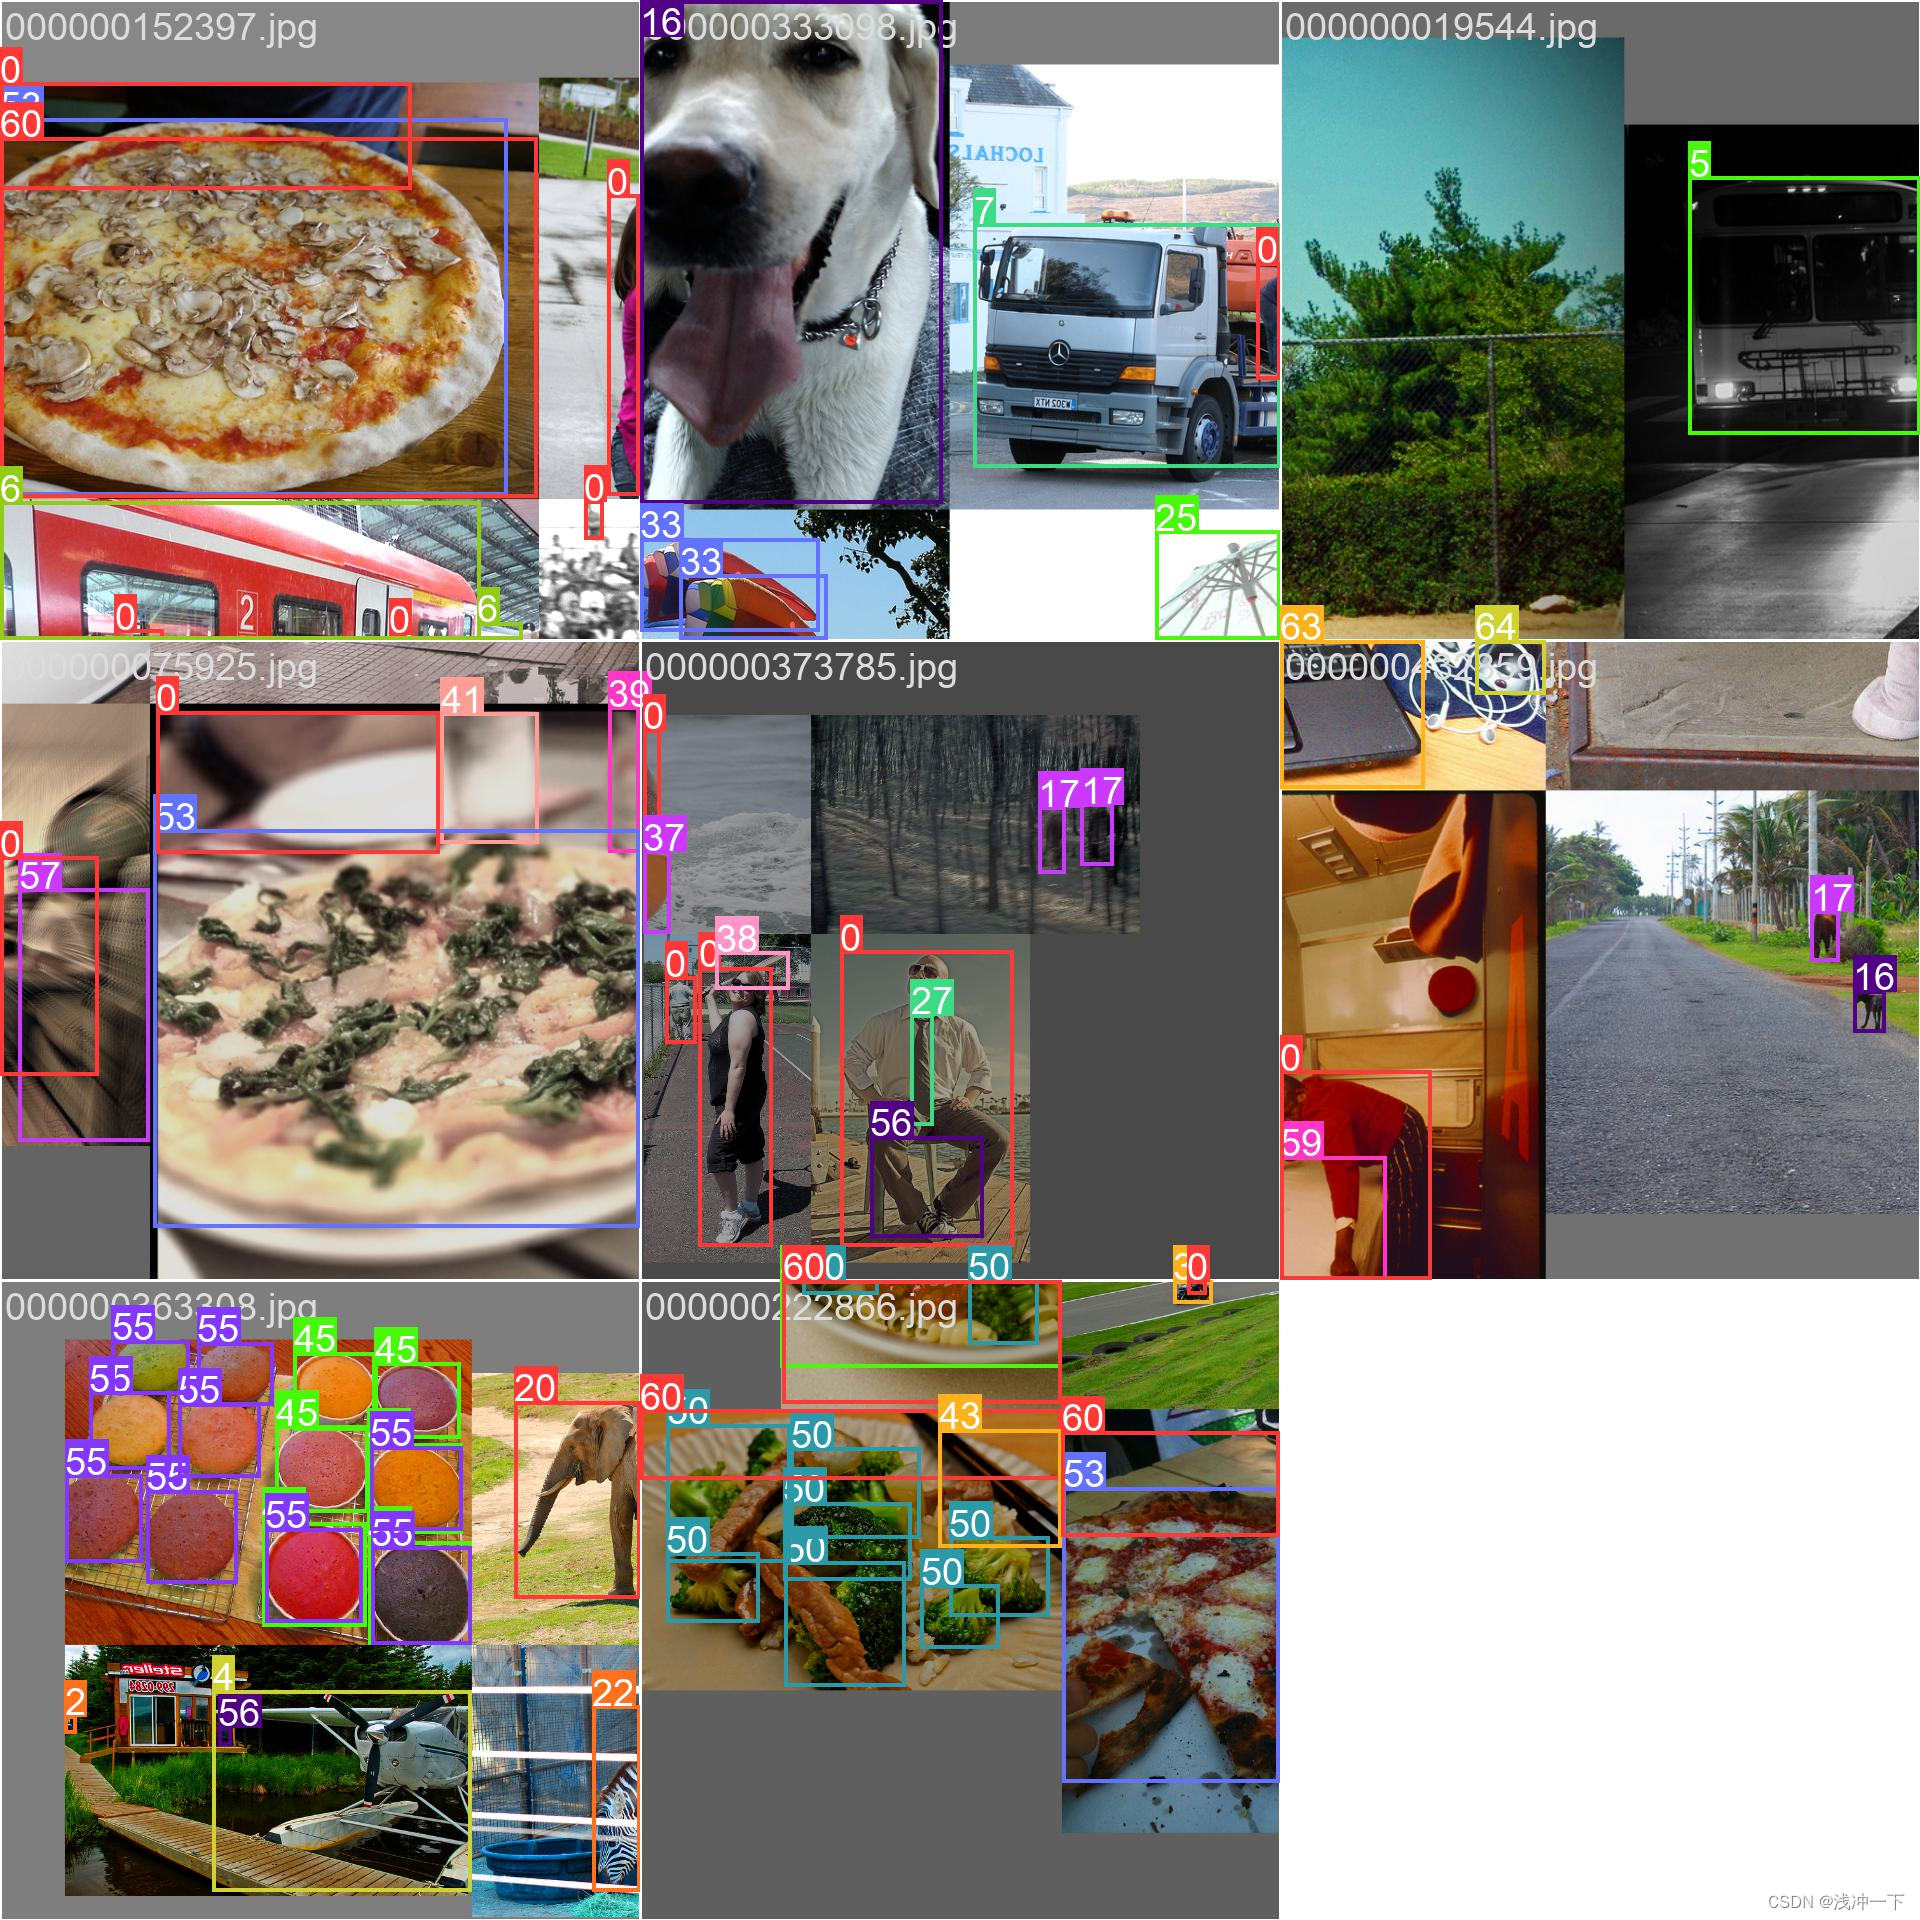
训练图片一个batch_size 如下:
训练 CrowdHuman 数据集
1、下载 官网数据集下载
CrowdHuman dataset下载链接:https://www.crowdhuman.org/download.html
把里面链接都进行下载。然后按照步骤二给出的连接即可。
2、转化为 coco 数据集格式
可以根据下面仓库的步骤进行 : https://github.com/Shaohu-Li/YOLOv5-Tools
3、使用下面命令进行训练。
# 不使用预训练权重
python train.py --data /home/adr/datasets/CrowdHuman/crowdhuman.yaml --cfg yolov5s.yaml --img 640 --batch-size 32 --weights ''# 使用预训练权重
python train.py --data /home/adr/datasets/CrowdHuman/crowdhuman.yaml --cfg yolov5s.yaml --img 640 --batch-size 32 --weights yolov5s.pt
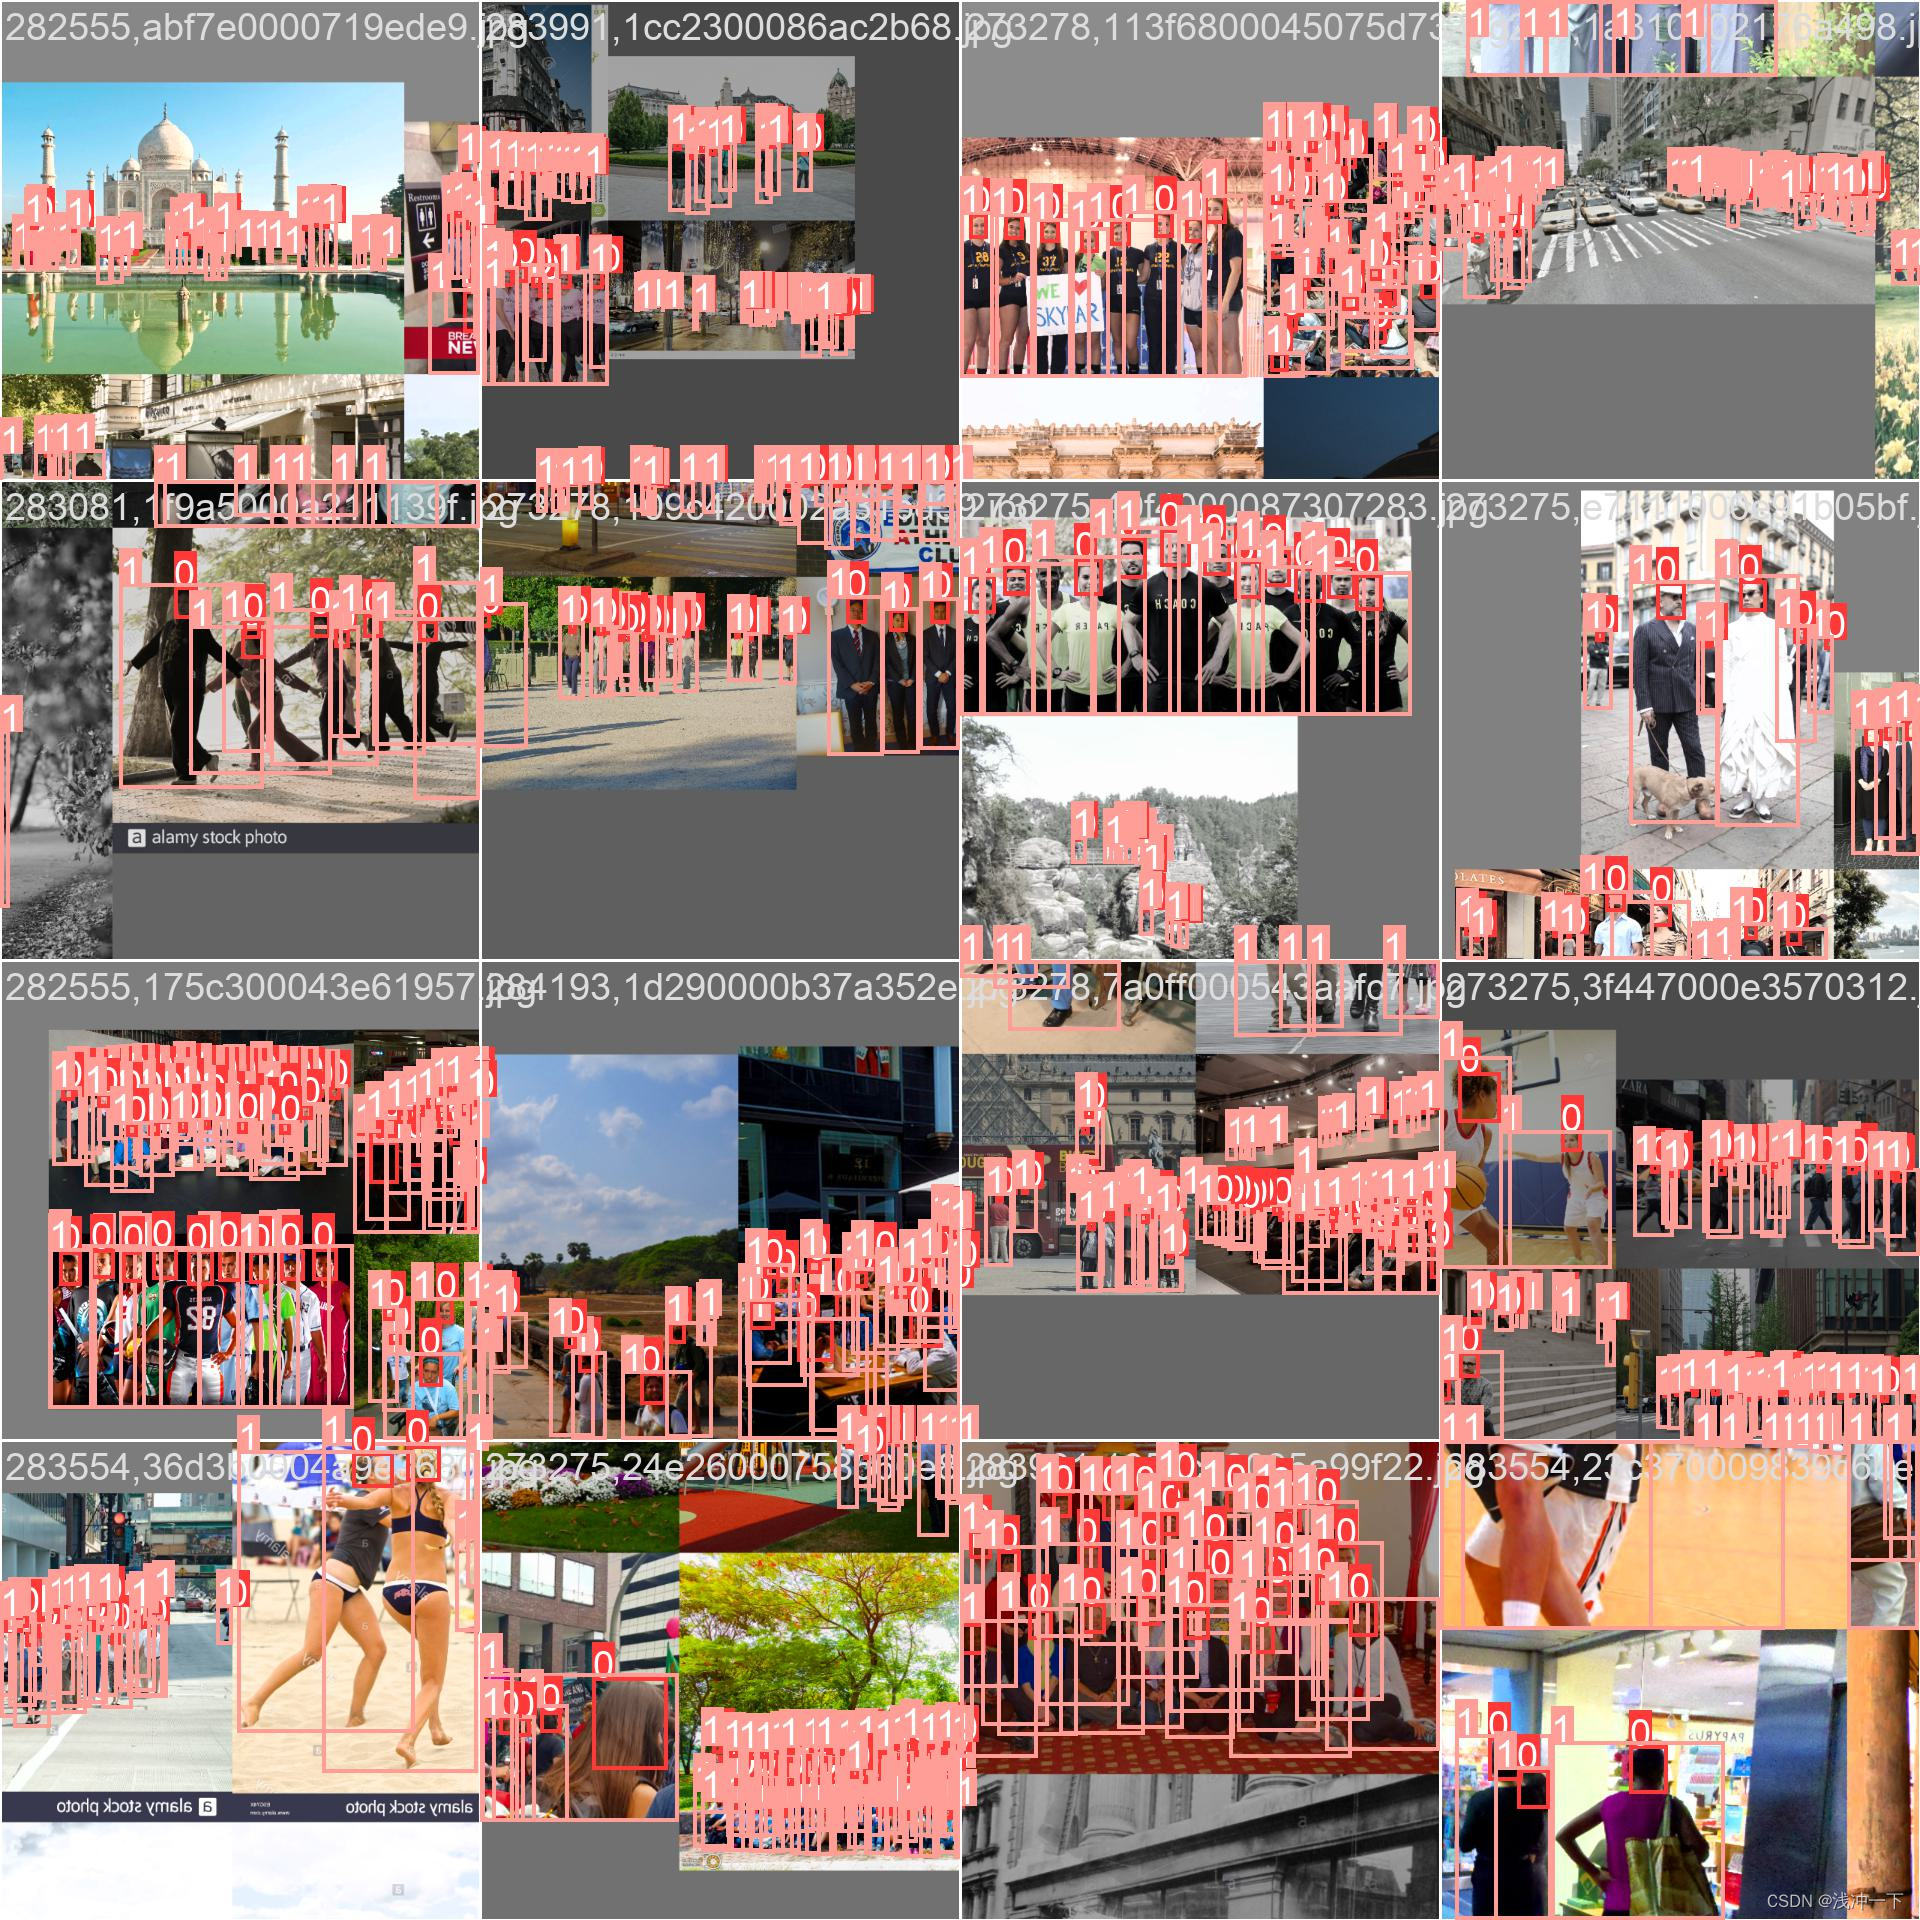
训练图片一个batch_size 如下:
本文参考 大神链接:
B 站: https://space.bilibili.com/286900343
相关文章:
YOLOv5 添加 OTA,并使用 coco、CrowdHuman数据集进行训练。
YOLO-OTA 第一步:拉取 YOLOv5 的代码第二步:添加 ComputeLossOTA 函数第二步:修改 train 和 val 中损失函数为 ComputeLossOTA 函数1、在 train.py 中 首先添加 ComputeLossOTA 库。2、在 train.py 修改初始化的损失函数3、在 train.py 修改一…...
SpringBoot 日志
目录 1.如何使用日志 2.自定义打印日志 3.日志级别 3.1 日志从低到高级别 3.2 日志级别设置 为什么 Spring Boot 可以打印日志?并设置日志级别? 4.日志的持久化 5.lombok——更加简单的输出日志 5.1 使用slf4j 注解输出日志 5.2 lombok 执行原…...
非小米笔记本小米妙享中心安装最新教程 3.2.0.464 兼容所有Windows系统
小米妙享中心 3.2.0.464 版本帮助 : 支持音频流转、屏幕镜像、屏幕拓展、键鼠拓展、无线耳机、小米互传 目录 小米妙享中心 3.2.0.464 版本帮助 : 1.常规教程使用安装包方式安装失败 或者 1.1安装失败可使用大佬的加载补丁方法解决 补充卸载残留 1.2 截图存档 2. 本教程…...
基于大数据的社交平台数据爬虫舆情分析可视化系统 计算机竞赛
文章目录 0 前言1 课题背景2 实现效果**实现功能****可视化统计****web模块界面展示**3 LDA模型 4 情感分析方法**预处理**特征提取特征选择分类器选择实验 5 部分核心代码6 最后 0 前言 🔥 优质竞赛项目系列,今天要分享的是 🚩 基于大数据…...
)
MYSQL(事务)
一、什么是事务,四大特性 事务:一组操作的集合,它是一个不可分割的单位,事务会将这些操作作为一个整体一起像系统提交,这些操作要么同时成功,要么同时失败 四大特性(ACID) 原子性&am…...

npm start启动的是什么
npm start 命令是在一个 Node.js 项目中执行的一个自定义命令,用于启动该项目。该命令是在 package.json 文件中定义的,通常被用于启动一个 Web 应用程序或服务。 具体来说,当在项目目录下执行 npm start 命令时,npm 将会在该项目…...
基于PyTorch的MNIST手写体分类实战
第2章对MNIST数据做了介绍,描述了其构成方式及其数据的特征和标签的含义等。了解这些有助于编写合适的程序来对MNIST数据集进行分析和识别。本节将使用同样的数据集完成对其进行分类的任务。 3.1.1 数据图像的获取与标签的说明 MNIST数据集的详细介绍在第2章中已…...

conda 复制系统环境
直接复制 想要通过 conda 直接复制一个已存在的环境,你可以使用 conda create 命令并配合 --clone 参数。以下是具体步骤: 查看现有的环境: 首先,你可以使用以下命令来查看所有的 conda 环境: conda env list这会给你一个环境列表…...
如何在Microsoft Visual Studio 中使用Cpp代码调用python代码
Microsoft Visual Studio中Cpp调用Python代码 本文介绍如何在Microsoft Visual Studio中,开发cpp项目时,调用python代码。 文章目录 Microsoft Visual Studio中Cpp调用Python代码前言一、Cpp生成exe文件1.1 安装python环境1.2 配置Microsoft Visual Stu…...
DAY35 435. 无重叠区间 + 763.划分字母区间 + 56. 合并区间
435. 无重叠区间 题目要求:给定一个区间的集合,找到需要移除区间的最小数量,使剩余区间互不重叠。 注意: 可以认为区间的终点总是大于它的起点。 区间 [1,2] 和 [2,3] 的边界相互“接触”,但没有相互重叠。 示例 1: 输入: [ […...
代码随想录算法训练营第2天| 977有序数组的平方、209长度最小的子数组。
JAVA代码编写 977. 有序数组的平方 给你一个按 非递减顺序 排序的整数数组 nums,返回 每个数字的平方 组成的新数组,要求也按 非递减顺序 排序。 示例 1: 输入:nums [-4,-1,0,3,10] 输出:[0,1,9,16,100] 解释&…...

微信小程序通过startLocationUpdate,onLocationChange获取当前地理位置信息,配合腾讯地图解析获取到地址
先创建个getLocation.js文件 //获取用户当前所在的位置 const getLocation () > {return new Promise((resolve, reject) > {let _locationChangeFn (res) > {resolve(res) // 回传地里位置信息wx.offLocationChange(_locationChangeFn) // 关闭实时定位wx.stopLoc…...

C/C++字符三角形 2020年12月电子学会青少年软件编程(C/C++)等级考试一级真题答案解析
目录 C/C字符三角形 一、题目要求 1、编程实现 2、输入输出 二、算法分析 三、程序编写 四、程序说明 五、运行结果 六、考点分析 C/C字符三角形 2020年12月 C/C编程等级考试一级编程题 一、题目要求 1、编程实现 给定一个字符,用它构造一个底边长5个字…...

Python数据挖掘:入门、进阶与实用案例分析——基于非侵入式负荷检测与分解的电力数据挖掘
文章目录 摘要01 案例背景02 分析目标03 分析过程04 数据准备05 属性构造06 模型训练07 性能度量08 推荐阅读赠书活动 摘要 本案例将根据已收集到的电力数据,深度挖掘各电力设备的电流、电压和功率等情况,分析各电力设备的实际用电量,进而为电…...
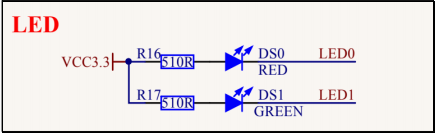
基于 Qt控制开发板 LED和C语言控制LED渐变亮度效果
## 资源简介 在STM32开发板,板载资源上有两个可自由控制的 LED。如下图原理 图其中我们以操作 LED1 为示例,LED1 为出厂系统的心跳指示灯。 ## 应用实例 想要控制这个 LED,首先出厂内核已经默认将这个 LED 注册成了 gpio-leds类型设备。所以我们可以直接在应用层接口直接…...

Android 11.0 禁用插入耳机时弹出的保护听力对话框
1.前言 在11.0的系统开发中,在某些产品中会对耳机音量调节过高限制,在调高到最大音量的70%的时候,会弹出音量过高弹出警告,所以产品 开发的需要要求去掉这个音量弹窗警告功能 2.禁用插入耳机时弹出的保护听力对话框的核心类 frameworks\base\packages\SystemUI\src\com\and…...

微信小程序案例2-3:婚礼邀请函
文章目录 一、运行效果二、知识储备(一)导航栏配置(二)标签栏配置(三)vw、vh单位(四)video组件(五)表单组件(六)Node.js概述 三、实现…...
K8S部署Dashboard
获取recommended.yaml文件 Dashboard是官方提供的一个UI,可用于基本管理K8s资源。 YAML下载地址: wget https://raw.githubusercontent.com/kubernetes/dashboard/v2.4.0/aio/deploy/recommended.yaml如果网络错误无法直接下载,可以直接访问…...

【OJ比赛日历】快周末了,不来一场比赛吗? #10.29-11.04 #7场
CompHub[1] 实时聚合多平台的数据类(Kaggle、天池…)和OJ类(Leetcode、牛客…)比赛。本账号会推送最新的比赛消息,欢迎关注! 以下信息仅供参考,以比赛官网为准 目录 2023-10-29(周日) #3场比赛2023-10-30…...

常用应用安装教程---在centos7系统上安装Docker
在centos7系统上安装Docker 1:切换镜像源 wget https://mirrors.aliyun.com/docker-ce/linux/centos/docker-ce.repo -O /etc/yum.repos.d/docker-ce.repo2:查看当前镜像源中支持的docker版本 yum list docker-ce --showduplicates | sort -r3&#x…...

SEGGER J-Flash V8.94添加芯片方法
1.打开J-Flash安装路径(一般为\SEGGER\JLink_V894) 在此路径下新建文件JLinkDevices.xml2.编辑xml文件 <DataBase><Device><ChipInfo Vendor"Renergy" /*厂家*/Name"RN8213B_SOC_V2" /*芯片型号*/WorkRAMAddr&q…...

【Ease UI】2026-04-03组件更新:新增组件xly-file-preview文件预览组件
🚀 即插即用的 Vue 3 业务组件库,让中后台开发回归简单 Ease UI 是一套为「快速复制」而生的 Vue 3 业务组件库。每个组件都是独立的 .vue 单文件,不依赖任何外部样式或工具函数,直接复制到你的项目即可使用。它仅依赖 Element P…...

【Seed-Labs 2.0】从攻到防:实战解析SQL注入漏洞与预编译语句防御
1. SQL注入漏洞:从入门到实战 第一次接触SQL注入时,我被这种攻击方式的简单粗暴震惊了。只需要在登录框输入admin#,就能直接绕过密码验证进入系统。这让我意识到,很多看似复杂的系统安全问题,其实都源于最基础的编码疏…...

小型葡萄除梗破碎机的设计【三维proe+7张cad图纸+CAXA图纸+毕业论文】
小型葡萄除梗破碎机是葡萄加工领域的关键设备,其核心作用在于高效分离葡萄果粒与果梗,同时实现果粒的适度破碎,为后续发酵或榨汁工艺提供优质原料。传统人工除梗破碎效率低、劳动强度大,且易因操作差异影响原料品质。该设备通过机…...
)
GPS定位误差从几十米到厘米级:RTK技术如何实现高精度定位(附手机实测对比)
GPS定位误差从几十米到厘米级:RTK技术如何实现高精度定位(附手机实测对比) 你是否曾在城市峡谷中看着导航地图上飘忽不定的定位箭头哭笑不得?或是户外徒步时发现轨迹记录偏离实际路线数十米?这些困扰背后,是…...

基于MATLAB Robotics Toolbox的机械臂轨迹规划仿真与数据可视化分析
基于MATLAB Robotics Toolbox的机械臂轨迹规划仿真与数据可视化分析 摘要 机械臂轨迹规划是机器人学研究的核心问题之一,直接影响工业机器人的作业精度、运动平稳性和工作效率。本文以六自由度PUMA560型机械臂为研究对象,利用Peter Corke开发的Robotics Toolbox for MATLAB…...

Label Studio ML Backend架构设计与高可用机器学习服务实现深度解析
Label Studio ML Backend架构设计与高可用机器学习服务实现深度解析 【免费下载链接】label-studio-ml-backend Configs and boilerplates for Label Studios Machine Learning backend 项目地址: https://gitcode.com/gh_mirrors/la/label-studio-ml-backend Label Stu…...

智能体快速构建指南
智能体快速构建指南 基于 NVIDIA GTC 大会「Agentic AI 101」主题讲座整理 覆盖:本质认知 → 核心模块 → 落地场景 → 实操路径 一、Agentic AI 是什么?与传统 AI 的本质分野 一句话定义 传统 AI 告诉你怎么做,Agentic AI 直接帮你做完。 传…...

番茄小说下载器:打造个人离线图书馆的终极指南 [特殊字符]
番茄小说下载器:打造个人离线图书馆的终极指南 🍅 【免费下载链接】Tomato-Novel-Downloader 番茄小说下载器不精简版 项目地址: https://gitcode.com/gh_mirrors/to/Tomato-Novel-Downloader 想要随时随地畅读番茄小说,不受网络限制&…...

Windows 11安装终极指南:5分钟绕过所有硬件限制
Windows 11安装终极指南:5分钟绕过所有硬件限制 【免费下载链接】MediaCreationTool.bat Universal MCT wrapper script for all Windows 10/11 versions from 1507 to 21H2! 项目地址: https://gitcode.com/gh_mirrors/me/MediaCreationTool.bat 还在为Wind…...