神经网络气温预测
#引用所需要的库
import numpy as np
import pandas as pd
import matplotlib.pyplot as plt
import torch
import torch.optim as optim#优化器
#过滤警告
import warnings
warnings.filterwarnings(“ignore”)
%matplotlib inline
features=pd.read_csv(‘temps.csv’)
features.head()
year month day week temp_2 temp_1 average actual friend
0 2016 1 1 Fri 45 45 45.6 45 29
1 2016 1 2 Sat 44 45 45.7 44 61
2 2016 1 3 Sun 45 44 45.8 41 56
3 2016 1 4 Mon 44 41 45.9 40 53
4 2016 1 5 Tues 41 40 46.0 44 41
#把列转为时间处理数据
import datetime
years=features[‘year’]
months=features[‘month’]
days=features[‘day’]
#datetime格式
dates=[str(int (year))+‘-’+str(int(month))+‘-’+str(int(day)) for year,month,day in zip(years,months,days)]
dates=[datetime.datetime.strptime(date,‘%Y-%m-%d’)for date in dates]
features.shape
(348, 9)
dates[:5]
[datetime.datetime(2016, 1, 1, 0, 0),
datetime.datetime(2016, 1, 2, 0, 0),
datetime.datetime(2016, 1, 3, 0, 0),
datetime.datetime(2016, 1, 4, 0, 0),
datetime.datetime(2016, 1, 5, 0, 0)]
#小展示,看看数据集长什么样
#独热编码
features=pd.get_dummies(features)
features.head(5)
year month day temp_2 temp_1 average actual friend week_Fri week_Mon week_Sat week_Sun week_Thurs week_Tues week_Wed
0 2016 1 1 45 45 45.6 45 29 1 0 0 0 0 0 0
1 2016 1 2 44 45 45.7 44 61 0 0 1 0 0 0 0
2 2016 1 3 45 44 45.8 41 56 0 0 0 1 0 0 0
3 2016 1 4 44 41 45.9 40 53 0 1 0 0 0 0 0
4 2016 1 5 41 40 46.0 44 41 0 0 0 0 0 1 0
features.shape
(348, 15)
#标签(Y)
labels=np.array(features[‘actual’])
#在特征集中剔除标签,剩下x
features=features.drop(‘actual’,axis=1)
#单独保存名字,以备后患
feature_list=list(features.columns)
#转成数组格式->后续还需要转换成tensor张量
features=np.array(features)
features.shape
(348, 14)
#因为数据有大有小,归一化(数值浮动范围小)
from sklearn import preprocessing
input_features=preprocessing.StandardScaler().fit_transform(features)
#构建网络模型(复杂版)
#转为tensor
x = torch.tensor(input_features, dtype = float)
y = torch.tensor(labels, dtype = float)
#权重参数初始化
weights = torch.randn((14,128),dtype=float,requires_grad=True)
biases = torch.randn(128,dtype=float,requires_grad=True)
weights2 = torch.randn((128,1),dtype=float,requires_grad=True)
biases2 = torch.randn(1,dtype=float,requires_grad=True)
learning_rate = 0.001
losses = []
for i in range(1000):
#计算隐藏层
hidden = x.mm(weights)+biases
#给激活函数
hidden = torch.relu(hidden)
#预测
predictions = hidden.mm(weights2)+biases2
#计算损失
loss = torch.mean((predictions - y) ** 2)
losses.append(loss.data.numpy())
if i % 100 == 0 :print('loss:',loss)
# 反向传播计算
loss.backward()#更新参数
weights.data.add_(- learning_rate * weights.grad.data)
biases.data.add_(- learning_rate * biases.grad.data)
weights2.data.add_(- learning_rate * weights2.grad.data)
biases2.data.add_(- learning_rate * biases2.grad.data)
#记得清空权重参数,因为每次迭代会累计
weights.grad.data.zero_()
biases.grad.data.zero_()
weights2.grad.data.zero_()
biases2.grad.data.zero_()
loss: tensor(8652.8872, dtype=torch.float64, grad_fn=)
loss: tensor(155.4351, dtype=torch.float64, grad_fn=)
loss: tensor(147.5643, dtype=torch.float64, grad_fn=)
loss: tensor(144.6621, dtype=torch.float64, grad_fn=)
loss: tensor(143.1741, dtype=torch.float64, grad_fn=)
loss: tensor(142.2740, dtype=torch.float64, grad_fn=)
loss: tensor(141.6748, dtype=torch.float64, grad_fn=)
loss: tensor(141.2530, dtype=torch.float64, grad_fn=)
loss: tensor(140.9336, dtype=torch.float64, grad_fn=)
loss: tensor(140.6799, dtype=torch.float64, grad_fn=)
简化实现
指定规模
input_size = input_features.shape[1]
hidden_size = 128
output_size = 1
batch_size = 16
搭建网络
my_nn = torch.nn.Sequential(
torch.nn.Linear(input_size,hidden_size),
torch.nn.Sigmoid(),
torch.nn.Linear(hidden_size,output_size),
)
定义损失函数
cost = torch.nn.MSELoss(reduction = ‘mean’)
optimizer = torch.optim.Adam(my_nn.parameters(),lr = 0.001)
训练网络
losses = []
for i in range(1000):
batch_loss = []
# 小批量随机梯度下降进行训练
for start in range(0,len(input_features),batch_size):
end = start+batch_size if start + batch_size < len(input_features) else len(input_features)
xx = torch.tensor(input_features[start:end],dtype = torch.float,requires_grad = True)
yy = torch.tensor(labels[start:end],dtype = torch.float,requires_grad = True)
prediction = my_nn(xx)
loss = cost(prediction,yy)
optimizer.zero_grad()
loss.backward(retain_graph=True)
optimizer.step()
batch_loss.append(loss.data.numpy())
# 打印损失
# 打印损失值
if i % 100 == 0:losses.append(np.mean(batch_loss))print(i,np.mean(batch_loss))
0 4015.5623
100 38.040577
200 35.64831
300 35.261333
400 35.099106
500 34.968235
600 34.84836
700 34.728233
800 34.605637
900 34.48074
#评估模型
x = torch.tensor(input_features,dtype = torch.float)
predict = my_nn(x).data.numpy()
转换日期格式
dates = [str(int(year))+‘-’+str(int(month))+‘-’+str(int(day)) for year,month,day in zip(years,months,days)]
dates = [datetime.datetime.strptime(date,‘%Y-%m-%d’) for date in dates]
创建一个表格来存日期和其对应的标签数值
true_data = pd.DataFrame(data = {‘date’:dates,‘actual’:labels})
同理,在创建一个来存日期和其对应的模型预测值
mouths = features[:,feature_list.index(‘month’)]
days = features[:,feature_list.index(‘day’)]
years = features[:,feature_list.index(‘year’)]
test_dates = [str(int(year))+‘-’+str(int(month))+‘-’+str(int(day)) for year,month,day in zip(years,months,days)]
test_dates = [datetime.datetime.strptime(date,‘%Y-%m-%d’) for date in test_dates]
predictions_data = pd.DataFrame(data = {‘date’:test_dates,‘prediction’:predict.reshape(-1)})
真实值
plt.plot(true_data[‘date’],true_data[‘actual’],‘b-’,label = ‘actual’)
预测值
plt.plot(predictions_data[‘date’],predictions_data[‘prediction’],‘ro’,label = ‘prediction’)
plt.xticks(rotation = ‘60’)
plt.legend()
图名
plt.xlabel(‘Date’);plt.ylabel(‘Maximum Temperature (F)’);plt.title(‘Actual and Predicted Values’)
plt.show()
ValueError: rotation must be ‘vertical’, ‘horizontal’ or a number, not 60
相关文章:

神经网络气温预测
#引用所需要的库 import numpy as np import pandas as pd import matplotlib.pyplot as plt import torch import torch.optim as optim#优化器 #过滤警告 import warnings warnings.filterwarnings(“ignore”) %matplotlib inline featurespd.read_csv(‘temps.csv’) feat…...

体验SOLIDWORKS钣金切口工具增强 硕迪科技
在工业生产制造中,钣金加工是一种常用的加工方式,在SOLIDWORKS2024新版本中,钣金切口工具再次增强了,从SOLIDWORKS 2024 开始, 您可以使用切口工具在空心或薄壁圆柱体和圆锥体中生成切口。 只需在现有空心或薄壁圆柱体…...
Flask之app.route装饰器函数的参数)
(八)Flask之app.route装饰器函数的参数
app.route参数 app.route()是Flask框架中用于定义路由的装饰器函数,它接受一些参数来指定路由的URL规则、请求方法等。 app.route()参数如下: rule(必选):定义URL规则的字符串,表示要匹配的URL路径。可以…...

ES6.8集群配置注意点
x-pack配置 当启用xpack.security.enabled时,确保集群中的所有节点都配置了此项,并确保所有节点都已重启。如果只有部分节点启用安全性,那么集群可能会遇到问题。 设置密码 使用elasticsearch-setup-passwords工具设置密码时,确保…...
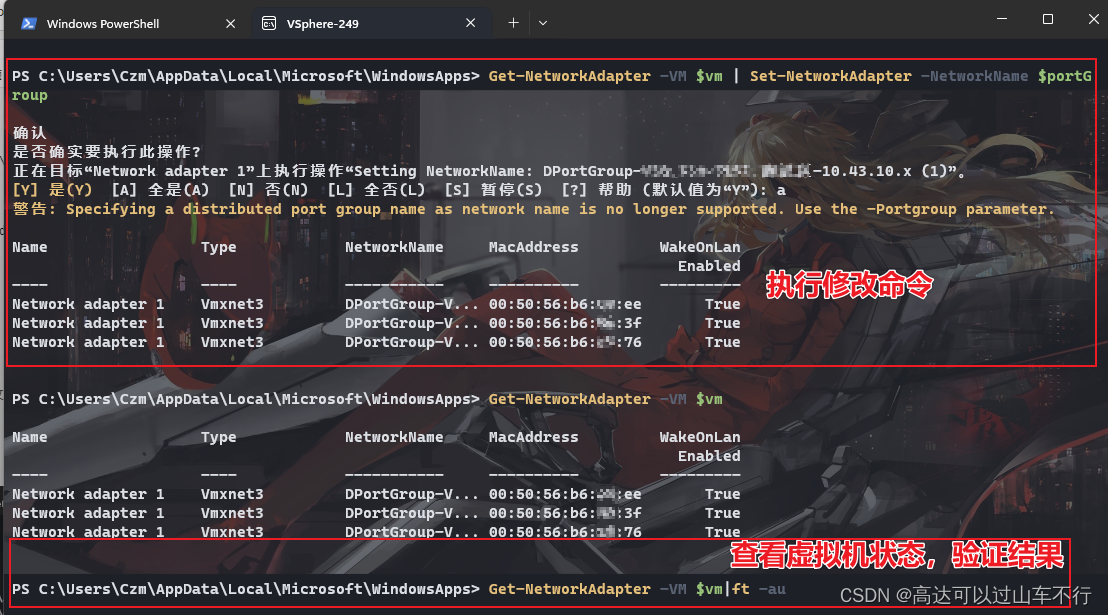
Powercli批量修改分布式交换机端口组
背景 需求: 批量修改虚拟机的分布式端口组 解决方式一: 三条命令解决:先获取目标虚拟机、获取目标端口组、修改虚拟机端口组、检查虚拟机状态。 $vm Get-VM -Name <虚拟机名称> $portGroup Get-VirtualPortGroup -Name <端口…...

ZKP10.2 Efficient Recursion via Statement Folding (Nova)
ZKP学习笔记 ZK-Learning MOOC课程笔记 Lecture 10: Recursive SNARKs, Aggregation and Accumulation (Dan Boneh) 10.3 Efficient Recursion via Statement Folding: Nova, Supernova, and generalizations The difficulty with full recursion Prover P needs to build a…...

高浓度cod废水怎么处理
高浓度COD废水的处理方法主要有物理法、生物法和化学法。 物理法:一般通过加入絮凝剂,利用絮凝剂的吸附、电中和等作用将水中的颗粒物结团沉降下去,从而达到去除部分来自颗粒物的COD。此方法基本上只对浓度上万、上千的COD起作用,…...
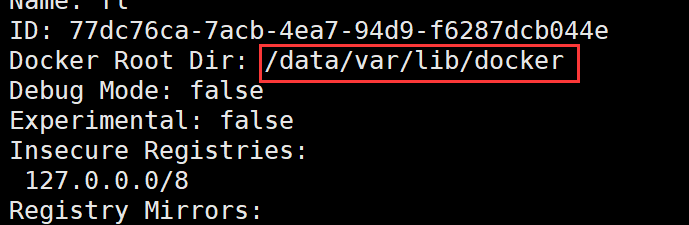
Docker学习——②
文章目录 1、Docker是什么1.1 Docker本质1.2 Docker的引擎迭代1.3 Docker和虚拟机的区别1.4 Docker 为什么比虚拟机资源利用率高,启动快?1.5 Docker 和 JVM 虚拟化的区别? 2、Docker架构3、Docker生态3.1 新时代软件诉求3.2 Docker 解决方案 …...
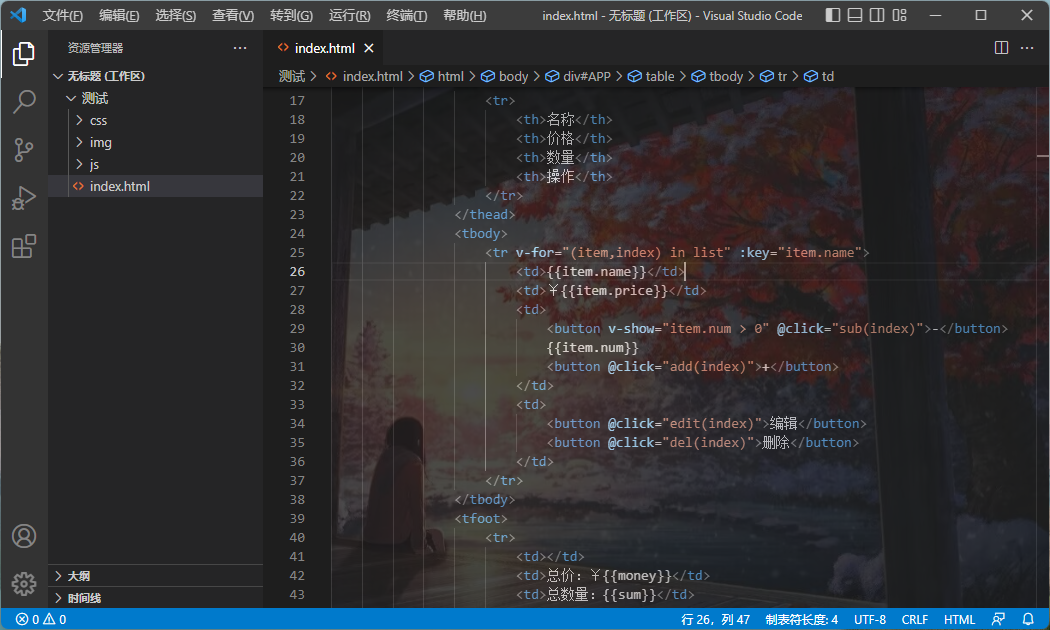
VSCode 设置平滑光标
1.点击左下角的设置按钮,再点击设置 2.点击文本编辑器,点击光标,勾选控制是否启用平滑插入动画。 3.随便打开一个文件,上下左右移动光标时,会发现非常的流畅。 原创作者:吴小糖 创作时间:2023…...

Spring、SpringMVC、Mybatis
一.Spring基础 1.Spring 框架是什么 Spring 是一款开源的轻量级 Java 开发框架,我们一般说 Spring 框架指的都是 Spring Framework,它是很多模块的集合,例如,Spring core、Spring JDBC、Spring MVC 等,使用这些模块可…...
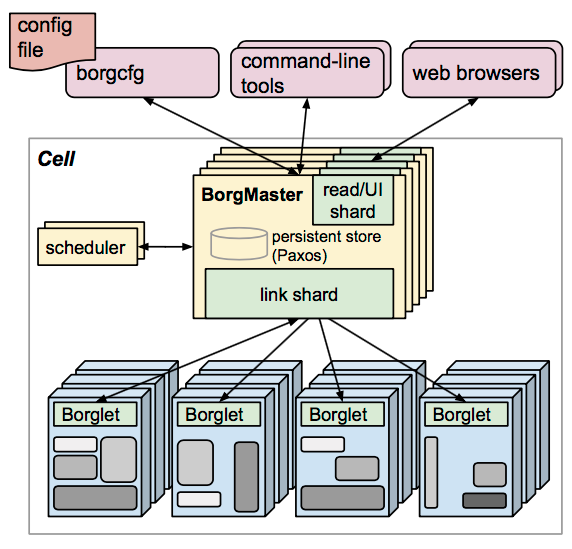
Kubernetes 架构
Kubernetes 架构 Kubernetes 最初源于谷歌内部的 Borg,提供了面向应用的容器集群部署和管理系统。Kubernetes 的目标旨在消除编排物理 / 虚拟计算,网络和存储基础设施的负担,并使应用程序运营商和开发人员完全将重点放在以容器为中心的原语上进行自助运营。Kubernetes 也提…...
)
python---数据类型(列表)
组织列表 使用sort()方法对列表永久性排序 按照字母顺序排序: motorcycles [chunlan, yamaha, dayun, jianshe]motorcycles.sort()print(motorcycles) 字母倒序: motorcycles [chunlan, yamaha, dayun, jianshe]motorcycles.sort(reverseTrue)pri…...

CentOS 7升级gcc/G++版本
Centos 7默认gcc版本为4.8,有时需要更高版本,只需要执行几条命令,无需下载源码编译编译。 安装centos-release-scl sudo yum install centos-release-scl 安装devtoolset sudo yum install devtoolset-8-gcc* 注意,如果想安装…...

uni-app开发微信公众号 H5打开扫一扫功能
<!--引入微信sdk--> <script src"http://res.wx.qq.com/open/js/jweixin-1.6.0.js"></script>let url location.href.split(#)[0];newApi.getSignature({ url }).then(res > {if (res.code 0) {this.sdk.config({beta: true, // 必须这么写&a…...

k8s-服务网格实战-入门Istio
istio-01.png 背景 终于进入大家都比较感兴趣的服务网格系列了,在前面已经讲解了: 如何部署应用到 kubernetes服务之间如何调用如何通过域名访问我们的服务如何使用 kubernetes 自带的配置 ConfigMap 基本上已经够我们开发一般规模的 web 应用了…...

金属压铸件自动化3D全尺寸测量设备自动外观检测三维检测-CASAIM
铸造作为现代装备制造工业的基础共性技术之一,铸件产品既是工业制造产品,也是大型机械的重要组成部分,被广泛运用在航空航天、工业船舶、机械电子和交通运输等行业。 铸件形状复杂,一般的三坐标或者卡尺圆规等工具难以获取多特征…...

Android笔记(十):结合Navigation组件实现Compose界面的导航
在Android笔记(七)搭建Android JetPack Compose组件中Scaffold脚手架 一文中通过定义一个导航的函数来实现不同界面的切换。如果没有传递任何参数,这样的导航处理也是可以接受的,处理方式也非常简单。但是,如果考虑到不…...

linux内核tcp配置--断网后连接卡住
通过隐藏通信应用程序中的临时网络中断,TCP 可以在偶尔不可靠的网络上提供可靠的通信。在通知发件人任何问题之前,您的操作系统将多次重发丢失的消息。大多数 Linux 发行版默认将任何丢失的数据包重传 15 次。重新传输以指数方式回退,因此这 …...
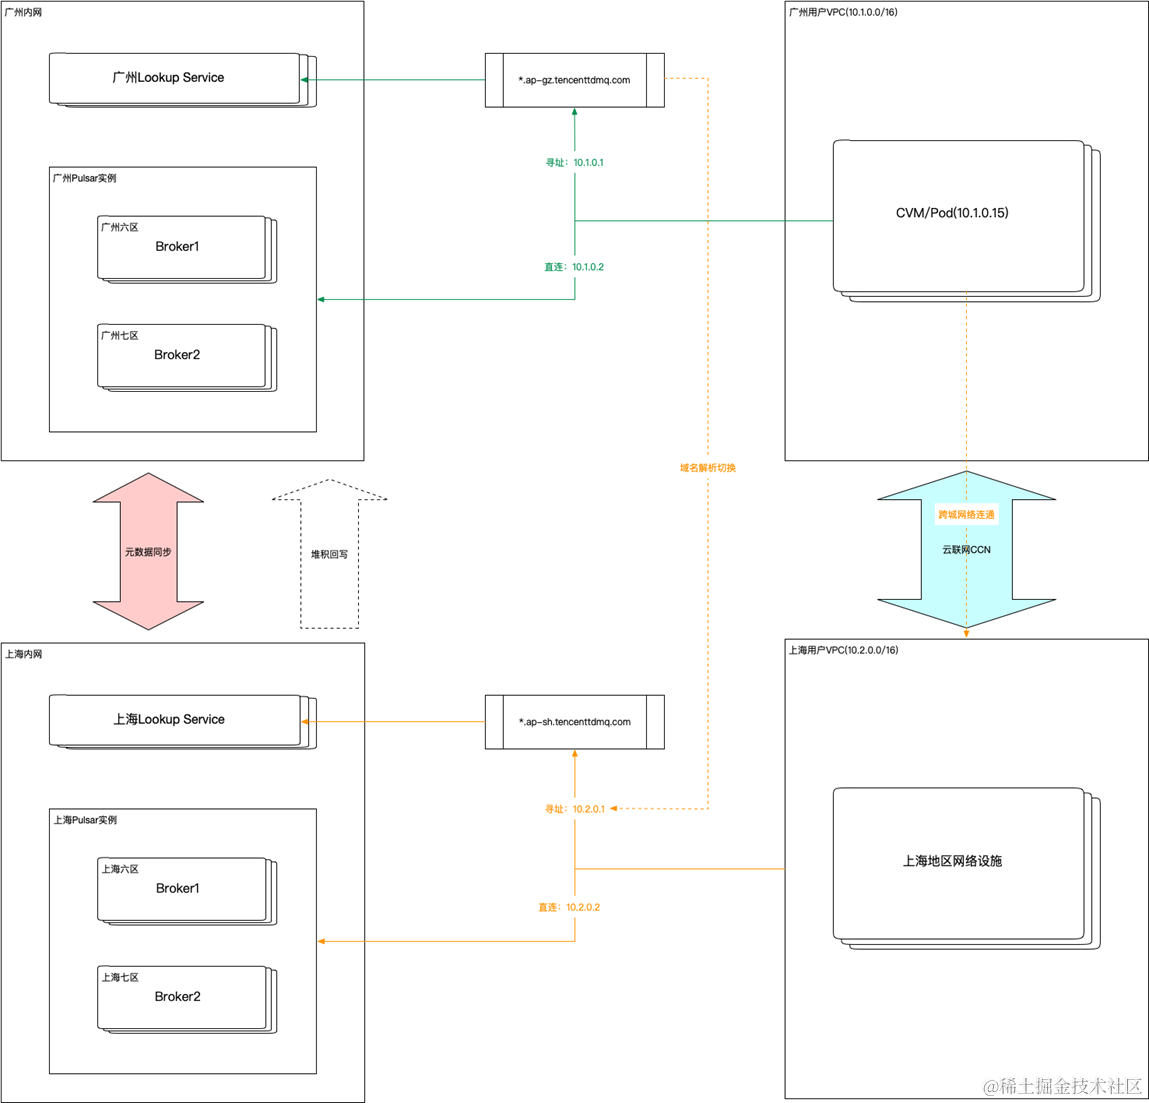
Apache Pulsar 在腾讯云上的最佳实践
导语 由 StreamNative 主办的 Pulsar Meetup Beijing 2023 在2023年10月14日完美落幕,本次活动大咖云集,来自腾讯、滴滴、华为、智联招聘、RisingWave 和 StreamNative 的行业专家们一起,深入探讨 Pulsar 在生产环境中的最佳应用实践&#x…...
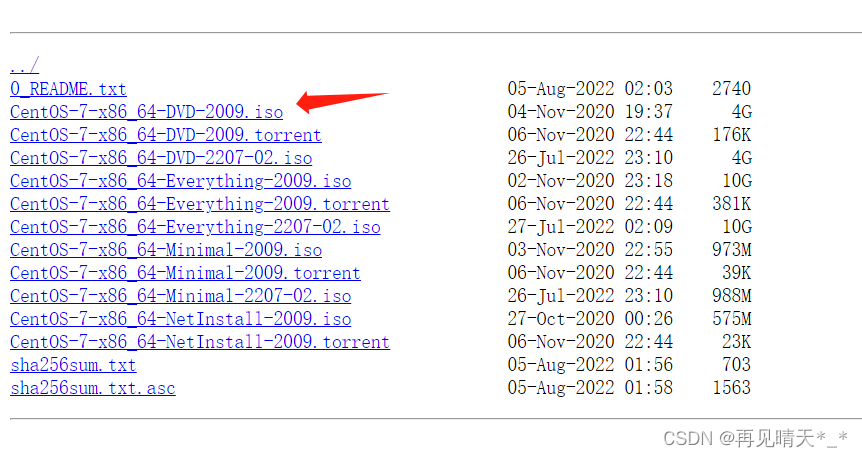
VMware 虚拟机安装 CentOS 7
CentOS 7 1. 下载CentOS 7 iso镜像 Index of /centos/7.9.2009/isos/x86_64/ 2. Vmware安装CentOS 7 安装教程: 超详细VMware CentOS7(最小安装)安装教程_虚拟机最小化安装-CSDN博客 【精选】VMware 安装 Centos7 详细过程_vm虚拟机安装centos7_expectation Fu…...

云原生安全新思路:基于DPU智能网卡的IPsec卸载实战,为K8s节点通信加密‘减负’
云原生安全新思路:基于DPU智能网卡的IPsec卸载实战 在Kubernetes集群中,节点间的网络通信安全一直是DevOps团队关注的焦点。传统IPsec加密方案虽然能有效保护数据传输,却不可避免地消耗大量主机CPU资源。当集群规模扩大时,这种加密…...
完整38页pdf)
Anthropic《创始人手册:打造AI原生创业公司》Claude(中文精读版)完整38页pdf
Anthropic 在2026年5月发布的官方手册,聚焦 AI 原生创业的全生命周期,拆解从创意、MVP、上线到扩张的四大核心阶段,重构 AI 时代的创业逻辑。 手册核心围绕 “AI 重塑创业模式” 展开,指出 2026 年 AI 已打破技术门槛,…...

别再让PCIe性能打折扣!手把手教你用lspci和setpci调优MaxPayloadSize
PCIe性能调优实战:用lspci和setpci精准优化MaxPayloadSize 当你的NVMe固态硬盘突然降速,或者10G网卡吞吐量不及预期时,可能正遭遇PCIe链路层的隐形性能杀手。本文将带你用Linux系统自带的lspci和setpci工具,像专业工程师一样诊断和…...

颠覆性AI 3D建模:Zoo Text-to-CAD技术将设计效率提升10倍
颠覆性AI 3D建模:Zoo Text-to-CAD技术将设计效率提升10倍 【免费下载链接】text-to-cad-ui A lightweight UI for interacting with the Zoo Text-to-CAD API. 项目地址: https://gitcode.com/gh_mirrors/te/text-to-cad-ui 在机械设计与工程制造领域&#x…...

君正IConfigTool介绍
IConfigTool 是君正 SDK 里的图形化配置工具,一般路径类似: tools/iconfigtool/IConfigToolApp/IConfigTool它的作用可以理解成: 用图形界面修改君正平台的一些系统/板级配置文件。 君正文档里说明:IConfigTool 是基于 Qt 的 GUI…...

权限管理测试
在 RuoYi(若依)系统中,要实现一个自定义接口的权限验证,通常需要遵循 “后端定义 -> 前端配置 -> 角色分配 -> 测试验证” 的流程。以下是具体的实施步骤及详细解析:第一步:后端定义接口并添加注解…...

别再说国产模型不行了!DeepSeek V4 + Claude Code,编程体验直接起飞
别再说国产模型不行了!DeepSeek V4 Claude Code,编程体验直接起飞 还在觉得 DeepSeek V4 不如国外模型? 醒醒,2026 年了。DeepSeek V4 系列在代码能力上已经卷到让人窒息——而且价格只有 Claude 官方的零头。 但问题来了&…...

Webhook测试工具终极对决:开源自建与云端托管的决策指南
Webhook测试工具终极对决:开源自建与云端托管的决策指南 【免费下载链接】webhook.site ⚓️ Easily test HTTP webhooks with this handy tool that displays requests instantly. 项目地址: https://gitcode.com/gh_mirrors/we/webhook.site 在当今API驱动…...

iOS激活锁终极绕过指南:5分钟免费解锁iPhone完整方案
iOS激活锁终极绕过指南:5分钟免费解锁iPhone完整方案 【免费下载链接】applera1n icloud bypass for ios 15-16 项目地址: https://gitcode.com/gh_mirrors/ap/applera1n 对于拥有二手iPhone却卡在激活锁界面的用户来说,applera1n提供了一个专业、…...
)
手把手教你用Vector CANape创建第一个AUTOSAR ECU测量工程(附A2L文件配置避坑点)
从零构建AUTOSAR ECU测量工程:Vector CANape实战指南与A2L文件深度解析 在汽车电子开发领域,ECU数据测量与标定是功能验证和性能优化不可或缺的环节。作为Vector工具链中的核心组件,CANape凭借其强大的实时数据采集和分析能力,已成…...