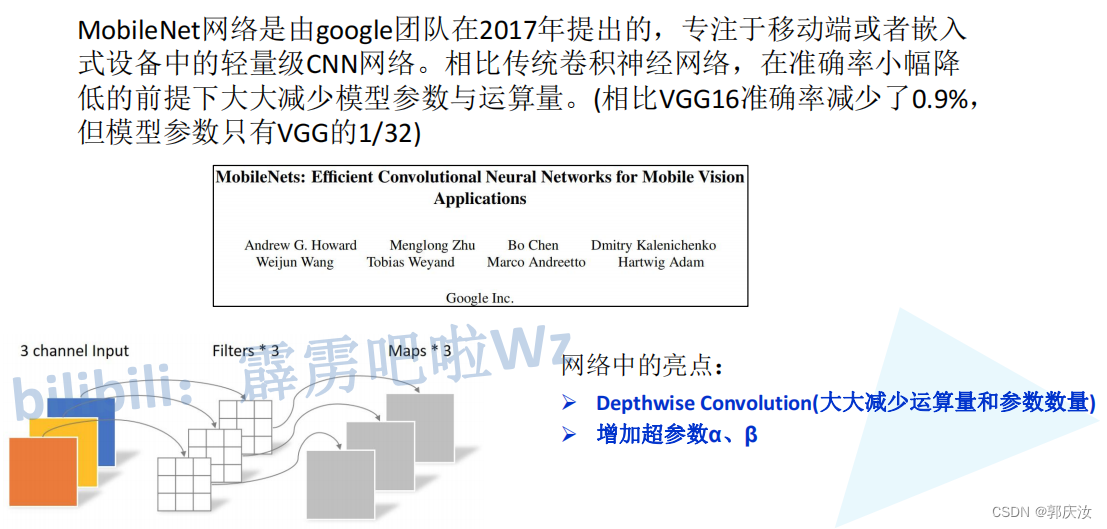
深度学习网络模型 MobileNet系列MobileNet V1、MobileNet V2、MobileNet V3网络详解以及pytorch代码复现
深度学习网络模型 MobileNet系列MobileNet V1、MobileNet V2、MobileNet V3网络详解以及pytorch代码复现
- 1、DW卷积与普通卷积计算量对比
- DW与PW计算量
- 普通卷积计算量
- 计算量对比
- 2、MobileNet V1
- MobileNet V1网络结构
- MobileNet V1网络结构代码
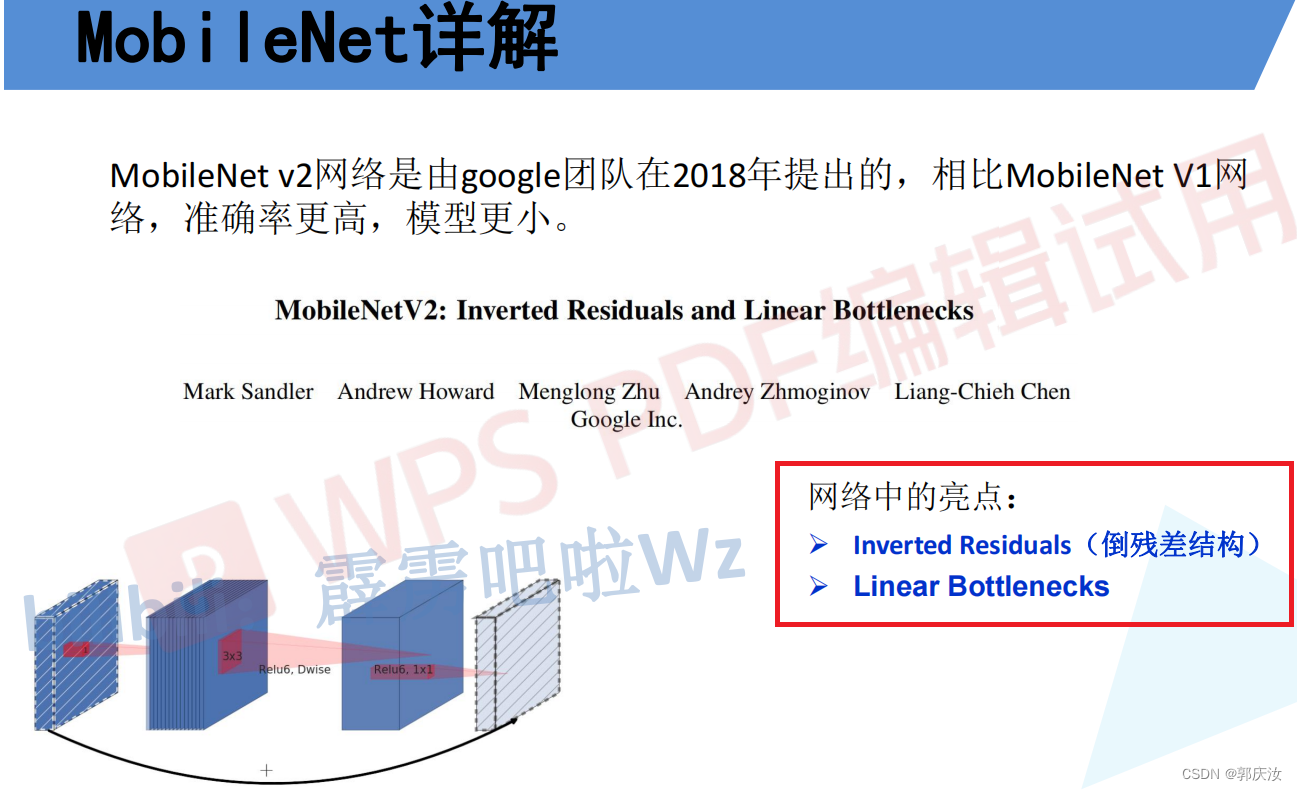
- 3、MobileNet V2
- 倒残差结构模块
- 倒残差模块代码
- MobileNet V2详细网络结构
- MobileNet V2网络结构代码
- 4、MobileNet V3
- 创新点
- MobileNet V3详细网络结构
- 注意力机制SE模块代码
- InvertedResidual模块代码
- 整体代码
- pytorch代码复现MobileNet V1~V2
- 项目目录
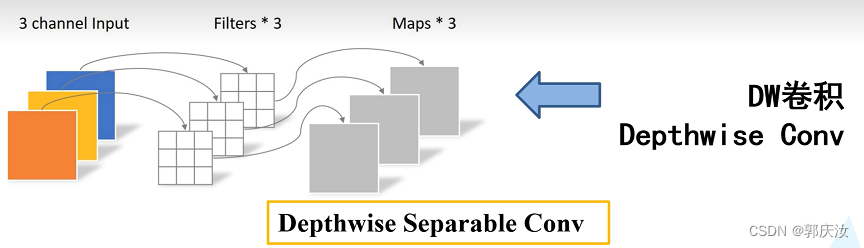
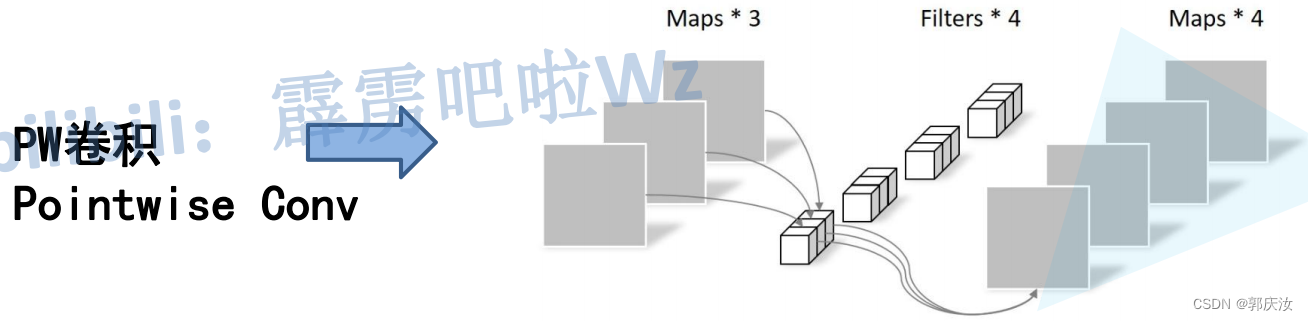
1、DW卷积与普通卷积计算量对比
DW与PW计算量
普通卷积计算量
计算量对比
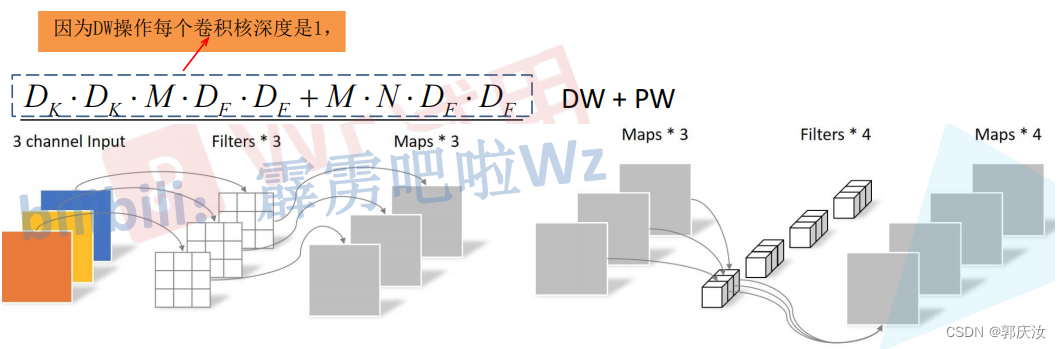
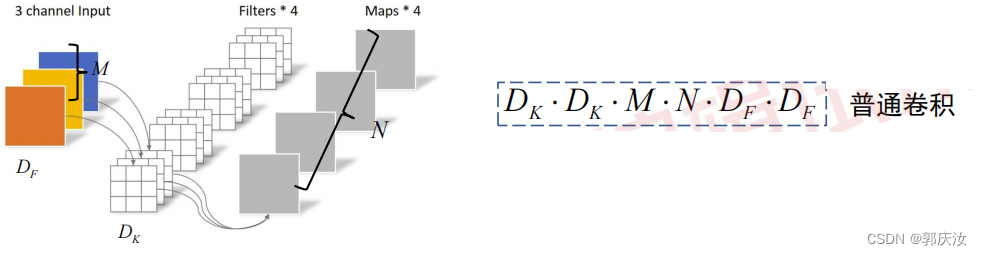

因此理论上普通卷积是DW+PW卷积的8到9倍
2、MobileNet V1
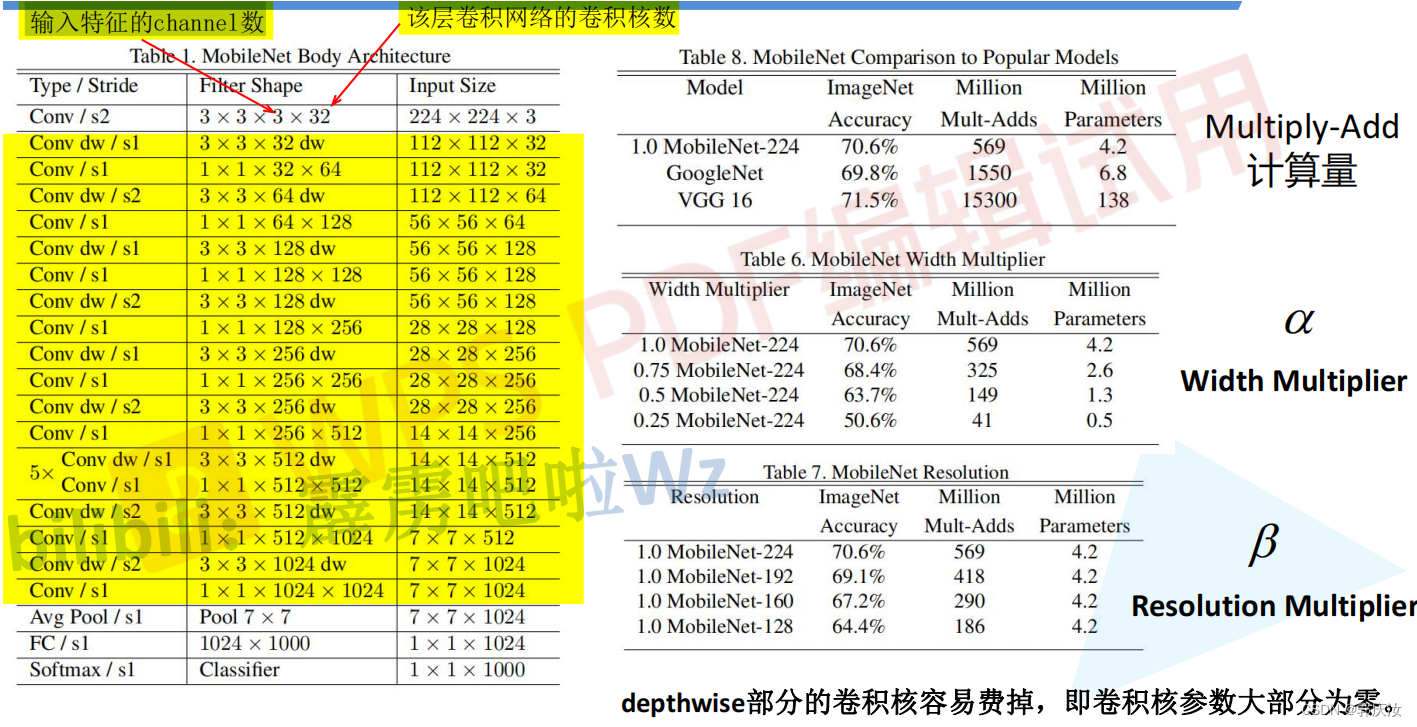
MobileNet V1网络结构
MobileNet V1网络结构代码
import torch.nn as nn
import torchclass MobileNetV1(nn.Module):def __init__(self, ch_in, n_classes):super(MobileNetV1, self).__init__()# 定义普通卷积、BN、激活模块def conv_bn(inp, oup, stride):return nn.Sequential(nn.Conv2d(inp, oup, 3, stride, 1, bias=False),nn.BatchNorm2d(oup),nn.ReLU(inplace=True))# 定义DW、PW卷积模块def conv_dw(inp, oup, stride):return nn.Sequential(# dwnn.Conv2d(inp, inp, 3, stride, 1, groups=inp, bias=False),   # DW卷积的卷积核输入与输出的数量一致,且等于分组数nn.BatchNorm2d(inp),nn.ReLU(inplace=True),# pwnn.Conv2d(inp, oup, 1, 1, 0, bias=False),nn.BatchNorm2d(oup),nn.ReLU(inplace=True),)self.model = nn.Sequential(conv_bn(ch_in, 32, 2),conv_dw(32, 64, 1),conv_dw(64, 128, 2),conv_dw(128, 128, 1),conv_dw(128, 256, 2),conv_dw(256, 256, 1),conv_dw(256, 512, 2),conv_dw(512, 512, 1),conv_dw(512, 512, 1),conv_dw(512, 512, 1),conv_dw(512, 512, 1),conv_dw(512, 512, 1),conv_dw(512, 1024, 2),conv_dw(1024, 1024, 1),nn.AdaptiveAvgPool2d(1))self.fc = nn.Linear(1024, n_classes)def forward(self, x):x = self.model(x)x = x.view(-1, 1024)x = self.fc(x)return xif __name__=='__main__':# model checkmodel = MobileNetV1(ch_in=3, n_classes=5)print(model)random_data=torch.rand([1,3,224,224])result = model(random_data)print(result)
3、MobileNet V2
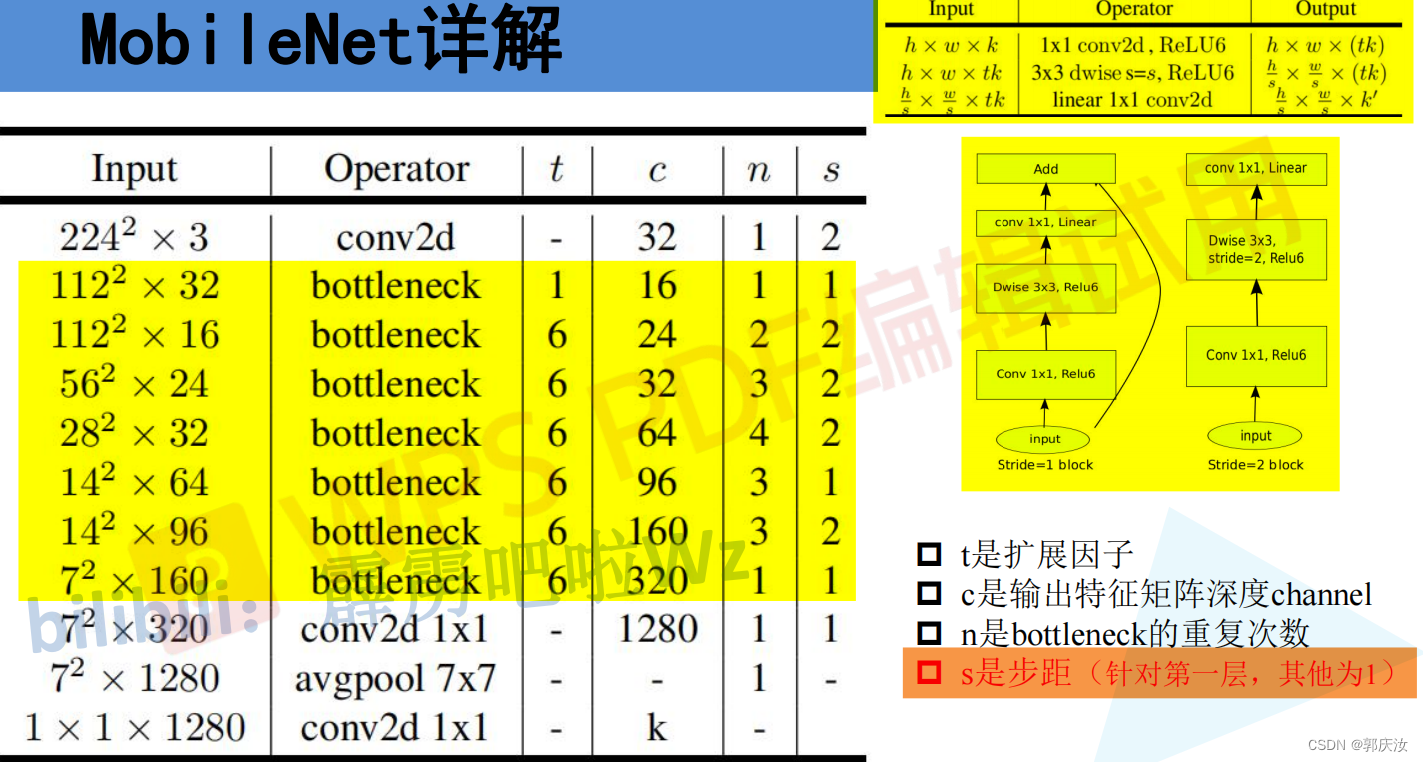
倒残差结构模块
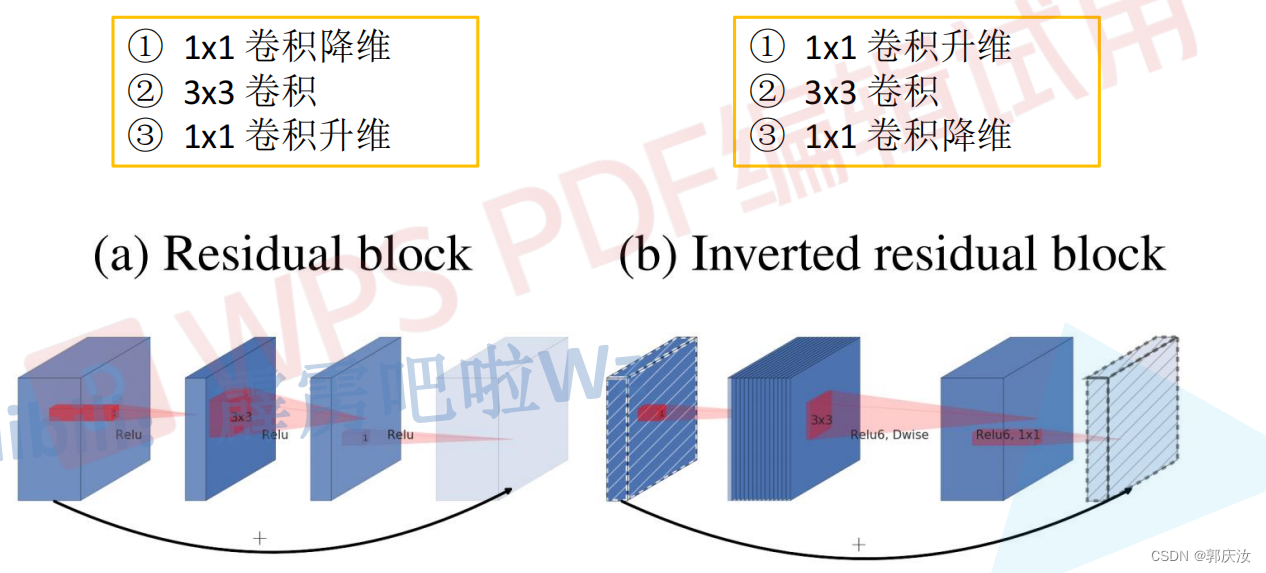
Residual blok与Inverted residual block对比:
- Residual blok:先采用1 x 1的卷积核来对特征矩阵进行压缩,减少输入特征矩阵的channel,再通过3 x 3的卷积核进行特征处理,再采用1 x 1的卷积核来扩充channel维度,形成了两头大中间小的瓶颈结构。并且3 x 3的卷积后面采用Relu激活函数。
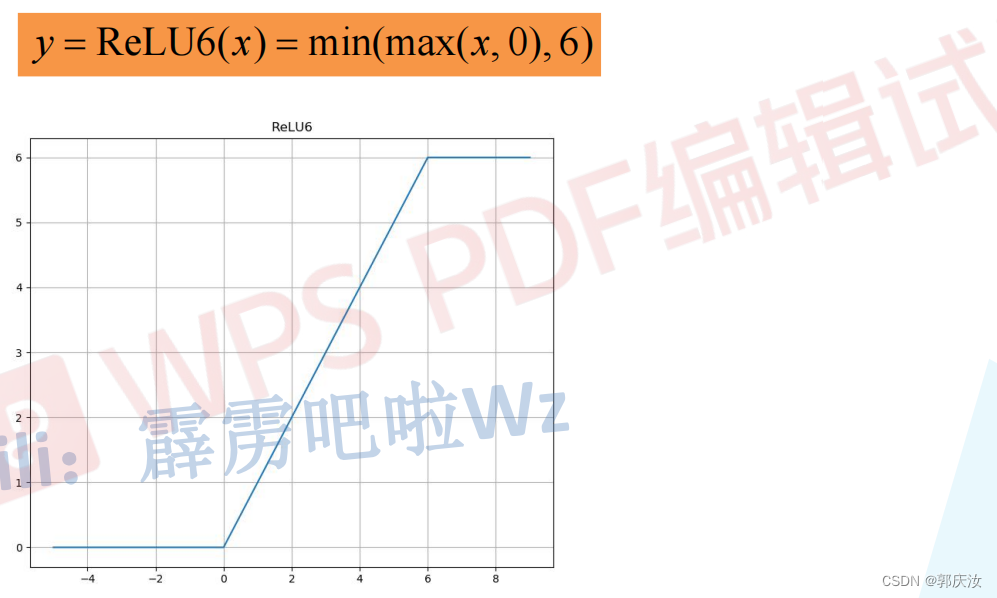
- Inverted residual block:先采用1 x 1的卷积核进行升高channel维度的操作,通过卷积核大小为3 x 3的DW模块进行卷积,再通过1 x 1的卷积进行降低channel维度的处理,形成两头小中间大的结构。并且3 x 3的卷积后面采用Relu6激活函数。
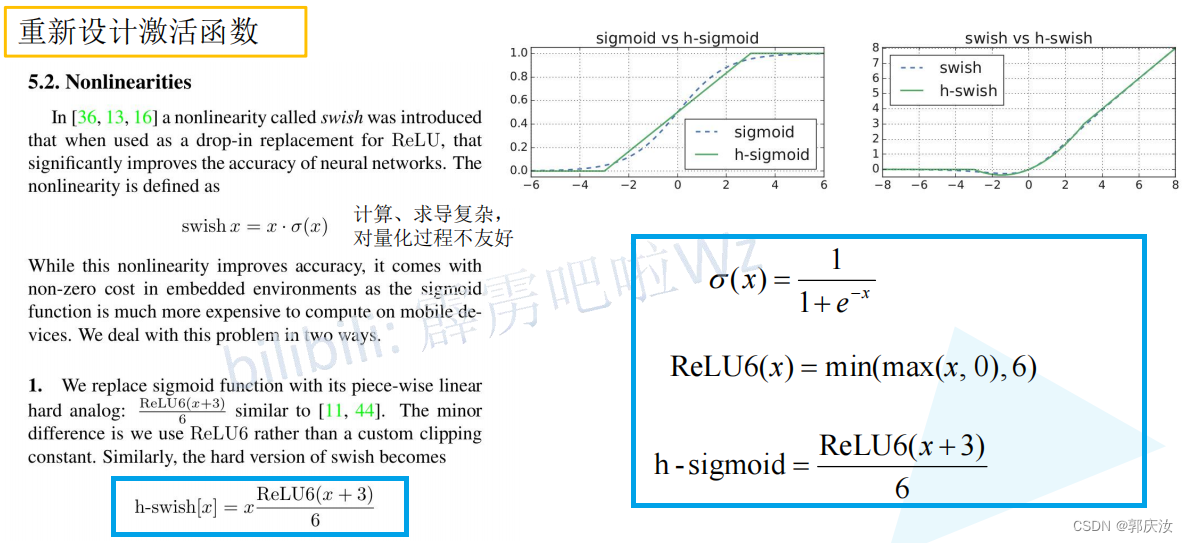
- Relu6激活函数
- 倒残差结构详细示意图

倒残差模块代码
# 定义普通卷积、BN结构
class ConvBNReLU(nn.Sequential):def __init__(self, in_channel, out_channel, kernel_size=3, stride=1, groups=1):padding = (kernel_size - 1) // 2  # padding的设置根据kernel_size来定,如果kernel_size为3,则padding设置为1;如果kernel_size为1,为padding为0super(ConvBNReLU, self).__init__(# 在pytorch中,如果设置的 group=1的话,就为普通卷积;如果设置的值为输入特征矩阵的深度的话(即in_channel),则为深度卷积(deptwise conv),并且Dw卷积的输出特征矩阵的深度等于输入特征矩阵的深度nn.Conv2d(in_channel, out_channel, kernel_size, stride, padding, groups=groups, bias=False),  # groups=1,表示普通的卷积;因为接下来要使用的是BN层,此处的偏置不起任何作用,所以设置为1nn.BatchNorm2d(out_channel),nn.ReLU6(inplace=True)    # 此处使用的是Relu6激活函数)
# 定义mobile网络基本结构--即到残差结构
class InvertedResidual(nn.Module):def __init__(self, in_channel, out_channel, stride, expand_ratio):super(InvertedResidual, self).__init__()hidden_channel = in_channel * expand_ratioself.use_shortcut = stride == 1 and in_channel == out_channel  # stride == 1 and in_channel == out_channel:保证输入矩阵与输出矩阵的shape一致,且通道数也一致,这样才可以进行shurtcutlayers = []if expand_ratio != 1:  # 表示如果扩展因子不为1时,则使用1x1的卷积层(即对输入特征矩阵的深度进行扩充)# 1x1 pointwise convlayers.append(ConvBNReLU(in_channel, hidden_channel, kernel_size=1))layers.extend([# 3x3 depthwise conv# 在pytorch中,如果设置的 group=1的话,就为普通卷积;如果设置的值为输入特征矩阵的深度的话(即in_channel),则为深度卷积(deptwise conv),并且Dw卷积的输出特征矩阵的深度等于输入特征矩阵的深度ConvBNReLU(hidden_channel, hidden_channel, stride=stride, groups=hidden_channel),# 1x1 pointwise conv(linear)  因为其后跟随的是线性激活函数,即y=x,所以其后面不在跟随激活函数nn.Conv2d(hidden_channel, out_channel, kernel_size=1, bias=False),nn.BatchNorm2d(out_channel),])self.conv = nn.Sequential(*layers)def forward(self, x):if self.use_shortcut:return x + self.conv(x)else:return self.conv(x)
MobileNet V2详细网络结构
MobileNet V2网络结构代码
from torch import nn
import torchdef _make_divisible(ch, divisor=8, min_ch=None):"""将输入的通道数(ch)调整到divisor的整数倍,方便硬件加速This function is taken from the original tf repo.It ensures that all layers have a channel number that is divisible by 8It can be seen here:https://github.com/tensorflow/models/blob/master/research/slim/nets/mobilenet/mobilenet.py"""if min_ch is None:min_ch = divisornew_ch = max(min_ch, int(ch + divisor / 2) // divisor * divisor)# Make sure that round down does not go down by more than 10%.if new_ch < 0.9 * ch:new_ch += divisorreturn new_ch# 定义普通卷积、BN结构
class ConvBNReLU(nn.Sequential):def __init__(self, in_channel, out_channel, kernel_size=3, stride=1, groups=1):padding = (kernel_size - 1) // 2  # padding的设置根据kernel_size来定,如果kernel_size为3,则padding设置为1;如果kernel_size为1,为padding为0super(ConvBNReLU, self).__init__(# 在pytorch中,如果设置的 group=1的话,就为普通卷积;如果设置的值为输入特征矩阵的深度的话(即in_channel),则为深度卷积(deptwise conv),并且Dw卷积的输出特征矩阵的深度等于输入特征矩阵的深度nn.Conv2d(in_channel, out_channel, kernel_size, stride, padding, groups=groups, bias=False),  # groups=1,表示普通的卷积;因为接下来要使用的是BN层,此处的偏置不起任何作用,所以设置为1nn.BatchNorm2d(out_channel),nn.ReLU6(inplace=True)    # 此处使用的是Relu6激活函数)# 定义mobile网络基本结构--即到残差结构
class InvertedResidual(nn.Module):def __init__(self, in_channel, out_channel, stride, expand_ratio):super(InvertedResidual, self).__init__()hidden_channel = in_channel * expand_ratioself.use_shortcut = stride == 1 and in_channel == out_channel  # stride == 1 and in_channel == out_channel:保证输入矩阵与输出矩阵的shape一致,且通道数也一致,这样才可以进行shurtcutlayers = []if expand_ratio != 1:  # 表示如果扩展因子不为1时,则使用1x1的卷积层(即对输入特征矩阵的深度进行扩充)# 1x1 pointwise convlayers.append(ConvBNReLU(in_channel, hidden_channel, kernel_size=1))layers.extend([# 3x3 depthwise conv# 在pytorch中,如果设置的 group=1的话,就为普通卷积;如果设置的值为输入特征矩阵的深度的话(即in_channel),则为深度卷积(deptwise conv),并且Dw卷积的输出特征矩阵的深度等于输入特征矩阵的深度ConvBNReLU(hidden_channel, hidden_channel, stride=stride, groups=hidden_channel),# 1x1 pointwise conv(linear)  因为其后跟随的是线性激活函数,即y=x,所以其后面不在跟随激活函数nn.Conv2d(hidden_channel, out_channel, kernel_size=1, bias=False),nn.BatchNorm2d(out_channel),])self.conv = nn.Sequential(*layers)def forward(self, x):if self.use_shortcut:return x + self.conv(x)else:return self.conv(x)# 定义mobileNetV2网络
class MobileNetV2(nn.Module):def __init__(self, num_classes=1000, alpha=1.0, round_nearest=8):super(MobileNetV2, self).__init__()block = InvertedResidualinput_channel = _make_divisible(32 * alpha, round_nearest)  # 将卷积核的个数调整为8的整数倍last_channel = _make_divisible(1280 * alpha, round_nearest)inverted_residual_setting = [# t, c, n, s[1, 16, 1, 1],[6, 24, 2, 2],[6, 32, 3, 2],[6, 64, 4, 2],[6, 96, 3, 1],[6, 160, 3, 2],[6, 320, 1, 1],]features = []# conv1 layerfeatures.append(ConvBNReLU(3, input_channel, stride=2))   # 添加第一层普通卷积层# building inverted residual residual blockesfor t, c, n, s in inverted_residual_setting:output_channel = _make_divisible(c * alpha, round_nearest)   # 根据alpha因子调整卷积核的个数for i in range(n):   # 循环添加倒残差模块stride = s if i == 0 else 1  # s表示的是倒残差模块结构中第一层卷积对应的步距,剩余层都是1features.append(block(input_channel, output_channel, stride, expand_ratio=t))  # 添加一系列倒残差结构input_channel = output_channel# building last several layersfeatures.append(ConvBNReLU(input_channel, last_channel, 1))  # 构建最后一层卷积层# combine feature layersself.features = nn.Sequential(*features)# building classifierself.avgpool = nn.AdaptiveAvgPool2d((1, 1))  # 采用自适应平均采样层self.classifier = nn.Sequential(nn.Dropout(0.2),nn.Linear(last_channel, num_classes))# weight initialization  初始化全只能怪for m in self.modules():if isinstance(m, nn.Conv2d):nn.init.kaiming_normal_(m.weight, mode='fan_out')if m.bias is not None:nn.init.zeros_(m.bias)elif isinstance(m, nn.BatchNorm2d):nn.init.ones_(m.weight)nn.init.zeros_(m.bias)elif isinstance(m, nn.Linear):nn.init.normal_(m.weight, 0, 0.01)   # 初始化为正态分布的函数,均值为0,方差为0.01nn.init.zeros_(m.bias)def forward(self, x):x = self.features(x)x = self.avgpool(x)x = torch.flatten(x, 1)x = self.classifier(x)return xif __name__ == '__main__':divisible = _make_divisible(1)print(divisible)
4、MobileNet V3
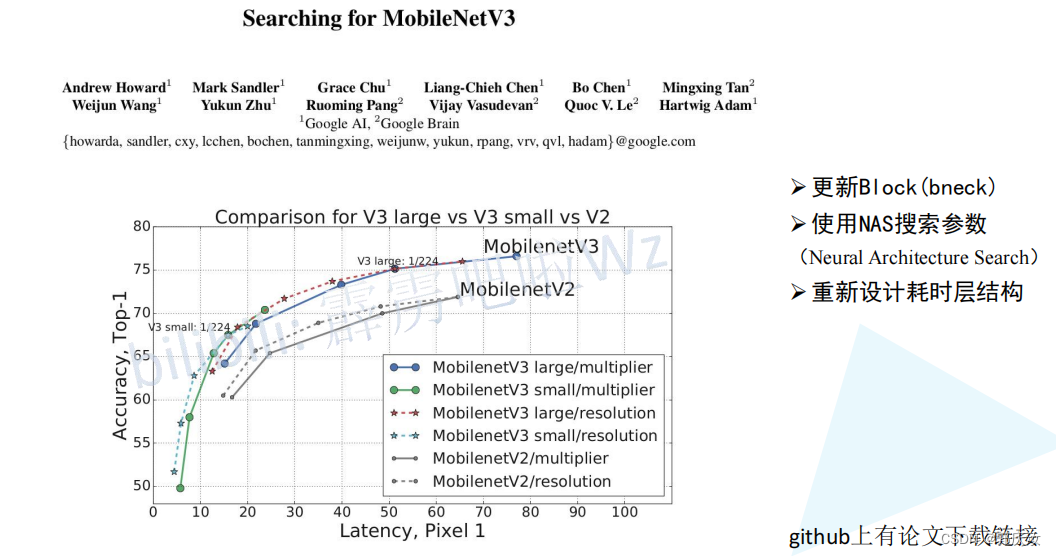
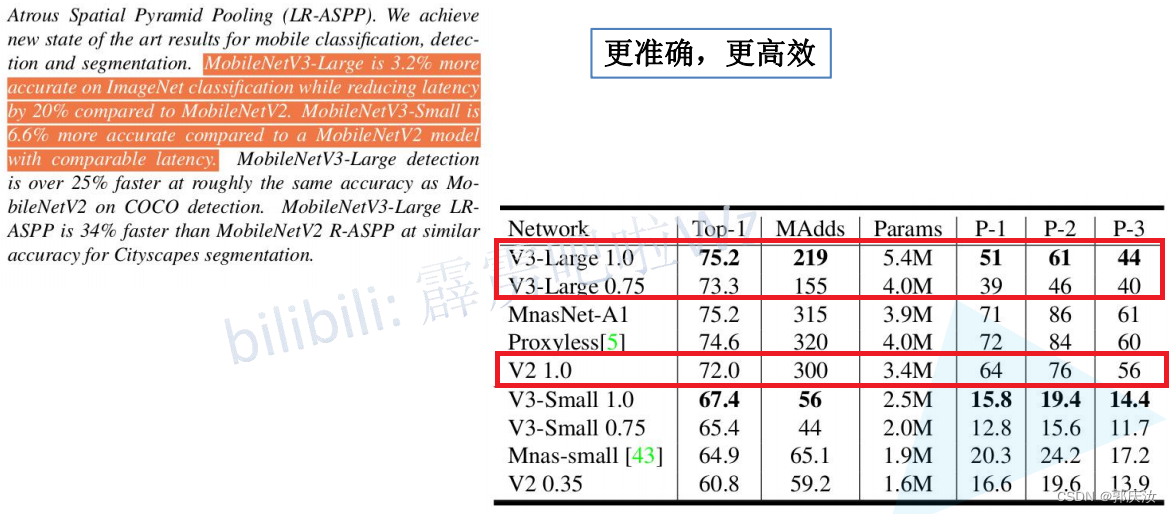
创新点
- 加入了注意力机制SE模块
- 使用的新的激活函数
- 激活函数

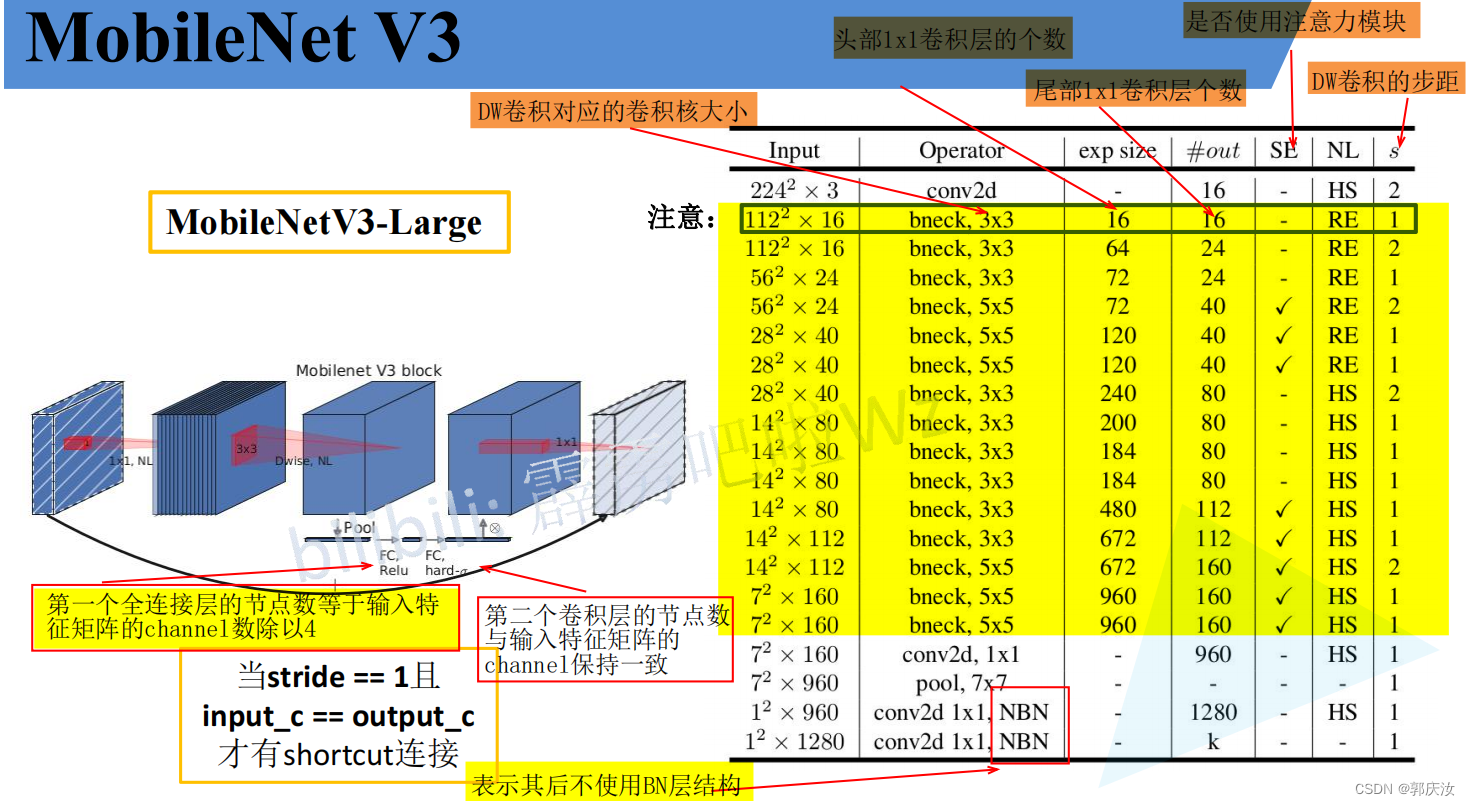
MobileNet V3详细网络结构
# 定义block的配置类
class InvertedResidualConfig:def __init__(self,input_c: int,  # block模块中的第一个1x1卷积层的输入channel数kernel: int,   # depthwise卷积的卷积核大小expanded_c: int,   # block模块中的第一个1x1卷积层的输出channel数out_c: int,  # 经过block模块中第二个1x1卷积层处理过后得到的channel数use_se: bool,  # 是否使用注意力机制模块activation: str,   # 激活方式stride: int,       # 步长width_multi: float):  # width_multi:调节每个卷积层所使用channel的倍率因子self.input_c = self.adjust_channels(input_c, width_multi)self.kernel = kernelself.expanded_c = self.adjust_channels(expanded_c, width_multi)self.out_c = self.adjust_channels(out_c, width_multi)self.use_se = use_seself.use_hs = activation == "HS"  # whether using h-swish activationself.stride = stride@staticmethoddef adjust_channels(channels: int, width_multi: float):return _make_divisible(channels * width_multi, 8)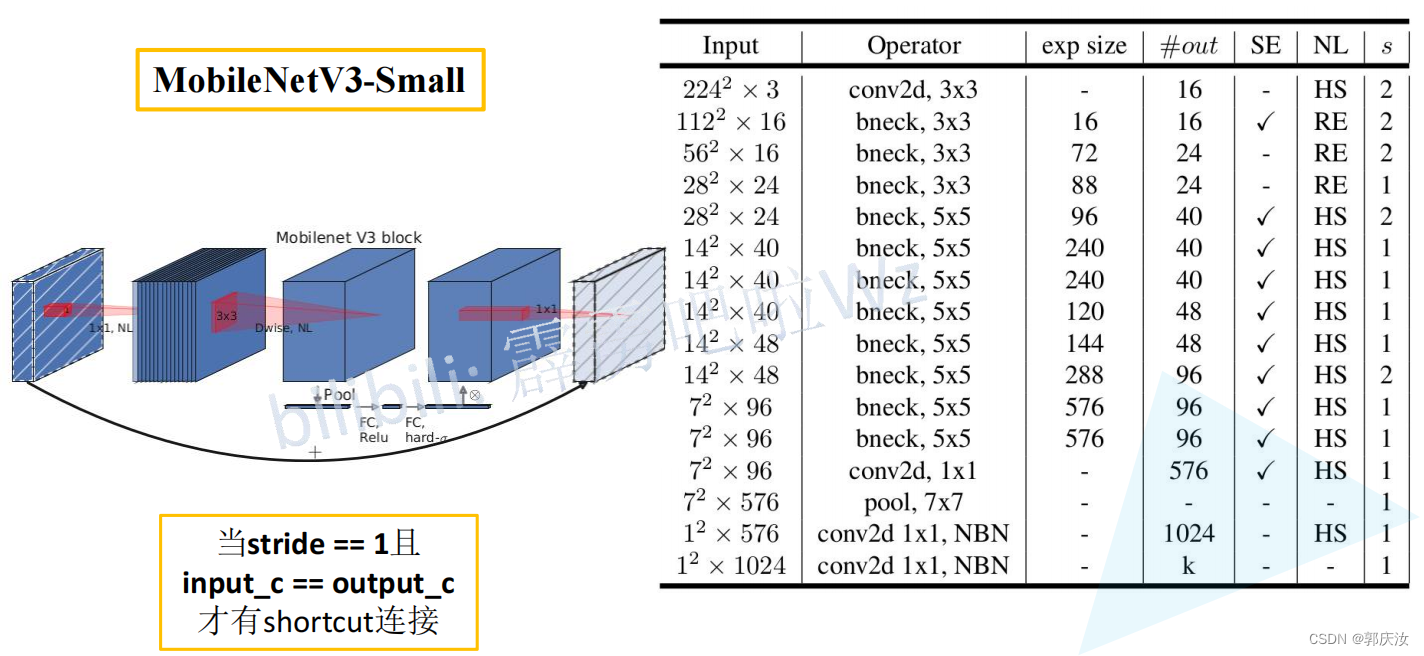
注意力机制SE模块代码
# 注意力机制模块(SE模块,即两个全连接层)   该模块的基本流程是:先进行自适应平均池化(1x1)———>1x1的卷积层———>relu激活层———>1x1的卷积池化———>hardsigmoid()激活函数激活
class SqueezeExcitation(nn.Module):def __init__(self, input_c: int, squeeze_factor: int = 4):super(SqueezeExcitation, self).__init__()squeeze_c = _make_divisible(input_c // squeeze_factor, 8)    # 获得距离该数最近的8的整数倍的数字self.fc1 = nn.Conv2d(input_c, squeeze_c, 1)    # 该卷积的输出的squeeze_c是输入input_c的1/4self.fc2 = nn.Conv2d(squeeze_c, input_c, 1)def forward(self, x: Tensor) -> Tensor:scale = F.adaptive_avg_pool2d(x, output_size=(1, 1))   # 将特征矩阵每一个channel上的数据给平均池化到1x1的大小scale = self.fc1(scale)scale = F.relu(scale, inplace=True)scale = self.fc2(scale)scale = F.hardsigmoid(scale, inplace=True)   # 激活函数return scale * x   # 将得到的数据与传入的对应channel数据进行相乘
InvertedResidual模块代码
# 定义block模块
# 此为block模块,其包含第一个1x1卷积层、DeptWis卷积层、SE注意力机制层(判断是否需求)、第二个1x1卷积层、激活函数(需要判断是否是非线性激活)
class InvertedResidual(nn.Module):def __init__(self,cnf: InvertedResidualConfig,   # cnf:配置类参数norm_layer: Callable[..., nn.Module]):      # norm_layer:# BN层super(InvertedResidual, self).__init__()if cnf.stride not in [1, 2]:  # 判断某一层的配置文件,其步长是否满足条件raise ValueError("illegal stride value.")# 判断是否进行短连接self.use_res_connect = (cnf.stride == 1 and cnf.input_c == cnf.out_c)  # 只有当步长为1,并且输入通道等于输出通道数layers: List[nn.Module] = []activation_layer = nn.Hardswish if cnf.use_hs else nn.ReLU    # 判断当前的激活函数类型# expand# 判断是否相等,如果相等,则不适用1x1的卷积层增加channel维度;不相等的话,才使用该层进行升维度if cnf.expanded_c != cnf.input_c:layers.append(ConvBNActivation(cnf.input_c,cnf.expanded_c,kernel_size=1,norm_layer=norm_layer,activation_layer=activation_layer))# depthwiselayers.append(ConvBNActivation(cnf.expanded_c,cnf.expanded_c,kernel_size=cnf.kernel,   # depthwise卷积的卷积核大小stride=cnf.stride,groups=cnf.expanded_c,norm_layer=norm_layer,   # BN层activation_layer=activation_layer))# 判断是否需要添加SE模块if cnf.use_se:layers.append(SqueezeExcitation(cnf.expanded_c))# projectlayers.append(ConvBNActivation(cnf.expanded_c,cnf.out_c,kernel_size=1,norm_layer=norm_layer,  # BN 层activation_layer=nn.Identity))   # 此层的activation_layer就是进行里普通的线性激活,没有做任何的处理self.block = nn.Sequential(*layers)self.out_channels = cnf.out_cself.is_strided = cnf.stride > 1def forward(self, x: Tensor) -> Tensor:result = self.block(x)if self.use_res_connect:result += x   # 进行shortcut连接return result
整体代码
from typing import Callable, List, Optionalimport torch
from torch import nn, Tensor
from torch.nn import functional as F
from functools import partial# 得到同传入数据最近的8的整数倍数值
def _make_divisible(ch, divisor=8, min_ch=None):"""This function is taken from the original tf repo.It ensures that all layers have a channel number that is divisible by 8It can be seen here:https://github.com/tensorflow/models/blob/master/research/slim/nets/mobilenet/mobilenet.py"""if min_ch is None:min_ch = divisornew_ch = max(min_ch, int(ch + divisor / 2) // divisor * divisor)# Make sure that round down does not go down by more than 10%.if new_ch < 0.9 * ch:new_ch += divisorreturn new_ch# 普通卷积、BN、激活层模块
class ConvBNActivation(nn.Sequential):def __init__(self,in_planes: int,   # 输入特征矩阵的通道out_planes: int,  # 输出特征矩阵的通道kernel_size: int = 3,stride: int = 1,groups: int = 1,norm_layer: Optional[Callable[..., nn.Module]] = None,   # 在卷积后的BN层activation_layer: Optional[Callable[..., nn.Module]] = None):  # 激活函数padding = (kernel_size - 1) // 2if norm_layer is None:norm_layer = nn.BatchNorm2dif activation_layer is None:activation_layer = nn.ReLU6super(ConvBNActivation, self).__init__(nn.Conv2d(in_channels=in_planes,out_channels=out_planes,kernel_size=kernel_size,stride=stride,padding=padding,groups=groups,bias=False),norm_layer(out_planes),   # BN层activation_layer(inplace=True))# 注意力机制模块(SE模块,即两个全连接层)   该模块的基本流程是:先进行自适应平均池化(1x1)———>1x1的卷积层———>relu激活层———>1x1的卷积池化———>hardsigmoid()激活函数激活
class SqueezeExcitation(nn.Module):def __init__(self, input_c: int, squeeze_factor: int = 4):super(SqueezeExcitation, self).__init__()squeeze_c = _make_divisible(input_c // squeeze_factor, 8)    # 获得距离该数最近的8的整数倍的数字self.fc1 = nn.Conv2d(input_c, squeeze_c, 1)    # 该卷积的输出的squeeze_c是输入input_c的1/4  其作用与全连接层一样self.fc2 = nn.Conv2d(squeeze_c, input_c, 1)def forward(self, x: Tensor) -> Tensor:scale = F.adaptive_avg_pool2d(x, output_size=(1, 1))   # 将特征矩阵每一个channel上的数据给平均池化到1x1的大小scale = self.fc1(scale)scale = F.relu(scale, inplace=True)scale = self.fc2(scale)scale = F.hardsigmoid(scale, inplace=True)   # 激活函数return scale * x   # 将得到的数据与传入的对应channel数据进行相乘# 定义block的配置类
class InvertedResidualConfig:def __init__(self,input_c: int,  # block模块中的第一个1x1卷积层的输入channel数kernel: int,   # depthwise卷积的卷积核大小expanded_c: int,   # block模块中的第一个1x1卷积层的输出channel数out_c: int,  # 经过block模块中第二个1x1卷积层处理过后得到的channel数use_se: bool,  # 是否使用注意力机制模块activation: str,   # 激活方式stride: int,       # 步长width_multi: float):  # width_multi:调节每个卷积层所使用channel的倍率因子self.input_c = self.adjust_channels(input_c, width_multi)self.kernel = kernelself.expanded_c = self.adjust_channels(expanded_c, width_multi)self.out_c = self.adjust_channels(out_c, width_multi)self.use_se = use_seself.use_hs = activation == "HS"  # whether using h-swish activationself.stride = stride@staticmethoddef adjust_channels(channels: int, width_multi: float):return _make_divisible(channels * width_multi, 8)# 定义block模块
# 此为block模块,其包含第一个1x1卷积层、DeptWis卷积层、SE注意力机制层(判断是否需求)、第二个1x1卷积层、激活函数(需要判断是否是非线性激活)
class InvertedResidual(nn.Module):def __init__(self,cnf: InvertedResidualConfig,   # cnf:配置类参数norm_layer: Callable[..., nn.Module]):      # norm_layer:# BN层super(InvertedResidual, self).__init__()if cnf.stride not in [1, 2]:  # 判断某一层的配置文件,其步长是否满足条件raise ValueError("illegal stride value.")# 判断是否进行短连接self.use_res_connect = (cnf.stride == 1 and cnf.input_c == cnf.out_c)  # 只有当步长为1,并且输入通道等于输出通道数layers: List[nn.Module] = []activation_layer = nn.Hardswish if cnf.use_hs else nn.ReLU    # 判断当前的激活函数类型# expand# 判断是否相等,如果相等,则不适用1x1的卷积层增加channel维度;不相等的话,才使用该层进行升维度if cnf.expanded_c != cnf.input_c:layers.append(ConvBNActivation(cnf.input_c,cnf.expanded_c,kernel_size=1,norm_layer=norm_layer,activation_layer=activation_layer))# depthwiselayers.append(ConvBNActivation(cnf.expanded_c,cnf.expanded_c,kernel_size=cnf.kernel,   # depthwise卷积的卷积核大小stride=cnf.stride,groups=cnf.expanded_c,    # 深度DW卷积norm_layer=norm_layer,   # BN层activation_layer=activation_layer))# 判断是否需要添加SE模块if cnf.use_se:layers.append(SqueezeExcitation(cnf.expanded_c))# projectlayers.append(ConvBNActivation(cnf.expanded_c,cnf.out_c,kernel_size=1,norm_layer=norm_layer,  # BN 层activation_layer=nn.Identity))   # 此层的activation_layer就是进行里普通的线性激活,没有做任何的处理self.block = nn.Sequential(*layers)self.out_channels = cnf.out_cself.is_strided = cnf.stride > 1def forward(self, x: Tensor) -> Tensor:result = self.block(x)if self.use_res_connect:result += x   # 进行shortcut连接return result# MobileNetV3网络结构基础框架:其包括:模型的第一层卷积层———>nx【bneckBlock模块】———>1x1的卷积层———>自适应平均池化层———>全连接层———>全连接层
class MobileNetV3(nn.Module):def __init__(self,inverted_residual_setting: List[InvertedResidualConfig],           # beneckBlock结构一系列参数列表last_channel: int,   # 对应的是倒数第二个全连接层输出节点数  1280num_classes: int = 1000,  # 类别个数block: Optional[Callable[..., nn.Module]] = None,   # InvertedResidual核心模块norm_layer: Optional[Callable[..., nn.Module]] = None):super(MobileNetV3, self).__init__()if not inverted_residual_setting:raise ValueError("The inverted_residual_setting should not be empty.")elif not (isinstance(inverted_residual_setting, List) andall([isinstance(s, InvertedResidualConfig) for s in inverted_residual_setting])):raise TypeError("The inverted_residual_setting should be List[InvertedResidualConfig]")if block is None:block = InvertedResidual   # block类if norm_layer is None:norm_layer = partial(nn.BatchNorm2d, eps=0.001, momentum=0.01)  # partial()为python方法,即为nn.BatchNorm2d传入默认的两个参数layers: List[nn.Module] = []# building first layer# 构建第一层卷积结构firstconv_output_c = inverted_residual_setting[0].input_c   # 表示第一个卷积层输出的channel数layers.append(ConvBNActivation(3,   # 输入图像数据的channel数firstconv_output_c,    # 输出channelkernel_size=3,stride=2,norm_layer=norm_layer,activation_layer=nn.Hardswish))# building inverted residual blocks# 利用循环的方式添加block模块,将每层的配置文件传给blockfor cnf in inverted_residual_setting:layers.append(block(cnf, norm_layer))# building last several layerslastconv_input_c = inverted_residual_setting[-1].out_c  # 最后的bneckblock的输出channellastconv_output_c = 6 * lastconv_input_c    # lastconv_output_c 与 最后的bneckblock的输出channel数是六倍的关系# 定义最后一层的卷积层layers.append(ConvBNActivation(lastconv_input_c,   # 最后的bneckblock的输出channel数lastconv_output_c,   # lastconv_output_c 与 最后的bneckblock的输出channel数是六倍的关系kernel_size=1,norm_layer=norm_layer,activation_layer=nn.Hardswish))self.features = nn.Sequential(*layers)self.avgpool = nn.AdaptiveAvgPool2d(1)self.classifier = nn.Sequential(nn.Linear(lastconv_output_c, last_channel),nn.Hardswish(inplace=True),nn.Dropout(p=0.2, inplace=True),nn.Linear(last_channel, num_classes))# initial weightsfor m in self.modules():if isinstance(m, nn.Conv2d):nn.init.kaiming_normal_(m.weight, mode="fan_out")if m.bias is not None:nn.init.zeros_(m.bias)elif isinstance(m, (nn.BatchNorm2d, nn.GroupNorm)):nn.init.ones_(m.weight)nn.init.zeros_(m.bias)elif isinstance(m, nn.Linear):nn.init.normal_(m.weight, 0, 0.01)nn.init.zeros_(m.bias)def _forward_impl(self, x: Tensor) -> Tensor:x = self.features(x)x = self.avgpool(x)x = torch.flatten(x, 1)x = self.classifier(x)return xdef forward(self, x: Tensor) -> Tensor:return self._forward_impl(x)### 构建large基础mobilenet_v3_large模型
def mobilenet_v3_large(num_classes: int = 1000,reduced_tail: bool = False) -> MobileNetV3:"""Constructs a large MobileNetV3 architecture from"Searching for MobileNetV3" <https://arxiv.org/abs/1905.02244>.weights_link:https://download.pytorch.org/models/mobilenet_v3_large-8738ca79.pthArgs:num_classes (int): number of classesreduced_tail (bool): If True, reduces the channel counts of all feature layersbetween C4 and C5 by 2. It is used to reduce the channel redundancy in thebackbone for Detection and Segmentation."""width_multi = 1.0bneck_conf = partial(InvertedResidualConfig, width_multi=width_multi)adjust_channels = partial(InvertedResidualConfig.adjust_channels, width_multi=width_multi)reduce_divider = 2 if reduced_tail else 1   # 是否较少网络参数标志,默认是False,即不减少# # beneckBlock结构一系列参数列表inverted_residual_setting = [# input_c, kernel, expanded_c, out_c, use_se, activation, stridebneck_conf(16, 3, 16, 16, False, "RE", 1),bneck_conf(16, 3, 64, 24, False, "RE", 2),  # C1bneck_conf(24, 3, 72, 24, False, "RE", 1),bneck_conf(24, 5, 72, 40, True, "RE", 2),  # C2bneck_conf(40, 5, 120, 40, True, "RE", 1),bneck_conf(40, 5, 120, 40, True, "RE", 1),bneck_conf(40, 3, 240, 80, False, "HS", 2),  # C3bneck_conf(80, 3, 200, 80, False, "HS", 1),bneck_conf(80, 3, 184, 80, False, "HS", 1),bneck_conf(80, 3, 184, 80, False, "HS", 1),bneck_conf(80, 3, 480, 112, True, "HS", 1),bneck_conf(112, 3, 672, 112, True, "HS", 1),bneck_conf(112, 5, 672, 160 // reduce_divider, True, "HS", 2),  # C4bneck_conf(160 // reduce_divider, 5, 960 // reduce_divider, 160 // reduce_divider, True, "HS", 1),bneck_conf(160 // reduce_divider, 5, 960 // reduce_divider, 160 // reduce_divider, True, "HS", 1),]last_channel = adjust_channels(1280 // reduce_divider)  # C5return MobileNetV3(inverted_residual_setting=inverted_residual_setting,last_channel=last_channel,num_classes=num_classes)### 构建small基础mobilenet_v3_small模型
def mobilenet_v3_small(num_classes: int = 1000,reduced_tail: bool = False) -> MobileNetV3:"""Constructs a large MobileNetV3 architecture from"Searching for MobileNetV3" <https://arxiv.org/abs/1905.02244>.weights_link:https://download.pytorch.org/models/mobilenet_v3_small-047dcff4.pthArgs:num_classes (int): number of classesreduced_tail (bool): If True, reduces the channel counts of all feature layersbetween C4 and C5 by 2. It is used to reduce the channel redundancy in thebackbone for Detection and Segmentation."""width_multi = 1.0bneck_conf = partial(InvertedResidualConfig, width_multi=width_multi)adjust_channels = partial(InvertedResidualConfig.adjust_channels, width_multi=width_multi)reduce_divider = 2 if reduced_tail else 1inverted_residual_setting = [# input_c, kernel, expanded_c, out_c, use_se, activation, stridebneck_conf(16, 3, 16, 16, True, "RE", 2),  # C1bneck_conf(16, 3, 72, 24, False, "RE", 2),  # C2bneck_conf(24, 3, 88, 24, False, "RE", 1),bneck_conf(24, 5, 96, 40, True, "HS", 2),  # C3bneck_conf(40, 5, 240, 40, True, "HS", 1),bneck_conf(40, 5, 240, 40, True, "HS", 1),bneck_conf(40, 5, 120, 48, True, "HS", 1),bneck_conf(48, 5, 144, 48, True, "HS", 1),bneck_conf(48, 5, 288, 96 // reduce_divider, True, "HS", 2),  # C4bneck_conf(96 // reduce_divider, 5, 576 // reduce_divider, 96 // reduce_divider, True, "HS", 1),bneck_conf(96 // reduce_divider, 5, 576 // reduce_divider, 96 // reduce_divider, True, "HS", 1)]last_channel = adjust_channels(1024 // reduce_divider)  # C5return MobileNetV3(inverted_residual_setting=inverted_residual_setting,last_channel=last_channel,num_classes=num_classes)
pytorch代码复现MobileNet V1~V2
本项目包含训练MobileNet V1、V2、V2模型
项目目录

项目代码下载地址:
项目代码下载地址
相关文章:
深度学习网络模型 MobileNet系列MobileNet V1、MobileNet V2、MobileNet V3网络详解以及pytorch代码复现
深度学习网络模型 MobileNet系列MobileNet V1、MobileNet V2、MobileNet V3网络详解以及pytorch代码复现 1、DW卷积与普通卷积计算量对比DW与PW计算量普通卷积计算量计算量对比 2、MobileNet V1MobileNet V1网络结构MobileNet V1网络结构代码 3、MobileNet V2倒残差结构模块倒残…...

Spring 中 BeanFactory 和 FactoryBean 有何区别?
这也是 Spring 面试时一道经典的面试问题,今天我们来聊一聊这个话题。 其实从名字上就能看出来个一二,BeanFactory 是 Factory 而 FactoryBean 是一个 Bean,我们先来看下总结: BeanFactory 是 Spring 框架的核心接口之一…...
黑马程序员项目-黑马点评
黑马点评1 短信登录 基于Session实现登录流程 发送验证码: 用户在提交手机号后,会校验手机号是否合法,如果不合法,则要求用户重新输入手机号 如果手机号合法,后台此时生成对应的验证码,同时将验证码进行…...
)
ubuntu 20.04 + Anaconda + cuda-11.8 + opencv-4.8.0(cuda)
环境:一键编译opencv-4.8.0(cuda),前提是已经安装好了cuda和cudnn Anaconda安装 参考: https://blog.csdn.net/weixin_46947765/article/details/130980957 opencv4.8.0编译安装 一键编译shell脚本 VERSION4.8.0test -e ${VERSION}.zip || wget http…...

Linux 目录
目录 1. Linux 目录1.1. 目录 /usr/bin 和 /usr/local/bin 区别 1. Linux 目录 1.1. 目录 /usr/bin 和 /usr/local/bin 区别 /usr/bin 下面的都是系统预装的可执行程序, 系统升级有可能会被覆盖。/usr/local/bin 目录是给用户放置自己的可执行程序。...
Linux shell编程学习笔记21:用select in循环语句打造菜单
一、select in循环语句的功能 Linux shell脚本编程提供了select in语句,这是 Shell 独有的一种循环语句,非常适合终端(Terminal)这样的交互场景,它可以根据用户的设置显示出带编号的菜单,用户通过输入不同…...

线性回归与线性拟合的原理、推导与算法实现
关于回归和拟合,从它们的求解过程以及结果来看,两者似乎没有太大差别,事实也的确如此。从本质上说,回归属于数理统计问题,研究解释变量与响应变量之间的关系以及相关性等问题。而拟合是把平面的一系列点,用…...
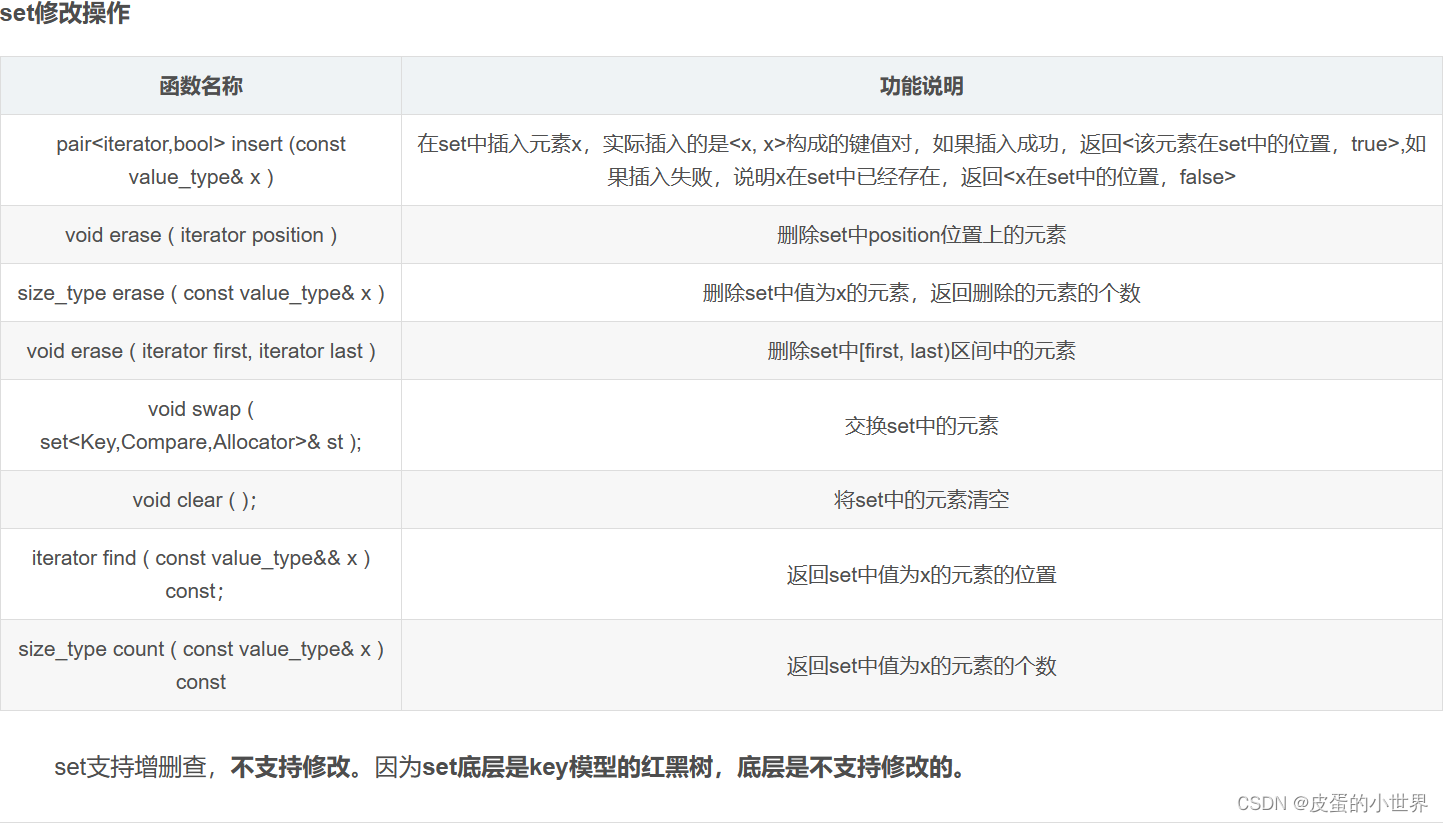
【C++】set和multiset
文章目录 关联式容器键值对一、set介绍二、set的使用multiset 关联式容器 STL中的部分容器,比如:vector、list、deque、forward_list(C11)等,这些容器统称为序列式容器,因为其底层为线性序列的数据结构,里面存储的是元…...

二十、泛型(1)
本章概要 基本概念 与 C 的比较 简单泛型 一个元组类库一个堆栈类RandomList 基本概念 普通的类和方法只能使用特定的类型:基本数据类型或类类型。如果编写的代码需要应用于多种类型,这种严苛的限制对代码的束缚就会很大。 多态是一种面向对象思想的泛…...

【Unity数据交互】游戏中常用到的Json序列化
ˊˊ 👨💻个人主页:元宇宙-秩沅 👨💻 hallo 欢迎 点赞👍 收藏⭐ 留言📝 加关注✅! 👨💻 本文由 秩沅 原创 👨💻 收录于专栏࿱…...
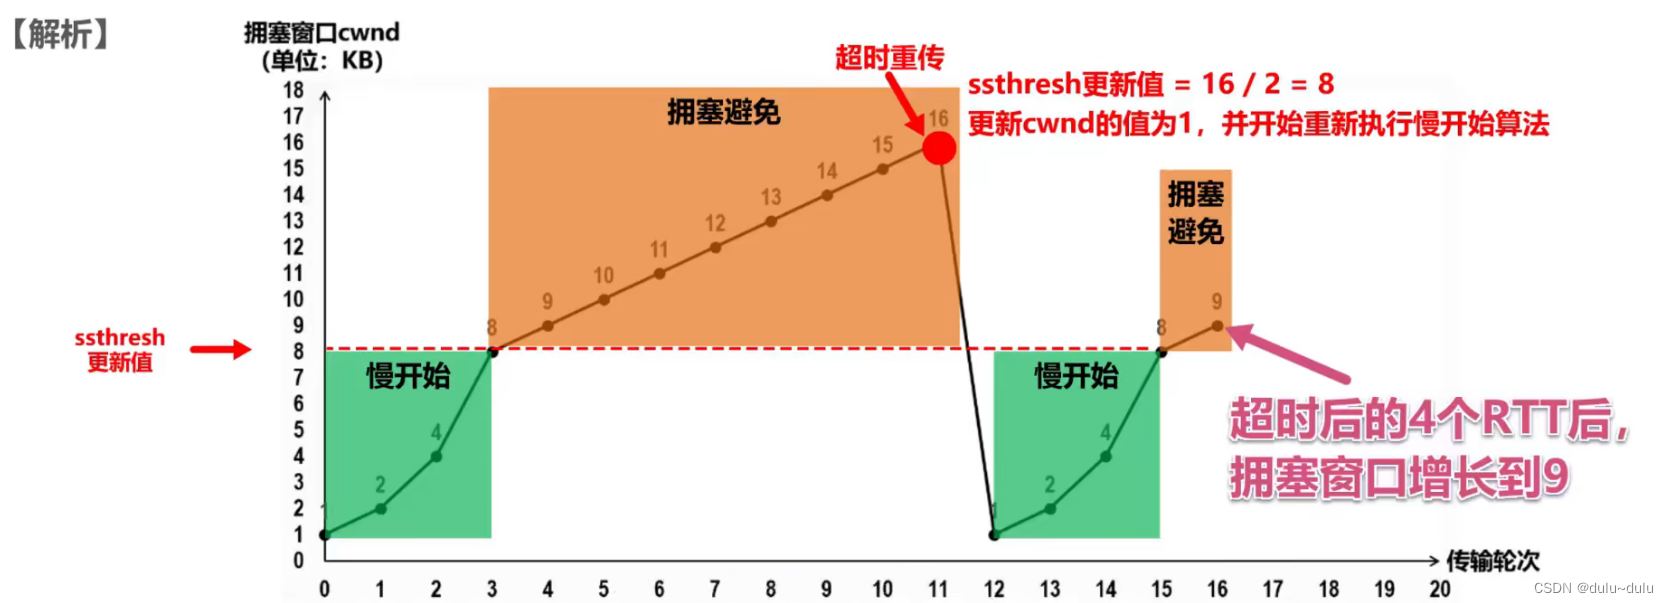
TCP的滑动窗口和拥塞控制
目录 滑动窗口 1.发送窗口和接收窗口 2.滑动窗口的分类 停止等待协议:发送窗口大小 1, 接收窗口大小 1 后退N帧协议(GBN):发送窗口大小 > 1,接收窗口大小 1 选择重传协议(SR…...

零信任网络:一种全新的网络安全架构
随着网络技术的不断发展,网络安全问题日益凸显。传统的网络安全策略往往基于信任和验证,但这种信任策略存在一定的局限性。为了解决这一问题,零信任网络作为一种全新的网络安全架构,逐渐受到人们的关注。本文将对零信任网络的概念…...
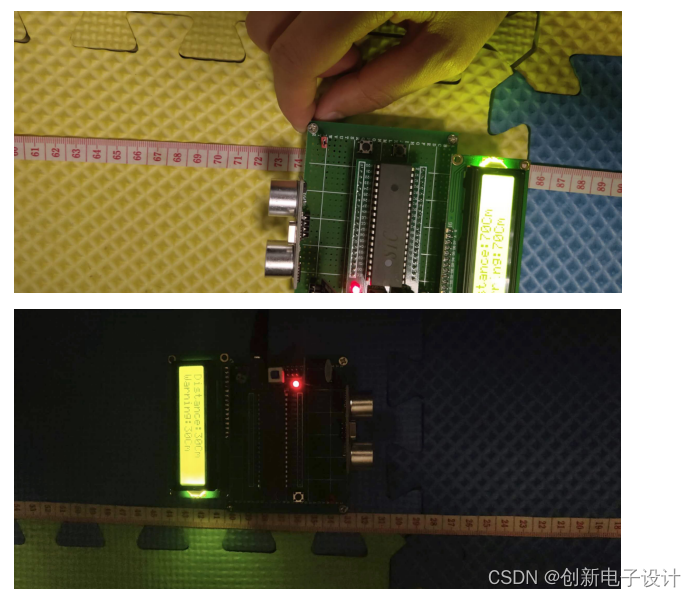
基于单片机的智能拐杖软件设计
欢迎大家点赞、收藏、关注、评论啦 ,由于篇幅有限,只展示了部分核心代码。 技术交流认准下方 CSDN 官方提供的联系方式 文章目录 概要 一、整体设计方案2.1本设计设计原理2.1.1单片机基本介绍 二、本设计方案选择三、软件设计AD原理图:原理图…...
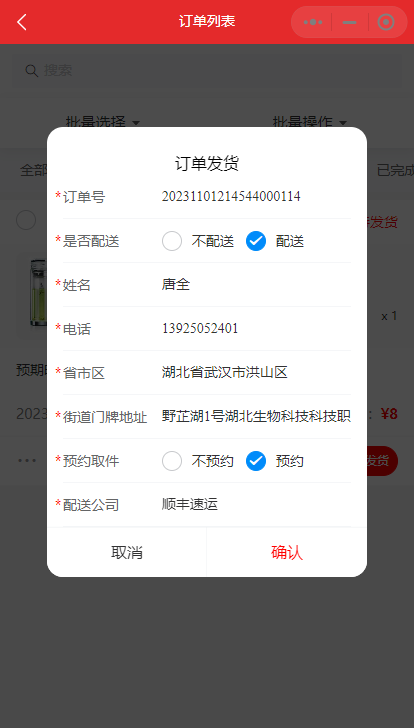
小程序如何设置自动预约快递
小程序通过设置自动预约功能,可以实现自动将订单信息发送给快递公司,快递公司可以自动上门取件。下面具体介绍如何设置。 在小程序管理员后台->配送设置处,选择首选配送公司。为了能够支持自动预约快递,请选择正常的快递公司&…...
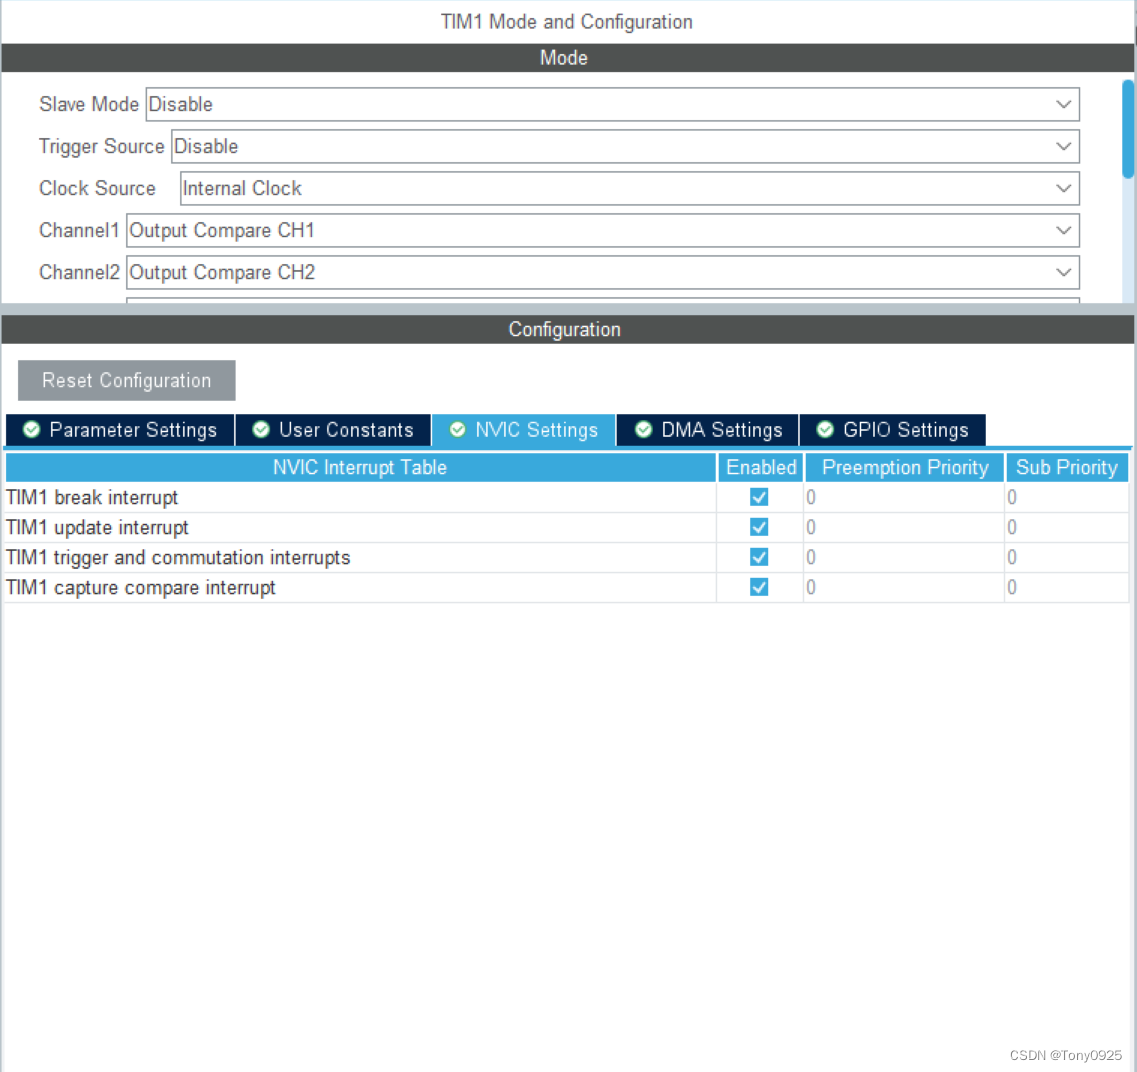
STM32-HAL库08-TIM的输出比较模式(输出PWM的另一种方式)
STM32-HAL库08-TIM的输出比较模式(输出PWM的另一种方式) 一、所用材料: STM32F103C6T6最小系统板 STM32CUBEMX(HAL库软件) MDK5 示波器或者逻辑分析仪 二、所学内容: 通过定时器TIM的输出比较模式得到预…...
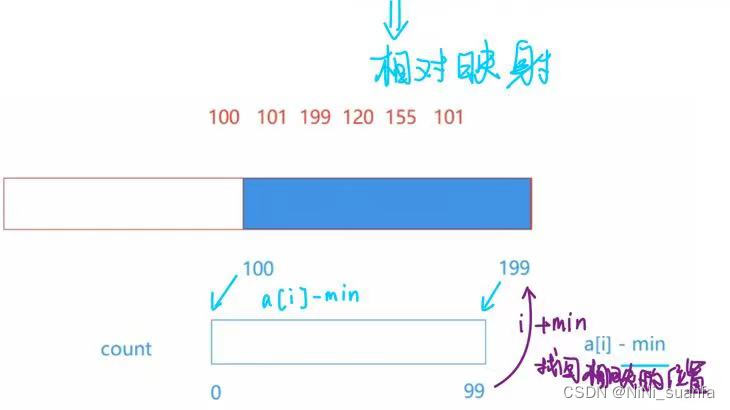
【数据结构】深入浅出讲解计数排序【图文详解,搞懂计数排序这一篇就够了】
计数排序 前言一、计数排序算法核心思路映射 概念补充绝对映射相对映射 二、计数排序算法核心实现步骤三、码源详解四、效率分析(1)时间复杂度 — O(Max(N,range))(2)空间…...

Canvas制作喷泉效果示例
Canvas能制作出很多动画效果,下面是一个制作喷泉效果的示例 效果图 源代码 <!DOCTYPE html> <html> <head> <meta charset"utf-8"> <meta name"viewport" content"widthdevice-width, initial-scale1 ,user-…...

什么是NPM(Node Package Manager)?它的作用是什么?
聚沙成塔每天进步一点点 ⭐ 专栏简介 前端入门之旅:探索Web开发的奇妙世界 欢迎来到前端入门之旅!感兴趣的可以订阅本专栏哦!这个专栏是为那些对Web开发感兴趣、刚刚踏入前端领域的朋友们量身打造的。无论你是完全的新手还是有一些基础的开发…...
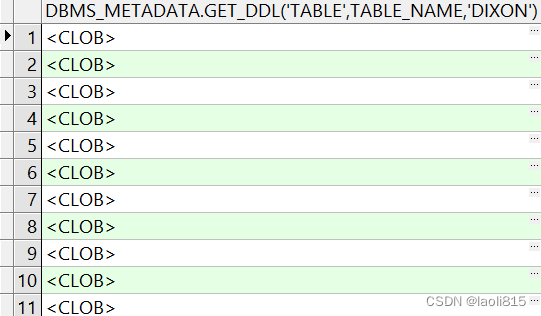
oracle如果不适用toad或者plsql工具如何获取索引建表语句
select dbms_lob.substr(dbms_metadata.get_ddl(INDEX,INDEX_NAME,DIXON))||; from dba_indexes where ownerDIXON这个语句可以获取dixon用户的所有索引创建语句,sql脚本形式呈现 点开一个语句查看 如果不使用dbms_lob.substr这个函数最后得到是一个clob selec…...
某大厂伺服驱动器量产方案
本文介一款大厂量产伺服驱动器方案!带2500线省线式编码器,17位增量编码器,20位绝对值编码器!标配CANopen、高精度运动控制,高速总线通讯,主芯片28335FPGA,已验证过,带can和485通讯&a…...

企业安全运维:轻量级OpenClaw检测脚本的设计、部署与MDM集成实战
1. 项目概述:为什么我们需要一个轻量级的OpenClaw检测脚本?在当今的企业IT环境中,开发工具和AI辅助编程代理的普及带来了前所未有的效率提升,但同时也引入了新的安全与合规盲区。想象一下,一个未经批准的开发工具&…...

构建毫秒级实时传输系统:基于flv.js的低延迟架构优化方案
构建毫秒级实时传输系统:基于flv.js的低延迟架构优化方案 【免费下载链接】flv.js HTML5 FLV Player 项目地址: https://gitcode.com/gh_mirrors/fl/flv.js flv.js作为HTML5 FLV播放器的核心技术方案,通过Media Source Extensions实现浏览器端FLV…...

芯片设计演进:从摩尔定律到软件驱动与异构集成的工程实践
1. 项目概述:一位芯片老兵的CMOS缩放宣言在半导体这个日新月异的行业里,每隔几年就会听到“摩尔定律已死”的论调。这几乎成了一个周期性出现的“行业寓言”。但如果你在2014年,有机会和吉姆凯勒(Jim Keller)——这位先…...

ComfyUI-Impact-Pack深度解析:从AI图像模糊到专业级细节增强的完整解决方案
ComfyUI-Impact-Pack深度解析:从AI图像模糊到专业级细节增强的完整解决方案 【免费下载链接】ComfyUI-Impact-Pack Custom nodes pack for ComfyUI This custom node helps to conveniently enhance images through Detector, Detailer, Upscaler, Pipe, and more. …...

AI工作流引擎:基于DAG与智能体的自动化任务编排实践
1. 项目概述:当AI遇上工作流,一场效率革命的开端 最近在GitHub上看到一个挺有意思的项目,叫 DahnM20/ai-flow 。光看名字,你可能会觉得这又是一个“AI自动化”的玩具,但仔细研究其源码和设计理念后,我发现…...

OpencvSharp 算子学习教案之 - Cv2.Sobel
OpencvSharp 算子学习教案之 - Cv2.Sobel 大家好,Opencv在很多工程项目中都会用到,而OpencvSharp则是以C#开发与实现的Opencv操作库,对.NET开发人员友好,但很多API的中文资料、应用场景及常见坑点等缺乏系统性归纳,因此…...

QQ音乐加密文件解密终极指南:qmcdump工具完全使用教程
QQ音乐加密文件解密终极指南:qmcdump工具完全使用教程 【免费下载链接】qmcdump 一个简单的QQ音乐解码(qmcflac/qmc0/qmc3 转 flac/mp3),仅为个人学习参考用。 项目地址: https://gitcode.com/gh_mirrors/qm/qmcdump 你是否…...
)
Win10台式机没蓝牙?手把手教你用USB适配器搞定BLE设备通信(附驱动避坑指南)
Win10台式机蓝牙适配器实战指南:从硬件选型到BLE通信全解析 当台式机遇到蓝牙设备通信需求时,许多开发者首先面临的不是代码问题,而是硬件基础建设。本文将带你系统解决从零搭建蓝牙开发环境的完整流程,特别针对低功耗蓝牙&#x…...

一人一书一时代:《凰标》是海棠山铁哥的东方文明宣言@凤凰标志
一人执笔,一书立世,一作定时代。 ——《凰标》题记一、破题:当网文只剩“爽点”,谁来承载文明?行业通病《凰标》回应娱乐至死以笔墨思考时代碎片叙事构建完整文明体系功利写作以文载道,以书传文明 二、个人…...

AI工作流自动化实践:Claude数据同步工具架构与实现
1. 项目概述与核心价值 最近在折腾AI应用集成的时候,发现一个挺有意思的项目,叫 cam901051/claude-sync 。乍一看这个标题,你可能会有点懵,这到底是干嘛的?简单来说,这是一个旨在实现Claude(…...