纯python实现大漠图色功能
大漠图色是一种自动化测试工具,可以用于识别屏幕上的图像并执行相应的操作。在Python中,可以使用第三方库pyautogui来实现大漠图色功能。具体步骤如下:
- 安装pyautogui库:在命令行中输入pip install pyautogui。
- 导入pyautogui库:在Python脚本中使用import pyautogui语句导入pyautogui库。
- 使用pyautogui.locateOnScreen()函数来查找屏幕上的图像,并返回图像的位置坐标。
- 使用pyautogui.click()函数来模拟鼠标点击操作。
- 使用pyautogui.typewrite()函数来模拟键盘输入操作。
实现如标题,废话不多说,直接看代码:
# 更新StressShow命令import numpy as np
import pyautogui
import copy
import cv2
from sklearn import clusterclass TuSe:def __init__(self):print('欢迎使用')def GetCapture(self, stax, stay, endx, endy):w = endx - staxh = endy - stayim = pyautogui.screenshot(region=(stax, stay, w, h))# im = cv2.cvtColor(np.array(im), cv2.COLOR_BGR2RGB)return np.array(im)def FindPic(self, x1, y1, x2, y2, path, thd):'''找图:param x1: 起点X:param y1: 起点Y:param x2: 终点X:param y2: 终点Y:param path: 图片路径:param thd: 相似度:return: 图片中心坐标'''img = self.GetCapture(x1, y1, x2, y2)img = cv2.cvtColor(img, cv2.COLOR_BGR2GRAY)template = cv2.imread(path, 0)th, tw = template.shape[::]rv = cv2.matchTemplate(img, template, 1)minVal, maxVal, minLoc, maxLoc = cv2.minMaxLoc(rv)if 1 - minVal >= thd:return minLoc[0] + tw / 2 + x1, minLoc[1] + th / 2 + y1else:return -1, -1def Hex_to_Rgb(self, hex):'''十六进制转RGB:param hex: 十六进制颜色值:return: RGB'''return np.array(tuple(int(hex[i:i + 2], 16) for i in (0, 2, 4)))def CmpColor(self, x, y, color, sim: float):'''比色:param x: X坐标:param y: Y坐标:param color: 十六进制颜色,可以从大漠直接获取:param sim: 相似偏移:return: 真或加'''img = self.GetCapture(x - 1, y - 1, x + 1, y + 1)img = np.array(img)img = img[1][1]color = self.Hex_to_Rgb(color)res = np.absolute(color - img)sim = int((1 - sim) * 255)return True if np.amax(res) <= sim else Falsedef FindColor(self, x1, y1, x2, y2, des, sim: float):'''找色:param x1: 起点X:param y1: 起点Y:param x2: 终点X:param y2: 终点Y:param des: 十六进制颜色,可以从大漠直接获取:param sim: 相似偏移:return:'''img = self.GetCapture(x1, y1, x2, y2)img = np.array(img)res = np.absolute(img - self.Hex_to_Rgb(des))sim = int((1 - sim) * 255)res = np.argwhere(np.all(res <= sim, axis=2))res = res + (y1, x1)return res[:, [1, 0]]def GetColorNum(self, x1, y1, x2, y2, des, sim: float):'''获取颜色数量:param x1: 起点X:param y1: 起点Y:param x2: 终点X:param y2: 终点Y:param des: 十六进制颜色,可以从大漠直接获取:param sim: 相似偏移:return:'''return len(self.FindColor(x1, y1, x2, y2, des, sim))def FindMultColor(self, stax, stay, endx, endy, des):'''多点找色:param stax::param stay::param endx::param endy::param des: 大漠获取到的多点找色数据,偏色必须写上:return:'''w = endx - staxh = endy - stayimg = pyautogui.screenshot(region=(stax, stay, w, h))img = np.array(img)rgby = []ps = []a = 0firstXY = []res = np.empty([0, 2])for i in des.split(','):rgb_y = i[-13:]r = int(rgb_y[0:2], 16)g = int(rgb_y[2:4], 16)b = int(rgb_y[4:6], 16)y = int(rgb_y[-2:])rgby.append([r, g, b, y])for i in range(1, len(des.split(','))):ps.append([int(des.split(',')[i].split('|')[0]), int(des.split(',')[i].split('|')[1])])for i in rgby:result = np.logical_and(abs(img[:, :, 0:1] - i[0]) < i[3], abs(img[:, :, 1:2] - i[1]) < i[3],abs(img[:, :, 2:3] - i[2]) < i[3])results = np.argwhere(np.all(result == True, axis=2)).tolist()if a == 0:firstXY = copy.deepcopy(results)else:nextnextXY = copy.deepcopy(results)for index in nextnextXY:index[0] = int(index[0]) - ps[a - 1][1]index[1] = int(index[1]) - ps[a - 1][0]q = set([tuple(t) for t in firstXY])w = set([tuple(t) for t in nextnextXY])matched = np.array(list(q.intersection(w)))res = np.append(res, matched, axis=0)a += 1unique, counts = np.unique(res, return_counts=True, axis=0)index = np.argmax(counts)re = unique[index] + (stay, stax)if np.max(counts) == len(des.split(',')) - 1:return np.flipud(re)return np.array([-1, -1])def FindPicEx(self, x1, y1, x2, y2, path, thd=0.9, MIN_MATCH_COUNT=8):'''全分辨率找图:param x1::param y1::param x2::param y2::param path::param thd: 相似度:param MIN_MATCH_COUNT: 特征点数量:return:'''thd = thd - 0.2template = cv2.imread(path, 0)  # queryImage# target = cv2.imread('target.jpg', 0)  # trainImagetarget = self.GetCapture(x1, y1, x2, y2)target = cv2.cvtColor(target, cv2.COLOR_BGR2GRAY)# Initiate SIFT detector创建sift检测器sift = cv2.xfeatures2d.SIFT_create()# find the keypoints and descriptors with SIFTkp1, des1 = sift.detectAndCompute(template, None)kp2, des2 = sift.detectAndCompute(target, None)# 创建设置FLANN匹配FLANN_INDEX_KDTREE = 0index_params = dict(algorithm=FLANN_INDEX_KDTREE, trees=5)search_params = dict(checks=50)flann = cv2.FlannBasedMatcher(index_params, search_params)matches = flann.knnMatch(des1, des2, k=2)# store all the good matches as per Lowe's ratio test.good = []for m, n in matches:if m.distance < thd * n.distance:good.append(m)if len(good) > MIN_MATCH_COUNT:# 获取关键点的坐标src_pts = np.float32([kp1[m.queryIdx].pt for m in good]).reshape(-1, 1, 2)dst_pts = np.float32([kp2[m.trainIdx].pt for m in good]).reshape(-1, 1, 2)# 计算变换矩阵和MASKM, mask = cv2.findHomography(src_pts, dst_pts, cv2.RANSAC, 5.0)h, w = template.shape# 使用得到的变换矩阵对原图像的四个角进行变换,获得在目标图像上对应的坐标pts = np.float32([[0, 0], [0, h - 1], [w - 1, h - 1], [w - 1, 0]]).reshape(-1, 1, 2)dst = cv2.perspectiveTransform(pts, M)res = (dst[0] + dst[2]) / 2  # [[[ 39.11337  147.11575 ]] [[135.06624  255.12143 ]]return int(res[0][0]) + x1, int(res[0][1]) + y1else:return -1, -1def _FilterRec(self, res, loc):""" 对同一对象的多个框按位置聚类后,按置信度选最大的一个进行保留。:param res: 是 cv2.matchTemplate 返回值:param loc: 是 cv2.np.argwhere(res>threshold) 返回值:return: 返回保留的点的列表 pts"""model = cluster.AffinityPropagation(damping=0.5, max_iter=100, convergence_iter=10, preference=-50).fit(loc)y_pred = model.labels_pts = []for i in set(y_pred):argj = loc[y_pred == i]argi = argj.Tpt = argj[np.argmax(res[tuple(argi)])]pts.append(pt[::-1])return np.array(pts)def FindMultPic(self, x1, y1, x2, y2, path, thd):'''多目标找图:param x1::param y1::param x2::param y2::param path::param thd: 相似度:return:'''target = self.GetCapture(x1, y1, x2, y2)target = cv2.cvtColor(target, cv2.COLOR_BGR2GRAY)template = cv2.imread(path, 0)w, h = template.shape[:2]res = cv2.matchTemplate(target, template, cv2.TM_CCOEFF_NORMED)loc = np.argwhere(res >= thd)if len(loc):resc = self._FilterRec(res, loc)return resc + (h / 2 + x1, w / 2 + y1)else:return [[-1, -1]]def FindPic_TM(self, x1, y1, x2, y2, path, thd):'''找透明图,透明色为黑色:param x1: 起点X:param y1: 起点Y:param x2: 终点X:param y2: 终点Y:param path: 图片路径:param thd: 相似度:return: 图片中心坐标'''img = self.GetCapture(x1, y1, x2, y2)img = cv2.cvtColor(img, cv2.COLOR_BGR2RGB)template = cv2.imread(path)template2 = cv2.cvtColor(template, cv2.COLOR_BGR2GRAY)ret, mask = cv2.threshold(template2, 20, 255, cv2.THRESH_BINARY)th, tw = template.shape[:2]rv = cv2.matchTemplate(img, template, 1, mask=mask)minVal, maxVal, minLoc, maxLoc = cv2.minMaxLoc(rv)if 1 - minVal >= thd:return minLoc[0] + tw / 2 + x1, minLoc[1] + th / 2 + y1else:return -1, -1def StressShow(self, stax, stay, endx, endy, des, type=0):'''保留选中颜色,其他为黑色,相似度根据偏色调整:param stax::param stay::param endx::param endy::param des: 大漠的色彩描述:param type: 0为原来颜色,1为白色:return:'''# des = 'e81010-101010|f9ad08-000000'dess = des.split('|')des = [i[0:6] for i in dess]des = [np.array(self.Hex_to_Rgb(d)) for d in des]pds = [i[-6:] for i in dess]pds = tuple(tuple(int(item[i:i + 2]) for i in range(0, len(item), 2)) for item in pds)img = self.GetCapture(stax, stay, endx, endy)mask = np.zeros(img.shape[:2], dtype=np.bool_)for i, color in enumerate(des):mask += np.all(np.abs(img - color) <= pds[i], axis=-1)new_img = np.where(mask[..., None], [255, 255, 255], [0, 0, 0]) if type else np.where(mask[..., None], img,[0, 0,0])  # 修改这里,将选中的颜色设为白色img_converted = cv2.convertScaleAbs(new_img)img_converted = cv2.cvtColor(np.array(img_converted), cv2.COLOR_BGR2RGB)return img_converteda = TuSe()
b = a.StressShow(0, 0, 1920, 1080, 'e81010-101010|36659e-101010', 0)
cv2.imshow('13', b)
cv2.waitKey(0)
cv2.destroyAllWindows()
相关文章:

纯python实现大漠图色功能
大漠图色是一种自动化测试工具,可以用于识别屏幕上的图像并执行相应的操作。在Python中,可以使用第三方库pyautogui来实现大漠图色功能。具体步骤如下: 安装pyautogui库:在命令行中输入pip install pyautogui。导入pyautogui库&a…...

debounce and throtlle
debounce // 核心:单位时间内触发>1 则只执行最后一次。//excutioner 可以认为是执行器。执行器存在则清空,再赋值新的执行器。function debounce(fn, delay 500) {let excutioner null;return function () {let context this;let args arguments…...
四、数据库系统
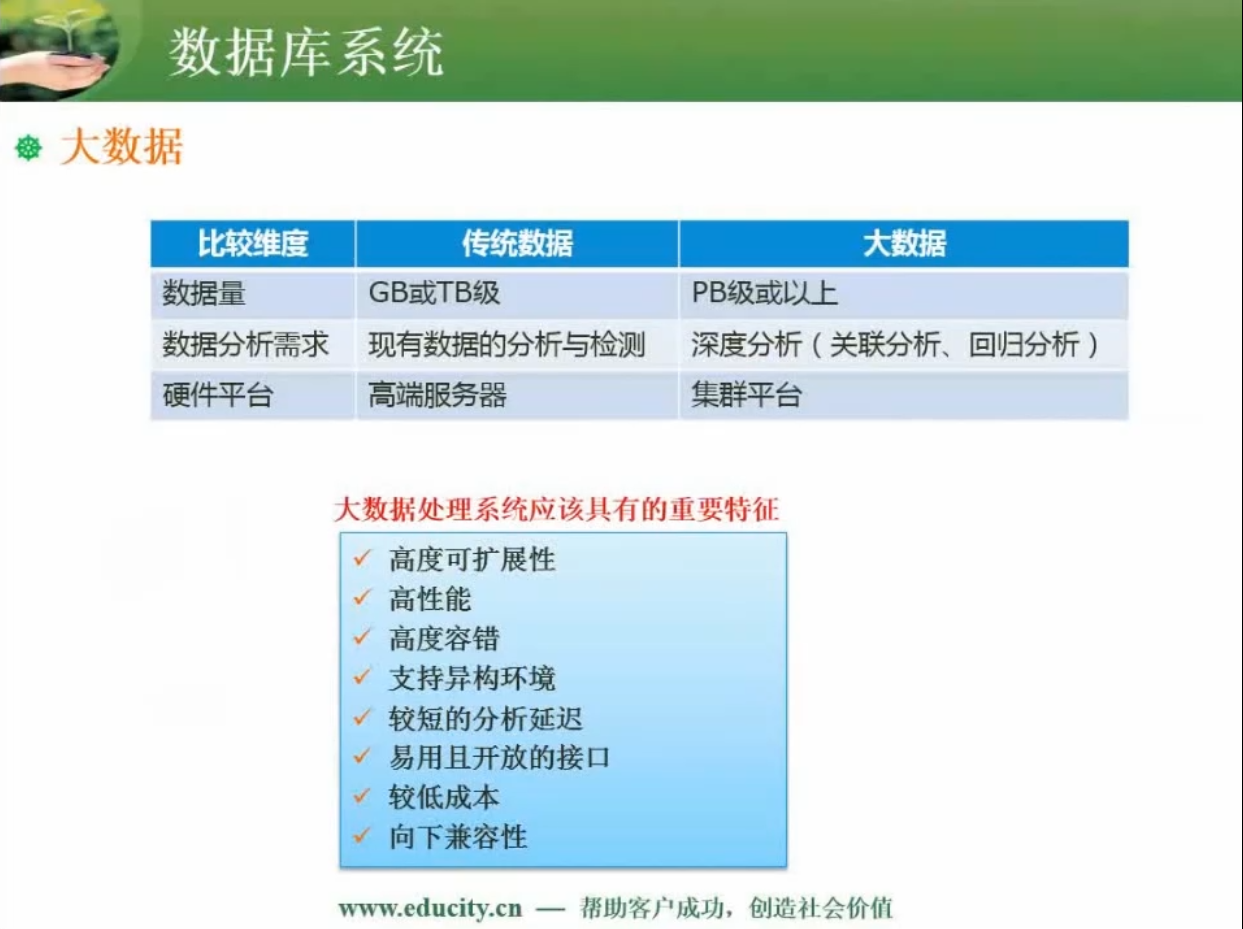
数据库系统(Database System),是由数据库及其管理软件组成的系统。数据库系统是为适应数据处理的需要而发展起来的一种较为理想的数据处理系统,也是一个为实际可运行的存储、维护和应用系统提供数据的软件系统,是存储介…...
Linux中的高级IO
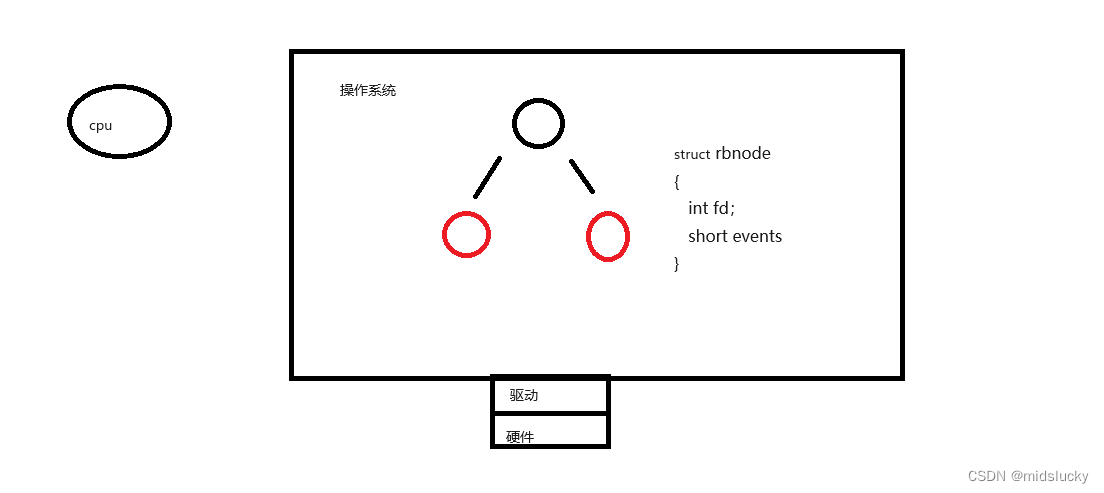
文章目录 1.IO1.1基本介绍1.2基础io的低效性1.3如何提高IO效率1.4五种IO模型1.5非阻塞模式的设置 2.IO多路转接之Select2.1函数的基本了解2.2fd_set理解2.3完整例子代码(会在代码中进行讲解)2.4优缺点 3.多路转接之poll3.1poll函数的介绍3.2poll服务器3.…...
项目管理之如何估算项目工作成本
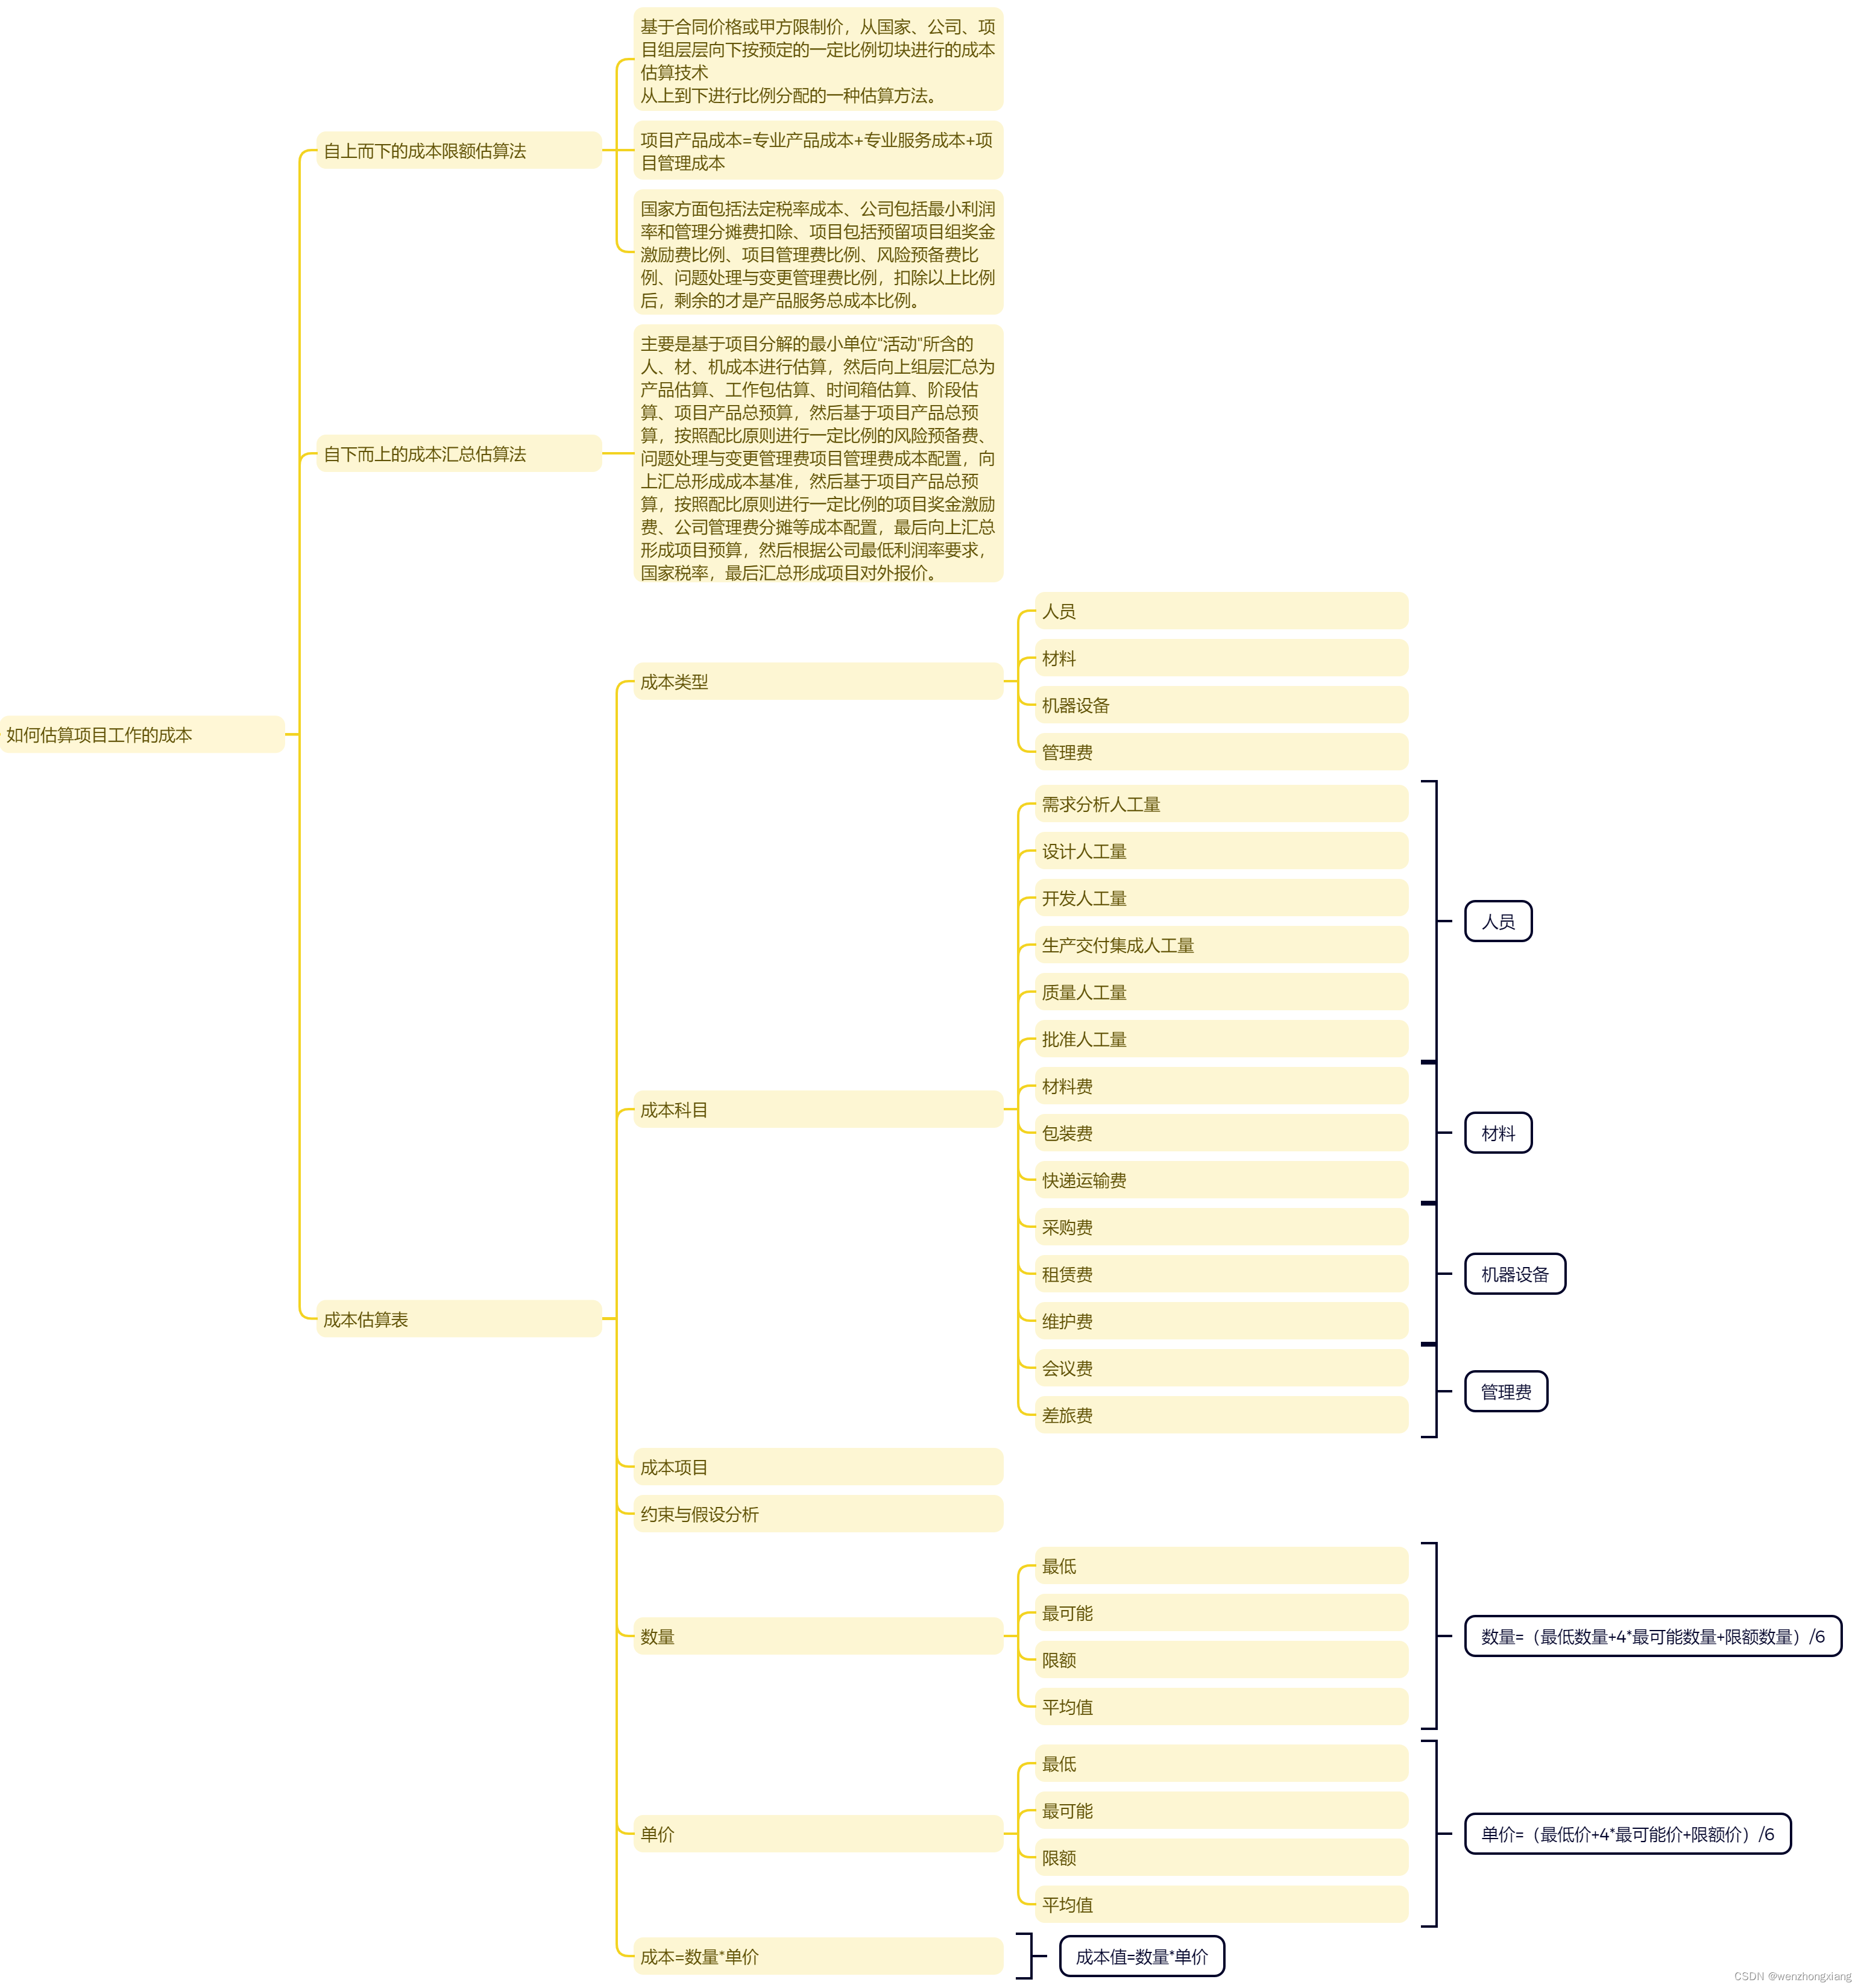
在项目管理中,如何估算项目工作成本是一个关键问题。为了解决这个问题,我们可以采用自上而下的成本限额估算法和自下而上的成本汇总估算法。这两种方法各有优缺点,但都可以帮助我们准确地估算项目工作成本。 自上而下的成本限额估算法 自上…...

Redis主从复制基础概念
Redis主从复制:提高数据可用性和性能的策略 一、概述 Redis主从复制是一种常用的高可用性策略,通过将数据从一个Redis服务器复制到另一个或多个Redis服务器上,以提高数据的可用性和读取性能。当主服务器出现故障时,可以快速地切…...

图数据库Neo4j概念、应用场景、安装及CQL的使用
一、图数据库概念 引用Seth Godin的说法,企业需要摒弃仅仅收集数据点的做法,开始着手建立数据之间的关联关系。数据点之间的关系甚至比单个点本身更为重要。 传统的**关系数据库管理系统(RDBMS)**并不擅长处理数据之间的关系,那些表状数据模…...
: RIP原理与配置)
路由器基础(四): RIP原理与配置
路由信息协议 (Routing Information Protocol,RIP) 是最早使用的距离矢量路由协议。因为路由是以矢量(距离、方向)的方式被通告出去的,这里的距离是根据度量来决定的,所以叫“距离矢量”。 距离矢量路由算法是动态路由算法。它的工作流程是:…...

红外遥控开发RK3568-PWM-IR
提示:文章写完后,目录可以自动生成,如何生成可参考右边的帮助文档 文章目录 前言1.红外遥控的发送接收工作原理2.红外协议3.红外遥控系统框图4.遥控器添加方法4.1 记录键值4.2 添加键值总结前言 提示:这里可以添加本文要记录的大概内容: 1.红外遥控的发送接收工作原理 …...

go-sync-mutex
Sync Go 语言作为一个原生支持用户态进程(Goroutine)的语言,当提到并发编程、多线程编程时,往往都离不开锁这一概念。锁是一种并发编程中的同步原语(Synchronization Primitives),它能保证多…...

高并发系统设计
高并发系统通用设计方法 Scala-out 横向扩展,分散流量,分布式集群部署 缺点:引入复杂度,节点之间状态维护,节点扩展(上下线) Scala-up 提升单机性能,比如增加内存,增…...

Vue3-Pinia快速入门
1.安装pinia npm install pinia -save 2.在main.js中导入并使用pinia // 导入piniaimport { createPinia } from "pinia"; const pinia createPinia();//使用pinia app.use(pinia)app.mount(#app) 3.在src目录下创建包:store,表示仓库 4…...

Python算法——插入排序
插入排序(Insertion Sort)是一种简单但有效的排序算法,它的基本思想是将数组分成已排序和未排序两部分,然后逐一将未排序部分的元素插入到已排序部分的正确位置。插入排序通常比冒泡排序和选择排序更高效,特别适用于对…...

Java21新特性
目录 一、Java21新特性 1、字符串模版 2、scoped values 3、record pattern 4、switch格式匹配 5、可以在switch中使用when 6、Unnamed Classes and Instance Main Methods 7、Structured Concurrency 一、Java21新特性 1、字符串模版 字符串模版可以让开发者更简洁的…...
4 Tensorflow图像识别模型——数据预处理
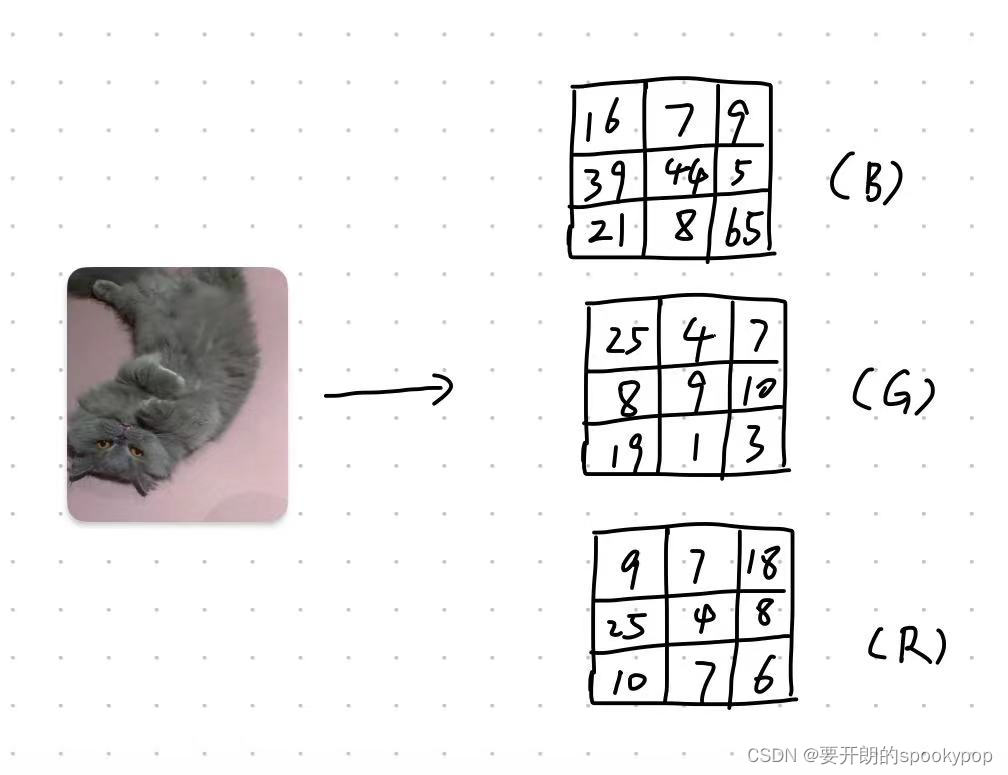
上一篇:3 tensorflow构建模型详解-CSDN博客 本篇开始介绍识别猫狗图片的模型,内容较多,会分为多个章节介绍。模型构建还是和之前一样的流程: 数据集准备数据预处理创建模型设置损失函数和优化器训练模型 本篇先介绍数据集准备&am…...
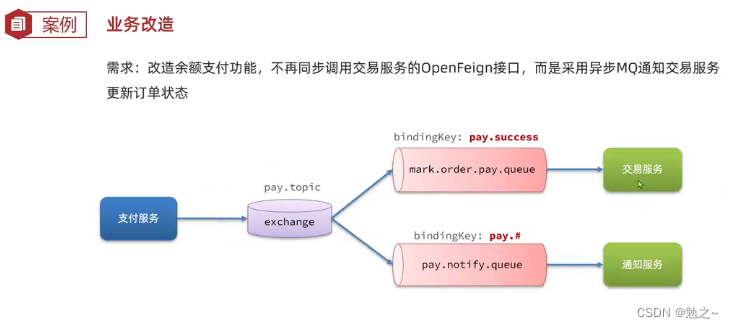
SpringBoot整合RabbitMQ学习笔记
SpringBoot整合RabbitMQ学习笔记 以下三种类型的消息,生产者和消费者需各自启动一个服务,模拟生产者服务发送消息,消费者服务监听消息,分布式开发。 一 Fanout类型信息 . RabbitMQ创建交换机和队列 在RabbitMQ控制台,新…...

在校园跑腿系统小程序中,如何设计高效的实时通知与消息推送系统?
1. 选择合适的消息推送服务 在校园跑腿系统小程序中,选择一个适合的消息推送服务。例如,使用WebSocket技术、Firebase Cloud Messaging (FCM)、或第三方推送服务如Pusher或OneSignal等。注册并获取相关的API密钥或访问令牌。 2. 集成服务到小程序后端…...
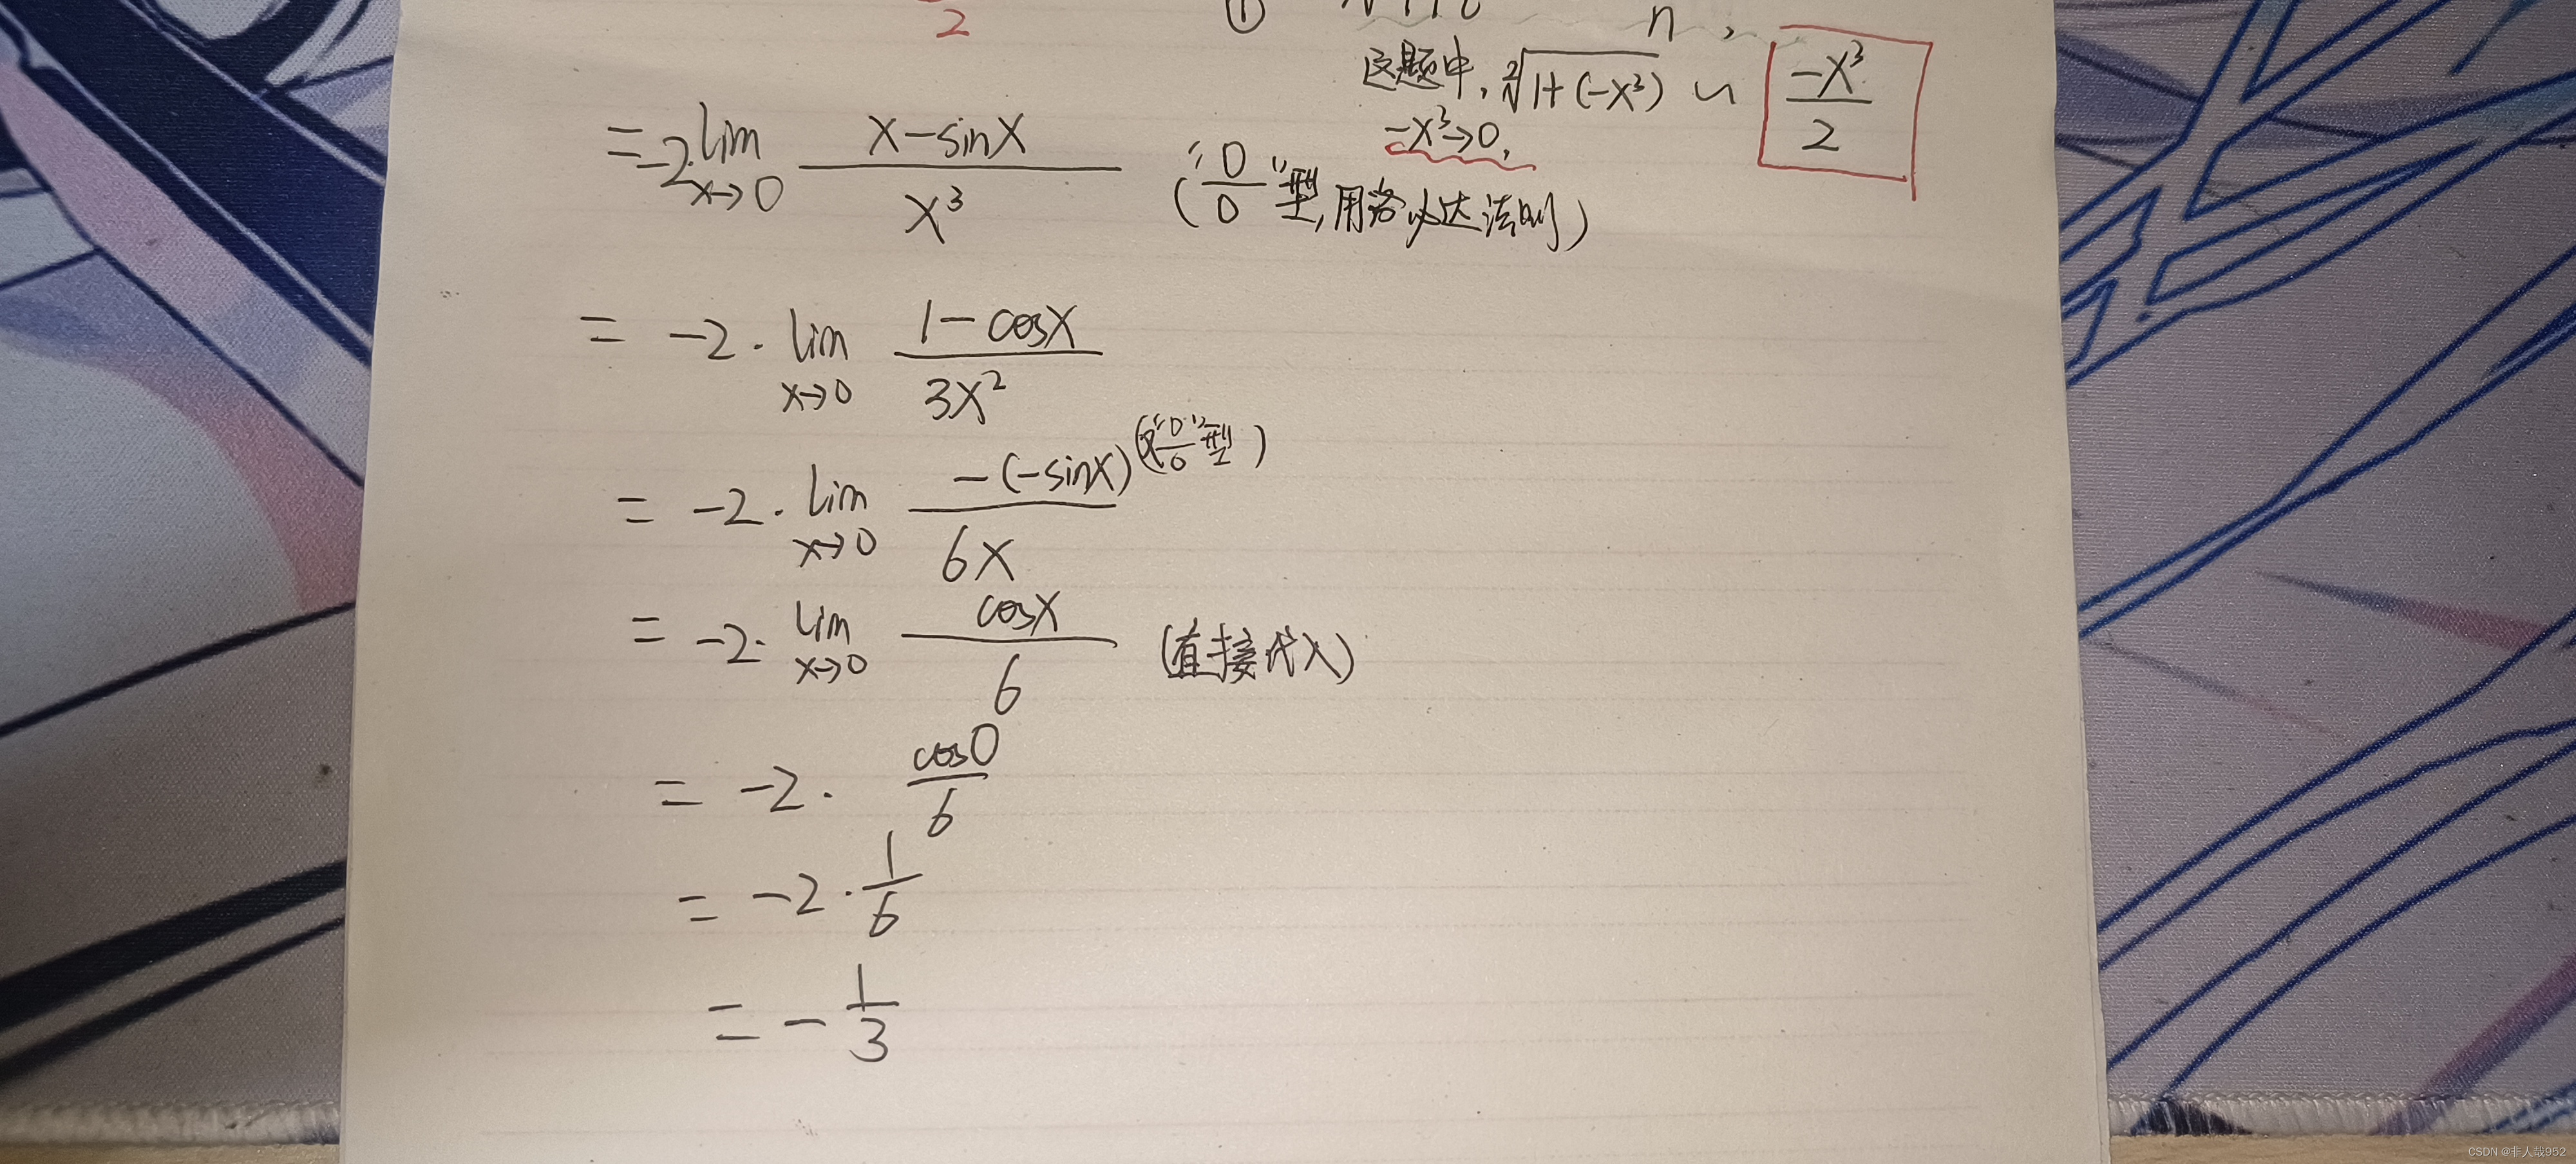
求极限Lim x->0 (x-sinx)*e-²x / (1-x)⅓
题目如下: 解题思路: 这题运用了无穷小替换、洛必达法则、求导法则 具体解题思路如下: 1、首先带入x趋近于0,可以得到(0*1)/0,所以可以把e的-x的平方沈略掉 然后根据无穷小替换,利用t趋近于0时…...

JavaScript数据类型详细解析与代码实例
JavaScript是一种弱类型动态语言,数据类型分为原始类型和对象类型。 原始类型 原始类型包括:数字、字符串、布尔值和undefined、null。 数字 JavaScript中的数字类型包括整数和浮点数,可以进行基本的数学运算。 var num1 10; // 整数 v…...
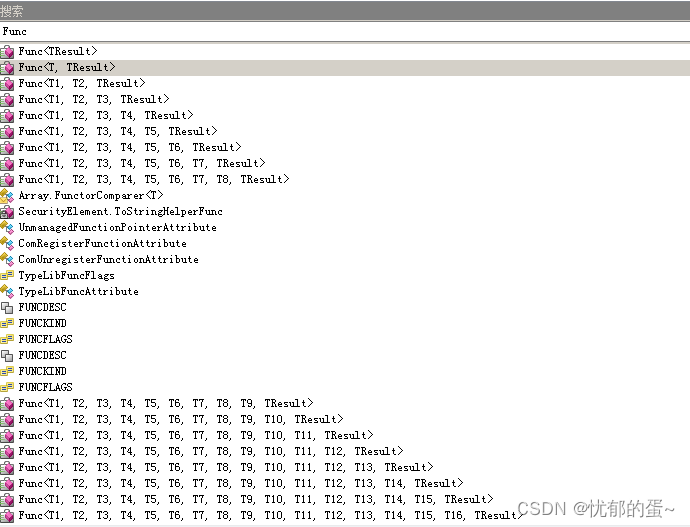
.NET Framework中自带的泛型委托Func
Func<>是.NET Framework中自带的泛型委托,可以接收一个或多个输入参数,并且有返回值,和Action类似,.NET基类库也提供了多达16个输入参数的Func委托,输出参数只有1个。 1、Func泛型委托 .NET Framework为我们提…...

Logisim-Evolution:用可视化设计破解数字电路学习难题的开源工具
Logisim-Evolution:用可视化设计破解数字电路学习难题的开源工具 【免费下载链接】logisim-evolution Digital logic design tool and simulator 项目地址: https://gitcode.com/gh_mirrors/lo/logisim-evolution 重新定义数字电路设计:从抽象概念…...

3分钟学会在Blender中安装和使用VRM插件:从零到精通完整指南
3分钟学会在Blender中安装和使用VRM插件:从零到精通完整指南 【免费下载链接】VRM-Addon-for-Blender VRM Importer, Exporter and Utilities for Blender 2.93 to 5.0 项目地址: https://gitcode.com/gh_mirrors/vr/VRM-Addon-for-Blender VRM Addon for Bl…...

提升编码效率:在快马平台利用多模型切换,快速生成复杂表格组件
最近在开发一个数据管理后台时,遇到了一个比较棘手的需求:需要实现一个功能完善的交互式表格组件。这个表格不仅要展示模拟的用户数据,还要支持多条件筛选、动态排序和分页功能。作为一个前端经验有限的开发者,我决定尝试使用InsC…...

软件测试新方法:利用Lingbot-Depth-Pretrain-ViTL-14进行GUI界面立体元素测试
软件测试新方法:利用Lingbot-Depth-Pretrain-ViTL-14进行GUI界面立体元素测试 你有没有遇到过这种情况?一个软件界面看起来功能都正常,按钮能点,输入框能输,但用起来就是感觉“不对劲”。比如,一个弹窗好像…...

2025医药AI全景:数智赋能新纪元,Linux基础开发工具 --- vim。
2025医药行业数智赋能与AI应用全景分析 行业背景与核心驱动力 全球医药行业正经历数字化转型浪潮,AI技术、大数据分析、物联网成为关键驱动力。2025年市场规模预计突破2.5万亿美元,年复合增长率达12%。政策支持(如FDA加速AI医疗审批ÿ…...

SUNFLOWER MATCH LAB 赋能软件测试:自动化生成植物图像测试用例
SUNFLOWER MATCH LAB 赋能软件测试:自动化生成植物图像测试用例 如果你在软件测试,特别是图像处理或计算机视觉相关的测试领域工作过,一定对寻找合适的测试图像这件事感到头疼。为了测试一个图像分类算法,你可能需要满世界找各种…...

手把手教你用ESP32-S3+Ollama打造本地AI语音助手:从Django服务到硬件播放
从零构建基于ESP32-S3的本地AI语音助手:OllamaDjango全链路实战 在智能硬件开发领域,语音交互系统正经历着从云端依赖到本地化部署的范式转移。本文将完整呈现如何利用ESP32-S3微控制器与Ollama大语言模型,构建一个完全运行在内网环境的AI语音…...

告别重复劳动:用快马平台集成codex,自动生成模型与api代码提升效率
作为一名经常需要开发用户管理系统的开发者,我深刻体会到重复编写基础代码的繁琐。最近在InsCode(快马)平台尝试了集成codex模型的功能,发现它能显著提升开发效率。下面分享我的实践过程: 用户数据模型生成 传统方式需要手动定义每个字段类型…...

5分钟搞定OpenClaw+Kimi-VL-A3B-Thinking:星图GPU镜像一键体验
5分钟搞定OpenClawKimi-VL-A3B-Thinking:星图GPU镜像一键体验 1. 为什么选择云端沙盒体验OpenClaw 作为一个长期折腾本地AI部署的技术爱好者,我深刻理解配置环境的痛苦。上周尝试在MacBook Pro上手动部署OpenClaw时,光是解决Node.js版本冲突…...

OpenClaw自动化测试新思路:千问3.5-27B生成与执行UI测试用例
OpenClaw自动化测试新思路:千问3.5-27B生成与执行UI测试用例 1. 为什么我们需要重新思考UI测试 作为一位经历过手工测试、录制回放、脚本维护三个阶段的老测试工程师,我始终被一个问题困扰:测试用例的维护成本永远与业务复杂度成正比。直到…...