DAIR-V2X-V 3D检测数据集 转为Kitti格式 | 可视化
本文分享在DAIR-V2X-V数据集中,将标签转为Kitti格式,并可视化3D检测效果。

一、将标签转为Kitti格式
DAIR-V2X包括不同类型的数据集:
- DAIR-V2X-I
- DAIR-V2X-V
- DAIR-V2X-C
- V2X-Seq-SPD
- V2X-Seq-TFD
- DAIR-V2X-C-Example: google_drive_link
- V2X-Seq-SPD-Example: google_drive_link
- V2X-Seq-TFD-Example: google_drive_link

本文选择DAIR-V2X-V作为示例。
1、下载DAIR-V2X工程
DAIR-V2X开源地址:https://github.com/AIR-THU/DAIR-V2X
2、存放数据
可以将数据存放到data目录中,比如:data/DAIR-V2X-V/single-vehicle-side,里面包含两个关键目录和一个文件
calib/
label/
data_info.json
3、修复bug
在tools/dataset_converter/gen_kitti/label_json2kitti.py中的22行,将 i15 = str(-eval(item["rotation"])) 改为:
i15 = str(-float(item["rotation"]))如何不修改会报错的;
DAIR-V2X-gp/tools/dataset_converter/gen_kitti/label_json2kitti.py", line 22, in write_kitti_in_txt
i15 = str(-eval(item["rotation"]))
TypeError: eval() arg 1 must be a string, bytes or code object
将tools/dataset_converter/gen_kitti/label_json2kitti.py复制到根目录中,避免找不到tool库。
4、修改配置参数
label_json2kitti.py中,可以将rawdata_copy和kitti_pcd2bin注释掉。
这样节约时间,不用程序拷贝图像、点云数据,只需生成标签即可。
if __name__ == "__main__":print("================ Start to Convert ================")args = parser.parse_args()source_root = args.source_roottarget_root = args.target_rootprint("================ Start to Copy Raw Data ================")mdkir_kitti(target_root)# rawdata_copy(source_root, target_root)# kitti_pcd2bin(target_root)
5、转换数据
执行如下命令
python dair2kitti.py --source-root ./data/DAIR-V2X-V/single-vehicle-side --target-root ./data/DAIR-V2X-V/single-vehicle-side --split-path ./data/split_datas/single-vehicle-split-data.json --label-type camera --sensor-view vehicle
会打印信息
================ Start to Convert ================
================ Start to Copy Raw Data ================
================ Start to Generate Label ================
================ Start to Generate Calibration Files ================
15627 15627
================ Start to Generate ImageSet Files ================
查看目录:data/DAIR-V2X-V/single-vehicle-side,生成了3个目录
ImageSets
testing
training
其中,testing目录是空的
ImageSets目录包含:

training目录包含:

6、查看生成数据格式
查看calib中的相机标定文件,比如 000000.txt
P2: 3996.487567 0.0 955.58618 0.0 0.0 3963.430994 527.646219 0.0 0.0 0.0 1.0 0.0
P2: 3996.487567 0.0 955.58618 0.0 0.0 3963.430994 527.646219 0.0 0.0 0.0 1.0 0.0
P2: 3996.487567 0.0 955.58618 0.0 0.0 3963.430994 527.646219 0.0 0.0 0.0 1.0 0.0
P2: 3996.487567 0.0 955.58618 0.0 0.0 3963.430994 527.646219 0.0 0.0 0.0 1.0 0.0
R0_rect: 1 0 0 0 1 0 0 0 1
Tr_velo_to_cam: 0.006283 -0.999979 -0.001899 -0.298036 -0.005334 0.001865 -0.999984 -0.666812 0.999966 0.006293 -0.005322 -0.516927
Tr_velo_to_cam: 0.006283 -0.999979 -0.001899 -0.298036 -0.005334 0.001865 -0.999984 -0.666812 0.999966 0.006293 -0.005322 -0.516927
查看lable_2中的标签,比如 000000.txt
Car 0 0 0.33888581543844903 0 527.938232 69.723068 637.4556269999999 0.850836 4.337498 2.073565 -9.601712831407 0.8624079931420001 32.383280568744 1.615145
二、可视化3D框
使用Kitti的方式,实现可视化推理结果,上面生成的结果,和kitii标签格式是一致的。
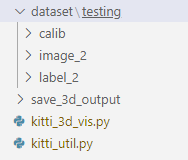
在新建一个vis目录包括:
dataset 存放相机标定数据、图片、标签
save_3d_output 存放可视化图片
kitti_3d_vis.py 可视化运行此代码
kitti_util.py 依赖代码
具体的目录结构:
主代码 kitti_3d_vis.py
# kitti_3d_vis.pyfrom __future__ import print_functionimport os
import sys
import cv2
import random
import os.path
import shutil
from PIL import Image
BASE_DIR = os.path.dirname(os.path.abspath(__file__))
ROOT_DIR = os.path.dirname(BASE_DIR)
sys.path.append(BASE_DIR)
sys.path.append(os.path.join(ROOT_DIR, 'mayavi'))
from kitti_util import *def visualization():import mayavi.mlab as mlabdataset = kitti_object(r'./dataset/')path = r'./dataset/testing/label_2/'Save_Path = r'./save_3d_output/'files = os.listdir(path)for file in files:name = file.split('.')[0]save_path = Save_Path + name + '.png'data_idx = int(name)# Load data from datasetobjects = dataset.get_label_objects(data_idx)img = dataset.get_image(data_idx)img = cv2.cvtColor(img, cv2.COLOR_BGR2RGB)calib = dataset.get_calibration(data_idx)print(' ------------ save image with 3D bounding box ------- ')print('name:', name)show_image_with_boxes(img, objects, calib, save_path, True)if __name__=='__main__':visualization()
依赖代码 kitti_util.py
# kitti_util.pyfrom __future__ import print_functionimport os
import sys
import cv2
import numpy as np
from PIL import Image
import matplotlib.pyplot as plt
BASE_DIR = os.path.dirname(os.path.abspath(__file__))
ROOT_DIR = os.path.dirname(BASE_DIR)
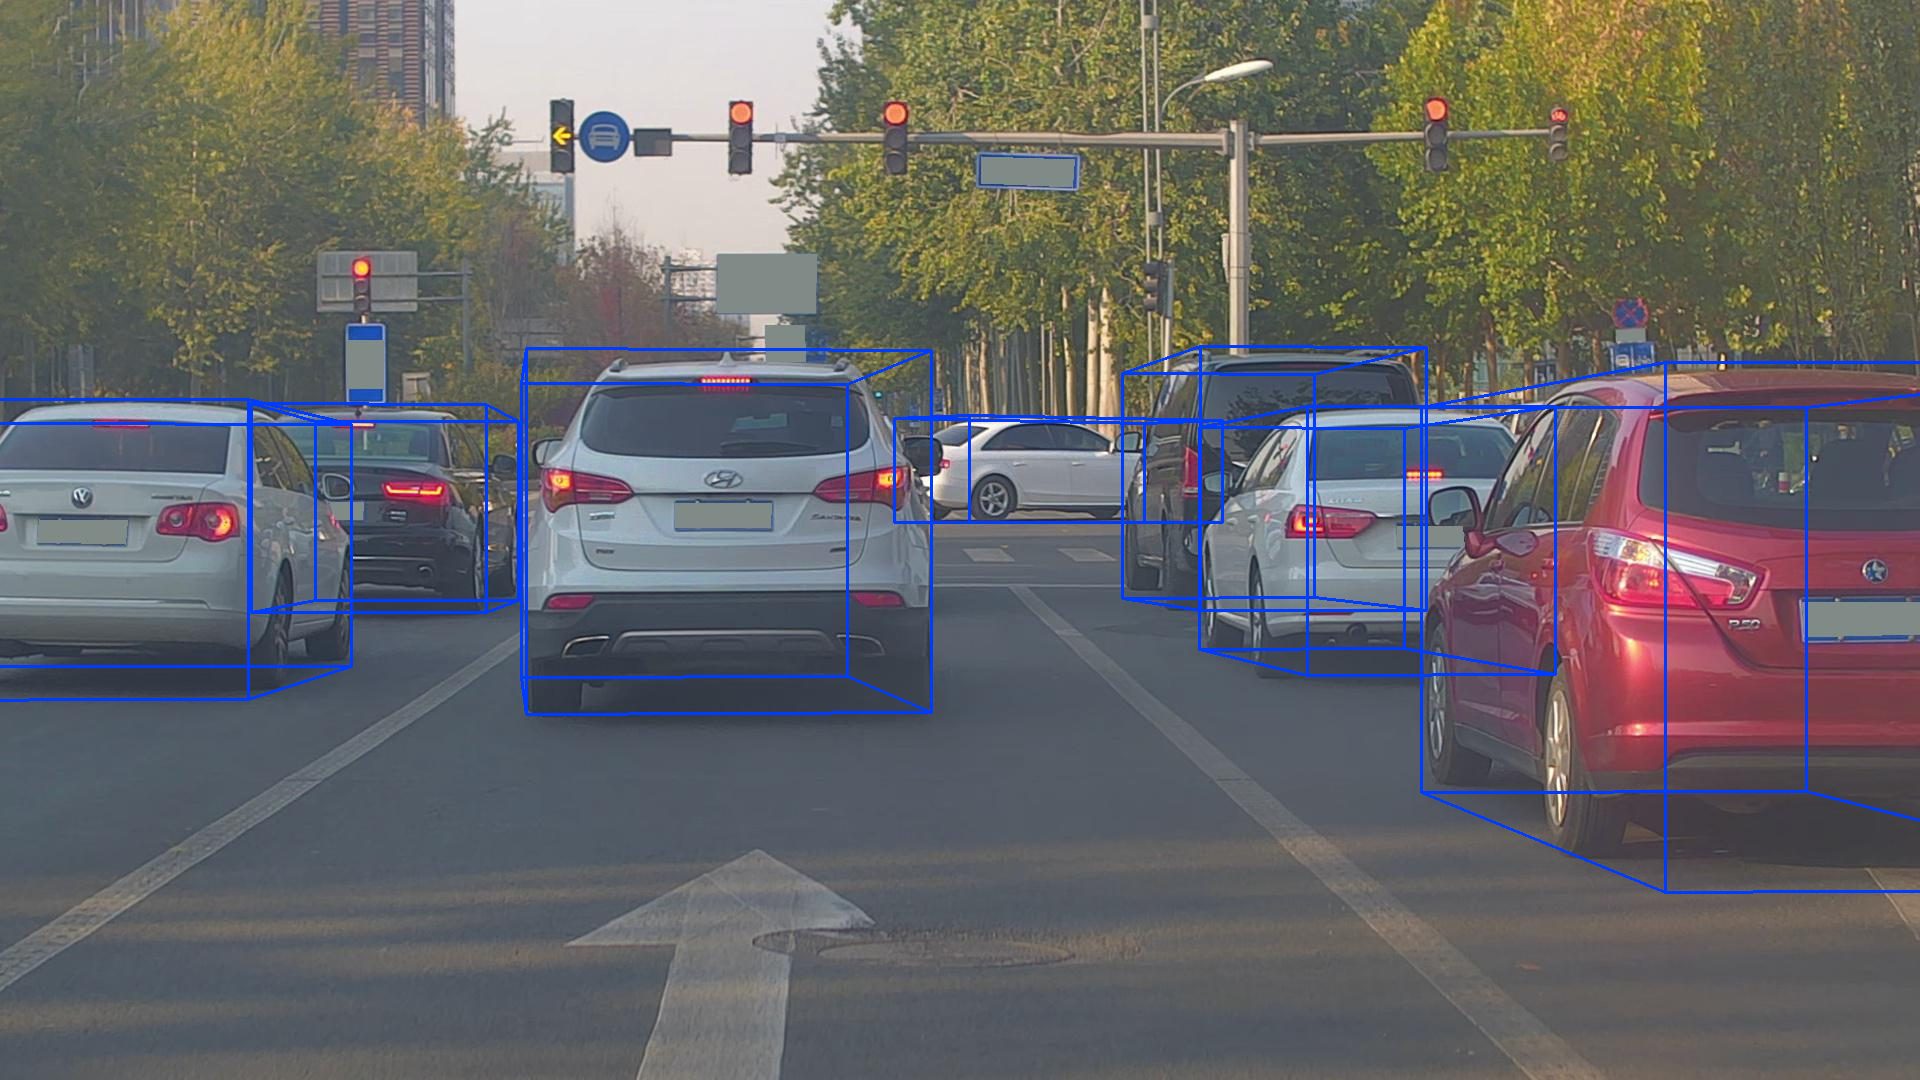
sys.path.append(os.path.join(ROOT_DIR, 'mayavi'))class kitti_object(object):def __init__(self, root_dir, split='testing'):self.root_dir = root_dirself.split = splitself.split_dir = os.path.join(root_dir, split)if split == 'training':self.num_samples = 7481elif split == 'testing':self.num_samples = 7518else:print('Unknown split: %s' % (split))exit(-1)self.image_dir = os.path.join(self.split_dir, 'image_2')self.calib_dir = os.path.join(self.split_dir, 'calib')self.label_dir = os.path.join(self.split_dir, 'label_2')def __len__(self):return self.num_samplesdef get_image(self, idx):assert(idx<self.num_samples) img_filename = os.path.join(self.image_dir, '%06d.png'%(idx))return load_image(img_filename)def get_calibration(self, idx):assert(idx<self.num_samples) calib_filename = os.path.join(self.calib_dir, '%06d.txt'%(idx))return Calibration(calib_filename)def get_label_objects(self, idx):# assert(idx<self.num_samples and self.split=='training') label_filename = os.path.join(self.label_dir, '%06d.txt'%(idx))return read_label(label_filename)def show_image_with_boxes(img, objects, calib, save_path, show3d=True):''' Show image with 2D bounding boxes '''img1 = np.copy(img) # for 2d bboximg2 = np.copy(img) # for 3d bboxfor obj in objects:if obj.type=='DontCare':continuecv2.rectangle(img1, (int(obj.xmin),int(obj.ymin)), (int(obj.xmax),int(obj.ymax)), (0,255,0), 2) # 画2D框box3d_pts_2d, box3d_pts_3d = compute_box_3d(obj, calib.P) # 获取3D框-图像(8*2)、3D框-相机坐标系(8*3)img2 = draw_projected_box3d(img2, box3d_pts_2d) # 在图像上画3D框if show3d:Image.fromarray(img2).save(save_path) # 保存带有3D框的图像# Image.fromarray(img2).show()else:Image.fromarray(img1).save(save_path) # 保存带有2D框的图像# Image.fromarray(img1).show()class Object3d(object):''' 3d object label '''def __init__(self, label_file_line):data = label_file_line.split(' ')data[1:] = [float(x) for x in data[1:]]# extract label, truncation, occlusionself.type = data[0] # 'Car', 'Pedestrian', ...self.truncation = data[1] # truncated pixel ratio [0..1]self.occlusion = int(data[2]) # 0=visible, 1=partly occluded, 2=fully occluded, 3=unknownself.alpha = data[3] # object observation angle [-pi..pi]# extract 2d bounding box in 0-based coordinatesself.xmin = data[4] # leftself.ymin = data[5] # topself.xmax = data[6] # rightself.ymax = data[7] # bottomself.box2d = np.array([self.xmin,self.ymin,self.xmax,self.ymax])# extract 3d bounding box informationself.h = data[8] # box heightself.w = data[9] # box widthself.l = data[10] # box length (in meters)self.t = (data[11],data[12],data[13]) # location (x,y,z) in camera coord.self.ry = data[14] # yaw angle (around Y-axis in camera coordinates) [-pi..pi]def print_object(self):print('Type, truncation, occlusion, alpha: %s, %d, %d, %f' % \(self.type, self.truncation, self.occlusion, self.alpha))print('2d bbox (x0,y0,x1,y1): %f, %f, %f, %f' % \(self.xmin, self.ymin, self.xmax, self.ymax))print('3d bbox h,w,l: %f, %f, %f' % \(self.h, self.w, self.l))print('3d bbox location, ry: (%f, %f, %f), %f' % \(self.t[0],self.t[1],self.t[2],self.ry))class Calibration(object):''' Calibration matrices and utils3d XYZ in <label>.txt are in rect camera coord.2d box xy are in image2 coordPoints in <lidar>.bin are in Velodyne coord.y_image2 = P^2_rect * x_recty_image2 = P^2_rect * R0_rect * Tr_velo_to_cam * x_velox_ref = Tr_velo_to_cam * x_velox_rect = R0_rect * x_refP^2_rect = [f^2_u, 0, c^2_u, -f^2_u b^2_x;0, f^2_v, c^2_v, -f^2_v b^2_y;0, 0, 1, 0]= K * [1|t]image2 coord:----> x-axis (u)||v y-axis (v)velodyne coord:front x, left y, up zrect/ref camera coord:right x, down y, front zRef (KITTI paper): http://www.cvlibs.net/publications/Geiger2013IJRR.pdfTODO(rqi): do matrix multiplication only once for each projection.'''def __init__(self, calib_filepath, from_video=False):if from_video:calibs = self.read_calib_from_video(calib_filepath)else:calibs = self.read_calib_file(calib_filepath)# Projection matrix from rect camera coord to image2 coordself.P = calibs['P2'] self.P = np.reshape(self.P, [3,4])# Rigid transform from Velodyne coord to reference camera coordself.V2C = calibs['Tr_velo_to_cam']self.V2C = np.reshape(self.V2C, [3,4])self.C2V = inverse_rigid_trans(self.V2C)# Rotation from reference camera coord to rect camera coordself.R0 = calibs['R0_rect']self.R0 = np.reshape(self.R0,[3,3])# Camera intrinsics and extrinsicsself.c_u = self.P[0,2]self.c_v = self.P[1,2]self.f_u = self.P[0,0]self.f_v = self.P[1,1]self.b_x = self.P[0,3]/(-self.f_u) # relative self.b_y = self.P[1,3]/(-self.f_v)def read_calib_file(self, filepath):''' Read in a calibration file and parse into a dictionary.'''data = {}with open(filepath, 'r') as f:for line in f.readlines():line = line.rstrip()if len(line)==0: continuekey, value = line.split(':', 1)# The only non-float values in these files are dates, which# we don't care about anywaytry:data[key] = np.array([float(x) for x in value.split()])except ValueError:passreturn datadef read_calib_from_video(self, calib_root_dir):''' Read calibration for camera 2 from video calib files.there are calib_cam_to_cam and calib_velo_to_cam under the calib_root_dir'''data = {}cam2cam = self.read_calib_file(os.path.join(calib_root_dir, 'calib_cam_to_cam.txt'))velo2cam = self.read_calib_file(os.path.join(calib_root_dir, 'calib_velo_to_cam.txt'))Tr_velo_to_cam = np.zeros((3,4))Tr_velo_to_cam[0:3,0:3] = np.reshape(velo2cam['R'], [3,3])Tr_velo_to_cam[:,3] = velo2cam['T']data['Tr_velo_to_cam'] = np.reshape(Tr_velo_to_cam, [12])data['R0_rect'] = cam2cam['R_rect_00']data['P2'] = cam2cam['P_rect_02']return datadef cart2hom(self, pts_3d):''' Input: nx3 points in CartesianOupput: nx4 points in Homogeneous by pending 1'''n = pts_3d.shape[0]pts_3d_hom = np.hstack((pts_3d, np.ones((n,1))))return pts_3d_hom# =========================== # ------- 3d to 3d ---------- # =========================== def project_velo_to_ref(self, pts_3d_velo):pts_3d_velo = self.cart2hom(pts_3d_velo) # nx4return np.dot(pts_3d_velo, np.transpose(self.V2C))def project_ref_to_velo(self, pts_3d_ref):pts_3d_ref = self.cart2hom(pts_3d_ref) # nx4return np.dot(pts_3d_ref, np.transpose(self.C2V))def project_rect_to_ref(self, pts_3d_rect):''' Input and Output are nx3 points '''return np.transpose(np.dot(np.linalg.inv(self.R0), np.transpose(pts_3d_rect)))def project_ref_to_rect(self, pts_3d_ref):''' Input and Output are nx3 points '''return np.transpose(np.dot(self.R0, np.transpose(pts_3d_ref)))def project_rect_to_velo(self, pts_3d_rect):''' Input: nx3 points in rect camera coord.Output: nx3 points in velodyne coord.''' pts_3d_ref = self.project_rect_to_ref(pts_3d_rect)return self.project_ref_to_velo(pts_3d_ref)def project_velo_to_rect(self, pts_3d_velo):pts_3d_ref = self.project_velo_to_ref(pts_3d_velo)return self.project_ref_to_rect(pts_3d_ref)def corners3d_to_img_boxes(self, corners3d):""":param corners3d: (N, 8, 3) corners in rect coordinate:return: boxes: (None, 4) [x1, y1, x2, y2] in rgb coordinate:return: boxes_corner: (None, 8) [xi, yi] in rgb coordinate"""sample_num = corners3d.shape[0]corners3d_hom = np.concatenate((corners3d, np.ones((sample_num, 8, 1))), axis=2) # (N, 8, 4)img_pts = np.matmul(corners3d_hom, self.P.T) # (N, 8, 3)x, y = img_pts[:, :, 0] / img_pts[:, :, 2], img_pts[:, :, 1] / img_pts[:, :, 2]x1, y1 = np.min(x, axis=1), np.min(y, axis=1)x2, y2 = np.max(x, axis=1), np.max(y, axis=1)boxes = np.concatenate((x1.reshape(-1, 1), y1.reshape(-1, 1), x2.reshape(-1, 1), y2.reshape(-1, 1)), axis=1)boxes_corner = np.concatenate((x.reshape(-1, 8, 1), y.reshape(-1, 8, 1)), axis=2)return boxes, boxes_corner# =========================== # ------- 3d to 2d ---------- # =========================== def project_rect_to_image(self, pts_3d_rect):''' Input: nx3 points in rect camera coord.Output: nx2 points in image2 coord.'''pts_3d_rect = self.cart2hom(pts_3d_rect)pts_2d = np.dot(pts_3d_rect, np.transpose(self.P)) # nx3pts_2d[:,0] /= pts_2d[:,2]pts_2d[:,1] /= pts_2d[:,2]return pts_2d[:,0:2]def project_velo_to_image(self, pts_3d_velo):''' Input: nx3 points in velodyne coord.Output: nx2 points in image2 coord.'''pts_3d_rect = self.project_velo_to_rect(pts_3d_velo)return self.project_rect_to_image(pts_3d_rect)# =========================== # ------- 2d to 3d ---------- # =========================== def project_image_to_rect(self, uv_depth):''' Input: nx3 first two channels are uv, 3rd channelis depth in rect camera coord.Output: nx3 points in rect camera coord.'''n = uv_depth.shape[0]x = ((uv_depth[:,0]-self.c_u)*uv_depth[:,2])/self.f_u + self.b_xy = ((uv_depth[:,1]-self.c_v)*uv_depth[:,2])/self.f_v + self.b_ypts_3d_rect = np.zeros((n,3))pts_3d_rect[:,0] = xpts_3d_rect[:,1] = ypts_3d_rect[:,2] = uv_depth[:,2]return pts_3d_rectdef project_image_to_velo(self, uv_depth):pts_3d_rect = self.project_image_to_rect(uv_depth)return self.project_rect_to_velo(pts_3d_rect)def rotx(t):''' 3D Rotation about the x-axis. '''c = np.cos(t)s = np.sin(t)return np.array([[1, 0, 0],[0, c, -s],[0, s, c]])def roty(t):''' Rotation about the y-axis. '''c = np.cos(t)s = np.sin(t)return np.array([[c, 0, s],[0, 1, 0],[-s, 0, c]])def rotz(t):''' Rotation about the z-axis. '''c = np.cos(t)s = np.sin(t)return np.array([[c, -s, 0],[s, c, 0],[0, 0, 1]])def transform_from_rot_trans(R, t):''' Transforation matrix from rotation matrix and translation vector. '''R = R.reshape(3, 3)t = t.reshape(3, 1)return np.vstack((np.hstack([R, t]), [0, 0, 0, 1]))def inverse_rigid_trans(Tr):''' Inverse a rigid body transform matrix (3x4 as [R|t])[R'|-R't; 0|1]'''inv_Tr = np.zeros_like(Tr) # 3x4inv_Tr[0:3,0:3] = np.transpose(Tr[0:3,0:3])inv_Tr[0:3,3] = np.dot(-np.transpose(Tr[0:3,0:3]), Tr[0:3,3])return inv_Trdef read_label(label_filename):lines = [line.rstrip() for line in open(label_filename)]objects = [Object3d(line) for line in lines]return objectsdef load_image(img_filename):return cv2.imread(img_filename)def load_velo_scan(velo_filename):scan = np.fromfile(velo_filename, dtype=np.float32)scan = scan.reshape((-1, 4))return scandef project_to_image(pts_3d, P):'''将3D坐标点投影到图像平面上,生成2D坐pts_3d是一个nx3的矩阵,包含了待投影的3D坐标点(每行一个点),P是相机的投影矩阵,通常是一个3x4的矩阵。函数返回一个nx2的矩阵,包含了投影到图像平面上的2D坐标点。'''''' Project 3d points to image plane.Usage: pts_2d = projectToImage(pts_3d, P)input: pts_3d: nx3 matrixP: 3x4 projection matrixoutput: pts_2d: nx2 matrixP(3x4) dot pts_3d_extended(4xn) = projected_pts_2d(3xn)=> normalize projected_pts_2d(2xn)<=> pts_3d_extended(nx4) dot P'(4x3) = projected_pts_2d(nx3)=> normalize projected_pts_2d(nx2)'''n = pts_3d.shape[0] # 获取3D点的数量pts_3d_extend = np.hstack((pts_3d, np.ones((n,1)))) # 将每个3D点的坐标扩展为齐次坐标形式(4D),通过在每个点的末尾添加1,创建了一个nx4的矩阵。# print(('pts_3d_extend shape: ', pts_3d_extend.shape))pts_2d = np.dot(pts_3d_extend, np.transpose(P)) # 将扩展的3D坐标点矩阵与投影矩阵P相乘,得到一个nx3的矩阵,其中每一行包含了3D点在图像平面上的投影坐标。每个点的坐标表示为[x, y, z]。pts_2d[:,0] /= pts_2d[:,2] # 将投影坐标中的x坐标除以z坐标,从而获得2D图像上的x坐标。pts_2d[:,1] /= pts_2d[:,2] # 将投影坐标中的y坐标除以z坐标,从而获得2D图像上的y坐标。return pts_2d[:,0:2] # 返回一个nx2的矩阵,其中包含了每个3D点在2D图像上的坐标。def compute_box_3d(obj, P):'''计算对象的3D边界框在图像平面上的投影输入: obj代表一个物体标签信息, P代表相机的投影矩阵-内参。输出: 返回两个值, corners_3d表示3D边界框在 相机坐标系 的8个角点的坐标-3D坐标。corners_2d表示3D边界框在 图像上 的8个角点的坐标-2D坐标。'''# compute rotational matrix around yaw axis# 计算一个绕Y轴旋转的旋转矩阵R,用于将3D坐标从世界坐标系转换到相机坐标系。obj.ry是对象的偏航角R = roty(obj.ry) # 3d bounding box dimensions# 物体实际的长、宽、高l = obj.l;w = obj.w;h = obj.h;# 3d bounding box corners# 存储了3D边界框的8个角点相对于对象中心的坐标。这些坐标定义了3D边界框的形状。x_corners = [l/2,l/2,-l/2,-l/2,l/2,l/2,-l/2,-l/2];y_corners = [0,0,0,0,-h,-h,-h,-h];z_corners = [w/2,-w/2,-w/2,w/2,w/2,-w/2,-w/2,w/2];# rotate and translate 3d bounding box# 1、将3D边界框的角点坐标从对象坐标系转换到相机坐标系。它使用了旋转矩阵Rcorners_3d = np.dot(R, np.vstack([x_corners,y_corners,z_corners]))# 3D边界框的坐标进行平移corners_3d[0,:] = corners_3d[0,:] + obj.t[0];corners_3d[1,:] = corners_3d[1,:] + obj.t[1];corners_3d[2,:] = corners_3d[2,:] + obj.t[2];# 2、检查对象是否在相机前方,因为只有在相机前方的对象才会被绘制。# 如果对象的Z坐标(深度)小于0.1,就意味着对象在相机后方,那么corners_2d将被设置为None,函数将返回None。if np.any(corners_3d[2,:]<0.1):corners_2d = Nonereturn corners_2d, np.transpose(corners_3d)# project the 3d bounding box into the image plane# 3、将相机坐标系下的3D边界框的角点,投影到图像平面上,得到它们在图像上的2D坐标。corners_2d = project_to_image(np.transpose(corners_3d), P);return corners_2d, np.transpose(corners_3d)def compute_orientation_3d(obj, P):''' Takes an object and a projection matrix (P) and projects the 3dobject orientation vector into the image plane.Returns:orientation_2d: (2,2) array in left image coord.orientation_3d: (2,3) array in in rect camera coord.'''# compute rotational matrix around yaw axisR = roty(obj.ry)# orientation in object coordinate systemorientation_3d = np.array([[0.0, obj.l],[0,0],[0,0]])# rotate and translate in camera coordinate system, project in imageorientation_3d = np.dot(R, orientation_3d)orientation_3d[0,:] = orientation_3d[0,:] + obj.t[0]orientation_3d[1,:] = orientation_3d[1,:] + obj.t[1]orientation_3d[2,:] = orientation_3d[2,:] + obj.t[2]# vector behind image plane?if np.any(orientation_3d[2,:]<0.1):orientation_2d = Nonereturn orientation_2d, np.transpose(orientation_3d)# project orientation into the image planeorientation_2d = project_to_image(np.transpose(orientation_3d), P);return orientation_2d, np.transpose(orientation_3d)def draw_projected_box3d(image, qs, color=(0,60,255), thickness=2):'''qs: 包含8个3D边界框角点坐标的数组, 形状为(8, 2)。图像坐标下的3D框, 8个顶点坐标。'''''' Draw 3d bounding box in imageqs: (8,2) array of vertices for the 3d box in following order:1 -------- 0/| /|2 -------- 3 .| | | |. 5 -------- 4|/ |/6 -------- 7'''qs = qs.astype(np.int32) # 将输入的顶点坐标转换为整数类型,以便在图像上绘制。# 这个循环迭代4次,每次处理一个边界框的一条边。for k in range(0,4):# Ref: http://docs.enthought.com/mayavi/mayavi/auto/mlab_helper_functions.html# 定义了要绘制的边的起始点和结束点的索引。在这个循环中,它用于绘制边界框的前四条边。i,j=k,(k+1)%4cv2.line(image, (qs[i,0],qs[i,1]), (qs[j,0],qs[j,1]), color, thickness)# 定义了要绘制的边的起始点和结束点的索引。在这个循环中,它用于绘制边界框的后四条边,与前四条边平行i,j=k+4,(k+1)%4 + 4cv2.line(image, (qs[i,0],qs[i,1]), (qs[j,0],qs[j,1]), color, thickness)# 定义了要绘制的边的起始点和结束点的索引。在这个循环中,它用于绘制连接前四条边和后四条边的边界框的边。i,j=k,k+4cv2.line(image, (qs[i,0],qs[i,1]), (qs[j,0],qs[j,1]), color, thickness)return image运行后会在save_3d_output中保存可视化的图像。
模型推理结果可视化效果:
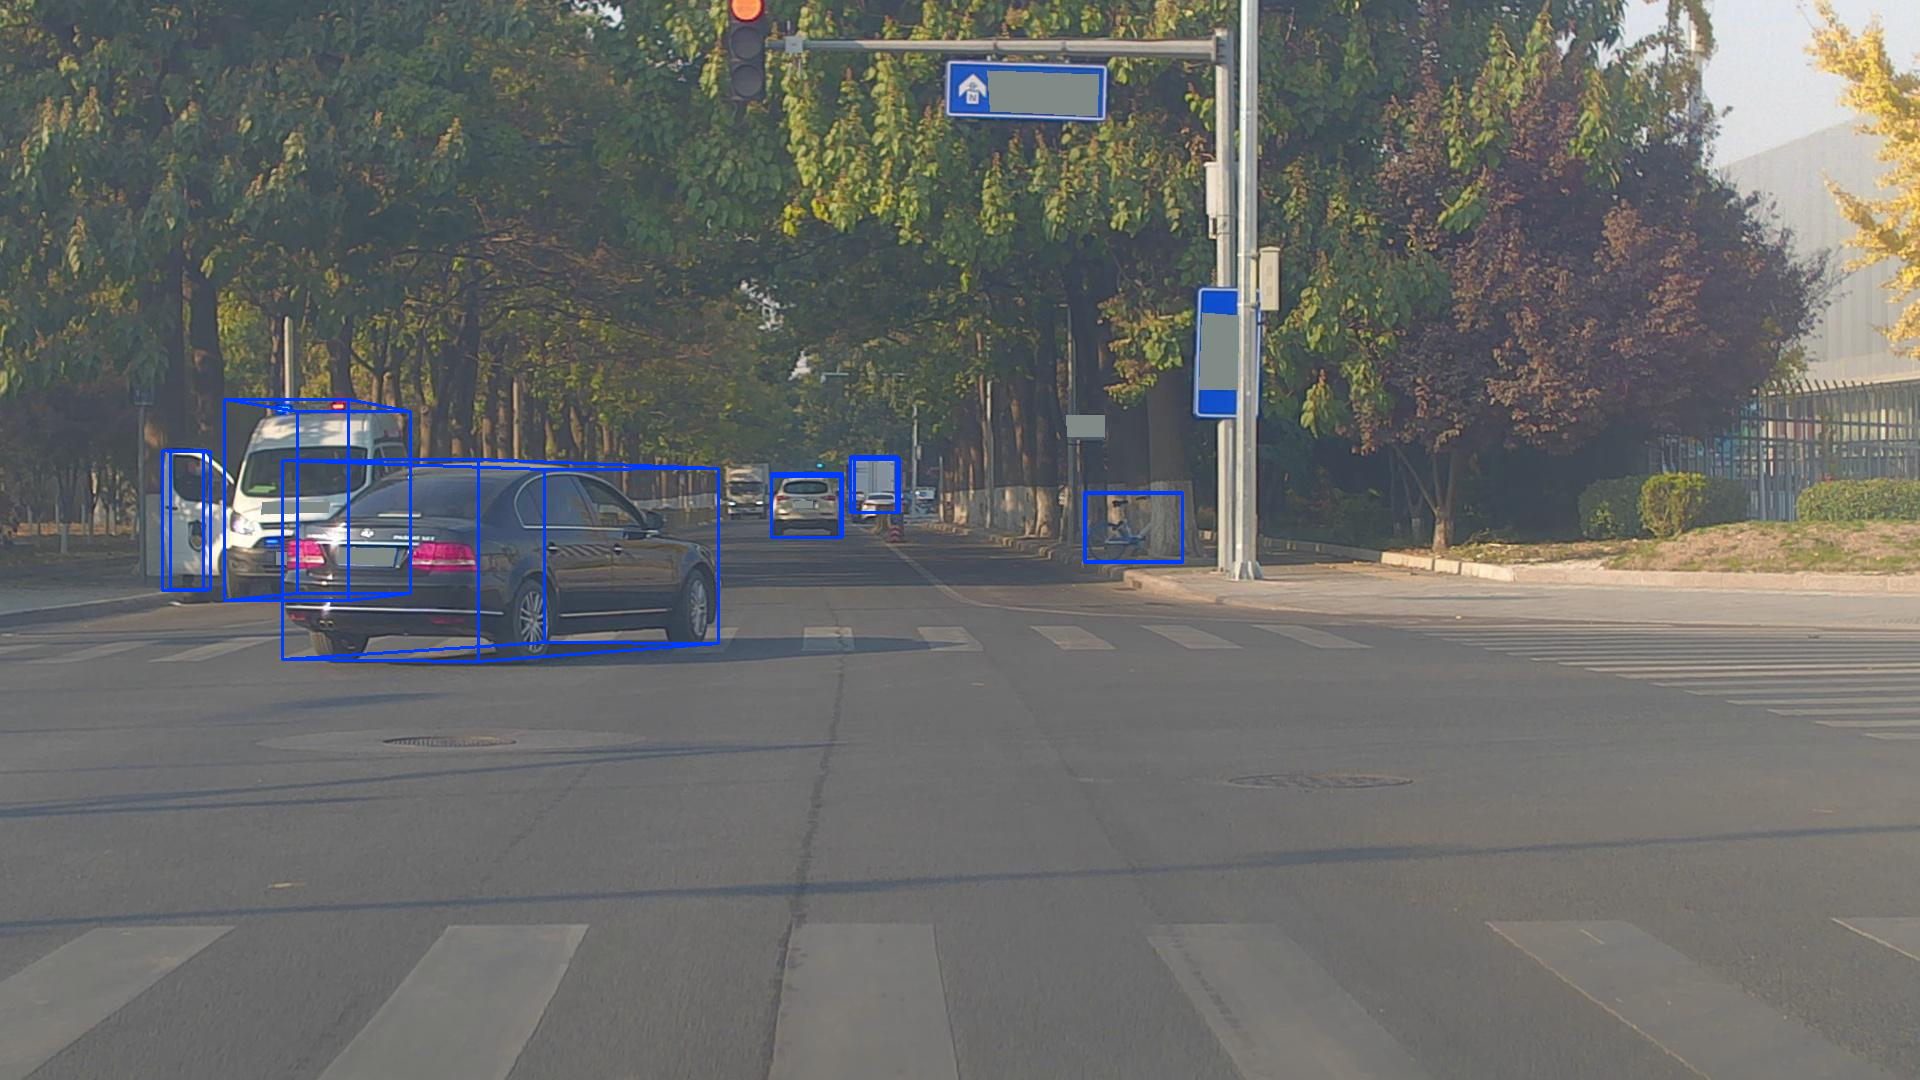


这个数据集的部分标签不准确!!!

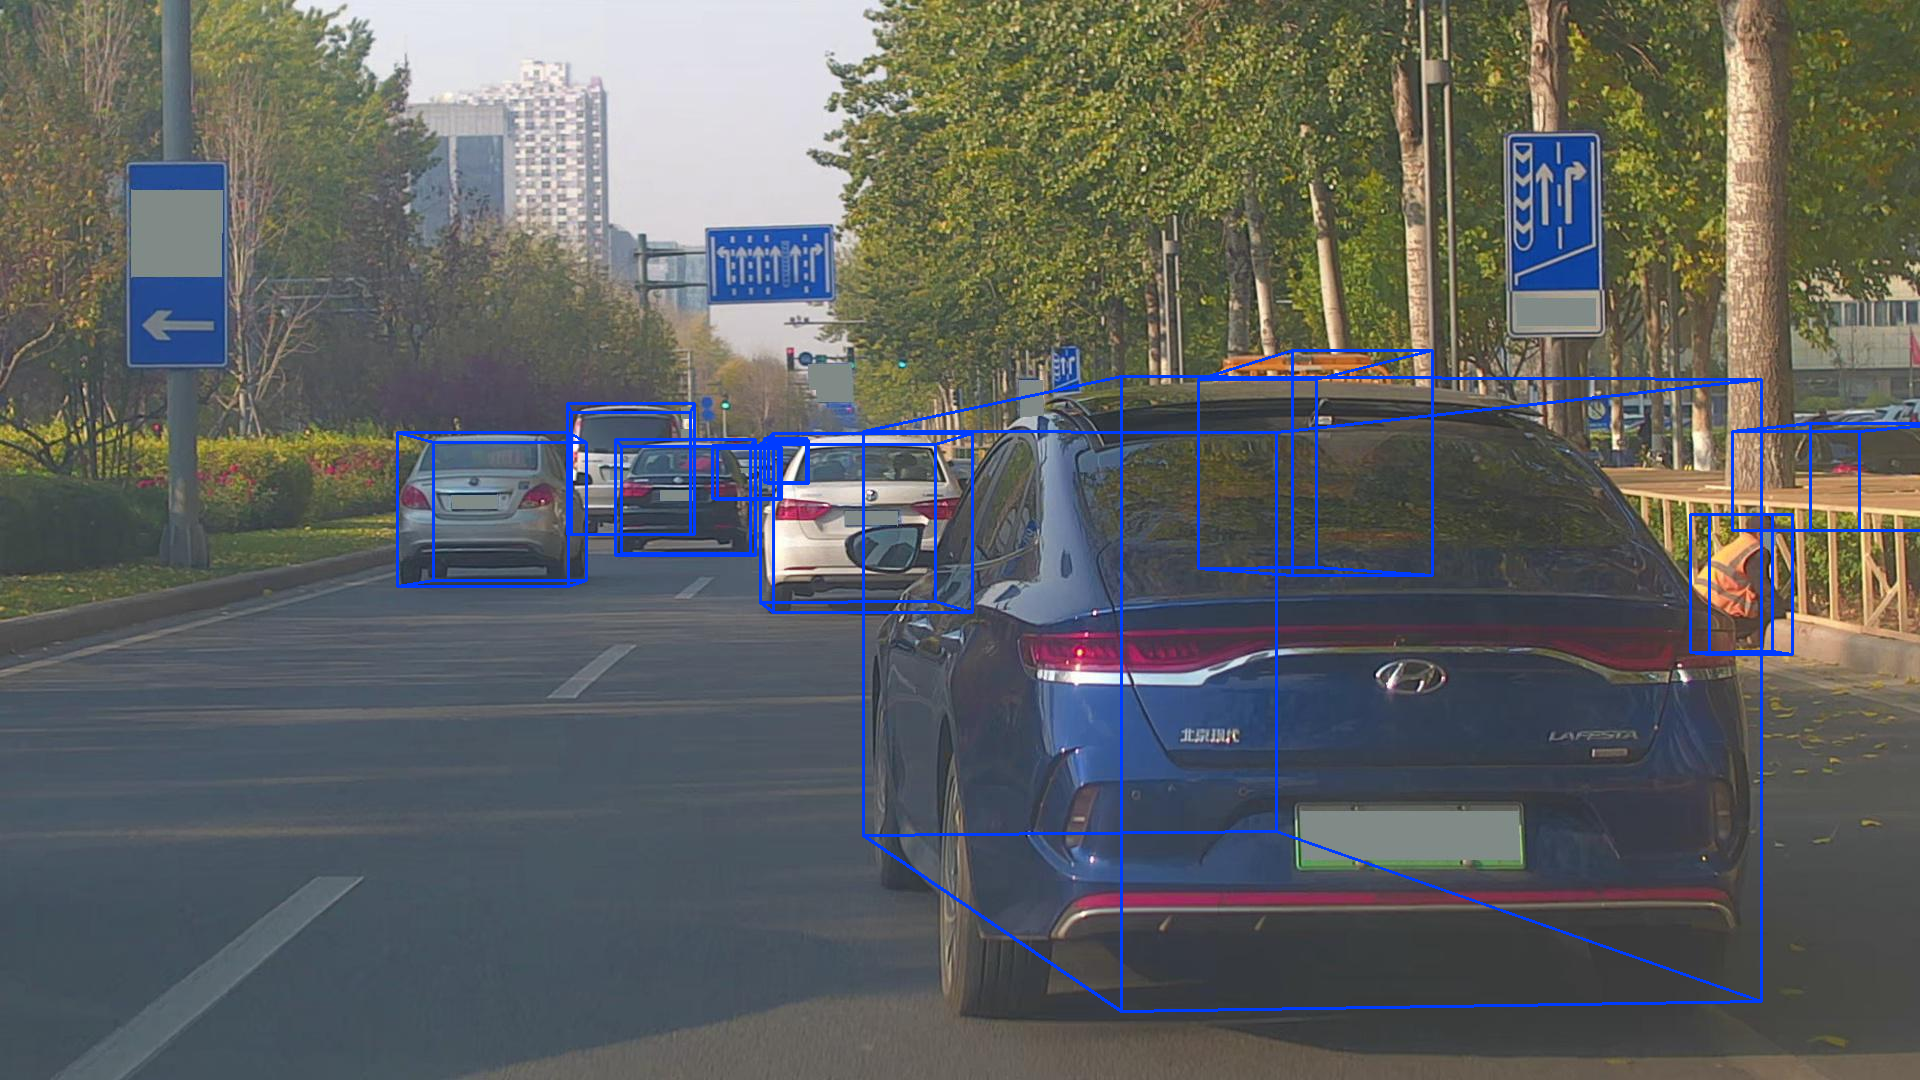
总结:有些失望,不准确的标签占比较大;本来还想着用它替换Kitti的数据集。
只能用来做预训练,或者人工挑选标签做数据清洗。
相关文章:
DAIR-V2X-V 3D检测数据集 转为Kitti格式 | 可视化
本文分享在DAIR-V2X-V数据集中,将标签转为Kitti格式,并可视化3D检测效果。 一、将标签转为Kitti格式 DAIR-V2X包括不同类型的数据集: DAIR-V2X-IDAIR-V2X-VDAIR-V2X-CV2X-Seq-SPDV2X-Seq-TFDDAIR-V2X-C-Example: google_drive_linkV2X-Seq-…...
深入理解指针:【探索指针的高级概念和应用二】
目录 一,数组参数、指针参数 1.一维数组传参 2.二维数组传参 3.一级指针传参 4.二级指针传参 二,函数指针 三,函数指针数组 🍂函数指针数组的用途(转移表): 四,指向函数指针…...
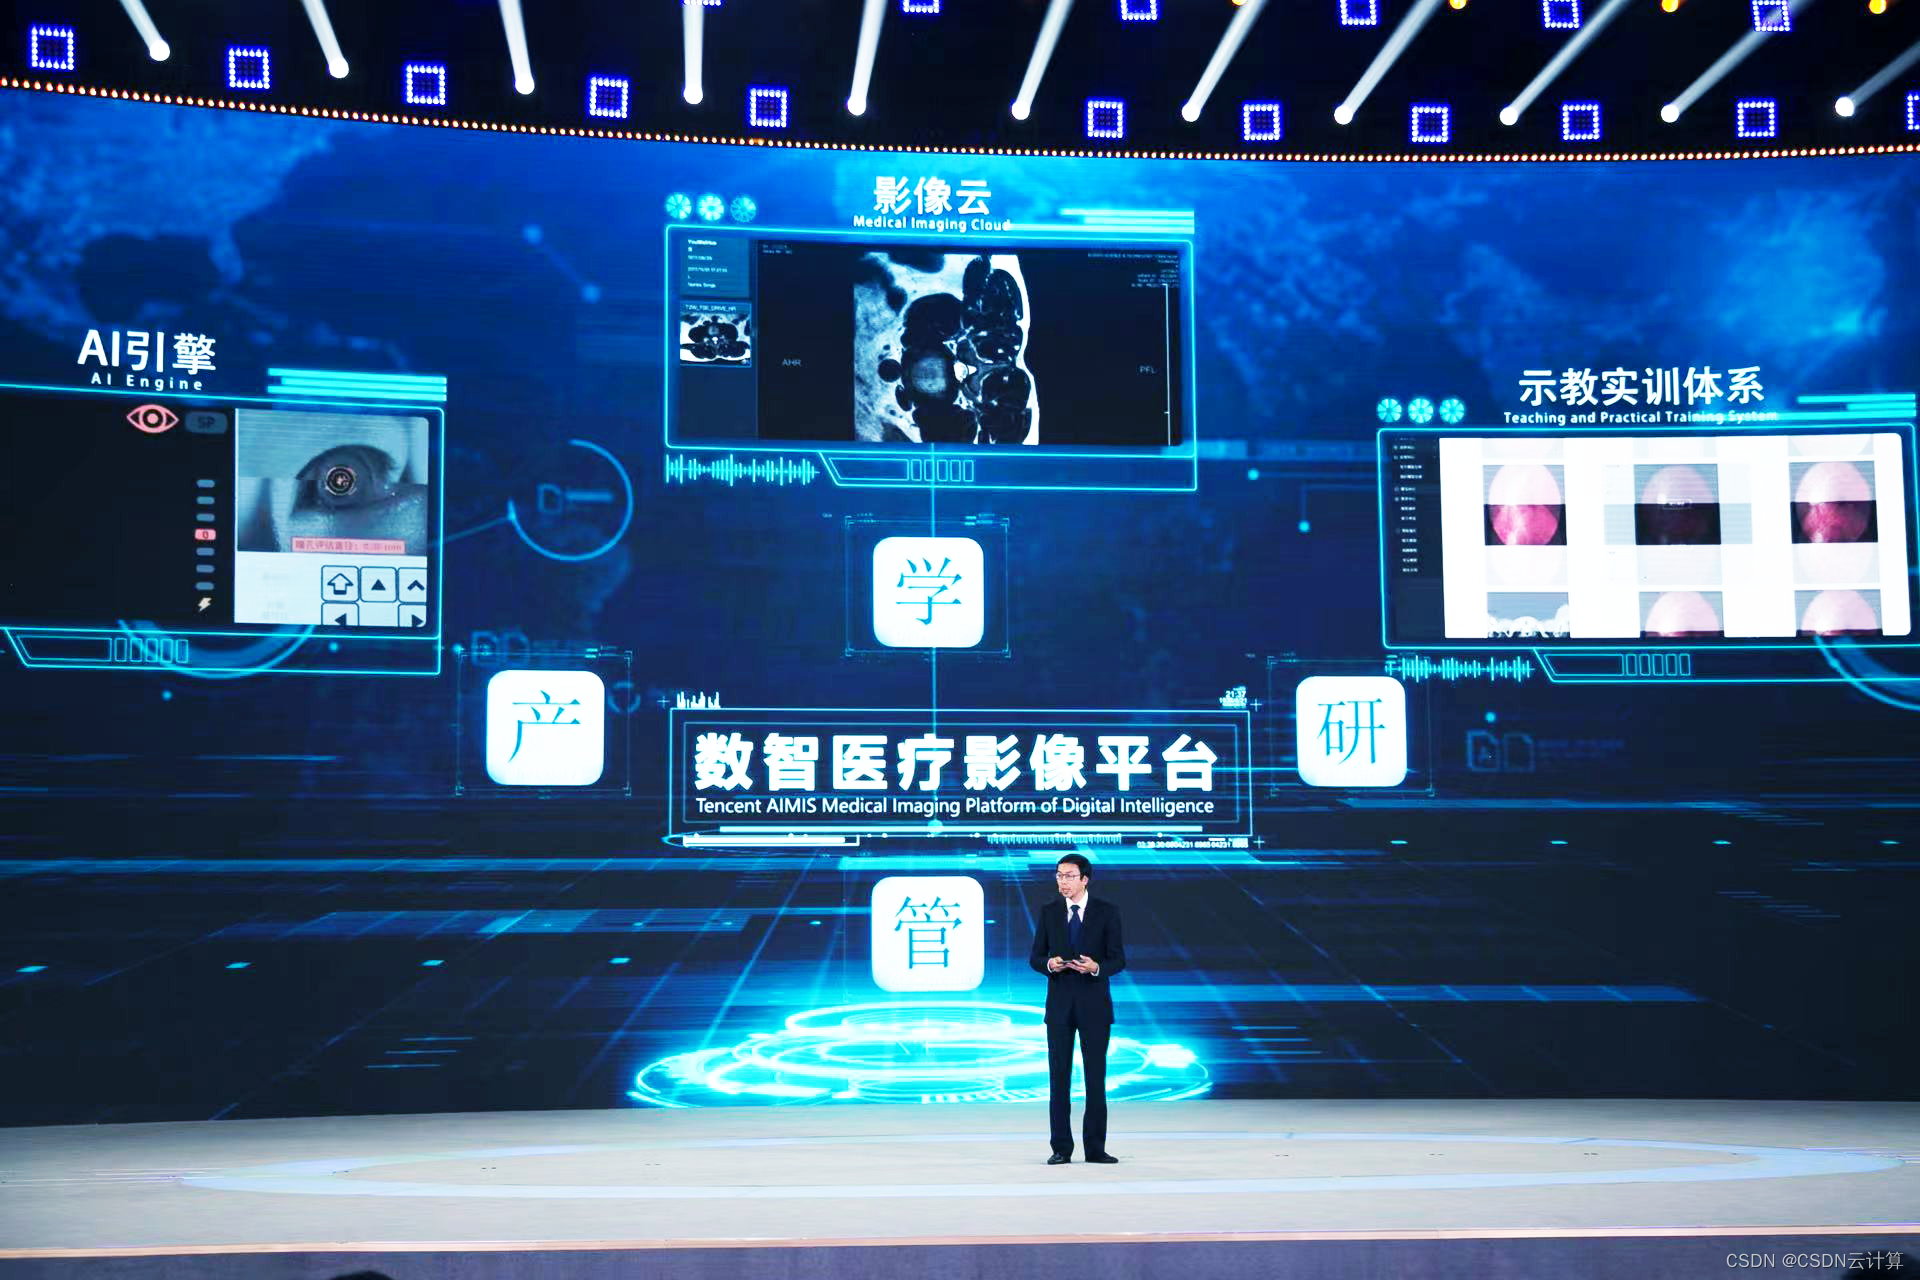
腾讯觅影数智医疗影像平台获颁世界互联网领先科技成果大奖
11月8日,2023年世界互联网大会乌镇峰会在乌镇举行,腾讯再度获颁“世界互联网领先科技成果”大奖。腾讯健康总裁吴文达在世界互联网领先科技成果发布活动中介绍,“腾讯觅影数智医疗影像平台”已全面开放20多个医疗AI引擎助力科研创新ÿ…...
鸿蒙开发工具DevEco Studio的下载和安装
一、DevEco Studio概述 1、简介 HUAWEI DevEco Studio(获取工具请单击链接下载,以下简称DevEco Studio)是基于IntelliJ IDEA Community开源版本打造,为运行在HarmonyOS和OpenHarmony系统上的应用和服务(以下简称应用…...
【原理篇】四、自定义starter
文章目录 1、案例分析2、业务功能的实现3、中途调试4、开启定时任务打印报表5、引入属性配置类,写活业务参数配置6、拦截器7、开启yml提示功能 做一个记录系统访客独立IP访问次数的功能,并把它自定义成一个starter,实现:在现有项目…...
redisTemplate不支持zpopmax,解决方案使用reverseRangeWithScore
在redis客户端可以使用zpopmax redisTemplate不支持zpopmax 解决方案 使用reverseRangeWithScore 接下来我们进行测试 我们要返回最大的value,应该是c import org.junit.Test; import org.junit.runner.RunWith; import org.springframework.beans.factory.a…...
基于深度模型的日志异常检测
本文转载自:深度模型的日志异常检测,还有谁不会?PPT下载地址:https://bbs.huaweicloud.com/forum/thread-100052-1-1.html视频讲解地址:https://bbs.huaweicloud.com/live/DevRun_live/202101222000.html 文章目录 1. …...

最大连续子数组
最大连续子数组(Maximum Subarray)问题是一个经典的算法问题,其目标是在给定的整数数组中找到一个连续的子数组,使得该子数组的元素之和最大。这个问题有多种解决方法,其中包括暴力解法、分治法和动态规划等。 下面是…...
【FastCAE源码阅读5】使用VTK实现鼠标拾取对象并高亮
鼠标拾取对象是很多软件的基本功能。FastCAE的拾取比较简单,是通过VTK实现的。 对几何而言,拾取类型切换在工具栏上,单击后再来单击视图区对象进行拾取,拾取后的对象会高亮显示。效果如下图: 一、拾取对象 拾取对象…...
【全志H616 使用标准库 完成自制串口库(分文件实现) orangepi zero2(开源)】.md updata: 23/11/07
文章目录 H616 把玩注意:Linux内核版本5.16 及以上,需手动配置i2c-3 uart5驱动配置示例 分文件编译时需将每个文件一同编译 (空格隔开)例: ggc a.c b.c b.h -lpthread -lxxx..; 常用命令查看驱动文件查看内核检测信息/…...
小白学爬虫:手机app分享商品短连接获取淘宝商品链接接口|淘宝淘口令接口|淘宝真实商品链接接口|淘宝商品详情接口
通过手机APP分享的商品短链接,我们可以调用相应的接口来获取淘口令真实URL,进而获取到PC端的商品链接及商品ID。具体步骤如下: 1、通过手机APP分享至PC端的短链接,调用“item_password”接口。 2、该接口将返回淘口令真实URL。 3…...

python 应用之 request 请求调用
场景: 验证一个第三方接口 目录 一、应用实例 1、预准备工作 1)、引用包 2)、生成随机串 3)、获得当前时间戳 4)、HASH 5)、header处理 6)、请求处理 2、requests请求 1)…...

BeanUtils.copyProperties浅拷贝的坑你得知道?
今天想写一篇文章,主要关于深拷贝和浅拷贝相关的,主要是最近写代码的时候遇到一个BUG,刚好涉及到浅拷贝导致的问题。 问题背景 现在有一个需要是需要修改门店信息,门店也区分父门店和子门店,父门店被编辑更新是需要通过…...

ubuntu安装rabbitMQ 并 开启记录消息的日志
apt-get update apt-get install rabbitmq-server rabbitmqctl add_user root password // 设置用户名密码 rabbitmqctl set_user_tags root administrator // 设置为管理员身份 rabbitmqctl set_permissions -p / root ".*" ".*" ".*" //为…...
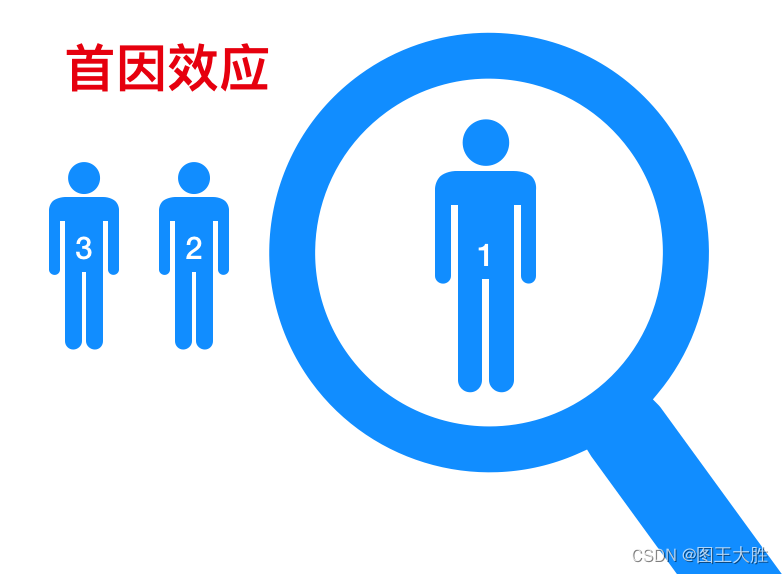
思维模型 首因效应
本系列文章 主要是 分享 思维模型,涉及各个领域,重在提升认知。先入为主,一见钟情。 1 首因效应的应用 1.1 面试中的首因效应 小李是一名应届毕业生,他准备参加一家知名互联网公司的面试。在面试前,他做了充分的准备…...
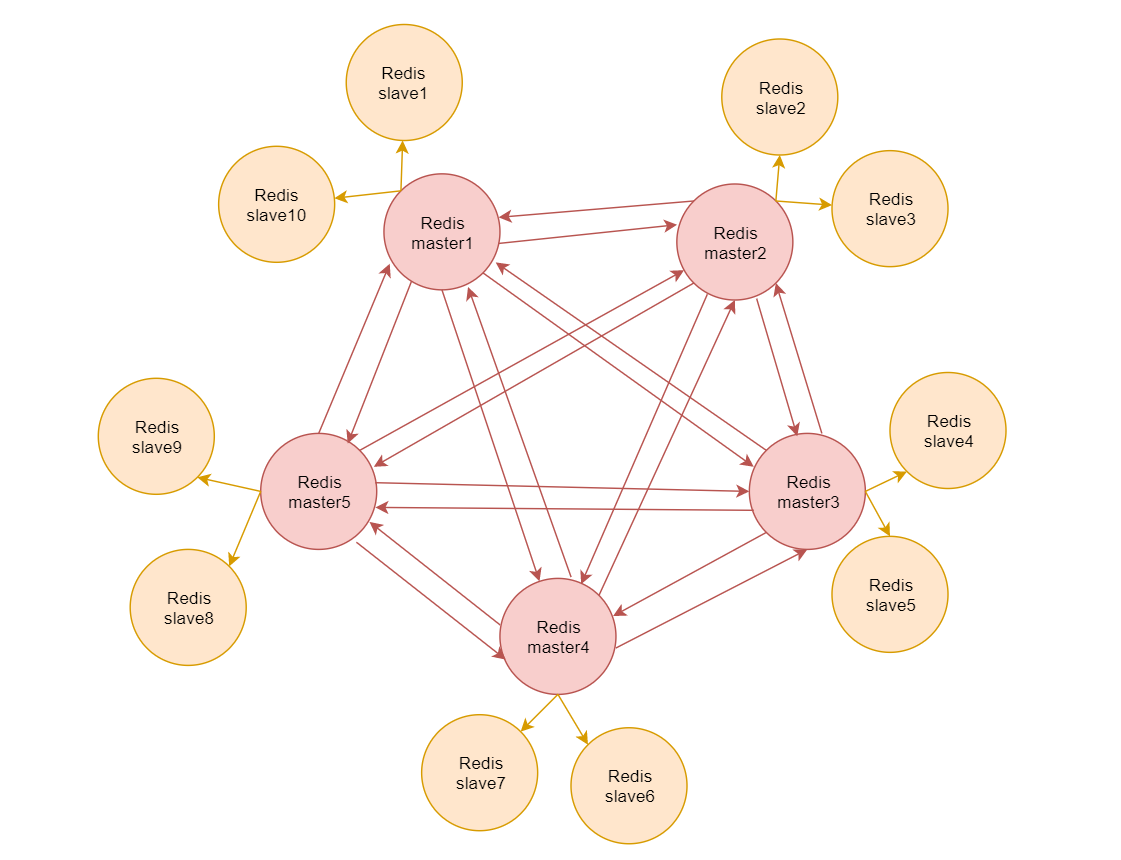
Redis极速上手开发手册【Redis全面复习】
文章目录 什么是RedisRedis的特点Redis的应用场景Redis安装部署Redis基础命令Redis多数据库特性Redis数据类型Redis数据类型之stringRedis数据类型之hashRedis数据类型之listRedis数据类型之setRedis数据类型之sorted set案例:存储高一班的学员信息 Redis封装工具类…...
[动态规划] (十四) 简单多状态 LeetCode LCR 091.粉刷房子
[动态规划] (十四) 简单多状态 LeetCode LCR 091.粉刷房子 文章目录 [动态规划] (十四) 简单多状态 LeetCode LCR 091.粉刷房子题目解析解题思路状态表示状态转移方程初始化和填表顺序返回值 代码实现总结 LCR 091. 粉刷房子 题目解析 (1) 一排房子,共有n个 (2) 染…...
【VSS版本控制工具】
VSS版本控制工具 1 安装 VSS2 服务器端配置3 新建用户4 客户端配置Vss2005Vs20055 客户端详细操作 1 安装 VSS 第一步:将VisualSourceSafe2005安装包解压。 第二步:找到setup.exe双击运行。 第三步:在弹出的界面复选框中选中Iaccepttheterms…...

数据持久化技术(Python)的使用
传统数据库连接方式:mysql(PyMySQL)ORM 模型:SQLAlchemy MyBatis、 Hibernate PyMySQL 安装: pip install pymysql简单使用 利用 pymysql.connect 建立数据库连接并执行 SQL 命令(需要提前搭建好数据库…...
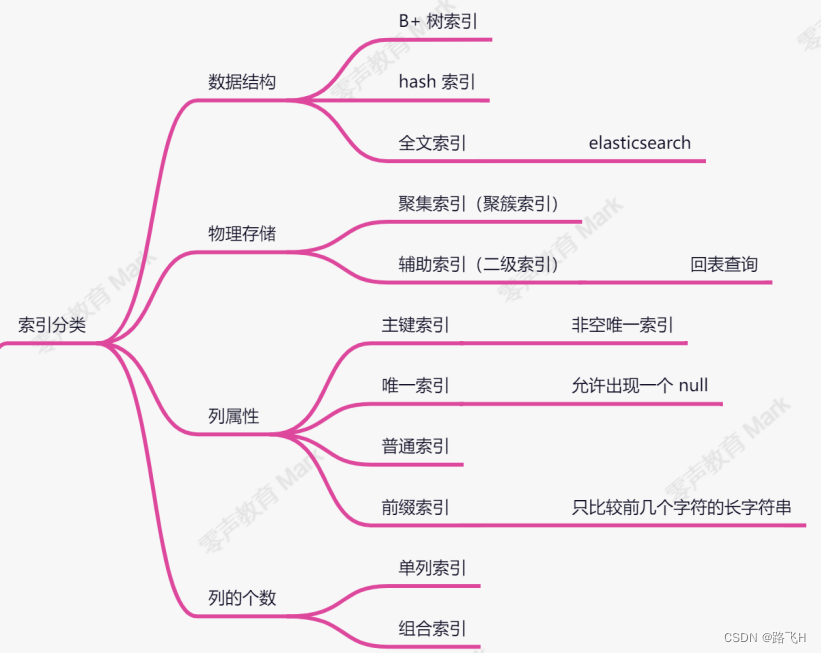
第23章(上)_索引原理之索引与约束
文章目录 索引索引分类主键选择索引的代价 约束外键约束约束与索引的区别 索引使用场景不要使用索引的场景总结 索引 索引的概念:索引是一种有序的存储结构。索引按照单个或多个列的值进行排序。 索引的目的:提升搜索效率。 索引分类 按照数据结构分为…...

嵌入式系统栈溢出问题分析与防护实践
1. 栈溢出问题现象与初步分析最近在调试一个嵌入式系统时,遇到了一个非常典型的栈溢出问题。现象很简单:一个局部变量status的值莫名其妙地从0x01变成了其他值。最诡异的是,在两次打印status之间,代码并没有直接修改这个变量。简化…...

成为数据科学家之路,第一部分:数学
原文:towardsdatascience.com/roadmap-to-becoming-a-data-scientist-part-1-maths-2dc9beb69b27 https://github.com/OpenDocCN/towardsdatascience-blog-zh-2024/raw/master/docs/img/492ae0fb35397ff6690bc9518f937530.png 简介 数据科学无疑是当今最迷人的领域…...
)
C++27执行策略演进全图谱(从C++17到C++27 TS23742的5次关键修订与ABI兼容性断崖预警)
第一章:C27执行策略的范式跃迁与标准定位C27正将执行策略(Execution Policies)从“并行化提示”升格为“可验证执行契约”,标志着标准库算法语义模型的根本性重构。这一转变不再仅依赖实现对std::execution::par_unseq等策略的启发…...

雷军5小时拆车直播爆火!硬核技术成新风口,自媒体可直接做
4月2日晚,雷军5小时直播拆解新一代SU7引发全网热议,单场观看量突破1亿,弹幕满是“硬核”“专业”的好评。这场直播颠覆了技术内容的传播模式,从“参数堆砌”转向“实证拆解”,从“单向宣讲”升级为“双向互动”&#x…...

Python AOT编译成本如何从$280K/年压至$49K/年?2026前最后窗口期的6个不可逆决策点
第一章:Python AOT编译成本断崖式下降的战略本质Python 长期以来被诟病于运行时开销高、启动慢、内存占用大,其核心瓶颈在于 CPython 解释器的字节码解释执行机制。而近年来,以 Nuitka、Cython(搭配 --aot 模式)、以及…...
)
阿里通义实验室FunAudioLLM实战:如何用SenseVoice快速搭建多语言语音识别系统(附代码)
基于SenseVoice构建多语言语音识别系统的工程实践指南 语音识别技术正在重塑人机交互的边界,而阿里通义实验室开源的FunAudioLLM项目中的SenseVoice模型,为开发者提供了一把打开多语言语音世界的钥匙。不同于传统ASR系统需要针对不同语言单独训练模型的繁…...

SecGPT-14B模型量化:降低OpenClaw长期运行的Token消耗
SecGPT-14B模型量化:降低OpenClaw长期运行的Token消耗 1. 为什么需要量化SecGPT-14B模型 当我第一次在OpenClaw项目中接入SecGPT-14B模型时,就被它的安全分析能力惊艳到了。这个模型能精准识别代码漏洞、异常网络请求和各种安全威胁,让我的…...

Naive UI 主题色定制实战:从组件覆盖到全局配置
1. 为什么需要定制Naive UI主题色? 当你使用Naive UI开发项目时,默认的绿色主题可能并不符合你的品牌风格。比如我们团队最近接手的一个金融类项目,客户要求整体UI采用深蓝色调,这时候就需要对Naive UI的主题色进行深度定制。主题…...

GKD规则冲突检测:自动化识别并提示重叠规则问题
GKD规则冲突检测:自动化识别并提示重叠规则问题 在GKD自动化工具的使用过程中,规则冲突检测是一个至关重要的功能。当多个订阅规则同时作用于同一个应用时,可能会出现规则重叠或相互干扰的情况。GKD的智能冲突检测机制能够自动识别这些问题&…...

TypeScript组件库终极指南:Arco Design类型定义与接口设计最佳实践
TypeScript组件库终极指南:Arco Design类型定义与接口设计最佳实践 【免费下载链接】arco-design A comprehensive React UI components library based on Arco Design 项目地址: https://gitcode.com/gh_mirrors/ar/arco-design Arco Design是一个基于TypeS…...