Spring Boot中配置多个数据源
配置数据源实际上就是配置多个数据库,在一个配置文件中配置多个数据库,这样做主要的好处有以下几点:
- 数据库隔离:通过配置多个数据源,可以将不同的业务数据存储在不同的数据库中,实现数据的隔离。这样可以提高系统的安全性和稳定性,避免不同业务之间的数据相互干扰。
- 性能优化:通过配置多个数据源,可以将读写操作分离到不同的数据库中,从而提高系统的并发性能。例如,将读操作集中在一个主数据库中,将写操作分散到多个从数据库中,可以有效地减轻数据库的读写压力,提高系统的响应速度。
- 扩展性:当系统需要扩展到多个地理位置或多个数据中心时,配置多个数据源可以更好地支持分布式部署。每个地理位置或数据中心可以配置一个独立的数据源,使得数据访问更加高效和可靠。
- 多租户支持:对于多租户的系统,配置多个数据源可以实现不同租户的数据隔离。每个租户可以拥有自己独立的数据库,从而保证数据的安全性和隐私性。
- 数据库版本升级:在进行数据库版本升级时,可以通过配置多个数据源,将新版本的数据库与旧版本的数据库并行使用。这样可以在升级过程中保证系统的正常运行,减少升级带来的风险。
我们目前常用的三种数据访问方法方式:
- JDBCTemplate
- Spring Data JPA
- MyBatis
接下来我们将围绕这种数据访问方法进行配置:
JDBCTemplate
实际上这种方式,主要还是在application.properties中设置我们需要链接的数据库配置,比如我A数据库用来存储用户信息,B数据库用来存储业务数据。
spring.datasource.primary.jdbc-url=jdbc:mysql://localhost:3306/test?useUnicode=true&characterEncoding=utf-8&useSSL=true&serverTimezone=UTC
spring.datasource.primary.username=root
spring.datasource.primary.password=123456
spring.datasource.primary.driver-class-name=com.mysql.cj.jdbc.Driverspring.datasource.secondary.jdbc-url=jdbc:mysql://localhost:3306/test2?useUnicode=true&characterEncoding=utf-8&useSSL=true&serverTimezone=UTC
spring.datasource.secondary.username=root
spring.datasource.secondary.password=123456
spring.datasource.secondary.driver-class-name=com.mysql.cj.jdbc.Driver
ok,我们继续配置完毕后数据源后,我们就通过配置类来完成加载这些配置信息,初始话数据源,以及初始化每个数据源的时候要用的JDBCTemplate。你只需要在你的Spring Boot中应用下面的配置类就可以完成。
@Configuration
public class DataSourceConfiguration {@Primary@Bean@ConfigurationProperties(prefix = "spring.datasource.primary")public DataSource primaryDataSource() {return DataSourceBuilder.create().build();}@Bean@ConfigurationProperties(prefix = "spring.datasource.secondary")public DataSource secondaryDataSource() {return DataSourceBuilder.create().build();}@Beanpublic JdbcTemplate primaryJdbcTemplate(@Qualifier("primaryDataSource") DataSource primaryDataSource) {return new JdbcTemplate(primaryDataSource);}@Beanpublic JdbcTemplate secondaryJdbcTemplate(@Qualifier("secondaryDataSource") DataSource secondaryDataSource) {return new JdbcTemplate(secondaryDataSource);}}
<dependencies><dependency><groupId>org.springframework.boot</groupId><artifactId>spring-boot-starter-web</artifactId></dependency><dependency><groupId>org.springframework.boot</groupId><artifactId>spring-boot-starter-jdbc</artifactId></dependency><dependency><groupId>mysql</groupId><artifactId>mysql-connector-java</artifactId></dependency><dependency><groupId>org.projectlombok</groupId><artifactId>lombok</artifactId></dependency><dependency><groupId>org.springframework.boot</groupId><artifactId>spring-boot-starter-test</artifactId><scope>test</scope></dependency></dependencies>
单元测试类:
@RunWith(SpringRunner.class)
@SpringBootTest
public class ApplicationTests {@Autowiredprotected JdbcTemplate primaryJdbcTemplate;@Autowiredprotected JdbcTemplate secondaryJdbcTemplate;@Beforepublic void setUp() {primaryJdbcTemplate.update("DELETE  FROM  USER ");secondaryJdbcTemplate.update("DELETE  FROM  USER ");}@Testpublic void test() throws Exception {// 往第一个数据源中插入 2 条数据primaryJdbcTemplate.update("insert into user(name,age) values(?, ?)", "aaa", 20);primaryJdbcTemplate.update("insert into user(name,age) values(?, ?)", "bbb", 30);// 往第二个数据源中插入 1 条数据,若插入的是第一个数据源,则会主键冲突报错secondaryJdbcTemplate.update("insert into user(name,age) values(?, ?)", "ccc", 20);// 查一下第一个数据源中是否有 2 条数据,验证插入是否成功Assert.assertEquals("2", primaryJdbcTemplate.queryForObject("select count(1) from user", String.class));// 查一下第一个数据源中是否有 1 条数据,验证插入是否成功Assert.assertEquals("1", secondaryJdbcTemplate.queryForObject("select count(1) from user", String.class));}
}
有两个JdbcTemplate,为什么不用@Qualifier指定?这里顺带说个小知识点,当我们不指定的时候,会采用参数的名字来查找Bean,存在的话就注入。
这两个JdbcTemplate创建的时候,我们也没指定名字,它们是如何匹配上的?这里也是一个小知识点,当我们创建Bean的时候,默认会使用方法名称来作为Bean的名称,所以这里就对应上了。读者不妨回头看看两个名称是不是一致的。
Spring Data JPA
和上边那种方式基本上类似,所做的操作会有细微的区别。
<dependency><groupId>org.springframework.boot</groupId><artifactId>spring-boot-starter-web</artifactId></dependency><dependency><groupId>org.springframework.boot</groupId><artifactId>spring-boot-starter-data-jpa</artifactId></dependency><dependency><groupId>org.springframework.boot</groupId><artifactId>spring-boot-starter-actuator</artifactId></dependency><dependency><groupId>mysql</groupId><artifactId>mysql-connector-java</artifactId></dependency><dependency><groupId>org.projectlombok</groupId><artifactId>lombok</artifactId><scope>provided</scope></dependency><dependency><groupId>org.springframework.boot</groupId><artifactId>spring-boot-starter-test</artifactId><scope>test</scope></dependency>
配置application.properties文件
# pring boot 1.x的配置:spring.datasource.primary.url=jdbc:mysql://localhost:3306/test1?useUnicode=true&characterEncoding=utf-8&useSSL=true&serverTimezone=UTC
spring.datasource.primary.jdbc-url=jdbc:mysql://localhost:3306/test1
spring.datasource.primary.username=root
spring.datasource.primary.password=123456
spring.datasource.primary.driver-class-name=com.mysql.cj.jdbc.Driver# spring boot 1.x的配置:spring.datasource.secondary.url=jdbc:mysql://localhost:3306/test2?useUnicode=true&characterEncoding=utf-8&useSSL=true&serverTimezone=UTC
spring.datasource.secondary.jdbc-url=jdbc:mysql://localhost:3306/test2
spring.datasource.secondary.username=root
spring.datasource.secondary.password=123456
spring.datasource.secondary.driver-class-name=com.mysql.cj.jdbc.Driver# 日志打印执行的SQL
spring.jpa.show-sql=true
# Hibernate的DDL策略
spring.jpa.hibernate.ddl-auto=create-drop
创建实体类:
@Entity
//@Data
//@NoArgsConstructor
public class User {@Id@GeneratedValueprivate Long id;private String name;private Integer age;public User(String name, Integer age) {this.name = name;this.age = age;}public Long getId() {return id;}public void setId(Long id) {this.id = id;}public String getName() {return name;}public void setName(String name) {this.name = name;}public Integer getAge() {return age;}public void setAge(Integer age) {this.age = age;}public User() {}
}
public interface UserRepository extends JpaRepository<User, Long> {}
@Entity
//@Data
//@NoArgsConstructor
public class Message {@Id@GeneratedValueprivate Long id;private String title;private String message;public Message(String title, String message) {this.title = title;this.message = message;}public Long getId() {return id;}public void setId(Long id) {this.id = id;}public String getTitle() {return title;}public void setTitle(String title) {this.title = title;}public String getMessage() {return message;}public void setMessage(String message) {this.message = message;}public Message() {}
}
public interface MessageRepository extends JpaRepository<Message, Long> {}
多数据源配置类:
@Configuration
public class DataSourceConfiguration {@Primary@Bean@ConfigurationProperties(prefix = "spring.datasource.primary")public DataSource primaryDataSource() {return DataSourceBuilder.create().build();}@Bean@ConfigurationProperties(prefix = "spring.datasource.secondary")public DataSource secondaryDataSource() {return DataSourceBuilder.create().build();}}
主数据源配置类:
@Configuration
@EnableTransactionManagement
@EnableJpaRepositories(entityManagerFactoryRef="entityManagerFactoryPrimary",transactionManagerRef="transactionManagerPrimary",basePackages= { "com.miaow.demo.p" }) //设置Repository所在位置
public class PrimaryConfig {@Autowired@Qualifier("primaryDataSource")private DataSource primaryDataSource;@Autowiredprivate JpaProperties jpaProperties;@Autowiredprivate HibernateProperties hibernateProperties;private Map<String, Object> getVendorProperties() {return hibernateProperties.determineHibernateProperties(jpaProperties.getProperties(), new HibernateSettings());}@Primary@Bean(name = "entityManagerPrimary")public EntityManager entityManager(EntityManagerFactoryBuilder builder) {return entityManagerFactoryPrimary(builder).getObject().createEntityManager();}@Primary@Bean(name = "entityManagerFactoryPrimary")public LocalContainerEntityManagerFactoryBean entityManagerFactoryPrimary (EntityManagerFactoryBuilder builder) {
//        HibernateJpaVendorAdapter jpaVendorAdapter = new HibernateJpaVendorAdapter();
//        jpaVendorAdapter.setGenerateDdl(true);return builder.dataSource(primaryDataSource).packages("com.miaow.demo.p") //设置实体类所在位置.persistenceUnit("primaryPersistenceUnit").properties(getVendorProperties()).build();}@Primary@Bean(name = "transactionManagerPrimary")public PlatformTransactionManager transactionManagerPrimary(EntityManagerFactoryBuilder builder) {return new JpaTransactionManager(entityManagerFactoryPrimary(builder).getObject());}
}
设置从数据库配置类:
@Configuration
@EnableTransactionManagement
@EnableJpaRepositories(entityManagerFactoryRef="entityManagerFactorySecondary",transactionManagerRef="transactionManagerSecondary",basePackages= { "com.miaow.demo.s" }) //设置Repository所在位置
public class SecondaryConfig {@Autowired@Qualifier("secondaryDataSource")private DataSource secondaryDataSource;@Autowiredprivate JpaProperties jpaProperties;@Autowiredprivate HibernateProperties hibernateProperties;private Map<String, Object> getVendorProperties() {return hibernateProperties.determineHibernateProperties(jpaProperties.getProperties(), new HibernateSettings());}@Bean(name = "entityManagerSecondary")public EntityManager entityManager(EntityManagerFactoryBuilder builder) {return entityManagerFactorySecondary(builder).getObject().createEntityManager();}@Bean(name = "entityManagerFactorySecondary")public LocalContainerEntityManagerFactoryBean entityManagerFactorySecondary (EntityManagerFactoryBuilder builder) {return builder.dataSource(secondaryDataSource).packages("com.miaow.demo.s") //设置实体类所在位置.persistenceUnit("secondaryPersistenceUnit").properties(getVendorProperties()).build();}@Bean(name = "transactionManagerSecondary")PlatformTransactionManager transactionManagerSecondary(EntityManagerFactoryBuilder builder) {return new JpaTransactionManager(entityManagerFactorySecondary(builder).getObject());}}
创建的单元测试:
@Slf4j
@RunWith(SpringRunner.class)
@SpringBootTest
public class ApplicationTests {@Autowiredprivate UserRepository userRepository;@Autowiredprivate MessageRepository messageRepository;@Testpublic void test() throws Exception {userRepository.save(new User("aaa", 10));userRepository.save(new User("bbb", 20));userRepository.save(new User("ccc", 30));userRepository.save(new User("ddd", 40));userRepository.save(new User("eee", 50));Assert.assertEquals(5, userRepository.findAll().size());messageRepository.save(new Message("o1", "aaaaaaaaaa"));messageRepository.save(new Message("o2", "bbbbbbbbbb"));messageRepository.save(new Message("o3", "cccccccccc"));Assert.assertEquals(3, messageRepository.findAll().size());}}
MyBatis
在Spring Boot的配置文件application.properties中设置我们需要的两个连接的数据库配置:
# pring boot 1.x的配置:spring.datasource.primary.url=jdbc:mysql://localhost:3306/test1?useUnicode=true&characterEncoding=utf-8&useSSL=true&serverTimezone=UTC
spring.datasource.primary.jdbc-url=jdbc:mysql://localhost:3306/test1
spring.datasource.primary.username=root
spring.datasource.primary.password=123456
spring.datasource.primary.driver-class-name=com.mysql.cj.jdbc.Driver# spring boot 1.x的配置:spring.datasource.secondary.url=jdbc:mysql://localhost:3306/test2?useUnicode=true&characterEncoding=utf-8&useSSL=true&serverTimezone=UTC
spring.datasource.secondary.jdbc-url=jdbc:mysql://localhost:3306/test2
spring.datasource.secondary.username=root
spring.datasource.secondary.password=123456
spring.datasource.secondary.driver-class-name=com.mysql.cj.jdbc.Driver#mybatis.mapper-locations=classpath:mapper/*.xml
创建一个初始化多数据源和MyBatis配置
@Configuration
public class DataSourceConfiguration {@Primary@Bean@ConfigurationProperties(prefix = "spring.datasource.primary")public DataSource primaryDataSource() {return DataSourceBuilder.create().build();}@Bean@ConfigurationProperties(prefix = "spring.datasource.secondary")public DataSource secondaryDataSource() {return DataSourceBuilder.create().build();}}可以看到内容跟JdbcTemplate、Spring Data JPA的时候是一模一样的。通过@ConfigurationProperties可以知道这两个数据源分别加载了spring.datasource.primary.*和spring.datasource.secondary.*的配置。@Primary注解指定了主数据源,就是当我们不特别指定哪个数据源的时候,就会使用这个Bean真正差异部分在下面的JPA配置上。
分别创建这两个数据源的MyBatis配置文件:
Private 数据源的JPA的配置文件:
@Configuration
@MapperScan(basePackages = "com.miaow.demo.p",sqlSessionFactoryRef = "sqlSessionFactoryPrimary",sqlSessionTemplateRef = "sqlSessionTemplatePrimary")
public class PrimaryConfig {private DataSource primaryDataSource;public PrimaryConfig(@Qualifier("primaryDataSource") DataSource primaryDataSource) {this.primaryDataSource = primaryDataSource;}@Beanpublic SqlSessionFactory sqlSessionFactoryPrimary() throws Exception {SqlSessionFactoryBean bean = new SqlSessionFactoryBean();bean.setDataSource(primaryDataSource);return bean.getObject();}@Beanpublic SqlSessionTemplate sqlSessionTemplatePrimary() throws Exception {return new SqlSessionTemplate(sqlSessionFactoryPrimary());}}
Secondary的数据源JPA配置:
@Configuration
@MapperScan(basePackages = "com.miaow.demo.s",sqlSessionFactoryRef = "sqlSessionFactorySecondary",sqlSessionTemplateRef = "sqlSessionTemplateSecondary")
public class SecondaryConfig {private DataSource secondaryDataSource;public SecondaryConfig(@Qualifier("secondaryDataSource") DataSource secondaryDataSource) {this.secondaryDataSource = secondaryDataSource;}@Beanpublic SqlSessionFactory sqlSessionFactorySecondary() throws Exception {SqlSessionFactoryBean bean = new SqlSessionFactoryBean();bean.setDataSource(secondaryDataSource);return bean.getObject();}@Beanpublic SqlSessionTemplate sqlSessionTemplateSecondary() throws Exception {return new SqlSessionTemplate(sqlSessionFactorySecondary());}}注意在此说明一下,配置类上使用@MapperScan注解来指定当前数据源下定义的Entity和Mapper的包路径;
另外需要指定sqlSessionFactory和sqlSessionTemplate,这两个具体实现在该配置类中类中初始化。
配置类的构造函数中,通过@Qualifier注解来指定具体要用哪个数据源,其名字对应在DataSourceConfiguration配置类中的数据源定义的函数名。
配置类中定义SqlSessionFactory和SqlSessionTemplate的实现,注意具体使用的数据源正确。
创建一个UserPrimary实体类:
public class UserPrimary {private Long id;private String name;private Integer age;public UserPrimary(String name, Integer age) {this.name = name;this.age = age;}public Long getId() {return id;}public void setId(Long id) {this.id = id;}public String getName() {return name;}public void setName(String name) {this.name = name;}public Integer getAge() {return age;}public void setAge(Integer age) {this.age = age;}public UserPrimary() {}
}
创建一个UserMapperPrimary用来作为填写SQL语句的接口:
public interface UserMapperPrimary {@Select("SELECT * FROM USER WHERE NAME = #{name}")UserPrimary findByName(@Param("name") String name);@Insert("INSERT INTO USER(NAME, AGE) VALUES(#{name}, #{age})")int insert(@Param("name") String name, @Param("age") Integer age);@Delete("DELETE FROM USER")int deleteAll();}
创建一个UserSecondary实体类:
public class UserSecondary {private Long id;private String name;private Integer age;public Long getId() {return id;}public void setId(Long id) {this.id = id;}public String getName() {return name;}public void setName(String name) {this.name = name;}public Integer getAge() {return age;}public void setAge(Integer age) {this.age = age;}public UserSecondary() {}public UserSecondary(String name, Integer age) {this.name = name;this.age = age;}
}
public interface UserMapperSecondary {@Select("SELECT * FROM USER WHERE NAME = #{name}")UserSecondary findByName(@Param("name") String name);@Insert("INSERT INTO USER(NAME, AGE) VALUES(#{name}, #{age})")int insert(@Param("name") String name, @Param("age") Integer age);@Delete("DELETE FROM USER")int deleteAll();
}
之后,也是最关键的一步,我们需要在MyBatis的配置文件中使用Mapper.xml
在Resources目录下创建一个mapper文件夹,之后再mapper文件夹下边分别创建primary和secondary文件夹:
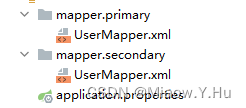
UserMapper.xml
<?xml version="1.0" encoding="UTF-8" ?>
<!DOCTYPE mapperPUBLIC "-//mybatis.org//DTD Mapper 3.0//EN""http://mybatis.org/dtd/mybatis-3-mapper.dtd"><mapper namespace="com.miaow.demo.p.mapper.UserMapperPrimary"><select id="findByName" resultType="com.miaow.demo.p.entity.UserPrimary">SELECT * FROM USER WHERE NAME = #{name}</select><insert id="insert">INSERT INTO USER(NAME, AGE) VALUES(#{name}, #{age})</insert></mapper>
与上边这个几乎一样,只是两者指向的接口位置不一样:
<?xml version="1.0" encoding="UTF-8" ?>
<!DOCTYPE mapperPUBLIC "-//mybatis.org//DTD Mapper 3.0//EN""http://mybatis.org/dtd/mybatis-3-mapper.dtd"><mapper namespace="com.miaow.demo.s.mapper.UserMapperSecondary"><select id="findByName" resultType="com.miaow.demo.s.entity.UserSecondary">SELECT * FROM USER WHERE NAME = #{name}</select><insert id="insert">INSERT INTO USER(NAME, AGE) VALUES(#{name}, #{age})</insert></mapper>
最后我们可以通过一个测试类进行测试:
@Slf4j
@RunWith(SpringRunner.class)
@SpringBootTest
@Transactional
public class ApplicationTests {//第一数据库配置类@Autowiredprivate UserMapperPrimary userMapperPrimary;//第二数据库配置文件@Autowiredprivate UserMapperSecondary userMapperSecondary;@Beforepublic void setUp() {// 清空测试表,保证每次结果一样userMapperPrimary.deleteAll();userMapperSecondary.deleteAll();}@Testpublic void test() throws Exception {// 往Primary数据源插入一条数据userMapperPrimary.insert("AAA", 20);// 从Primary数据源查询刚才插入的数据,配置正确就可以查询到UserPrimary userPrimary = userMapperPrimary.findByName("AAA");Assert.assertEquals(20, userPrimary.getAge().intValue());// 从Secondary数据源查询刚才插入的数据,配置正确应该是查询不到的UserSecondary userSecondary = userMapperSecondary.findByName("AAA");Assert.assertNull(userSecondary);// 往Secondary数据源插入一条数据userMapperSecondary.insert("BBB", 20);// 从Primary数据源查询刚才插入的数据,配置正确应该是查询不到的userPrimary = userMapperPrimary.findByName("BBB");Assert.assertNull(userPrimary);// 从Secondary数据源查询刚才插入的数据,配置正确就可以查询到userSecondary = userMapperSecondary.findByName("BBB");Assert.assertEquals(20, userSecondary.getAge().intValue());}}
相关文章:
Spring Boot中配置多个数据源
配置数据源实际上就是配置多个数据库,在一个配置文件中配置多个数据库,这样做主要的好处有以下几点: 数据库隔离:通过配置多个数据源,可以将不同的业务数据存储在不同的数据库中,实现数据的隔离。这样可以…...

C++学习笔记---命名空间namespace
文章目录 前言简介定义命名空间using指令不连续&嵌套的命名空间 前言 wu 简介 C中的命名空间(Namespace)是一种用于组织和封装代码的机制,它允许你将一组相关的函数、类、变量和其他标识符放置在一个逻辑分组内,以便在不同的…...
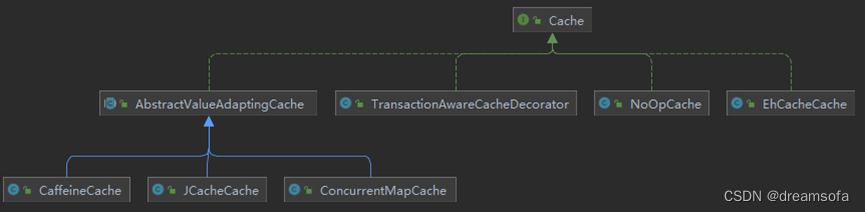
缓存-Spring Cache 缓存抽象
缓存-Spring Cache 缓存抽象 Spring从版本3.1开始提供非侵入的将Cache集成到Spring应用的方式。Spring Cache提供Cache的统一抽象,支持集成各种不同的缓存解决方案。从4.1版本开始,提供了注解和更多的定制参数。 Spring Cache 抽象提供了对Java方法的缓存…...
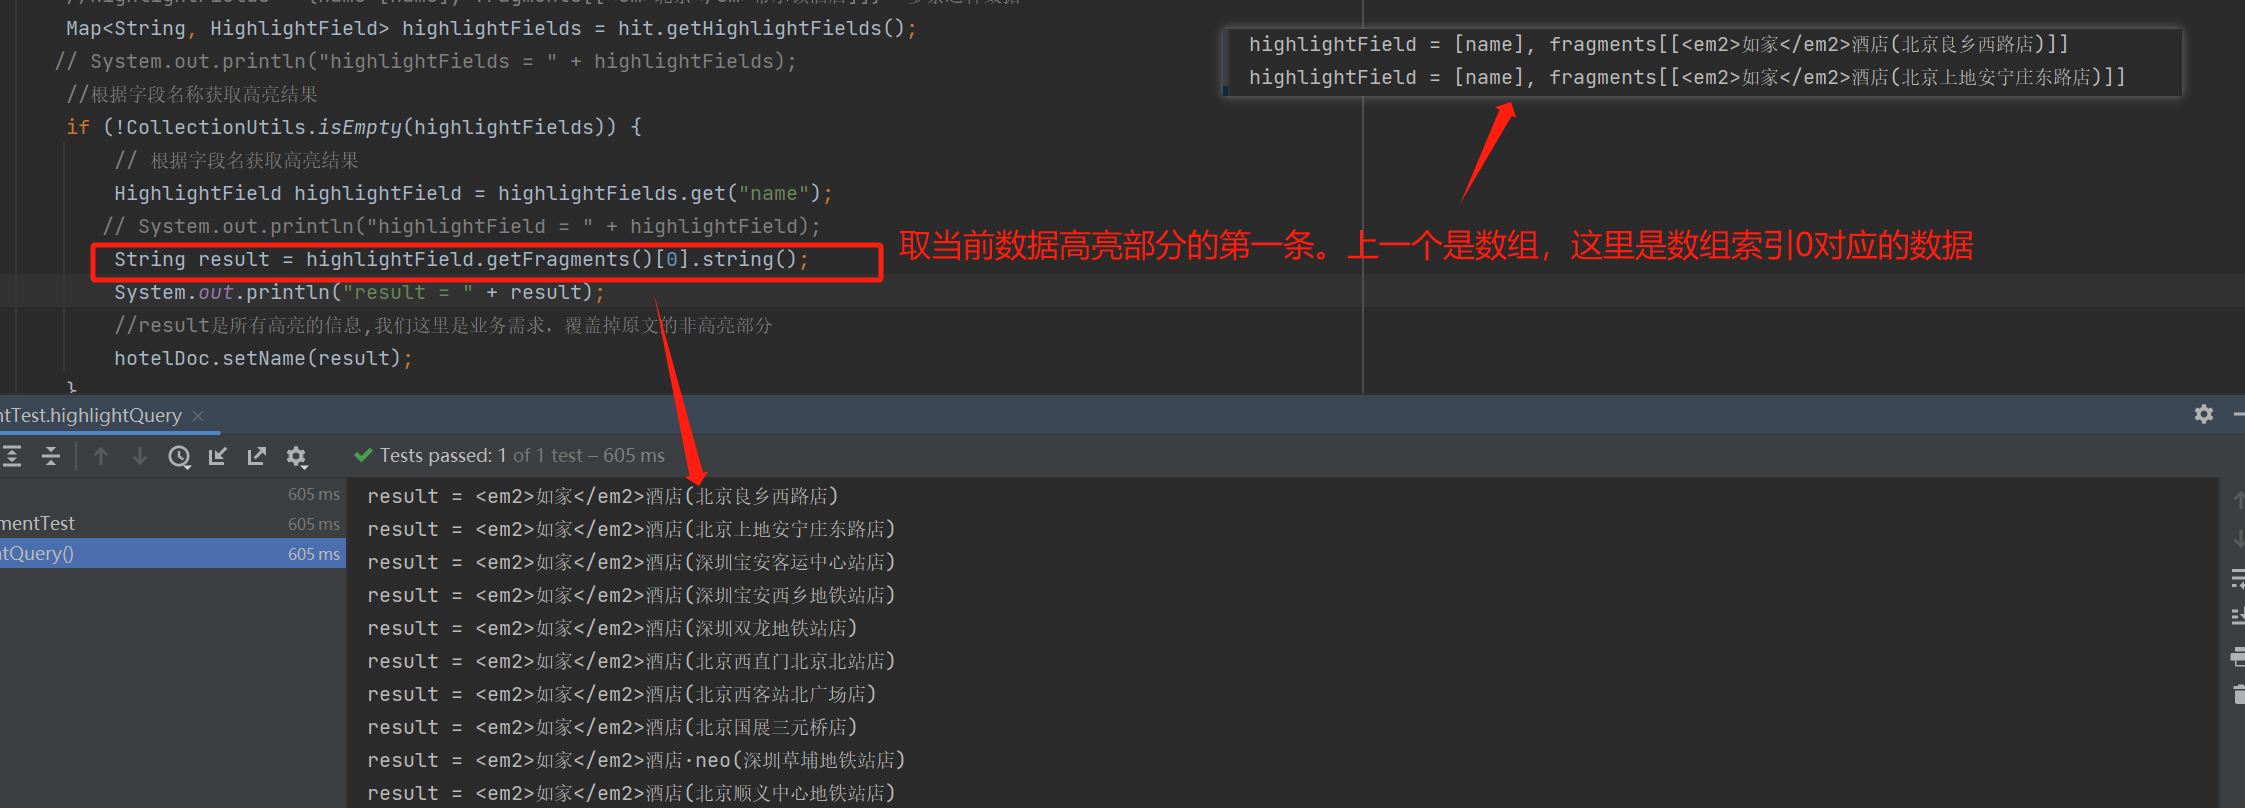
Java修仙传之神奇的ES2(巧妙的查询及结果处理篇)
SDL语句查询 查询的基本语法 GET /indexName/_search {"query": {"查询类型": {"查询条件": "条件值"}} } 根据文档id查询 #查询文档 GET hotel/_doc/36934 查询所有 会弹出该索引库下所有文档// 查询所有 GET /indexName/_searc…...

架构设计的课程资料
架构设计课 枫叶云笔记...
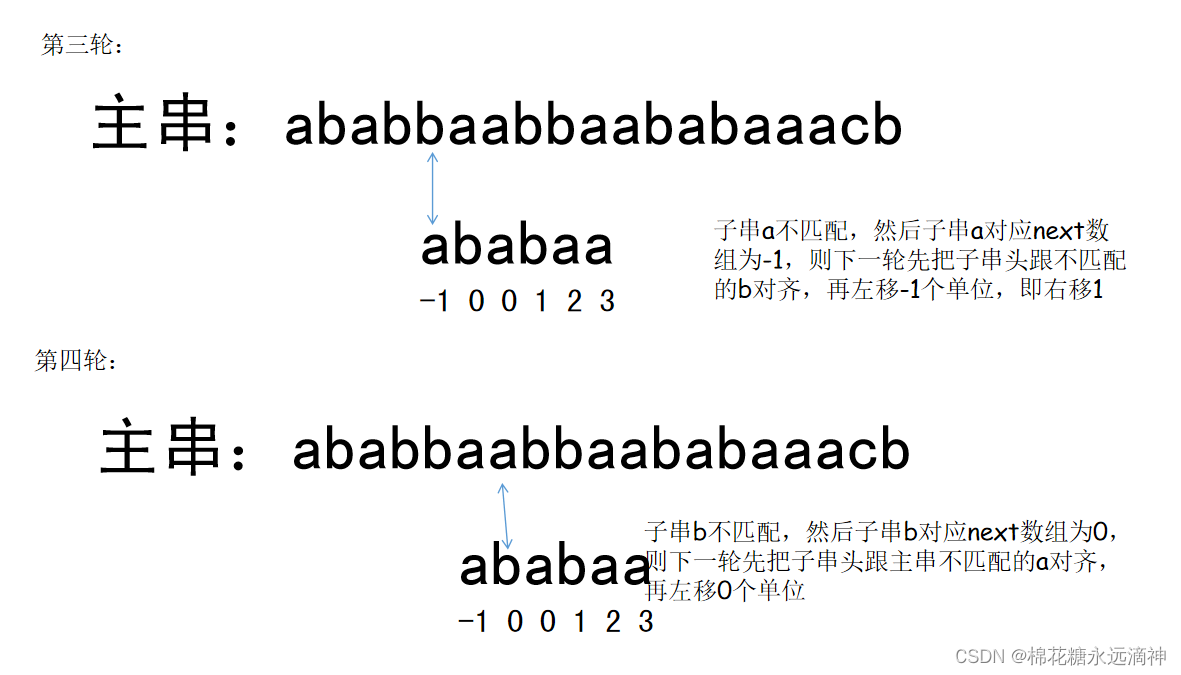
数据结构与算法C语言版学习笔记(5)-串,匹配算法、KMP算法
提示:文章写完后,目录可以自动生成,如何生成可参考右边的帮助文档 文章目录 前言一、串的定义二、串的存储结构1.顺序结构2.链式结构 三、串的朴素的模式匹配算法(暴力匹配算法)1.背景2.假设我们要从下面的主串 S"…...

新版HI3559AV100开发注意事项
新版HI3559AV100开发注意事项 一、在Hi3559A上使用openCV VideoCapture开启.mp4影像档, isOpened一直得到false 在Hi3559A上已经cross compile ffmepg 4.1openCV 3.4.4 但使用openCV VideoCapture开启.mp4影像档, isOpened一直得到false 请问要如何知道是什么原因无法开启影像…...
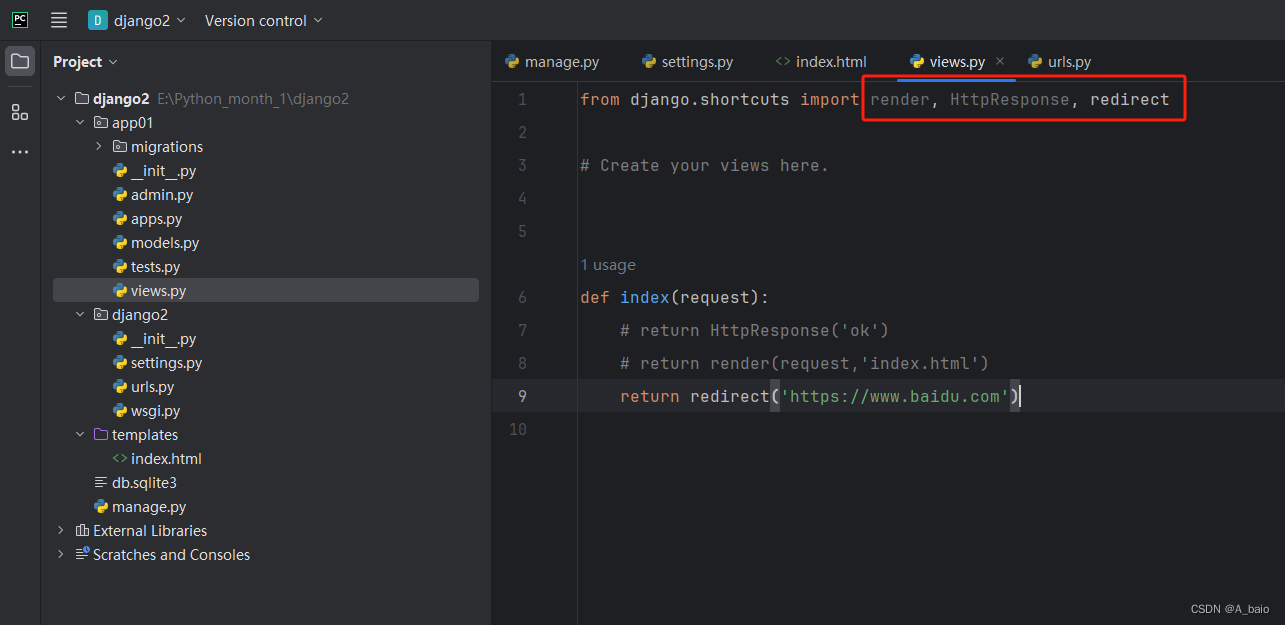
Django(一、简介,安装与使用)
文章目录 一、Django引入1.web应用程序什么是web?web引用程序的优点web应用程序的缺点什么是web框架 2.纯手写web框架1.web框架的本质2.HTTP协议的特性:3.编写基于wsgire模块搭建web框架代码封装优化代码封装 二、Django框架的学习1.Python中的主流框架2…...
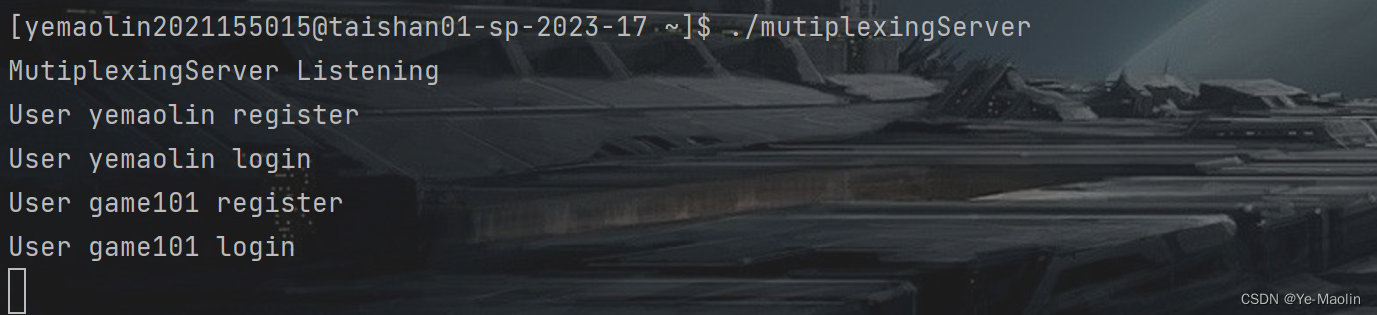
【Linux C IO多路复用】多用户聊天系统
目录 Server-Client mutiplexingServer mutiplexingClient mutiplexing Server-Client 在Linux系统中,IO多路复用是一种机制,它允许一个进程能够监视多个文件描述符(sockets、pipes等)的可读、可写和异常等事件。这样…...
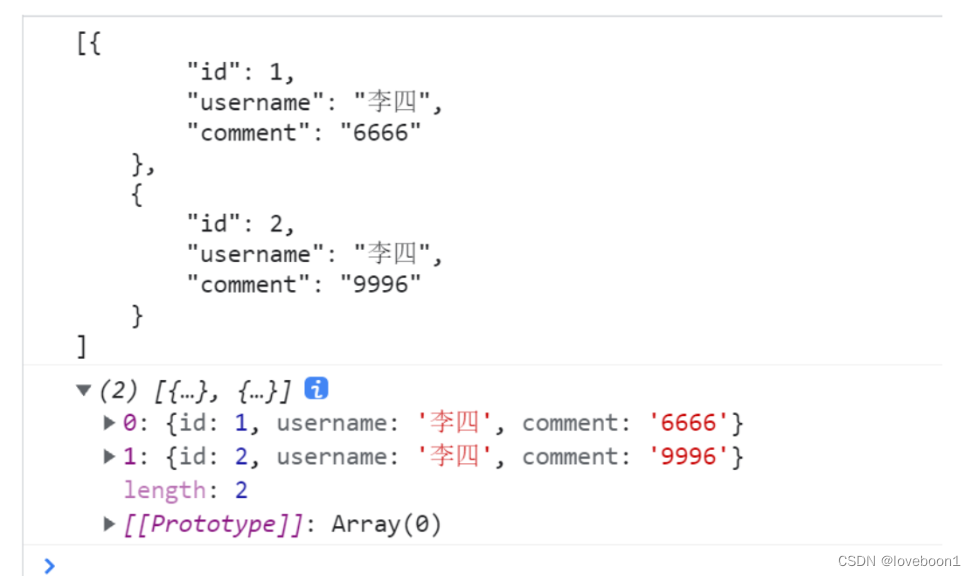
JSON——数组语法
一段JSON可能是以 ”{“ 开头 也可能仅包含一段JSON数组 如下 [ { "name" : "hello,world"}, {"name" : "SB JSON”}, {“name” : "SB互联网房地产CNM“}, ] 瞧,蛋疼不...CJSON过来还是得搜下网…...
运营商大数据精准获客:我们提供精准客源渠道的最大资源体?
运营商大数据精准营销 谈起精准获客,竞争对手永远是为我们提供精准客源渠道的最大资源体! 最新的获客方式,就是从竞争对手的手中把他们的精准客户资源变为自己的。 今年最火的运营商大数据精准营销是拒绝传统营销方式的烧钱推广࿰…...
表象变换与矩阵元
表象变换 一维粒子哈密顿量 表象中的矩阵元 态的表象变换 不难证明 算符的表象变换 坐标表象 Non-denumerable basis...

vue乾坤微前端项目
1、主应用 安装乾坤 npm i qiankun -S 注册微应用并启动: import { registerMicroApps, start } from qiankun;//设置两个微应用 registerMicroApps([{name: vue1, //要跟package.json中的name保持一致entry: //localhost:8081, //本地就这么写container: #cont…...
大语言模型比武
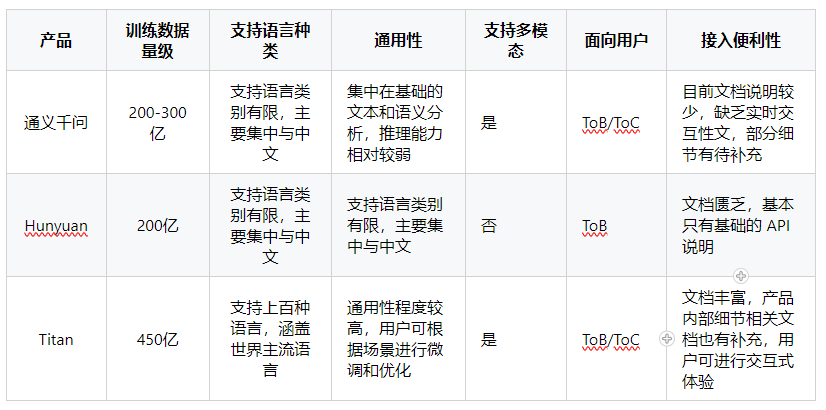
今年随着 ChatGPT 的流行,并在各个领域有一定程度生产级别的应用。国内外也掀起了一股大语言模型浪潮,各大厂商都推出了自己的大语言模型,阿里推出了 通义千问,腾讯推出了 Hunyuan,亚马逊云推出了 Titan,大…...

王道数据结构第五章二叉树的遍历第13题
目录 解题思路 宏定义 二叉树定义 栈定义 实现函数 测试代码 测试结果...

微服务的发展历程的详细说明及每个阶段主流的架构和组件
微服务的发展历程的详细说明及每个阶段主流的架构和组件如下: 一、微服务的发展历程: 起始阶段:这个阶段主要是面向服务的架构(SOA)的兴起。此时,企业开始尝试将单体应用拆分为多个服务,但此时…...
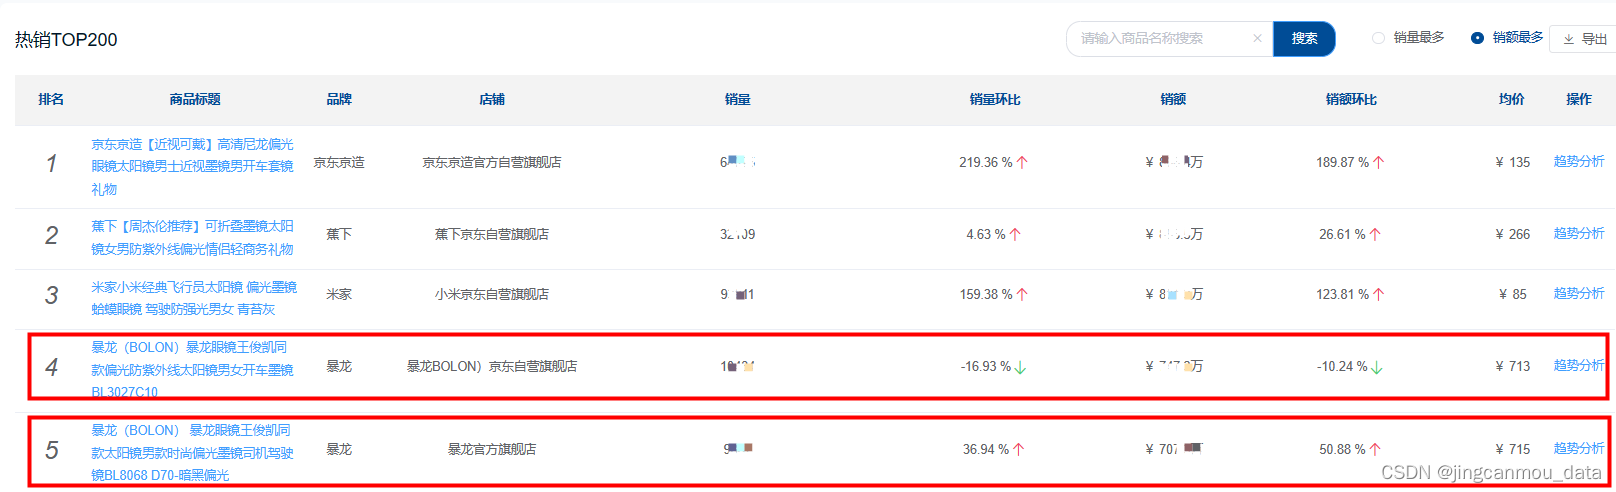
2023年眼镜行业分析(京东眼镜销量数据分析):市场规模同比增长26%,消费需求持续释放
随着我国经济的不断发展,电子产品不断普及,低龄及老龄人口的用眼场景不断增多,不同年龄阶段的人群有不同的视力问题,因此,视力问题人口基数也随之不断加大,由此佩戴眼镜的人群也不断增多。 同时,…...
基础课26——业务流程分析方法论
基础课25中我们提到业务流程分析方法包括以下几种: 价值链分析法:主要是找出或设计出哪些业务能够使得客户满意,实现客户价值最大化的业务流程。要进行价值链分析的时候可以从企业具体的活动进行细分,细分的具体方面可以从生产指…...

【数字图像处理-TUST】实验二-图像噪声生成与滤波降噪
一,题目 读入一幅图像使用两种以上的方法向图像中分别添加噪声输出一幅二值图像,背景为黑色,噪声区域为白色使用三种滤波方法对上述添加了噪声的图像进行降噪处理输出降噪处理后的结果图像 二,实验原理 采用了两种方法添加了噪…...
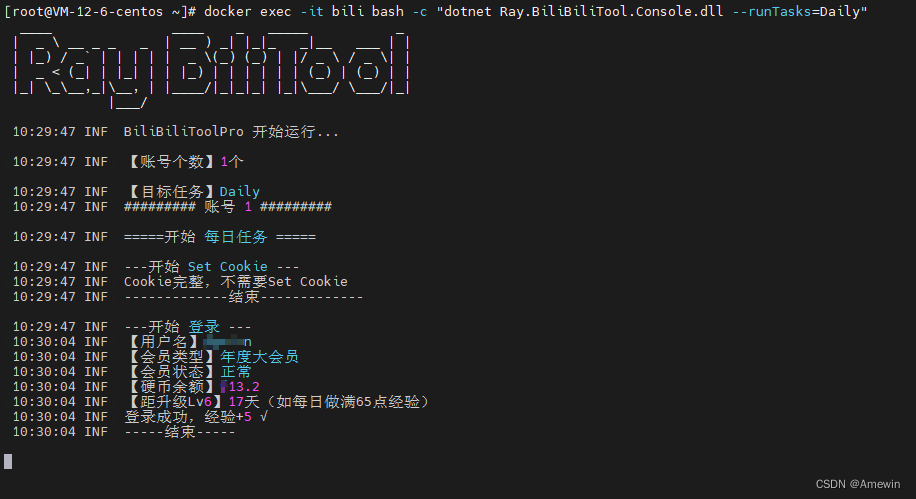
bilibili快速升满级(使用Docker 容器脚本)
部署bilibili升级运行容器脚本 docker run --name"bili" -v /bili/Logs:/app/Logs -e Ray_DailyTaskConfig__Cron"30 9 * * *" -e Ray_LiveLotteryTaskConfig__Cron"40 9 * * *" -e Ray_UnfollowBatchedTaskConfig__Cron"…...

11_《智能体微服务架构企业级实战教程》开发环境搭建之Miniconda安装配置
前言 配套视频教程: 👉《智能体微服务架构企业级实战教程》共72节 更多文章专栏内容: 👉《智能体微服务架构企业级实战教程》专栏 本文提供了Miniconda3的完整安装与配置指南。首先从官网下载安装包,双击运行并按提示完成安装(接受协议、选择安装目录等)。安装后通…...
数据1993-2023年)
行政区划变更(撤县设市、撤县设区、省直管县、新设地级市)数据1993-2023年
01、数据介绍撤县设市是撤销县,设立县级市,行政制度与县级相同,将县改为县级市。地级市管辖的县撤县设市后,一般有省级直辖管理,为省直管市,实际仍由地级市代管。2022年《政府工作报告》中国务院提出&#…...

瑞萨DA14592双核BLE芯片架构与低功耗设计解析
1. 瑞萨DA14592双核BLE芯片深度解析瑞萨电子最新发布的DA14592系统级芯片(SoC)堪称蓝牙低功耗(BLE)领域的里程碑产品。作为从业十余年的嵌入式工程师,我第一时间拿到了开发套件进行实测。这款芯片最令人印象深刻的是其双核架构与超低功耗特性的完美结合——Cortex-M…...

AI日志分析系统:多代理自修正RAG架构解析与实践
1. 日志分析系统的现状与挑战现代软件系统产生的日志数据正以惊人的速度增长。根据2023年DevOps状态报告,大型互联网公司每天产生的日志量普遍超过1TB,而传统金融系统的日志量也达到了数百GB级别。这些日志包含了系统运行状态、错误信息、性能指标等关键…...

哈希算法核心特性解析
哈希算法(Hash Algorithm)是一种将任意长度的输入(或消息)通过散列函数(Hash Function)变换成固定长度的输出(哈希值,或称摘要)的数学函数 。这个输出值通常是一个由字母…...

Copilot Next 工作流配置不踩坑,深度解析YAML Schema校验机制、Context Token 限制与上下文注入失效根因,2024最新版避坑手册
更多请点击: https://intelliparadigm.com 第一章:Copilot Next 工作流配置全景概览 Copilot Next 是 GitHub 官方推出的下一代智能协作引擎,深度集成于 VS Code、JetBrains IDEs 及 GitHub Actions 运行时中。其工作流配置以 YAML 驱动&…...

MCP 2026组件集成失效率骤升47%?揭秘3个被92%开发团队忽略的上下文绑定陷阱
更多请点击: https://intelliparadigm.com 第一章:MCP 2026组件集成失效率骤升的行业警讯 近期,多家头部云原生平台在升级至 MCP(Model-Centric Platform)2026 版本后,报告其核心组件(如 mcp-r…...

显卡驱动残留问题终极解决方案:Display Driver Uninstaller深度使用指南
显卡驱动残留问题终极解决方案:Display Driver Uninstaller深度使用指南 【免费下载链接】display-drivers-uninstaller Display Driver Uninstaller (DDU) a driver removal utility / cleaner utility 项目地址: https://gitcode.com/gh_mirrors/di/display-dri…...

前端GIF处理效率提升300%?gifuct-js深度解析与应用实践
前端GIF处理效率提升300%?gifuct-js深度解析与应用实践 【免费下载链接】gifuct-js Fastest javascript .GIF decoder/parser 项目地址: https://gitcode.com/gh_mirrors/gi/gifuct-js 在现代前端开发中,GIF动态图像的处理一直是个技术挑战。传统…...

【Linux】开发工具3 : gcc/g++的使用
其他篇章 【C语言专栏】 其他篇章【Linux专栏】 上期回顾 【Linux】开发工具2:vim 文章目录前言1. gcc/g的使用1.1 预处理(进行宏替换)1.2 编译(生成汇编)1.3 汇编(生成机器可识别代码)1.4 链…...